
YTSV1100 - Audio System YAMAHA - Free user manual and instructions
Find the device manual for free YTSV1100 YAMAHA in PDF.
| Product Type | TV mounting bar compatible with YAMAHA YRS-1000 and YRS-2000 audio systems |
| Brand | YAMAHA |
| Model | YTS-V1100 |
| Dimensions (W x D x H) | 540 mm x 70 mm x 1235 mm |
| Product Weight | 8.4 kg |
| Maximum Load Capacity | 45 kg |
| Adjustable Heights | 3 positions (low, middle, high) with 100 mm interval |
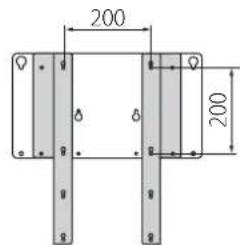
| VESA Compatibility | 200x200, 300x200, 400x200, 400x400, 500x200 (with adapter) |
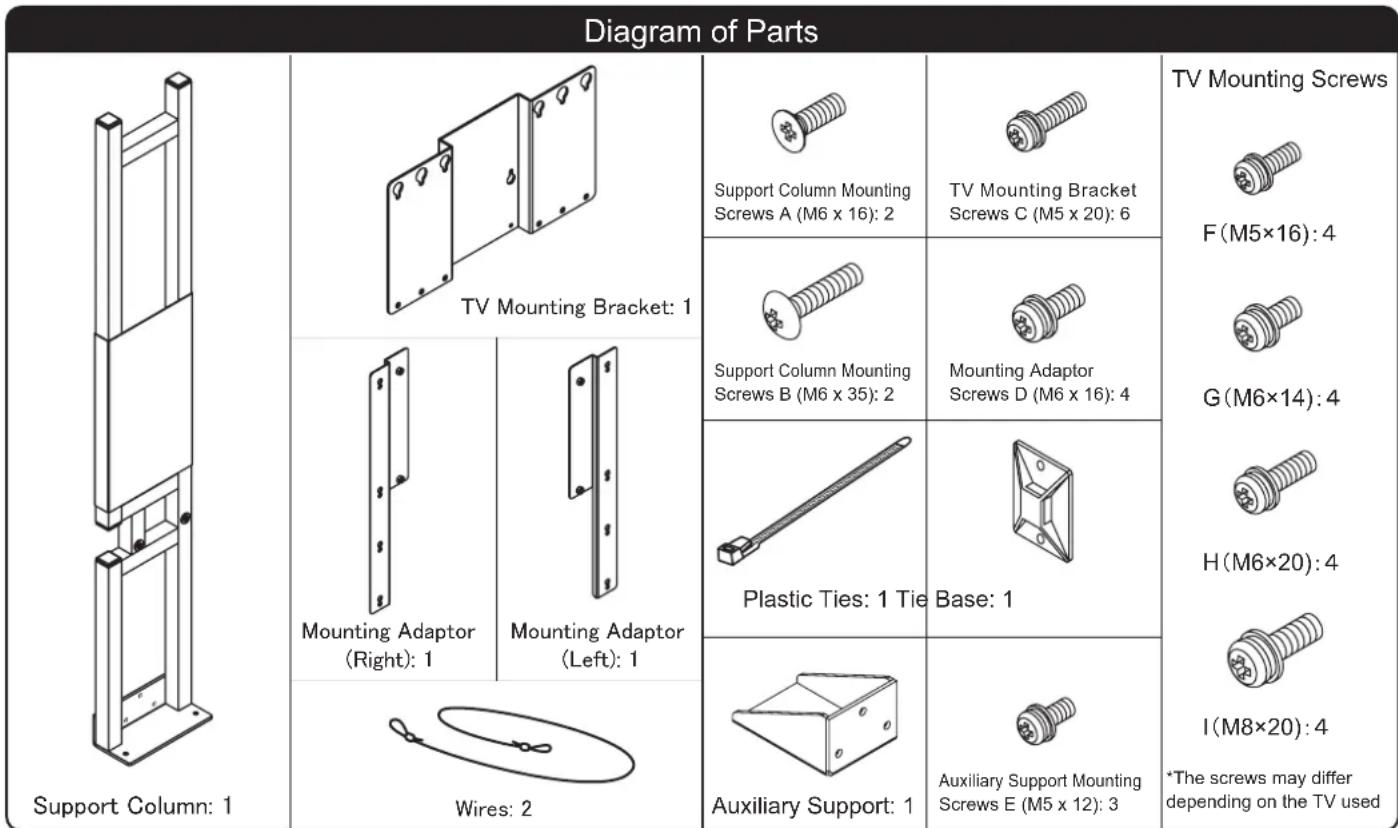
| Included Accessories | Support column, TV mounting bar, mounting adapters (right and left), screws (A, B, C, D, E, F, G, H, I), cables, cable ties, attachment base, auxiliary support |
| Main Material | Steel |
| Care and Cleaning | Use a dry cloth or diluted neutral detergent; avoid benzene, thinner or household wax |
| Installation Safety | Installation by two or more people; wall mounting mandatory to prevent tipping; do not install on wet, dusty or unstable surfaces |
| Required Tools | Phillips screwdriver |
| Intended Use | Mounting TVs up to 47 inches on YRS-1000/YRS-2000 audio systems |
| Recommended Number of People for Installation | 2 or more |
| Warranty | Not specified by the manufacturer |
Frequently Asked Questions - YTSV1100 YAMAHA
User questions about YTSV1100 YAMAHA
0 question about this device. Answer the ones you know or ask your own.
Ask a new question about this device
Download the instructions for your Audio System in PDF format for free! Find your manual YTSV1100 - YAMAHA and take your electronic device back in hand. On this page are published all the documents necessary for the use of your device. YTSV1100 by YAMAHA.
USER MANUAL YTSV1100 YAMAHA
Before Installing Televisions that can be installedinstalled
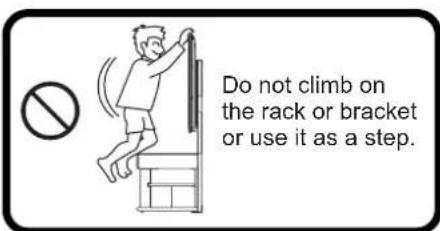
If you install a TV that does not fit, it may tip over or fall off, resulting in damage and/or injury.
When using only the TV mounting bracket
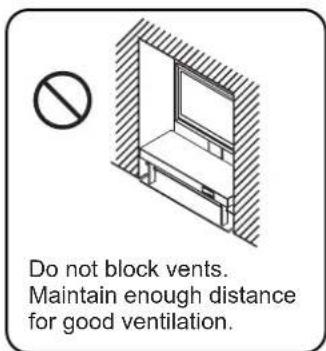
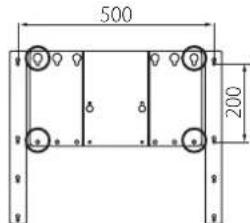
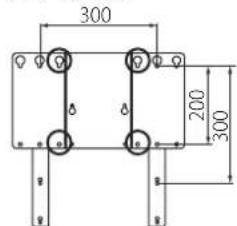
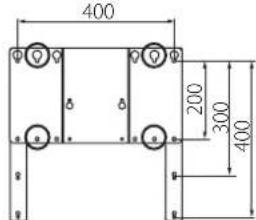
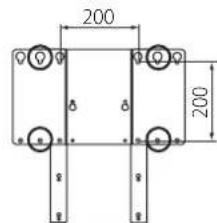
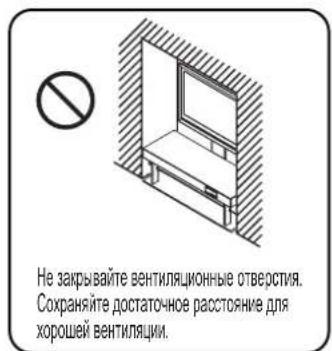
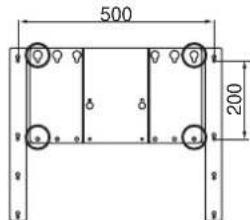
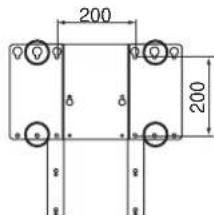
If the position of the mounting holes on the back of the TV is 200 (W) x 200 (H), 300 x 200 or 400 x 200 Note that there must not be any projections at the positions where the mounting bracket attaches to the back of the TV and the vents must not be blocked by the bracket
*Refer to the installation procedures on pages 4 to 6.
TeneBx30pb, KOtOpbE MoTy 6bTy yTaHOBnHeB
When using the TV mounting bracket + mounting adaptor
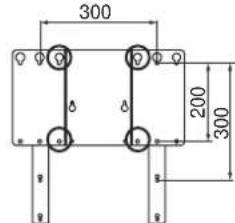
If the position of the mounting holes on the back of the TV is 300 (W) x 300 (H), 400 x 200, 400 x 400 or 500 x 200 If the position of the mounting holes is 200 (W) x 200 (H), 300 x 200 or 400 x 200, and the projecting part and/or blocking a vent on the back of the TV can be avoided by using the mounting adaptor
*Refer to the installation procedures on pages 4 and 7 to 9.
When using only the TV mounting bracket
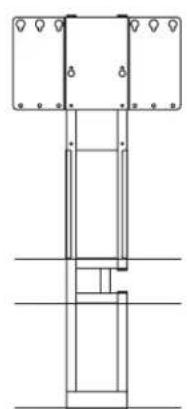
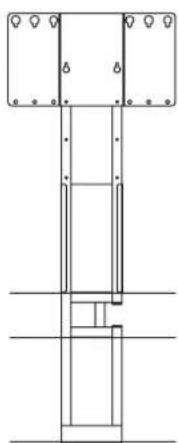
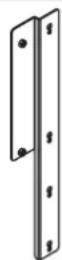
TV Mounting Bracket + Support Column
TV Mounting Bracket + Support Column + Mounting Adaptor
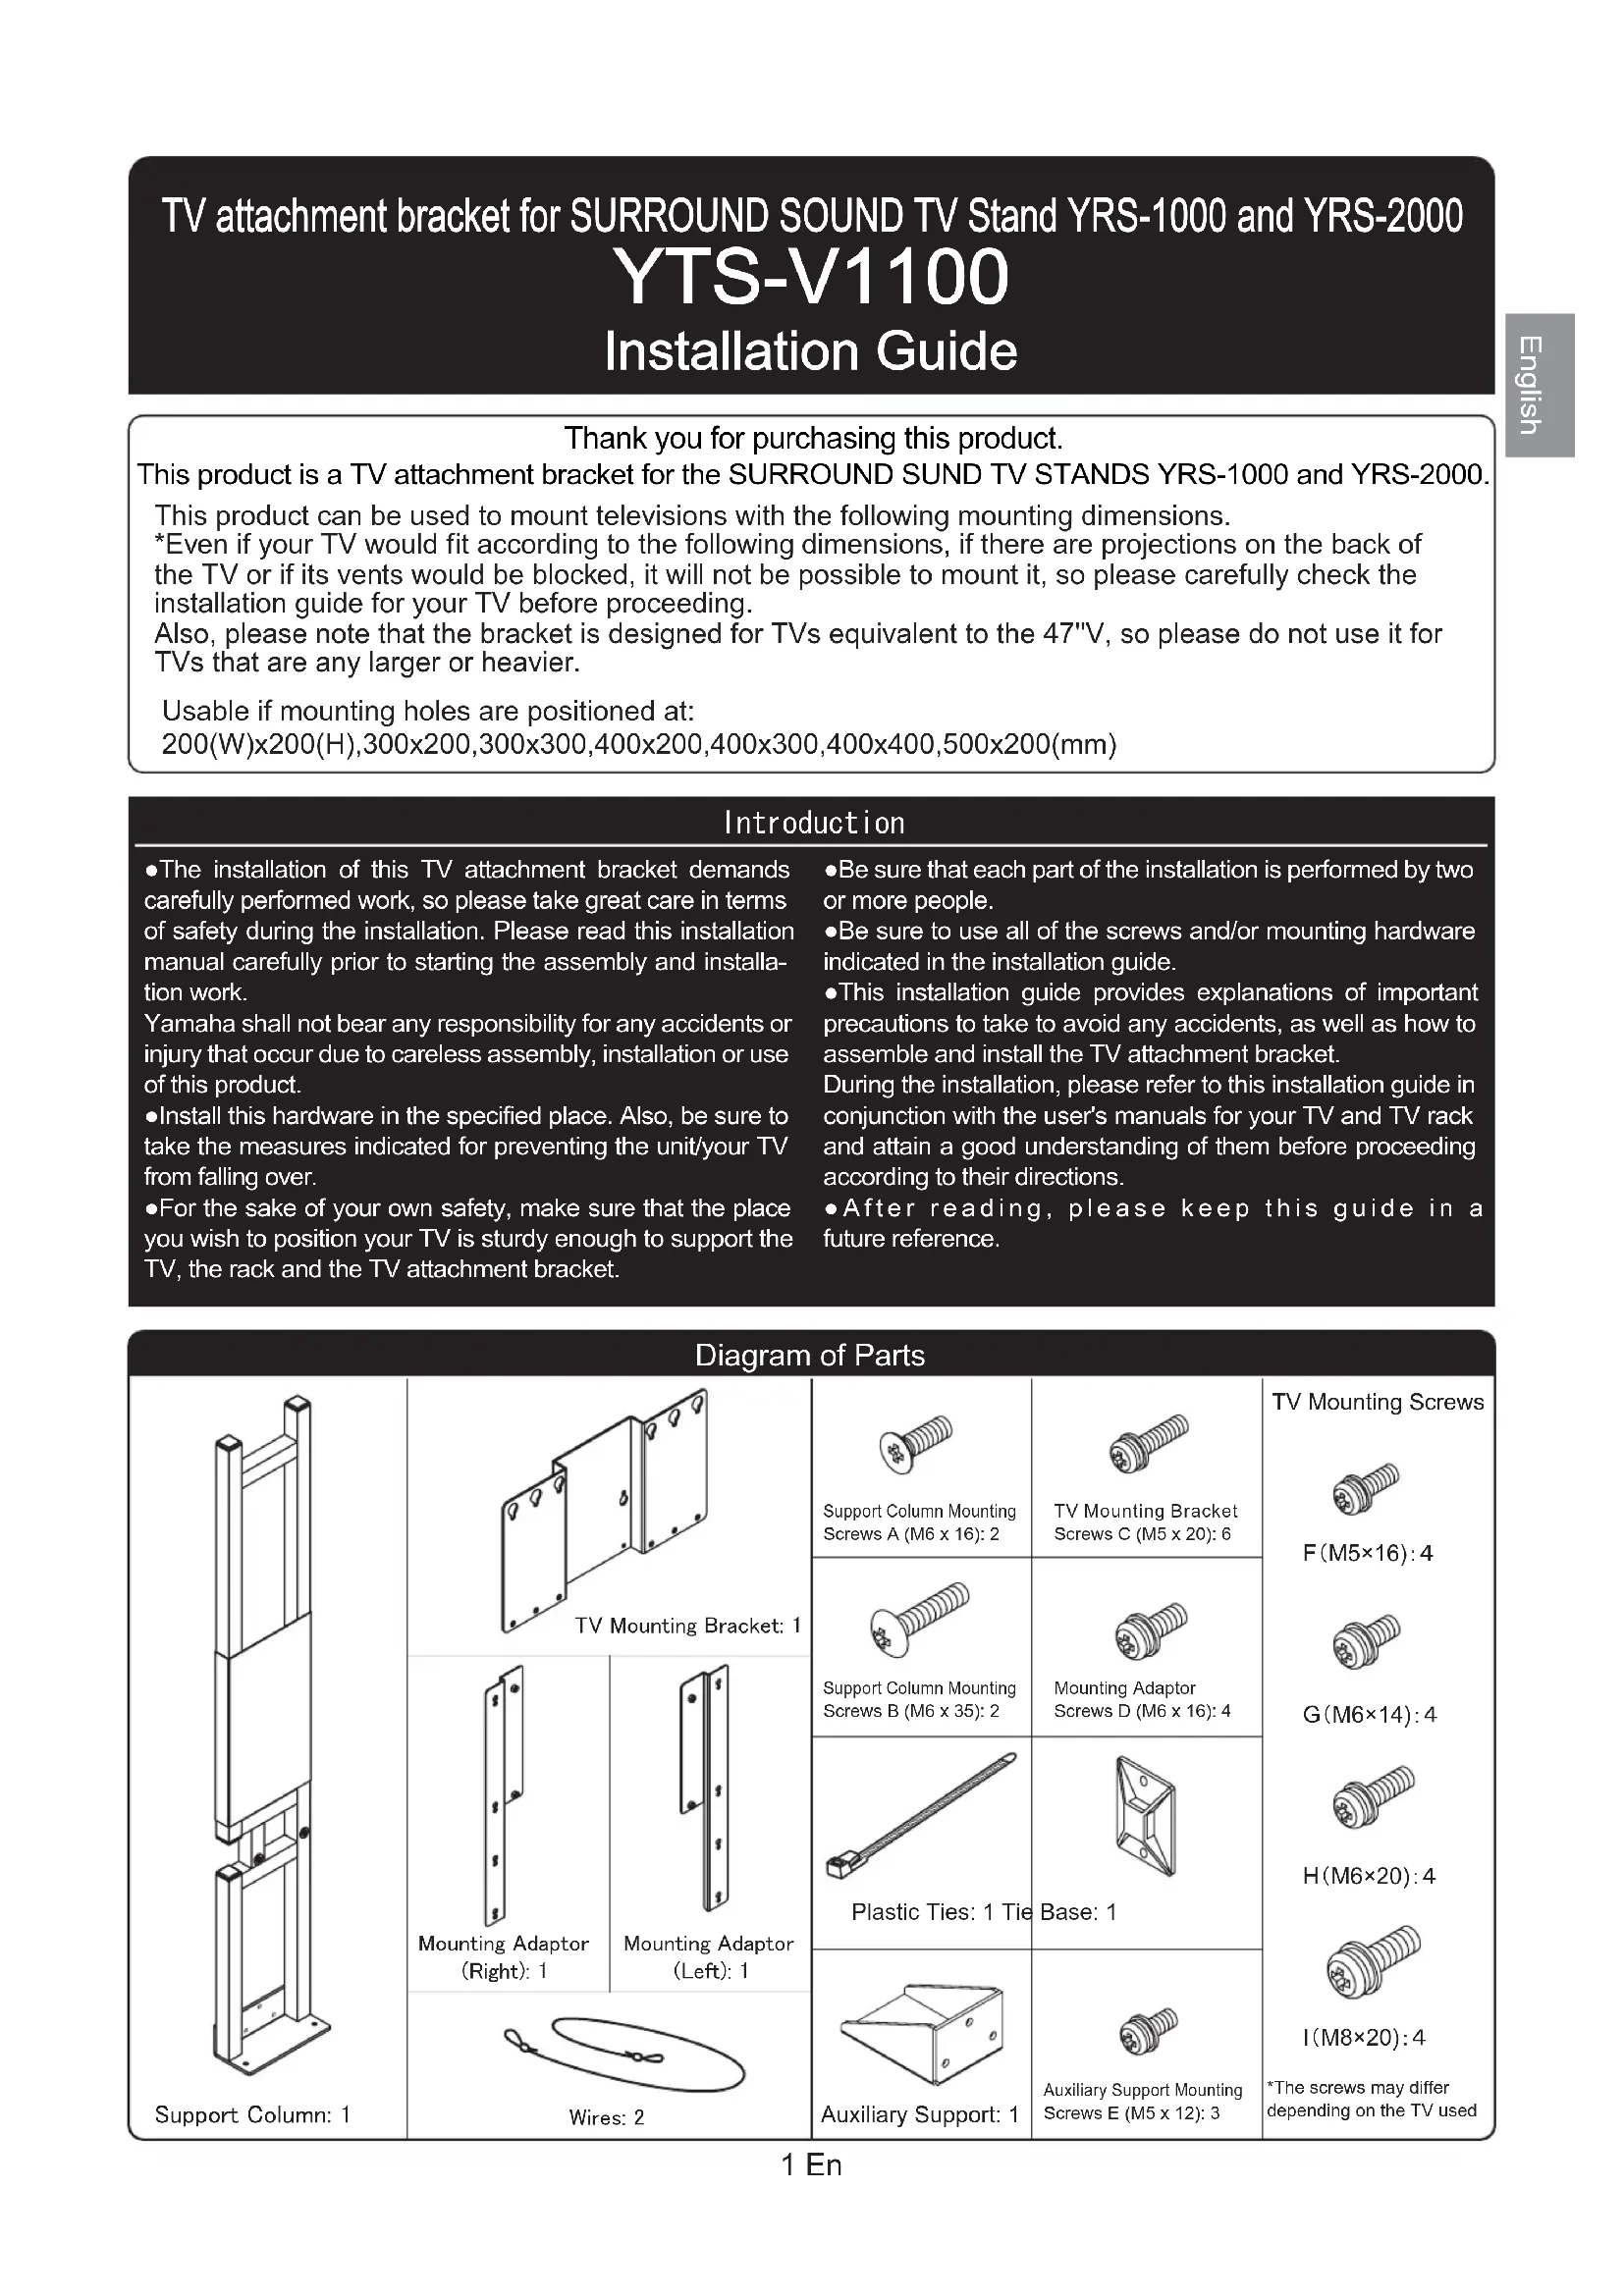
TV attachment bracket for SURROUND SOUND TV Stand YRS-1000 and YRS-2000
YTS-V1100
Installation Guide
Thank you for purchasing this product.
This product is a TV attachment bracket for the SURROUND SUND TV STANDS YRS-1000 and YRS-2000.
This product can be used to mount televisions with the following mounting dimensions.
*Even if your TV would fit according to the following dimensions, if there are projections on the back of the TV or if its vents would be blocked, it will not be possible to mount it, so please carefully check the installation guide for your TV before proceeding.
Also, please note that the bracket is designed for TVs equivalent to the 47^ , so please do not use it for TVs that are any larger or heavier.
Usable if mounting holes are positioned at:
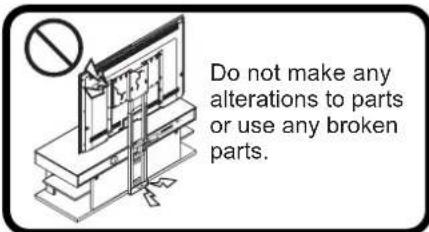
- The installation of this TV attachment bracket demands carefully performed work, so please take great care in terms of safety during the installation. Please read this installation manual carefully prior to starting the assembly and installation work.
Yamaha shall not bear any responsibility for any accidents or injury that occur due to careless assembly, installation or use of this product.
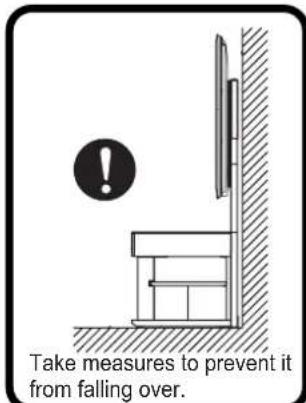
Install this hardware in the specified place. Also, be sure to take the measures indicated for preventing the unit/your TV from falling over.
For the sake of your own safety, make sure that the place you wish to position your TV is sturdy enough to support the TV, the rack and the TV attachment bracket.
-
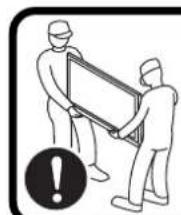
Be sure that each part of the installation is performed by two or more people.
-
Be sure to use all of the screws and/or mounting hardware indicated in the installation guide.
-
This installation guide provides explanations of important precautions to take to avoid any accidents, as well as how to assemble and install the TV attachment bracket.
During the installation, please refer to this installation guide in conjunction with the user's manuals for your TV and TV rack and attain a good understanding of them before proceeding according to their directions.
After reading, please keep this guide in a future reference.
Cautions for Use Use this product safely and properly.
About our Symbols
We use the following symbols to help you use this product safely and properly, to prevent an accident from occurring and to prevent any injury to you or others and/or damage to personal property.

WARNING
This symbol indicates that if you ignore the content of the warning and mishandle the items indicated, it may result in death or serous injury.

CAUTION
This symbol indicates that if you ignore the content of the warning and mishandle the items indicated, it may result in injury or damage to personal property.

This symbol indicates content that calls for care (including warnings).

This symbol indicates an action that is forbidden.

This symbol indicates an instruction to follow.

Caution (general) Forbidden (general) Instruction (general)

Safety Precaution
During Installation


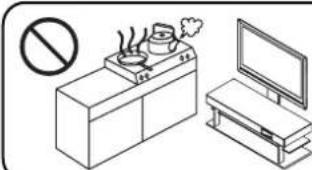
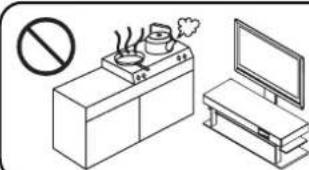
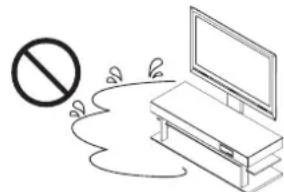
Do not install in humid or dusty places or where your TV would be subject to steam or oily smoke.
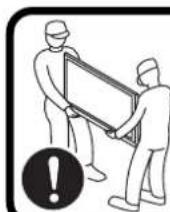
This installation is to be performed by two or more people.
Failure to comply may cause fire and/or injury.
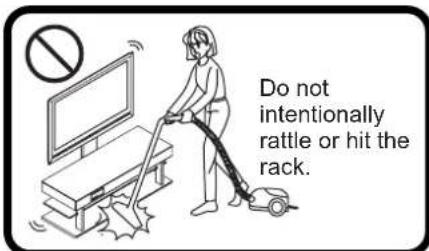
During Use


Failure to comply may cause fire and/or injury.
Rules to Follow
Positioning of your TV rack
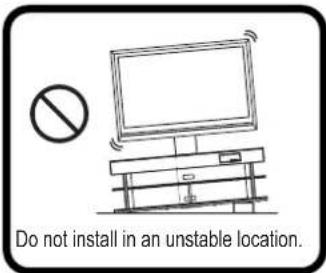
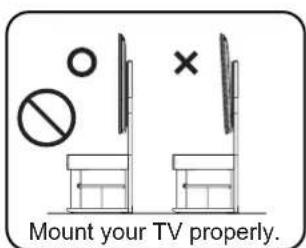
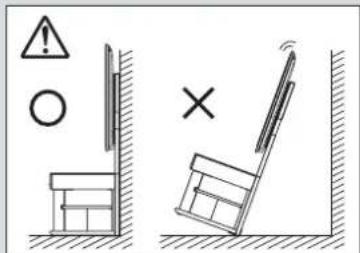
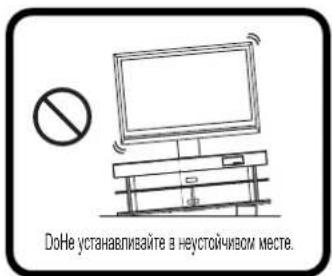
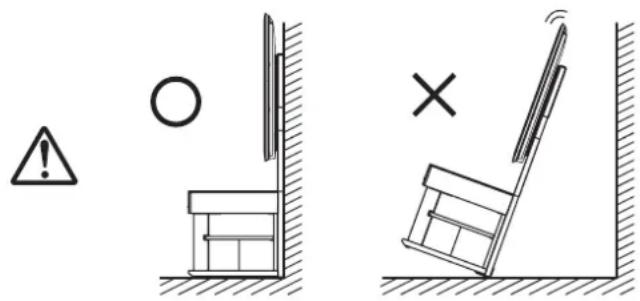
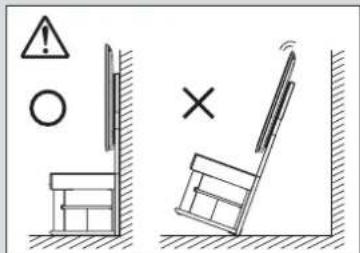
- When selecting an installation location, pick a flat, stable spot that can support sufficient weight. (Do not install on surfaces that are tilted, out of level, or on unstable surfaces like carpet, straw mats or on warped surfaces.)
If installed in a poor location, your TV may tip over or fall off the stand, resulting in injury.
- If you have no option except installing on a carpet or a straw mat, put a board under the rack and then mount your TV. Also, when moving the unit over carpet or a straw mat, be sure to lift it up and carry it.
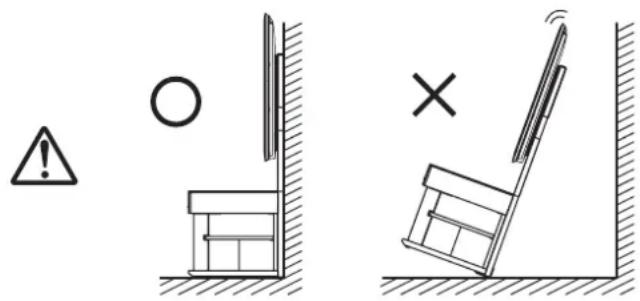
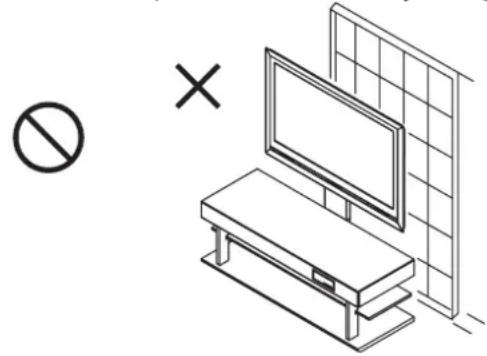
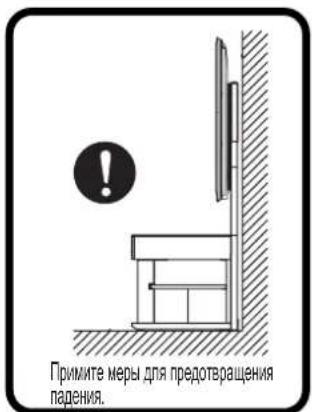
- Be sure the unit rests against a wall. If it is installed away from a wall, it may tip over, resulting in injury.
- Do not use on a wet or waxed floor.
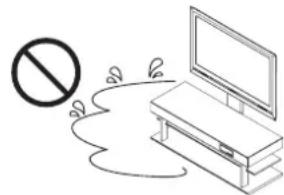
When this product is used in such a location, it may, in rare cases, become stuck to the floor.
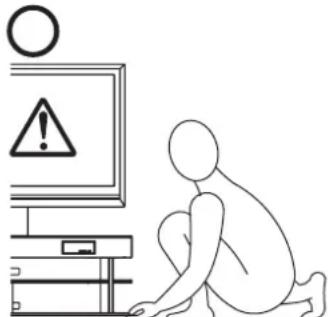
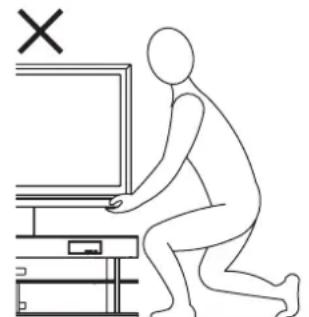
- When moving the unit, two or more people should pick it up and carry it. Also, when doing so, it should be picked up from the bottom shelf of the rack.
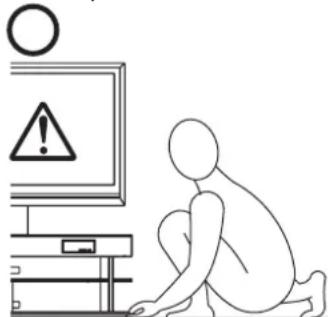
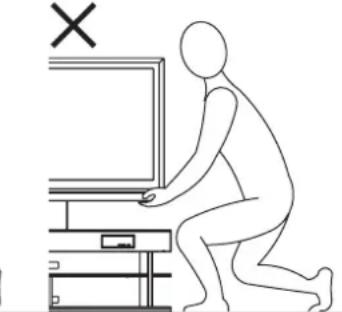
If you pick it up by the TV or from the top shelf, it may damage either the rack or the top shelf.
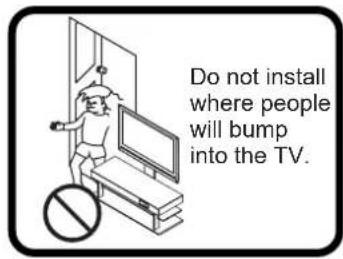
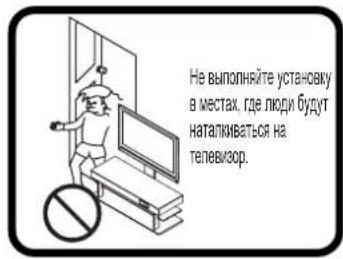
- Do not position the unit against a sliding door, a partition or other place that is not sturdy enough.
Precautions for Use
- Locate in a location that does not get too hot. Locating it under direct sunlight or close to a heater may result in bubbling, peeling or discoloration of painted surfaces.
- Do not apply cellophane tape or other adhesive materials to painted surfaces, the paint may peel.
- Use a dry cloth to remove dust or dirt. When the unit is very dirty, wet the cloth in a neutral detergent diluted with water and wring it out well before wiping the unit. Please note that if products like benzene, paint thinner or household wax are used, they may cause the paint to fade and/or damage the finish.
Main Specifications
| Model Number | YTS-V1100 |
| External Dimensions | 540 mm (W) x 70 mm (D) x 1,235 mm (H) |
| Product Weight | 8.4 kg |
| Capacity | 45 kg |
Installation Method
To complete the installation you will need a Phillips screwdriver.
- Turn your rack (YRS-1000 or YRS-2000) over so it's face down.
It is a good idea to spread a blanket or other soft material on the floor so neither the floor nor the rack gets scratched.
Be careful when turning the rack over that it does not get scratched and you prevent injuries.
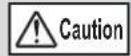
Before turning the rack over, remove the shelves and top glass panel from the rack. They might otherwise come out when you turn the rack over, resulting in damage and/or injury.
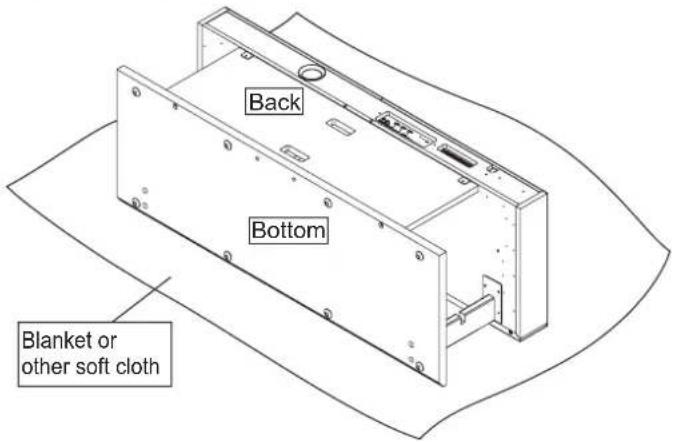
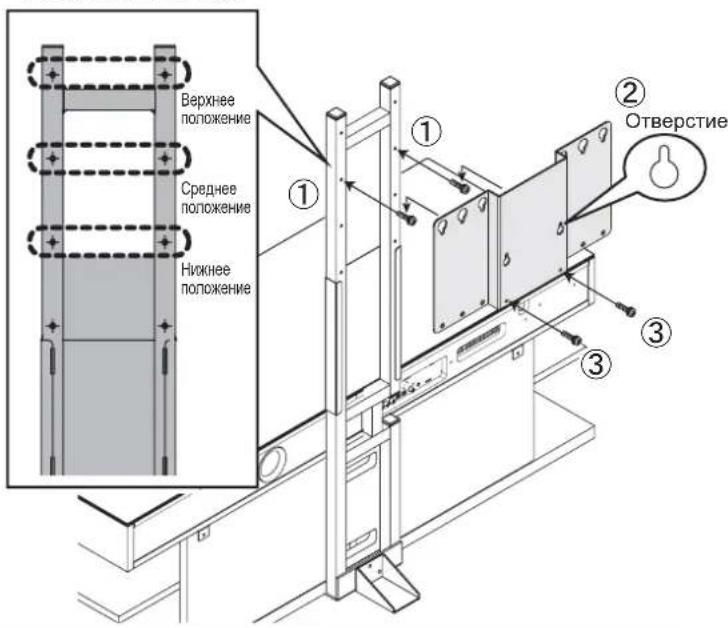
- Mount the support column on the rack with (1) two support column mounting screws A (M6× 16) and (2) two support column mounting screws B (M6× 35) , in that order. Attach the auxiliary support with (3) three auxiliary support mounting screws (M5× 12) .

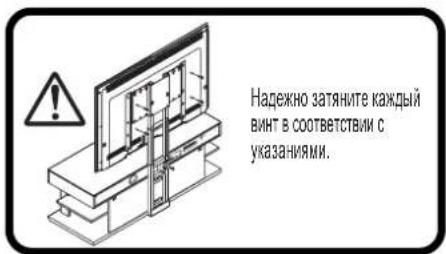
Be sure to tighten the screws that fasten the support column to the rack. Failure to tighten them properly may cause the support column to tip over or break, resulting in injury.

If you perform this installation without the auxiliary support installed, the stand may tip over, resulting in injury. Be sure to install the auxiliary support prior to performing the installation.
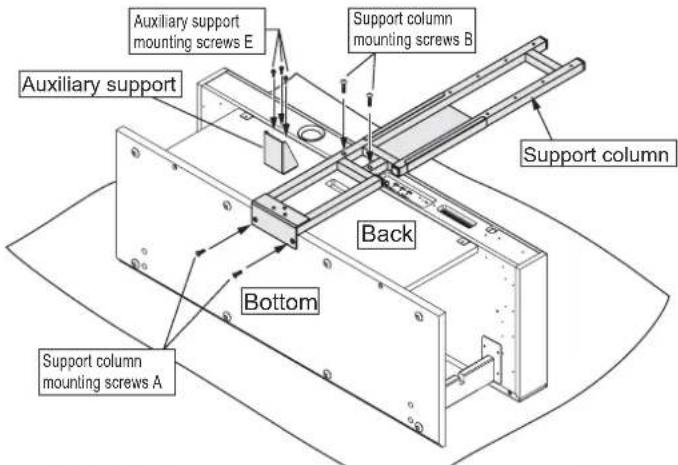
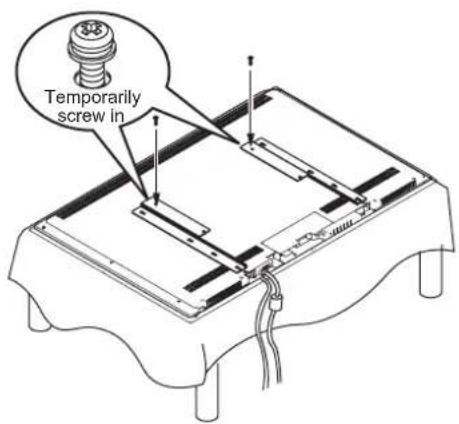
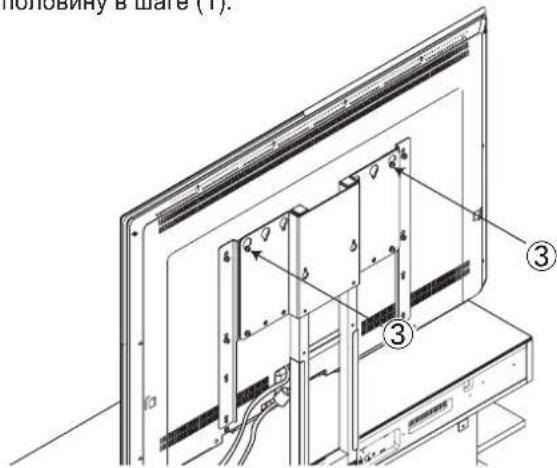
- Stand the rack up and attach the TV mounting bracket to the support column with the four TV mounting bracket screws C (M5 x 20).
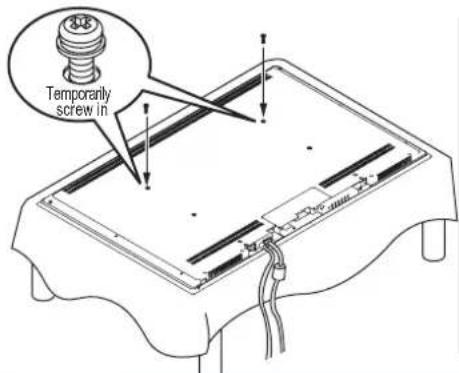
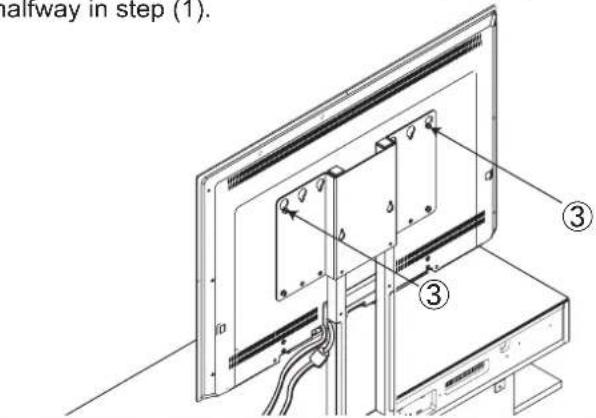
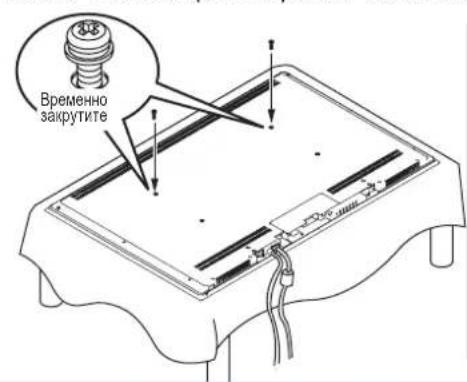
(1) Temporarily screw the two screws halfway in at whichever TV mounting height you prefer.
(2) Hang the TV mounting bracket on the screws from (1) by its mounting holes.
(3) Tighten each of the two screws securely.
(4) Tighten the screws that were initially screwed in halfway in step (1).
You can select from among three heights for the TV mounting bracket at 100mm intervals.
*Some TVs may hit the top panel of the rack, so check the usable height prior to installation.
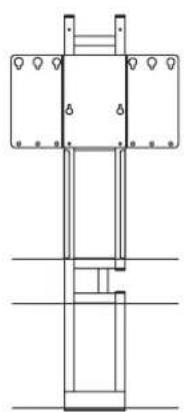
At bottom height At middle height At top height

Be careful when standing the rack up that it does not get scratched and that you prevent injuries.

Be sure to tighten the screws that fasten the TV mounting bracket to the support column. Failure to tighten them properly may cause the TV mounting bracket to fall off or break, resulting in injury.
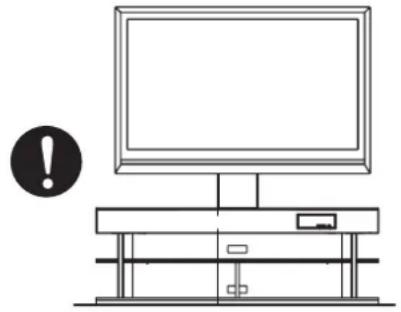
Install the TV mounting bracket at a height so that the TV does not touch the top panel when the TV is mounted. If the TV touches the panel, it may cause damage to the TV, the rack or mounting hardware, or cause injury.
When using only the TV mounting bracket
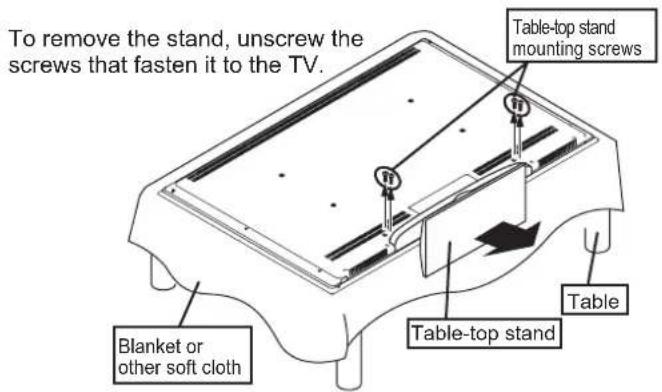
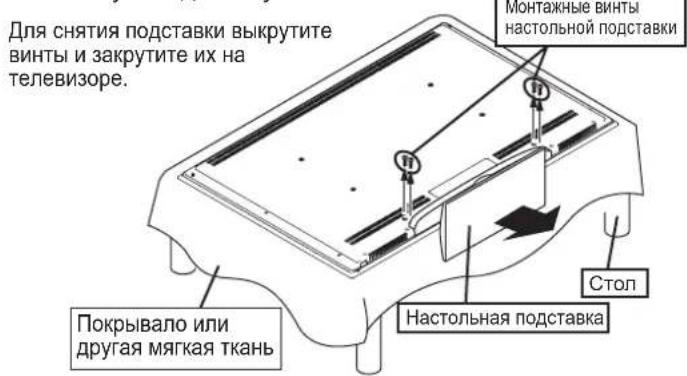
- Taking care not to damage the TV, spread a soft cloth on a level surface and carefully lower the TV screen down onto it. Then remove the table-top stand from the TV.
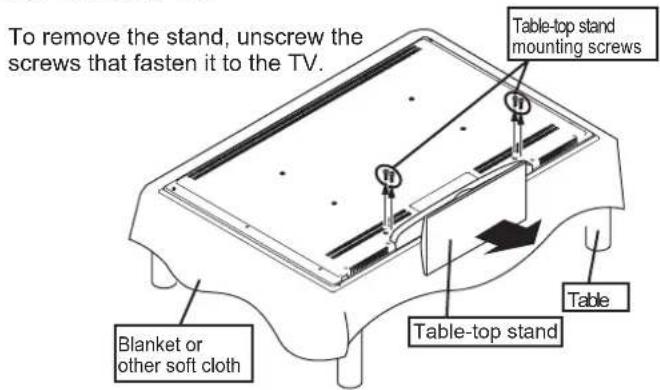

The method used for removing the table-top stand, the location and number of screws and method of handling the TV will vary depending on the TV model. Be sure to refer to the TV's user's manual.
If you anticipate using the table-top stand again, you will need the table-top stand mounting screws, so store them carefully with the table-top stand so they are not lost.
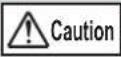
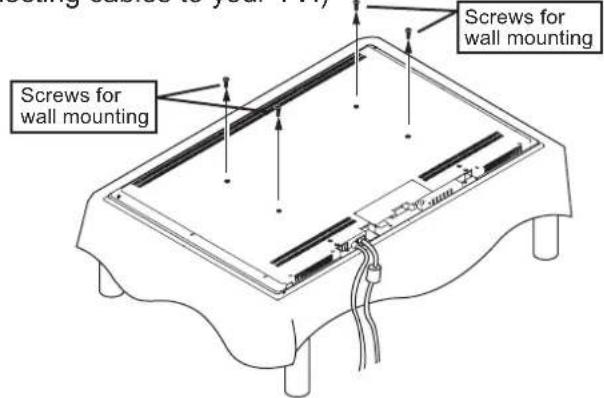
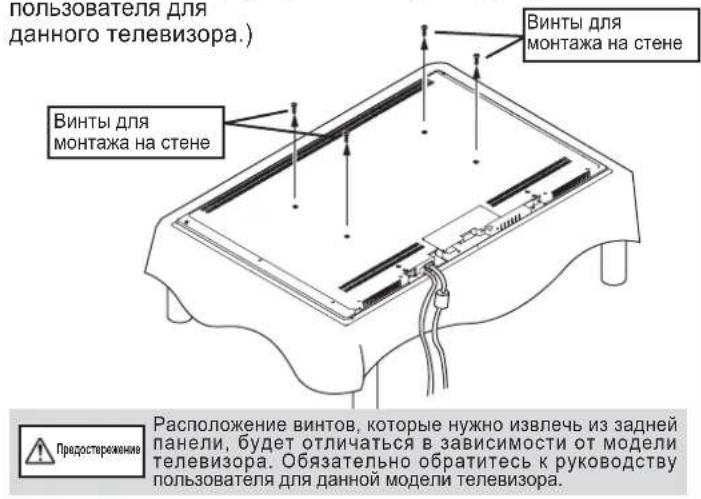
- Wire all cabling to the TV and remove the four screws for wall-mounting the TV from its rear. (Refer to the TV's user's manual for information on connecting cables to your TV.)
The location of screws that need to be removed from the back will vary with the model of TV. Be sure to refer to the TV's user's manual.
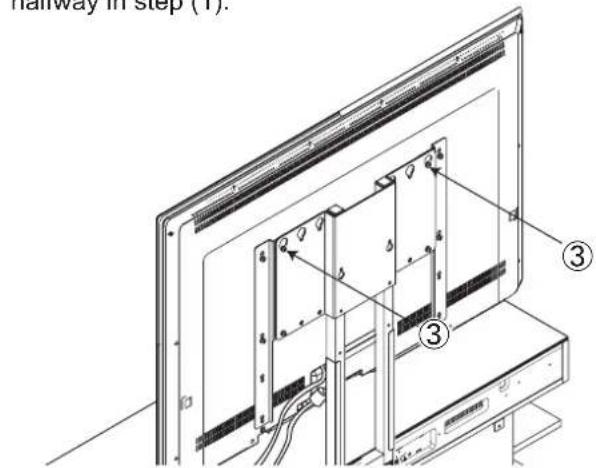
- Temporarily screw the two TV mounting screws halfway in at the top of the TV.
Check the size of the TV mounting screws in your user's manual under the section for mounting your TV on a wall. If this information is not listed, find the appropriate screw by mating the TV mounting bracket to your TV and gently trying the screws in order from the shortest and smallest screws up to longer and larger screws. While doing so, if it feels like the tip of the screw has run into something, immediately stop screwing the screw in any further.
*If you will use the mounting adaptor, proceed to page 7.
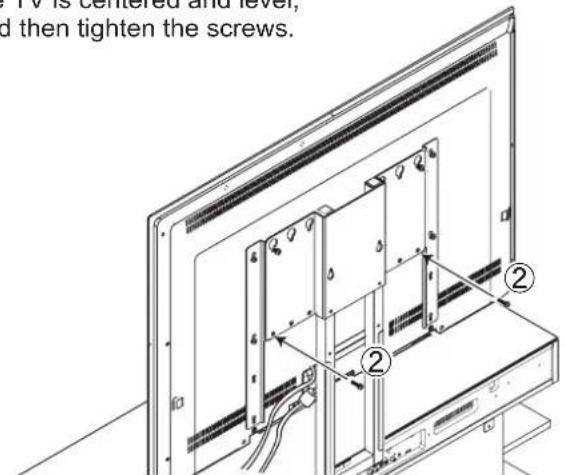
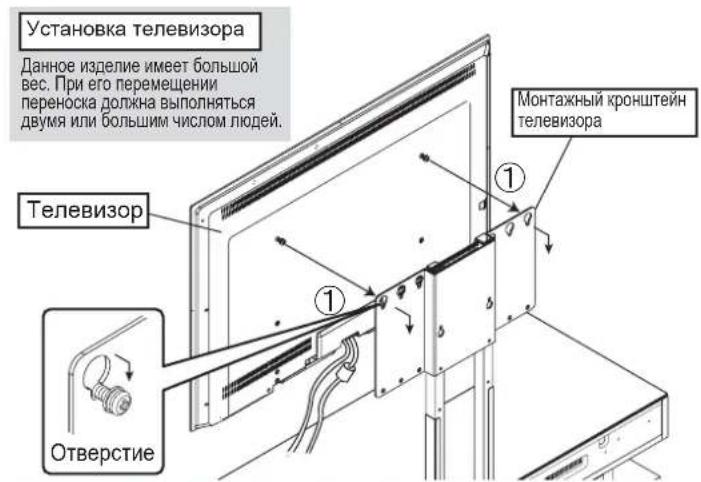
- Mount your TV on the rack.
(1) Mount the TV by hanging the TV mounting screws you temporarily screwed in on the mounting holes in the TV mounting bracket.
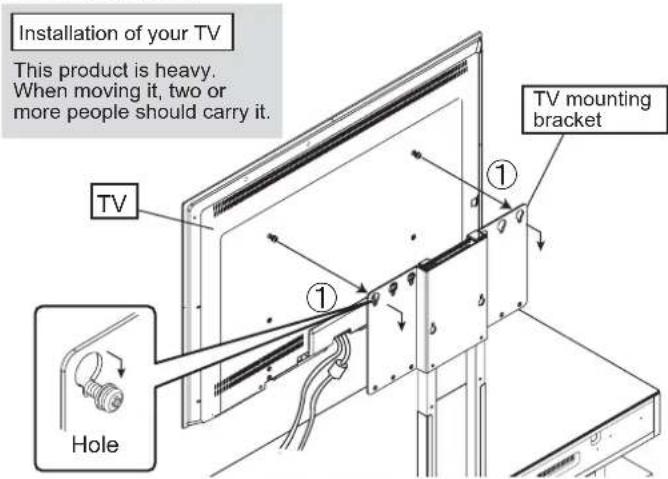
When mounting your TV, take your time as you carefully attach it to the stand. If you drop it onto the bracket, it may bend the bracket and/or put the screw holes out of alignment.
(2) Using the two TV mounting screws, line up the lower holes on the back of your TV and the bottom holes on the TV mounting bracket, making sure the TV is centered and level, and then tighten the two TV mounting screws.
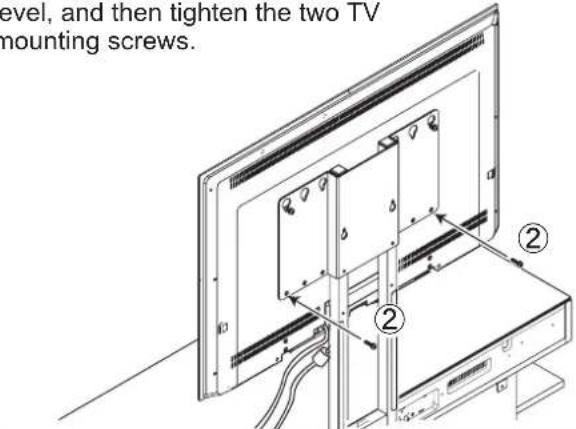
If the holes do not line up left-right, or if the TV is not level, move the left or right side of the TV a bit to find the right position.
(3) Tighten the screws that were temporarily screwed in halfway in step (1).

After tightening the screws for mounting the TV, check and make sure that all of them are fully tightened. Failure to tighten them properly may cause the TV to tip over or break, resulting in injury.
- Connect the wiring for the TV, speaker rack and any other equipment.
(Refer to the user's manuals for information on connecting wiring for each device.)
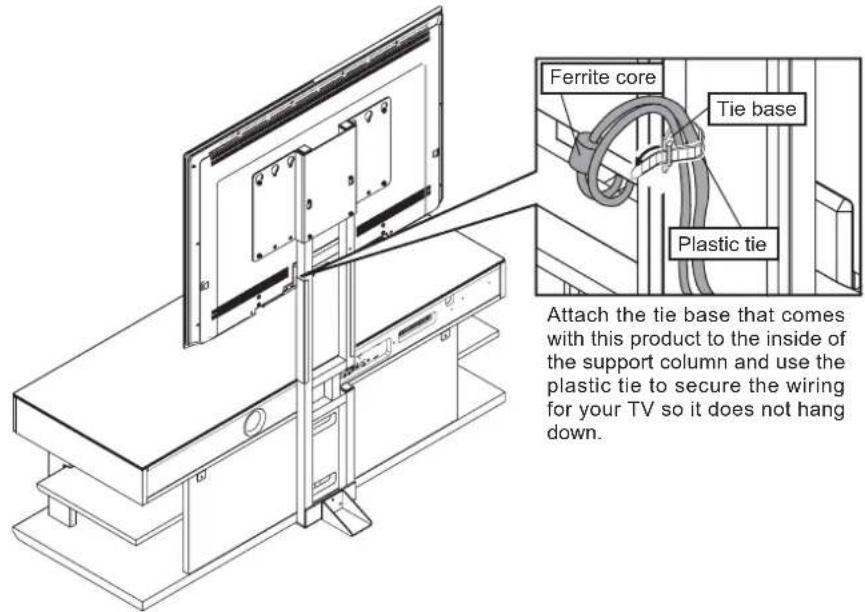

Wire the power cord so the ferrite core does not end up behind the support column. It may be damaged if it is sandwiched in between the wall and the support column when the rack is set against the wall.

The methods for connecting your TV and/or other equipment may differ, so be sure to refer to the user's manuals for TV and each device.
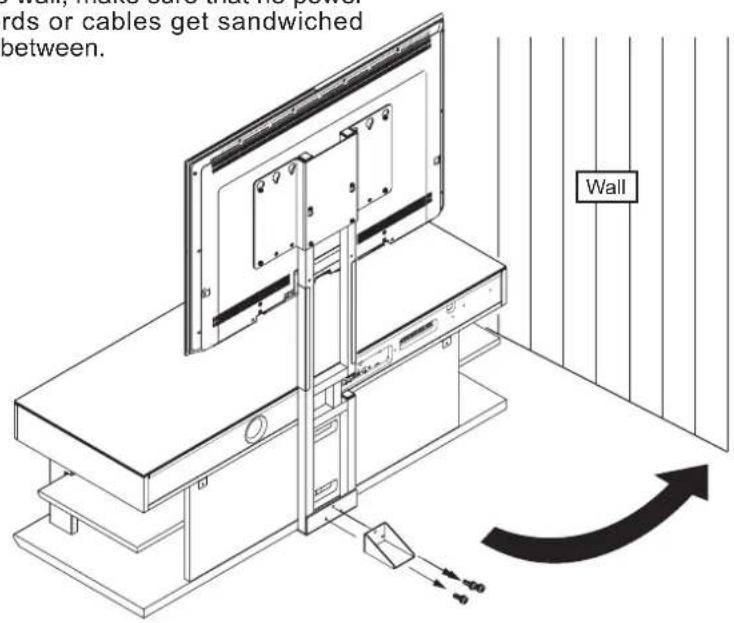
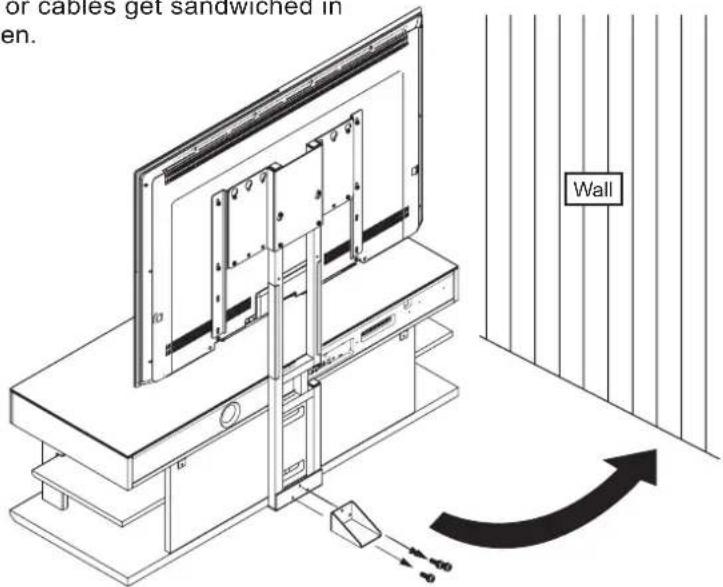
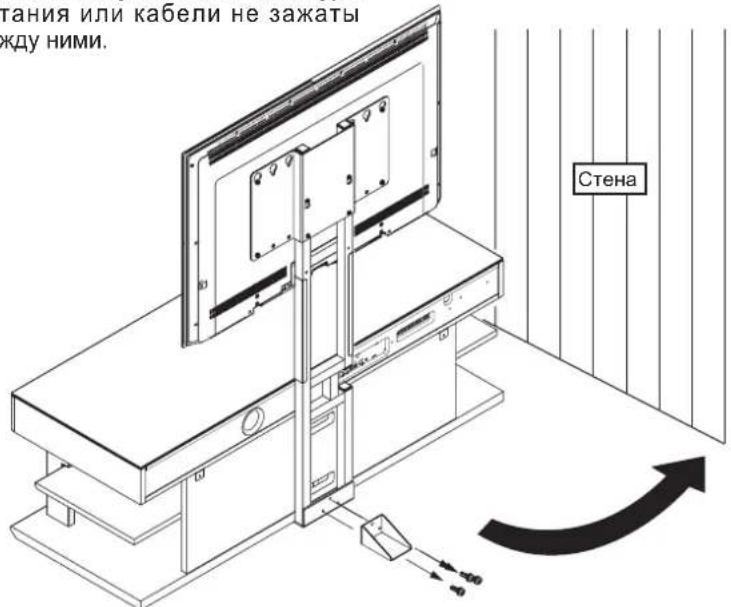
- After everything has been installed, remove the auxiliary support and rest the rack against the wall in its appointed location. After removing the auxiliary support, store it with its three auxiliary support mounting screws E (M5 x 12) in a safe place. In addition, to prevent an accident with this rack, be sure to screw the wires accompanying this product to the wall, thus preventing it from tipping over. (Refer to the user's manual for the rack as well.)
*When placing the rack against the wall, make sure that no power cords or cables get sandwiched in between.
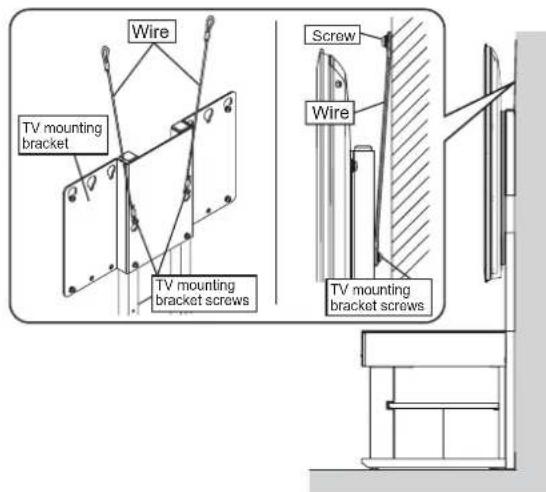
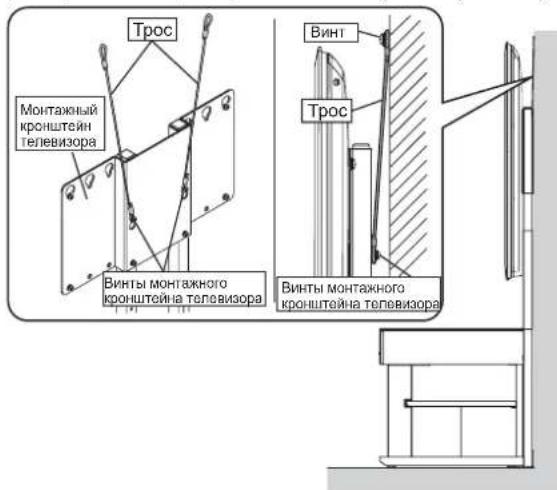
Securing the Unit so it does not Tip Over
- Use the screw holes on the back of the TV mounting bracket to hold the supplied wires. (The installation position may vary with the model of TV and/or the height. Install the wires to suit the TV.)
- Use commercially available screws to fasten the wires securely to a wall or stud that can support the TV. (Select screws that are appropriate for the type of wall.)
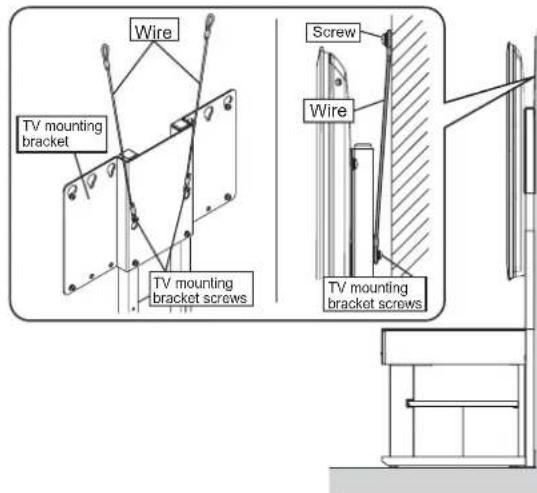

Be careful when setting the unit against the wall that no cables are sandwiched between the wall and the rack.
Install this rack in a sturdy location. In addition, be sure to install it against a wall and take measures to prevent it from tipping over. If no measures are taken to prevent it from tipping over, the rack may tip over, causing injury and/or damage.
- When using the TV mounting bracket + mounting adaptor
- Taking care not to damage the TV, spread a soft cloth on a level surface and carefully lower the TV screen down onto it. Then remove the table-top stand from the TV.
- Wire all cabling to the TV and remove the four screws for wall-mounting the TV from its rear. (Refer to the TV's user's manual for information on connecting cables to your TV.)
The method used for removing the table-top stand, the location and number of screws and method of handling the TV will vary depending on the TV model. Be sure to refer to the TV's user's manual.

The location of screws that need to be removed from the back will vary with the model of TV. Be sure to refer to the TV's user's manual.
If you anticipate using the table-top stand again, you will need the table-top stand mounting screws, so store them carefully with the table-top stand so they are not lost.
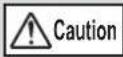
- Fasten the mounting adaptor with the four TV mounting screws.

Install the mounting adaptor parallel to the vertical axis of the TV. If it is not installed parallel, it will slant when it is attached to the support column.
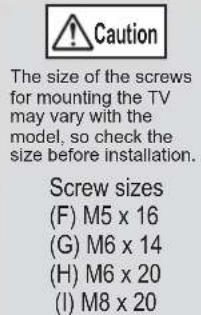
The size and/or installation position of TV mounting screws may vary with the model, so check them prior to installation. If a mistake is made in installing the screws, it may damage the hardware and/or cause injury.
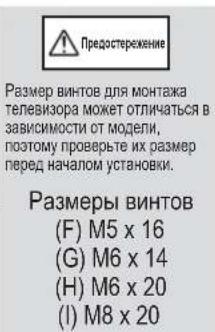
Screw sizes
(F) M5 x 16 ... small hole
(G) M6 x 14 ... small hole
(H) M6 x 20 ... small hole
(1) M8 x 20 ... large hole
Check the size of the TV mounting screws in your user's manual under the section for mounting your TV on a wall. If this information is not listed, find the appropriate screw by mating the TV mounting bracket to your TV and gently trying the screws in order from the shortest and smallest screw up to longer and larger screws. While doing so, if it feels like the tip of the screw has run into something, immediately stop screwing the screw in any further.
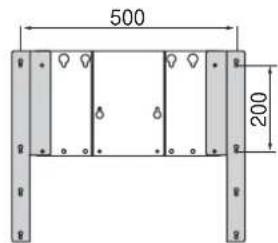
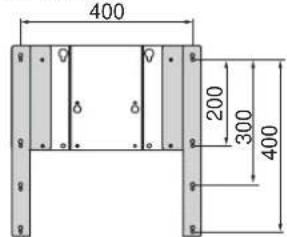
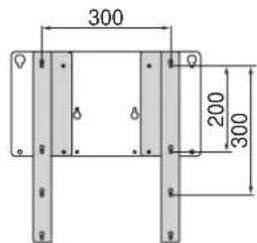
■Positioning of the mounting adaptor with the TV mounting bracket
500 (W) x 200 (H)
400× 200
400 × 300
400 × 400

300 × 300
300 × 200
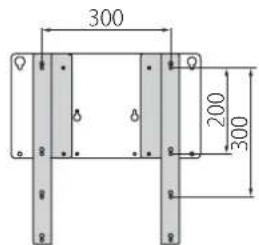
200× 200
If the size is 200 x 200, shift the mounting adaptor left-right to attach it.
-
When using the TV mounting bracket + mounting adaptor
-
Temporarily screw the two mounting adaptor screws halfway in the top holes of the mounting adaptor.
14. Mount your TV on the rack.
(1) Mount the TV by hanging the mounting adaptor screws you temporarily screwed into the mounting adaptor on the mounting holes in the TV mounting bracket.
Installation of your TV
This product is heavy.
When moving it, two or more people should carry it.


#
When mounting your TV, take your time as you carefully
attach it to the stand. If you drop it onto the bracket, it may
bend the bracket and/or put the screw holes out of alignment.
Positioning of TV mounting bracket screws to tighten
500 (W) x 200 (H)
400× 200
400× 300
400 × 400
300 × 300
300 × 200
200× 200
(2) Using the two mounting adaptor screws, line up the lower holes on the back of the mounting adaptor and the bottom holes on the TV mounting bracket, making sure the TV is centered and level, and then tighten the screws.

Caution
If the holes do not line up left-right, or if the TV is not level, move the left or right side of the TV a bit to find the right position.
(3) Tighten the screws that were temporarily screwed in halfway in step (1).

Warning
After tightening the screws for mounting the TV, check and make sure that all of them are fully tightened.
Failure to tighten them properly may cause the TV to tip over or break, resulting in injury.
-
When using the TV mounting bracket + mounting adaptor
-
Connect the wiring for the TV, speaker rack and any other equipment.
(Refer to the user's manuals for information on connecting wiring for each device.)


Wire the power cord so the ferrite core does not end up behind the support column.
It may be damaged if it is sandwiched in between the wall and the support column when the rack is set against the wall.

The methods for connecting your TV and/or other equipment may differ, so be sure to refer to the user's manuals for TV and each device.
- After everything has been installed, remove the auxiliary support and rest the rack against the wall in its appointed location.
After removing the auxiliary support, store it with its three auxiliary support mounting screws E (M5 x 12) in a safe place. In addition, to prevent an accident with this rack, be sure to screw the wires accompanying this product to the wall, thus preventing it from tipping over.(Refer to the user's manual for the rack as well.)
*When placing the rack against the wall, make sure that no power cords or cables get sandwiched in between.
Securing the Unit so it does not Tip Over
-
Use the screw holes on the back of the TV mounting bracket to hold the supplied wires. (The installation position may vary with the model of TV and/or the height. Install the wires to suit the TV.)
-
Use commercially available screws to fasten the wires securely to a wall or stud that can support the TV. (Select screws that are appropriate for the type of wall.)
Be careful when setting the unit against the wall that no cables are sandwiched between the wall and the rack.

Install this rack in a sturdy location. In addition, be sure to install it against a wall and take measures to prevent it from tipping over.
If no measures are taken to prevent it from tipping over, the rack may tip over, causing injury and/or damage.
Using the Auxiliary Support
When you need to clean or change the wiring to your TV, and thus move the rack from the wall temporarily, be sure to lift the rack when moving it, then attach the supplied auxiliary support to the support column.
*Attach the auxiliary support with the three auxiliary support mounting screws.
Store the auxiliary support with its mounting screws after you remove them so you can use them again when moving the rack from the wall temporarily to clean or to change the wiring to the TV.

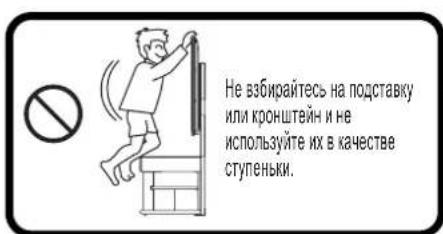
The auxiliary support provides no guarantee of preventing the rack from tipping over in the event of an earthquake. Do not use the auxiliary support to support the rack in a permanent installation away from a wall.
Usable if mounting holes are positioned at:
200(W)x200(H),300x200,300x300,400x200,400x300,400x400,500x200(mm)
Introduction
Montageadapter (rechts): 1
Montageadapter (links): 1
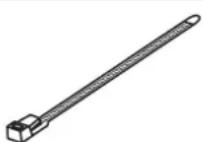
Plastic draadbinder: 1
MOHTaxhHbE BnHTbI TeNEBn3opa

F(M5×16):4

G(M6×14):4

H(M6×20):4
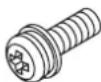
1(M8×20):4
*BnHTbMoRyOTOnHAtbC B3ABNCMOCTNOT IcNoIb3yEmoT OTeNEB3OpA.
PepdynpexdHnO tHocnteJbHo nCOnb3OBaHn
IcnoIb3yIte daHnoe 3dJIeNe 6e30aNacbIM nHaIeJaxaUM o6pa3oM.
0603haueHn
Cneyuonie CnBOJIb nCOnB3yOTc dIra TORO, yTObI cNoOC6CTBOBaTb 6e3oNaChomy HnHaNexKaUeMy NCIOJIb3OBAHNO daHHoro N3DeJINr, PpeDToBpaTb BO3HKnHOBeHHe HechAcTHOrO cNyAa HaHeceHne KaKnx-JIb6 TpABm Bam nn DpyIM JIOdAm I/nn NOBpeXJeHne NmHOrO mMyIecCTBa.

PepdyppeckdeHne
DnHbMCBON03HaAeT,TOBcnyae
HnHOpuBaHnI npdynpexdeHn HnepaBnHOrO
ObaeHHcYkazaaHHbIMn ppeMetam,30MOKET
PnBeCTN K CMePTN Wn CepBe3HO TpaME.

Ppeoocrepekenne
DanHHB CMBON O3Haaet, YTO B CNYae HrHopuObaHn PpeDynpexKeHnE HN
HepaBnHbOro 30 MoKeT PnBeCTN K TpaBMe Hnn NobpeJcENHO NnHOro MUYcEBA.

JaHHb CMBON CNYKNT DnO603HaeHINHOPMaUN, Tpe6yIOUeN OTOPOXHOCTN(BKNIOA npDynpExHNA).

JaHHbI CnBON CnyKHT DnO603NaueHn 3anpeeHnHO DeCTBn.

HnBmOBON CnyKNT DnO603HaueHn HNCTpyKuN, KOTopyHOe6XoDMBOBInOHINHTb.

Ipeoctepexehme (obme cbehenra) 3anee (obme cbehenra) Hcrtpykunr (obme cbe

Mepb6e3oNaChOCTn
BoBpeMa yctaHOBKn


YeYCTAHABHBAHTE BO BnAXHHXIMN NnBnBbHex MecTAX,AMN B MeCtAX,TeNEBk30p ByET NOBeePratcBOB3DEXCTBnIa npA mN MaONHmCTO DbMa.
Heco6IIOJeHne MoXeT npNBecTN K noxapy n/nn TpaBme.

JaHAAy yCTAHOKa DIOJIKHAA BbIOnHHaTcBdMy MM 60bnWMCnOM NIOEi
BoBpeMa nCNoJIb3OBAHnA


HecobJeHne MoKet npBecTN K Poxapu n/nJn TpaBme.
PpaBnla, KOTOpbIe cIeMyET co6IIOdaTb
Pa3meHHe nOcTaBKn InI TeJIeBn3opa
-Пи Bыборе MeCTa ДЯ уctahOBKn Haundte poBHOe, yctOuHBOe MecTo, KOTOpoe MOKET BbIdepKATb DoCTaOHTb BEc. (He BblONHnTe YCTAHOBKy Ha NOBepxHOCTX, KOTOpbIE HAKJIOHEbI, HerOpN3oHTaNbHbI, a TaKKe Ha TAKNX HeyCTOuHbIX NOBepxHOCTX, KAK KOBep, MaTb N3 npeccobAHHO coNOMbI NIn Ha NOKopo6NeHHbIX NOBepxHOCTX.)
B cnyae yctahOBKn B HnnpaBnIbHOM MeCTe TeneBmOp MOxET nepeBepHyTbc Nyn yNactb C nOCTabK, YTO npBEdet K NOlyuHeHnIO TpaBMbl.
- Ecni OTCyTCTByIOT dpyrne BapnAHTbl, Kpome yctaHOKn Ha KOBpe NIM MaTe N3 ppeccOBaHHoC oLOMbl, NOMeCTNTe DOCKy NOI NOCTABK, a 3aTeM CMOHTnpyIte TeIeBn3Op. Kpome TOrO, BO BpemN nepemEeHn DaHHoro yCTpoNCTBa NOBepx KObpa IIN MATA N3 npeccOBaHHoC oLOMbl, O6ra3aTeNbHO npINODHMITE erO npi nepeHoCke.
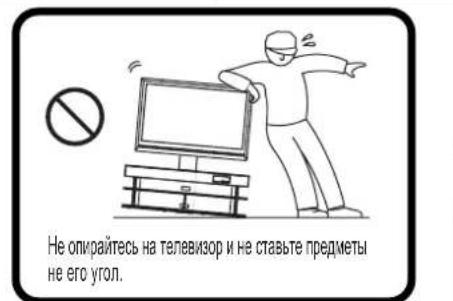
- y6eINTEcB, yTO yCTpOInCTBO ONnpaETcHa CTehy. B cnyae ycTaHOBKn Ha pacCToRHNOT CTehbl, OHO MOKeT nepeBepHybC, yTO pNBeTeK NOnyHeHHIO TpaMbI.
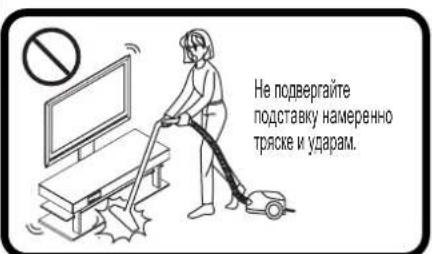
He nCnoJIb3yIe erHa MOKpOM IIN BOUeHOM NoJy.
PnHcNoJIb3OBAHN
DaHHOro N3dEInN B TaKOM
MeCTe OHO MoKeT, B peKnX
Cnyyax, npnnnHyTb K
NOJy.
-Пипспспшнусгьа,эрнонгги ипсрнocka Джны ВьногнгсдВьмгИбьшчICNOM ПОд. КрOME TOrO, BO ВьмгБвINОЛнEHнЯ 3TNX ONEpaCnI ycgtrpoCTBO Heo6xOdIMNoDHNMaTb 3a HxHIO NOKky NOCTABKN.
IIOHHTne 3a TeNEBn3Op ININ BepXHIOI NOIky MOKeT IPNBeCTN K NOBpeXeHHIO NIO SoCTaBKN, NIO BO BepXHeI NoIKN.
-He pacnoIaraiTe daHoe ycTpoiCTBO BO3ne pa3dBHXHOI DBepn, nperopOdkn nn DpyTORo MecTa, KOTOPoe He ABJIaETcdoCTaTOUHO IpouHbIM.
Mepbl ppeoctopoxhoCTN BO Bpemnncno3OBaHn
BbIbepTe MeTo, KOtOpoe He HArpeBaTcCnIuKOM CnIbHo. Pa3MeueHHe NOI npMByIM NpyAmu CONHca IIN 6N3n HarpeBaTeMa MoKET npBeCTN K O6pa3OBAHIO Ny3bIeP, OTCIOEHIO INI ObecueHbAHIO OKpaeeHHbIX NOBepxHOctEi.
He HauKneBaIte qeIIOoPAHOBYIOJeHTy IINI DpyrNe IINIKNE MaTePnaJIbI Ha OKpaWeHHbIe NOBepXHOCTN, 3TO MOKeT PnBecTN KOTcNoEHNO KpackN.
-IVcnoIb3ynte cyxyu TkaHb dnyaJaleHnna bIIN nII rpa3n. B cnyae cunbHoro 3arpa3HeHH yctpoNCTBa, CMOHTeTKaHb HeHTpaJIbHOM MOUSeM CpeDCTBe, pa36abNeHHOM BOIO, IN XOPOo BOBIXMMTe ee nepeD BbITnpAHmE yCTPOINCTBa. IMeHTe B BVND, YTO IcNoIb3OBaHne TaKHX BeueCTB, KAK SeH3nH, pACTBOpNTeJIb dIg Kpackn NII 6bITOB0B0CK MoKET PpNBecTN K ObecuBeuBAHNIO Kpackn N/ INI NOBpeXdEHNO NOKpbITnA.
OchOBHbIeTexHnueckneXapaKTePncTnKn
| Hombre moideles | YTS-V1100 |
| HapyxнBLE pa3mepbI | 540 MM (L) x 70 MM (Γ) x 1235 MM (B) |
| Bec n3deJЯ | 8.4 Kr |
| ВыдэрхиBaemaj harpy3ka | 45 Kr |
Cnooc yctaHOBKn
■BbINOHeHn yctaHObKn nHaO6ntc KpeToo6pa3Ha OTBeptKa.
1.ПepeBepHnTe nOcTaBky (YRS-1000 uyn YRS-2000) IINUEBOI CTOpOH BHN3.
PekomeHdyetcpaacTeJIntbHaNoJyNOKpbIbaIO nIpyoMRAKmMaTepeNaJ,HTO6bI He noapaanatb nonnnoDCTABKY.
Будte octopoKhbI BO BpeMЯ nepeBopaunBaHnnoCTaBKN, YTObI He NOUapanaTb ee n HeNoIyuHTb TpaBMy.
Neped nepebopaahmbaHem NoCTabk CHMMTE C NOCTABK NOKM INBepxHNO CTeknLHHYPO HaneHB. B npOTBMHOM CNYae BO BpEMNepeBaOPAHBAHIO OHMOYT BInactb, YTO pNBPeDeT K NOBpeKdEHINHN NIOYehHO TpaBMBi.
2.CMOHTpyNe Ha noCDaBky OOnOpHyCToKy C NOMOuIbIO (1) DBYX MOHTaXhBX BnHTOB ONOpHO CTOnK A (M6 x 16) u (2) DByx MOHTaXhBX BnHTOB ONOpHO CTOnK B (M6 x 35), B yka3aHHom nopAke. PnPKePInTe BCnOMoRatEnbHyO onOpy c NOMOuIbIO (3) Tpex MOHTaXhBX BnHTOB BCnOMoRatEnbHoN onOpbl (M5 x 12).

O8a3eTbHO 3aTHTHe BnHTb, C nMOoBIO KOTOpBk KpeNITcK T NOCTBaK eONOPH CTOKKa. EOni Nx He 3aTHTb HADmEKAaMIM O6p3OM, 3TO M0KET Bb3sTbNepeBopaYbAHMe NIN Pa3pyeHE Me ONOPH CTOKX, TTO PnBBeTeK X NONYeHNO TpaBbI.

Bcnyae bblonHHeHa daHH yctahOBn 6e3 nCnoIb3OBAHn BCNOmOratelhOn onOpby, NoCTABKa MOKET nepeBepHTcy,TO npBedeK NONyEHnTpaBMy. OBs3aTeNHO yctahOBn BcNOmOratelhHyo ONopy NepeD BblIOHHEHM yctAHOBKn.
- YcTaHOBInTe NIOCTaBky BepTKaJIbHo I npNKpeINTe MOHTaXHbI KPOHSTeIH TeJeBu3Opa K ONOPHO CTOnKe C NOMUbIO YeTbIePex BNHTOB MOHTaXHOrO KPOHSTeIHa TeJeBu3Opa C (M5 x 20).
(1)Bpemehno3aKpyTneDba BNHTa HanoNObHy Ha npednoHTaEMOB Bicote MOHTaKa TeJeBnO3opa.
(2)HabeCbTe MOHTaXbI KPOHHTeIH TeJIeBn3OpHa BnHTbI (1) 3a eTo MOHTaXHbIe OTBePCTN.
(3)HaTeXHO 3aTnHTe KaXdbIu3 DBYBXBHTOB.
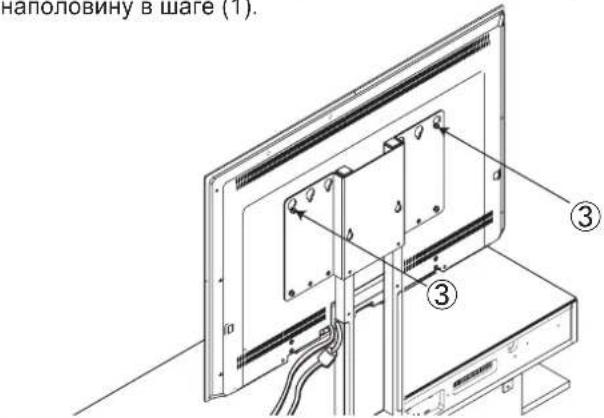
(4)3aTnHTe BnHTb, KOTOpBle 6bln nepBOHaayanbHo 3akpyeHb HanoNoBHy B ware (1).
MOxHO Bb6paTb Ond HO 3 TpEx NIOXeHn BBICOTb DnmoHTaXHOrO KPOHtEHa TeEnBu3Opa, paCNOIOXeHHbIX CmHTepBanamn 100 MM.
*HeKOTOpbI TeIeBn3Opbl MOrTy yIIMPaTbC B BepxHIO naHEnb NOCTaBKN, N03Tomy IPOBepbTe HyXHyIO BbICOTy nepeHaJAmO YcTaHOBKn.
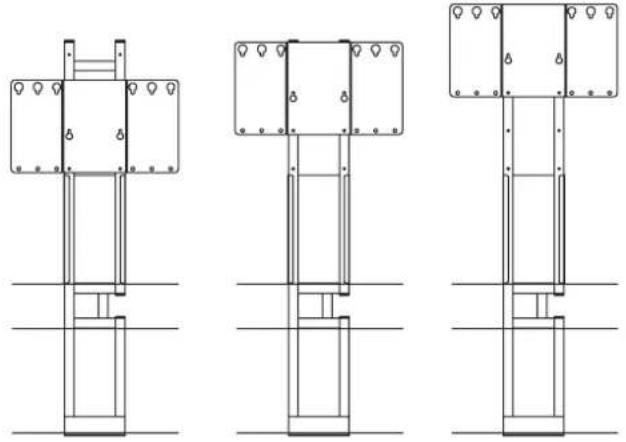
Ha HnKHeBbICoTe Ha cpeHne BbICoTe Ha BepxHeBbICoTe

Bdyte ocTopoKHb BO Bpemy yCTaHOBKn NOcTaBKn BepTKKaIbHo, YTObHe NoUapanaTb ee H He NOnyuHTb TpaBMy.

O63aTeBHO 3aTHeMe BHTb, C NOMoUbHO KOTobix KpeTnCTK ONOPHON CTKe MCHTAKHHKO HPOOHETHE TNEB3Opa. ECNI HX HE 3aTHyTB HADNBeAuaIM O6p3OM, 3TO MOxET B3bBAT NaHEEN INI PApyuweHne MONTAKHORO KOHHTeHnTA EINB3Opa, TO pVMBEDK NOJYEHNO TpBMvI.
YctahabnBaIteMOHTaKbHkPOnHTeH TeneB3OpaHaTakOH BbICOTe, YoToBbNcNE MoTtAka TeneB3OpHe KacANCBepxHE naHEN. Ecn TeneB3Op 6yET KacATbcnaHEN, 3TO MOKeT npBeCTK NOpeKJeHNO TeneB3Opa, NOCTABKn Mm MOtAxAHO pncocobHnMn PnBeCTKn NOnyEHHIO TpaMBbl.
B cnyuae nCIOJIb3OBAHnra ToJIbKO MOHTaXHOro KPOHHTeHa TeJIeBN3opa
*Iprn nCIOB3OBAHm MOHTaXHO r aDAnTepe nepeiTe K cTp.7.
4.CobJIOaOCTOPOXHOCb, YTO6bI He NOBpeINb TEJIeBn3Op,pacCTeJInte MRAKyIO TkaHB Ha POBHOn IOBepXHOCTNIOCTOPOXH0 ONYCTNTe Ha Hee TEJIeBn3Op 3KpaHOM BHN3.3aTEM CHIMITE C TEJIeBn3Opa HAcTOJIbHyIO NOCTaBky.
Cnocob,MCNcIb3yEmblnCHTNAHCTOBHNOODCTABM,EEpACONONKHeMe NHCIO BNTOB,TaKAKe CnOcB 6oBaPAEHN C TeneBn3OPOM 6yDyT OTNNHATCB 8 3AAMCMOTN OMOEN TENEBn3OpA.06aTeNaHo 6oPaTHTeCk PkyOBoCTBy NnO3BoTeBn4n DAAHNO MOnen TENEBn3OpA.
Ecn npnnonanaetcB dalbHeWem HcNoIb3oBaTbHacTobnHyno NoCTabky,
Dn 3TO NOHOADoBcTc MOHTaXHBe BnHTb HAcToNbHO NoCTabKn,NoTOMy
CneYET bePexHO xpaHmTB IV BMeCTe CHaTOnbHO NoCTabKO, TTOb6OHN He
NoteopANCb.
5.ПоdkлочиTeКтелев3opy BCEKa6eJIN NbIKpyTITe n3 3aДнйпаHEnTeNeBUN3Opa YeTbpe BnHTaДЯ erO MOtTaJa Ha cTeHe.(ДЯ NOЛуЧЕИ NHФОрмАЦN O NOДКЛIOчEHIN Ka6eJIeK TteLEBN3Opy,OBpatNTeCb KpyKOBOdCTBy NOIb3OBAteJIЯ dIЯ BnHTblДЯ MoTHaJIa HcCT
- BpemHHO 3akpyTte HanoJIOBHy DbMa MOHTaXHBIX BnHTa TeNEBn3Opa B BepxHeu Yactu TeNEBn3Opa.
POpEBpTe pa3Mep MOHTaXbIb X BnHTOB TeneBnOpa B pykoBoDCTBe Nnon30BaTeB P a3dene No MToHAtKy TeneBnOpa H aTcEe EcnIa 3nHopmaCna He npBmeDeHa, HAnDiTe COOTBeCTByuOoHN BnHT, pNkNaIbBaB MaTOHbKb KPOHtSeH K TeneBnOpy n octOpJHO NpOBepra BnHTbI, HaNuHaC cMaBx KOpOTKnX Hbe60bIbXb X BnTOB N3aKaHuaBba Boone DInHHbIMn N BonSbIMm BnHTaMn. EcnIb BoBpeMa BInToHHe DaHohon Opeaapano BO3HNKET OUySeHne, YTO KOHeJ BnHTaHaTaNKhynCn HaYTo-TO, HEmeDNeHNO ppeKpTaTe DaJIbHeJWee er 3akpyuBaHMe.
- CMOHTnpyTe TeJIeBn3Op Ha NODCTaBKe.
(1)CMoHTpyuTe TeJIeBn3Op nyTeM BBeJeHnB BpeMeHHO 3aKpyeHHbIX MOHTaXhblx BNHTOB TeJIeBn3Opa BMOHTaXHbIe OTBepCTnMoTAtXHOrO KPOHlTeHa TeJIeBn3Opa.
Bo Bpem MoTaka TeneBn3opa octopoxho H He Cnewa PnKpKeNteIe ro KnoCTabeke. B cnyae ero naHeHna KaPOnuTeH, 3TO MOKeT npBeCTn Kn3rOy KoPOnuTeHa nK CmEueHIO OTBepTn DnBHTOB.
(2)Испοльзуя ДБа моТахньиВиHTа,CoBмeCTnTeДБа HиЖнIX OTВерСТЯHAЗднЯПаHelen TELEВ3OpaИ HиЖнe OTВерСТЯHAMOТАхнOMKPOHшТЕНeTELEB3Opa, y6eДиВшьс,чTO TENEВ3Op pacNoJoxH NO ZeHTpy И ROP3OHTaJIbHo,a 3aTeM 3aTЯHnTe ДБа моТахньиВиHTa TELEВ3Opa.
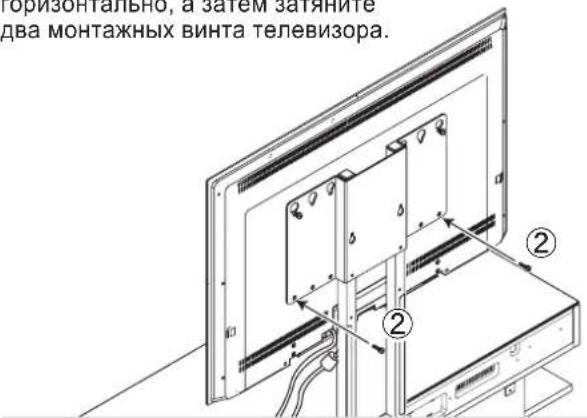

EcniOnTBePcTnHe BbipOBHeHbI INn ecIn TeneBn3Op He pacnoNIOXeHgnpa3OHTaNbHO,HEMHOro nepeMeCTte Nebyo Hnn npabyTO cToPOHy TeBn3Opa,YTObblHaTN npabnHoeNoIOxKeHne.
(3) 3aTnHHe BuHTbI, KOtOpBie 6bln BpeMeHHO 3aKpyeHbI HanoNoBuHy B ware (1).
Iocne 3aTARBAHnBnHTOB nna MoNTaxa TeNEBn30pa, npOeBPteN y6bndTeCB, TTO Bce OHN NtHOCTbO 3aTHyTb. ECnn Hx He 3aTAYHyb HApNexaUMm ObpA3OM, 3TO MOKeT bBy3BaTbepeBOcPAAHBnE Wn pa3pyuHHe TENEBn30pa, TTO pInBeTeK NONyueHnIO TpaBMbl.
B cnyuae nCnoIb3OBAHnra ToIbKO MOHTaXHOro KPOHHTeHa TeJIeBu3opa
*Pnp nCnObl3OBAHm MOHTaxHOro aanTepeeDnte K cTp.7.
- NpoknOHTe npoBOna nTneBn3opa, noCTabKn KOIOHKn IIOboro dpyroro obopydoBaHna. (IJIynoJyHeHHnOpMaun O NOKNOUeHNn PPOBOOB dNRA KAKDOrO yCTpoiCTBa, o6paTntecb KpykoBOcTBy Nolb3OBaTeTn.)

PnKpEnIte 1Hyp nHTaHnRA TApKIM O6pa3OM, 7O6bIeepnTOBc cepDeuHKn He BbCTypan3a onOpHy cToKny. B CNYae yctAHOBN NOpCTABKN BO3ne CTHe, OH MOKeT 6bIb NoBpeKdEHN PnN oNaDAHm MEkDy cTeHO NOnOPHO cToKOH.

CnocobbnoKIOHcHHe TeneBn3Opa H/nn
Dpyrroo6opyDobAHnMOrYT OTHNATCB,
NoTOMy 083aTeNbHO 6pAHTec K pyKOBoCTBy
NoB3BOaTeIe I nTneBn3Opa N KaKDOro
ycTroIcBA.
- Nocne toro, kak BCE 6ydt yctahOBnHeO, ydaNTe BCNOMORATEbHyO onopy u npucnoHnte NOCTABky K cTeHe B Ha3HaueHHOM MeTe. Nocne ydaene HBCNOMORATEbHO ONOpbl, coxpaHnte ee B HaedekHom MecTe BMeCTe C TpeM ROHTaKbIMu BNHTaMn BCNOMORATEbHO ONOpbl E (M5 x 12). Kpome toro, dny npedeTbPaueHna HeCuaCTHorO cnuyar npn nCNOb30BaHm daHHo NDCTABKN, o83aTeNbHO npkpytnte K cTeHe TPOcbl, noCTabJnEble C daHbIM n3deJIeHem, YTO6bl npedeOTbpaTntb erO nepeBopauBaHne. (Obpatntec TaKke K pykoBOdCTBy nonb3OBaTeN dnn OndCTABKn.)
*Bo Bpempa3MeueHnnoCTaBKn BO3ne CTeHbI, y6eDntecb, 7TO WHypbI NHTAHN nn Ka6enn He 3axatbl MEXdy HMM.
3aKpePnHne yctpoNCTBa c ceIbI npdeTbpaueHn ero nepeBopaunBaHn
1.BocnonbyTecbI3aKpenneHnNoCTabnEmbIX TPOCOB OTBePCTMNIMN BIN HHTOB HA 3aHHeuactn MOHTAXHORO KPOHHTeHaTNEBEM3Opa (MeCto YCTAHOBKN MOKET OTNIUATbCBA 3aBNCUMOCTNOT MODETNTEBEN3OHAWIIIBBCOTJI.YCTAHOBNT TPOCbI, KOPTObe COOTBTCTBYOT DAHOMY TEBEN3Opy.)
2. BocnoB3yTecb npoAioUIMMCnO TDeNBo BVHTAMn
IaHaeXHO rPnKpeJIeHn TPcO8 K CTHe HIN
Onope, CNOcOBOH yDepKaTB TeJIeBmOP.
(Bb6epnte BnTHbl, KOtOpbl COOTBCTBYOT TIny CTHebl.)

Bydtbe octopoxbBo Bpemy yctahOBKn daHHoro YcpoTbBA Bo3ne CteHb, TTObKa6en He 6bn 3aKaTbMeKdy cTeHn NODCTABKO.

YcTaHOBnTe DaHHyIO NOCTaBky B IpOuyHom MeCe. KpOme TOrO, O63aTeIbHo YcTaHOBnTe ee BO3Ne CTeHbI N ppeDnPmITe Mepbl No PpeDToBpaUeHNIO ee nepeBopauHBnA. Ecn He PpeDnPnHrTb Mep no PpeDToBpaUeHNIO ee nepeBopauHBnA, NOCTaBA MoKeT NepeBepHyTbC, YTO pNBeET K NOJyHeHIO TpaBM n/nnn NobpeKdEHNM.

B cnyuae nCnoNb3OBAHnMoHTaXHOro KPOHHTeHa TeEbn3Opa + MoHTaXHOro aDAnTepa
- Co6JIIOJAOA OCTOPOXHOCb, YTO6bI He NOBpeuNTb TEJIeBN3Op, pacCTeJIInTE MRAKyU TkaHb Ha POBHOJ NOBepxHOCTn I OTOPOXHOO NcyTHe Ha Hee TEJIeBN3Op 3kpaHOM BHN3. 3aTeM CHIMNTE C TeJIeBN3Opa HAcTOJIbHyU NOCTabKy.
11.ПОДКИЧУТЕ K TeLEBUN3OPY BCE KaBEN N BbIKpyTITeN 3aJHEn NaHEn TTeLEBUN3Opa YeTbIpe BNHTa DnE rO MOHTaKaHa CTHe. (ДЯ NOЛуЧЕНЯ INHФOPMaUN O NOДКИЧЕHIM KaBEN K TeLEBUN3OPY,OBpaTNTecbK PYKOBOCTBy PONb3ObaTeJIЯ BnHTbl nJa MOnTHaZHa CSteH
Cnocob,HCNObEyemblDnCHTmHAcTbHOBNoCTaBKn,eePacnoOnKeHne H CnIOBTOB,ABAKCnO6oBaueHN CTeNebu3Op0 BydTYOTNNHATCB AABNCIMOHTOTMOnEINTEBUNOPaOBpaNTeBCXpyKOBODCTBy NnONBOBETANDAHNNMOENNTENB3OpA.
PacnojoxHe BnHOB, KOTOpBle HxJHO N3BneB n3aHne nAnei, 6ydt OTnHyaTcB a 3BaNCmOCTN oMDoNN TeneBn3Opa. O63aTeNbHO o6pTaNTecb KpyKOBoDCTBY NOIb30aBeTJe Dn daHNO MOneN TeneBn3Opa.
Ecn npnnpnonaraetcB dAnbHeWem McnOnb3oBaTb HAcTobnHyNo NOCTABK,
Dn 3TO NoHApC8TCR MoHTAaXHB BmTHb HAcToNbSHo NODCTABKN, No3OTMy
CneyET BepeXHO XpaHbTb IV Bmecte C HAcToNbHO NODCTABKO, YTObbl OHn HE
noteparnnc.
- 3aKpeINTe MOHTaXHbI aAanTep C NOMOu bYeTbIpex MOHTaXHbIX BnHTOB TeJIeBn3opa.
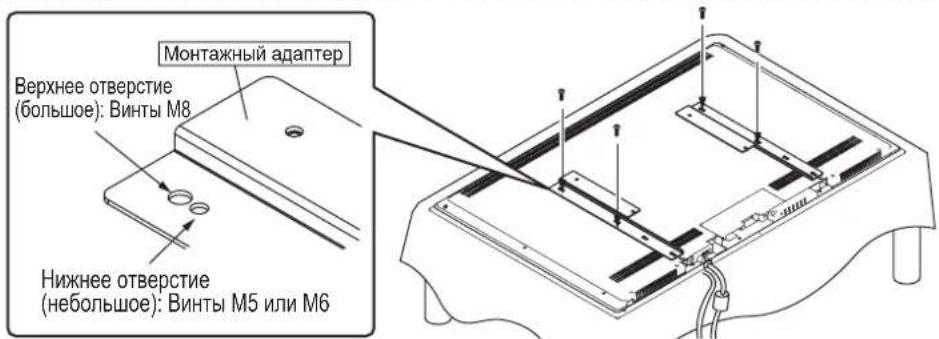

YcTaHOBnTe MoTaNKbH aJaTep npaIeNbHo BepTKaIbH0 NC TeneBn3Opa.Ecnn OH 6yDeT ycTaHOBnEH He npaIeNbHo,TO npuBeNeT K eTo NpeKocy BO BpEm npkpenHe N OnOpHOn CTOnKe.
Pa3Mep HmH MeTo yCTAHOBKMOHTAKHXB INBTOB TeneBb3Opa MOTY OTNHYaTcB C 3ABHNBCMTOIOTMDEN, N03TOMY KxCNEyET PNOBEPNTpePd HauAONM YCTAHOBK. EcnH BO BPEMg YCTAHOBK INBTOB 6yde DONYeHa OUN6Ka, 3TO MOXET PnHBCTN K NOPBekDeHIO PNCHNCO6BHeHH NnnN NOnyueHH TpABMbI.
(F)M5x16...He6oJbIooOTBepCTne (G)M6x14...He6oJbIooOTBepCTne (H)M6x20...He6oJbIooOTBepCTne (I)M8x20...6oJbIooOTBepCTne
PpOBeBpTe pa3Mep MOHTaXbHbX BnHTOB TeneBn3Opa By pyKoBOcTBe NOIb3OBeRbApa3Dpe No MONTaXy TEeNtBn3Opa Ha CTHe.
Ecn 3Ta IHNoPpMaia He npMBeHa, HauNITE COOTBCTBYUoiu BnHT,
PnpNKadlbBaMOHTaXhB KPOHUTe K TeneBn3Opy N octopoXHO
npOBePra BnHTb, HauHHa C cAMTO KOpOTKO I He6oJIbTO BnHTa M
3aKaHnBaB BoJe DnHHbIMN H6oLMMn BVHTAm. Ecn BO BpEmr
BbINONHeHMa daHHO ONePAuWM BoHNKeHET OuyUeHme, YTO KOHeu BnHTa
HaTKHyNCa Ha YTO-TO, HEmeJEnHNO PekpATte DaNbHeHue erO
3aKpyuBaHne.
Pa3MeHHe MOHTaXHO r aanTepa C nOMOu BO MHTaXHO r KPOHtEHa TeNeBn3opa
500(山)×200(B)
400× 200
300 × 300
200× 200
400 × 300
300 × 200
400 × 400

B cnyuae pa3mepa 200 x 200, NOBEPHNTe MOHTKHNbI aanTep BnEo INN BnpAIO npiKnpePENHNI.
B cnyuae nCnoIb3OBAHnMoHTaXHOro KPOHHTeHa TeHeBn3Opa + MoHTaXHOro aDAnTepa
- BpemeHNO 3aKpyTnte HanoNobnHy Dba BnHTa MOHTaXHOro aAnTepea TeleBn3opa B BepxHne OTBepCTnRA MOHTaXHOro aAnTepea.
YcTaHOBKaTeJIeBn3Opa
14. CMOHTpyTe TeIeBn3Op Ha IOnCTaBKe.
(1)CMoHTnpyTe TeJIeBn3Op nyTeM BBeIeHnBaPMeHHO BkpyeHHbIX B MoHTaXHbI aIaNTep BNHTOB MOHTaXHOrO aIaNTepa B MOHTaXHbIe OTBepCTnB MOHTaXHOM KPOHITeHe TeJIeBn3opa.
Haeu 3nne Hmee60b
Bec.При有很大петершени
IpeHocka DOnJXHa BbInOJIHrTbC
DyMnN BONbHmHcHOM IIOe

PepoeTepeHMe
BoBpemMOHTaKaTeNEBn3opaOCTOpoxHoHe CneWApKPNKeNTeEroNIOCTabke.Bcnyaeero naedHn KaHOHsTeH,3TO MOKETnpBecTn H3r6bY KoHsTeHa NkCmEeHNOOTBepCTnDnBAHTOB.
(2)Испοльзуя ДВа Винта моТахного aДаNTepa, nopabHЯnte DBA HxKHXN OTBepCTnHa 3aHHe NaHEn MOrTaXHORO aDanTepa u HxKHne OTBepCTnHa MOrTAxHOM KPOHHTeH e TENEuBn3Opa, y6eBnBmCb, YTO TeLEBn3Op paCOnNoJoxH NO UcHTpy I Ropn3OHTaJIbHO, a 3aTeM 3aTaNHTe BnHTbl.

Pepdoctepexhenne
Ecni OTBepCTMn He BbipOBHeHbI INI ECNI TeneBn3Op He pacnoNIOxEN Ropn3OHTaJIbHO, HEMHO NpeMeCmTE NeByIO INI npAbyIO CTOPOny TeBnBn3Opa, YTO6bl HaITN npabnBho NOJNOXeHne.
PacnoJIOKeHHe BnHTOB MOHTaXHO KPOHHTeHaTeNEBn3Opa DnI INx 3aTAAKKN
500(山)×200(B)
400 × 200
400×300
400 × 400
300 × 300
300 × 200

200 × 200
(3) 3aTnHTe BnHbI, KOTOpBie 6bln BpeMeHHO 3akpyeHbI HAnoNoBuHy B Ware (1).

IpeynpeckdneH
Iocne 3aTnBnHn BnHTOB nmoHTaxKa TeEnBn30pa, npoeBpTe Nb6eNtEcb, TcBce OHN pNOHCTbO 3aTnHYbl. ECnn Hx He 3aTnHyb Hndnxkaum Obpa3om, 3TO MOKet BB3BaTbepeBopacnBHe NIN pa3pyuHHe TeneBn30pa, TTO pnpBeDet K NOyueHnIO TpaBMbl.
B cnyuae nCnoNb3OBAHnMoHTaXHOro KPOHHTeHa TeEbn3Opa + MoHTaXHOro aAnTepa
- Npoknue Te npoOda nra Te neBn3opa, noCTaBKn KOONKn n IIObOro dpyroro o6OpydoBaHna. (NpI NOJUyeHn HOpMaun O noKlnuoyenm npoOob DnKkDOrO yctpoNCTBa, 6paTntecb K pykoBOCTBy nolb3OBaTeJIa.)
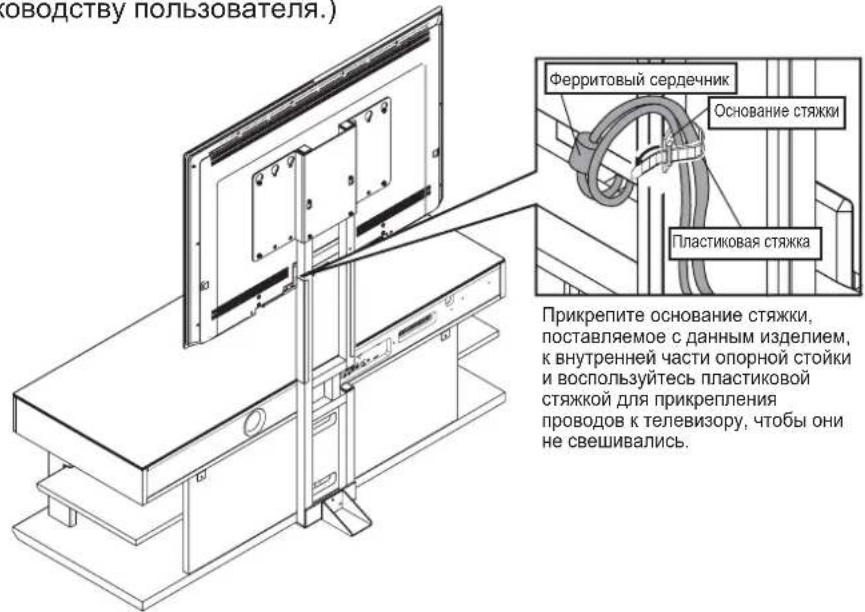

PpKpeHnTe WHP NTaTHNA TAKM O6pa3OM, YTO6bI feppTOBbI cepDeuHK He BbCTyNa1 3a onOpHy cToKy.
B Cnyae yCTaHOBN NODCTABKN BO3Ne CTeHb, OH MOKeT 6bTb NOBpeJH pN nONaAHm MEXdy CTeho H ONOPHO CT0KOH.

CnocobnoioknoeHnTeBn30paN/nn
Dpyrroo6opdyoBaHnMOryOTnHnatc,
NoTOMyO6b3aTeBnHO6pataTeCk pykoBoCTBy
NoB30BaTeBnI DnTneBn30paN KaKdoT OycToPCTBA.
- Nocne toro, kac Bce 6ydt yctahOBHe, ydaHnte BCNOMORAteIbHyOnOpny nPncnoHnTe NOCTABky K CTeHE BA3HaehHom MeCe. Nocne ydaHEnra BCNOMORAteIbHOonOpbl, coXpaHnte ee B HAdexKHom MecTe BMeCTe C TpeM MoTAtKHbIM BNHTaMn BCNOMORAteIbHO onOpbl E (M5 x 12). Kpome toro, dna npedotBpaueHn HeCuaCTHorO cnuay npn nCNoIb30BaHN daHHo nn OndTabKn, o83aTeIbHo npKpytnte K CTHe TPOcbl, noCTabJIaemble C daHHbIM n3deJInem, YTO6bl npedotBpaTntb erO nepeBopauBaHne. (Obpatntecb TaKke K pykoBOdCTBy nonb3OBaTeN dnn NOCTABKn.)
*Bo Bpempa3MeueHnnoCTaBKn BO3ne CTHe, y6eNTecb, 7TO WHypbI NHTAHN nn Ka6enn He 3axKaTbMexdy HMM.
3aKpePnneHne yCTpoNCTBa c ceIbI npdeTbpaueHn ero nepeBopaunBaHn
1.Bocnonb3yntecb nna 3akpenneHnnoCTabnernBmIX TPOCOB OTBpctCNMn Dn HINTOB HA 3aDHeu Cactn MOHTAXHO KPOHHTeHnA TNEBIm3Opa. (MeTO YCTAHOBKN MOKET OTNIuATbCn B 3aBNCUMOCTNOT MOdENI TNeBIm3Ou W/INBcOtIy. UCTaHOBnTE TPOCb, KOtOpbe COOTBETCTByHOT DaHOMy TeneBIm3Opy.)
2.BocnoIb3yIteCb npOaIOUIMMCr OTeJIbHO BNHTAMn
TnHAdEHXORo pNkPENNEHH TPOC0K CTHe NNN
Onope, CnOC6HOyDEKaTaB TeIEBn3Op.
(BbIbePte BnHTb, KOTOble COOTBeTCTByOT TmY CTHebl.)
Bydtbe octopoxbBo Bpemy yctahOBKn daHHoro 8yctpoCTBa BO3ne CteHb, YTObKa6eNn He 6bln 3aKaTbM MEXdy CTehN NIOCTABKNO.

YctaHOBNTe DaHHyIO NOCTaBky B IpOCHOM MeCTe. Kpome TOrO, O63aTeNbHO YCTaHOBNTe ee BO3Ne CTeHbI INpeDnPmITe Mepbl No PpeDToBpaueHIO ee nepeBOPaUBAHNA.Ecnn He PpeDnPnHrMbepno PpeDToBpaueHIO ee nepeBOPaUBAHNA, NOCTaBA MoKeT NepeBepHyTbCry, YTO pNBeDeT K NOLyEHNTO TaBM n/INn NOBpeKdEHNM.

- Before Installing Televisions that can be installedinstalled
- When using only the TV mounting bracket
- TeneBx30pb, KOtOpbE MoTy 6bTy yTaHOBnHeB
- When using the TV mounting bracket + mounting adaptor
- TV attachment bracket for SURROUND SOUND TV Stand YRS-1000 and YRS-2000
- YTS-V1100
- Installation Guide
- Thank you for purchasing this product.
- Cautions for Use Use this product safely and properly.
- About our Symbols
- WARNING
- CAUTION
- Safety Precaution
- During Installation
- Failure to comply may cause fire and/or injury.
- During Use
- Rules to Follow
- Positioning of your TV rack
- Precautions for Use
- Installation Method
- Securing the Unit so it does not Tip Over
- - When using the TV mounting bracket + mounting adaptor
- ■Positioning of the mounting adaptor with the TV mounting bracket
- Mount your TV on the rack.
- Installation of your TV
- #
- Positioning of TV mounting bracket screws to tighten
- Using the Auxiliary Support
- Introduction
- PepdynpexdHnO tHocnteJbHo nCOnb3OBaHn
- IcnoIb3yIte daHnoe 3dJIeNe 6e30aNacbIM nHaIeJaxaUM o6pa3oM.
- 0603haueHn
- PepdyppeckdeHne
- Ppeoocrepekenne
- Mepb6e3oNaChOCTn
- BoBpeMa yctaHOBKn
- Heco6IIOJeHne MoXeT npNBecTN K noxapy n/nn TpaBme.
- BoBpeMa nCNoJIb3OBAHnA
- HecobJeHne MoKet npBecTN K Poxapu n/nJn TpaBme.
- PpaBnla, KOTOpbIe cIeMyET co6IIOdaTb
- Pa3meHHe nOcTaBKn InI TeJIeBn3opa
- Mepbl ppeoctopoxhoCTN BO Bpemnncno3OBaHn
- Cnooc yctaHOBKn
- B cnyuae nCIOJIb3OBAHnra ToJIbKO MOHTaXHOro KPOHHTeHa TeJIeBN3opa
- B cnyuae nCnoIb3OBAHnra ToIbKO MOHTaXHOro KPOHHTeHa TeJIeBu3opa
- 3aKpePnHne yctpoNCTBa c ceIbI npdeTbpaueHn ero nepeBopaunBaHn
- B cnyuae nCnoNb3OBAHnMoHTaXHOro KPOHHTeHa TeEbn3Opa + MoHTaXHOro aDAnTepa
- Pa3MeHHe MOHTaXHO r aanTepa C nOMOu BO MHTaXHO r KPOHtEHa TeNeBn3opa
- B cnyuae nCnoIb3OBAHnMoHTaXHOro KPOHHTeHa TeHeBn3Opa + MoHTaXHOro aDAnTepa
- CMOHTpyTe TeIeBn3Op Ha IOnCTaBKe.
- PacnoJIOKeHHe BnHTOB MOHTaXHO KPOHHTeHaTeNEBn3Opa DnI INx 3aTAAKKN
- B cnyuae nCnoNb3OBAHnMoHTaXHOro KPOHHTeHa TeEbn3Opa + MoHTaXHOro aAnTepa
- 3aKpePnneHne yCTpoNCTBa c ceIbI npdeTbpaueHn ero nepeBopaunBaHn
Brand : YAMAHA
Model : YTSV1100
Category : Audio System