Metropolitan - Stroller Giordani - Free user manual and instructions
Find the device manual for free Metropolitan Giordani in PDF.
User questions about Metropolitan Giordani
0 question about this device. Answer the ones you know or ask your own.
Ask a new question about this device
Download the instructions for your Stroller in PDF format for free! Find your manual Metropolitan - Giordani and take your electronic device back in hand. On this page are published all the documents necessary for the use of your device. Metropolitan by Giordani.
USER MANUAL Metropolitan Giordani
Manufactured by: FUJIAN O'SK BABY AND CHILDREN PRODUCTS CORP.,LTD Xingtai Industrial zone, Changtai County, Zhangzhou city, Fujian Province, China
Distributed by: HDG S.p.A. Via delle Primule, 5 – 20815 Cogliate (MB) Italy
I In conformità con: EN 1888: 2012 · EN 1466:2014 · ECE R 44/04
UK Approved to: EN 1888: 2012 - EN 1466:2014 - ECE R 44/04
E En conformidad con: EN 1888: 2012 - EN 1466:2014 - ECE R 44/04
P Em conformidade com: EN 1888: 2012 - EN 1466:2014 - ECE R 44/04
GRΣύμφωνα με: EN 1888: 2012 - EN 1466:2014 - ECE R 44/04
RU В соответствии с: EN 1888: 2012 - EN 1466:2014 - ECE R 44/04
NL In overeenstemming met: EN 1888: 2012 - EN 1466:2014 - ECE R 44/04
F Conformément à : EN 1888: 2012 - EN 1466:2014 - ECE R 44/04
SA EN 1888: 2012 - EN 1466:2014 - ECE R 44/04 : مطابق للمواصفة القياسية الأوروبية
Giordani
metropolitan
Istruzioni per l'uso Owner's manual Instrucciones Manual de utilização Обัญёс хрήσεως Инструкция по использованию Gebruiksaanwijzing Guide d'utilisation تعليمات الاستعمال
natural_image
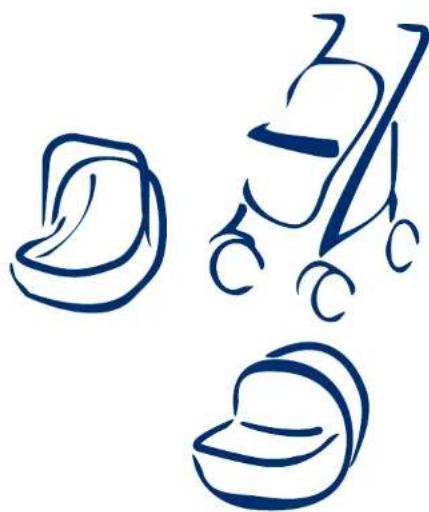
Three blue line drawings of a baby stroller, a hat, and a cup (no text or symbols)1
IMPORTANTE:
LEGGERE ATTENTAMENTE QUESTO
LIBRETTO DI ISTRUZIONI
PER NON COMPROMETTERE LA SICUREZZA
DEL VOSTRO BAMBINO.
CONSERVARLO PER INFORMAZIONI FUTURE.
UK
IMPORTANT:
PLEASE READ THESE INSTRUCTIONS
CAREFULLY TO ENSURE THE
SAFETY OF YOUR CHILD.
PLEASE KEEP FOR FUTURE REFERENCE.
E
IMPORTANTE:
LEER DETENIDAMENTE ESTE MANUAL
DE INSTRUCCIONES PARA GARANTIZAR
text_image
A B C D E F G H I L M N O P Q RCOMPONENTI
A Handle reversible adjustor B Front bandrail
C Adjustable footrest button
D Front wheel quick-release button
E Front wheel locating lever
F Front wheel
G Basket
H Hood
1 Adjustable handle button
L Seat height adjuster
M Front handrail button
N Seat reversible adjustor
o Footrest leg
P Folding hook
Q Rear wheel
R Rear wheel quick-release button
E COMPONENTES
A Rear wheels x2
B Front wheel x2
C Front handrail x1
D Stroller frame x1
E Seat unit x1
F Changing table bag
E CONTENIDO
natural_image
Mechanical device with blue and gray components, no visible text or symbols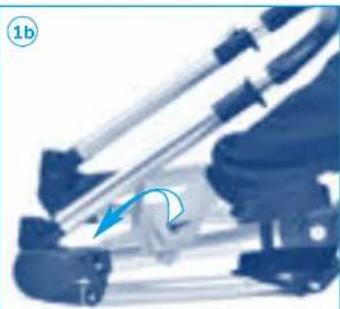
natural_image
Mechanical assembly with rotating component and blue arrow indicating motion (no visible text or symbols)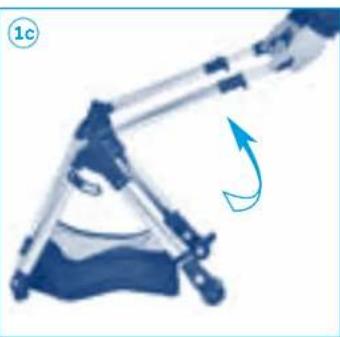
natural_image
Illustration of a tripod-mounted telescope with an arrow indicating rotational motion (no text or symbols)
natural_image
Illustration of a laboratory filtration setup with a conical apparatus and test tube (no text or symbols)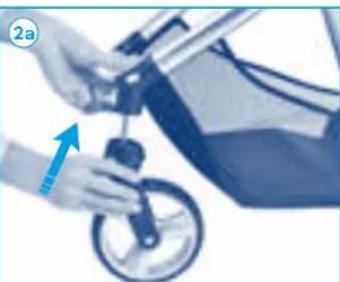
natural_image
Close-up of hands adjusting a bicycle wheel with a blue arrow indicating motion (no text or symbols)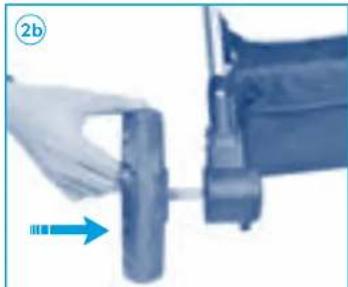
natural_image
Close-up of a hand holding a mechanical component with a blue arrow indicating direction (no text or symbols visible)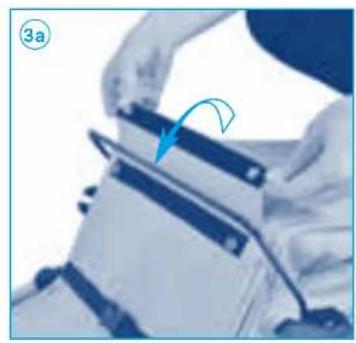
natural_image
Close-up of a person in protective gear holding a device, with a blue arrow indicating rotation (no text or symbols visible)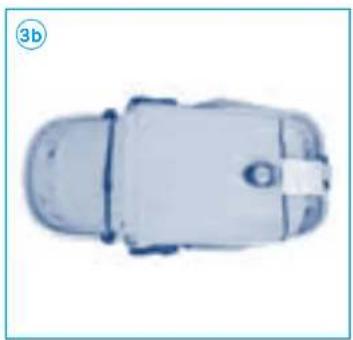
natural_image
Top-down view of a car with visible side brackets and roof (no text or symbols)
natural_image
Close-up of a hand adjusting a mechanical component with a blue arrow pointing to it (no visible text or symbols)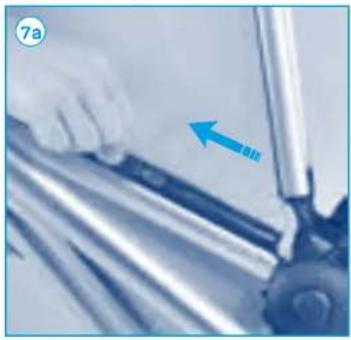
natural_image
Close-up of a hand pressing down on a metal mechanical component with a blue arrow indicating direction (no text or symbols visible)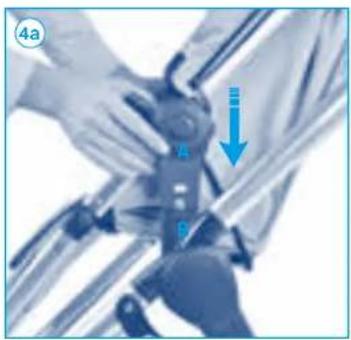
natural_image
Close-up of hands assembling a mechanical component with a blue arrow indicating a downward motion (no text or symbols visible)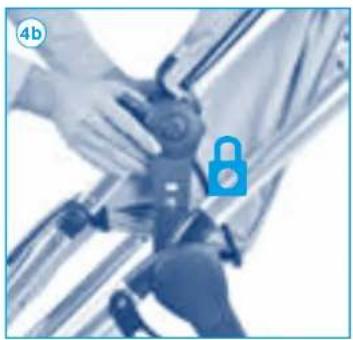
natural_image
Close-up of hands holding a mechanical device with a blue lock icon (no text or symbols visible)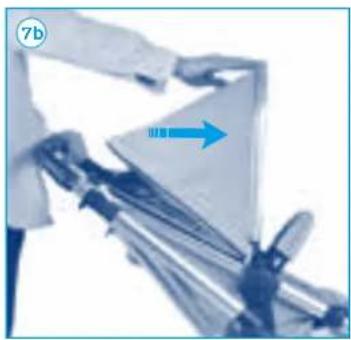
natural_image
Close-up of a mechanical device with a blue arrow indicating direction (no visible text or symbols)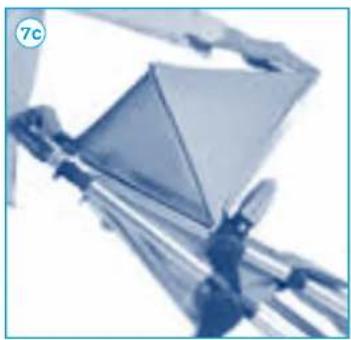
natural_image
Close-up of a mechanical component with triangular blades and metal arms (no visible text or symbols)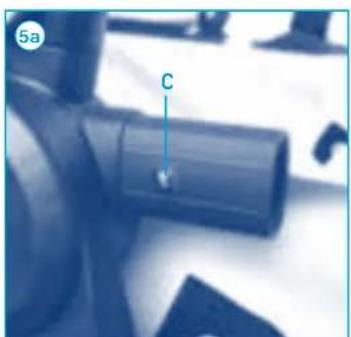
text_image
5a C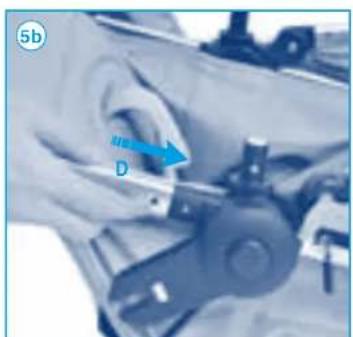
natural_image
Close-up of a hand using a tool to adjust or install a mechanical component, with no visible text or symbols.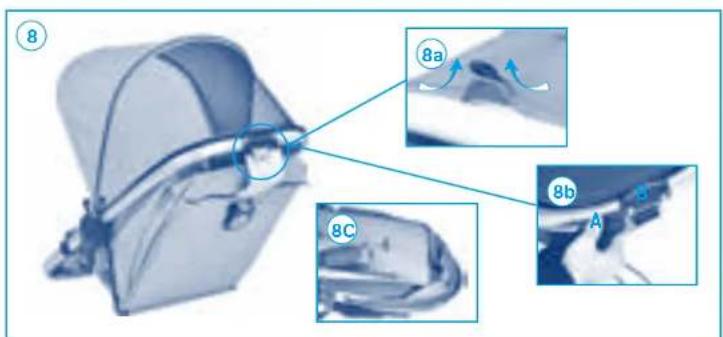
text_image
8 8a 8b 8C A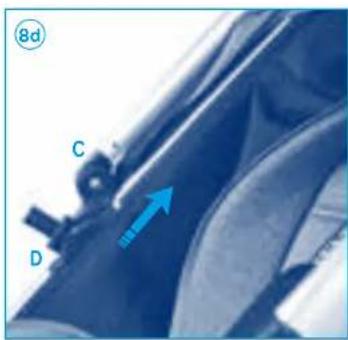
text_image
8d C D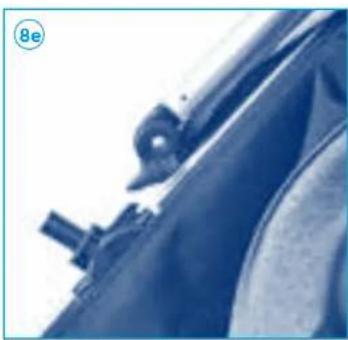
natural_image
Close-up of a mechanical component with a bracket and mounting bracket (no visible text or symbols)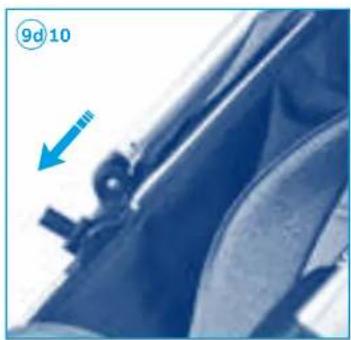
natural_image
Close-up of a mechanical component with a blue arrow pointing to a detail (no visible text or symbols)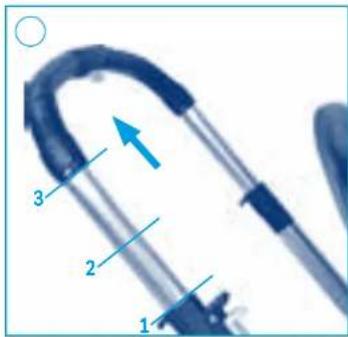
text_image
1 2 3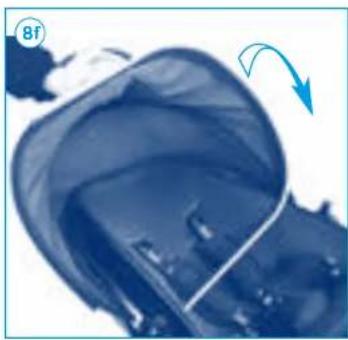
natural_image
Close-up of a blue, translucent container with internal structure and a curved arrow indicating rotation (no text or symbols)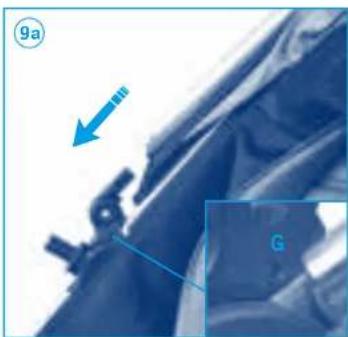
natural_image
Close-up of a mechanical component with blue arrows and labeled section G, no readable text or symbols present.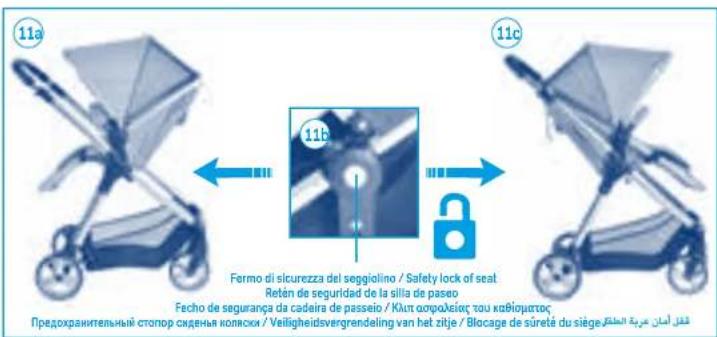
text_image
11a 11b Fermo di sicurezza del seggiolino / Safety lock of seat Retén de seguridad de la silla de paseo Fecha de segurança da cadeira de passeio / Klatt αφαλείας του καθίοματος Предохранительный стопор сиденья колвски / Veiligheidsvergrendeling van het zitje / Blocage de sûretà du siège 11c القَلْ أَمْنَ عَرَّهُ الْعَلَّقَ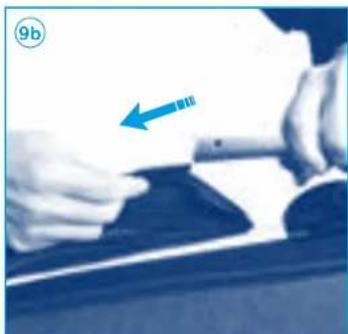
natural_image
Close-up of hands holding a small object, possibly a tool or device, with a blue arrow pointing to it (no visible text or symbols)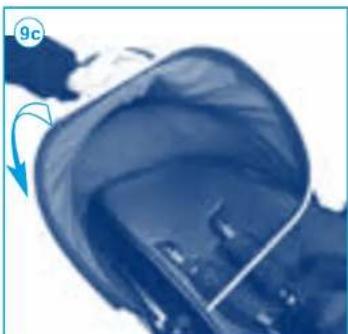
natural_image
Close-up of a blue, curved mechanical component with a blue arrow indicating rotation (no visible text or symbols)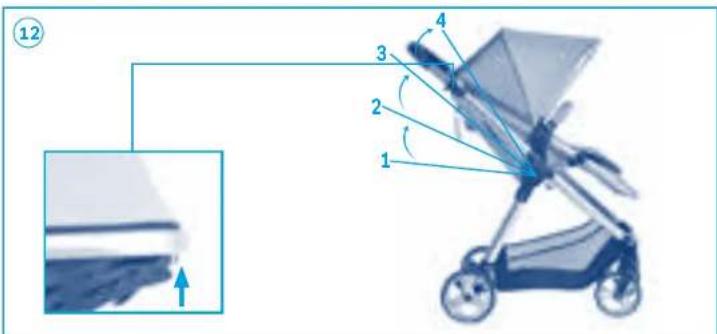
text_image
Diagram of a baby stroller with numbered parts and an inset showing a folded fabric or insulation material.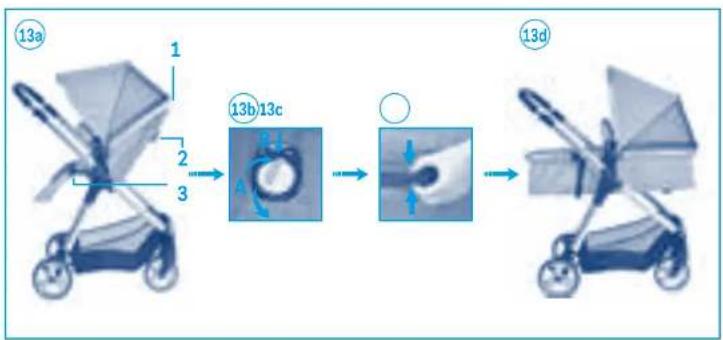
flowchart
graph LR
    A["13a"] --> B["13b/13c"]
    B --> C["13d"]
    style A fill:#f9f,stroke:#333
    style B fill:#ccf,stroke:#333
    style C fill:#cfc,stroke:#333
natural_image
Close-up of a mechanical component with a gasket and handle, no visible text or symbols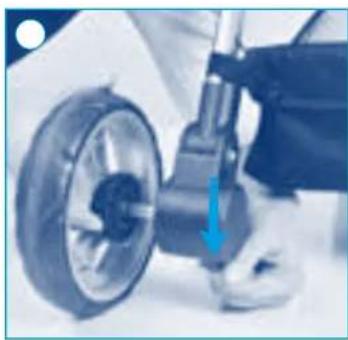
natural_image
Close-up of a person using a bicycle tire to lift a wheel, with a blue arrow indicating the wheel's direction (no text or symbols visible)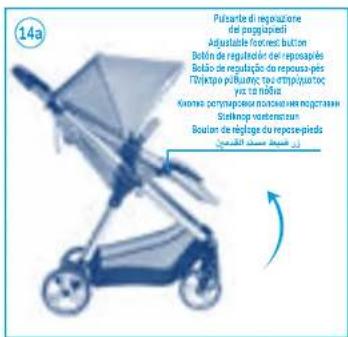
natural_image
Close-up of a hand adjusting a mechanical component with a blue arrow pointing to the component (no visible text or symbols)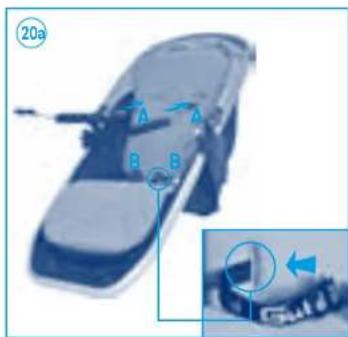
text_image
20a A B A B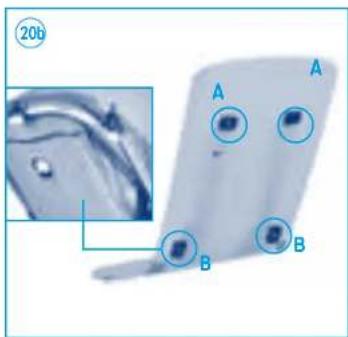
natural_image
Medical imaging of a device with labeled points A and B, showing internal structures and a magnified inset (no text or symbols beyond labels)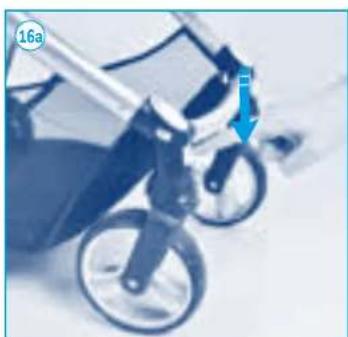
natural_image
Close-up of a stroller with wheels and a blue arrow indicating direction (no text or symbols)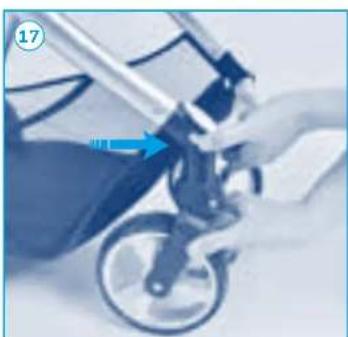
natural_image
Close-up of a hand adjusting a bicycle wheel, with a blue arrow pointing to the wheel (no visible text or symbols)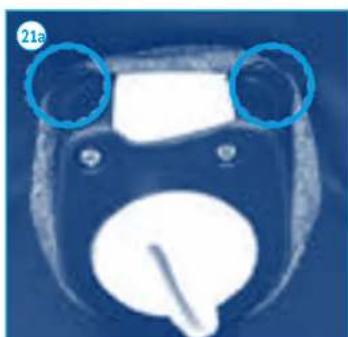
natural_image
Close-up of a black bear face with white spots and blue circles highlighting regions (no text or symbols)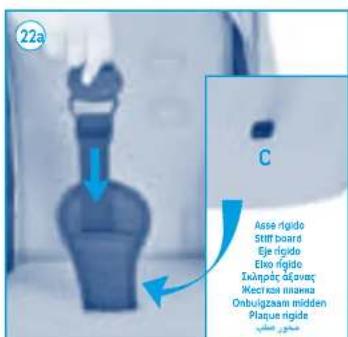
text_image
22a C Assè rigido Stiff board Eje rigido Elvo rigido Σκληράς αξανες Жесткая πισικα Onbulgzaam midden Plaque rigide مُعَرْبِ عَلَيْ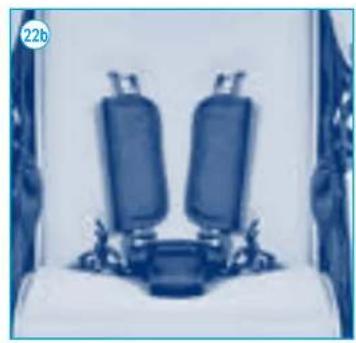
natural_image
Interior view of a vehicle seat with two cylindrical equipment blocks (no visible text or symbols)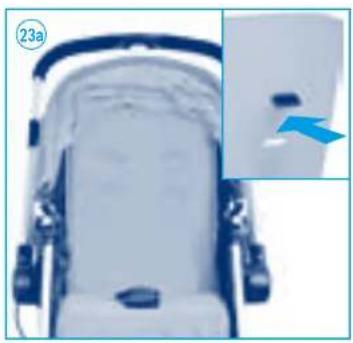
natural_image
Close-up of a white ergonomic chair with a blue arrow pointing to a small white object on the side (no text or symbols visible)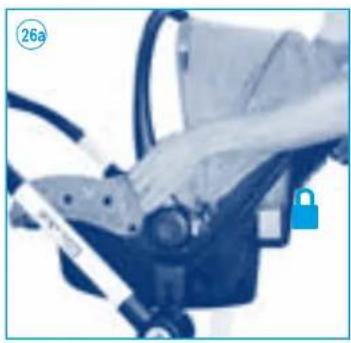
natural_image
Close-up of a hand operating a blue bicycle seatbelt with a lock icon (no text or symbols visible)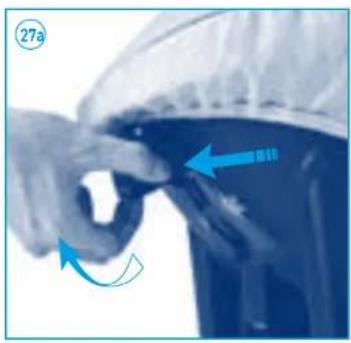
natural_image
Close-up of a person adjusting a blue garment with directional arrows indicating movement (no text or symbols)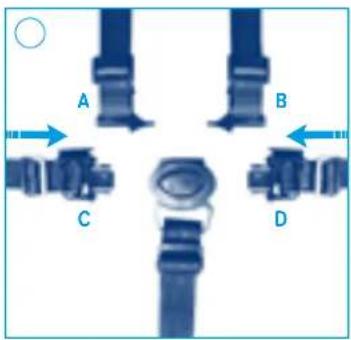
text_image
A B C D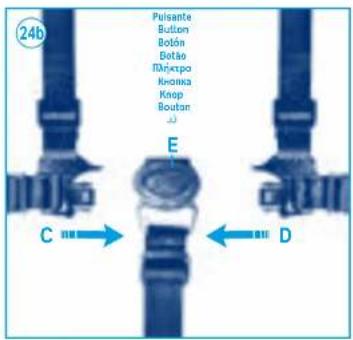
text_image
24b Pulsante Budlon Botón Botão Плактора Кнова Knop Boutan E C D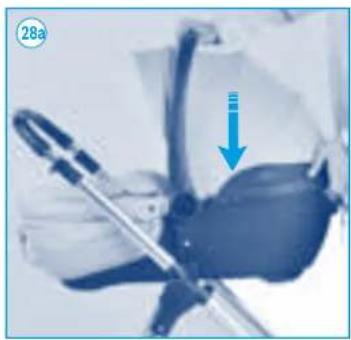
natural_image
Close-up of a medical or laboratory procedure with a blue arrow pointing to a component (no visible text or symbols)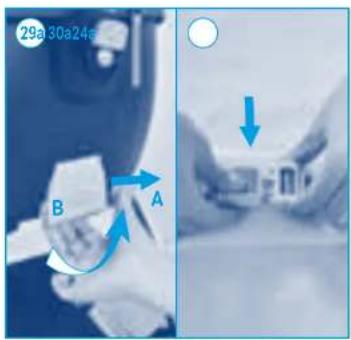
text_image
29a 30a24a B A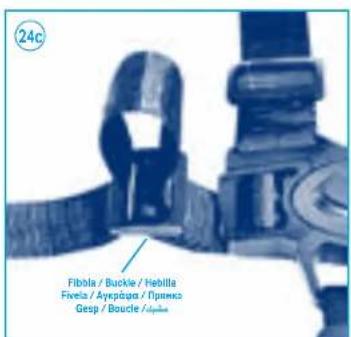
text_image
24c Fibola / Buckle / Hebilla Fivela / Aykpapa / Prenko Gesp / Boucle / Apelia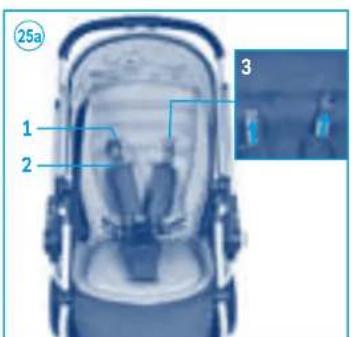
text_image
25a 1 2 3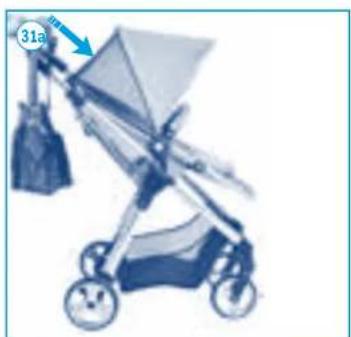
natural_image
Illustration of a baby stroller with a 31a label and arrow pointing to the handle (no text or symbols on the device itself)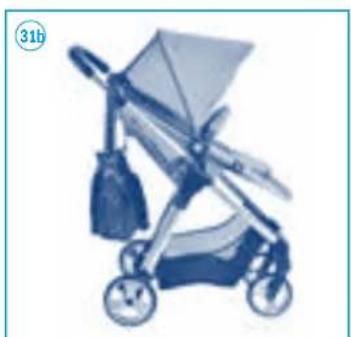
natural_image
Illustration of a baby stroller with wheels and a tray, no text or symbols visible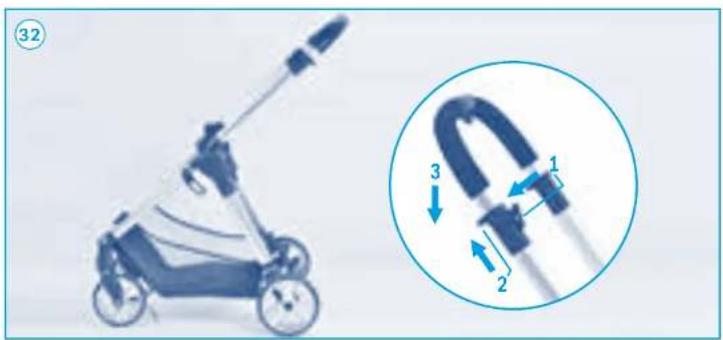
natural_image
Illustration of a scooter with a magnified inset showing internal components (no text or symbols)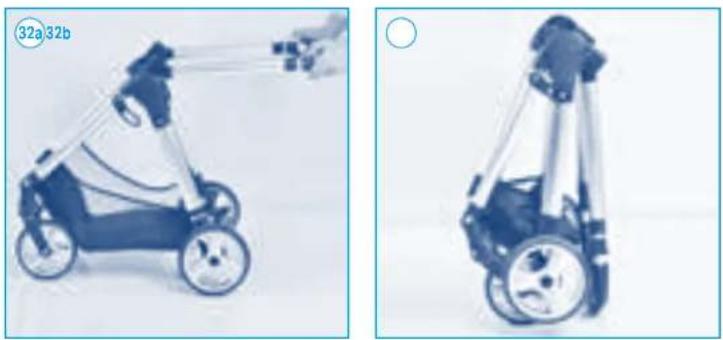
natural_image
Two views of a small wheeled toy with wheels, shown from front and side angles (no text or symbols visible)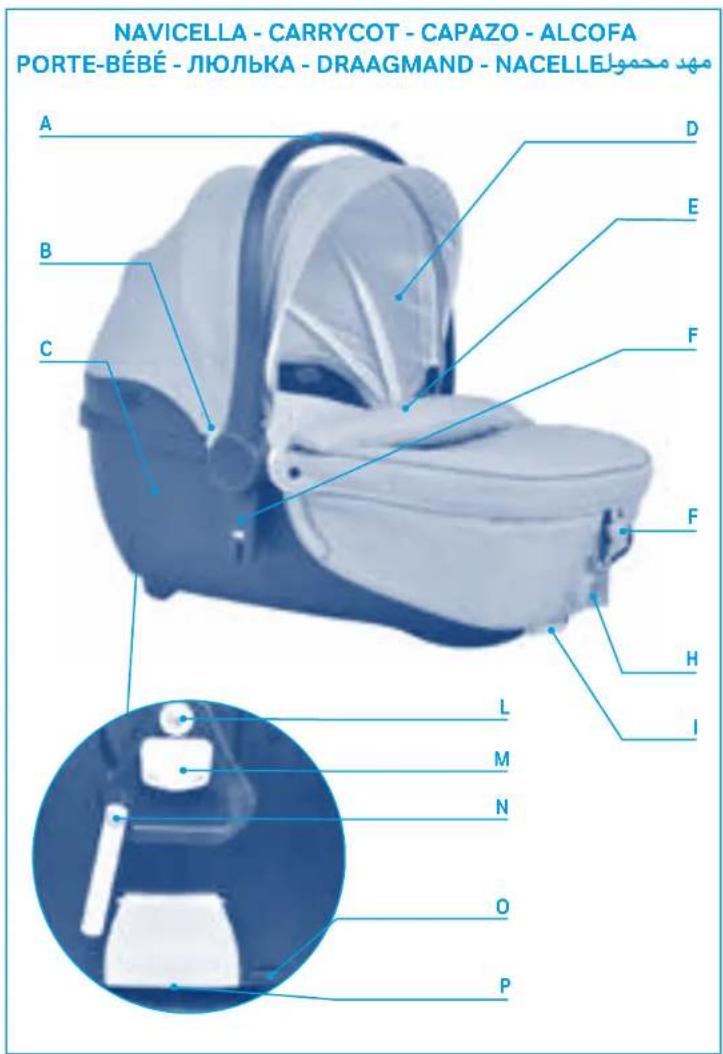
text_image
NAVICELLA - CARRYCOT - CAPAZO - ALCOFA PORTE-BÉBÉ - ЛЮЛЬКА - DRAAGMAND - NACELLE مهد محويل A B C D E F F H I L M N O PCOMPONENTI
B Button for adjusting carrying handle
C Kit
D Hood
E Foot cover
F Adapter
G Metal car connector
H Backrest adjustor
1 Breath hole adjustor
L Fixed plastic
M Positioning plastic
N Lever
0 Second lock
P Button for releasing carry cot
E COMPONENTES
A Manillar de transporte
L Vast plastic element
text_image
UK CONTENTS A Foot cover x1 B Soft cushion x1 C Big buckle x2 D Kit x1 E Hood x1
text_image
E CONTENIDO A Cubrepiernas x 1 B Suave almohada x 1 C Hebilla grande x 2 D Kit x 1 E Capota x 1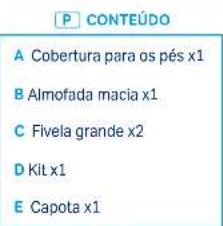
text_image
P CONTEÚDO A Cobertura para os pés x1 B Almofada macia x1 C Fivela grande x2 D Kit x1 E Capota x1
natural_image
Close-up of a hand holding a camera lens with a blue arrow indicating rotation (no text or symbols visible)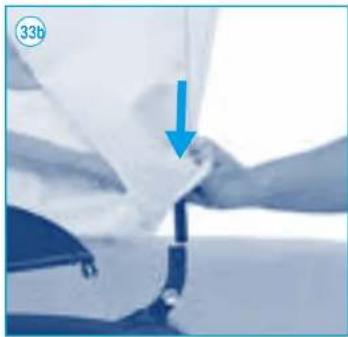
natural_image
Close-up of hands holding a white object with a blue arrow pointing downward (no text or symbols visible)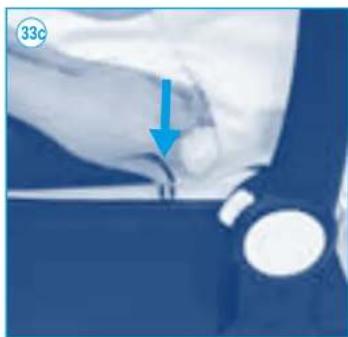
natural_image
Close-up of a hand holding a small object with a blue arrow pointing downward (no visible text or symbols)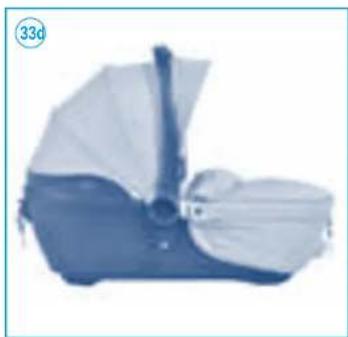
natural_image
Blue and white baby seat with a strap, no visible text or symbols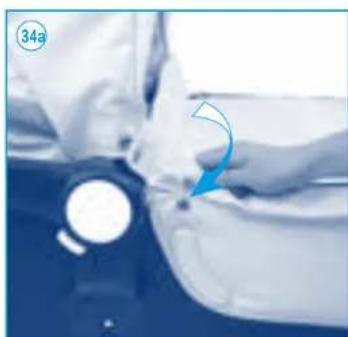
natural_image
Close-up of a hand holding a small object with a blue arrow indicating rotation (no visible text or symbols)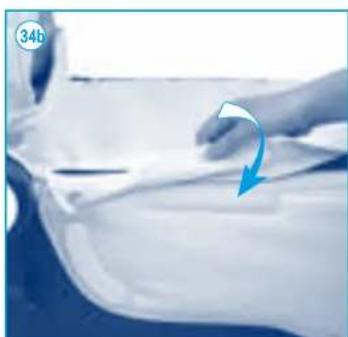
natural_image
Close-up of a hand pressing down on a curved surface with a blue arrow indicating motion (no text or symbols)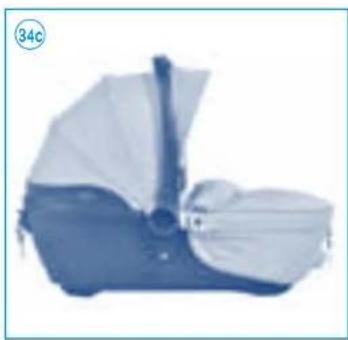
natural_image
Blue and white baby seat with a strap, no visible text or symbols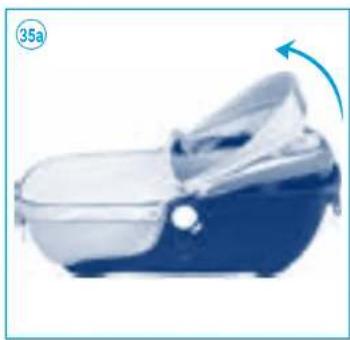
natural_image
Close-up of a blue and white plastic device with a blue arrow indicating rotation (no text or symbols)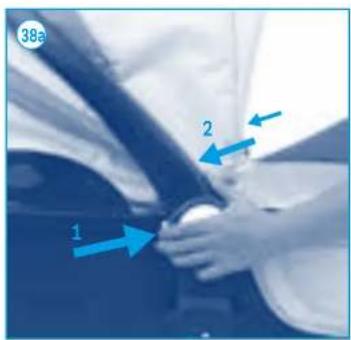
text_image
38a 1 2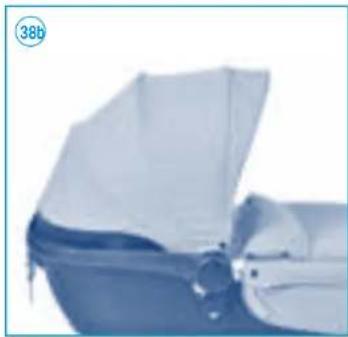
natural_image
Close-up of a blue and white object with a circular label '38b' in the top-left corner (no other text or symbols visible)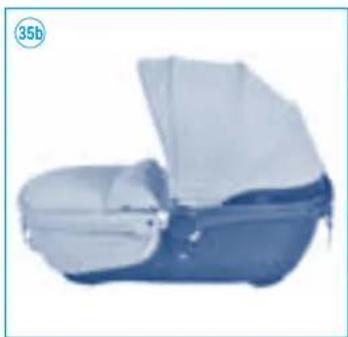
natural_image
Blue and white plastic bag with open lid, no visible text or symbols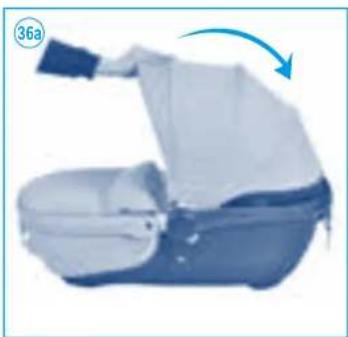
natural_image
Illustration of a blue and white object with a blue arrow indicating rotation (no text or symbols)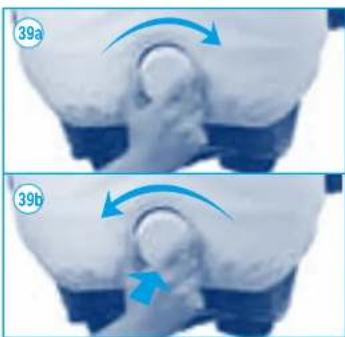
natural_image
Two-step medical procedure images showing a circular object being adjusted, labeled 39a and 39b with blue arrows indicating motion (no text or symbols beyond labels)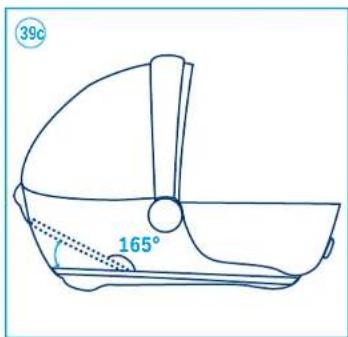
text_image
39c 165°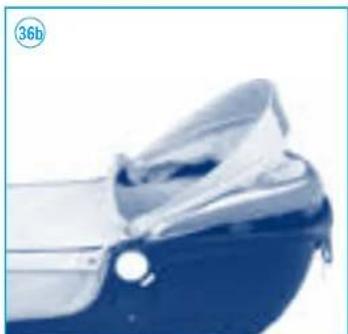
natural_image
Close-up of a transparent plastic object with a dark blue base and a white circular mark labeled '36b' in the corner (no other text or symbols visible)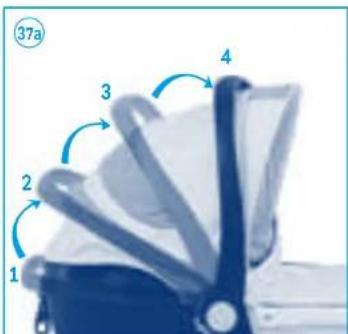
text_image
37a 1 2 3 4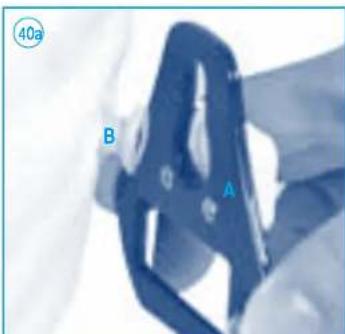
text_image
40a B A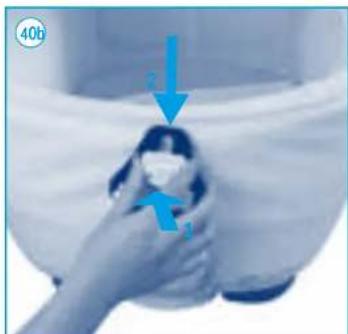
natural_image
Close-up of a hand holding a small object with blue arrows indicating motion or force (no text or symbols visible)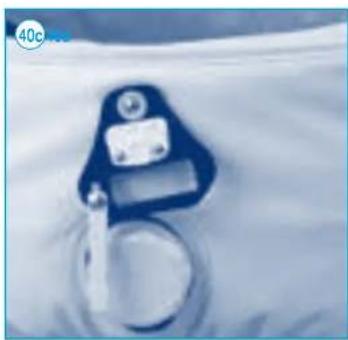
natural_image
Close-up of a mechanical clamp or bracket with a circular base and a white rod inserted (no visible text or symbols)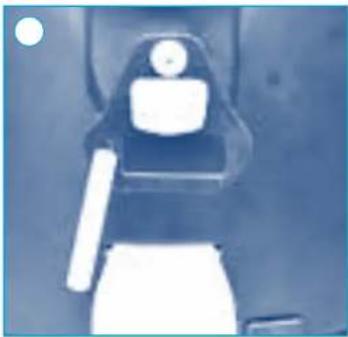
natural_image
Close-up of a mechanical device with a white handle and black frame (no visible text or symbols)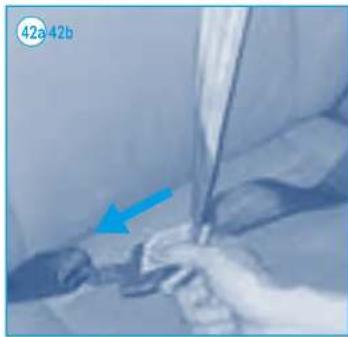
natural_image
Close-up of a person's hands operating a medical or surgical tool, with a blue arrow pointing to the tool (no visible text or symbols)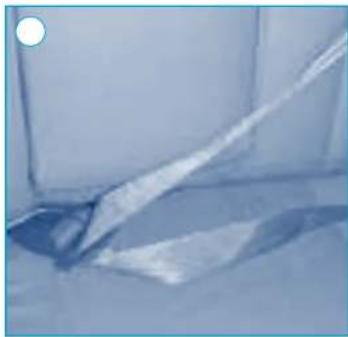
natural_image
Close-up of a metallic tool interacting with a surface, no visible text or symbols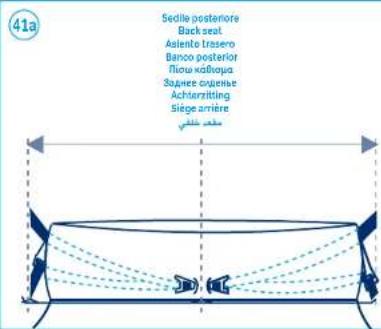
text_image
41a Sedile posteriore Back seat Aslenito Brasero Banco posterior Riou kallouja Sazane coumene Acherritzling Siège arrièreSe la navicella è montata in un'auto con sedile posteriore a due posti, colocaria tra i due sedil del veicolo. The carry cat must be placed between the seats of the vehicle when installed in the two-backsar car. Si se monta il capazo en un coche con el asiento trasero dividioe en dos plazas, detse ser colocado entre los dos asientos del vehicula. Se a alcofa for instalada um automévil equipado com un banco posterioro do diols lugares, colloque-a entre os dols bancos do vehicula. Av to porte-biné eleti anterapivante ante autocyktroto art. pica kábitus bóu biotius, tomopistrette to análisisa ota bóu kábitusata. Pri установe a zatoionobe e di muestimi sturiy cundemi sienkemi valniya podrimit paizacennione nemu dyu uvedeniho transportirolo sredetta. Vienne de draagmand op een achterzitting met twee zitplaatsen in de auto is gemontoed ze n hem tussen de twee autoritzlingen. Si on monte la nacelle dans une voiture avec un siège arrière à deux places, la placer entre les deux sièges du vehicula.
natural_image
Close-up of a robotic arm holding a smartphone with a blue arrow pointing to it (no visible text or symbols)
natural_image
Close-up of a white propeller blade with a blue arrow pointing to it, against a dark blue background (no text or symbols visible)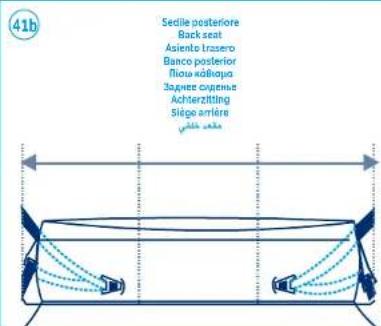
text_image
41h Sedile posteriorore Back seat Asiento Irasero Banco posterior Fisca kallouya Sagnes cypninae Achterzitting Sitga arriere Jella sadaSe la navicella è montata in un'auto con sedile posteriore a tre posti, colocaria sul sedile centrale del veiculo. The carry cat must be placed on the central back seat of the vehicle when installed in the three-backseat car. Sie non monta la casapo en un cache con el asiento trasero dividido in tres plazas, debe ser colocado sobre al asiento central del vehículo. Se a scalofa for installata num automévil equipado com un banco posterior de tres lugares, colloque-a no banco central del vehículo. Av to porte-bèbè sèc utreprelèvo auto autokluyto ce più kéviùva trèsè bēwēs, tonelētīrte to ovidùce oato kautriò kéviùva. Pri установe a automobile che treaministhe zahrim ciadinyi lomina podlesnit paizacenniu na centraulioni ciadinye transconstróne средства. Vianner de dragmand op sen achterzitting met drie zpitplaats in de auto is gemonfeerd ze i hem od de middeiste autozitting. Si on monte la nacelle dans une voiture avec un siège antirè a trois places, la placer sur la siège central du véhicule.
natural_image
Close-up of a robotic arm handling a white sheet with a blue downward arrow (no text or symbols visible)
natural_image
Close-up of a small white object with circular features inside a dark blue container, held by gloved hands (no visible text or symbols)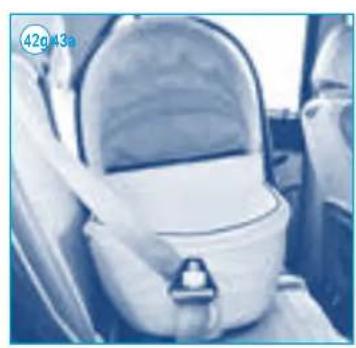
natural_image
Interior view of a car seatbelt device with visible seats and seatbelt (no text or symbols)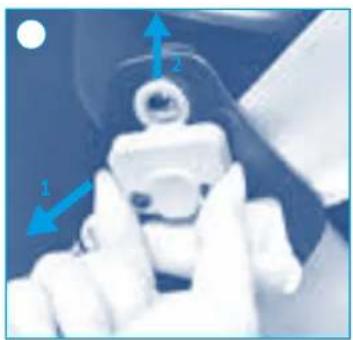
natural_image
Close-up of a robotic arm with blue directional arrows indicating movement or force (no text or symbols)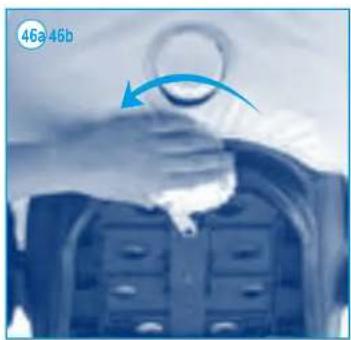
natural_image
Close-up of a mechanical component with a blue curved arrow indicating rotation or force (no text or symbols visible)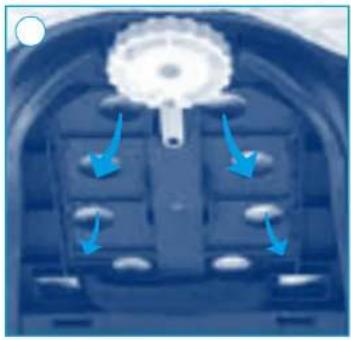
natural_image
Close-up of a mechanical component with blue arrows pointing to internal features (no text or symbols visible)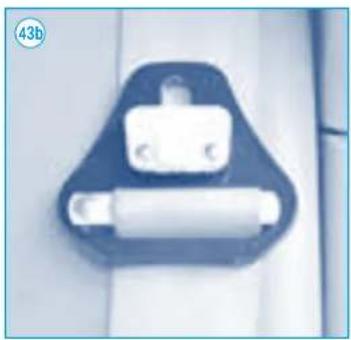
natural_image
Close-up of a mechanical component with a cylindrical roller and rectangular housing (no visible text or symbols)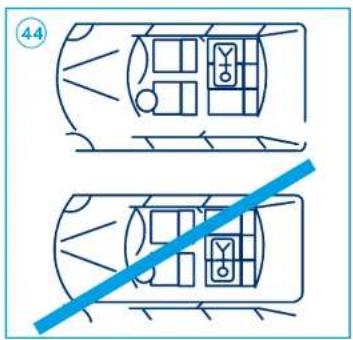
natural_image
Two identical line drawings of a vehicle with internal compartments and a diagonal blue line crossing through them (no text or symbols)
natural_image
Close-up of a mechanical component with a blue arrow indicating rotation (no visible text or symbols)
natural_image
Close-up of a mechanical component with internal compartments and mounting holes (no visible text or symbols)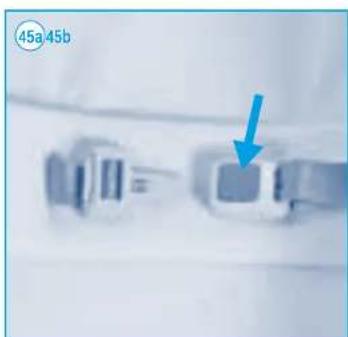
natural_image
Close-up of a mechanical component with a blue arrow pointing to a small component (no visible text or symbols)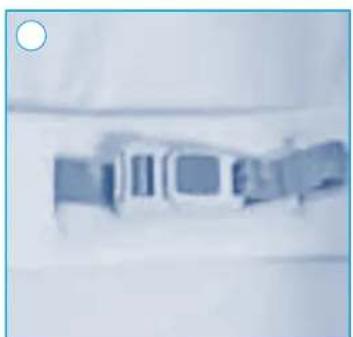
natural_image
Blurred image of a mechanical device with no visible text or symbols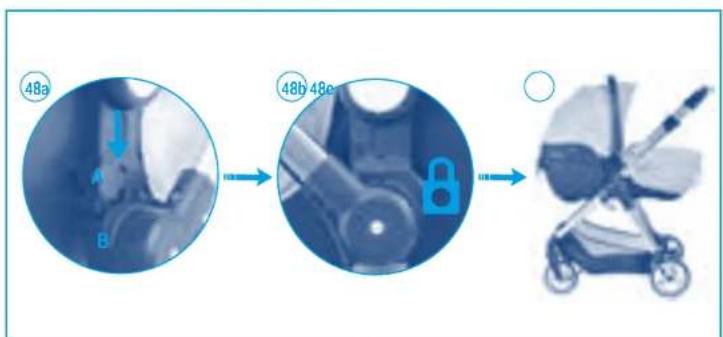
text_image
48a B 48b 48c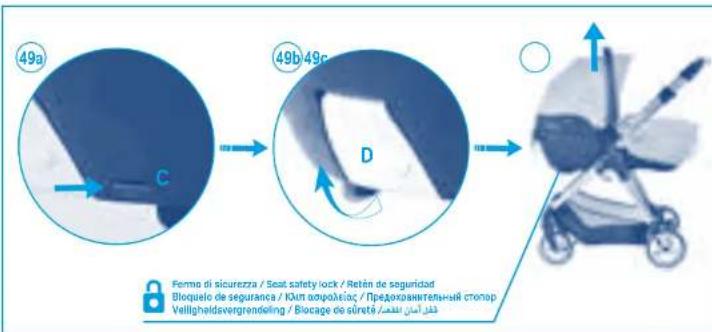
text_image
49a C 49b 49c D Forme di sicurezza / Seat safety lock / Retén de seguridad Bloquelo de segurança / Kaïnt aotpáliaç / Predохранительный стопор Veiligheidavergrendeling / Blocage de sûrets / قَلْرَّانِبِنْتُمْSEGGIOLINO PER AUTO GR 0+ - CAR SEAT GR 0+
SILLA DE AUTO GR 0+ - CADEIRA DE SEGURANÇA GR 0+
KAΘΙΣΜΑ AYTOKINHTOY GR 0+ - AUTOSTOELTJE GR 0+
SIÈGE AUTO GR 0+ - GR 0+{-}مqed طفل للسیارة
text_image
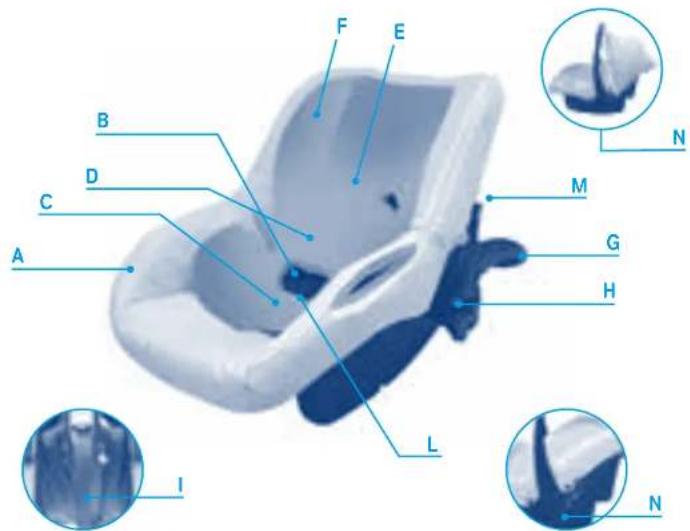
F E B D C A M G H L I NCOMPONENTI
A Scocca
B Belt buckle
C Crotch strap with belt pad
D Shoulder belt with belt pad
E Lots to adjust shoulder belt
F Support pillow
G Carrying handle
H Push button for adjusting carrying handle
1 3-point belts adjustment strap
L Control button of quick adjuster
M Instruction and airbag warning sticker
N Sun canopy (builtin)
GR ΣΤΟΙΧΕΙΑ
Α Σκελετός
natural_image
Close-up of a car seatbelt with blue filter bands (no visible text or symbols)
natural_image
Close-up of a baby seatbelt with a curved seatbelt (no text or symbols visible)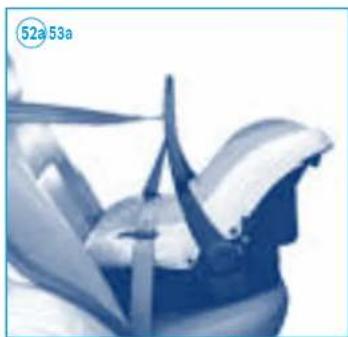
natural_image
Close-up of a mechanical component with blue and white surfaces, no visible text or symbols
natural_image
Close-up of a car interior with seats and steering wheel (no visible text or symbols)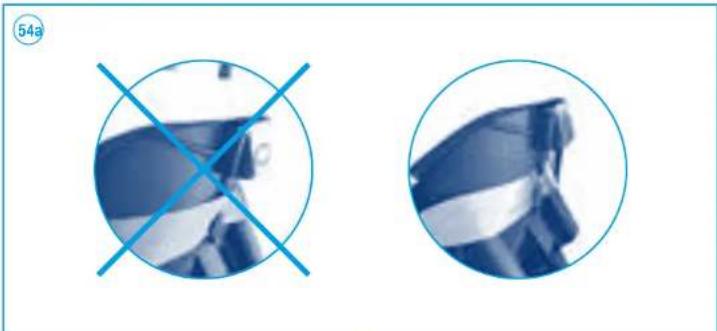
natural_image
Two circular images showing a person's face with a blue X mark, one in a circle and the other in a circle (no text or symbols)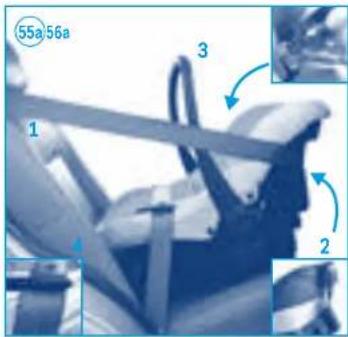
text_image
55a 56a 1 3 2
natural_image
Close-up of a hand holding a small electronic device with labeled parts (no readable text or symbols)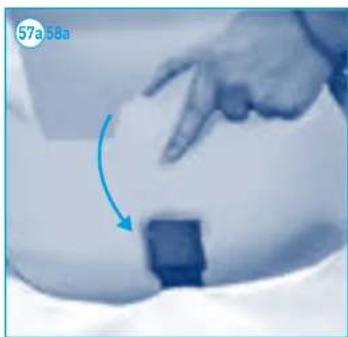
natural_image
Hand interacting with a small electronic device (no visible text or symbols)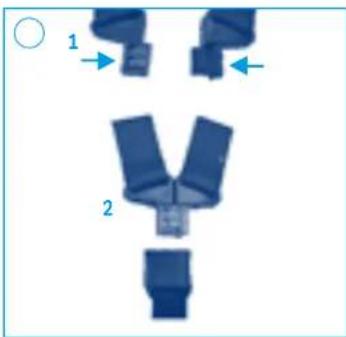
natural_image
Diagram of a mechanical component with two labeled parts (1 and 2), showing internal structure without any text or symbols.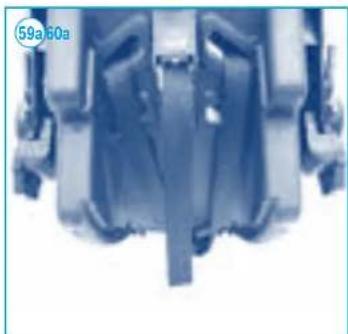
natural_image
Close-up of a mechanical component with no visible text or symbols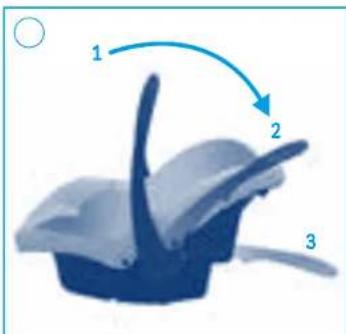
text_image
1 2 31 GIORDANI METROPOLITAN SISTEMA MODULARE (DA 0 A 36 MESI CIRCA)
PASSEGGINO
APERTURA DEL PASSEGGINO
Note: For security reasons, it is necessary to check again the pull clasp after fix the car seat onto the stroller frame, if the pull clasp doesn't return completely, please push the plastic part to the end.
USO DELLA NAVICELLA
- According to Fig. 1a/1b/1c/1d, release the folding hook, which keeps the stroller closed. And then lift up the handle as the arrow shown, the stroller will be opened fully when you hear a CLICK.
ASSEMBLE THE WHEELS
- Assemble front wheel: as the show on Fig. 2a Fix the front wheel axles into front legs houses it is fixed when you hear a CLICK. Assemble rear wheel: as the show on Fig. 2b fix the real wheel axles into the rear wheel houses, it is fixed when you hear a CLICK. ATTENTION: Please try to move and rotate all the wheels by your hand to make sure all the wheels are firmly fixed on wheel houses before use.
SEAT UNIT ASSEMBLY
- Fasten the Velcro in the direction of arrow as shown on Fig. 3a, and then attach the button to the bottom of the seat pad. The seat unit is now completely assembled, as shown on Fig. 3b.
- Seat unit assembly: As shown on Fig. 4a, fix both adaptors A of the seat unit onto the seat supporting base B simultaneously; they are fixed together firmly when you hear a "CLICK".
- How to fix the leg of footrest: According to Fig. 5a, press both sides of clips C with your finger, then push the leg D into the plastic connecting parts, it is fixed when you hear a "CLICK" (see Fig. 5b).
- How to fix the font handrail: As shown on Fig. 6a, grip the handrail and press down the white buttons on both sides simultaneously, and then fix the handrail onto both sides of stroller, it is fixed when you hear a "CLICK".
- As shown on Fig. 7a/7b/7c, unzip the canopy in the direction of arrow, then push the canopy forward, the stroller is firmly opened.
HOW TO ASSEMBLE AND DISASSEMBLE THE CANOPY
- Canopy detachment: Hold the plastic C and push it out from the plastic holder slot D as the arrow shown, see Fig. 8d/8e; See Fig. 8a, pull
out the canopy fabric as the arrow shown, see Fig. 8f, pull out the iron bar E from the plastic holder slot as the arrow shown, the canopy can be detached completely.
- Canopy assembly: See Fig. 8a/8b Insert the rear-end A of canopy fabric into the seat slot B, one hand press and push the fabric into the slot and another hand pulling the front of fabric at the same time as the arrow shown, the canopy can be assembled. See Fig. 9a, insert the canopy post into the canopy base as the arrow shown, make sure the dot G of base fixed in the hole of post. See Fig. 9b/9c/9d, Insert the front-end B of canopy fabric into the front of canopy tube, then fix the tube to the slot of canopy post as the arrow shown, canopy be assembled completely, see Fig. 8.
HANDLE FUNCTION
- Handle height adjustment: see Fig. 10, press down the one-hand-button, pull up or down the handle. It is convenient to adjust the handle height.
REVERSIBLE SEAT
- Quickly release seat unit: see Fig. 11a/11b/11c, press down the safety lock on both side of seat at the same time and lift it up. The seat can take down quickly or put the seat unit on the contrary direction.
ATTENTION: Keep your child away from stroller when you want to release the seat unit.
ADJUSTABLE SEAT
- Press down the adjustor on backrest or rotate the knob, the angle of the backrest is adjustable. The seat can be adjustable in 4 positions.
THE CONVERSION OF SEAT UNIT TO SLEEPING COT
- Firstly, reverse the seat unit as shown on pic 13a, and press button 1 to adjust the seat unit to horizontal position, then press button 2 in B way as shown on pic 13b, and finally release the buckle 3 as shown on pic 13c to change the seat unit into the sleeping cot as shown on pic 13d; on the contrary, rotate the button button 2 clockwise in A way, and fast-ern the buckle 3 to change the sleeping cot
into the seat unit.
Kindly remind: In order to ensure your baby safe, always keep the sleeping cot face to you when using it (see Fig. 13d).
BACKREST AND FOOTREST FUNCTION
- Press down the footrest buttons and move it up and down, the footrest can be adjustable in 3 positions, see Fig. 14a.
QUICK RELEASE THE FRONT HANDRAIL
- See Fig. 15a. Press down the button on both side, then pull out the handrail and the handrail can be released quickly.
WHEELS FUNCTION
- Front Wheel Lock: Pull the front wheel locking lever as the direction of arrow when hear a "CLICK" the wheel is locked in placed, as shown in Fig. 16a.
- Front wheels quickly taken-off; Pre down the Front wheel quickly-release button, the front wheels will be released automatically.
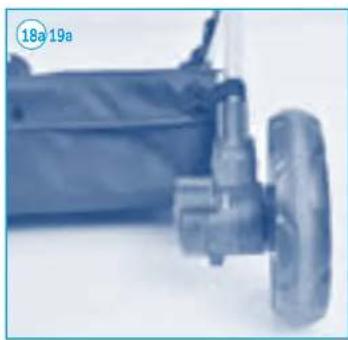
- Rear wheels brake: To apply the brakes by depressing the lock lever as shown on Fig. 18a, depress the brake lever in the same way to release the stroller. (Red means in brake condition, Green means in movement condition).
- Detachable rear wheels: As shown on Fig. 19a, press the quick release button as the direction of arrow, then you can pull out the wheels quickly.
SAFETY BELT ASSEMBLY
- Pass the buckles of shoulder belt A and waist belt B through the loops located on the seat pad and the stiff board which hid in side of seat pad. Make sure they are attached firmly before use (see Fig. 20a/20b).
- Adjust the safety belt height, please pull out the colth which mark in Fig. 21a. And then the installation method same as the first points which is shown in Fig. 20a/20b.
- Pass the crotch belt through the seat pad and the stiff board which hid in side of seat pad as the arrow shown on Fig. 22a. Always make sure they are attached firmly before use. The safety belts are correctly assembled as Fig. 22b.
SAFETY BELT DETACHMENT
- Detach the shoulder belt H and waist belt I by
pulling out the buckles from the seat pad (see Fig. 23a).
ATTENTION:
- Please remove the seat belt from the stroller while using as a sleeping cot.
- Please assemble all the seat belt fastenly in the stroller while using as a seat.
ATTACH THE BUCKLES
- Attach the buckles: (See Fig. 24a), attach the buckles on the shoulder belt (C, D) on the buckles of waist belt (A, B), And then attached the waist buckles on the central buckle E until you hear a CLICK (See Fig. 24b). Release the belt: (See Fig. 24a), press down the central button to release the waist strap. Adjust the seat belt: Adjust the shoulder and waist strap according to the size of child in comfortable position (See Fig. 24c).
- The height of shoulder belt is adjustable by 2 positions (see Fig. 25a), the lowest position (position 2) is only for the baby under 6 months, and the position 1 are for the baby between 6 months and 36 months. Adjust the height of seat belt by pulling buckles out of the seat. Then attach them into the same level, always make sure the buckles are in their positions. Kindly remind: Always use the safety harness when the child is in the baby stroller.
OPTIONAL ACCESSORIES
HOW TO USE THE CAR SEAT
- Assemble the car seat: According to Fig. 26a, put the car seat onto the seat supporting base, push down the car seat until you hear a CLICK.
- Disassemble the car seat: Release the additional safety lock and raise the button with your hand as shown in the picture; lift the child seat upwards with the other hand at the same time using the handle to unhook the seat from the frame (see Fig. 27a).
Kinder Reminder: For security reasons, it is necessary to check again the pull clasp after fix the car seat onto the stroller frame, if the pull clasp doesn't return completely, please push the plastic part to the end.
HOW TO USE THE CARRY COT
- Assemble the carry cot: Put the carry cot onto the supporting bases of the stroller, then push
down the carry cot until you hear a "CLICK", as shown on Fig. 28a.
- Disassembly: Push the button to the right as the direction of arrow A with your thumb, and pull up the pull-button as the direction of arrow A simultaneously, then lift the carry cot up to release it from the stroller.
- Safety Belt: The carry cot is equipped with safety belt inside. Press the red button as shown on Fig. 30a, the safety buckle will be released.
Kinder Reminder:
- Please ensure to keep the baby to face to you when using the components, it is convenient for you to watch the baby's activity. - Please try to pull up the components after assembled stroller as the picture shown, to ensure the both sides of components fixed completely and would not loose.
HOW TO PLACE THE MAMA BAG
- As shown in Fig. 31a, putting the straps of mama bag on the handle of the stroller, then the mama bag will be hanged on the stroller as shown in Fig. 31b.
- Before folding the stroller, please remove the seat first. Then press down the stroller-folding button 1, and pull up both sides of handle simultaneously as the direction of arrow 2, next fold the handle as the direction of arrow 3, the stroller will be folded automatically as shown on Fig. 32b. Please note: the folding-hook on the left side should be locked manually, when the folding-hook is fixed in position, the stroller can be folded completely.
CARE AND MAINTENANCE
This vehicle requires regular check by user to make sure moving parts remain intact. All the locking devices and the second lock are engaged before use. This product can be cleaned with damp rag and usual detergents. Do not use any abrasive detergents. The cover can be removed and washed, but should be dry before reuse. Every fixed device should be clipped firmly, when reinstall it.


44 45
MATERIALS
Cover: 100% polyester
Frame:
aluminum
SIZES
Open: L; 86 cm;
H: 60 cm;
D: 107 cm.
Close: L: 78.5 cm;
H: 60 cm;
D: 41 cm.
WARNINGS
• WARNING Never leave your child unattended.
- WARNING Ensure that all the locking devices are engaged before use.
- WARNING To avoid injury ensure that your child is kept away when unfolding and folding this product.
- WARNING Do not let your child play with this product.
- WARNING Check that the pram body or seat unit or car seat attachment devices are correctly engaged before use.
• WARNING Keep away from fire.
- WARNING The stroller complies with EN1888:2012.
- WARNING The stroller is not for the children weight more than 15 KG (33LBS).
- WARNING It is suitable for the children under 3 years old.
- WARNING Avoid serious injury from falling or sliding out always use the restraint system.
- WARNING Do not put more than 3 KG in the basket.
- WARNING Do not carry additional children, goods or accessories in or on this vehicle except as recommended in the manufacturer's instructions.
- WARNING Put on all the brakes whenever you park the stroller.
- WARNING Make sure children are clear on any moving parts if you adjust the pram/stroller otherwise they may be injured.
- WARNING The product is not suitable for running or skating.
- WARNING This seat unit is not suitable for children under 6 months. And the reclined system of the seat is not for baby under 6 months. Push chair designed to be used from
birth shall use of the most reclined position for new born babies.
- WARNING Always use the restraint system.
- WARNING Use a harness as soon as your child can sit unaided.
- WARNING No additional mattress shall be added.
- WARNING Parking device shall be engaged when placing and removing the children.
- WARNING Child may slip into leg openings and strangle.
- Never use in reclined carriage position(s) unless the seat used as a sleeping cot.
- WARNING It cannot use the lowest position of footrest when you use the stroller.
- The stability of the stroller may be compromised when weights are placed on the handle or the backrest or sides of the stroller.
- Do not use accessories not approved by the manufacturer.
CARRYCOT
HOW TO ASSEMBLE THE HOOD
- Pull up the hood axis as the arrow shown on Fig. 33a and clip the 2 side metal plates into it. The metal plate is installed completely when you hear a CLICK. Try to move it by your hands to make sure the hood is firmly assembled before use (see Fig. 33a/33b). Clip the decorative pieces into the clip base according to Fig. 33c. The decorative clips are installed completely when you hear a CLICK. Try to move them by your hands to make sure every clip is firmly assembled before use. The hood is completely assembled as Fig. 33d shown.
HOW TO ASSEMBLE THE FOOT COVER
- As shown on Fig. 34a/34b/34c, put the foot cover on the kit first, and then buckles the snap button and fastens the velcros.
ADJUSTING THE HOOD
- Unfold the hood: unfold the hood by pulling it forward as the arrow shown on Fig. 35a.
- Fold the hood: pull the hood as the arrow shown (see Fig. 36a/36b) for storage.
ADJUSTABLE HANDLE
- Unfold the handle: pull the handle as the arrow shown, it can be adjusted by three position. The carrying cot is firmly engaged when
you hear a CLICK (see Fig. 37a).
- Fold the handle: Press down buttons on both side of the handle simultaneously, and the adapter will be unlocked, then push the handle as the arrow2 shown. The handle is firmly folded when you hear A CLICK (see Fig. 38a/38b).
ADJUSTABLE BACKREST
- Rotate the knob clock wise, the backrest can be raised up to the highest 165 degrees. Rotate the knob counter clock wise and push downwards lightly, and then you can lay down the backrest (see Fig. 39a/39b/39c).
ACCESSORIES
- Preparation before use: Install the big buckle on the carry cot first. Fix the "hole a" to the fixed plastic b, insert in and pull downwards the big buckle as the arrow 2 shown (see Fig. 40a/40b) simultaneously. Repeat the operation also for the other buckle of the carry cot.
- Matters need attention when car seat is used in the car, see Fig. 41a/41b.
- Install the carry cot in the car: Install the carry cot in the position as Fig. 41a/41b shown. Insert the car safety slot into the buckle on the seat and pull out of the safety belt, see Fig. 42a/42b; make a loop with the strap, pass the loop into the hole of the metal car connector and slide it over the tongue of the connector according to the arrow shown on Fig. 42c/42d; Tighten the seat belt as the arrow shown (see Fig. 42e). Repeat the operation also for the other buckle. Then the carry cot is firmly installed in the car as Fig. 42f/42g shown.
- Disassemble carry cot from the car: According to Fig. 43a, disassemble carry cot from the car by pulling out the "big buckle" as the arrow shown. The big buckles can be fixed on the safety belt after removing the carry cot from the vehicle (see Fig. 43b). Kindly remind: The carry cot can only be installed on the rear bench seat, and always level with the road. It can be installed in vehicles equipped with 3 point static in accordance with regulation R 6 ECE/EEG.
WARNING
- For the sake of safety, never put the head of your child on the door side. When as-
sembled in the back seat, make sure that your child is firmly restrained in the carry cot, especially on a trip. When assembled in the back seat, adjust the backrest to the lowest position and lower the carrying handle. When assembled in the back seat, the seat belts holding the restraint to the vehicle should be tight. Make the seat belt to the maximum length to ensure the stability of carry cot when used in the car. Adjust the safety belt in order to keep steady the carry cot on the vehicle, the safety belt must tense and never twisted.
THE USAGE OF SAFETY BELT
- When the product is used as a car seat, press the middle button to open the buckle, see Fig. 45a. Plug the buckle on the both sides, the buckle can be fasten, see Fig. 45b. Kindly remind: always use the safety belt when your child is in the carry cot.
HOW TO USE THE BREATH HOLE
-
Open the air hole: Rotate the knob under the basket counter clock wise, the breath holes are open. It has the function of ventilation with all holes upwards.
-
Close the air hole: Rotate the knob under the basket clock wise, the breath holes are closed (see Fig. 47a/47b). There will be no function of ventilation with all holes downwards.
-
Assemble the carry cot: When use the carry cot on the frame, match the adapter, push down the carry cot until you hear a "click" (see Fig. 48a/48b). The carry cot is assembled correctly on the frame as shown in Fig. 48c.
-
Push the lock C as the arrow shown in Fig. 49a, then raise the button D at the bottom of carry cot as the arrow shown and lift up it, and then you can release the carry cot from the stroller easily (see Fig. 49b/49c).
CARE AND MAINTENANCE
For the sake of safety. This product requires regular check and maintenance. Keep all parts clean. If they become stiff apply a light application of a silicon based spray lubricant between components. Metal parts, the seat and fabric parts -Clean with a damp cloth soaked in warm water and mild detergent and
wipe dry. Never clean with abrasive, ammonia based, bleach based or spirit cleaners. The cover and accessories are removable for cleaning. The canopy can be removed by simply pulling the frame out of the fixings. Do not use solvents, chemical cleaners or lubricants on any part of the seat and never attempt to bleach or dye the webbing. Never store the carry cot when it is wet. Always dry out first. If damp, leave fully open in a warm environment and dry off with a soft cloth. Storing a damp carrycot will encourage mildew to form. Use near the sea in the winter will encourage salt to settle. Always keep regularly cleaned with a soft cloth soaked in warm water and mild detergent. Operate the carry cot according to the instruction to avoid any damage. Always service your carrycot before using for a second child.

MATERIALS
Cover: 100% polyester
Frame: aluminum
SIZES
L:97.5cm:
H: 60 cm;
D: 107 cm.
WARNINGS
- Child shall never be left in this product unattended in the carry cot! Always keep child in view.
- Use only replacement parts supplied or approved by manufacturer.
- Never overload the carrycot with an additional child or any objects.
- This product is suitable for children from birth to approximately 0-9 months.
- This product is suitable for a child who cannot sit up by itself, roll over and cannot push itself up on its hands and knees. Maximum weight of the child: 9 kg.
- Never use the carrycot in passenger seats with airbags.
- The carry cot only can be installed on the rear bench seat of the car as described in the instruction, never install on the front seat.
• Always use the carrycot with fastening the harness s correctly.
- Never use the carrycot without fastening harness into the car or stroller.
• Make sure the carry cot can be fixed firmly when used on the assigned stroller.
- The buckle should always be easily accessible.
• Children should never play with the buckle.
- It is in important that the child can be released quickly in the event of an emergency.
- Only suitable if the approved vehicles are fitted with 3 point static or with retractor safety belts, approval to UN/ECE regulation No.16 or other equivalent standards.
- The child should be clear of moving parts while making any adjustments. Be particular careful when performing these tasks with the child nearby.
- Never store or use the carry cot in a humid, cold and high temperature place, keep it away from fire or heat source.
- Never carry the product by second lock, and keep the handle upwards.
• We strongly recommend that change the damaged accessories or parts.
- Any luggage or other objects liable to cause injuries in the event of a collision shall be properly secured.
- Contact your nearest retailer while have any problems or question in use.
• This product is only suitable for a child who cannot sit up unaided.
- Do not use if any part is broken, torn or missing.
• Always use the restraint system.
- WARNING use a harness as soon as your child can sit unaided.
CAR SEAT GR 0+
INSTALLING THE SAFETY BABY CAR SEAT IN YOUR CAR
- This product is suitable for installation in three-point seatbelts which will be divided into hip and shoulder part, as shown in picture 50a.
- Place the baby car seat in a rearward facing position on the seat, therefore with the back forward facing. The carrying handle must be locked in an upright position, as shown in pic-
ture 51a.
- Thread the lap section of the seat belt across the front (foot end) between the shell and two belt hooks, as shown in picture 52a.
- Place the shoulder section of the seat belt around the car seat and slide it into the belt hook on the back, as shown in picture 53a.
- The retaining hook holds the seat belt in place, as shown in picture 54a.
- Insert the tongue section into the buckle. Make sure the seat belt is not twisted. Tighten it as much as possible. Check again to make sure the seat is thread through all hree blue belt hooks, as shown in picture 55a.
HOW TO USE THE CAR SEAT
- Loose the shoulder belts by pressing the quick adjuster button and pulling the shoulder belts towards you as shown in picture 56a, then put down the crotch strap as shown in picture 57a.
- Join the buckle tongue sections together and insert them into the buckle as shown in picture 58a.
- Pull the shoulder belts tight using the quick adjuster belt strap on the front. The loop can be secured under shell rim.
- Adjust the height of the shoulder belts, the shoulder belts should run through the slots located directly above the baby's shoulders as shown in picture 59a. Pull the shoulder belts through the slots in the shell and cover. Place the shoulder belts back, at the required height and use the same slots in both shell and cover. Check to make sure the belts can be used properly and that they are not twisted.
- Press the buttons on both sides of the carrying handle at the same time and then adjust the carrying handle to the desired position. The buttons will pop up again once the handle is in place 1. Carrying position/driving position 2. Sleeping position/rocking position 3 sitting position as shown in picture 60a.
REMOVING THE COVER
First remove the belt pads, open the rim at the sun canopy as far as possible. Then pull the buckle tongue sections and adjustment strap through the openings. To refit the cover, carry out the above instructions in reverse order.
MAINTENANCE
The seat can be cleaned with soap snd lukewarm water. Do not use any abrasive detergents. The cover must be washed by hand (maximum 30°C). Do not use a dryer. The belt buckle can be cleaned using warm water. Do not lubricate. To ensure optimum and safe use of car safety seats, they should not be used for longer than 5 years after the date of purchases. Ageing of the plastic, for instance, under the influence of sunlight (UV), may quite unnotice - ablyreduce the qualities of the product. Once the child has grown out of the seat, we therefore advise you to no longer use the car seat and to dispose of it in proper way.

MATERIALS
Cover: 100% polyester
Frame:
aluminum
SIZES
L: 86 cm;
H: 60 cm;
D: 107 cm.
WARNINGS
• This product is suitable for children from birth to approximately 9 months (0-10kg).
- For car seats used in conjunction with a chassis, this vehicle does not replace a cot or a bed. - Should your child need to sleep, then it should be placed in a suitable pram body, cot or bed.
- To prevent your child from falling out of the seat. Always check to make sure the carrying handle is "clicked" into carrying positions before lifting the seat. Also make sure your child is always strapped securely with the harness belt.
- The correct rooting of the seat belt along the blue markings on the product is essential for your child's safety. Please see the installation section. Never thread the belt in any other way.
- Never use this product on a seat equipped with a front airbag.
- When installing with the seat belt, only use the car seat on forward facing seat that has been provided with an automatic or static 3-point belt. The belt provided has been approved according to the ECER16 standard or similar.
FOR TECHNICAL OR COMMERCIAL REASONS, GIORDANI RESERVES THE RIGHT, AT ANY TIME AND ALSO ONLY IN A SPECIFIC COUNTRY, TO MODIFY THE TECHNICAL CHARACTERISTICS OF THE MODELS DESCRIBED IN THIS LEAFLET, AND/OR THE SHAPE, TYPE AND NUMBER OF THE ACCESSORIES SUPPLIED
E GIORDANI METROPOLITAN SISTEMA MODULAR (DE 0 A 36 MESES APROX.)
SILLA DE PASEO
APERTURA DE LA SILLA DE PASEO
OPTIONELE ACCESSOIRES
HET AUTOSTOELTJE GEBRUIKEN
Bekleding: 100% polyester
Frame: aluminium
AFMETINGEN
Bekleding: 100% polyester
Frame: aluminium
AFMETINGEN
Br: 97.5 cm;
H: 60 cm
D: 107 cm.
WAARSCHUWINGEN
Bekleding: 100% polyester
Frame:
aluminium
AFMETINGEN
Br: 86 cm:
H: 60 cm
D: 107 cm
WAARSCHUWINGEN
Structure: aluminium
DIMENSIONS
Ouvert: L:86 cm;
H:60cm;
P:107cm.
Fermé: L:78.5 cm;
H:60cm:
P:41cm.
AVERTISSEMENTS
Structure: aluminium
DIMENSIONS
L:86cm:
H:60cm:
P:107cm