Club - Stroller Giordani - Free user manual and instructions
Find the device manual for free Club Giordani in PDF.
| Brand | Giordani |
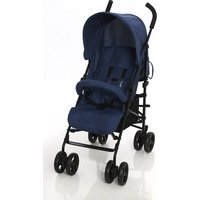
| Model | Club |
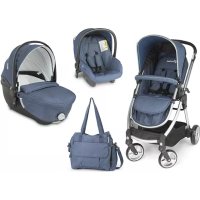
| Category | Modular stroller (Club system) |
| Product type | Stroller compatible with carrycot and car seat |
| Use | From birth (with carrycot or car seat) up to 15 kg (stroller only) |
| Dimensions stroller open | W 87 cm, H 106 cm, D 53.5 cm |
| Dimensions stroller folded | W 92.5 cm, H 38 cm, D 38 cm |
| Dimensions carrycot open | W 85.5 cm, H 53 cm, D 44.8 cm |
| Dimensions car seat open | W 62.5 cm, H 59 cm, D 44.8 cm |
| Upholstery materials | Polyester, foam fiber |
| Frame | Steel (stroller), Polypropylene (carrycot and car seat) |
| Safety harness | 5-point, height-adjustable |
| Backrest adjustment | 3 reclining positions |
| Leg rest adjustment | Yes, adjustable |
| Front wheels | Swivel with lock for rough terrain |
| Brake | Rear lever brake |
| Canopy | With rear bellows extension, sun protection |
| Storage basket | Max load 3 kg |
| Included accessories | Canopy, basket, complete rain cover, leg cover, carrycot, group 0+ car seat |
| Care | Clean with damp cloth, mild soap for fabrics; do not use abrasive detergents |
| Safety | Never leave child unattended, always use harness, lock brake when parked |
| Maximum child weight (stroller) | 15 kg |
| Maximum child weight (carrycot) | 9 kg |
| Maximum child weight (car seat) | 13 kg |
Frequently Asked Questions - Club Giordani
User questions about Club Giordani
0 question about this device. Answer the ones you know or ask your own.
Ask a new question about this device
Download the instructions for your Stroller in PDF format for free! Find your manual Club - Giordani and take your electronic device back in hand. On this page are published all the documents necessary for the use of your device. Club by Giordani.
USER MANUAL Club Giordani
Manufactured by: Dorel Juvenile (Zhongshan) Product Co., Ltd. Address: No. 28 KUI XING ROAD, DONGSHENG TOWN, ZHONGSHAN, GUANDONG, CHINA
Distributed by: HDG S.p.A. Via delle Primule, 5 - 20815 Cogliate (MB) Italy
I In conformità con: EN 1888: 2012 - EN 1466:2014 - ECE R 44/04
UKApproved to: EN 1888: 2012 - EN 1466:2014 - ECE R 44/04
E En conformidad con: EN 1888: 2012 - EN 1466:2014 - ECE R 44/04
P Em conformidade com: EN 1888: 2012 - EN 1466:2014 - ECE R 44/04
GRΣύμφωνα με: EN 1888: 2012 - EN 1466:2014 - ECE R 44/04
RUB соответствии с: EN 1888: 2012 - EN 1466:2014 - ECE R 44/04
NL In overeenstemming met: EN 1888: 2012 - EN 1466:2014 - ECE R 44/04
F Conformément à : EN 1888: 2012 - EN 1466:2014 - ECE R 44/04
D In Übereinstimmung mit: EN 1888: 2012 - EN 1466:2014 - ECE R 44/04

text_image
Giordani® ClubKEEP THIS INSTRUCTIONS
FOR FUTURE REFERENCE.
E
iIMPORTANTE!
CONSERVAR ESTAS INSTRUCCIONES
natural_image
Line drawing of a baby stroller with no text or symbols
text_image
Technical diagram showing mechanical assembly with labeled parts D, E, and C, including a blue arrow indicating direction of movement.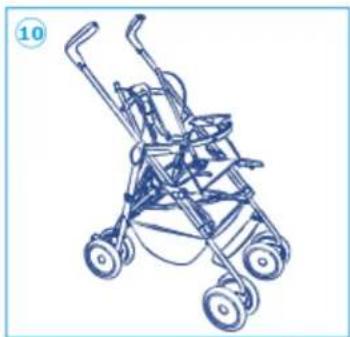
natural_image
Line drawing of a stroller with four wheels and handlebars (no text or symbols)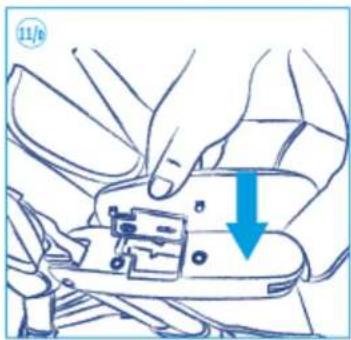
natural_image
Line drawing of hands assembling a mechanical component with a blue arrow indicating downward motion (no text or symbols)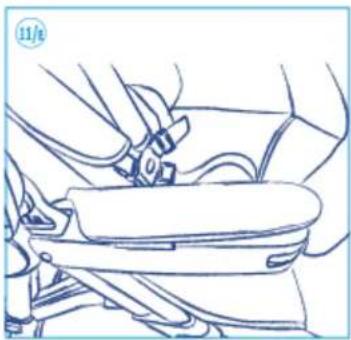
natural_image
Line drawing of a car seatbelt with hands adjusting the seat (no text or symbols)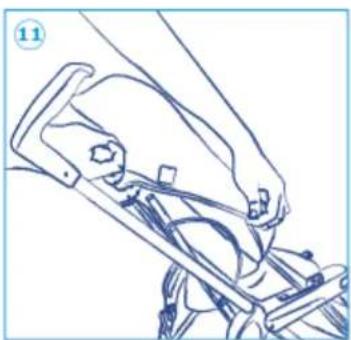
natural_image
Line drawing of a mechanical device with hands and brackets (no text or symbols)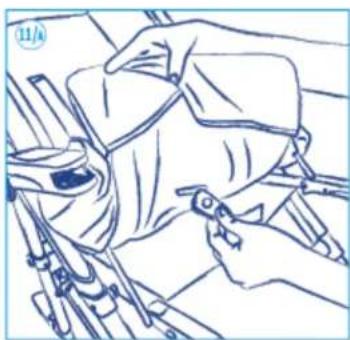
natural_image
Line drawing of hands using a tool to adjust or install a garment (no text or symbols)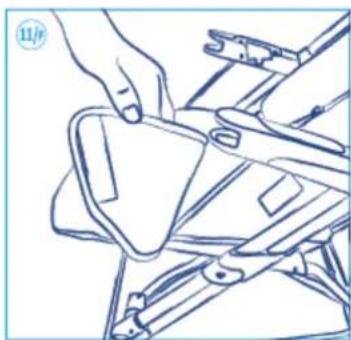
natural_image
Line drawing of a hand holding a small object over a table, with no visible text or symbols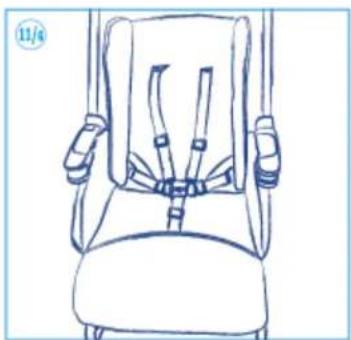
natural_image
Line drawing of a car seat with straps and seats (no text or symbols)
natural_image
Line drawing of a hand holding a tool near a table with three tools (no text or symbols)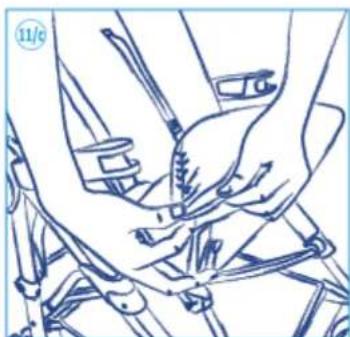
natural_image
Line drawing of hands using a tool on a bicycle (no text or symbols)
text_image
12 A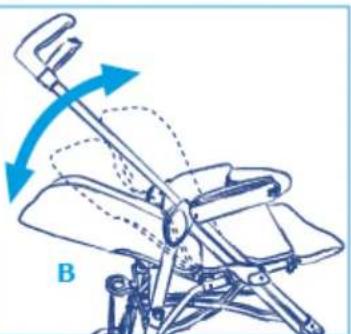
natural_image
Diagram of a bicycle seat with directional arrows indicating motion (no text or symbols)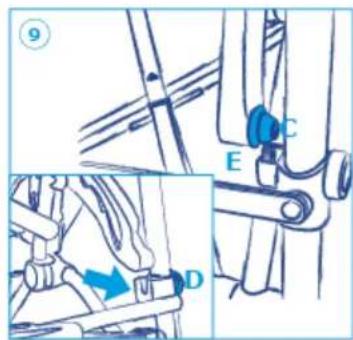
text_image
Technical diagram showing mechanical assembly with labeled parts E, C, D and a blue arrow indicating direction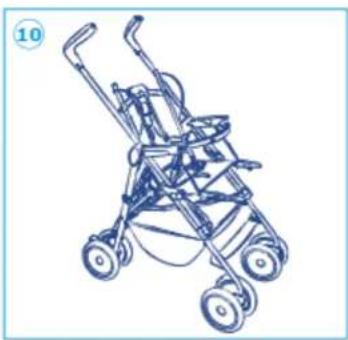
natural_image
Line drawing of a stroller with four wheels and a seat (no text or symbols)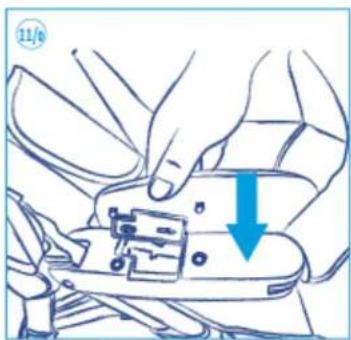
natural_image
Line drawing of hands assembling a mechanical component with a blue arrow indicating downward motion (no text or symbols)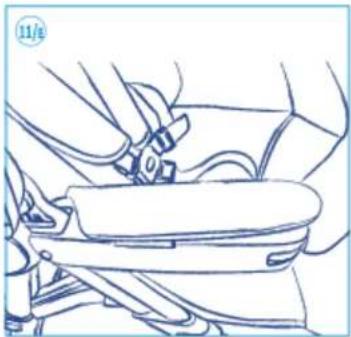
natural_image
Line drawing of a car seatbelt mechanism (no text or symbols)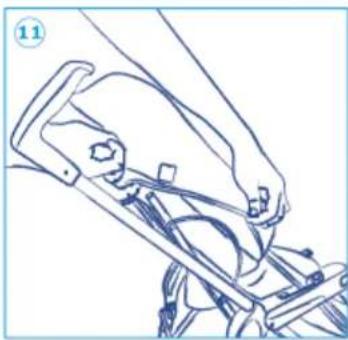
natural_image
Line drawing of a mechanical linkage or bracket assembly (no text or symbols)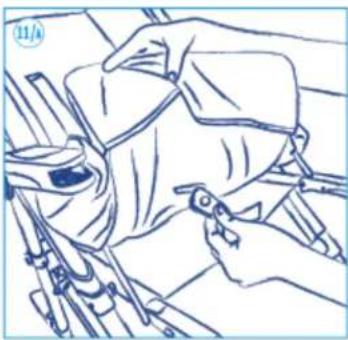
natural_image
Line drawing of a hand using a tool to adjust or install a garment (no text or symbols)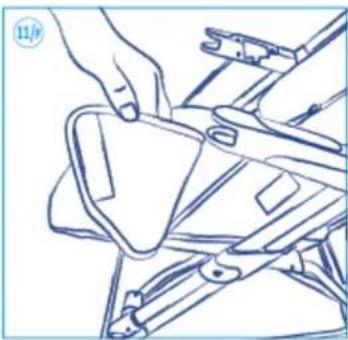
natural_image
Line drawing of a hand holding a small object over a mechanical component (no text or symbols)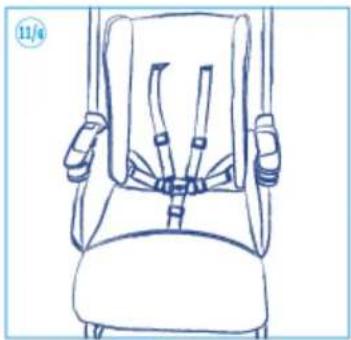
natural_image
Line drawing of a baby car seat with straps and straps (no text or symbols)
natural_image
Line drawing of a hand holding a tool, with no visible text or symbols
natural_image
Line drawing of hands using a tool on a bicycle (no text or symbols)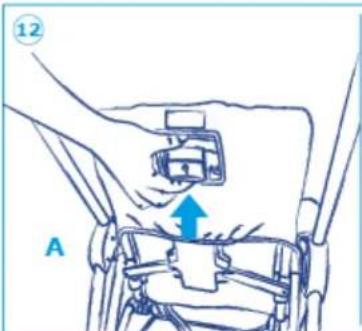
text_image
12 A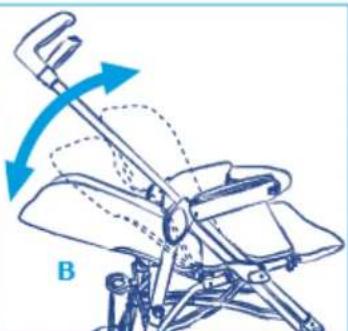
natural_image
Diagram of a mechanical device with directional arrows indicating motion or force (no text or symbols)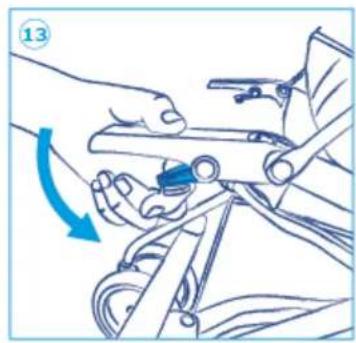
natural_image
Illustration of a hand using a tool to adjust or install a bicycle (no text or symbols visible)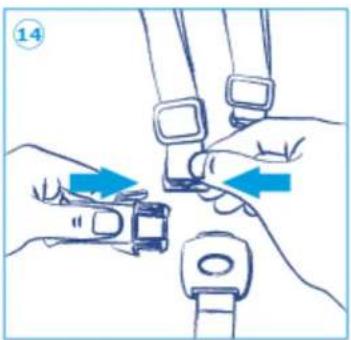
natural_image
Illustration of hands fastening a seatbelt using a tool, showing blue arrows indicating movement (no text or symbols)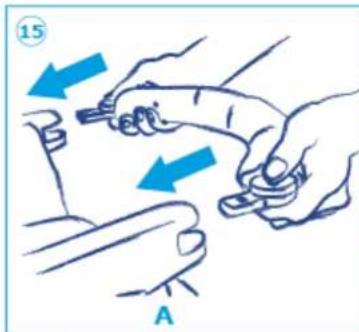
text_image
15 A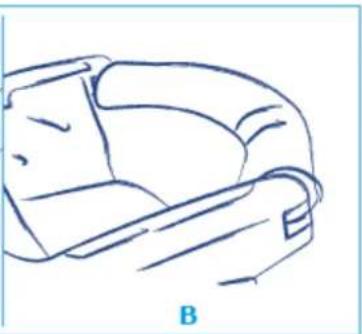
natural_image
Line drawing of a chair or armrest with no text or symbols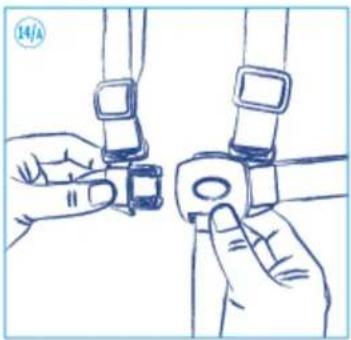
natural_image
Line drawing of two hands adjusting a small object with a belt buckle (no text or symbols)
natural_image
Diagram of a mechanical assembly with two vertical bars and a blue arrow indicating direction (no text or symbols)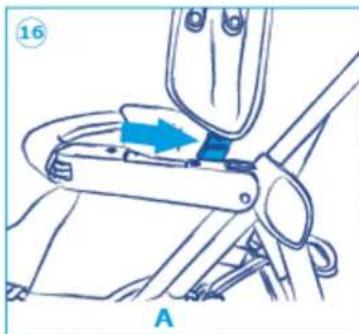
natural_image
Mechanical assembly diagram showing a lever mechanism with blue arrows indicating motion (no text or symbols)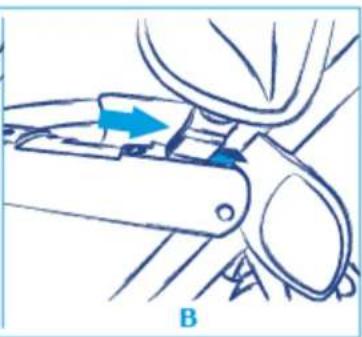
natural_image
Mechanical component diagram showing a lever mechanism with blue arrows indicating motion (no text or symbols)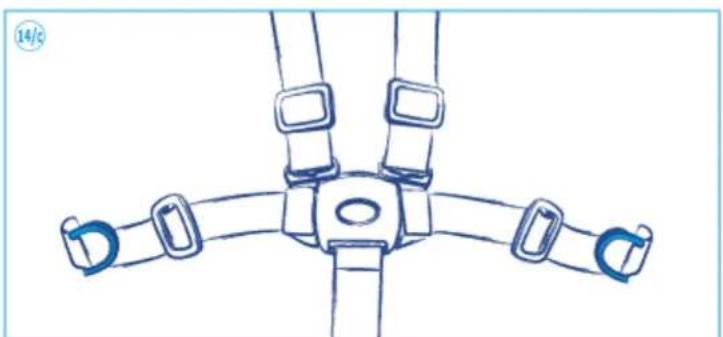
natural_image
Technical line drawing of a mechanical bracket with four clamps (no text or symbols)10
natural_image
Line drawing of a person in a seatbelt with a blue arrow indicating direction (no text or symbols)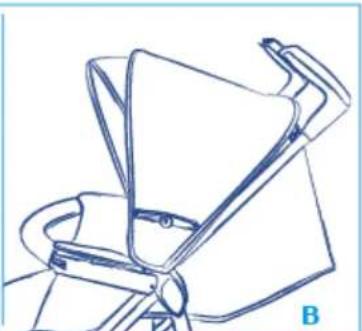
natural_image
Line drawing of a chair with a seatbelt and handle, labeled 'B' (no text or symbols on the diagram itself)11
natural_image
Technical line drawing of a chair with labeled sections A and B, showing structural components (no text or symbols beyond labels)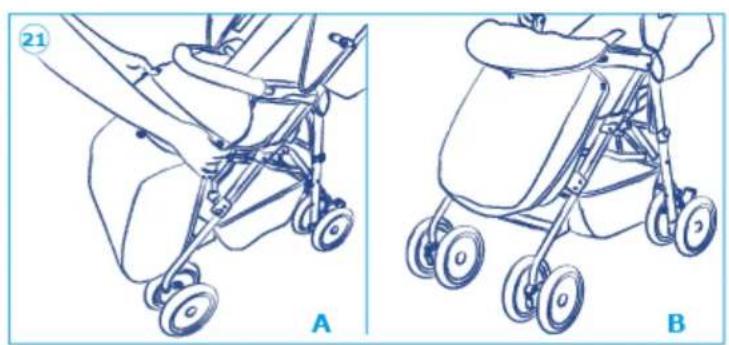
natural_image
Line drawings of two strollers with wheels, labeled A and B (no text or symbols on the diagram itself)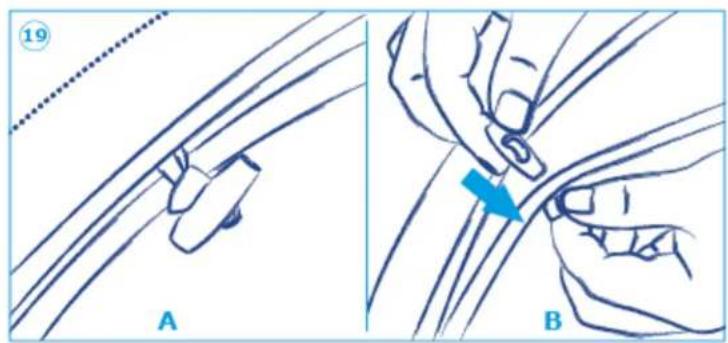
text_image
19 A B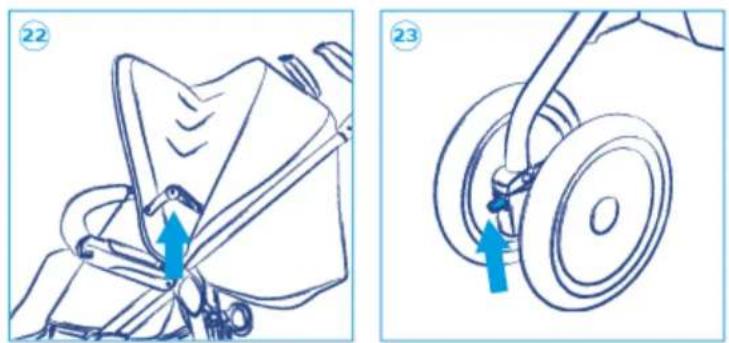
natural_image
Illustration of a person in a wheelchair and a car steering wheel, both showing blue directional arrows indicating motion (no text or symbols)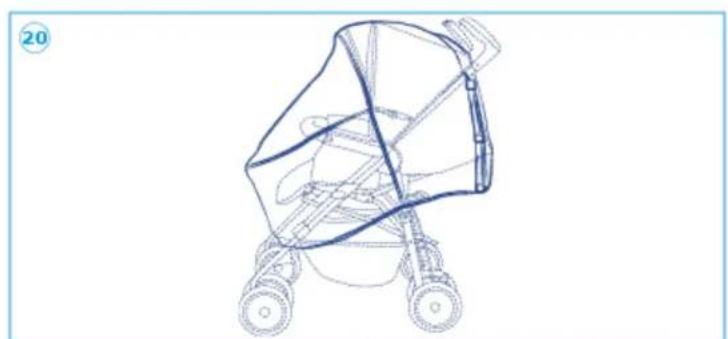
natural_image
Line drawing of a stroller with wheels and a seat cover (no text or symbols)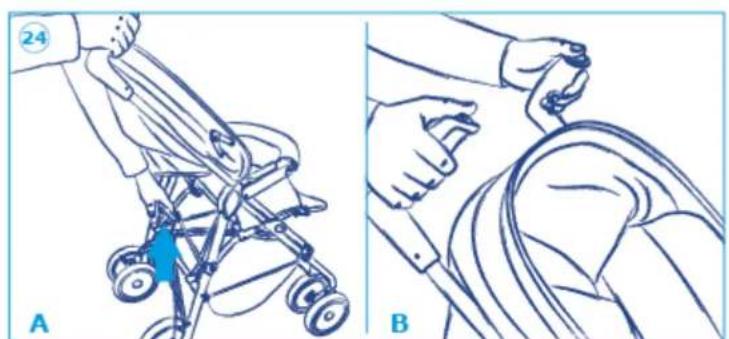
natural_image
Illustration of a person using a stroller to lift a patient's arm, showing two different positions (A and B) with no text or symbols.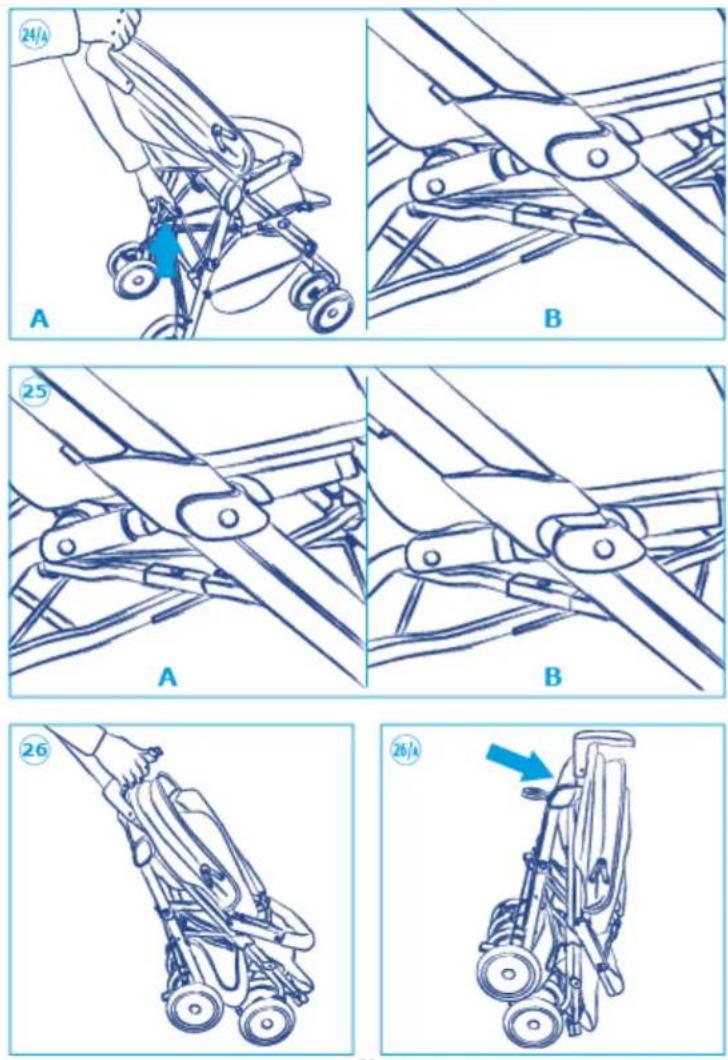
NAVICELLA - CARRYCOT - CAPAZO
ALCOFA - PORTE-BÉBÉ - ЛЮЛЬКА - DE KAP
NACELLE - BABYWANNE
natural_image
Line drawing of a closed box with a handle and lid, no text or symbols present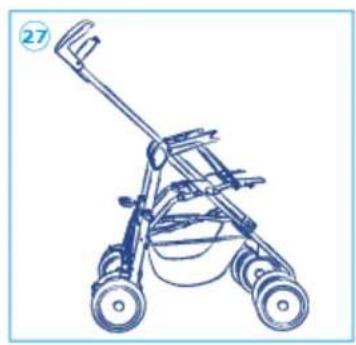
natural_image
Line drawing of a stroller with wheels and handle (no text or symbols)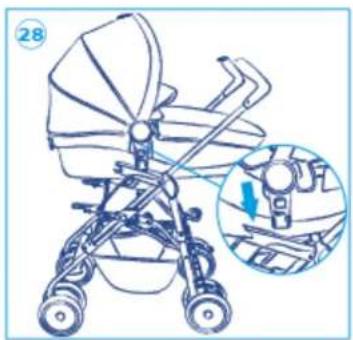
natural_image
Line drawing of a baby stroller with a magnified inset showing internal components (no text or symbols)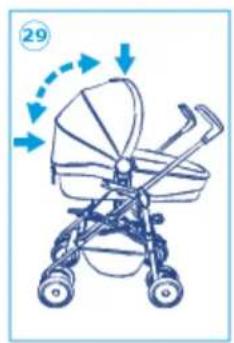
natural_image
Illustration of a stroller with directional arrows indicating motion (no text or symbols)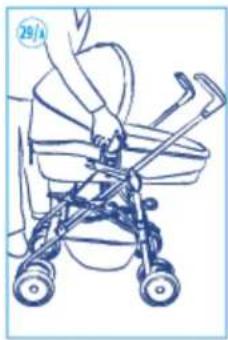
natural_image
Line drawing of a stroller with hands and wheels, no text or symbols present
natural_image
Line drawing of hands holding a small object over a surface, no text or symbols present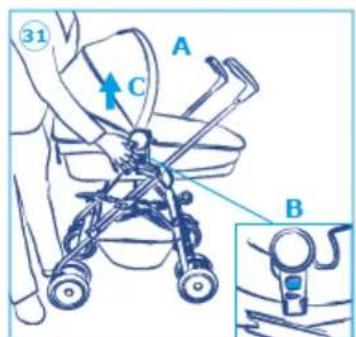
text_image
31 A C B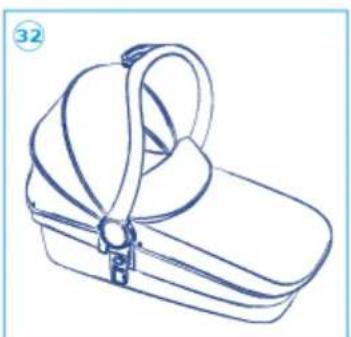
natural_image
Line drawing of a box with a handle and zipper, no text or symbols presentSEGGIOLINO PER AUTO - CAR SEAT - SILLA DE AUTO
CADEIRA DE SEGURANÇA - KAΘΙΣΜΑ ΑΥΤΟΚΙΝΗΤΟΥ
ДЕТСКОЕ АВТОКРЕСЛО - AUTOSTOELTJE
SIÈGE AUTO - AUTOSITZ
natural_image
Line drawing of a human ear with attached bandages (no text or symbols)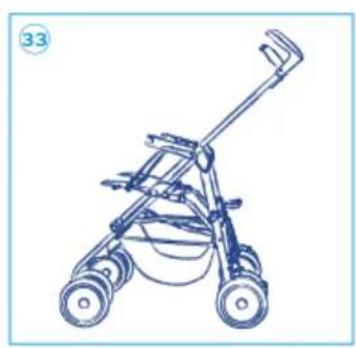
natural_image
Line drawing of a four-wheeled stroller with wheels and a handle (no text or symbols)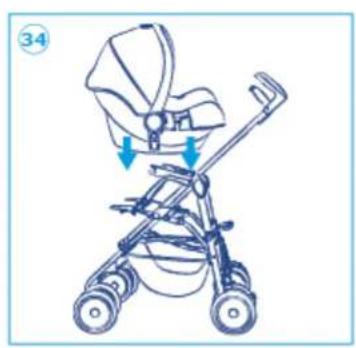
natural_image
Line drawing of a baby stroller with directional arrows indicating movement or change (no text or symbols)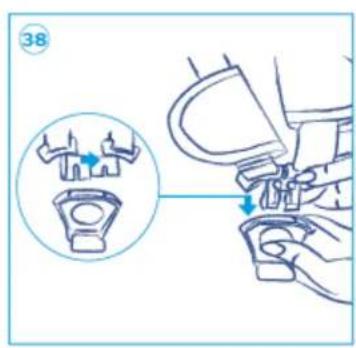
text_image
38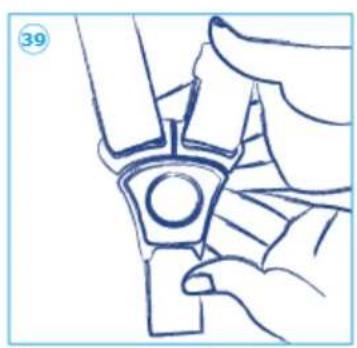
natural_image
Line drawing of a hand holding a mechanical component (no text or symbols)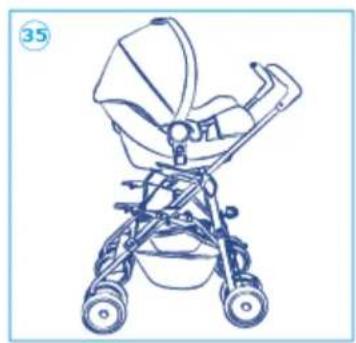
natural_image
Line drawing of a baby stroller with wheels and a seat (no text or symbols)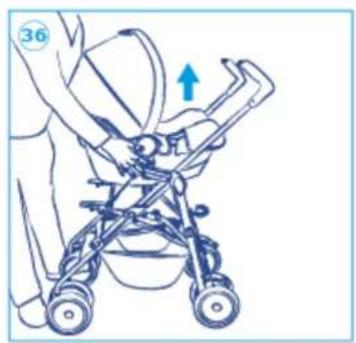
natural_image
Line drawing of a baby stroller with a blue arrow indicating the motion direction (no text or symbols)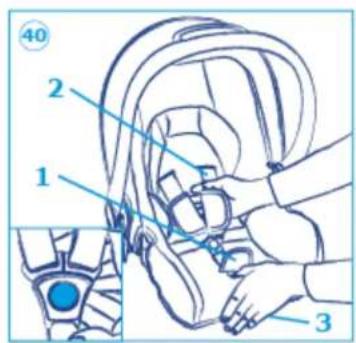
text_image
Technical diagram of a car interior with numbered parts and labeled parts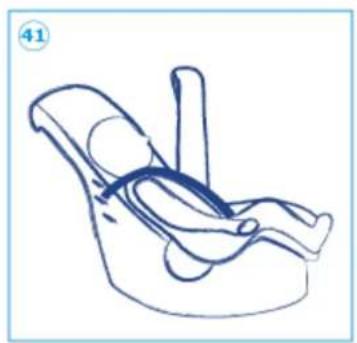
natural_image
Line drawing of a baby car seat with a seatbelt and seatbelt (no text or symbols)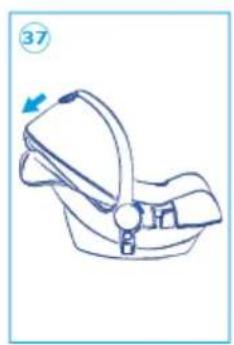
natural_image
Line drawing of a baby car seat with a blue arrow indicating direction (no text or symbols)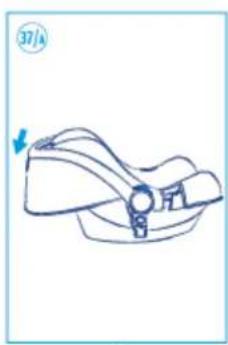
natural_image
Line drawing of a baby car seat with a blue arrow indicating the angle (no text or symbols)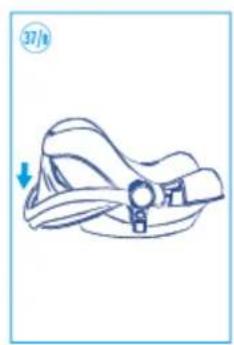
natural_image
Line drawing of a baby hat with a zipper and arrow indicating direction (no text or symbols)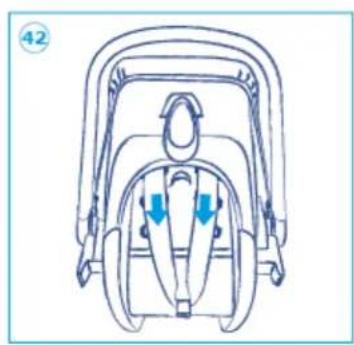
natural_image
Line drawing of a car seatbelt with blue arrows indicating movement or force (no text or symbols)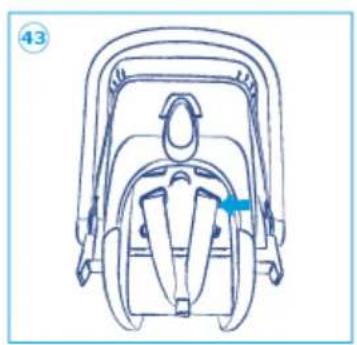
natural_image
Line drawing of a baby car seat with a blue arrow pointing to the seat (no text or symbols)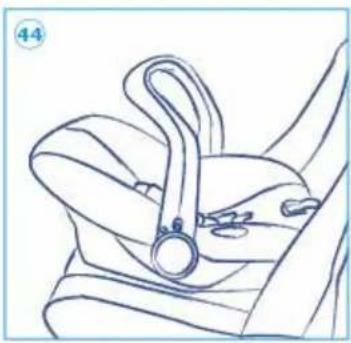
natural_image
Line drawing of a car seatbelt with a handle and clasp (no text or symbols)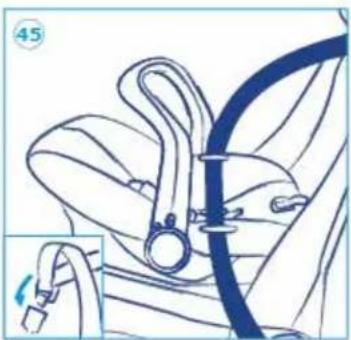
natural_image
Medical illustration of a car seatbelt with a blue surgical tube inserted, showing no text or symbols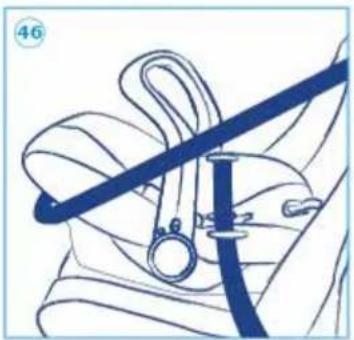
natural_image
Illustration of a blue rope tied with a string, showing rope routing and clasp (no text or symbols)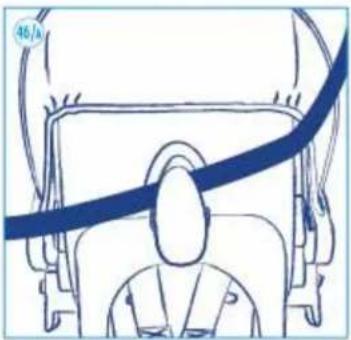
natural_image
Line drawing of a person seated in a chair with a blue curved line above, no text or symbols present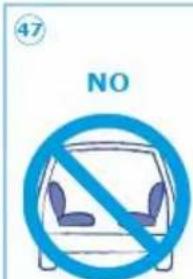
text_image
47 NO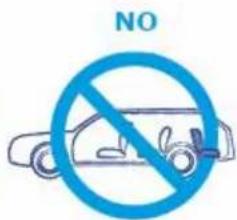
text_image
NO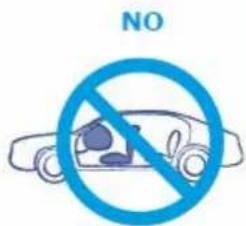
text_image
NO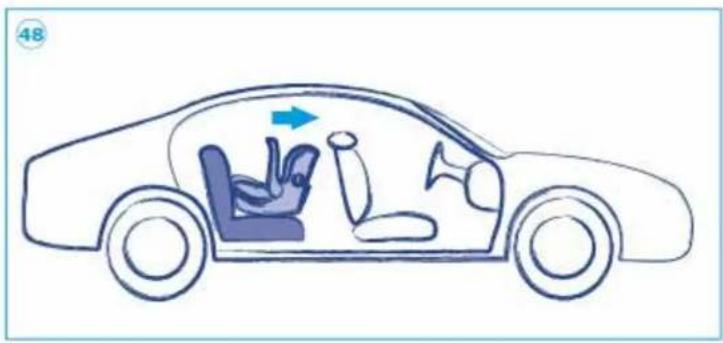
natural_image
Diagram of a car interior showing seat, dashboard, and exhaust components (no text or labels)I GIORDANI CLUB SISTEMA MODULARE (DA 6 A 36 MESI CIRCA)
PASSEGGINO
ASSEMBLAGGIO E UTILIZZO
Remove the stroller and all the components from the packaging and its wrapping.
WARNING! DO NOT ALLOW CHILDREN TO PLAY WITH THE PLASTIC BAGS USED FOR PACKAGING BECAUSE THEY MAY SUFFOCATE.
- Hold the stroller by the handles and press both closure buttons.
- At the same time push your foot down on the special tip-up until the frame opens completely.
- Insert the front wheels in the front structure until they lock with a click.
- To remove them, simply press the lever underneath them and pull them towards you.
WARNING! Before using the stroller make sure that the wheels are fully engaged.
WARNING! Always ensure that the stroller is completely open before using it.
FRONT WHEELS
- The stroller has front self-centring swivel wheels that can be locked in a fixed position, recommended on a bumpy ground. Wheel-locking is done by raising both the levers (Fig. A and B). Vice versa to unlock the wheels.
WARNING! The wheels must always fixed or both swivel for correct use of the stroller.
BRAKE
- The stroller is equipped with a rear brake. To lock the stroller, push the lever placed on the wheel downwards (Fig. 6/a). To unlock the stroller, push the lever placed on the wheel downwards (Fig. 6/a).
WARNING! Always operate the wheel brake when the stroller is stationary with the child inside.
USE OF THE STROLLER
-
Open the backrest. Insert the backrest connection "A" into the appropriate housing "B", located on the sidebar of the stroller. Repeat the same operation for the other connection (Fig. 7/A - 7/B).
-
Recline the backrest.
- Pull the button plug "D" outwards, placed outside on the rear of the stroller frame, insert the "C" PIN (of the backrest lever) in its housing "E" and release the button plug until you hear a "click". Repeat the same operation for the other connection.
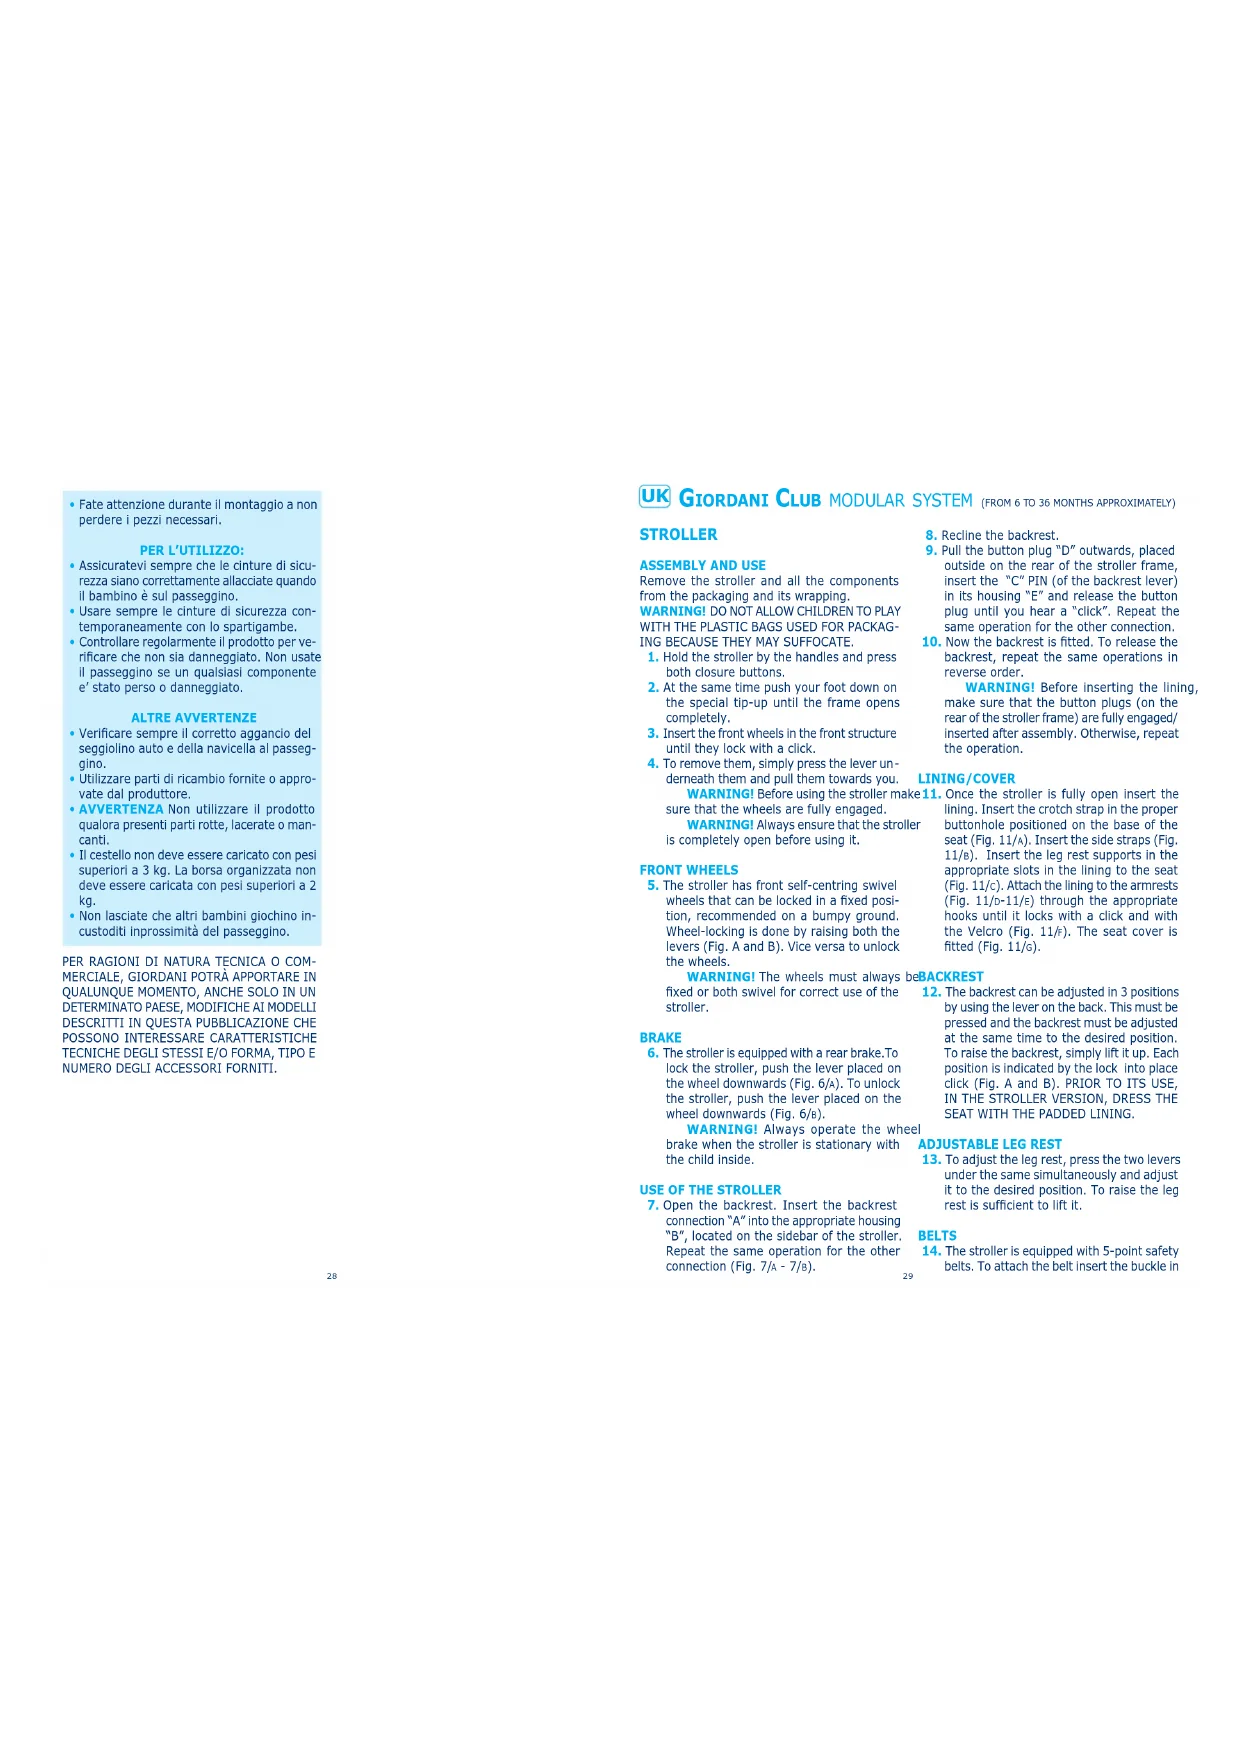
- Now the backrest is fitted. To release the backrest, repeat the same operations in reverse order.
WARNING! Before Inserting the lining, make sure that the button plugs (on the rear of the stroller frame) are fully engaged/inserted after assembly. Otherwise, repeat the operation.
LINING/COVER
- Once the stroller is fully open insert the lining. Insert the crotch strap in the proper buttonhole positioned on the base of the seat (Fig. 11/A). Insert the side straps (Fig. 11/B). Insert the leg rest supports in the appropriate slots in the lining to the seat (Fig. 11/c). Attach the lining to the armrests (Fig. 11/D-11/E) through the appropriate hooks until it locks with a click and with the Velcro (Fig. 11/F). The seat cover is fitted (Fig. 11/G).
beBACKREST
- The backrest can be adjusted in 3 positions by using the lever on the back. This must be pressed and the backrest must be adjusted at the same time to the desired position. To raise the backrest, simply lift it up. Each position is indicated by the lock into place click (Fig. A and B). PRIOR TO ITS USE, IN THE STROLLER VERSION, DRESS THE SEAT WITH THE PADDED LINING.
ADJUSTABLE LEG REST
- To adjust the leg rest, press the two levers under the same simultaneously and adjust it to the desired position. To raise the leg rest is sufficient to lift it.
BELTS
- The stroller is equipped with 5-point safety belts. To attach the belt insert the buckle in
the snap hook of the shoulder strap (Fig. 14/A). To unfasten the belts, press the button on the central buckle (fig. 14/ B). Optional harness systems (reins), in accordance with the European standard EN 13210: 2004 and the British BS 6684, can be attached to the stroller using the "D" shaped rings on the sides of the seat (Fig. 14/c).
WARNING! Always use the stroller with the child strapped with the safety harness together with the crotch strap.
FRONT BUMPER BAR
- Insert the front bumper bar in the slots of the armrests until it locks with a click (Fig. A and B). Make sure that the hook on/off tabs of the bumper bar are pointing downwards. The bumper bar is partially openable from both sides and fully removable to facilitate positioning of the child. To remove it, press the hook on/off tabs on the bumper bar hooks under the armrests and remove the bumper bar by pulling it towards you.
ASSEMBLING THE ACCESSORIES
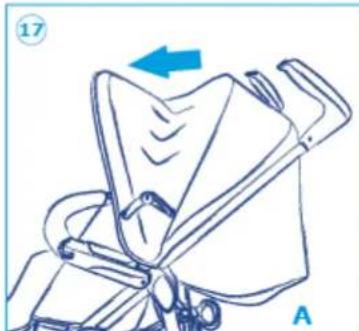
CANOPY
-
The canopy fastens onto special plastic compartments placed along the side tubes of the frame. To remove the canopy, proceed with the operation in reverse order (Fig. A and B).
-
Open the canopy by pulling the bow forward and lock it by pushing the side joints (Fig. A and B). Attach the back in fabric with the special Velcro straps on the sides of the seat.
-
The canopy includes a further folding rear extension to better protect your child from the sun (Fig. A and B).
-
To open the collapsible hood unfasten the specific button (Fig. A and B). To protect your child from the sun, turn the canopy forward into the desired position.
BASKET
Basket included in the package. The storage basket is fastened to the stroller through the base hooks. It is not suitable to carry loads in excess of 3 kg.
FULL RAINCOVER
- The raincover goes over the stroller, carrycot and car seat, securing it to the frame using the specific Velcro straps. The raincover is universal, hence the dressing can be slightly abundant in the stroller and stroller with car seat versions.
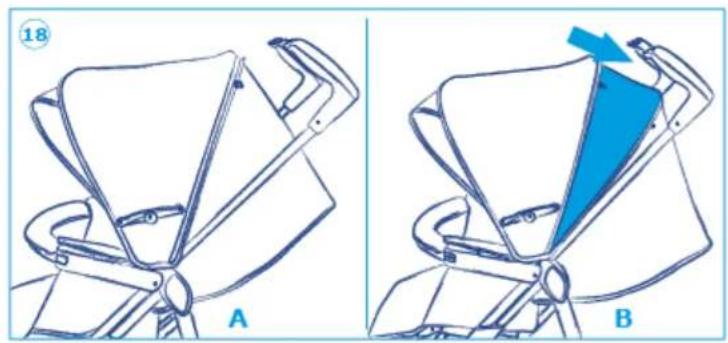
LEG COVER
- The leg cover for the stroller is standardised with the carrycot one. Remove the leg cover of the carrycot and pass it under the front bumper bar and secure it to the stroller.
To close the stroller please follow this procedure.
-
Close the canopy by releasing the joints on both sides.
-
Block the front wheels. They should not remain in swivel mode but should always be locked by lifting both levers.
-
Grasp the handle on the back of the stroller and retract it upwards (Fig. A) then hold the stroller by pushing both closure buttons on the handles (Fig. B) and push down simultaneously to release the frame on the front (see Fig. 24/A A-24/A B).
-
To close the stroller completely, push both handles downwards simultaneously until you hear a click.
-
Now the stroller is closed and can stand on its own (Fig. 26/A).
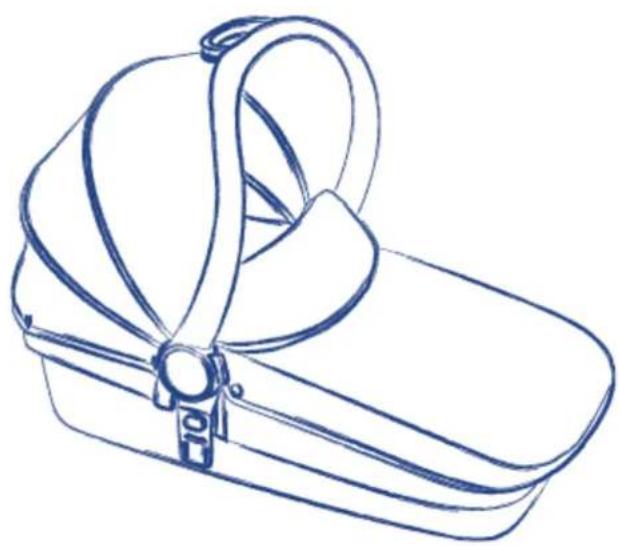
CARRYCOT
THE CARRYCOT FASTENS ONTO THE STROLLER THROUGH A PRACTICAL AND QUICK COUPLING SYSTEM.
WARNING! THE CARRYCOT IS APPROVED FOR TRANSPORT BY CAR. THE "CAR KIT" IS NOT INCLUDED IN THE PACKAGE. REFER TO THE USER MANUAL OF THE "CAR KIT" FOR ALL INFORMATION CONCERNING ASSEMBLY OF THE "CAR KIT" ON THE CARRYCOT, THE INSTALLATION OF THE CARRYCOT IN THE CAR AND ITS USE DURING TRAVEL.
-
Use the stroller structure without backrest, canopy and front bumper bar.
-
Position the carrycot on the stroller.
-
Make sure it is properly in place (the pins placed under both sides of the carrycot spoiler must enter in the appropriate grafts on the armrests of the stroller until you hear a fastening "click"). The handlebar of the pram can be positioned vertically or horizontally (Fig. 29/A) by pressing on the two side buttons of the handlebar.
WARNING! Always make sure that the carrycot is securely attached to the stroller on both sides, by pushing with both hands on the product.
- The carrycot is equipped with a pad to be placed under the mattress to raise the child slightly.
DISASSEMBLY
- To remove the carrycot, be sure the handlebar is in the upright position (Fig. A). Push the button positioned on both sides placed under the carrycot handlebar (Fig. B) and release the carrycot at the same time by lifting it vertically from the stroller (Fig. C).
BLANKET
- The carrycot is equipped with a leg cover blanket for colder months. The inner fabric lining of the carrycot is washable with mild soap in lukewarm water. Light stains can be cleaned with a sponge and soapy water. Do not use bleach, do not iron, do not machine wash, do not tumble dry.
WARNING! Pay attention to the danger of an open flame or strong heat sources near the baby carrier bag. Do not use the carrycot on a support.
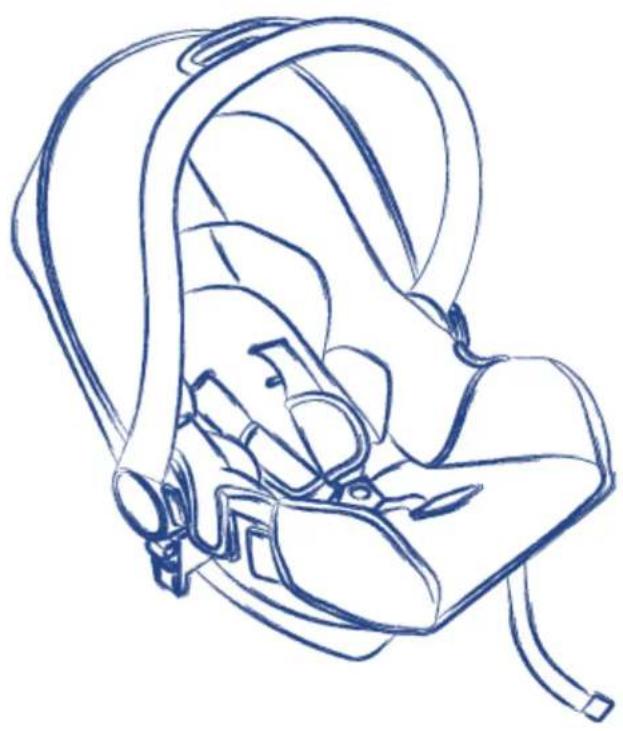
CAR SEAT
ASSEMBLY ON THE STROLLER FRAME USE OF THE CAR SEAT
THE CAR SEAT ATTACHES TO THE STROLLER THROUGH A PRACTICAL AND QUICK COUPLING SYSTEM.
-
Use the stroller structure without backrest, canopy and front bumper bar.
-
Place the car seat as shown in the figure.
-
Make sure it is properly in place (the pins placed under both sides of the carrycot handle must enter in the appropriate grafts
on the armrests of the stroller until you hear a fastening "CLICK").
DISASSEMBLY
- To remove the car seat from the stroller, press the release buttons on the sides of the car seat and simultaneously lift the seat vertically from the stroller frame.
HANDLE
- The handle can be adjusted in 3 positions, by pressing both release buttons and bringing it into the desired position (see direction of arrow). Then release the buttons (Fig. A, B, C).
SAFETY BELTS
-
Open the safety belts and place the child on the seat. Join the shoulder strap buckles. Insert them in the central buckle until it clicks into place.
-
Make sure the belt is properly closed.
-
Adjust the tension of the belts with the adjustment strap pulling the front strip that comes out of the lining (Fig. 3). To loosen the tension of the belts, press the button on the front of the chair, under the tissue flap (Fig. 1). Hold the shoulder straps at the same time and pull towards you (Fig. 2). To open the belts press the safety button at the centre of the buckle (see detail in the circle).
WARNING! Always make sure that your child is securely fastened to the car seat belts.
CORRECT POSITION OF SAFETY BELTS
-
The safety belts can be adjusted in 3 different heights.
-
Remove the two safety belts from the slit of the bodywork and from the lining of the car seat towards the rear.
-
Once you have selected the desired height, insert the straps again in the bodywork slit and in the car seat lining one.
WARNING! Belts must always be used properly. They must always be well tensioned, adhering to the body of the child, not twisted, and properly fastened.
WARNING! THE CAR SEAT MUST NOT BE USED IN LIEU OF THE BOUNCER. WHEN THE
CHILD IS 9 MONTHS OF AGE OR WEIGHING 9-11 KG, PULL OUT THE PAD UNDER THE COVER OF THE SEAT OF THE CHILD CAR SEAT SO AS TO INCREASE THE EASE AND COMFORT OF THE CHILD.
Proceed as follows:
- Lift the car seat lining.
2.Open the pocket at the back of the lining.
-
Remove the pad from the pocket.
-
Close the pocket and reposition the lining on the car seat.
USE IN THE CAR
WARNING! Do not use on seats with Airbags enabled. Always secure the child with the car safety harness.
-
Place the car seat in the opposite direction of travel in a car without an airbag or with uninstalled airbag.
-
Make sure the handle is in the upright position. Pass the lap belt of the car over the seat and under the specific hooks.
-
Pass the cross belt around the back of the seat as shown in Fig. 46- 46/A, through the specific rails. Block the car's belts in the specific catch. If the car belts are fastened properly and well tensioned, there are about 2.5cm between the anchor point and the car catch.
WARNING! If the car seat does not seem to be installed properly, repeat steps above.
POSITION OF THE CHILD CAR SEAT ON THE CAR
- NO: SEATS WITH LATERAL SEAT. NO: SEATS IN THE OPPOSITE DIRECTION TO TRAVEL.
NO:DO NOT POSITION THE CAR SEAT ON VEHICLES EQUIPPED WITH AIRBAG INSTALLED.
- WARNING! After selecting the proper configuration for the housing of the car seat, follow the installation instructions.
MAINTENANCE
Clean plastic parts with a damp cloth. Do not use abrasive detergents. Keep wheels clean from sand and dust. Dry the metal parts accurately to prevent the formation of rust. Do not leave the product exposed to sunlight or bad weather for a long time to avoid fabrics
and materials changing colour. Clean the lining with a damp cloth.

MATERIALS
STROLLER
Cover: Polyester
Fiber foam
Structure: Steel
CARRYCOT
Cover: Polyester
Fiber foam
Structure: Polypropylene
CAR SEAT
Cover: Polyester
Fiber foam
Structure: Polypropylene
SIZES
STROLLER
Open: L: 87 cm;
H: 106 cm;
D: 53.5 cm.
Closed: L: 92,5 cm;
H: 38 cm;
D: 38 cm.
CARRYCOT
Open: L: 85,5 cm;
H: 53 cm;
D: 44,8 cm.
Closed: L: 85,5 cm;
H: 28 cm;
D: 44,8 cm.
CAR SEAT
Open: L: 62,5 cm;
H: 59 cm;
D: 44.8 cm.
Closed: L: 68,5 cm;
H: 38 cm;
D: 44,8 cm.
WARNINGS
- Your child's safety may be affected if you do not follow these instructions..
FOR STROLLER
- WARNING Never leave your child unattended.
- WARNING Ensure that all locking devices are engaged before use.
- WARNING To avoid injury ensure that your child is kept away when unfolding and folding this product.
- WARNING Do not let your child play with this product.
- WARNING This seat unit is not suitable for children under 6 months.
• WARNING This seat is intended for children from 6 months and weighing up to 15kgs.
- The stroller can be used from birth of the child if used with the carrycot or car seat group 0+ (combined with the package).
- Do not allow children to play with the plastic bags used for packaging because they may suffocate.
- WARNING Always use the restraint system. - WARNING Always use the crotch strap in combination with the waist belt.
- WARNING Check that the pram body or seat unit or car seat attachment devices are correctly engaged before use.
- WARNING this product is not suitable for running or skating.
- WARNING This product is suitable for a child that cannot sit up by itself, roll over and cannot push itself up on its hands and knees. Maximum weight of the child: 9 kg.
- WARNING After removal of the safety harness (e.g. for washing), ensure that the harness is reassembled correctly using the anchorage points. The harness must be readjusted. To ensure that the harness is adjusted correctly, fitting your child and securely closed, pull firmly on the end of the harness (on the underside of the seat).
- WARNING The parking device shall be engaged when placing and removing the children.
- WARNING Any load attached to the handle and/or on the backrest and/or the sides of the vehicle will affect the stability of the vehicle.
- Do not use accessories not approved by the manufacturer.
- Do not use with more than one child at the same time.
- Do not leave the child standing on the stroller.
- Do not lift it up with the child inside.
- Do not lift the stroller by grasping it from the front bumper bar because it is not designed to withstand loads. Grasp the stroller under the armrests if necessary.
- Keep away from fire. Never allow a naked flame near this product.
- Do not leave the stroller on hill or inclined even though the brake is operated.
- WARNING This stroller can only be used to sit one child.
- Please brake the stroller even when not using it to avoid emergencies.
- Ensure that anyone using the product is aware of the exact operation of the same.
- Be very careful on the street and fold the stroller before going upstairs or downstairs.
- Do not use the product on the beach.
- Avoid contact of the product with saline water to prevent the formation of rust.
FOR STROLLER USED
IN COMBINATION WITH THE PRAM
- WARNING This product is only suitable for a child that cannot sit up unaided. The carrycot is not suitable for children that can sit up by themselves, that know how to roll on themselves or that know how to point hands, knees or feet and weighing over 9 kg.
- Use only on a stable, horizontal level and dry surface.
- WARNING Do not let other children play unattended near the carrycot.
- Be aware of the risk of open fire and other sources of strong heat, such as electric ring fires, gas fires, etc., in the near vicinity of carrycot.
- The handles and the bottom should be inspected regularly for signs of damage and wear.
- WARNING Never use the carrycot on a stand.
- WARNING! The carycot can be used for car transportation only if using the "car kit". Refer to the user manual of the "car kit" for all information concerning assembly of the same on the carycot, the installation of the
carrycot in the car and its use during travel (car kit sold separately).
- Do not add a mattress with a thickness greater than 10 mm in the carrycot.
- The carrycot does not replace the cot; if your child needs to sleep, put it in a suitable cot.
- The carrycot is not intended for prolonged periods of sleep.
FOR STROLLER USED IN
COMBINATION WITH THE CAR SEAT
- The car seat is classified group 0+ and has been specially designed for children weighing up to 13 kg.
- The safety buckle of the car seat must always be fastened when in use, but take care that it is always clearly visible in order to release the child in case of an emergency.
- Keep the instructions of the car seat in the specific back pocket of the same (child's head height) inside the lining.
- Do not modify the seat, for any reason and do not integrate extraneous elements in the same.
- Do not use the child seat without the cover and replace the same only with a lining recommended by the manufacturer. Regularly check the base and the handle for damage and wear and tear. Check the product regularly for damage.
- When the child is 9 months of age or weighing 9-11 kg, pull out the pad under the cover of the seat of the child car seat so as to increase ease and comfort of the child.
- WARNING! The car seat must not be used in lieu of the reclining bouncer.
- For car seats used in conjunction with a chassis, this vehicle does not replace a cot or a bed. Should your child need to sleep, then it should be placed in a suitable pram body, cot or bed.
FOR THE ASSEMBLY PHASE:
• The product must be assembled by an adult.
- Keep the child away when opening and closing.
- During installation be careful not to lose the pieces needed.
FOR USE:
• Always make sure that the safety harnesses are correctly fastened when the child is in the stroller.
• Always use the safety harnesses together with the crotch strap.
- Regularly check the product for damage. Do not use the stroller if any component has been lost or damaged.
OTHER WARNINGS
• Always check correct fastening of the carrycot and car seat to the stroller.
- Use only replacement parts supplied or approved by the manufacturer.
- WARNING Do not use if any part is broken, torn or missing.
- The basket must not be loaded with more than 3 kg. The organised bag must not be loaded with more than 2 kg.
- Do not let other children play unattended near the stroller.
FOR TECHNICAL OR COMMERCIAL REASONS, GIORDANI RESERVES THE RIGHT, AT ANY TIME AND ALSO ONLY IN A SPECIFIC COUNTRY, TO MODIFY THE TECHNICAL CHARACTERISTICS OF THE MODELS DESCRIBED IN THIS LEAFLET, AND/OR THE SHAPE, TYPE AND NUMBER OF THE ACCESSORIES SUPPLIED.