A6 - Dashcam TrueCam - Free user manual and instructions
Find the device manual for free A6 TrueCam in PDF.

| Product type | Dashcam TrueCam A6 |
| Video resolution | Full HD 1080p (1920x1080) at 30 fps |
| Rear camera | HD 720p (1280x720) at 30 fps |
| Viewing angle | 130° (in 1080p) |
| Screen | LCD 2.7 inches |
| Sensor | CMOS 3 MP (AR0330) |
| Storage support | Micro SD card up to 32 GB (Class 10 recommended) |
| Built-in battery | 250 mAh |
| Power supply | 12-24 V (cigarette lighter adapter) |
| Safety functions | G-sensor, file protection, parking mode |
| Advanced functions | Motion detection, loop recording, time-lapse, WDR |
| GPS module | Optional, records route and speed |
| Radar detector | Optional, voice and visual alerts |
| Filters | Optional (CPL and UV) |
| Maintenance | Clean with a soft, lint-free cloth, avoid humidity and extreme temperatures |
| Safety | Do not operate while driving, do not place in front of airbags |
| Spare parts | GPS module, radar detector, filters, mounts, charger |
| Repairability | Do not disassemble; firmware update available at truecam.com |
| Dimensions | 103 x 51 x 41 mm |
| Color | Black |
| Interface languages | French, English, German, Spanish, etc. |
| Manufacturer | elem6 s.r.o., www.truecam.eu |
Frequently Asked Questions - A6 TrueCam
User questions about A6 TrueCam
0 question about this device. Answer the ones you know or ask your own.
Ask a new question about this device
Download the instructions for your Dashcam in PDF format for free! Find your manual A6 - TrueCam and take your electronic device back in hand. On this page are published all the documents necessary for the use of your device. A6 by TrueCam.
USER MANUAL A6 TrueCam
a) Device Introduction 1
b) Introduction of accessories 2
c) Button functions in recording mode. 3
d) Button functions in playback mode 3
(e)LED light status list. 4
f) Product accessories 4
Basic operation. 5
a) TF card installation. 5
b) Rear Camera Installation. 6
c) GPS locator and speed camera detector (optional). 7
d) CPL Installation (optional). 9
(e) Power supply. 10
Device operation. 10
a) Automatic video-recording. 10
b) Taking picture. 10
c) Motion Detection. 10
d) GPS voice + units. 11
e) File Protection. 11
f) G-sensor function. 11
Important Functions. 12
a) Parking mode 12
b) Timelapse. 12
c) Loop settings. 12
d) Delay ON/OFF. 12
(e) Displaying GPS (optional). 12
f) Speed camera detection. 12
g) Speed Display (optional) 12
h) Player. 13
Icons on screen display. 14
(a) In standby status. 14
b) In recording status. 15
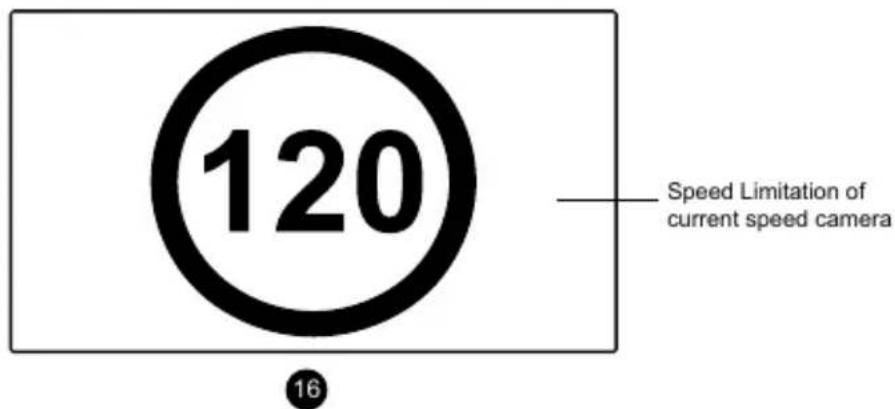
c) Function SPEEDOMETER (optional with GPS module). 16
Menu setting. 17
a) In the recording mode. 17
b) In the playback mode. 19
Connection. 19
a) TV or monitor connection. 19
b) Computer connection 19
Technical specifications. 20
Product pictures & Function
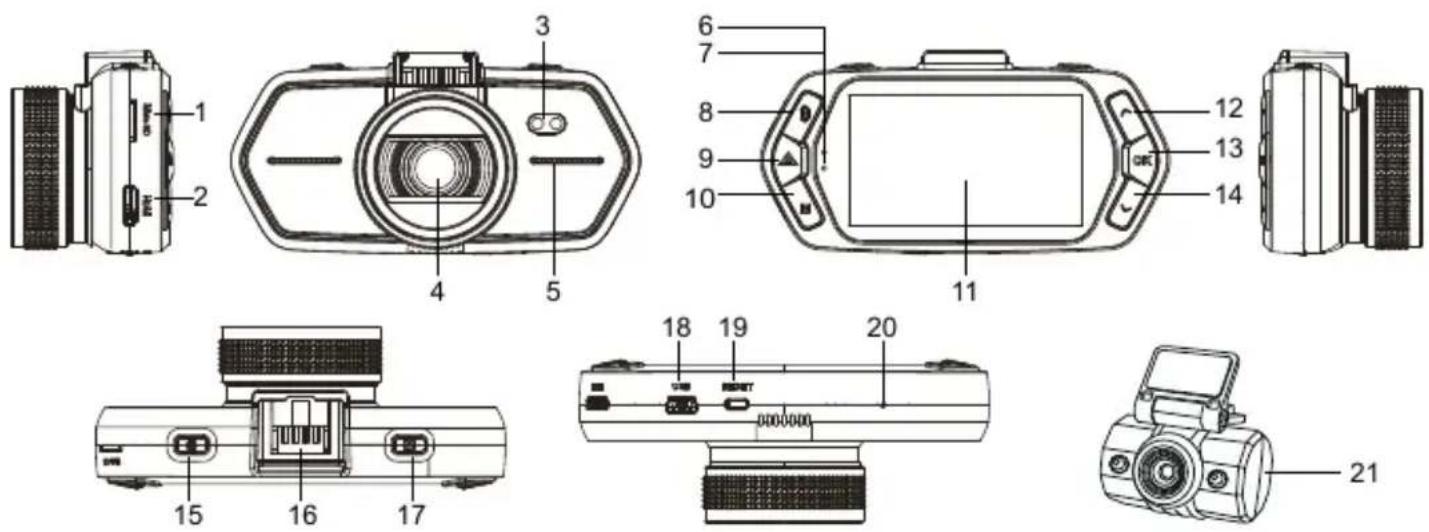
a) Device Introduction
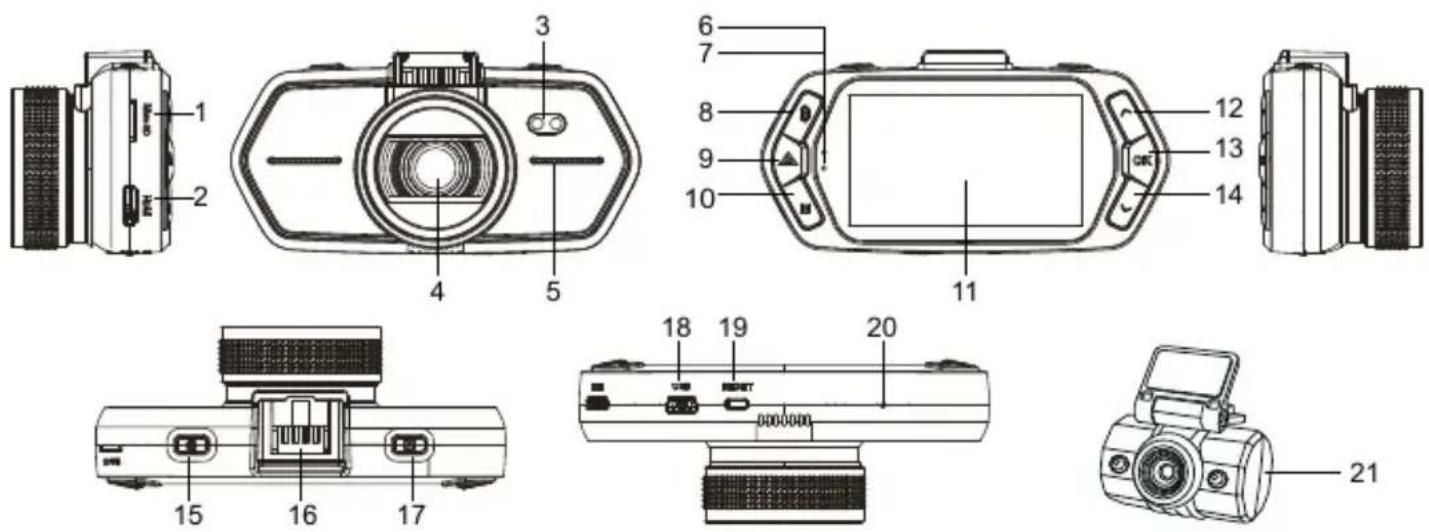
| 1. TF Card Slot | 2. HDMI Port | 3. LED Light |
| 4. Lens | 5. Speaker | 6. Status Light (Blue) |
| 7. Charging Light (Red) | 8. Menu Button M | 9. File Protection Button ▲ |
| 10. Mode Button M | 11. LCD Display | 12. Up Button |
| 13. OK Button | 14. Down Button | 15. Power Button |
| 16. Holder Connector | 17. Photo Button | 18. USB Port |
| 19. Reset Button | 20. Microphone | 21. Rear camera |

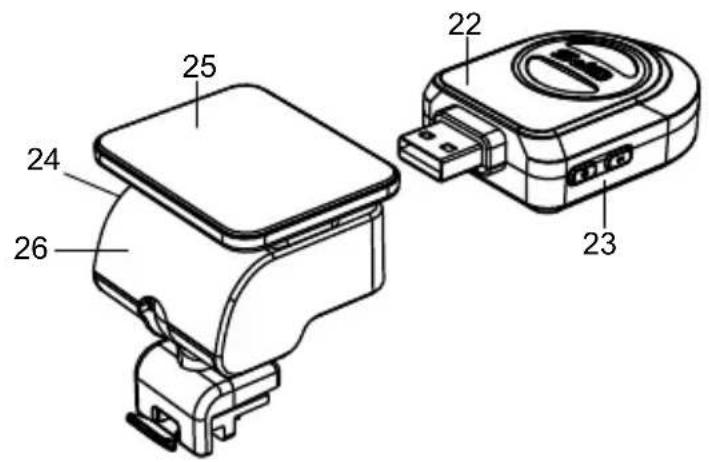
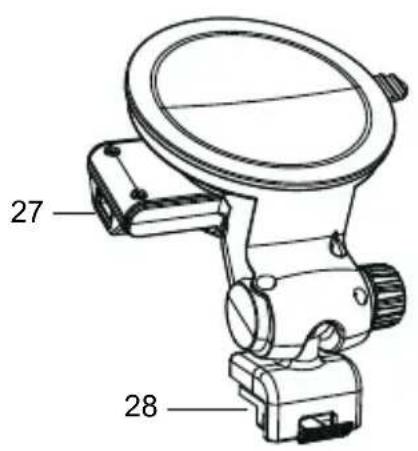
b) Introduction of accessories
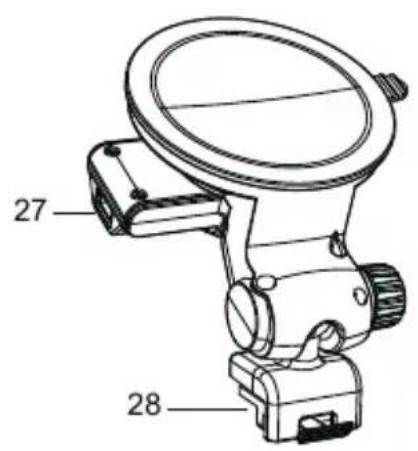
| 22. GPS module with speed camera detector (optional) | 23. Speed camera detector voice switch | 24. Power connector | 25. Adhesive surface |
| 26. Camera holder | 27. Power connector | 28. Holder connect with Device Port | |
c) Button functions in recording mode
| Button | Function | Action | Remark |
| Main switch | On/Off | Long press | Turns the camera on/off |
| SPEEDOMETER | Short press | Turns the SPEEDOMETER function on/off | |
| Menu button | Menu settings | Press | Press this button to display the video settings. Double-click to show camera settings |
| File protection button | File Protection | Press | In recording mode, it locks/unlocks the record |
| Photo trigger | Taking a photograph | Press | Takes a photograph |
| Mode button M | Mode switching / turns the LCD screen off | Press | Switches between recording/playback modes In the recording mode - turns off the LCD screen |
| "Up" button | Move up | Press | In the menu - moves up |
| OK button | Starting a recording | Press | Turns the video recording On/Off |
| "Down" button | Move down/tums the sound recording off | Press | In the menu - moves down In the recording mode - turns the sound recording On/Off |
d) Button functions in playback mode
| Button | Function | Action | Remark |
| Menu button | Menu setting | Short press | Press this button to display the video settings. Double-click to show camera settings |
| Mode button M | Switch mode | Short press | Switch video/playback mode |
| Up button | 1) Previous file | Short press | Previous file |
| 2) Rewind | Short press | When playing video, press this button to rewind | |
| OK button | Play/pause video file | Short press | Play/pause video file |
| Down button | 1) Next file | Short press | Next file |
| 2) Fast forward | Short press | When playing video, press this button to fast forward play |
e) LED light status list
| LED light | Status | Description |
| Rec light (blue) | Flash | Device is recording |
| On | Device is in standby or playback mode | |
| Off | Device is off | |
| Charging light (red) | On | Charging battery |
| Off | Charging finished |
f) Product accessories
| 1. Car DVR 1x | 2. Car charger 1x | 3. Camera holder 1x | 4. 3M sticker 1x |
| 5. Suction mount 2x | 6. USB cable 1x | 7. Quick Start Guide 1x | 8. Rear camera 1x |
| 9. GPS module / Speed camera detector 1x (optional) | |||
Basic operation
a) TF card installation
Insert the Micro SD card into the slot so that the connectors on the card are facing towards the camera display. When inserting or removing the SD card, keep your camera turned off.

We recommend formatting the SD card while in use once a month. This will prevent the creation of defective files and helps to protect the SD card itself against damage.
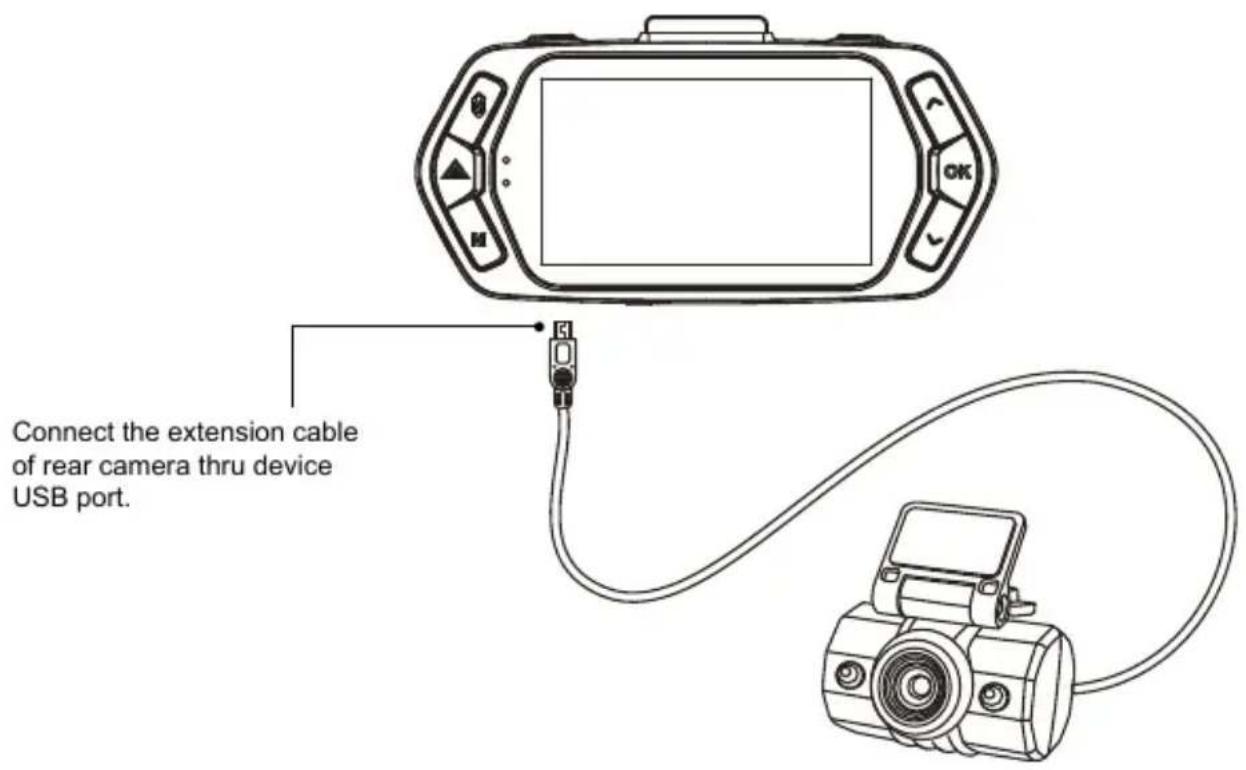
b) Rear Camera Installation
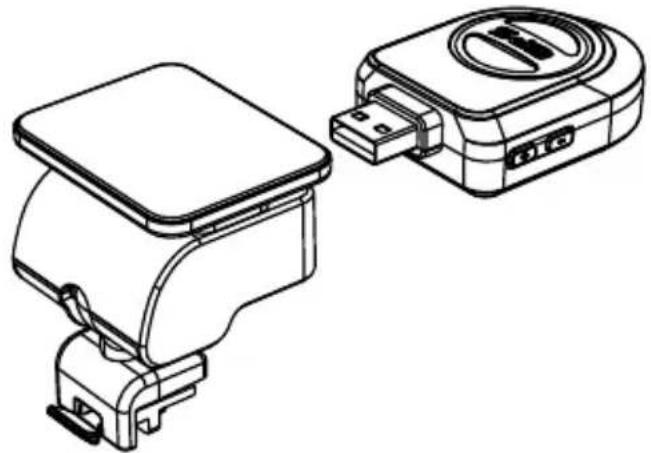
c) GPS locator and speed camera detector (optional)
Insert GPS / Speed camera detector module into the camera holder, as in the picture below:
Install the device on the windshield with the sticker or the suction mount.
When the device is powered, speed camera detector speaker will provide voice instructions from the speed camera detector speaker, and the device will automatically start to receive GPS signal. When not connected to a GPS satellite, GPS icon " 電 " will be shown red on the LCD display.
When connected to a GPS satellite, GPS icon "C" will be shown on the LCD display.
Note: GPS module works properly only when it is plugged into the DVR mount adapter that is connected to a power into the car lighter.
When you want to change the voice alert setting, the GPS module must be connected to power into the car lighter according to the notes above.
Updating the database of radars and voice alerts can be found at: www.truecam.com/firmware/
HOW TO PROPERLY INSTALL THE GPS MODULE INTO THE DVR HOLDER?
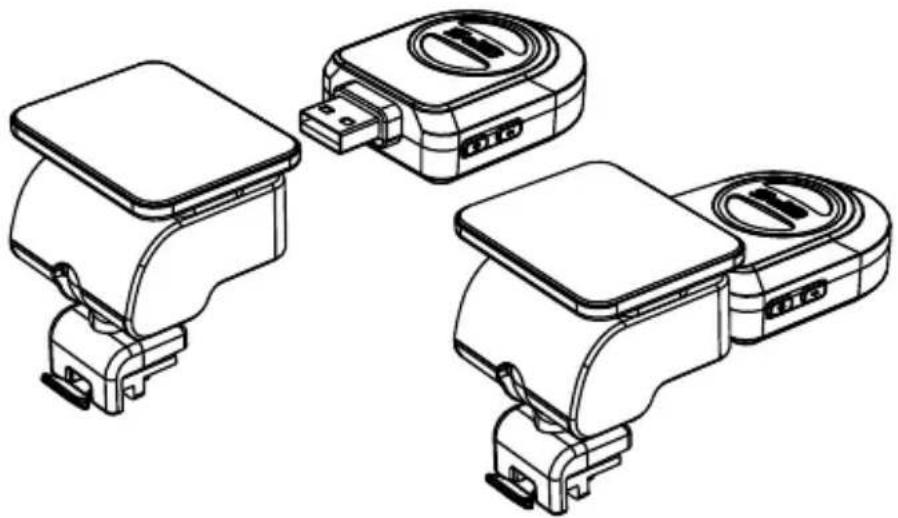
To connect the GPS module and the dashcam mount correctly, use sufficient force so there is no visible gap between the GPS module and the mount. This connection is strong enough for the GPS module to hold firmly in place, even during long journeys.
d) CPL Installation (optional)
CPL: Circular-Polarizing Filters, could reduce the reflection of inner car on the car window.
Without CPL
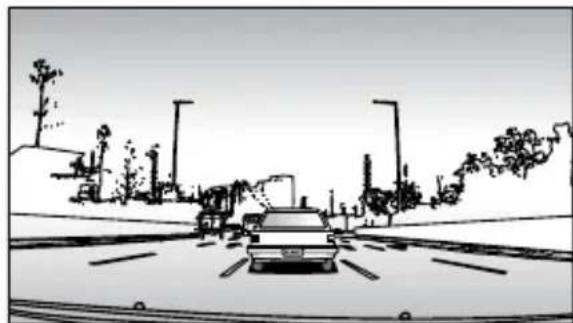
With CPL
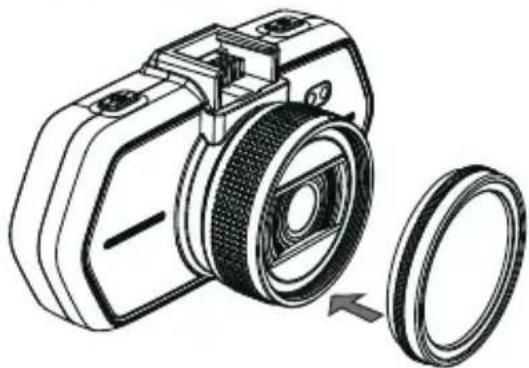
Install CPL onto device thru screw on device camera.
Adjustment circle ring
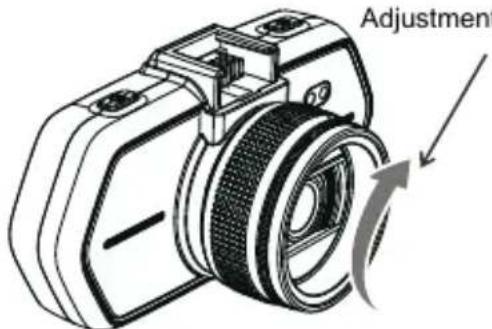
And after install CPL onto device and install device onto car window, rotate the adjustment circle ring on CPL to get the good Polarized effect to car window reflection.
e) Power supply
Connect the USB port and the cigarette lighter socket with the car charger, then start the engine, the device will automatically power on and start recording.
Note: There are two mini USB ports, one is on the device, another one is on the camera holder.
When the charging USB cable is connected to the camera, only the camera will by powered.
When the charging USB cable is connected to the camera holder, both the camera and the GPS / Speed camera detector will by powered.
So if want to work with GPS / Speed camera detector module, car charger need connect with mini USB port on camera holder.
Device operation
a) Automatic video-recording
- Start the car engine.
- The device will turn on and start recording automatically.
- Press file protection button to lock or unlock the recording video file.
- Press down button to start or stop audio recording.
- Press Power button to turn on the speedometer function.
- Press OK button to stop or start recording.
- When you turn the car engine off, the device will save the file and will be automatically powered off.
b) Taking picture
In recording mode, press camera button to take a photo in the current recording resolution.
In standby mode, press camera button to take a photo in the menu setting resolution.
c) Motion Detection
- In the recording mode, press the Menu button to enter the settings, then select Motion Detection.
- If the camera registers moving objects within its range, a flashing red dot "●" will appear on the display and the device will begin recording.
Once there are no moving objects detected, the device automatically stops recording.
The intensity of movement depends on the selected motion detection sensitivity. Users must know that selecting high sensitivity may soon lead to a full memory card.
Note: It is not recommended to use the motion detection and loop recordings together.
d) GPS voice + units
Allows you to select the language of the GPS module and change distance units between KMH and MPH.
e) File Protection
-
During recording, press the file protection button. Then the "O" will appear on the screen and the camera saves the current recording and protects it from being overwritten in the time loop mode.
-
Press the file protection button again to disable the file protection.
This function allows you to lock the video and protects it from being overwritten with another recording. Videos can be locked directly in the recording mode and in the playback mode.
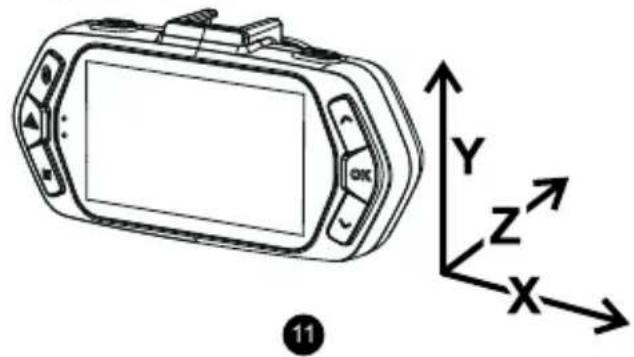
f) G-sensor function
In case of an accident, the gravity sensor (G-sensor) can gather direction and other important data of the collision. According to the value set for the G-sensor sensitivity, the camera will determine whether to turn the protection mode on or not. If the protection mode is not turned on, the current video may be overwritten by loop recording. Be careful when setting the G-sensor to a high sensitivity as it may cause file locking even when driving on a rough road. This might fill up the memory card quickly.
G-sensor directions are shown in the picture below:
Important Functions
a) Parking mode
When the function is activated in the menu, the camera will protect the vehicle during your absence. If the vehicle moves slightly, the camera begins recording automatically. After 60 seconds, the recording stops and the camera turns off if the movement is not repeated. The device uses a built-in battery for power. To extend battery life, which is up to 24 hours when fully charged, connect the device to an external power source, e.g. connect it to a car cigarette lighter.
b) Timelapse
The Timelapse function can be activated/deactivated in the menu. When the function is activated, the camera records with the selected speed (fps = frames per second), at 15 fps, 10 fps or 5 fps. The less fps you set, the more accelerated the resulting recording will be. The advantages of this function are as follows: 1) The total recording time that can fit on a memory card is several times higher. 2) The whole recording can be watched a lot faster, without you missing any unexpected or unusual situations. Timelapse recording is captured by both the front and rear camera.
c) Loop settings
The Time Loop allows continuous recording regardless of the memory card capacity. You can choose from three time intervals: Off / 1 min / 3 min / 5 min / 10 min. The selected interval determines the length of recording time which the camera will save. The advantage of using this setup is that you will never run out of space on your memory card. Moreover, it is very easy to send very small files via e.g. e-mail for use as evidence.
d) Delay ON/OFF
This function is used to delay turning the camera on/off after starting/stopping the engine of your car. It is therefore possible to increase free space on the memory card (regarding delayed turning on), or to have a record of what happens when you leave your car (regarding delayed turning off).
e) Displaying GPS (optional)
It shows your GPS position directly in the video. The location is displayed in the form of coordinates.
f) Speed camera detection
This function enables / disables voice and visual alerts of speed cameras.
g) Speed Display (optional)
It shows your speed directly in the video. It can be used for checking later.
h) Player
- Player uses data from GPS module (optional).
TrueCam A6 camera offers you smart and useful software. On a single screen it allows you to view your footage, the route on map, the speed chart and the g-forces obtained from the camera's internal G-sensor.
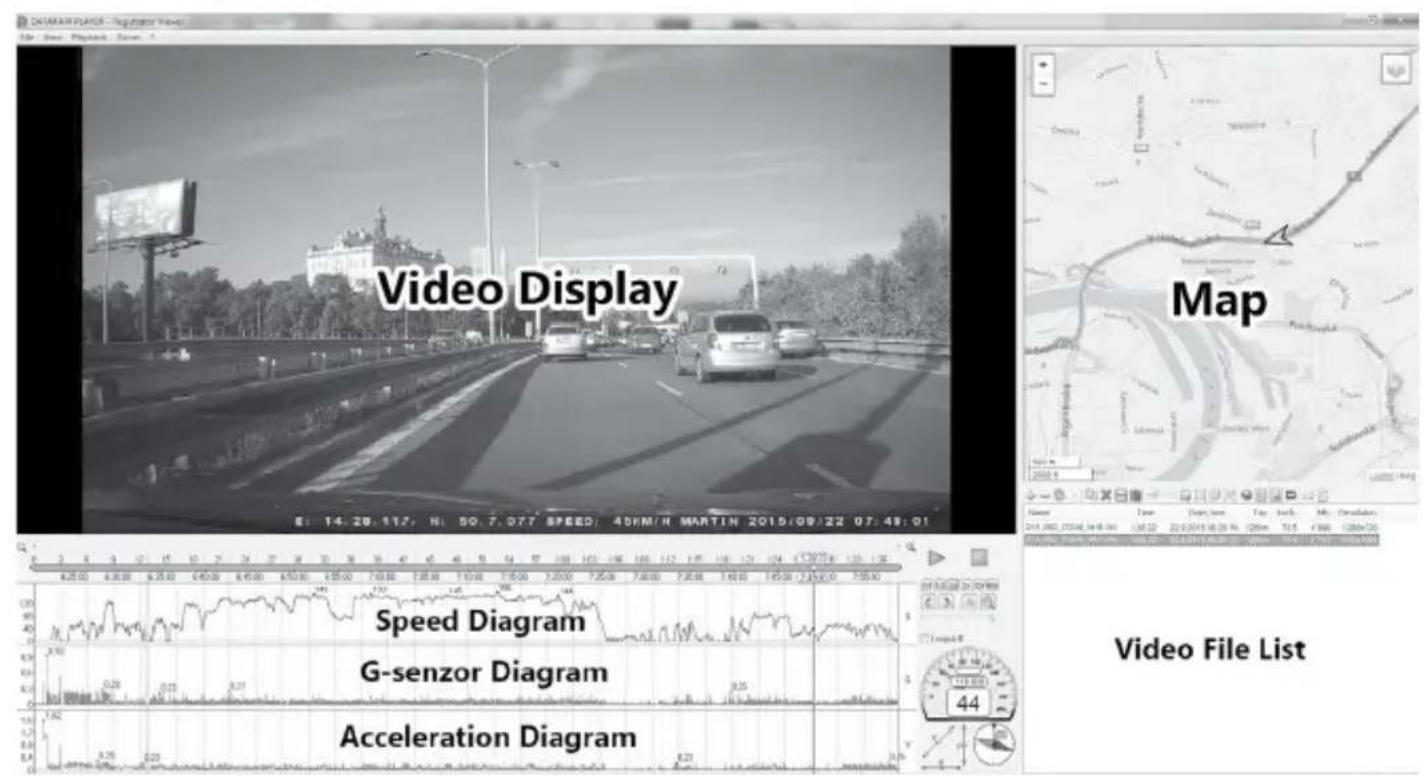
More info about how to download software player can be found here: http://truecam.com/download/player.zip
Icons on screen display
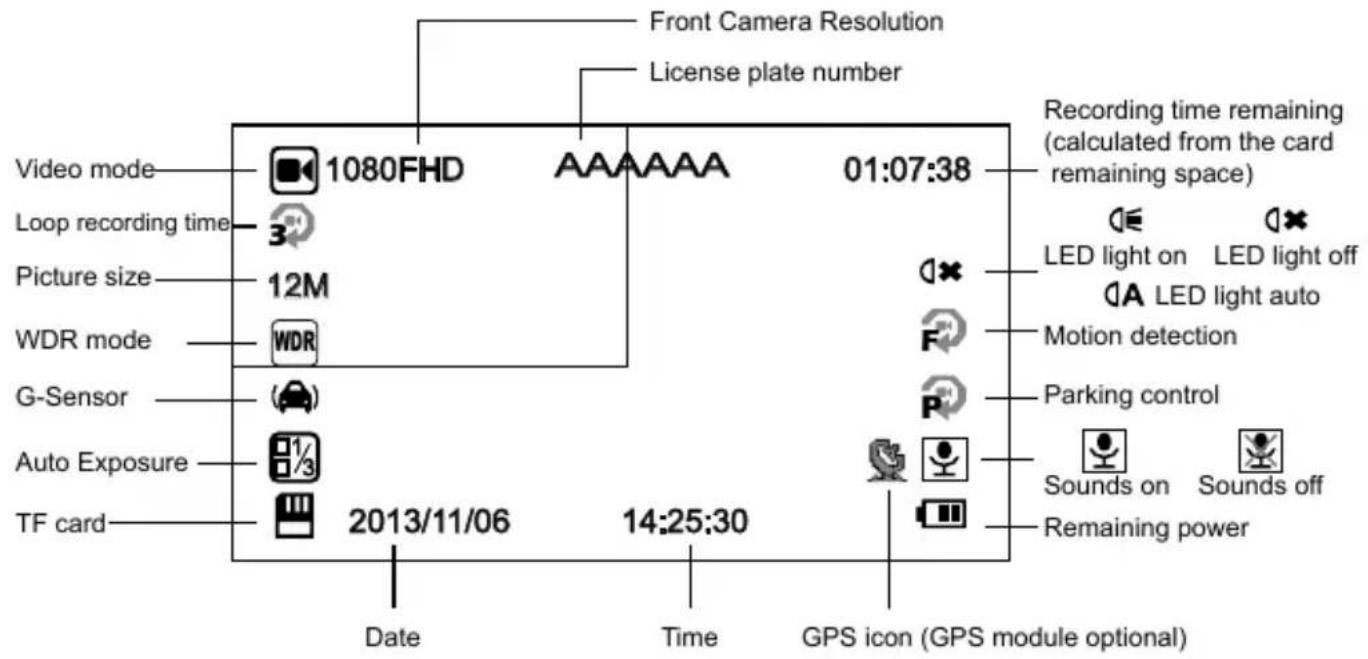
a) In standby status
b) In recording status
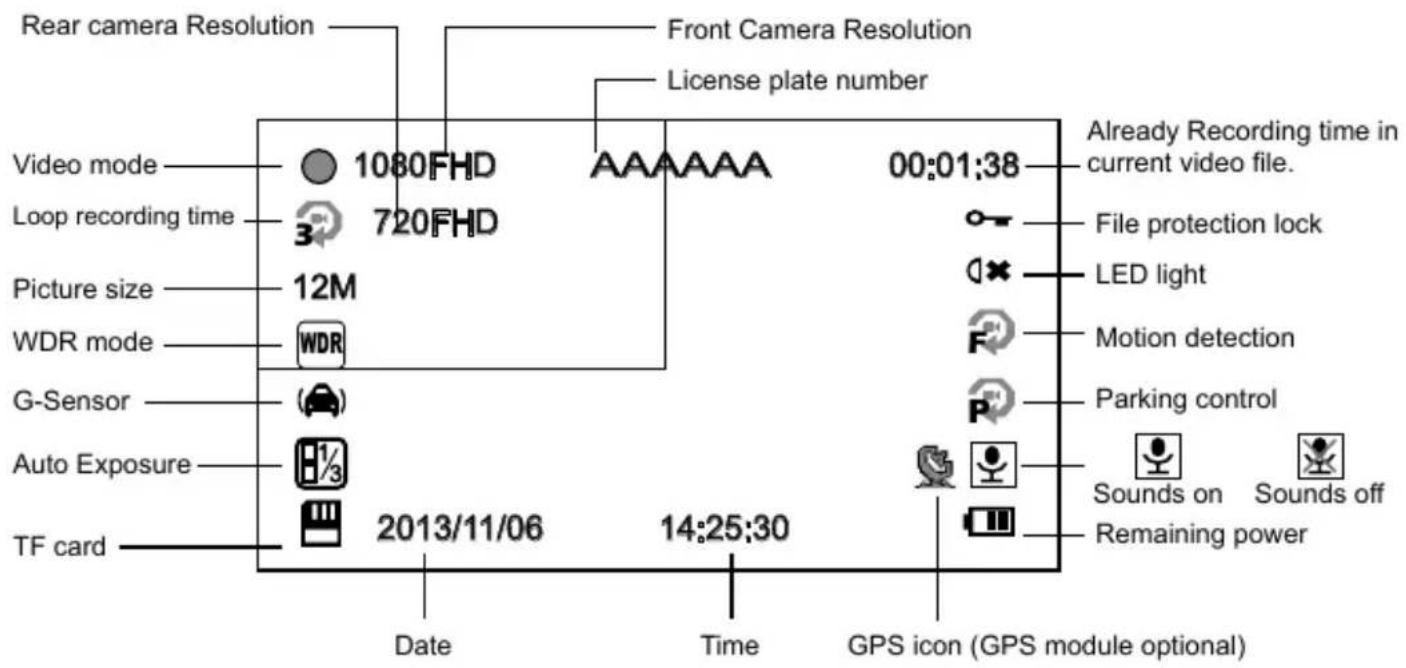
Note I: The sign "720FHD" will be displayed on the camera screen only with the attached rear camera. Note II: When connecting the rear camera, the front camera adjusts the resolution to 1440 x 1080p.
c) Function SPEEDOMETER (optional with GPS module)
When in recording mode or standby mode, pressing up button will switch the screen to the picture bellow and information about current speed, compass and distance to speed camera will be shown.
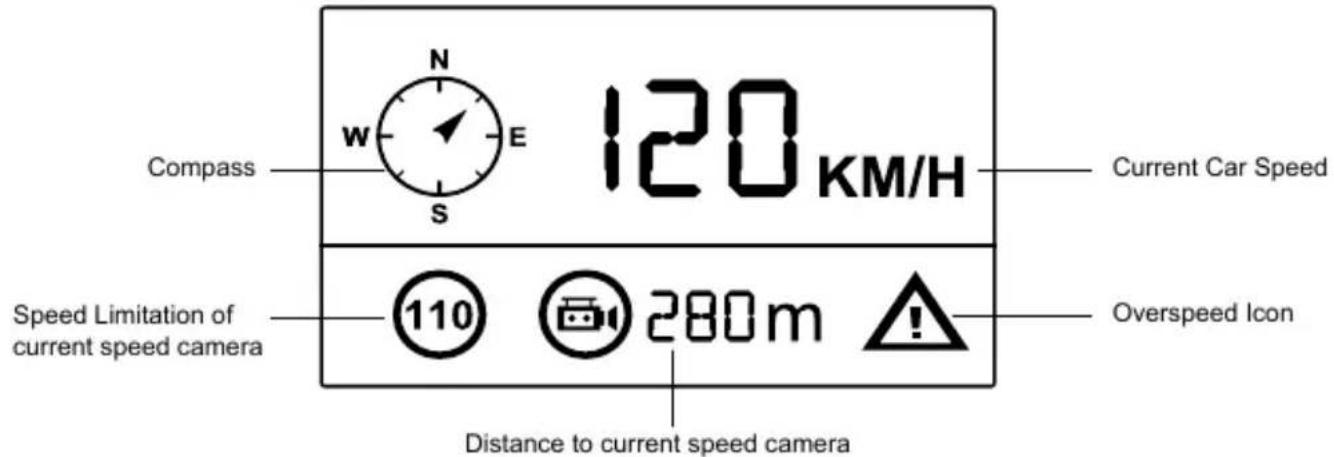
If the driving speed is above the current speed limit, the below picture will appear.
Menu setting
The device uses two modes - recording and playback.
a) In the recording mode
| Function | Menu item | Note |
| Resolution | 1080p / 720p / WVGA / VGA | Sets the video resolution. |
| TimeLapse | Off / 15 fps / 10 fps / 5 fps | Sets the number of images for Timelapse. |
| Dual recording | Off / On | Sets both cameras to record. |
| Loop recording | Off / 1 min / 3 min / 5 min / 10 min | Sets the length of the video time loop. |
| Picture resolution | 12M / 8M / 5M / 3M / 2MHD | Sets the photo resolution. |
| Exposure | +2.0; +5/3; +4/3; +1.0; +2/3; +1/3; 0; -1/3; -2/3; -1.0; -4/3; -5/3; -2.0 | The "+" increases recording brightness. The "-" decreases brightness and darkens the recording. |
| White Balance | Auto / Daylight / Cloudy / Tungsten / Fluorescent | We recommend setting it to Auto. White Balance depends on light conditions. |
| WDR | Off / On | WDR settings. |
| Motion Detection | Off / Low / Medium / High | Motion Detection function settings. |
| Parking mode | Off / On | Parking mode function settings. |
| G-Sensor set | Off / Low / Medium / High | G-Sensor sensitivity settings. |
| Record Audio | Off / On | Audio Recording settings. |
| Date Stamp | Off / On | Timestamp in the video settings. |
| Drive name | ----- | Sets the driver's name. |
| Driver name stamp | Off / On | Sets the display of the driver's name. |
| Image Rotation | Off / On | Rotates the image 180 degrees. |
| Date/Time | YY/MM/DD | Date and Time settings. |
| Power on delay | Off / 10 s / 20 s / 30 s | Sets the delay when turning the camera on. |
| Power off delay | Off / 10 s / 20 s / 30 s | Sets the delay when turning the camera off. |
| Auto Power Off | Off / 1 min / 3 min / 5 min | By setting the time, the camera switches off automatically in the standby mode after a given period of time if it does not detect any motion. |
| Beep Sound | Off / On | Sets the camera's tones On/Off. |
| Screensavers | Speedometer: 1 min / 3 min / 5 min / Display off: 1 min / 3 min / 5 min / Off | Instead of playing recorded footage, the camera screen can be turned off after a certain time interval, or the Speedometer function can be set. |
| Key backlighting | Auto / Off / On | Sets the backlighting of keys. |
| LED illumination | Auto / Off / On | Camera illumination settings. |
| TV mode | NTSC / PAL | TV mode settings. |
| Frequency | 50Hz / 60Hz | Video frequency settings. |
| Language | English / French / Spanish / Portuguese / German / Italian / Hungarian / Czech / Polish / Serbian / Chinese / Russian / Japanese / Lithuanian | Language settings. |
| GPS voice + units | 1. English KMH / 2. English UK MPH / 3. Deutsch KMH / 4. Polski KMH / 5. Čeština 1 KMH / 6. Čeština 2 KMH / 7. Lietuvić KMH / 8. Magyarország KMH / 9. Srpski KMH | GPS Module language settings. |
| Speed camera detection | On / Off | This function enables / disables voice and visual alerts of speed cameras. |
| Time Zone Setting | GTM | Chooses the time zone. |
| GPS Watermark | Off / On | Sets the display of the GPS in a video. |
| Speed Watermark | Off / On | Shows the speed in a video. |
| Format | Cancel / OK | Formats data on the memory card. |
| Default Setting | Cancel / OK | Reset the camera to the original factory settings. |
| Software version | TRCM_A6_V## | Displays the installed FW version. |
b) In the playback mode
| Delete | Delete current / Delete all |
| Protect | Lock current / Unlock current / Lock all / Unlock all |
| Format | Yes / No |
| Presentation | 2 seconds / 5 seconds / 8 seconds |
Connection
The camera can be set to output video to another device (TV or a computer monitor) and start the playback or adjust the settings.
a) TV or monitor connection
- Insert SD card to the camera.
- Connect HDMI cable to a TV and your camera.
- Turn on both devices.
- Set the input channel to HDMI on a TV or a monitor.
- Installation completed.
Connect the camera to a TV to watch a live video feed.
b) Computer connection
- Insert SD card to the camera.
- Use a USB cable to connect a PC to the camera. "Found new hardware" notification will appear on the screen.
- Open the removable disc folder to play any file.
Technical specifications
| Camera | Sensor | 3Mega CMOS Senzor, AR0330 |
| Camera angle | 130° 1080p | |
| Video | Format | Format Mov, compression H.264 |
| Resolution | 1920x1080 30fps / 1280x720 30fps / 800x480 30fps / 640x480 30fps | |
| Rear camera | 1280x720 30fps | |
| Microphone | Built-in microphone, can be turned on or off | |
| Photo resolution | 4032x3024 / 3264x2448 / 2592x1944 / 2048x1536 / 1920x1080 | |
| LCD | 2.7 inches LCD display | |
| G-Sensor | In the event of a severe impact, the device automatically locks the last recorded recording and protects it from being deleted. | |
| GPS locator (optional) | GPS locator to record path, position, speed and time. Has the possibility of playing path and position on Google Maps. | |
| Speed camera detector (optional) | Uses a database of speed cameras. If a radar detector is close, the device will warn you with a sound and on the screen. | |
| Filters (optional) | A circular polarizing filter, which reduces reflections on the car's interior wind shield. | |
| UV filter: It protects the lens and filters very bright lights. | ||
| Other functions | Button Illumination | |
| Loop recording. If the card's capacity is full, the camera will automatically begin overwriting the first file. As a result, the video will not be interrupted. | ||
| Protection against deleting locked files. | ||
| Automatic recording starts when connected to power (starting the car) | ||
| Memory card slot | Supports Micro SD cards up to 32 GB (Class 10 cards are recommended) | |
| Language | English / French / Spanish / Portuguese / German / Italian / Hungarian / Czech / Polish / Serbian / Chinese / Russian / Japanese | |
| Interface | USB 2.0 | USB 2.0 |
| HDMI | HDMI | |
| Battery | 250 mAh | |
| Power supply | 12 to 24 V | |
| Operating temperature | -5°C ~ 40°C | |
| Colour | Black | |
| Dimensions | 103 x 51 x 41 mm | |
Made in China.
Printing errors are reserved.
Precautions and notices
- For your own safety, do no use the camera's controls while driving.
- A window mount is needed when using the recorder in a car. Make sure that you place the recorder in an appropriate place, so as not to obstruct the driver's view or deployment of airbags.
- Make sure that no object is blocking the camera lens and no reflective material is placed near the lens. Please keep the lens clean.
- If the car windscreen is tinted or heated, it may limit the quality of the recording and, above all, the GPS signal.
- For general use it is recommended to have motion detection enabled. May lead to the memory card filling up quickly.
- The camera is primarily designed to operate while being constantly under power supply.
Safety notices for batteries
- Before first use, fully charge the battery.
- For charging only use chargers, that is specified for this type of battery.
- Use standard cables for charging, otherwise it could damage the device.
- Never connect to a mechanically damaged charger or if the batteries are swollen. Do not use batteries in this condition due to risk of explosion.
- Do not use any damaged adapter or charger.
- Charge at room temperature, never charge at a temperature below 0^ or at a temperature higher than 40^ .
- Avoid dropping the battery, don't puncture, or mutilate it. Definitely do not attempt to repair a damaged battery.
- Do not expose the charger or battery to moisture, water, rain, snow or any kind of various liquids.
- Do not leave the battery in the car, do not expose to direct sunlight and do not place it near heat sources. Strong light or high temperatures can damage the battery.
- Never leave batteries without supervision during charging, short circuit or accidentally overcharge. Some batteries are unsuitable for fast charging or being charged excessively. This can cause a shock, or due to charger failure, may cause leakage of aggressive chemicals, explosion or subsequent fire!
- In the case of excessive heating of the battery during charging, immediately disconnect it from the power supply.
- Do not place charger and charging battery on or near flammable objects. Beware of curtains, carpets, tablecloths etc.
- Once the battery or device with integrated battery is fully charged, disconnect it from the power supply.
- Keep the battery out of the reach of children and animals.
-
Never disassemble the charger or battery. If the battery is integrated, do not disassemble the device, unless stated otherwise. Any such attempt is dangerous and can cause injury or damage to the product and subsequent loss of warranty.
-
Do not dispose worn or damaged batteries into the trash, fire or into heating devices, but hand them in at collection points for hazardous waste.
Safety precautions
- Charge the battery under continuous supervision.
- Use only the charger supplied with your device. Use of another type of charger may result in malfunction and/or danger.
- Do not use the charger in a high moisture environment. Never touch the charger when your hands or feet are wet.
- Allow adequate ventilation around the charger when using it to operate the device or charge the battery. Do not cover the charger with paper or other objects that will reduce cooling. Do not use the charger while it is inside a carrying case.
- Connect the charger to a proper power source. The voltage requirements are found on the product case and/or packaging.
- Do not use the charger if it is visibly damaged. In case of damage, do not repair the equipment yourself!
- In case of device overheating, immediately disconnect the power source.
About GPS
- GPS is operated by the United States government, which is solely responsible for the performance of GPS. Any change to the GPS system can affect the accuracy of all GPS equipment.
- GPS satellite signals cannot pass through solid materials (except glass). When you are inside a tunnel or building, GPS positioning is not available. Signal reception can be affected by situations such as bad weather or dense overhead obstacles (e.g. trees, tunnels, viaducts and tall buildings).
- The GPS positioning data is for reference only.
Caring for your device
- Taking good care of your device will ensure trouble-free operation and reduce the risk of damage.
- Keep your device away from excessive moisture and extreme temperatures and avoid exposing your device to direct sunlight or strong ultraviolet light for extended periods of time.
- Do not drop your device or subject it to severe shock.
- Do not subject your device to sudden and severe temperature changes. This could cause moisture condensation inside the unit, which could damage your device. In the event of moisture condensation, allow the device to dry out completely before use.
- The screen surface can easily be scratched. Avoid touching it with sharp objects.
- Never clean your device when it is powered on. Use a soft, lint-free cloth to wipe the screen and the exterior of your device. Do not use paper towels to clean the screen.
-
Never attempt to disassemble, repair or make any modifications to your device. Disassembly, modification or any attempt at repair could cause damage to your device and even bodily injury or property damage and will void any warranty.
-
Do not store or carry flammable liquids, gases or explosive materials in the same compartment as your device, its parts or accessories.
- To discourage theft, do not leave the device and accessories in plain view in an unattended vehicle.
- Overheating may damage the device.
Speed camera alerts
Caution:
- The camera includes supplementary software that is eligible to detect speed cameras and other traffic safety systems. Please verify that this supplementary software is according to the law of the state where the camera is used. Seller, producer or distributor assumes no responsibility for any damages incurred in connection with the use of cameras TrueCam and their functions.
- TrueCam is eligible to detect speed cameras and other systems used for securing safety in the traffic by finding out their GPS coordinates, which are ascertained from the public databases. The camera is not equipped by any system, which is able to detect radio waves, which are sent out by the speed cameras or other traffic safety system.
- The user of TrueCam is obligated to follow the rules of the traffic law of the country where TrueCam is used. Seller, producer or distributor assumes no responsibility for any possible sanctions, which are granted to the user of the TrueCam in the connection with the operation of the vehicle.
- You can activate this function in your GPS module by setting to ON position. You can receive alerts to warn you about the locations of speed camera, which will enable you to monitor your speed through these areas.
Database Update
- The elem6 s.r.o. is not liable, nor takes any responsibility, for the accuracy or validity of any coordinates of listed speed cameras or traffic cameras.
- The elem6 s.r.o. may from time to time offer an update for the coordinates of listed speed cameras or traffic cameras. All available updates, including voice alert updates, are available for download from our website www.truecam.eu. Please make sure to accurately follow the instructions for updates as stated on our website.
Other information
1)
For households: This marking indicates that this product should not be disposed with other household wastes throughout the EU. To prevent possible harm to the environment or human health from uncontrolled waste disposal, recycle it responsibly to promote the sustainable reuse of material resources. To return your used device, please use the return and collection systems or contact the retailer where the product was purchased.
They can take this product for environmental safe recycling.

In case of incorrect disposal of this kind of wastes user can be fined according to national laws.
User information for disposal of electric and electronic devices in countries outside the EU: The symbol stated above (crossed recycle bin) is valid only in countries in European Union. For correct disposal of electric and electronic devices ask your city hall or distributor of these devices. Everything is expressed by the symbol of crossed recycle bin on product, cover or printed materials.
2)
You can determine a warranty service at the place of purchase. In case of technical problems or queries contact your dealer who will inform you about the following procedure. Follow the rules for work with electric devices. User is not allowed to disassembly the device neither replace any of its components. To reduce the risk of electric shock, do not remove or open the cover. In case of incorrect setup and plug in of device you will expose yourself risk of electric shock.
3)
We recommend to have the most up-to-date firmware version installed. This ensures optimal functionality of the device: www.truecam.com/firmware/
Declaration of Conformity:
Hereby, elem6 s.r.o., declares that all TrueCam A6 products are in compliance with the essential requirements and other relevant provisions of the EU Directive 2004/108/EC.
Products are intended for sale without any restriction in Germany, Czech Republic, Slovak Republic, Poland, Hungary and other EU countries. The warranty period for products is 24 months from the date of purchase, unless otherwise specified. The warranty period of the battery is 24 months and 6 months for its capacity. You can download the Declaration of Conformity from the website: www.truecam.com/support/doc.
Manufacturer:
elem6 s.r.o.
Braskovska 308/15, 16100 Praha 6
http://www.truemcam.eu
TrueCam® brand is a registered trademark and our products are protected by patent. All rights reserved.


TrueCam
FULL HD CAR DVR
BENUTZERHANDBUCH

Hergestell in China.
Technique parametry. 20
Predstaveni produktu
a) Predstaveni kamery
d) Vertraging AAN/UIT
a) In the recording mode
6) OchOBHbIe CBeDeHHaOpHaJaNExKHOCTaX
3TaФyHKcIa36JOKpyET BnDeo HHOBoe erO He CMOxKet 3aMeHHTb. 3a6JIOKIpOBaTb BnDeo MoXHo nprMoBpeXmte 3aIncu N BOCppon3BeDeHn.
e)ФункциG-ceHcopa
B cnuyae konlnn3n n ceh cop daet hnapaBneHne ydapa n ToUHbIe IHOpMaun O hem. B cooTBETCTBn C bbl6paHHo 1yBCTBNTeNbHOCTBO 3Haet, KOrda 3anncb DoJXHa 6bItb 3aunuEHa ot ydaJeHna. OctopoXHo, npn BBICOKO uYBCTBNTeNBcTn G-ceHCopa, faiNbI Moryt camOppon3BOJbHO 6nOKIpOBaTbcr N BO BpeM e3DbI NO HepOBhIX Doporax. KapTa naTm MoKet 6bICTpo 3anONHraTbcr.
HanpaBHeHne G-ceHCopa n3o6paxeHo Ha cIeDyUoJei KapTnHke:

Baxhblc yHkCnn
a) PeknnapKOBKn
Iocne BkHoueHn yHKuHn peKm NapKOBKn B MeHIO, KaMepa 6yTe 3aunuaTb ABTomObNlb BO BpeMraBaWero OTCyTCTBn. EcJn ABTomObNlb DInHeTcXOTb HeMHoro, KaMepa ABTomaTneckn HauHaeT 3annCb. YpeE3 60 cekyn 3anncb octaHaBnBaETc, n KaMepa BblKnUoAeTc, ecnn DBnxKeHne He nobToprEtC. YcPoJCTBO nCnoB3yET BCToeHHb nn AKKymJrTOp. TTo6bl npOdNtB CpOK EKnpyatau (nonHOctb 3apxKeHHb nn AKKymJrTOp pa6otaet do 24 Yacob), noKnHouHTe ycToPcTBo K BHeUHemy NcToHnky NtTaHn, HanpImep, K npNKypNBaTeJIIO.
6) Taumnanc
B MeHIO KaMepb MoKHO BKNIOHTb/BbIKIOHTb FyHKUHO TaIMJANC. EcN 3Ta FyHKUHO BKIOUeHa, 3aINCb npoxoHb Ha BbIbpaHHo cKOpocTn (fps = frame per second; KOInueCTBO KaDPOB B ceKyHdy), To eCTb 15 fps, 10 fps nnn 5 fps. Yem MeHbIe KaDPOB B cekHyDy, Tem 6Oone yckopenHHa 3annc bnoyaeTc. PpeMMyuectBa 3ToI FyHKUHN: 1) o6uee Bpem 3aInCn, KOTopA NOMEuaetc H a KapTu NaMraTn B HeCKoJIbKO pa3 yBeJIuHBAeTc. 2) POnHyIO 3aInCb MoKHO npOCmotpeB 6bICTpee, He npOnyckar IIObIe HeOxNiDaHHbIe INI HeOsbIuHbIe CNTyaUIN. BnJeO c nomoubIO FyHKUIN TaIMJANC CHImaET nepedHry n 3aDNRA KAMEpa.
B)ПeТЯВрЕмEH
No3B0JAEHnpepbBHO CHmMaTb BnDeo He3aBncMo OT EMKocTn KapTb NaMrtn. MoXHo Bbl6paTb n3 Tpex BpeMeHHbIX INTEPBAIOB: BBkIIOUHTb / 1 MmH / 3 MmH / 5 MmH. Bbl6paHHbINTEPBAO nOpdeJeT, KaK DOnIro Kamepa CoXpaHIT 3aIIncN. PpenMyueCTBOM 3ToI HAcTPOKn YBJIeTcT O, YTO Ba7a KapTa NaMrtn HIKoTa He 3aONHHTcR NOHOCtBu. Kpome TOrO, HamHoro IpOSe OTnpaBHTb He6OJIbWne paIbI NO 3NeKTpoHHo NoyTe DnA NCNOB3OBAHn B KaueCTBe DOKa3aTeJIbCTBa.
r) Otpoqka BkIIOueHn/BBIKIOueHn
3TaФyHKUINHCNoB3yETcRdIgOTCPOUKNBkHIOUeHN/BBKIIIOUeHNKaMepblNocLeTOrO,KaK Bbl 3aBeJIINn 3aRnyuINMOtOpBaWeroABTomo6nI. TaKIMOBpa3OMMOKeTeYBEJNUHTCB0bODHOeMeCTOHaKapTeNaMRTN(B CNYue OTCPOUKNBkHIOUeHN) ININ ObecneuNTb 3aNNCbO pONCXODAeEM NOCLe TOrO, KaK Bbl NOKHUN ABTOMO6nIB (B CNYaeOTCPOUKNBkHIOUeHN).
I3o6paKaet GPS MeToOnIOxKeHne npA Mo B 3aIncN. MeToOnIOxKeHne I3o6paKaeTcB B Vnde KoOpDnHaT.
e) 06napyxeHne paapob
aHHa yHKnra N03BOJrae TBKIOHTb/BBIKIOHTb rOIOCOBbl e Bn3yAlhblte npdeynpeXdHn o paapax.
e) N3o6paXeHne cKOpOCTn (dONOIHTenbHO)
I3o6paKaetckopocTb npraMo B 3aHncn. 3To MoKet HcNoJb3ObaTbc Ja KHTpOJa No3Ke.
3) PporpaMMHbI npOnrpBbATEJIb
d) GPS voice + units
f) Speed camera detection
d) GPS voice + units
Omogucje izabrati gezik modula GPS zajedno s prethodno podesenim Jedinicama udalienosti KMH i MPH.
e) Zastita datoteka
- Tijekom snimanja pritisnite tipku „Izbornik". Nazaslonu ce se pojaviti " ", a kamera spremi aktualni video da bi se zašitio od presnimavanja u režimu snimanja unedogled.
- Ponovno pritisnite tipku „Izbomik" da isključite zašitu datoteka.