H5 - Dashcam TrueCam - Free user manual and instructions
Find the device manual for free H5 TrueCam in PDF.

| Product type | Car video camera (Dashcam) |
| Brand | TrueCam |
| Model | H5 |
| Dimensions | 54 x 45 x 45 mm |
| Power supply | 12-24 V via cigarette lighter charger; built-in battery 420 mAh |
| Maximum video resolution | 1920 × 1080 @ 30 fps (Full HD) |
| Viewing angle | 130° |
| Screen | 1.5 inch LCD |
| G sensor | Yes, adjustable (High/Medium/Low) |
| Loop recording | Yes (1/3/5/10 min) |
| Motion detection | Yes |
| Parking mode | Yes |
| Built-in WiFi | Yes (SSID: TrueCam H5, password: 12345678) |
| GPS module | Optional (in the mount) |
| Mounting bracket | Magnetic + 3M adhesive |
| Memory card | Micro SD up to 64 GB (Class 10 recommended) |
| Built-in microphone | Yes, enable/disable |
| Interface languages | French, English, German, etc. (8 languages) |
| Operating temperature | -5 °C to 40 °C |
| Warranty | 2 years (battery: 24 months, capacity: 6 months) |
| Maintenance | Clean with a soft, lint-free cloth; do not use abrasive products |
| Safety | Use only the supplied charger; do not expose to moisture; do not disassemble |
| Included accessories | Camera, car charger, mount, 3M stickers, USB cable, manual, Micro SD adapter |
| Manufacturing | China |
Frequently Asked Questions - H5 TrueCam
User questions about H5 TrueCam
0 question about this device. Answer the ones you know or ask your own.
Ask a new question about this device
Download the instructions for your Dashcam in PDF format for free! Find your manual H5 - TrueCam and take your electronic device back in hand. On this page are published all the documents necessary for the use of your device. H5 by TrueCam.
USER MANUAL H5 TrueCam
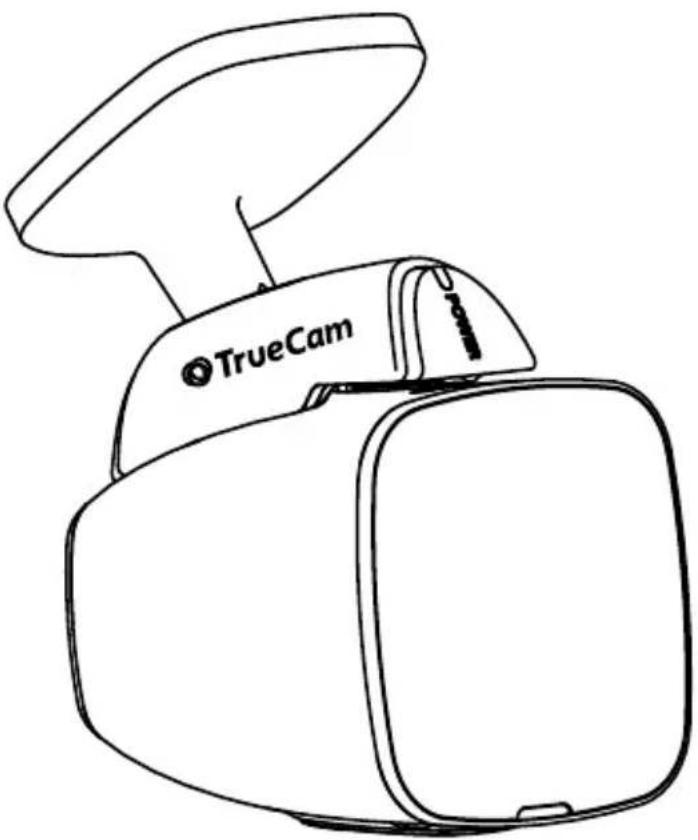
natural_image
Line drawing of a TrueCam device with a circular top and rectangular body (no text or symbols on the device itself)
TrueCam
TRUECAM H5
Dash Cam with Integrated Wi-Fi and Magnetic Holder
natural_image
Line drawing of a TrueCam device with a circular top and rectangular body (no text or symbols on the device itself)TrueCam H5
User manual
• 1080P Full HD
• GPS (optional)
• WiFi
• Magnetic Holder
Product Diagram & Functions....1
a) Device Introduction....1
b) Button Functions....2
c) LED Status List....3
d) Product Accessories....3
Basic Setup....4
a) SD Card Installation 4
b) GPS (optional) 4
c) Charging 5
Basic Features....6
a) Motion detection 6
b) Loop Settings 6
c) LDWS System 6
d) G-Sensor Function 6
e) Parking Mode 7
Modes 10
a) Video Mode 10
b) Photo Mode 10
c) Playback Mode....10
Important Features 11
Connection....11
a) Connecting to a Computer 11
Menu Settings....12
a) In Video / Photo Mode 12
b) In Playback Mode....13
Software Player....18
Technical Specifications....19
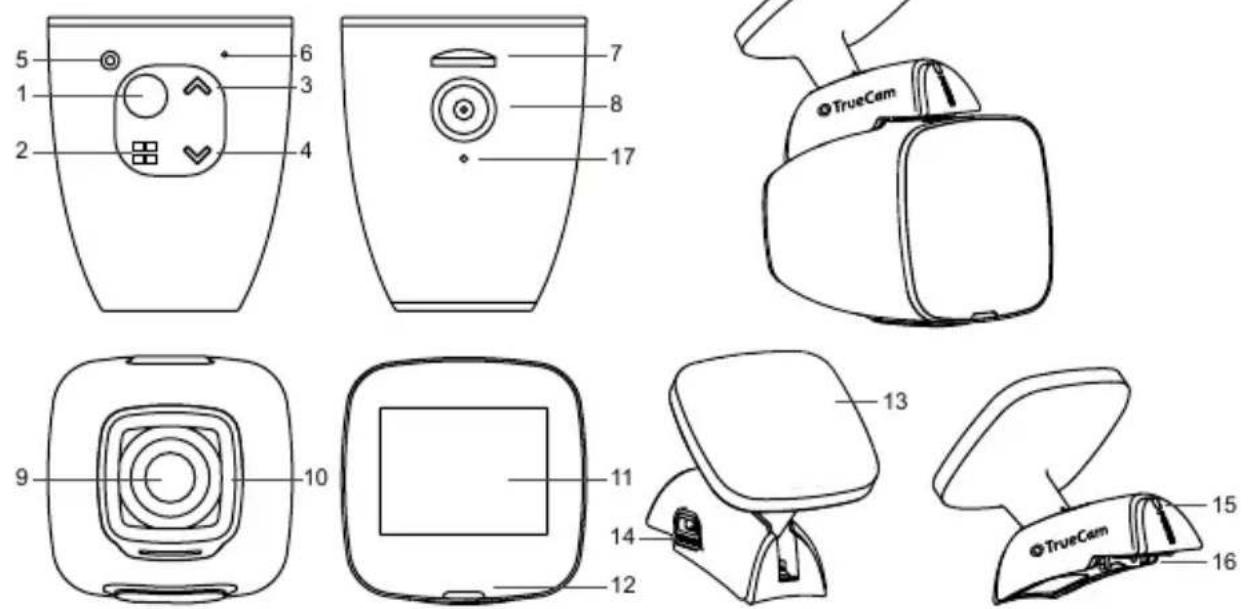
Product Diagram & Functions
a) Device Introduction

natural_image
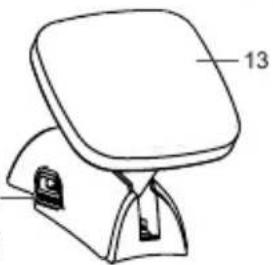
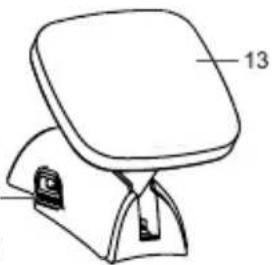
Line drawing of a beige portable device with a flat top and handle, labeled 'TrueCam' (no additional text or symbols)| 1. Power / OK | 7. SD Card Slot | 13. Mount with 3M Adhesive Pad |
| 2. Menu / Mode | 8. Magnetic Power Input | 14. USB Power Input |
| 3. Up | 9. Wide-Angle Lens | 15. Power LED |
| 4. Down | 10. Toughened Optical Glass | 16. Magnetic Power Supply Output |
| 5. Reset | 11. 1,5" Display | 17. GPS connector |
| 6. Microphone | 12. Status LED |
b) Button Functions
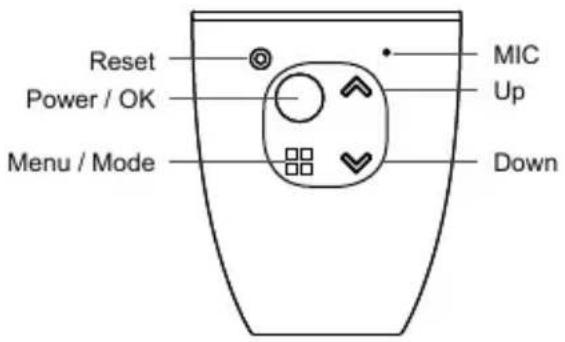
Power / OK Button
- To turn the device on / off, press and hold this button for 2 to 3 seconds.
- In video mode, the key works as a start / stop button.
- In the settings menu, press to confirm selection.
Reset Button
- If the device malfunctions, press this button to perform a hard reset.
Menu / Mode Button
- In video mode, press to go to the video settings menu. Double tap to go to the camera settings menu.
- In video mode (whilst recording), press to manually lock the current recording, to protect it from being overwritten when loop recording.
- In the settings menu, it serves as a "back" button.
- Press and hold to toggle between modes. Video – Photo – Playback
- In playback mode, press to enter the menu where you can lock / unlock the files or view them (when a file is locked, the "Key" icon is displayed).
Up Button
- In video or photo mode, press to zoom in.
- In video mode, press and hold to rotate the screen 180 degrees.
- In the settings menu, press to go to the previous item.
- In playback mode, press to select the previous file.
- In playback mode, when the camera is recording video, press to rewind.
Down Button
- In video or photo mode, press to zoom out.
- In video mode, press and hold to turn on Wi-Fi.
- In the settings menu, press to go to the next item.
- In playback mode, press to select the next file.
- In playback mode, when the camera is playing video, press to forward.
c) LED Status List
| LED Light | Status | Meaning |
| Camera Status LED(red) | Blinking | Camera is recording |
| On | Camera is in standby or playback mode | |
| Off | Camera is turned off | |
| Mount status LED(blue) | On | Camera is connected to the power supply |
| Off | Camera is not connected to the power supply |
d) Product Accessories
| 1. Car Camera 1x | 2. Car charger 1x | 3. Camera holder 1x |
| 4. 3M adhesive pads 2x | 5. USB cable 1x | 6. 3M power cable adhesive pads 5x |
| 7. User Manual | 8. Micro SD adapter 1x |
Basic Setup
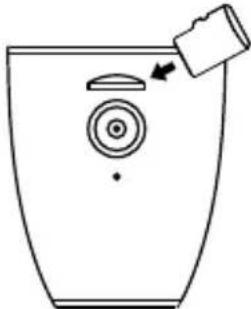
a) SD Card Installation
Insert the Micro SD card into the slot so that the connectors on the card are facing towards the camera display. When inserting or removing the SD card, keep your camera turned off.
natural_image
Simple line drawing of a toilet with a lid and outlet, no text or symbols presentWe recommend formatting the SD card while in use once a month. This will prevent the creation of corrupt files and helps to protect the SD card itself against damage.
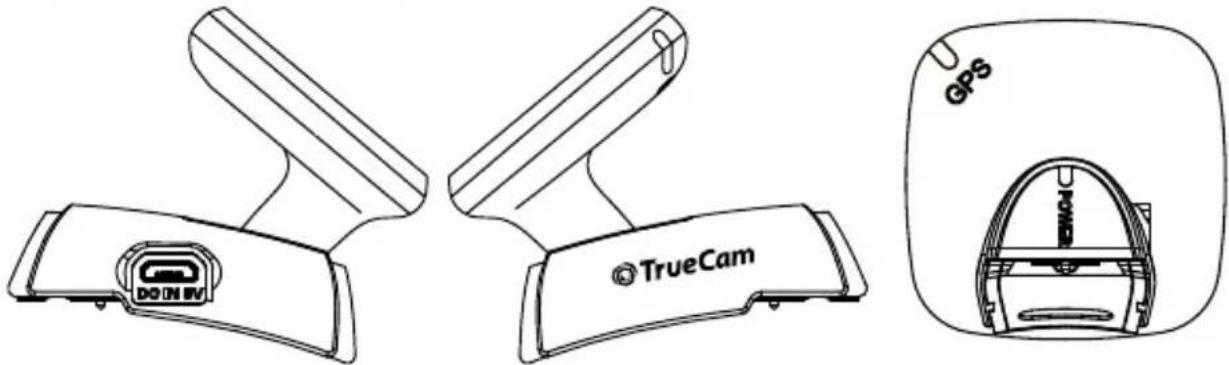
b) GPS (optional)
The GPS module is located directly in the camera mount.
natural_image
Three technical line drawings of a camera device with labeled components (no readable text or symbols)4
Install the device on the windscreen with the 3M adhesive pad. When not connected to a GPS satellite, the GPS icon
will be shown in red on the LCD display. When connected to a GPS satellite, the GPS icon will be shown on the LCD display.
c) Charging
Connect the USB charging port of the mount to the input port of the car charger / cigarette lighter, then start the engine. The camera automatically turns on and starts recording. Note: recording will only start automatically when the socket in the vehicle is powered by the ignition key.
Basic Features
a) Motion detection
- In video mode, press the Menu button to enter the settings, then select Motion Detection.
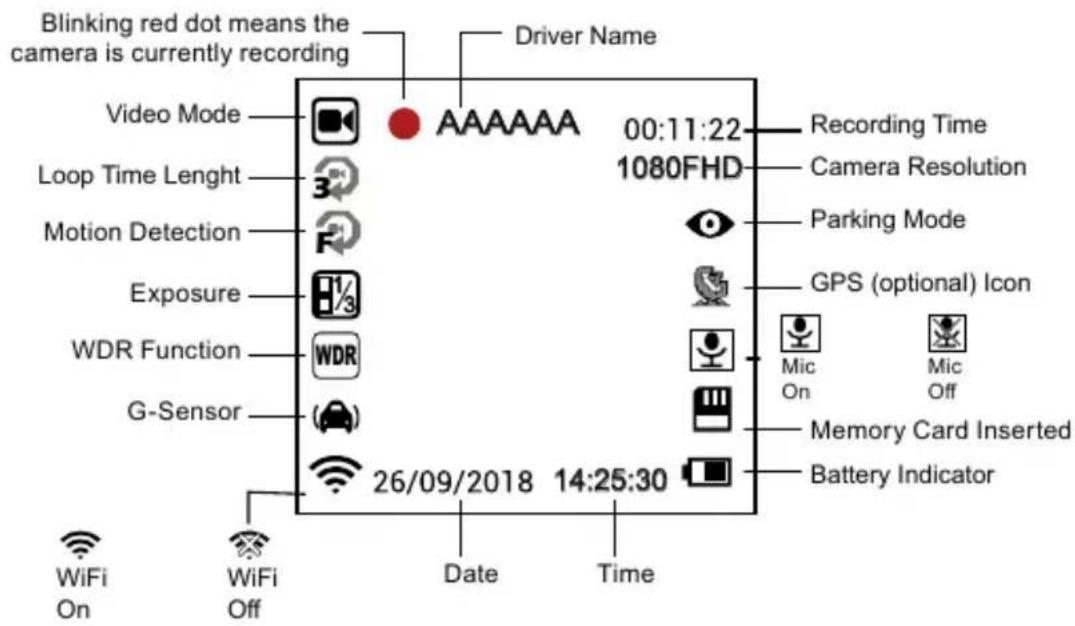
- If the camera registers moving objects within its range, a flashing red dot "●" will appear on the display and the device will begin recording. When the device does not detect a moving object, it automatically stops recording after 10 seconds.
Note: We do not recommend using motion detection and loop recording at the same time. The motion detection function is superior in this respect. We recommend that you have the camera connected to the power supply for optimal use, otherwise the recording time is limited by the capacity of the battery, which decreases with each recording made.
b) Loop Settings
Loop recording allows continuous recording regardless of the memory card capacity. You can choose from three time intervals: 1 min / 3 min / 5 min / 10 min. The selected interval determines the length of recording time which the camera will save. The advantage of using this setup is that you will never run out of space on your memory card. Moreover, it is very easy to send very small files via e.g. e-mail for use as evidence.
c) LDWS System
The Lane Departure Warning System (LDWS) alerts the driver as soon as the vehicle starts veering out of its lane. This system is designed to minimize traffic accidents due to driver inattention caused by distractions or drowsiness. It's an additional feature with a live video preview.
d) G-Sensor Function
In case of an accident, the gravity sensor (G-sensor) can gather direction and other important collision data. According to the value set for the G-sensor sensitivity, the camera will determine whether to lock the recording or not. If protection mode is not turned on, the current video may be overwritten by loop recording. Be careful when setting the G-sensor to a high sensitivity as it may cause file locking even when driving on a rough road. This might fill up the memory card quickly.
G-sensor directions are shown in the picture bellow:

natural_image
Line drawing of a TrueCam device with 3D coordinate axes (X, Y, Z) shown alongside it, no text or symbols on the device itself.e) Parking Mode
When the function is activated in the menu, the camera will protect the vehicle during your absence. If the vehicle moves slightly, the camera begins recording automatically. After 60 seconds, the recording stops and the camera turns off if the movement is not repeated. The device uses a built-in battery for power. When the parking mode is on, do not operate the camera in the power supply.
Basic Controls
- Icons Displayed in Video Mode:
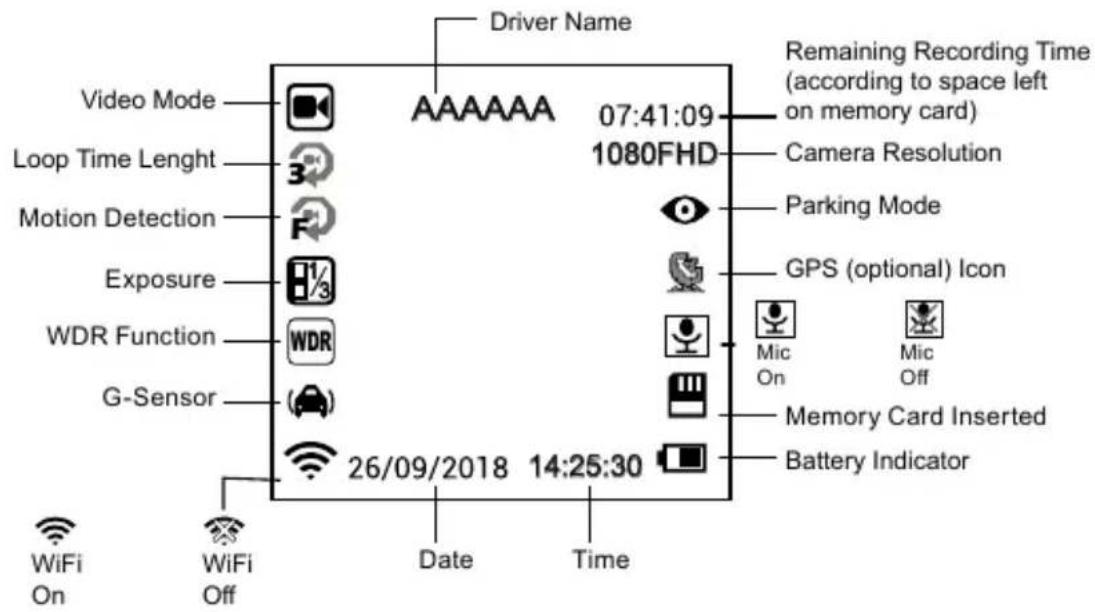
- Icons Displayed in Standby Mode:
Modes
a) Video Mode
| Power / OK Button | Start / Stop |
| Menu Button | Opens the settings menu / Locks the current recording being made |
| Up Button | Zoom in / Hold to rotate the screen by 180 degrees |
| Down Button | Zoom out / Hold to turn on Wi-Fi |
b) Photo Mode
In video mode, press and hold the menu button to switch to photo mode. Then press the OK button to take a photo. Press the menu in photo mode to go to the settings menu.
| Power / OK Button | Take a photo |
| Menu Button | Open the settings menu |
| Up Button | Zoom in the image |
| Down Button | Zoom out the image |
c) Playback Mode
To enter, press and hold the menu button twice, then use the up and down keys to select any video or photo on the memory card.
| Up Button | Previous file / During playback, it has a rewind function of 2x, 4x 8x |
| Down Button | Next file / During playback, it has a fast rewind function of 2x, 4x 8x |
| Power / OK Button | Start/ Stop / Confirm |
| Menu Button | Open settings menu |
Important Features
Automatically Display GPS Coordinates (optional) – display the GPS position directly on the video. The position is displayed in the form of coordinates.
Automatically Display Speed (optional) – display the speed of the vehicle directly on the video. This can be used for review later. Speed displayed is based on GPS satellites and is only indicative.
Video Lock – protect the video against being overwritten by subsequent recordings. Videos can be locked in both video and playback mode.
Motion Detection – automatically starts recording when the camera detects sufficient motion, for example when reversing.
Delay Power Off – this feature is used to delay the shutdown of the camera after the car engine has been turned off. Therefore, you can record what happens when you leave your vehicle.
Connection
a) Connecting to a Computer
- Insert the microSD card into your computer (or into a USB or SD adapter).
- Open the removeable disk folder and play any file.
Menu Settings
The device works with two modes – video / photo and playback.
a) In Video / Photo Mode
| Function | Menu Item | Note |
| Resolution | 1080FHD / 720P / WVGA 848x480 / VGA 640x480 | Sets the video resolution. |
| Loop Recording | Off / 1 minute / 3 minutes / 5 minutes / 10 minutes | Sets the length of the video time loop. |
| Image Size | 12MP / 10MP / 8MP / 5MP / 3MP / 2MPHD / 1.3MP | Sets the photo resolution. |
| Exposure | +2.0; +5/3; +4/3; +1.0; +2/3; +1/3; 0; -1/3; -2/3; -1.0; -4/3; -5/3; -2.0 | “+” increases recording brightness and “-” de-creases brightness and darkens the recording. |
| White Balance | Auto / Daylight / Cloudy / Tungsten / Fluorescent | We recommend setting it to Auto. White Bal-ance depends on light conditions. |
| Photo Burst | Off / On | Take 3 sequential shots in a second. |
| Quality | Good / Normal / Economy | The higher the chosen quality, the more details will be captured (the file size will also increase). |
| Sharpness | Strong/ Normal / Soft | This feature indicates degree of sharpness during recording. Select higher sharpness for better capturing of details and face recognition. |
| WDR | Off / On | WDR settings. |
| Motion Detection | Off / On | Motion Detection function settings. |
| Parking Mode | Off / On | Parking mode function settings. |
| G-Sensor | Off / Low / Medium / High | G-Sensor sensitivity settings. |
| Record Audio | Off / On | Audio Recording settings. |
| Date Stamp | Off / On | Timestamp in the video settings. |
| Driver Name | ---- | To confirm the selected character, press Menu. Press the OK button to confirm your full name. |
| Date/Time | YY/MM/DD | Date and Time settings. |
| Power off Delay | Off / 10 s / 20 s / 30 s | Sets the delay when turning the camera off. |
| Auto Power Off | Off / 1 min / 3 min / 5 min | The camera switches off automatically in standby mode after a given period of time if it does not detect any motion. |
| Beep Sound | Off / On | Switches the camera tones On / Off. |
| Screensaver | Display off: 1 min / 3 min / 5 min / Off | Instead of playing recorded footage, the camera screen can be turned off after a certain time interval. |
| Frequency | 50Hz / 60Hz | Video frequency settings. |
| Language | English / French / German / Russian / Polish / Czech / Slovak / Hungarian / Lithuanian | Language settings. |
| Format | Cancel / OK | Formats data on the memory card. |
| Factory Settings | Cancel / OK | Resets the camera to the original factory settings. |
| Software Version | xxxx | Displays the installed FW version. |
b) In Playback Mode
| Delete | Delete current / Delete all |
| Protect | Lock current / Unlock current / Lock all / Unlock all |
| Presentation | 2 seconds / 5 seconds / 8 seconds |
Turn On Wi-Fi and Install the App
- First install the app on your device, available for download for Android and iOS. Please scan the following QR code to download the app.
- Turn on the Wi-Fi on the TrueCam H5- go to the settings → Settings → Wi-Fi → Turn On. In playback mode, you can turn on the Wi-Fi simply by pressing and holding the down button.
- After turning on Wi-Fi, the display shows the Wi-Fi name (SSID): TrueCam H5 and password PWD: 12345678.
- On your device select the Wi-Fi network of the camera: TrueCam H5 and enter the password: 12345678 and then connect to the camera.
- After the phone is connected to the camera Wi-Fi network, the Wi-Fi icon on the camera will turn green.
- The distance between the TrueCam H5 and the device should be no more than 10 m.

Launching the App
- When your device is successfully connected to the TrueCam H5 Wi-Fi network, open the app.
- After you open, the app automatically connects to the TrueCam H5 and a live video preview is displayed on your device.
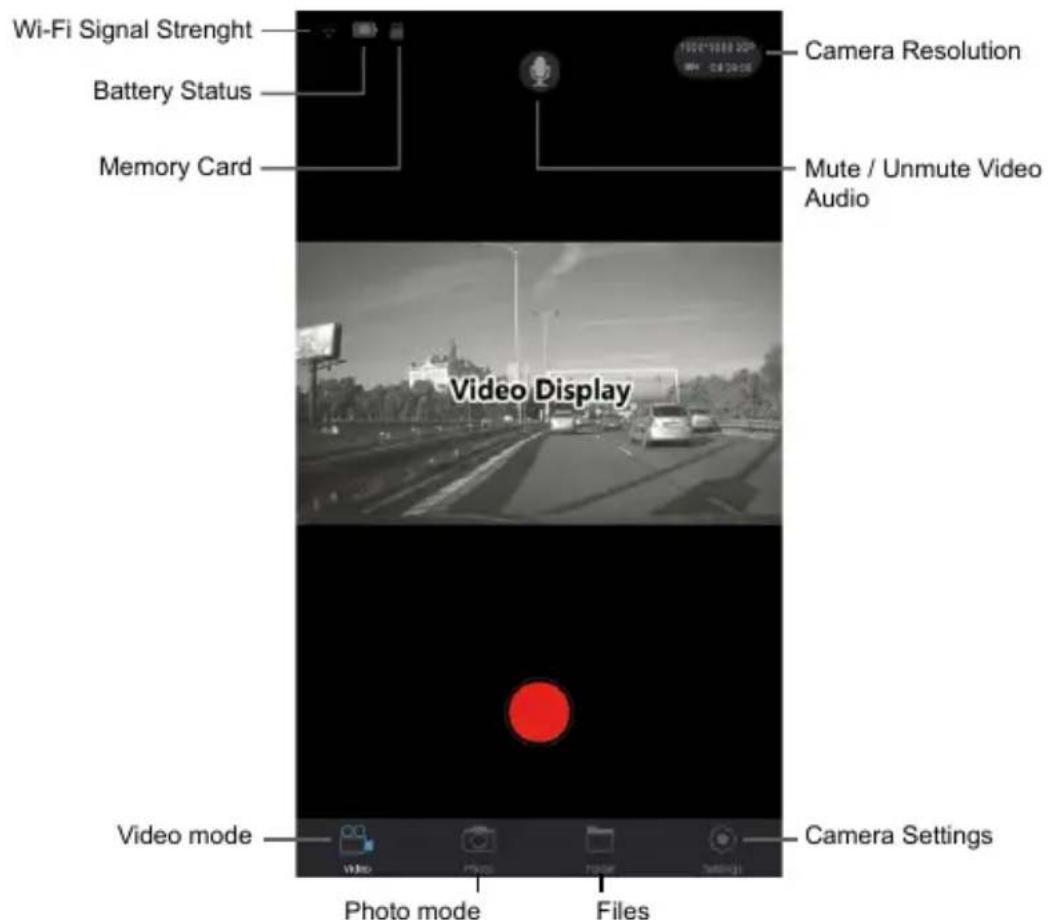
Application Controls
a) Live Video Preview
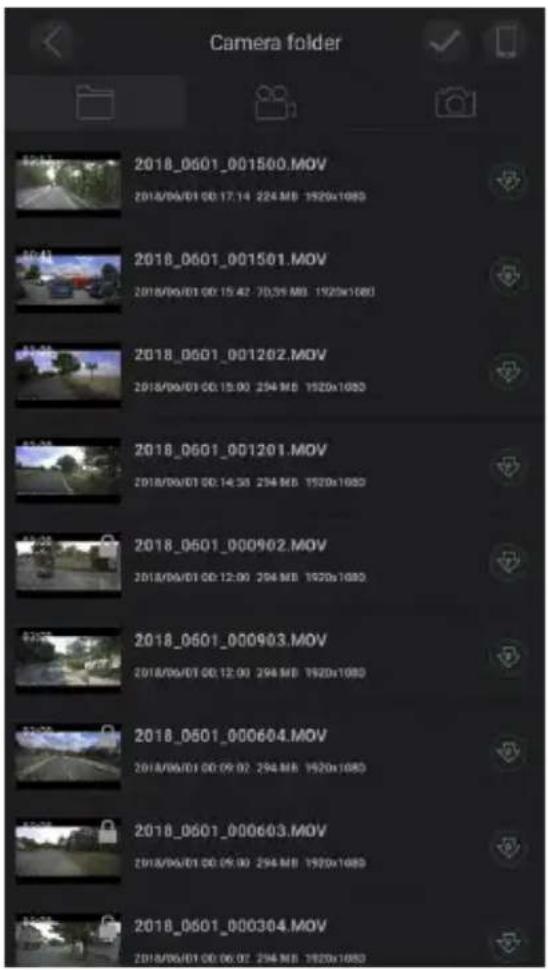
b) File List
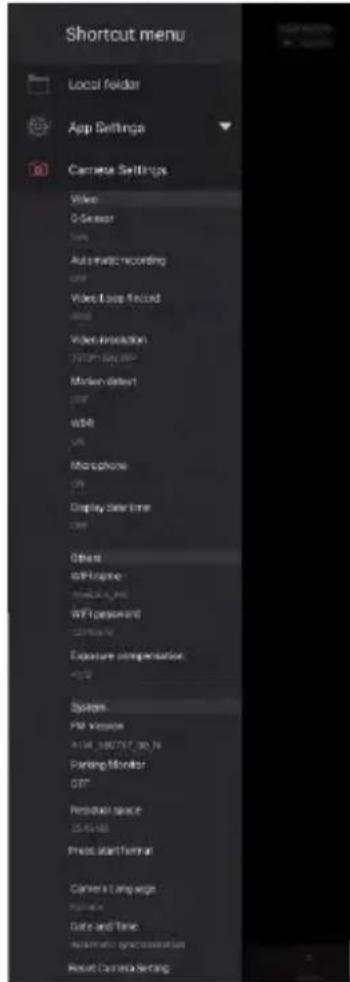
c) Camera Settings Using Wi-Fi
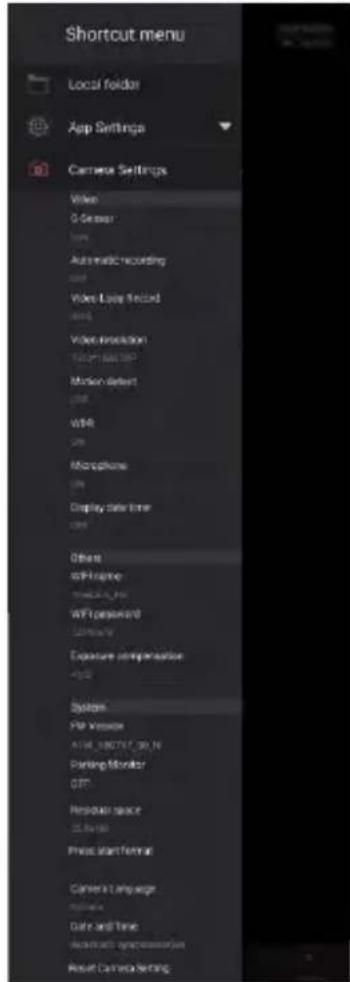
Local folder
App Settings
G-senzor
Automatic recording
Video Loop Record
Video resolution
Motion detect
WDR
Microphone
Display date time
WiFi name (SSID)
WiFi password (PSW)
Exposure compensation
FW Version
Parking Monitor
Residual space
Press start format
Camera Language
Date and Time
Reset Camera Setting
Software Player
* The player uses data from the GPS module which isn't included in the basic package
The TrueCam H5 dash cam offers you smart and useful software which allows you to view captured video, the map, GPS coordinates and speed all on one screen.
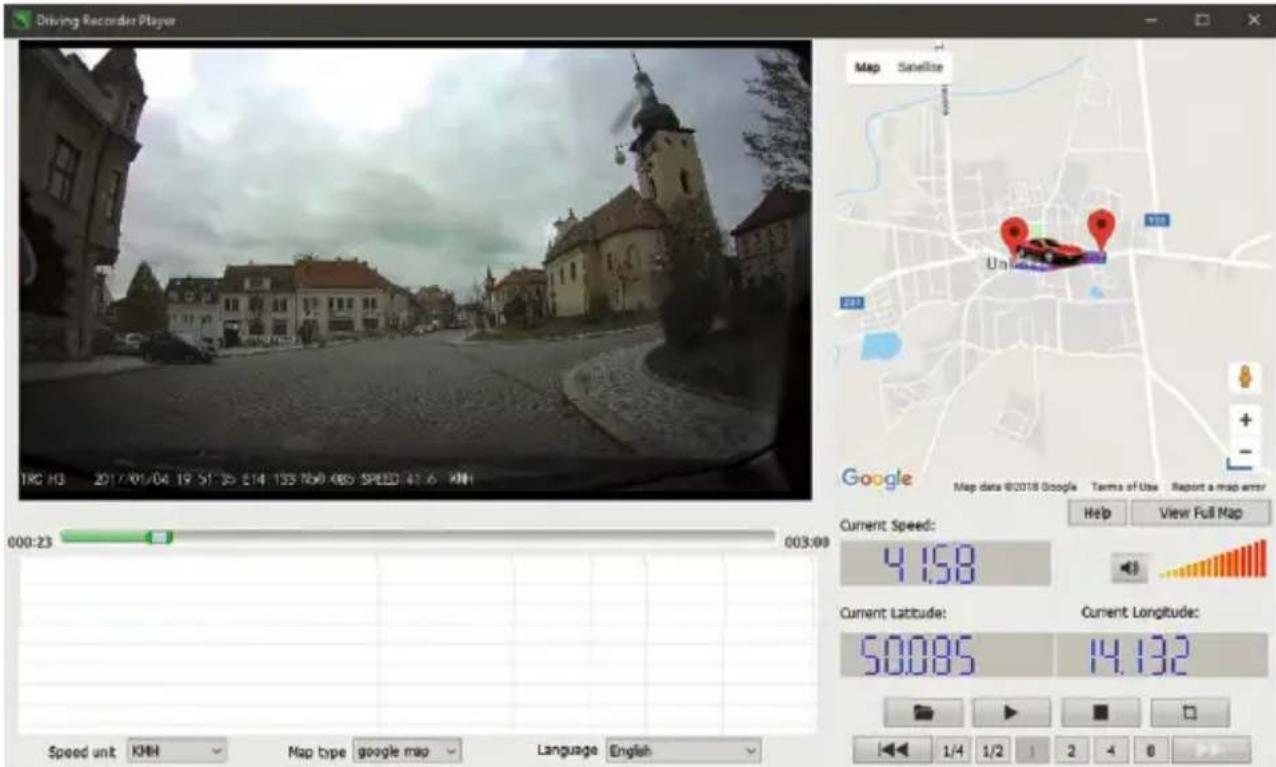
Please download here: http://truecam.com/download/H5_player.zip
Technical Specifications
| Camera | Lens | 130° horizon angle in 1080P |
| Standard | Mov file, H.264 compression | |
| Resolution | 1920x1080@30fps1280x720@30fps1280x720@60fpsWVGA 848x480VGA 640x480 | |
| Audio | Built-in microphone | |
| LCD | 1.5-inch LCD display | |
| Photo Resolution | 4032x3024 / 3648x2736 / 3264x2448 / 2592x1944 / 2048x1536 / 1920x1080 / 1280x960 | |
| G-Sensor | In the event of an accident, the camera automatically protects and locks the latest files against deletion. | |
| GPS (optional) | GPS logger for path, position, speed and time of the recording.Replay path, position information on Maps. | |
| Other Features | Uninterrupted loop recording: overwrites the oldest file if memory is full, no interruption to the recording process. | |
| File protection function: once a file is locked, it cannot be deleted whilst loop recording. | ||
| Automatic recording after car ignition. | ||
| SD Card Slot | Supports up to 64 GB microSD card, Class 10 cards recommended. | |
| Language | English / French / German / Russian / Polish / Czech / Slovak / Hungarian / Lithuanian | |
| Interface | USB 2.0 | |
| Battery | Built-in 420 mAh battery | |
| Power | 12-24V car charger | |
| Operating Temperature | -5°C ~ 40°C | |
| Colour | Black | |
| Size | 54 x 45 x 45 mm | |
Made in China.
Printing errors reserved.
The consumer is required to learn the principles of safe use of the product before first use.
Precautions and notices
- For your own safety, do not use the camera's controls while driving.
- A window mount is needed when using the recorder in a car. Make sure that you place the recorder in an appropriate place, so as not to obstruct the driver's view or deployment of airbags.
- Make sure that no object is blocking the camera lens and no reflective material is placed near the lens. Please keep the lens clean.
- If the car windscreen is tinted or heated, it may limit the quality of the recording and, above all, the GPS signal.
- For general use it is recommended to have motion detection enabled. It may lead to the memory card filling up quickly.
- The camera is primarily designed to operate while being constantly connected to a power supply.
Safety precautions
- Use only the charger supplied with your device. Use of another type of charger may result in malfunction and/or danger.
- Do not use the charger in high moister environment. Never touch the charger when your hands or feet are wet.
- Allow adequate ventilation around the charger when using it to operate the device or to charge the battery. Do not cover the charger with paper or other objects that will reduce cooling. Do not use the charger while it is inside a carrying case.
- Connect the charger to a proper power source. The voltage requirements are found on the product case and/or on the packaging.
- Do not use the charger if it is visibly damaged. In case of damage, do not repair the equipment yourself!
- In case of device overheating, immediately disconnect the power source.
- Charge the device under supervision only.
- Packaging contains small pieces, that can be dangerous for children. Store the product always out of reach of children. Bags or many of the pieces containing may cause suffocation after swallowing.
Safety notices for Li-ion batteries
- Before first use, fully charge the battery.
- For charging only use chargers, that is specified for this type of battery.
- Use standard cables for charging, otherwise it could damage the device.
- Never connect to a mechanically damaged charger or if the batteries are swollen. Do not use batteries in this condition due to risk of explosion.
- Do not use any damaged adapter or charger.
- Charge at room temperature, never charge at a temperature below 0°C or at a temperature higher than 40°C.
- Avoid dropping the battery, don't puncture, or mutilate it. Definitely do not attempt to repair a damaged battery.
- Do not expose the charger or battery to moisture, water, rain, snow or any kind of various liquids.
- Do not leave the battery in the car, do not expose to direct sunlight and do not place it near heat sources. Strong light or high temperatures can damage the battery.
- Never leave batteries without supervision during charging, short circuit or accidentally overcharge. Some batteries are unsuitable for fast charging or being charged excessively. This can cause a shock, or due to charger failure, may cause leakage of aggressive chemicals, explosion or subsequent fire!
- In the case of excessive heating of the battery during charging, immediately disconnect it from the power supply.
- Do not place charger and charging battery on or near flammable objects. Beware of curtains, carpets, tablecloths etc.
- Once the battery or device with integrated battery is fully charged, disconnect it from the power supply.
- Keep the battery out of the reach of children and animals.
- Never disassemble the charger or battery. If the battery is integrated, do not disassemble the device, unless stated otherwise. Any such attempt is dangerous and can cause injury or damage to the product and subsequent loss of warranty.
- Do not dispose worn or damaged batteries into the trash, fire or into heating devices, but hand them in at collection points for hazardous waste.
Caring for your device
- Taking good care of your device will ensure trouble-free operation and reduce the risk of damage.
- Keep your device away from excessive moisture and extreme temperatures and avoid exposing your device to direct sunlight or strong ultraviolet light for extended periods of time.
- Do not drop your device or subject it to severe shock.
- Do not subject your device to sudden and severe temperature changes. This could cause moisture condensation inside the unit, which could damage your device. In the event of moisture condensation, allow the device to dry out completely before use.
- The screen surface can easily be scratched. Avoid touching it with sharp objects.
- Never clean your device when it is powered on. Use a soft, lint-free cloth to wipe the screen and the exterior of your device. Do not use paper towels to clean the screen.
- Never attempt to disassemble, repair or make any modifications to your device. Disassembly, modification or any attempt at repair could cause damage to your device and even bodily injury or property damage and will void any warranty.
- Do not store or carry flammable liquids, gases or explosive materials in the same compartment as your device, its parts or accessories.
- To discourage theft, do not leave the device and accessories in plain view in an unattended vehicle.
- Overheating may damage the device.
Other information
1) For households: This marking indicates that this product should not be disposed with other household wastes throughout the EU. To prevent possible harm to the environment or human health from uncontrolled waste disposal, recycle it responsibly to promote the sustainable reuse of material resources. To return your used device, please use the return and collection systems or contact the retailer where the product was purchased. They can take this product for environmental safe recycling. In case of incorrect disposal of this kind of wastes user can be fined according to national laws. User information for disposal of electric and electronic devices in countries outside the EU: The symbol stated above (crossed recycle bin) is valid only in countries in European
Union. For correct disposal of electric and electronic devices ask your city hall or distributor of these devices. Everything is expressed by the symbol of crossed recycle bin on product, cover or printed materials.
2) You can determine a warranty service at the place of purchase. In case of technical problems or queries contact your dealer who will inform you about the following procedure. Follow the rules for work with electric devices. User is not allowed to disassembly the device neither replace any of its components. To reduce the risk of electric shock, do not remove or open the cover. In case of incorrect setup and plug in of device you will expose yourself risk of electric shock.
Products are covered by a two year warranty, unless otherwise stated. The warranty period of the battery is 24 months and 6 months for its capacity.

Declaration of Conformity
Hereby, elem6 s.r.o., declares that all TrueCam H5 products are in compliance with the essential requirements and other relevant provisions of Directive 2014/53/EU and 2014/30/EU. Products are intended for sale without any restriction in Germany, Czech Republic, Slovak Republic, Poland, Hungary and other EU countries. You can download the Declaration of Conformity from the website: www.truecam.com/support/doc.

Frequency band(s) in which the radio equipment operates: 2.412–2.472 GHz
Maximum radio-frequency power transmitted in the frequency band(s) in which the radio equipment operates: 10,2 dBm
Manufacturer:
TrueCam® brand is a registered trademark and our products are protected by patent.
All rights reserved.

TrueCam
TRUECAM H5
natural_image
Line drawing of a TrueCam device with a circular top and rectangular body (no text or symbols on the device itself)TrueCam H5
Benutzerhandbuch
natural_image
Line drawing of a beige portable device with a flat top and handle, labeled 'TrueCam' (no additional text or symbols)natural_image
Simple line drawing of a toilet with a lid and outlet (no text or symbols)natural_image
Line drawings of three camera modules: a door with 'DO IN EV' label, a TrueCam device, and a GPS scanner (no text or symbols on main components)4
natural_image
Line drawing of a 3D camera with X, Y, Z coordinate axes (no text or symbols on device)e) Parkmodus
Applikation
Lokale Dateien
natural_image
Line drawing of a beige portable device with a flat top and handle, labeled 'TrueCam' (no additional text or symbols)natural_image
Simple line drawing of a toilet with a lid and outlet (no text or symbols)natural_image
Three technical line drawings of a camera device with labeled components (no readable text or symbols)4
natural_image
Line drawing of a 3D camera with X, Y, Z coordinate axes (no text or symbols on device)Obsługa aplikacji
Pliki lokalne
Wersja aplikacji
Ustawienia G-sensora
natural_image
Line drawing of a TrueCam device with a circular top and rectangular body (no text or symbols on the device itself)TrueCam H5
natural_image
Line drawing of a device resembling a camera or scanner with a handle and label (no text or symbols on the device itself)natural_image
Simple line drawing of a toilet with a lid and outlet (no text or symbols)natural_image
Three technical line drawings of camera modules: front view, top view, and side view (no text or symbols)4
natural_image
Line drawing of a TrueCam device with 3D coordinate axes (X, Y, Z) shown alongside it, no text or symbols on the device itself.e) Parkolás mód
File lista
natural_image
Line drawing of a TrueCam device with a circular top and rectangular body (no text or symbols on the device itself)TrueCam H5
natural_image
Line drawing of a beige portable device with a flat top and handle, labeled 'TrueCam' (no additional text or symbols)natural_image
Simple line drawing of a toilet with a lid and outlet (no text or symbols)natural_image
Line drawing of a TrueCam device with 3D coordinate axes (X, Y, Z) shown alongside it, no text or symbols on the device itself.e) Parkovací mód
Spuštění aplikace
Lokální soubory
Verze aplikace
Nastavení G-senzoru
natural_image
Line drawing of a TrueCam device with a circular top and rectangular body (no text or symbols on the device itself)TrueCam H5
natural_image
Line drawing of a beige portable device with a flat top and handle, labeled 'TrueCam' (no additional text or symbols)natural_image
Simple line drawing of a toilet with a lid and outlet (no text or symbols)natural_image
Line drawings of three camera modules: a doorbell, a camera with 'TrueCam' label, and a GPS scanner (no text or symbols on main components)4
natural_image
Line drawing of a TrueCam device with 3D coordinate axes (X, Y, Z) shown alongside it, no text or symbols on the device itself.e) Parkovací mód
Spustenie aplikácie
c) Nastavenie kamery pomoci WiFi
natural_image
Line drawing of a TrueCam device with a circular top and rectangular body (no text or symbols on the device itself)TrueCam H5
Vartojimo instrukcija
• 1080P Full HD
• GPS lokalizatorius (pasirinktinai)
• WiFi
• Magnetinis laikiklis
natural_image
Line drawing of a camera with a flat top and base (no text or symbols)natural_image
Simple line drawing of a toilet with a lid and outlet, no text or symbols presentnatural_image
Technical line drawings of three camera modules: a door with 'DO IN IV' label, a TrueCam device, and a GPS scanner (no text or symbols on main components)4
Pritvirtinkite jrenginj priekiniame stikle su lipniu tvirtinimu. Jei jrenginys negali susijungti su palydovu pasirodys GPS klaidos piktograma . Po atitinkamo susijungimo su palydovu ekrane pasirodys sekanti GPS piktograma
c) Pakrovimas
natural_image
Line drawing of a TrueCam device with 3D coordinate axes (X, Y, Z) shown alongside it, no text or symbols on the device itself.e) Parkavimo monitorius
Programos ijungimas
Lokalinés bylos
Programos versija
TrueCam H5
natural_image
Line drawing of a beige portable device with a flat top and handle, labeled 'TrueCam' (no additional text or symbols)natural_image
Simple line drawing of a toilet with a lid and outlet, no text or symbols presentnatural_image
Line drawings of three camera modules: a door with 'DO IN EV', a TrueCam device, and a GPS scanner (no text or symbols on the devices themselves)4
natural_image
Line drawing of a TrueCam device with 3D coordinate axes (X, Y, Z) shown alongside it, no text or symbols on the device itself.e) Режим парковки
Локальные файлы
Версия программы
G-сенсор
natural_image
Line drawing of a TrueCam device with a circular top and rectangular body (no text or symbols on the device itself)TrueCam H5
natural_image
Line drawing of a device resembling a camera or scanner with a flat top and handle (no text or symbols)
natural_image
Diagram of a device with a square top and attached base (no text or symbols)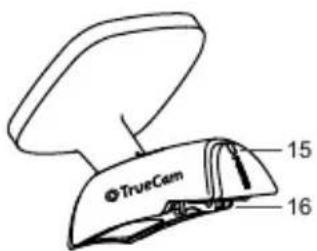
natural_image
Simple line drawing of a toilet with a lid and arrow indicating action (no text or symbols)natural_image
Line drawings of three camera modules: a door with 'DO IN EV', a TrueCam device, and a GPS scanner (no text or symbols on the devices themselves)4
natural_image
Line drawing of a TrueCam device with 3D coordinate axes (X, Y, Z) shown alongside it, no text or symbols on the device itself.e) Modalité parking
Fichiers locaux
natural_image
Line drawing of a TrueCam device with a circular top and rounded body (no text or symbols on the device itself)TrueCam H5
Navodila za uporabo
• 1080P Full HD
• GPS lokator (poljubno)
• WiFi
• Magnetno držalo
Opis izdelka in funkcije....1
a) Predstavitev naprave....1
b) Funkcije tipk 2
c) Opis stanja LED diode....3
d) Vsebina kompleta....3
Osnovne nastavitve....4
a) Namestitev kartice TFT 4
b) *GPS lokator....4
c) Polnjenje 5
natural_image
Line drawing of a beige portable device with a flat top and handle, labeled 'TrueCam' (no additional text or symbols)natural_image
Simple line drawing of a toilet with a lid and outlet (no text or symbols)natural_image
Three technical line drawings of a camera device with labeled components: front view, top view, and side view (no readable text or symbols)4
natural_image
Line drawing of a 3D camera with X, Y, Z coordinate axes (no text or symbols on device)e) Način parkiranje
Upravljanje aplikacije
a) Živ vpogled video
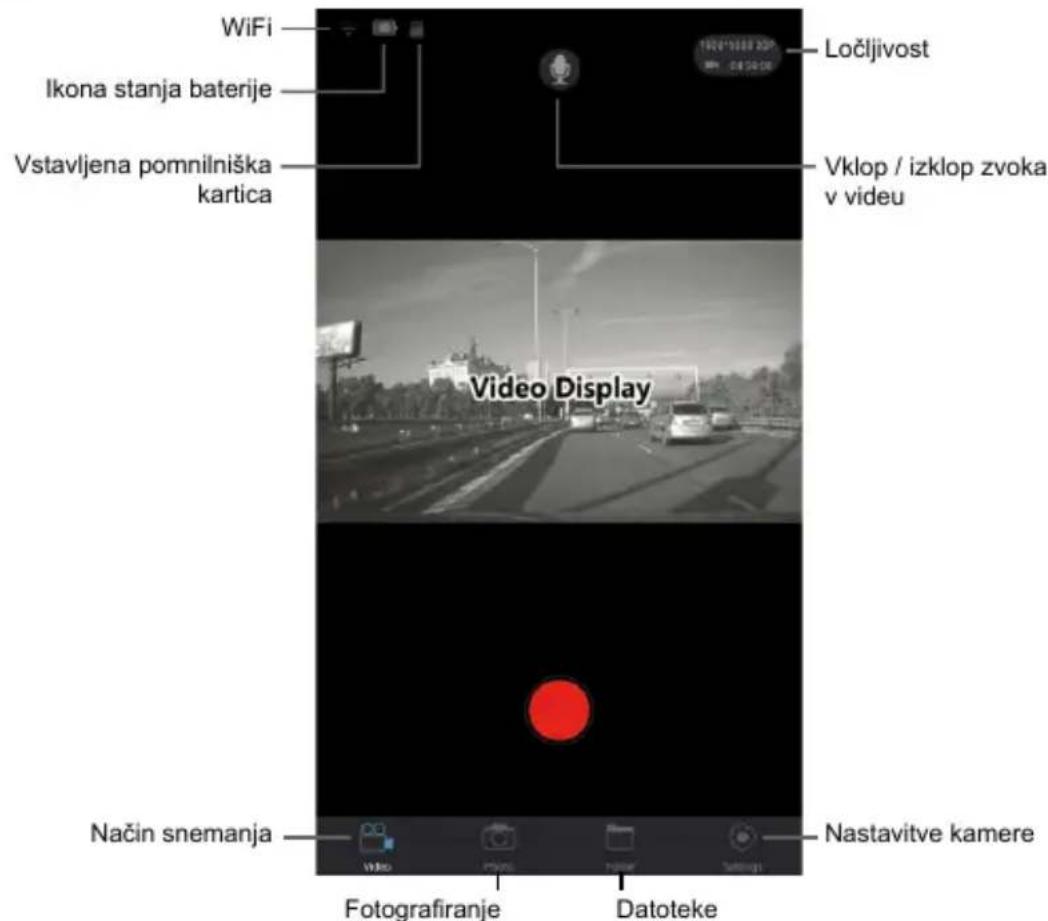
Lokalne datoteke
Verzija aplikacije
G senzor
Samodejno snemanje pri vklopu
Nastavitve zanke
Ločljivost posnetka
Zaznavanje gibanja
WDR
Vklop / izklop zvoka v videu
Prikaz Data
Ime (SSID) kamere
Geslo (PSW) kamere
Izpostavitev
Firmware različica
Način parkiranje
Proste mesto na spominski kartici
Formatiranje
Jezik
Datum / ura
natural_image
Line drawing of a TrueCam device with a circular top and rectangular body (no text or symbols on the device itself)TrueCam H5
Upute za upotrebu
Prezentacija proizvoda i funkcija....1
a) Prezentacija proizvoda....1
b) Funkcije tipki....2
c) Opisi stanja LED diode 3
d) Sadržaj kompleta....3
Osnovne postavke 4
a) Instalacija TFT kartice TFT 4
b) *GPS Lokalizator 4
c) Punjenje....5
natural_image
Line drawing of a beige portable device with a circular top and handle, labeled 'TrueCam' (no additional text or symbols)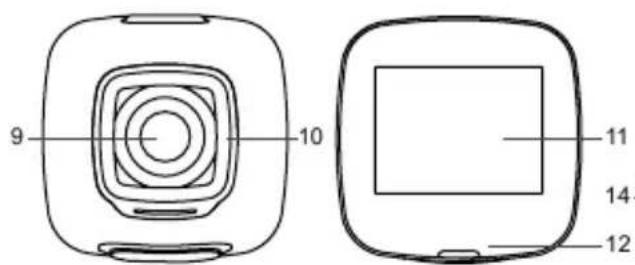
natural_image
Line drawing of a device with a square top and attached base (no text or symbols)
| 1. Glavni prekidač / Tipka OK | 7. Ulaz za memorijsku karticu | 13. Nosač s 3M naljepnicom |
| 2. Tipka za izbor režima / Izbornik | 8. Ulaz magnetnog napajanja kamere | 14. USB ulaz napajanja |
| 3. Tipka „Gore“ | 9. Objektiv | 15. Dioda napajanja |
| 4. Tipka „Dolje“ | 10. Optičko armirano staklo | 16. Izlaz magnetnog napajanja |
| 5. Tipka za resetiranje | 11. 1,5" LCD zaslon | 17. GPS konektor |
| 6. Zvučnik | 12. Obavijesna dioda |
b) Funkcije tipki

Glavni prekidač / Tipka OK
- Za isključenje / uključenje uređaja držite ovu tipku pritisnutu 2 do 3 sekunde.
- U režimu snimanja služi kao start / stop.
- U izborniku pritisnite za potvrdu odabira.
Tipka za resetiranje
natural_image
Simple line drawing of a toilet with a lid and arrow indicating direction (no text or symbols)Preporučuje se barem jednom mjesečno formatirati memorijsku karticu na računalu. Na taj ćete način ograničiti kreiranje nepravilnih datoteka koje u budućnosti mogu oštetiti karticu.
b) GPS Lokalizator (po izboru)
natural_image
Line drawing of a TrueCam device with 3D coordinate axes (X, Y, Z) shown alongside it, no text or symbols on the device itself.e) Modus parkiranja
U slučaju aktivacije funkcije Modus parkiranja u izborniku, kamera će štititi vozilo tijekom Vaše odsutnosti. Ako se vozilo i samo malo pomakne, kamera će automatski pokrenuti snimanje. Ako se pokret ne ponovi, kamera će nakon 60 sekundi zaustaviti snimanje i isključiti se. Uređaj se napaja iz ugrađene baterije. Kada je način parkiranja uključen, nemojte koristiti fotoaparat u napajanju.
Osnovne kontrole
Pokretanje aplikacije
Lokalne datoteke
Inačica aplikacije
Preuzmite ovdje: http://truecam.com/download/H5_player.zip
Tehnička specifikacija
| Kamera | Objektiv | 130° na 1080p |
| Format I kompresija | Mov, H. 264 | |
| Rezolucija | 1920x1080@30fps1280x720@30fps1280x720@60fpsWVGA 848x480VGA 640x480 | |
| Zvuk | Ugrađen mikrofon s mogućnošću uključivanja u opcijama izbornika | |
| LCD zaslon | LCD zaslon od 1,5 inči | |
| Rezolucija fotografija | 4032x3024 / 3648x2736 / 3264x2448 / 2592x1944 / 2048x1536 / 1920x1080 / 1280x960 | |
| G-Senzor | Nakon jakog udarca uređaj automatski štiti od brisanja trenutno snimane datoteke. | |
| GPS lokalizator (po izboru) | GPS lokalizator za snimanje rute, lokacije, brzine i vremena.Mogućnost rekonstrukcije rute i položaja na Maps. | |
| Ostale funkcije | Snimanje unedogled. Ako se memorijska kartica popuni, automatski se presnimava najstarija datoteka, zahvaljujući čemu se snimanje neće prekinuti. | |
| Funkcija zaštite datoteka: ako je datoteka zaštićena, neće se presnimitiprilikom snimanja unedogled. | ||
| Automatsko pokreće snimanje nakon paljenja motora vozila. | ||
| Ulaz za SD karticu | Ulaz za memorijsku karticu kapaciteta od 64GB (min. kapacitet 8GB) – preporučuje se korištenje kartica s najmanjom kvalitetom Class 10. | |
| Jezik | Engleski / francuski / njemački / ruski / poljski / češki / slovački / mađarski / litvanski | |
| Ulazi | USB 2.0 | |
| Baterija | Ugrađena 420 mAh baterija | |
| Punjač | 12-24V | |
| Temperatura rada | -5°C ~ 40°C | |
| Boja | Crna | |
| Dimenzije | 54 x 45 x 45 mm | |