
MMJ430D - Hi-Fi System SAMSUNG - Free user manual and instructions
Find the device manual for free MMJ430D SAMSUNG in PDF.
| Product type | Micro Hi-Fi Component System |
| Brand | Samsung |
| Model | MMJ430D |
| Dimensions (main unit) | 230 x 115 x 238.5 mm |
| Dimensions (front speaker) | 142.5 x 260.5 x 180.5 mm |
| Weight (main unit) | 1.20 kg |
| Weight (front speaker) | 2.07 kg |
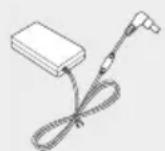
| Power supply | DC 24 V adapter, power cord |
| Output power (speakers) | 60 W/channel (3 Ω, 100 Hz, MAX) |
| Supported disc formats | DVD-Video, DVD±R/±RW, CD-DA, CD-R/RW, DivX, MP3, WMA, JPEG |
| Main functions | Disc player, FM radio (15 presets), Bluetooth, TV SoundConnect, USB recording, karaoke, equalizer, timer |
| Connectivity | HDMI out, component video, composite video, auxiliary input (AUX), USB port, FM antenna |
| Bluetooth | A2DP stereo version, range up to 5 m, Bluetooth power on |
| USB recording | CD, radio, external source (AUX), MP3 format, normal or high speed |
| Equalizer | Presets: Flat, Pop, Rock, Jazz, Classical, etc. |
| Display | Touch screen, dimmer function |
| Operating temperature | +5 °C to +35 °C |
| Operating humidity | 10 % to 75 % |
| Safety | Class 1 laser protection, automatic shutdown, grounding, do not expose to moisture |
| Maintenance and cleaning | Clean discs from center to edge with a soft cloth and mild detergent; avoid moisture and excessive heat |
| Included accessories | Remote control, AAA batteries, DC adapter, power cord, user manual |
Frequently Asked Questions - MMJ430D SAMSUNG
User questions about MMJ430D SAMSUNG
0 question about this device. Answer the ones you know or ask your own.
Ask a new question about this device
Download the instructions for your Hi-Fi System in PDF format for free! Find your manual MMJ430D - SAMSUNG and take your electronic device back in hand. On this page are published all the documents necessary for the use of your device. MMJ430D by SAMSUNG.
USER MANUAL MMJ430D SAMSUNG
Thank you for purchasing this Samsung product.
To receive more complete service,
please register your product at
www.samsung.com/register
SafetyWarnings
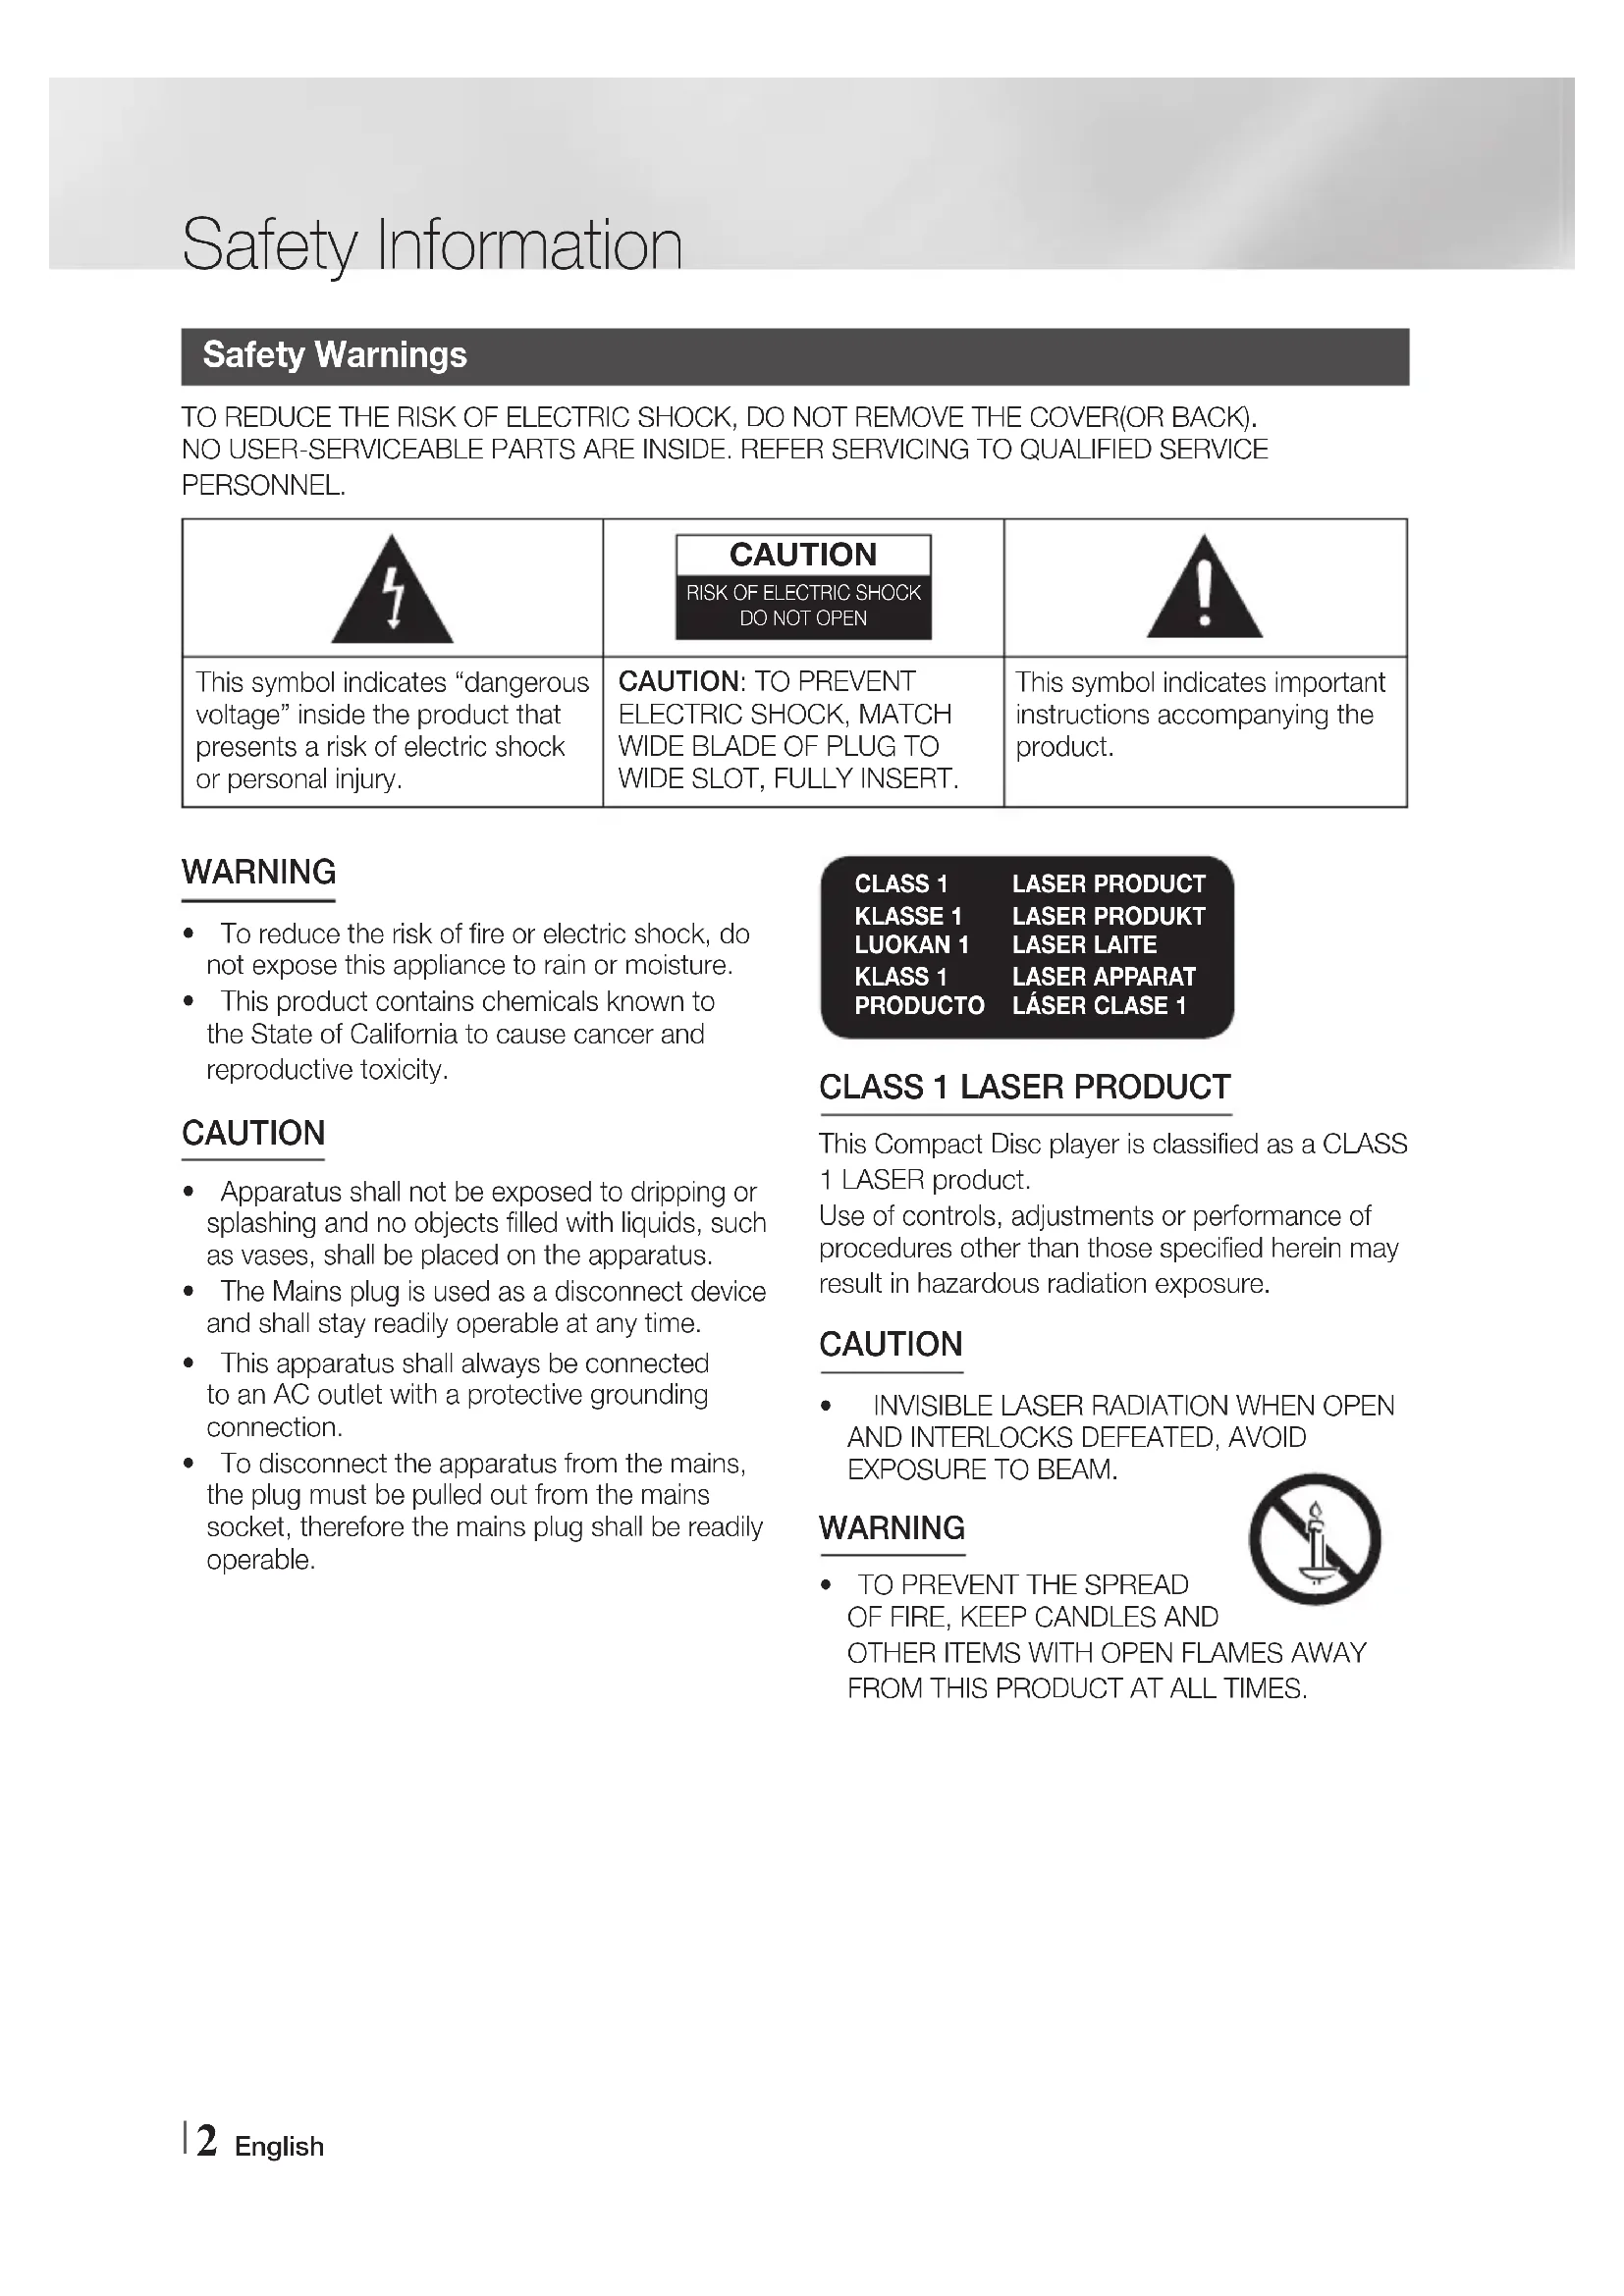
TO REDUCE THE RISK OF ELECTRIC SHOCK, DO NOT REMOVE THE COVER(OR BACK). NO USER-SERVICEABLE PARTS ARE INSIDE. REFER SERVICING TO QUALIFIED SERVICE PERSONNEL.
| CAUTION RISK OF ELECTRIC SHOCK DO NOT OPEN | ||
| This symbol indicates “dangerous voltage” inside the product that presents a risk of electric shock or personal injury. | CAUTION: TO PREVENT ELECTRIC SHOCK, MATCH WIDE BLADE OF PLUG TO WIDE SLOT, FULLY INSERT. | This symbol indicates important instructions accompanying the product. |
WARNING
- To reduce the risk of fire or electric shock, do not expose this appliance to rain or moisture.
- This product contains chemicals known to the State of California to cause cancer and reproductive toxicity.
CAUTION
- Apparatus shall not be exposed to dripping or splashing and no objects filled with liquids, such as vases, shall be placed on the apparatus.
- The Mains plug is used as a disconnect device and shall stay readily operable at any time.
- This apparatus shall always be connected to an AC outlet with a protective grounding connection.
- To disconnect the apparatus from the mains, the plug must be pulled out from the mains socket, therefore the mains plug shall be readily operable.
CLASS 1 LASER PRODUCT
KLASSE 1 LASER PRODUKT
LUOKAN 1 LASER LAITE
CLASS 1 LASER APPARAT
PRODUCTO LÁSÉR CLASE 1
CLASS 1 LASER PRODUCT
This Compact Disc player is classified as a CLASS 1 LASER product.
Use of controls, adjustments or performance of procedures other than those specified herein may result in hazardous radiation exposure.
CAUTION
- INVISIBLE LASER RADIATION WHEN OPEN AND INTERLOCKS DEFEATED, AVOID EXPOSURE TO BEAM.
WARNING
TO PREVENT THE SPREAD OF FIRE, KEEP CANDLES AND OTHER ITEMS WITH OPEN FLAMES AWAY FROM THIS PRODUCT AT ALL TIMES.
Precautions
- Ensure that the AC power in your house matches the requirements listed on the identification sticker located on the back of your product.
- Install your product horizontally, on a suitable base (furniture), with enough space around it for ventilation (3 - 4 inches/7.5 - 10 cm).
- Do not place the product on amplifiers or other equipment which may become hot. Make sure the ventilation slots are not covered.
- Do not stack anything on top of the product.
Before moving the product, ensure the Disc tray is empty. - To turn off the product completely, disconnect the AC plug from the wall outlet. Disconnect the AC plug from the wall outlet if you will be leaving the device unused for a long period of time.
- During thunderstorms, disconnect the AC plug from the wall outlet. Voltage peaks due to lightning could damage the product.
- Do not expose the product to direct sunlight or other heat sources. This could cause the product to overheat and malfunction.
- Protect the product from moisture, and excess heat or equipment creating strong magnetic or electric fields (i.e. speakers.).
- Disconnect the power cable from the AC supply if the product malfunctions.
- Your product is not intended for industrial use. It is for personal use only.
- Condensation may occur if your product or a disc has been stored in cold temperatures. If transporting the product during the winter, wait approximately 2 hours until the product has reached room temperature before using.
- The batteries used with this product contain chemicals that are harmful to the environment. Do not dispose of batteries in the general household trash.
- Place the loudspeakers at a reasonable distance on either side of the system to ensure good stereo sound.
- Direct the loudspeakers towards the listening area.
-
Do not expose this apparatus to dripping or splashing. Do not place objects filled with liquids, such as vases, on the apparatus.
-
To turn this apparatus off completely, you must disconnect it from the wall outlet. Consequently, the wall outlet and power plug must be readily accessible at all times.
- Use only a properly grounded plug and receptacle.
- An improper ground may cause electric shock or equipment damage. (Class I Equipment only.)
Disc Storage & Management
-
Holding Discs
-
Fingerprints or scratches on a disc may reduce sound and picture quality or cause skipping.
- Avoid touching the surface of a disc where data has been recorded.
- Hold the disc by the edges so that fingerprints will not get on the surface.
-
Do not stick paper or tape on the disc.
-
Cleaning Discs
-
If you get fingerprints or dirt on a disc, clean it with a mild detergent diluted in water and wipe with a soft cloth.
- When cleaning, wipe gently from the inside to the outside of the disc.
Disc Storage
- Do not keep in direct sunlight.
- Keep in a cool, ventilated area.
-
Keep in a clean, protective jacket and store vertically.
-
Condensation may form if warm air comes into contact with cold parts inside the product. When condensation forms inside the product, it may not operate correctly, remove any discs in the pot then let the product stand for 1 or the power on.


this
occurs, remove any discs in the product, and then let the product stand for 1 or 2 hours with the power on.
License
DIVX.
This DivX Certified® device has passed rigorous testing to ensure it plays DivX® video.
To play purchased DivX movies, first register your device at vod.divx.com. Find your registration code in the DivX VOD section of your device setup menu.
DivX Certified® to play DivX® video, including premium content.
DivX®, DivX Certified® and associated logos are trademarks of DivX, LLC and are used under License.
Covered by one or more of the following U.S. patents: 7,295,673; 7,460,668; 7,515,710; 8,649,669; 8,656,183; 8,731,369; RE45,052.

DOLBY.
DIGITAL
Manufactured under license from Dolby Laboratories. Dolby and the double-D symbol are trademarks of Dolby Laboratories.
HOMI
- HDMI, the HDMI Logo, and High-Definition Multimedia Interface are trademarks or registered trademarks of HDMI Licensing LLC in the United States and other countries.
- This item incorporates copy protection technology that is protected by U.S. patents and other intellectual property rights of Rovi Corporation. Reverse engineering and disassembly are prohibited.
Copyright
© 2015 Samsung Electronics Co., Ltd. All rights reserved.
Copy Protection
- Many DVD discs are encoded with copy protection. Because of this, you should only connect your product directly to your TV, not to a VCR. Connecting to a VCR results in a distorted picture from copy-protected DVD discs.
- This product incorporates copyright protection technology that is protected by U.S. patents and other intellectual property rights. Use of this copyright protection technology must be authorized by Macrovision, and is intended for home and other limited viewing uses only unless otherwise authorized by Macrovision. Reverse engineering or disassembly is prohibited.
SAFETY INFORMATION
2 SafetyWarnings
3 Precautions
3.3 Disc Storage & Management
4 License
4 Copyright
4 Copy Protection
GETTING STARTED
6 Disc and Format Compatibility
7 Notes on the USB connection
8 Front/Top Panel
9 Rear Panel
9 Accessories
10 Remote control
CONNECTIONS
11 Connecting the Speakers
12 Connecting the Video Out to your TV
SETTINGS
14 The Initial Settings Procedure
14 Accessing the Settings Screen
14 Display
14 TV Aspect
14 BD Wise
15 Resolution
15 Video Out Signal
15 HDMI Format
15 Audio
15 DRC (Dynamic Range Compression)
15 AUDIO SYNC
15 Speaker Selection
16 Audio Return Ch.
16 System
16 Initial Settings
16 Language
16 Security
16 Parental Rating
16 Change Password
16 Support
16 Product Information
BASIC FUNCTIONS
17 DiscPlayback
17 Audio CD(CD-DA)/MP3/WMA Playback
17 JPEG File Playback
17 Using the Playback Function
19 Special Sound Effects
20 TV SoundConnect
21 Listening to the Radio
21 Display Function
22 Setting the Clock
22 Timer Function
23 Selecting MY KARAOKE Mode
23 USB Function
24 Recording Function
25 Bluetooth
27 Software update
OTHER INFORMATION
28 Troubleshooting
29 Specifications
- Figures and illustrations in this User Manual are provided for reference only and may differ from actual product appearance.
An administration fee may be charged if either
a. an engineer is called out at your request and there is no defect in the product (i.e. where you have failed to read this user manual)
b. you bring the unit to a repair centre and there is no defect in the product (i.e. where you have failed to read this user manual).
The amount of such administration charge will be advised to you before any work or home visit is carried out.
Disc and Format Compatibility
Disc types and contents your product can play
| Media Term | Disc Type | |
| VIDEO | DVD | DVD-Video or DVD±R/±RW discs |
| CD | Data CD (CD DA, CD-R/-RW) | |
| DivX DVD | D±R/±RW, CD-R/-RW | |
| MUSIC MP3 CD-R/-RW | ||
| PHOTO J PEG CD-R/-RW | ||
Disc types your product cannot play
LD, CD-G/-I/-ROM, DVD-ROM/-RAM
NOTES
DVD discs purchased abroad may not play on this product.
This product may not respond to all operating commands because some DVD, and CD discs allow specific or limited operation and provide only certain features during playback. Please note that this is not a defect in the product.
Samsung cannot guarantee that this product will play every disc bearing the DVD or CD logo because disc formats evolve, and problems and errors may occur during the creation of DVD, and CD software and/or the manufacture of discs.
- Please contact the SAMSUNG Customer Care Centre, if you have questions or encounter difficulty when playing DVD, or CD discs in this product. Also, refer to rest of this user manual for additional information on playback restrictions.
- Some commercial discs and DVD discs purchased outside your region may not play on this product.
Supported Formats
Video File Support
| Format Supported Versions | |
| AVI | DivX3.11,4,5,6 |
| WMV | V1/V2/V3/V7 |
Music File Support
| File Extension | Audio Codec | Sampling Rate | Bit Rate |
| *.mp3 | MPEG 1 Layer3 | 16KHz ~ 48KHz | 80Kbps ~ 320Kbps |
| MPEG 2 Layer3 | 16KHz ~ 48KHz | 80Kbps ~ 320Kbps | |
| MPEG 2.5 Layer3 | 16KHz ~ 48KHz | 80Kbps ~ 320Kbps | |
| *.wma | Wave_Style_ MSAudio1 | 16KHz ~ 48KHz | 56Kbps ~ 128Kbps |
| Wave_Style_ MSAudio2 | 16KHz ~ 48KHz | 56Kbps ~ 128Kbps | |
| AC3 | / | 44.1/48khz | 128~384kbps |
- Aspect Ratio : This product supports up to 720x576 pixels. TV screen resolutions higher than 800 will not be supported.
- When you play a disc whose sampling frequency is higher than 48kHz or 320kbps, you may experience shaking on the screen during playback.
Sections with a high frame rate might not be played while playing a DivX file. - Since this product only provides encoding formats authorized by DivX Networks, Inc., a DivX file created by the user might not play.
Logos of Discs the product can play
| DVD VIDEO | COMPACT DISC DIGITAL AUDIO | DIVX. |
| DVD-VIDEO AUDIO-CD DivX | ||
Region Code
Both products and discs are coded by region. These regional codes must match for a disc to play. If the codes do not match, the disc will not play. The Region Number for this product is displayed on the rear panel of the product.
| Disc Type | Region Code | Area |
| DVD-VIDEO | 1 | The U.S., U.S. territories and Canada |
| 2 | Europe, Japan, the Middle East, Egypt, Africa, Greenland | |
| 3 | Taiwan, Korea, the Philippines, Indonesia, Hong Kong | |
| 4 | Mexico, South America, Central America, Australia, New Zealand, Pacific Islands, Caribbean | |
| 5 | Russia, Eastern Europe, India, North Korea, Mongolia | |
| 6 | China |
| NOTE |
If the Region number of a DVDs does not correspond to the Region number of this product, the product cannot play the disc.
Notes on the USB connection
Supported devices: USB storage media, MP3 player, digital camera
- If a folder or file name is longer than 10 characters, it may not properly display or operate.
- A subtitle file bigger than 300KB may not be properly displayed.
- Some USB devices, digital cameras, USB card readers, iPods, iPhones, and Smart Phones may not be supported.
- FAT16 and FAT32 file systems are supported.
- Connect directly to the product's USB port. Connecting through another cable may raise
problems with USB compatibility.
- Inserting more than one memory device to a multi-card reader may not operate properly.
- PTP protocol for digital camera is not supported.
- Do not disconnect USB device during a "READ" process.
- Bigger the image resolution, the longer the delay to displaying.DRM applied MP3/WMA or video files downloaded from a commercial site are not played back.
- USB HDD's should be connected to a separate power source. Otherwise, the HDD's will not work.
- The maximum current supported by the USB port for an external device is 500mA (at 5V DC).
Supported file formats
| Format | Still Picture | Music Movie | |||
| File name | JPG MP3 | WMA WMV DivX | |||
| File extension | JPG .JPEG .MP3 .WMA .WMV .AVI | ||||
| Bit rate | - | 80~320 kbps | 56~128 kbps | 4Mbps 4Mbps | |
| Version | --V8 | V1,V2, V3,V7 | DivX3.11,4,5,6 | ||
| Pixel | 640x480 -- | 720x576 | |||
| Sampling Frequency | - | 44.1kHz | 44.1kHz | 44.1KHz~48KHz | |
NOTES
- Playing back a JPEG file whose image resolution is higher than that of DVD may result in degraded image quality when displayed.
A maximum of 999 tracks can be played per CD.
A maximum of 250 folders can be played per CD.
Front/Top Panel
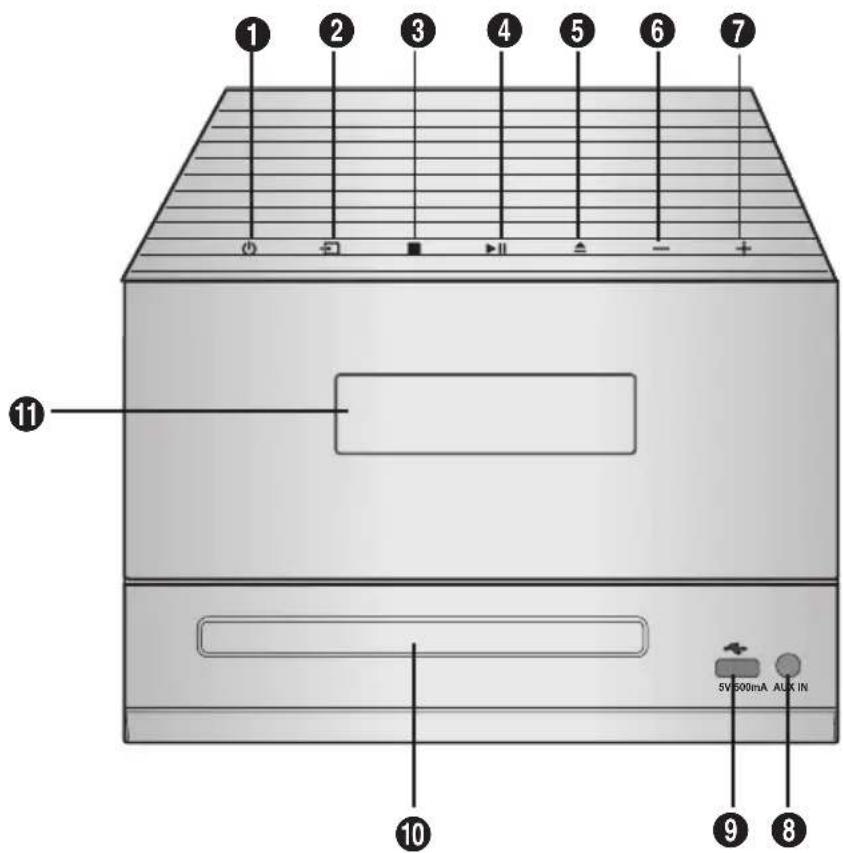
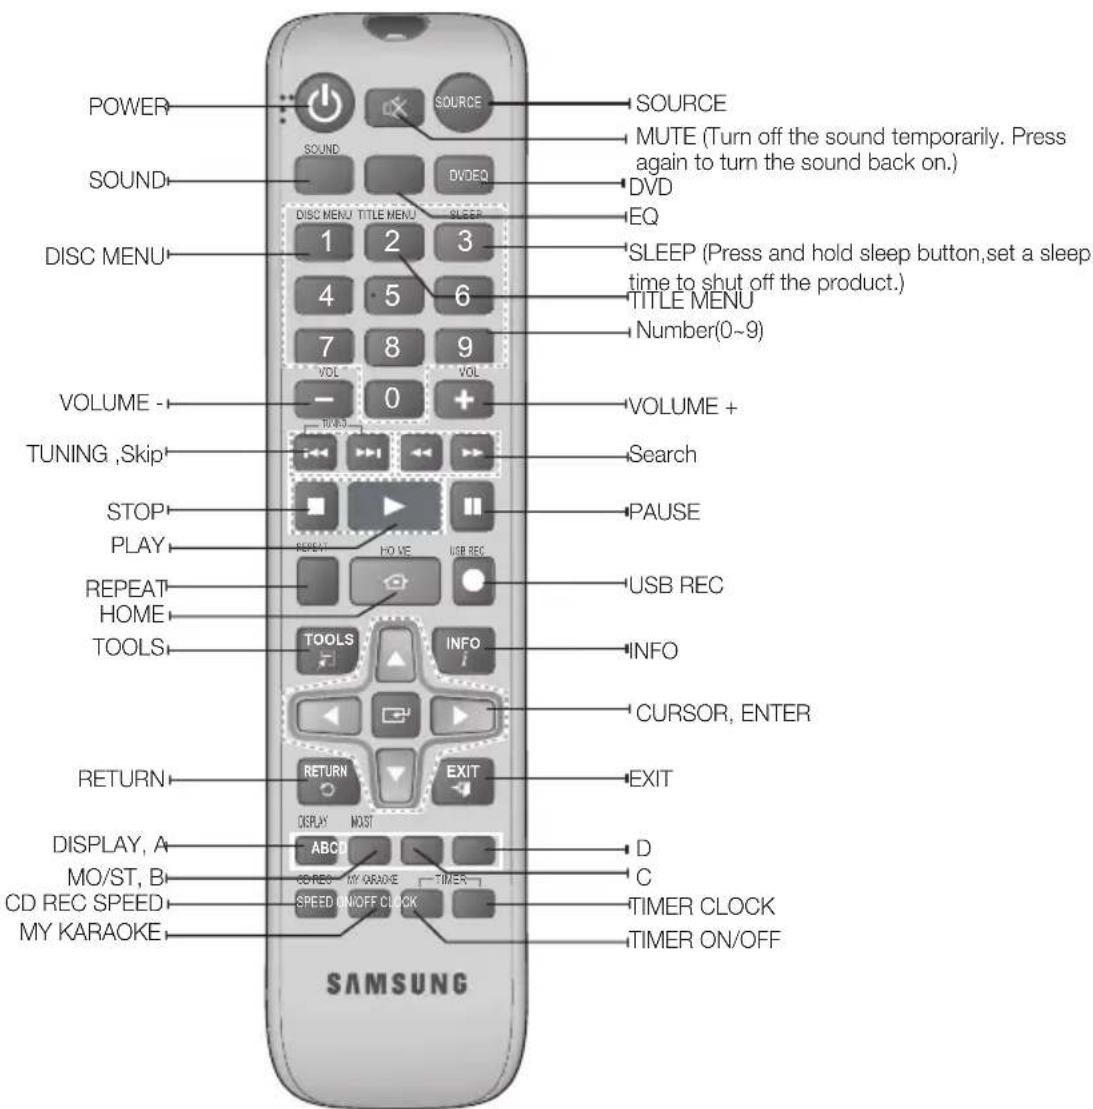
| 1 | POWER button Press this button to switch your product on or off. |
| 2 | SOURCE button |
| 3 | STOP button |
| 4 | PLAY/PAUSE button |
| 5 | OPEN/CLOSE button |
| 6 | VOLUME CONTROL - button |
| 7 | VOLUME CONTROL + button |
| 8 | AUX IN JACK 1. Use the Audio Cable (not supplied) to connect AUX IN on the player to Audio Out on the external analog component. 2. Press switch the input mode to AUX. · If no button actions for more than 8 hours in AUX mode, the power will automatically turn off. |
| 9 | USB jack |
| 10 | DISC slot |
| 11 | Display Panel |
Tap on touch screen with your fingertip.
To avoid damage to the touch screen, do not use any object other than your fingers to operate it.
Do not tap on the touch screen if your fingers are not clean.
Do not tap on the touch screen with gloves on.
The touch screen may not function if you use your fingernail or other instrument such as a ballpoint pen.
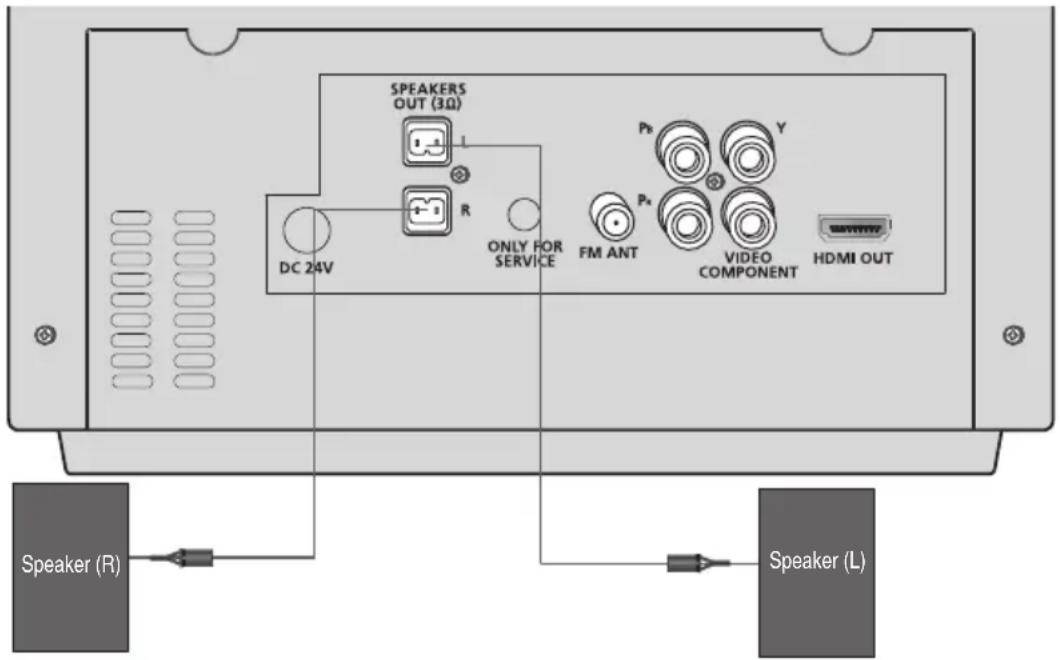
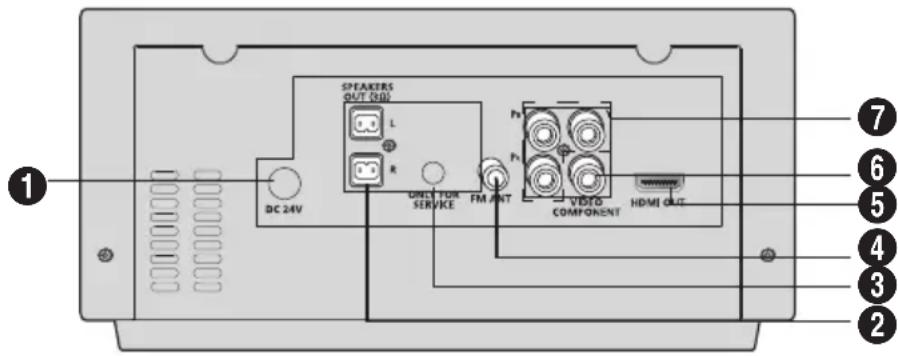
Rear Panel
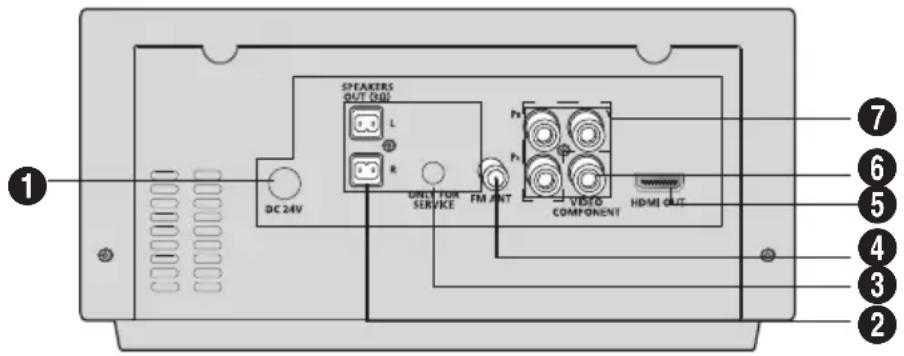
1. DC 24V (Power Supply In)
- Connect the DC power adaptor to the power supply jack, and then connect the AC power adaptor plug to a wall outlet.
2. 2.0 CH Speaker Connector Terminals
The speaker connector terminals are located on the rear of the system. To achieve the correct sound quality, insert the speaker connector cables identified below into the correct speaker terminals on the back of the system.
- Left speaker (marked L).
Right speaker (marked R).
3. ONLY FOR SERVICE
- This jack is for service only. Please do not use.
4. FM Antenna Connector Terminal
-
Connect the FM antenna (supplied) to the FM Antenna jack.
-
Slowly move the antenna wire until you find a location where reception is good, then fasten it to a wall or other rigid surface.
- If reception is poor, you may need to install an outdoor antenna. To do so, connect an outdoor FM antenna to FM antenna jack on the rear of the system using a 75 coaxial cable (not supplied).
5. HDMI OUT Jack
Outputs digital video and audio signals simultaneously using an HDMI cable.
6. VIDEO OUT Jack
Connect your TV's Video Input jack (VIDEO IN) to the VIDEO OUT jack.
7. COMPONENT VIDEO OUTPUT Jacks
Connect a TV with Component video inputs to these jacks.
Accessories
Check for the supplied accessories below.

Video Cable FM Antenna

User's Manual
Remote Control/ Batteries
DC Adapter Power Cord

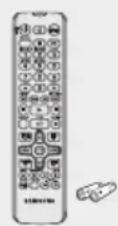
Remote control
Tour of the Remote Control
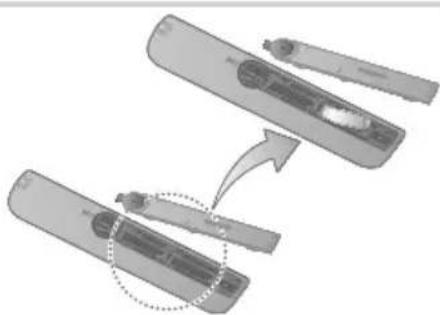
Installing batteries in the Remote Control
NOTES
- Place batteries in the remote control so that the polarities (+, -) match the diagram in the battery compartment.
Do not dispose of batteries in a fire.
Do not short circuit, disassemble, or overheat the batteries. - You could cause an explosion if you replace the battery with the wrong type of battery. Replace the battery only with the same or equivalent type.
The remote control can be used up to approximately 23 feet (7 meters) in a straight line from the unit.
* Battery size: AAA
Connecting the Speakers
Before moving or installing the product, be sure to turn off the power and disconnect the power cord.
Position of the product
Place it on a stand or cabinet shelf, or under the TV stand.
Selecting the Listening Position
The listening position should be located about 2.5 to 3 times the distance of the TV's screen size away from the TV.
Example: For 32" TV's 2~2.4m
For 55" TV's 3.5~4m
| Speakers L R | Place these speakers in front of your listening position, facing inwards (about 45°) toward you. Place the speakers so that their tweeters will be at the same height as your ear. |
CAUTION
Do not let children play with or near the speakers. They could get hurt if the speaker falls.
- When connecting the speaker wires to the speakers, make sure that the polarity (+ / -) is correct.
| NOTE |
If you place a speaker near your TV set, screen colour may be distorted because of the magnetic field generated by the speaker. If this occurs, place the speaker away from your TV set.
Connecting the Video Out to your TV
Choose one method for connecting to a TV.
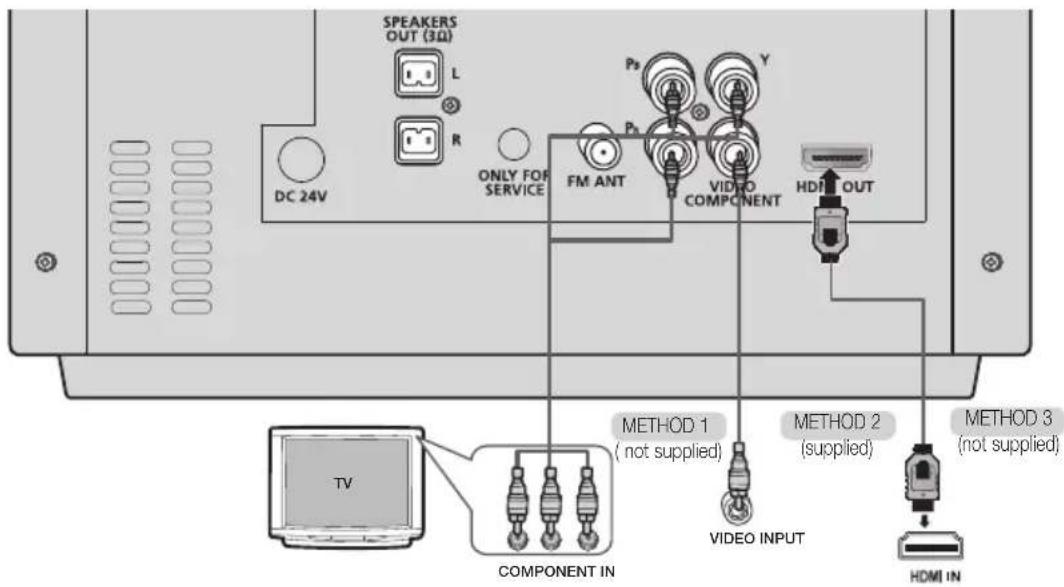
METHOD 1 : Component Video
If your television is equipped with Component Video inputs, connect a Component video cable (not supplied) from the COMPONENT OUT (Pr, Pb and Y) Jacks on the back of the product to the Component Video Input Jacks on your TV.
METHOD 2 : Composite Video
Connect the supplied Video cable from the VIDEO OUT jack on the back of the product to the VIDEO IN jack on your TV.
METHOD 3:HDMI
Connect an HDMI cable (not supplied) from the HDMI OUT jack on the back of the product to the HDMI IN jack on your TV.
NOTES
Resolutions available for the HDMI output are 480p(576p), 720p, 1080i/1080p. See page 15 for the resolution setting.
This product operates in Interlace scan mode 480i(576i) for component/composite output.
After making the video connection, set the Video input source on your TV to match the corresponding Video output mode on your product.
Turn this product on first before you set the video input source on your TV. See your TV owner's manual for more information on how to select the TV's Video Input source.
!CAUTION
- Do not connect the unit through a VCR. Video signals fed through VCRs may be affected by copyright protection systems and the picture will be distorted on the television.
HDMI FUNCTION
HDMI Auto Detection Function
If your TV is Samsung TV and it supports CEC function. The product's video output will automatically change to HDMI mode when connecting an HDMI cable while power is on.
HDMI (High Definition Multimedia Interface)
- HDMI is an interface that enables the digital transmission of video and audio data with just a single connector. Using HDMI, the product transmits a digital video and audio signal and displays a vivid picture on a TV having an HDMI input jack.
HDMI connection description
-
HDMI outputs only a pure digital signal to the TV.
-
If your TV does not support HDCP (High-bandwidth Digital Content Protection), random noise appears on the screen.
-
What is the HDCP?
- HDCP (High-band width Digital Content Protection) is a system for protecting DVD content outputted via HDMI from being copied. It provides a secure digital link between a video source (PC, DVD, etc) and a display device (TV, projector, etc). Content is encrypted at the source device to prevent unauthorized copies from being made.
Using Anynet+(HDMI-CEC)
Anynet+ is a function that enables you to control other Samsung Devices with your Samsung TV's remote control. Anynet + can be used by connecting this product to a SAMSUNG TV using a HDMI Cable. This is only available with SAMSUNG TV's that support Anynet+(HDMI-CEC).
- Connect the product to a Samsung TV with an HDMI cable. (See page 12)
- Set the Anynet+ function on your TV. (See the TV instruction manual for more information.)
NOTES
The Anynet+ function supports some buttons of the remote control.
This function is not available if an HDMI cable does not support CEC.
Depending on your TV, certain HDMI output resolutions may not work. Please refer to the user's manual of your TV.
Please check the Anynet+(HDMI-CEC) logo (If your TV has an Anynet+(HDMI-CEC) logo, then it supports Anynet+ function.)
Using ARC(Audio Return Channel)
ARC is feature that transfer audio from the TV back to the product and listen to your TV's audio through the product instead of the TV's speakers without having to connect a second cable between the TV and other audio system.
- Connect the product to a Samsung TV with an HDMI cable. (See page 12)
-
Press the SOURCE button to select ARC input.
-
You can select ARC by pressing the SOURCE button on the remote control and the product.
- When you select the TV speaker on TV and then the main set will display"SMUTE".
- On S MUTE MODE, EQ/SOUND/VOL/MUTE button doesn't work.
The Initial Settings Procedure
Press the POWER button when it is plugged in TV for the first time. Initial Settings screen will be displayed.
(select the desired language) (select the desired TV Aspect)
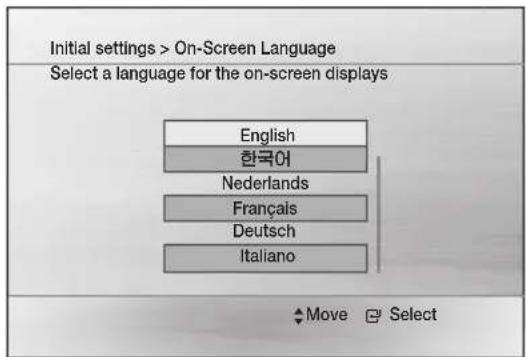
NOTES
The initial screen may appear different, depending on the content of the disc.
If you move to the previous screen, press and hold the RED(A) button.
Once you select a menu language, you can change it by pressing the button on the front panel for more than 5 seconds with no disc.
If you want to display the Initial Setting screen again and make changes, select the Reset option.
Accessing the Settings Screen
- Press the POWER button.
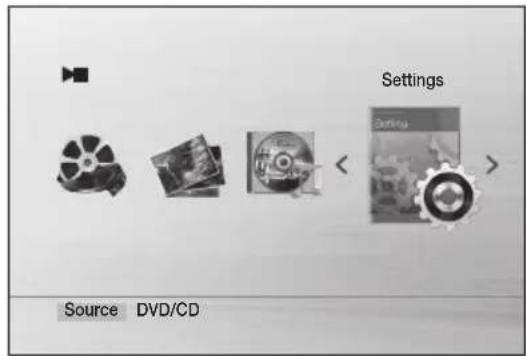
- Press the buttons to select Settings, then press the button. The Settings screen appears.
- To access the menus, sub-menus, and options on the Settings screen, please refer to the remote control illustration below.
Buttons on the Remote Control Used for the Settings Menu
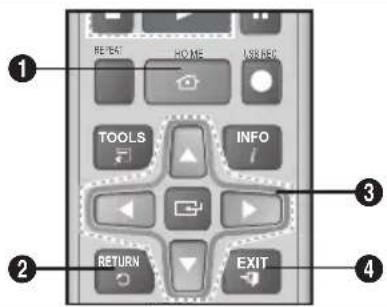
| 1 | HOME Button:Press to move to the Home screen. |
| 2 | RETURN Button:Return to the previous menu. |
| 3 | Enter/DIRECTION Button: • Press▲▼▲▶to move the cursor or select an item. • Press the button to activate the currently selected item or confirm a setting. |
| 4 | EXIT Button:Press to exit the current menu. |
Display
TV Aspect
4:3 Pan-Scan: Select when you want to see the 16:9 video supplied by the DVD without the black bars on top and bottom, even though you have a TV with a 4:3 ratio screen.
4:3 Letterbox: Select when you want to see the total 16:9 ratio screen DVD supplies, even though you have a TV with a 4:3 ratio screen. Black bars will appear at the top and bottom of the screen.
16:9 Wide: You can view the full 16:9 picture on your widescreen TV.
NOTES
If a DVD is in the 4:3 ratio, you cannot view it in the wide screen.
- Since DVD discs are recorded in various image formats, they will look different depending on the software, the type of TV, and the TV aspect ratio setting.
- When using HDMI, the screen is automatically converted to the 16:9 Wide mode and TV Aspect is deactivated.
BD Wise
(Samsung products only)
BD Wise is Samsung's latest inter-connectivity feature. When you connect Samsung products with BD-Wise to each other via HDMI, the optimum resolution will be set automatically.
- On: The original resolution of the DVD disc will be output to the TV direct.
- Off: The output resolution will be fixed according to the Resolution previously set, regardless of the resolution of the disc.
NOTES
This will optimize the picture quality according to the content (In the DVD disc, etc) that you want to play and the product or your BD Wise-compliant Samsung TV.
If you want to change the resolution in BD Wise mode, you must set BD mode to Off in advance.
BD Wise will be disabled if the product is connected to a device that does not support BD Wise.
Resolution
Sets the output resolution of the HDMI video signal. The number in 480p(576p), 720p, 1080i and 1080p indicates the number of lines of video.
The i and p indicate interlace and progressive scan, respectively.
480p(576p) Outputs 480 lines of progressive video.
- 720p: Outputs 720 lines of progressive video.
- 1080i: Outputs 1080 lines of interlaced video.
1080p: Outputs 1080 lines of progressive video.
- BD Wise: Automatically sets the optimal resolution when connected via HDMI to a TV with the BD Wise feature. (The BD Wise menu item appears only if BD Wise is set to On.)
NOTES
If Component or Composite is connected, the resolution supports only 480i(576i).
1080P may not appear depending on TV.
Video Out Signal
Different countries apply different TV standard. You can select from NTSC or PAL.
- NTSC : You can set to the NTSC video format
- PAL: You can set to the PAL video format
| NOTE |
Depending on the type(NTSC or PAL) of main unit you have, the TV screen displayed may be different.
HDMI Format
You can optimize the color setting from the HDMI output. Select a connected device Type.
- Monitor: Select if connected to a Monitor via HDMI.
TV: Select if connected to a TV via HDMI.
Audio
DRC (Dynamic Range Compression)
This feature balances the range between the loudest and quietest sounds. You can use this function to enjoy Dolby Digital sound when watching movies at low volume at night.
- You can select either Full, 6/8, 4/8, 2/8, Off.
AUDIO-SYNC
Video and audio sync may not match with digital TV. If this occurs, adjust the audio delay time to match the video.
- You can set the audio delay time between 0 mS and 300 mS. Set it to the optimal status.
Speaker Selection
The audio signals transmitted over the HDMI Cable can be changed Audio System/TV Speaker.
Audio System: Video is transmitted over the HDMI connection cable only, and audio is output through the product speakers only.
- TV Speaker: Both video and audio signals are transmitted over the HDMI connection cable, and audio is output through your TV speakers only.
NOTES
The default setting of this function is Audio System.
HDMI Audio is automatically down-mixed to 2ch for TV speakers.
- When TV Selection is set to TV Speaker, EQ/POWER BASS/Recording/MY KARAOKE/VOL/MUTE doesn't work.
- With Speaker Selection set to 'TV Speaker', the volume can be adjusted only using the TV remote control.
Audio Return Ch.
You can enjoy TV sound from the speakers by using just one HDMI cable.
- Off: Turn the Audio Return Channel function off.
- Auto: Listen to TV sound from the speakers if your TV is compatible with the Audio Return Channel function.
NOTES
When Anynet+ (HDMI-CEC) is Off, the Audio Return Channel function is not available.
Using an ARC (Audio Return Channel)-uncertified HDMI cable may cause a problem in compatibility.
ARC function is only available if an ARC-compliant TV is connected.
If no ARC signal for more than 25 minutes, the power will automatically turn off.
System
Initial Settings
By using the Initial Settings, you can set the language and TV aspect.
| NOTE |
If an HDMI cable is connected to the product, the TV aspect does not appear and it is set to 16:9 Wide automatically.
DivX(R) VOD
View DivX(R) VOD Registration Code to purchase and play DivX(R) VOD content.
| NOTE|
Even after you reset the system, the settings of DivX Registration will not be reset.
Language
You can select the language you prefer for on-screen menu, disc menu, etc.
To select a language that does not appear in the menu, select OTHERS in the Disc Menu, Audio and Subtitle, and enter the language code of your country. For more information, refer to www.samsung.com or call to Samsung customer service center.
NOTES
You cannot select OTHERS in the OSD Language menu.
The selected language will only appear if it is supported on the disc.
Security
The Parental Lock function works in conjunction with DVDs that have been assigned a rating, which helps you control the types of DVDs that your family watches. There are up to 8 rating levels on a disc.
Parental Rating
Select the rating level you want to set. Enter the password and then press the button.
The password is set to "0000" by default.
Change Password
Select Change and enter the 4-digit password to set the parental lock using the number buttons on the remote control.
If you forgot your password
In No Disc mode, Press and hold the button on the remote control for 5 seconds or more. All settings will revert to the factory settings.
Support
Product Information
Provide the product information such as Model code, Software Version, etc.
DiscPlayback
OPEN/CLOSE Place a disc gently into the tray with the disc's label facing up OPEN/CLOSE.
NOTES
- When you stop disc play, the product remembers where you stopped, so when you press button again, it will pick up where you left off. (Resume function works only with DVDs.) Press the button twice during playback to disable the Resume function.
If no buttons are pressed on the product or remote control for more than 3 minutes when the product is in Pause mode, it will be changed to stop mode.
Pirated discs will not play in this product because they violate the CSS (a copy protection system) recommendations.
will appear when an invalid button is pressed.
If no button input is made for more than 5 minutes in Stop or Play (music) mode, the screen saver will get activated.
If the product is left in the screen saver mode for more than 20 minutes, the power will automatically turn off. (Except during play a music) - DTS Audio is not supported.
Audio CD(CD-DA)/MP3/WMA Playback
- Insert an Audio CD(CD-DA) or an MP3 Disc.
For an Audio CD, the first track will be played automatically.
-
Press the buttons to move to the previous/next track. You can also use the Number(0~9) button to select the desired track.
-
For the MP3/WMA disc, press the▶ buttons to select Music, then press the button.
-
Press the buttons to select a desired file and press the button.
-
Press the buttons to move to the previous/next pages.
-
Press the button to stop playback.
NOTES
Some MP3/WMA-CDs may not play, depending on the recording mode.
Table of contents of a MP3-CD varies depending on the MP3/WMA track format recorded on the disc.
WMA-DRM files cannot be played.
If no buttons are pressed on the product or remote control for more than 25 minutes when the product is in Stop mode or no Disc mode, the power will automatically turn off.
JPEG File Playback
Insert a JPEG disc (select Photos) (select the desired folder) (select the desired photo)
- The selected file will play and slide show will start. To stop slide show, press the button.
- You can view the previous/next file by pressing the , , , buttons during the slideshow mode.
Rotate Function
Press the GREEN(B) or YELLOW(C) button during the PAUSE mode.
GREEN(B) Button: Rotate 90^ Counterclock wise.
YELLOW(C) Button: Rotate 90^ Clockwise.
| NOTE |
The maximum resolutions supported by this product are 5120 × 3480 (or 19.0MPixel ) for standard JPEG files and 2048 × 1536 (or 3.0MPixel ) for progressive image files.
Using the Playback Function
Forward/Reverse Search
Press the buttons for Search Function.
| NOTE |
No sound is heard during the fast playback (except CD-DA x 1 and CD-DA x 2).
Skipping Scenes/Songs
Press the buttons.
Each time the button is pressed during playback, the previous or next chapter, track or directory (file) will be played.
- You cannot skip chapters consecutively.
Skipping Folder
When the Music/Video/Photo files on play and stop mode, press and hold the 山山山山 buttons on the remote control.
- It will skip to the previous/next folder, and "File Searching..." is displayed.
NOTES
In Forward/Reverse/Pause/Step/Slow mode, this function does not work.
Depending on the content of the file or the folder, the skipping time may be different.
Basic Functions
Slow Motion Play
Press the button and then press the button for Slow Motion play.
NOTES
No sound is heard during slow playback.
Reverse slow playback does not work.
This function is available for the DivX/DVD.
Step Motion Play
Press the button repeatedly.
- The picture moves forward one frame each time the button is pressed during playback.
NOTES
No sound is heard during step motion playback.
This function is available for the DivX/DVD.
5 Minute Skip Function
During playback, press the , button.
- Playback skips 5 minutes forward whenever you press the button.
- Playback skips 5 minutes backward whenever you press the button.
| NOTE |
This function is available only for the DivX that contains time information.
Using the Disc/Title Menu
During playback, press and hold
DISC MENU or TITLE MENU ▲▼△▶→
- Disc Menu: You can view the menus for the audio language, subtitle language, profile, etc.
- Title Menu: For DVDs containing multiple titles, you can view the title of each movie.
| NOTE |
Depending on the disc, menu setup items may vary and this menu may not be available.
Repeat Playback
DVD/DivX Repeat
You can repeat the title, chapter or the section(A-B Repeat) of the DVD/DivX.
- During DVD/DivX playback, press the REPEAT button on the remote control.
-
Press the buttons to select a desired repeat mode, then press the G button.
-
Press the buttons to select OFF to return to normal play, then press the button.
DVD Off Title Chapter A-B
DivX: Off Title Folder All
CD/MP3 Repeat
During the CD/ MP3 playback, press the REPEAT button repeatedly to select the repeat mode you want.
CD: (Off) → finack) → (A) → (Random) → A-B (Section A-B)
- MP3:Off) → (Dack) → (Directory)→ (All)→ (Random)
A-B Repeat Playback
You can repeatedly play back a designated section of a DVD or CD.
- During the DVD disc or CD playback, press the REPEAT button on the remote control.
- For DVD, press the buttons to select A-. For CD, press the REPEAT button repeatedly until appears.
- Press the button at the point where you want repeat play to start (A).
- Press the button at the point where you want repeat play to stop (B).
- To return to normal playback, For DVD, press the REPEAT button to select to OFF. For CD, press the REPEAT button to select to
NOTES
The A-B Repeat function does not operate with DivX, MP3 or JPEG discs.
For DVD, point B cannot be set until 5 seconds of playback has elapsed from point A.
Displaying Disc Information
- During playback, press the TOOLS button on the remote control.
- Press the buttons to select the desired item.
-
Press the buttons to make the desired setup change and then press the button.
-
You may use the number buttons of the remote control to control some items.
- To make Disc information disappear, press the TOOLS button again.
| NOTE |
- Some tools menus may differ depending on discs and files.
TOOLS menu
- Title: To access the desired title when there is more than one in the disc.
Chapter: Most DVD discs are recorded in chapters so that you can quickly find a specific chapter. - Playing time: Allows playback of the film from a desired time. You must enter the starting time as a reference. The time search function does not operate on some discs.
Audio Refers to the film's soundtrack language. A DVD Disc can contain up to 8 audio languages. - Subtitle Refers to the subtitle languages available in the disc. You will be able to choose the subtitle languages or, if you prefer, turn them off from the screen. A DVD Disc can contain up to 32 subtitle languages.
- Angle: When a DVD contains multiple angles of a particular scene, you can use the Angle function.
TOOLS (select AUDIO, SUBTITLE or ANGLE)
→ (select the desired option)
NOTES
Depending on the disc, the Subtitle and Audio Language functions may not be available.
The Angle function works only with discs on which multiple angles have been recorded.
Caption Function
- You must have some experience with video extraction and editing in order to use this feature properly.
- To use the caption function, save the caption file (.smi) in the same file name as that of the DivX media file (.avi) within the same folder.
- Up to 60 alphanumeric characters or 30 East Asian characters (2 byte characters such as Korean and Chinese) for the file name.
- The subtitle of DivX files are .smi, .sub, *.srt over 148 kbyte is not supported.
Special Sound Effects
Your Micro Component System provides predefined equalizer settings that are optimized for particular music genre.
- Operational only in LPMC 2ch stream.
These functions are not available during playback of a AC-3 signal.
EQ
- Press the EQ button.
Each time you press this button, the sound mode will switch as following:
FLAT RANCHERA CUMBIA REGGAE MERENGUE SALSA REGGATON FOLKLORE PARTY POP HIP HOP ROCK JAZZ CLASSICAL ELECTRONIC OFF
NOTES
The equalizer is set to "OFF" automatically and is not available during a Recording.
If no buttons are pressed within 4 seconds, your settings will automatically be cancelled and the previous settings will be saved.
The equalizer mode may be different depending on your region.
POWER BASS
Your Micro-component system has a bass amplification function called Power Bass.This function makes the sound more powerful and real.
- Press the SOUND button on the remote control.
Result: " ON -POWER BASS" is displayed.
- To cancel this function, press this button again, "OFF-POWER BASS" is displayed for a few seconds.
NOTES
The Power Bass is set to "OFF" automatically and becomes not available during a CD recording.
TV SoundConnect
You can listen to the sound from your SoundConnect Compatible Samsung TV through the Micro Component by using the TV SoundConnect function.
Connecting the Micro Component to a SoundConnect Compatible Samsung TV
Before activating this function, be sure to activate the Samsung TV's SoundConnect or SoundShare mode.
- Press the SOURCE button to display the TV SOUND CONNECT message.
WAIT SEARCH REQUEST
- Set Add New Device to On in the TV's SoundConnect Settings menu. (Refer to the TV's user manual for details.)
- When the Micro Component is connected to the TV, it will display [TV] Name CONNECTED TV on the front display.
-
The audio from the connected TV plays over the Micro Component audio system.
-
In TV SoundConnect mode, the Play/Repeat/Stop/Next/Back functions are not available.
- The SoundConnect feature is available on some Samsung TVs released since 2012. Check whether your TV supports the SoundShare or SoundConnect function. (For further details, refer to the TV's user's manual.)
- If you unplug the Micro Component, the TV SoundConnect connection is terminated. To re-establish the connection, plug the Micro Component into an outlet, and then set the TV SoundConnect connection again.
- Only one Micro Component at a time can be connected to a TV via TV SoundConnect.
- To connect to another TV in TV Soundconnect mode, press the button on the main set for more than 5 seconds, and then connect to the other TV by following the directions above.
To disconnect the TV from the Micro Component
You can disconnect the TV from the Micro Component.
For instructions, see the TV's user manual.
- When the Micro Component is disconnected from the TV, the Micro Component will display TV DISCONNECTED REQUEST on its display.
To disconnect the Micro Component from the TV
Press another mode button on the front panel of the Micro Component to switch from TV SoundConnect mode to another mode or turn off the Micro Component. The currently connected device is disconnected.
- The connected TV will wait a certain amount of time for a response from the Micro Component before terminating the connection.(Disconnection time may differ, depending on the TV)
- The connection may be lost or sound may stutter if the distance between the TV and the Micro Component exceeds 6.5 feet (2 m).
- Instability in the network environment may cause the connection to be lost or sound to stutter.
- In TV SoundConnect mode, the Micro Component automatically turns off after 25 minutes if it is not connected to a TV.
Listening to the Radio
To Store the Stations You Want
You can store up to 15 FM stations.
- Select FM by pressing the SOURCE button.
- To search for a station, press the STOP button on the product one or more times until MANUAL is displayed.
-
Select a station by:
-
Pressing and holding the TUNIN button on the remote control to automatically search for active broadcasting stations.
-
Press the MO/ST button to switch between stereo and mono.
-
In a poor reception area, select MONO for a clear, interference-free broadcast.
-
This applies only when listening to an FM station.
-
If you do not want to store the radio station found, go back to Step 3 and search for another station.
Otherwise:
a. Press the ENTER button.
FM followed by a flashing number appears in the display. That number is the current preset number.
b. Press the , buttons to scroll through and select a preset number.
- You can select a number from 1 to 15.
c. Press the button to save the preset.
- To store additional radio stations, repeat Steps 3 to 5.
NOTES
In Tuner mode
In the Manual mode, you can use the or button to change stations.
- In the Preset mode, you can use the × or × button to search for a stored radio station.
Selecting a Stored Station
To listen to a stored station, follow these steps:
- Select FM by pressing the SOURCE button.
- Press the STOP button until "PRESET" is displayed.
- Press TUNING on the remote control to select a preset number.
Display Function
You can view all functions available on the display, adjust the brightness of the display.
- Each time you press the DISPLAY button on the remote control, the display mode will change as following:
The Dimmer function
The Dimmer function is selected and the display darkens.
Display ON
The Display turns on.
Clock ON
The Clock you set is displayed.
Setting the Clock
For each step, you have a few seconds to set the required options. If you exceed this time, you must start again.
- Switch the system on by pressing the POWER ( button.
- Press the TIMER CLOCK button and then press the button.
Result: "CLOCK" is displayed.
- Press the button.
Result: The hour flashes.
Decrease the hours:
Increase the hours:
- When the correct hour is displayed, press the button.
Result: The minutes flashes.
Decrease the minutes:
Increase the minutes:
- When the correct minute is displayed, press the button.
Result: "TIME" appears in the display.
The current time is now set.
| NOTE |
You can display the time, even when you are using another function, by pressing the TIMER CLOCK button once.
Timer Function
The timer enables you to switch the system on or off at specific times automatically.
Before setting the timer, check that the current time is correct.
For each step, you have a few seconds to set the required options. If you exceed this time, you must start again.
If you no longer want the system to switch on or off automatically, you must cancel the timer by pressing the TIMER ON/OFF button.
Example: You wish to wake up to music every morning.
-
Switch the system on by pressing the POWER (O) button.
-
Press the TIMER CLOCK button and then press the or buttons until TIME is displayed.
- Press the button.
Result: ON is displayed for a few seconds, you can set the timer switch-on time.
- Set the timer switch-on time.
a Press the or button.
b Press the button.
Result: The minutes flash.
Press the or button.
d Press the C button.
Result: OFF is displayed for a few seconds, you can now set the timer switch-off time.
- Set the timer switch-off time.
a Pressthe or button.
b Press the button.
Result: The minutes flash.
Press the or button.
d Press the C button.
Result: VOL XX is displayed, where XX corresponds to the volume already set.
- Press or button to adjust the volume level and press the button.
Result: The source to be selected is displayed.
- Press the or button to select the desired source to be played when the system switches on.
FM (radio): a Press the button.
b Select a preset station by press the or button.
DVD/CD (compact disc): Load one audio CD.
USB:Connect the USB device.
- Press the button.
Result: CHKREC (Do you want to record?) is displayed.
- Press the button.
Result: REC N is displayed, you can press the or button to select the REC Y or REC N, and then press button.
1). If you select the REC N, it will cancel tuning timing recording even if you have already set the tuner timing recording.
2). If you select the REC Y, you can set the tune timing recording.
a. Press the button.
Result: ON is displayed for a few seconds, you can set the tuner timing recording switch-on time.
b. Press the C button.
Result: OFF is displayed for a few seconds, you can set the tuner timing recording switch-off time.
NOTES
The maximal tune timing recording time is 5 hours.
If the auto timer is turned on, the DVD/CD or USB function may require an additional step to be activated depending on the disc (or device). Hence, it is better for you to select the tuner function instead.
If the timer switch on and off times are identical, the word ERROR is displayed.
- Selecting DVD/CD or USB will automatically change to TUNER if there is no disc or USB is inserted.
If the switch-on or-off time is the same as the timing recording time, only the switch-on or-off time is effective, and the timing recording time is not applied.
Cancelling the Timer
After having set the timer, it will start automatically as shown by the TIMER indication on the display. If you no longer wish to use the timer, you can cancel it.
- To cancel the timer, press the TIMER ON/OFF button once.
- To resume the timer, press the TIMER ON/OFF button again.
| NOTE |
When you select the OFF-TIMER mode, the TIMER RECORDING and TIME function are not available.
Selecting MY KARAOKE Mode
Set the volume of the vocals when using the karaoke feature.
Each time you press the MY KARAOKE button on the remote control, the sound mode will change as follows: ON OFF
OFF: Volume is set to the level of the original sound.
ON: Volume is set to a level lower than that of the original sound.
- For My Karaoke mode, this mode works only for CDDA/DVD/MP3/WMA playback. and this mode cannot be applied during Tuner, Bluetooth, AUX,ARC and TV Sound Connect modes.
USB Function
Playing Media Files using the USB Host Feature
You can enjoy media files such as pictures, movies and music saved on an MP3 player, USB memory stick or digital camera in high quality video with 2.0 channel sound by connecting the storage device to the USB port of the product.
- Connect the external USB storage device to the USB jack of the main unit.
-
Select the USB mode by pressing the button on the main unit or pressing the SOURCE button on the remote control.
-
Press the buttons to select Videos, Music or Photos.
-
Select a file to play.
Safe USB Removal
To prevent damage to the memory stored in the USB device, perform safe removal before disconnecting the USB cable.
-
Press the YELLOW(C) button.
-
REMOVE will appear on the display.
- Remove the USB cable.
NOTES
- Remove the USB cable from the USB port slowly. Otherwise, it may cause damage to the USB port.
The product will automatically turn off from no USB and Stop mode for more than 25 minutes.
A maximum of 999 files can be played per USB device.
Recording Function
You can record from a CD, radio broadcast, or an external source to a USB storage device.
- Connect an external USB storage device to the USB (J)ack on your product.
- Playa disc, tune to a station, or connect an external source to your product.
CD
- Press the SOURCE button on the main unit to select the DVD/CD function.
- Press the OPEN/CLOSE button to open the disc tray.
- Inserta CD and press the OPEN/CLOSE button to close the disc tray.
- Uset he CD selection (or ) buttons to select the desired song.
Tuner
- Select FM by pressing the SOURCE button.
Tune to a station you want to record.
External Source
- Connect an External Component/MP3 player to your product.
- Press the SOURCE button to select <AUX> input.
-
Play a song from the external device.
-
Press the USB REC button to start recording.
CD
- "TRACK RECORDING" is displayed and CD recording starts.
- Press and hold the USB REC button to start recording all tracks on the disc. "FULL CD RECORDING" is displayed.
MP3/WMA/PHOTO/DivX-RECORD DISC
- Press the USB REC button, the current playing file is copied onto the USB device.
To copy a music folder, highlight desired folder first and press USB REC button, the folder is copied. COPY: "CHECK" "START" "COPY XX"
"COPY END" is displayed. When the copy is done, "STOP" will be displayed.
- If there is a duplicate file name, "FILE EXIST" is displayed, and the function is canceled.
Tuner/External Source
TUNER:TUNER RCORDING"-->"RECORD"
- AUXAUX RECORDING"-->"RECORD"
- To stop recording, press the button. The unit automatically creates and saves recorded files in .MP3 format (SAM-XXXX.MP3).
- To remove the USB device safely, press the button once again. After recording, a directory named "RECORDING(DISCxxxxx)"(FULL CD RECORDING), "RECORDING"(TRACK
RECORDING), "CD COPY"(MP3/WMA/ PHOTO/DivX-RECORD DISC), "TUNER RECORDING" or "AUX RECORDING" is created in your USB device.
NOTES
Do not disconnect the USB or the AC Cord during the recording as this may cause damage to the file.
If you disconnected the USB device during a recording, the main unit powers off and you will not be able to delete the recorded file from your USB device. If this occurs, please connect the USB device to a PC and backup the USB data to the PC first, and then format the USB device.
- When the USB memory has insufficient free space, the system will display "NOT ENOUGH MEMORY".
The USB device or HDD you are recording to must be formatted in the FAT file system. The NTFS file system is not supported.
- When you use the CD high speed search function, CD recording is not available.
- Sometimes, the recording time may be longer with some USB devices.
The equalizer and power bass is set to "OFF" automatically and is not available during a CD recording.
The REPEAT function is set to "OFF" automatically and is not available during a CD recording.
You can not record the radio when searching or no available station is found in the Tuner mode.
Note that setting the input level too loud when recording music from an external device through the AUX or USB channel may cause noise in the recording. If this occurs, lower the external device's volume level.
The maximum TUNER/AUX recording time is 5 hours.
Up to 300MB of a video file can be copied.
Recording Speed
You can select the recording speed before recording.
- Each time you press the CD REC SPEED button on the remote control, the recording speed will change as following:
When you record from the tuner or an external source, you cannot change the recording speed.
If you select HIGH SPEED RECORD, sound is not produced during the recording.
Bluetooth
You can use a Bluetooth device to enjoy music with high quality stereo sound, all without wires!
What is Bluetooth?
Bluetooth is a technology that enables Bluetooth compliant devices to interconnect easily with each other using a short, wireless connection.
-
A Bluetooth device may cause noise or malfunction, depending on usage, when:
-
A part of your body is in contact with the receiving/transmitting system of the Bluetooth device or the Micro Component.
- It is subject to electrical variation from obstructions caused by a wall, corner, or office partitioning.
-
It is exposed to electrical interference from same frequency-band devices including medical equipment, microwave ovens, and wireless LANs.
-
Pair the Micro Component with the Bluetooth device while they are close together.
- The greater the distance between the Micro Component and the Bluetooth device, the worse the quality. If the distance exceeds the Bluetooth operational range, the connection is lost.
- In poor reception areas, the Bluetooth connection may not work properly.
- The Bluetooth connection only works when the Bluetooth device and the Micro Component are close together. The connection will be automatically cut off if the Bluetooth device is out of range. Even within range, the sound quality may be degraded by obstacles such as walls or doors.
- This wireless device may cause electric interference during its operation.
To connect the Micro Component to a Bluetooth device
Before you begin, confirm that your Bluetooth device supports the Bluetooth-compliant stereo headset function.
-
Press the SOURCE button to display the BT message.
-
You will see WAIT for a short period of time and then BT READY on the front display of the Micro Component.
-
Select the Bluetooth menu on the Bluetooth device you want to connect. (Refer to the Bluetooth device's user manual.)
-
Select the Stereo headset menu on the Bluetooth device.
-
You will see a list of scanned devices.
-
Select "[Samsung] MICROxxxxxx" from the list.
-
When the product is connected to the Bluetooth device, it will display Device name BT on the front display.
-
If the Bluetooth device has failed to pair with the product, delete the previous "Samsung" MICRO xxxxxx "found by the Bluetooth device and have it search for the product again.
-
You can listen to the music playing on the connected Bluetooth device over the Micro Component system.
-
In Bluetooth mode, some model's Play/Stop/Next/Back functions are not available.
NOTES
The product only supports Middle Quality SBC data (up to 237kbps@48kHz), and does not support High Quality SBC data (328kbps@44.1kHz).
The AVRCP feature is not supported.
- Connect only to a Bluetooth device that supports the A2DP (AV) function.
You cannot connect to a Bluetooth device that supports only the HF (Hands Free) function.
- Only one Bluetooth device can be paired at a time.
- You may be required to enter a PIN code (password) when connecting the Bluetooth device to the Micro Component. If the PIN code input window appears, enter <0000> .
Basic Functions
-
Once you have turned off the Micro Component and pairing is terminated, pairing will not be restored automatically. To reconnect, you must pair the device again.
The Micro Component system may not search or connect properly in the following cases: -
If there is a strong electrical field around the Micro Component.
- If the Bluetooth device is turned off, not in place, or malfunctions.
Note that such devices as microwave ovens, wireless LAN adaptors, fluorescent lights, and gas stoves use the same frequency range as the Bluetooth device, which can cause electric interference.
To disconnect the Bluetooth device from the Micro Component
You can disconnect the Bluetooth device from the Micro Component. For instructions, see the Bluetooth device's user manual.
- The Micro Component will be disconnected.
- When the Micro Component is disconnected from the Bluetooth device, the Micro Component will display BT DISCONNECTED BT READY on the its display.
To disconnect the Micro Component from the Bluetooth device
Press the another mode button on the front panel of the Micro Component to switch from Bluetooth mode to another mode or turn off the Micro Component. The currently connected device is disconnected.
NOTES
The connected Bluetooth device will wait a certain amount of time for a response from the Micro Component before terminating the connection.(Disconnection time may differ, depending on the Bluetooth device)
In Bluetooth connection mode, the Bluetooth connection may be lost if the distance between the Micro Component and the Bluetooth device exceeds 16.25 feet (5 meters).
If the Bluetooth device comes back into the effective range after disconnecting, you can restart the Micro Component to restore the pairing with the Bluetooth device.
The Micro Component automatically turns off after 25 minutes in the Ready mode.
- When a Bluetooth device is connected to the Micro Component system, the Component system automatically switches to the Bluetooth mode if it is in a different mode (except when it is displaying "REQUEST" in the TV SoundConnect mode if the Bluetooth device haven't been paired with the Micro Component before.).
Using Bluetooth Power On
When the product is turned off, you can connect your smart device to the product via a Bluetooth connection to turn it on.
- Press and hold the SOURCE button to set the Bluetooth Power On function on. ON-BLUETOOTH POWER appears on the display.
-
When the product is off, connect your smart device to the product via Bluetooth. (For information on Bluetooth connections, refer to your smart device's manual.)
-
The Bluetooth device must have been paired with the Micro Component before.
-
When the connection is complete, the product turns itself on automatically in Bluetooth mode.
- Select the desired music to play from your smart device.
NOTE
Press and hold the SOURCE button to turn the Bluetooth Power On function on or off. Each time you press and hold this button, the Micro Component displays ON -BLUETOOTH POWER OFF-BLUETOOTH POWER on its display.
Software update
Samsung may offer updates for the product's system firmware in the future.
If an update is offered, you can update the firmware by connecting a USB device with the firmware update stored on it to the USB port on your product.
Note that if there are multiple update files, you must load them onto the USB device singly and use them to update the firmware one file at a time.
Please visit samsung.com or contact the Samsung Call Center to receive more information about downloading updates files.
- Select USB function, insert a USB device containing the firmware update into the USB port on the main unit.
- Updating firmware may not work properly if audio files supported by the product are stored in the USB storage device.
- Do not disconnect the power or remove the USB device while updates are being applied. The main unit will turn off automatically after completing the firmware update.
- After the update, all settings are reset to their factory default settings. We recommend you write down your settings so that you can easily reset them after the update. If the firmware fails to update, we recommend formatting the USB device in FAT16/FAT32 and trying again.
- Once the software update is completed, turn on the product with no disc inserted. The "NO DISC" message appears on the display. Press and hold the STOP button on the main unit for longer than 5 seconds. "INIT" appears on the display and the unit powers off. The upgrade is complete.
- Do not format the USB device in the NTFS format. The product does not support the NTFS file system.
- Depending on the manufacturer, some USB devices may not be supported.
- The product has a DUAL BOOT function. If the firmware fails to update, most functions will become inoperable and "UPGRADE FIRMWARE" will appear on the display. Update the firmware again.
Other Information
Troubleshooting
Refer to the chart below when this unit does not function properly. If the problem you are experiencing is not listed below or if the instruction below does not help, turn off the unit, disconnect the power cord, and contact the nearest authorized dealer or Samsung Electronics Service Center.
| Symptom Check/Remedy | |
| I cannot eject the disc. | ·Is the power cord plugged securely into the outlet? ·Turn off the power and then turn it back on. |
| Playback does not start. | ·Check the region number of the DVD. DVD discs purchased from abroad may not be playable. ·CD-ROMs and DVD-ROMs cannot be played on this product. ·Make sure that the rating level is correct. |
| Playback does not start immediately when the Play/Pause button is pressed. | ·Are you using a deformed disc or a disc with scratches on the surface? ·Wipe the disc clean. |
| Sound is not produced. | ·No sound is heard during fast playback, slow playback, and step motion playback. ·Are the speakers connected properly? Is the speaker setup correctly customized? ·Is the disc severely damaged? |
| The remote control does not work. | ·Is the remote control being operated within its operation range of angle and distance? ·Are the batteries drained? |
| ·Disc is rotating but no picture is produced. ·Picture quality is poor and picture is shaking. | ·Is the TV power on? ·Are the video cables connected properly? ·Is the disc dirty or damaged? ·A poorly manufactured disc may not be playable. |
| Audio language and subtitles do not work. | ·Audio language and subtitles will not work if the disc does not contain them. |
| The menu screen does not appear even when the menu function is selected. | ·Are you using a disc that does not contain menus? |
| Aspect ratio cannot be changed. | ·You can play 16:9 DVDs in 16:9 WIDE mode, 4:3 LETTER BOX mode, or 4:3 PAN SCAN mode, but 4:3 DVDs can be seen in 4:3 ratio only. Refer to the DVD disc jacket and then select the appropriate function. |
| ·The product is not working. (Example: The power goes out or the front panel key doesn't work or a strange noise is heard.) ·The product is not working normally. | ·While "NO DISC" message appears on the display of the productpress and hold the button on the main unit for longer than 5 seconds with no disc is inserted (reset function). Using the RESET function will erase all stored settings. Do not use this unless necessary. |
| The rating level password has been forgotten. | ·While "NO DISC" message appears on the display of the product, press and hold themain unit's button for longer than 5 seconds. "INIT" appears on the display and all settings will return to the default values. And then press the POWER button. Using the RESET function will erase all stored settings. Do not use this unless necessary. |
| Can't receive radio broadcast. | ·Is the antenna connected properly? ·If the antenna's input signal is weak, install an external FM antenna in an area with good reception. |
Specifications
| GENERAL | Weight | Main unit 1.20 Kg | |
| Speaker 2.07 Kg | |||
| Dimensions | Main unit | 230 (W) x 115 (H) x 238.5 (D) mm | |
| Speaker 142.5 (W) x 260.5 (H) x 180.5 (D) mm | |||
| Operating Temperature Range +5°C~+35°C | |||
| Operating Humidity Range 10 % to 75 % | |||
| FM Tuner | Signal/Noise ratio 55 dB | ||
| Usable sensitivity 10 dB | |||
| Total harmonic distortion 0.6 % | |||
| Disc | DVD (Digital Versatile Disc) | Reading Speed : 3.49 ~ 4.06 m/sec. | |
| Approx. Play Time (Single Sided, Single Layer Disc) : 135 min. | |||
| CD : 12 cm (COMPACT DISC) | Reading Speed : 4.8 ~ 5.6 m/sec. | ||
| Maximum Play Time : 74 min. | |||
| Video Output | Component Video | Y : 1.0 Vp-p (75 Ω load) | |
| Pr : 0.70 Vp-p (75 Ω load) | |||
| Pb : 0.70 Vp-p (75 Ω load) | |||
| Video/Audio | HDMI | 1080p, 1080i, 720p, 480p(576p) | |
| Amplifier | Speaker output 60W/CH (3Ω/100Hz)(MAX) | ||
| Frequency range | 20Hz~20KHz | ||
| S/N Ratio 75 dB | |||
| Channel separation 60 dB | |||
| Input sensitivity | (AUX) 1.2 V | ||
*: Nominal specification
Samsung Electronics Co., Ltd reserves the right to change the specifications without notice.
- Weight and dimensions are approximate.
- Design and specifications are subject to change without prior notice.
- For information on the power supply and power consumption, refer to the label attached to the product.
Open Source License Notice
- To send inquiries and requests regarding open sources, contact Samsung via Email (oss.request@samsung.com).
- This product uses some software programs which are distributed under the Independent JPEG Group.

Hereby, Samsung Electronics, declares that this equipment is in compliance with the essential requirements and other relevant provisions of Directive 1999/5/EC.
The original Declaration of Conformity may be found at http://www.samsung.com, go to Support > Search Product Support and enter the model name.
This equipment may be operated in all EU countries.
Contact SAMSUNG WORLD WIDE
If you have any questions or comments relating to Samsung products, please contact the SAMSUNG customer care centre.
| Area Contact Centre | Web Site | |
| ■ Europe | ||
| AUSTRIA | 0800 - SAMSUNG (0800 - 7267864) | www.samsung.com/at/support |
| BELGIUM 02-201 | -24-18 | www.samsung.com/be/support(Dutch)www.samsung.com/be_fr/support(French) |
| BOSNIA 051 331 | 999 www.samsung.com/support | |
| BULGARIA 07001 | 33 11, sharing cost www.samsung.com/bg/support | |
| CROATIA 062 726 | 786 www.samsung.com/hr/support | |
| CZECH 800 - SAMSUNG (800-726786) www.samsung.com/cz/support | ||
| DENMARK 70 70 19 70 www.samsung.com/dk/support | ||
| FINLAND 030-6227 | 515 www.samsung.com/fi/support | |
| FRANCE 01 48 | 63 00 00 www.samsung.com/fr/support | |
| GERMANY | 0180 6 SAMSUNG bzw.0180 6 7267864*(*0,20 €/Anruf aus dem dt.Festnetz, aus dem Mobilfunkmax. 0,60 €/Anruf) | www.samsung.com/de/support |
| CYPRUS | 8009 4000 only from landline, toll free | www.samsung.com/gr/support |
| GREECE | 80111-SAMSUNG (80111 7267864) only from land line(+30) 210 6897691 from mobile and land line | |
| HUNGARY | 0680SAMSUNG (0680-726-786)0680PREMIUM (0680-773-648) | http://www.samsung.com/hu/support |
| ITALIA | 800-SAMSUNG (800.7267864) | www.samsung.com/it/support |
| Area Contact Centre | Web Site | |
| LUXEMBURG | 261 03 710 | www.samsung.com/support |
| MONTENEGRO | 020 405 888 www.samsung.com/support | |
| SLOVENIA | 080 697 267090 726 786 | www.samsung.com/si/support |
| NETHERLANDS | 0900-SAMSUNG (0900-7267864)(€ 0,10/Min) | www.samsung.com/nl/support |
| NORWAY | 815 56480 | www.samsung.com/no/support |
| POLAND | 0 801-172-678* lub +48 22607-93-33** (alkowity koszt polaczenia jak za1 impuls wedlug taryfy operatora** (koszt polaczenia wedlug taryfoperatora) | www.samsung.com/pl/support |
| PORTUGAL | 808 20 7267 www.samsung.com/pt/support | |
| ROMANIA | 08008 SAMSUNG (08008 7267864) TOLL FREE No. | www.samsung.com/ro/support |
| SERBIA | 011 321 6899 | www.samsung.com/rs/support |
| SLOVAKIA | 0800 - SAMSUNG(0800-726 786) | www.samsung.com/sk/support |
| SPAIN | 0034902172678 | www.samsung.com/es/support |
| SWEDEN | 0771 726 7864 (SAMSUNG) | www.samsung.com/se/support |
| SWITZERLAND | 0848 726 78 64 (0848-SAMSUNG) | www.samsung.com/ch/support(German)www.samsung.com/ch_fr/support(French) |
| U.K | 0330 SAMSUNG (7267864) www.samsung.com/uk/support | |
| EIRE | 0818 717100 | www.samsung.com/ie/support |
| LITHUANIA | 8-800-77777 | www.samsung.com/lt/support |
| LATVIA | 8000-7267 | www.samsung.com/lv/support |
| ESTONIA 800-7267 www.samsung.com/ee/support | ||
[Correct disposal of batteries in this product]
![SAMSUNG MMJ430D - [Correct disposal of batteries in this product] - 1](/content/2026/02/383813/images/4f2d0a366700675831e4121c6eba0e2ad52d766b992e82917aabe25ddd0f5c75.jpg)
Correct Disposal of This Product
(Waste Electrical & Electronic Equipment)
(Applicable in countries with separate collection systems)
This marking on the battery, manual or packaging indicates that the batteries in this product should not be disposed of with other household waste at the end of their working life. Where marked, the chemical symbols Hg, Cd or Pb indicate that the battery contains mercury, cadmium or lead above the reference levels in EC Directive 2006/66. If batteries are not properly disposed of, these substances can cause harm to human health or the environment.
To protect natural resources and to promote material reuse, please separate batteries from other types of waste and recycle them through your local, free battery return system.
(Applicable in countries with separate collection systems)
This marking on the product, accessories or literature indicates that the product and its electronic accessories (e.g. charger, headset, USB cable) should not be disposed of with other household waste at the end of their working life. To prevent possible harm to the environment or human health from uncontrolled waste disposal, please separate these items from other types of waste and recycle them responsibly to promote the sustainable reuse of material resources.
Household users should contact either the retailer where they purchased this product, or their local government office, for details of where and how they can take these items for environmentally safe recycling.
Business users should contact their supplier and check the terms and conditions of the purchase contract. This product and its electronic accessories should not be mixed with other commercial wastes for disposal.
SYSTEME MICRO COMPONENTDVD
PRODUIT LASER DE CLASSE 1

Cable video Antenne FM

LASERPRODUKT DER KLASSE 1
DRC (Dynamic Range Compression)

Cavo video Antenna FM

Manuale utente
CLASS 1 LASER PRODUCT
KLASSE 1 LASER PRODUKT
LUOKAN 1 LASER LAITE
KCLASS 1 LASER APPARAT
PRODUCTO LASER CLASE 1
CLASS 1 LASER PRODUCT
Different countries apply different TV standard. You can select from NTSC or PAL.
Vystupny signal video
CD: (Off) → (fback) → (AD) → x
(Random) (Section A-B)
MP3:off) → (back) → (Directory)→
All Random)
Ponuka TOOLS (NASTROJE)
- Title (Titul)(Vstup k požadovanému titulu, ked'ana disku nachadza viac ako jedem.
Chapter (Kapitola) Väčsina DVD diskov je nahranych v kapitolach, takze prislušnu kapitolu možete rychlo najst. - Playing time (Cas prehravania) Umoznije prehravanie filmu od pozadovaneho casu. Ako referenciu musite zadat'cas spustenia. Funkcia vyhladavania podla casu s niektonymi diskmi nefunguje.
Audio (Zvuk)( Tyka sa jazyka zvukového záznamu filmu. DVD disk moze obsahovat' až 8 jazykov zvuku. - Subtitle (Titulky) Tyka sa jazykov titulkov dostupnych na disku. Mozete si vybrat z jazykov titulkov alebo ich mozte z obrazovky uplne vypnut, ak si to zelate. DVD disk moze obsahovat' a3 32 jazykov titulkov.
Angle (Uhol) Ak sa na DVD disku nachadza viacero uhlov urcitej sceny, mozete vybrat funkciu uhl.
7,295,673; 7,460,668; 7,515,710;
8,649,669;8,656,183;8,731,369;RE45,052.

DOLBY DIGITAL
XPHESH TON KOYMNIQN AΦH
Παπησε την σθόνη αρής με την ακρητου δακτύλου σας.
Tia va aTnOpyET nTv npokAnon Znmuac stnv oOvnaPnc, un XpnoiPoTOIEe Kaveva avTIkeievo EKTc aTto Ta daKtuLaa cG yia va tn xEpioteTE.
Mny ayyizet Tnv oovn apns av ta daKTua aq esivai kaapa.
Mnyayicetntovoyn apnqopwvtacyavtia.
H oθóvns aφnε ενδexεται va μη λειοργει av xρησιμοποίαετε to vúχι σας καττοίο εργαλείο, ὄπως ενα στυλό διαρκείας.
πiω oψη
1. DC 24V (Eiooos tropooosiae pEuato)
7,295,673; 7,460,668; 7,515,710;
8,649,669;8,656,183;8,731,369;RE45,052.

DOLBY.
DIGITAL
Fabricat sub licenta Dolby Laboratories. Dolby si simbolul dublu D sunt mardi commerciale inregistrate ale Dolby Laboratories.
Hami
- HDMI, sigla HDMI,.si High-Definition Multimedia Interface reprezinta marmi commerciale sau marmi commerciale inregistrate ale HDMI Licensing LLC in Statele Unite ale Americi si in alte tari.
- Acest aparat contine technologie de protejare a drepturilor de autor, protejata de brevete SUA si de alte drepturi privind proprietatea intelectuală a Rovi Corporation. Demontarea sidezasamblarea aparatului sunt interzise.
Copyright
© 2015 Samsung Electronics Co., Ltd. Toate drepturile rezervate.
Protectia la copiere
4. Conector antenna FM
- Conectati antenna radio (furnizata) la mufa pentru antenna FM.
- Mutati incet antenna in jurul dvs. pana cand
Accesorii
In continuare sunt enumerate accesorile incluse.

Cablu video Antena FM

Resolution (Rezoluţie)
Seteazārezolutiā de iesire a semnalului video HDMI.
Numerele 480p(576p), 720p, 1080i sì 1080p indicá
DRC (Dynamic Range Compression)
Speaker Selection (Selectare boxe)
Semi nalele audio transmise printr-un cablu HDMI pot fi transmise catre sistemul Sistem audio sau boxele televizorului.
Security (Securitate)
CD: (Dezactivat) → (Plesa) → (Aate) → (Aleator) → (A-B) (Sectiunea A-B)
- MP3: (Dezactivat) → (Pesã) → (Director) → (ate) → (ateator)
Redare repetata A-B
POWER BASS (BASS PUTERNIC):
JIa3EPEH IPOyKT KJIAC 1
To3n KOMNaKTIINCK IJIeNbpeKJIaCnΦuipaH KaTO JIA3EPEH PPOJyKT KJAC 1.
N3noI3BaHeTo Ha opraHn 3a ynpabHeHne, NaCTpOiKn IInn N3PbJIHeHHeTo Ha npOeJypn, pa3IuHn OT OINcaHnTe B HAcTOrIto, MoKe Da IOBede Do ONaCHO n3JaHaHe Ha N3IbYBaHe.
BHIMAHNE
HEBUNMOJIA3EPHOIV3JIbYBAHEBOTBOPEHOIOJIOXEHNEIINPINOCBO6OJEHINBJOKIPOBKN;IV3BJBAITEIN3JIaFAHEHAJIbUa.
PPEyPEXKDEHNE
3AДАИЗБЕГHTEИЗБYBAHETO
HA IOXAP, BINHANI DpBXKTE
CBEUNTE INIIN DPYTN
I3TOUHNI HA OTKPNOTbN DAJEYE OT
TO3N IPOJyKT.

PpeDynpexKdHnna
- IorpiKTe ce npOMEHnBOTO eJekTpO3axpaHbaHe BbBaIaIOM Da CbOTBeTCTBa Ha N3NCKBaHnTa Ha IeHTnΦnKaUHOHHn CTnKeP, KOITo e NOCTaEH Na IbpaHa npoDyKta.
- INHCTaIIpaIte n3dJIeNETo xOpN3OHTaJIHO, Bbpxy IOxOJaIa OCHOBa (Me6en), CIOCTaTbUHO MRCTO OKONO Hero 3a BEHTnlaucn (7,5 - 10 cm).
He noctabaIte n3deIneTo Bbpxy ycunBaTeIIN nn Dpyro 60bOpUdBaHe, Koeto MoKe da ce Haropeu. BnImaBaiTe Da He 6bDat NOKpTN BeHTnlaCIOHnTe OTBOpN.
He nocTabaIte HnkaKbN npedMeTn Bbpxy n3denneto.
-ПпсдппсмecтbaHeHa yctpoiCtBTo ПрOBepTeДANI OTBOpbT 3a NOCTabHRe Ha NcK e npa3eH.
3a da n3KIOUHTe HAnbIHO npOdykTa, N3BaTe AC ⅢeNcena OT KOHTaKa. N3KIOUBAte AC ⅢeNcena OT KOHTaKa, aKO HAma Da N3NoJ3BaTe TO3n ypeD Iblro BpeMe. - ITO Bpeme Ha rpbMOTeBnUHn 6bpyn n3BaJdaIte AC.
IeIcEla Ha eIeKTPo3aXpaHbaHeTo OT KOHTaT.
IIIKOBe Ha HAppeXeHne, DblJaU n Ce Ha MblHN,
MOrat Da IIOBpeJr N3dJIIneTO.
He n3naraTe yCTpoiCTBOTO Ha npraKa cIbHueBa CBeTInHa IIN Ha DpyrN IN3TOUHNu HA TOINHa. ToBa MoKe Da npuHHn PperpBaHe Hn3npaBHOCT Ha npOdyKta. - Na3eTe N3eJIneIeTo OT BlaRa n IpeKOMepHa TOnnHa NnO TnN O6OpyDbaHe, KoETo Cb3JaBa CnHn MaHnTHn Nn eKeTpnuCeKn POneTa (HaNP. BnCOKOrOBOpuTeN).
- Ako yctpoiCTBOTO ce noBpeNi, n3BaJeTe uenCeNa OT KOHTaKTa.
To3n npOdyKT e cAmo 3a IuHNo nOJ3BaHe. He e npEJaHa3HaueH 3a npOMuIeHa yN0Tpe6a. - AKo npOdyKbT nIIN DnCKbT ca 6nII CNbXpaHBAHn Ha cTydeHO, Bb3MOxHO e da ce o6pa3yBa KOHNHe3aUN. Ako TpaHCnOpTnnpate N3dEIneTo npes 3mMaTa, n3uKaaiTe pni6n3nTeHo 2 Yaca, JOKATO TO IOCTnIRHe cTaNHa TEMpepaTypa, npen Da rO n3NON3BaTe.
BaTePnTe, KOITo Ce n3NoJ3BaT B TOBa yCTPOIcTBO, CbIbPkaT XIMNkAIN, KOITo Ca bpeHn 3a OKJIHaTa cpea. He n3xBpIyIe 6aTePnTe c o6uIte DOMakInHcKn OTnaDbuN. - NocTaBete BnCOKOROBOpTeJIne Ha pa3ymHO pa3CToHHe OT DBeTe CtpaHn Ha CNCTeMaTa, 3a DaOCnIpyPte Do6bp Ctepeo 3ByK.
- Hacouete BnCOKOrOBOpnteJIte KbM 3OHaTa 3a cnyuShaHe.
AnapaTbHe 6nBa da 6bJe n3naRaH Ha Kaene He nn npbckn. He noctabYte Bbpxy anapata npedMeTu, HnblHeHc TeuHOCT, HnprImep BaN.
3a da n3KIOUHTe HAnbHNO ypeDa, Tp6Ba Da n3BaIte 7eNcena OToKaTtA.3aToBa KOHTaKTbT N 7eNceJIbT Ha 3axpaHbAun Ka6en Tp6Ba Da ca JecHO DoCTbHn NO BcKaO BpeMe.
- I3nON3BaIte cAmO npaBnIHo 3a3eMeHn ⅢeNcEN N KOHTaKT.
- HenpaBnHTo 3a3EmBaHe MoKe da npeun3Bnka TOKOB yIap nIIN NOpeHa Ha o6OpyDbaHTo. (cAmO ypeN KnaC I.)
CbXpaHHeHn ynpaBHeHne Ha nMcKObE
- Haunn Ha Ibpxkane Ha DnCKOBe
-OTneuatbucn OT npbctn nI IN dpackotnH NO DnCKa MORaT Da BNOwAT KaueCTBOTo Ha 3Byka N KaptInHaTa IIN da PnPsiHr Tpeckaaye.
- IV36IgBaIe Da IOKOCBaTe NOBbpxHocTtA HaNcKa, KbJeTo e HappaBeH 3aInC.
-XBaauTe DnCKa 3a p6oBeTe, 3a da He octaHaT OTpeaTbCn OT npCTn NO NobbpxHOCTTa.
- He jenete xaptny nIeHTn no dIscka.
HAUYH 1: KompoheHTHO Bndeo
Ako TeBnO3OpBT Bn e Cha6eH C BXoOBe 3a KOMNoHETHO BnIeO, CBpKTe Ka6eN 3a KOMNoHETHO BnIeO (He e BKnUoyen B IocTaBkata) ot rHe3daTHa COMPONENT OUT (Pr, Pb n Y) Ha rpb6a Ha yCTPOJCTBOTO KbM BXoHNte rHe3da 3a KOMNoEHTHO BnIeO Ha BaWnY TeBn3Op.
HAUYH 2: Komno3nHO Bndeo
Cbpxte doctabene Bndeo ka6en OT n3bOda VIDEO OUT ha rpb6a Ha yctpoiCTBOTO KbM n3bOda VIDEO IN Ha Ba7ra TeleBn3op.
HACHN3:HDMI
CbpxteHDMI ka6ena (he e BkIoueh B doCTaKaTa) ot n3BOda HDMI OUT Ha rbp6a Ha yctpoiCTBOTO KbM n3BOda HDMI IN ha Baunr TeneBn3Op.
3A6EJIEXKAI
HannuHnTe pa3eHnTeHN cnoc6HoCTn ot HDMI n3xOa ca 480p(576p), 720p,1080i/1080p. Bx. cTp. 15 3a HacTpoKa Ha pa3eHnTeHnata cnoc6HoCT.
ToBa yctpoiCTBO pa60TN B pexm Ha npespeo BO cKaHnpaHe 480i(576i) 3a KOMnoHeTeH/KOMnO3nteH n3xoI.
CneI KaTO CbBpXeTe BnDeOTo, HAcTpoIte N3TOUHnKa Ha BXoJrBa BnDeO CnHaJI Ha Baunr TeNeBn3Op Da CboTBcTBA Ha peKIMa Ha BnDeO N3XoJa Ha BaWeTo YCTPOIcTBO. PbpBO BKIOUeTe npOykTa, npei Da HAcTpoIte BxOJaUNBaNDeO N3TOUHnK Ha TeneBn3Opa. SBX. pBKOBoDCTBOTO Ha BAuINr TeneBn3Op 3a NoBuee INΦOpMauaK aK Da N36epTe N3TOUHnKa Ha BXoJrBnDeO CNrHaJI Ha TeneBn3Opa.
! BHIMAHINE
He cbbp3BaIte yctpoiCTBOTO ue3 BndeokacetofoH. BndeocirHaIte, noabAHn ue3 BndeokacetofoH, morat da 6bdat nobmaHOn OT CnCTeMn 3a 3aunTa Ha aBTOCKOT npabo, KOET da npuHHn deoPmnpaHa KaptnHa Ha TeleBu3opa.
ФУHKЦИHDMI
Функцяза abTomatnHо OTkpmbaHe Ha HDMI cnHan
Ako Baunr TeneBn3Op e Samsung n noDbpxa fynKcNra T CEC. NxOHNr BIneO cnHnHa yCTpoiCTBOTo ige Ce npomEn aBTOMaTnUHO b pexIM HDMl, Korato cBbPKeTe HDMI ka6en npn BkIoUeHo eJeKTpO3axpaHBaHe.
HDMI (BncokokaueCTBeH MyTnImeDneH INTepeEic)
HDMI e nHTepfeic, KOITo no3B0nlaBa cnofo BpdaBaHe Ha BnEo N ayDIO daHHN C eHN-HcHCTBeH KOHEKTO. IocpeCTbOM HDMI yCTpoiCTBOTo npdaBa cnofo BnEo N ayDIO cunHaN IN oKa3Ba JPKa KapTnHa HA TeneBn3Op C BXoJ 3a HDMI.
OncaHnHaHDMICbBp3BaHe
-HDMI noidaba cama QnCT UnfoB CunHan KbM TeIeBn3opa.
- Ako Baunr TeneBn3Op He noDnBpKa HDCP (UnpokoneHToBa uΦpOba 3aunTa Ha cbNbpxaHneTo), Ha ekpaHa ige ce nOBRT CMyuEHH.
KaKBO npedctabnBA HDCP?
HDCP (Unpokolentoba uqfpobaa 3auneta Ha cbbpkahe) e cntema 3a 3auneta ot konipanae Ha DVD cbbpkahe, Bb3pnoun3bexkdaHO ue3 HDMI. Tg ocnpyra 3auuTeHa uqfpobaa Bp3ka Mexy Bndeo nToHnK (KomnoTbp, DVD n np.) n yctpoiCTBO 3a noka3BaHe (TeneBnOp, npoeKtpor n dp.). CbdpkaHneTo ce kpiTTnpa npn n3xOHDto yctpoiCTBO, 3a da ce npedotbpaTH hepazpeseho konipanae.
I3noJ3BaHe Ha Anynet+ (HDMI-CEC)
Anynet+ e Функця, Когу Ви поьлва дупавлвate Дугн Samsung устор STВа чeз вадето Достанцонно упавеленse Samsung. Anynet + може да сизюлba пи CBp3BaHe на ТОВа устор STBO Кьм телевизор Samsung, с поцда на HDMI ka6en. Претлara ce само за телевизори SAMSUNG, кочтовпдьржат Anynet+(HDMI-CEC).
- CbbpkTe ycTpoiCTBTO KbM TeIeBn3Op Samsung ue3 HDMI ka6en. (Bx. ctp. 12)
- HactpoTe yHKuTAt Anynet+ Ha Baunr TeJeBn3Op. (Bx. pbKOBoCTBOTo C nHcTpkyKuN 3a TeJeBn3Opa 3a NOBeue INHOpMaquna.)
3ABEJIEXKAI
FyHKnIaTa Anynet+ noDpBka HraKoN 6yToHn Ha nCTaHOnHOHTo ynpabneHne.
Ta3nФyHKuH He e DocbHa, aKo HDMI Ka6eJbT He noaCEC.
B 3aBnCIMOCT OT BaIINI TeneBn3Op, ONpeIeHn pa3dIInTeHn CnOCo6HOCTn Ha I3XODaII HA DMI cnHAn MoKe da He fynKIOHnpat. HanpaBeTe cnpabKa c pbKOBoIDCTBOTo 3a Notpe6Ntela Ha BaIINI TeneBn3Op.
- Поберете лороту Anynet+(HDMI-CEC) (ако телевизорьт виima лlorу Anynet+(HDMI-CEC), това ознayава, что полдьржфункцяпу Anynet+).
I3noJ3BaHe Ha ARC (KaHaJI BpbUaHe ayDIO)
ARC e ΦyHKζη, KÖrTo πρexBbρλa ayDnO OT TeLEBn3Opa 6paTHo B npOyKta, C KOeTOMOKe Da cnUaTe ayDnO OT TeLEBn3Opa Upe3 BaùnN I pOdyKT, BMEcTO OT BnCOKOrOBopNTeNITE Ha TeLEBn3Opa, 6e3 Da ce HanaRa Da CBbp3BaTe Btopi Kaβen N TeLEBn3Opa KbM dpyra ayDnO CNCTema.
- CbpxTe npOyKt KaM TeIeBn3Op Samsung ype3 HDMI ka6eJ. (Bx. ctp. 12)
-
HatncheTe 6yToHa SOURCE,3a da n36peTe BxoI ARC.
-
Moze Да ИЗбере ARC, Като Натисенте 6уTOHA SOURCE (ИЗTOUHК) На ДИСТАЦИОНTOупавлиени И на пpoДуКта.
Korato 36epete BucOKoROBOpuTeHa TeNeBu3Opa, OCHOBHOTo yCTpoCTBO ue nokae SMUTE (S 3AJIyUJABAHE) - ByToHbT S MUTE MODE (PEKIM S 3AJIYJUABAHE),EQ (EKB.)/SOUND (3BYK)/VOL (CJIA HA 3B.)/MUTE (3AJIYJUABAHE).
PpoeDpya no npbPBOHaJHn HaCTpOyKu
HaTnCHTe 6yToHa POWER (BKJIIOUBAHE)
Pn PpBTO BKnIOUbaHe Ha TeneBu3opa. Ie ce NOKaKe ekpaHbT 3a PpBOHaUHa HAcTpoKa.

BENEKKN
B 3abucmocT OT cbdpjxahHeTo Ha dNcKa, ppBOHaayHnT ekpaH MoKe Da e pa3nueH.
3a da ce BbpeHeTe KbM npeunHnE ekpaH,HaTncHeTe 3aDpBkTe YEPBEHnA (A)6yToH.
CneI KaTo n36peTe e3nK 3a MeHIOTo, MoXeTe da ro npomehnte KaTo HATNCHeTe 6yToHa Ha npedHnaHEn B npOdbJxKeHne Ha NoBuee OT 5 cekyHn, 6e3 da NMa DnCK B yCTPOINCTBOTO.
Ako nckate da nokkete ekpaHa Ha HauJaHa hactpoika OTHOBO, 3a Da HappaBnTe npomEni, n36epe Te onueta 3a HynpaHe.
Docbno ekpaHa c hactpoiKn
1. Hatachete 6ytoHa POWER (BKJIIOUBAHE).
- HatncheTe 6yToHnTe ,3a da n36epete Settings (HaCtpoKn) n oocne HaTncHeTe 6yToHa .IorBa ce ekpaHbT c HactpoKn.
- 3a IOCTbI Do MEHIO C HAcTPOiKN, NOIMeHOTata N ONTuNte Bx. NIOCTpaUraTa Ha INCTaHcNOHHOTO ynpabLeHne No-DOy.
BytoHn Ha nctaHcnoHHoto ynpabIeHne, H3NoJ3BaHn B MeHIO TO 3a HAcTPOIKN
OPEN/CLOSE (OTBAPRAHE/3ATBAPRAHE)
IocTaBeTe BnHMaTeJHo DnCKa C NlueBaTa CtpaHa Harope Bbpxy TaBnUkKaTa OPEN/CLOSE (OTBAPRAHE/3ATBAPRAHE).
[BENIEKNI]
Korato cnpete da Bb3npoun3BexdaTe DNCK, yCTPOIcTBOTOMOMHN KbJe Cte CnpEn, Taka ye KORATO HATNCHETE OTHOBO6yToHa , Bb3npoun3BexdAHeTO ue npOdbnJxN OTkbDeTOp eCnpNo. (OyHKUrra 3a NDoHOBraBe p6oTN cmoC DVD.)HaTNCHeTe 6yToHa DBA NbTu NO Bpeme HaBb3npoun3BexdAHe, 3a Da DeaAKTINBnPaTe FyHKUrra 3aNDoHOBBaHe.
AkoB npOdbNKeHHe Ha 3 MmHyTn nn NoBce He 6bDat HaTHCHaTI 6yTOHn Ha yCTPOINCTBOTo nn INCTAHIOHHOT O npabHe, KOrato e B pekmHa Na3a, peKmBt ue ce npomehn Ha STOP.
InpaTCKNte DnCKOB HeMa Da Ce Bb3Pon3BeaT B TO3N IPOyKT, 3aIoTO HApUwAbat IpeNOpBkNTe Ha CSS (CnCTema 3a IpeDnA3BaHe OT KOnnpaHe).
念 ce NOBBA npu HATnCKaHe Ha HeBaJIuIeH 6yTOH.
Ako He ce haTnche 6yToH 3a NoBuee OT 5 MNHyTN B cnPnH pexm m nppekm Ha Bb3pOn3BExkDaHe Ha My3Nka, Ie ce aKTHBnPa cKnHcEeBpbT.
Ako npOdykTbT ce octaB bpeKIM Ha cKpHnHcEBbp NOBce oT 20 MNHyTN, 3axpaHbHaTe Oe Ce n3KIOUa ABTomATNuHO. (C IN3KIOUeHne Ha N0 BpeMe Ha Bb3PON3BeXJaHe Ha My3Nka)
DTS ayuio He ce noDbpbka.
Bb3npo3Bexdahe Ha Ayno CD (CD-DA)/MP3/WMA
-
NocTaBete ayDnO CD (CD-DA) nnn MP3 nnck.
-
Pn ayno nck npBTO n3nHeHne Ce Bb3npOINBExJa aBTOMaTNoHO.
HaTncheTe 6yToHnTe3a da npemHeTe KbM npEnuHnR/CneBaaun 3aInC.CbIO TaKa, MoKe da n3NoJ3BaTe UnΦpoBte 6yToHn (0~9) ,3a da n36epeTe 3aInC.
-
Пи PM3/WMA ДИСК, НАТИССЕ 6уTOHINTe▶, 3a ДИЗБЕРЕ Music (MyзИкA) И спED TOВа HATИССЕ 6уTOHa
-
Hatnche6byoHHTe▼▶, 3a da u36peTe JxenaHnI aJIn i CneI TOBa HATNCHE6byToHa
-
Hatnche6byonHte3a da npemnHeTe KbMnpenuHaTa/CneBaUcaTcTpaHua.
-
HatncheTe 6yToHa 3a da cnpeTe Bb3npOn3BexKaHETO.
[BENIEKNI]
B 3aBnMocT OT pexima Ha 3aNc, HAKoN MP3/WMA-CD DnCKOBe MoKe Da He Ce Bb3npounBExKaT.
CbIbpXaHHeTo Ha MP3-CD e pa3nUHO, B 3aBncMocT OT fOpMaTa Ha MP3/WMA n3PbLnHeHnraTa, 3aNcAhn Ha dNcKa.
WMA-DRM faJIOBe He moraT da Ce Bb3npoN3BexJaT.
Ako HnkaBn 6yToHn Ha yCTpoCTBOTO nHn Ha nCTaHnOHHOTy npabHeHne He 6bDat HATNCaTHn 3a NOBee ot 25 MInHyTN B CnpH npexM nPi npexM 6e3 DnCK, 3axpaHaBaHETo ue CE n3KnIOu ABTomATNoHO.
Bb3npoun3BexkaHe Ha JPEG faInoBe
IocTaBeTe nnck C JPEG aJIOBE (n36epete Photos(CHUMKU)) (n36epete XeNaHaTaNanKa) (n36epete XeNaHaTa CHIMKa)
- N36paHnT faiI nIe 3aNoUHe da Ce Bb3npOn3BekJa Ie 3aNoUHe NokaBaHTo Ha cnaIduoy. 3a da cnpeTe cnaIduoyTO, HATNCHTe 6yToHa
- Moxe da Bvndte npednunna/CneBaunna faun, KaTo HATNCHeTe 6yToHnTe , , no BpeMe Ha peKIM Ha cnaDwoy.
Функцяза3abptTaHe
HaTnchHeTe 3EJIeHnB (B) 6yToH nn JXbJITnA (C) 6yToH no BpeMe Ha pexm nay3a.
3EIEH (B) 6byoH: 3aBbptaHe Ha 90^ o6paTHo Ha yacOBHNKOBaTa CTpeKa.
XbJT (C) 6byoH:3aBbptaHe Ha 90^ no nocoka Ha yaCOBHnKOBaTa CTpeJIka.
3A6EJIEXKAI
MaKcMmaHnTe pa3dennTEnHn cnoc6HoCTn, noDbpxaHn OT ToBa ycTpoiCTBO, ca 5120 x 3480 (nn 19,0 MPixel) 3a cTaNapTHn JPEG faInoBe n 2048 x 1536 (nn 3,0 MPixel) 3a faInoBe c nporpeCnBHO cKaHnpaHn n3O6paXeHn.
I3nol3BaHe Ha yHKuTgTa 3a Bb3npOn3BexJaHe
Tbpcene Happei/Ha3aI
HaTnCHete 6yToHIne 一 一 3a yHKUraHa TbpcHe.
3A6EJIEXKAI
IopBpeMeHa6bp3oBb3npoun3BexJaHe He ce yBa 3Byk (ocBeH npi CD-DA x 1 n CD-DA x 2).
PponyckaHe Ha cueHn/nechN
HaTnCHeTe 6yToHInTe I
- PnB BcKO HaTnCKaHe Ha 6yToHa No BpeMe Ha Bb3PON3BExJaHcTO Ce IpemHHaba KbM Bb3POn3BExKaHe Ha npEiNHaTa Nn CneDbaaTa rnaBa, 3aInc Nn DnpeKTopn (faIn).
He mokeTe da npeckaate nocneoBatoHn rnaBn.
PpeckauneHa nanka
KoraTo My3nKaHnTe/BnDeo/foTo aaiNoBe ce Bb3npOn3BexkDaT nIi Ca B CnpH pexKIM, HaTNCHeTe 3aApbXkTe 6yToHnTe I<▶▶Ha dNCTAHUHOHHOTynpaBLeHne.
ToBa ue npceKoyn npednunHata/CneBaaata napanKa n ue ce nokaxe File Searching..(TbpceHe Ha faInloBe...).
BEJIEXKNI
Ta3n fynKUH He pa60Tu B pexm 6bp3o npebpTaHe Happe/Ha3ad/Nay3a/CTon/3a6abeHo Bb3npounBExkDaHe.
B 3aBnCmOCT OT cbIbPxaHHeTo Ha faIa IINI naNkTa, BpeMeTo 3a npeckaHa He MoKe Ja e pa3nHiO.
Bb3npoun3Bexkahe c haMaNeHa ckopoCT
HaTnCHeTe 6yToHa III nIIOcNe HaTnCHeTe 6yToHa
3a Bb3POn3BExJaHe C HamaJeHa CKOpOCT.
BENEKKN
PnH3NbHHeHc HamaHc CKOpocHe Ce CyBa 3ByK.
BabHTo Bb3Pon3BexJaHe Ha3aH He yHKnOHHpa.
Ta3nФyHKUeHannuHa 3aDivX/DVD.
Bb3npoN3BexKaHe Ha cTbNk
HaTncheTe HraKOJIkoKpaTHo 6yToHa
KapTnHaTa ce npuBnKbHa npei c no eHn KaIbP npn BcAko HaTuCKaHe Ha 6yToHa No Bpeme Ha Bb3npoN3BexKaHe.
[BENEKKN]
PnH3NbIHeHc HamaHc CKOpOCT He ce UyBa 3ByK.
Ta3nФyHKUeHaHnUHa 3aDivX/DVD.
Функцяз苹пескаане ha 5 mHyTu
IIO BpeMe Ha n3nJIHeHne HATnCHte 6yToHa
Bb3npoun3BekdaheTo npcecka75 mHyTu HnpeD npu BcAko HaTnCKaHe Ha 6yToHa
Bb3npoN3BExKaHaTeIpeckaay5MnHyTuHa3ad npi BCaKO HaTnCKaHe Ha6yToHa
3ABEJIEXKA
Ta3nФункци e haHnUHa cAmo 3a DivX, KoITo CbIbpxka HΦOpMaци 3a BpeMeTO.
I3noJ3BaHe Ha MeHIOTo Nnck/3aRJaBne
PbpeMaBb3npo3BekdaheHaTnchete 3aepk
DISC MENU (MEHIO INCK) TITLET MENU (MEHIO 3AΓΑΝΑΒΕ) → ▲▼ ▲→
Disc Menu (Meho nck) Moxete da nperepeate MeHOTaTa 3a eNk 3a aydno, eNk 3a cy6Ttprn, npoФnI n T.H.
- Title Menu (Meng 3aarnaBne) Pnp DVD DnCKOBe, CbDpkaun HRAKONKO 3aIaBnA, MOKeTe da BnInTe 3aRaNaBNeTo Ha BCEk nIM.
3ABEJIEXKA
B 3aBUNMOCT OT DnCKa, eNeMeHTnte 3a HacTPOJka OT MeHIOTo MOKe Da Ca pa3NIuHN NIN TOBa MEHIO Da He e HAnuHO.
Повторно ВьзпponЗвекданe
Повараян ДVD/DivX
MoxTe Ia NOBTopHe 3aIaBneTo, rIaBaTa nn pa3eJa (A-B Repeat) Ha DVD/DivX.
- ПО ВЕме на Вьзпponьжданeto Ha DVD/DivX,Натисные 6утона REPEAT (ПОВТAPЯНЕ)HaДИСТаHцюнноуnpавлениe.
-
Hatnche 6ytoHnTe ▲▼, 3a da n36peTe jekanepekim Ha nobTopeHne i CneT TOBa HATNCHe 6yToHa
-
Hatnche6bytoHnTe ▲▼, 3a da n36epeTe OFF (N3KJ.) 3a BpbuaHe B HopMaHOTOBb3npoN3BexJaHe n CneI TOBa HATNCHE6byToHa
DVD:Изкл. → 3аглаве → Гала → A-B
DivX:ИЗкЛ.→3aŋlaBne→Панka→Всчкn
Повтагелян CD/MP3
IIO BpeMe Ha B3npoun3Bekdane Ha CD/MP3,HaTncheTe HnKoNkoKpTaHO 6yToHa REPEAT (IOBTAPRHE),3a da n36epete pexima Ha NobTapaHe, KOTo Jeelaete.
IobtOHO Bb3npOn3BexKaHe Ha A-B
Moxete da Bb3npoun3BexdaTe HeKoNkoKpaTHO onpeenepa3denOT DVD nn CD.
- Пов Браима Вьзпрουибжданeto Ha DVD ИИ CD,Натисные 6уToHA REPEAT (ПОВТAPРЕ)HaДИCTAHUNOHOTU ynpaBneHne.
2.Пи DVD Hatnche6byOnHte ▲▼,3aДа n36epeTe A-Пи CD Hatnche6 byToHa REPEAT (NOBTAPRHE) HAKOLKOKpaTHO,ДOKATO CE NOBn - Hatnche6byToHa BTOUkaTa, B KOrTo NCKaTe Da 3anoHe NOBtOPHOTo N3nJIHeHHe (A).
- Hattchete 6yToHa B ToKaTa, B KOrTo NCKaTe Da cnpe NOBtOPHOTo IN3nJIHeHne (B).
- 3a da ce BbPheTe KbM HopMaJIHO Bb3npOu3BexJaHe.
Pn DVD HATNCHEte 6yTOHnTE REPEAT (IOBTAPRAHE), 3a da n36epete OFF.
Pn CD HATNCHEte 6yTOHnTE REPEAT (IOBTAPRAHE), 3a da n36epete
BEJIEXKNI
yhkznura 3a noBtapAHe hA-B He yHKnOHnpa 3a DivX, MP3 nIJN JPEG dncKobe.
3a DVD Toya B He Moke da 6bJe 3aJaHa npei Da ca H3MnHaHn 5 CeKyHn VB3pnOu3BexKaHe OToTuKA A.
Ioka3BaHe Ha nHΦopMaζη 3aДиcka
1.ПОВЕмеHaB3npOu3BExKaHEnTo,HaTnCHeTe6yToHa TOOLS(MHCTPUMEHTN)HaДиCTaHcNoHHOTO ynpabNeHne.
2. Hatnche6byoHnTe ▲▼, 3a da n36epete xenahn enemeHT.
3. HaTnCHeTe 6yToHnTe ▲, 3a Da HAnpaBnTe XeNaHaTa npOMraBa B HAcTpOoiKaTa N CneI TOBa HaTnCHeTe 6yToHa
MoxTe Da n3non3BaTe uΦpOBeTe 6yToHn Ha INCTaHcNHOHHOTU ynpabJIeHne, 3a da ynpabJRAbATE HAKON eIemEHNI.
4. HaTnCHete OTHOBO 6yToHa TOOLs (NHCTPYMEHTN), 3a Da N3ue3He INHOpMaunraTa 3a DnCKa.
3A6EJIEXKA
Hakon INHCTpymeHTN MOKe da ce pa3JIuYaBaT B 3aBNCIMOCT OT DnCKOBete N faJIOBete.
MeHToOOLS (VHCTPYMEHTN)
3arnaBne:3a da OTbOpnte JekaHTo 3aIraBne, KOrato IMa NOBeue OT eNHO 3aIraBnHa DaNCKa.
- Γλaba():Повец� DVD ДИСКОBE ca 3апсани на Гал,在а таке за можete 6ьрзд памирате onpeденин радел.
BpeMe Ha n3nblHeHneO:Pi03BoJBa H3nblHeHneTo Ha fInMa OT onpeJeH yac.Tp6Ba Da BbBeTe HaaJIHHy lac 3a OTHTaHE. FyHKUraTa 3a TbpceHe Ha BpeMe He pa6OTn pnp HAKON DnCKOBe.
- Aydno: OThacr ce 3a e3nka Ha 3Byko3aInca Ha
- phlma. Ha eINH DVD mck Moke da nMa do 8 aydno
- e3nka.
Cy6TtprnBx. e3nnte 3a cy6Ttprte, npednaHn Ha ncka. lJe moKeTe da n3bnpate e3nk 3a cy6Ttprte nn, ako npednoHTate, da rN n3KnIOHTe ot ekpaHa. Ha eHN DVD nck MoKe da nma do 32 e3nka 3a cy6Ttprn.
brbn(8):Korato DVD nuckbt cbdbpka noBuee ot eINbbln Ha Chmame 3a onpeedehe cceHa,MOxe da n36epete yHKunra Ta bbl.
TOOLS (NHCTPYMEHTN) ▲▼ (n36epete AUDIO (AUYINO), SUBTITLE (CYBTNTPN) nπ ANGLE (bΓbJI)) △▶ (n36epete xenahata onцян)
BEJIEXKNI
B 3aBnCmOCT O T nCKa fYHKuNTe 3a cy6Ttprn n e3NK 3a ayINO MOKe da He ca DOCTbHNI.
品 YHKUraTbBnpa60n cmo npn DnCKOBe,yHToCueHN ca 6nn 3anncAHn OT pa3nun Hbrnn.
ФункцязHaHnnc
3a da n3no3BaTe Ta3n 0yHKpI npaBnHO, Tp86Ba Da IMaTe n3BeCTeH ONIT C IN3BnUaHe Ha BnDeo I peJaKTnpaHe.
3a da n3non3BaTe fhyKnUyra Ta 3a HauNcN, 3aHnWeTe faHa c HauNcN (.smi) cBc CbUTo NMe Ha faHn KaTO MeHHnHa aJl DivX (.avi) B cbuTa nAnKa.
- Moxe da ce n3noB3BaT do 60 6yKBeHO-uzpOBO n3haKa nn 30 n3TOUHOa3NaTcKN 3HaKa (2-6aHTOBn 3HaUN, HapPImep npN KopeiCKn NKTaIckN) 3a nme Ha aIn.
Cy6TnTpnaDivXfaiNoBe*.smi,*.sub,*.srt, no- rolemn ot 148 kb, He ce noDtbpxkT.
CneuaJIHn 3ByKOBn eΦeKTH
BaWata MINKPOKOMNOEHTHa CnCTema npedocabnpeBapnteHNo DeHHnpaHn HacTpoKN 3aekBnJa3ep, KOnTO Ca ONTNMn3npaHN 3a ONpeDeneH My3NKaneH XaHp.
Pa6ota cAmo B LPMC 2-kaHaJIHo ITOUHO npedabaHe.
Te3nФyHKcHHe caHaJIuHn npn Bb3npoIN3BExJaHe Ha AC-3 cnHan.
EQ (EKB.)
- Hattchete 6yToHa EQ (EKB.).
- PnB BcRAKO HaTnCKaHe Ha To3N 6yTOH pexIMbT Ha 3Byka Ce npeBKnIOvBa, KaKTo CneIeBa:
FLAT RANCHERA CUMBIA REGGAE MERENGUE SALSA REGGATON FOLKLORE PARTY POP HIP HOP ROCK JAZZ CLASSICAL ELECTRONIC OFF
[BENEKNI]
Eknna3epbT aBtOMaTHo e 3aJaH e OFF (N3KJI.) He e HAnuH nO BpeMe Ha 3aInc.
Ako He ce HaTnchat 6yToHn B pAMKnTe Ha 4 ckyHn, HactpoNKeTE BN ABTomATuHNo Ie ce OTMeHrT N Ie Ce 3aNwAT npEnuHnTe.
PexmbT Ha eKbnai3ep MoKe Da e pa3nueH B 3aBNCIMOCT OT peNHOHa.
MOUeH BAC
BaShaTa MINKPOKOMNOHEHTHa CnCTema HMa FyHKUa 3a ycINBaHe Ha HnCKNte ToHOBe, HapeeHa MoUeH 6ac. Ta3n FyHKUra IpaBn 3ByKa N-O-MoUeH n peaJIeH.
- Hatachete 6byToHa SOUND (3ByK) Ha DnCTaHIOHHOTynpabNeHne.
Pe3yIraT: Ioka3Ba ce ON -POwER BASS (BKJI. MOLUeH BAC). - 3a da OTMeHnTe Ta3n fHyKcN, HATnCHeTe 6byToHa OSe BeiHbX, NOKa3Ba ce OFF- POWER BASS (N3KJI. MOUeH bAC) 3a HAKoIKO CeKyHdN.
[BELIEKNI]
Moien 6ac ce 3aIaBA aBOMaTHNo Ha OFF (N3KJI.) He e HAnueH no BpeMe Ha 3aInc Ha CD.
TV SoundConnect
MoxeteДаСлушate3BykaOT CBOI TeJIeBn3Op Samsung, cBMeCTIM cbc SoundConnect, npe3 MINKPOKOMNOHeHTHaTcCtTeMa, KaTO n3NoJ3BaTe ΦyHKuYra TV SoundConnect.
Cbbp3BaHe Ha MKNpOKOMNOHeHTHaTa cnCTema C TeNeBu3Op Samsung, CbBMeCTnM Cbc SoundConnect
Ipei n aKtBnPaHe Ha Ta3n FyHKuJa Tp8Ba Da aKtBnPaTe pexmMa SoundConnect nn SoundShare Ha TeleBn3opa Samsung.
- Hatachete 6yToHa SOURCE (N3TOUHMK), 3a da nokaxete cbo6eHHeTo TV SOUND CONNECT.
WAIT SEARCH REQUEST
- HactpoIte Add New Device (IO6aBHe Ha HOBO yCTpoIcTBo) B peKIM SoundConnect Setting Ha On (BkI.). (BnXTe pBkoBOdCTBOTo 3a noTppe6nteHa TeJeBn3Opa 3a noBeue npDo6HocTn.)
- Korato MINKPOKOMNOHEHTHa Ta CnCTeMa e CBbp3aHa KbM TeJIeBn3Opa, TЯ Ze IOKaKe IMe Ha [TB] CONNECTED (CBbP3AH) TV (TB) Ha npedHra DnCnpe.
- 3ByKbT OT Cbbp3aHnI TeJIeBn3Op Ce N3IbJIHBA npe3 MINKPOKOMNOEHTHaTa aydno CNTema.
BpeKIMTVSoundConnectyHKuHnTe3a Bb3IpOn3BExJaTe/NoBtApHe/CnnpaHe/ HaPepd/Ha3aHcHaNHyN.
- ΦункцитasyoundConnect ce noДьрka ot
няkon TeLEBn3Opn Ha Samsung, nychatn
Ha na3apa cIeD 2012 r. Пювepete дani
Ваши TeLEBn3Op noДьрka ФункцитЯ
SoundShare ИИ SoundConnect. (3a
nobeye Инфорmaци Вж. рьковдTGOTO Ha
notpe6nteЯ Ha TeLEBn3Opa.)
- Ako n3KJIIOHITe OT 3axpaHbAHeTo MInKPOKOMNOHEHTHaTc CNCTema, Bpb3KaTa TV SoundConnect ce npekpatraBa. 3a da yCTaHOBnTe OTHOBo Bpb3Ka, BKIOUeTe MInKPOKOMNOHEHTHaTc CNCTema B KOHTaKT N HacptpoTe naK Bpb3KaTa TV SoundConnect.
- Camo eHa MInKpOKOMIOHeHTHa CnCTema MoKe da 6bIe cBbp3aHa c TeJeBn3Op Upe3 TV SoundConnect.
3a da cBbpxKeTe npyr TeIeBn3Op B pexm TV Soundconnect HATncHeTe 6yToHa Ha OCHOBHO TO yCTpOINCTBO 3a NOBeue OT 5 CEkyHIn N CbbpxKeTe dpYrN TReBn3Op, KaTO CneDbATE INCHCTpyKUnTe No-rope.
3a npeKbcBaHe Ha Bpb3KaTa Ha TeJeBu3Opa KbM MUKPOKOMNOHEHTHaCTema
Moxete da npeKbcHeTe Bpb3KaTa Ha TeNeBn3Opa KbM MUKPOKOMNOHEHTHaTa CNTema.
3a INCTpykun Bx. pkoBOcTBOTo 3a noTpe6nteHa TeleBn3opa.
Korato Bpb3KaTa Ha MKNPOKOMNOHEHTHa TcTeJIeBn3Opa e IpeKbCHaTa, MKNPOKOMNOHEHTHaTcNCTema ige NOKaKe TV DISCONNECTED (BPb3kATA KbM TB E INPEKbCHATA) REQUEST (3AABKA).
3a npeKbCbaHe Ha Bpb3KaTa Ha TeNeBu3Opa KbM MUKPOKOMNOHEHTHa CNTema
HaTnche6yToH 3a npr pexm Ha IuceBnaHeI Ha MKNpOKOMNoHEHTHa TCCTema, 3a Da npEeKlIOUHTe OT pexm TV SoundConnect Ha npyrpeXIM NIN Da N3KIOUHTe MKNpOKOMNOHEHTa CNTema. YcTPOJCTBOTO, KOEt e Cbbp3aHO B MOMeHTa, ce OTdJIa.
Cbbp3aHnT TeBUN3Op n3BecTHo BpeMe ue yaKa OTROBOP OT MKNPOKOMNoHEHTHaTa CnCTema npeNi Da npeKpaTN Bpb3kata. (BpeMeTo 3a npEKBcBAHe MoKe Da e pa3NJuHO, B 3aBNCUMOCT OT TeBUN3Opa)
Bpb3kata MoKe Da ce N3ry6n nn 3ByKbT da npkeKbcBa, aKO pa3CToHneTo MeXy TeJeBn3opa n MmKpOKOMNoHEHTHaTa CnCTema HaXbPn 6,5 cyta (2 metpa).
HeCTa6nHocB MpeXOBaTa CpeJa MoKe Ja npuHH 3ary6a Ha Bpb3KaTa NIn PpeKbcBaHe Ha 3ByKa.
BpeKIMTVSoundConnect MKNPOKOMNOHeHTHaTa CnCTeMa aBTOMaTnUHO ce N3KIOUBa CneI 25 MNHyTN, aKO He e CBbp3aHa c TeJIeBn3Op.
Cnyuhahe ha paadno
3a 3anameTBAHe Ha cTaHcNITe, KOINTO NCKate
MoxTe Da 3aNaMeTnTe Do 15 FM cTaHcNn.
1.Изберет FM,кATOHaTиСHTe 6уToHa SOURCE (ИЗTOUHнK).
2. 3a Da NOTbpcnte CTAHcHn, HATNCHeTe 6yToHa STOP (CTON) Ha npOdyKta BeDhbX nIN NOBuepe NbTn, DOKaTO ce NoRBN MANUAL (Pb4HO).
3. ɪnʒepeTe CTaHциЯ, kaTo:
HaTnchete 3aIbpxnte 6yToHa TUNING (HACTPOIKA) (1, Ha nCTaHnOHHTO ynpabJeHne 3a aBtOMaTHUHO TbpcHe Ha I3JIbYBaHN CTaHcN.
- Hatachete 6ytoHa MO/ST (MOOH/CTEPEO), 3a Da npebKIOUbaTe MeJdy MoHO/CTepeo.
BpaOH cbc cna6 ciHnI36epete MONO (MOHO) 3a NO-rcHO npMeHaHe 6e3 cmUeHn.
ToBa BaJn cAmo npn cnUshaHe Ha FM CTaHcN.
- Ako He nckate da 3aapanMeTne HamepeHaTa paiaoctaHcN, BbPHeTe ce Ha Ctbnka 3 n NotbpcTe dpyra cTahn.
B npoTnBeH cnyuA:
a. Hatachete 6yToHa ENTER (BbBEXDAHE).
Ha nncnpe ce noka3Ba FM, noceIbaHO ot mraa zpa. cippa e HomepBT Ha Hactoata npedBapnteH No hactpoeh CTAHU.
b. Hatachete 6ytoHnTe , 3a da npebbptate n 36epete npedbapntHo Hactpoe Homep.
- MojkeTe Da n36npuTe Homepa ot 1 do 15.
c. HataHCTe 6yToHa , 3a Ja 3aJaMaTeHacTpoiKaTa.
- 3a da 3anaMeTne DoIbHnTeHN npaoocTaHn, NOBTOpe TbKn 3 do 5.
BENEKNI
B pexm Ha tyhep
Bpbueh pexm MOKeTe da n3noJ3BaTe 6yToHa nn, 3a da CMeHrTe cTaHcNHTe.
BpeKnHa npEiBapuTeHa HAcTpoiKa MoKeTe Da n3POn3BaTe 6yToHa nn 3a Da Tbpcnte 3aapanMeTeHn paNIOCTaHcN.
Pe3yntaT: Poka3Ba ce CHKREC (Do you want to record? (NcKate nI da 3aannwete?).
- HatncheTe 6yToHa C
Pe3yntaT: Ioka3Ba ce REC N n moxete da HataChete 6yToHa ▲ nnn▼, 3a da n36epete REC Y nnn REC N, n noce haTnchete 6yToHa
1). Ako n36epete REC N, ToBa ige OTMeHn 3aNc a Tynep dOpn aKO Buee Te HaCTpOuJIn 3aNc c Tynep C TaMep.
2). Ako n36peTe REC Y, moXeTe da hAcTpOnTe 3aInc c TyHep c TaIMeP.
a. HatticHeTe 6yToHa C
Pe3ynta: ON (BkI.) ce noKa3Ba 3a HAKoJIco CekyHn N MoKeTe Da HaCTpOnTe Yaca Ha BKIOUbaHe Ha TaIMepa Ha 3aNc C TyHep.
b. HatticheTe 6yToHa G
Pe3yIaT: OFF (N3KJI.) ce noka3Ba 3a HЯколko cekyHn IN MOKeTe Da HaCTpOnTE Yaca Ha N3KJIIOUbaHe Ha TaIMepa Ha 3aINc C TyHep.
BENKNI
MaKcImaJIHOTo BpeMe Ha 3aIInC C TyHeP C TaIMep e 5 yaca.
AkoeBKNIOUeHABTOMaTHNHTaMep,Bb3MOXHO e fynKcIyraTa 3a DVD/CD nnu USB da n3nckBa aKTINBIPAHe Ha DOnbJIHNTeJHa CTbPKa Ha DNCKa (nn yCTpOJCTBOTo).3aTOBa 3a Bac e no-do6pe da n36epete fynKcIyraTa 3a Tyhep.
Ako BpeMeHaTa Ha BkIIOBaHe N N3KIIIOBaHe Ha TaMepa Ca INeHTnUHn, Ce NOKa3Ba DymaTa ERROR (PPEUKA).
- 136npaHTo Ha DVD/CD nIn USB abTomTuHNo ue cmeHn Ha TYHEP, aKo HMa NoCTaBeH dNcK nIn USB.
Ako yacbT 3a BkIIOUBaHe IIN N3KIOUBaHe CbBnada CbC 3aNNCBaHETo C TaIMep, eEeKTHBeH e Camo YacbT 3a BkIIIOUBaHe I IN3KIOUBaHe, a YacbT Ha 3aNNCBaHe C TaIMep He ce npInara.
OTMHa Ha DeiCTBnETo Ha TaIMepa
CneI KaTO CTe HAcTPOUNI TaIMepa, CnCTeMaTa Ue Ce BKNIOUy ABOMATNUHO, KOEt O NOKA3Ba C INHINKAUNrTA TIMER (TAIMEP) Ha DnCpJJe. Ako He NCKate Beue da I3NON3BATE TaIMepa, MoKeTe Da Ro OTMeHInTe.
- 3a da OTMeHnTe TaMepa, HATNCHe6yToHa TIMER ON/OFF (BKl./N3Kl.) Ha TaMepa BeHbXk.
- 3a Na NOHOBITE TaIMepa, HATNCHEte OTHOBO 6yTOHa TIMER ON/OFF (TAYMEP BKJI./M3KJI.).
3A6EJIEXKA
Korato n36epete pexm OFF-TIMER (TAMMEP N3KJ.). cyHKunTe TIMER RECORDING (3ANIC CTAMMEP) n TIMER (TAMMEP) He ca HanuHn.
I36upahe ha pexm MY KARAOKE
HactpoTe cInata Ha 3Byka 3a rnaCa, KOrato n3nol3BaTe yHKunraTa 3a Kapaoke.
Bcekn nblT, KOraTo HaNTnCHTe 6yToHa MY KARAOKE (MOETO KAPAOKE) Ha
ДиСТаHCUHNOHOTуУпавЛеНe,ржIMbT Ha 3Byka ue ce npOMeHЯ NO cIeДнЯ NaH: ON (BКЛ.) OFF (ИЗКЛ.)
OFF (N3KJ.): Cunata Ha 3Byka e HaCTpoeHa Ha HbOTO Ha OpunHajnHn 3BYK.
ON (BKl.): Cunata Ha 3Byka e Hactpoeha Ha NO-HNCKO HNBO OT OpINHnHn3BYK.
- PexkmbT My Karaoke pa60n caMo npu Bb3npoN3BekJaHe Ha CDDA/DVD/MP3/WMA.ИTo3n peKm He MoKe Ja ce npuJoxn no BpeMe Ha pexkMn TyHep,Bluetooth, AUX,ARC n TV Sound Connect.
Функцma USB
Bb3npoN3BexKaHe Ha MyIITmEiHn H paJIOBe c cyHKuYrTa USB xocT
MoKeTe Da ce HacnaJdaBaTe Ha MeiHn H aaiNoBe, KaTO KapTnHn, fIIMN mMeIoHN, 3aIncAHn B MP3 nIeBpa, USB naMeTTa IINu cIΦpOBn foToanapat C BnCOKoKaueCTBeHO BInDeO CbC 2,O-KaHaJeH 3ByK, KaTO CBbpXeTe yCTPOINCTBOTo 3a CbXpaHeHne KbM USB npTa Ha yCTPOINCTBOTo.
- Cbpxe Te BbHnHOTo USB yctpoNCTBO 3a cbxpaHeHne KbM rHe3dOTo USB Ha oCHOBHOTo yctpoNCTBO.
2.Изберете рекиIM USB,кATO haTicheTe 6yToHa - Ha OCHOBHOTO yCTpoiCTBO n 6yToHa SOURCE (M3TOUHk) HaДиUCTaHcNoHHOTO управлес.
-
Hatnchete 6byToHnTe , 3a da n36epeTe Videos (BndeoknNoBe), Music (My3nKa) nn Photos (ChmKn).
-
IV36epete faaJn 3a n3nJIHeHne.
БezonaCHO n3Baxkdahe Ha USB
3aДа npedOTbpaTne NOBpeKdaHe Ha NaMeTTa, cBXpaHenaB USB yCTpOiCTBOTO, n3nblHete 6e3oNaCHO npemaxBaHe, npedn da n3KnIOuHTe USB ka6eJa.
-
Hatachete XbNTnC (C) 6yToH.
-
Ha dincnpei ce noBBA REMOVE (N3BAKDAHE).
- I3dpbnaite USB ka6eja.
BEJIEXKNI
13BaKaJaTe 6aBHO USB Ka6eNa ot USB npTa. B npOTuBEH cnUaym MoKeTe da nobpeDnTe USB npTa.
PpOdyKbT ABTomTuH Oe Ce N3KnUOn npn Lnnc Ha USB nnn cnpn pexm 3a noBuee ot 25 mHytn.
OT eHNO USB yCTPOINCTBO MORaT da ce Bb3npon3BeJaT MaKcMMym 999 faJna.
Функця 3a 3anic
MoxTe da 3aNNcBaTe ot CD, paAno npedabahe nnBbHsE H3TOuHnK Ha USB ycTpoNCTBO 3a cbxpaHHe.
- CbbpkTe BbHnHO USB yCTpoNCTBO 3a cbxpaHeHne KbM rHe3dOTo USB ( ) Ha npOyKtA.
2.ИЗнБЛНЕДИСК,perynipaIte paIIO YecToTAta ИИN CBbPKeTe BbHUNO yCTPOIcTBO KbM BaIIINI pOdyKT.
CD
- Hatnche6ytoHa SOURCE (M3TOUHk) Ha OCHOBHOTO yCTPOIcTB0, 3a Da I36epTe fYHKnraTa DVD/CD.
- HataHcHete6yToHaOPEN/CLOSE (OTBAPRHE/ 3ATBAPRHE), 3a da OTBOpTe TabuKata Ha duCKa.
- NocTaBete CDи haTnCHeTe 6yToHa OPEN/CLOSE (OTBAPRAHE/3ATBAPRAHE), 3a da 3aTBOpNTe TaBnKata 3a INCK.
- N3πολBaIte 6byToHnTe 3a n36Op Ha CD (1<1), 3a da n36epete xenahata neceH.
TyHep
- 136epete FM, kaTo haTnCHete 6yToHa SOURCE (M3TOUHnK).
-Премн electeHa ctaHua,koTOnuKcTe Da 3aNnWeTe.
BbHHeu H3ToyHnK
CbpxKeTe BbHWeH KOMnHOHeTEn N3ToUHnK/MP3 nIeBp KbM pOdyKta.
- HatncheTe 6yToHa SOURCE (M3TOUHk), 3a da n36epTe BxOJ
- 3nBHeTe neceH OT BbHJHOTO yCTPOIcTBO.
- HATNCHeTe 6yToHa USB REC (USB 3anuc), 3a da 3anoUHe 3aNNCBAHeto.
CD
- Tioka3Ba ce TRACK RECORDING (3AINC HA INCEH) n 3aIncBaHeTo Ha CD 3aIOUba.
- Hatnche 3aJpBkTe 6yToHa USB REC (USB 3aInc), 3a Da 3aOnuHete 3aINCBaHeTO Ha BCnUKN neChn Ha nCKa. Ioka3Ba ce FULL CD RECORDING (3AINCBAHE HA LJI CD).
MP3/WMA/CHUMKA/DivX-RECORD JIICK
HaTnchTe 6yToHa USBREC (USB3anic), TeKyUo n3IbJIHbAHHaT paIe KOnIPA Ha USB yCTPOIcTBOTO.
3a da konipate napanca m My3nka, npbpo MapknpaTe KenaHata napanka n oocne hatachete 6ytoHa USB REC (USB 3annc), napankata ce konippa. KOIIPAHE: Ioka3Ba ce "CHECK" "START" "COPY XX" "COPY END". Korato 3abbpwn 3anncbT, ue ce nokaxe STOP (CTO).
Ako mAmcbuToHMeHa fai,ce noka3Ba FILE EXIST (AAMTbCTCbIECTBYA) n yHKnraTa ce OTMEHA.
Tyhep/bbHwOyCTpoIcTBO
TUNER (TYHEP):TUNER RCORDING (3AIINCBAHE C TYHEP) RECORD (3AIINC)
- AUX: AUX RECORDING (3AIIICBAHE C AUX) RECORD (3AIIIC)
4.3a da cnpete 3aHNCBAHETO, HATNCHE6yToHa
YCTPOICTBOTO ABTomATNUHO Cb3dAba N 3aNaMeTBA 3aIncanH fainoBe B.MP3 fopmat (SAM-XXX.MP3).
- 3a ДИЗВАДЛЕ 6e3ОпаСНо USB yCtpoIcTBOTO, HATINCHTe OTHOBO 6yToHa .Слд 3aПиСа, Вьрху BAшeto USB yCtpoIcTBО 6e ce Cb3Дае ДИпeКТори C Имeto "RECORDING(DISCxxxx)" (FULL CD RECORDING), "RECORDING" (TRACK RECORDING), "CD COPY"(MP3/WMA/PHOTO/ DivX-RECORD DISC), "TUNER RECORDING" ИИ "AUX RECORDING".
[BENJEKNI]
He npekcbai Te Bp3kaTa Ha USB nIi AC ka6eIa IIO BpeMe Ha 3aIINC, 3aOTo TOBa MoKe da NOBpeN IaIIIOBete.
Ako npkebche Tbp3kata Ha USB yctpoiCTBOTO no Bpeme Ha 3aINIC, OCHOBHOTO yCTPOICTBO ce N3KJIIOUBA n He MoXeTe Da n3TPneTe 3aINcAHn oaiN ot USB yCTPOICTBOTO. AKO TOBa CTAHe, CBpXeTe USB yCTPOICTBO KbM KOMNIOTbPa n IIbPBO apxNBpaIte daHHnte Ha USB yCTPOICTBOTO, cIeN KOeTO fOpMaTnpaIte USB yCTPOICTBOTO.
Korato USB nameta e HeoctaTbHa, ciCTemaTne nokake haanncbT NOT ENOUGH MEMORY (HMA DOCTATbYHO NAMET).
USB yctpoiCTBOTO INI TBbpNAT DNCK, KOUTO CBbp3BaTe, Tp86Ba Da ca FOpmatnpaHn BbB FaiIOBaTa CnCTema FAT. FaiIOBaTa CNCTema NTFS He ce NODbpXa.
Korato n3non3BaTe BnCOKocOpocThaTa yHKun 3a TbpceHe B CD, 3anncbaHTo Ha CD He pa60tN.
- Понякога Врет氧н Ha 3aПС може д e NO-Дьлго 3a
- Няко USB vctpoiCTBa.
Eknna3epbT mOuHnT 6ac ce 3aabaT ha OFF (N3KJI.) aBtOMaTHNO H He ca HaNNHn NO BpeMe Ha 3aHNC HA CD.
YuHKuIra REPEAT (IOBTAPEH) ce 3aIaBa Ha OFF (U3KJI.) aBTOMaTHNo HHe eHaIInuHa IIO BpeMe Ha 3aInc Ha CD.
He MoKe da 3aHNCBaTe paDIO, KOrato Tbpcnte nnKorato HMa HAnuHa CTaHnB B pexkIM Tuner.
OToBeJekTe,Ye npu 3aDaBaHeTO Ha TBbpDn BUCOKO BXoJaIO HINBO HA CIna Ha 3Byka,KOraTO 3aNcBaTe OT BbHNo YcTpoIcTB Ope3 AUX n USB KaHaB 3aNcBt MoKe Da NonaAnHe fOHOB Wym. B To3n CnyaI NOHKeTe CInaTa Ha 3Byka Ha BBHNoTO YcTpoIcTBO.
MaKcImaHTo BpeMe 3a 3aIncBaHe ue3 TUNER/ AUX e 5 yaca.
Mozhe da ce konipat Bnpeo faInobe c pa3mep do 300MB.
Ckopoct Ha 3aIncBahe
Moxete da n36epete ckopocTt ha 3annc npedn 3aNCbaHeTo.
- Bcekn nbT, KOraTo HaTnChTe 6yToHa CD REC SPEED (CKOPOCT HA 3AIMC HA CD) Ha INCTaHcNoHHOTU ynpaBneHne, CKoPoCTTa ige ce npomEn, KaKTo CneDbA:
Korato 3aIncBate OT Tyhepa INN BbHnHO yCTpOInCTBO, He MoXeTe Da IpOMeHrTe CKOpOCTTa Ha 3aINC.
Ako n36epete HIGH SPEED RECORD (BNCOKA CKOPOCT HA 3ANC), NO BpeMe Ha 3aNc He ce Bb3PON3BeKda 3ByK.
Bluetooth
CLASS 1 LASER PRODUCT
KLASSE 1 LASER PRODUKT
LUOKAN 1 LASER LAITE
KCLASS 1 LASER APPARAT
PRODUCTO LASER CLASE 1
LASERSKI PROIZVOD KLASE 1
CD:Off) → CTrack) → (AII) → (Random)→ (A-B) (Section A-B)
- MP3: Off) → (rack) → (Directory)→ (All)→ Random)
- MP3: Off) → Track) → (Directory)
(All) Random)
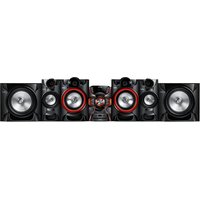
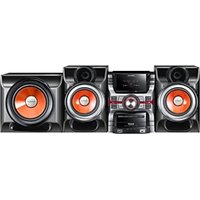
- SafetyWarnings
- WARNING
- CAUTION
- CLASS 1 LASER PRODUCT
- Precautions
- Disc Storage & Management
- License
- DIVX.
- HOMI
- Copyright
- Copy Protection
- SAFETY INFORMATION
- GETTING STARTED
- CONNECTIONS
- SETTINGS
- BASIC FUNCTIONS
- OTHER INFORMATION
- Disc and Format Compatibility
- Disc types and contents your product can play
- Disc types your product cannot play
- NOTES
- Supported Formats
- Logos of Discs the product can play
- Region Code
- | NOTE |
- Notes on the USB connection
- Front/Top Panel
- Rear Panel
- DC 24V (Power Supply In)
- 2.0 CH Speaker Connector Terminals
- ONLY FOR SERVICE
- FM Antenna Connector Terminal
- HDMI OUT Jack
- VIDEO OUT Jack
- COMPONENT VIDEO OUTPUT Jacks
- Accessories
- Remote control
- Tour of the Remote Control
- Installing batteries in the Remote Control
- Connecting the Speakers
- Position of the product
- Selecting the Listening Position
- Connecting the Video Out to your TV
- METHOD 1 : Component Video
- METHOD 2 : Composite Video
- METHOD 3:HDMI
- !CAUTION
- HDMI FUNCTION
- HDMI Auto Detection Function
- Using Anynet+(HDMI-CEC)
- Using ARC(Audio Return Channel)
- The Initial Settings Procedure
- Accessing the Settings Screen
- Buttons on the Remote Control Used for the Settings Menu
- Display
- TV Aspect
- BD Wise
- Resolution
- Video Out Signal
- HDMI Format
- Audio
- DRC (Dynamic Range Compression)
- AUDIO-SYNC
- Speaker Selection
- Audio Return Ch.
- System
- Initial Settings
- DivX(R) VOD
- Language
- Security
- Parental Rating
- Change Password
- If you forgot your password
- Support
- Product Information
- DiscPlayback
- Audio CD(CD-DA)/MP3/WMA Playback
- JPEG File Playback
- Rotate Function
- Using the Playback Function
- Forward/Reverse Search
- Skipping Scenes/Songs
- Skipping Folder
- Slow Motion Play
- Step Motion Play
- Minute Skip Function
- Using the Disc/Title Menu
- Repeat Playback
- DVD/DivX Repeat
- CD/MP3 Repeat
- A-B Repeat Playback
- Displaying Disc Information
- TOOLS menu
- Caption Function
- Special Sound Effects
- EQ
- POWER BASS
- TV SoundConnect
- Connecting the Micro Component to a SoundConnect Compatible Samsung TV
- WAIT → SEARCH → REQUEST
- To disconnect the TV from the Micro Component
- You can disconnect the TV from the Micro Component.
- To disconnect the Micro Component from the TV
- Listening to the Radio
- To Store the Stations You Want
- Otherwise:
- In Tuner mode
- Selecting a Stored Station
- Display Function
- Setting the Clock
- Timer Function
- Cancelling the Timer
- Selecting MY KARAOKE Mode
- USB Function
- Playing Media Files using the USB Host Feature
- Safe USB Removal
- Recording Function
- CD
- Tuner
- External Source
- MP3/WMA/PHOTO/DivX-RECORD DISC
- Tuner/External Source
- Recording Speed
- Bluetooth
- What is Bluetooth?
- To connect the Micro Component to a Bluetooth device
- To disconnect the Bluetooth device from the Micro Component
- To disconnect the Micro Component from the Bluetooth device
- Using Bluetooth Power On
- NOTE
- Software update
- Troubleshooting
- Specifications
- Open Source License Notice
- Contact SAMSUNG WORLD WIDE
- [Correct disposal of batteries in this product]
- Correct Disposal of This Product
- (Waste Electrical & Electronic Equipment)
- (Applicable in countries with separate collection systems)
- SYSTEME MICRO COMPONENTDVD
- PRODUIT LASER DE CLASSE 1
- LASERPRODUKT DER KLASSE 1
- Vystupny signal video
- Ponuka TOOLS (NASTROJE)
- DOLBY DIGITAL
- XPHESH TON KOYMNIQN AΦH
- πiω oψη
- DC 24V (Eiooos tropooosiae pEuato)
- DOLBY.
- DIGITAL
- Hami
- Protectia la copiere
- Conector antenna FM
- Accesorii
- Resolution (Rezoluţie)
- Speaker Selection (Selectare boxe)
- Security (Securitate)
- Redare repetata A-B
- POWER BASS (BASS PUTERNIC):
- JIa3EPEH IPOyKT KJIAC 1
- BHIMAHNE
- PPEyPEXKDEHNE
- PpeDynpexKdHnna
- CbXpaHHeHn ynpaBHeHne Ha nMcKObE
- HAUYH 1: KompoheHTHO Bndeo
- HAUYH 2: Komno3nHO Bndeo
- HACHN3:HDMI
- 3A6EJIEXKAI
- ! BHIMAHINE
- ФУHKЦИHDMI
- Функцяза abTomatnHо OTkpmbaHe Ha HDMI cnHan
- I3noJ3BaHe Ha Anynet+ (HDMI-CEC)
- 3ABEJIEXKAI
- I3noJ3BaHe Ha ARC (KaHaJI BpbUaHe ayDIO)
- PpoeDpya no npbPBOHaJHn HaCTpOyKu
- BENEKKN
- Docbno ekpaHa c hactpoiKn
- Hatachete 6ytoHa POWER (BKJIIOUBAHE).
- BytoHn Ha nctaHcnoHHoto ynpabIeHne, H3NoJ3BaHn B MeHIO TO 3a HAcTPOIKN
- OPEN/CLOSE (OTBAPRAHE/3ATBAPRAHE) →
- [BENIEKNI]
- Bb3npo3Bexdahe Ha Ayno CD (CD-DA)/MP3/WMA
- Bb3npoun3BexkaHe Ha JPEG faInoBe
- Функцяза3abptTaHe
- I3nol3BaHe Ha yHKuTgTa 3a Bb3npOn3BexJaHe
- Tbpcene Happei/Ha3aI
- PponyckaHe Ha cueHn/nechN
- PpeckauneHa nanka
- BEJIEXKNI
- Bb3npoun3Bexkahe c haMaNeHa ckopoCT
- Bb3npoN3BexKaHe Ha cTbNk
- Функцяз苹пескаане ha 5 mHyTu
- I3noJ3BaHe Ha MeHIOTo Nnck/3aRJaBne
- Повторно ВьзпponЗвекданe
- Повараян ДVD/DivX
- Повтагелян CD/MP3
- IobtOHO Bb3npOn3BexKaHe Ha A-B
- Ioka3BaHe Ha nHΦopMaζη 3aДиcka
- MeHToOOLS (VHCTPYMEHTN)
- ФункцязHaHnnc
- CneuaJIHn 3ByKOBn eΦeKTH
- EQ (EKB.)
- [BENEKNI]
- MOUeH BAC
- [BELIEKNI]
- Cbbp3BaHe Ha MKNpOKOMNOHeHTHaTa cnCTema C TeNeBu3Op Samsung, CbBMeCTnM Cbc SoundConnect
- 3a npeKbcBaHe Ha Bpb3KaTa Ha TeJeBu3Opa KbM MUKPOKOMNOHEHTHaCTema
- Moxete da npeKbcHeTe Bpb3KaTa Ha TeNeBn3Opa KbM MUKPOKOMNOHEHTHaTa CNTema.
- 3a npeKbCbaHe Ha Bpb3KaTa Ha TeNeBu3Opa KbM MUKPOKOMNOHEHTHa CNTema
- Cnyuhahe ha paadno
- 3a 3anameTBAHe Ha cTaHcNITe, KOINTO NCKate
- B npoTnBeH cnyuA:
- BENEKNI
- B pexm Ha tyhep
- BENKNI
- OTMHa Ha DeiCTBnETo Ha TaIMepa
- 3A6EJIEXKA
- I36upahe ha pexm MY KARAOKE
- HactpoTe cInata Ha 3Byka 3a rnaCa, KOrato n3nol3BaTe yHKunraTa 3a Kapaoke.
- Функцma USB
- Bb3npoN3BexKaHe Ha MyIITmEiHn H paJIOBe c cyHKuYrTa USB xocT
- БezonaCHO n3Baxkdahe Ha USB
- Функця 3a 3anic
- MoxTe da 3aNNcBaTe ot CD, paAno npedabahe nnBbHsE H3TOuHnK Ha USB ycTpoNCTBO 3a cbxpaHHe.
- TyHep
- BbHHeu H3ToyHnK
- MP3/WMA/CHUMKA/DivX-RECORD JIICK
- Tyhep/bbHwOyCTpoIcTBO
- [BENJEKNI]
- Ckopoct Ha 3aIncBahe
- LASERSKI PROIZVOD KLASE 1
Brand : SAMSUNG
Model : MMJ430D
Category : Hi-Fi System