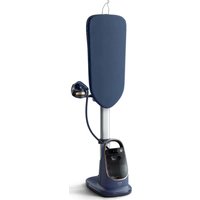
Azur Elite OptimalTEMP GC5032 - Iron PHILIPS - Free user manual and instructions
Find the device manual for free Azur Elite OptimalTEMP GC5032 PHILIPS in PDF.
User questions about Azur Elite OptimalTEMP GC5032 PHILIPS
0 question about this device. Answer the ones you know or ask your own.
Ask a new question about this device
Download the instructions for your Iron in PDF format for free! Find your manual Azur Elite OptimalTEMP GC5032 - PHILIPS and take your electronic device back in hand. On this page are published all the documents necessary for the use of your device. Azur Elite OptimalTEMP GC5032 by PHILIPS.
USER MANUAL Azur Elite OptimalTEMP GC5032 PHILIPS
01072008KoNtJepcPnHgN N. All rights reserved. 02735410001


User manual Denlutzherhandbuch Mode demploi Gebruksammlung Brugereijelding
KittyTopas Brukerhandbook Anandharhandbook Hrving e2o cug
00
ENGLISH 7
DEUTCH 12
FRANÇAIS 17
NEORELANDS 22
DANSK 27
FRAZIL 32
NORISK 32
SVENSKI 42
TIÉNG VIET 47
1HnreBnBnBnBnBnBnBnBnBnBnBnBnBnBnBnBnBnBnBnBnBnBnBnBnBnBnBnBnBnBnBnBnBnBnBnBnBnBnBnBnBnBnBnBnBnBnBnBnBnBnB

Introduction
Congratulations on your purchase and welcome to Philips! To fully benefit from the support that Philips offers, register your product at www.philips.com/welcome.
Read this user manual and the important information leaflet carefully before you use the appliance. Save them for future reference.
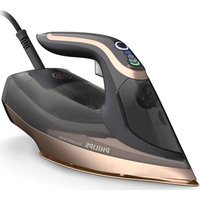
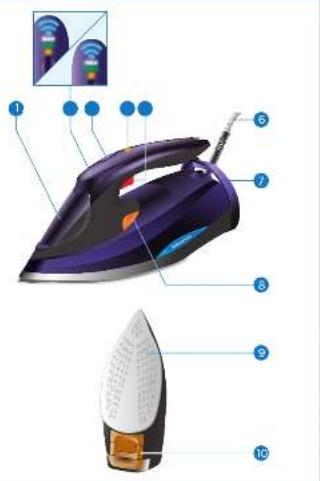
Product Overview
1 Water tank lid
2 Display panel
3 Steam button
4 Calc-Clean / Quick Calc Release reminder light
5 Steam boost trigger
6 Mains cord
7 Cord winding
8 Calc-Clean button (specific types only)
9 Soleplate
10 Quick Calc Release (specific types only)
Exclusive technology from Philips
OptimalTEMP technology
The OptimalTEMP technology enables you to iron all types of ironable fabrics, in any order, without adjusting the iron temperature and without sorting your garments.
It is safe to just rest the hot soleplate directly on the ironing board without putting back to the iron platform. This will help reduce the stress on your wrist.
This iron has been approved by The Woolmark Company Pty Ltd for the ironing of wool-only products, provided that the garments are ironed according to the instructions on the garment label and those issued by the manufacturer of this iron. R0000. The Woolmark symbol is a certification mark in many countries.
Dynamiq sensor
This appliance uses the most advanced Dsenso that detects your iron movement precisely and delivers intelligent steam release for perfect results. Our advanced Dsenso nows precisely how your iron is moving and when it's standing still. Just switch to Dmndjnd you'll always have the perfect amount of steam, when you need it to get rid of your wrinkles faster.
Turbo steam pump
We add a turbo steam pump in this appliance to boost up to 50% more steam directly through fabrics, so creases quickly disappear.
8 ENGLISH
Using the appliance
Note: The iron may give off some smoke when you use it for the first time. This stops after a short while.
Type of water to use
This appliance has been designed to be used with tap water. However, if you live in an area with hard water, fast scale build-up may occur. Therefore, it is recommended to use distilled or demineralized water to prolong the lifetime of the appliance.
Do not use perfumed water, water from the tumble dryer, vinegar, starch, descaling agents, ironing aids, chemically descaled water or other chemicals, as they may cause water spitting, brown staining or damage to your appliance.
Ironable fabrics
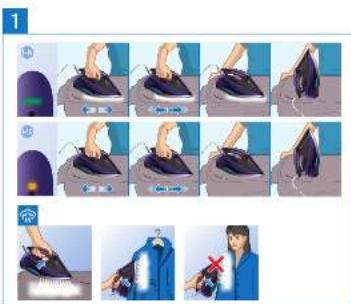
1 Check whether the garment is ironable by reading the label on the garment (Fig. 1-3).
Do not iron non-ironable fabrics. Prints on the garment are not ironable either.
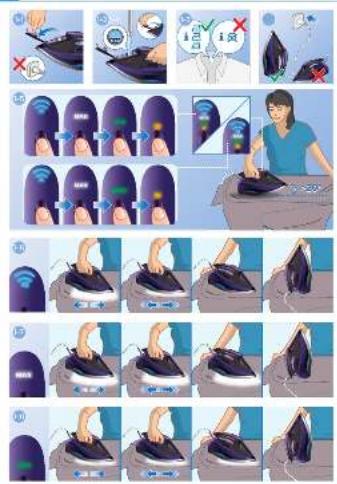
Steam settings
1 To change steam settings, tilt the iron up slightly (about 20 degree and more), and press steam button on top of the handle (Fig. 1-5)
Note: All steam settings are equipped with OptimalTEMP technology and are safe to use on all ironable fabrics.
- (iQ setting) (Fig. 1-6): enabled by the Dynamic sensor, perfect amount of steam is produced automatically when needed during movement of the iron. Steam stops when the iron is not moved or put to vertical position.
It is recommended to use the iGetting for ultimate convenience on all garments. - MAX (MAX setting) (Fig. 1-7): maximum constant steam is delivered continuously for stubborn creases. For best result on tough fabrics such as cotton, jeans and linen, it is recommended to use the MAX setting. Steam stops when the iron is put to vertical position.
- ECO (ECO setting) (specific types only) (Fig. 1-8): minimum constant steam is delivered continuously for garments with less creases. This setting also saves energy. Steam stops when the iron is put to vertical position.
- IONIC (ionic setting) (specific types only) (Fig. 1-9): deep and powerful ionic steam bursts are produced for more hygienic ironing.
- (steam off setting) (Fig. 1-10): select this setting to iron without steam.
Tip: In any steam setting, you can press the steam button during ironing for more steam.
Auto shut-off
The safety auto-off function automatically switches off the appliance if it has not been used for 2 minutes resting on its soleplate or 8 minutes resting on its backplate. The display panel flashes to indicate the appliance is at auto-off status.
To let the appliance heat up again, pick up the appliance or move it slightly. The display panel turns to breathing and the appliance starts to heat up.
Cleaning and maintenance
For more information on how to performance clean and maintenance on the iron, refer to the videos in this link : http://www.philips.com/descaling-iron.
Cleaning the soleplate
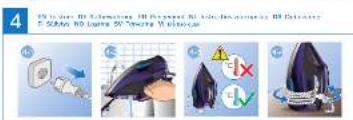
1 Unplug the appliance and let it cool down.
Pour any remaining water out of the water tank.
3 Wipe flakes and any other deposit off the soleplate with a damp cloth and a non-abrasive (liquid) cleaning agent.
Note: To keep the soleplate smooth, avoid hard contact with metal objects. Never use a scouring pad, vinegar or other chemicals to clean the soleplate.
Quick Calc Release (specific types only)
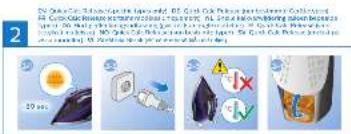
IMPORTANT: The Quick Calc Release automatically collects loose scale particles during ironing. After 1 to 3 months of use, the Calc-Clean reminder light starts flashing to remind you to use the Quick Calc Release function (Fig. 2-1). This is to remove scales collected from your iron to prolong its life. When the Calc-Clean reminder light is flashing, the iron does not heat up.
Tip: The Quick Calc Release function can be used at any time, even when the reminder light is not activated yet. If you live in a hard water area, use the function more frequently.
Do not perform the Quick Calc Release when the iron is hot. Do not pour water into the Quick Calc Release opening.
1 Unplug the appliance (Fig. 2-2) and make sure that the appliance is cool (Fig. 2-3).
2 Hold the appliance in vertical position over the sink.
3 Flip up the lever of Quick Calc Release collector (Fig.2-4) and pull out the collector (Fig.2-5).
4 Clean the Quick Calc Release collector with water (Fig. 2-6, Fig. 2-7).
Gently shake the appliance to allow scale particles to fall out (Fig. 2-8).
6 Insert the Quick Calc Release collector back into the appliance (Fig. 2-10).
7 Push down the lever ("click") to lock the collector (Fig. 2-11).
Calc-Clean (specific types only)
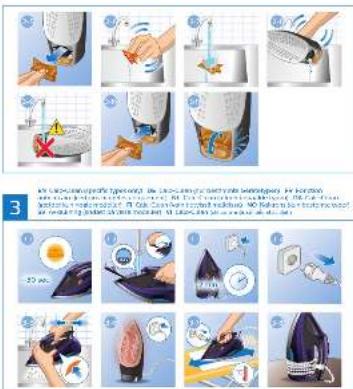
IMPORTANT: After 1 to 3 months of use, the Calc-Clean reminder light starts flashing to remind you to use the Calc-Clean function (Fig. 3-1). This is to remove scales in your iron to prolong its life.
Tip: The Calc-Clean function can be used at any time, even when the reminder light is not activated yet. If you live in a hard water area, use the function more frequently.
1 Make sure that the steam slider is set to "steam off" position.
2 Make sure there is enough water (more than 3/4) in the water tank. If there is not enough water, unplug the iron, fill the water to MAX indication (Fig.3-2) and plug in the iron again (Fig.3-3).
Do not pour vinegar or other descaling agents into the water tank.
3 Wait for the iron to heat up. This takes about 2 minutes (Fig.3-3).
Note: the Calc-Clean reminder light turns off during heating up.
4 Unplug the iron when the 'iron ready' light stops breathing (Fig. 3-4).
Hold the iron over the sink. Keep pushing the Calc-Clean button and gently shake the iron forth and back until all water in the water tank has been used up (Fig. 3-5).
Scales is flushed out, steam and boiling water also come out of the soleplate.
Note: Repeat steps 2 to 5 if the water that comes out of the appliance still contains scale particles.
Plug in the appliance and let the appliance heat up to dry the soleplate. This takes about 2 minutes (Fig.3-6).
7 Unplug the appliance. Move the appliance gently over a piece of cloth to remove any water stains on the soleplate (Fig. 3-7).
Troubleshooting
This chapter summarises the most common problems you could encounter with the appliance. If you are unable to solve the problem with the information below, visit www.philips.com/support for a list of frequently asked questions or contact the Consumer Care Centre in your country.
Problem Possible cause Solution
| The iron does not produce any steam. | There is not enough water in the tank. | Fill the water tank. |
| The steam setting is set to “steam off” | Tilt the iron up and press the steam button on top of the handle to select a steam setting. | |
| The iron is not ready. Wait until the iron is ready (the light on the display panel stops flashing). | ||
| The steam setting does not change when I press the steam button on top of the handle. | The steam button changes steam settings only when the iron is tilted. In horizontal position, the steam button serves as a trigger to release extra steam in any setting. | Tilt the iron up slightly and press the steam button to change steam setting. This is designed to ensure the consumers do not accidentally change the steam setting while ironing. |
| The ironing board cover becomes wet or there are water droplets on the garment during ironing. | Steam has condensed on the ironing board cover after a long ironing session. | Replace the ironing board cover if the foam material has worn out. You can also add an extra layer of felt material under the ironing board cover to prevent condensation on the ironing board. You can buy felt in a fabric shop. |
| Problem Possible cause Solution | ||
| You have an ironing board cover that is not designed to cope with the high steam rate of the appliance. | Put an extra layer of felt material under the ironing board cover to prevent condensation on the ironing board. You can buy felt in a fabric shop. | |
| Water droplets drips onto the garment during ironing. | You have used the steam boost function too often within a short period. | Continue ironing in horizontal position and wait a while before you use the steam boost function again. |
| You have not closed the water tank lid properly. | Press the lid until you hear a 'click'. | |
| You have not insert the Quick Calc Release collector properly back to the appliance (specific types only). | Stop ironing and let the iron cools down for at least 1 hour. Take out the Quick Calc Release collector. Insert it back into the appliance and ensure the collector is in-line with the surface of the appliance. Push down the lever ("click"). If the Quick Calc release tray is damaged, contact a consumer care center in your country (see the world wide guarantee leaflet for contact details). | |
| You have put a chemical into the water tank. | Rinse the water tank and do not put any perfume or chemicals into the water tank. | |
| The iron does not produce a steam boost | You have used the steam boost function too often within a short period. | Continue ironing in horizontal position and wait a while before you use the steam boost function again. |
| You are ironing before the iron gets ready | Wait until the iron is ready (the light on the display panel stops flashing). | |
| Dirty water and impurities come out of the soleplate during ironing. | Hard water with impurities or chemicals has formed flakes inside the soleplate. | Perform Quick Calc Release (specific types only) or Calc-Clean (specific types only). See chapter "Cleaning and maintenance". |
| There is an amber light flashing on the handle of the iron. | The Calc-Clean reminder light is activated. This is to remind you to perform Calc-Clean. | Perform Quick Calc Release (specific types only) or Calc-Clean (specific types only). See chapter "Cleaning and maintenance". |
| The iron leaves a shine or an imprint on the garment. | The surface to be ironed was uneven, for instance because you ironed over a seam or a fold in the garment. | The iron is safe to use on all ironable garments. The shine or imprint is not permanent and disappears when you wash the garment. Avoid ironing over seams or folds. You can also place a cotton cloth over the area to be ironed to avoid imprints. |
| The iron makes a lot of noise. | There is no water in the appliance. | Fill the water in the water tank. |