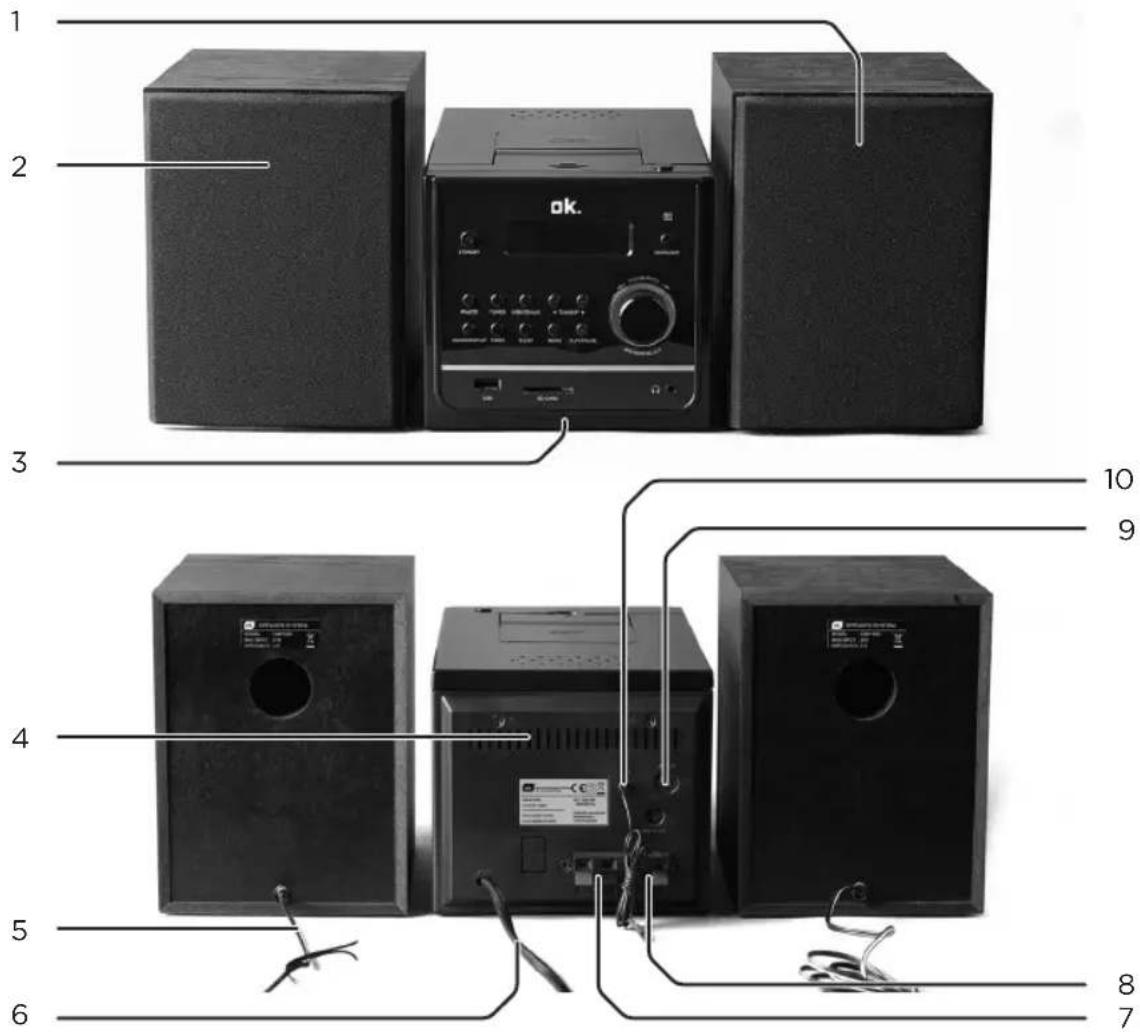
OMH 600 - Speaker OK - Free user manual and instructions
Find the device manual for free OMH 600 OK in PDF.

| Product Type | Hi-fi system with CD player, FM radio, iPod/iPhone dock |
| Brand | OK |
| Model | OMH 600 |
| Power Supply | 100-240 V ~, 50/60 Hz |
| Output Power | 2 x 4 Ω (8 W) |
| FM Radio | 87.5 - 108 MHz |
| Supported Audio Formats | Audio CD, MP3, WMA |
| USB Support | Up to 32 GB (FAT/FAT32) |
| SD Card Support | Yes |
| Docking Station | iPod/iPhone (auto charging) |
| AUX Input | 3.5 mm jack socket |
| Headphone Output | 3.5 mm jack socket |
| Remote Control | Yes (CR2032 battery included) |
| Playback Functions | Programming, random playback, repeat |
| Timer | Timer (standby and wake up) |
| Equalizer | EQ presets |
| X-Bass | Bass enhancement |
| Backlight | Yes |
| Display | LCD |
| Maintenance | Clean with a dry, soft cloth |
| Safety | Do not open, risk of electric shock |
Frequently Asked Questions - OMH 600 OK
User questions about OMH 600 OK
0 question about this device. Answer the ones you know or ask your own.
Ask a new question about this device
Download the instructions for your Speaker in PDF format for free! Find your manual OMH 600 - OK and take your electronic device back in hand. On this page are published all the documents necessary for the use of your device. OMH 600 by OK.
USER MANUAL OMH 600 OK
The unit supports the listed iPod / iPhone devices (iPod / iPhone devices shown are not included)
iPod nano 1st generation 1GB 2GB 4GB

iPod nano 2nd generation (aluminum) 2GB 4GB 8GB

iPod nano 3rd generation (video) 4GB 8GB

iPod nano 4th generation (video) 8GB 16GB

iPod nano 5th generation (video camera) 8GB 16GB

iPod nano 6th generation 8GB 16GB

iPod 4th generation 20GB

iPod 4th generation 40GB
iPod 4th generation (color display) 20GB 30GB

iPod 4th generation (color display) 40GB 60GB

iPod 5th generation (video) 30GB

iPod 5th generation (video) 60GB 80GB
iPod touch 1st generation 8GB 16GB 32GB

iPod touch 2nd generation 8GB 16GB 32GB

iPod touch 3rd generation 32GB 64GB
iPod touch 4th generation 8GB 32GB 64GB
iPhone 4GB 8GB 16GB
iPhone 3G 8GB 16GB
iPhone 3GS 16GB 32GB
iPhone 4 16GB 32GB
bauteile

CLASS 1 LASER PRODUCT

natural_image
Black rectangular object with a circular pattern and an arrow pointing right (no text or symbols)1
natural_image
Top-down view of a black electronic device with a circular component and mounting bracket (no visible text or symbols)2
natural_image
Close-up of a black rectangular electronic component with a white arrow pointing to its side (no visible text or symbols)3
natural_image
Two black audio/video sound amplifiers with a central control unit (no visible text or symbols)1
natural_image
Close-up of a black electronic device rear panel showing ports and cables (no readable text or symbols)2
natural_image
Close-up of a device's rear panel showing two Ethernet ports with visible cables (no text or symbols)natural_image
Close-up of a black cable inserted into an open electrical outlet, with a close-up inset showing a circular component (no text or symbols visible)123
natural_image
Close-up of a black cable inserted into a square electrical socket (no text or symbols visible)1
2
3
natural_image
Simple line icon of an open book (no text or symbols)1
natural_image
Two black USB connectors with white leads, shown against a plain background (no text or symbols visible)2
natural_image
Illustration of a computer mouse with a black plastic tray and three circular patterns on its surface (no text or symbols)5
natural_image
Close-up of a black electronic device with a metallic audio jack connected to a port, showing no visible text or symbols.natural_image
Close-up of a printer's front panel with an arrow pointing to the lid area (no text or symbols visible)2
natural_image
Close-up of a black printer or printer device with a central cover and mounting bracket (no visible text or symbols)CLASS 1 LASER PRODUCT
natural_image
Black rectangular object with a circular pattern and an arrow pointing right (no text or symbols)1
natural_image
Top-down view of a black electronic device with a circular component and mounting bracket (no visible text or symbols)2
natural_image
Close-up of a black rectangular electronic component with a white arrow pointing to its side (no text or symbols visible)3
natural_image
Two black audio equipment units with speakers and a central control panel (no visible text or symbols)1
natural_image
Close-up of a black electronic device showing three ports with cables, no visible text or symbols2
natural_image
Close-up of a black electronic device with two cables and a 10W power indicator (no readable text or symbols beyond labels)广力云智慧零售收银系统
natural_image
Close-up of a black cable inserted into an electrical outlet, with a close-up inset showing the same cable (no text or symbols visible)123
natural_image
Close-up of a black cable inserted into a white electrical socket (no text or symbols visible)1
3
natural_image
Simple line icon of an open book (no text or symbols)1
natural_image
Close-up of two black USB connectors with metallic leads, no text or symbols visible2
natural_image
Illustration of a computer mouse with a black plastic tray and three circular patterns on its surface (no text or symbols)5
natural_image
Close-up of a black electronic device with a metallic audio jack connected to a port, showing no visible text or symbols.natural_image
Close-up of a printer's front panel with an arrow pointing to the lid area (no text or symbols visible)2
natural_image
Close-up of a black printer or printer device with a central cover and mounting bracket (no visible text or symbols)This appliance is only intended for audio entertainment. Only use according to these instructions. Improper use is dangerous and will void any warranty claim. For household use only. Do not use outdoors.
Important safety instructions can be found in the separate document.
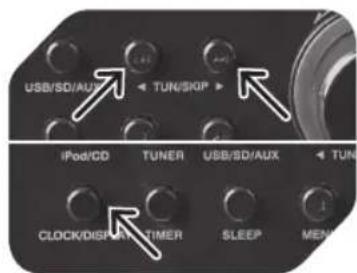
Note: Remote control buttons are not separately described, unless they are different from the buttons on the main unit.
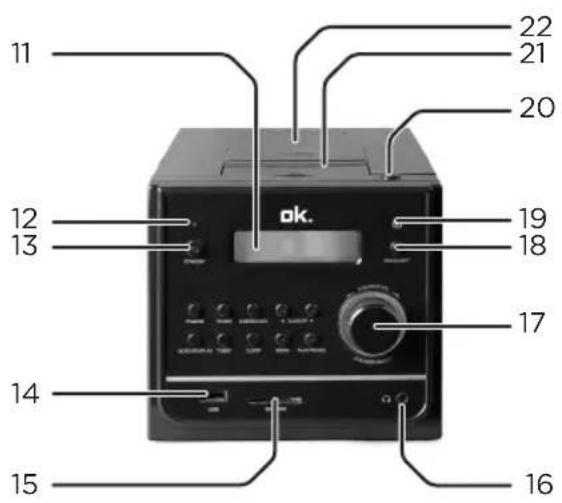
Remote sensor19. OPEN button 20.
-
iPod docking station
-
CD compartment
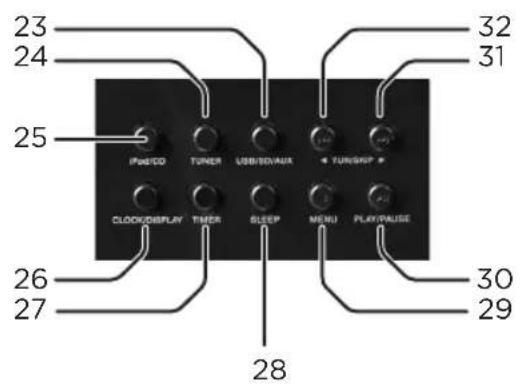
23.USB/SD/AUX button
-
TUNER button iPod/CD button25. CLOCK/DISPLAY 26. button
-
TIMER button SLEEP button28. STOP/MENU button29.
30PLAY/PAUSE button
-
TUN/SKIP button
-
TUN/SKIP button
-
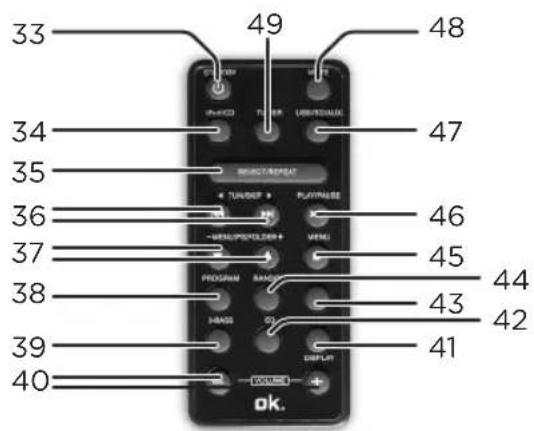
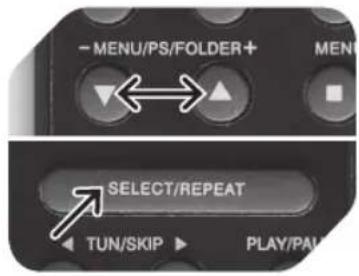
Standby button iPod/CD button34. SELECT/REPEAT 35. button
36.◀TUN/SKIP◀▶▶▶▶▶▶▶▶▶▶▶▶▶▶▶▶▶▶▶▶▶▶▶▶▶▶▶▶▶▶▶▶▶▶▶▶▶▶▶▶▶▶▶▶▶▶▶▶▶▶▶▶▶▶▶▶▶▶▶▶▶▶▶▶▶▶▶▶▶▶▶▶▶▶▶▶▶▶▶▶▶▶▶▶▶▶▶▶▶▶▶▶▶▶▶▶▶▶▶▶>
- ▼MENU/PS/FOLD- ER ▲button PROGRAM button38. X-BASS button39. VOLUME +/- buttons40. CLOCK/DISPLAY 41. button EQ button42. SLEEP button43.
RANDOM button44. STOP/MENU button45. 46PLAY/PAUSE button 47.USB/SD/AUX button 48.MUTE button 49.TUNER button
IMPORTANT SAFETY INSTRUCTIONS. READ CAREFULLY AND KEEP FOR FUTURE REFERENCE.
CLASS 1 LASER PRODUCT

This label on the product informs the user that this is a class 1 laser product containing a laser component.
Do not touch the lens inside the disc compartment.
CAUTION! Use of controls or adjustments of procedures other than those specified herein may result in hazardous radiation exposure.
DANGER! Invisible laser radiation when open and safety interlock failed or defeated. Avoid direct exposure to the beam.Do not touch the lens.
The lightning flash with arrowhead within an equilateral triangle is intended to alert the user to the presence of uninsulated "dangerous voltage" inside the enclosure of this appliance, which may be of sufficient magnitude to constitute a risk of electric shock to persons and animals.
The exclamation point within an equilateral triangle is intended to alert the user to the presence of important operating and maintenance instructions in the literature accompanying this appliance.
BEFORE FIRST TIME USE
Carefully read this user manual in order to avoid damage or injuries due to incorrect use. Pay particular attention to safety instructions. Keep for future reference and pass it on to further users.
Carefully remove all packaging and check if appliance is complete and un- damaged. In case of damage, do not use the appliance.
- IMPORTANT: Remove the protective sheet from the disc compartment, if one is in place.
SPECIFICATIONS
Rated voltage: 100-240 V\~ / Rated frequency: 60/50 Hz / Rated power consumption: Speakers 2 x 4Ω (8W)/ Radio frequency range: FM87.5-108 MHz / Remote control battery: CR2032-(included) / Supported audio formats: Audio CD, MP3, WMA / Supported devices/standards: Audio CD, CD-R, CD-RW (not guaranteed), MP3 (max. 256 tracks, max. 256 folders, USB (max. 999 tracks, max. 999 folders, max. 32 GB in size) / USB output 5V +/- 0,5V 400 mA
The rating label is located on the bottom of the unit.
reMOte cOntrOI
natural_image
Black rectangular object with a circular pattern and an arrow pointing right (no text or symbols)1
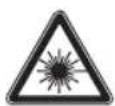
Slide compartment cover on the backside open.
natural_image
Top-down view of a black electronic device with a circular component and mounting bracket (no visible text or symbols)2
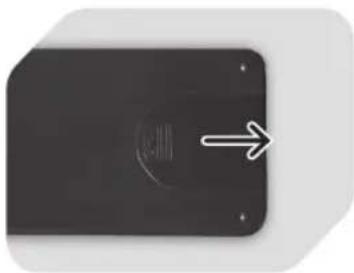
Insert battery of type CR 2032 observing the + and - polarities as indicated on the battery and inside the battery compartment.
natural_image
Close-up of a black rectangular electronic component with a white arrow pointing to its edge (no visible text or symbols)3
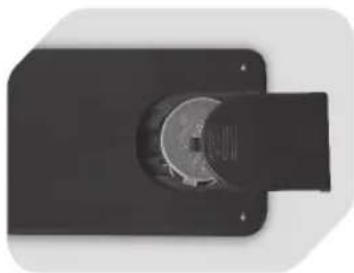
Slide compartment cover on until locked.
nOteS
For first time use, pull the protective sheet from the battery compartment to use remote control with the battery provided.
If the distance required between remote control and appliance decreases, the batteries are exhausted; replace with new ones.
Avoid using the remote control near other remote controls or appliances generating infrared rays, in order to ensure correct operation.
Always direct remote sensor on appliance. Make sure there are no obstacles • between the appliance and remote control.
SetuP
natural_image
Two black audio/video sound amplifiers with a central control unit (no visible text or symbols)1
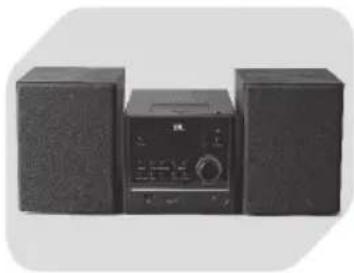
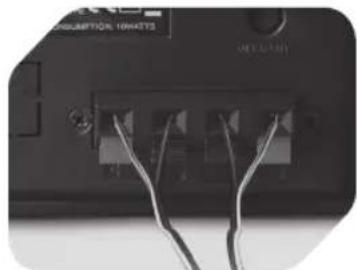
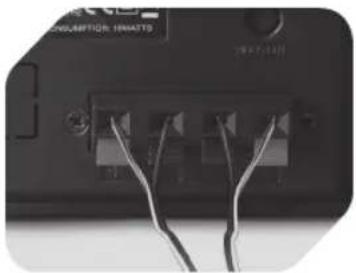
Place main unit and speakers on a flat and stable surface.
natural_image
Close-up of a black electronic device rear panel showing ports and cables (no readable text or symbols)2
natural_image
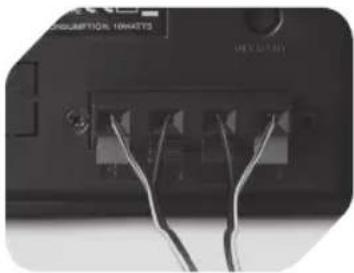
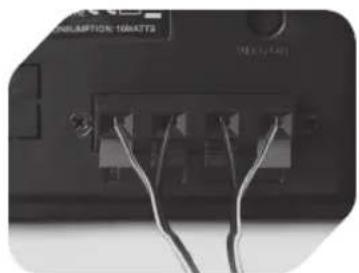
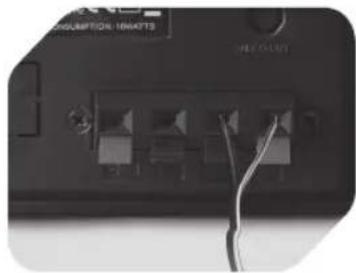
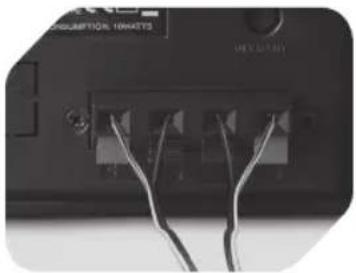
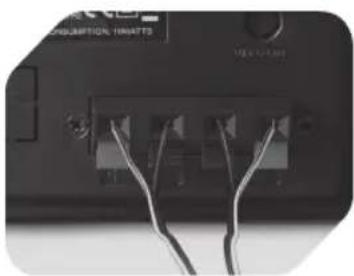
Close-up of a device's rear panel showing two connected ports with visible cables (no text or symbols)Unwind speaker cables and connect to L (left) and R (right) speaker jacks on the back of the main unit. Connect speakers before turning the appliance on.
turning aPPIance On anD Off
natural_image
Close-up of a black plug inserted into a white socket, with an arrow pointing to the plug (no text or symbols visible)123
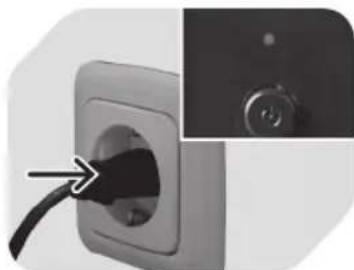
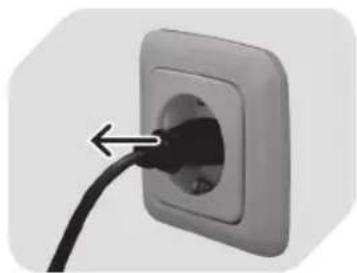
Plug in the appliance; the indicator light lights up. The appliance is in standby mode.

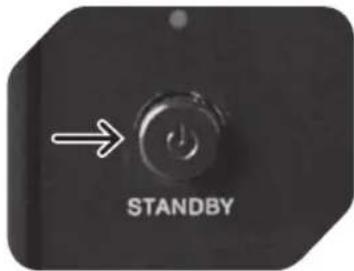
Press Ⓗ/STANDBY to turn the appliance on. Press again to enter standby mode. Please note that the appliance consumes power in standby mode.
natural_image
Close-up of a black cable inserted into a white electrical outlet socket (no text or symbols visible)Remove the plug from the socket when the appliance is not used for a prolonged period of time in order to save energy.
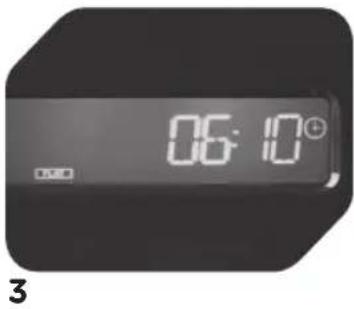
Setting tHe cIOck (in StanDby MODE Only)
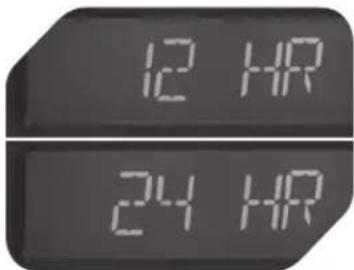
1
Press and hold CLOCK/ DISPLAY button until time format appears in display. Use or to set time format (12H/24H). Press CLOCK/DISPLAY button again to confirm.
2

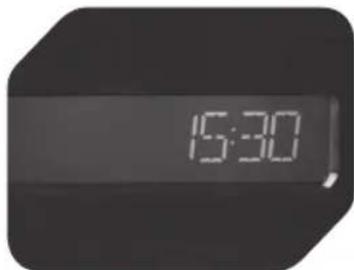
The time begins to flash. Use or to set hour and confirm with CLOCK/DISPLAY button. Then set minute with or and confirm with CLOCK/DISPLAY button. Time shows in standby mode only. To display time during playback, press CLOCK/DISPLAY button repeatedly until the clock will be displayed for 5 seconds.
OPERating buttOnS fOr cD/MP3/wMa/uSb
123
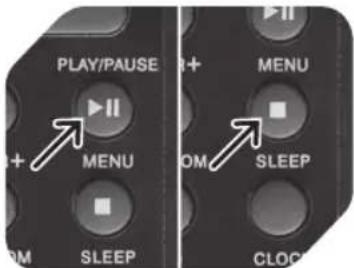
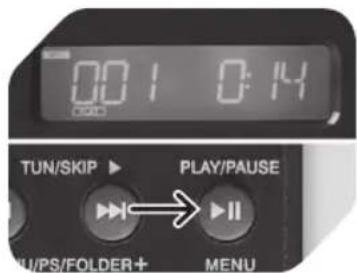
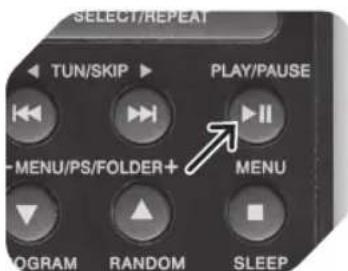
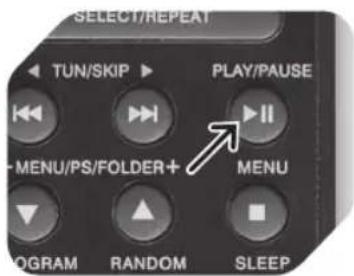
▶: Press to start, pause, and resume playback.
■ Stop playback, delete program.
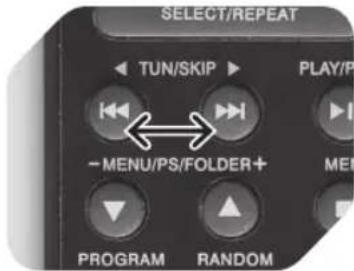
Press ▶bnce to play next track. Press ◀ once to play track from beginning and twice to play previous track. Press and hold during playback to fast-forward or rewind.
▲ and ▼ Album up and album down (MP3 and WMA only).
4
Adjust volume remotely. Press VOLUME + to increase, VOLUME - to decrease volume.
auDiO cD/MP3 cD/wMa cD Playback
123
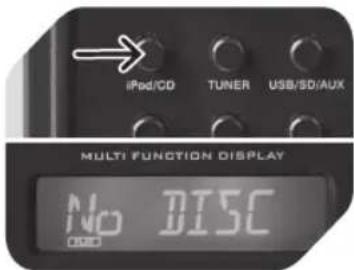
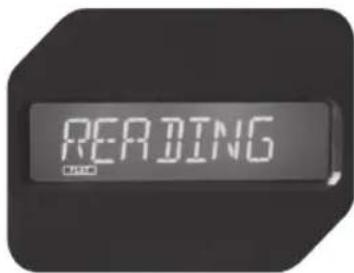
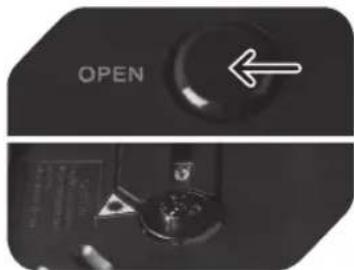
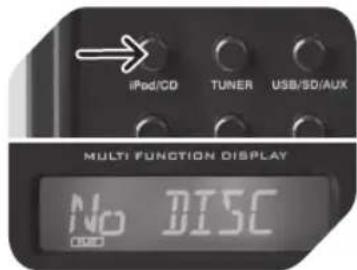
When unit is on, repeatedly press iPod/CD to select CD function. If no disc is inserted, the display will show No DISC.

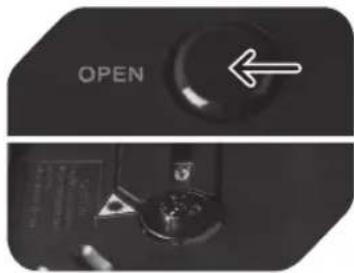
Open CD door by pressing OPEN and insert a CD/MP3/WMA disc with label facing up; close CD door.
Focus search will be performed, after which total number of folders/tracks or total number of tracks and time will be displayed.
4
Press ▶button to start disc from te beginning. MP3/WMA indicators light up when playing MP3/WMA discs.
5
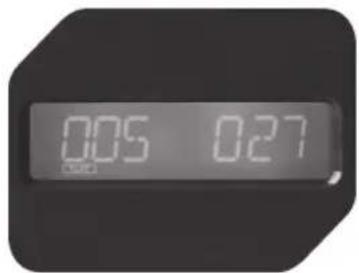
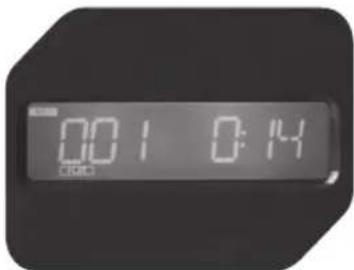
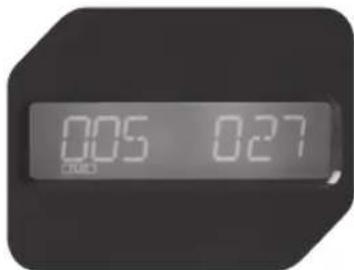
During playback the elapsed time and track number are displayed. In stop mode, total number of folders/tracks (MP3) or total number of tracks and time (Audio CD) will be displayed.
6
For navigation refer to chapter OPERATING BUTTONS FOR CD/MP3/WMA/USB.
USB/SD CARD MP3 PLAYBACK
1
2
or
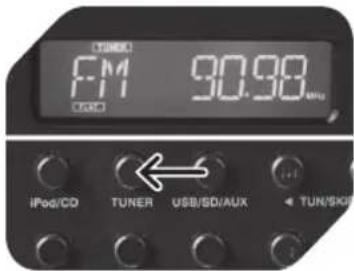
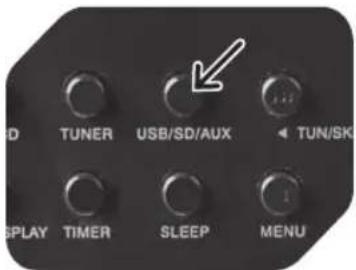
Press USB/SD/AUX button repeatedly to select USB or SD function.
Plug USB device in USB port.
3
4
5
Plug SD card into SD CARD slot.
Focus search is performed, after which the total number of folders and tracks will be shown in the display.
Press ▶ button to start from the first folder or track. Display will show folder/track no., time and ID3 tag if available.
6
NOTES
USB devices with extension cables are not supported.
Do not connect a computer to this appliance.
Only USB devices with following formatting are • recognized: FAT/FAT32
For navigation refer to chapter OPERATING BUTTONS FOR CD/MP3/WMA/USB.
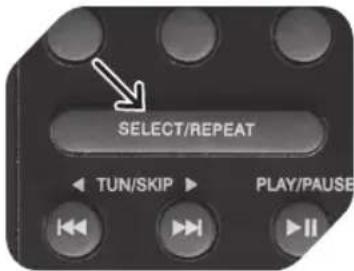
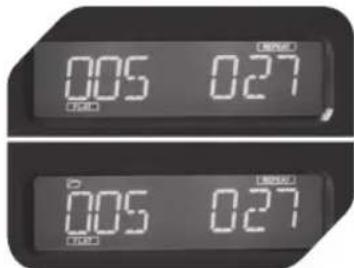
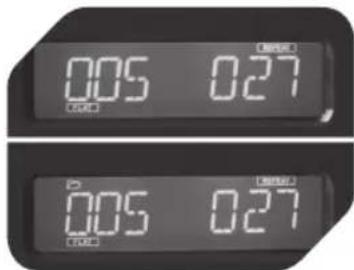
rePeat Playback (reMOte cOntrOI Only)
1
During CD playback, press REPEAT repeatedly to switch the play-back modes as follows:
2
Press REPEAT once to repeat one track; display will show REPEAT
Press again, will appear in display (MP3 only). Current folder will be repeated.
3
Press REPEAT again to repeat entire disc; display will show REPEAT CD.
To cancel repeat play, press REPEAT button until the repeat icon dis-sapears in the display.
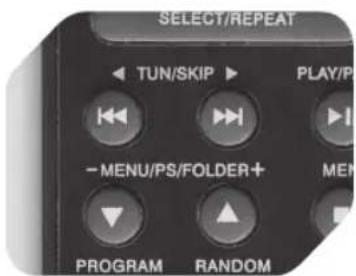
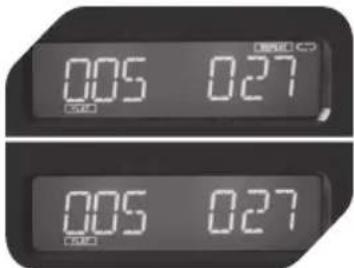
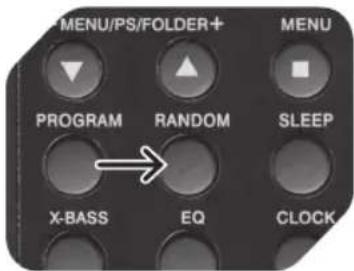
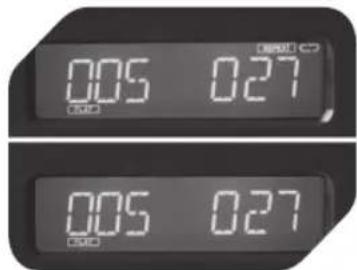
ranDOM Playback (reMOte cOntrOI Only)
1
During CD stop press RANDOM once to select random mode; display will show RANDOM
2
During random play press or skip tracks/folders randomly.
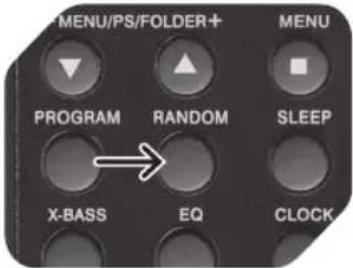
3
Press RANDOM to resume normal play-back. RANDOM indicator disappears.
One track will be randomly selected and starts playing.
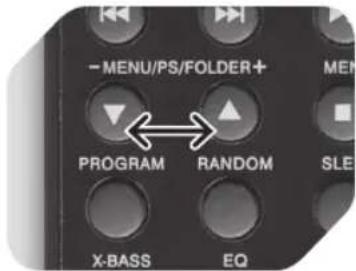
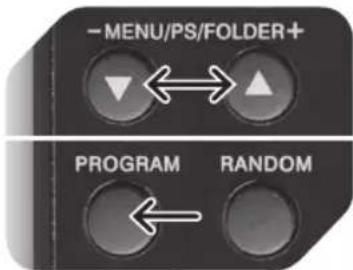
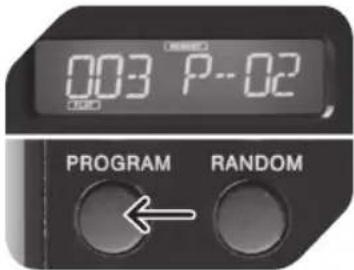
PrOgraM Playback (reMOte cOntrOI Only)
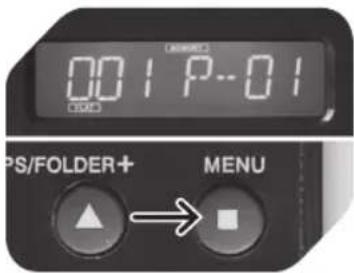
1
2
3
Press ■ to stop play-back.
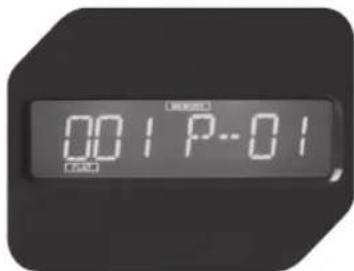
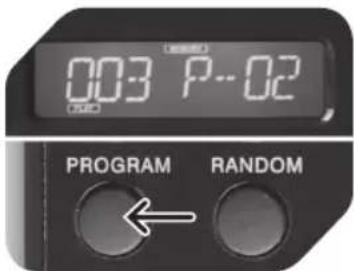
Press PROGRAM button to enter program mode. MEMORY is flashing; P-01 appears.
Use and to select track to be stored in first place (P-01). Use MENU/PS/FOLDER +/- to switch between albums (if available).
Press PROGRAM to save settings and program next track. A maximum of 60 tracks can be stored.
456
Press ▶lto start play-back from first programmed track.
When program play is completed, the player stops. The player remains in program play mode and flashing. Press ▶to play programmed sequence again.

Press ■ to stop program play. Press twice to cancel function; 📂 disappear.
nOte
During program playback, random and repeat functions are available as described above, but for the programmed sequence only.
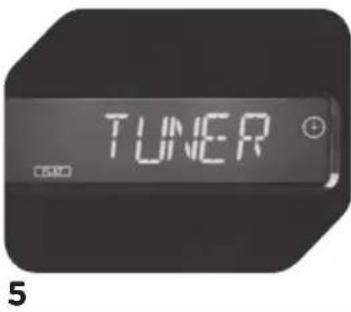
FM/AM RADIO
1
When unit is switched on, press TURNER repeatedly to enter FM mode.
2
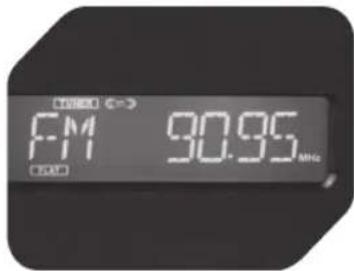
Press for tune to desired station. FM stereo stations are indicated by the ST indicator in display.
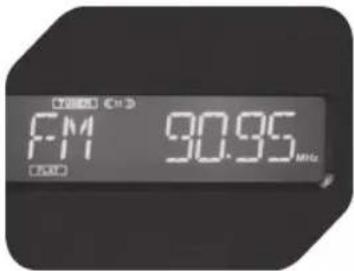
3
Press and hold ▶ or ▶ to start auto search, which stops at first receivable station. To interrupt auto search, press ▶ or ▶ button again.
NOTES
For better FM reception, fully unwind the FM wire antenna. Do not connect the wire antenna to an outdoor antenna!
Select the desired radio station to be stored. Press PROGRAM button on the remote once. Current preset (e.g. 01) will blink in the display.
2
Press MENU/PS/FOLDER +/- button on remote to select preset station number. Press PROGRAM to confirm.
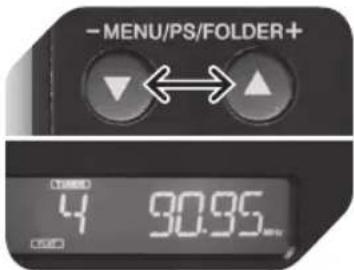
3
To select preset stations during normal FM mode, press MENU/PS/FOLDER +/- button on the remote. The display will show preset station number and its frequency.
SleeP functiOn
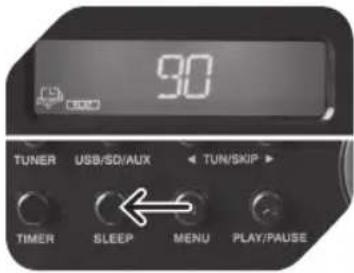
To activate Sleep function press SLEEP button; sleep indicator in display will be flashing.
Press SLEEP button repeatedly to set duration between 10 and 90 minutes (in increments of 10), or off (OFF). After 2 seconds, display returns to normal mode, with sleep indicator steady. Appliance will turn off after pre-set time has elapsed.
To cancel sleep mode, press SLEEP button once again, display will show SLP OFF and sleep indicator goes out.
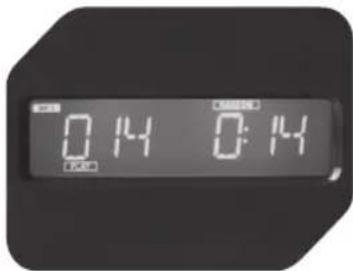
tiMer functiOn
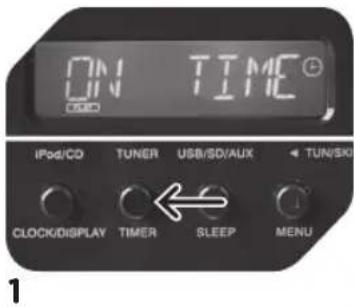
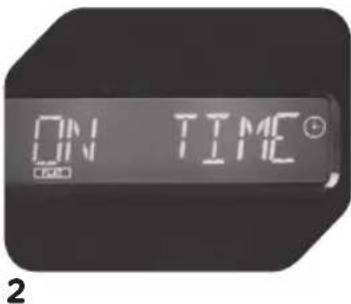
Press TIMER to choose between timer function on and off. Display will show ⏻to indicate timer function is on.
Press and hold TIMER button until display shows ON TIME to set timer clock. The hour digit begins to flash.
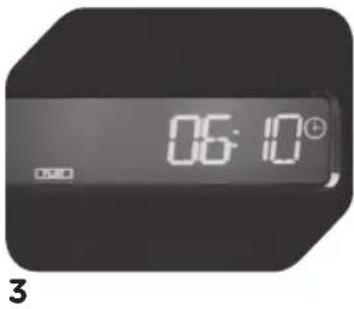
Use K or K set hour and confirm with TIMER button. Then set minute with K or K and confirm with TIMER to set the on time clock.
nOte
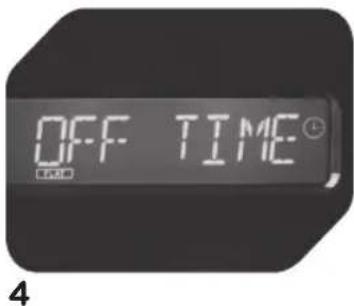
Each time the timer is set to on, all settings will be displayed in order.
Display will enter OFF TIME mode. Repeat step 3 to set off timer.
Press Kbr to select the timer mode - iPod, CD, TUNER, AUX, USB or SD CARD and confirm with TIMER button. Press VOLUME+/- to set desired volume. Settings are then complete.
backligHt functiOn
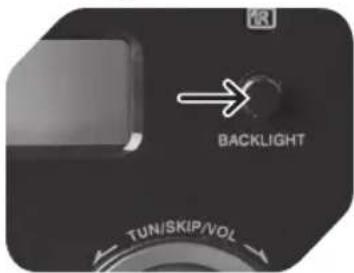
During any mode, press BACKLIGHT to turn front panel backlight on or off. When entering standby, backlight turns off automatically.
PreSet eQ functiOn (reMOte cOntrOI Only)
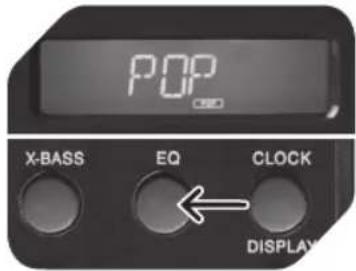
Press EQ button once to display current EQ mode. Press repeatedly to select desired mode; the respective indicator appears in the display.
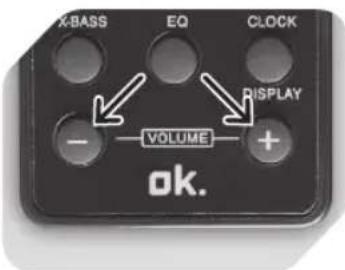
Press X-BASS button to toggle this function between on and off. Display will show BASS ON or BASS OFF. When X-BASS is on, the bass sound is enhanced and be displayed.
Mute functiOn (reMOte cOntrOI Only)
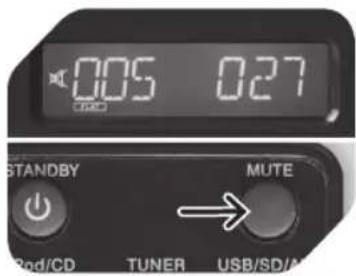
Press MUTE on remote control to stop sound output temporarily, the display will show. To cancel, press MUTE again or press VOLUME+/-.
auX MODE (cConnecting an eXternal Device)

natural_image
Simple line icon of an open book (no text or symbols)1
Consult respective sections in the instruction manual of the external device before you connect the device to this appliance.
natural_image
Close-up of two black USB connectors with metallic leads, shown against a plain background (no text or symbols visible)2
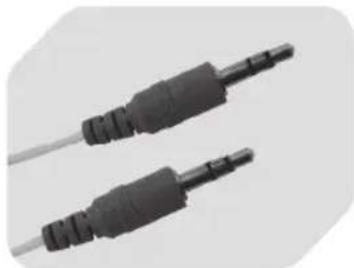
Turn this appliance and the external device off. A 3.5mm stereo jack plug to jack plug lead (not included) is required for the connection.

3
Connect the AUX IN jack at the back of this appliance with the external device.
4
Turn appliance on and select AUX mode by pressing USB/SD/AUX until display shows AUX.
natural_image
Illustration of a computer mouse with a black plastic tray and three circular patterns on its surface (no text or symbols)5
Start playback on external device. Adjust volume using VOLUME buttons of this appli-ance.
HeaDPHOneS
natural_image
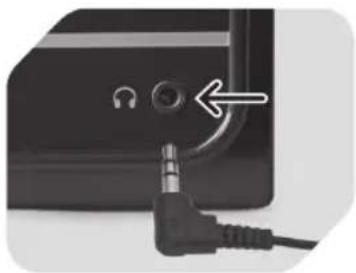
Close-up of a black electronic device with a metallic audio jack connected to a port, showing no visible text or symbols.Turn volume fully down. Connect a headphone set with a 3.5 mm plug to the headphone jack. The speakers are automatically muted. Adjust volume with VOLUME +/-
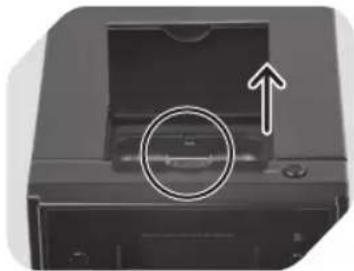
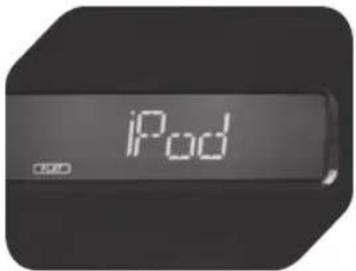
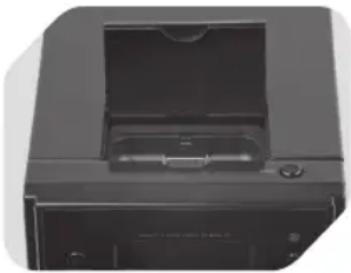
LISTENING TO iPOD AND iPhone
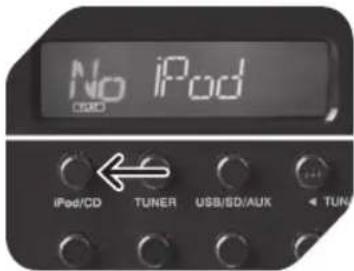
1
Press iPOD/CD repeatedly until the display shows No iPod.
natural_image
Close-up of a printer's front panel with a circular arrow and arrow indicating a measurement or operation (no text or symbols visible)2
Lift up the door of the iPod docking station on the top front. Install the adaptor which matches your iPod/iPhone model into the docking tray.
3
Insert a iPod/iPhone into docking tray, the display will show iPod. Start iPod operation.

456
Press ▶to start and pause playback.
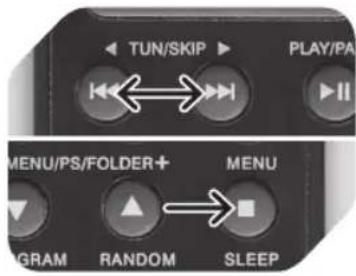
Press ▶br ▶ skip forward or back to other tracks during playback. Press MENU to select iPod Menu.
Use MENU/PS/FOLDER +/- buttons on remote to scroll up and down in iPod Menu. To confirm selection press SELECT.
CHARGING UP iPOD AND iPhone
natural_image
Close-up of a black printer or printer device with a central cover and mounting bracket (no visible text or symbols)The iPod and iPhone will be automatically charged when docked, in either standby or operation mode.
FACTORY RESET
In case that you need to reset the unit back to its original factory settings, please do as follows:
- Disconnected unit from the AC mains; reconnect after a few seconds. Unit will be standby mode.
- Within the first 5 seconds of standby, press and hold MENU button. At the same time press STANDBY button once.
- Release both buttons when the display shows RESET.
- The unit is then reset to its factory settings. All of the pre-set radio stations, clock and timer settings need to be set again.
EN
NOTE
- Copyrights: The making of unauthorized copies of copyright-protected material, including computer programs, files, broadcasts and sound recordings, may be an infringement of copyrights and constitute a criminal offence under your national law. This equipment should not be used for such purposes. Only use CD compact discs with digital audio signals.
- Condensation: The information on the compact disc is read by a laser through an optical lens (do not touch). If you take the appliance from a cold to a warm room, moisture may condense on the lens, and the playback may be hampered. In this case leave the appliance for one hour at room temperature before use. Take the disc out of the appliance. Should the problem persist, have the appliance checked by qualified personnel.
The batteries are not included; please refer to the safety instructions provided by the battery manufacturer.
Remove batteries when not using the remote control and appliance for a longer period of time in order to avoid leakage.
CD MAINTENANCE
A small amount of dust or scratches will usually not have an impact • on the quality of a disc. The discs should, however, be treated with care.
Protect your compact discs from dust and scratches.
Store your compact discs in their covers when not in use.
To maintain the original quality of sound, you should occasionally • wipe your compact discs with a soft cloth, from the centre to the edge (not with circular movements). Never use gasoline or other solvents.
Only hold a compact disc by its edges!

CLEANING AND CARE
Before cleaning, unplug the supply cord. Allow the appliance to cool down • completely.
Clean appliance with a dry and soft cloth.
DISPOSAL
The crossed-out wheeled bin logo requires the separate collection of waste electric and electronic equipment (WEEE). Electric and electronic equipment may contain dangerous and hazardous substances. Do not dispose of this appliance as unsorted municipal waste. Return it to a designated collection point for the recycling of WEEE. By
doing so, you will help to conserve resources and protect the environment. Contact your retailer or local authorities for more information.

iPOD / iPHOne
"Made for iPod," and "Made for iPhone," mean that an electronic accessory has been designed to connect specifically to iPod or iPhone respectively, and has been certified by the developer to meet Apple performance standards. Apple is not responsible for the operation of this device or its compliance with safety and regulatory standards. Please note that the use of this accessory with iPod or iPhone may affect wireless performance.
iPhone & iPod are trademarks of Apple Inc., registered in the U.S. and other countries.
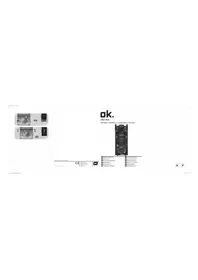
cOMPONENTeS
CLASS 1 LASER PRODUCT
natural_image
Black rectangular object with a circular arrow pointing right, no visible text or symbols123
natural_image
Top-down view of a black electronic device with a circular component and mounting bracket (no visible text or symbols)natural_image
Close-up of a black rectangular electronic component with a white arrow pointing to its surface (no text or symbols visible)natural_image
Exterior view of a black audio workstation with two speakers (no visible text or labels)1
natural_image
Close-up of a device rear panel showing two ports with attached cables (no visible text or symbols)2
natural_image
Close-up of a black electronic device with two Ethernet ports and visible cables (no text or symbols)natural_image
Close-up of a black cable inserted into an electrical outlet, with a close-up inset showing a circular component (no text or symbols visible)123
natural_image
Close-up of a black cable inserted into a square electrical socket (no text or symbols visible)1
2
3
2
3
3
natural_image
Simple line icon of an open book (no text or symbols)1
natural_image
Close-up of two black USB connectors with white leads, no text or symbols visible2
natural_image
Illustration of a computer mouse with a black circular design on the screen (no text or symbols)5
natural_image
Close-up of a black electronic device with a metallic audio jack connected to a port, showing no visible text or symbols.natural_image
Close-up of a printer's front panel with an arrow pointing to the cover (no text or symbols visible)2
natural_image
Close-up of a black printer or printer device with a central cover and control panel (no visible text or symbols)CLASS 1 LASER PRODUCT
natural_image
Black rectangular object with a circular mark and an arrow pointing right (no text or symbols)1
natural_image
Top-down view of a black electronic device with a circular component and mounting bracket (no visible text or symbols)2
natural_image
Close-up of a black rectangular electronic component with a white arrow pointing to its edge (no visible text or symbols)3
natural_image
Three black audio equipment units with speakers, featuring a central speaker and two side speakers (no visible text or labels)1
natural_image
Close-up of a black electronic device rear panel showing three ports with cables, no visible text or symbols2
natural_image
Close-up of a black electronic device with three ports and wires, no visible text or symbolsnatural_image
Close-up of a black plug inserted into a white socket, with an arrow pointing to the socket (no text or symbols visible)123
natural_image
Close-up of a black cable inserted into a white electrical outlet socket (no text or symbols visible)rePrODuctiOn cD auDiO/cD MP3/cD wMa

123
1
3
natural_image
Simple line icon of an open book (no text or symbols)1
natural_image
Close-up of two black USB connectors with white leads, no text or symbols visible2
natural_image
Illustration of a computer mouse with a black plastic tray and three circular patterns on its surface (no text or symbols)5
natural_image
Close-up of a black electronic device with a metallic audio jack connected to a port, showing no visible text or symbols.natural_image
Close-up of a printer's front panel with an arrow pointing to the lid area (no text or symbols visible)2
natural_image
Close-up of a black printer or printer device with a central cover and control panel (no visible text or symbols)CLASS 1 LASER PRODUCT


WARNING: SHOCK HAZARD-DO NOT OPEN AVIS: RISQUE DE CHOC ÉLECTRIQUE-NE PAS OUVRIR
natural_image
Black rectangular object with a circular pattern and an arrow pointing right (no text or symbols)1
natural_image
Top-down view of a black electronic device with a circular component and mounting bracket (no visible text or symbols)2
natural_image
Close-up of a black rectangular electronic component with a white arrow pointing to its side (no text or symbols visible)3
natural_image
Exterior view of a black audio workstation with two speakers and a central control unit (no visible text or symbols)1
natural_image
Close-up of a device rear panel with two connectors and cables (no visible text or symbols)2
natural_image
Close-up of a black electronic device with three ports and two wires, no visible text or symbolsnatural_image
Close-up of a black cable inserted into an electrical outlet, with a close-up inset showing a button (no text or symbols visible)123
natural_image
Close-up of a black cable inserted into a square electrical outlet socket (no text or symbols visible)1
3
natural_image
Simple line icon of an open book (no text or symbols)1
natural_image
Close-up of two black USB connectors with white leads, no text or symbols visible2
natural_image
Illustration of a computer mouse with a black plastic tray and three circular patterns on the cover (no text or symbols)5
natural_image
Close-up of a black electronic device with a metallic audio jack connected to a port, showing no visible text or symbols.natural_image
Close-up of a printer's front panel with an arrow pointing to the lid area (no text or symbols visible)2
natural_image
Close-up of a black printer or printer device with a central cover and mounting bracket (no visible text or symbols)-
Docking station per iPod
-
Vano CD
23.Tasto USB/SD/AUX
-
Tasto TUNER Tasto iPod/CD25. Tasto CLOCK/DIS-26. PLAY
-
Tasto TIMER
Tasto SLEEP28.
29.Tasto STOP/MENU
30Tasto PLAY/PAUSE
-
▶Tasto TUN/SKIP
-
Tasto TUN/SKIP
-
♩/Tasto Standby Tasto iPod/CD34.
Tasto SELECT/RE-35. PEAT
36.◀Tasti TUN/SKIP ▶
- ▼Tasto MENU/PS/FOLDER ▲
Tasto PROGRAM38.
Tasto X-BASS39.
Tasti VOLUME +/-40.
Tasto CLOCK/DIS-41. PLAY
Tasto EQ42.
Tasto SLEEP43.
Tasto RANDOM44.
45.Tasto STOP/MENU
46.Tasto PLAY/PAUSE
47.Tasto USB/SD/AUX
48.Tasti MUTE
49.Tasto TUNER
IMPORTANTI ISTRUZIONI DI SICUREZZA. LEGGERE ATTENTA- MENTE E CONSERVARE PER CONSULTAZIONI FUTURE.
CLASS 1 LASER PRODUCT
natural_image
Black rectangular object with a circular pattern and an arrow pointing right (no text or symbols)1
natural_image
Top-down view of a black electronic device with a circular component and mounting bracket (no visible text or symbols)2
natural_image
Close-up of a black rectangular electronic component with a white arrow pointing to its surface (no text or symbols visible)3
natural_image
Two black audio equipment units with speakers and a central control panel (no visible text or symbols)1
natural_image
Close-up of a black electronic device showing three ports with cables, no visible text or symbols2

natural_image
Close-up of a device's rear panel showing two connected cables (no visible text or symbols)natural_image
Close-up of a black cable inserted into an open electrical outlet, with a close-up inset showing the same component (no text or symbols visible)123
natural_image
Close-up of a black cable inserted into a white electrical outlet socket (no text or symbols visible)riPrODuziOne auDiO cD cD/MP3, cD/wMa
123
2 oppure
1
2

3
2
3
natural_image
Simple line icon of an open book (no text or symbols)1
natural_image
Two black USB connectors with white leads, shown against a plain background (no text or symbols visible)2
natural_image
Illustration of a computer mouse with a black plastic tray and three circular patterns on the cover (no text or symbols)5
natural_image
Close-up of a black electronic device with a metallic audio jack connected to a port, showing no visible text or symbols.natural_image
Close-up of a printer's front panel with an arrow pointing to the cover (no text or symbols visible)2