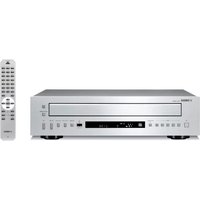
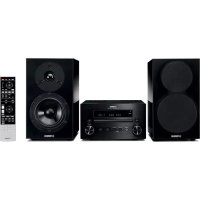
CDX396 - Audio System YAMAHA - Free user manual and instructions
Find the device manual for free CDX396 YAMAHA in PDF.
User questions about CDX396 YAMAHA
0 question about this device. Answer the ones you know or ask your own.
Ask a new question about this device
Download the instructions for your Audio System in PDF format for free! Find your manual CDX396 - YAMAHA and take your electronic device back in hand. On this page are published all the documents necessary for the use of your device. CDX396 by YAMAHA.
USER MANUAL CDX396 YAMAHA
Use of controls or adjustments or performance of procedures other than those specified herein may result in hazardous radiation exposure.
ATTENTION
- To assure the finest performance, please read this manual carefully. Keep it in a safe place for future reference.
- Install your unit in a well ventilated, cool, dry, clean place — away from windows, heat sources, vibration, dust, moisture, or cold. To avoid humming sounds, locate the unit away from other electrical appliances, motors, and transformers. To prevent fire or electrical shock, do not expose to rain and water.
- Be sure to allow at least 10cm of ventilation space at the top, on left, right, and back sides of this unit.
- Do not operate the unit upside-down. It may overheat, possibly causing damage.
- Never open the cabinet. If something drops into the set, contact your dealer.
- Do not use force on switches, knobs or cords.
- When not planning to use this unit for long periods of time (i.e., vacation, etc.), disconnect the AC power plug from the wall outlet.
- Grounding or polarization — Precautions should be taken so that the grounding or polarization of the unit is not defeated.
- Do not clean the unit with chemical solvents; this might damage the finish. Use a clean, dry cloth.
- Be sure to read the "Troubleshooting" section on common operating errors before concluding that your unit is faulty.
- Do not place another component on top of this unit, as damage or discoloration on the surface of the unit may result.
- To prevent damage by lightning, disconnect the power cord from the wall outlet during an electrical storm.
- When disconnecting the power cord from the wall outlet, grasp the plug; do not pull the cord.
- Do not plug the AC power plug to the wall outlet before you finish all connections.
- The voltage to be used must be the same as that specified on this unit. Using this unit with a higher voltage than that which is specified is dangerous and may result in a fire or other type of accident causing damage. YAMAHA will not be held responsible for any damage resulting from use of this unit with a voltage other than that which is specified.
- Sudden temperature changes and storage or operation in an extremely humid environment may cause condensation inside the cabinet.
CAUTION FOR MOVING THE UNIT
Before moving the unit, first remove the disc from the unit, press POWER to turn the unit off, and then disconnect the AC power plug from the wall outlet.
CAUTION
Use of controls or adjustments or performance of procedures other than those specified herein may result in hazardous radiation exposure.

This compact disc player is classified as a CLASS 1 LASER product.
The CLASS 1 LASER PRODUCT label is located on the rear exterior.
Laser component in this product is capable of emitting radiation exceeding the limit for Class 1.
SPECIAL INSTRUCTIONS FOR U.K. MODEL
IMPORTANT:
The wires in the mains lead are coloured in accordance with the following code:
Blue: NEUTRAL
Brown: LIVE
As the colours of the wires in the mains lead of this apparatus may not correspond with the coloured markings identifying the terminals in your plug, proceed as follows: The wire which is coloured BLUE must be connected to the terminal which is marked with the letter N or coloured BLACK. The wire which is coloured BROWN must be connected to the terminal which is marked with the letter L or coloured RED. Making sure that neither core is connected to the earth terminal of the three pin plug.
For U.K. customers
If the socket outlets in the home are not suitable for the plug supplied with this appliance, it should be cut off and an appropriate 3 pin plug fitted. For details, refer to the instructions described above.
Note: The plug severed from the mains lead must be destroyed, as a plug with bared flexible cord is hazardous if engaged in a live socket outlet.
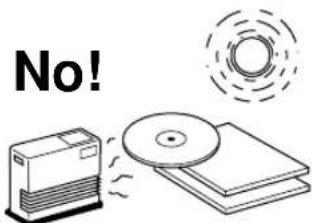
Discs playable with this unit
This compact disc player is designed only for playing compact discs bearing the marks shown below. Never attempt to load any other type of disc into the unit. The unit will also play 8-cm (3-inch) compact discs.

... Compact discs (digital audio)
The most popular discs for commercially available audio CDs.

CD-RW (ReWritable) digital audio discs
The discs repeatedly recordable by using CD recorders for audio recording. Recorded CD-RW discs can be played only with CD players which have the ability to play CD-RW discs.
Notes
- Be sure to use a CD-RW disc made by a reliable manufacture.
- Be sure to use a CD-RW disc which has at least one of the following phrases on the disc or disc case.
FOR CONSUMER FOR CONSUMER USE FOR MUSIC USE ONLY

... CD-TEXT discs
The discs recorded with text data such as album titles, track titles and artist names. These discs can be played with ordinary CD players, however, the text data can be displayed only with CD players which have the ability to display such data.
CDX-596 can display text data recorded on CD-TEXT discs.
Note
This compact disc player may not be able to play some CD-RW discs or discs on which recording was not made correctly.
To prevent a malfunction of this unit:
- Do not use any nonstandard shaped disc (heart etc.) available on the market because it might damage the unit.

- Do not use a disc with tape, seals, or paste on it. If you use such a disc, a disc may get stuck in the unit, or damage to the unit may result.
Notes about handling compact discs
Always handle the disc with care so that its surface is not scratched.
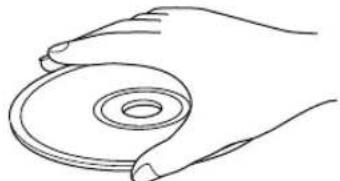
- Compact discs are not subjected to wear during play, but damage to the disc surface when the disc is being handled can adversely affect the disc's play.
- Be sure to use a felt-tip pen or similar writing tool when writing on the label side of the disc. Do not use a ball-point pen, pencil, or other hard-tipped writing tool, as these may damage the disc and may adversely affect the disc's play.
- Do not warp discs.
- When a disc is not currently being used, remove it from the unit and store in an appropriate case.
- When removing or storing a disc, be careful not to scratch the playing surface.
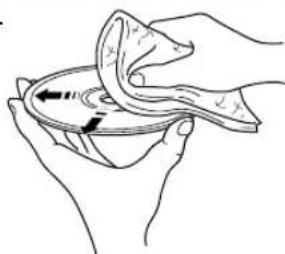
- Compact discs are not affected by small particles of dust or fingerprints on their playing surface, but even so they should be kept clean. Wipe by using a clean, dry cloth. Do not wipe with a circular motion; wipe straight outward from the center.
- Do not try to clean the disc's surface by using any type of disc cleaner, record spray, anti-static spray or liquid, or any other chemical-based liquid because such substances might irreparably damage the disc's surface.
- Do not expose discs to direct sunlight, high temperature or high humidity for a long period of time because these might warp or otherwise damage the disc.
To play an 8-cm CD
Place it in the inner recessed area of the disc tray. Do not put a normal (12-cm) CD on top of an 8-cm CD.
FEATURES
CD-RW (ReWritable) Disc Playability * Refer to page 2 for details.
Program Play
Random-Sequence Play
Single Track/Entire Disc Repeat Play
Automatic Spacing Function
- Track Programming Function Useful for Recording Tracks Fitted onto Any Length of Tape
Automatic Peak Level Search Function
CD Synchronized Recording
Adjustable Display Brightness
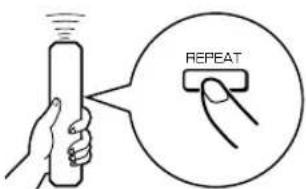
Remote Control Capability
Optical Digital Output
CDX-596 only
Coaxial Digital Output
CD-TEXT Data Display Capability
CONTENTS
CAUTION 1
NOTES ABOUT DISCS 2
FEATURES 3
UNPACKING 4
NOTES ABOUT THE REMOTE
CONTROL 4
CONNECTIONS 5
IDENTIFICATION OF COMPONENTS 6
BASIC OPERATION 8
To pause play 9
To stop play 9
To turn off the power 9
To play directly from the desired track. 9
To skip to the beginning of the desired track (SKIP SEARCH). 10
To advance or reverse play rapidly (MANUAL SEARCH) 10
Other useful functions 11
TRACK PROGRAMMING FOR
RECORDING TO TAPE. 16
Automatic tape-programming 16
Manual tape-programming 18
Random sequential tape-programming..... 19
Automatic searching for the peak level on a disc 20
CD SYNCHRONIZED RECORDING 21
TROUBLESHOOTING 22
SPECIFICATIONS 23
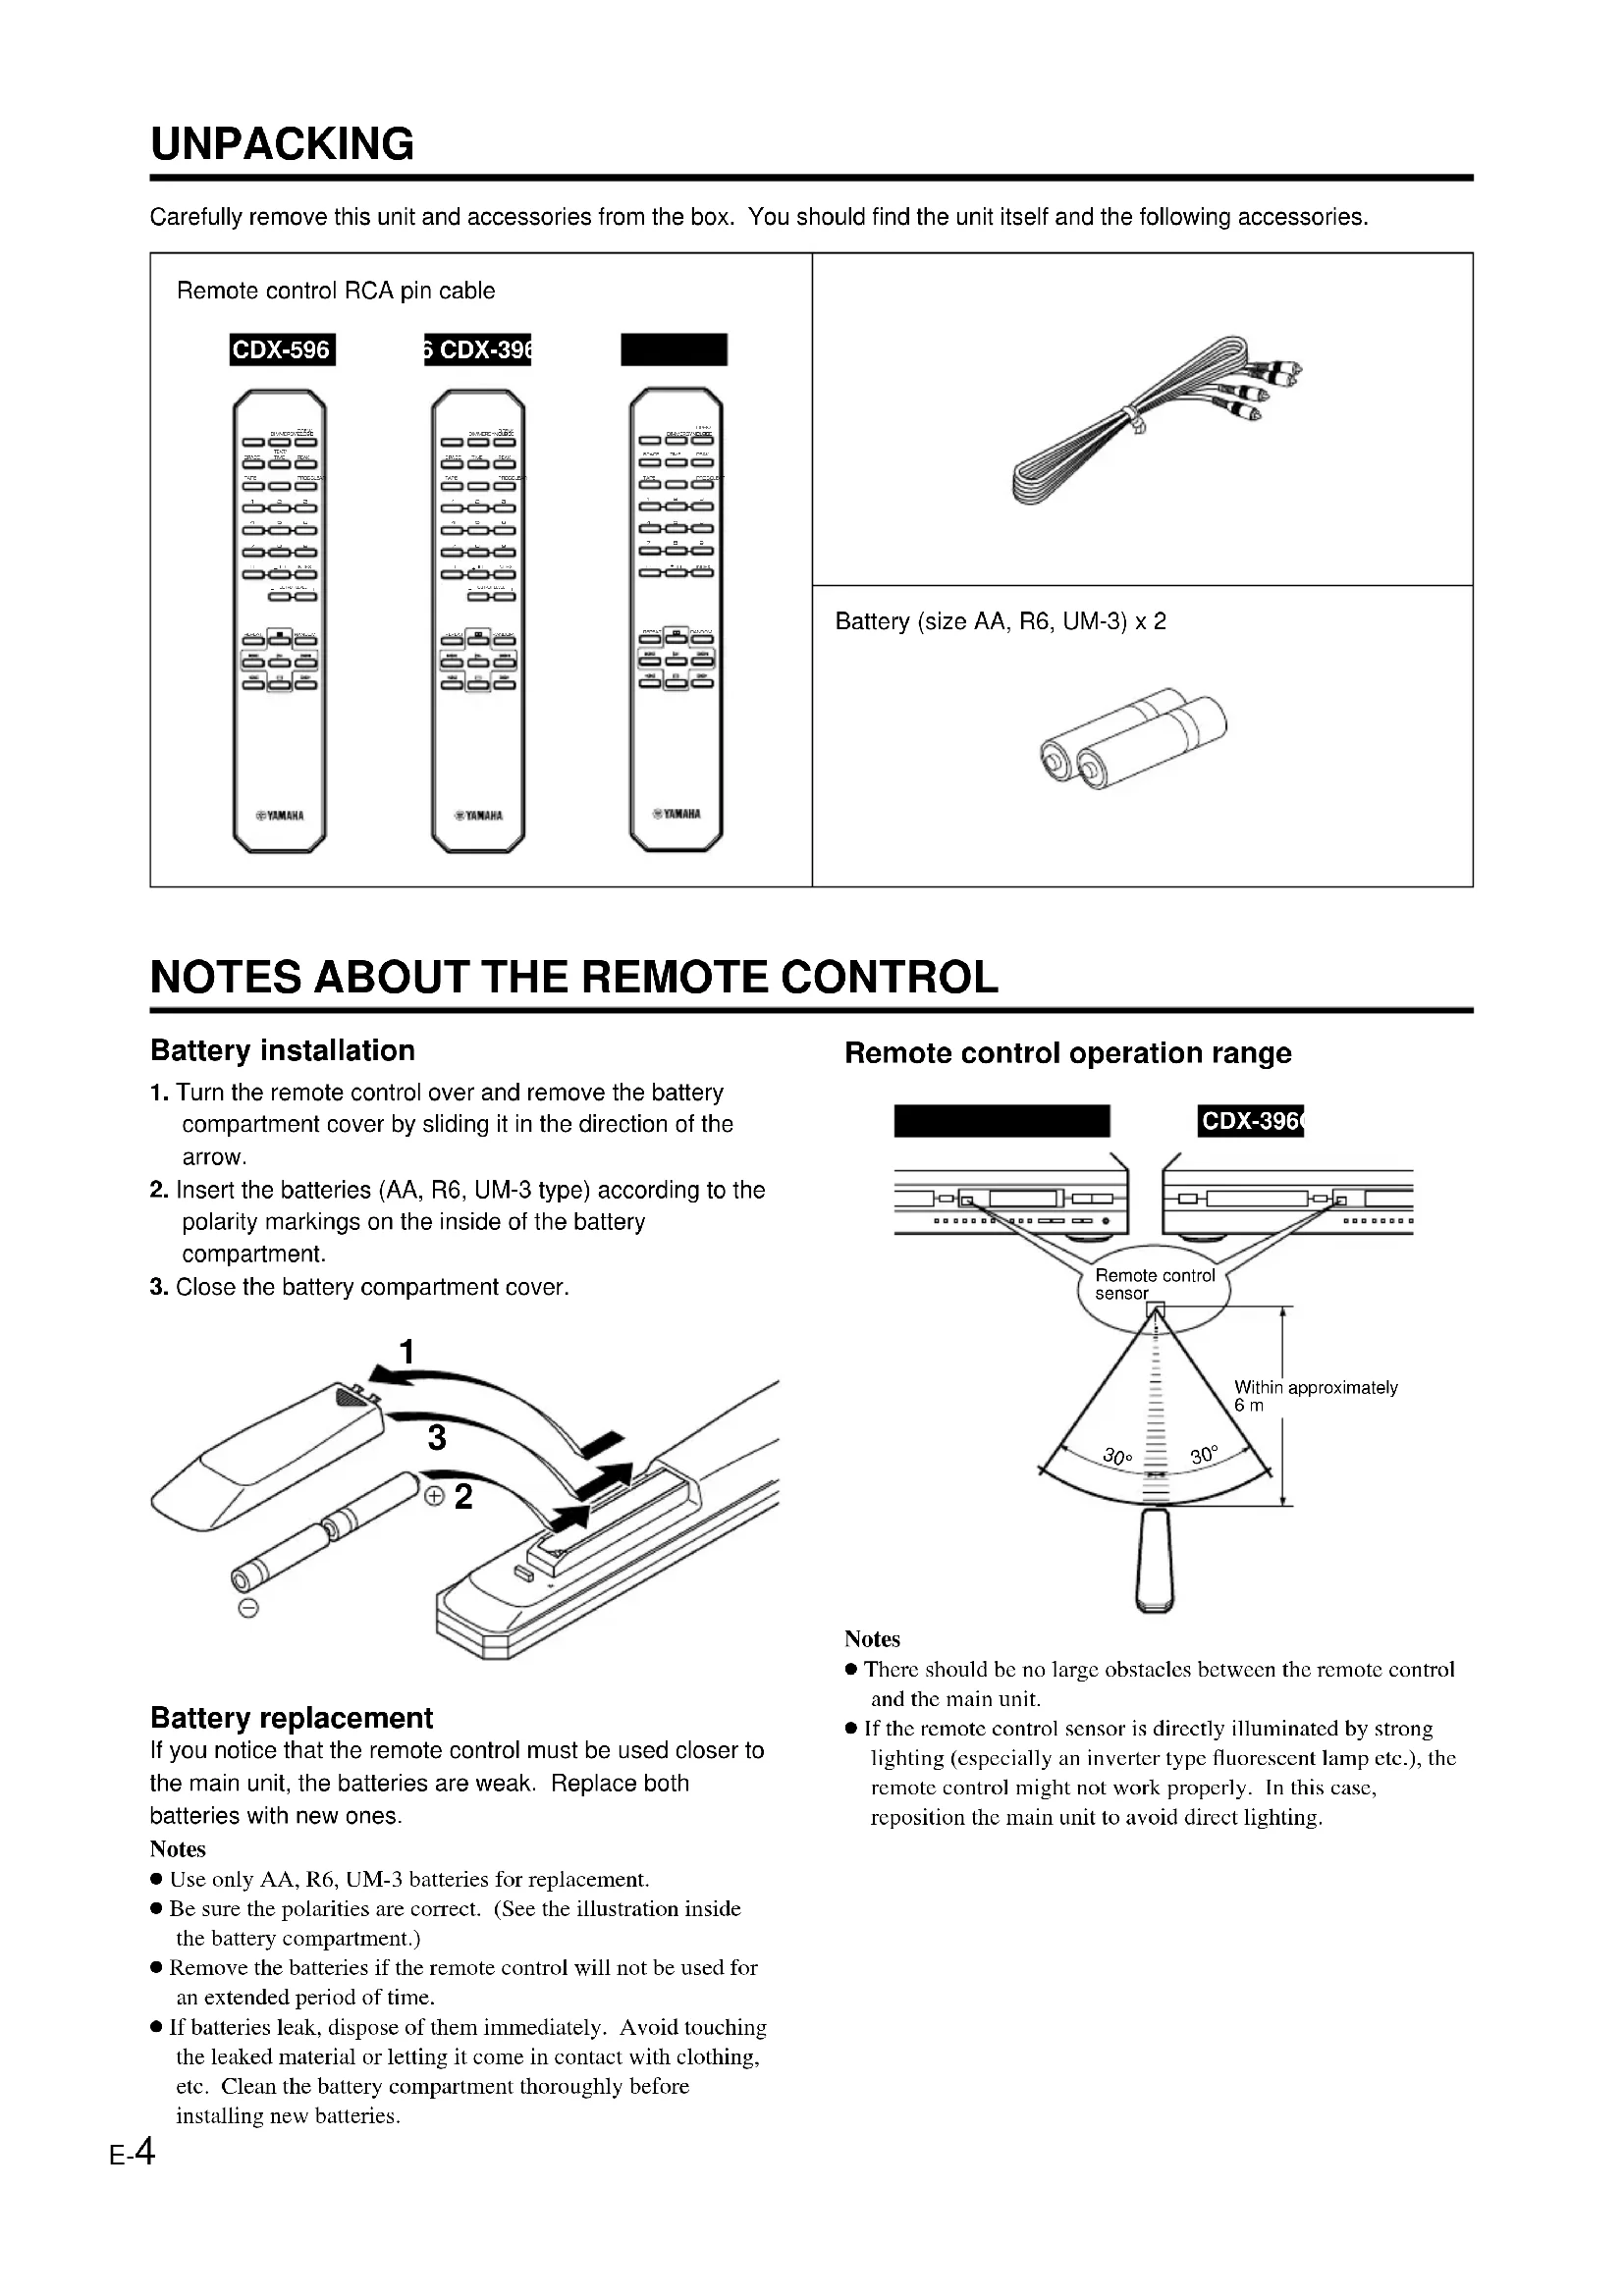
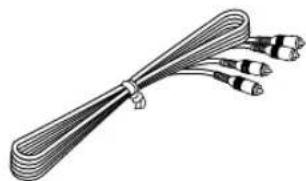
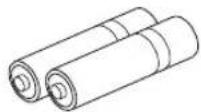
Carefully remove this unit and accessories from the box. You should find the unit itself and the following accessories.
Remote control RCA pin cable
CDX-596
CDX-396
Battery (size AA, R6, UM-3) × 2
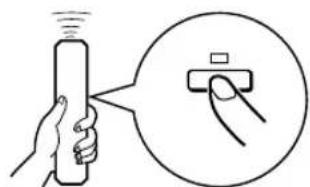
NOTES ABOUT THE REMOTE CONTROL
Battery installation
- Turn the remote control over and remove the battery compartment cover by sliding it in the direction of the arrow.
- Insert the batteries (AA, R6, UM-3 type) according to the polarity markings on the inside of the battery compartment.
- Close the battery compartment cover.
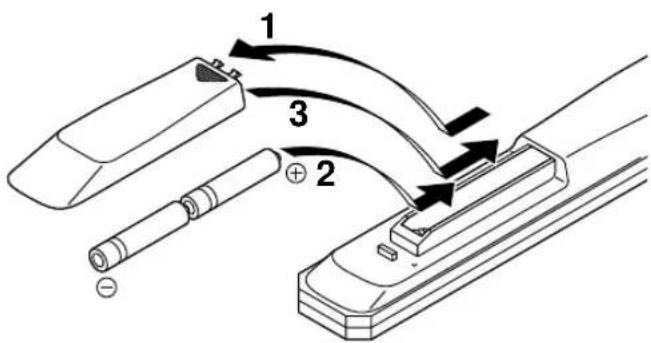
Battery replacement
If you notice that the remote control must be used closer to the main unit, the batteries are weak. Replace both batteries with new ones.
Notes
- Use only AA, R6, UM-3 batteries for replacement.
- Be sure the polarities are correct. (See the illustration inside the battery compartment.)
- Remove the batteries if the remote control will not be used for an extended period of time.
- If batteries leak, dispose of them immediately. Avoid touching the leaked material or letting it come in contact with clothing, etc. Clean the battery compartment thoroughly before installing new batteries.
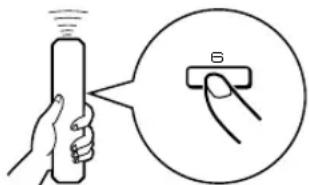
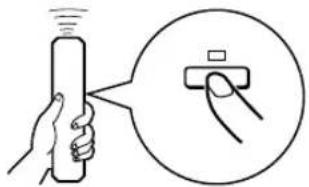
Remote control operation range
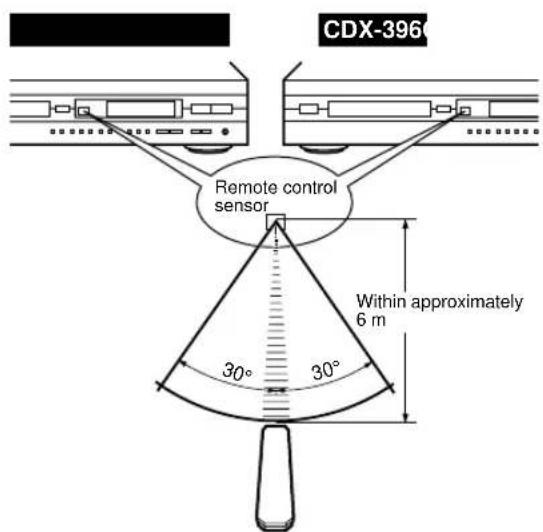
Notes
- There should be no large obstacles between the remote control and the main unit.
- If the remote control sensor is directly illuminated by strong lighting (especially an inverter type fluorescent lamp etc.), the remote control might not work properly. In this case, reposition the main unit to avoid direct lighting.
CONNECTIONS
- Before making any connection, switch OFF the power to the unit and the amplifier or other component.
-
Connections should be made to the correct input terminals of the amplifier or another component.
-
If the placement of this unit causes noise to another equipment, such as a tuner, separate them from each other.
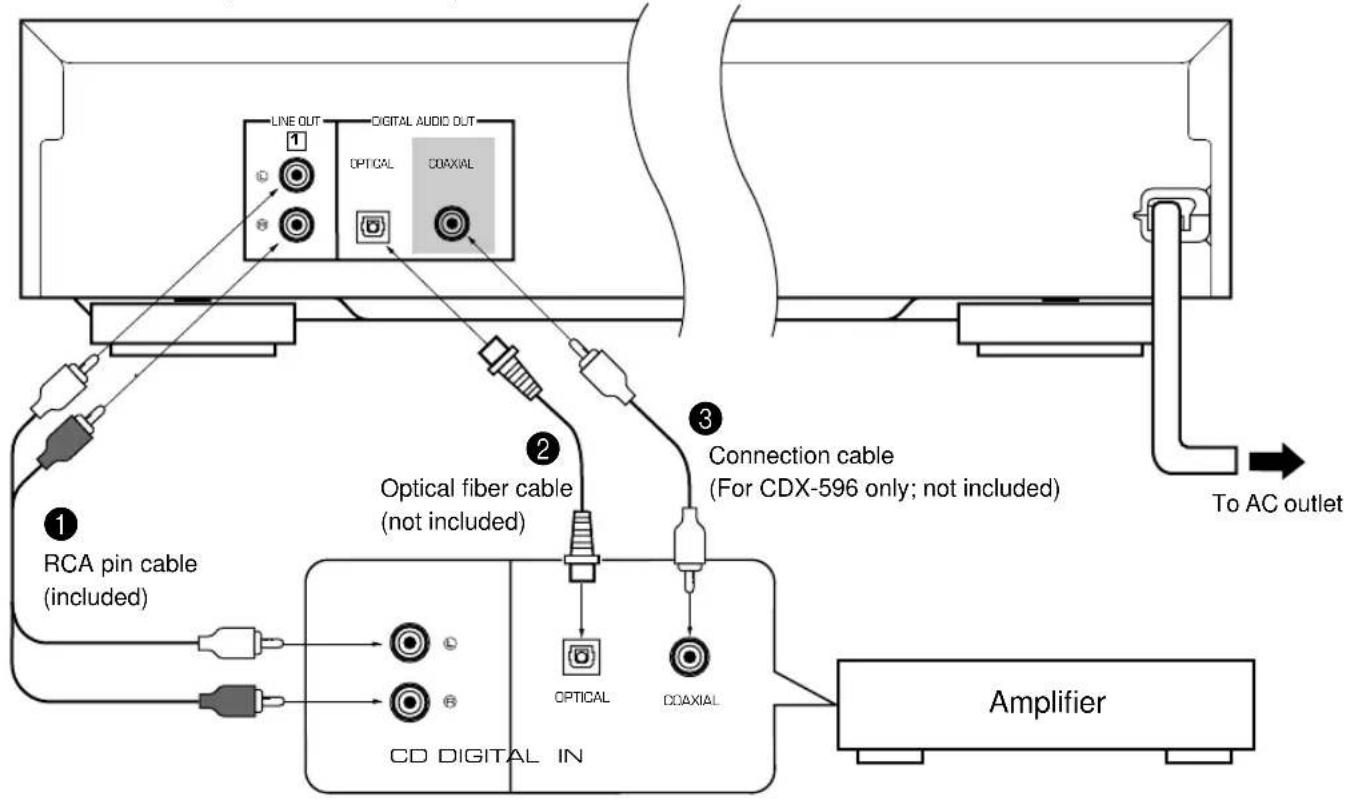
The shaded part ( ) is provided for CDX-596 only.
To connect this unit to your amplifier, choose one of the ways listed below.
When the LINE OUT (analog) terminals of this unit are used ( 1 )
Connect these terminals to the "CD" (or "AUX") terminals of the amplifier. For additional details concerning these connections, refer to the operation instructions of the amplifier being used.
- Be sure that the left ("L") and right ("R") of these terminals are connected to the corresponding (left and right) terminals of the amplifier or another component.
CDX-596 and CDX-496 only
- The level of signals output from any of these terminals into an amplifier can be adjusted by using the - OUTPUT LEVEL + buttons.
- When using the DIGITAL AUDIO OUT (OPTICAL or COAXIAL) terminal, set the level of signals output into an amplifier to max. by using the - OUTPUT LEVEL + buttons.
When the DIGITAL AUDIO OUT (OPTICAL) terminal of this unit is used (2)
- Before using this terminal, pull out the terminal's cover.
-
Make the connection from this terminal to the optical input terminal of an amplifier by using a commercially available optical fiber cable.
-
Use an optical fiber cable that conforms to EIAJ standards. Other cables might not function correctly.
-
Be sure to attach the terminal's cover when this terminal is not being used, in order to protect the terminal from dust.
- This terminal can also be connected to the optical input terminal of an MD recorder etc. to record CD onto MD directly.
When the DIGITAL AUDIO OUT (COAXIAL) terminal of this unit is used ( 3 ) CDX-596 only
Make the connection from this terminal to the digital input terminal of an amplifier by using a connection cable.
IDENTIFICATION OF COMPONENTS
( ) indicates the page number on which the controls are best described.
FRONT PANEL
-
The control functions on the main unit and on the remote control are virtually identical, with the exceptions below.
-
( 1 - 2) / on the main unit has both the functions of delay) and (pause) on the remote control.
- SKIP/SEARCH on the main unit has both the functions of skip and / (search) the remote control.
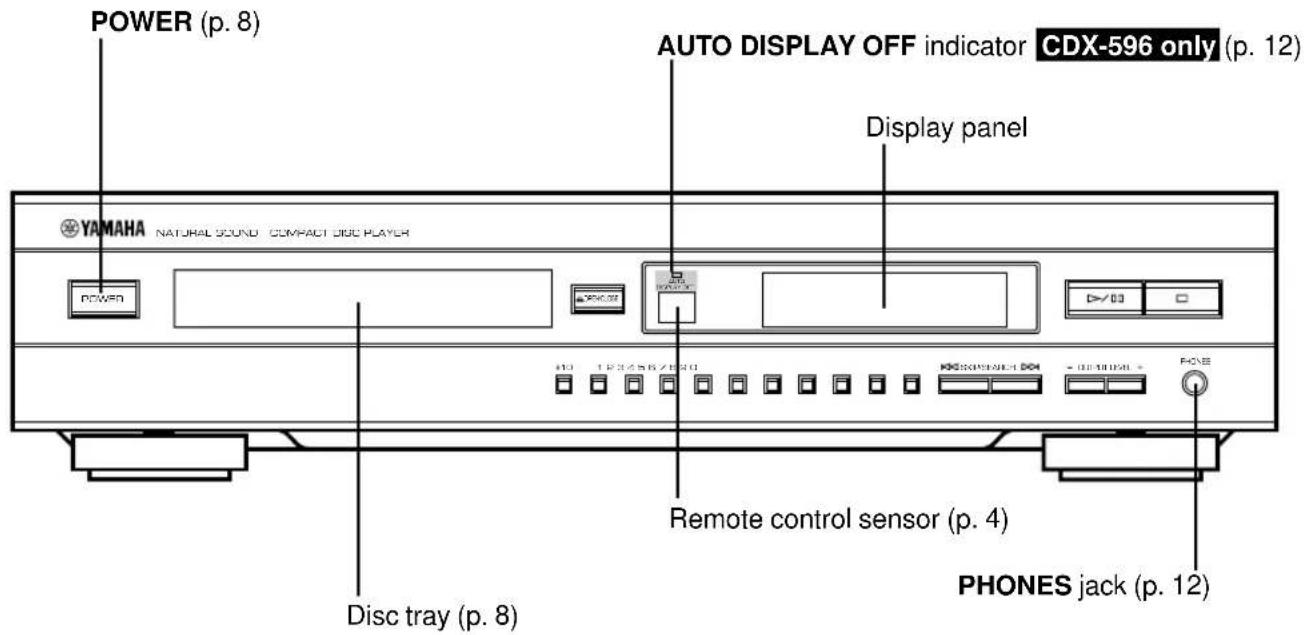
CDX-596, CDX-496
The shaded part ( ) is provided for CDX-596 only.
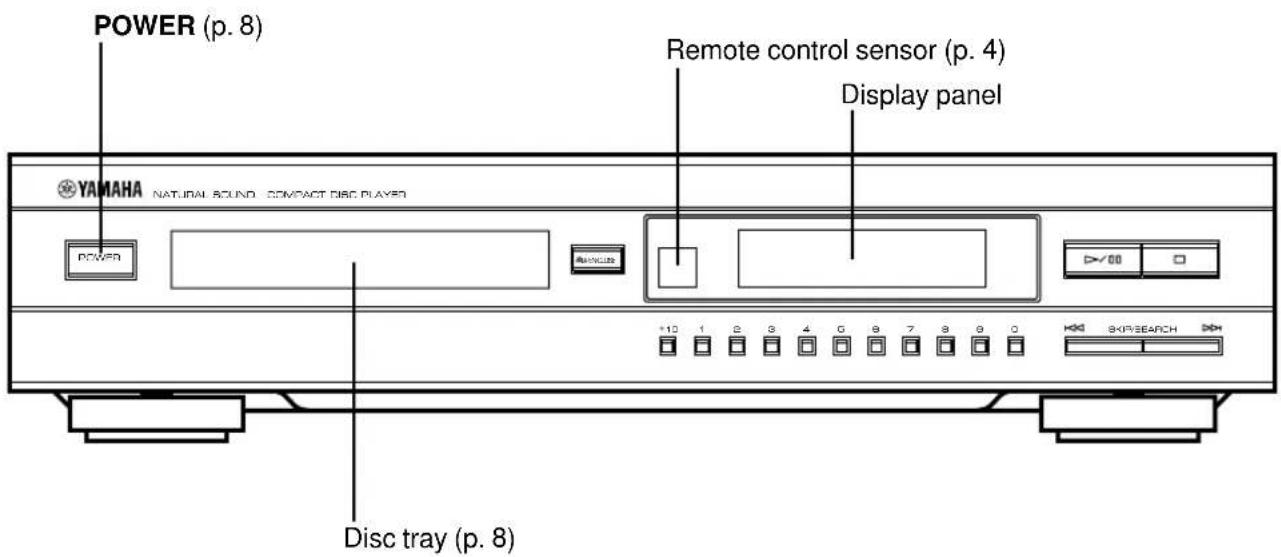
CDX-396
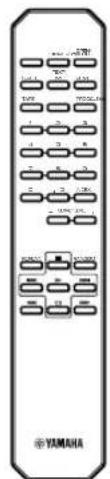
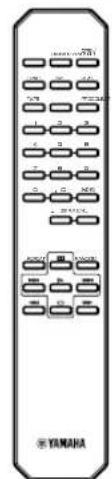
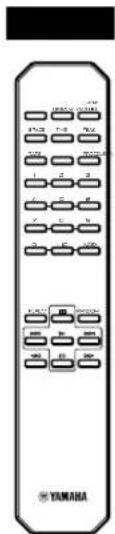
REMOTE CONTROL
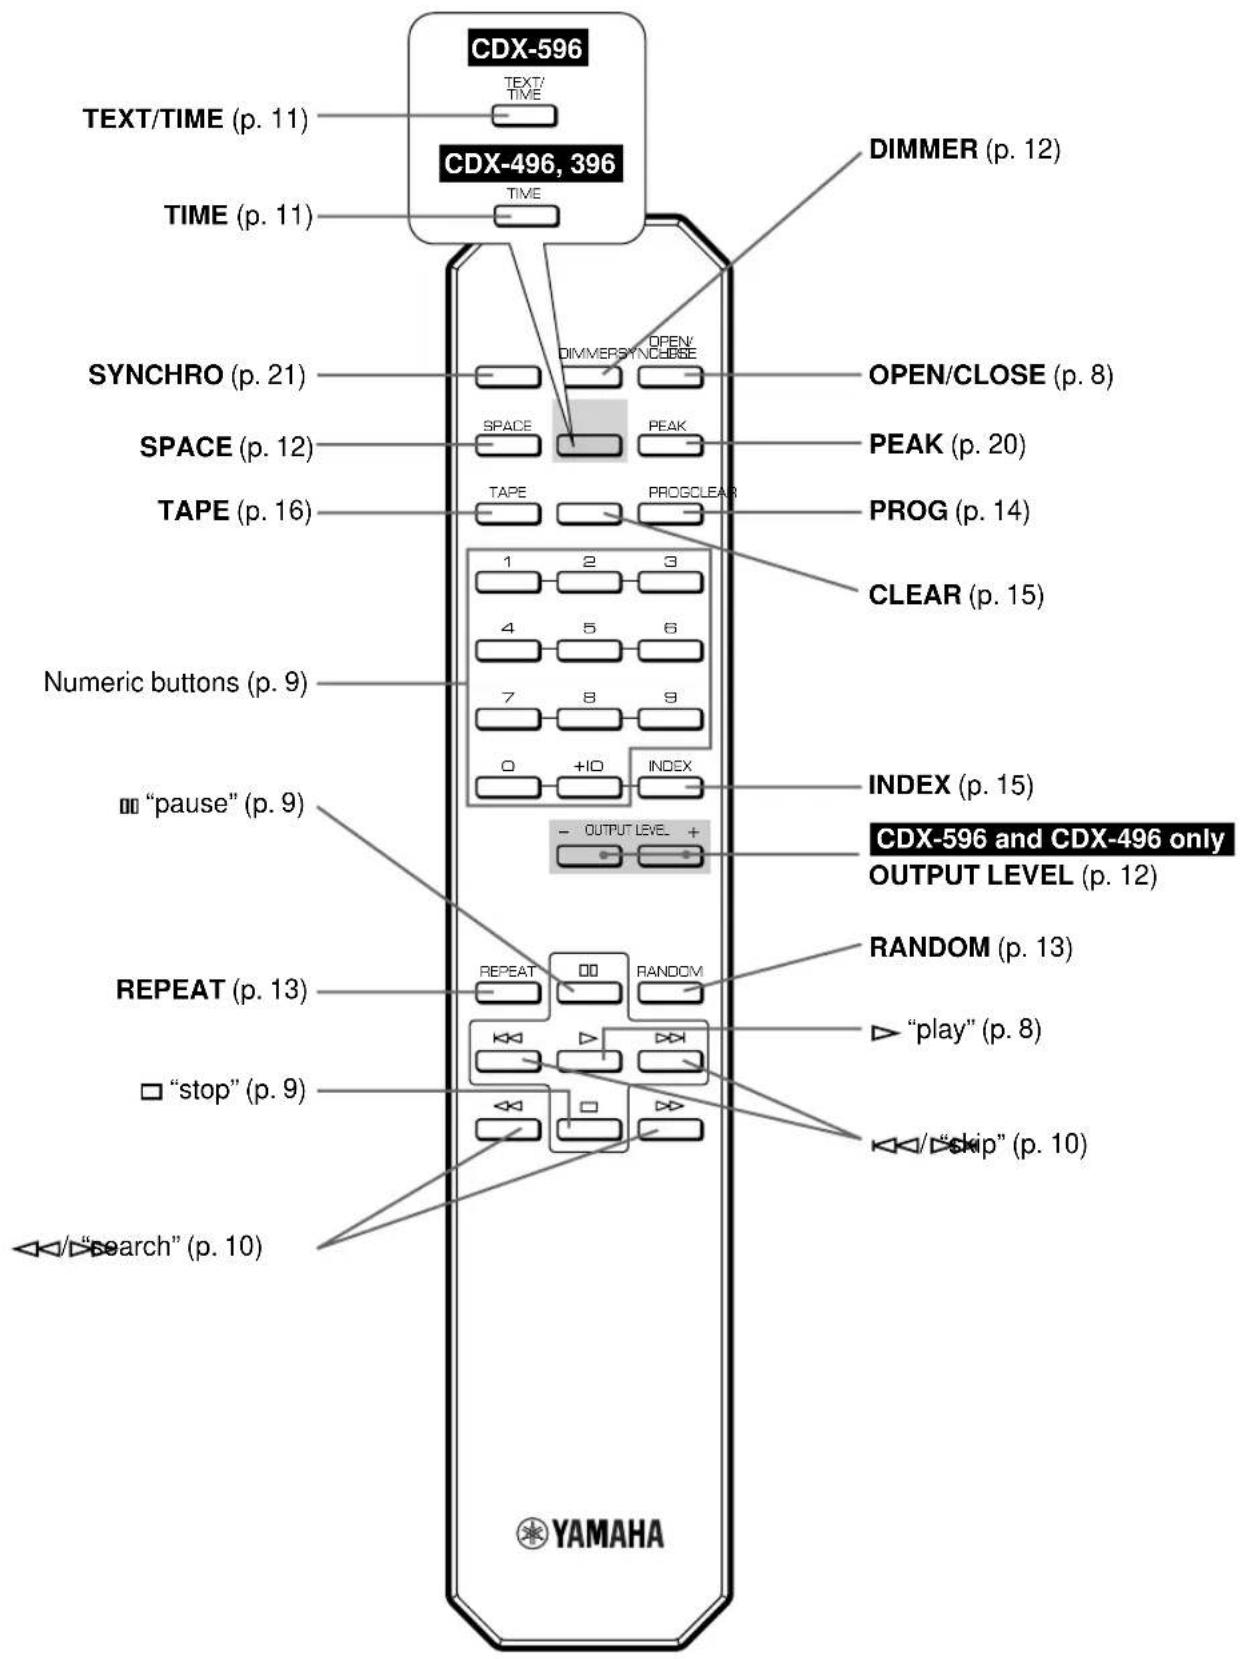
The shaded parts ( ) vary between models.
This manual describes how to operate this unit by using the remote control. To operate this unit from the front panel, use the corresponding buttons on the front panel.
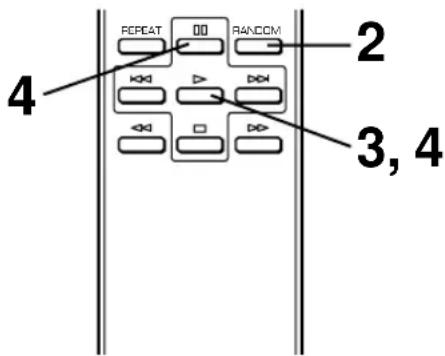
BASIC OPERATION

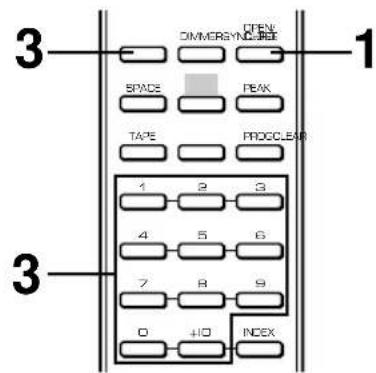
1 Press POWER to turn on the power.

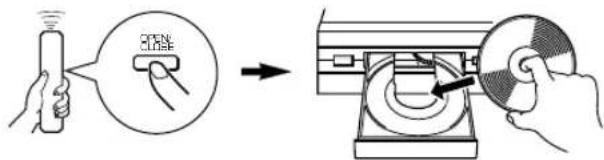
2 Press OPEN/CLOSE to open the disc tray, and load a disc.
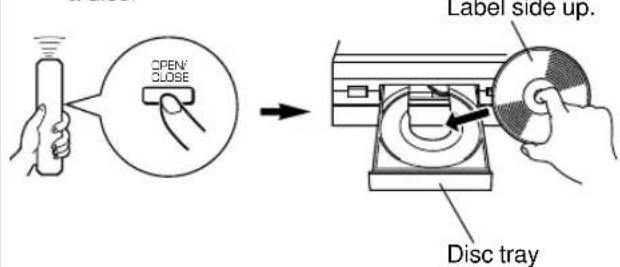
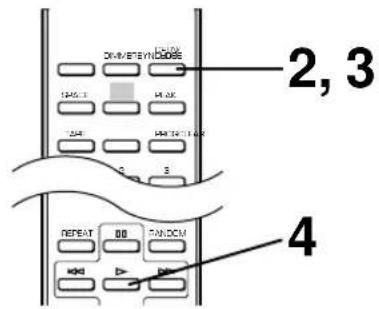
3 Press OPEN/CLOSE to close the disc tray.

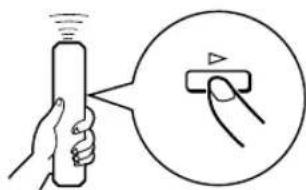
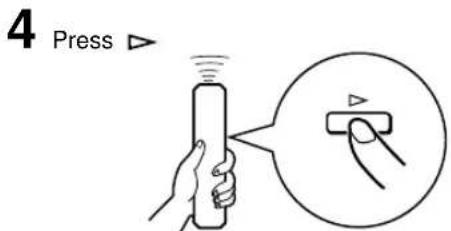
4 Press ) to begin play.
Play will begin from the first track of the disc.
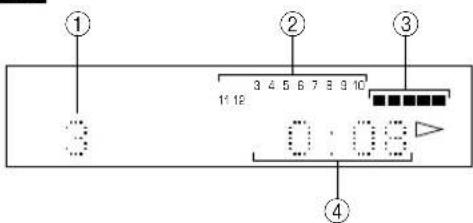
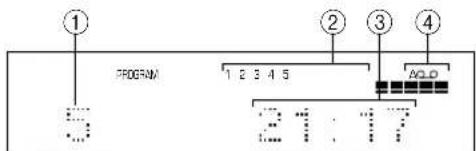
Display information
CDX-596
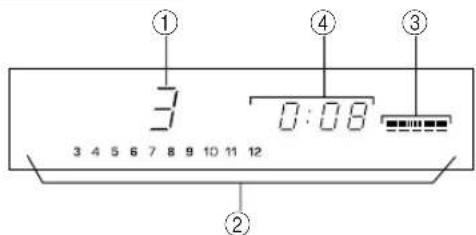
CDX-496, CDX-396
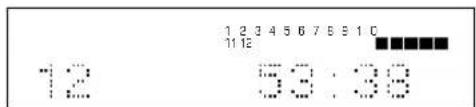
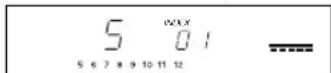
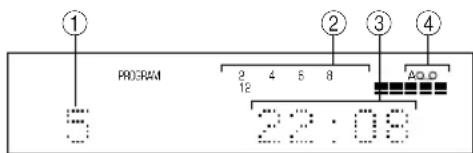
① Shows the track number selected or being played.
② Displays the numbers that correspond to the numbers of tracks (as high as number 20) on the disc. After each track is played, its corresponding number disappears so the number of remaining tracks (and their numbers) can be seen at a glance.
CDX-596 and CDX-496 only
Shows the level of signals output into an amplifier or the headache level adjusted by pressing- OUTPUT LEVEL+.
④ Shows the time displays. (Refer to "Changing displays" on page 11.)
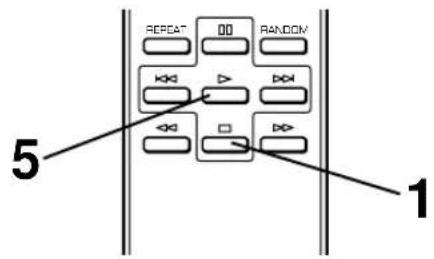
To pause play
Press

To resume play, press again (or press
- front panel can also be used to stop play temporarily or to resume play.
To stop play
Press
To turn off the power
Press POWER again.
- If you turn on the power again with a disc still on the tray, the disc starts playing automatically from the first track.
To play directly from the desired track
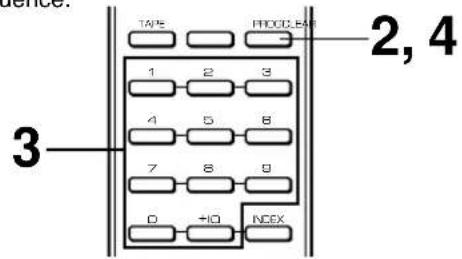
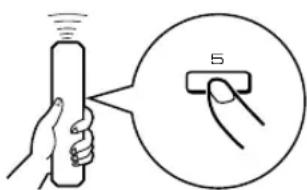
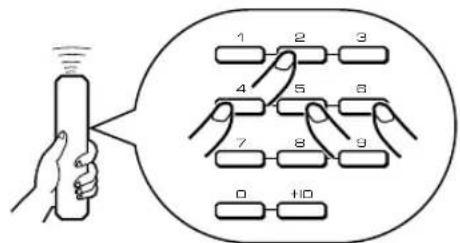
Select a desired track by using the numeric buttons.
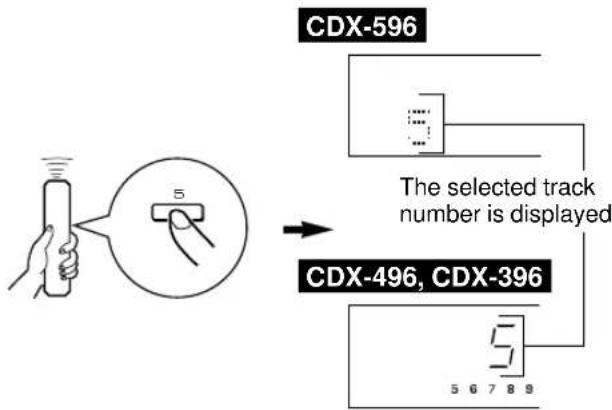
To select track number 10 or higher
Press +10 to select the first digit and then press a numeric button (1 - 0) to select the second digit.
Example: To select track 25
Press +10 twice, then immediately press 5 once.

- If a track number higher than the highest track number on the disc is selected, the last track on the disc will be played.
Notes
After closing the disc tray by pressing OPEN/CLOSE, the display shows the total number of tracks and the total recorded time of the disc for a few seconds.
CDX-596
CDX-496, CDX-396
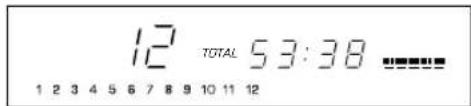
- Additionally, you can close the disc tray by pressing D
- (D) numeric button or RANDOM, or by pressing the front edge of the disc tray gently. If the tray is closed in one of these ways, play will begin automatically; however, the display will not show the total number of tracks nor the total recorded time of the disc.
CDX-596 only
If you load a CD-TEXT disc, the display also shows the disc title after showing the total number of tracks and the total recorded time of the disc.
Caution
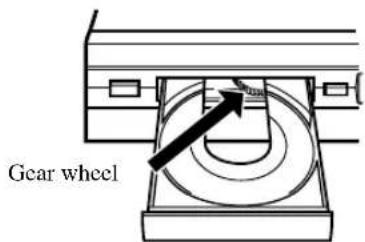
When the disc tray is open, do not touch the inside gear wheel. If you touch the gear wheel, your finger may be caught in the closing tray and injured.
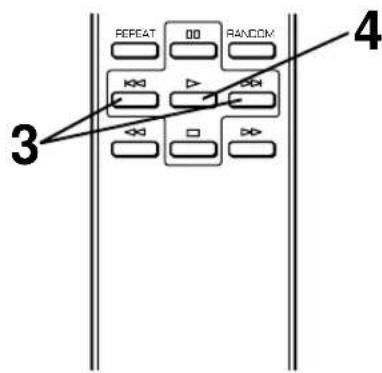
To skip to the beginning of the desired track (SKIP SEARCH)
To play from the beginning of the next track
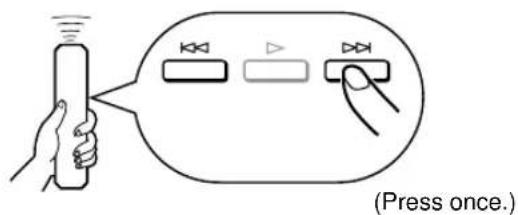
To play from the beginning of the current track
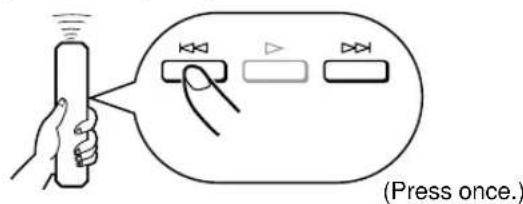
To play from the beginning of the preceding track
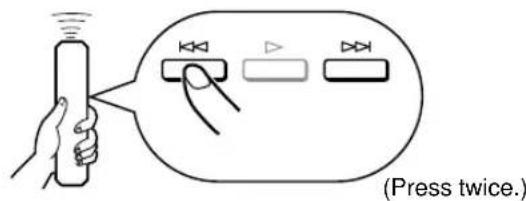
These operations can also be performed when the unit is paused or stopped.
- When using on the remote control: If 品 _ 品 ) is pressed and held, the track number is continuously changed to higher numbers (or lower numbers).
- When using SKP/SEARCH on the front panel: Be careful not to press and hold the button, otherwise the selected track is played forward (or backward) rapidly.
To advance or reverse play rapidly (MANUAL SEARCH)
To advance rapidly
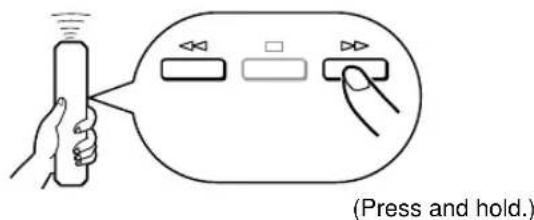
To reverse rapidly
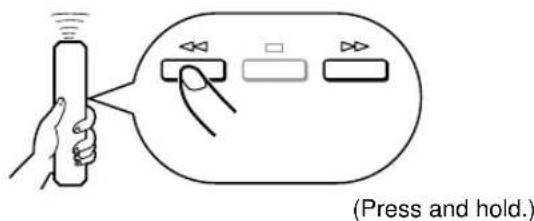
The sound can be heard (although slightly garbled) during manual search in either direction. This is convenient for locating a precise position within a track, or for reviewing the contents quickly.
- Manual search can also be performed while disc play is paused, though no sound will be heard.
- When using SKP/SEARCH on the front panel:
Be careful not to release the button just after it is pressed, otherwise the play is skipped to the beginning of the next track or returned to the beginning of the current track.
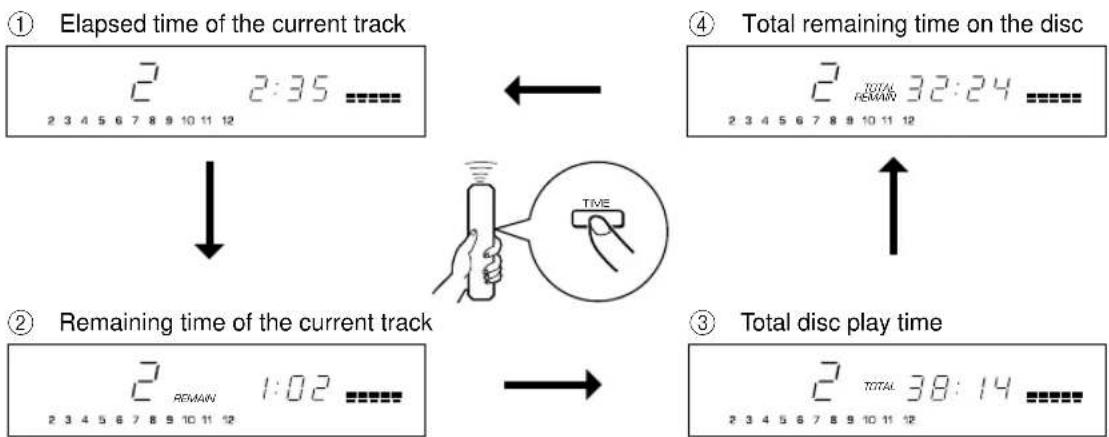
Changing displays
CDX-596
You can select any of the four time displays (① - ④) by pressing TEXT/TIME. When you play a CD-TEXT disc, the disc title, artist name, and track name (⑤ - ⑦) are also displayed.
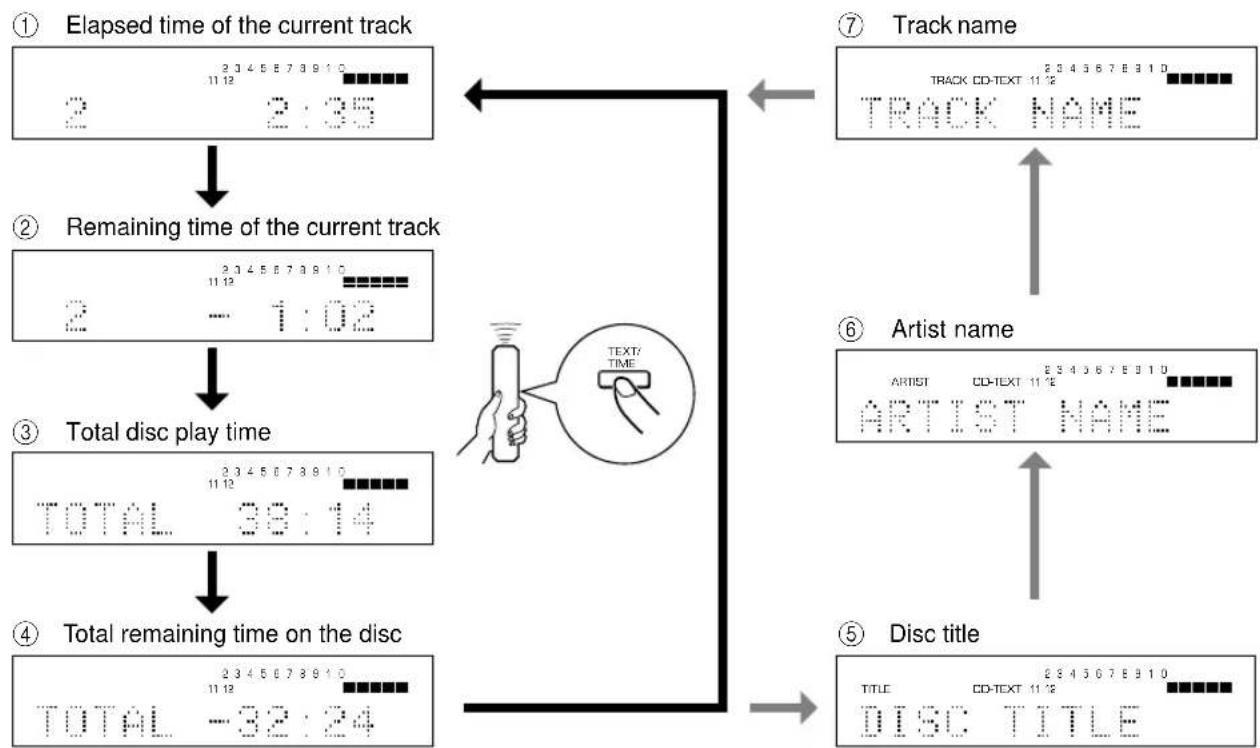
Notes
The disc title, artist name, or track name may not be displayed with some CD-TEXT discs. In that case, “(NO ENTRY)” appears on the display.
- When playing a CD-TEXT disc, "CD-TEXT" also lights up on displays ① - ④.
CDX-496 and CDX-396
You can select any of the four time displays by pressing TIME.
Changing brightness of the display
CDX-596
You can change the brightness of the display (or turn off the illumination) by pressing DIMMER.

During play
- While the display illumination is off, the AUTO DISPLAY OFF indicator on the front panel lights up.
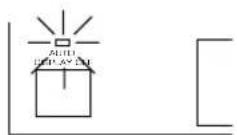
- The AUTO DISPLAY OFF indicator lights up. If a disc is played in this state, the display illumination will be turned off.
CDX-496, CDX-396
If desired, you can change brightness of the display in three degrees by pressing DIMMER.

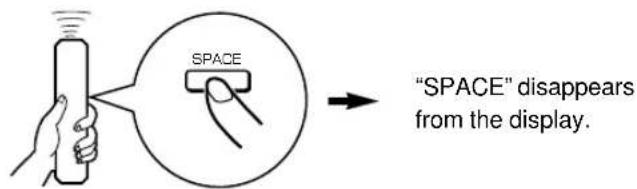
Automatic spacing
If you record a disc onto tape with an insufficient time space between tracks, the tape deck will not be able to perform blank search operations on the tape correctly. To prevent such a search mistake of the deck, press SPACE and light up "SPACE" on the display before recording. Spaces of about 4 seconds are inserted between the tracks.

Note
When the automatic spacing function is in effect, the display of the total time and of the total remaining time will include each of the 4 second intervals placed between tracks.
To cancel the automatic spacing function Press SPACE.
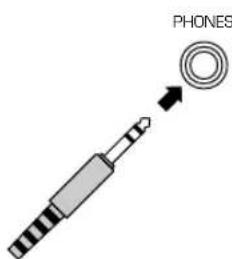
Adjusting the level of signals output to the amplifier and the headphone listening level CDX-596 and CDX-496 only
You can adjust the level of signals output to the amplifier by pressing - OUTPUT LEVEL +.
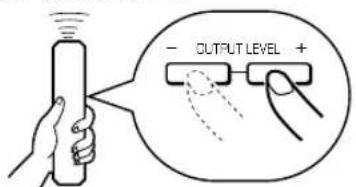
When you listen with headphones, connect the headphones to the PHONES jack and adjust the volume by pressing -OUTPUT LEVEL+. At that time, note that this adjustment will also vary the signal level output to the amplifier.
The unit can play the tracks on a disc in a random sequence.
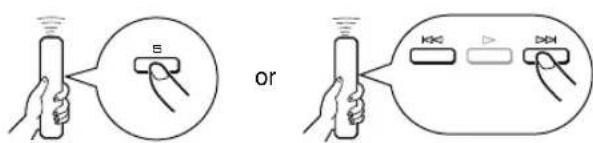
To perform random-sequence play Press RANDOM.
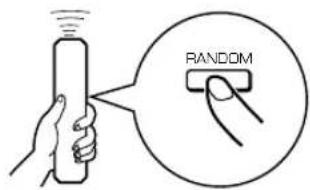
To cancel random-sequence play Press RANDOM.

Notes
- This feature will not function while programming, or during programmed play.
- If (SKIP/SEARCH) is pressed during random-sequence play, the next randomly programmed track will be played. If (SKIP/SEARCH) is pressed, play will return to the beginning of the current track.
Thisindication appears while the unit is mixing up tracks. - Total remaining time on the disc will not be displayed during random-sequence play.
CDX-596 and CDX-496 only
If the power is switched off during random-sequence play, pressing POWER again to turn on the unit will automatically restore random-sequence play.
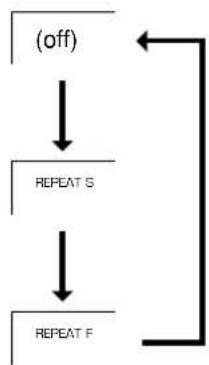
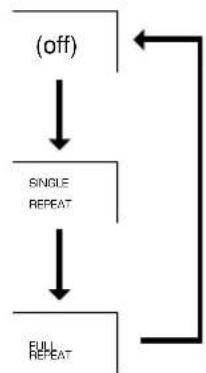
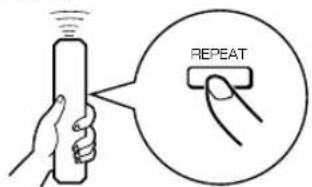
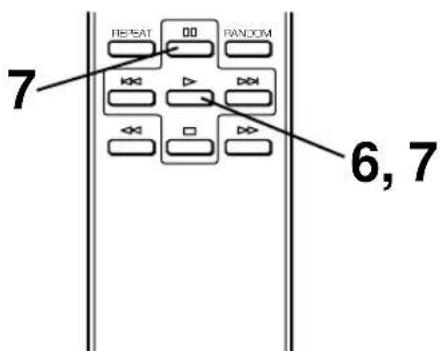
REPEAT PLAY
You can play any desired track or the entire disc repeatedly by pressing REPEAT. The repeat play mode will change whenever you press REPEAT.
CDX-596
CDX-496.CDX-396
SINGLE REPEAT (S)
A single track is played repeatedly.
- This also works for programmed play and random-sequence play. (If repeat play is switched off, programmed play or random-sequence play will be resumed.)
FULL REPEAT (F)
All tracks (the entire disc) are played repeatedly.
- During programmed play, all programmed tracks are played repeatedly.
- During random-sequence play, all randomly sequenced tracks are played repeatedly in the same order.
CDX-596 and CDX-496 only
If the power is switched off during FULL REPEAT play, pressing POWER again to turn on the unit will automatically restore FULL REPEAT play.
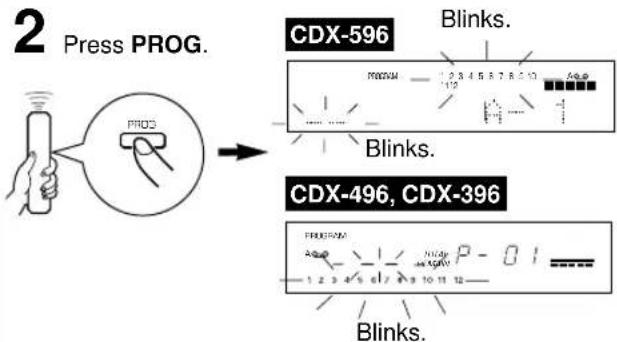
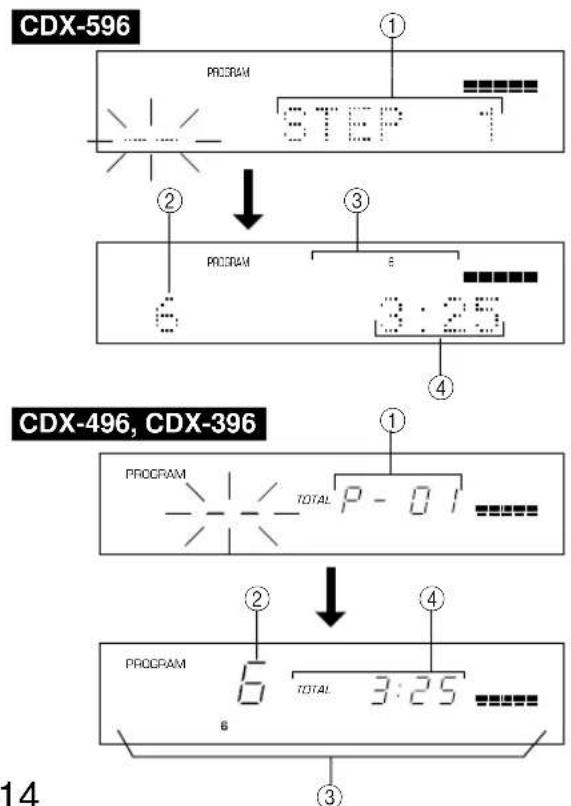
PROGRAM PLAY
You can enjoy listening to your favorite tracks in any desired order by programming tracks. As many as 40 tracks can be programmed in sequence.
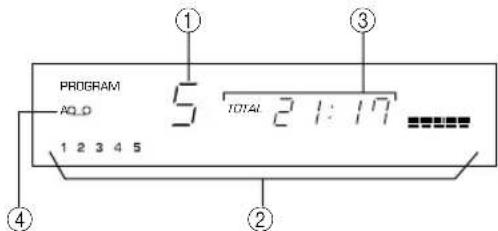
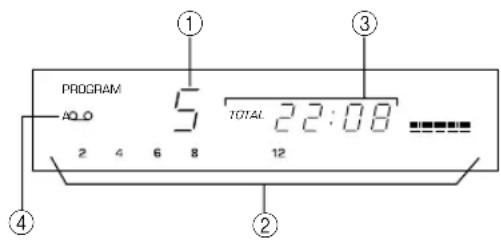
Display information during programming
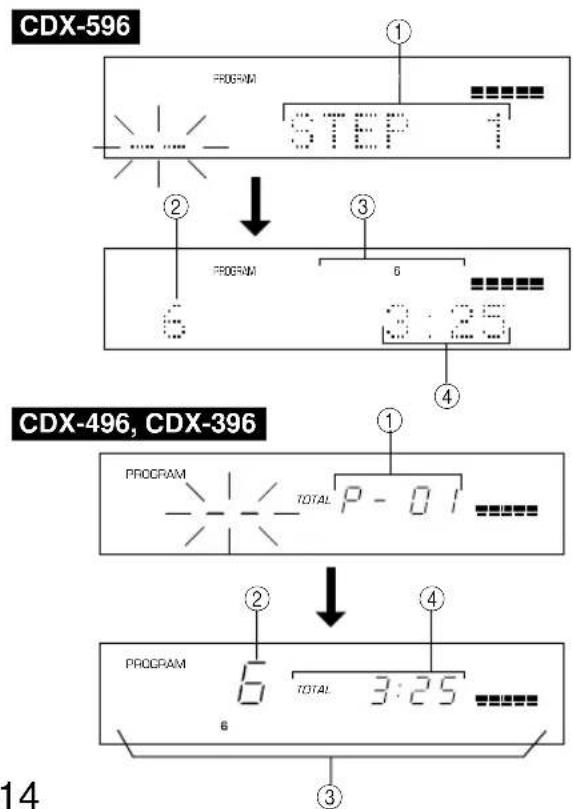
① Shows the program number for the track to be programmed next.
② Shows the selected track number.
③ Shows only the numbers of programmed tracks.
④ Shows the total time of the tracks currently programmed.
- If the total time becomes 100 minutes or more, the first digit will not be displayed.
Notes
- If, during programming, TIME is pressed, the program number display can be changed to display the total time of the programmed tracks. To return to the previous display, press TIME once again.
- SKIP/SEARCH can be used during playing, but only within the range of the programmed tracks.
- SKIP/SEARCH can be used during playing to search all tracks, including unprogrammed tracks.
To stop program play
Press The first programmed track number will be displayed.
To resume play, press Play will begin from the beginning of the program.
To clear program data
There are several methods, as described below.
- Press CLEAR while the unit is stopped.
- Open the disc tray.
- Switch off the power.
To check program data
- If during program play, press .□
- Press PROG.
- Each time (SKIP/SEARCH) is pressed, the track numbers and sequential order of the programmed tracks can be checked one after another. The display of the track number can be returned (sequentially in reverse order) by pressing (SKIP/SEARCH).
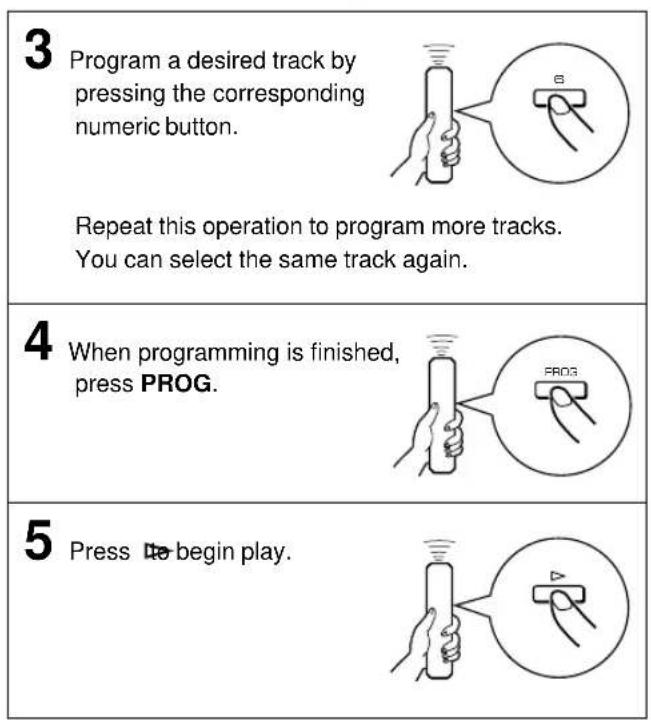
To correct program data
- Follow the procedure described in "To check program data".
- Display the track number to be corrected by pressing
- Press a numeric button to select a desired track to replace the one displayed. The previously programmed track will be cleared from the memory, and the new one will be programmed.
- Press PROG to complete the correction. To begin play immediately after making the correction, press instead of pressing PROG.
INDEX SEARCH
If the disc includes index numbers, play can be started from any desired index number.
1 Press a numeric button to select a track which has index numbers.
2 Press INDEX.

CDX-596
112 1
CDX-496, CDX-396
3 Press a numeric button to select the desired index number.
To cancel the index search function
Press INDEX.
Notes
- Not all discs have index numbers. In addition, among those discs which have index numbers, not all discs necessarily have more than one index number.
The index system is a method for sub-dividing tracks into smaller divisions for easier location of those parts. The liner notes contained in the disc case usually tell that such index numbers are included with the [mik] - If an index number is selected that is higher than any index number on that disc, play will start from the last index point on the disc.
- For some discs, play may begin slightly prior to the actual designated index point.
- If the disc has no encoded index points, play will begin from the beginning of the selected track.
The index number can be designated only while "INDEX" is illuminated.
TRACK PROGRAMMING FOR RECORDING TO TAPE
The unit can program tracks on a disc for recording onto tape. By considering the tape's total possible recording time, the unit will automatically program tracks or help you program tracks so they will fit onto the tape with the least amount of unrecorded space at each end of the tape.
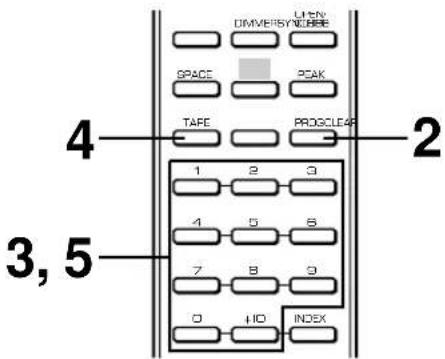
Automatic tape-programming
The unit will automatically program tracks on a disc with their original order.
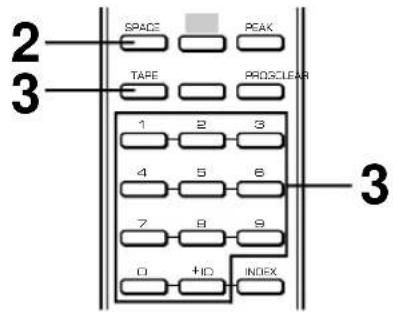
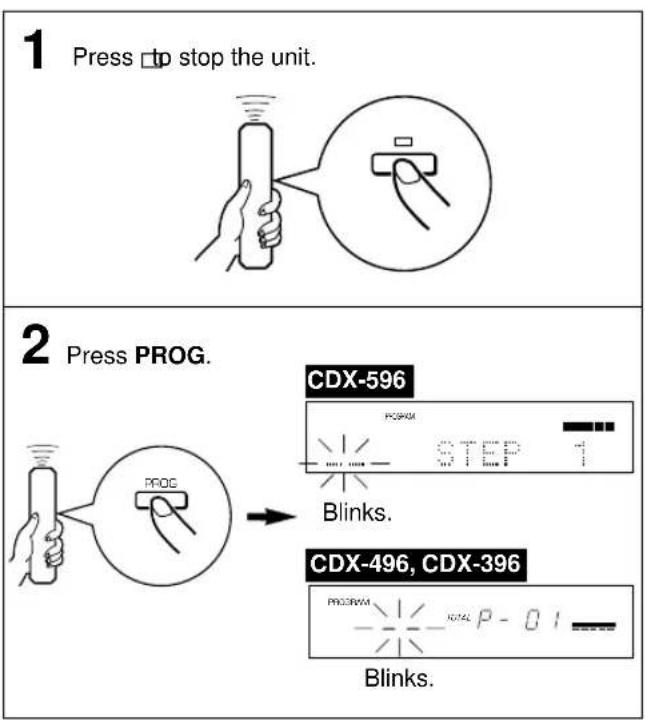
1 Press stop the unit.
- The peak level search function of this unit is useful for adjusting recording level on the tape deck. (Refer to page 20.)
2 If desired, you can automatically insert additional time space between tracks by pressing SPACE to light up "SPACE" on the display. (Refer to page 12.)

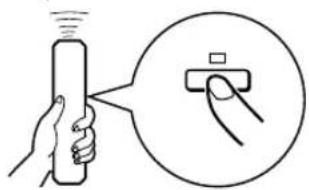
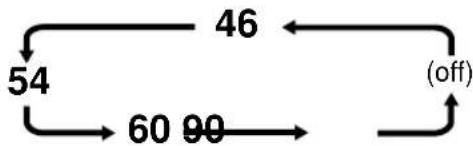
3 Press TAPE to show the tape's total possible recording time on the display.
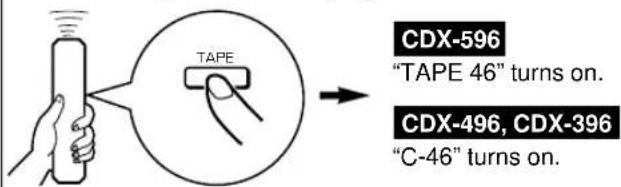
You can select any of the four tape lengths by pressing TAPE.
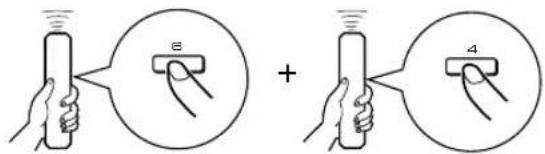
If desired, you can also enter the tape's total possible recording time manually.
Example: For a C-64 tape (32 minutes on each side), press "6" and "4".
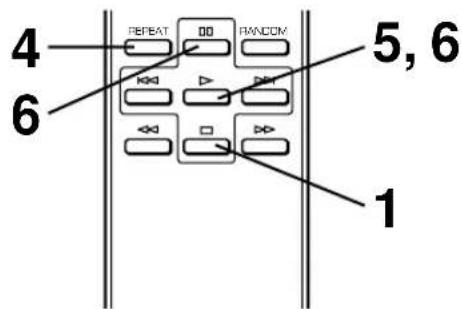
4 Press REPEAT.
The unit automatically programs tracks for both side A and side B considering the tape's total time.
5 Begin recording on the tape deck, and then press on this unit.
6 The unit will pause at the end of side A of the tape. Turn the tape over to side B. Resume recording, and then press on this unit.
Notes
In step 4, you can check the program data for side A and side B.
CDX-596
CDX-496, CDX-396
① Shows the number of tracks programmed on each side right after the programming is finished. It is then replaced by the number of the first programmed track on side A.
② Shows the programmed track numbers on each side.
③ Shows the total time of programmed tracks on each side.
④ Shows the side of the tape.
- All tracks may not be programmed if the tape's length is not enough. To program all tracks, use a tape that is longer than the actual playing time.
- To check, cancel or correct program data, refer to page 15.
- When checking program data, note that "PAUSE" or "Pu" appears between track numbers for side A and side B.
- Up to 40 tracks can be programmed. A pause inserted between side A and B is counted as one track.
- CD synchronized recording function can be used if your tape deck is compatible with it. If so, in step 5 and 6, press SYNCHRO and then press this unit's remote control. Recording automatically begins. (For details, refer to page 21.)
Manual tape-programming
This is for recording desired tracks in any order onto a tape.
1 Follow steps 1-3 on page 16.
5 Use numeric buttons to select the track numbers (to be recorded on side B) in any order.
3 Use numeric buttons to select desired tracks (to be recorded on side A) in any order.
6 Begin recording on the tape deck, and then press on this unit.
The unit will pause at the end of side A of the tape. Turn the tape over to side B. Resume recording, and then press D or this unit.
Notes
- If, in step 3 or 5, "ERROR" or "Err" appears on the display, the track number just selected cannot be programmed because there is not enough time remaining on the tape. However, at this time, if any other track number is flashing continuously on the display, you can program it instead of the unprogrammable one.
- In step 3 or 5, each time a selection is made, the track number and the tape's remaining time will be displayed, and then the display will change to indicate the next program number.
To check, cancel or correct program data, refer to page 15. When checking program data, note that "PAUSE" or "Pu" appears between track numbers for side A and side B. - Up to 40 tracks can be programmed. If, however, a pause is inserted, it is counted as one track.
-
CD synchronized recording function can be used if your tape deck is compatible with it. If so, in step 6 and 7, press SYNCHRO and then press this unit's remote control. Recording automatically begins. (For details, refer to page 21.)
-
Programmed track numbers light up on the display. You can select a track which can be programmed for the remaining time on side A from track numbers flashing on the display. You cannot, however, select a track number extinguished from the display.
4 When track selection for side A is finished, press TAPE.

A pause is inserted.
Random sequential tape-programming
The unit will automatically program tracks in random sequential order for recording to tape.
1 Follow steps 1-3 on page 16.
2 Press RANDOM.

- The unit will automatically program tracks at random for both side A and side B considering the tape's total time.
3 Begin recording on the tape deck, and then press on this unit.
4 The unit will pause at the end of side A of the tape. Turn the tape over to side B. Resume recording, and then press on this unit.
Notes
- Because programmed data changes every time RANDOM is pressed, the unrecorded space at the end of each side of the tape also varies accordingly.
- All tracks may not be programmed if the tape's length is not enough. To program all tracks, use a tape that is longer than the actual playing time.
- In step 2, you can check the program data for side A and side B.
CDX-596
CDX-496, CDX-396
① Shows the number of tracks programmed on each side right after the programming is finished. It is then replaced by the number of the first programmed track on side A.
② Shows the programmed track numbers on each side.
③ Shows the total time of programmed tracks on each side.
④ Shows the side of the tape.
- Up to 40 tracks can be programmed. A pause inserted between side A and B is counted as one track.
- CD synchronized recording function can be used if your tape deck is compatible with it. If so, in step 3 and 4, press SYNCHRO and then press on this unit's remote control. Recording automatically begins. (For details, refer to page 21.)
Automatic searching for the peak level on a disc
The unit automatically searches for a part in the disc where the source level peaks and next plays that part repeatedly. When recording to tape, this feature is very helpful for adjusting the recording level on the tape deck.
1 Press to stop the unit.
2 Press PEAK.
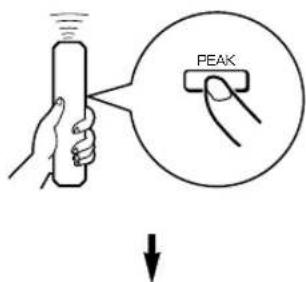
"PEAK" lights up on the display, and the peak level search is performed on the disc.
It takes a few minutes to search for the peak level.

Next, the part where the source level peaks is repeatedly played. Adjust the recording level on the tape deck listening to this sound.
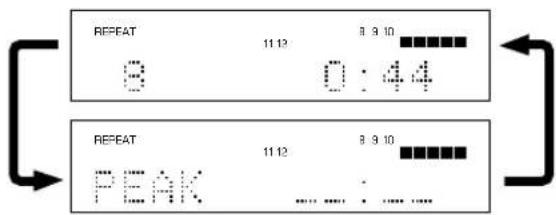
CDX-596
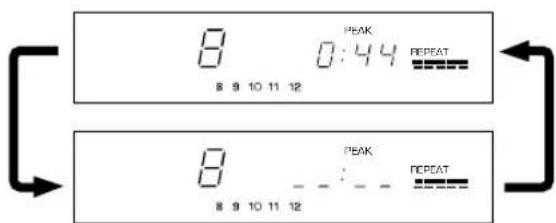
CDX-496, CDX-396
To cancel the peak level search function
Press (Some other buttons can also be used.)
Notes
- Even if the peak level search is performed several times on the same disc, the same part will not be always selected. That is because the unit searches for the peak level among parts of the disc that are randomly selected by the internal microcomputer.
- In the program play mode, this feature will function among the programmed tracks only. If program play is being performed, first press and then press PEAK. If program play is not being performed, only press PEAK.
CD SYNCHRONIZED RECORDING
This unit can automatically synchronize a tape deck's recording with CD play. With this function, you can record a CD on tape easily and precisely.
This recording method requires a YAMAHA tape deck compatible with this function. (Refer to the tape deck's operation manual to find out whether it is compatible or not.)
- This unit and the tape deck must be placed close to each other so that both of them can simultaneously receive the signals from this unit's remote control.
1 Press OPEN/CLOSE to open the disc tray, and load a disc.
2 Load a tape on the tape deck.
- The peak level search function of this unit is useful for adjusting recording level on the tape deck. (Refer to page 20.)
3 Press SYNCHRO.
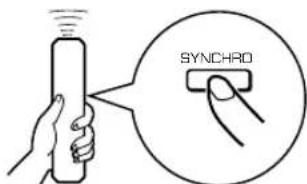
Both CD play and tape deck recording begin.
- CD play begins shortly after the recording.
5 If you want to stop recording temporarily and restart recording from a desired track, stop this unit by pressing and the tape deck as well, then follow steps 3-4 again.
To cancel synchronized CD-tape recording function
Press
Notes
- To finish or stop the recording, make proper operations on the tape deck. (For details, please refer to the owner's manual of the tape deck.)
- Programmed sequence of tracks can also be recorded with this function instead of recording an entire disc. (Refer to pages 14-15 for the programming procedure.)
- This function can also be used together with the automatic tape-programming function. (Refer to pages 16-19.)
This unit enters into the pause mode, and the tape deck enters into the REC/PAUSE mode.
- In this state, the time display on this unit flashes on and off.
If necessary, select a desired track by pressing a numeric button or K(SKIPSEARCH).
If the unit fails to operate normally, check the following points to determine whether the fault can be corrected by the simple measures suggested. If it cannot be corrected, or if the fault is not listed in the SYMPTOM column, disconnect the power cord and contact your authorized YAMAHA dealer or service center for help.
| SYMPTOM | PROBABLE CAUSE | REMEDY |
| The unit does not switch ON when POWER is pressed. | The power cord is not connected nor completely connected. | Securely connect the power cord. |
| The disc tray does not close completely. | A foreign object is obstructing the tray. | Carefully check the disc tray and remove the foreign object. |
| Play does not begin. | The disc is damaged. | Check the disc carefully; replace it if necessary. |
| There is moisture on the laser pickup. | Wait 20 to 30 minutes after switching the unit ON before trying to play a disc. | |
| The disc is loaded upside down. | Reload the disc with the label side up. | |
| The disc is dirty. | Clean the disc. | |
| The CD-RW (ReWritable) disc is not recorded correctly. | Replace the disc with a correctly-recorded disc playable with this unit. | |
| The disc is a non-standard disc not playable with this unit. | ||
| Play is delayed, or begins at the wrong place. | The disc may be scratched or damaged. | Check the disc carefully; replace it if necessary. |
| No sound. | Improper output cable connections. | Connect the cables properly. If the problem persists, the cables may be defective. |
| Improper amplifier operation. | Set the amplifier controls to the correct input selection. | |
| The-OUTPUT LEVEL + buttons are set at minimum. (CDX-596 and CDX-496 only) | Adjust the volume by using the -OUTPUT LEVEL + buttons. (CDX-596 and CDX-496 only) | |
| Sound "skips". | The unit is being subjected to vibrations or impacts. | Relocate the unit. |
| The disc is dirty. | Clean the disc. | |
| Sound "hums". | Improper cable connections. | Securely connect the audio cables. If the problem persists, the cables may be defective. |
| Noise from a nearby tuner. | The tuner is too close to the unit. | Move the tuner and the main unit farther apart. |
| Noise from inside of the disc tray. | The disc may be warped. | Replace the disc. |
| No sound from the headphones. (CDX-596 and CDX-496 only) | The-OUTPUT LEVEL + buttons are set at minimum. | Adjust the volume by using the -OUTPUT LEVEL + buttons. |
| The remote control does not work. | The batteries of the remote control are too weak. | Replace the batteries with new ones. |
| Remote control is too far away or tilted too much. | Use within 6 m and 60° radius. | |
| Direct sunlight or lighting (of an inverter type fluorescent lamp etc.) is striking the remote control sensor of the main unit. | Reposition the main unit. | |
| TV functions strangely when the remote control is used. | Remote control is being used near TV set with a remote control sensor. | Relocate the main unit away from the TV or cover TV's remote control sensor. |
Audio Section
Frequency response 2 Hz - 20 kHz, ±0.5 dB
Harmonic distortion + noise (1 kHz)
S/N ratio
Dynamic range
Wow & flutter Unmeasurable
Output voltage (1 kHz, 0 dB) 2.0±0.5V
Headphones output (-20 dB)
Laser Diode Properties
Material .GaAlAs
Wavelength 780 nm
Emission Duration continuous
Laser Output max. 44.6 W^*
- This output is the value measured at a distance of about 200 mm from the objective lens surface on the Optical Pick-up Block.
General
Power requirements
U.S.A.and Canada models 120V,60 Hz
Australia model 240V,50 Hz
Europe and U.K. models 230V, 50 Hz
General model 110/120/220/240V, 50/60 Hz
Power consumption
Dimensions (W× H× D) 435x96x277mm
Weight 3.7 kg
Accessories. RCA pin cable x 1
Remote control
Battery (size AA, R6, UM-3) x 2
Please note that all specifications are subject to change without notice.
Pile (format AA, R6, UM-3) x 2
Tryck in Celler RANDOM.

Anmarkningar
Indikering under programming
① Visar programnumret für den melodi som skall programmeras harnast.
② Visar det valda melodinumret.
③ Visar bara numren pa de programmerade melodierna.
④ Visar den totala speltiden for de melodier som hittills har programmerats.
Harmonisk distorsion (1 kHz)
Signal brusforhallande
Dynamikområde
Svaj Omatbart
Utgangsspanning (1 kHz, 0 dB) 2,0±0,5V
HERHAALDE WEERGAVE 13
GEPROGRAMMERDE WEERGAVE 14
INDEX ZOEKEN 15
PROGRAMMEREN VAN SPOREN VOOR OPNAME OP CASSETTEBAND. 16