
HTR6140 - Home cinema amp YAMAHA - Free user manual and instructions
Find the device manual for free HTR6140 YAMAHA in PDF.

| Product Type | Integrated 5-channel home cinema amplifier |
| Brand | YAMAHA |
| Model | HTR6140 |
| Dimensions (W x H x D) | 435 x 151 x 352 mm |
| Weight | 8.5 kg |
| Power Supply | AC 220-240 V, 50/60 Hz (depending on model) |
| Power Consumption | 240 W (max. 440 W depending on model) |
| Standby Consumption | 0.8 W |
| Output Power (1 kHz, THD 0.9%) | 105 W/channel (8 Ω for US/Canada, 6 Ω for others) |
| HDMI Inputs | 2 (DVD, DTV/CBL) + 1 output (MONITOR OUT) |
| Audio Decoders | Dolby Digital, Dolby Pro Logic II, DTS |
| Sound Field Corrections | CINEMA DSP, Virtual CINEMA DSP, SILENT CINEMA, STRAIGHT and DIRECT modes |
| Acoustic Optimization | YPAO (Yamaha Parametric Room Acoustic Optimizer) with supplied microphone |
| SCENE Function | 16 preset models, customizable |
| Tuner | FM/AM with RDS (Europe/Russia models) |
| USB Port | 1 (front) for USB memory or portable audio player (MP3, WMA, WAV) |
| iPod/Bluetooth Connectivity | Via Yamaha universal dock or Bluetooth adapter (sold separately) |
| Additional Inputs | 6 MULTI CH INPUT jacks for external multi-channel source |
| Sleep Timer | Yes (adjustable up to 120 min) |
| Supplied Accessories | Remote control unit, batteries, optimizer microphone, AM loop antenna, and indoor FM antenna |
| Safety | Do not expose to moisture, follow ventilation and voltage instructions |
| Repairability | Refer all repairs to a Yamaha authorized service |
Frequently Asked Questions - HTR6140 YAMAHA
User questions about HTR6140 YAMAHA
0 question about this device. Answer the ones you know or ask your own.
Ask a new question about this device
Download the instructions for your Home cinema amp in PDF format for free! Find your manual HTR6140 - YAMAHA and take your electronic device back in hand. On this page are published all the documents necessary for the use of your device. HTR6140 by YAMAHA.
USER MANUAL HTR6140 YAMAHA
Caution: Read this before operating your unit.
1 To assure the finest performance, please read this manual carefully. Keep it in a safe place for future reference.
2 Install this sound system in a well ventilated, cool, dry, clean place - away from direct sunlight, heat sources, vibration, dust, moisture, and/or cold. Allow ventilation space of at least 30~cm on the top, 20~cm on the left and right, and 20~cm on the back of this unit.
3 Locate this unit away from other electrical appliances, motors, or transformers to avoid humming sounds.
4 Do not expose this unit to sudden temperature changes from cold to hot, and do not locate this unit in a environment with high humidity (i.e. a room with a humidifier) to prevent condensation inside this unit, which may cause an electrical shock, fire, damage to this unit, and/or personal injury.
5 Avoid installing this unit where foreign object may fall onto this unit and/or this unit may be exposed to liquid dripping or splashing. On the top of this unit, do not place:
- other components, as they may cause damage and/or discoloration on the surface of this unit.
- burning objects (i.e. candles), as they may cause fire, damage to this unit, and/or personal injury.
- containers with liquid in them, as they may fall and liquid may cause electrical shock to the user and/or damage to this unit.
6 Do not cover this unit with a newspaper, tablecloth, curtain, etc. in order not to obstruct heat radiation. If the temperature inside this unit rises, it may cause fire, damage to this unit, and/or personal injury.
7 Do not plug in this unit to a wall outlet until all connections are complete.
8 Do not operate this unit upside-down. It may overheat, possibly causing damage.
9 Do not use force on switches, knobs and/or cords.
10 When disconnecting the power cable from the wall outlet, grasp the plug; do not pull the cord.
11 Do not clean this unit with chemical solvents; this might damage the finish. Use a clean, dry cloth.
12 Only voltage specified on this unit must be used. Using this unit with a higher voltage than specified is dangerous and may cause fire, damage to this unit, and/or personal injury. Yamaha will not be held responsible for any damage resulting from use of this unit with a voltage other than specified.
13 To prevent damage by lightning, keep the power cord and outdoor antennas disconnected from a wall outlet or the unit during a lightning storm.
14 Do not attempt to modify or fix this unit. Contact qualified Yamaha service personnel when any service is needed. The cabinet should never be opened for any reasons.
15 When not planning to use this unit for long periods of time (i.e. vacation), disconnect the AC power plug from the wall outlet.
16 Install this unit near the AC outlet and where the AC power plug can be reached easily.
17 Be sure to read the "Troubleshooting" section on common operating errors before concluding that this unit is faulty.
18 Before moving this unit, press (A)STANDBY/ON to set this unit in the standby mode, and disconnect the AC power plug from the wall outlet.
19 VOLTAGE SELECTOR (Asia and General models only)
The VOLTAGE SELECTOR on the rear panel of this unit must be set for your local main voltage BEFORE plugging into the AC wall outlet. Voltages are:
Asia model 220/230-240 V AC, 50/60 Hz
General model 110/120/220/230-240 V AC, 50/60 Hz
20 Excessive sound pressure from earphones and headphones can cause hearing loss.
21 The batteries shall not be exposed to excessive heat such as sunshine, fire or the like.
WARNING
TO REDUCE THE RISK OF FIRE OR ELECTRIC SHOCK, DO NOT EXPOSE THIS UNIT TO RAIN OR MOISTURE.
This unit is not disconnected from the AC power source as long as it is connected to the wall outlet, even if this unit itself is turned off by STANDBY/ON.
This state is called the standby mode. In this state, this unit is designed to consume a very small quantity of power.
■For U.K. customers
If the socket outlets in the home are not suitable for the plug supplied with this appliance, it should be cut off and an appropriate 3 pin plug fitted. For details, refer to the instructions described below.
Note
The plug severed from the mains lead must be destroyed, as a plug with bared flexible cord is hazardous if engaged in a live socket outlet.
Special Instructions for U.K. Model
IMPORTANT
THE WIRES IN MAINS LEAD ARE COLOURED IN ACCORDANCE WITH THE FOLLOWING CODE:
Blue: NEUTRAL
Brown: LIVE
As the colours of the wires in the mains lead of this apparatus may not correspond with the coloured markings identifying the terminals in your plug, proceed as follows:
The wire which is coloured BLUE must be connected to the terminal which is marked with the letter N or coloured BLACK. The wire which is coloured BROWN must be
connected to the terminal which is marked with the letter L or coloured RED.
Making sure that neither core is connected to the earth terminal of the three pin plug.

This symbol mark is according to the EU directive 2002/96/EC.
This symbol mark means that electrical and electronic equipment, at their end-of-life, should be disposed of separately from your household waste.
Please act according to your local rules and do not dispose of your old products with your normal household waste.
Contents
INTRODUCTION
Features 2
Getting started 3
Quick start guide 4
Preparation: Check the items. 4
Step 1: Set up your speakers. 5
Step 2: Connect your DVD player and other components. 6
Step 3: Press SCENE 1 button. 7
What do you want to do with this unit? 8
PREPARATION
Connections 9
Rear panel 9
Placing speakers. 10
Connecting speakers. 11
Information on jacks and cable plugs 13
Information on HDMITM 14
Audio and video signal flow. 14
Connecting video components. 15
Connecting other components 16
Connecting audio components. 18
Connecting a Yamaha iPodTM universal dock or BluetoothTM adapter. 19
Using theVIDEO AUX jacks on the front panel ... 19
Connecting the FM and AM antennas. 20
Connecting the power cable. 20
Turning on and off the power 21
Front panel display 22
Optimizing the speaker setting
for your listening room 24
Using AUTO SETUP 24
BASIC OPERATION
Selecting the SCENE templates.. 28
Selecting the desired SCENE template. 28
Creating your original SCENE templates. 31
Using remote control on the SCENE feature. 32
Playback 33
Basic operations 33
Selecting audio input jacks (AUDIO SELECT). 34
Selecting the MULTI CH INPUT component. 34
Displaying the current status of this unit on a video monitor. 35
Using your headphones. 35
Muting the audio output. 35
Playing video sources in the background of an audio source. 36
Displaying the input source information 36
Using the sleep timer 37
Sound field programs 38
Sound field program descriptions. 38
Using audio features 41
Enjoying high quality sound. 41
Adjusting the tonal quality. 41
Adjusting the speaker level. 41
Selecting the night listening mode. 42
FM/AM tuning 43
Automatic tuning 43
Manual tuning. 43
Automatic preset tuning. 44
Manual preset tuning 44
Selecting preset stations 45
Exchanging preset station. 45
Radio Data System tuning
(Europe and Russia models only) 46
Displaying the Radio Data System information 46
Selecting the Radio Data System program type (PTY SEEK mode). 47
Using the enhanced other networks (EON) data service. 48
Using a USB memory device or a USB portable audio player 49
Playback operation 49
Using iPodTM 51 Controlling iPodTM 51
Using Bluetooth™ components. 53
Pairing the Bluetooth™ adapter and your Bluetooth™ component. 53
Playback of the BluetoothTM component 53
Recording 54
ADVANCED OPERATION
SET MENU 55
Using SET MENU 56
1 SOUND MENU 57
2 INPUT MENU 62
3 OPTION MENU 64
Remote control features.. 67
Controlling this unit, a TV, or other components.... 67
Setting remote control codes 69
Advanced setup. 70
ADDITIONAL INFORMATION
Troubleshooting. 71
Glossary. 81
Specifications 83
Index 84
APPENDIX
(at the end of this manual)
Front panel..
Remote control .ii
List of remote control codes iii
About this manual
indicates a tip for your operation.
- Some operations can be performed by using either the buttons on the front panel or the ones on the remote control. In case the button names differ between the front panel and the remote control, the button name on the remote control is given in parentheses.
- This manual is printed prior to production. Design and specifications are subject to change in part as a result of improvements, etc. In case of differences between the manual and product, the product has priority.
- "①SPEAKERS" or "③DVD" (example) indicates the name of the parts on the front panel or the remote control. Refer to the attached sheet or the pages at the end of this manual for the information about each position of the parts.
- The symbol “ u ” with page number(s) indicates the corresponding reference page(s).
Features
Built-in 5-channel power amplifier
Minimum RMS output power
(1kHz, 0.9% THD, 8Ω)
105 W/ch
(1kHz,0.9% THD,6Ω)
105 W/ch
SCENE select function
Preset SCENE templates for various situations
SCENE template customizing capability
Decoders and DSP circuits
Proprietary Yamaha technology for the creation of multi-channel surround sound
Compressed Music Enhancer mode
Dolby Digital decoder
Dolby Pro Logic/Dolby Pro Logic II decoder
DTS decoder
VirtualCINEMADSP
SILENT CINEMA TM
Radio tuners
FM/AM tuning capability
Radio Data System capability (Europe model only)

DIGITAL PROLOGIC
Manufactured under license from Dolby Laboratories.
"Dolby", "Pro Logic", and the double-D symbol are trademarks of Dolby Laboratories.
SILENT
CINEMA
"SILENT CINEMA" is a trademark of Yamaha Corporation.
iPodTM
"iPod" is a trademark of Apple, Inc., registered in the U.S. and other countries.
HDMI (High-Definition Multimedia Interface)
HDMI interface for standard, enhanced or high-definition video (includes 1080p video signal transmission) as well as multi-channel digital audio
DOCK terminal
DOCK terminal to connect a Yamaha iPod universal dock (such as YDS-10, sold separately) or Bluetooth adapter (such as YBA-10, sold separately)
USB features
USB port to connect a USB memory device or a USB portable audio player
MP3, WMA and WAV capability
Other features
YPAO (Yamaha Parametric Room Acoustic Optimizer) for automatic speaker setup
192-kHz/24-bit D/A converter
DIRECT mode for high quality sound for all sources
6 additional input jacks for discrete multi-channel input
OSD (on-screen display) menus that allow you to optimize this unit to suit your individual audiovisual system
Component video input/output capability
(3 COMPONENTVIDEOINs and 1 MONITOR OUT)
Optical and coaxial digital audio signal jacks
Sleep timer
Cinema and music night listening modes
iPod controlling capability
Remote control with preset remote control codes

Digital Surround
"DTS" and "DTS Digital Surround" are registered trademarks of DTS, Inc.
BluetoothTM
Bluetooth is a registered trademark of the Bluetooth SIG and is used by Yamaha in accordance with a license agreement.
HOMI
"HDMI", the "HDMI" logo and "High-Definition Multimedia Interface" are trademarks or registered trademarks of HDMI Licensing LLC.
Getting started
Supplied accessories
Check that you received all of the following parts.
Remote control
Batteries (2) (AAA, R03, UM-4)
Optimizer microphone
AM loop antenna
Indoor FM antenna
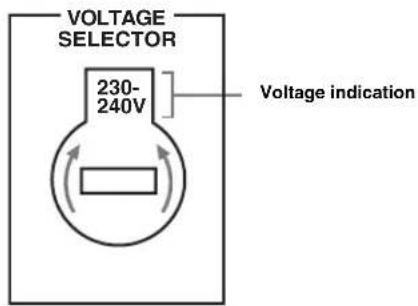
■VOLTAGE SELECTOR
(Asia and General models only)
Caution
The VOLTAGE SELECTOR on the rear panel of this unit must be set for your local voltage BEFORE plugging the power cable into the AC wall outlet. Improper setting of the VOLTAGE SELECTOR may cause damage to this unit and create a potential fire hazard.
Rotate the VOLTAGE SELECTOR clockwise or counterclockwise to the correct position using a straight slot screwdriver.
Voltages are as follows:
Asia model 220/230-240 V AC, 50/60 Hz General model
110/120/220/230-240 V AC, 50/60 Hz
■Installing batteries in the remote control
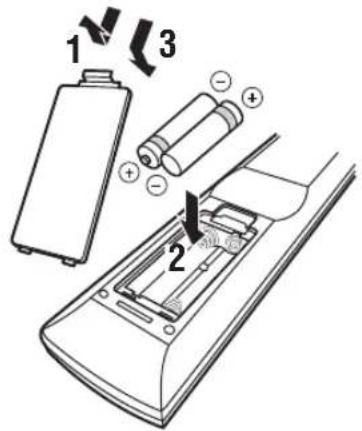
1 Take off the battery compartment cover.
2 Insert the two supplied batteries (AAA, R03, UM-4) according to the polarity markings (+ and -) on the inside of the battery compartment.
3 Snap the battery compartment cover back into place.
Notes
- Change all of the batteries if you notice that the operation range of the remote control decreases.
- Do not use an old battery and a new one together.
- Do not use different types of batteries (such as alkaline and manganese batteries) together. Read the packaging carefully as these different types of batteries may have the same shape and color.
- If the batteries have leaked, dispose of them immediately. Avoid touching the leaked material or letting it come into contact with clothing, etc. Clean the battery compartment thoroughly before installing new batteries.
- Do not throw away batteries with general house waste; dispose of them correctly in accordance with your local regulations.
- If the remote control is without batteries for more than 2 minutes, or if exhausted batteries remain in the remote control, the contents of the memory may be cleared. When the memory is cleared, insert new batteries and set up the remote control code.
Quick start guide
The following steps describe the easiest way to enjoy DVD movie playback in your home theater.
Step 1: Set up your speakers
P.5
Step 2: Connect your DVD player and other components
P.6
Step 3: Press SCENE 1 button
P.7
Enjoy DVD playback!
Preparation: Check the items
Prepare the following items.
Speakers
□Front speaker .x2
Center speaker .x1
Surround speaker x 2
Select magnetically shielded speakers. The minimum required speakers are two front speakers. The priority of the requirement of other speakers is as follows:
- Two surround speakers
- Center speaker
Active subwoofer .x1 Select an active subwoofer equipped with an RCA input jack.
Speaker cable x5
Subwoofer cable.. .x 1 Select a monaural RCA cable.
DVD player .x1 Select DVD player equipped with coaxial digital audio output jack and composite video output jack.
Video monitor.. x1 Select a TV monitor, video monitor or projector equipped with a composite video input jack.
Video cable 2 Select an RCA composite video cable.
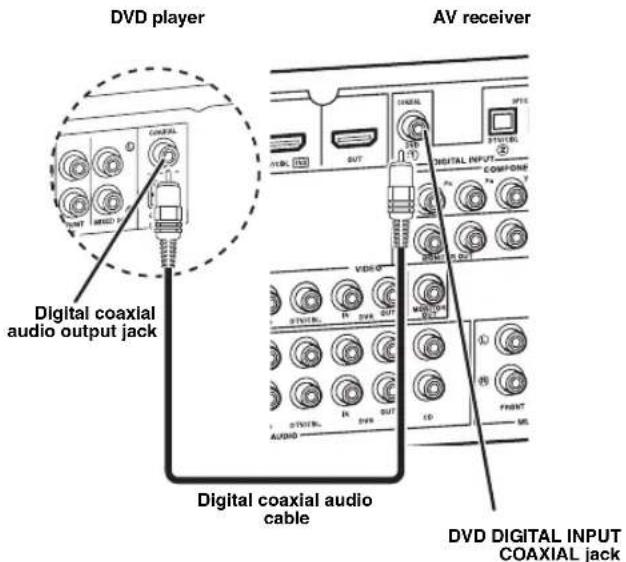
Digital coaxial audio cable .x1
Step 1: Set up your speakers
Place your speakers in the room and connect them to this unit.
1 Place your speakers and subwoofer in the room.
2 Connect speaker cables to each speaker.
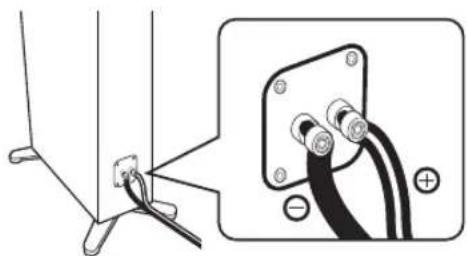
Cables are colored or shaped differently, perhaps with a stripe, groove or ridge. Connect the striped (grooved, etc.) cable to the "+" (red) terminals of your speaker. Connect the plain cable to the "-" (black) terminals.
3 Connect each speaker cable to the corresponding speaker terminal of this unit.
(1)

(2)
③
4
1 Make sure that this unit and the subwoofer are unplugged from the AC wall outlets.
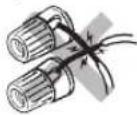
Twist the exposed wires of the speaker cables together to prevent short circuits.
Do not let the bare speaker wires touch each other.
④ Do not let the bare speaker wires touch any metal part of this unit.
Be sure to connect the left channel (L), right channel (R), "+" (red) and "-(black) properly.
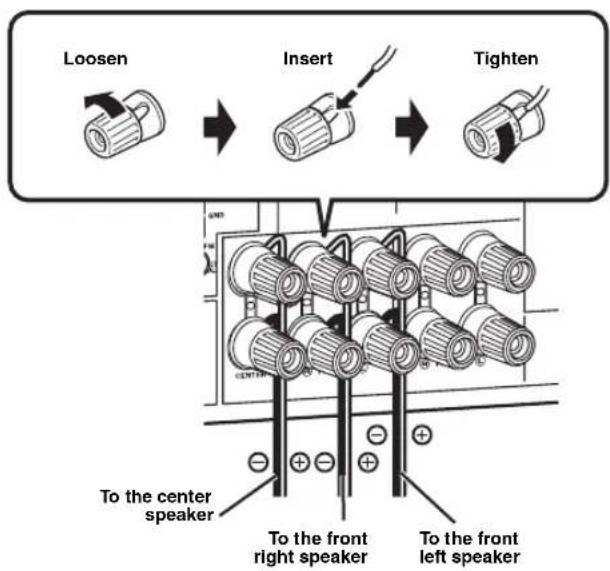
Front and center speakers
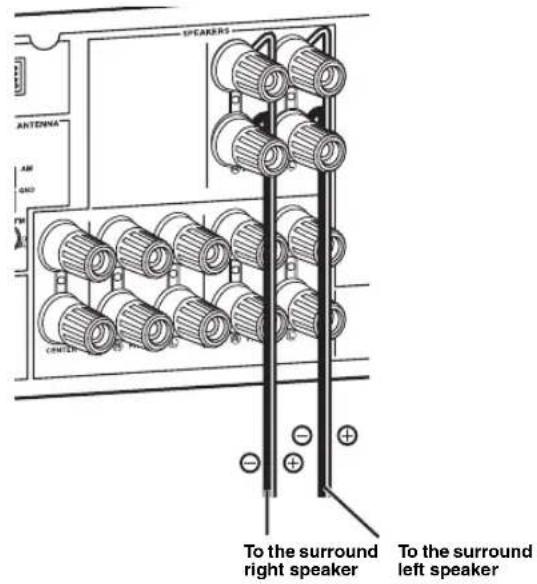
Surround speakers
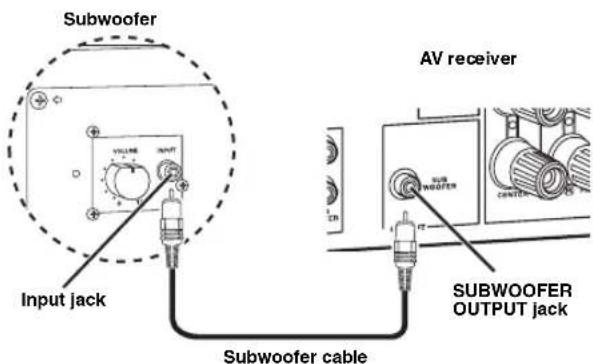
4 Connect the subwoofer cable to the input jack of the subwoofer and the SUBWOOFER OUTPUT jack of this unit.
Step 2: Connect your DVD player and other components

Make sure that this unit and the DVD player are unplugged from the AC wall outlets.
1 Connect the digital coaxial audio cable to the digital coaxial audio output jack of your DVD player and the DVD DIGITAL INPUT COAXIAL jack of this unit.
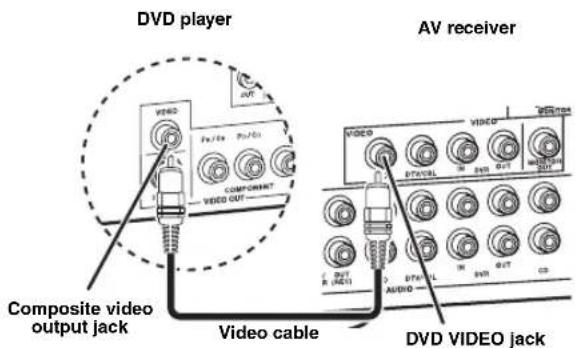
2 Connect the video cable to the composite video output jack of your DVD player and the DVD VIDEO jack of this unit.
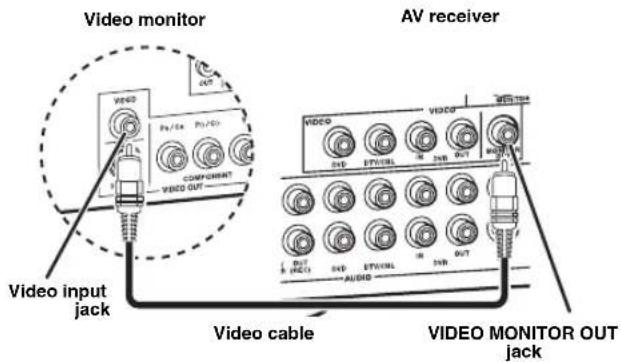
3 Connect the video cable to the video input jack of your video monitor and theVIDEO MONITOR OUT jack of this unit.
4 Connect the power plug of this unit and other components into the AC wall outlet.
For further connections
Using the other kind of speaker combinations P.11
- Connecting video components P. 15
- Connecting a DVD player P. 16
- Connecting a DVD recorder P.17
- Connecting a set-top box P.17
- Connecting a CD player and a CD recorder/MD recorder P. 18
- Connecting a multi-format player or an external decoder P. 18
- Connecting a Yamaha iPod/Bluetooth dock P.19
Using the VIDEO AUX jacks on the front panel P.19
- Connecting an FM/AM antenna P.20
Using the USB jack on the front panel P.49
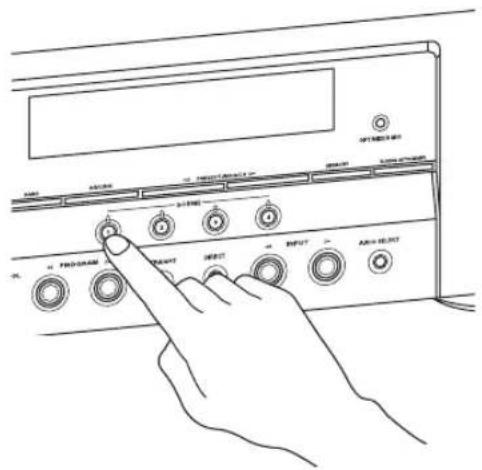
Step 3: Press SCENE 1 button
1 Turn on the video monitor and then set the input source selector of the video monitor to this unit.
2 Press @SCENE 1.
This unit is turned on. "DVD Viewing" appears in the front panel display, and this unit automatically optimize own status for the DVD playback.
中
The indicator on the selected SCENE button lights up while this unit is in the SCENE mode.
3 Start playback of the desired DVD on your player.
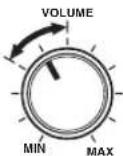
4 Rotate ①VOLUME to adjust the volume.

Note
When you change the input source or sound field program, the SCENE mode is deactivated.
■About SCENE function
Just by pressing one SCENE button, you can turn on this unit and recall your favorite input source and sound field program according to the SCENE template that has been assigned to the SCENE button. The SCENE templates are built combinations of input sources and sound field programs.
中
If you connect a Yamaha product that has capability of the SCENE control signals, this unit can automatically activate the component and start playback. Refer to the instruction manual of the DVD player for further information.
The default assigned SCENE templates
| Default SCENE button | The name of the SCENE template and its description |
| SCENE 1 | DVD Movie Viewing - input source: DVD - sound field program: Movie Dramatic For when you want to enjoy a movie from the connected DVD player. |
| SCENE 2 | Music Disc Listening - input source: DVD - sound field program: 2ch Stereo For when you want to listen to a music disc from the connected DVD player. |
| SCENE 3 | TV Viewing *1 - input source: DTV/CBL - sound field program: STRAIGHT For when you want to watch a TV program. |
| SCENE 4 | Radio Listening *2, *3, *4 - input source: TUNER - sound field program: 5ch Enhancer For when you want to listen to a music program from the FM radio station. |
Notes
1 You must connect a cable TV or a satellite tuner to this unit in advance. See page 17 for details.
2 You need to connect the supplied FM and AM antennas to this unit in advance. See page 20 for details.
3 You must tune into the desired radio station in advance. See pages 43 to 45 for tuning information.
4 To achieve the best possible reception, orient the connected AM loop antenna, or adjust the position of the end of the indoor FM antenna.
中
You can change the assigned SCENE template for the SCENE buttons. See page 28 for details.
■After using this unit...
Press ASTANDBY/ON on the front panel to set this unit to the standby mode.
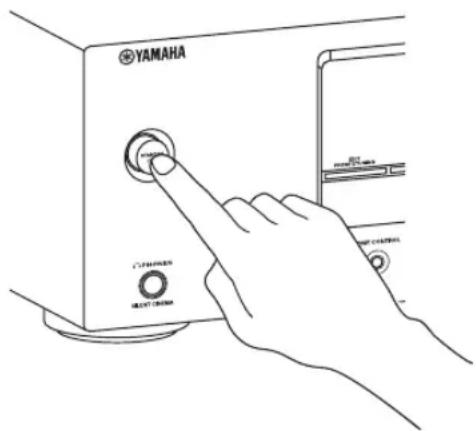
This unit is set to the standby mode. In the standby mode, this unit consumes a small amount of power in order to receive infrared signals from the remote control. To turn on this unit from the standby mode, press ④STANDBY/ON (or ⑦ POWER). See page 21 for details.
What do you want to do with this unit?
■Customizing the SCENE templates
- Using various SCENE templates P. 28
- Creating your original SCENE templates P.
Using various input sources
Basic controls of this unit P.33
-Enjoying FM/AM radio programs P.43
Using your USB portable device with this unit P.49
- Using your iPod with this unit P. 51
Using your Bluetooth components with this unit P.53
Using various sound features
- Using various sound field programs
P.38
Using the direct mode for the high quality sound P.41
- Customizing the sound field programs
P.40
Adjusting the parameters of this unit
- Automatically optimizing the speaker parameters for your listening room (AUTO SETUP) P. 24
- Manually adjusting various parameters of this unit P. 55
- Setting the remote control P.67
Adjusting the advanced parameters P. 70
Additional features
Automatically turning off this unit P. 37
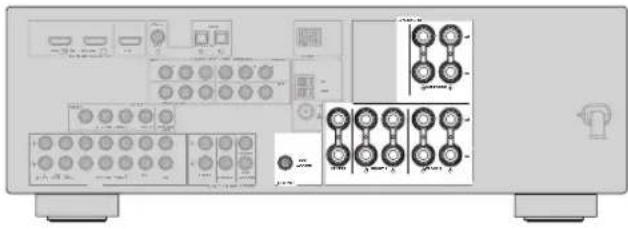
Connections
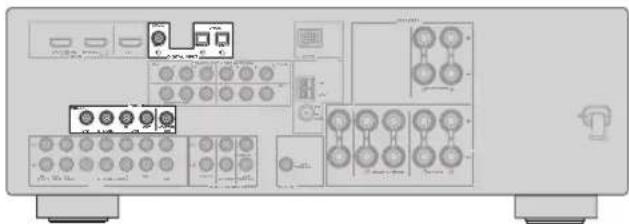
Rear panel
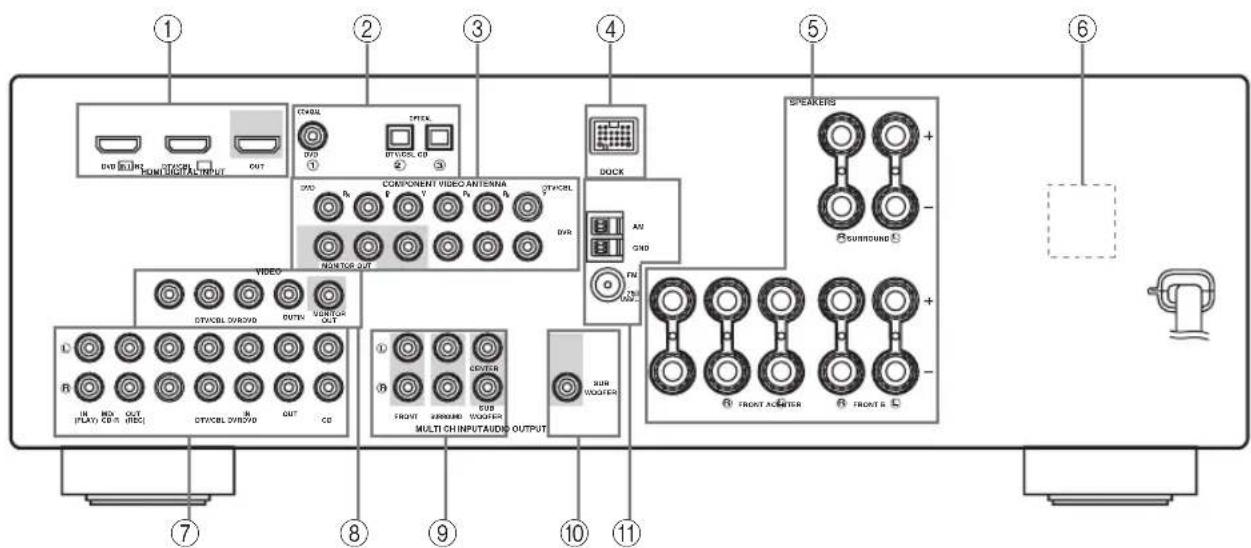
| Name | Page | |
| ① | HDMI jacks | 14 |
| ② | DIGITAL INPUT jacks | 13 |
| ③ | COMPONENT VIDEO jacks | 13 |
| ④ | DOCK terminal | 19 |
| ⑤ | Speaker terminals | 11 |
| ⑥ | VOLTAGE SELECTOR (Asia and General models only) | 3 |
| ⑦ | AUDIO jacks | 13 |
| ⑧ | VIDEO jacks | 13 |
| ⑨ | MULTI CH INPUT jacks | 18 |
| ⑩ | SUBWOOFER OUTPUT jack | 11 |
| ⑪ | ANTENNA terminals | 20 |
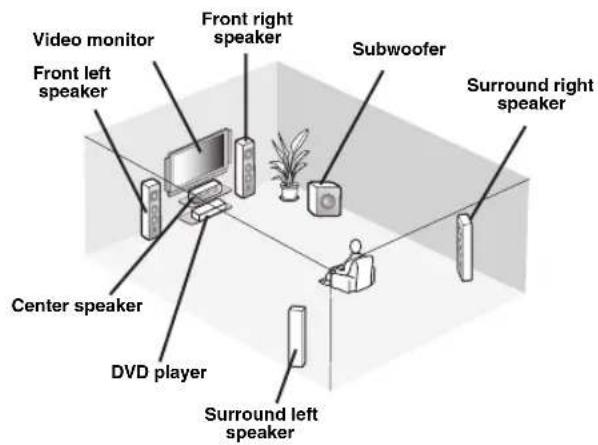
Placing speakers
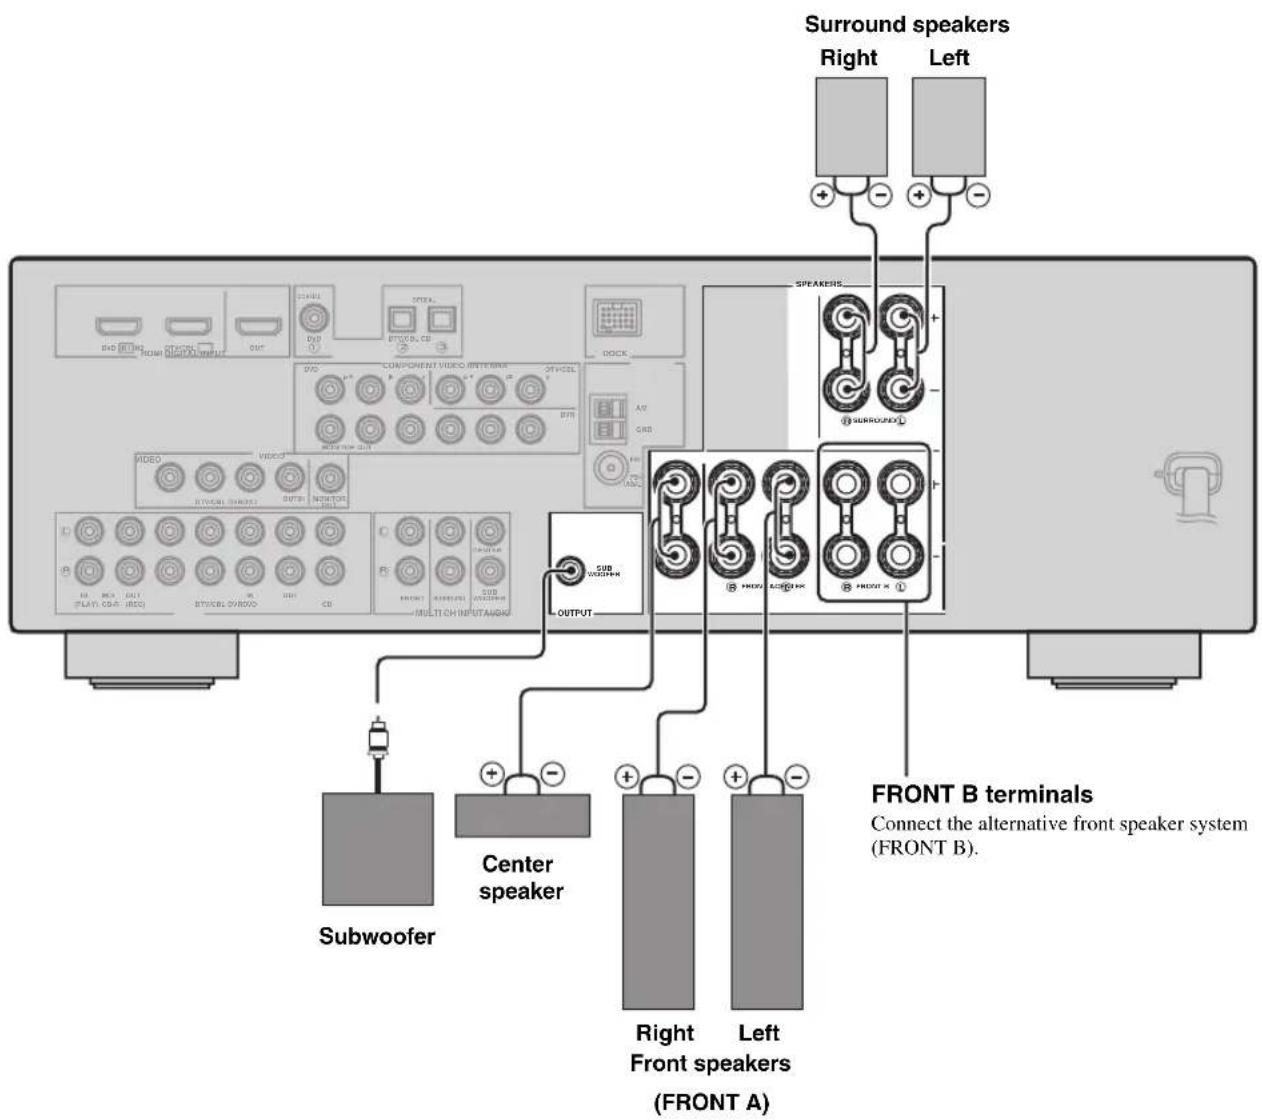
The speaker layout below shows the speaker setting we recommend. You can use it to enjoy CINEMA DSP and multi-channel audio sources.
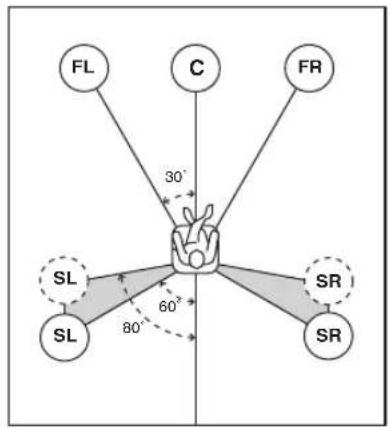
Front left and right speakers (FL and FR)
The front speakers are used for the main source sound plus effect sounds. Place these speakers at an equal distance from the ideal listening position. The distance of each speaker from each side of the video monitor should be the same.
Center speaker (C)
The center speaker is for the center channel sounds (dialog, vocals, etc.). If for some reason it is not practical to use a center speaker, you can do without it. Best results, however, are obtained with the full system.
Surround left and right speakers (SL and SR)
The surround speakers are used for effect and surround sounds.
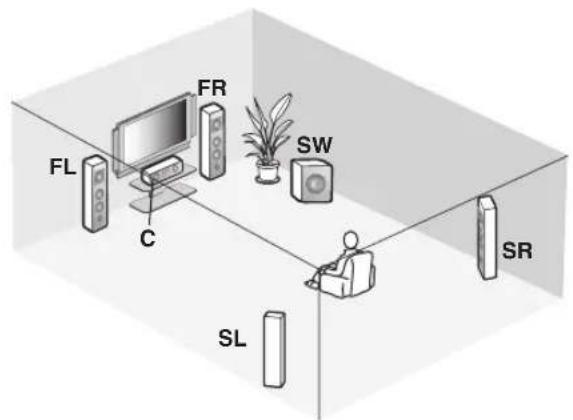
Subwoofer (SW)
The use of a subwoofer with a built-in amplifier, such as the Yamaha Active Servo Processing Subwoofer System, is effective not only for reinforcing bass frequencies from any or all channels, but also for high fidelity sound reproduction of the LFE (low-frequency effect) channel included in Dolby Digital and DTS sources. The position of the subwoofer is not so critical, because low bass sounds are not highly directional. But it is better to place the subwoofer near the front speakers. Turn it slightly toward the center of the room to reduce wall reflections.
Connecting speakers
Be sure to connect the left channel (L), right channel (R), "+" (red) and "-" (black) properly. If the connections are faulty, this unit cannot reproduce the input sources accurately.
Caution
- Before connecting the speakers, make sure that the AC power plug is disconnected from the AC wall outlet.
- Do not let the bare speaker wires touch each other or let them touch any metal part of this unit. This could damage this unit and/or the speakers. If the speaker wires are short-circuited, "CHECK SP WIRES" appears in the front panel display when you turn on this unit.
- Use the magnetically shielded speakers. If this type of speaker still creates interference with the monitor, place the speakers away from the monitor.
Before connecting to the SPEAKERS terminal
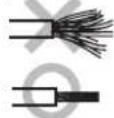
A speaker cord is actually a pair of insulated cables running side by side. Cables are colored or shaped differently, perhaps with a stripe, groove or ridges.
Connect the striped (grooved, etc.) cable to the "+" (red) terminals of this unit and your speaker. Connect the plain cable to the " -" (black) terminals.
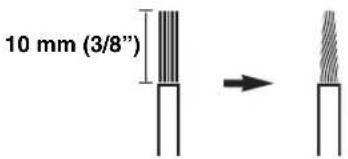
Remove approximately 10mm (3/8") of insulation from the end of each speaker cable and then twist the bare wires of the cable together to prevent short circuits.
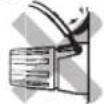
Connecting to the SPEAKER terminals
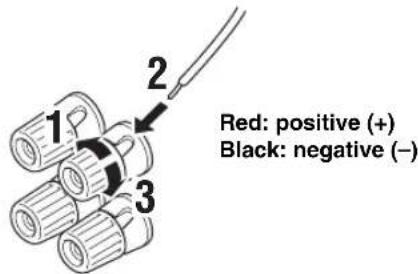
1 Loosen the knob.
2 Insert the bare end of the speaker wire into the hole on the terminal.
3 Tighten the knob to secure the wire.
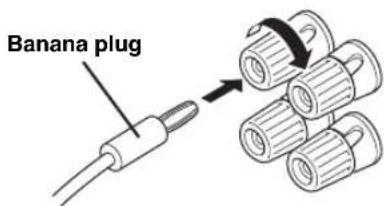
Connecting the banana plug
(except Europe, Russia, Korea, and Asia models)
The banana plug is a single-pole electrical connector widely used to terminate speaker cables. First, tighten the knob and then insert the banana plug connector into the end of the corresponding terminal.
Information on jacks and cable plugs
Connect one of the type of the audio jack(s) and/or video jack(s) that your input components are equipped with.
Audio jacks and cable plugs Video jacks and cable plugs
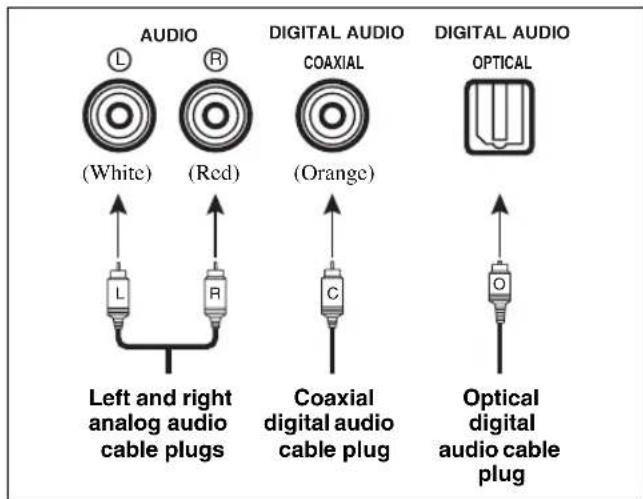
Audio jacks
This unit has three types of audio jacks. Connection depends on the availability of audio jacks on your other components.
AUDIO jacks
For conventional analog audio signals transmitted via left and right analog audio cables. Connect red plugs to the right jacks and white plugs to the left jacks.
DIGITAL AUDIO COAXIAL jack
For digital audio signals transmitted via a coaxial digital audio cable.
DIGITAL AUDIO OPTICAL jacks
For digital audio signals transmitted via optical digital audio cables.
Notes
- You can use the digital jacks to input PCM, Dolby Digital and DTS bitstreams. Optical input jacks are compatible with digital signals with up to 96kHz of sampling frequency.
- This unit handles digital and analog signals independently. Thus audio signals input at the digital jacks are not output at the analog AUDIO OUT (REC) jacks.
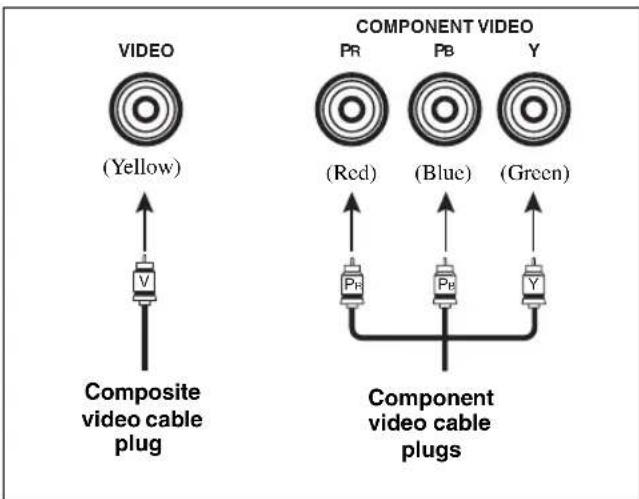
Video jacks
This unit has two types of video jacks. Connection depends on the availability of input jacks on your video monitor.
VIDEO jacks
For conventional composite video signals transmitted via composite video cables.
COMPONENTVIDEOjacks
For component signals, separated into the luminance (Y) and chrominance (P_B,P_R) video signals transmitted on separate wires of component video cables.
Note
The OSD signal is not output at the DVR OUT (REC) jacks.
Information on HDMI™
HDMI compatibility with this unit
| Audio signal types | Audio signal formats | Compatible HDMI components |
| 2ch Linear PCM 2ch | 32-192 kHz, 16/20/24 bit | CD, DVD-Video, DVD-Audio, etc. |
| Multi-ch Linear PCM | 8ch, 32-192 kHz, 16/20/24 bit | DVD-Audio, etc. |
| Bitstream Dolby Digital, DTS DVD-Video, etc. | ||
This unit's HDMI interface is based on the following standards:
HDMI Version 1.2a (High-Definition Multimedia Interface Specification Version 1.2a) licensed by HDMI Licensing, LLC.
- HDCP (High-bandwidth Digital Content Protection System) licensed by Digital Content Protection, LLC.
Notes
- When CPPM copy-protected DVD audio is played back, video and audio signals may not be output depending on the type of the DVD player.
- This unit is not compatible with HDCP-incompatible HDMI or DVI components.
- You can check the potential problem about the HDMI connection (see page 36).
■HDMI jack and cable plug


We recommend using an HDMI cable shorter than 5 meters (16 feet) with the HDMI logo printed on it.
- Use a conversion cable (HDMI jack DVI-D jack) to connect this unit to other DVI components.
Notes
- Do not disconnect or connect the cable or turn off the power of the HDMI components connected to the HDMI OUT jack of this unit while data is being transferred. Doing so may disrupt playback or cause noise.
- Audio signals input at input jacks other than the HDMI IN DVD or HDMI IN DTV/CBL jack of this unit cannot be digitally output at the HDMI OUT jack.
- If you turn off the power of the video monitor connected to the HDMI OUT jack via a DVI connection, this unit may fail to establish the connection to the component.
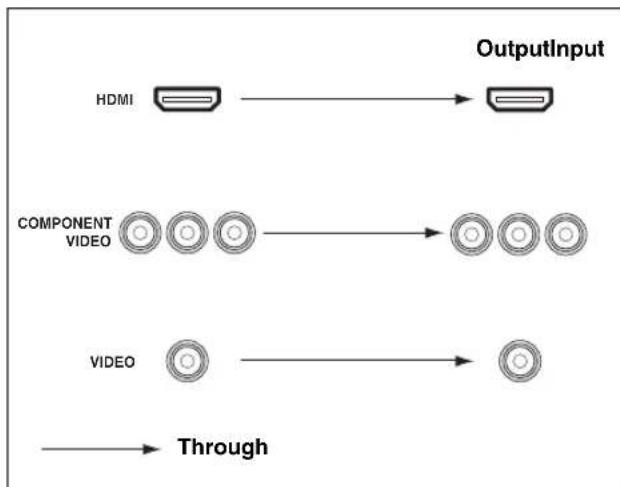
Audio and video signal flow
Audio signal flow
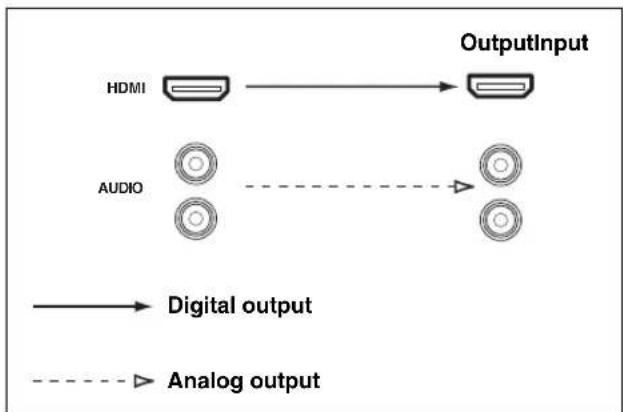
Notes
- 2-channel as well as multi-channel PCM, Dolby Digital and DTS signals input at the HDMI IN DVD or HDMI IN DTV/CBL jack can be output at the HDMI OUT jack only when "SUPPORT AUDIO" is set to "Other" (see page 61).
- Audio signals input at the HDMI IN jacks are not output at the AUDIO output jacks.
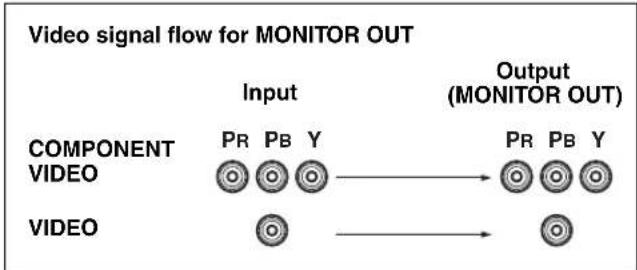
Video signal flow
Connecting video components
Connect your TV (or projector) to the HDMI OUT jack, the COMPONENT VIDEO MONITOR OUT jacks, or the VIDEO MONITOR OUT jack of this unit.

Make sure that this unit and other components are unplugged from the AC wall outlets.
中
You can choose to play back HDMI audio signals on this unit or on another HDMI component connected to the HDMI OUT jack of this unit. Use the "SUPPORT AUDIO" parameter in "SOUND MENU" to select the component to play back HDMI audio signals (see page 61).
Notes
- Some video monitors connected to this unit via a DVI connection fail to recognize the HDMI audio/video signals being input if they are in the standby mode. In this case, the HDMI indicator flashes irregularly.
- When you connect your TV monitor or projector via HDMI connection, the OSD does not appear. In such cases, connect the TV monitor or projector via component, or video connection.
- Connect the input source components to the HDMI IN DVD or HDMI IN DTV/CBL jack to display the video images on the video monitor connected to the HDMI OUT jack.
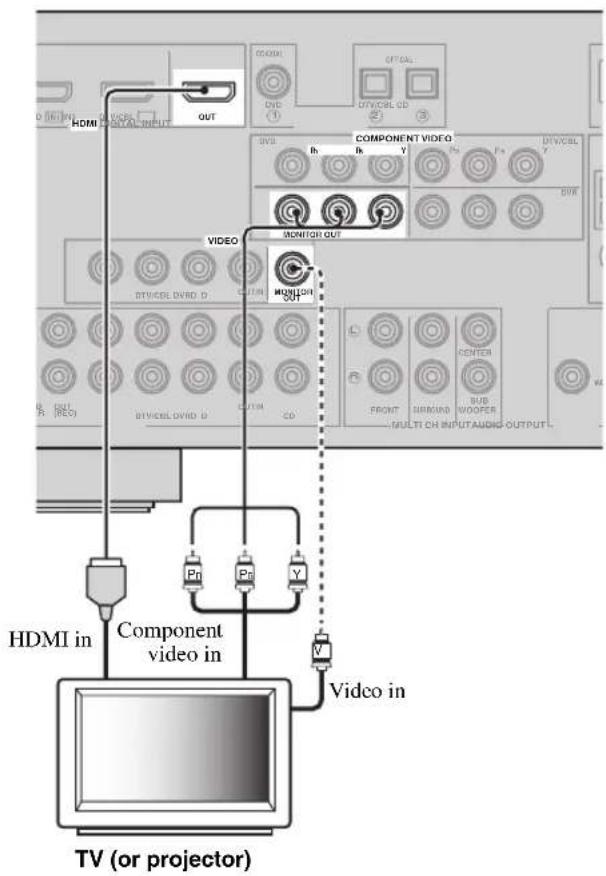
一
indicates recommended connections
indicates alternative connections
Connecting other components

Make sure that this unit and other components are unplugged from the AC wall outlets.
Notes
- Be sure to make the same type of video connections as those made for your TV (see page 15).
To make a digital connection to a component other than the default component assigned to DIGITAL INPUT jack, select the corresponding setting for "OPTICAL IN" or "COAXIAL IN" in "INPUT ASSIGNMENT" (see page 62).
Connecting a DVD player
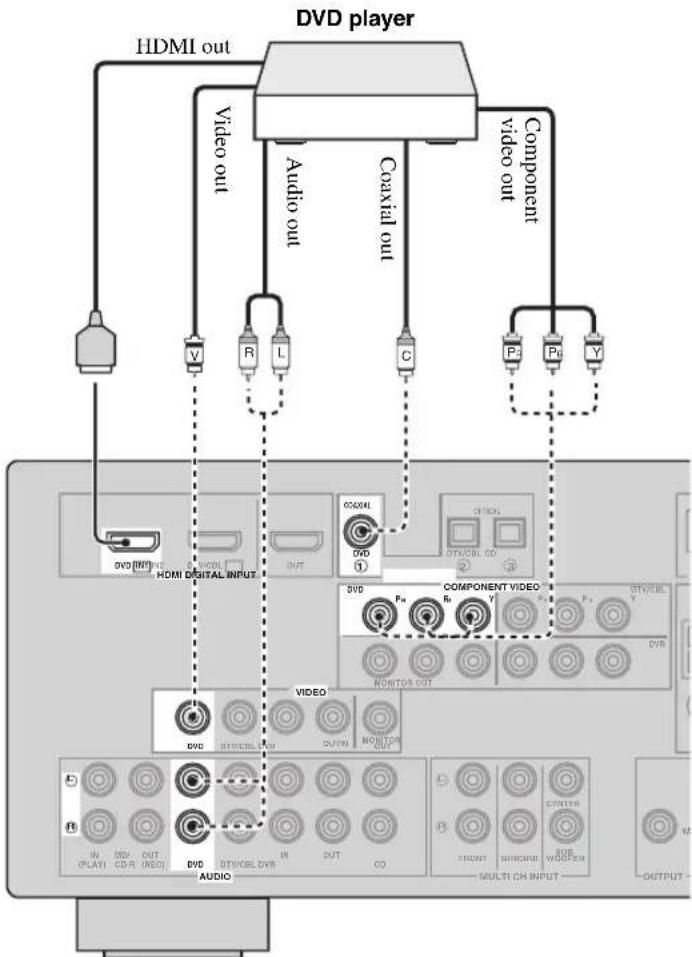
indicates recommended connections
indicates alternative connections (One for the video connection, and one for the audio connection)
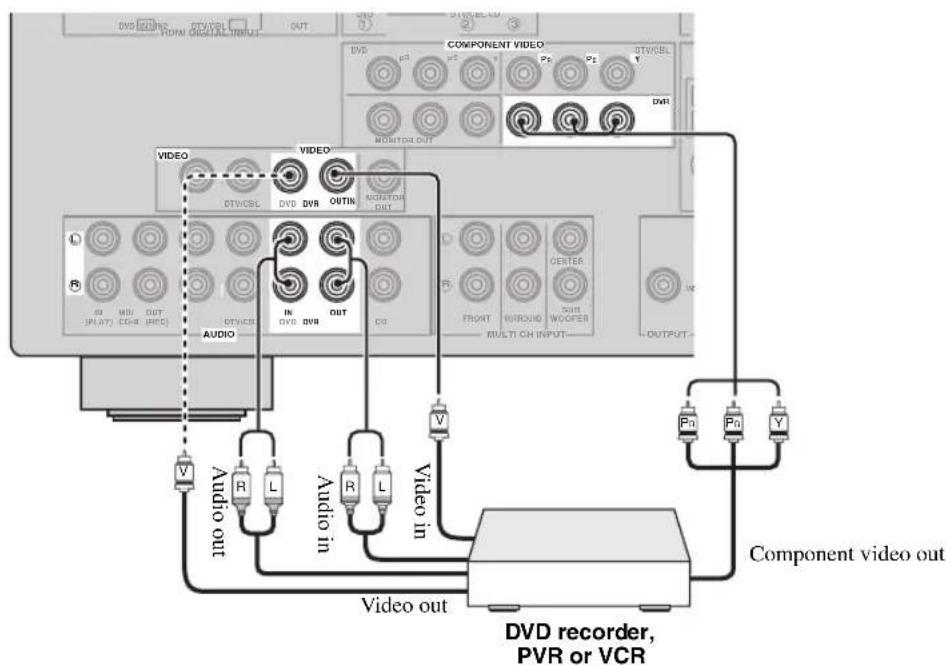
Connecting a DVD recorder, PVR or VCR
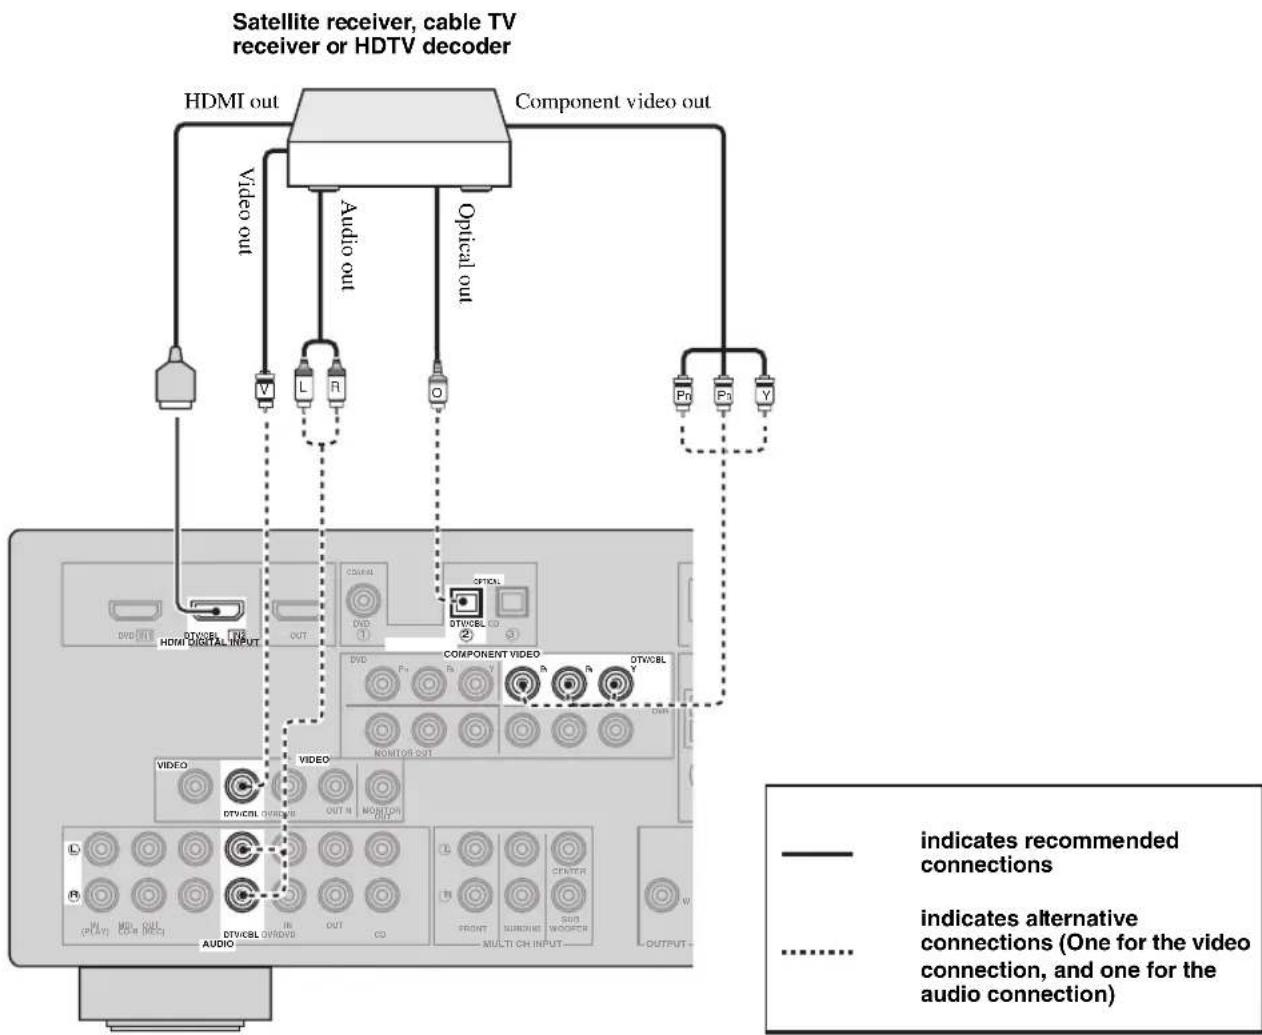
Connecting a set-top box
Connecting audio components
Connect the audio components as follows.
Connecting a CD player and a CD recorder/MD recorder
Notes
- When you connect your CD player via analog and digital connection, priority is given to the signal input at the DIGITAL INPUT jack.
To make a digital connection to a component other than the default component assigned to each DIGITAL INPUT jack, select the corresponding setting in "INPUT ASSIGNMENT" (see page 62).

Make sure that this unit and other components are unplugged from the AC wall outlets.
indicates recommended connections
indicates alternative connections

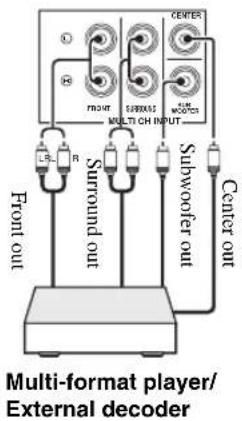
- Connecting a multi-format player or an external decoder
This unit is equipped with 6 additional input jacks (FRONT L/R, SURROUND L/R, CENTER and SUBWOOFER) for discrete multi-channel input from a multi-format player, external decoder or sound processor. Connect the output jacks on your multi-format player or external decoder to the MULTI CH INPUT jacks. Be sure to match the left and right output jacks to the left and right input jacks for the front and surround channels.
Notes
- When you select the component connected to the MULTI CH INPUT jacks as the input source (see page 34), this unit automatically turns off the digital sound field processor, and you cannot select sound field programs.
- This unit does not redirect signals input at the MULTI CH INPUT jacks to accommodate for missing speakers. We recommend that you connect a 5.1-channel speaker system before using this feature.
Connecting a Yamaha iPodTM universal dock or BluetoothTM adapter

Make sure that this unit and other components are unplugged from the AC wall outlets.
This unit is equipped with the DOCK terminal on the rear panel that allows you to connect a Yamaha iPod universal dock (such as YDS-10, sold separately) or Bluetooth adapter (such as YBA-10, sold separately). Connect a Yamaha iPod universal dock or Bluetooth adapter to the DOCK terminal on the rear panel of this unit using its dedicated cable.
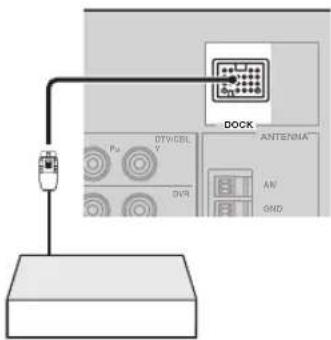
Yamaha iPod universal dock or Bluetooth adapter
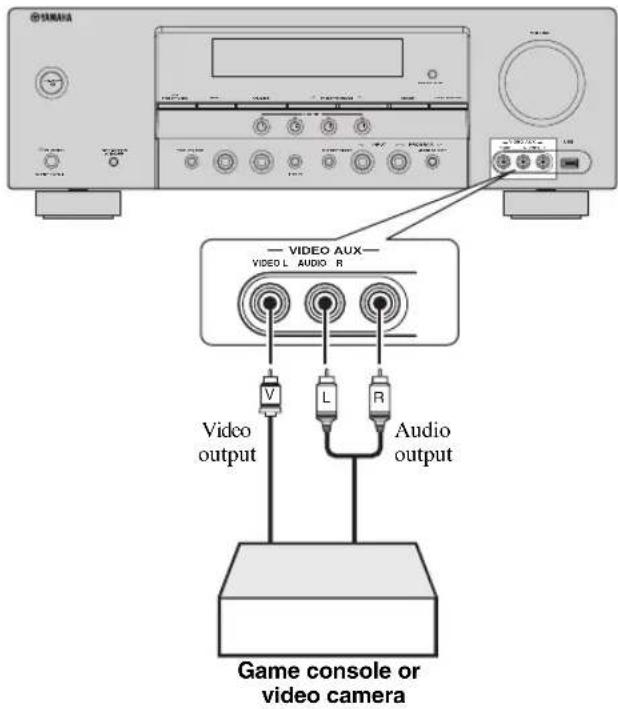
Using the VIDEO AUX jacks on the front panel
Use the VIDEO AUX jacks on the front panel to connect a game console or a video camera to this unit.
Caution
Be sure to turn down the volume of this unit and other components before making connections.
Notes
To reproduce the source signals input at these jacks, select "V-AUX" as the input source.
-
When audio signals are input at the AUDIO jacks and the DOCK terminal on the rear panel, the priority order of the input signal is as follows:
-
DOCK
2.AUDIO
Connections
Connecting the FM and AM antennas
Both FM and AM indoor antennas are supplied with this unit. Connect each antenna correctly to the designated terminals. In general, these antennas should provide sufficient signal strength.

Use a 5 to 10m (16 to 33 ft) vinyl-covered wire extended outdoors from a window.
See right for connection information of the supplied AM loop antenna.
Notes
- The AM loop antenna should be placed away from this unit.
The AM loop antenna should always be connected, even if an outdoor AM antenna is connected to this unit. - A properly installed outdoor antenna provides clearer reception than an indoor one. If you experience poor reception quality, install an outdoor antenna. Consult the nearest authorized Yamaha dealer or service center about outdoor antennas.
Outdoor AM antenna
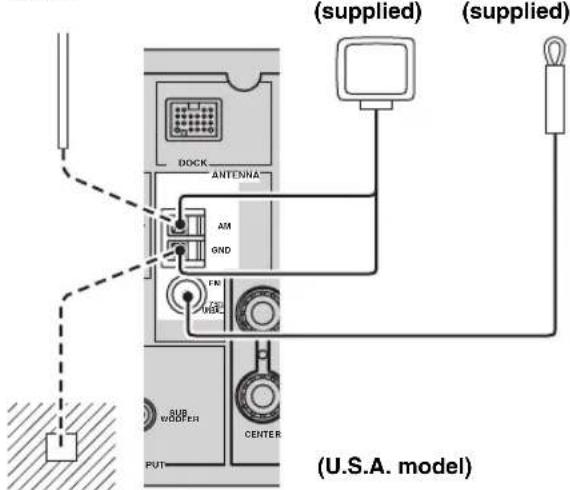
AM loop antenna (supplied)
Indoor FM antenna (supplied)
(U.S.A. model)
Ground (GND terminal)
For maximum safety and minimum interference, connect the antenna GND terminal to a good earth ground. A good earth ground is a metal stake driven into moist earth.
Connecting the wire of the AM loop antenna
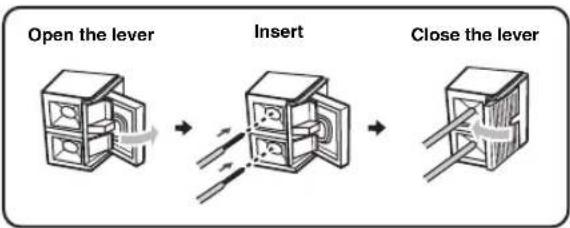
The wire of the AM loop antenna does not have any polarity and you can connect either end of the wire to AM or GND terminal.
Assembling the supplied AM loop antenna
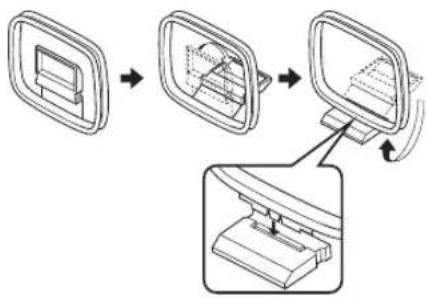
Note
The types of the supplied AM loop antenna is different depending on the models.
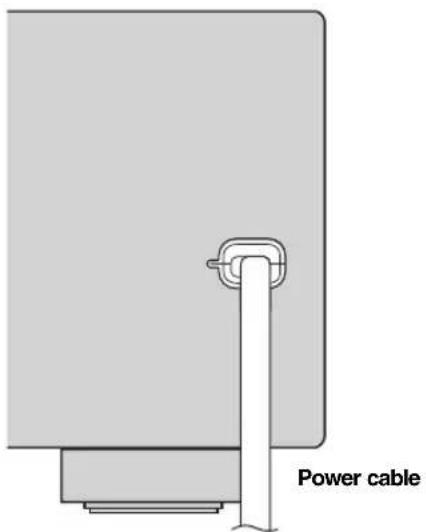
Connecting the power cable
Once all connections are complete, plug the power cable into the AC wall outlet.
Turning on and off the power
■Turning on this unit
Press A STANDBY/ON (or 17 POWER) to turn on this unit.
When you turn on this unit, there will be a 4 to 5-second delay before this unit can reproduce sound.
Set this unit to the standby mode
Press A STANDBY/ON (or 8 STANDBY) to set this unit to the standby mode.
In the standby mode, this unit consumes a small amount of power in order to receive infrared signals from the remote control.
Front panel display
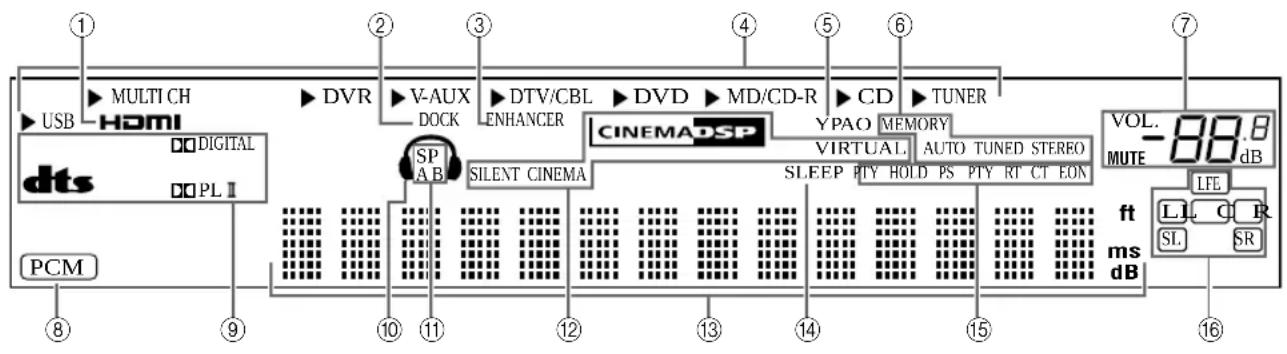
① HDMIindicator
Lights up when the signal of the selected input source is input at the HDMI IN jacks (see page 14).
② DOCK indicator
-
Lights up when you station your iPod in a Yamaha iPod universal dock (such as YDS-10, sold separately) connected to the DOCK terminal of this unit (see page 19) and V-AUX is selected as the input source.
-
Flashes while the connected Yamaha Bluetooth adapter (such as YBA-10, sold separately) and the Bluetooth component is in the paring (see page 53) or the Bluetooth adapter is searching the Bluetooth component (see page 53).
-
Lights up while the connected Yamaha Bluetooth adapter is connected to the Bluetooth component (see page 19).
③ ENHANCER indicator
Lights up when the Compressed Music Enhancer mode is selected (see page 38).
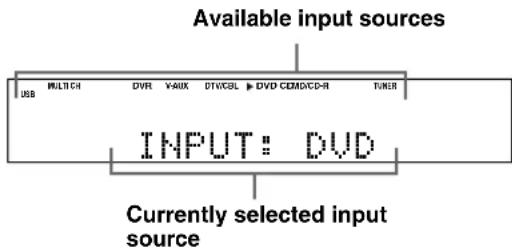
④ Input source indicators
The corresponding cursor lights up to show the currently selected input source.
⑤ YPAO indicator
Lights up when you run "AUTO SETUP" and when the speaker settings set in "AUTO SETUP" are used without any modifications (see page 24).
⑥ Tuner indicators
Lights up when this unit is in the FM or AM tuning mode (see pages 43 to 45).
⑦ MUTE indicator and VOLUME level indicator
- The MUTE indicator flashes while the MUTE function is on (see page 35).
- Indicates the current volume level.
⑧ PCM indicator
Lights up when this unit is reproducing PCM (Pulse Code Modulation) digital audio signals.
⑨ Decoder indicators
The respective indicator lights up when any of the decoders of this unit function.
10 Headphone indicator
Lights up when headphones are connected (see page 35).
⑪ SP A B indicators
Light up according to the set of front speakers activated (see page 33).
SP A: The FRONT A speakers are activated.
SP B: The FRONT B speakers are activated.
CINEMA DSP indicator
Lights up when you select a CINEMA DSP sound field program (see page 39).
VIRTUAL indicator
Lights up when Virtual CINEMA DSP is active (see page 39).
SILENT CINEMA indicator
Lights up when headphones are connected and a sound field program is selected (see page 39).
13 Multi-information display
Shows the name of the current sound field program and other information when adjusting or changing settings.
⑭ SLEEP indicator
Lights up while the sleep timer is on (see page 37).
15 Radio Data System indicators (Europe and Russia models only)
PTY HOLD
Lights up while searching for the Radio Data System stations in the PTY SEEK mode.
PS, PTY, RT and CT
Light up according to the selected Radio Data System display mode.
EON
Lights up when the EON data service is being received.
16 Input channel and speaker indicators

LFE indicator
Input channel indicators
Input channel indicators
- Indicate the channel components of the current digital input signal.
- Light up or flash according to the settings of the speakers when this unit is in the automatic setup procedure (see page 24) or the speaker level setting procedure in the "SP LEVEL" (see page 59).
Using the remote control
The remote control transmits a directional infrared ray. Be sure to aim the remote control directly at the remote control sensor on this unit during operation.
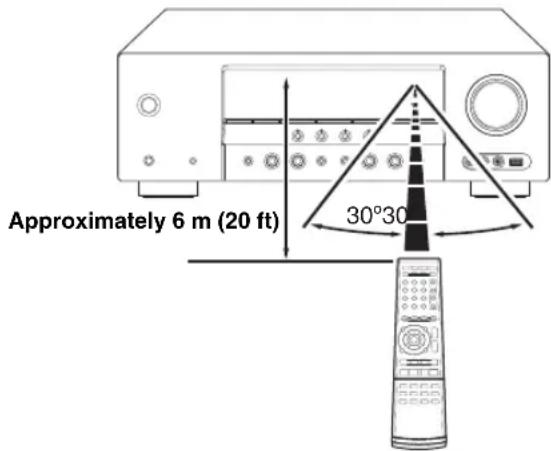
① Infrared window
Outputs infrared control signals. Aim this window at the component you want to operate.
中
To set the remote control codes for other components, see page 69.
Notes
- Do not spill water or other liquids on the remote control.
- Do not drop the remote control.
- Do not leave or store the remote control in the following types of conditions:
places of high humidity, such as near a bath
places of high temperature, such as near a heater or stove
places of extremely low temperatures
-dustyplaces
Optimizing the speaker setting for your listening room
This unit employs the YPAO (Yamaha Parametric Room Acoustic Optimizer) technology which lets you avoid troublesome listening-based speaker setup and achieves highly accurate sound adjustments automatically. The supplied optimizer microphone collects and this unit analyzes the sound your speakers produce in your actual listening environment.
Using AUTO SETUP
Notes
- Be advised that it is normal for loud test tones to be output during the "AUTO SETUP" procedure.
To achieve the best results, make sure the room is as quiet as possible while the "AUTO SETUP" procedure is in progress. If there is too much ambient noise, the results may not be satisfactory.
#
You can run "AUTO SETUP" using the system menu that appears in the OSD or in the front panel display. This manual uses the OSD illustrations to explain the "AUTO SETUP" procedure.
1 Make sure of the following check points.
Note
Before starting the automatic setup, check the following check points.
□Speakers are connected appropriately.
□Headphones are disconnected from this unit.
This unit and the video monitor are turned on.
This unit is selected as the video input source of the video monitor.
The connected subwoofer is turned on and the volume level is set to about half way (or slightly less).
The crossover frequency controls of the connected subwoofer is set to the maximum.
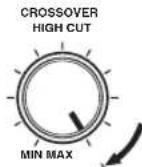
Controls of a subwoofer (example)
□FRONT A speakers are selected as the front speaker system (see page 33).
The room is sufficiently quiet.
2 Connect the supplied optimizer microphone to the OPTIMIZER MIC jack on the front panel.
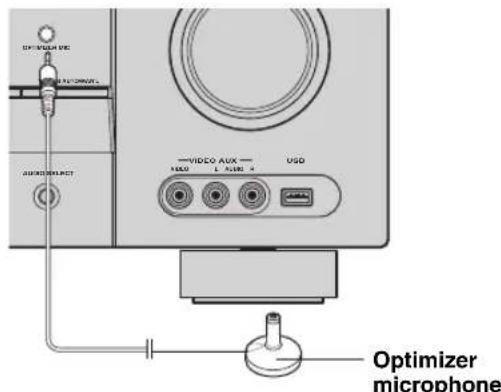
The following display appears in the OSD.
3 Place the optimizer microphone at your normal listening position on a flat level surface with the microphone heading upward.
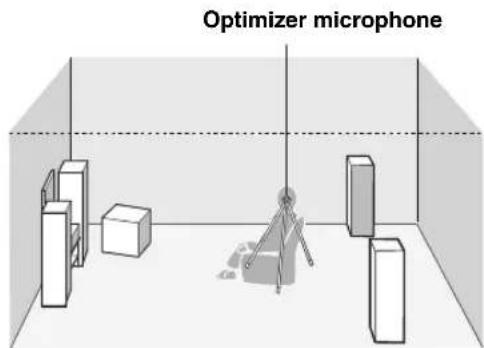
中
It is recommended that you use a tripod (etc.) to affix the optimizer microphone at the same height as your ears would be when you are seated in your listening position. You can use the attached screw of a tripod (etc.) to fix the optimizer microphone to the tripod (etc.).
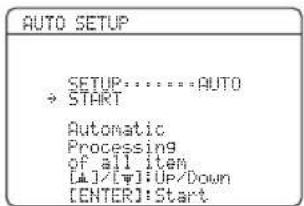
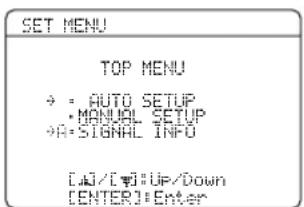
4 Make sure that "SETUP" is set to "AUTO" and the pointer is pointing at "START".
中
You can also select the following setup methods. In this case, press ⑦ to select "SETUP", press ⑦ < 1 / > to select the one of the following choices and then select "START".
Choices: AUTO, RELOAD, UNDO, DEFAULT
- Select "AUTO" to automatically run the entire "AUTO SETUP" procedure.
- Select "RELOAD" to reload the last "AUTO SETUP" settings and override the previous settings.
- Select "UNDO" to undo the last "AUTO SETUP" settings and restore the previous settings.
- Select "DEFAULT" to reset the "AUTO SETUP" parameters to the initial factory settings.
Note
"RELOAD" or "UNDO" is available only when you have previously run "AUTO SETUP" and confirmed the results.
5 Press ⑦ to select "START" and then press ⑦ ENTER to start the setup procedure.
The following message appears in the OSD.
NOTICE
Loud test tones are output.
Please keep quiet or leave the room,
Press [ENTER]
Before proceeding next operation
Once you perform the next operation, this unit starts the automatic setup procedure. For more accurate measurements, keep quiet and move to the wall where speakers are not around. We recommend that you leave the listening room during the automatic setup procedure.
6 Press ⑦ENTER to start the setup procedure.
This unit starts the auto setup procedure. Loud test tones are output from each speaker during the auto setup procedure. Once all items are set, the result display appears in the OSD.
Notes
- During the auto setup procedure, do not perform any operation on this unit.
- We recommend getting out of the room while this unit is in the auto setup procedure. It takes approximately 3 minutes for this unit to complete the auto setup procedure.
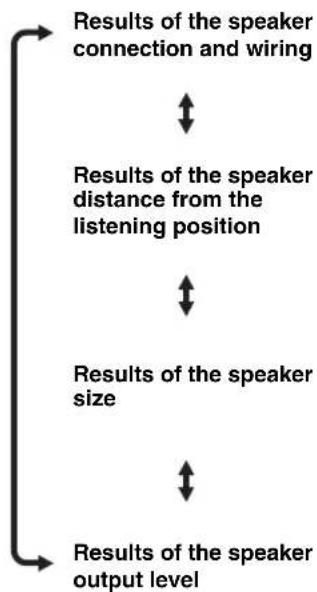
This unit performs the following checks:
Speaker wiring/volume level WIRING/LEVEL
Checks which speakers are connected and the polarity of each speaker. Also checks and adjusts the volume level of each speaker.
Speaker distance DISTANCE
Checks the distance of each speaker from the listening position and adjusts the timing of each channel.
Speaker size SIZE
Checks the frequency response of each speaker and sets the appropriate low-frequency crossover for each channel.
The display changes as follows.
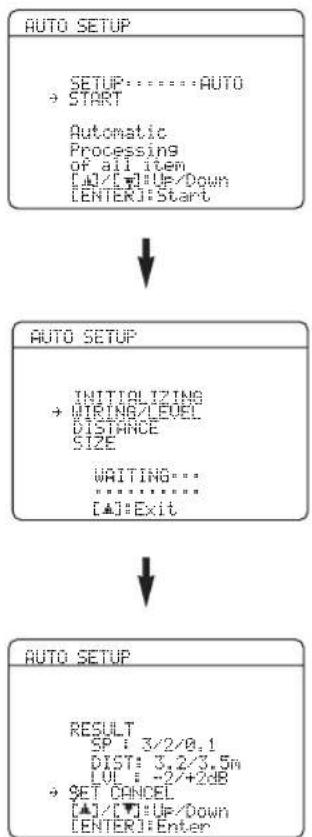
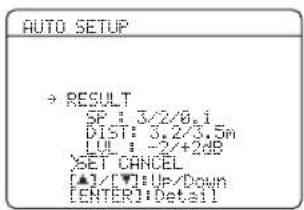
The results displayed under "RESULT" are as follows.
Number of speakers SP
Displays the number of speakers connected to this unit in the following order:
Front/Back/Subwoofer
Speaker distance DIST
Displays the speaker distance from the listening position in the following order:
Closest speaker distance/Farthest speaker distance
Speaker level LUL
Displays the speaker output level in the following order: Lowest speaker output level/Highest speaker output level
Notes
If "E-9:INTERNAL ERROR" appears during the testing procedure, restart from step 4.
- If you selected "RELOAD" in step 4, no test tones are output.
- If an error occurs during the "AUTO SETUP" procedure, the setup procedure is canceled and an error screen appears. For details, see "If an error screen appears" on page 27.
- When this unit detects potential problems during the "AUTO SETUP" procedure, "WARNING" and the number of warning messages appears (see page 27).
7 Press ⑦ and ⑦ ENTER to display the setup results in detail.
8 Press ⑦ < / > repeatedly to toggle between the setup result displays.
#
If you are not satisfied with the results or want to manually adjust each parameter, run "MANUAL SETUP" (see page 55).
Note
The distances displayed in the "DISTANCE" results may be longer than the actual distance depending on the characteristics of your speakers.
9 Press ⑦ ENTER to return to the result display.
10 Press ⑦ and then press ⑦ < / > to select "SET" or "CANCEL".
Choices: SET, CANCEL
- Select "SET" to confirm the "AUTO SETUP" results.
- Select "CANCEL" to cancel the "AUTO SETUP" results.
11 Press ⑦ ENTER to confirm your selection.
The top "SET MENU" display appears in the OSD.
12 Press ② MENU to exit from "SET MENU".
13 Disconnect the optimizer microphone from this unit.
The optimizer microphone is sensitive to heat. Keep it away from direct sunlight and do not place it on top of this unit.
#
If you change speakers, speaker positions, or the layout of your listening environment, run "AUTO SETUP" again to recalibrate your system.
If an error screen appears
Press ⑦ / / / to select "RETRY" or "EXIT" and then press ⑦ ENTER.
The following display is an example where "E-8:USER CANCEL" appears in the OSD.
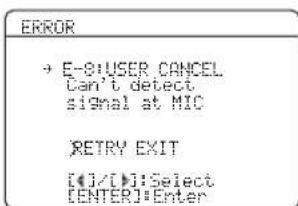
Choices: RETRY, EXIT
- Select "RETRY" to retry the "AUTO SETUP" procedure.
- Select "EXIT" to exit from the "AUTO SETUP" procedure.
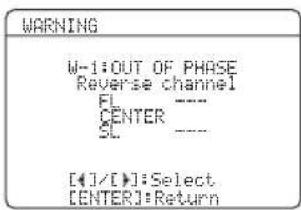
■If "WARNING" appears
When this unit detects potential problems during the "AUTO SETUP" procedure, "WARNING" appears in the result display. Check the warning messages to correct your speaker settings.
Note
Warnings differ from errors in that warnings do not cancel the "AUTO SETUP" procedure.
1 Make sure the pointer is pointing at "WARNING" and then press ⑦ EN display the detailed information ab warning.
The number on the right of "WARNING" indicates the number of warning messages.

2 Press ⑦ < / > repeatedly to toggle between the warning displays.
#
- For details about each warning message, see the "AUTO SETUP" section in "Troubleshooting" on page 75.
- When the corresponding warning message is not applicable to a speaker, "---" is displayed instead.
3 Press ⑦ENTER to return to the result display.
Selecting the SCENE templates
This unit is equipped with 16 preset SCENE templates for various situations of using this unit. As the initial factory setting, the following SCENE templates are assigned to each SCENE button:
SCENE 1: DVD Movie Viewing
SCENE 2: Music Disc Listening
SCENE 3: TV Viewing
SCENE 4: Radio Listening
If you want to use other SCENE templates, you can select the desired SCENE templates from the SCENE template library and assign the templates to the selected SCENE buttons on the front panel and the remote control.
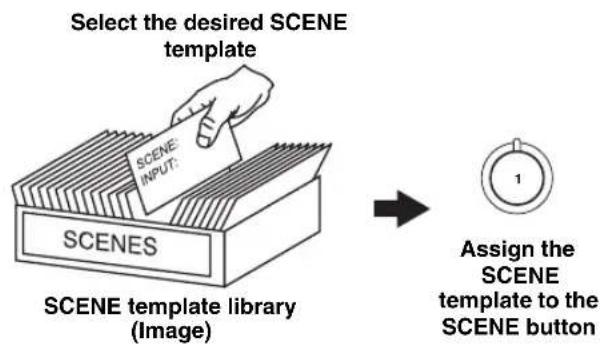
Selecting the desired SCENE template
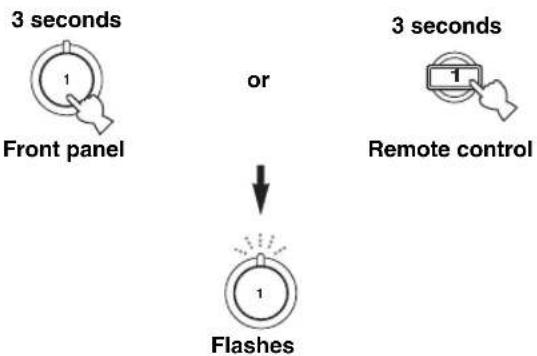
1 Press and hold the desired @SCENE (or 5SCENE) button for 3 seconds.
The indicator on the selected SCENE button on the front panel starts to flash, and the name of the currently assigned SCENE template appears in the front panel display.
DVD Movie View
2 Press INPUT < / > (or press ④ AMP and then press ⑦ < / > ) to select the desired template.
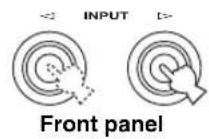
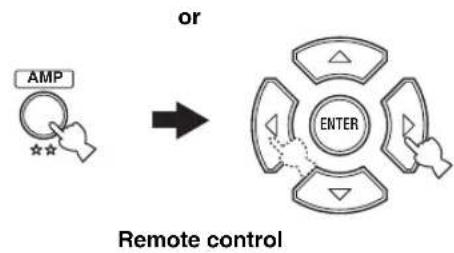
DVD Viewing
3 Press the @SCENE (or 5 SCENE) button again to confirm the selection.
The selected SCENE template is assigned to the button.

or

Remote controlFront panel
Note
Once the desired SCENE templates are assigned to the corresponding SCENE buttons, you may need to set the input source of the SCENE template on the remote control. See page 32 for details.
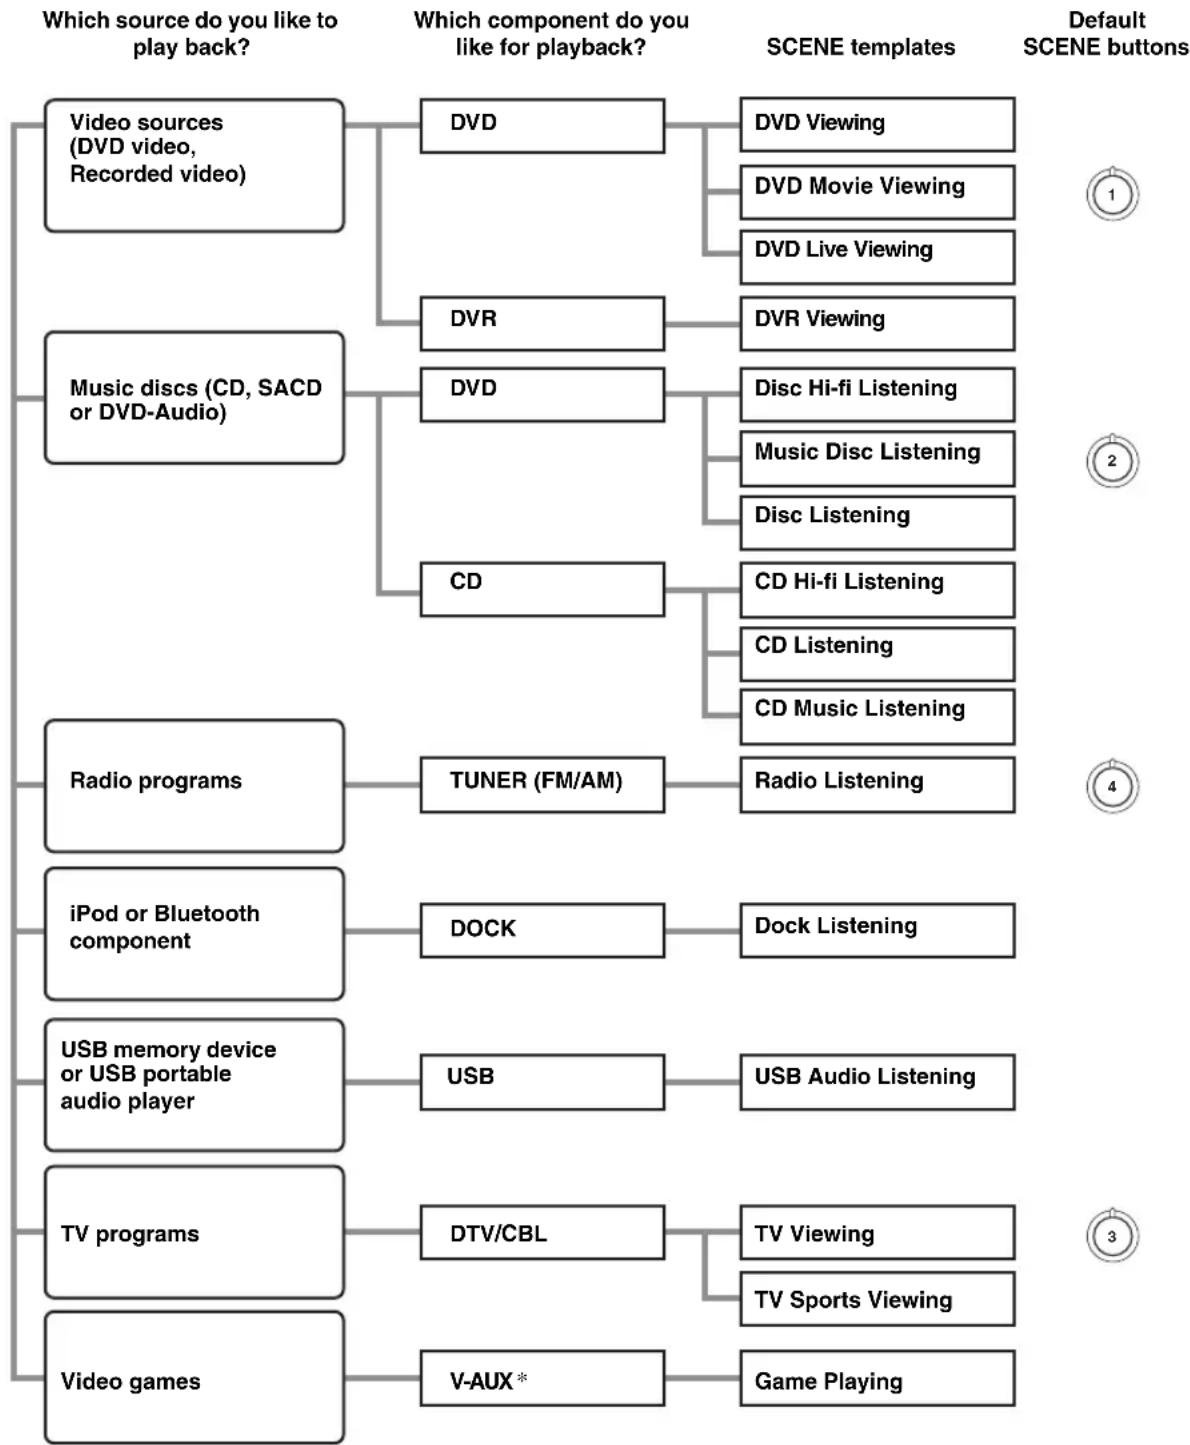
Which SCENE template would you like to select?
Note
- When iPod is connected to the Yamaha iPod universal dock or a Bluetooth component is connected to the Bluetooth adapter, this unit plays back the audio sources input at the DOCK terminal.
You can create your original SCENE templates by editing the preset SCENE templates. See page 31 for details.
■Preset SCENE templates descriptions
The illustrations of the SCENE button in the following table indicate the assigned SCENE buttons in the default setting.
| SCENE template Input source playback mode Features | |||
| DVD Viewing | DVD STRAIGHT | Select this SCENE template when you play back general contents on the DVD player. | |
| DVD Movie Viewing | DVD MOVIE | Movie Dramatic | Select this SCENE template when you play back movies on your DVD player. |
| DVD Live Viewing | DVD MUSIC | Pop/Rock | Select this SCENE template when you enjoy the music live video on your DVD player. |
| DVR Viewing | DVR MOVIE | Movie Dramatic | Select this SCENE template when you play back movies on your digital video recorder. |
| Disc Hi-fi Listening | DVD DIRECT | Select this SCENE template when you enjoy the high fidelity sound of the music discs on your DVD player. | |
| Music Disc Listening | DVD STEREO | 2ch Stereo | Select this SCENE template when you play back music discs on your DVD player. |
| Disc Listening | DVD STEREO | 5ch Stereo | Select this SCENE template when you play back music sources on your DVD player as the background music. |
| CD Hi-fi Listening | CD DIRECT | Select this SCENE template when you enjoy the high fidelity sound of the music discs on your CD player. | |
| CD Listening | CD STEREO | 5ch Stereo | Select this SCENE template when you play back music discs on your CD player as the background music. |
| CD Music Listening | CD STEREO | 2ch Stereo | Select this SCENE template when you play back music source on your CD player. |
| Radio Listening | TUNER MUSIC | Enhancer 5ch Enhancer | Select this SCENE template when you enjoy FM or AM radio programs. |
| Dock Listening | DOCK MUSIC | Enhancer 5ch Enhancer | Select this SCENE template when you play back music on your iPod stationed in a Yamaha iPod universal dock or Bluetooth component that is connected to the Bluetooth adapter. |
| USB Audio Listening | USB MUSIC | Enhancer 5ch Enhancer | Select this SCENE template when you play back music on your USB memory device or a USB portable audio player. |
| TV Viewing | DTV/CBL | STRAIGHT | Select this SCENE template when you enjoy general programs on your TV. |
| TV Sports Viewing | DTV/CBL | ENTERTAINMENT TV Sports | Select this SCENE template when you enjoy sports programs on your TV. |
| Game Playing | V-AUX | ENTERTAINMENT Game | Select this SCENE template when you play video games. |
Creating your original SCENE templates
You can create your original SCENE templates for each SCENE button. You can refer to the preset 16 SCENE templates to create the original SCENE templates.
■Customizing the preset SCENE templates
Use this feature to customize the preset SCENE templates.
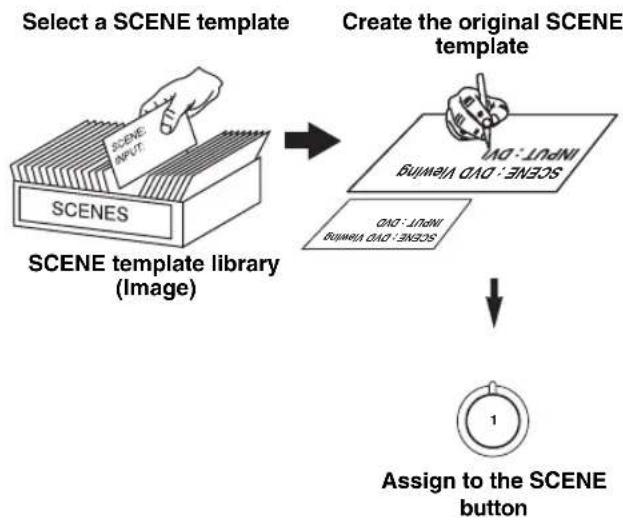
1 Turn on the video monitor connected to this unit.
2 Press and hold the desired ⑤SCENE button for 3 seconds.
The SCENE template customizing screen appears on the video monitor.

3 seconds
Note
When the SCENE template you want to customize is not assigned to any of the ⑤SCENE buttons, press ④AMP and then press ⑦ < 1 / 一 repeatedly to recall the desired SCENE template on the menu screen.
3 Press ④ AMP and then ⑦ / to select the desired parameter of the SCENE template and then ⑦ < 1 / 2> to select the desired value of the selected parameter.
You can adjust the following parameters for a SCENE template:
- INPUT: The input source component
-
MODE: The active sound field programs, STRAIGHT or DIRECT mode (see pages 39 and 41)
-
NIGHT: The night listening mode setting (see page 42)
-
SYSTEM: Keeps the current night listening mode.
- CINEMA: Sets the night listening mode to the CINEMA mode.
- MUSIC: Sets the night listening mode to the MUSIC mode.
4 Press the ⑤SCENE button again to confirm the edit.

#
An asterisk mark (*) appears by the name of the original SCENE template.
Notes
- Once the desired SCENE templates are assigned to the corresponding ⑤SCENE buttons, you may need to set the input source of the SCENE template on the remote control. See page 32 for details.
- You can create a customized SCENE template for each ⑤SCENE button, and if you create another customized SCENE template, this unit overwrites the old customized SCENE template with the new one.
- The newly created template is only available for the assigned ⑤SCENE button.
■Renaming the SCENE templates
Select the name of the SCENE template at step 3 of "Customizing the preset SCENE templates" and then press ⑦ ENTER.
Press ⑦ / to select the desired character.
- Press ⑦ / to place “_” (underscore) under the space or the desired character.
- Press ⑧ RETURN to cancel the new name.
- Press ⑦ ENTER to confirm the new name.
Using remote control on the SCENE feature
Controlling the input source components in the SCENE mode
You can operate both this unit and the input source component by using the remote control. You must set the appropriate remote control code for each input source in advance (see page 69).
1 Press the desired ⑤SCENE button on the remote control.
2 Press the desired buttons in the * area below to control the input source component of the selected SCENE template.
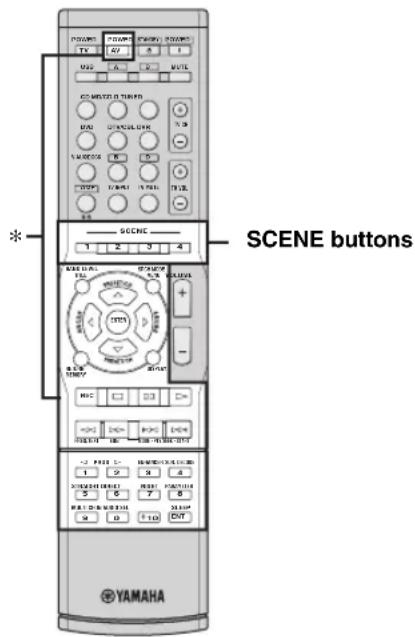
Press the ⑤SCENE button again to operate the input source component.
Setting input source of the customized SCENE template on the remote control
If you customize the input source of the selected SCENE template, you must set the input source of the SCENE template on the remote control to operate the input source component correctly.
Press and hold the ⑤ SCENE button and the desired input selector button (③) for 3 seconds.
Note
Playback
Caution
Extreme caution should be exercised when you play back CDs encoded in DTS. If you play back a CD encoded in DTS on a DTS-incompatible CD player, you will only hear some unwanted noise that may damage your speakers. Check whether your CD player supports CDs encoded in DTS. Also, check the sound output level of your CD player before you play back a CD encoded in DTS.
Basic operations
1 Turn on the video monitor connected to this unit.
2 Press ①SPEAKERS repeatedly to select the front speakers you want to use.
The respective speaker indicators lights up in the front panel display.
3 Press INPUT < 1 / > repeatedly (or press one of the input selector buttons (③)) to select the desired input source.
The name of the currently selected input source appears in the front panel display for a few seconds.
4 Start playback on the selected component or select a broadcast station.
Refer to the operating instructions for the source component.
See page 43 for details about FM/AM tuning instructions.
5 Rotate ①VOLUME (or press
② VOLUME + / - ) to adjust the volume to the desired output level.
6 Press ①PROGRAM / repeatedly (or press ④AMP and then ⑪PROG / repeatedly) to select the desired sound field program.
The name of the selected sound field program appears in the front panel display.
See page 38 for details about sound field programs.

Notes
- Choose a sound field program based on your listening preference, not merely on the name of the program.
- When you select an input source, this unit automatically selects the last sound field program used with the corresponding input source.
- Sound field programs cannot be selected when the component connected to the MULTI CH INPUT jacks is selected as the input source (scc page 34).
- When PCM signals with a sampling frequency higher than 48 kHz are input, this unit is automatically set to the "STRAIGHT" mode (see page 39).
- To display information about the currently selected input source in the OSD, see page 36 for details.
A quick guide to contents
| When you want to... | See page |
| Enjoy high quality sound 41 | |
| Adjust the tonal quality of the front speakers 41 | |
| Adjust the parameters of sound field programs 40 | |
| Enjoy the sources with a wide dynamic range at night 42 | |
| Use headphones 35 | |
| Select a decoder to play back sources with 39 | |
| Automatically set this unit to the standby mode 37 |
Selecting audio input jacks (AUDIO SELECT)
This unit comes with a variety of input jacks. Use this feature (audio input jack select) to switch between input jacks when more than one input jack is assigned to as the same input source.

- We recommend setting the audio input jack select to "AUTO" in most cases.
- You can adjust the default audio input jack select of this unit by using "AUDIO SELECT" in "OPTION MENU" (see page 65).
Press ① AUDIO SELECT (or press ④ AMP and then ⑤ AUDIO SEL) repeatedly to select the desired audio input jack select setting.
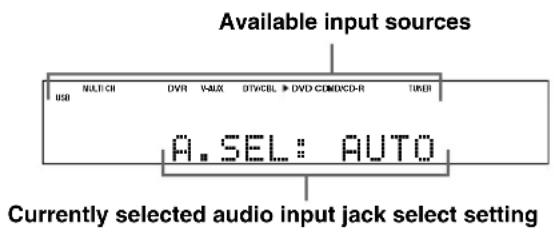
AUDIO SELECT Function
| AUTO | Automatically selects input signals in the following order:(1)HDMI(2)Digital signals(3) Analog signals |
| HDMI | Selects only HDMI signals. When HDMI signals are not input, no sound is output. |
| COAX/OPT | Selects only digital signals. When no signals are input, no sound is output. |
| ANALOG | Selects only analog signals. If no analog signals are input, no sound is output. |
Note
This feature is not available when no digital input jacks (OPTICAL, COAXIAL and HDMI) are assigned. In addition, HDMI is not available as an audio input jack select setting when the HDMI IN DVD and HDMI IN DTV/CBL jacks are not used. Use "INPUT ASSIGNMENT" in "INPUT MENU" to reassign the respective input jack (see page 62).
Selecting the MULTI CH INPUT component
Use this feature to select the component connected to the MULTI CH INPUT jacks (see page 18) as the input source.
Press INPUT < / > repeatedly (or press 4AMP and then 14MULTI CH IN) to select MULTICH.
"MULTI CH" appears in the front panel display.

Use "MULTI CH SET" menu in "INPUT MENU" to set the parameters for MULTI CH INPUT (see page 63).
Note
The input signals are amplified and output directly without sound processing. Therefore, you cannot activate sound field programs, the night listening mode, etc. while MULTI CH is selected as the input source.
Displaying the current status of this unit on a video monitor
You can display the operating information of this unit on a video monitor.
1 Turn on the video monitor connected to this unit.
2 Press DISPLAY.
The current status screen appears in the OSD.

中
You can select the amount of time that the current status is displayed in the OSD by using the "OSD-AMP" parameter in "OPTION MENU" (see page 64).
Note
The OSD signal is not output at the DVR VIDEO OUT jacks and will not be recorded.
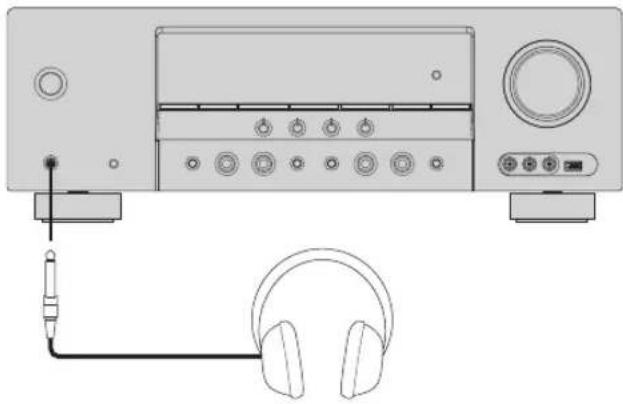
Using your headphones
Connect a pair of headphones with a stereo analog audio cable plug to the PHONES jack on the front panel.
#
When you select a sound field program, SILENT CINEMA mode is automatically activated (see page 39).
Notes
- When you connect headphones, no signals are output at the speaker terminals.
- All Dolby Digital and DTS audio signals are mixed down to the left and right headphone channels.
Muting the audio output
Press 19 MUTE to mute the audio output. Press 19 MUTE again to resume the audio output.
中
- You can also rotate ① VOLUME or press ② VOLUME +/− to resume the audio output.
- You can adjust the muting level by using the "MUTE TYPE" parameter in "SOUND MENU" (see page 60).
- The MUTE indicator flashes in the front panel display when the audio output is muted and disappears from the front panel display when the audio output is resumed.
Playing video sources in the background of an audio source
You can combine a video image from a video source with sound from an audio source. For example, you can enjoy listening to classical music while viewing beautiful scenery from the video source on the video monitor.
Press the input selector buttons (③) to select a video source and then an audio source.
中
- You can also select "MULTI CH" as the audio source (see page 34). Press ④ AMP and then press ④ MULTI CH IN.
- Set the "BGV" parameter in the "MULTI CH SET" menu to the desired setting to select the default background video input source of the MULTI CH INPUT sources (see page 63).
Displaying the input source information
You can display the format, sampling frequency, channel, bit rate and flag data of the current input signal.
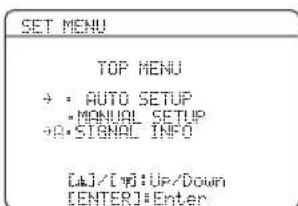
1 Press ④AMP and then ②MENU.
The top "SET MENU" display appears in the OSD.
2 Press ⑦ repeatedly to select "SIGNAL INFO" and then press ⑦ ENTER.
The audio information about the input source appears in the OSD.
3 Press ⑦ < / 口 to toggle between the audio and video information displays.
4 Press ② MENU again to exit from “SET MENU”.
Audio information
| Information Descriptions | |
| FORMAT | Signal format. When this unit cannot detect a digital signal, it automatically switches to analog input. |
| SAMPLING | The number of samples per second taken from a continuous signal to make a discrete signal. |
| CHANNEL | The number of source channels in the input signal (front/surround/LFE). For example, a multi-channel soundtrack with 3 front channels, 2 surround channels and LFE, is displayed as “3/2/0.1”. |
| BITRATE | The number of bits passing a given point per second. |
| FLAG | Flag data encoded in DTS, Dolby Digital, or PCM signals that cue this unit to automatically switch decoders. |
Note
“——” appears when this unit cannot display the corresponding information.
Video information
| Information Descriptions | |
| HDMI SIGNAL | Type of the source video signals and the video signals output at the HDMI OUT jack of this unit. |
| HDMI RES. | Resolution of the HDMI signals input or output at the HDMI IN/OUT jacks of this unit. |
| HDMI ERROR (Only when error is detected) | Error message for HDMI sources or connected HDMI devices. See “HDMI error and message” for details. |
Note
"——" appears when this unit cannot display the corresponding information.
HDMI error and message
| Message Cause | |
| DEVICE OVER | The number of the connected HDMI components is over the limit. |
| HDCP ERROR | HDCP authentication failed. |
| OUT OF RES. | The connected monitor is not compatible with the resolution of the input video signal. |
Using the sleep timer
Use this feature to automatically set this unit to the standby mode after a certain amount of time.
Press ④ AMP and then press ⑧ SLEEP repeatedly to set the amount of time.
Each time you press ⑧ SLEEP, the front panel display changes as shown below.

The SLEEP indicator flashes while you are switching the amount of time for the sleep timer. Once the sleep timer is set, the SLEEP indicator lights up in the front panel display, and the display returns to the selected sound field program.
#
To cancel the sleep timer, press ④ AMP and then press 2SLEEP repeatedly until "SLEEP OFF" appears in the front panel display.
- The sleep timer setting can also be canceled by pressing STANDBY/ON (or STANDBY) to set this unit to the standby mode.
Sound field programs
This unit is equipped with a variety of precise digital decoders that allow you to enjoy multi-channel playback from almost any stereo or multi-channel sound source.
Press ①PROGRAM < / > (or press ④AMP and then press ⑪PROG < / > repeatedly).
The name of the selected sound field program appears in the front panel display.
Notes
- When you select an input source, this unit automatically selects the last sound field program used with the corresponding input source.
- Sound field programs cannot be selected when the component connected to the MULTI CH INPUT jacks is selected as the input source (see page 34).
- When PCM signals with a sampling frequency higher than 48 kHz are input, this unit is automatically set to the "STRAIGHT" mode (see page 39).

Choose a sound field program based on your listening preference, not merely on the name of the program itself.
Sound field program descriptions
| Category Program Features | ||
| MUSIC | Pop/Rock | CINEMA DSP processing. This program presents an image of pop, rock, or jazz live concert. The sound field reproduces the spaciousness of a massive pavilion with an emphasis on the vividness of vocals on the stage and solo instruments and the beats of rhythm instruments. |
| Hall | CINEMA DSP processing. This sound field is suitable for classic and orchestral music. The program uses data collected in a large concert hall in Munich. You can enjoy delicate and beautiful reverberation and a majestic atmosphere. | |
| Jazz | CINEMA DSP processing. The sound field is suitable for jazz and fusion music. It uses data collected in a famous jazz club in New York. You can enjoy clear reverberation. | |
| ENTERTAINMENT | Game | CINEMA DSP processing. You can enjoy dynamic and thrilling sound effects as you play games. The program lets you feel the depth and three-dimensional surrounding sounds of the field where you are playing, and offers cinema-like surrounding sound effects for the scenes of movies. |
| TV Sports | CINEMA DSP processing. You can enjoy sports relays broadcast in stereo and variety shows with a live sound environment. For sports relays, the voices of commentators and announcers come clearly from the center; the cheers and atmosphere in the stadium spread around within a comfortable range, and you can feel like as if you are in the stadium. | |
| MOVIE | Movie Spacious | CINEMA DSP processing. The sound field is suitable for movies with an emphasis on spectacular sound effects, and is a perfect fit with a wide screen. The program reproduces a wide dynamic range from minimum sound effects to powerful sounds. |
| Movie Dramatic | CINEMA DSP processing. This sound field is also suitable for movies with an emphasis on three-dimensional sound effects. It restrains reverberation to an moderate extent, but reproduces sound effects and background music in a soft, three-dimensional manner with clarity and center orientation of voices as pivots. | |
| STEREO | 2ch Stereo | Downmixes multi-channel sources to 2 channel or plays back 2-channel sources as they are. |
| 5ch Stereo | CINEMA DSP processing. Using this program increases the listening position range. This is a sound field suitable for background music at parties. | |
| MUSIC ENHANCER | 2ch Enhancer | Select these programs to play back compression artifacts (such as the MP3 format) in 2-channel or 5-channel stereo. This program enhances your listening experience by regenerating the missing harmonics in a compression artifact. |
| 5ch Enhancer | ||
Note
The sound field programs of this unit are recreations of real-world acoustic environments made from precise measurements taken in the actual concert hall, music venue, movie theater, etc. Thus, you may notice variations in the strength of the reflections coming from each direction.
■Enjoying 2-channel sources using the standard decoders
Signals input from 2-channel sources can also be played back on multi-channels.
Press ④AMP and then press ②SUR. DECODE repeatedly to select a decoder.
You can select from the following decoders depending on the type of source you are playing and your personal preference.
| Decoder Functions | |
| Pro Logic | Dolby Pro Logic processing for any sources |
| PLII Movie | Dolby Pro Logic II processing for movie sources |
| PLII Music | Dolby Pro Logic II processing for music sources |
| PLII Game | Dolby Pro Logic II processing for game sources |
■Using sound field programs without surround speakers (Virtual CINEMA DSP)
Virtual CINEMA DSP allows you to enjoy the CINEMA DSP programs without surround speakers by creating virtual speakers.
If you set "SUR. L/R SP" to "NONE" (see page 58), Virtual CINEMA DSP is automatically activated whenever you select a CINEMA DSP program (see page 38).
Note
Virtual CINEMA DSP will not be activated even when "SUR. L/R SP" is set to "NONE" (see page 58) in the following cases:
- when "5ch Stereo" (see page 38) is selected.
- when headphones are connected to the PHONES jack.
■Enjoying multi-channel sources and sound field programs with headphones (SILENT CINEMA)
SILENT CINEMA allows you to enjoy multi-channel music or movie sound, including Dolby Digital and DTS sources, through ordinary headphones. SILENT CINEMA is automatically activated whenever you connect headphones to the PHONES jack while listening to CINEMA DSP sound field programs (except for 5ch Stereo) (see page 38). When activated, the SILENT CINEMA indicator lights up in the front panel display.
■Enjoying unprocessed input sources (Straight decoding mode)
When this unit is in the "STRAIGHT" mode, multichannel sources are decoded straight into the appropriate channels without any additional effect processing. 2-channel stereo sources are output from only the front left and right speakers.
Press ⑧STRAIGHT (or press ④AMP and then press ②STRAIGHT) to select "STRAIGHT".
To deactivate the "STRAIGHT" mode, press
STRAIGHT (or press 4 AMP and then
⑫ STRAIGHT) again so that "STRAIGHT" disappears from the front panel display.
Sound field programs
■Editing sound fields parameters
You can enjoy good quality sound with the factory default parameters. Although you do not have to change the initial settings, you can change some of the parameters to better suit the input source or your listening room.
1 While listening to a source, press ④AMP and then press ②PARAMETER.
2 Press ⑦ / to select the desired parameter you want to change.
3 Press ⑦ < / 口 to change the parameter value.
Note
You cannot change parameter values when "MEMORY GUARD" in "OPTION MENU" is set to "ON" (see page 64).
中
Initial settings are indicated in bold under each parameter.
For Pop/Rock, Hall, Jazz, Game, TV Sports, Movie Spacious and Movie Dramatic:
DSP level DSP LEVEL
Function: Adjusts the effect level.
Choices: MIN, MID, MAX
For 2ch Enhancer and 5ch Enhancer:
Effect level EFFECT LEVEL
Function: Adjusts the effect level.
Choices: LOW, HIGH
For Pro Logic II Music:
Panorama PANORA
Function: Sends stereo signals to the surround speakers as well as the front speakers for a wraparound effect.
Choices: OFF, ON
Dimension DIMENSION
Function: Gradually adjusts the sound field either towards the front or towards the rear.
Control range: -3 (towards the rear) to +3 (towards the front), initial setting is STD (standard).
Center width CT WIDTH
Function: Adjusts the center image from all three front speakers to varying degrees. A larger value adjusts the center image towards the front left and right speakers.
Control range: 0 (center channel sound is output only from center speaker) to 7 (center channel sound is output only from front left and right speakers), initial setting is 3.
Using audio features
Enjoying high quality sound
Use the DIRECT mode to enjoy the high quality sounds of the selected source. When the DIRECT mode is activated, this unit plays back the selected source with the least circuitry.
Press ⑨ DIRECT (or press ④ AMP and then 13 DIRECT) to select "DIRECT".
Notes
TONE CONTROL and SOUND MENU (see page 57) settings (except for speaker level settings) are not effective.
- The front panel display automatically dims.
#
While DIRECT mode is activated, the front panel display turns on momentarily when an operation is performed.
Adjusting the tonal quality
Use this feature to adjust the balance of bass and treble for the front left and right speaker channels.
中
Speaker and headache adjustments are stored independently.
1 Press TONE CONTROL repeatedly to select the high-frequency response (TREBLE) or the low-frequency response (BASS).
2 Press 口 P R O G R A M < / 口 > repeatedly to adjust the high-frequency response (TREBLE) or the low-frequency response (BASS).
Notes
- If you increase or decrease the high-frequency or the low-frequency sound to an extreme level, the tonal quality of the surround speakers may not match.
TONE CONTROL is not effective when this unit is in the DIRECT mode, or when MULTI CH is selected as the input source.
Adjusting the speaker level
You can adjust the output level of each speaker while listening to a music source. This is also possible when playing sources input at the MULTI CH INPUT jacks.
Note
This operation will override the level adjustments made in "AUTO SETUP" (see page 24) and "SP LEVEL" (see page 59).
1 Press
④AMP and then press ⑥LEVEL on
the remote control and then 7 / to select the speaker you want to adjust.
Display Adjusted speaker
FRONT L Front left speaker
FRONT R Front right speaker
CENTER Center speaker
SWFR Subwoofer
SUR. L Surroundd left speaker
SUR. R Surround right speaker
中
- The available speaker channels differ depending on the setting of the speakers.
- When the video monitor is turned on, the "SPEAKER LEVEL" adjustment menu appears in the video monitor.
2 Press ⑦ < / 口 to adjust the speaker output level.
- Pr e7 to increase the value.
- Pr e7s to decrease the value.
Control range: -10dB to +10dB
3 Press ⑥ LEVEL to turn off the speaker level adjustment display.
Selecting the night listening mode
The night listening modes are designed to improve listenability at lower volumes or at night.
1 Press
④AMP and then ②NIGHT repeatedly
to select "NIGHT:CINEMA" or
"Night:MUSIC".
Choices: NIGHT:CINEMA, NIGHT:MUSIC, OFF
- Select "NIGHT:CINEMA" when watching films to reduce the dynamic range of film soundtracks and make dialog easier to hear at lower volumes.
- Select "NIGHT:MUSIC" when listening to music sources to preserve ease-of-listening for all sounds.
- Select "OFF" if you do not want to use this feature.
When a night listening mode is selected, the NIGHT indicator lights up in the front panel display.
2 Press
⑦ / to adjust the effect level while
"Night:CINEMA" or "NIGHT:MUSIC" is
displayed in the front panel display.
Effect.Lv1:MID
Choices: MIN, MID, MAX
- Select "MIN" for minimum compression.
- Select "MID" for standard compression.
- Select "MAX" for maximum compression.
"Night:CINEMA" and "NIGHT:MUSIC" adjustments are stored independently.
Notes
-
You cannot use the night listening modes in the following cases:
-
when the DIRECT mode (see page 41) is selected.
-
when the component connected to the MULTI CH INPUT jacks is selected as the input source (see page 34).
-
when headphones are connected to the PHONES jack.
-
The night listening modes may vary in effectiveness depending on the input source and surround sound settings you use.
FM/AM tuning
There are 2 tuning methods: automatic and manual. Automatic tuning is effective when station signals are strong and there is no interference. If the signal from the station you want to select is weak, tune into it manually. You can also use the automatic and manual preset tuning features to store up to 40 stations.
Automatic tuning
Automatic tuning is effective when station signals are strong and there is no interference.
1 Press INPUT / repeatedly so that "TUNER" is displayed in the front panel display.
2 Press © BAND to select the reception band (FM or AM).
3 Press TUNING AUTO/MAN'L so that the AUTO indicator lights up in the front panel display.
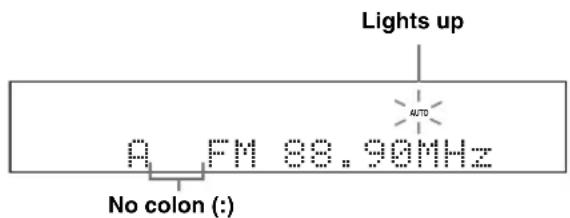
If a colon (·) appears in the front panel display, automatic tuning is not possible. Press PRESET/TUNING to turn the colon (·) off.
4 Press ⑥ PRESET/TUNING/CH / once to begin automatic tuning.
When this unit is tuned into a station, the TUNED indicator lights up and the frequency of the received station is shown in the front panel display.
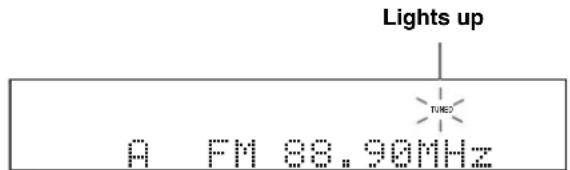
Manual tuning
If the signal received from the station you want to select is weak, tune into it manually.
Note
Manually tuning into an FM station automatically switches the tuner to monaural reception to increase the signal quality.
1 Press INPUT / repeatedly so that "TUNER" is displayed in the front panel display.
2 Press BAND to select the reception band (FM or AM).
3 Press TUNING AUTO/MAN'L so that the AUTO indicator disappears from the front panel display.
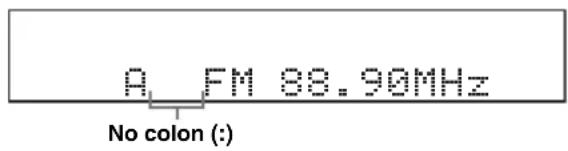
If a colon (·) appears in the front panel display, manual tuning is not possible. Press PRESET/TUNING to turn the colon (·) off.
4 Press ⑥ PRESET/TUNING/CH / to tune into the desired station manually.
中
Hold down the button to continue searching.
Automatic preset tuning
You can use the automatic preset tuning feature to store FM stations with strong signals up to 40 (A1 to E8: 8 preset station numbers in each of the 5 preset station groups) of those stations in order. You can then recall any preset station easily by selecting the preset station number.
1 Press INPUT / repeatedly so that "TUNER" is displayed in the front panel display.
2 Press © BAND to select "FM" as the reception band.
3 Press and hold ⑤ MEMORY for more than 3 seconds.
The preset station number as well as the MEMORY and AUTO indicators flashes. After approximately 5 seconds, automatic presetting starts from the current frequency and proceeds toward the higher frequencies.
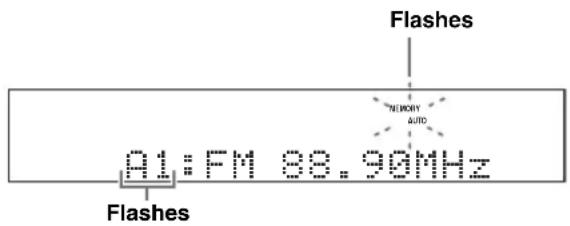
When automatic preset tuning is completed, the front panel display shows the frequency of the last preset station.
#
You can select the preset station group and the preset station number where the first received station will be stored by pressing A/B/C/D/E and then PRESET/TUNING/CH </>.
Notes
- Any stored station data existing under a preset station number is cleared when you store a new station under the same preset station number.
- Only FM stations with sufficient signal strength are stored automatically by automatic preset tuning. If the station you want to store is weak in signal strength, tune into it manually and store it as described in "Manual preset tuning" on this page.
- Only Radio Data System broadcasting station are stored automatically by automatic preset tuning (Europe and Russia models only).
Manual preset tuning
You can also store up to 40 stations (A1 to E8: 8 preset station numbers in each of the 5 preset station groups) manually.
1 Tune into a station automatically or manually.
See page 43 for tuning instructions.
2 Press ⑤ MEMORY.
The MEMORY indicator flashes in the front panel display for approximately 30 seconds.
3 Press D A/B/C/D/E and E PRESET/ TUNING/CH / repeatedly to select a preset station group (A1 to E8) while the MEMORY indicator is flashing.
Check that the colon (·) appears in the front panel display.
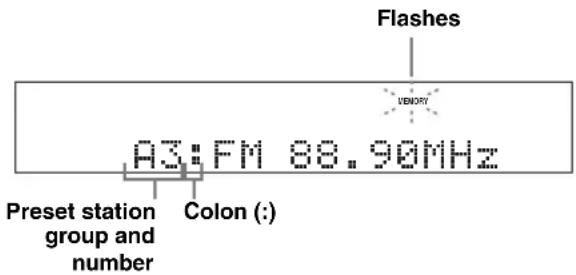
4 Press MEMORY while the MEMORY indicator is flashing.
The station band and frequency appear in the front panel display with the preset station group and number you have selected.
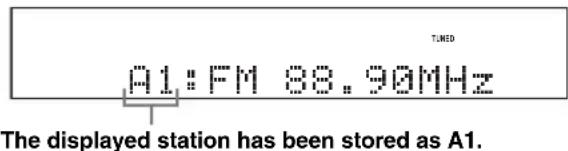
Notes
- Any stored station data existing under a preset station number is cleared when you store a new station under the same preset station number.
- The reception mode (stereo or monaural) is stored along with the station frequency.
Selecting preset stations
You can tune into any desired station simply by selecting the preset station group and number under which it was stored.
#
When performing this operation with the remote control, press ③ TUNER to select "TUNER" as the input source.
1 Press ① A/B/C/D/E (or ⑦ A/B/C/D/E ) repeatedly to select the desired preset station group (A to E).
The preset station group letter appears in the front panel display and changes each time you press the button.
2 Press PRESET/TUNING/CH / (or ⑦ PRESET/CH /) to select the desired preset station number (1 to 8).
The preset station group and number appear in the front panel display along with the station band and frequency.
E1: FM 88.90MHz
中
You can select the desired preset station number (1 to 8) directly by pressing the numeric buttons on the remote control.
Exchanging preset station
You can exchange the assignments of two preset stations with each other. The example below describes the procedure to exchange preset station "E1" with "A5".
1 Select preset station "E1" using ① A/B/C/D/E and 已 PRESET/TUNING/CH /
See "Selecting preset stations" on this page.
2 Press and hold ⑧ PRESET/TUNING for more than 3 seconds.
"E1" and the MEMORY indicator flash in the front panel display.
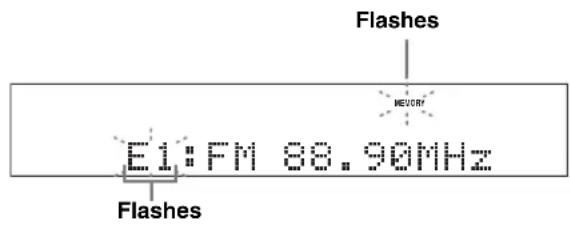
3 Select preset station "A5" using ① A/B/C/D/E and 已 PRESET/TUNING/CH /
"A5" and the MEMORY indicator flash in the front panel display.
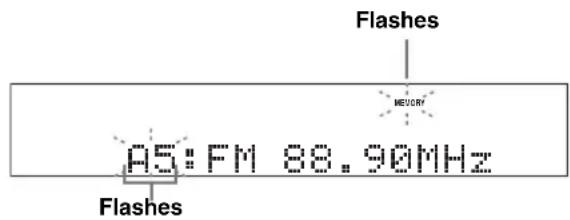
4 Press PRESET/TUNING again.
"EXCHANGE E1-A5" appears in the front panel display and the assignments of the two preset stations are exchanged.
Radio Data System tuning (Europe and Russia models only)
Radio Data System is a data transmission system used by FM stations in many countries. This unit can receive various Radio Data System data such as PS (program service), PTY (program type), RT (radio text), CT (clock time), and EON (enhanced other networks) when receiving Radio Data System broadcasting stations.
Displaying the Radio Data System information
Use this feature to display the 4 types of the Radio Data System information: PS (program service), PTY (program type), RT (radio text) and CT (clock time). The corresponding indicators light up in the front panel display.
Notes
- You can select one of the Radio Data System display modes only when the corresponding Radio Data System indicator lights up in the front panel display. It may take a while for this unit to receive all of the Radio Data System data from the station.
- You can select only the available Radio Data System display modes being offered by the station.
- If the signals being received are not strong enough, this unit may not be able to utilize the Radio Data System data. In particular, the "RT" mode requires a large amount of data and may not be available even when the other Radio Data System display modes are available.
- In case of poor reception conditions, press TUNING AUTO/ MAN' on the front panel so that the AUTO indicator disappears from the front panel display.
- If the signal strength is weakened by external interference while this unit is receiving the Radio Data System data, the reception may be cut off unexpectedly and "...WAIT" appears in the front panel display.
- When the "RT" mode is selected, this unit can display the program information by a maximum of 64 alphanumeric characters, including the umlaut symbol. Unavailable characters are displayed with the " _" (underscore).
- If the reception is cut off when the "CT" mode is selected, "CT WAIT" appears in the front panel display.
1 Tune into the desired Radio Data System broadcasting station.
- We recommend using the automatic preset tuning to tune into the Radio Data System broadcasting stations (see page 44).
- You can also use PTY SEEK mode to tune into the desired Radio Data System broadcasting station from the preset ones.
2 Press FREQ/TEXT on the remote control repeatedly to select the desired Radio Data System display mode.
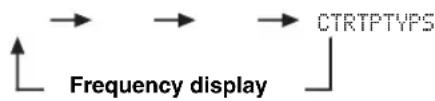
- Select "PS" to display the name of the Radio Data System program currently being received.
- Select "PTY" to display the type of the Radio Data System program currently being received.
- Select "RT" to display the information on the Radio Data System program currently being received.
- Select "CT" to display the current time.
Selecting the Radio Data System program type (PTY SEEK mode)
Use this feature to select the desired radio program by program type from the all preset Radio Data System broadcasting stations.
中
Use the automatic preset tuning feature to preset Radio Data System broadcasting stations (see page 44).
1 Press ③ TUNER on the remote control to select "TUNER" as the input source.
2 Press 10 PTY SEEK MODE on the remote control to set this unit to the PTY SEEK mode.
The name of the program type or "NEWS" flashes in the front panel display.

To cancel the PTY SEEK mode, press ⑩PTY SEEK MODE on the remote control again.
3 Press ⑦ PRESET/CH / on the remote control to select the desired program type.
The name of the selected program type appears in the front panel display.

Lights up
| Program type Descriptions | |
| NEWS | News |
| AFFAIRS | Current affairs |
| INFO | General information |
| SPORT | Sports |
| EDUCATE | Education |
| DRAMA | Drama |
| CULTURE | Culture |
| SCIENCE | Science |
| VARIED | Light entertainment |
| POP M | Popular music |
| ROCK M | Rock music |
| M.O.R. M | Middle-of-the-road music (easy-listening) |
| LIGHT M | Light classics |
| CLASSICS | Serious classics |
| OTHER M | Other music |
4 Press 10PTY SEEK START on the remote control to start searching for all the available Radio Data System preset stations.
The name of the selected program type flashes and the PTY HOLD indicator lights up in the front panel display while this unit is searching for stations.


To stop searching for stations, press ⑩PTY SEEK START on the remote control again.
Notes
- This unit stops searching for stations when a station broadcasting the selected program type is found.
- If the station found is not the one you desire, press PTY SEEK START again to resume searching for another station broadcasting the same program type.
Using the enhanced other networks (EON) data service
Use this feature to receive the EON (enhanced other networks) data service of the Radio Data System station network. Once you select one of the 4 Radio Data System program types (NEWS, AFFAIRS, INFO, or SPORT), this unit automatically searches for all the available preset stations that are scheduled to broadcast the EON data service of the selected program type for a certain duration of time. When the scheduled EON data service starts, this unit automatically switches to the local station broadcasting the EON data service and then switches back to the national station once the EON data service ends.
Notes
- You can use this feature only when the EON data service is available.
- The EON indicator lights up in the front panel display only when the EON data service is being received from a Radio Data System station.
1 Tune into the desired Radio Data System broadcasting station.
2 Make sure the EON indicator is lit in the front panel display.
If the EON indicator is not lit in the front panel display, select another Radio Data System program so that the EON indicator lights up.

3 Press ⑩ EON on the remote control repeatedly to select one of the 4 Radio Data System program types (NEWS, AFFAIRS, INFO or SPORT).
The name of the selected program type appears in the front panel display.

#
To cancel the EON feature, press ⑩ EON on the remote control repeatedly until the name of the program type disappears and "EON OFF" appears in the front panel display.
Using a USB memory device or a USB portable audio player
Use this feature to enjoy WAV (PCM format only), MP3 and WMA files saved on your USB memory device or USB portable audio player connected to the USB port on the front panel of this unit.
Supported USB devices
This unit supports USB mass storage class devices (except USB hard disk drives) using FAT16 or FAT32 format.
Notes
- Only the first partition (32 GB or less) is displayed in the OSD. You cannot select files in other partitions.
- Up to 8 levels of directory hierarchy and 500 music files per directory are recognized.
- Some devices may not work properly even if they meet the requirements.
- Some WAV, MP3 and WMA files may not be playable or may be noisy when played.
Connecting a USB memory device or a USB potable audio player
Connect a USB jack of a USB memory device or USB portable audio player to the USB port on the front panel of this unit.
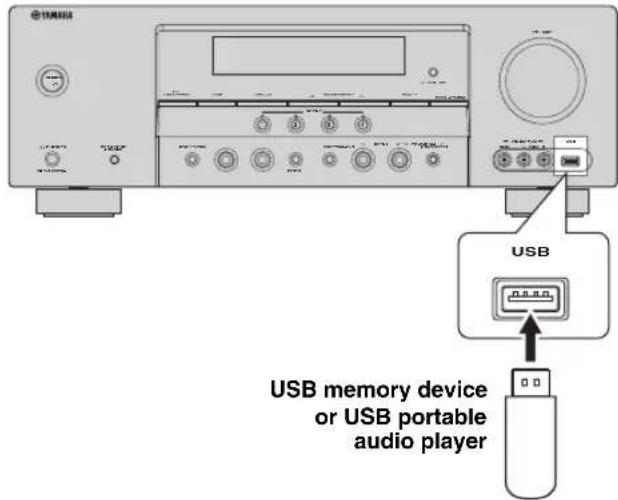
Playback operation
Follow the procedures below to enjoy the music stored in your USB device or a USB portable audio player.
1 Press INPUT / repeatedly (or press ③USB) to select USB.
The cursor on the left of the USB indicator lights up in the front panel display, and the contents previously played is automatically played.
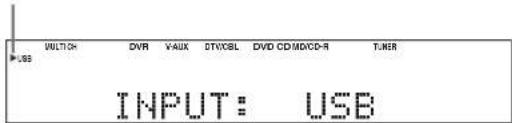
Lights up
2 Press DISPLAY to display the top USB file list.
The USB file list appears in the OSD.
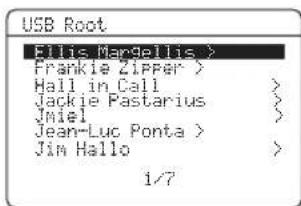

- ">>" in the right corner of each menu line indicates that there is a submenu available in the next menu level.
- When this unit is in the top directory, "Root" appears beside "USB".
3 Press ⑦ / / < 1 / > on the remote control to select the desired file.
- Press ⑦ / to select the desired file/folder.
- Press ⑦ ENTER or ⑦ > to enter the selected folder.
- Press ⑦ to return to the previous folder level.
4 Press ⑦ ENTER to play the selected file.
- You can use ⑨ 卡 卡 / 卡 to skip backward/forward and ⑨ > /to start/stop playback independently from the menu in the OSD.
- You can set the settings for repeat and shuffle mode by using the "USB PLAY STYLE" parameters in "OPTION MENU" (see page 66).
- You can select the display mode in the front panel display by using "FL SCROLL" in "OPTION MENU" (see page 64).
The function of the play information display
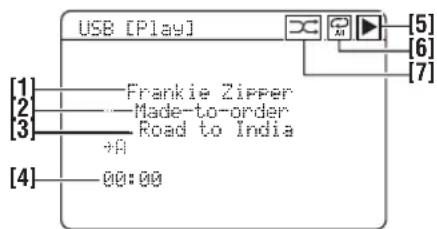
[1] Name of the artist
[2] Name of the album
[3] Name of the song
[4] Elapsed time
Note
When the elapsed time exceeds "99:59", "... appeared instead of the time.
[5] (playback) icon
[6] (all repeat), (single repeat) icons
When "REPEAT" of the "USB PLAY STYLE" in "OPTION MENU" (see page 66) is set to "OFF", no icon appears in the top right corner while files or folders are being played.
[7] (shuffle) icon
When "SHUFFLE" of the "USB PLAY STYLE" in "OPTION MENU" (see page 66) is set to "OFF", no icon appears in the top right corner while files or holders are being played.
Using iPodTM
Once you have stationed your iPod in a Yamaha iPod universal dock (such as YDS-10, sold separately) connected to the DOCK terminal of this unit (see page 19), you can enjoy playback of your iPod using the supplied remote control. You can also use the Compressed Music Enhancer mode of this unit to improve the sound quality of the compression artifacts (such as the MP3 format) stored on your iPod (see page 19).
Notes
- Only iPod (Click and Wheel), iPod nano, and iPod mini are supported.
- Some features may not be compatible depending on the model or the software version of your iPod.
中
- For a complete list of status messages that appear in the front panel display and in the OSD, see the "iPod" section in "Troubleshooting" on page 78.
- Once your iPod is stationed in a Yamaha iPod universal dock, this unit begins signal transmission with your iPod.
- Once the connection between your iPod and this unit is complete, "iPod connected" appears in the front panel display and the DOCK indicator lights up in the front panel display.
- Only the analog audio and video signals of your iPod are input at the DOCK terminal, and the analog audio signals can be output at the analog AUDIO OUT (REC) jacks for recording.
Controlling iPodTM
You can control your iPod when "V-AUX" is selected as the input source. The operations of your iPod can be done with the aid of the OSD of this unit (menu browse mode) or without it (simple remote mode).
Remote control operation
Before performing the following operations, press ③ V-AUX/ DOCK.
Button Function
⑦ ENTER Subsequent menu
Menu up
Menu down
Previous menu
Subsequent menu
Search backward (Press and hold)
Search forward (Press and hold)
Skip backward
Skip forward
Pause (Menu browse mode)
Play/Pause (Simple remote mode)
Play (Menu browse mode)
Play/Pause (Simple remote mode)
21 MENU Previous menu
DISPLAY Display
Controlling iPod in the simple remote mode
You can perform the basic operations of your iPod (play, stop, skip, etc.) using the supplied remote control without the aid of the OSD of this unit.
中
- You can view the photos or video clips stored on your iPod (some models only).
- Operations can be also done with the controls on your iPod.
■Controlling iPod in the menu browse mode
You can perform the advanced operations of your iPod using the supplied remote control when you connect this unit and a monitor using the VIDEO connection. You can browse the songs stored on your iPod in the OSD. Further, you can change or adjust settings for your iPod to suit your personal preferences.
中
- The name of the song being played also appears in the front panel display according to the "FL SCROLL" parameter in "OPTION MENU" (see page 64).
- You can select the amount of time the iPod menu and play information is displayed in the OSD by using the "OSD-SOURCE" in "OPTION MENU" (see page 64)
Notes
- Operations cannot be done with the controls on your iPod.
- The Yamaha logo appears in the display window of your iPod.
- There are some characters that cannot be displayed in the front panel display or in the OSD of this unit. Those characters are replaced with underscores “_”.
- The "Settings" parameters can be changed or adjusted only in the OSD. Press ENTER repeatedly to toggle between the "Settings" parameter settings.
- You cannot browse the photos or video clips stored on your iPod in the OSD. Use the simple remote mode to enjoy watching the photos or video clips stored on your iPod.
1 Press ③V-AUX/DOCK and then DISPLAY.
The following display appears in the OSD.

2 Press ⑦ / / < 1 / > to navigate the iPod menu and then press ⑦ ENTER to begin playback of the selected song.
Choices: Playlists (playlists), Artists (artists), Albums (albums), Songs (songs), Genres (genres), Composers (composers), Settings (settings)
- Playlists > Songs
- Artists > Albums > Songs
- Albums > Songs
Songs - Genres > Artists > Albums > Songs
- Composers > Albums > Songs
- Settings > Shuffle, Repeat
Shuffle Shuffle
Use this feature to set this unit to play songs or albums in random order.
Choices: Off, Songs, Albums
- Select "Off" to deactivate this feature.
- Select "Songs" to set this unit to play songs in random order.
- Select "Albums" to set this unit to play albums in random order.
中
When "Shuffle" is set to a setting other than "Off", "..." appears in the top right corner while songs or albums are being shuffled.
Repeat Repeat
Use this feature to set this unit to repeat one song or a sequence of songs.
Choices: Off, One, All
- Select "Off" to deactivate this feature.
- Select "One" to set this unit to repeat one song.
- Select "All" to set this unit to repeat a sequence of songs.
中
When "Repeat" is set to a setting other than "Off", "or" appears in the top right corner while one song or a sequence of songs are being repeated.
The function of the play information display
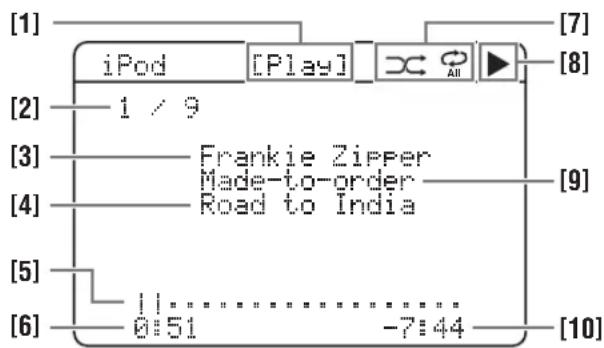
[1]Playbackstatus
[2] Track number/total tracks
[3] Artist name
[4] Song title
[5] Progress bar
[6] Elapsed time
[7] Shuffle and repeat icons
[8] (playback), (parsing), (search forward) and ((search backward)
[9] Name of the album
[10] Remaining time
Using Bluetooth™ components
You can connect a Yamaha Bluetooth adapter (such as YBA-10, sold separately) to the DOCK terminal of this unit and enjoy the music contents stored in your Bluetooth component (such as a portable music player) without wiring between this unit and the Bluetooth component. You need to perform "pairing" the connected Bluetooth adapter and your Bluetooth component in advance.
Pairing the Bluetooth™ adapter and your Bluetooth™ component
Pairing must be performed when using a Bluetooth component with the Bluetooth adapter connected to this unit for the first time or if the pairing data has been deleted. "Pairing" refers to the operation of registering a Bluetooth component for Bluetooth communications.
#
- You only need the pairing operation for the first time that you use the Bluetooth component with the Bluetooth adapter.
- Pairing requires operations on this unit and on the other component with which Bluetooth communications are to be established. If necessary, refer to the other component's operating instructions.
There are two pairing methods: pairing by using "START PAIRING" in "SET MENU" and quick pairing.
Pairing by using "SET MENU"
Use this feature to perform pairing with the video monitor. Select "START PAIRING" in "INPUT MENU". See page 62 for details.
Quick pairing
To ensure security, a time limit of 8 minutes is set for the pairing operation. You are recommended to read and fully understand all the instructions before starting.
1 Press INPUT < / > repeatedly (or press 3V-AUX/DOCK) to select "V-AUX" as the input source.
2 Turn on the Bluetooth component you want to pair with.
3 Press and hold BAND (or 6BAND) for 3 seconds.
Once the Bluetooth adapter starts pairing, "Searching..." appears for a moment. While the Bluetooth adapter is in the pairing mode, DOCK indicator flashes in the front panel display.
To cancel the pairing, press BAND (or 6BAND) again.
Note
If the Bluetooth adapter is not connected to the DOCK terminal of this unit, "No BT adapter" appears in the front panel display.
4 Check that the Bluetooth component detects the Bluetooth adapter.
If the Bluetooth component detects the Bluetooth adapter, "YBA-10 YAMAHA" (example) appears in the Bluetooth device list.
5 Select the Bluetooth adapter in the Bluetooth device list and then enter the pass key "0000" on the Bluetooth component.
When the pairing procedure is successful, "Completed" appears in the front panel display.
Note
The Yamaha Bluetooth adapter can be paired with up to eight Bluetooth components. When pairing is conducted successfully with a ninth component and the pairing data is registered, the pairing data for the least recently used other component is cleared.
Playback of the Bluetooth™ component
1 Press INPUT < / > repeatedly (or press 3V-AUX/DOCK) to select "V-AUX" as the input source.
2 Start playback of your Bluetooth component.
When the connected Bluetooth adapter detects the Bluetooth component, "BT connected" and the DOCK indicator appears in the front panel display.
中
- When you press ⑦ ENTER, the connected Bluetooth adapter searches and connect to the last connected Bluetooth component. If the Bluetooth adapter cannot find the Bluetooth component, "Not found" appears in the front panel display.
- To disconnect the Bluetooth adapter from the Bluetooth component, press ⑧RETURN.
Recording
Recording adjustments and other operations are performed from the recording components. Refer to the operating instructions for those components.
Notes
- When this unit is set to the standby mode, you cannot record between other components connected to this unit.
TONE CONTROL (see page 41) and VOLUME settings, speaker levels (see page 41) and the sound field programs (see page 38) do not affect recorded material. - The source connected to the MULTI CH INPUT jacks of this unit cannot be recorded.
- Digital signals input at the DIGITAL INPUT jacks are not output at the analog AUDIO OUT (REC) jacks for recording. Therefore, if your source component is connected to provide only digital signals, you cannot record the source.
- A given input source is not output on the same AUDIO OUT (REC) channel.
- The analog audio signals input at the DOCK terminal can be output at the analog AUDIO OUT (REC) jacks for recording.
- Once you have connected a recording component to this unit, keep the component turned on while using this unit. If the component is turned off, this unit may distort the sound from other components.
- Check the copyright laws in your country to record from CDs, radio, etc. Recording of copyrighted material may infringe copyright laws.
中
Do a test recording before you start an actual recording.
If you play back a video source that uses scrambled or encoded signals to prevent it from being dubbed, the picture itself may be disturbed due to those signals.
1 Turn on all the connected components.
2 Press INPUT < / > repeatedly (or press one of the input selector buttons (3)) to select the source component you want to record from.
3 Start playback on the selected source component or select a broadcast station.
4 Start recording on the recording component.
SET MENU
You can use the following parameters in "SET MENU" to adjust a variety of system settings and customize the way this unit operates. Change the initial settings (indicated in bold under each parameter) to reflect the needs of your listening environment.
Auto setup AUTO SETUP
Use this feature to automatically adjust speaker and system parameters (see page 24).
■Manual setup MANUAL SETUP
Use this feature to manually adjust speaker and system parameters.
Sound menu 1 SOUND MENU
| Parameter Features Page | ||
| A) SPEAKER SET | Selects the size of each speaker, the speakers for low-frequency signal output, and the crossover frequency, and the location of the front speakers connected to the FRONT B terminals. | 57 |
| B) SP LEVEL | Adjusts the output level of each speaker. | 59 |
| C) SP DISTANCE | Adjusts the delay time of each speaker. | 59 |
| D) CENTER GEQ | Adjusts the tonal quality of the center speaker. | 60 |
| E) LFE LEVEL | Adjusts the output level of the LFE channel for Dolby Digital or DTS signals. | 60 |
| F) DYNAMIC RANGE | Adjusts the dynamic range of Dolby Digital or DTS signals. | 60 |
| G) AUDIO SET | Adjusts the muting level, audio delay, maximum volume level and initial volume level. | 60 |
| H) HDMI SET | Selects whether to play back HDMI audio signals on this unit or on another HDMI component connected to the HDMI OUT jack. | 61 |
Input menu 2 INPUT MENU
| Parameter Features Page | ||
| A)INPUT ASSIGNMENT | Assigns the input jacks of this unit according to the component to be used. | 62 |
| B)INPUT RENAME | Changes the name of the input source. | 62 |
| C)VOLUME TRIM | Adjusts the output volume of each input source. | 63 |
| D)DECODER MODE | Selects the decoder mode for the sources connected to the DIGITAL INPUT jacks on the rear panel of this unit. | 63 |
| E)MULTI CH SET | Selects the video source played in the background of the sources input from the MULTI CH INPUT jacks. | 63 |
SET MENU
Option menu 3 OPTION MENU
| Parameter Features Page | ||
| ADISPLAY SET | Adjusts the brightness of the front panel display and the way in which the iPod information is displayed. | 64 |
| B)MEMORY GUARD | Locks sound field program parameters and other “SET MENU” settings. | 64 |
| C)AUDIO SELECT | Designates the default audio input jack select setting for the input sources connected to the DIGITAL INPUT jacks when you turn on the power of this unit. | 65 |
| D)PARAM. INI | Initializes the parameters of a group of sound field programs. | 65 |
| E)BLUETOOTH SET | Pair the connected Yamaha Bluetooth adapter (such as YBA-10, sold separately) with a Bluetooth component (see page 53). | 65 |
| F)USB PLAY STYLE | Adjusts the playback style of a USB source. | 66 |
■Signal information SIGNAL INFO
Use this feature to check audio signal information (see page 36).
Using SET MENU
Use the remote control to access and adjust each parameter.
You can change the "SET MENU" parameters while this unit is reproducing sound.
1 Press
④AMP and then press ②MENU to
enter "SET MENU".
The top "SET MENU" display appears in the OSD.
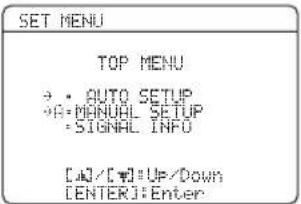
2 Press
⑦ / to select "MANUAL SETUP".
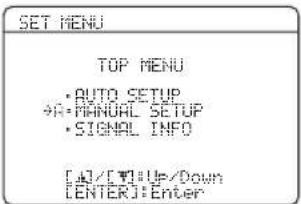
3 Press
⑦ ENTER to enter "MANUAL SETUP".
The "MANUAL SETUP" display appears in the OSD.
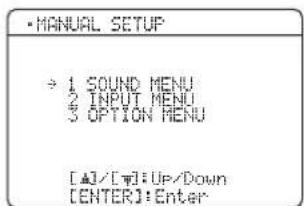
4 Press
⑦ / / < / > and ⑦ ENTER to select change the parameter.
- P r e7s/ to select the desired menu or parameter.
- Pr e7s < 1 / d > to change the parameter value.
- Pre⑦ENTER to enter the selected menu or to confirm the parameter.
- Pre8sRETURN to return to the previous menu level.
5 Press
2 MENU to exit from "SET MENU".
1 SOUND MENU
Use this menu to manually adjust any speaker settings or compensate for video signal processing delays when using LCD monitors or projectors.
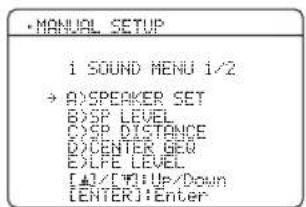

■Speaker settings A) SPEAKER SET
Use this feature to manually adjust any speaker settings.
FRONT B speaker setting FRONT B
Use this feature to select the location of the front speakers connected to the FRONT B terminals.
Choices: FRONT, ZONE B
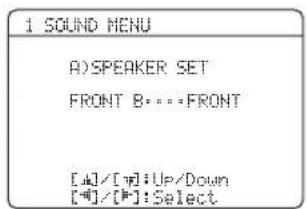
- Select "FRONT" to turn on or off SPEAKERS A and B when the speakers connected to the FRONT B terminals are set in the main zone.
- Select "ZONE B" if the speakers connected to the FRONT B terminals are set in another zone. If SPEAKERS A is turned off and SPEAKERS B is turned on, all the speakers including the subwoofer in the main zone are muted and this unit outputs sound at the FRONT B terminals only.
Notes
- If you connect headphones to the PHONES jack of this unit, the sound is output from both headphones and the FRONT B terminals when "FRONT B" is set to "ZONE B".
- If a DSP program is selected when "FRONT B" is set to "ZONE B", this unit automatically enters the Virtual CINEMA DSP mode (see page 39).
Woofer section of a speaker is 16cm (6.5 in) or larger: large
Woofer section of a speaker is smaller than 16cm (6.5 in): small
Front speakers FRONT SP
Choices: SMALL, LARGE
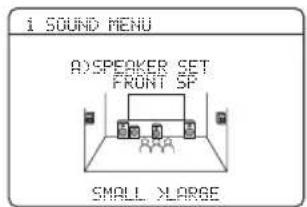
When the front speakers are large
Select "LARGE" (large).
When the front speakers are small
Select "SMALL" (small).
Note
When "LFE/BASS OUT" is set to "FRONT" (see page 58), you can select only "LARGE" in "FRONT SP". If the value of "FRONT SP" is set to a setting other than "LARGE" in advance, this unit automatically changes the value to "LARGE".
Center speaker CENTER SP
Choices: NONE, SML, LRG
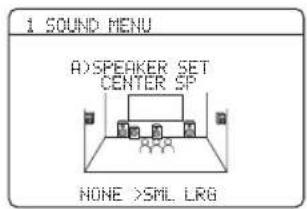
When the center speaker is large
Select "LRG" (large).
When the center speaker is small
Select "SML" (small).
When you do not use the center speaker
Select "NONE" (none). The center channel signals are directed to the front left and right speakers.
SET MENU
Surround left/right speakers SUR. L/R SP
Choices: NONE, SML, LRG

When the surround speakers are large
Select "LRG" (large).
When the surround speakers are small
Select "SML" (small).
When you do not use the surround speakers
Select "NONE" (none). This unit is set to the Virtual CINEMA DSP mode (see page 39).
LFE Bass out LFE/BRASS OUT
Use this feature to select the speakers that output the LFE (low-frequency effect) and the low-frequency signals.
Choices: SWFR, FRNT, BOTH
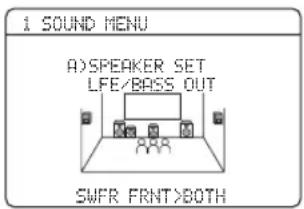
When a subwoofer is connected to this unit and you want to get natural bass sound
Select "SWFR" (subwoofer). The LFE signals as well as the low-frequency signals of other speakers set to "SML" (or "SMALL") are directed to the subwoofer.
When a subwoofer is connected to this unit and you want to get rich bass sound
Select "BOTH" (both). The low-frequency signals of any source are output from the subwoofer. The LFE signals as well as the low-frequency signals of other speakers set to "SML" (or "SMALL") are directed to the subwoofer. The low-frequency signals of the front left and right channels are directed to the front left and right speakers and the subwoofer regardless of the "FRONT SP" setting (see page 57).
When you do not use a subwoofer
Select "FRNT" (front). The LFE signals, the low-frequency signals of the front left and right channels, and the low-frequency signals of other speakers set to "SML" (or "SMALL") are all directed to the front left and right speakers regardless of the "FRONT SP" setting (see page 57).
Crossover CROSS OVER
Use this feature to select a crossover frequency of all the speakers set to "SML" (or "SMALL") in "SPEAKER SET" (see pages 57). All frequencies below the selected frequency will be sent to the subwoofer or front speakers depending on the setting of "LFE/BASS OUT" in "SPEAKER SET" (see pages 57).
Choices: 40Hz 60Hz,80Hz,90Hz,100Hz,110Hz
120Hz, 160Hz, 200Hz
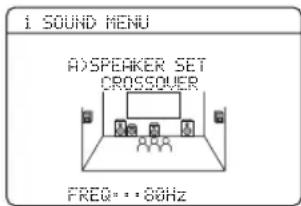
Subwoofer phase SUBWOOFER PHASE
Use this feature to switch the phase of your subwoofer if bass sounds are lacking or unclear.
Choices: NORMAL, REVERSE

- Select "NORMAL" if you do not want to reverse the phase of your subwoofer.
- Select "REVERSE" to reverse the phase of your subwoofer.
■Speaker level B)SP LEVEL
Use this feature to manually adjust the output level of each speaker.
Control range: -10 to +10 dB
Control step: 1 dB
Initial setting: 0 dB
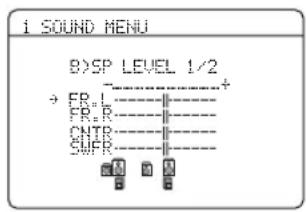
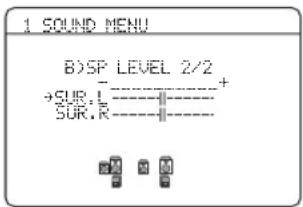
SP LEVEL Adjusted speaker
| FR.L | Front left speaker |
| FR.R | Front right speaker |
| CNTR | Center speaker |
| SUFR | Subwoofer |
| SUR.L | Surround left speaker |
| SUR.R | Surround right speaker |
Note
The available speaker channels differ depending on the setting of the speakers.
■Speaker distance C)SP DISTANCE
Use this feature to manually adjust the distance of each speaker and the delay applied to the respective channel. Ideally, each speaker should be the same distance from the main listening position. However, this is not possible in most home situations. Thus, a certain amount of delay must be applied to the sound from each speaker so that all sounds will arrive at the listening position at the same time.
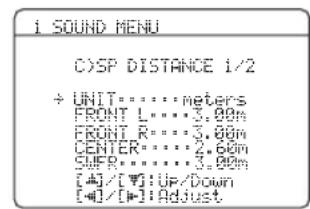
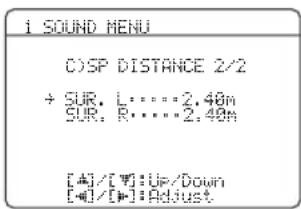
Unit UNIT
Choices: meters (m), feet (ft)
Initial setting:
- Select "meters" to adjust speaker distances in meters.
- Select "feet" to adjust speaker distances in feet.
Speaker distances
Control range: 0.30 to 24.00m (1.0 to 80.0 ft)
Control step: 0.10m (0.5 ft)
Initial setting:
FRONT L/FRONT R/SWFR: 3.00m (10.0 ft)
CENTER: 2.60m (8.5 ft)
SUR. L/SUR. R: 2.40m (8.0 ft)
| SP DISTANCE Adjusted speaker | |
| FRONT L | Front left speaker |
| FRONT R | Front right spaker |
| CENTER | Center speaker |
| SUFR | Subwoofer |
| SUR. L | Surround left speaker |
| SUR. R | Surround right spaker |
Note
The available speaker channels differ depending on the setting of the speakers.
SET MENU
Center speaker equalizer DCENTER GEO
Use this feature to adjust the built-in 5-frequency band (100 Hz, 300 Hz, 1 kHz, 3 kHz and 10 kHz) graphic equalizer for the center channel so that the tonal quality of the center speaker matches that of the front speakers. You can make adjustments while listening to the currently selected source component or a test tone.
Control range: -6.0 to +6.0 dB
Control step: 0.5 dB
Initial setting: 0 dB
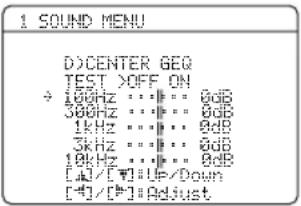
Test tone TEST
Use this feature to make adjustments for "CENTER GEQ" while listening to a test tone.
Choices: OFF, ON
- Select "OFF" to stop test tones and output the currently selected source component.
- Select "ON" to output test tones from the center and front left speakers.
Low-frequency effect level E>LFELE LEVEL
Use this feature to adjust the output level of the LFE (low-frequency effect) channel according to the capacity of your subwoofer or headphones. The LFE channel carries low-frequency special effects which are only added to certain scenes. This setting is effective when the input signal contains the LFE channel.
Control range: -20 to 0 dB
Control step: 1 dB
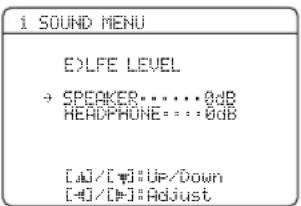
Speaker SPEAKER
Adjusts the speaker LFE level.
Headphone HEADPHONE
Adjusts the headphone LFE level.
Note
Depending on the settings of "LFE/BASS OUT" (see page 58), some signals may not be output at the SUBWOOFER OUTPUT jack.
Dynamic range F)DYNAMIC RANGE
Use this feature to select the amount of dynamic range compression to be applied to your speakers or headphones. This setting is effective only when this unit is decoding Dolby Digital and DTS signals.
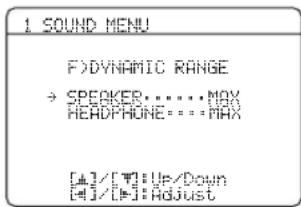
Speaker SPEAKER
Adjusts the speaker compression.
Headphone HEADPHONE
Adjusts the headphone compression.
Choices: MIN, STD, MAX
- Select "MIN" (minimum) if you regularly listen at low volume levels.
- Select "STD" (standard) for general use.
- Select "MAX" (maximum) to preserve the greatest amount of dynamic range.
Audio settings G)AUDIO SET
Use this feature to adjust the overall audio settings of this unit.
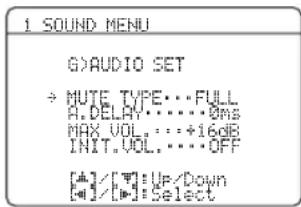
Mute type MUTE TYPE
Use this feature to adjust how much the mute function reduces the output volume (see page 35).
Choices: FULL, -20dB
- Select "FULL" to completely mute all the audio output.
- Select “-20dB” to reduce the current volume by 20 dB.
Audio delay A DELAY
Use this feature to delay the sound output and synchronize it with the video image. This may be necessary when using certain LCD monitors or projectors.
Control range: 0 to 160ms
Control step: 1 ms
Maximum volume MAX VOL.
Use this feature to set the maximum volume level. This feature is useful to avoid the unexpected loud sound by mistake. For example, the original volume range is -80dB to +16dB . However, when "MAX VOL." is set to -5dB , the volume range becomes -80dB to -5dB .
Control range: -30 dB to +10 dB, +16 dB
Control step: 5 dB
Note
The "MAX VOL." setting takes priority over the "INIT.VOL." setting. For example, if "INIT.VOL." is set to -20 dB and "MAX VOL." is set to -30 dB, the volume level is automatically set to -30 dB when you turn on the power of this unit next time.
Initial volume I N T. VOL.
Use this feature to set the volume level when the power of this unit is turned on.
Choices: OFF, MUTE, -80 dB to +16 dB
Control step: 1 dB
Note
The "MAX VOL." setting takes priority over the "INIT.VOL." setting.
Use this feature to select the component to play back HDMI audio signals.
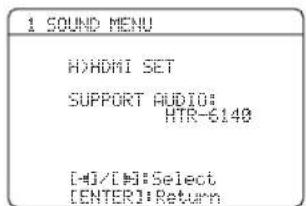
Support audio SUPPORT AUDIO
Use this feature to select whether to play back HDMI audio signals on this unit or on another HDMI component connected to the HDMI OUT jack on the rear panel of this unit.
Choice Functions
| HTR- 6140 | Plays back HDMI audio signals on this unit. The HDMI audio signals input at the HDMI input jacks of this unit are not output to the HDMI component connected to the HDMI OUT jack on the rear panel of this unit. |
| Other | Plays back HDMI audio signals on another HDMI component connected to the HDMI OUT jack. |
Notes
- This unit transmits audio and video signals input at the HDMI input jacks to the HDMI out jack only when this unit is turned on even if "SUPPORT AUDIO" is set to "Other".
- Available audio/video signals depend on the specification of the connected video monitor. Refer to the instruction manual of each connected component.
2 INPUT MENU
Use this menu to reassign the input jacks, select the decoder mode or rename the input source.
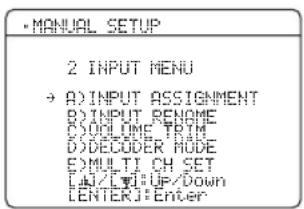
■Input assignment
ADINPUT ASSIGNMENT
Use this feature to assign the input jacks according to the component to be used if the initial settings of this unit do not correspond to your needs. Change the following parameters to reassign the respective jacks and effectively connect more components.
Once the input jacks are reassigned, you can select the corresponding component by using INPUT < /> (or the input selector buttons (3)).
For COAXIAL INPUT jack 1
COAXIAL IN (1)
Choices: (1) CD, MD/CD-R, DVD, DTV/CBL, V-AUX, DVR

For OPTICAL INPUT jacks 2 and 3
OPTICAL IN (2)
OPTICAL IN (3)
Choices: (2) CD, MD/CD-R, DVD, DTV/CBL, V-AUX, DVR
(3) CD, MD/CD-R, DVD, DTV/CBL, V-AUX, DVR
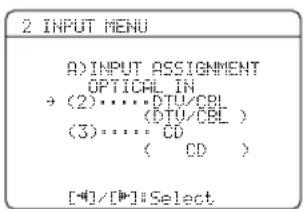
Note
You cannot select a specific item more than once.
For HDMI jacks 1 and 2
HDMIN[1]
HDMIN[2]
Choices: [1] DVD, DTV/CBL, V-AUX, DVR
[2]DVD, DTV/CBL, V-AUX, DVR
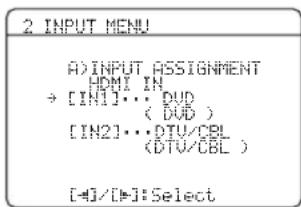
■Input rename B)INPUT RENAME
Use this feature to change the name of the input source that appears in the OSD and in the front panel display.

1 Press one of the input selector buttons ( ③) or ④MULTI CH IN to select the input source you want to change the name of.
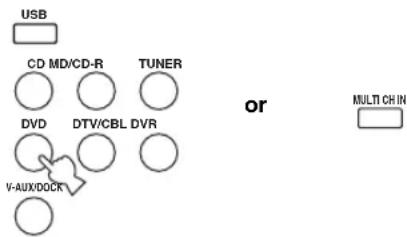
2 Press ④ AMP and then press ⑦< /> on the remote control to place the "\_ " (underscore) under the space or the character you want to edit.
3 Press ⑦ / to select the character you want to use and then press ⑦ < 1 > to move to the next space.
Notes
- You can use up to 8 characters for each input.
- Press ⑦ to change the character in the following order, or press ⑦ to go in the reverse order:
A to Z, a space, 0 to 9, a space, a to Z, a space, symbols (#, *, -, +, ctc.)
4 Repeat steps 1 through 3 to rename each input source.
5 Press ⑦ ENTER to exit from "INPUT RENAME".
Volume trim C> volume TRIM
Use this feature to adjust the output volume of each source. This is useful if you want to balance the level of each input source to avoid sudden changes in volume when switching between input sources.
Choices: CD, MD/CD-R, TUNER, DVD, DTV/CBL, V-AUX, DVR, DOCK, USB, MULTI CH
Control range: -6.0 to +6.0 dB
Control step: 1.0dB
Initial setting: 0.0dB
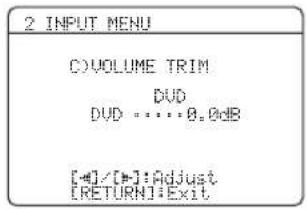
Note
You can only adjust the value for DOCK when your iPod is stationed in the Yamaha Universal Dock connected to this unit.
Decoder mode D>DECODER MODE
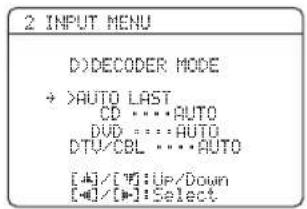
Decoder select mode
Use this feature to designate the default decoder mode for the input sources connected to the DIGITAL INPUT jacks when you turn on the power of this unit.
Choices: AUTO, LAST
- Select "AUTO" if you want this unit to automatically detect the type of input signals and select the appropriate decoder mode.
- Select "LAST" if you want this unit to automatically select the last decoder mode used the connected input source.
DTS decoder prioritize setting
Choices: AUTO, DTS
- Select "AUTO" if you want this unit to automatically detect input signal types and select the appropriate input mode.
- Select "DTS" when you play back a DTS-CD.
■Multi channel input setup
E)MULTI CH SET
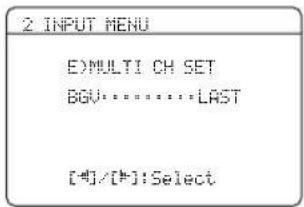
Background Video BGU
Use this feature to select the video source played in the background of the sources input at the MULTI CH INPUT jacks.
Choices: DVD, DTV/CBL, V-AUX, DVR, LAST
Select "LAST" to set this unit to automatically select the last selected video source as the background video source.
3 OPTION MENU
Use this menu to adjust the optional system parameters.
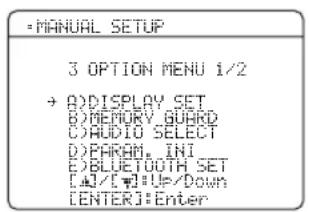
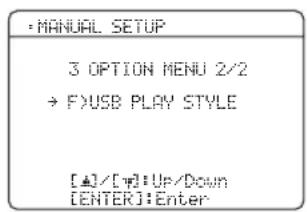
■Display settings A>DISPLAY SET
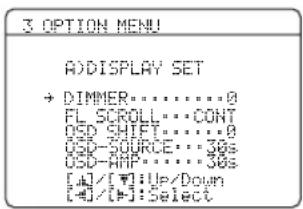
Dimmer DIMMER
Use this feature to adjust the brightness of the front panel display.
Control range: -4 to 0
Control step: 1
- Press ⑦ to make the front panel display dimmer.
- Press ⑦ to make the front panel display brighter.
Front panel display scroll FL SCROLL
Use this feature to set whether to display the information (such as a song title or a channel name) in the front panel display in a continuous manner or by the first 14 alphanumeric characters after scrolling all characters once when "DOCK" is selected as the input source.
Choices: CONT, ONCE
- Select "CONT" to display the operation status in the front panel display in a continuous manner.
- Select "ONCE" to display the operation status in the front panel display by the first 14 alphanumeric characters after scrolling all characters once.
OSD shift OSD SHIFT
Use this feature to adjust the vertical position of the OSD.
Control range: -5 (downward) to +5 (upward)
Control step: 1
Initial setting: 0
- Press ⑦ to lower the position of the OSD.
- Press ⑦ to raise the position of the OSD.
Source feature OSD display time
OSD-SOURCE
Use this feature to set the amount of time to display the iPod menu in the OSD after you perform a certain operation.
Choices: ON, 10s, 30s
- Select "ON" to display the OSD unceasingly during an operation.
- Select "10s" to turn off the OSD 10 seconds after you perform a certain operation.
- Select "30s" to turn off the OSD 30 seconds after you perform a certain operation.
Amplifier function OSD display time
OSD-AMP
Use this feature to set the amount of time to display the status after you perform a certain operation.
Choices: ON, 10s, 30s
- Select "ON" to display the OSD constantly during an operation.
- Select "10s" to turn off the OSD 10 seconds after you perform a certain operation.
- Select "30s" to turn off the OSD 30 seconds after you perform a certain operation.
■Memory guard B)MEMORY GUARD
Use this feature to prevent accidental changes to DSP program parameter values and other system settings.
Choices: OFF, ON
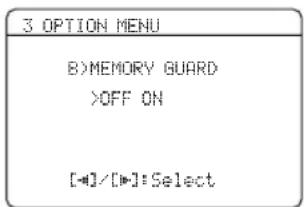
- Select "OFF" to turn off the "MEMORY GUARD" feature.
- Select "ON" to protect:
sound field program parameters
all“SET MENU”items
all speaker levels
-SCENE template parameters
Note
When "MEMORY GUARD" is set to "ON", you cannot select and adjust any other "SET MENU" items.
Audio select C)AUDIO SELECT
Use this feature to designate the default audio input jack select setting for the input sources when you turn on the power of this unit.
Choices: AUTO, LAST
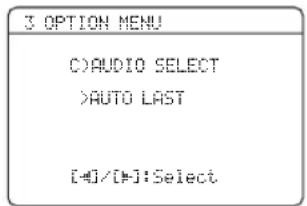
- Select "AUTO" if you want this unit to automatically detect the type of input signals and select the appropriate input mode.
- Select "LAST" if you want this unit to automatically select the last input mode used for the connected input source (see page 34).
Parameter initialization DPARAM.INI
Use this feature to set all the parameters of the sound field programs to the initial factory settings.
Choices: NO, YES
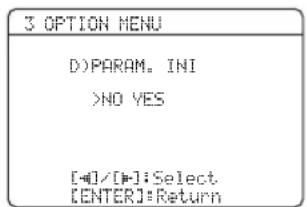
- Select "NO" to cancel the parameter initialization and return to the previous menu screen.
- Select "YES" and press ⑦ ENTER to set all the sound field parameters to the initial factory settings.
Notes
- You cannot automatically revert to the previous parameter settings once you initialize the sound field program parameters.
- You cannot separately initialize individual sound field programs.
- You cannot initialize any sound field program groups when "MEMORY GUARD" is set to "ON".
■Bluetooth setting E>BLUETOOTH SET

Use this feature to start pairing the connected Yamaha Bluetooth adapter (such as YBA-10, sold separately) with your Bluetooth component. For details about the pairing, refer to "Pairing the Bluetooth™ adapter and your Bluetooth™ component" on page 53.
To ensure security, a time limit of 8 minutes is set for the pairing operation. You are recommended to read and fully understand all the instructions before starting.
1 Press ⑦ENTER to start pairing.
The connected Bluetooth adapter starts searching Bluetooth components. "Searching..." appears in the video monitor.
2 Check that the Bluetooth component detects the Bluetooth adapter.
If the Bluetooth component the Bluetooth adapter, "YBA-10 YAMAHA" (example) appears in the Bluetooth device list.
3 Select the Bluetooth adapter in the Bluetooth device list and then enter the pass key "0000" on the Bluetooth component.
Once this unit completes the pairing successfully, "Pairing completed" appears.
中
To cancel the pairing, press ⑧ RETURN to exit from "START PAIRING".
4 Press ⑧RETURN to exit from "START PAIRING".
Notes
- If the connected Bluetooth adapter cannot find any Bluetooth components, "Not found" appears.
- If a Bluetooth adapter is not connected to this unit, "No BT adapter" appears.
SET MENU
■USB playback styles F)USB PLAY STYLE
Use this feature to adjust the playback style according to your preference. You can shuffle files in a random order or repeat one specific file or a sequence of files.
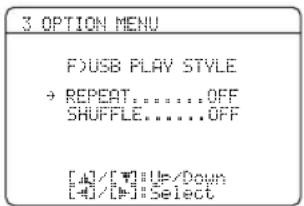
Repeat REPEAT
Use this feature to set this unit to repeat one file or a sequence of files.
Choices: OFF, SINGLE, ALL
- Select "OFF" to deactivate this feature.
- Select "SINGLE" to set this unit to repeat one file.
- Select "ALL" to set this unit to repeat a sequence of files.
Shuffle SHUFFLE
Use this feature to set this unit to play files or folders in a random order.
Choices: OFF, ON
- Select "OFF" to deactivate this feature.
- Select "ON" to set this unit to play files or folders in a random order.
Remote control features
In addition to controlling this unit, the remote control can also operate other audiovisual components made by Yamaha and other manufacturers. To control your TV or other components, you must set up the appropriate remote control code for each input source (see page 69).
Controlling this unit, a TV, or other components
Controlling this unit
Press ④ AMP to control this unit.

Notes
1 These buttons always control this unit.
2 These buttons control this unit only when ④ AMP is pressed.
Controlling a TV
Press ③ DTV/CBL to control your TV. To control your TV, you must set the appropriate remote control code for DTV/CBL (see page 69).
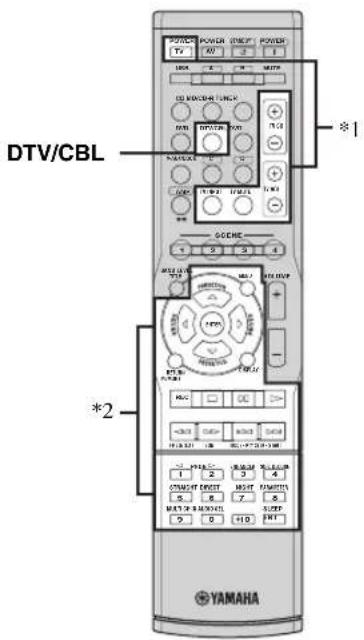
Notes
*1 These buttons always control your TV regardless of whether you press ③ DTV/CBL or not.
| Remote control Digital TV/Cable TV | |
| TV POWER | Turns on or off the power. |
| TV CH +/- | Changes the channel number. |
| TV VOL +/- | Increases or decreases the volume level. |
| TV INPUT | Changes the input source. |
| TV MUTE | Mutes the audio output. |
*2 These buttons control your TV only when ③ DTV/CBL is pressed. For details, see the "Digital TV/Cable TV" column on page 68.
中
You can control more than one TV by setting the appropriate remote control code for any input source selector buttons other than ③DTV/CBL. In such a case, you can control the buttons highlighted above (1 and 2) when you press the input source selector button.
Controlling other components
Press one of the input selector buttons (③) or A to D buttons to control other components. You must set the appropriate remote control code for each input source in advance (see page 69). The following table shows the function of each control button used to control other components assigned to each input selector button. Be advised that some buttons may not correctly operate the selected component.
#
- The remote control has 13 modes (input areas) to control components so that the remote control can operate up to 13 different components.
- When you press one of the optional component control area buttons (A to D), you can control the desired component without changing the input source of this unit.
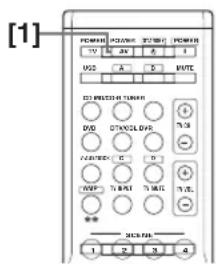
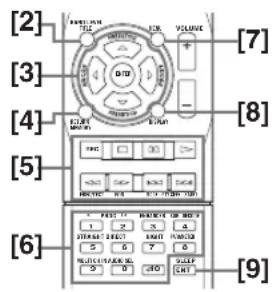
| Remote control | DVD player/ recorder | VCR | Digital TV/ Cable TV | LD player CD player | MD/CD recorder | Tuner | |
| [1] AV POWER | Power *1 | Power *1 | Power *2 | Power *1 | Power *1 | Power *1 | |
| [2] TITLE | Title | Band | |||||
| [3] PRESET/CH Δ | Up | VCR channel up | Up | Preset up (1-8)/ Tuning up | |||
| PRESET/CH ∇ | Down | VCR channel down | Down | Preset down (1-8)/Tuning down | |||
| A/B/C/D/E <1 | Left | Left | Preset down (A-E) | ||||
| A/B/C/D/E > | Right | Right | Preset up (A-E) | ||||
| ENTER | Enter | Enter | Hold | ||||
| [4] RETURN | Return | Return | Memory | ||||
| [5] REC | Disc skip (player) Rec (recorder) | Rec | Rec *2 | Disc skip | Rec | ||
| ▷ | Play | Play | Play *2 | Play | Play | Play | |
| <◁ | Search backward | Search backward | Search backward *2 | Search backward | Search backward | Search backward | Information |
| ▷▷ | Search forward | Search forward | Search forward *2 | Search forward | Search forward | Search forward | |
| □□ | Pause | Pause | Pause *2 | Pause | Pause | Pause | |
| ◁◁ | Skip backward | Skip backward | Skip backward *2 | Skip backward | Skip backward | Skip backward | Audio program down |
| ▷▷† | Skip forward | Skip forward | Skip forward *2 | Skip forward | Skip forward | Skip forward | Audio program up |
| □□ | Stop | Stop | Stop *2 | Stop | Stop | Stop | |
| [6] 1-9, 0, +10 | Numeric buttons | Numeric buttons | Numeric buttons | Numeric buttons | Numeric buttons | Numeric buttons | Preset stations (1-8) |
| [7] MENU | Menu | Menu | Search mode | ||||
| [8] DISPLAY | Display | Display | Display | Display | Display | Display | Display |
| [9] ENT | Title/Index | Enter | Enter | Chapter/Time | Index | Index | Enter |
Notes
1 This button is operational only when the original remote control supplied with the component has a POWER button.
2 These buttons operate your DVD recorder only when you set the appropriate remote control code for DVR (see page 69).
Setting remote control codes
You can control other components by setting the appropriate remote control codes. For a complete list of available remote control codes, refer to "List of remote control codes" at the end of this manual.
Remote control code default settings
| Input source | Component category | Manufacturer | Default code |
| CD CD | Yamaha 5013 | ||
| MD/CD-R CD-R Yamaha 5001 | |||
| TUNER TUNER Yamaha 5007 | |||
| DVD DVD Yamaha 2000 | |||
| DTV/CBL | — | — | |
| V-AUX | TUNER Yamaha 5011 | ||
| DVR | DVR | Yamaha 2011 | |
| USB TUNER Yamaha 5012 | |||
| A | TUNER Yamaha 5009 | ||
| B | TUNER Yamaha 5017 | ||
| C | TUNER Yamaha 5009 | ||
| D | TUNER Yamaha 5017 | ||
Note
You may not be able to operate your Yamaha component even if a Yamaha remote control code is preset as listed above. In this case, try setting another Yamaha remote control code.
1 While pressing and holding one of the input selector buttons (③) on the remote control to select the input area you want to set up, press ② AV POWER for more than 3 seconds.
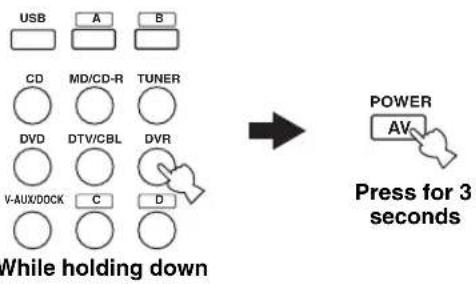
2 Press the numeric buttons (0 to 9) (16) to enter the four-digit remote control code for the component to be used.
When the setting succeeds, "RemoteSetup OK" appears; however, when it does not, "RemoteSetup NG" appears in the front panel display.
Notes
- If the manufacturer of your component has more than one code, try each of them until you find the correct one.
- If you do not press any buttons within 30 seconds in step 2, the setup process is canceled. If this happens, repeat the setup procedure.
Advanced setup
This unit has additional menus that are displayed in the front panel display. The advanced setup menu offers additional operations to adjust and customize the way this unit operates. Change the initial settings (indicated in bold under each parameter) to reflect the needs of your listening environment.
Notes
- Only ASTANDBY/ONPROGRAM / and MSTRAIGHT are effective while you are using the advanced setup menu.
- No other operations can be made while you are using the advanced setup menu.
- The advanced setup menu is only available in the front panel display.
1 Press ④STANDBY/ON to set this unit to the standby mode.
2 Press and hold TONE CONTROL and then press A STANDBY/ON to turn on this unit.
This unit turns on, and the advanced setup menu appears in the front panel display.
3 Press PROGRAM / to select the parameter you want to adjust.
The name of the selected parameter appears in the front panel display.
4 Press STRAIGHT repeatedly to change the selected parameter setting.
5 Press A STANDBY/ON to confirm your selection and set this unit to the standby mode.
中
The settings you made are reflected next time you turn on this unit.
■Tuner frequency step TU (Asia and General models only)
Use this feature to set the tuner frequency step according to the frequency spacing in your area.
Choices: AM10/FM100, AM9/FM50
- Select "AM10/FM100" for North, Central and South America.
- Select "AM9/FM50" for all other areas.
■Initializing INIT.
Use this feature to reset all the parameters of this unit to the initial factory settings (see page 80).
Choices: CANCEL, RESET
- Select "CANCEL" not to reset any parameters of this unit.
- Select "RESET" to reset the parameters of this unit.
Notes
- This setting completely resets all the parameters of this unit including the "SET MENU" parameters. However, the advanced setup menu parameters will not be initialized.
- The initial factory settings are activated next time you turn on this unit.
Troubleshooting
Refer to the table below when this unit does not function properly. If the problem you are experiencing is not listed below or if the instruction below does not help, turn off this unit, disconnect the power cable, and contact the nearest authorized Yamaha dealer or service center.
General
| Problem Cause Remedy | See page | ||
| This unit fails to turn on or enters the standby mode soon after the power is turned on. | The power cable is not connected or the plug is not completely inserted. | Connect the power cable firmly. | — |
| The protection circuitry has been activated. | Make sure that all speaker wire connections on this unit and on all speakers are secure and that the wire for each connection does not touch anything other than its respective connection. | 11 | |
| This unit has been exposed to a strong external electric shock (such as lightning or strong static electricity). | Set this unit to the standby mode, disconnect the power cable, plug it back in after 30 seconds and then use it normally. | — | |
| No sound. Incorrect input or output cable connections. | Connect the cables properly. If the problem persists, the cables may be defective. | 13-18 | |
| Set an appropriate Audio input jack select has been set. | 34 | ||
| Audio input jack select is set to “HDMI”, “COAX/OPT” or “ANALOG”. | 34 | ||
| Audio input jack select is set to “ANALOG” while playing a source encoded in Dolby Digital or DTS. | 34 | ||
| No appropriate input source has been selected. | 33 | ||
| Speaker connections are not secure. Secure the connections. | 11 | ||
| The front speakers to be used have not been selected properly. | 33 | ||
| The volume is turned down. Turn up the volume. | — | ||
| The sound is muted. | 35 | ||
| Signals this unit cannot reproduce are being input from a source component, such as a CD-ROM. | — | ||
| The HDMI components connected to this unit do not support the HDCP copy protection standards. | 14 | ||
| “SUPPORT AUDIO” is set to “Other” and “HDMI” audio signals are not being played back on this unit. | 61 | ||
Troubleshooting
| Problem Cause Remedy | See page | ||
| The sound suddenly goes off. | The protection circuitry has been activated because of a short circuit, etc. | Check that the speaker wires are not touching each other and then turn this unit back on. | - |
| The sleep timer has turned off this unit. Turn on this unit, and play the source again. | - | ||
| The sound is muted. | Press ⑩MUTE or ②VOLUME +/- to resume audio output. | 35 | |
| Sound is heard from the speaker on one side only. | Incorrect cable connections. Connect the cables properly. If the problem persists, the cables may be defective. | 11-18 | |
| Incorrect settings in "SP LEVEL". Adjust the "SP LEVEL" settings. | 41 | ||
| Only the center speaker outputs substantial sound. | When playing a monaural source with a CINEMA DSP program, the source signal is directed to the center channel, and the front and surround speakers output effect sounds. | This is not malfunction. | - |
| No sound is heard from the center speaker. | "CENTER SP" in "SPEAKER SET" is set to "NONE". | Set "CENTER SP" to "SML" or "LRG". | 57 |
| Some sound field programs do not output sounds from the center speaker. | Try another sound field program. | 38 | |
| No sound is heard from the surround speakers. | "SUR. L/R SP" in "SPEAKER SET" is set to "NONE". | Set "SUR. L/R SP" to "SML" or "LRG". | 58 |
| This unit is in the "STRAIGHT" mode and a monaural source is being played back. | Press ⑫STRAIGHT so that "STRAIGHT" disappears from the front panel display. | 39 | |
| No sound from the center, surround speakers when the FRONT B speakers are activated. | "FRONT B" in "SPEAKER SET" is set to "ZONE B". | Set "FRONT B" to "FRONT". | 57 |
| No sound is heard from the subwoofer. | "LFE/BASS OUT" in "SPEAKER SET" is set to "FRNT" when a Dolby Digital or DTS signal is being played. | Set "LFE/BASS OUT" to "SWFR" or "BOTH". | 58 |
| "LFE/BASS OUT" in "SPEAKER SET" is set to "SWFR" or "FRNT" when a 2-channel source is being played. | Set "LFE/BASS OUT" to "SWFR" or "BOTH". | 58 | |
| The source does not contain low-frequency bass signals. | This is not malfunction. | - | |
| Dolby Digital or DTS sources cannot be played. (Dolby Digital or DTS indicator in the front panel display does not light up.) | The connected component is not set to output Dolby Digital or DTS digital signals. | Make an appropriate setting following the operating instructions for your component. | — |
| Audio input jack select is set to “ANALOG”. | Set Audio input jack select to “AUTO”. | 34 | |
| A humming sound is heard. | Incorrect cable connections. Connect the audio cables firmly. If the problem persists, the cables may be defective. | — | |
| The volume level cannot be increased, or the sound is distorted. | You are attempting to set the volume level higher than the maximum volume level. | Adjust “MAX VOL.” setting. | 61 |
| The component connected to the AUDIO OUT (REC) jacks of this unit is turned off. | Turn on the power of the component. | — | |
| The sound effect cannot be recorded. | It is not possible to record the sound effect with a recording component. | This is not malfunction. | — |
| A source cannot be recorded by an analog component connected to the AUDIO OUT (REC) jacks. | The source component is not connected to the analog AUDIO IN jacks of this unit. | Connect the source component to the analog AUDIO IN jacks. | 14, 18 |
| The sound field parameters and some other settings of this unit cannot be changed. | “MEMORY GUARD” in “OPTION MENU” is set to “ON”. | Set “MEMORY GUARD” to “OFF”. | 64 |
| This unit does not operate properly. | The internal microcomputer has been frozen by an external electric shock (such as lightning or excessive static electricity) or by a power supply with low voltage. | Disconnect the power cable from the AC wall outlet and then plug it in again after about 30 seconds. | — |
| No sound is heard from the connected HDMI component. | The HDMI component does not accept the multi-channel audio signals. | Convert the multi-channel audio signals to the 2-channel audio signals at the source component such as a DVD player. | — |
| “CHECK SP WIRES” appears in the front panel display. | Speaker cables are short-circuited. Make sure all speaker cables are connected correctly. | 11 | |
| There is noise interference from digital or radio frequency equipment. | This unit is too close to the digital or high-frequency equipment. | Move this unit further away from such equipment. | — |
| The picture is disturbed. | The video source uses scrambled or encoded signals to prevent dubbing. | This in not malfunction. | — |
| This unit suddenly enters the standby mode. | The internal temperature is too high and the overheat protection circuitry has been activated. | Wait about 1 hour for this unit to cool down and then turn it back on. | — |
Troubleshooting
■Tuner
| Problem Cause Remedy | See page | |||
| FM | FM stereo reception is noisy. | The characteristics of FM stereo broadcasts may cause this problem when the transmitter is too far away or the antenna input is poor. | Check the antenna connections. | 20 |
| Try using a high-quality directional FM antenna. | — | |||
| Use the manual tuning method. | 43 | |||
| There is distortion, and clear reception cannot be obtained even with a good FM antenna. | There is multi-path interference. Adjust the antenna position to eliminate multi-path interference. | — | ||
| The desired station cannot be tuned into with the automatic tuning method. | The signal is too weak. Use a high-quality directional FM antenna. | — | ||
| Use the manual tuning method. | 43 | |||
| Previously preset stations can no longer be tuned into. | This unit has been disconnected for a long period. | Set preset stations. | 44 | |
| AM | The desired station cannot be tuned into with the automatic tuning method. | The signal is weak or the antenna connections are loose. | Tighten the AM loop antenna connections and orient it for the best reception. | — |
| Use the manual tuning method. | 43 | |||
| There are continuous crackling and hissing noises. | Noise can result from lightning, fluorescent lamps, motors, thermostats and other electrical equipment. | Use an outdoor antenna and a ground wire. This will help somewhat, but it is difficult to eliminate all noise. | — | |
| There are buzzing and whining noises. | A TV set is being used nearby. Move this unit away from the TV set. | — | ||
AUTO SETUP
Before AUTO SETUP
| Error message Cause Remedy | See page | |
| Connect MIC! | Optimizer microphone is not connected. Connect the supplied optimizer microphone to the OPTIMIZER MIC jack on the front panel. | 24 |
| Unplug HP! | Headphones are connected. Unplug the headphones. | — |
During AUTO SETUP
| Error message Cause Remedy | See page | |
| E-1: NO FRONT SP | Front L/R channel signals are not detected. Check the front L/R speaker connections. | 11 |
| E-2: NO SUR, SP | A surround channel signal is not detected. Check the surround speaker connections. | 11 |
| E-4: NOISY | Background noise is too loud. Try running “AUTO SETUP” in a quiet environment. | — |
| Turn off noisy electric equipment like air conditioners or move them away from the optimizer microphone. | ||
| E-6: NO MIC | The optimizer microphone was unplugged during the “AUTO SETUP” procedure. | Connect the supplied optimizer microphone to OPTIMIZER MIC jack on the front panel. |
| E-7: NO SIGNAL | The optimizer microphone does not detect test tones. | Check the microphone setting. |
| Check the speaker connections and placement. | ||
| E-8: USER CANCEL | The “AUTO SETUP” procedure was cancelled due to user activity. | Run “AUTO SETUP” again. |
| E-9: INTERNAL ERROR | An internal error occurred. Run “AUTO SETUP” again. | 24 |
Troubleshooting
After AUTO SETUP
| Warning message Cause Remedy | See page | ||
| W-1:OUT OF PHASE | Speaker polarity is not correct. This message may appear depending on the speakers even when the speakers are connected correctly. | Check the speaker connections for proper polarity (+ or -). | 12 |
| W-2:OVER 24m (80ft) | The distance between the nearest speaker and the furthest speaker is out of adjustable range. | Bring the speaker closer to the listening position. | — |
| W-3:LEVEL ERROR | The difference of volume level among speakers is excessive. (No level correction is made.) | If "SWFR:TOO LOUD" or "SWFR:TOO LOW" appears, adjust the output volume of the subwoofer. | 24, 59 |
| Readjust the speaker installation so that all speakers are set in locations with similar conditions. | — | ||
| Check the speaker connections. | 11 | ||
| Use speakers of similar quality. | — | ||
Notes
- If the "ERROR" or "WARNING" screens appears, check the cause of the problem, then run "AUTO SETUP" again.
- If a warning message "W-1", "W-2", or "W-3" appears, corrections are made, but they may not be optimal.
- If an error message "E-9" occurs repeatedly, please contact a qualified Yamaha service center.
USB
| Problem Cause Remedy | See page | ||
| The music files and directories in the USB device cannot be viewed. | The music files and directories are placed in locations other than the FAT area. | Place music files and directories in the FAT area. | — |
| You are attempting to browse directory hierarchies of over 8 levels or a directory with more than 500 files. | Modify the data structure on your USB device. | — | |
| The USB device cannot be recognized. | The connected USB device is other than a USB mass storage class USB memory device or USB portable audio player. | This unit can recognize only a USB mass storage class USB memory device (except USB hard disk drives) or USB portable audio player. Also note that it cannot recognize certain USB devices even when they are devices as described above. | 49 |
| Some devices may become easier to recognize when they are inserted before turning this unit on. | 21 | ||
| “Disconnected” is displayed even when a USB device is present. | This unit recognized the USB device as an illegal device. | Turn this unit off then on again. | 21 |
| Status message Cause Remedy | See page | ||
| Disconnected | Your USB memory device or USB portable audio player has been disconnected from the USB port of this unit. | Check the connection between this unit and your USB memory device or USB portable audio player. | — |
| There is a problem with the signal path from your USB memory device or USB portable audio player to this unit. | Turn off this unit and reconnect your USB memory device or USB portable audio player to the USB port of this unit. | 49 | |
| Try resetting your USB memory device or USB portable audio player. | — | ||
| Access error | This unit cannot access your USB memory device or USB portable audio player. | Try another USB memory device or USB portable audio player. | — |
| There is a problem with the signal path from your USB memory device or USB portable audio player to this unit. | Turn off this unit and reconnect your USB memory device or USB portable audio player to the USB port of this unit. | 49 | |
| Try resetting your USB memory device or USB portable audio player. | — | ||
| Unable to play | No varied data is detected. Try another USB memory device or USB portable audio player. | — | |
Troubleshooting
iPod
Note
In case of a transmission error without a status message appearing in the front panel and in the OSD, check the connection to your iPod (see page 19).
| Status message Cause Remedy | See page | |
| Loading... | This unit is in the middle of recognizing the connection with your iPod. | |
| This unit is in the middle of acquiring song lists from your iPod. | ||
| Connect error | There is a problem with the signal path from your iPod to this unit. | Turn off this unit and reconnect the Yamaha iPod universal dock to the DOCK terminal of this unit. |
| Try resetting your iPod. | ||
| Unknown iPod | The iPod being used is not supported by this unit. | Only iPod (Click and Wheel), iPod nano, and iPod mini are supported. |
| iPod connected | Your iPod is properly stationed in a Yamaha iPod universal dock (YDS-10, sold separately) connected to the DOCK terminal of this unit, and the connection between your iPod and this unit is complete. | |
| Disconnected | Your iPod was removed from a Yamaha iPod universal dock (YDS-10, sold separately) connected to the DOCK terminal of this unit. | Station your iPod back in a Yamaha iPod universal dock (YDS-10, sold separately) connected to the DOCK terminal of this unit. |
| Unable to play | This unit cannot play back the songs currently stored on your iPod. | Check that the songs currently stored on your iPod are playable. |
| Store some other playable music files on your iPod. | ||
Bluetooth
| Status message Cause Remedy | See page | |
| Searching... | The Bluetooth adapter and the Bluetooth component is in the middle of the pairing. | |
| The Bluetooth adapter and the Bluetooth component is in the middle of establishing the connection. | ||
| Completed | The paring is completed. | |
| Canceled | The paring is canceled. | |
| BT connected | The connection between the Yamaha Bluetooth adapter (such as YBA-10, sold separately) and the Bluetooth component is established. | |
| Disconnected | The Bluetooth component is disconnected from the Yamaha Bluetooth adapter (such as YBA-10, sold separately). | |
| No BT adapter | The Bluetooth adapter is not connected to the DOCK terminal. | Connect the Yamaha Bluetooth adapter (such as YBA-10, sold separately) to the DOCK terminal. |
Troubleshooting
Remote control
| Problem Cause Remedy | See page | |
| The remote control does not work nor function properly. | Wrong distance or angle. The remote control functions within a maximum range of 6 m (20 ft) and no more than 30 degrees off-axis from the front panel. | 23 |
| Direct sunlight or lighting (from an inverter type of fluorescent lamp, etc.) is striking the remote control sensor of this unit. | Reposition this unit. | |
| The batteries are weak. Replace all batteries. | 3 | |
| The remote control code is not correctly set. | Set the remote control code correctly using “List of remote control codes” at the end of this manual. | |
| Try setting another code for the same manufacturer using “List of remote control codes” at the end of this manual. | ||
| Even if the remote control code is correctly set, there are some models that do not respond to the remote control. | ||
Resetting the system
Use this feature to reset all the parameters of this unit to the initial factory settings.
1 Press ④STANDBY/ON on the front panel to set this unit to the standby mode.
2 Press and hold TONE CONTROL and then press A STANDBY/ON to turn on this unit.
The advanced setup menu appears in the front panel display.
3 Press PROGRAM / to select "INIT."
4 Press STRAIGHT repeatedly to select "RESET".
Select "CANCEL" to cancel the initialization procedure without making any changes.
5 Press ASTANDBY/ON to confirm your selection and set this unit to the standby mode.
Notes
- This procedure completely resets all the parameters of this unit including the "SET MENU" parameters. However, the advanced setup menu parameters will not be initialized.
- The initial factory settings are activated next time you turn on this unit.
#
To cancel the initialization procedure at any time without making any changes, press STRAIGHT repeatedly to select
"CANCEL" and then press ④ STANDBY/ON.
Glossary
CINEMA DSP
Since the Dolby Surround and DTS systems were originally designed for use in movie theaters, their effect is best felt in a theater having many speakers designed for acoustic effects. Since home conditions, such as room size, wall material, number of speakers, and so on, can differ so widely, it is inevitable that there are differences in the sound heard. Based on a wealth of actually measured data, Yamaha CINEMA DSP uses Yamaha original sound field technology to combine Dolby Pro Logic, Dolby Digital and DTS systems to provide the audiovisual experience of a movie theater in the listening room of your own home.
■Component video signal
With the component video signal system, the video signal is separated into the Y signal for the luminance and the P_B and Pr signals for the chrominance. Color can be reproduced more faithfully with this system because each of these signals is independent. The component signal is also called the "color difference signal" because the luminance signal is subtracted from the color signal. A monitor with component input jacks is required in order to output component signals.
Composite video signal
With the composite video signal system, the video signal is composed of three basic elements of a video picture: color, brightness and synchronization data. A composite video jack on a video component transmits these three elements combined.
■Dolby Digital
Dolby Digital is a digital surround sound system that gives you completely independent multi-channel audio. With 3 front channels (front L/R and center), and 2 surround stereo channels, Dolby Digital provides 5 full-range audio channels. With an additional channel especially for bass effects, called LFE (Low Frequency Effect), the system has a total of 5.1-channels (LFE is counted as 0.1 channel). By using 2-channel stereo for the surround speakers, more accurate moving sound effects and surround sound environment are possible than with Dolby Surround. The wide dynamic range from maximum to minimum volume reproduced by the 5 full-range channels and the precise sound orientation generated using digital sound processing provide listeners with unprecedented excitement and realism. With this unit, any sound environment from monaural up to a 5.1-channel configuration can be freely selected for your enjoyment.
■Dolby Pro Logic II
Dolby Pro Logic II is an improved technique used to decode vast numbers of existing Dolby Surround sources. This new technology enables a discrete 5-channel playback with 2 front left and right channels, 1 center channel, and 2 surround left and right channels instead of only 1 surround channel for conventional Pro Logic technology. There are three modes available: "Music mode" for music sources, "Movie mode" for movie sources and "Game mode" for game sources.
Dolby Surround
Dolby Surround uses a 4-channel analog recording system to reproduce realistic and dynamic sound effects: 2 front left and right channels (stereo), a center channel for dialog (monaural), and a surround channel for special sound effects (monaural). The surround channel reproduces sound within a narrow frequency range. Dolby Surround is widely used with nearly all video tapes and laser discs, and in many TV and cable broadcasts as well. The Dolby Pro Logic decoder built into this unit employs a digital signal processing system that automatically stabilizes the volume on each channel to enhance moving sound effects and directionality.
■DTS Digital Surround
DTS digital surround was developed to replace the analog soundtracks of movies with a 5.1-channel digital sound track, and is now rapidly gaining popularity in movie theaters around the world. DTS, Inc. has developed a home theater system so that you can enjoy the depth of sound and natural spatial representation of DTS digital surround in your home. This system produces practically distortion-free 5.1-channel sound (technically, left, right and center channels, 2 surround channels, plus an LFE 0.1 channel as a subwoofer, for a total of 5.1-channels).
Glossary
■HDMI
HDMI (High-Definition Multimedia Interface) is the first industry-supported, uncompressed, all-digital audio/video interface. Providing an interface between any source (such as a set-top box or AV receiver) and an audio/video monitor (such as a digital television), HDMI supports standard, enhanced or high-definition video as well as multi-channel digital audio using a single cable. HDMI transmits all ATSC HDTV standards and supports 8-channel digital audio, with bandwidth to spare to accommodate future enhancements and requirements. When used in combination with HDCP (High-bandwidth Digital Content Protection), HDMI provides a secure audio/video interface that meets the security requirements of content providers and system operators. For further information on HDMI, visit the HDMI website at "http://www.hdmi.org/".
LFE 0.1 channel
This channel reproduces low-frequency signals. The frequency range of this channel is from 20Hz to 120Hz . This channel is counted as 0.1 because it only enforces a low-frequency range compared to the full-range reproduced by the other 5 channels in Dolby Digital or DTS 5.1-channel systems.
■MP3
One of the audio compression methods used by MPEG. It employs the irreversible compression method, which achieves a high compression rate by thinning out the data of hardly audible part to the human ears. It is said to be capable of compressing the data quantity by about 1/11 (128 kbps) while maintaining a similar audio quality to music CD.
PCM (Linear PCM)
Linear PCM is a signal format under which an analog audio signal is digitized, recorded and transmitted without using any compression. This is used as a method of recording CDs and DVD audio. The PCM system uses a technique for sampling the size of the analog signal per very small unit of time. Standing for "Pulse Code Modulation", the analog signal is encoded as pulses and then modulated for recording.
■Sampling frequency and number of quantized bits
When digitizing an analog audio signal, the number of times the signal is sampled per second is called the sampling frequency, while the degree of fineness when converting the sound level into a numeric value is called the number of quantized bits. The range of rates that can be played back is determined based on the sampling rate, while the dynamic range representing the sound level difference is determined by the number of quantized bits. In principle, the higher the sampling frequency, the wider the range of frequencies that can be played back, and the higher the number of quantized bits, the more finely the sound level can be reproduced.
■SILENT CINEMA
Yamaha has developed a natural, realistic sound effect DSP algorithm for headphones. Parameters for headphones have been set for each sound field so that accurate representations of all the sound field programs can be enjoyed on headphones.
■Virtual CINEMA DSP
Yamaha has developed a Virtual CINEMA DSP algorithm that allows you to enjoy DSP sound field surround effects even without any surround speakers by using virtual surround speakers. It is even possible to enjoy Virtual CINEMA DSP using a minimal two-speaker system that does not include a center speaker.
■WAV
Windows standard audio file format, which defines the method of recording the digital data obtained by converting audio signals. It does not specify the compression (coding) method so a desired compression method can be used with it. By default, it is compatible with the PCM method (no compression) and some compression methods including the ADPCM method.
■WMA
An audio compression method developed by Microsoft Corporation. It employs the irreversible compression method, which achieves a high compression rate by thinning out the data of hardly audible part to the human ears. It is said to be capable of compressing the data quantity by about 1/22 (64 kbps) while maintaining a similar audio quality to music CD.
Specifications
AUDIO SECTION
Minimum RMS Output Power for Front, Center, Surround U.S.A. and Canada models 1 kHz, 0.9% THD, 8 105 W Other models 1 kHz, 0.9% THD, 6 105 W
Maximum Power for Front, Center, Surround (JEITA) [Asia, General, China, and Korea models] 1 kHz, 10% THD, 6Ω 130 W
Dynamic Power [U.S.A.and Canada models] (IHF,8/6/4/2Ω) 90/110/130/150W Other models (IHF,6/4/2Ω) 100/110/125 W
- Dynamic Headroom U.S.A. and Canada models 8Ω 0.27 dB
Maximum Input Signal CD, etc. Effect On, 1 kHz, 0.5% THD 2.0 V or more
Frequency Response CD, etc. to Front L/R 10 Hz to 100kHz, -3 dB
Total Harmonic Distortion U.S.A. and Canada models (1 kHz, 45 W, Front L/R, 8 Ω) 0.06% or less Other models (1 kHz, 50 W, Front L/R, 6 Ω) 0.06% or less
- Signal to Noise Ratio (IHF-A Network) CD (200mV) to Front L/R, Effect Off 98 dB or more CD (250mV) to Front L/R, Effect Off 100 dB or more
- Residual Noise (IHF-A Network)
Front L/R 150 μV or less
- Channel Separation (1 kHz/10 kHz) CD, etc. (5.1 kΩ shorted) to Front L/R 60 dB/45 dB or more
- Tone Control (Front L/R)
BASS Boost/Cut ± 10 dB/100 Hz
TREBLE Boost/Cut ± 10 dB/20 kHz
- Headphone Jack Rated Output/Impedance 400 mV/470 Ω
- Input Sensitivity/Input Impedance CD, etc. 200 mV/47 kΩ MULTI CH INPUT 200 mV/47 kΩ
Output Level/Output Impedance AUDIO OUT (REC) 200 mV/1.2 kSUBWOOFER OUTPUT 4 V/1.2 k
- Filter Characteristics (fc=40/60/80/90/100/110/120/160/200 Hz)
H.P.F.
(FRONT SP, CENTER SP, SUR. L/R SP:
SMALL/SML) 12 dB/oct.
L.P.F. (Subwoofer) 24 dB/oct.
VIDEO SECTION
Video Signal Type (Gray back) [U.S.A., Canada, Korea and General models] NTSC Other models PAL
Signal Level Composite 1 Vp-p/75Ω Component 1 Vp-p/75 Y)0.7 Vp-p/75 (P_B / P_R)
- Signal to Noise Ratio 50 dB or more
Maximum Input Level. 1.5 Vp-p or more
Frequency Response (MONITOR OUT) Component Signal 5 Hz to 60 MHz, -3 dB
FM SECTION
Tuning Range U.S.A. and Canada models 87.5 to 107.9 MHz [Asia and General models] 87.5/87.50 to 108.0/108.00 MHz Other models 87.50 to 108.00 MHz
- 50 dB Quieting Sensitivity (IHF, 100% mod.)
Mono 2.8 μV (20.2 dBf)
- Signal to Noise Ratio (IHF)
Mono/Stereo 73 dB/70 dB
Harmonic Distortion (1 kHz)
Mono/Stereo 0.5%/0.5%
- Antenna Input (unbalanced) 75Ω
AM SECTION
Tuning Range U.S.A. and Canada models 530 to 1710kHz [Asia and General models] 530/531 to 1710/1611 kHz Other models 531 to 1611 kHz
GENERAL
- Power Supply [Europe, and Russia models] 230 V AC, 50 Hz
U.S.A. and Canada models 120 V AC, 60 Hz
[Australia model] 240 V AC, 50 Hz
[Korea model] 220 V AC, 60 Hz
[China model] 220 V AC, 50 Hz
[Asia model] 220/230-240 V AC, 50/60 Hz
[General model] 110/120/220/230-240 V AC, 50/60 Hz
Power Consumption U.S.A. and Canada models 240 W/320 VA Other models 240 W - Standby Power Consumption 0.8 W
Maximum Power Consumption [Asia and General models only] 5ch, 10% THD 440 W -
Dimensions (W x H x D) 435 x 151 x 352 mm (17-1/8" x 5-15/16" x 13-7/8")
Weight 8.5 kg (18 lbs 12 oz) -
Specifications are subject to change without notice.
Index
■Numerics
1 SOUND MENU, Manual setup 55
2 INPUT MENU, Manual setup 55
2ch Enhancer,
Sound field program 38
2ch Stereo,Sound field program 38
3 OPTION MENU 64
3 OPTION MENU, Manual setup 56
5ch Enhancer,
Sound field program 38
5ch Stereo,Sound field program 38
A
A)DISPLAY SET,Option menu 64
A)INPUT ASSIGNMENT,
Input menu 62
A)SPEAKER SET,Sound menu 57
A DELAY, Audio settings 60
AFFAIRS, Radio Data System program type
AM antenna connection 20
AM tuning 43
Amplifier function OSD display time, Display settings 64
Audio components, Connection 18
Audio delay, Audio settings 60
Audio information 36
Audio input jacks selection 34
AUDIO jacks 13
Audio jacks 13
AUDIO SELECT 34
Audio select, Option menu 65
Audio settings,Sound menu 60
Audio signal flow 14
AUTO SETUP 24
AUTO SETUP, Error message 75
Automatic preset tuning, FM/AM tuning 44
Automatic tuning, FM/AM tuning 43
B
B)INPUT RENAME, Input menu 62
B)MEMORY GUARD, Option menu 64
BGV, Multi channel input setup 63
Bluetooth setting, Option menu 65
BT connected, Bluetooth status message 79
C
C)AUDIO SELECT, Option menu .... 65
C)SP DISTANCE,Sound menu 59
C)VOLUME TRIM, Input menu 63
Canceled, Troubleshooting 79
CD player, Connection 18
CD recorder, Connection 18
CENTER SP, Speaker settings 57
Center speaker equalizer, Sound menu 60
Center speaker, Speaker settings 57
Center width, Sound field parameter 40
CINEMA DSP indicator 23
CLASSICS, Radio Data System program type 47
Clock time, Radio Data System information 46
COAXIAL IN (1), Input assignment ...62
COAXIAL INPUT assignment, Input assignment 62
COAXIAL INPUT jacks 62
Completed, Bluetooth status message 79
COMPONENTVIDEOjacks 13
Connect error, iPod controlling status message 78
Connect MIC!, Auto setup error message 75
Connecting to the FRONT A terminals 12
Connection, AM antenna connection ...20
Connection, Audio components 18
Connection, CD player 18
Connection, CD recorder 18
Connection, DVD player 16
Connection, DVD recorder 17
Connection, external decoder 18
Connection, FM antenna 20
Connection, HDMI 14
Connection, MD recorder 18
Connection, Multi-format player 18
Connection, Power cable 20
Connection, PVR 17
Connection, set-top boxes 17
Connection, VCR 17
Connection, Video components 15
Connection,
Yamaha iPod universal dock 19
Controlling a TV 67
Controlling other components, Remote control 68
Controlling this unit, Remote control .67
Creating original SCENE templates ...31
CROSSOVER, Speaker settings 58
Crossover, Speaker settings 58
CT indicator 23
CTWIDTH,Sound field parameter.....40
CT, Radio Data System information ...46
CULTURE, Radio Data System program type 47
Current status display 35
D
D)CENTER GEQ,Sound menu .60
D)DECODER MODE, Input menu ....63
D)PARAM.INI,Option menu. 65
Decoder indicators 22
Decoder mode, Input menu 63
Decoder select mode, Decoder mode .. 63
DIGITAL AUDIO COAXIAL jacks ... 13
DIGITAL AUDIO OPTICAL jacks ... 13
DIMENSION, Sound field parameter 40
Dimension,Sound field parameter 40
DIMMER, Display settings 64
Dimmer, Display settings 64
DIRECT 41
Disconnected, Bluetooth status message 79
Disconnected, iPod controlling status message 78
Display settings, Option menu 64
DIST 26
DIST, Auto setup result 26
DISTANCE 25
DISTANCE, Auto setup 25
DOCK indicator 22
DRAMA, Radio Data System program type 47
DSP LEVEL,Sound field parameter..40
DSP level,Sound field parameter 40
DTS decoder prioritize setting, Decoder mode 63
DVD player connection 16
DVD recorder connection 17
Dynamic range,Sound menu 60
E
E)LFE LEVEL,Sound menu 60
E)MULTI CH SET, Input menu 63
E-1:NO FRONT SP, Auto setup error message 75
E-2:NO SURR.SP, Auto setup error message 75
E-4:NOISY, Auto setup error message 75
E-6:NO MIC, Auto setup error message 75
E-7:NO SIGNAL, Auto setup error message 75
E-8:USER CANCEL, Auto setup error message 75
E-9:INTERNAL ERROR, Auto setup error message 75
EDUCATE, Radio Data System program type 47
Effect level, Sound field parameter .... 40
Enhanced other networks data service, Radio Data System tuning 48
ENHANCER indicator 22
EON data service, Radio Data System tuning 48
EON indicator 23
Exchange, Preset station, FM/AM tuning 45
External decoder connection 18
F
F)DYNAMIC RANGE,
Sound menu 60
Factory presets, Advanced setup 70
FL SCROLL, Display settings 64
FM antenna 20
FM antenna connection 20
FM tuning 43
FRONT B speaker setting,
Speaker settings 57
FRONT B, Speaker settings 57
Front panel display 22
Front panel display scroll,
Display settings 64
FRONT SP, Speaker settings 57
Front speakers, Speaker settings 57
G
G)AUDIO SET,Sound menu 60
Games,Sound field program 38
H
H) HDMI SET,Sound menu 61
Hall, Sound field program 38
HDMI indicator 22
HDMI set,Sound menu 61
HDMI, Connection 14
HEADPHONE, Dynamic range 60
Headphone, Dynamic range 60
HEADPHONE,
Low-frequency effect level 60
Headphone,
Low-frequency effect level 60
Headphones 35
Headphones indicator 22
#
INFO, Radio Data System
program type 47
Infrared window, Remote control 23
INI.VOL., Audio settings 61
Initial volume, Audio settings 61
Input assignment, Input menu 62
Input channel and speaker indicators ...23
Input channel indicators 23
Input menu, Manual setup 55
Input rename, Input menu 62
Input source indicators 22
Input source information display 36
iPod connected, iPod controlling status message 78
iPod control, Status message 78
iPod using 51
#
Jazz,Sound field program 38
#
LFE/BASS OUT, Speaker settings 58
LFE/Bass out, Speaker settings 58
LIGHT M, Radio Data System program type 47
Loading...
iPod controlling status message .... 78
Low-frequency effect level,
Sound menu 60
LVL 26
LVL, Auto setup result 26
M
M.O.R.M, Radio Data System program type 47
Manual preset tuning, FM/AM tuning 44
MANUAL SETUP, SET MENU 55
Manual setup, SET MENU 55
Manual tuning, FM/AM tuning 43
MAX VOL., Audio settings 61
Maximum volume, Audio settings 61
MD recorder, Connection 18
Memory guard, Option menu 64
Menu browse mode, iPod controlling 52
Movie Dramatic, Sound field program 38
Movie Spacious, Sound field program 38
MULTI CH INPUT component selection 34
Multi channel input setup, Input menu 63
Multi-channel source with headphones 39
Multi-format player connection 18
Multi-information display 23
MUTE 35
MUTE indicator 22
MUTE TYPE, Audio settings 60
Muting 35
N
NEWS, Radio Data System program type 47
Night listening mode 42
No BT Adapter, Bluetooth status message 79
Number of speakers 26
Number of speakers, Auto setup result 26
#
OPTICAL IN (2), Input assignment 62
OPTICAL IN (3), Input assignment 62
OPTICAL INPUT assignment, Input assignment 62
OPTIMIZER MIC jack, Auto setup 24
Optimizer microphone 24
Optimizer microphone, Auto setup 24
Optimizing speaker setting 24
Option menu, Manual setup 56
OSD SHIFT, Display settings 64
OSD shift, Display settings 64
OSD-AMP, Display settings 64
OSD-SOURCE, Display settings 64
Other components controlling by remote control 68
Other components controlling, Remote control 68
OTHER M, Radio Data System program type 47
P
PANorama, Sound field parameter 40
Panorama, Sound field parameter 40
Parameter initialization, Option menu 65
PCM indicator 22
PHONES jack 35
Play information display, iPod controlling 52
Play information display, USB controlling 50
Playing video sources in the background 36
PLII Game 39
PLII Movie 39
PLII Music 39
POP M, Radio Data System program type 47
Pop/Rock,Sound field program 38
Power cable, Connection 20
Presct SCENE templates 30
Preset station exchange, FM/AM tuning 45
Preset station selection, FM/AM tuning 45
PRESET, Advanced setup 70
Pro Logic 39
Program service, Radio Data System information 46
Program type, Radio Data System information 46
PS indicator 23
PS, Radio Data System information ... 46
PTY HOLD indicator 23
PTY indicator 23
PTY SEEK mode, Radio Data System tuning 47
PTY, Radio Data System information. 46
Pure hi-fi sound 41
PVR connection 17
R
Radio Data System indicator 23
Radio Data System tuning 46
Radio text, Radio Data System information 46
Remote control codes iii
Remote control, Troubleshooting 80
Rename, SCENE template 31
Repeat 52
Repeat, iPod controlling 52
Resetting the system 80
ROCK M, Radio Data System program type 47
RT indicator 23
Index
RT, Radio Data System information ..... 46
S
SCENE 1. 7
SCENE template selection 28
SCIENCE, Radio Data System program type 47
Searching..., Bluetooth status message 79
Selection, Audio input jacks 34
Selection, MULTI CH INPUT component 34
Selection, Preset station, FM/AM tuning 45
Selection, Radio Data System program type 47
Selection,SCENE template 28
SET MENU 55
Setting remote control codes 69
Setting SCENE template input source, Remote control 32
Set-top box connection 17
Shuffle, iPod controlling 52
SILENT CINEMA 39
SILENT CINEMA indicator 23
Simple remote mode, iPod controlling 51
SIZE 25
SIZE, Auto setup 25
SLEEP indicator 23
Sleep timer 37
Sound field programs with headphones 39
Sound menu, Manual setup 55
Source feature OSD display time, Display settings 64
SP 26
SP A B indicators 22
SP, Auto setup result 26
Speaker distance 25, 26
Speaker distance, Auto setup 25
Speaker distance, Auto setup result .... 26
Speaker distance,Sound menu 59
Speaker distances, Speaker distance ... 59
Speaker level 26
Speaker level adjustment 41
Speaker level, Auto setup result 26
Speaker level,Sound menu 59
Speaker settings,Sound menu 57
Speaker size 25
Speaker size, Auto setup 25
Speaker wiring 25
Speaker wiring, Auto setup 25
Speaker wiring/volume level, Auto setup 25
SPEAKER, Dynamic range 60
Speaker, Dynamic range 60
SPEAKER, Low-frequency effect level 60
Speaker, Low-frequency effect level ...60
Specifications 83
SPORT, Radio Data System program type 47
STRAIGHT 39
Straight 39
SUBWOOFER PHASE, Speaker settings 58
Subwoofer phase, Speaker settings 58
SUPPORT AUDIO, HDMI set 61
Support audio, HDMI set 61
SUR. L/R SP, Speaker settings 58
Surround left/right speakers, Speaker settings 58
T
Test tone, Center speaker equalizer ....60
TEST, Center speaker equalizer 60
Tonal quality adjustment 41
Troubleshooting 71
TU, Advanced setup 70
Tuner (FM/AM), Troubleshooting 74
Tuner frequency step, Advanced setup 70
Tuner indicators 22
Turning off the power 21
Turning on the power 21
TV Sports, Sound field program 38
U
Unable to play, iPod controlling status message 78
UNIT, Speaker distance 59
Unit, Speaker distance 59
Unknown iPod, iPod controlling status message 78
Unplug HP!, Auto setup error message 75
USB memory device using, USB portable audio player using 49
USB playback operation 49
USB playback styles 66
USB, Troubleshooting 77
#
VARIED, Radio Data System program type 47
VCR connection 17
VIDEO AUX jacks, Front panel 19
Video components, Connection 15
Video information 36
VIDEO jacks 13
Video jacks 13
Video signal flow 14
Video sources in the background 36
Virtual CINEMA DSP 39
VIRTUAL indicator 23
VOLTAGE SELECTOR 3
VOLUME level indicator 22
Volume Trim, Input menu 63
W
W-1:OUT OF PHASE, Auto setup error message 76
W-2: DISTANCE ERROR, Auto setup error message 76
W-3:LEVEL ERROR, Auto setup error message 76
WIRING/LEVEL 25
WIRING/LEVEL, Auto setup 25
Y
Yamaha iPod universal dock, Connection 19
Yamaha Parametric Room Acoustic Optimizer 24
YPAO 24
YPAO (Yamaha Parametric Room Acoustic Optimizer) 24
YPAO indicator 22
"Speakers" or "3DVD"(example) indicates the name of the parts on the front panel or the remote control. Refer to the attached sheet or the pages at the end of this manual for the information about each position of the parts.
Limited Guarantee for European Economic Area (EEA) and Switzerland
Thank you for having chosen a Yamaha product. In the unlikely event that your Yamaha product needs guarantee service, please contact the dealer from whom it was purchased. If you experience any difficulty, please contact Yamaha representative office in your country. You can find full details on our website (http://www.yamaha-hiff.com/ or http://www.yamaha-uk.com/ for U.K. resident).
The product is guaranteed to be free from defects in workmanship or materials for a period of two years from the date of the original purchase. Yamaha undertakes, subject to the conditions listed below, to have the faulty product or any part(s) repaired, or replaced at Yamaha's discretion, without any charge for parts or labour. Yamaha reserves the right to replace a product with that of a similar kind and/or value and condition, where a model has been discontinued or is considered uneconomic to repair.
Conditions
- The original invoice or sales receipt (showing date of purchase, product code and dealer's name) MUST accompany the defective product, along with a statement detailing the fault. In the absence of this clear proof of purchase, Yamaha reserves the right to refuse to provide free of charge service and the product may be returned at the customer's expense.
- The product MUST have been purchased from an AUTHORISED Yamaha dealer within the European Economic Area (EEA) or Switzerland.
- The product must not have been the subject of any modifications or alterations, unless authorised in writing by Yamaha.
- The following are excluded from this guarantee:
a. Periodic maintenance and repair or replacement of parts due to normal wear and tear.
b. Damage resulting from:
(1) Repairs performed by the customer himself or by an unauthorised third party.
(2) Inadequate packaging or mishandling, when the product is in transit from the customer. Please note that it is the customer's responsibility to ensure the product is adequately packaged when returning the product for repair.
(3) Misuse, including but not limited to (a) failure to use the product for its normal purpose or in accordance with Yamaha's instructions on the proper use, maintenance and storage, and (b) installation or use of the product in a manner inconsistent with the technical or safety standards in force in the country where it is used.
(4) Accidents, lightning, water, fire, improper ventilation, battery leakage or any cause beyond Yamaha's control.
(5) Defects of the system into which this product is incorporated and/or incompatibility with third party products.
(6) Use of a product imported into the EEA and/or Switzerland, not by Yamaha, where that product does not conform to the technical or safety standards of the country of use and/or to the standard specification of a product sold by Yamaha in the EEA and/or Switzerland.
(7) Non AV (Audio Visual) related products. (Products subject to "Yamaha AV Guarantee Statement" are defined in our website at http://www.yamaha-hifi.com/ or http://www.yamaha-uk.com/ for U.K. resident.)
- Where the guarantee differs between the country of purchase and the country of use of the product, the guarantee of the country of use shall apply.
- Yamaha may not be held responsible for any losses or damages, whether direct, consequential or otherwise, save for the repair or replacement of the product.
- Please backup any custom settings or data, as Yamaha may not be held responsible for any alteration or loss to such settings or data.
- This guarantee does not affect the consumer's statutory rights under applicable national laws in force or the consumer's rights against the dealer arising from their sales/purchase contract.
APPENDIX (APPENDICE)
Prises DIGITAL AUDIO OPTICAL
Loud test tones are output.
Please keep quiet or leave the room.
Press [ENTER]
Avant/Arriere/Caisson de graves
SCENE 1: DVD Movie Viewing
SCENE 2: Music Disc Listening
SCENE 3: TV Viewing
SCENE 4: Radio Listening
Choix: meters (m), feet (ft)
Réglage initial:
Volume initial I NT. VOL.
■DTS Digital Surround
MANUAL SETUP, SET MENU 55
MAX VOL., Reglages sonores 61
Menu entree, Reglage manuel 55
Menu option, Reglage manuel 56
Menu son, Reglage manuel 55
Raccordement, Antenne FM 20
Raccordement, Appareils audio 18
Raccordement, Appareils video 15
Raccordement, Cable d'alimentation.... 20
Raccordement,decodeur externe 18
Raccordement, Decodeurs 17
Raccordement, Station universelle
Yamaha iPod 19
Selection, Appareil MULTI CH INPUT 34
Station universelle Yamaha iPod, Raccordement 19
STRAIGHT 39
Styles de lecture USB 66
SUBWOOFER PHASE, Reglage des enceintes 58
SUPPORT AUDIO, Reglage HDMI ....61
Support audio, Reglage HDMI 61
SUR. L/R SP, Reglage des enceintes 58
Syntonisation AM 43
USB memory device using, USB portable audio player using 49
USB playback operation 49
(1kHz, 0.9% Klimm, 8Ω)
105 W/Kanal
(1kHz,0.9% Kllr,6Ω)
105 W/Kanal
SCENE-Wahlfunktion
HDMI (High-Definition Multimedia Interface)
Loud test tones are output.
Please keep quiet or leave the room.
Press [ENTER]
SCENE 1: DVD Movie Viewing
SCENE 2: Music Disc Listening
SCENE 3: TV Viewing
SCENE 4: Radio Listening
Fur Pro Logic II Music:
Panorama PANORA
Manuelles Setup MANUAL SETUP
■DTS Digital Surround
BASS Boost/Cut ±10 dB/100 Hz
TREBLE Boost/Cut. ± 10dB / 20kHz
(FRONT SP, CENTER SP, SUR. L/R SP: SMALL/SML) 12 dB/oct.
L.P.F. (Subwoofer) 24 dB/ct.
VIDEOABSCHNITT
MANUAL SETUP, SET MENU 55
Manuelles Setup, SET MENU 55
MAX VOL., Audio-Einstellungen ....61
Maximal-Lautstärke,
(1 kHz, 0,9% overtonsdistorsion, 8 Ω)
105 W/kanal
[Övrigamodeller]
(1 kHz, 0.9% overtonsdistorsion, 6 Ω)
105 W/kanal
SCENE-valsfunktion
Forinstallda SCENE-mallar for olika situationer
Egenhändig SCENE-mallsanpassning
DIGITAL AUDIO OPTICAL-jack
Loud test tones are output.
Please keep quiet or leave the room.
Press [ENTER]
Innan nasta atgard utfors
Alternative: SET, CANCEL
Alternative: RETRY, EXIT
SCENE 1: DVD Movie Viewing
SCENE 2: Music Disc Listening
SCENE 3: TV Viewing
SCENE 4: Radio Listening
FortattanvandaandraSCENE-mallarkanonskade SCENE-mallarvaljasfranscENE-mallsbiblioteketoch tildelasatdevaldaSCENE-knapparnaopa frontpanelen ochfjarrkontrollen.
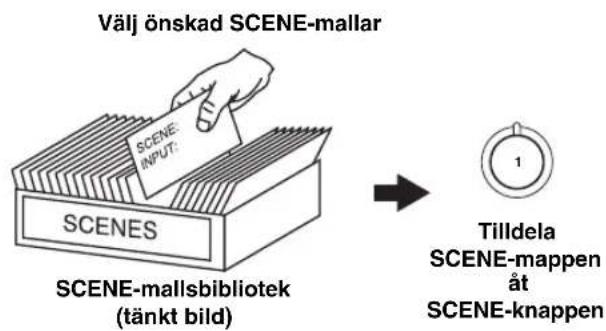
Alternative: MIN, MID, MAX
Alternative: LOW, HIGH
For Pro Logic II Music:
Panorama PANORAMA
Alternative: OFF, ON
Dimension DIMENSION
Alternative: MIN, MID, MAX
- Välj "MIN" für minimal compression.
- Valj "MID" for standard compression.
- Valj "MAX" for maximal compression.
中
Justeringar for "NIGHT:CINEMA" och "NIGHT:MUSIC" lagras var for sig.
Anmarkninger
Manuell stationsinstalling
Om de mottagna signalen fran en viss onskad station ar svag, sa prova att stalla in den manuellt.
Anmarkning
Alternative: Playlists (spellistor), Artists (artist), Albums (album), Songs (latar), Genres (genrer), Composers (kompositörer), Settings (installingar)
- Playlists > Songs
- Artists > Albums > Songs
- Albums > Songs
Songs - Genres > Artists > Albums > Songs
- Composers > Albums > Songs
- Settings > Shuffle, Repeat
Alternative: Off, One, All
Alternative: SMALL, LARGE
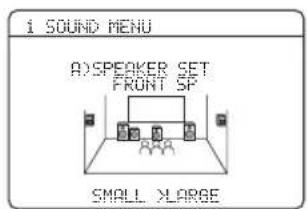
Alternative: NONE, SML, LRG
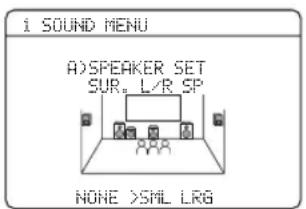
Alternative: SWFR, FRNT, BOTH

Alternative: NORMAL, REVERSE
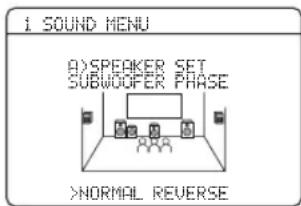
Alternative: meters (m), feet (ft)
Ursprungliginstalling:
Alternative: OFF, ON
Alternative: MIN, STD, MAX
Alternative: CONT, ONCE
Alternative: OFF, ON

Bluetooth -installing E)BLUETOOTH SET

Alternative: OFF, SINGLE, ALL
Alternative: AM10/FM100, AM9/FM50
■Sammansatt videosignal
■DTS Digital Surround
Minimum uteffekt RMS for fram, mitt, surround
1 kHz, 0.9% overtonsdistorsion, 8 Ω 105 W
[Övriga modeller]
1 kHz, 0.9% overtonsdistorsion, 6Ω 105 W
1 kHz, 10% overtonsdistorsion, 6Ω 130 W
Dynamisk effekt
IHIF,8/6/4/2Ω) 90/110/130/150 W
[Övrigamodeller]
(THF, 6/4/2 Ω) 100/110/125 W
- Kanalseparation (1 kHz/10 kHz)
CD etc. (5,1k kortsluten) till vanderhoger fram
60 dB/45 dB erer mer
- Yttermatt (b x h x d)
435× 151× 352mm
Vikt
8.5kg
MANUAL SETUP, SET MENU 55
Manuell forinstalling, FM/AM-mottagning 44
Namnandring, SCENE-mapp 31
(1kHz, 0.9% THV, 8Ω)
105 W/kanaal
(1kHz, 0.9% THV, 6Ω)
105 W/kanaal
HDMI (High-Definition Multimedia Interface)
Loud test tones are output.
Please keep quiet or leave the room.
Press [ENTER]
SCENE 1: DVD Movie Viewing
SCENE 2: Music Disc Listening
SCENE 3: TV Viewing
SCENE 4: Radio Listening
Keuzes: MIN, MID, MAX
Keuzes: Off, Songs, Albums
■Handmatige setup MANUAL SETUP
Keuzes: NONE, SML, LRG

Wanner de surround-luidsprekers groot়n
Selecteer "LRG" (groot).
LFE Bass out LFE/BASS OUT
Keuzes: SWFR, FRNT, BOTH
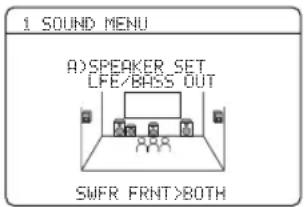
Keuzes: meters (m), feet (ft)
Begininstelling:
Keuzes: MIN, STD, MAX
Keuzes: FULL, -20 dB
Beginvolume I NIT. VOL.
Keuzes: OFF, MUTE, -80 dB t/m +16 dB
Instelstap: 1 dB
Opmerking
Volume Trim C)VOLUME TRIM
Keuzes: ON, 10s, 30s
Keuzes: ON, 10s, 30s
Bluetooth installing E)BLUETOOTH SET

Keuzes: OFF, SINGLE, ALL
■DTS Digital Surround
Handmatige setup, SET MENU 55
HDMI indicator 22
HDMI instelling, Geluidsmenu 61
LFE/Bass out, Luidspreker-installingen ...58
LIGHT M, Radio Data System programmatype 47
Linker/rechter surround-luidsprekers, Luidspreker-installingen 58
Loading..., iPod bediening statusmelding ...78
Luidspreker, Dynamisch bereik 60
Luidspreker, Niveau Lage Frequentie Effecten ...60
MANUAL SETUP, SET MENU 55
MAX VOL., Audio installingen 61
Maximum volume, Audio instellingen ...61
PTY HOLD indicator 23
PTY indicator 23
① SPEAKERS" of "③DVD"
Bb6ope Ⅲa6JIOHOB SCENE 28
Bb6op HxKHO IIIa6JIOHa SCENE 28
Co3daHHe CBOHXOpHnHaJIbHbIXIa6JIOHOB
SCENE 31
HcnoJb3ObaHHe npjIbTa Ny IaI yHKnH
SCENE 32
BocnpoH3BeJeHHe 33
OchOBhIe onepa.. 33
BbI6op ayINHOxOJIHbIX THe3I (AUDIO SELECT) 34
Bb16op KOMIOHeHTa MULTI CH INPUT 34
OTo6paKeHHe TcKyIeRo cocTOnHnJaHHoro aHaapaTa Ha BnEoKpaHe 35
HcnoJb3OBaHHc HayHHKOB 35
IIpHryIeHHN BbIBOIMMOro 3ByaHHn 35
BocpoH3BeEHHeBHHeoHCTOHHKOB B KaueCTBc 0Ha dIyHOnctOHHKa 36
OTo6paXeHHe HhOpMaIIH NcToYHnKa IIpHeMa ... 36
PpHMeHeHHe TaHMepa cHa 37
Iporpammbi 3BykoBoro noJia 38
OHHcaHHe IporpamM 3ByKOBOIIOJIA 38
Hcno.1b30BaHne ayDnOfoyHKnH 41
PocJyHBAHHe BbICOKKaueCTBeHHOro 3ByaHH...41
PeryJnpoBka ToHaJIbHOro KauecTba 41
PerylnpOBka ypoBHa KOIOHOK 41
Bb6oppeKIMaHOHOrIOIPOcIyINBaHHA. 42
Hactpoika paHonporpamM hana3oHa YM/AM ... 43
ABROMATNUeCKa HacTPOKa 43
PyuHa HaCToPiKa 43
ABTOMaTHueckKa IIpeIycTaHOBKa 44
PyHnHa IpeIyctaHOBka 44
Bb6op npedyctaHOBJeHHbIX paHocTaHINI ... 45
3aMeHa IpeynCTaHOBJIeHHo paHocTaHHI.. 45
Hactpoika ChTeMbI PaHaHOJaHHbIX
(ToJbKO MoJeIIN IJI EByOIIbI IN PocchH) ....46
6opaxeHHe HhfoPmaHn ChTeMbI PaHnoHaHHbIX 46
Bb6op TIIIa IIporpaMMbI CnCTeMbI PaHIOJAHHBIX (peXHM PTY SEEK) 47
HcnoJIb3OBaHHe HnΦopMaIIHOHHoYcJIyTH npYrHX paIHoCTaHIuN C yJIyUHcHHbIMN BO3MOxKHOCTaMn (EON) 48
HcnoIb3ObaHne yctpoiCTBa namrTH USB nn
Ipehochooro ayHOnIeepa USB 49
YIpaBJIeHHe BOCIIpon3BeJeHHem 49
HcnoJb30BaHne iPodTM 51
YIpaBJIeHHe iPodTM 51
HcnoJb3ObaHne KOMnOHeITOB Bluetooth™ ...53
CnapBaHne aaTepa BluetoothTM H KOMIOHeHTa BluetoothTM 53
BocpoH3BeHeHne KOMIOHeHTa BluetoothTM ... 53
3amncb 54
DONOJIHINTEJBHOE YNPABJIENHE
SET MENU 55
HcnoJb30BaHne SET MENU 56
1 SOUND MENU 57
2 INPUT MENU 62
3 OPTION MENU 64
.67
YIIpaBJIeHHe JaHHbIM aIIIapaTOM, TeJEBH3OpOM, HIN JpyTHMH KOMIOHeHTaMH ... 67
YcTaHOBka KOIOB IY 69
DIOHOHTe.IbHbIe HaCTPOKn 70
DONOHHTENbHAR INΦOPMALNA
Bo3MOxHbIe HeHcnpaBHOCTn cnoCo6bI no
Hx yctpaehnio 71
CnpaBoOHHK 81
TexHHueckHe xapaKtepHCTKNH 83
IpeMeTHbI yka3aTeJI 84
APPENDIX (IPNUJIOXEHNE)
(B KOHue daHHoro pyKOBoDCTBa)
ΦpoHTaJIbHaI HaHeJIb
Iy.IbT Iy .ii
CINCOK KOIOB DnCTaHIOHOHOrO ynp aB.IeHHa....iii
O daHHOM pyKOBOdCTBe
-03HaetaCT COBET JIIA OJIeIeHnY IIPaBJIeHn.
HeKOTOpBie OIIepaIH MOrYI IPOH3BOIDHTbC HcIOJIb3OBAHc HONOK HaΦpOHTaJIbHOI NaHEJIN HJH HApIbTe JY.BcIyae, ecJH HAMeHOBAHH KONIKΦpOHTaJIbHOI NaHEJIN He COBIIaIaOT C HAMeHOBAHHM KONIK IIbTa JY, HAMeHOBAHH KONIK IIbTa JY yKa3bIbAeTcB cKO6kax.
JaHHoe pyKOBOCTBO OTNeaTaHO Do IPOH3BOJCTBA. H3aHn TEXHHueckHe XapakTepehKMOrY TaCTHNO H3MeHrTbc C IIeJIbO yIyIiEHHa KaecTBa H.T.J.B CIyae,ecHN HMeIOTc pa3JIHn Mekdy pyKOBOCTBOM H anIIapaTom, HpOpHTet OITaeTc anIIapaTy.
“①SPEAKERS”HIN“③DVD"(IpHmep)O6o3HaayeT Ha3BaHHe qAcTeH aΦPOHTaJIbHOH IaHEJIN HIN IIyJIbTe IY.IIHOΦOpMaIIH OKaXIOI IO3HIIH qAcTeI CMOTPHTe IpiJIOKeHHe HIN IpiJIOKeHHe B KOHIE JaHHORo pyKOBOJCTBa.
CHMBOJI“cHOMepoAMnCTpaHHI(b)063HaaeT(OT)COOTBETCTByIOUYIO(ne)CINPABOUHYIO(he)CTpaHHu(bl)
OnncaHne
BcTpoEHHbI 5-KaHaJIbHbI yCnJInteMb MOUHOCTN
MHHMaJIbHOC cpeINHeKBAIpaTHuecKoc BbIXOIIHOC HaipJxKeHne
[MoJIeJIuIJIa CIIIA N KaHaIbI]
(1KΓI,0.9%OHH,8Ω)
105 BaTT/KaHaJI
[nyrme moJeJIN]
(1KΓI,0,9%OHH,6Ω)
105 BaTT/KaHaJI
Функць Вьбoga SCENE
PpetyctaHOBJIeHHbIe IIIa6IOHBI SCENE IIpa3IIHbIX cHTyauuH
YHK HnHacrpoKn Ia6JHOhSCENE
H3roTOBJIeHO IO JIINHeH3HH Dolby Laboratories. "Dolby", "Pro Logic", H cHMBOJ B BnCe IByx 6yKB D ABJIAOTcT OBaHPbIMn 3HaKaAMn Dolby Laboratories.
SILENT CINEMA
"SILENT CINEMA" JBIIeTcT TopROB MApKoYamaH Corporation.
iPodTM
"iPod" 1B2IeTcT TopROB MApKo Apple, Inc., 3apeHtCtpnPoBaHHo B CIIIA HpyHx cTpaHax.
HDMI (High-Definition Multimedia Interface)
HHTepcHc HDMIJI rcaTAApTHbIX, yCOBcPCHCTBOAHHbIX HJI BBICOKOyCTKHX BnDCOHHaIOB (BKIOYAR IpeJaCy BnDCOCnHaJ1 1080p), a TaKKe IIN MHorOKaHaJIbIX IIHΦPOBbIX ayINOCnHaIOB
TepmnHaJ DOCK
TepMHHaJDOCKIIIINIOIKJIOUeHnYHHBepcaJIbHoIokaYamahaIIIPod(Haipmep,YDS-10,IIpoiaIOIeroC0rOTJeIbHo)IIHn aaiITepa Bluetooth (Haipmep,YBA-10,IPOIAIOIeroC0rOTJeIbHo)
Функции USB
USB IOPT IIJI IOIKJIIOUeHHy yCTPOHCTBA IaMRTN USB HIN IpeHoCHORO ayHOONIEepa USB
_HKIIIA o6pa6OTKN MP3, WMA n WAV
Dpyrne oco6eHHoCTn
_YHKIIJ YPAO (Yamaha Parametric Room Acoustic Optimizer) JINABTOMATUeCKoHACrPOuKn KOJOHOK
192-KI/24-6HTOBBII IINΦpOBO-aHaJIOrOBBII IIpeo6pa3OBATe.Ib
PexHM DIRECT JIIBYBICOKOKaueCTBeHHORO 3ByaHNNJITBCEXNCTOCHIKOB
6IOIOJIHHTeJIbHbIX BXOINbIX IHE3IJIJIIPHeMa HCKPeTHbIX MHOROKaHaJIbHbIX CHIHHaJIOB
MeHIO OSD (KpaHHoe MeHIO), IO3BOJHOIIIE ONTHMHNPOBAtbJaHHbI aHIIaPaT JJI HINHBUNyajbHOJ avHOBn3YajbHO CHCTEMBI
ΦyHKIIBA BBOa/BbBOa KOMIOHeHTHO BVIEO (3 COMPONENT VIDEO IN 1 MONITOR OUT)
OITnueckne H KOaKcnaJIbHbIe rHe3Ja IuΦpOBbIX ayDnOCHHaIOB
TaHMepea
PeKHMbI HOYHOrO IIPOCJIyIIINBaHHKINHOΦHJbMOB H MY3bIKH
ΦyHKnua ynpabIeHHia iPod
NyJBt NyCippeNyctaIOBJIeHHbIMKoJAMH N
Digital Sur
"DTS" n "DTS Digital Surround" ABJIOCTapeHcTpnpoBaHHbIMN TopRObIMM MapKaMn DTS, Inc.
BluetoothTM
Bluetooth - 3to 3aperHcTpnpoBaHHaT ToproBa MapKa Bluetooth SIG H nHcIOJIb3yeTcR YamaB aCOOTBeTCTBnC JHHeH3IOHHbIM COJJaIIeHHeM.
HOMI
"HDMI", JIorOTH "HDMI" H "High-Definition Multimedia Interface" ABJIOCTC TOpROBIMM MapKaMH JIN 3apeRHeCTpIPoBaHHbIMN TopROBIMM MapKaMH HDMI Licensing LLC.
POndrotOBka
IocTabnReMbIe akceccyapbl
Y6eIITecb H aHnHn Bcex cIeNyUOuNX DeTaJIe.
OnynbTdY
BaTapeKn (2) (AAA, R03, UM-4)
MnKpooh ONTNMn3aTopa
PamouHaAMaHTeHa
BHyTppeHHaM aHTeHHa
■VOLTAGE SELECTOR
(Tolbko MoeJIb dIy A3nn n o6uaa MoeJIb)
PpeynpeKdHne
CeJIeKTop VOLTAGE SELECTOR Ha 3aHHei HaneJIN daHHoro aHaparaTdoJKeH 6bITb ycTaHOBJEHN Ha MeCTHOe HAmpaKeHne IO IIOKIIIOUeHnI CNIOBOrO Ka6JIa K PO3eTke IepemEHOro TOKa. HeIpaBUNbHaY cTaHOBka VOLTAGE SELECTOR MoXeT IOBpeNtB daHHbI aHApaT n CO3JaTb pNCK BO3MOxHOro IIOXapa.
IobopaHbA VOLTAGE SELECTOR IocAOBOHn HIpOTnB YacOBOn CTpeJIKN C HOMOIIbIO IIpMaON OTBePTKn, yCTaHOBHTe eO Ha COOTBeTCTBYIOUYIO IO3HIIIO.
HappxeHHa:
MoJIeJIbIaA3HH
220/230-240BnepeMeHIOrTOKa,50/60T 06nau MoeJIb
110/120/220/230-240 B IIepeMeHHoro ToKa, 50/60 T
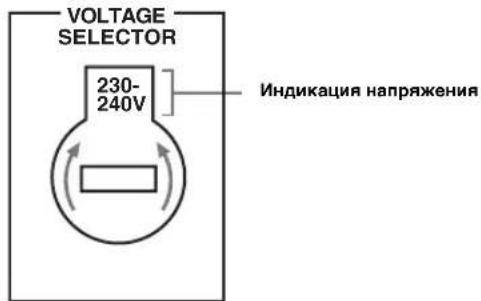
YcTaHOBka 6aTapeeK B nyIbT dy
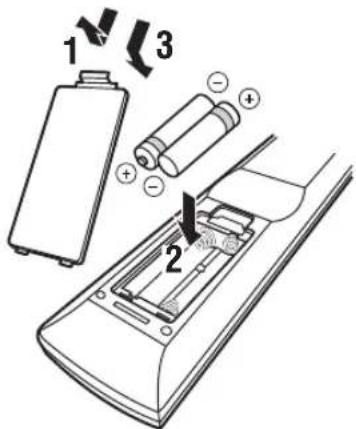
1 N3BneKeTe KpbIshky otdeJeHnA dJa 6aTaapeek.
2 BcTabbTe IBe NocTabnembIe 6aTapeKu (AAA, R03,UM-4)B COOTBeTCTBm C 6oO3HaueHnMn noJnPHocTn (+ / - ) Ha BVHTpeHne CTopoHe otJeHnA dN6 6aTapeek.
3 yctaHOBHTe KpbIshky OTdJIeHnA Jn 6atapeek Ha MeCTO.
Приимеанnia
IIpn cHnKeHHN 30HbI ynpabJIeHHN IyJIbTa IY,3aMeHHTe BCE 6aTapeKNI.
- He nioJIb3yIte cTapyIO 6aTapeuKy BmecTe c HOBoi.
He HcnoIb3yIte pa3JHINbIe Tnblb6aTaapeek (HaipnMep, IIcIOuHbIC HMapraHIOBbIc 6aTaapeK) OIOHBpeMeHHO. BHNMaTeJIbHO H3yHTe YNAKOBy, Ta KaKaTaNKe pa3JHINbIE Tnblb6aTaapeek MOrYt HMeTB OINHaKOByo fOpMy IIBet.
- IIpn IpoTeKaHHH 6aTapeck, HcMeJIeHIO H3BLeKHTc Hx. N36eRaIte KOHTaKTa c MaTePhaIOM IpoTeKaHHH NIIH He JaBaHTe OJekIe H T.I.D. COIIpHKacatbce C MaTePhaIOM IpoTeKaHHH. IpcI yCTaHOBKO HOBbIX 6aTapeck, TIIaTeJIbHo IpoTpHe OTJeJIeHHe JIA SaTapeek.
HIOB3OBAHHbC 6aTapckn Ccayet BbipacbIbTaH KAKoBHbIOMaIHHe OTXOJIb, a B COOTBeTCTBHn C MeCTHJIMn IpaBAHJaM.
IIaHTbIyIbTaIy MoKeT 6bIb yHaJIeHa,ecHIN IyIbT IY HaxoIHTC8 6c3 6aTapeck 60Jee 2 MHyT, HIN B HEM HaxoITc HIOHOCTbIO HNOJIb3OBAHHbIe 6aTapeKN. IIpy JdaJIeHN HAMrTH, BCTaBtE HOBBe 6aTapeKN H yCtAHOBHTe KOI IY.
KpaTKoe pyKOBoIDcTBO NOIb3OBaTeJIa
CJeIyIOIIHe IIIaHr OINcBbAiot HaJIeKKn cIOco6 IIPOcMOtpa KInHOΦHbMoB Ha DVD-ⅡHcKaX Ha BaIeM IOMaIIHem KINHOTeaTpe.
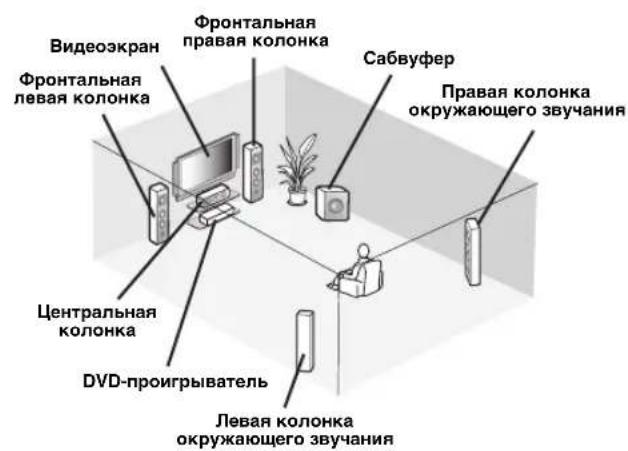
War 1: YctaHOBnTe KOJOhKn
c.5
War 3: Haxmte KhoNky SCENE 1
1 BkIIOHTe BVIEO3KpaH n 3aTeM yCTaHOBNTe ceJIeKTOp IcTOUHnKa IpHeMa BVIEO3KpaHa Ha daHHbI aannapaT.
2 HaKMMTe KHONky @SCENE 1.
JaHHbI aIIapAT BKJIIOUaEcTc. Ha IINCIJIe
ΦpOHTaJIbHOI IIaHeIb OTO6paXaEcTc "DVD Viewing", IIaHHbI aIInapAT ABOMaTHueCKN
OITHMn3HpyET CBOI CTaTyc IJIa
BocIpOn3BeJeHNr DVD.
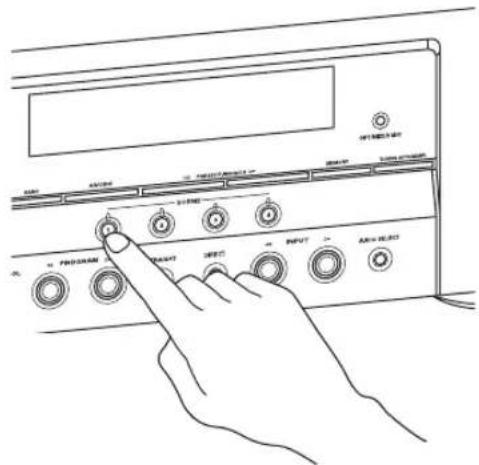
中
KorJa daHbI aHapar HaxOHTcB pexHMe SCENE, BbcBeHHBaTe cHnHKaTOp BB6paHHo KhoIIKN SCENE.
3 Haunte Bocnpon3BeJeHne XeJaemoro DVD-ncka ha npourpblBaTeNe.
4ПовораиВайт e VOLUMEДЯнстой КгомКоCTN.
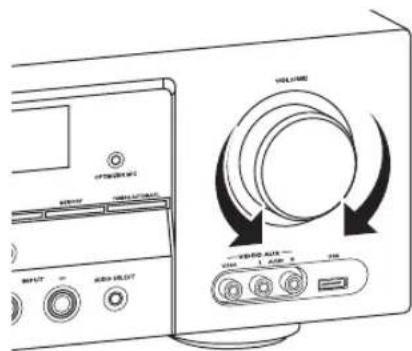
PnmeaHne
IIpH IIpeKIOUeHHN HCTOuHHKa IIpHeMa HIN IIpoIpaMMbI 3ByKOBOrO IOJI,peKm SCENE OTKIOHaetc.
OФункциN SCENE
HaxaTHem TOJIbKO OJHO KHOKN SCENE MOKHO BKIOuHTb DaHHbI aIIIapAT H BbI3BaTb JIO6HMbI HCTOuHHK IIpHeMa I IPOrpaMMy 3BYKOBOrO IOJIa B COOTBeTcTBn C IIa6IOHOM SCENE, Ha3HaueHHbIM IIIA KHOIIKN SCENE. IIIa6IOhBi SCENE - 3TO BCTPOeHHbIe KOMoHaIHH NCTOuHHKOB IIpHeMa I IIPOrpaMm 3ByKOBOrO IOJIa.
中
IIpH IIOKJIIOUcEH H3IeJIyama c cyHKIeH cHHaIOB yIpabJIeHH SCENE, JAnHbI aIcapaT MoKeT aBTOMaTHueCKB KJIIOuHT bOMIOHeHT H 3aIyckaTb BOCIIPOH3BeJeHHe. IIJ6OJIee IOpObOH INHΦOpMaIIH, CMOTPte HHCTpyKIIHO NO ekCIIyataIH N DVD-IPoHrpbIbATEJIIO.
Ha3haeHHbI no yMOnUaHnIO wa6NohBi SCENE
0603haaet aIbTePHaTnBHbIe NOkHoueHHA
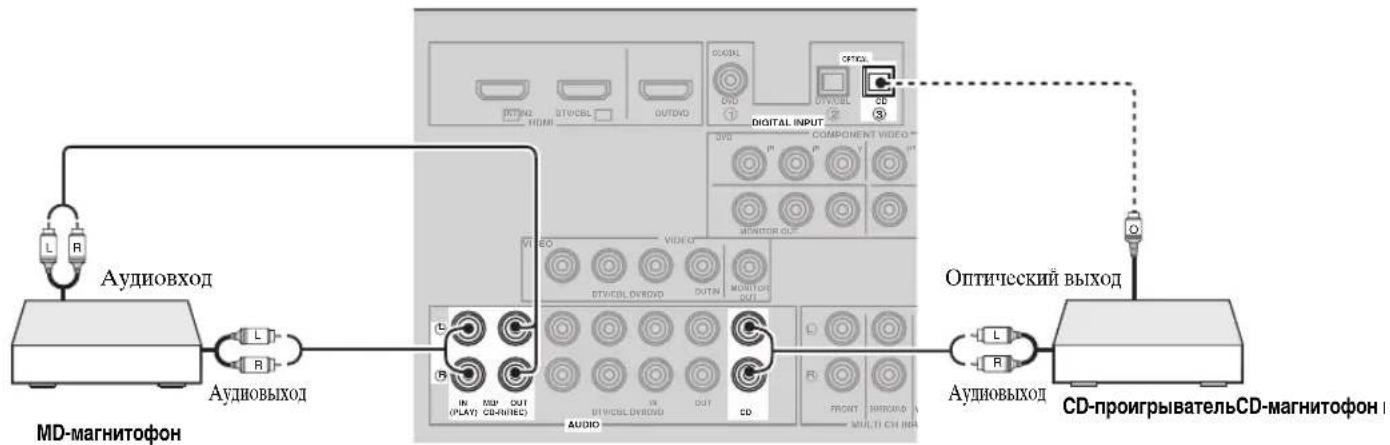
■IopKJIouHHe MHorOΦOpMaTHOro npOnrpbIbATEJnBHeHero DeKOePa
IaHbI aHpaT o6OpyIOBaH 6-IO IOIOJIINTEJIbHbIMN BXOINbIMn rHe3dAMN (FRONT L/R, SURROUND L/R, CENTER n SUBWOOFER) IIA INCKpeTHORo MHOROKaHaJIbHOrO IIpHEMa OT MHOROΦopMaTHORO IIPOHRpbIbATEJIA, BHeIIHeRo IeKOIEpa HIN 3ByKOBOrO IIpoUeCCOPa. IIOJIIOuHTe BbIXOINbIE rHe3Ja MHOROΦopMaTHORO IIPOHRpbIbATEJIA HIN BHeIIHeRo IeKOIEpa K rHe3dAM MULTI CH INPUT. Y6eINTEcB, YTO JIEBOE n IIpaBOE bIXOINbIE rHe3Ja IIOIKJIIOUeHbI K JLeBOMy I pAbOMy BXOINbIM rHe3dAm IJIΦpOHaJIbHOrO KaHaJa N KaHaJa OKpyKaIOUIeTO 3ByaHnI.
PnmuMeaHn
- IIpy BbIbOpc KOMIIIOHHTa, IIOKJIIOUChHIoro K IHe3JAM MULTI CH INPUT KaK HcTOHHKa IocTyIIAOIeRo cHIIHaJa (CMOTpHte CTrp. 34), IaHHbI aIIIAPA t ABTOMaTHueCKN BbIKJIIOYaeT IIHΦpOBoI IIPOIEccop 3ByKOBOrIOJIA, H BB6Op IIporpaMM 3BYKOBOrIOIOJIra CTaHOBHTcR HCBO3MOKHBIM.
JaHHb annapat He IpeHaipabJraet CHTHaJIb, NoctyNaIOuIne B rHe3la MULTI CH INPUT, JIA KOMnEHCaIHIN 3ByaHnO TOT OTCYCTBYIOUHX KOIOHOK. Ipeep HIOJIb3OBaHHem DaHHo FyHKIIHN, peKOMeHnyETc IOIKJIOHTb 5,1-KaHaJIbHyIO aKyCTHueCKyIO cHCTcEMy.
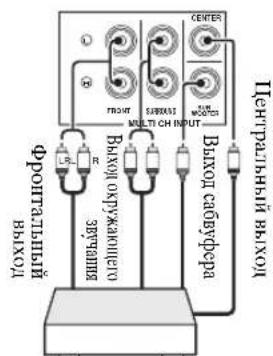
MhoropopMaTHbI npOnrpbBaTeJIb/ BHeuHn IekOep
IpeJI BbIIIOJIHeHnEM IOJIKJIOUeHHN, 063aTeJIbHO BbIKJIIOHTe 3ByK JaHHORO aIIIapTa H JpyTHX KOMIOHcHTOB.
PnmeaHn
IIIBOCINHOBeHnHcHnHOB,IOCTyHaIOHHxHaAHHeIe Hte3Ja, Bb6epTe IapameTp "V-AUX" KaHcTOHNIIOCTyHaiIOIErO CHHAJIa.
Ipn npheMe ayHocHaJIOB Yepe3 rHe3a AUDIO IN TepMaHaJ DOCK Ha 3aJHei HaneJIN, npmeHnTcN cJeIyOuII npOpHTbI IopAIOK JJI IOCTyaOuix CNHaJIOB:
1. DOCK
2.AUDIO
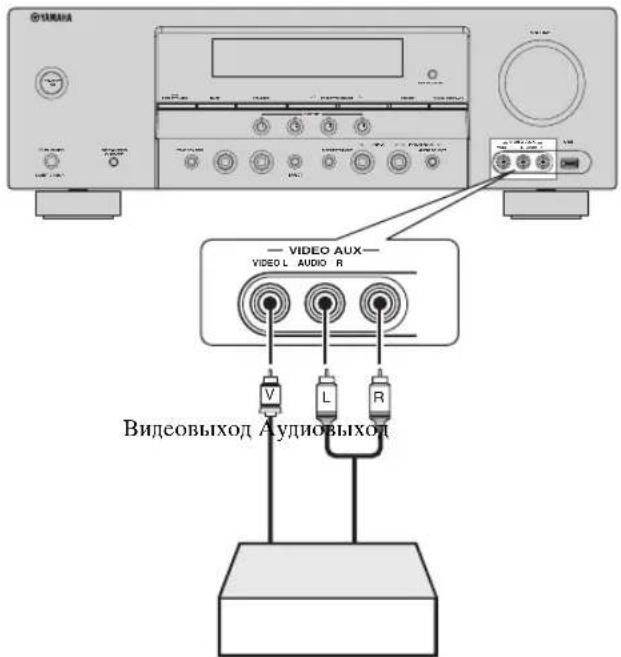
HrpoBaKoHcOJIb HIN BnDeOkamepa
THHbIOCTABJIECMoPamOyHOAMaHTeHHpa3JIHaOTcB3aBCHMOCTHOTMOJeIe.
HdkaTopbI npHHMaembIX KaHaJIOB
- OTo6paXkaIOT KOMIOHeHTbI KaHaJa IIΦpOBOrO cHTHaJa, IIOCTyIIaIOIIeRO B JaHHbIMOMcHT.
BbICBEHBAOTcHJIN MmraOT B COOTBCCTBn c HAcTPOHKAMN KOJOHOK, KOrJa daHHbI aIIapat BbIOJIHReT IpoueDpy aBTOMaTHueCKoH HAcTPOIKn (CMOTpHTe CTP.24) HJIn IIpoueDpy HAcTPOIKu yPoBHRA KOJOHOK B "SP LEVEL" (CMOTpHTe CTP.59).
IcnoJb3ObaHne npJbTa Dy
NjIbT DY nepeaet HnPaBJIeHHbI HHppaKpaChbI JyU. Bo Bpem ynpabJIeHHa, O63aTeJbHO HnPaBJIaTe NjIbT DY npraMo Ha ceHcop DY ha daHHOM aIIapate.
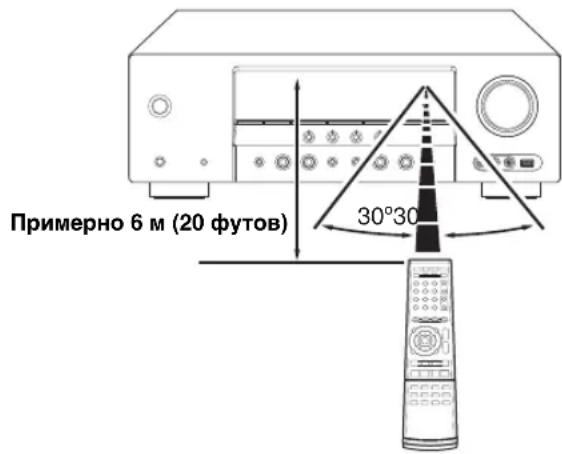
① Hhpaekpachoeokowko
N3Jaet HnHppaKpaChbIe CnHaJIbI yIpaBJIeHHa.
HaipabbTe JaHHoe OKIOKO Ha KOMIOHcT JIyipabJIeHn.
#
JyctaHOBKn KOIOB NpypyrNX KOMHOHEHTOB, CMOTpHt eTp.69.
PnmeuHaH
-Ⅲ6eraIe IpoJIINBaHHB BOIb HJIN JpyrHx KJIKoCTeHa IIyJB T Y.
-He poHnTc npIbT N
Hc octabTne HxpanHTe nyIbT yB mectax co cJeIyIOIMN BnAmn ycIOBn:
-McCTax CIOBbHIIEHHIO BIAKHOCTbIO, HAIIpHMep, BO3JIc BaHHO
-B MeCTax CIOOBbIeHHHOI TeMIIepaTyPOH,HaIIpHMep, BO3JIc O6oRpCBaTcJIHJIN IIJHTbI
B MecTaX C IIpeJIeJIbHO HN3KoI TeMIIpeaTpyO
-B3aIIbIJCHHHbIX MccCTAX
OnTNIM3aun HaCTpoKn KOIOHOK dJa KOMHaTbI dJa IpocnyuBaHnA
IaHbI aIIapat coepKHT TexHOJorHIO YPAO (Yamaha Parametric Room Acoustic Optimizer), IO3BOJIIOUIOyIO H36eKaTb XIOIOPTJIHBbI IPOIECC HAcTPOIK KOLIOHOK C IIPOCSUYINBAHHEM, I IOMORAIOUIO aBTOMaTHueCKN BbIOJIHNb BbICOKOTOHbIE HaCTPOIKN 3ByaHn. IocTaJIReMbI MHKpOoH ONITMHn3aTopa CObnpaET N daHbI aIIIapAT aHaJIIN3HpyET 3ByaHnE OT KOLOHOK B BaIe He HIIOCpeCTBeHHoC ppe IIPOCSUYINBAHHa.
Loud test tones are output.
Please keep quiet or leave the room.
Press [ENTER]
Ipeed nepexoDM K cJeDyUoSei onepaun
IocJIe BbIOJIHcHHcIeIyIOIeOnepaIIHH, IaHHbI aIInapaT 3aIyckacI npOJeIpyu ABToMaTHueCKo HAcTpOoiKn. JIa 6OJIee ToUHbIX H3MepeHn, COJIIOJaTe TNIHHy H OTOIHTe K cTeHe, rHe HIOJIIN3OCTN KOLOHOK. Bo BpeM IpoIeIypbI abToMaTHueCKo HaCtPoIKn peKOMeHdyeTcBbIHn H3 KOMHaTbI IIPOCIyIIINBaHH.
6 Haxmte ⑦ENTER nla 3anycka npoceDypbl HacTpoiKn.
IaHHbI aIIIapAT HaunHaet IpoUeDpy
aBTOHaCTPoiKn. Bo BpeMra IpoUeDpybI
aBTOHaCTPoiKn, KaJdaR KOJIOHKa
BOcPiPOH3BOiHT rPoMKHe TecTOBbIE TOHaJIbHbIE
CHrHaJIbI. KaK ToJIbKO BCE npaMeTpbl
HaCTPoeHbI, pe3yJIbTaTbI OTo6paKaIoTcRa Ha
3KpaHHOM MeHIO.
PnmuMeaHn
BoBpMaIPOUeDpybI aBTOHaCtpoKn,He BILIOJIHJrTe HnKaKHX OIIepaIi Ha JaHHOM aIⅡnapaTe.
BoBpEMBAHIOJIHeHHIPOUeIpybI aBTOHaCTPoiKn HaJAAHHOMaIIHapate,peKOMeHJyETcBAHTN H3 KOMHaTbI.Ⅱo 3aBepeHHeHHIPOUeIpybI aBTOHaCTPoiKn HaJAAHHOMaIIHapate IOTpe6yeTcI pIMepHO 3MHHyTbI.
IaHbI aIIpaT BbIOJIHeT cJeNyIOJIne IPOBepK:
NoKIOueHne KOnOHOK/ypoBeHb rPOMKOCTN WIRING/LEVEL
IPOBepaETIOIKJIIOUeHHbIE KOJIOHKn IIOJIAPHOCTb KaKIOH KOJIOHKn. TaKKe IPOBepaET HAcTpaHbAe TypOBeHb rPOMKOCTN KaKIOH KOJIOHKn.
PacctoHne KOJOHOK DISTANCE
H3mepaETpacCToHHeKaXIOHKOJIOHKNOT MeTa cIyIaTeJI HAcTpaHBAe TBpeM KaXIOH KOJIOHKN.
Pa3Mep KOJHOK SIZE
PPOBepaTcTOTHyO xapaKTEpHCTNky KaKIOI KOJIOHKn H yCTaHaBJIbAcTe COOTBeCTCTBYIOIIH yPOBeH Hn3KOuAcTOTHO RopeXoJa IJIa KaKIOrO KaHaJa.
HicnIe IpeKIOaETcCJeIyIOHM o6pa3OM.
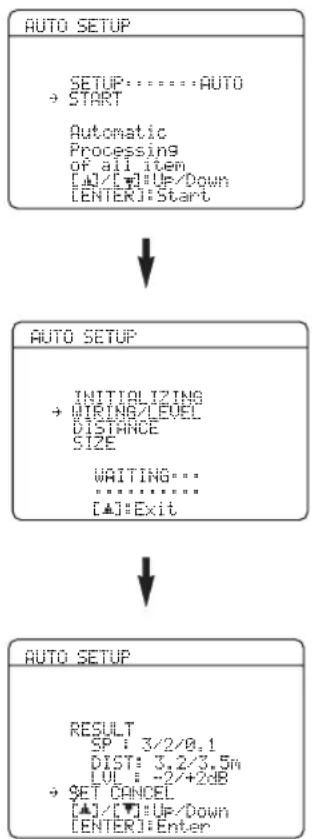
Pe3yIbTaTbIB“RESULT"o60naaIOt cJeIyoIooee.
KoJIueCTBO KOJIOHOK SP
OTo6paKeHHe KOJIInueCTBa KOJIOHOK, IIOJKIIOUeHHbIX K DaHHOMy aIIIapaTy B CJIeDyIOIIeM IIOpraIKe:
ΦoHTaJIbHbIe/TbIIOBbIe/Ca6ByΦep
PacctoHnKoJohok DIST
OTo6paKaetpaccToHHe KOIOHOK OT MeTa CJIyWATEJIB CJIeIyUoIeM IOpAKe:
PacctoHneOTHa6JnxKaIeKoIOHKn/PacctoHne OT HaJaJIbHeIe K0IOHKn
YpoBeHb KOJHOK LUL
OTo6paKaetypoBeHbBOcIpOn3BceJeHHaKOJIOHOK B cIeNyIOIeM IopRKe:
KoJIOHka c HauHH3HMM yPOBHeM BOCIIPOH3BeJeHnA/
KoJIOHka c HauBbIcIIIM yPOBHeM BOCIIpon3BeIeHHa
PnmeuHna
- EcIN BO BpEmI IpoIeIpybI TeCTHPOBaHHOTo6paKaAeTcE "E-9:INTERNAL ERROR", IIpe3aIyCTHRe c mara 4.
-Пин Вьборe“RELOAD”Ha IIIare 4,TeCTOBHToHaJIbHbI ChrHaJI He BOCIIPOH3BOJNTcR. - PnB03HHKHOHNNOHN6KNBO BpeM IpoIeIpybI "AUTO SETUP", IpoIeIpya HacTpOKn OTMeHaeTc H OTO6paKaTaC coo6HHeNc 06 OoH6Ke. IpoIpo6Hee, cmoTpHte "PnIO8JIeHHNcoo6HHeNc 06 OoH6Ke" Ha cTp.27.
- EcIIaHHbI aHIIapAT o6hApxHJI BO3MOXHbIE HpO6JIeMbl BO BpeMn HpoIeIpybl “AUTO SETUP”, OTo6paKaaeTcHnHKnKaIIHn“WARNING” H Homep HpeIyHpeKJHeHH (CMOTpHTe cTp. 27).
7 Haxmte ⑦n ⑦ENTER nI npo6horo oTo6paXeHnpe3yNbTaTOB hAcTpoiKn.
8ДЯпepeклioченяЗкраHOВpe3yЛьТаTOB HacTpOиKN, NOBtOpHOn HaXIMaIte ⑦ < /
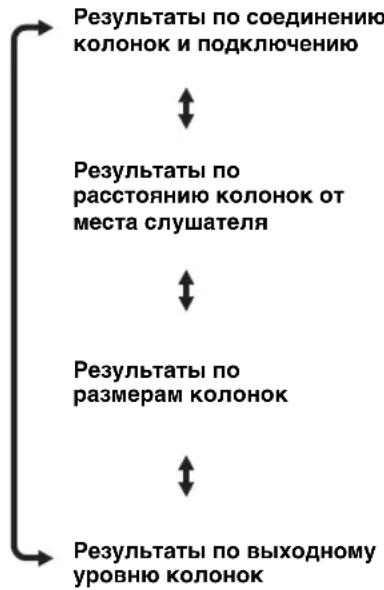
#
Pn HeyIOBJIETBOPHTeJIbHbIXpe3yJIbTaTAX HIN ECJIN HyXHO HaCtPoHTb KaKJbI IpaMaTeP BpyHyO, 3aIyCTHrE“MANUAL SETUP" (cMOTpITc cTp.55).
Pnmeuane
PacToHHne, OTo6paXeHHoe B pe3yIbTaTAX IIa "DISTANCE", MOKET 6bITb IINHec, YcHnACToHHce pacToHHne, B 3aBHCIMOCTH OT XapaKTepHCTHK KOJIOHOK.
9 Haxmnte ⑦ENTERДЯ BO3BpTaHa 3KpaH pe3yIbTaTOB.
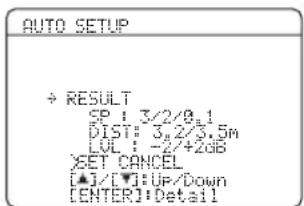
10 Haxmam ⑦V n 3aTeM, Haxmam ⑦, BbIbepnte "SET" uN "CANCEL".
Bb6op: SET, CANCEL
- BbI6epHTe "SET" IIIA IOITBepKJcHnpe3yJIbTaTob "AUTO SETUP".
- BbIbepHTe "CANCEL" IIa OTMeHbI pe3yJIbTaTob "AUTO SETUP".
11 Haxmte ⑦ENTERДЯ NOДТВерхденьбopa.
Ha 3KpaHHOM MeHIO OTo6pKaaeTcraJIaBbHIN 3KpaH "SET MENU".
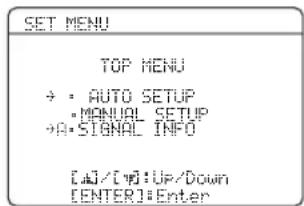
12 HaxmTe ②MENU IJIa BbIXOda N3 "SET MENU".
13 OToCoeHnHTe MnkpofoH ONTmN3aTopa OT daHHoro annapata.
MnKpoOoI ONTHMn3aTopa YyBCTBHTeJIeN K TeIIJy. XpaHnte erO BdaJIn OT IIpMaTOrIO IIHaJaHHc COJIHeuHbIX JIyueH He paCIOJIaRaTe erO Ha JaHHOM aIIIapate.
中
IIpH 3aMeHc KOJOHOK, H3MeHcHHI paIOJOKeHHaKOJOHOK, HIN H3MeHcHH cpcbl IPOcIyHHBaHHa, IIIB BbIEpKN ChTeMbI, CHOba 3aIycHTHe "AUTO SETUP".
Pn noBHeHH coo6eHna 06 own6ke
Haxmam ⑦△/V/I<1/D,BbI6epnte npaMeTp "RETRY"nIN“EXIT”n3aTeM Haxmnte ⑦ENTER.
Ha cIeIyIOIIeM 3KpaH e IOKa3aH IIpHMeP OTo6paKeHHa "E-8:USER CANCEL" Ha 3KpaHHOM MeHIO.

Bb6op: RETRY, EXIT
- BbIepeHte "RETRY" IIa IIOBToPA IpoIeIpybI "AUTO SETUP".
- BbIepeHTe "EXIT" IJIa BbIXOJa H3 IIpoUeIpyBbI "AUTO SETUP".
При отообрахкени "WARNING"
ПиOBснужКИВОЗМоЖьIXIIpo6JIeMДaHHbIM aHapatom BO BpeM IIpoIeIpybI“AUTOSETUP”, oTo6paKaetc“WARNING”Ha3KpaHe pe3yIbTaTob.IPocHTaIte IpeIyIpeXJdeHne HICpABTe HacTPOIKN KOJOHOK.
PnmeaHne
IpeIyIpcKJcHnO rJIHuaOTcR OOnb60k TcM, YTO IpeIyIpcKJcHnHe OTMeHnOT pOIIeIpy "AUTO SETUP".
1 y6eIntecb, yTo yKa3aTeIb HnPaBneH Ha "WARNING" n 3aTeM haxMnte ⑦ ENTER dIy OTO6paXeHn IopPo6HoN IHΦOpMaun o npedynpexKdeHn.
YncIIO cnpaba oT "WARNING" 0603Haayet KOJIInyeCTBO COOOHnO 60HH6Kax.
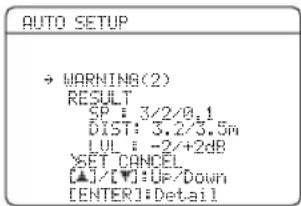
2ДЯпескюченяпpeурждени, NOBTOPOHaXImaTe ⑦<1>
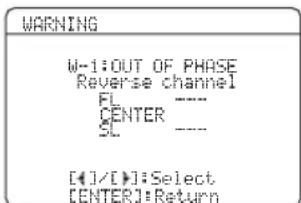
IIOJpO6Hee o KaKdOM IppeDyIpEeKHeHH, cMOTpHTe pa3IcJI "AUTO SETUP" B "Bo3MoKHbIC HeNCIIpaBHOCTn H cNooc6bl IO Hx ycTpaHeHHo" Ha cTp. 75.
- EcJH COOTBcTByIOUeI IpeDyIIpeKJeHHe He OTHOCHTCK KOJOHKe, BMeCTO HrE OTo6paXaTeC T
3 Haxmte ⑦ENTER nB03Bpata Ha 3KpaH pe3yIbTaTOB.
BbI6ope шаблонов SCENE
IaHHb aIIIapat OobpyObaH 16 npeYcTaHOBJeHHbIMn Ia6IOHaMH SCENE IIpa3JIuHbIX cHTyaIIN IIpn HcIOJIb3OBaHH daHHORo aIIIapaTa. B KaueCTBe HcxOJHO yCTaHOBKn, cJeIyUIIne Ia6IObI SCENE Ha3NaueHbI IIkaKJIOI KHOIIKN SCENE:
SCENE1: DVD Movie Viewing
SCENE 2: Music Disc Listening
SCENE 3: TV Viewing
SCENE 4: Radio Listening
IIHNCIOIb3OBAHHIpyrHXIIa6IOHOBSCENE,MOxHO BbIpaTbHyXhBnIIa6IOHSCENEB6HOHTeKe IIIa6IOHOBSCENE HHa3HaHTbIIa6IOHbIJIIBbIpaHHIX KHOIKSCENHaΦpOHTaJIbHOHNaHeJINIyJIbTeIY.
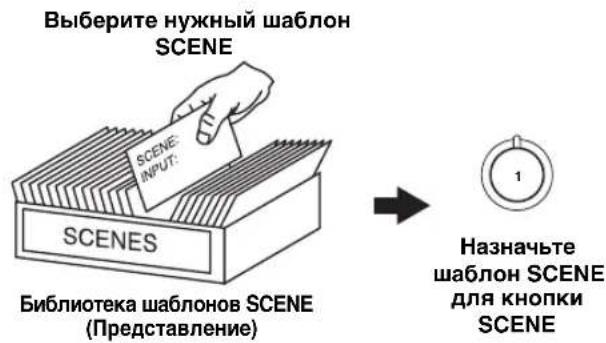
Bb6op HxKHO ro 7a6NoHa SCENE
1 HaKMITE u ydepxkBaIte HaxaToHyXHyIO KhoNky @SCENE (uIN 5SCENE) B TeueHne 3 cekyHd.
HnKaTOp BbI6paHHo KHOIIKSCENE Ha
pOHTaJIbHOI NaHeJIN HauHHaET MHTaTB, HHa IHCJIeE
pOHTaJIbHOI NaHeJIN OTO6paXaeTcH3BaHHe
TeKyIeRo Ha3NaueHHoro IIa6IoHa SCENE.

DVD Movie View
2 HaXumaI INPUT / (HnHaXab
④AMPиЗaTemHaXmMaJ ⑦<1/D>), BBi6epnte HxHbI Sha6NoH.

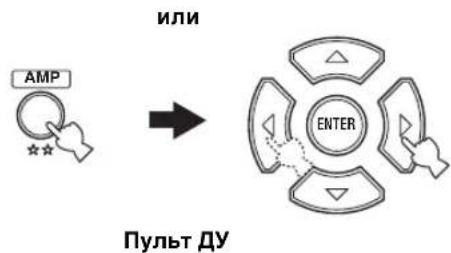
DVD Viewing
3 CHOBA HAXMITE KHONKY @SCENE (ИЛN ⑤SCENE) ДЯ NOДТВЕРЖDEHNA Bbl6opa.
Bb6paHHbI Ia6IOH SCENE Ha3HaayaeTcJ KHOIIKN.

naHeJIb
HNN

NynbDyΦoHTanbHa
PpMeyaHne
KaK ToJIbKO HJxHbc IIIa6JIOHb SCENE Ha3NaueHb IIN COOTBeCTByIOHx KHOIOK SCENE, MoXcT IOrpeoBaTbc HAcToPOnTB HcTOUHHK IIpHeMa IIIa6JIOHa SCENE Ha IIyJIbTe IY. CMOTpHte cTp. 32 IIaIIOIpOboHn HfOpMaIIHN.
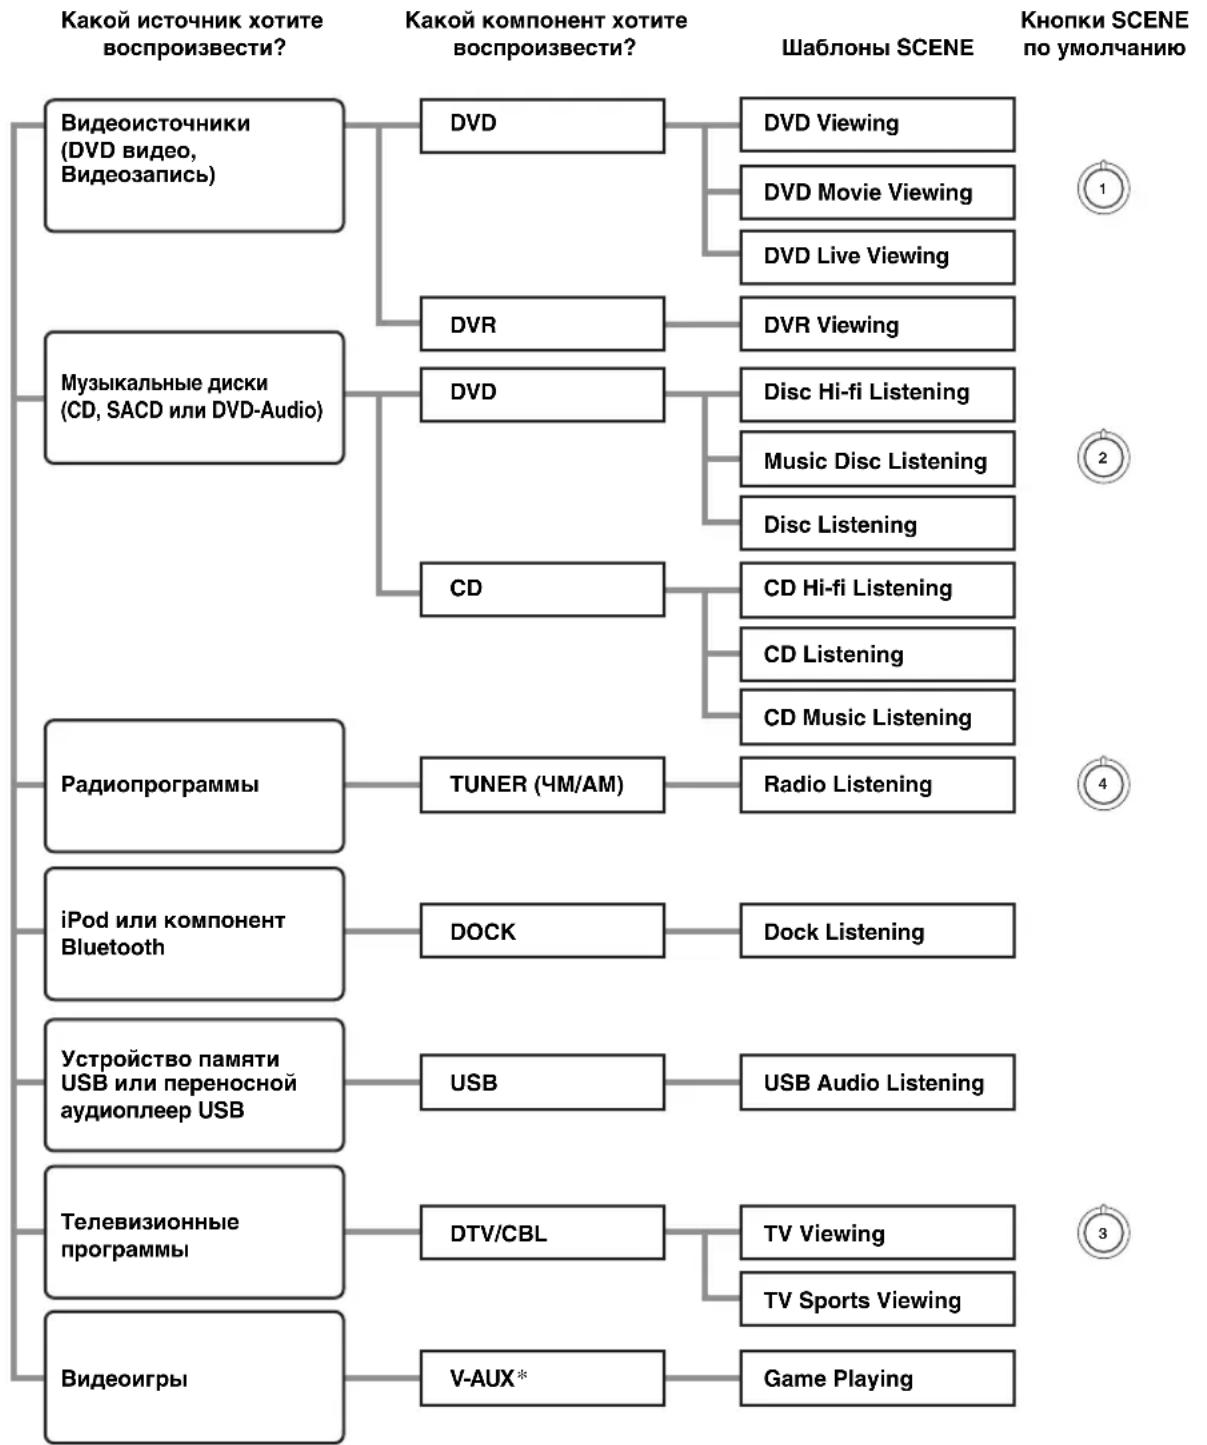
Kakoia6nohSCENE xoTnte BbIpaTb?
PpMueaHne
* Ipn NIOKIOHEni iPod K yHnBepcaJIbHOMy JOKy YamaHa IIN iPod HIN IOKJIOeHHN KOHoneHTa Bluetooth KaIantepy Bluetooth, aHHbI anIAPAAT BocIIpOHN3BOINT ayDHOHCTOHHKN, IocTyIaIOUHe Ha TepMHHaI DOCK.
MoKHO co3aTb cBOH opHHaJIbHbIe IIIa6JIOHBI SCENE,OTpeJaKTnPOBaB IIpeyctaHOJIeHHbIe IIIa6IOHBI SCENE.
CMOTpHTe cTp.31IJIa 6OJIe IIOJPObHOH HOpMaHH
OnicaHne npedyctaHOBHeHHbIX wa6IHOHB SCENE
NJIIOCTpaHH KHOHN SCENE B cIeIyIOIIe Ta6JIHIE NOKa3bIBaIOT Ha3HaueHHbIe KHOHN SCENE no yMOJUHaHHIO.
MoXHO Bb6paTb JINTEJBHoCTb OTo6paKeHHaTeKyuIero COcTOHnB 3KpaHHOM MeHIO C HMOIbIbI NaPaMeTp a "OSD-AMP" B "OPTION MENU" (cmOTpHe ctp.64).
Pnmeuahne
CHHaJI 3KpaHOro MeHIO He BBIOJITcHa THe3Ja DVR VIDEO OUT n Hc 6yIeT 3aIIncn.
H3MeHeHHe 3HaueHnI npaMeTpoB IIpH yHKIIHH "MEMORY G uARD" B "OPTION M E N U", ycTaHOBJIeHHoH Ha ON, HeBO3MOxHo (CMOTpHTe cTp.64).
中
HaTaIbHbIe ycTaHOBKn BblJeJIeHbI XnPbIM IIPnΦTOM IOKaKdIm IapamCTpOM.
Для Pop/Rock, Hall, Jazz, Game, TV Sports, Movie Spacious Movie Dramatic:
YpoBeHb DSP DSP LEVEL
Функия: Habстpoиka ypoBna əффekta. Bt6op: MIN, MID, MAX
Дя 2ch Enhancerи 5ch Enhancer:
YpoBeHb 3ΦΦeKta EFFECT LEVEL
- BbI6epHTe "MIN" JIIa MHHMaJIbHOrO cKaTHIA.
- BbIbePHTe "MID" IIJIaCTaHapTHOrO cKaTnI.
Bb6epHc“MAX"IIaMaKcHMaJIbHOrcKaTHI.
中
HacrpoKn "NIGHT:CINEMA" n "NIGHT:MUSIC" coxpaHIOCTc He3aBHCIMO.
PnmeuHn
- PexHMbI HOHOrO IPOcJyINBaHHa HeIOCTyINbIB CJIeJyIOIIIX cJyuaX:
-KoTja BbIbpaHpeXHM DIRECT (cmotprte crp.41).
-ecJH BB6paH KOMIOHEHT,IOJKIOUeHHbI K THe3JaM MULTI CH INPUT, KaK HcTouHHK IIpHeMa (CMOTpHTe crp. 34).
-ecJIK rHe3Iy PHONES IOdKJIIOeHb HAYINHKI.
PexHMbI HOHOrO IPOcIyHHBaHH MOrTy pa3JIHcTaBcHIOJeCTBHIO, B 3aBHCMOCTH OT HcTOUYHKa IOCTyHaIOIEGCHHaJa HcIOJb3yeMbIX HaCTpoEK OKpyKaIOIIeEO3ByuAHn.
Hactrojka paAnonporpamM dnaana30Ha YM/AM
CyIeCTByIOT 2 MeToJa HAcTpoKn: aBTOMaTHueCKa I pyuHa. ABTOMaTHueCKa HaCTpOJa 念 fpeKTHBnBa TEx cJIyuaX, KOrJa IIOCTyIIaIOIIHe OT paIIOCTaHIIIN CHTHaJIbI IOCTaTOUHO cJIbHbI N OTCyTCTBYOT IOMexN. PIn cJIa6oM cHTHaJIe JcJIaEMoI paIIOCTaHIIIN, IPOIN3BeIIrte pyuHyIO HaCTpOKn. TaKKe MoJHO hIOJB3OBaTB yHKIIIO aBTOMaTHueCKoI IN pyuHO HAcTpoKn II ppeIycTaHOBKn II COxpaHHTb IO 40 paIIOCTaHIIIN.
ABTOMATUYeCKaHacTpoiKa
ABTOMaTHuecka HactpoiKa 3ΦΦeKTHBHa B Tex CJyuaX, KOrJa IOCTyIaIOIIne OT paJInOCTaHIIN CNHajbI IOCTaTOUHO CJIbHbI N OTCYCTBYOT IOMexN.
1 NOBTOPHO HAXIMaTe OTO6paXeHn“TUNE φpoHTaJIbHo nHaHeJ
INPUT / do
"Ha Дисплee
2 Haximam KhoNky BAND, BbI6epTe dna30H npema (M nAm).
3 HaximaiTe TUNING AUTO/MAN'LOI NOBHeHn INDnKaTopa AUTO Ha DnCnJee FOPOHTaJIbHOI NaHeJI.
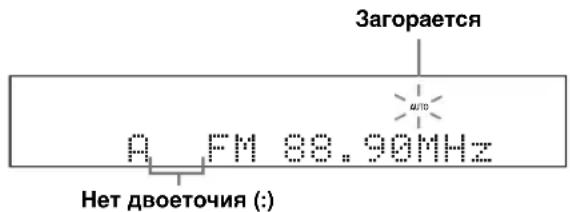
ABTOMaTHuecka HaCTpoKa HeBO3MOxHa IIpN IOBJIeHn IBOeTOUH (:) HaIINCIJIee pOHTaJIbHOI IaHEJIN. HaxkAB ⑧ PRESET/TUNING,OTKJIIOHTe IBOeTOUHe ().
4 HaxmTe 电 PRESET/TUNING/CH<1/D OINH pa3 dJa HaayaJa aBTOMaTHueCKo HactpoKn.
Pn HacrpoKe JaHHoro aannapaTa Ha paHnoctaHIO, 3aropaetcra HHdkaTOp TUNED n YaCTOta PnHHMaemor paHNOCTaHIN oTo6paKaETcra Ha JncIIee pPOHTaJIbHOI IaHeJIn.
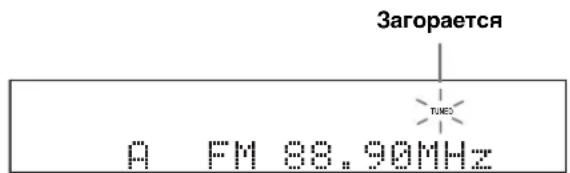
PyuHaHa HacTpoiKa
Pn cnaob noctyaioem cnHaJe jeJaemoi paHnoCTaHH, pON3BeNTe pyHyIO hAcTPOKy.
PpmeaHne
Pn pyHn HacpoKe Ha YM paHIOCTaHIIO, TIOHEp aBTOMaTHueckn IpeKJIHOaETcHa MOHOFOHNIeCKn peKIM IIpHeMa dIyIyUHcHNaCeCTBa IOCTYnAIOIero cHTHaJIa.
1 NOBTOPOH NoXnMaTe INPUT < / > do oTo6paXeHnra "TUNER" Ha dncnnee fpoHTaJIbHOI naHeJI.
2 Haximam KhoNky BAND, BbI6epTe dna30H npnema (M nAm).
3 HaximMaTe TUNING AUTO/MAN'LO oTKIoueHn INdkaTopa AUTO Ha dinCpJee fpoHTaBHO nAHeJI.

Het BoeToH (:)
PyHaHa HaCTpoHka HeBO3MOxHa IIpH IIOBJIeHHn
IBOeTOuHs (:) HaIINCIJIe e pOHTaJIbHOI NaHeJIN.
HaXkAB ⑧ PRESET/TUNING, OTKJIIOUHTe
IBOeToUHe (:).
Homep (1 8) HxKHOIpeYcTaHOBJIeHHo paHocTaHHIOxHO Bb6paTb HApMyIO, HaxaB IuΦpOBbc KHOIIKN Ha NyJIbTe N.
3aMeHa npedyctaHOBJIeHHoJ paHIOCTaHcN
BbMOKeTe 3aMeHHTb MecTaMn IBe
IpeNcTaHOBJIeHHbIe paJInocTaHHn. Ha IprHMepe
HNke OINcaHa IIpoUeIpya 3aMeHbI
IpeNcTaHOBJIeHHoI paJInocTaHHn "E1" Ha "A5".
1 BbI6epnte npeducTaHOBJIeHHyIO paHocTaHcHIO "E1", nCNoJb3yA/B/C/D/E n EPRESET/TUNING/CH </>.
CMOTpHTe “BbI6op IIpeIyctaHOBJeHHbIX paIIOCTaHIIN” Ha daHHoI cTpaHnIe.
2 HaxmTe n ydepxnBaute HaXaToN KhoNky PRESET/TUNING Ha 6oJee Yem 3 ceKynbl.
HaIINCLIIee pOHTaJIbHOI NaHeJIMMnraIOT "E1" nHnKATOP MEMORY.
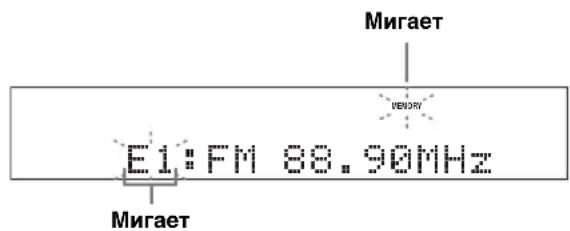
3 BbI6epnte npedyctaHOBJIeHHyIO paHocTaHcHIO “A5”,ncnoJb3yA/B/C/D/E n EPRESET/TUNING/CH<1/D.
Ha IIHcIIJIe pOHTaJIbHOI IaHeJIN MInrAOT“A5" HnHnKaTOp MEMORY.
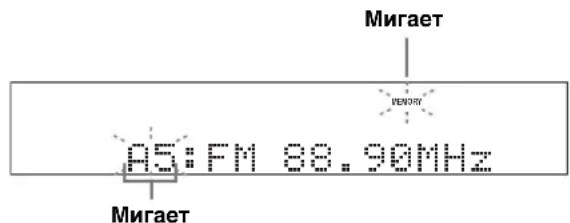
4 HaXmTe ⑥ PRESET/TUNING CHOba.
Ha nncnlee fpoHTaJIbHOI naHeJIN oTo6paXacTcra EXCHANGE E1-A5" n IBe npEynCTaHOBJIeHHbIe paHIOCTaHIIIN 3aMeHryOTcR MeCTaMn.
HactpoJa CnCTeMbI PaAnOdaHHbIX (ToJIbKO MoJeN dJa EBrpoNbI N PocCnn)
CnCTema PaHNOHaAHbIX - 3TO CnCTema IepaHIN HhOpMaIIHN, HcIOJIb3yEmaY MpaHIOCTaHIIMM MHOHN CTpaH. PpH IIpeMe paHIOCTaHIIM CnCTeMbI PaHIOHaHHbIX, JaHHbI aIIIpaT MoKcET IIpHHMaTb pa3JHyIO HhOpMaIIIO CnCTeMbI PaHIOHaHHbIX, KaK PS (HaHmEOBaHHe IIporpaMMbI), PTY (TN IIporpaMMbI), RT (paHIOTeKcT), CT (TeKyuee BpeM) n EON (dpyrhe paHIOCTaHIIM c pacIHIpEHbIMN BO3MOxHocTAM).
OTo6paXeHne HOpMaunn CnCTembl PaNODaHHbIX
JaHHaФyHKIIH NcIOJIb3YeTcraIg OTo6paKeHHa4 TnIOB HnΦopMaun CnCTeMbI PaIHOJAHbIX:PS (HaHMeHOBaHHe IporpaMMbl),PTY (TnI IIporpaMMbl), RT (paIHOteKCT) INCT (TeKyIee BpeM).Ha IncJIee φpOHTaJIbHOINaHEJN 3aropaOTccoOTBeTCTBYIOH INHINKaTOpbl.
PnmeuHna
MooHOBb6paTbOJHH3peKHMOBOTObpaKeHH CnCTeMBiPaHOnaHHbIXTOJIbKOIIpH BKNIOUeHH COOTBcETCTByIOIIErO HJINKaTOpa ChCTeMBi PaHOaHHbIX HA JINCIJIeEΦPOHTaJIbHOIHaHeJN.ⅡO3aBePHEHH IIPhema BceX HnΦopMaIIHN ChCTeMBi PaHOnaHHbIX OT paHOCTaIHNN,JaHHOMy aHHapaty MOKeT IOTpe6OBaTcH HeKOTOpoe Bpem.
MooIO BbIbpaTb TOJIbKO IOCTyIHbIe peKHMbI OTO6paXKeHHa CnCTeMbI PaJHOaHHbIX, IIpeIOCTaBJIaEMbIe padHocTaHIIneI.
- Pn cIa6bOM IOCTyHIOHcM CnHJaJIe, JaHHbI aIIIapAT MoKeT He HcIOJIb3OBAr HNΦOpMaIINo CnCTeMbI PaHOJdaHHbIX. B Ooc6eHHOCTH, peKHM "RT" coIepKHT 6OJIbIOc KOJIInueCTBO HNΦOpMaIINu H MOKCT 6bITb HeIOCTyIeH, JaXe PpN IOCTyIHOCTH IpyrHX peKHMOB OTo6paXCHHcCTCMbI PaHOJdaHHbIX.
-IIpnIIOxHx yCIOBHX IpiHeMa,HaKHMaHTe TUNING AUTO/MAN'La HcpoHTaJIbHOI IIaHEJIN OOTKIIIOueHHNHaIKKaTopa AUTO HaIINcIIJee pOHTaJIbHOI HAHCJH.
- EcIN ChIa CHTHaJa OcIa6JIeHa IIO IIpHInHe BHeIIHHX IOMCX BO BpeM IIpHcMa IaHHbIM aIIIIapATOM HΦopMaIIHN ChCTeMbI PaJINOJIaHHbIX, IIpHE M MoKeT BHe3aIIHO IIpePbAteCnHa JINcHJIee φpOHTaJIbHOI NaHeJIH oTo6pa3HTcra "...WAIT".
-Пи NBIOpe pexHMa“RT”,IaHHbI aIIIapAT MOKeT OTo6paKaTaB IIpOrpaMMHyIO HhΦOpMaIIHO 3MaKChMym 646yKBeHHO-ⅡHΦpOBbIX 3HaKOB,BKIOUay CHMBOI yMIAyT. HeIOCTyINHbIe 3HaKn OTo6paKaIoTcKaK“_ (NoJIepeKNBaHc)
- EcII INI INI INI INI INI INI INI INI INI INI INI INI INI INI INI INI INI INI INI INI INI INI INI INI INI INI INI INI INI INI INI INI INI INI INI INI INI INI INI INI INI INI INI INI INI INI INI INI INI INI IN1
1 HactpoTeCb Ha XeIaemy paNocTaHcIIO, TpaHCnpyOuSyIO CnCTeMy PaNODaHHbIX.
- PekomchIyecTcHcIOJIb3ObaTb aBTOMaTHUeCKyIO IpcIyCTaHOBky IJIa HacTpOIKn Ha paAnocTaHIIIN, TpaHCInpyIOuIne CnCTemy PaIHOJaHHbIX (cmOTpHTe cTp.44).
-ⅡЯ HabcTpoiKn Ha IIpeIyctaHOBJeHHbIe paIIOCTaHIIN, TpaHCJInpyIOIIne CnCTeMy PaIIOJaAHbIX, TaKKe MoXHo IcIOJIb3OBaTb peXIM PTY SEEK.
2 NOBTOPO HAXIMa FREQ/TEXT Ha nyIbTe DY, BbIbepnTe HxHbI pexM OTo6paXeHHcNCTembl PaNoDaHHbIX.

- BbI6epHTe "PS" IJIa OTo6paKeHHn HaHMeHOBaHHa TeKyuIe IpiHHMaEMo IporpaMMbI CnCTeMbI PaJNoJaHHbIX.
- BbI6epHTe "PTY" IIJIa OTO6paXeHHa TnIIa TeKyuIe IpiHHaemOIIpOrpaMMbI CnCTeMbI PaIIOJaHHbIX.
BbI6epHTe "RT" IJIa OTo6paKeHHn HhΦopMaunu O TeKyuuei IIpHnHaemOn IporpaMe CnCTemBi PaJNoJaHHbIX.
BbI6epHTe“CT"IIaOTo6paKeHHaTeKyuIero BpeMeHH.
BbI6Op Tnna npoRpaMMbl CnCTeMbI PaNNoDaHHbIX (peKm PTY SEEK)
JaHHaФyHKINHcIOJIb3yEcTcIJIb6Opa
KcJIaEMoI paHNOIIpOrpAMMbI IO TnIpy IporpaMMbI CO
BCEX IIpeIyCTaHOBJeHHbIX paHOCTaHIIIN,
TpaHCJInpyUoiX CntEmy PaHOnaHHbIX.
中
IIIpyeYCTAHOBKn paHIOcTAHIN, TpaHCINpyOUIHX ChTeMy PaHIOaHHbIX, HcIOJIb3yITe cyHKINHO abTOMaTHuecko IIpeYCTAHOBKn (CMOTpHTe cTp.44).
1 HaKMute
TUNERHa npJIbTe Dy n
BbI6epnte "TUNER" KaK nCTOuHnK npHeMa.
2 Haxab
10PTY SEEK MODE Ha nylte dy, BNTe daHHbI annapaT ha peXIM PTY
HaHMeHOBaHHe TIIa IIporpAmMbI HIN "NEWS" Mnraet Ha IINJIeee pOHTaJIbHOI HaneJIN.

Muraet
中
IIOrOMeHbIpeKHMaPTYSEEK,CHOBaHaKMHTe 10PTYSEEKOEMHaIIyJBTeIY.
3 Haxmam
⑦PRESET/CH△/VHa npIbTe DNTe HxHbI TnnporpaMMbl.
HaMeHOBaHHe BbIbpaHHoro TnIIa IIpoIpaMMbI IIOBHTcHa IINCHJIe CPOHTaJIbHOI NaHEJN.

3aropaeTc
| Ти п(npогамьОписанne | |
| NEWS | Новости |
| AFFAIRS | Текшие akтульные Воцrosы |
| INFO | Овочая Информашия |
| SPORT | Сport |
| EDUCATE | Одразование |
| DRAMA | Драма |
| CULTURE | Культура |
| SCIENCE | Hayka |
| VARIED | Развileчени |
| POP M | Поспларна музбika |
| ROCK M | Рок музбika |
| M.O.R.M | Музбika в рун (для Легкою Проблелвашия) |
| LIGHT M | Лegrьая класnéеска музбika |
| CLASSICS | Класnéеска музбika рли Знатоков |
| OTHER M | Дрugsсевinski музбiku |
4ДЯнянayаJA NOUcKa BCex
PpeDyCTaHOBJIeHHbIX paIIOCTaHcI IN CnCTeMbI PaIIODaHHbIX, HaxMMTe 10PTY SEEK START Ha nyIbTe Dv.
BoBpemIIOHcKa paAnocTaHIIJ daHHbIM aIIIapaTOM,HaIHCJIeE pOHTaJIbHOI IaHeJI MIRaET Ha3BaHHe BbI6paHHORO TIIa IIporpaMMbl ⅢaropacTe r HINkAToP PTY HOLD.

Muraet 3aropaetca
中
IIOCTAHOBKN HONCKA BcEx paHIOCTAHIN,CHOBA HAXMITE 10PTY SEEK START Ha IyJIbTe JY.
PnmeuHn
-ⅡpH HaxoKHeHH paIIOcTaHIIH, IpepeaIOJIe HJxHbI TnI IporpaMMbI, JaHHbI aIIHaPaT IIpepbIBaET IOHck paIIOcTaHIIH.
- EcHn HaJIeHa He Ta paJIOOCTaHIN, CHOBa HaxMHTe 10PTY SEEK START IJRA BO3O6HOBJeHNI IOHCKa IpyrO paJIOOCTaHIN, IpepeAIOIIe TaKo JKe TIN IIporpAMMbI.
IcnoJb3OBAHne IHΦopMaζoHHO yCnyrnpaDpyrnx paDnOCTaHcN C yIyUweHHbIMN BO3MOxHOCTaMn (EON)
JaHHaIyHKIIINHCIOJIb3yeTcIINII INPHEMa HINΦopMaIHHOH OH yCITY EON (IpyrHe paJIOHocTAHIN C yIyUHIEHHBMn BO3MOxKHOCTMn) cTeH paJIOOCTAHIN CHCTeMbI PaJIOHOAHbIX. IPrn BbIbope OIOHO IN3 4 THIOB IIporpAMM CHTeMbI PaJIOHOAHbIX (NEWS, AFFAIRS, INFO, IIN SPORT), DaHHbI aIIIapAT aBTOMaTHueCKn HaunHaet IOHCK BCEx IOCTUYHbIX INpeYcTaHOBJIEHHbIX paJIOOCTAHIN, IIaHHPyIOHIX TpaHCJIaHIIO HHΦopMaIHOOHNOY cIJyTR EON BB16paHHORO TIIa IIporpAMMBI HA ONPeJIeJIeHNBI INPOMeXyTOK BPEMeHN. IPrn HAaJIte 3aJIaHINPOBaHHO INHΦopMaIHHOHNOY cIJyTR EON, DaHHbI aIIIapAT aBTOMaTHueCKN INepeKJIIOVAeTcR Ha MecTHyIO paJIOCTAHINIO, TpaHCJIpyIOWUIO HINΦopMaIHHOHHUO YcIyTR EON, IIaTEM NO 3aBePIeHHIO HINΦopMaIHHOHHO YcIJYH EON, INepeKJIIOuAeTcR Ha NaIOHOJIbHyIO paJIOCTAHINIO.
PnmeaHna
JaHHa fyHKINMOKeT HIOJB3OBaTbC8TOJbKO IpiH aJINuHnHΦopMaunHOy cIyRn EON.
- INHnKaTOp EON BbICBeHBAeTc Ha HncHIIee fpoHTaJIbHOI IaHEJIT TOJIbKO IIIN IIpHEMe HHΦopMaIHHOHHOY cJyRr EON OT paHIOCTAHUHN CInTeMbl PaJINOJdAHbIX.
1 HacptpoTeceb Ha XeIaemy paNocTaHcIIO, TpaHCnpyoOyIO CnCTemy PaNODaHHbIX.
2 y6eHNTecb, yTO INHnKATOp EON BBICBeueH Ha DnCnIee pOHTaJIbHOJ naHeJI.
EcHn HnHKaTOp EON otKIOueH Ha nHcIIe e pOHTaIbHO
HaHeJIH, BbIepHTe IpyrIyIO paHocTaHHIO CnCTeMBI
PaHDoAHbIX, IIpN IIpHEMe KOtOp8 3aropaeTc HnHKaTOp EON.

3 NOBTOPO HAXIMAR 10EON Ha nyIbTe DY, BbI6epHTe ODNH I3 TINOB IIporpaMM CnCTEmbl PaIOHOAHbIX (NEWS, AFFAIRS, INFO nIN SPORT). HaIMcHOBAHHe BbI6paHHORO TIIa IIporpaMMbI IIOBNTcRA Ha INCIJIe cPpOHTaJIbHOI NaHEJN.

#
IINOTMEHbI FyHKHIN EON,IOBTOPOHO HAKHMAHTE 10EON Ha IYIbTe IY IOKIIIOHHeHHa3BaHHTHII pOIRpAMMb H BKIOUeHH HnHaKaHIN "EON OFF" HaJNCiIEe fpoHTaJIbHO HAeJIH.
Bb6op: NONE, SML, LRG
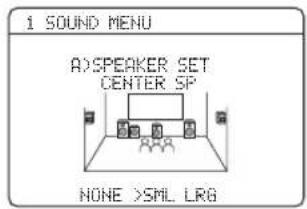
ДябьwoцentpaNBKOnOHKn
Bb6epTe“LRG”(6oJIbIIaIa).
Длma moи ceHTpaBHOJ KOLOHKn
Bb6epHe "SML" (Maiaa).
Ecnu ceHTpaBna KonoHka He MCNoIb3yeTc
Bb6epntc“NONE”(OTcyTCTByeT).CnHaJIb KaHaJaOkpykaIOIeRo 3ByuHaHH HaIpaBIAIOITcH NaΦpOHTaJIbHbIeJeByIO IIpaByIO KOJOHKn.
SET MENU
Jeba/npabaKoNoHKn OkpykaIoUeRo 3ByaHNA SUR.L/R SP
Bb6op: NONE, SML, LRG
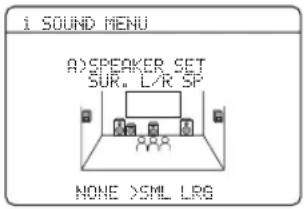
ДлгболшхКОLOHOKOKpyхаюцero3ByчньВыбepиTe“LRG”(60Льшя).
Длmaьх KOJIOHOK OkpykaIoUeTo 3ByaHnA
Bb6epHe "SML" (Maiaa).
EcnKoJOnHKn OkpyXaIOUeO 3ByuHnHe NcNoJIb3yIOTc
Bb6epHTe“NONE" (OTcyTCTByeT).JaHHbI anIapat yctaHaBJIHbaertcHa peXHM Virtual CINEMA DSP (cmOTpHTe cTp.39).
BbIOd 6acOB LFE LFE/BASS OUT
JaHHaФyHKIIH NcIOJIb3YeTcraIJI BbI6opa KOJIOHOK IJIa BOCIpOn3BeJeHHaLFE (Hn3KoYacTOTHbIe 9ΦΦeKT) Hn3KoYAcTOThbIX cHrHaJIOB.
Bb6op: SWFR, FRNT, BOTH

PnnoKlueynn K daHomy annapaty ca6byepa n DnI npocnyuBaHHN eCTeBHeHoro 6acOBoro 3ByaHnr
Bb6epHTe "SWFR" (ca6Bypep). CnHaJIb LFE, a TaKKe H3KOuactOTHbIe CnHaJIb IpyHX KOJIOHOK, yCTaHOBJeHHbIX Ha "SML" (HIN "SMALL") HauipaBIAHOTcHa ca6Bypep.
PnI POKKJIUOeHNN K DAHNOMy annapaty ca6Byepa I DnI PnocLyuBaHHN HacbIeHHoro 6acOBOro 3ByaHn
Bb6epHte“BOTH" (o6a).Ca6Byfepe H3daet Hn3KooyactOTHBIE CnHaJIbI OT JIOBOrO HCTOHTNKA. CnHaJIbI LFE, a TaKke Hn3KooyactOTHBIE CnHaJIbI IpyTHX KOJIOHOK, yCTaHOBJeHHbIX Ha "SML"(HJIN "SMALL") HnnpabJIyOTcRa Ca6Byfep.Annapat HnnpabJIyET Hn3KooyactOTHBIE CnHaJIbI φpOHTaJIbHOrO JIeBOrO IIpaBOrO KaHaJIOB Ha φpOHTaJIbHbIe JIeBYIO II paBvIO K0JOHKn H Ca6Byfep,BHE 3aBHCIMOCtH OT HacTPOHN “FRONT SP" (CMOTPHTe cTp.57).
Ecnn ca6Byepe He nCnoB3yeTcA
Bb6epnte“FRNT”(ΦpoHTaJIbHbI).CnHaJI LFE, HN3KoYAcTOTHbIe CnTHaJIbIΦPOHTaJIbHbIX JIEBOrO H IIpaBOrO KaHaJIIOB, H Nn3KoYAcTOTHbIe CnTHaJIbI JpyrHx KOJIOHOK,yCTaHOBJeHHbIX Ha“SML”(HIN“SMALL)” -BCE OHn HAIIpaABJIOITcH aΦpOHTaJIbHbIe JIEByIO H IIpaBYIO KOJOHOKN BHe 3aBNCIMOCtH OT HaCTPoiKn “FRONT SP" (CMOTpHTe cTp.57).
KpoccoBep CROSS OVER
Bb6op: meters (m), feet (ft)
IcxoJIH aYcTaHOBka: [MoJeJIH IJIa CIIA n KaIIaIbI]: feet (ft) [JpyrHe moJeJIH]: meters (M)
Bb6epHTe "meters" HAcTPOKn paCCTOHHN KOJOHOK B Metpax.
BbIepeHTe "feet" nIIa HacTpoNKn paCCToHnKoJIIOHOK B cyTaX.
PacctoHnKoJHOK
Hnana30n HacTpoKn:OT0,30no24,00M(OT1.0no80.0fyt)
UarperyJInpObaHn:0.10m(0.5pyT)
IcxoHaayyctaHObKa:
FRONT L/FRONT R/SWFR: 3,00M (10.0 yr )
CENTER: 2,60 M (8.5 ΦyT)
SUR. L/SUR. R: 2,40 M (8.0 Φyr)
HactpoKa ypoBHa LFE HayHHKOB.
PnmeaHne
B 3aBnMoCTH OTHacTPOeK“LFE/BASS OUT" (CMOTpHTe Ctp.58), HeKOToPbIe cHrHaJIb MOrYT He BBIOITbC HrHe3IO SUBWOOFER OUTPUT.
Диhamчeckn Диana3OH
FDYNAMIC RANGE
JaHHaJyHKIIINHcIOJIb3yeTcIJIbBbIbopa ypOBHa cKaTTHINHAMUeCKOTo IHaIIa3OHa IIJI
IocJIeIyIOIIeTO IIpIMHeHENK KOJOHNKaM HJH
HayIIHHKam. DaHHaNacTPOKa DeIcTBHTeJIbHa
TOJIbKO BO BpeMaIeKOIoHPoBAHnJaHHbIM aIIHapATOM
CnIHbIOB bΦopMaTe Dolby Digital IIN DTS.

KOLONKA SPEAKER
HaCtpoKa cKaTna KOJIOHOK.
Hayushnkn HEADPHONE
HactpoKa cKaTnHaayuHHKOB.
Bb16op:MIN,STD,MAX
BbI6epHTe MINMHHMaJIbHbI)ecJIbIOCTOHHIO pOcJIyIHBAeTe Ha Hn3KHX yPoBHx rPOMKocTH.
- BbI6epHre "STD" (craHdaprHbI) IJIa OIOJIb3OBAHn.
Bb6epHTe MAX" (MaKcHMAJIbHbI) JIA COxpaHeHH 60JIbIOrO KOJINueCTBa HnHaMNUeCKORo DnAIIa3OHa.
Hactpoyn 3ByaHnG>AUDIO SET
JaHHa qyHKnHcIOJIb3yeTcIJa HAcTpOKn Bcex ayHNOnapaMeTPOB JaHHoro aHapata.
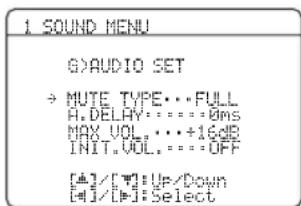
Tn npnnyuweH NUTE TYPE
BbI He MoKeTe aBTOMaTHYeecKn BO3BpaTHTbcN Ha IIpeIbIyIIne HAcTpOoiKN IapaMeTpOB,ecIN Bbl yKe IIpoI3BCJIH HHHIIHaJIN3aIIO IapAmeTpOB IIporpAMM 3ByKOBOrIO HOJI.
BbI He MoKeTe HHHHnHaJIN3HPOBaTb IIO-OTJeJIbHOCTH HHHBnYaJIbHbIe IIporpaMMb 3BYKOBORIOJIA.
BbI He MoKeTe HHHHaJIH3HPOBaTb JIO6bIe rpyIIbI IIporpAMM 3ByKOBOrO IIoJIA,ecJIN "MEMORY GUAGE" ycTaHOBJeH Ha "ON".
HactpoKa Bluetooth E>BLUETOOTH SET
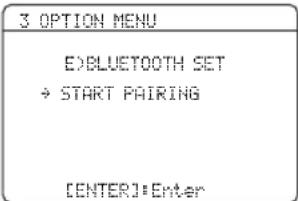
IaHHaФyHKnHnHcHIOJIb3yeTcIJI3aIycka cnapHBaHnI IOKIIIOueHHOro aIaITepa YamaHa IJI BluTooth (Haipmep, YBA-10, IpOJaIOIINcra OTeJIbHO) c KOMIOHcHTom BluTeoth. IOpPb6He cIaNpHBaHn, CMOTpHte "CnapHBaHne aIaITepa BluetoothTM n KOMIOHcHTa BluetoothTM" Ha cTp. 53.
IIJRAOBCEHNEHNE630NaCHOCTH,JIIN OIEpaHn CIIAPHBAHN yCTaHOBJIeHO BpeMeHHoe ORpaHnueHne I0 8MHHT.IpeI cIapHBaHHeM, peKOMeHJyETCra H3yHTb NIOJIHOCTbIO BHNKHyt Bo BCE HHCTpyKIIHH.
1 HaKMITE ⑦ ENTER ДЯ зауcka cnapNBaHnA.
ПОДКЛЮУЕньий[aɪaɪTepBluetooth haɪnHaet IONCK KOMIHOHeTob Bluetooth. Ha BɪneOəKpaHe OTObpaKaæTcR“Searching...”.
2 y6eIntecb, yTO KOMnoHrT Bluetooth o6hApxkn aAnTeP Bluetooth.
EcJIN KOMIOHENT Bluetooth o6hApyKJI aJaITeP Bluetooth, B cIncke yctpOcnTb Bluetooth oTo6paXaetcY“YBA-10 YAMAHA" (npimep).
3 BbIbePte aadTep Bluetooth B cncKe yctpoicTB Bluetooth n 3aTeM BBeNTe napoJIb "0000" Ha KOMnoHeTe Bluetooth.
KaT ToJIbKO JaHHbI aIInapaT ycNeIIHO 3aBepHJI cIapHbAHHe, oTO6paXJaTeTcR "Pairing completed".
TJIOOTMeHbIcIapHBaHHa,HaXMHTe ⑧RETURN BBInNTHe H3“START PAIRING”.
4ДЯ BBIXOda n3 ⑧RETURN,HaXMMTe "START PAIRING".
PnmeuHn
- EcJIN IIIOJIKJIIOUeHHbI aIaIITep Bluetooth He MoKeT o6HapyKHTb HHKaKHe KOMIOHeHTb Bluetooth, OTo6paKaaeTcra "Not found".
- EcJHK JaaHHOMa aIIapaty He IIOKJIIOueH aIaIITep Bluetooth, oTo6pakaertcNo BT adapter".
CTNJIN BOCPON3BeDeHNA USB
F>USB PLAY STYLE
DaHHaФyHKnHnCNOJb3yeTcIJIHaCTpOKN CTIIBAOCIIPOUN3BeJeHHB COOTBeTcTBHN CJIINHbIMN IIpeIIOUHTeHHM. MoXHO BOCIPPOUN3BOJNTb φaJIbIB CJIyuaHOM IopRKe HIN IOBTOPHO BOCIPPOUN3BOJNTb OINH OIpEeJIeHHbI φaJI N.II INOCJIeIOBaTeJIbHOCTb φaIIOB.
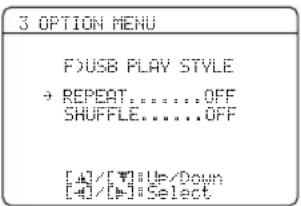
NoBtop REPEAT
JaHHa yHKIIH NcIOJIb3yeTcra JIyUcTaHOBKN JaHHoro aIIIapata Ha IOBTOpHOE BOCIIPOH3BeJeHHe OJHO rAaiJA HIN IOCJIeIOBATeJIbHOCTn PaaiIOB. Bb6op: OFF, SINGLE, ALL
-ⅡIЯOTKJIIOUeHnJaHHoH ΦyHKiHn, BbI6epHTe “OFF”.
- Bb6epHre "SINGLE" yTaNOBKn daHHoro annapara ha noBtOp oHoro faJa.
Bb6epHTe ALL" yctAHOBKn daHHoro aHaapata Ha IOBTOP IOCJIEIOBAteJIbHOCTn faHIOB.
CmewaTb SHUFFLE
IaHHaI cyHKIIH NcIOJIb3yETcIJI yCTaHOBKn IaHHoro aIIIapata Ha BOCINPOUN3BeJeHne aJIOB IIIN IaIOK B cIJyauHOM IOpAKe.
Bb16op:OFF,ON
-IOKJIIOeHnJaHHoHΦyHKiHn,BbI6epHTe "OFF".
- BbI6epHrTe "ON" IJIy yCTaHOBKn IaHHoro aIIIapapaTa Ha BOCIpOn3BeJeHne 4aJIIOB IIIN IaIOK B cIJyauHOM IOpJKe.
Функцип nyltа Dv
KpOME yipapBHeHnJaHHbIM aIIIapaTOM, IyJIbT Y TaKxE MoKcET yippaBJIaTb IpyrHM ayINOBH3yaJIbHBIMN KOMIOHEHTAMn IIPOHN3BOJCTBa Yamaha n IpyrHX IPOHN3BOJNTeJe. IJIy IYPaBJIeHn TcJIeBN3Opa NIn IpyTHX KOMIOHEHTOB, Tpe6yeTcraYcTaHOBnTB COOTBeTcByIOIHn KOJ Iy kaxdoro HcToUHnKa (CMoTpIte cTp. 69).
YnpaBHeHne daHHbIM aannapatOM, TeJIeBN3OpOM, IJIu dpyrMM KOMNoHETaM
UnpaBHeHne daHHbIM annapaTOM
HaxmTe ④AMP yIpyaJIeHHn JaHHbIM annapaTOM.
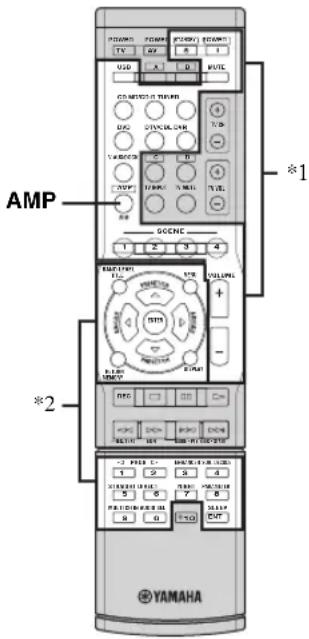
PnmuMeaHn
^1 Даннбіе KHOПКИВСЕДАУПаВЛЯТДANHьIM aIIIapaTOM.
^2 ДаHHHбе KHOIIKN yIpaBJIOTДaHHbIM aIIIIapaTOM TOJbKO IIpH HaxKaTHN ④ AMP.
UnpaBneHne TeJIeBn3OpOM
HaKMnTe ③ DTV/CBL nIy npabJIeHnI TeJcBn3OpOM. IINy npabJIeHnI TcJIeBn3OpOM, Tpe6yeTcY cTaHOBHTb COOTBeCTByIOIIH KOI N DY nIy DTV/CBL (cmOTpHrE cTp.69).

PnmeaHn
^1 Данньie KhoIIKN BceIa yIpaBJIHOT TeJIeBn3OpOM BHe 3aBHCMOCTH OT TOrO, HαKaTa JIN ③DTV/CBL HJIn HeT.
Bo3MOxHbIe HEnCpapBHOCTn I CNoCo6bI NO INX yCTpaHeHIO
EcIn y Bac BO3HNKJIN JIO6bIe H3 cJIeIyIOUHX TpyIHOCTe BO BpeM 3KCIJIyAToHn DaHHORo aIIIapaTa, BocIOJIb3yIITecb Ta6JIHcEi HIXCe IJIY ycTpaHcHn OIIH6Kn. B cJIyAc, ecIn HeHCIIpABHOCTb He yKa3aHa B Ta6JIHc HIN BbI He CMOrJIN HCIPaBHTb OIIH6Ky, cJIeIy IHNCTpyKIIHm Ta6JIHbI, OTKJIIOHTe JaHHbI aIIIapaT, OTCoeINHITe CIIIOBOI Ka6JIb, IN o6paTHTEcB K 6IIIXaIIHcMy oΦIINaJIbHOMy IIJIepy IIN cepBNC IENTp YamaHa.
06zaa yactb
| Héncπrpabhoctb Причина Способ устранения | Смогрочестр. | |
| Данный симпат не вклочаетс и посяведя в ржим ожidiadingи поочь вклочевши. питания. | Нссыл пдддддддддддддддддддддддддддддддддддддддддддддддддддддддддддддддддддддддддддддддддддддддддддддддддддд徳 Былka He пдддддддддддддддддддддддддддддддддддддддддддддддддддддддддддддддддддддддддддддддддддддддддддддддддд徾 Былда akтульноа на схема зашты. | |
| Данный симпат пдддддддддддддддддддддддддддддддддддддд徾 Былда ясгьзироьа на схема зашты. | ||
| Каллочаюсь симьому симлочь симьому элесгочьчесу可靠яйуот Вислінх Источьков (надимер, молingly пли симьhoe саточескoe симлочьчесу. Данный симпат пддддддддддддддддд徾 Каллочьчь симьому элесгочьчь симьому Селесгочьчь симьому Селесгочьчь симьому Селесгочьчь симьому Селесгочьчь симьому Селесгочьчь симьому Селесгочьчь симьому Селесгочьчь симьому Селесgwhь симьому Селесgwhь симьому Селесgwhь симьому Селесgwhь симьому Селесgwhь симьому Селесgwhь симьому Селесgwhь симьому Селесgwhь симьому Селесgwhь сим�ь Селесgwhь симь Селесgwhь симь Селесgwhь симь Селесgwhь симь Селесgwhь симь Селесgwhь симь Селесgwhь симь Селесgwhь симь Селесgwhь симь Селесgwhь симь Селесgwhь сdim Селесgwhь сdim Селесgwhь сdim Селесgwhь сdim Селесgwhь сdim Селесgwhь сdim Селесgwhь сdim Селесgwhь сdim Селесgwhь сdim Селесgwhь сdim Селесgwhь сdim Селесgwhь сdim | YstahOBNTc Дадньй симарat в ржим Ожidianingу, OTKILOUHTe симobьй кабел, ПлкIOЛOTe сгК КрЗТСТСТВИОП плкIOЛOTe сгК КрЗТСТСТВИОП плкIOЛOTe сгК КрЗТСТСТВИОП плкIOЛOTe сгК КрЗТСТСТВИОП плкIOЛOTe сгК KpOZTKe 36ceKHyД, И ПльзуITEc KaK OБЧУ - | |
| Осух trade Звuchne. | Кабеля BXODA/BBXODA bbln ПлкIOЛOTe симьому Селесгочьчь симьому Селесгочьчь симьому Селесгочьчь симьому Селесгочьчь симьому Селесгочьчь симьому Селесгочьчь симьому Селесгочьчь сlim Селесгочьчь сlim Селесгочьчь сlim Селесgwhь симь Селесgwhь симь Селесgwhь симь Селесgwhь симь Селесgwhь симь Селесgwhь симь Селесgwhь симь Селесgwhь симь Селесgwhь симь Селесgwhь сим� Селесgwhь симь Селесgwhь симь Селесgwhь симь Селесgwhь симь Селесgwhь симь Селесgwhь симь Селесgwhь симь Селесgwhь симь Селесgwhь симь Селесgwhь симы Селесgwhь симь Селесgwhь симь Селесgwhь симь Селесgwhь симь Селесgwhь симь Селесgwhь симь Селесgwhь симь Селесgwhь симь Селесgwhь симь Селесgwhь сим bay Селесgwhь сим bay Селесgwhь сим bay Селесgwhь сим bay Селесgwhь сим bay Селесgwhь сим bay Селесgwhь сим bay Селесgwhь сим bay Селесgwhь сим bay Селесgwhь сим bay Селесgwhь симBay Селесgwhь симBay Селесgwhь симBay Селесgwhь симBay Селесgwhь симBay Селесgwhь симBay Селесgwhь симBay Селесgwhь симBay Селесgwhь симBay Селесgwhь симBay Селесgwhь сим Bay Селесgwhь симBay Селесgwhь симBay Селесgwhь симBay Селесgwhь симBay Селесgwhь симBay Селесgwhь симBay Селесgwhь симBay Селесgwhь симBay Селесgwhь симBay Селесgwhь сим bay Селесgwhь симBay Селесgwhь симBay Селесgwhь симBay Селесgwhь симBay Селесgwhь симBay Селесgwhь симBay Селесgwhь симBay Селесgwhь симBay Селесgwhь сим Bay Селесgwhь сим Bay Селесgwhь симBay Селесgwhь симBay Селесgwhь симBay Селесgwhь симBay Селесgwhь симBay СелNESG WHID СелNESG WHID СелNESG WHID СелNESG WHID СелNESG WHID СелNESG WHID СелNESG WHID СелNESG WHID СелNESG WHID СелNESG WHID СелNESG WHID СелNESG WHID СелNESG WHID СелNESG WHID СелNESG WHID CielNESG WHID СielNESG WHID СielNESG WHID СielNESG WHID СielNESG WHID СielNESG WHID СielNESG WHID СielNESG WHID СielNESG WHID СielNESG WHID СielNESG WHID СielNESG WHID СielNESG WHID СielNESG WHID СielNESG WHID СielYESG WHID СielYESG WHID СielYESG WHID СielYESG WHID СielYESG WHID СielYESG WHID СielYESG WHID СielYESG WHID СielYESG WHID СielYESG WHID СielYESG WHID СielYESG WHID СielYESG WHID СielYESG WHID СielYESG WhID СielYESG WHID СielYESG WHID СielYESG WHID СielYESG WHID СielYESG WHID СielYESG WHID СielYESG WHID СielYESG WHID СielYESG WHID СielYESG WHID СielYESG WHID СielYESG WHID СielYESG WHID СielYESG WHID | |
| Фразн'tаьфы симлбддддддддддддддддддддддддддддддддддддддддддддддддддддддддддддддддддддддддддддддддддддддддддддддддддд Былд bldbldbldbldbldbldbldbldbldbldbldbldbldbldbldbldbldbldbldbldbldbldbldbldbldbldbldbldbldbldbldbldbldbldbldbldbldbldbldbldbldbldbldbldbldbldbldbldbldbldbld Селесгочьчь симьому Селесгочьчь симьому Селесгочьчь симьому Селесgwhь симь СелYESG WHID СelYESG WHID СelYESG WHID СelYESG WHID СelYESG WHID СelYESG WHID СelYESG WHID СelYESG WHID СelYESG WHID СelYESG WHID СelYESG WHID СelYESG WHID СelYESG WHID СelYESG WHID СelYESG WHID СelYESQH WHID СelYESQH WHID СelYESQH WHID СelYESQH WHID СelYESQH WHID СelYESQH WHID СelYESQH WHID СelYESQH WHID СelYESQH WHID СelYESQH WHID СelYESQH WHID СelYESQH WHID СelYESQH WHID CielYESG WHID СelYESG WHID СelYESG WHID СelYESG WHID СelYESG WHID СelYESG WHID СelYESG WHID СelYESG WHID СelYESG WHID СelYESG WHID СelYESG WHID СelYESG WHID СelYESG WHID СelYESG WHID СelYESO WHID СelYESO WHID СelYESO WHID СelYESO WHID СelYESO WHID СelYESO WHID СelYESO WHID СelYESO WHID СelYESO WHID СelYESO WHID СelYESO WHID СelYESO WHID СelYESO WHID СelYESO WHID СelYESO WHIL СelYESO WHIL СelYESO WHIL СelYESO WHIL СelYESO WHIL СelYESO WHIL СelYESO WHIL СelYESO WHIL СelYESO WHIL СelYESO WHIL СelYESO WHIL СelYESO WHIL СelYESO WHIL СelYESO WHIL СelYESO WHIL CielYESO WHIL СelYESO WHIL СelYESO WHIL СelYESO WHIL СelYESO WHIL СelYESO WHIL СelYESO WHIL СelYESO WHIL СelYESO WHIL СelYESO WHIL СelYESO WHIL СelYESO WHIL СelYESO WHIL СelYESO WHIL СelYES0 WHIL СelYESO WHIL СelYESO WHIL СelYESO WHIL СelYESO WHIL СelYESO WHIL СelYESO WHIL СelYESO WHIL СelYESO WHIL СelYESO WHIL СelYESO WHIL СelYESO WHIL СelYESO WHIL СelYESO WHIL СelYESO WHL СelYESO WHL СelYESO WHL СelYESO WHL СelYESO WHL СelYESO WHL СelYESO WHL СelYESO WHL СelYESO WHL СelYESO WHL СelYESO WHL СelYESO WHL СelYESO WHL СelYESO WHL СelYESO WHL CielYESO WHIL СelYESO WHIL СelYESO WHIL СelYESO WHIL СelYESO WHIL СelYESO WHIL CielYESO WHIL СelYESO WHIL CielYESO WHIL СelYESO WHIL CielYESO WHIL CielYESO WHIL CielYESO WHIL CielYESO WHIL CielYESO WHIL CielYESO WHIL CielYESO WHIL CielYESO WHIL CielYESO WHIL CielYESO WHIL CielYESO WHIL CielYESO WHIL CielYESO WHIL CielYESO WHIL CielYES0 WHIL CielYESO WHIL CielYESO WHIL CielYESO WHIL CielYESO WHIL CielYESO WHIL CielYESO WHIL CielYESO WHIL CielYESO WHIL CielYESO WHIL CielYESO WHIL CielYESO WHIL CielYESO WHIL CielYESO WHIL CielYESO WHL CielYESO WHL CielYESO WHL CielYESO WHL CielYESO WHL CielYESO WHL CielYESO WHL CielYESO WHL CielYESO WHL CielYESO WHL CielYESO WHL CielYESO WHL CielYESO WHL CielYESO WHL CielYESO WHL СelYESO WHL СelYESO WHL CielYESO WHL CielYESO WHL CielYESO WHL CielYESO WHL CielYESO WHL CielYESO WHL CielYESO WHL CielYESO WHL CielYESO WHL CielYESO WHL CielYESO WHL CielYESO WHL CielYESO WHL CielYES0 WHL CielYESO WHL CielYESO WHL CielYESO WHL CielYESO WHL CielYESO WHL CielYESO WHL CielYESO WHL CielYESO WHL CielYESO WHL CielYESO WHL CielYESO WHL CielYESO WHL CielYESO WHL CielYESO WHIL CielYESO WHL CielYESO WHL CielYESO WHL CielYESO WHL CielYESO WHL CielYESO WHL CielYESO WHL CielYESO WHL CielYESO WHL CielYESO WHL CielYESO WHL CielYESO WHL CielYESO WHL СelYESO WHL CielYESO WHL CielYESO WHL CielYESO WHL CielYESO WHL CielYESO WHL CielYESO WHL CielYESO WHL CielYESO WHL CielYESO WHL CielYESO WHL CielYESO WHL CielYESO WHL CielYES0 WHL CielYES0 WHL CielYESO WHL CielYESO WHL CielYESO WHL CielYESO WHL CielYESO WHL CielYESO WHL CielYESO WHL CielYESO WHL CielYESO WHL CielYESO WHL CielYESO WHL CielYESO WHL CielYESO WHI CielYESO WHL CielYESO WHL CielYESO WHL CielYESO WHL CielYESO WHL CielYESO WHL CielYESO WHL CielYESO WHL CielYESO WHL CielYESO WHL CielYESO WHL CielYESO WHL CielYESO WHL CielYESO WHL cIelYESO WHL CielYESO WHL CielYESO WHL CielYESO WHL CielYESO WHL CielYESO WHL CielYESO WHL CielYESO WHL CielYESO WHL CielYESO WHL CielYESO WHL CielYESO WHL CielYESO WHL CielYESO WHL Ciel YESO WHL CielYESO WHL CielYESO WHL CielYESO WHL CielYESO WHL CielYESO WHL CielYESO WHL CielYESO WHL CielYESO WHL CielYESO WHL CielYESO WHL CielYESO WHL CielYESO WHL CielYESO WHL CielYESO WhL CielYESO WHL CielYESO WHL CielYESO WHL CielYESO WHL CielYESO WHL CielYESO WHL CielYESO WHL CielYESO WHL CielYESO WHL CielYESO WHL CielYESO WHL CielYESO WHL CielYESO WHL CielYESO WHL | ||
| Héncπrabnoctb Πprunha Cnocc6 yctpaenha | Смогитестр. | |
| ВиебанноeotКлочениЗвачим. | Быга akтivismзировансхема 3aцптугд. | - |
| ИЗ-3a Короткоу Замькади.Т.Д. | coilprkacaiaotc Дугсдуrom, ИЗатем сюваВКлочite anillapat. | |
| Таймер сда пinnьл anillapat кOTКлочени. | ВКлоччс даннй спларот, И заноу счнITE BOCIPON3BedeHne HCTOCHNka. | |
| Звачни epriiLiycheho.Дяя ВОЗбнOBlenя BBIOOMO 3BvuaHIM,HAЖMЛТС MUTE IINI 2VOLUME +/-. | 35 | |
| СнышtersьЗвачимOTКолонкToTOLkoHa ondnoi Storpone. | Кабел IOДКLOЧЕНь HePpavBILBO.ПОДКLOЧЕТС Ka6el NCOBTCTBcTByKUIIHmO6paZOM.Есл HeNCspaBNOCTb He bLlaHayTranHe,эTO O3naHAcT,чTO HeCIOJIb3yEmbcKa6el MyrUT b6bITc DeΦcKtOM. | 11-18 |
| HeipabinbnaHЯ NaCTPOIKA"SP LEVEL". | ОразуИруITE NaCTPOIKN "SP LEVEL".41 | |
| ОсвинhoeЗвачимВосpondиьcodntcToTOLkoOTceHTpalbnoiKOLONKH. | При ВSCПОнЗBEDEHINMOHФОнчESCKOTOH HCTOCHNka cHICIOJIbOBAHNEM IIpoIgPAMMbI CINEMA DSP,сгнail HCTOCHNkaHapPABIAETcHЯ IcHENTpaJIbHni KaHAI,aФpoNTaJIbHsE KoJOHKn I KOLONKHOKpyJauOSeTo 3BvuaHINBoCIPON3BODAT TOLKO 3ФФeKTbI3BvuaHIN. | ЭTO HeЯВLIeTc OSHIOKoi.- |
| Осутst因为我们ZвуняOTZeHTpalbnoiKOLONKH. | Пapametp“CENTER SP”В"SPEAKER SET"уstahOBlen Ha“NONE". | Установite“CENTER SP”Ha“SML”ИIN“LRG”. |
| HeKOTOPbIle IIpoIgPAMMbI 3BvKOBOrOIIOLЯп He BlyOДIT 3BvuaHIne OTIeHTpalbNoKOLONKH. | ПоцрбуITE ДугTuIpoIgPAMMy 3BvKOBOrOIIOLЯ. | |
| Осутst因为我们ZвуняOTКOLONOKokpyжалшero3BvuaHIN. | Пapametp“SUR.L/R SP”В"SPEAKER SET"уstahOBlen Ha“NONE". | Установite“SUR.L/R SP”Ha“SML”ИIN“LRG”. |
| Даимп aiPAPAT NaXOДITcB pexHMe“STRAIGHT”ИВSCPON3BODITcRMonOHФОнчeckn HCTOCHNk. | НajHMaiTe ②STRAIGHTДо OTКIOUChHnI“STRAIGHT”HaДИСПЕФpoNTaJIbHoi ПаHEЛ. | |
| При ВКлочemIKolONOKFRONT BoTsyCTBYeT3BvuaHINOTeCerPalbnoiKOLONKHиКOLONOKokpyжалшero3BvuaHIN. | Пapametp“FRONTB”В“SPEAKER SET"уstahOBlen Ha“ZONE B”. | Установite“FRONTB”Ha“FRONT”.5 |
| Осутst因为我们ZвуняOTca6bypepa. | Пapametp“LFE/BASS OUT”В"SPEAKER SET"уstahOBlen Ha“FRNT”пriв ВSCPON3BEDEHINCSINHala Dolby Digital ИIN DTS. | Установite“LFE/BASS OUT”Ha“SWFR”ИIN“BOTH”.58 |
| Пapametp“LFE/BASS OUT”В"SPEAKER SET"уstahOBlen Ha“SWFR”ИIN“FRNT”пriв ВSCPON3BEDEHIN2-KaHaiNbHOroHCTOCHNka. | Установite“LFE/BASS OUT”Ha“SWFR”ИIN“BOTH”.58 | |
| Истоннк He coIedpjtHnI3KouchactOTbIe 6acobble cnHaiIbI. | ЭTO HeЯВЯCTcOIIb6Koi.- | |
| Héncπρавноctь Пличина Спостанения | Сmotрипеср. | |
| Hebo3moxhoBocspon3bectnNtOchunki DolbyDigital nii DTS.(Индатор补DolyDigital nii DTS He3aorpaetcnaHaCnneJIeФрontalbno.nanen.) | ПлклочныКOMIOENT HeyctahOBJIeВ в ржим ВьЮДацфpoьх ChngHaoB Dolby Digital nii DTS. | - |
| СелектopyнбODHOrO ГЗдЯуstановиян ha“ANALOG”. | 34 | |
| Сышен rudyшишum. | Каблл Плckлочны Нсравиьно. ПлклочпсуадиКОТВСТВУППМобраэо.Еслн Иссправисть He bblayUCTPAnEHa,эTO OЗнчает,чTO HSCIIb3YeMbIe Ka6слmaугT bblb cIФсektom. | - |
| Hebo3moxhoYbeJIuHTb yPoBoHbrgpokocStn.Ili3bUChHne NcKaxKeHo. | Бы пытаясь установиь уразовь ГомкocStn.IpcBocXoJIMIMakcHMaJIbHy upoBoHь ГOMKocThn. | 6 |
| Былклочenv KOMIOHEnT,Плклочenvьк ГЗдAm AUDIO OUT (REC)ДанHORO anIIapata. | - | |
| Hebo3moxhoZaIncsTa 3ByKOBbléeФфскъ. | Hebo3moxho 3aIncsTa 3ByKOBblc eФфскъ Na 3aIncsBaIauOeM KomIoHcNTc. | - |
| Hebo3moxhoZaIncsTaNtOCHNK HaJIbOKnHa aHApOBOBk KOMIOHEnT 3aIncsN,пдКLOчENHbк K ГЗдam AUDIO OUT (REC). | KOMIOHcNT-HcTOnTHNK He Плклочenv K anaIocObYbIM ГЗдAm AUDIO INДанHORO anIIapata. | 14,18 |
| Hebo3moxhoN3mehntb napametprbI 3ByKOBoro polnyиNeKoToPbIe dpyrmeHactpoikn DaHNOro annapata. | Пларmetр“MEMORY GUAGE”В“OPTION MENU”установиь ha“ON”. | - |
| Даньй annapat He pa6OtaeTcoOttBcTeCTbUOzIMnObpa3OM. | Завс BvytrpenhMHKpOKOMlbOTepH3-a3a CnLbHOg TcEkpTcHcCKOHaHapJxHINn OT BvHUnHIncHcTouHINKOB(Пармер, молпьи и ИллпинецТаTHcEckOe TcEkpTcHcTBO) Ил n3-3aH3KOrO NaIpJxHekn TcEkpTcHcTBO) | - |
| Остустve 3Byuahne otпдКLOчENHOROkomIoHenthaHMI. | КOMIOHcNTHDMI He npHIMMaET MHorOkaHaJIbIe acdHOSHHaJIbI. | - |
| ИндзашаN“CHECK SP WIRESS"otobpaKaTeTЯHaDCnpleФрontalbno.nanelni. | Короткoe 3amblKaHne B Ka6eJAXKoJOHOK. | 11 |
| СышатяшMuMoBleпomexи OTцIFpOBOrO nIi pAdNouchToTHorO obOpudobAHn. | Даньй annapat очь 6Iln3KopPoiJoxK pAsIOJIOKEN K IqHpOBOmMy nIi BbICOKOaCTOTHomY obOpudobAHn. | - |
| Ис KaweHa Kaptnika. | Видаон stoЧИК coepejNIT3aIncsHaIIe nIi 3aIinTbI OT KOnpOBAHn. | - |
| Даньй annapatВиЗАнноучтЯнвlaBaTeСЯн reşим OkmДань. | Темпа typa BvytrpH KoRpycaIIОДИЯЗь BbICOKOи 6blJa 3aIeCTBOBaHaCxema 3aIupIbIe OTпсргсBa. | - |
1
TioHep
KomnoHeHTbI BnDeOcurnHaJ
CHCTema KOMIOHEHTHO BIIeOCHHaJa pa3JeIeT BIIeOCHHaJI Ha CnHai Y Ira JApKoCTn H CnHaiBbI Pb N Pr IHa cHbIeHHocTH. CHCTema BOCINPOH3BOJNT ICBet 60Jee IIpaBIOIOIO6HO, TAK KAe 3TH CnHaiJI He3aBNCIMbI. KOMIOHEHTbI CnHai TaKKe HA3bIbaeTcN "CnHaiJOM pa3JIuYH IBeTa", TAK KAc CnHai JApKoCTh OT JeJIeH OT CnHaiIa Ibeta, IJIa BBIOJa KOMIOHEHTHO CnHai TapeByeTc 3KpaH C KOMIOHEHTbIMB BXOJIbIMI IHe3dAMH.
KOMnO3nTHbI BnDeocnHaJI
CnCTema KOMIO3HTHO BUNEOCHHaJa pa3JeIaET BUNEOCHHaJI Ha TPh OCHOBbIX 3JIeMeHtA BUNEOKApTHKN: IBet, JRPKoCTb H CnHΦpOHN3aIIH JaHHbIX. KOMIO3HTHO BUNEOrHe3IO Ha BUNEOKOMIOHOHeTe Ipepeaet 3TN TPh 3JIeMeHtA BMecTe.
■Dolby Digital
IINΦPOBa CnCTema OKpykaOIOero 3ByaHnDolby Digital IO3BOJIaET HaCLaIHbCSIIOJHOCTbO He3aBHCMBIM MHOrOkaHaJIbHbIM 3ByuAHnEM.CnCTema Dolby Digital IO3BOJIaTe BOCpOH3BOJNTb 5IOJHOHaIIa3OHHbIX ayIOKoHaJIob C 3ΦpOHTaJIbHbMI KAnJaAMN (ΦpOHTaJIbHbI JEBBI/IIpaBbI INeHTpaJIbHbI), II 2 cTpeoOoHueckHMn KaHaJaAMN OKpykaIOUeO 3ByuAHn. BKIOUyA IOIOJInHeJIbHI KAnAI, CIEuaJIbHO IpeJHa3NaUeHHbI IIA H3KOuAcTOThbIX eΦΦeKTOB H3BeCTbI KAK LFE (HN3KOuAcTOThbI eΦΦeKT), DAHHa CHCTema B HTore O6JIaaeT 5.1 KaHaJIaMn (KaHa.I LFE cHTaetc KaK 0.1). NcIOJIb3OBaHHe 2-KaHaJIbHO rCteoOoHnCCKORO peXHMa IIN KOJOHOK OKpykaIOUeO 3ByuAHn IO3BOJrE T 6OTcc AKKypaTHO BOCpOH3BOJNTb IINJKyIINCCsR 3BYKOBbIc eΦΦcKtBi H cpeJy OKpykaIOUeO 3ByuAHn IIO cpaBHeHIO c cnCTcMoI Dolby Surround. IIIpOKHn DHHAMNuCeKN IINaIa3OH OT MaKCHMaJIbHO IIO MHHMaJIbHO UPOBHe rPOMKoCTH, BOCpOH3BOJIMb 5IOJHOHaIIa3OHHbIMN KaHaJIaMn, I TOUHOe HAIIpaJIeHne 3ByuAHn, cRehePnpOBaHHOe C HIOJIb3OBaHHeM IINΦpOBoi O6paBOTK 3ByuAHn, IO3BOJIAOT cITIIaTEJIO BIIepBbIe HcIIbTaTB becIpPeIeJeHTHOe YyBCTBO peAJIN3Ma I BOJIHeHn. DaHHbI aIIIapAT IO3BOJrE Bam Cbo6OJHO BbIPaTb IIO6YIO cpeY 3ByuAHn, OT MOHOΦOIIuYeCKOI Do 5.1-KaHaJIbHO KOnHfHypaIJN, B 3aBHNCMOCTH OT BAIIIx IOTpe6HocTeI.
■Dolby Pro Logic II
CnCTema Dolby Pro Logic II ABJIEcTc yJyUHcHHO
TexHOJIOTHe, KOToPA HcIOJIb3yeTcI
JeKOINPOBaHHo OBIIHPoro Kpyra cyIeCEbYIOHN
HcTOHKnOB BΦopMaTe Dolby Surround. DaHHa
HOBAr TexHOJIOTn IO3BOJIaE T NcCKpeTHoe
5-KaHaJIbHOe BOCIIPOH3BeJeHne c 2 φpOHTaJIbHbIM
JIeBBIM I IpaBBIM KaHaJIaMn, 1 IeHTpaJIbHbIM
KaHaJIOM, I 2 JEBBIM I IpaBBIM KaHaJIaMn
OKpykaIOIIeTO 3ByaHHN BMeCTO TOJIbKO 1 KaHaJa
OKpykaIOIIeTO 3ByaHHN IJIa O6bYHOb TExHOJIOTn
Pro Logic. IMcIOTc TPNIOCTUYHBIX peKHMa:
"PeXHM Music" IJIa MY3bIKaJIbHBIX IcTOHKNOB,
"PeXHM Movie" IJIa KHHoΦHJBMOB H "PeXHM
Game" IJIa HRPOBbIX hCTOuHHKOB.
■Dolby Surround
CnCTema Dolby Surround, HcnoJb3y4-KaHaJIbHyIO aHaIIOROByIO CnCTeMy 3aIIHcN, BOCIpOHN3BOIDHT peaJIInCTNuHbIe IINHAMUeCKNe 3BYKOBbIe 三 eKTbI:2 pOHTaJIbHbIX JEBbIX IIpaBbIX KaHaJIa (ctrepeofoHHueckn), IEHTpaJIbHbI KHaJI JIIra BOCIpOHN3BeJeHnRA HaIIOROB (MOHOfoHHueckn), IN KaHaJI OKpykaIOIeero 3ByaHnRA OCObIX 3ByKObIX 三 eKTOB (MOHOfoHHueckn).KaHaJI OKpykaIOIeero 3ByaHnRA BOCIpOHN3BOIDNT 3ByuHnne B y3KOM YacToTHom IINaIIa3OHe. CnCTema Dolby Surround IInpOKo HcNOJb3yeTcR IIouTHn BO BCEX BNIEOKaccTeax IJa3epHbIX IINCKAX, a TaKKe BO MHOrNX TpAHCJIaIINx TeJEBnDEHnRA Ka6eJIbHorO TeJEBnDEHnRA NaHHORO aIIIapapaTa HcNOJb3yeT CnCTeMy o6paOTKn IIINFOPOBOrO CNTHaJa, TaKIM O6pa3OM aBTOMaTHueckn cTaNIN3Hpyy UPOBeH b TpOMKocTH KaKJOrO KaHaJIa IJIa YcNJIeHnRA IpeEIBRaIOUHXcR 3BYKObIX 三 eKTOB IN HAIIpaBJIeHHOCtN.
■DTS Digital Surround
DTS 6bIpa3pa6oTaHa IJIa 3aMeHbI aHaIIOROBIX 3ByKOBBIX CnHbIOB KINHOΦHbMOB 5.1-KaHaJIbHbIM IINΦPOBBIM 3ByKOBbIM CnHbIOM, IN BaHOC BcPcMc CTAHOBHTcB CCCOJIe IOIyIAPHOJ IIr HCIOJIb3OBAHHB V KINHOtcaTpax BO BCCM MHPc. CnCTMa IOMaIIHcero KINHOtcaTpa, pa3pa6oTaHHaDR DTS, Inc., IO3BOJIaET Bam HacJaIITbcra FIy6HOB 3ByUaHHN IIPOCTpAHCtBEHHbIM 3ByuAHHe IINΦPOBOI CNCTeMbI OKpyKaIOIeO 3ByuAHn DTS BBaIeM OME. DaHHaIc TcTeMa eΦΦeKTNBHO BOCIPON3BOJNT CBO6OJHOc OT IOMex 5.1-KaHaJIbHOc 3ByuAHne (TOBOPa TEXHNueCKHM RaBikOM, BcETo 5.1-KaHaJIob, BKJIIOua JIEBbI, IIpaBbI N IIeHTpaJIbHbI KaHaJIbI, 2 KaHaJa OKpyKaIOIeO 3ByuAHn, IIIOc KaHaJI LFE 0.1 IJIa ca6Bypepa).
■HDMI
HDMI (High-Definition Multimedia Interface) -первий промьшлелно-поржнавемы, Hecxka tabиь, BceинфpoBoY ayHNO/BHNeO HHTeppeic. O6ecIeHHBaI HHTeppeic MexJy JIO6bIM IcTOUHKOM (HaIIpIMep, Ka6eJIbHЯ KOpO6Ka IIH ayINOBu3yaJIbHbI pecuBep) II ayHNo/BHNeO3KpaHOM (HaIIpIMep, IuΦpoBOI TeJIeBu3Op) c IIOMOIIbO OJHOro Ka6eJIa, HDMI IIOJIpePxHBaCt cTaHДapTHoe, yCHJIeHHOC IIH BbICOKoYeTKOE BnIEoN3O6paXKeHne, a TaKKe MHOrOKaHaJIbHoe IuΦpoBOc 3ByaHNc. HDMI IpePaT Bce cTaHДapTbI ATSC HDTV II IOIIePxHBaE8-KaHaJIbHOe IuΦpoBOe 3ByaHNe, c IOLOcoI yactOT IIA COOTBeTCTBna C 6byUIMH yJyUHeHNM N Tpe6OBaHNM. IIpr INIOJIb3OBaHNbI B Kom6HaNm c HDCP (High-bandwidth Digital Content Protection), HDMI O6ecIeYnBaCT HaJeXhIb ayHNO/BHNeO HHTeppeic, COOTBeTCTByIOIIIN Tpe6OBaHNM IIo 6e3OITacHOCTN IOCTaBIKNOB MaTePnaJa coIDepXaHNs I ChCTeMHbIX OIepaTopob. IJIA IOIpO6Hoi HfOpMaUNn o HDMI, CMOTpIte cTpaHNu HDMI Ha "http://www.hdmi.org/".
0.1 KaHaJ LFE
JaHHbI KaHaJI BOCIIPOIN3BOJNT HN3KOaCTOTHbIE CnHbJIb.IaHHbI KaHaJI O6JaIaET YAcTOTHBIM IHaIIa3OHOM OT 20 TIO 120 TIO. JaHHbI KaHaJI CHTaETc KaK 0.1, TaK KaK OH IIo3BOJIaET TOJIbKO YCHINTb HN3KOaCTOTHBI INHaIIa3OH, IO CpABHeHIO C IIOJIHOIIaIIa3OIIbIM BOCIIPOIN3BeJeHNEm dpyTHX 5 KaHaJIob B 5.1-KaHaJIbHbIX cHcTeMax Dolby Digital HIN DTS.
■MP3
OuHn H3 MeTOOB CKaTHA 3ByaHn, HcIOJIb3yEmbIMPEG. OH HcIOJIb3yeT MeToI 6e3BO3BpaTHOROCaTHN, KOTOpBn apxHBpyET C BbICOKHM ypOBHeM CKaTHN IIyTeM COKpaUeHHNJaHHbIX B 3ByaHn, TpyHNO yIOBmOM IJIYeJIOBEueCKORO cJyxa. 3TOT MeToI MoXeT CxHMaTb JaHHbIe IpHMePHO Ha1/11 (128 K6/ceK) c OINHOBpeMeHHbIM COxpaHeHHem OINHaKOBOrO KaueCTBa 3ByaHn, KaK HaMy3bkaJIbHbIX CD-dnckax.
PCM(JIHHHbI PCM)
JIHHeHbI PCM-3TOΦopMaT cHrHaJa, IO3BOJIAUHm IIpeo6pa3OBbIBaTb aHaJIIOROBbIe ayINocHraJIb I INΦpOBbIe φOpMaT, I 3aIIncbIBaTb I IpeJABaTB IX 6c3 JIOIOJIHNTEJIbHOro CKaATn. JaHHbI MeTOI HcIOJIb3yETcR JIA ayINO3aIIHCn Ha CD-JNcKax n DVD-JINCKax.CnCTema PCM HcIOJIb3yET TexHOJIOHIO IIPOH3BOJCTBa OT6opa pa3Mepa aHaJIOROBOrO cHrHaJa Ha OueHb KOPOTKyIO eINHHu BYpeMeHH. N3BeCTHBn KaK "MoJyJIna HmIyJIbCHOrO KoJa", aHaJIOROBbI CNrHaJI KOINpyEtC B BVNe HmIyJIbCoB I 3aTeM MOJyJInpyEtC JIA 3aIHcN.
Yactota cTpo6npoBaHn N KOJIueCTBO KBAHTOBaHHbIX 6NTOB
Ipi nppeo6pa3OBAHH anJIoTOBO roayinocHHaJaB
IHΦpOBOH fOpMaT, YactOTOn CTpO6pOBAHH Ha3bIBaIO T KOJIueCTBO pa3 CTpO6pOBAHH cHHaJa B CekyHny, B TO
BpeM KaK KOJIueCTBO KBaHTOBaHHbIX 6nTOB OIIpeJeIaeTcR
KaK yPOBeHb YacToTB Ipr nppeo6pa3OBAHH yPOBHe 3ByKa
B IIΦpOBOE 3NaueHne. IHaIIa3OH aMIINHTUHO-HMIYJBChOH MOJIyIuHN DIA BOCIPoH3BeDeHn 3aBHCIT OT YAcTOTbI
AMIIHTUHO-HMIYJBChOH MOJIyIuHN, B TO BpeM KaK
IMHaMHIECKH JHaIIa3OH, IpeJIcTaBJIHOIIH CO60 pa3HNIy
yPOBHe 3ByaHn, OIIpeJIeJIeTcR KOJIueCTBOM
KBaHTOBaHHbIX 6nTOB. B pInHIIHnC, Yem BblIe Yactota
AMIIHTUHO-IMIIYJBChOH MOJIyIuHN, TEm IIInpe JHaIIa3OH
YactOT dJIra BOCIpOHHBeDEHn, H Yem BoJIbIe KOJIueCTBO
KBaHTOBaHHbIX 6nTOB, TeM YNuIe BOCIpOHHBeDEHne yPOBHe 3ByaHn.
■SILENT CINEMA
Yamaha pa3pa6oTaJa aIITropTM 3BYKOBbIX
OΦΦeKTOB DSP JIA eCTeCTBeHHORO,peaJIHcTHUHO
BOcIIPOUN3BeJEnHa HAYIHINKOB. IapAmETpbI JIA
HayIHINKOB yCTaHOBJeHb I KaJKOM 3BYKOBOM IOJIe,
IO3BOJRA aKKypaTHO BOCIIPOUN3BOIDHTb BCE
IporpaMMbI 3BYKOBbIX IOJIe JIA IIPOCJIyIHINBaHHc
HCIOJIb3OBAHNEM HayIHINKOB.
■Virtual CINEMA DSP
Yamaha pa3pa6oTaJa aIropHTM Virtual CINEMA DSP, nIOJIb3yIOUIMn BnptyaJIbHbIe KOIOHNKn OKpykaIOUIEO 3ByuAHN, IIIO3BOJIAOUInn IIOcJIyUINBaTb kTbI OKpykaIOUeTo 3ByuAHN 3ByKOBOrIO IOJIaDSP JaXe 6e3 NIOJIb3OBaHN KIOHOK OKpykaIOUeTo 3ByuAHN. BbI MoKeTe JdXe BOCIIPOUN3BOINTB BnPtyaJIbHbIe kTbI Virtual CINEMA DSP JaXe c NIOJIb3OBaHHe MHHMaJIbHOJ 2-KOJOHOUHO CHTeMbI, KOTopA He BKJIIOUaET IeHTpaJIbHyO KOIOHKy.
■WAV
CTaHJapTHbIΦOpMaT ayuiofoaJaWindows,TO O3Haayet MeToI 3aIIncn uIΦpOBbIX daHHbIX IIyTeM IpcO6pa3OBaHnA ayuiochrrHaJIIOB. OH He yKa3bIBaCT Ha ONpeJeHHbI METoI cKaATnRA (KOINPOBaHn), H TaKIM o6pa3OM MOXHO NCIOJIb3OBAbTB HyKHbI METoI cKaATnRA. IIO yMOJIuaHnIO, OH COBMcCTHM C MeToIOM PCM (6e3 cKaATnRA) IN HeKOTOpbIMn dpyrHMn MeToIaMH cKaATnRA, BKJIouy aMeToI ADPCM.
■WMA
MeToI cKaTHe 3ByaHnHa, pa3pa6oTaHHbI Microsoft Corporation. OH nIOJb3yeT MeToI 6e3BO3BpaTHOrO cKaTHe, KOtOpB1 apXHBnpyET C BbICOKHM yPOBHeM cKaTHe IITEm COKpAIIeHN HaAHHbIX B 3ByaHn, TpyINHO yIOBMOM IJIy YEIOBEeCKORO CJlyxa. 3TOT MeToI MoKeT cKHMaTB JaHHbIE IIpIMepHO Ha 1/22 (64 Kb/ceK) c OJHOBpeMeHHbIM CoXpaHeHHem OJHHaKOBOrO KaueCTBa 3ByaHnHa, KaK Ha My3bIKaJIbHbIX CD-Ⅱckax.
TexHnueckne xapaKTepeNCTnKN
AUYINOPA3DEJ
MHHMaJIbHoe 3eKtpueckoe HnapRjKeHne RMS,174 pOHTaJIbHO, HeHTpaJIbHOro KaHaJa, KaHaJa OKpyKaioIero 3ByaHn
[MoJIeJIHIIJIa CIIIA n KaHaJIbI] 1KΓu,0,9% OHN,8Ω 105Barr
[Дугне moJIeJH] 1KII,09% OHN,6Ω 105 BaTT
MaKcHmAJbHOe HnppJxKeHne JIaPPOHTaJIbHoro, UeHTpaJIbHoro, OKpyKaIOUero 3ByuHaHH (JEITA)
[MoicnA3HH,KHTaKopnIO6HMAoCJIb] 1KΓu,10%OHH,6Ω 130Batt
JINHAMHCCKa MOIHIOCTb
[MoicnI IJIa CIIIA N KaHaIbI] (IHE 8/6/4/2 Ω) 90/110/130/150 Barr
[Дугне модел] (IHE, 6/4/2 Ω) 100/110/125 BaTT
-IMHAMHueckaMAUHOCTb [MOeJIH IJIa CIIIA n KaHaIbI] 8Ω .0.27dB
MaKcHMaJIbHbI BXoJHOH cHrHaJI
CD,ДР.ФФФКТВКЛ.1KΓI,0,5% OHH 2,0Bинболee
Pa3eJeHHe KaHaJIOB (1Kg/10Kg)
CD,πp.(5.1KΩ3aMKHytbH)HaΦpoHTaJIbHbIeJ/Π 60B/45B HIN 6oJIee
-KoHTpoJIb ToHaJIbHOCTn (ΦpOHTaJIbHbI J/II)
BASSIobaoHoeHaipjKeHne/IIpepbBaHne 10B/100
TREBLEIooBouHoeHaipjKeHHe/IIpepbBaHne 10B/20K
HOMHaJIbHbI BbIXOJ/HMIeJaHC HHe3a HayHHKOB 400MB/470Ω
IyBcTBNTeJIbHOCTb pIneMa/IMnTeJHaC pIneMa
CD, T.I. 200 MB/47 KΩ
MULTI CH INPUT 200 MB/47 KΩ
- ypoBCHb BixOJa/HMnCJaHc BixOJa
AUDIO OUT (REC) 200 MB/1,2 KΩ
SUBWOOFER OUTPUT 4 B/1,2 kΩ
XapaKTepeHcTKnΦnIbTpα
(TacToTHocIpcO6pa3oBaHnC=40/60/80/90/100/110/120/160/200T)ΦHJIbTp BbICOKHX TAcTO
(FRONT SP, CENTER SP, SUR. L/R SP: SMALL/SML) 12 Πb/okr.
L.P.F. (Ca6ByΦep) 24 Πb/okT.
BnDEOPA3dEJI
TINBUNEOCHHnA(CepbIΦOH) [MoJIH TIIA,KaHaJIb,KopEN H o6IIa MoJIb] NTSC [JpyrHe moJIH] . PAL
- YpOBeHb cHrHaJa KomIO3HTbI .1 Vp-p/75 Ω KomIOHeHTbI .... 1 Vp-p/75 Ω (Y), 0,7 Vp-p/75 Ω (Pb/PR)
CoothoHHe He HnHm 50B Hn6Jec
- MaKcHMaJIbHbI yPoBcHb IpiHcMa 1,5 Vp-p HnH 6oJIee
- ActOTHaXapaKTepeHcTHKa (MONITOR OUT) KomIOHeHTbI CNHaJI 5Γι -60 MΓι, -3μB
PA3DEJyM
-Ⅱha30H HacTpoKn [MoJIuIa CIIA n KaHaIbI] 87,5-107,9 MΓu [MoJIbIa A3HH n O6uaa MoJeJIb] 87,5/87,50-108,0/108,00 MΓu [JpyrHe moJIIn] 87,50-108,00 MΓu
-HOMHaJIbHaaIyCTBHTcJIbHOCTb50Ⅱ6(IHF,100%MOI.) MoHO 2,8μV(20,2dBf)
- CoOTHOIIeHHe cHTHaJI/IIyM (IHF) MoHO/Ctepeo 73 nB/70 nB
HeJIHHoe HcKaKeHHe (1 KII) MoHo/Ctepeo 0,5%/0,5%
·BXoJ aHTeHHbI (Heec6aJIaHcHpOBaHHbI) 75Ω
CEKLINRA M
-Ⅱhaa30H hacTpoKn [MoJI H CIIA H KaHaIb] 530-1710 KΓ
[MoJIb I A3HH N o6Iaer MoJIb] 530/531 -1710/1611 KΓ
[ДугHe moJIeH] 531-1611 KΓ
OBUPI PA3DEI
- Hanpxkne [MoeJIH II EbpObl H Pocchn] 230B IepMeHHoro ToKa,50 T
[MoeJIH II CIIA N KaHaIb] 120 B IepMeHHoro ToKa,60 T
[MoeJIb II ABCTpaTIn] 240B IepMeHHoro ToKa,50 T
[MoeJIb II Kope] 220B IepMeHHoro ToKa,60 T
[MoJIb JIa KHTa] 220B IepMeHHoro ToKa,50T
[MoJIb JIa A3H] 220/230-240B IIepMeHHoro ToKa,50/60 T
[OIIa MoJIb] 110/120/220/230-240B IIepMeHHoro ToKa,50/60T
3JektpoHOTpe6JIeHHe [MoJIeJIH IIaI CHIIA n KaHaIbI] 240 BaTT/320 BA [IpyrHe MoJIeJIH] 240 BaTT
3HePROIOIOTpe6.IeHNE BpeXHEMOOHNaHHN 0,8 BaTT
MaKcHMaJIbHOC 3HeCpROIOITpe6JIeHNc [ToJbKO MOJeTb TIAA A3HH N O6IIaIa MoJeJIb] 5-KaH,10% OHN 440 BaTT - _a6apHTb1 (III x B x Γ) 435 x 151 x 352 MM
Bcc 8,5K
*CneHnKanMOryT H3MeHrTbc8e3 yBeJOMJIeHH.
PpeDMeTHbIyKa3aTeI
0603HaueHn
1 SOUND MENU, рунаянастояka ...55
2 INPUT MENU, pyHaa HacTpoHka ... 55
2ch Enhancer, nporpaMa 3BykoBoro IOJIA ...38
2ch Stereo, pOorpAMMa 3ByKOBOrIOIIOI.. 38
3 OPTION MENU 64
3 OPTION MENU, pyHaa HacToPoiKa .... 56
5ch Enhancer, nporpamma 3BvkoBOro noi ...38
5ch Stereo, IpoIpaMa 3ByKObOro IIOJI ... 38
A
ABTOMaTHueckKa HAcTpOka HIpeJycTaHOBka, HAcTpOka TM/AM IHaHaIa3OHa 44
ABTOMaTHueckKa HacTpOiKa, HacTpOiKa YM/AM IHaIHa30Ha .... 43
Aynorhe3a 13
AynonHopmaa 36
AyIOKOMIOHEnbI,IOJIKIOueHne...18
AynHnHaCTpOKn,3ByKOBoe MeHIO ...60
AyinoceJIeKTop, MeHIO onn.. 65
B
BnneorHe3a 13
BnIeO3aCTaBAka,HaCTpOnKa MHOrOKaHaJIbHOro IIpHema 63
BuiJeOHΦopMaHn 36
BncoHcTOHHKN B BNde fOHa 36
BnEOKOMHOHeTbI, HOJIKNIOUeHne ...15
BkJIOUeHHe IIHTAHN 21
Bo3MOxHbI HeHcHpaBHOCTn H CIOOC6bI IO Hx yctpaeHHIO 71
BocpoH3BeHeHe BHeoHcToHHKOB BnIe oHa 36
BpeM OTo6paKeHH paOoTeo cocToHH yChJInTCJI Ha 3KpaHIO MCHIO, HacTpoKN INCIIIE 64
BpcmaOTOBpaXeHHaYHKiHn HcTOUHHKa B 3KpaHHOM MeHIO, HaCTpOJIKNIHCIIJCE 64
Bb6op ayINOBXOINBIX rHe3I 34
Bb60KOMHOHHTA MULTICH INPUT ... 34
Bb6op npEycTaHOBJHnOpaHHocTaHHn, Hacptoika TM/AM dHaiaa30ha 45
Bb6op Ⅲa6JOna SCENE 28
Bb6op,ayIOHOxOIOHbIe rHe3Ha 34
BbI6op, KOMIOHeHT MULTICH INPUT ... 34
Bb6op,ipcndyctaHOBJeHHa paHIOCTAHHHa HacTPOKa YM/AM dHaIa3oHa 45
Bb6op,THII IporpaMMbI ChCTeMbI PaHIOaHHbIX 47
Bb6op,Ⅲa6JIOHSCENE 28
BbIOI cHrHaIOB LFE/6acOB, HAcTPOKNI KOIOHKN 58
#
THe3aAUDIO 13
THe3Ja COAXIAL INPUT 62
THe3a COMPONENTVIDEO 13
The3jda DIGITAL AUDIO COAXIAL ... 13
The3 DIGITAL AUDIO OPTICAL 13
THe3JIAVIDEO 13
The3Ja VIDEO AUX, PpOHTaJIbHaII HaHeIb ... 19
THc3IO OPTIMIZERMIC, aBTOMaTHueckKaHaCTpOJa 24
THe3IO PHONES 35
A
HHAMHueckn HHaia3OH,3BYKOBOe MeHIO ...60
HicIIe HfOpMaHH BocIPOH3BcJeHH, ynpabJIeHHe iPod 52
IHHJIH HFOMaHH BOCINPOH3BcDEHH, yipabJIeHHe USB 50
HcJIe HpOHTaJIbHOI HaHeJIN 22
E
EHHHua,pacToaHHe KOIOHKn 59
3
3aBOckHe ycTaHOBKn, JIOHOJIHHTeJIbHbIe HAcrpoNKn ....70
3aemeJIeHne 3ByuHaHHa ayHOHaCTpoiKu .60
3aMeHaIpeyctAHOBJIeHHo paJIOCTAHINH, HACrpoKa M/AM JnHaIbAzoHa 45
3aMeHa, IpeIyctaHOBJIeHHa paHIOCTaHHa, Hacrpoika TM/AM dHaHa2oHa 45
3aHTa IaMaTn, MeHIO onnn 64
3BykoBoe MeHIO,pyuHa HaCTpOka...55
#
HIIHKaTOp HayIIHHKOB 22
Hnukatop ypOBH VOLUME 22
HIIKKaTOp CINEMA DSP 23
Hukatop CT 23
HIIKATOP DOCK 22
Hukatop ENHANCER 22
HnKaTop EON 23
Hukatop HDMI 22
HIIHKaTOp MUTE 22
Hukatop PCM 22
Hukatop PS 23
Hukatop PTY 23
Hnukatop PTY HOLD 23
Hnukatop Radio Data System 23
HnKaTOp RT 23
HnkaTop SILENT CINEMA .23
HnkaTop SLEEP 23
HJikKaTOp VIRTUAL 23
Hukatop YPAO 22
HJnKaTOpbI JeKOJIepOB 22
HIIHKaTOPbI HCTOuHHKOB IOCTYnAIOIeRO CHHaJa 22
HINKATOpblipHHMaEMbIXKaHaIOB...23
HJIKaTOpbI TIOHepa 22
HIIKAToPbI SP A B 22
HnHnHa.1n3aIiHn IapameTpA, MeHIO OIIIN ...65
HhphiMaHHOHHa ycIyra IpyrHXycOBepHHeCTBOBaHHbIX cTeH,HaCTpoKa ChTeMb PaHNoDAHHbIX ...48
HΦopMaHONHHa yCyTA EON, HAcTpoKa ChTeMb PaHNoHaHHbIX ...48
HΦpaKpaChoe OKoiIko, ΠyJIbT IY ...23
HcnoB3OBAHHe yctPoHCTBa IaMaTH USB, HcHIOJIb3OBAHHe IIpeHoCHOrO ayHOHeepa USB 49
HcIOJIb3OBAaHc iPod 51
HcxoIHbIypoBeHbIpyOMKocTH, ayHOHaCTpOKn 61
K
KaHaJI IIpHema H HIIHKaTOPbI KOJOHOK ... 23
KoJIHueCTBO KOJOHOK 26
KoJIHueCTBO KOJIOHOK, pc3yIbTaT aBTOHaCTpoiKn 26
KoIOHka, HnHaMHuecKHH HnHaIa3OH ... 60
KoJIOHka,ypOBeHb H3KOvAcToTHOro 3000eKta 60
KpoccoBep, HactpoKn KoJIOHKn ... 58
#
JIeBaIpaBaKoIOHKn OKpyKaIOIero 3ByaHaHH,HaCTPOHKn KOIOHKn 58
M
MaKcHMaJIbHbIyPOBeHrPOMKocTH, ayHOHaCTpOHK 61
MeHIO oniun,pyuHaN hAcTpoNka...56
MeHIOIpHema,pyHaHa HAcTpOka...55
MnKpOoH OHTHMn3aTopa 24
MHKpofoH ONTHMn3aTopa, abTOMaTHueckaHaCTPOKa 24
MHOrOkaHaJIbHbI INCToYHK Yepe3 HayuHHNK 39
MHOFOyHKIIHOHaJIbHbIINHΦOpMaIOHHbI JNCJIeIe 23
MD-MaHTTOOHNIOKJIKeHHe ... 18
H
Ha3naueHnIe IIpHcMa, MeHIO IIpHcMa ... 62
Ha3NaYeHHe COAXIAL INPUT, H3Nauchnnc npncma 62
Ha3nueHHe OPTICAL INPUT, Ha3nueHHe HpncMa 62
HactpoKa AM IHaIa3OHa 43
HacrpoKa HcToUHHa IIpncMa Ⅲa6JIOHa SCENE, IVbT IV ....32
HactpoKa KOJOIHKNFRONTB, HactpoKHOJIOHKn 57
HacTPOKa MHOROKaHaJIbHorO IIpHeMa, McHIO IIpHeMa 63
HacTpoNkCA ChTeMbPaHOJAdHHbIX .... 46
HaCtpoNkA ToHaNbHorO KauecTba ... 41
HactpoKa ypOBHa KOJOHOK 41
Hactpoika UM IHaIa3OHa 43
HacTpoKa Bluetooth, MeHIO omIe ... 65
HacTpoIka HDMI,3BYKOBOc MCHIO ... 61
HactpoN HncIIe, MeHIO OIIIN ... 64
HaTpoKHOJOIOHKH,3BYKOBOe MeHIO 57
Hayunnnn 35
HayHHKNH,HHaMHYcckKn HHaHa3OH....60
HayHHNK, ypOBeHb Hn3KoayactoTHoro 000000000060
#
ONTHMH3aIIH HAcTpOoiKHOJOHOK 24
OTKIOUeHHe IITaHH 21
#
IHaOpama,napaMeTp 3ByKOBOrO IIOJI ...40
Ipe3arpy3ka cHcTeMbI 80
IpeHMeHOBaHHBxOJa, MeHIO IpnHeMa ...62
IpeHMeHOBaHHe,IIa6JIOH SCENE...31
IIOBTOP 52
IIOBTOp,ynpaBHeHne iPod 52
IIOJIePJKKa 3ByaHnHa,ycTaHOBKa HDMI ...61
PiokJIOyeHHe AM aHTeHHbI.....19
IIOKJIIOUOeHHe BUIeOMaHRHTofoHa ...17
PiKIOHHeBHEIIHrOeKOJepa...18
IIIOKIIIOUeHHe K TePmHHa.IaM FRONT A ... 12
PiokHIOeHHe KOIOHOK 25
IIOJKJIOUOCHHE KOJOHOK, aBTOMaTHuecka HAcTpOJa 25
IIIOKIIIOUeHHe KOIOHOK/ypOBcHb IpOMKocTH, ABTOMATuecka HAcTPOKa 25
IIIOKJIIOUeHHe MHOrOΦOpMaTHORIOIpoHrpbBaTeJI 18
IIOKJIIOUeHHe IepcoHaJIbHOBBOJNeOMaHHTofoHa 17
IIOKIIHOeHHe TeJeINpHcTaBKN 17
PoiKJIIOUeHHe YM aHTeHHbI 19
IIKIOHHeDVD-MaHHTofoHa...17
IoiKIOueHHe DVD-IPoONPbIBaTeJI 16
IIOKJIIOUeHHe,AMaHTeHHa.19
IoiKIOueHne,ayIOKOMIOHeHTbI ... 18
IIOIKIOUeHHe, BIIeOKOMIOHeHTbI ... 15
IIOKIOUeHHe, BuJeOMaRHTofoH ...17
IIOKJIIOUeHHe, BHeIIHHJekOJIep ...18
IIOKIIIOUeHHe, MHOROΦopMaTHbI IpoHrPbIBaTeJIb ...18
PiokJIOeHHe,MD-MaHToOH....18
IIOKJIIOueHHe, IepcoHaJIbHbI BIIeOMaHHToΦOH ...17
IIOKIIIOUHeHHe,CHIOBOK Ka6eJIb 20
IIOKIIIOyeHHe, CD-MaHTofoH ... 18
PiKIOUChHc, CD-IPoONrPBbAteJb ...18
IIOKIIIOYEHHHe,TeJIeINPnCTaBKN 17
IOnKJIIOUcHHe, yINBcpcaJIbHbI JOKYamaHaIg iPod 19
PiokJIOUOCHNC,YM aHTChHa 19
IIOKJIIOYHeHne, DVD-MaHTHOOH ...17
PiKJIIOUChIc, DVD-IIPOHrpBbATEJb ... 16
IIOKJIIOYHeHHe, HDMI 14
IToK ayuHnOCHHaJa 14
IIOK BnJeocnHaJa 14
PcuyctahOBJIeHHIbe Ia6IOHbI SCENE ...30
IipnIyIeHne 35
IporpamMna ycyra,HHΦopMaunn CnCTembPaHnoaHbIX 46
IporpaMMbI 3ByKOBOrIO IIOJIa Yepe3 HayIIHHKN 39
PpokpyKa HcIIeIe φpoHTaJIbHOI HaHeJH, HAcTPOKn HcIIeIe ....64
Ipocto peXHM IY, YIpaBJIeHHe iPod ... 51
IpoTaeKHe, npaMeTp 3ByKOBO rOIOJr ...40
IipraMo 39
IyBt Iy,BO3MOKHBie HeHCIIpaBHocTH H CIOOC6bI IO HX ycTaPAHeHHIO 80
P
PaHIOTeKCT,HHΦopMaIIH ChTeMbI PaHIOHaHHbIX 46
Pa3Mep KOIOHOK 25
Pa3mep KOIOHOK, ABTOMATHueckKa HAcTPOHa ... 25
PacctOaHHe KOIOHOKH, 3BYKOBoe MeHIO ...59
PacctoHnKoJIOHOK 25,26
PacCToHHe KOJIOHOK, aBTOMaTHueckKa HaCTpOJa 25
PacToHHe KOJIOHOK,pe3yJIbTaT aBTOHaCTpOKn 26
PaccToaHHK KOJIOHOK, paccToaHHKe KOJIOHKN 59
Pery.ⅢnpOBKa 3BvuaHn, MeHIO IIpHema ...63
PeyjTOp oCBeHHe, HAcToHHn HcHJIeIe ...64
PexHM BbIbopa JeKOJIepa,peXHM JeKOJIepa ...63
PcKHM IeKOJIepa, MeHIO IIpHcMa ...63
PexHM HOHTHO IPOCJyINBaHHa...42
PcKHM IIOPOCMOTpa MeHIO, YIpaJIeHHe IPod ...52
PexHM PTY SEEK, HacTpoHka ChTeMbI PaJHOaHHbIX ...47
PyHnHa HacrpoKa HnpElyctaHOBka, HacrpoKa YM/AM JnaHa3OHa ....44
PyHnHa HacrpoKa, HacrpoKa IM/AM nHaIa3OHa ...43
PyuHnHa HacTpoNka, SET MENU 55
C
CdBHg 3KpaHHoro MeHIO, HAcTPOKNJINCHJIe 64
ChIOBOK Ka6eJIb, IOJIKIIOUeHHe 20
CmeHb, ynpabJIeHne iPod 52
Co3daHHeOpHHHa.1bHbIx IIIa6.THOOBSCENE...31
CTHIN BOCIPON3BeJeHHN USB 66
CD-MaHHToOH,IOJIKIOueHeH 18
#
Taimep cHa 37
TekyIeBpeM, HOpMaIIN CHTeMbPaHOnaHHbIX 46
TeCTOBbI TOHaJIbHbI CNrHaJI, 3KBAJaIeP IeHTpaJIbHOJ KOJOHOHKn ...60
TexHHuecknXapaKTepeHCTHKN 83
THIIpOgPaMMbI,HHΦOpMaIIHcCTcMbI PaJHOaAHbIX 46
THeP(UM/AM),BO3MOKHBHeHcPiPaBHOCTN HCHOC6bI IOHXyCTpaHCHHIO 74
#
YHBCpcalbblnIOKYamaha iPod,IOIKJIHOeHHe 19
YIIpaBJIeHHI BOCIIPOH3BCJcHHEM USB ...49
YIpaBJIeHHe IaHHbIM aIIIapaTOM, IIyIbT IY 67
YIpaBHeHHe IpyrHMN KOMIOHEHTAMN OT IIyIbTa IY ....68
YIIpaBJIeHHeIpyrHMKOMIOHeHTaMH, IIbT IY 68
YIIpaBHeHHe TeJIeBH3OpOM 67
YIpaBJIeHHe iPod,coo6JIeHHc o cocToHHH ...78
YPOBEH KOTOHKH, 3BYKOBOE MeHIO ...59
YpOBeHb KOJIOHOK 26
ypoBeHb KOJOHOK,pe3yHBaT aBTOHaCTpOKN 26
YPOBCHH H3KoAcTOTHOrO 9ΦΦeKTa, 3BYKOBOE MeHIO .60
YpOBCHb 3ΦΦeKTa, IapaMeTp 3ByKOBOrO IIoJI .40
YpOBeHbDSP,napaMeTp3ByKOBoroIOI.40
YcTaHOBKa KOIOB IY 69
YcTaHOBka IIpHOpHTeTa IekOJIepa DTS,peKIMIekOJIepa 63
#
_a3a ca6Byepa,HacrpoKNOJIOHKn...58
ΦpoHTaJIbHbIe KOJIOHKN, HAcTpoIKK KOJOHKN 57
4
UHeTpAaHbAaKoJIOHka,HAcTpoNKH KOJOHKn ... 57
4
THCTOC BBICOKOTOuHOC 3ByaHHc ...41
UMaHTeHa 20
山
Iar TactotbTIOhepa, IIOIOJHHTeJIbHbIe HAcTpOKn 70 IIHHa IeHTpa,IapAmTpEyKOBOrIOIOJI 40
3
3KBaJaiH3cpIeHTpaJIbHOI KOIOHKN, 3BYKOBOE MeHIO 60
3KpaH HΦopMaHH HCTouHHKa IIpHema ... 36
3KpaTekyuerococtoHHn 35
A
A)DISPLAY SET, MeHIO OIIIN ... 64
A)INPUT ASSIGNMENT, MeHIO npHema 62
A)SPEAKER SET, 3BYKOBOe MeHIO ... 57
A.DELAY,aydnoHaCtpoiKn 60
AFFAIRS, TIII IIporpaMMbI CnCTeMbI PaHIOHaHHbIX 47
AUDIO SELECT 34
AUTO SETUP 24
AUTO SETUP, coo6iHHe 06 oHH6Ke ... 75
B
B)INPUT RENAME, MeHIO npHeMa ... 62
B)MEMORY GUARD, MeHIO OHINI 64
B)SPEAKER LEVEL, 3BYKOBOE MeHIO ... 59
BGV, Hactpoika MHOROKAaJIbHoro UPHema ... 63
BT connected, coo6eHne o coctOaHHn Bluetooth ... 79
C
C)AUDIO SELECT, mchio onnnn ... 65
C)SP DISTANCE,3BYKOBOe MeHIO ... 59
C)VOLUME TRIM, MCHIO IIpHcMa ... 63
Canceled, Bo3MOKHbIe HeHcnpaBHOCTn H cnooc6bl IO Hx yctpaHCHIO 79
CD- npOnpBbTaTeIb, IONKIOUeHne... 18
CENTER SP, HAcTpoHKn KOJOHOKn ... 57
CLASSICS, TINI IporpaMMbI ChTeMbI PaHIOaHHbIX 47
COAXIAL IN (1). Ha3HaueHHe npHema ... 62
Completed, coo6eHHe o cocToaHHn Bluetooth ... 79
Connect error, coo6ueHne o coctOHHN vnpaBHeHH iPod .... 78
Connect MIC!, coo6eHne 06 oHH6Ke aBToHaCTpoKn 75
CROSSOVER, HacTpoHKn KOIOHKn....58
CTWIDTH,napaMeTp EByKOBORIOI0I....40
CT,HHOpMaHn CHCTeMbPaHOHaHHbIX....46
CULTURE, TINI IporpaMMbl CnCTeMb PaJIOJaHHbIX 47
D
D)CENTER GEQ, 3BYKOBOE MeHIO ... 60
D)DECODER MODE, MeHIO IIpHema ... 63
DRAMA, TINI INPOppaMMbI ChTeMbI PaHIOaHHbIX 47
DSP LEVEL, npapaMeTp 3bYkoBOrO IOJIa ...40
E
E)LFE LEVEL,3BYKOBOc MCHIO 60
E)MULTI CH SET, MeHIO IIpHema 63
E-1:NO FRONT SP,coo6eHne o6 ouHH6Ke aBToHaCTpOKn 75
E-2:NO SURR.SP,coo6HHe o6 OH6Ke aBTOHaCTpOKn 75
E-4:NOISY,coo6iueHne 06 ouHH6Ke aBTOHaCTpOKn 75
E-6:NO MIC,coo6ueHne 06 ouHH6Ke aBTOHaCTpOuKN 75
E-7:NO SIGNAL, coo6eHne o6 oHHke aBTOHaCTpoKn 75
E-8:USER CANCEL,coo6iueHne 06 oII6ke aBToHaCTpOKn 75
E-9:INTERNAL ERROR, coo6eHne o6 oHH6Ke aBToHaCtpoiKN 75
EDUCATE,THIIIurpapmmbl CnCTeMbPaHnoaHHbIX 47
F
F)DYNAMIC RANGE, 3BKYKOBOC MCHIO ...60
FL SCROLL, HacTpoKn IncIe ... 64
FRONT B, HactpoN K KOJIOHN 57
FRONT SP, HacTpoKn KOJIOHKn ... 57
G
G)AUDIO SET,3ByKOBoe MeHIO ... 60
Games, IIporpamma 3BvkoBOrO IIOJI ... 38
H
H)HDMI SET, 3ByKOBoe MeHIO ....61
Hall, nporpma3ByKOBOIOIJI 38
HDMI,IOJIKIIOJEHHe 14
HEADPHONE, HnHaHmHcckn HnHaH3OH ... 60
HEADPHONE,ypOBeHb H3KoYactOTHorO 60
#
INFO, TII IIpoIpaMMbI ChCTeMBI PaJIOJaHHbIX 47
INI.VOL.,ayHnoHaCTpoKn 61
iPod connected, coo6eHne o coctoHHyipabJIeHHn iPod 78
#
Jazz, nporpamma 3BykoBOrO noi ... 38
#
LFE/BASS OUT, HACTPOHKN KOJIOHKn ... 58
LIGHT M, TINI IporpaMMbICHTeMbPaJIOHaHHbx 47
Loading...coo6eHne o coctoHHyipabJIeHH iPod ....78
LVL 26
LVL, pe3yJbTaT aBToHaCTpoKn ...26
M
M.O.R.M.THINIPOrpaMMbI ChTeMbPaJHOaHHbIX 47
MANUAL SETUP, SET MENU ...55
MAX VOL., ayHnoHaCTpoKn ...61
Movie Dramatic, nporpaMMA 3BkyoBOrO nIa ...38
Movie Spacious, nporpaMMA 3ByKOBOrO IIIOJI ...38
MUTE 35
MUTE TYPE,ayHnoHaCToPoiKn 60
N
NEWS,THII IporpaMMbI ChTeMbI PaJHOaHHbIX 47
No BT Adapter, coo6HHe o cocToHHn Bluetooth 79
#
OPTICAL IN (2) 62
OPTICAL IN (2), Na3NaCHENH IIPhema ...62
OPTICAL IN (3), Ha3HaueHHe IIpHema ...62
OSD SHIFT, HacrpoKn nnCIIeae ...64
OSD-AMP, HacTpoNKN IIncIIe 64
OSD-SOURCE, HacrpoKn JncJIe ...64
OTHER M, TII IporpaMMBICHTeMbPaJIOJaHHbIX 47
P
PANORAMA,napametp 3ykoBoro IOJIOI...40
PLII Game 39
PLII Movie 39
PLII Music 39
POP M, TII IppaMMbI CnCTeMbI PaHIOHaHHbIX 47
Pop/Rock, IIporpamma 3BvKOBOrIO ...38
PRESET,IOIOIHHTeJIbHbIe HAcTPOHN…70
Pro Logic 39
PS,HHΦopMaIIH ChTeMbI PaJHOHaHHbIX ...46
PTY,HHOpMaIHIN CHCTcMbI PaHIOHaHHbIX ...46
R
ROCK M, TIII IIporpaMMbI ChCTcMbI PaJHOJIaIIbIX 47
RT,HHΦopMaIIHcHCTeMbPaIHOaAHbIX ...46
S
SCENE 1 .7
SCIENCE,THIIIPOrpaMMbI ChTeMbI PaJHOJaHHbIX 47
Searching...,coo6iEHe o coctOaHHn Bluetooth 79
SET MENU 55
SILENT CINEMA 39
SIZE 25
SIZE, aBTOMaTHuecka HAcTpoIka ...25
SP 26
SP,pe3yJIbTaT aBTOHaCTpoKn 26
SPEAKER, INHAMHueckHHINHaa3OH ...60
SPEAKER, ypoBHeHb H3KOaTcToTHOro 0000KaTa ...60
SPORT,THIIIiporpaMMbICnCTeMbPaHDoaHHbIX 47
STRAIGHT 39
SUBWOOFER PHASE,
HaCTpOINK KOJOHKN 58
SUPPORT AUDIO, hactponka HDMI ... 61
SUR. L/R SP, HacTpoiKN KOJIOHKn ... 58
#
TEST, 3KBA. TaHep IIeHTpaJIbHOH KOIOHKn ... 60
TU,doHIOJIHHTeJIbIbIe HAcTpoHNK ... 70
TV Sports, IIporpamma 3ByKOBOrIOIIOJ... 38
U
Unable to play, coo6iueHne o coctoHHn yipapBJeHn iPod .... 78
UNIT, paCCToHHc KOJIOHKn 59
Unknown iPod, coo6eHne o coctoHHn vnpabJIcHn iPod .... 78
Unplug HP!, coo6eHne 06 oHH6Ke aBTOHaCTpoKn 75
USB,BO3MOXHbIe HeHcIIpaBHOCTH H cIOOC6bI IO Hx yCTpaHeHHIO 77
#
VARIED,THIIIporpaMMbICnCTeMbPaJHOaHHbIX 47
Virtual CINEMA DSP 39
VOLTAGE SELECTOR 3
W
W-1:OUT OF PHASE, coo6iueHne 06 ouHH6Ke aBTOHaCTpOHNK 76
W-2:DISTANCE ERROR, coo6eHne 06 oHH6ke aBTOHaCTPOKKn 76
W-3:LEVEL ERROR, co06uHHeHc 06 oHH6Ke aBTOHaCTpoiKN 76
WIRING/LEVEL 25
WIRING/LEVEL, aBROMaTHueckKa HaCTpoiKa 25
#
Yamaha Parametric Room Acoustic Optimizer 24
YPAO 24
YPAO (Yamaha Parametric Room Acoustic Optimizer) 24
SPEAKERS "DVD
(IIpHMeP) 06o3Haayet Ha3BaHne
HaCTeHa pOHTaJIbHOI NaHeJIN HIN
HyJIbTe IY. IIO HfOpMaUN O KaKJIOI
HO3HNN HaTe CmOTpHTe
IpHIOKeHHe IIN CTpaHHBb IB KOHIE
JaHHOro pyKOBOICTBa.
■ Front panel/Face avant/Frontblende/Flontpanelen/Voorpaneel/Фронтайна панель
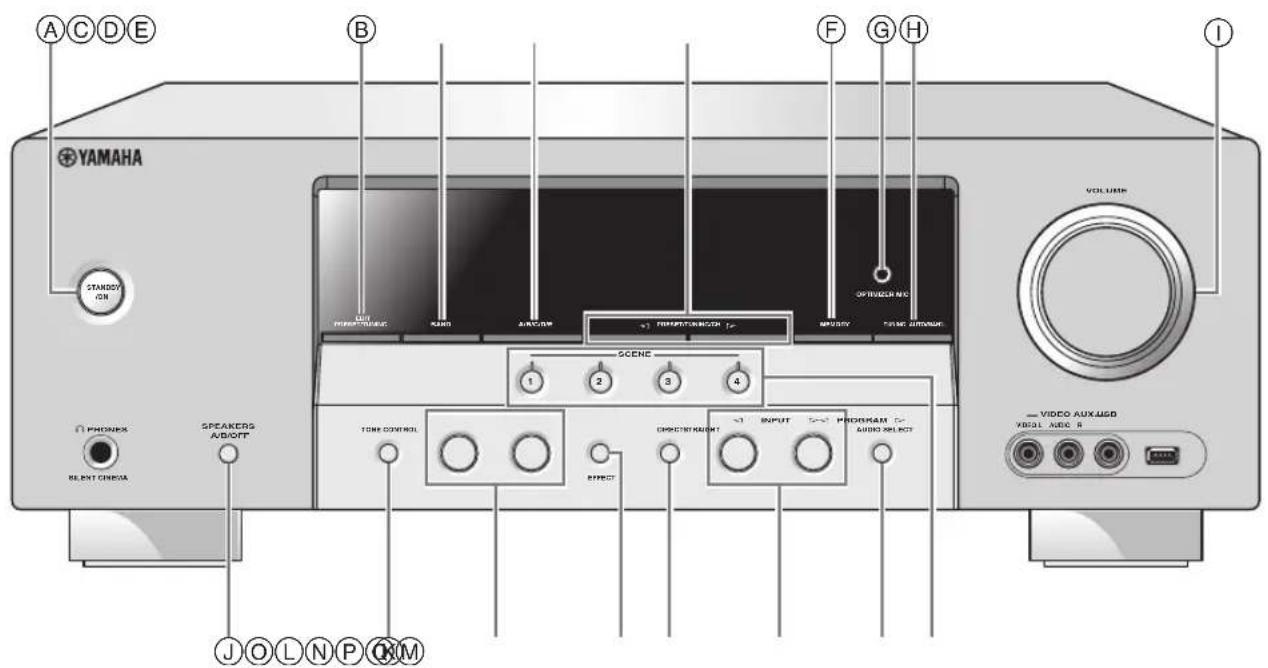
Denon 2030,2102,2103
Denver 2075, 20
Diamond 2074
DK Digital 2094
Dual 2078
D-Vision 2096
DVX 2074
Elta 2096
Euroline 2096
Funai 2052, 2058
Global Solutions2074
Global Sphere 2074
Goodmans 2075, 2077, 2078
Grundig 2077, 2098
H&B 2075
Haaz 2074
HE 2078
Hitachi 2032, 2072
Home Electronics
2078
Innovation 2072
Irradio 2134
JDB 2078
JVC 2033, 2045, 2053
2073, 2099
Kenwood 2030, 2097
Kingavon 2075
Koda 2075
Lawson 2074
Lenco 2075
LG 2084, 2087
Lifetec 2072
Limit 2074
LogicLab 2074
Luxor 2077
Magnavox 2037, 2073, 2075
Magnum 2072
MBO 2078
Medion 2072
Micromaxx 2072
Micromedia 2073
Microstar 2072
Mitsubishi 2035
Mizuda 2075
Mustek 2078
Naiko 2077
Onkyo 2073, 2135
Oraya 2075
P&B 2075
Pacific 2074
Panasonic 2030, 2040, 2054,
2057, 2105, 2110
Philips 2019, 2026, 2046
2073, 2081, 2090
Pioneer 2036,2082
Proline 2077
Provision
RCA 2031, 2042, 2050,
2051
Red Star 2076
Reoc 2074
Roadstar 2075, 2078, 2086
Rowa 2077
Saba 2085
Sabaki 2074
Samsung 2032, 2041, 2104
2113
Sansui 2074
Sanyo 2095
ScanMagic 2078
Scientific Labs 2074
Scott 2088
SEG 2074,2086
Sharp 2034, 2043, 2059.
2093
Silva 2076
Singer 2074
Skymaster 2074, 2078
Skyworth 2076
SM Electronic 2074, 2078
Sony 2028, 2029, 2039
2083, 2107
Soundmaster
Soundmax 2074
Standard 2074
Star Cluster 2074
Starmedia 2075
Supervision 2074, 2078
Sylvania 2052, 2058
Synn 2074
TCM 2072
Teac 2074
Tec 2076
Technics 2030
Technika 2096
Technosonic 2096
Tevion 2072, 2074
Thomson 2085.2109
Tokai 2076
Toshiba 2026, 2044, 2048
2056, 2073, 2108
2111
United 2078
Voxson 2078
Wharfedale 2074
Xlogic 2074
Yakumo 2077
Yamada 2077
Yamaha 2000, 2001, 2003
2030, 2101
Yukai 2078
2038, 2047, 2073
DVD Recorder
Apex 2024
JVC 2070
LG 2071
Panasonic 2020, 2065, 2066
2067
Philips 2019, 2061, 2062
2063
Pioneer 2021
RCA 2018
Sony 2022, 2064
Toshiba 2068
Yamaha 2023
Yukai 2069
DVD/LD
Pioneer 2036
DVD/VCR
JVC 1017,2045
LG 1071,2087
Panasonic 1020, 1072, 2040,
2105
Philips 1025
RCA 1022, 2042
Samsung 1021, 2041, 2104
Sharp 1023, 1073, 2043
2106
Sony 1019, 1074, 2039
2107
Toshiba 1024,1075,2044
2108
Zenith 1026, 2047
DVD-DVR
Panasonic 2067
Pioneer 2114
Samsung 2115
Toshiba 2068
DVR
ABS 2132
Alienware 2132
CyberPower 2132
Dell 2132
DIRECTV 2123,2128,2129
2133
DISH Network 2126, 2127
Dishpro 2126
Echostar 2126, 2127
Expressvu 2126
Gateway 2132
GOI 2126
Hewlett Packard 2132
Hitachi 2008
Howard Computers
2132
HTS 2126
Hughes 2123, 2128
Humax 2123
Hush 2132
iBUYPOWER 2132
JVC 2126, 2127
Linksys 2132
Media Center PC
2132
Microsoft
Mind 2132
Niveus Media 2132
Northgate 2132
Panasonic 2015, 2016, 2017
2120
Philips 2117, 2121, 2123
2128
Pioneer 2012, 2013, 2014
Proscan 2129
RCA 2116, 2124, 2129
2133
ReplayTV 2118,2119,2120
Sharp 2009, 2010
Sonic Blue 2119, 2120
Sony 2005, 2006, 2007
2122, 2130, 2131
2132
Stack 10 2132
Stack 9 2132
Systemax 2132
Tagar Systems 2132
Tivo 2116, 2121, 2122
2123, 2130, 2131
Toshiba 2004, 2125, 2132
Touch 2132
UltimateTV 2133
Viewsonic 2132
Voodoo 2132
Yamaha 2011
ZT Group 2132
HD DVD
Toshiba 2136
iPod
Yamaha 5011
LD player
Yamaha 2002
MD
Yamaha 5002, 5003, 5004
TAPE DECK
Yamaha 5005, 5006
TUNER
Yamaha 5007, 5008, 5009
5010, 5012, 5014
5015, 5016, 5017.
5018
TV
Acer 0093
Acme 0207
Acura 0208
ADA 0255
ADC 0206
Admiral 0058, 0205, 0206,
0210,0211
Adyson 0200, 0207
Agashi 0200
Agazi 0206
AGB 0204
Aiko 0127, 0200, 0207
0208
Aiwa 0028, 0139, 0229.
0237
Akai 0059, 0065, 0127
0129,0130,0200
0204,0208,0209
0213,0217,0218
0255
Akiba 0209, 0218
Akura 0206, 0209, 0218
Alaron 0200
Alba 0200, 0207, 0208
0209,0217,0218
ALBIRAL 0212
Allstar 0213
Amplivision 0207
Amstrad 0204,0206,0208
0209,0218
Amtron 0062
Anam 0208
Anam National 0062
Anglo 0208
Anitech 0206,0208
Ansonic 0203, 0208
AOC 0060,0061
Apex 0118,0122,0132
Arc en Ciel 0216
Arcam 0200
Arcam Delta 0207
Aristona 0213,0217
ASA 0205.0211
Asberg 0213
Astra 0208
Asuka 0200,0206,0207
0209,0218
Atlantic 0200, 0207, 0213
0217
Atori 0208
Audiosonic 0207,0208,0209
0213,0216,0217
0218
AudioTon 0207
Audiovox 0062
Autovox 0205,0206,0207
Awa 0200
Baird 0216
Bang & Olufscn 0205
Basic Line 0208, 0209, 0213,
0218
Bastide 0207
Baur 0217
Beko 0228
Belcor 0060
Bell & Howell 0058, 0064
Beng 0081
Becon 0213, 0217
Bestar 0213
Binatone 0207
Black Star 0214
Blaupunkt 0255
Blue Sky 0209,0218
Bondstec 0214
Boots 0207
Bradford 0062
Brandt 0216, 0226
Brionvega 0205,0213,0217
Britannia 0200,0207
Brockwood 0060
Broksonic 0138
Bruns 0205
BSR 0215
BTC0209,0218
Bush 0177, 0208, 0209
0210,0213,0215
0216,0217,0218
0230,0237
Candle 0060, 0061
Capsonic 0206
Cascade 0208
Cathay 0213, 0217
CCE 0127
Celebrity 0059
Centurion 0213,0217
Century 0205
CGE 0214.0215
Cimline 0208, 0218
Citizen 0060,0061,0062
0064
City 0208
Clarivox 0212,0217
Clatronic 0206,0207,0208.
0209.0213.0214
0218
CMS 0200
Colortyme 0060,0061
Concerto 0060,0061
Concorde 0208
Condor 0200,0207,0213
Contec 0200, 0207, 0208
Contec/Cony 0062
Continental Edison
0216
Cosmel 0208
Craig 0062
Crosley 0205, 0214, 0215
Crown 0062, 0063, 0128,
0208,0213,0217
CS Electronics 0200, 0207, 0209
0214,0218
CTC0214
Curtis Mathes 0057,0060,0061
0064,0065
CXC0062
Cybertron 0209,0218
Daewoo 0060,0061,0120
0127,0155,0193.
0200,0207,0208.
0213,0218,0238
Dainichi 0200,0209,0218
Dansai 0200, 0206, 0213
0217
Dantax 0217
Daytron 0060,0061,0208
De Graaf 0210
Decca 0204, 0207, 0213
0217
Desmet 0213,0217
Diamond 0200
Dimensia 0057
Dixi 0208,0213,0217
DTS 0208
Dual 0207, 0215, 0216
Dual-Tec 0207,0208,0215
Dumont 0060,0127,0205
0207
Durabrand 0126
Dux 0217
Dynatron 0213,0217
Elbe 0203,0204,0212
0218
Elbe-Sharp 0204
Elcit 0204,0205
ELECTROTECH
0208
Electroband 0059
Electrohome 0059,0060,0061
Elin 0200,0207,0213
0217
Elite 0209,0213,0218
0215
Elta 0200,0208
Emerson 0060,0061,0062
0064,0128,0205
Envision 0060,0061
Erres 0213, 0217
ESA 0080
Etron 0208
Euro-Feel 0206
Euroline 0217
Euroman 0200
Euromann 0206,0207,0213
Europhon 0200,0204,0207.
0213.0215
Fenner 0208
Ferguson 0212,0217,0226
Fidelity 0200, 0207, 0210
Finlandia 0210
Finlux 0204,0205,0207
0213,0215,0217
Firstline 0200,0207,0208
0213,0214
Fisher 0064, 0127, 0128
0205,0207,0215
Flint 0213,0218
Formenti 0200,0205,0207
0215,0217
Formenti-Phoenix
0200
Fortress 0205
Frontech 0206,0208,0210
0211.0214
Fujitsu 0023, 0024, 00
0088,0127
Funai 0033,0034,0035
0036.0037,0062.
0206
Futuretech 0062
Gateway 0094
GBC 0208, 0215, 0218
GE 0057,0060,0061
0122,0147
GEC 0204, 0207, 0211
0213
Geloso 0208, 0210, 0215
General Technic 0208
Genexxa 0209,0211,0213
0218
Gibraltar 0060
GoldHand 0200
GoldStar 0060,0061,0127
0128,0200,0201
0207,0208,0210
0213,0214,0215
0217
Goodmans 0171, 0201, 0204
0206,0208,0213.
0217,0240
GPM 0209,0218
Graetz 0211
Granada 0204,0207,0210.
0213,0217
Grandin 0208,0209,0217
Grundig 0128, 0130, 0222
0236,0255
Grunpy 0062
Halifax 0200,0206,0207
Hallmark 0060,0061
Hampton 0200,0207
Hanscatic 0203,0207,0208
0213,0215,0217
Hantarex 0204,0208
Harvard 0062
HCM 0206,0207,0208
0218
Hifivox 0216
Higashi 0200
Hinari 0208,0209,0213
0217,0218
Hisawa 0209,0218
Hitachi 0006, 0014, 0015
0016,0042,0060
0061,0095,0105
0127.0156.0179
0180,0204,0207.
0210,0211,0215
0216,0251
Hornyphon 0213
Hoshai 0209, 0218
Huanyu 0200,0207
Hygashi 0200, 0207
Hyper 0200, 0207, 0208.
0214,0215
Hypson 0206, 0207, 0213
0217
ICE 0127,0200,0206
0207,0208,0209
0213,0218
ICeS 0200,0218
IMA 0062
Imperial 0211,0213,0214
0215
Indiana 0213,0217
Infinity 0063
Ingelen 0211
Ingersol 0208
Inno Hit 0201,0204,0207
0208,0209,0213
0217,0218
Innovation 0206, 0208
Interbuy 0208,0214
Interfunk 0205,0211,0213
0214,0216,0217
International 0200
Intervention 0206, 0207, 0218
Irradio 0201, 0208, 0209
0213.0217.0218
Isukai 0209, 0218
ITC 0207,0215
ITS 0200,0209,0213
0218
| ITT 0129, 0208, 0211 | Medion | 0206, 0208 | Panasonic | 0006, 0007, 0063, | RFT | 0203, 0205 | |
| ITV 0208, 0217 | Megatron 0061 | 0073, 0074, 0097, | Rhapsody | 0200 | |||
| JBL 0063 | Melectronic | 0200, 0207, 0208, | 0110, 0114, 0137, | R-Line | 0213, 0217 | ||
| JC Penney 0057, 0060, 0061 | 0211, 0213, 0216, | 0141, 0151, 0162, | Roadstar | 0206, 0208, 0209, | |||
| JCB 0059 | 0217 | 0165, 0186, 0204, | 0218, 0237 | ||||
| Jensen 0060, 0061 | Memorex 0058, 0061, 0064, | 0208 | 0211, 0244, 0245, | Robotron | 0205 | ||
| JVC 0017, 0018, 0019, | Memphis | 0208 | 0246, 0254 | Rowa | 0200 | ||
| 0108, 0136, 0153, | Metz | 0208 | Pathe Cinema | 0200, 0203, 0207, | RTF 0205 | ||
| 0178, 0190, 0213, | Metz | 0205 | 0212, 0215 | Saba | 0204, 0205, 0211, | ||
| 0218 | MGA | 0060, 0061 | Pathe Marconi | 0212, 0216 | 0216 | ||
| Kaisui 0200, 0207, 0208, | Micromaxx | 0206, 0208 | Pausa | 0208 | saccs | 0212 | |
| 0209, 0218 | Microstar 0206, 0208 | Perdio 0200 | Saisho 0204, 0206, 0207, | ||||
| Kamosonic 0207 | Minerva | 0204 | Philco | 0060, 0061, 0063, | 0208 | ||
| Kamp 0200, 0207 | Minoka | 0213 | 0128, 0205, 0214, | Salora | 0201, 0204, 0210, | ||
| Kapsch 0211 | Mitsubishi 0006, 0015, 0016, | 0208 | 0215 | 0211, 0215 | |||
| Karcher 0207, 0208, 0212, | 0048, 0060, 0061, | Philharmonic | 0207 | Sambers 0204 | |||
| 0217 | 0104, 0112, 0113, | Philips | 0040, 0060, 0063, | Sampo | 0060, 0061, 0083, | ||
| Kawasho 0059, 0060, 0061, | 0125, 0205, 0213 | 0072, 0115, 0116, | 0101 | ||||
| 0200 | Mivar | 0200, 0201, 0202, | 0124, 0130, 0150, | Samsung | 0029, 0030, 0031, | ||
| Kendo 0128, 0210 | 0203, 0204, 0207 | 0175, 0184, 0187, | 0032, 0044, 0045, | ||||
| Kennedy 0215 | Montgomery Ward | 0205, 0207, 0213, | 0046, 0047, 0060, | ||||
| Kenwood 0060, 0061 | 0058 | 0215, 0217, 0220, | 0061, 0065, 0068, | ||||
| Kingsley 0200, 0207 | MTC | 0060, 0061, 0128, | 0221, 0232, 0233, | 0069, 0071, 0079, | |||
| Kloss Novabcam | 0200 | 0252, 0253 | 0087, 0127, 0128, | ||||
| 0062 | Multi System | 0217 | Philips Magnavox | 0130, 0144, 0160, | |||
| Kneissel 0203 | Multitech 0062, 0127, 0128, | 0124 | 0161, 0170, 0176, | ||||
| Kolster 0213 | 0200, 0207, 0208, | Phoenix | 0200, 0205, 0213, | 0183, 0185, 0200, | |||
| Konka 0209, 0218 | 0210, 0214, 0215, | 0217 | 0201, 0206, 0207, | ||||
| Korpel 0213, 0217 | Murphy 0200, 0207 | Phonola | 0200, 0205, 0213, | 0208, 0213, 0217, | |||
| Korting 0205 | Nad | 0061 | Pilot | 0060 | 0239, 0241, 0242, | ||
| Koyoda 0208 | NAD | 0061 | Pioneer | 0012, 0013, 0060, | 0243 | ||
| KTV 0062, 0127, 0207 | Naonis | 0210 | Pioneer | 0061, 0098, 0109, | Sansui 0123, 0126, 0213 | ||
| Kyoto 0200, 0212 | NEC | 0026, 0053, 0060, | 0117, 0128, 0181, | Sanyo | 0020, 0021, 0022, | ||
| Lenco 0208 | 0061, 0096, 0127 | ||||||
| Lenoir 0207, 0208 | Neckermann | 0205, 0207, 0210, | 0182, 0194, 0195, | 0049, 0060, 0064, | |||
| Lesa 0214 | Nei 0213, 0217 | 0213, 0217, 0255 | 0211, 0213, 0216, | 0127, 0128, 0200, | |||
| Leyco 0206, 0213, 0217 | NEI 0213, 0217 | 0217, 0250 | 0203, 0207, 0215 | ||||
| LG 0016, 0038, 0039, | Nesco | 0214 | Plantron | 0206, 0213 | SBR | 0217 | |
| 0127, 0128, 0157, | NET-TV | 0082, 0101 | Polaroid | 0075 | SCHAUB LORENTZ | ||
| 0158, 0163, 0164, | New Tech | 0208, 0213 | Poppy | 0208 | 0211 | ||
| 0166, 0188, 0189, | New World | 0209, 0218 | Portland | 0060, 0061 | Schneider | 0207, 0209, 0213, | |
| 0200, 0201, 0207, | Nicamagic | 0200, 0207 | Prandoni-Prince 0204, 0210 | 0215, 0216, 0217, | |||
| 0208, 0210, 0213, | Nikkai | 0200, 0206, 0207, | 0218 | ||||
| 0214, 0215, 0217 | 0209, 0213, 0217, | Prima | 0208, 0211 | Scotch | 0061 | ||
| Liesenk 0217 | 0218 | Profex 0208 | Scott | 0060, 0061, 0062 | |||
| Life 0206, 0208 | Nikko | 0061 | Profi-Tronic | 0213 | Sears | 0057, 0060, 0061, | |
| Lifetec 0206, 0208, 0218 | Nobliko | 0200, 0207 | Proline | 0213 | 0064 | ||
| Loewe 0063, 0128, 0203, | Nogamatic | 0216 | Proscan | 0057 | SEG | 0200, 0206, 0207, | |
| 0204, 0223, 0227 | Nokia 0129, 0211 | Prosonic | 0200, 0207, 0217 | 0214, 0215, 0217 | |||
| Loewe Opta 0205, 0213, 0217 | Nordmende | 0205, 0211, 0213, | Protech | 0206, 0207, 0208, | SEI | ||
| Logik 0058 | 0216 | 0213, 0214, 0215, | 0218 | ||||
| Luma | Orn dialvision | 0217 | 0217 | Seleco 0210, 0211, 0215 | |||
| Lumatron 0210, 0213, 0217 | Oceanic | 0211 | Proton 0060, 0061 | Sencora 0208 | |||
| Lux May 0213 | Olevia 0084 | Provision | 0217 | Sentra | 0218 | ||
| Luxman 0060, 0061 | ONCEAS | 0207 | Pulsar | 0060 | Serino 0200 | ||
| Luxor 0201, 0207, 0210 | Onwa | 0062, 0218 | Pye | 0213, 0217 | Sharp | 0009, 0010, 0011, | |
| LXI 0057, 0061, 0063, | Orbit | 0213 | Pymi | 0208 | 0060, 0061, 0066, | ||
| 0064 | Orion | 0126, 0204, 0208, | Quasar | 0152, 0214 | 0070, 0087, 0111, | ||
| Magnadyne 0204, 0205, 0214, | Nordmende | 0213, 0217, 0235 | Quelle 0201, 0206, 0207, | 0143, 0145, 0167, | |||
| Lumata 0215, 0217 | 0218 | 0213, 0214, 0215, | 0168, 0169, 0198, | ||||
| Magnafon 0200, 0204, 0207 | Orsowe | 0204 | 0217 | 0204, 0224, 0247, | |||
| Magnavox 0060, 0061, 0063, | Osaki | 0127, 0206, 0207, | 0248, 0249 | ||||
| 0102, 0103, 0150 | Pacl 0200, 0207 | Radio Shack | 0218 | Shogun | 0060 | ||
| Magnum 0206, 0208 | Osio | 0201 | Radio Shack/Realistic | Siarem | 0204, 0205, 0215 | ||
| Majestic 0058 | Oso | 0209, 0218 | Sicatel | ||||
| Mandor 0206 | Osume | 0218 | Siemens | ||||
| Manesth 0206, 0207, 0213, | Otto Versand | 0204, 0207, 0213, | Sierra | ||||
| Matsui 0217 | 0215, 0216, 0217, | Signature 0058 | |||||
| Marantz 0060, 0061, 0063, | Pacl 0200, 0207 | Radiotone | 0213 | Silva | 0200 | ||
| Marrelli 0205 | Palladium | RCA | 0057, 0060, 0061, | Singer 0205, 0214, 0215 | |||
| Mark 0200, 0213, 0217 | Panama | 0207 | 0091, 0133, 0135, | Sinudyne | |||
| Matsui 0204, 0207, 0208, | Otto Versand | 0204, 0206, 0207, | Skantic 0211 | ||||
| Meditator 0213, 0217 | 0208 | Revox | 0213, 0217 | ||||
| Rex | 0206, 0210, 0211 |
Sonoko 0206,0207,0208, 0213,0217 Sonolor 0211 Sontec 0213,0217
Sony 0041, 0059, 0067, 0085, 0086, 0174, 0196, 0199, 0208, 0219, 0234
Sound & Vision 0209, 0218
Soundesign 0060, 0061, 0062
Soundwave 0213, 0217
SSS0060,0062
Standard 0207, 0208, 0209, 0213, 0218
Starlight 0217
Starlite 0062
Stenway 0218
Stern 0210, 0211
Sunkai 0208, 0218
Sunwood 0208, 0213
Superla 0200,0204,0207
SuperTech 0200
Supra 0208
Supreme 0059
Susumu 0209
Sutron 0208
Sydney 0200,0207
Sylvania 0060,0061,0063, 0080,0134,0142, 0148
Symphonic 0062,0080
Sysline 0217
Sytong 0200
Tandy 0127,0207,0209, 0211,0218
Tashiko 0200, 0207, 0210
Tatung 0127,0204,0207, 0213,0217,0237
TCM 0206,0208
Teac 0127
Tec 0207,0208,0214 0215
Techwood 0060,0061
Teknika 0058,0060,0061, 0062
Teleavia 0216
Telecor 0218
Telefunken 0065,0213,0216
Telegazi 0218
Teletech 0208,0214,0217
Teleton 0207
Televideon 0200
Tensai 0208,0209.0213 0218
Tesmet 0213
Tevion 0206, 0208
Texet 0200,0207
Thomson 0191, 0192, 0207
0213,0216,0226
Thorn 0212,0217
TMK 0060,0061
Tokai 0213
Tokyo 0200,0207
Toshiba 0027, 0043, 0053
0054,0064,0078
0089,0090,0106
0107.0127.0131.
0140.0146.0159
0197.0225.0231
0237
Towada 0211, 0215
Transtec 0200
Trident 0204
Tristar 0218
Triumph 0204
Uher 0211,0213
Ultravox 0200, 0205, 0207
0214.0215
United 0217
Universum 0127,0128,0129
0201,0206,0213
0214,0215,0217
Univox 0212
Vestel 0210,0211,0213
0214,0215,0217
Vexa 0208,0217
Victor 0213
VIDELOGIC 0200
Videologique 0200,0207,0209
0218
Videosat 0214
VideoSystem 0213
Videotechnic 0200
Vidtech 0060,0061
Viewsonic 0076,0077,0092
0099,0172,0173
Visiola 0200,0207
Vision 0213
Vortec 0213,0217
Voxson 0205,0210,0211, 0213
Waltham 0207, 0212
Wards 0057,0058,0060
0061,0063
Watson 0213,0217,0218
Watt Radio 0200,0207,0212
0215
Wega 0205
Weltblick 0213,0217
Weston 0215
White Westinghouse
0200,0207,0217
Yamaha 0000,0001,0002
0003, 0004, 0005,
0060,0061
Yamishi 0218
Yoko 0200, 0206, 0207,
0208,0209,0213
0217,0218
Yorx 0209,0218
Zanussi 0210
Zenith 0058,0060,0100
0105,0119,0121
0154
TV/DVD
Aiwa 0139,2055
Apex 0132,2049
Broksonic 0138,2060
Bush 0230, 2112
JVC 0136,2053
Panasonic 0137,0254,2054.
2110
RCA 0133,0135,2050
2051
Sylvania 0134,2052
Thomson 0226, 2109
Toshiba 0131, 0231, 2048
2111
TV/DVD/VCR
Panasonic 0141,1040,2057
Samsung 0241,1070,2113
Sharp 0143, 1028, 2059
Sylvania 0142, 1041, 2058
Toshiba 0140, 1029, 2056
TV/VCR
Aiwa 0237,1066
Bush 0237,1066
Daewoo 0155,0238,1038.
1067
GE 0147,1030
Goodmans 0240,1069
Grundig 0236,
Hitachi 0156, 1039
JVC 0153,1036
Magnavox 0150, 1033
Orion 0235, 1065
Panasonic 0151,1034
Philips 0150, 0232, 0233
1033, 1062, 1063
Quasar 0152, 1035
RCA 0149, 1032
Roadstar 0237,1066
Samsung 0144,0239,1027
1068
Sharp 0145, 1028
Sony 0234,1064
Sylvania 0148, 1031
Tatung 0237,1066
Toshiba 0146, 0237, 1029
1066
Zenith 0154,1037
VCR
Admiral 1008, 1013
Adventura 1005
Aiwa 1005, 1042, 1043.
- 1066
Akai 1007,1043
Akiba 1050
Akura 1043,1050
1044, 1050
American High 1004
Amstrad 1042
Anitech 1050
ASA 1045, 1046
Asha 1002, 1014
Asuka 1042, 1045, 1046
1050
Audio Dynamics1000
Audiovox 1003
Baird 1042, 1043, 1047
Basic Line 1044, 1050
Baur 1046
Beaumark 1002, 1014
Bell & Howell 1001
Hanseatic 1045, 1046
Harley Davidson1005
Harman/Kardon 1000
Harwood 1006
HCM 1050
Headquarter 1001
Hinari 1044, 1050
Hisawa 1044
Hitachi 1007, 1010, 1039
1042, 1043, 1046.
1049
Hughes Network Systems
1010
Hypson 1044, 1050
Imperial 1042
Inno Hit 1046, 1050
Innovation 1044, 1048
Instant Replay 1004
Interbuy 1045
Interfunk 1046, 1047
Intervention 1042
Irradio 1045, 1050
ITT 1043,1047
ITV 1045
JC Penney 1000, 1001, 1002
1003, 1004, 1006
JCL 1004
Jensen 1007
JVC 1000,1001,1007
1011, 1017, 1036
1043
Kaisui 1050
Karcher 1046
Kendo 1044
Kenwood 1000, 1001, 1007, 1011, 1043
KLH 1006
Kodak 1003, 1004
Korpel 1050
Leyco 1050
LG 1003, 1042, 1045
1071
Lifetec 1044, 1048
Lloyd's 1005
Loewe 1048
Loewe Opta 1045, 1046
Logik 1006, 1050
Luxor 1047
LXI 1003
M Electronic 1042
Magnasonic 1047
Magnavox 1004, 1018, 1033
Magnin 1003, 1014
Manesth 1050
Marantz 1000, 1001, 1004,
1046, 1051
Marta
Matsui 1044, 1045
Matsushita 1004
Mediator 1046
Medion 1044, 1048
MEI 1004
Memorex 1001, 1002, 1003,
1004, 1005, 1008.
1013, 1014, 1042.
1045.1047
Memphis 1050
Metz 1048
MGA 1014
MGN Technology
1002, 1014
Micromaxx 1044, 1048
Microstar 1044, 1048
Migros 1042
Minolta 1010
Mitsubishi 1011, 1042, 1046
Montgomery Ward
1008
Motorola 1004, 1008
MTC 1002, 1014
Multitech 1002, 1005, 1006
1042, 1046, 1050
Murphy 1042
National 1048
NEC 1000, 1001, 1007
1011, 1043, 1051
Neckermann 1043, 1046
NEI 1046
Nesco 1050
Nikko 1003
Noblex 1002, 1014
Nokia 1043, 1047
Nordmende 1043
Oceanic 1042, 1043
Okano 1044
Olympus 1004
Optimus 1003, 1008
Orion 1012, 1013, 1044
1065
Orson 1042
Osaki 1042,1045,1050
Otto Versand 1046
Palladium 1043, 1045, 1050
Panasonic 1004, 1020, 1034
1040, 1048, 1054.
1072
Pathe Marconi 1043
Penney 1010, 1014
Pentax 1010, 1049
Perdio 1042
Philco 1004, 1051
Philips 1004, 1025, 1033
1046, 1056, 1057
1059, 1062, 1063
Philips Magnavox
1018
Phonola 1046
Pilot 1003
Pioneer 1011, 1046
Prinz 1042
Prefex 1050
Profitronic 1014
Proline 1042
Proscan 1009
Prosonic 1044
Protec 1006
Pye 1046, 1056
Quarter 1001
Quartz 1001, 1047
Quasar 1004, 1035
Quelle 1042, 1046, 1047
Radio Shack 1003
Radio Shack/Realistic
1001, 1002, 1003,
1004, 1005, 1008
Radiola 1046
Radix 1003
Randex 1003
RCA 1002, 1004, 1009
1010, 1014, 1015.
1022, 1032
Realistic
1001, 1002, 1003
1004, 1005, 1008
Rex
1043
RFT
1046
Roa
1045, 1050, 1066
Saba
1043
Saisho 1044, 1050
Salora
1047
Samsung
1002, 1014, 1021
1027, 1052, 1068
1070
Sanky 1008
Sansui 1007, 1011, 1013
11, 1013.
1043
Sanyo 1001, 1002, 1014
2, 1014,
1047
SBR
1046
Schaub Lorenz
1042, 1043, 1047
Schneider
1042, 1044, 1045
1046, 1050
Scott 1012
1001, 1003, 1004.
1010
SEG
1050
SEI-Sinudyne
1046
Seleco 1043
Sent
1050
Sharp
1008, 1023, 1028
1053, 1073
Shinton
1006, 1047, 1050
Shivaki
1045
Shogun
1002, 1014
Siemens
1045, 1047
Signature 2000 1008
Silva 1045
Singer
1004, 1006
Sinudyne
1046
Sontec 1045
Sony 1016, 1019, 1055
1060, 1064, 1074
STS
1004, 1010
Sunkai 1044
Sunstar 1042
Suntronic 1042
Sunwood 1050
Sylvania 1004, 1005, 1031
1041
Symphonic 1005
Taisho 1044
Tandy 1001
Tashiko 1003, 1042
Tatung 1007, 1042, 1043
1046, 1066
TCM 1044,1048
Teac 1005, 1007
Technics 1004, 1048
© 2008 YAMAHA CORPORATION All rights reserved.
The circled numbers and alphabets correspond to those in the Owner's Manual.


