MBG 2788 - Oven CLATRONIC - Free user manual and instructions
Find the device manual for free MBG 2788 CLATRONIC in PDF.

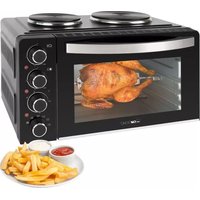
| Product Type | Oven |
| Brand | Clatronic |
| Model | MBG 2788 |
| Power Supply | 230 V / 50 Hz |
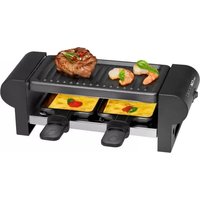
| Functions | Top heat/Grill, Duo (top+bottom), Rotisserie, Bottom heat |
| Timer | With automatic shut-off and audible signal, adjustable up to 120 minutes |
| Thermostat | Adjustable, maximum temperature not specified |
| Capacity | Not specified |
| Included Accessories | Grid, drip tray/metal plate, spit with holders, lever handles |
| Cleaning | Self-cleaning interior, accessories washable in soapy water, do not use abrasive cleaners |
| Safety | Hot surface, use oven mitt, do not leave unattended, do not place near hot objects |
| Warranty | 24 months |
| Repairability | Do not repair yourself, contact a qualified technician or after-sales service |
Frequently Asked Questions - MBG 2788 CLATRONIC
User questions about MBG 2788 CLATRONIC
0 question about this device. Answer the ones you know or ask your own.
Ask a new question about this device
Download the instructions for your Oven in PDF format for free! Find your manual MBG 2788 - CLATRONIC and take your electronic device back in hand. On this page are published all the documents necessary for the use of your device. MBG 2788 by CLATRONIC.
USER MANUAL MBG 2788 CLATRONIC
natural_image
White CM IRONC microwave oven with a cut of bread being placed on its tray (no visible text or symbols)MBG 2788
Inhalt
Inhoud • Sommaire • Indice • Índice • Indice
Contents • Spis treści • Obsah • Tartalom • Continut • Содержание
text_image
Exploded view diagram of a microwave oven with labeled parts from inner to outer casingD
natural_image
Diagram of a mechanical or electrical device with two identical arms connected to a central body, no text or symbols present.text_image
Diagram showing a device with labeled components and directional arrows, likely illustrating a process or system.natural_image
Diagram of a mechanical or electrical setup with two identical components connected to a central body, no text or symbols present.text_image
Diagram showing a device with labeled parts and directional arrows, likely illustrating a process or system in a container.natural_image
Diagram of a mechanical or electrical setup with two identical components connected by a central rod, no visible text or symbols.text_image
Diagram showing a device with labeled parts and directional arrows, likely illustrating a process or system.natural_image
Diagram of a mechanical or electrical setup with two identical components connected by a rod, forming a cross-section (no text or symbols visible)text_image
Diagram showing a device with labeled components and directional arrows, likely illustrating a process or system.E
natural_image
Diagram of a mechanical setup with two identical arms connected to a central block, no text or symbols present.text_image
Diagram showing two labeled components (① and ②) inside a container with arrows indicating movement or flow.Acessórios
natural_image
Diagram of a mechanical or electrical device with two connected components and a shaded area (no text or symbols)text_image
Diagram showing two labeled components (① and ②) with arrows indicating movement or flow, inside a rectangular frame.General Safety Instructions
- Read the operating instructions carefully before putting the appliance into operation and keep the instructions including the warranty, the receipt and, if possible, the box with the internal packing.
- The appliance is designed exclusively for private use and for the envisaged purpose. This appliance is not fit for commercial use. Do not use it outdoors (except if it is designed to be used outdoors). Keep it away from sources of heat, direct sunlight, humidity (never dip it into any liquid) and sharp edges. Do not use the appliance with wet hands. If the appliance is humid or wet, unplug it immediately. Do not put it in water.
- When cleaning or putting it away, switch off the appliance and always pull out the plug from the socket (pull on the plug, not the cable) if the appliance is not being used and remove the attached accessories.
- Do not operate the machine without supervision. If you should leave the workplace, always switch the machine off or remove the plug from the socket (pull the plug itself, not the lead).
- To protect children from the dangers posed by electrical appliances, make sure that the cable is hanging low and that children do not have access to the appliance.
- Check the appliance and the cable for damage on a regular basis. Do not use the appliance if it is damaged.
- Do not try to repair the appliance on your own. Always contact an authorized technician. To avoid the exposure to danger, always have a faulty cable be replaced only by the manufacturer, by our customer service or by a qualified person and with a cable of the same type.
- Use only original spare parts.
• Pay careful attention to the following "Special Safety Instructions".
Special safety information for this unit
- The unit gets hot in operation. Please use oven gloves or oven cloths.
- Do not put the unit down near to hot objects or sources of heat.
- Put the unit down onto a heat-resistant mat.
- In order to avoid a build-up of heat, do not put the oven directly under a cupboard. Ensure that there is plenty of space all around.
- Ensure that the timer is in the "0" position when you are not using the unit.
Overview of the Controls
A Housing H Handle
B Temperature regulator I Handle for the rotating spit
C Function switch J Rotating spit with fixing clips
D Timer K Grill grid
E Temperature control lamp L Baking tin/grease pan
F Glass door M Crumb tray
G Handle for baking tin/grease pan
Preliminary Operations
GB
- Remove any packaging materials that may be present in the oven.
- Before initial use please operate the oven for 15 minutes to remove the protective coating on the heating element. Please select dual operation.
- The presence of smoke is normal. Make sure that a sufficient level of ventilation is available.
Operation
- The timer must be set to the "0" position.
- Only connect the unit to a properly installed and earthed power socket (230 volts, 50 Hz). You can find the details on the type plate.
- Put the items to be cooked into the oven.
- Set the desired temperature.
- Select the area you wish to use.
Top heat/grill (Top heat + Bottom heat)
Dual
Grilling with revolving spit Bottom heat

Some examples of how you can use the individual functions:
Dual: signifies the combined use of top and bottom heat, e.g.
for pizza, cake etc.
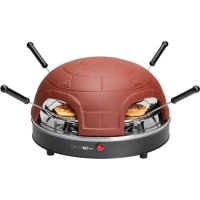
Grilling with
revolving spit: ideal for preparing poultry, large roasts etc.
Bottom heat: ideal for baking cakes and pastries.
- Set the timer by turning it clockwise to set the cooking time. Once the time set has come to an end, the unit switches off automatically and a ringing sound is heard.
- For cooking times of less than 5 minutes, first turn the timer to approx. 15 minutes and then back to 3 minutes, for example. This will make the timer more precise. In this case it is recommended that the oven should be preheated (for approx. 3 minutes).
- Once the oven has switched off, you can open the door again and remove the food with oven gloves or oven cloths (Take care! Hot!).
GB
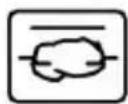
Grilling, including Grilling with the Revolving Spit
Note: Always grill only with top heat and with the grease pan inserted. Do not select a roast which is too large. The food being grilled must be far enough away from the internal walls and the heating elements and must not touch them.
- Insert the baking tray/grease pan into the bottom guide ridge of the oven.
- Rub edible oil on to the revolving spit and fixing clips.
- Poultry is dressed before grilling. To do so, tie the wings and the legs closely to the body using kitchen yarn.
natural_image
Diagram of a mechanical or electrical setup with two identical components connected by a central rod, no visible text or symbols.-
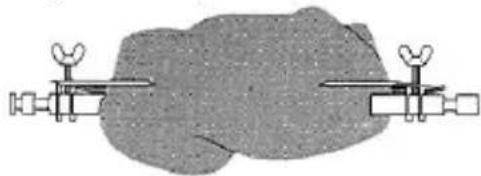
Place the dressed poultry or the piece of roast meat carefully on to the revolving spit. Push the fixing clips on to the revolving spit and use them to fix the roast meat in place. Tighten the fixing clips by means of the screws.
-
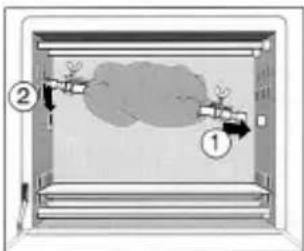
Lift the spit by the handle and place it in the oven. First insert the open end on the drive mechanism on the right-hand side of the oven. Then suspend the other end into the corresponding device on the left.
-
Turn the function switch to grilling with revolving spit. Select a temperature and cooking time. The revolving spit begins to turn. Please ensure that the piece of roast meat can turn freely.
-
After the set time has expired a sound is heard and the device switches off automatically. When the meat is completely cooked, remove the spit by the handle. Caution, this is very hot!
-
Turn off the oven: turn down the timer and temperature and turn the function switch to "O". Do not carry out any cleaning until the device has cooled down completely.
text_image
Diagram showing two labeled components (① and ②) inside a container with internal airflow or dust flow, likely illustrating a physics or fluid dynamics concept.Accessories
Grid: for toasting; to be placed underneath baking pans an moulds
Baking sheet: for pizza, to be placed underneath items to be finished in the oven, to be used as a drip-tray for fat.
Lifting handles: for removing the hot baking tin and inserting and removing the grill spit.
Summary of cooking times
| ITEM TO BE COOKED TEMPERATURE/°C TIME/min. FUNCTION | |||
| Pizza | 150-180 | 10-20 | Bottom |
| Meat 200-240 12-18 Dual | |||
| Toast | 120-160 | 3-5 | Dual |
| Baked goods 120-180 10-15 Bottom heat | |||
| Kebabs 200-240 40-60 Top heat/grill | |||
| Joints of meat 210-230 60-80 | Grilling with revolving spit | ||
| Poultry | 200-230 | 70-120 | Grilling with revolving spit |
These times are only approximations and may vary depending on circumstances.
Cleaning and storage
• Pull the plug out of the socket.
- ONLY clean or put away the unit when it has cooled down. DANGER OF BURNS!
- All the accessory parts can be cleaned in a bowl of water. The inside of the unit is self-cleaning and does not need to be looked after. Do not use abrasive or aggressive cleaners. Do not wipe the heating element. Do not scratch the protective layer of the baking sheet.
- Crumbs or other remnants on the base of the unit can be removed by taking out the base sheet.
This device has been tested according to all relevant current CE guidelines, such as electromagnetic compatibility and low voltage directives, and has been constructed in accordance with the latest safety regulations.
Subject to technical changes without prior notice!
Guarantee
The device supplied by our Company is covered by a 24 month guarantee starting on the date of purchase (receipt).
During the life of the guarantee any fault of the device or its accessories *) ascribable to material or manufacturing defects will be eliminated free of charge by repairing or, at our discretion, by replacing it. The guarantee services do not entail an extension of the life of the guarantee nor do they give rise to any right to a new guarantee!
Proof of the guarantee is provided by the proof of purchase. Without proof of purchase no free replacement or repair will be carried out.
If you wish to make a claim under the guarantee please return the entire machine in the original packaging to your dealer together with the receipt.
GB
heat
GB
*) Damage to accessories does not mean automatic free replacement of the whole machine. In such cases please contact our hotline. Broken glass or breakage of plastic parts are always subject to a charge.
Defects to consumables or parts subject to wearing (e.g. motor pistons, kneading blades, drive shafts, spare remote control, spare toothbrushes, saw blades, etc.) as well as cleaning, maintenance or the replacement of said parts are not covered by the guarantee and hence are to be paid!
The guarantee lapses in case of unauthorized tampering.
After the expiry of the guarantee
After the expiry of the guarantee repairs can be carried by the competent dealer or repair service against the payment of the ensuing costs.