Maxichef A CH3 - Convection Oven MOULINEX - Free user manual and instructions
Find the device manual for free Maxichef A CH3 MOULINEX in PDF.
| Brand | Moulinex |
| Model | Maxichef A CH3 |
| Product type | Convection oven |
| Capacity | 10 L |
| Total power | 1500 W |
| Oven cooking power | 1500 W |
| Grill cooking power | 750 W |
| Maximum temperature | 260 °C |
| Energy consumption (rise to 200°C) | 0.06 kWh |
| Energy consumption (maintain 1h at 200°C) | 0.37 kWh |
| Total energy consumption | 0.43 kWh |
| Inner walls | Aluminum |
| Cooking types | Traditional oven, Grill (model CH3) |
| Timer | Yes, with end-of-cooking audible signal |
| Included accessories | Reversible rack (2 positions), Baking tray (depending on model) |
| Optional accessories | Crumb tray, Grill pan |
| Maintenance and cleaning | Unplug and let cool; clean with a damp soapy sponge; do not use metal pads or abrasive products |
| Safety | Do not touch hot surfaces; keep children away; do not line the interior with aluminum; unplug after use |
| Installation | On a worktop that withstands ≥90°C; do not recess; clear the ventilation openings |
| Repairability | Spare parts available: baking tray (ref. 5843858), grill pan (ref. 5933218), rack (ref. 5933216), crumb tray (ref. 5933219) |
| Country of origin | France (Moulinex brand) |
Frequently Asked Questions - Maxichef A CH3 MOULINEX
User questions about Maxichef A CH3 MOULINEX
0 question about this device. Answer the ones you know or ask your own.
Ask a new question about this device
Download the instructions for your Convection Oven in PDF format for free! Find your manual Maxichef A CH3 - MOULINEX and take your electronic device back in hand. On this page are published all the documents necessary for the use of your device. Maxichef A CH3 by MOULINEX.
USER MANUAL Maxichef A CH3 MOULINEX
natural_image
Line drawing of a toaster oven with visible internal shelves and lid (no text or symbols)①
text_image
A A1 C D E B F②
text_image
MaxiChef I H K G J 35 220 45 240 15 260 30 260 Moulinex
text_image
MaxiChef Moulinex I H K G J 35 220 45 240 15 260 15 260 260 240 GRILL GRILL 120 150 90 180 210 150 35 45 15 15 GRILL
text_image
MaxiChef TAMCO I H 90 120 150 180 210 240 260 30 45 60 75 90 120 105 L Moulinex
text_image
Diagram showing a microwave oven with a crossed-out baking pan and a labeled box, marked with number 4.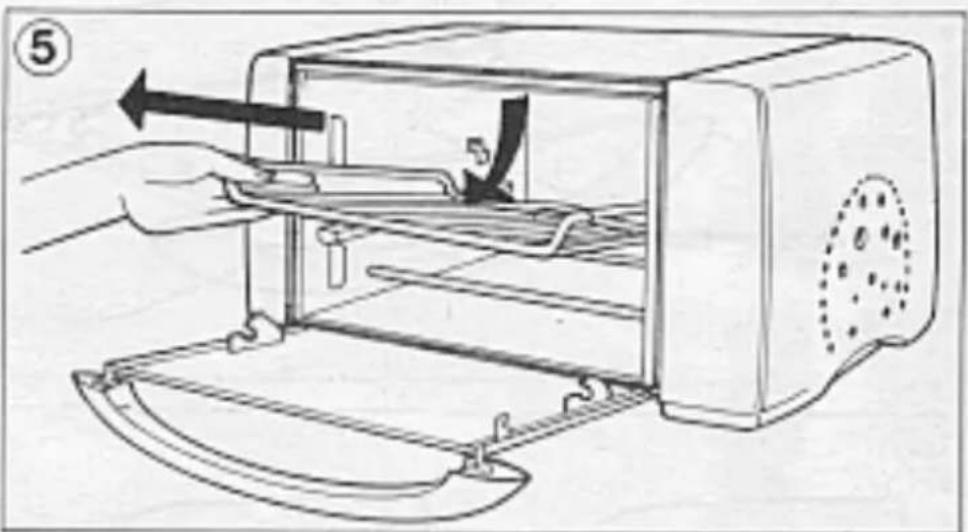
natural_image
Illustration of a hand operating a toaster oven with a handle, showing internal components and a tool (no text or symbols)
natural_image
Line drawing of a toaster oven with egg inside and open lid (no text or symbols)
natural_image
Line drawing of a portable oven with lid and tray, no text or symbols presentThank you for choosing an appliance from the Moulinex range.
The oven you have chosen boasts an ultra rapid preheating system, a conventional oven and a grill (models CH2 and CH3 only)
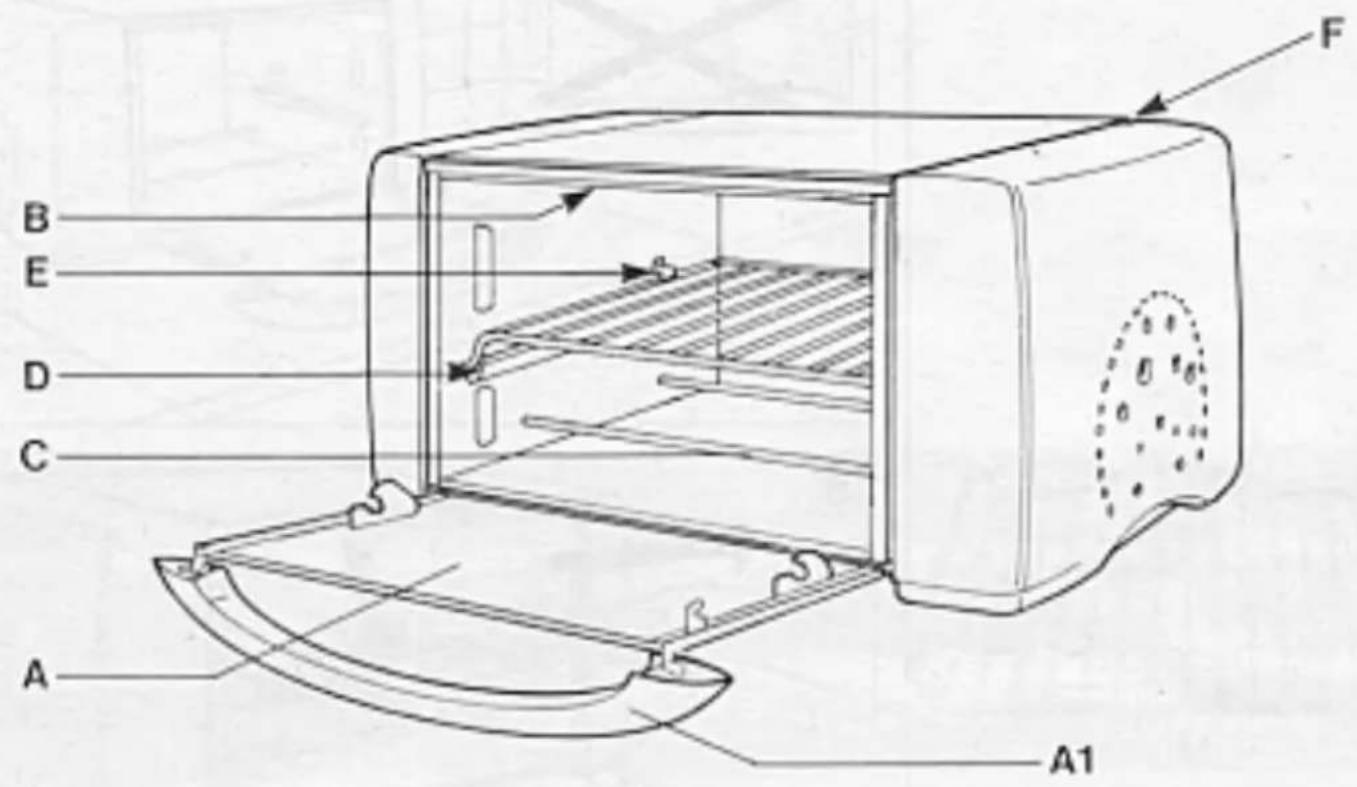
Description
Familiarise yourself with the different parts and accessories of you MaxiChef oven. Please refer to the numbers in the margin below and the figures on the inside cover.
① 1) The appliance
A Door
A1 Door handle
B Upper heating elements
C Lower heating elements
D Grill runners
E Safety hook
F Air vents
②2) Control panel
G On/off button (CH1 and CH2 models)
H Thermostat control
I On/off indicator light
J Cooking guide (models CH1 and CH2)
K Grill position (models CH2 and CH3)
L Timer button (model CH3)
③3) Accessories
M Reversible grill
M1 High position
M2 Low position
Grill Tray (according to model)
Crumb tray (optional)
Technical Data
- Aluminized interior walls
- Capacity: 10L
- Total power: 1500W
- Power: oven: 1500W grill: 750W
- Energy consumption:
. Preheating at 200°C 0,06 kWh
. For 1 hour at 200°C 0,37 kWh
. TOTAL: 0,43 kWh
Safety Advice
1) Recommendations
- Your appliance is for domestic use only, and should only be used for the cooking of food
- Do not touch the hot surfaces, particularly the window of the door, when the oven is in use
- For safety reasons, keep children at a safe distance from the oven
- Children should only use the oven under parents' supervision and responsibility
- Stay near the oven when in use
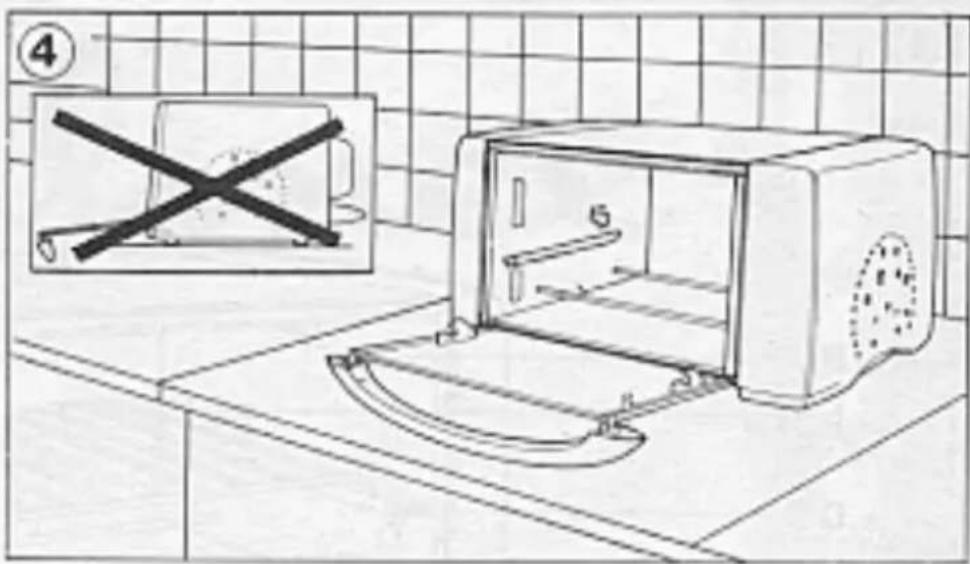
④- Do not place anything on the door when open
- Do not cover the inside of the oven with aluminium foil, this will prevent the thermostat working properly and you will thus risk damaging the appliance
- If the appliance does not function properly during use, disconnect it immediately and enquire at a Moulinex approved service centre
- Disconnect the appliance as soon as you finished using it
2) Connection
- Always check that the voltage of your appliance matches that of your electrical installation
- It is essential that your appliance is connected using an earthed plug complying with required electric standards.
Any error in connection will invalidate the guarantee
- It is essential that your meter and fuse box can withstand a minimum of 10 amps
Wiring instructions for U.K and Ireland only :
APPLIANCES WITH FITTED PLUG
Important: For your convenience this appliance is supplied complete with a plug incorporating a 13 amp fuse.
In the event of replacing a fuse in the plug supplied, a 13 amp fuse approved by ASTA to BS1362 must be used.
If the socket outlets are not of the 13A BS 1363 type, and therefore do not accept the plug connected to this appliance, cut off the plug.
When cut off, this plug is a shock hazard if inserted into a socket outlet and must therefore be disposed of safely.
If the fuse cover is detachable, never use the plug with the cover omitted. Replacement covers can be obtained from your service agent.
Fit the appropriate plug according to the instructions in paragraph "Fitting a plug". With alternative plugs a 15 amp fuse must be fitted either in the plug or adaptor or at the main fuse box.
APPLIANCES WITHOUT FITTED PLUG FITTING A PLUG - IMPORTANT
The wires in the mains lead are coloured in accordance with the following code:
GREEN & YELLOW : EARTH
BLUE : NEUTRAL
BROWN : LIVE
As the colours in the mains lead of this appliance may not correspond with the coloured markings identifying the terminals in your plug, proceed as follows:
The wire which is coloured GREEN & YELLOW must be connected to the terminal in the plug which is marked with the letter 'E' or by the earth symbol ⊥ or coloured green or green and yellow. The wire which is coloured BLUE must be connected to the terminal which is marked with the letter 'N' or coloured black. The wire which is coloured BROWN must be connected to the terminal which is marked with the letter 'L' or coloured red.
This appliance is manufactured to conform to the Low Voltage Electrical Equipment (Safety) Regulations 1989 and is designed to comply with BS 3456. It complies with the requirements of the EEC Directive (89/336/EEC).
3) Installation
- Place the oven on a work surface or piece of furniture able to withstand a temperature of at least 90°C. On no account should the oven be placed in a recess or cupboard.
- See that nothing blocks the air vents (F) of your appliance; do not place a towel or cloth or tray (etc.) on top of the oven
Before using your appliance for the first time
- Remove accessories from the packaging; wash and dry them carefully
⑤- To remove the grill shelf, lift slightly and pull towards you.
- To remove the "new" smell, use the appliance empty and with the door open:
. For models CH1 and CH2: set on/off button (G) to «I» position and put the thermostat control (H) on setting 260°C for 15 minutes
. For model CH3: set the thermostat control (H) to 260°C and the timer button (L) to 15 minutes
Using the appliance
1) Oven cooking
- select the cooking temperature using the thermostat control (H) (do not exceed 260°C on models CH2 and CH3 as this will then be in grill mode)
- For models CH1 and CH2, set the on/off button (G) to «|»
- For model CH3, set the timer to the required cooking time (L), if necessary increase by preheat time (2 to 5 minutes)
Note: For times less than 25 minutes, turn the button (L) to 30 minutes and turn back to the required time.
- The indicator light (I) will come on
- Place the food in the oven on the grill shelf (M) in the higher or lower position according to the required cooking (see cooking table at the end of the instruction)
- Close the door
- With models CH1 and CH2, you can switch the oven off by setting the on/off button to «0» position when you are sure cooking is complete.
- With model CH3, cooking stops when the cooking time elapses (the timer will beep when cooking is complete)
- Open the door and remove your food.
To choose a cooking time, refer to the cooking tables at the end of the instructions
2) Grill cooking (Models CH2 and CH3 only)
The grill enables you to seal food, to cook meat and prepare golden gratin dishes
- Place a dish with a little water on the lower elements (C)(not in use when in Grill mode) to catch any grease during cooking.
- Place food on the grill shelf in higher position (M1) at a minimum of 2cm from upper heating elements.
- Close the door
- Put the thermostat control (H) in Grill position
- With model CH2 switch on/off button (G) to «|» position
- With model CH3 set the timer (L) to required cooking time
Note: With times of less than 25 minutes turn the button (L) to 30 minutes and turn back to required cooking time.
- The indicator light (I) will come on
-
Keep an eye on the food, and turn halfway through cooking time
-
With model CH2 you can switch the oven off by switching the on/off switch to «0» when you are sure cooking is complete.
- With model CH3, cooking will stop automatically when the cooking time has elapsed (timer will beep)
- Open the door and remove food During cooking, any grease which has splashed on to the upper heating elements (B) will ignite. They will burn out by themselves and will cause no damage to the oven.
Practical Hints
Cooking food will always result in steam or smoke escaping. This can kept to minimum by regularly cleaning the inside walls of the oven.
- This can also be reduced by :
. adding a little water in the bottom of the dish or plate being used.
. keeping to or reducing cooking temperature
. using earthenware oven dishes
Cleaning
- Disconnect you oven and leave to cool before cleaning
- Wipe the body of the appliance (still warm) with a damp, soapy sponge to clean more effectively. Rinse and wipe carefully
- With the interior aluminised walls, remove greasy splashes with a sponge soaked in warm soapy water. Rinse and wipe carefully
- Do not immerse your appliance in water or place under running water
- The grill shelf can be cleaned using a sponge soaked in warm water and washing up liquid.
- Do not use soap-pads, metal sponges, scouring powders or oven cleaners.
Maintenance
If your appliance does not work, consult your usual retailer or a Moulinex approved service centre(see list in Moulinex Service booklet)
Changing the Mains Lead
If the mains lead or the plug are damaged, do not use your appliance. In order to avoid any accident, they must be replaced by an approved Moulinex Centre (see list in the leaflet "Moulinex Service").
Recipe Tables
Table showing cooking temperatures of some cookery books and the thermostat settings of your oven
$$ \begin{array}{l} 9 0 ^ {\circ} \mathrm{C}: 1 - 2 2 1 0 ^ {\circ} \mathrm{C}: 7 - 8 \ 1 2 0 ^ {\circ} \mathrm{C}: 2 - 3 \quad 2 4 0 ^ {\circ} \mathrm{C}: 8 - 9 \ 1 5 0 ^ {\circ} \mathrm{C}: 3 - 4 \quad 2 6 0 ^ {\circ} \mathrm{C}: 9 - 1 0 \ 1 8 0 ^ {\circ} \mathrm{C}: 5 - 6 \ \end{array} $$
The times and temperatures given are just an indication - they may vary according to the recipe and oven dish used.
Conventional oven cooking
| Food Thermos- | Cooking Grilltat °C time Position(min) | ||
| Starters | |||
| Cheese soufflé 240 35 1 low | |||
| Quiche Lorraine 240 30 1 high | |||
| Stuffed tomatoes 240 | 35 to 45 1 low | ||
| Dauphinois potatoes | 240 | 35 to 45 1 low | |
| Pizza | 260 15 | 1 high | |
| Cheese sticks | 240 | 10 to 15 | 1 high |
| Toasted sandwiches 240 | 10 to 15 | 1 high | |
| Meat (500g) | |||
| Beef | 260 18 | 1 low | |
| Mutton | |||
| . shoulder | 260 20 | 1 low | |
| . leg | 260 15 | 1 low | |
| Pork | 240 35 | 1 low | |
| Veal | 240 35 | 1 low | |
| Chicken | 240 30 | 1 low | |
| Fish (500g) | |||
| Gilt-head | 260 30 | 1 low | |
| Pastries | |||
| Sponge | 180 30 | 1 low | |
| Cake | 210 15 | 1 low | |
| then | 180 55 | 1 low | |
| Flan | 220 45 | 1 low | |
| Pound cake | 180 45 | 1 low | |
| Crumble | 180 20 | 1 low | |
| Shortcrust pastry,topping | 220 | 30 to 35 1 low | |
Grill Cooking (Grill shelf in high position)
| Food | Cooking Time | |
| 1st side | 2nd side | |
| Lamb chops | 10 to 12 min | 9 to 10 min |
| Sausages | 18 to 20 min | 12 to 15 min |
| Kebabs | 15 to 20 min | 12 to 15 min |
| Salmons steaks | 12 to 15 min | 10 to 12 min |
Accessories
It is possible to acquire the following accessories from your usual retailer or from a Moulinex approved centre
. grill plate : ref. 5843858
. grill shelf : ref. 5933516
. crumb tray : ref. 5933219
| Bereiding Thermos- | Bereiding-Standtaatstand stijd rooster°C in min. | ||
| VoorgerechtenKaassoufflé 240 35 laagQuiche lorraine 240 30 hoogGevulde tomatenAardappelgratinPizzaKasstengelsTostiVleesRundvleesSchapenvlees-schouder-boutVarkensvleesKipVis (500 gr.)BrasemGebakBiscuitgebakCakevervolgensClafoutisZandgebakKruimeldeeg(met garnituur) | 240240260 15240260 15260 20260 15240 35240 30260 30180 30210 15180 55220 45180 20220 | 35 à 4535 à 45per 500 gr.hoog10 à 15laaglaaglaaglaaglaaglaaglaaglaaglaaglaaglaaglaaglaaglaaglaaglaaglaaglaaglaaglaaglaaglaaglaaglaaglaaglaaglaaglaaglaaglaaglaaglaaglaaglaaglaaglaaglaaglaaglaaglaaglaaglaaglaaglaaglaaglaaglaaglaaglaaglaaglauglaaglaaglaaglaaglaaglaaglaaglaaglaaglaaglaaglaaglaaglaaglaaglaaglaaglaaglaaglaaglaaglaaglaaglaaglaaglaaglaaglaaglaaglaaglaaglaaglaaglaaglaaglaaglaaglaaglaaglaaglaaglaaglaaglaaglaaglaaglaaglaaglaaglaagglaaglaaglaaglaaglaaglaaglaaglaaglaaglaaglaaglaaglaaglaaglaaglaaglaaglaaglaaglaaglaaglaaglaaglaaglaaglaaglaaglaaglaaglaaglaaglaaglaaglaaglaaglaaglaaglaaglaaglaaglaaglaaglaaglaaglaaglaaglaaglaaglaaglaagtgaaglaaglaaglaaglaaglaaglaaglaaglaaglaaglaaglaaglaaglaaglaaglaaglaaglaaglaaglaaglaaglaaglaaglaaglaaglaaglaaglaaglaaglaaglaaglaaglaaglaaglaaglaaglaaglaaglaaglaaglaaglaaglaaglaaglaaglaaglaaglaaglaaglaaglgaaglaaglaaglaaglaaglaaglaaglaaglaaglaaglaaglaaglaaglaaglaaglaaglaaglaaglaaglaaglaaglaaglaaglaaglaaglaaglaaglaaglaaglaaglaaglaaglaaglaaglaaglaaglaaglaaglaaglaaglaaglaaglaaglaaglaaglaaglaaglaaglaaglaaggaaagaaagaaagaaagaaagaaagaaagaaagaaagaaagaaagaaagaaagaaagaaagaaagaaagaaagaaagaaagaaagaaagaaagaaagaaagaaagaaagaaagaaagaaagaaagaaagaaagaaagaaagaaagaaagaaagaaagaaagaaagaaagaaagaaagaaagaaagaaagaaagaaagaaagaaaggaaagaaagaaagaaagaaagaaagaaagaaagaaagaaagaaagaaagaaagaaagaaagaaagaaagaaagaaagaaagaaagaaagaaagaaagaaagaaagaaagaaagaaagaaagaaagaaagaaagaaagaaagaaagaaagaaagaaagaaagaaagaaagaaagaaagaaagaaagaaagaaagaaagcaagaaagaaagaaagaaagaaagaaagaaagaaagaaagaaagaaagaaagaaagaaagaaagaaagaaagaaagaaagaaagaaagaaagaaagaaagaaagaaagaaagaaagaaagaaagaaagaaagaaagaaagaaagaaagaaagaaagaaagaaagaaagaaagaaagaaagaaagaaagaaagaaagaaagaaaagaaagaaagaaagaaagaaagaaagaaagaaagaaagaaagaaagaaagaaagaaagaaagaaagaaagaaagaaagaaagaaagaaagaaagaaagaaagaaagaaagaaagaaagaaagaaagaaagaaagaaagaaagaaagaaagaaagaaagaaagaaagaaagaaagaaagaaagaaagaaagaaagaaagcaaggaaagaaagaaagaaagaaagaaagaaagaaagaaagaaagaaagaaagaaagaaagaaagaaagaaagaaagaaagaaagaaagaaagaaagaaagaaagaaagaaagaaagaaagaaagaaagaaagaaagaaagaaagaaagaaagaaagaaagaaagaaagaaagaaagaaagaaagaaagaaagaaagaaagaaaaggaaaggaaaggaaaggaaaggaaaggaaaggaaaggaaaggaaaggaaaggaaaggaaaggaaaggaaaggaaaggaaaggaaaggaaaggaaaggaaaggaaaggaaaggaaaggaaaggaaaggaaaggaaaggaaaggaaaggaaaggaaaggaaaggaaaggaaaggaaaggaaaggaaaggaaaggaaaggaaaggaaaggaaaggaaaggaaaggaaaggaaaggaaaggaaaggaaaggaaaggcaaggaaaggaaaggaaaggaaaggaaaggaaaggaaaggaaaggaaaggaaaggaaaggaaaggaaaggaaaggaaaggaaaggaaaggaaaggaaaggaaaggaaaggaaaggaaaggaaaggaaaggaaaggaaaggaaaggaaaggaaaggaaaggaaaggaaaggaaaggaaaggaaaggaaaggaaaggaaaggaaaggaaaggaaaggaaaggaaaggaaaggaaaggaaaggaaaggaaaggaaaaggaaaggaaaggaaaggaaaggaaaggaaaggaaaggaaaggaaaggaaaggaaaggaaaggaaaggaaaggaaaggaaaggaaaggaaaggaaaggaaaggaaaggaaaggaaaggaaaggaaaggaaaggaaaggaaaggaaaggaaaggaaaggaaaggaaaggaaaggaaaggaaaggaaaggaaaggaaaggaaaggaaaggaaaggaaaggaaaggaaaggaaaggaaaggaaaggaaggaaaggaaaggaaaggaaaggaaaggaaaggaaaggaaaggaaaggaaaggaaaggaaaggaaaggaaaggaaaggaaaggaaaggaaaggaaaggaaaggaaaggaaaggaaaggaaaggaaaggaaaggaaaggaaaggaaaggaaaggaaaggaaaggaaaggaaaggaaaggaaaggaaaggaaaggaaaggaaaggaaaggaaaggaaaggaaaggaaaggaaaggaaaggaaaggaaaggaagggaaggaaaggaaaggaaaggaaaggaaaggaaaggaaaggaaaggaaaggaaaggaaaggaaaggaaaggaaaggaaaggaaaggaaaggaaaggaaaggaaaggaaaggaaaggaaaggaaaggaaaggaaaggaaaggaaaggaaaggaaaggaaaggaaaggaaaggaaaggaaaggaaaggaaaggaaaggaaaggaaaggaaaggaaaggaaaggaaaggaaaggaaaggaaaggaaaggaaagggaaggaaaggaaaggaaaggaaaggaaaggaaaggaaaggaaaggaaaggaaaggaaaggaaaggaaaggaaaggaaaggaaaggaaaggaaaggaaaggaaaggaaaggaaaggaaaggaaaggaaaggaaaggaaaggaaaggaaaggaaaggaaaggaaaggaaaggaaaggaaaggaaaggaaaggaaaggaaaggaaaggaaaggaaaggaaaggaaaggaaaggaaaggaaaggaaaggaaggggaaggaaaggaaaggaaaggaaaggaaaggaaaggaaaggaaaggaaaggaaaggaaaggaaaggaaaggaaaggaaaggaaaggaaaggaaaggaaaggaaaggaaaggaaaggaaaggaaaggaaaggaaaggaaaggaaaggaaaggaaaggaaaggaaaggaaaggaaaggaaaggaaaggaaaggaaaggaaaggaaaggaaaggaaaggaaaggaaaggaaaggaaaggaaaggaaaggaaaggaaggaaaggaaaggaaaggaaaggaaaggaaaggaaaggaaaggaaaggaaaggaaaggaaaggaaaggaaaggaaaggaaaggaaaggaaaggaaaggaaaggaaaggaaaggaaaggaaaggaaaggaaaggaaaggaaaggaaaggaaaggaaaggaaaggaaaggaaaggaaaggaaaggaaaggaaaggaaaggaaaggaaaggaaaggaaaggaaaggaaaggaaaggaaaggaaaggaaggaaggaaaggaaaggaaaggaaaggaaaggaaaggaaaggaaaggaaaggaaaggaaaggaaaggaaaggaaaggaaaggaaaggaaaggaaaggaaaggaaaggaaaggaaaggaaaggaaaggaaaggaaaggaaaggaaaggaaaggaaaggaaaggaaaggaaaggaaaggaaaggaaaggaaaggaaaggaaaggaaaggaaaggaaaggaaaggaaaggaaaggaaaggaaaggaaaggcaaggcaaggcaaggcaaggcaaggcaaggcaaggcaaggcaaggcaaggcaaggcaaggcaaggcaaggcaaggcaaggcaaggcaaggcaaggcaaggcaaggcaaggcaaggcaaggcaaggcaaggcaaggcaaggcaaggcaaggcaaggcaaggcaaggcaaggcaaggcaaggcaaggcaaggcaaggcaaggcaaggcaaggcaaggcaaggcaaggcaaggcaaggcaaggcaaggcaaggcgaaggcaaggcaaggcaaggcaaggcaaggcaaggcaaggcaaggcaaggcaaggcaaggcaaggcaaggcaaggcaaggcaaggcaaggcaaggcaaggcaaggcaaggcaaggcaaggcaaggcaaggcaaggcaaggcaaggcaaggcaaggcaaggcaaggcaaggcaaggcaaggcaaggcaaggcaaggcaaggcaaggcaaggcaaggcaaggcaaggcaaggcaaggcaaggcaaggcaaggcatgggaaggcaaggcaaggcaaggcaaggcaaggcaaggcaaggcaaggcaaggcaaggcaaggcaaggcaaggcaaggcaaggcaaggcaaggcaaggcaaggcaaggcaaggcaaggcaaggcaaggcaaggcaaggcaaggcaaggcaaggcaaggcaaggcaaggcaaggcaaggcaaggcaaggcaaggcaaggcaaggcaaggcaaggcaaggcaaggcaaggcaaggcaaggcaaggcaaggcagggaaggcaaggcaaggcaaggcaaggcaaggcaaggcaaggcaaggcaaggcaaggcaaggcaaggcaaggcaaggcaaggcaaggcaaggcaaggcaaggcaaggcaaggcaaggcaaggcaaggcaaggcaaggcaaggcaaggcaaggcaaggcaaggcaaggcaaggcaaggcaaggcaaggcaaggcaaggcaaggcaaggcaaggcaaggcaaggcaaggcaaggcaaggcaaggcaaggCAgggaaggcaaggcaaggcaaggcaaggcaaggcaaggcaaggcaaggcaaggcaaggcaaggcaaggcaaggcaaggcaaggcaaggcaaggcaaggcaaggcaaggcaaggcaaggcaaggcaaggcaaggcaaggcaaggcaaggcaaggcaaggcaaggcaaggcaaggcaaggcaaggcaaggcaaggcaaggcaaggcaaggcaaggcaaggcaaggcaaggcaaggcaaggcaaggcaaggcgaaggaaggcaaggcaaggcaaggcaaggcaaggcaaggcaaggcaaggcaaggcaaggcaaggcaaggcaaggcaaggcaaggcaaggcaaggcaaggcaaggcaaggcaaggcaaggcaaggcaaggcaaggcaaggcaaggcaaggcaaggcaaggcaaggcaaggcaaggcaaggcaaggcaaggcaaggcaaggcaaggcaaggcaaggcaaggcaaggcaaggcaaggcaaggcaaggcaaggcaaggaaggcaaggcaaggcaaggcaaggcaaggcaaggcaaggcaaggcaaggcaaggcaaggcaaggcaaggcaaggcaaggcaaggcaaggcaaggcaaggcaaggcaaggcaaggcaaggcaaggcaaggcaaggcaaggcaaggcaaggcaaggcaaggcaaggcaaggcaaggcaaggcaaggcaaggcaaggcaaggcaaggcaaggcaaggcaaggcaaggcaaggcaaggcaaggcaaggcagaaggcaaggcaaggcaaggcaaggcaaggcaaggcaaggcaaggcaaggcaaggcaaggcaaggcaaggcaaggcaaggcaaggcaaggcaaggcaaggcaaggcaaggcaaggcaaggcaaggcaaggcaaggcaaggcaaggcaaggcaaggcaaggcaaggcaaggcaaggcaaggcaaggcaaggcaaggcaaggcaaggcaaggcaaggcaaggcaaggcaaggcaaggcaaggcaaggcaaggCAggggaaggcaaggcaaggcaaggcaaggcaaggcaaggcaaggcaaggcaaggcaaggcaaggcaaggcaaggcaaggcaaggcaaggcaaggcaaggcaaggcaaggcaaggcaaggcaaggcaaggcaaggcaaggcaaggcaaggcaaggcaaggcaaggcaaggcaaggcaaggcaaggcaaggcaaggcaaggcaaggcaaggcaaggcaaggcaaggcaaggcaaggcaaggcaaggcaaggcaAGGgaaggcaaggcaaggcaaggcaaggcaaggcaaggcaaggcaaggcaaggcaaggcaaggcaaggcaaggcaaggcaaggcaaggcaaggcaaggcaaggcaaggcaaggcaaggcaaggcaaggcaaggcaaggcaaggcaaggcaaggcaaggcaaggcaaggcaaggcaaggcaaggcaaggcaaggcaaggcaaggcaaggcaaggcaaggcaaggcaaggcaaggcaaggcaaggcaaggcaattggaaggcaaggcaaggcaaggcaaggcaaggcaaggcaaggcaaggcaaggcaaggcaaggcaaggcaaggcaaggcaaggcaaggcaaggcaaggcaaggcaaggcaaggcaaggcaaggcaaggcaaggcaaggcaaggcaaggcaaggcaaggcaaggcaaggcaaggcaaggcaaggcaaggcaaggcaaggcaaggcaaggcaaggcaaggcaaggcaaggcaaggcaaggcaaggcaaggCAggaaggcaaggcaaggcaaggcaaggcaaggcaaggcaaggcaaggcaaggcaaggcaaggcaaggcaaggcaaggcaaggcaaggcaaggcaaggcaaggcaaggcaaggcaaggcaaggcaaggcaaggcaaggcaaggcaaggcaaggcaaggcaaggcaaggcaaggcaaggcaaggcaaggcaaggcaaggcaaggcaaggcaaggcaaggcaaggcaaggcaaggcaaggcaaggcaaggcatggggaaggcaaggcaaggcaaggcaaggcaaggcaaggcaaggcaaggcaaggcaaggcaaggcaaggcaaggcaaggcaaggcaaggcaaggcaaggcaaggcaaggcaaggcaaggcaaggcaaggcaaggcaaggcaaggcaaggcaaggcaaggcaaggcaaggcaaggcaaggcaaggcaaggcaaggcaaggcaaggcaaggcaaggcaaggcaaggcaaggcaaggcaaggcaaggcaaggaaggcatggggaaggcaaggcaaggcaaggcaaggcaaggcaaggcaaggcaaggcaaggcaaggcaaggcaaggcaaggcaaggcaaggcaaggcaaggcaaggcaaggcaaggcaaggcaaggcaaggcaaggcaaggcaaggcaaggcaaggcaaggcaaggcaaggcaaggcaaggcaaggcaaggcaaggcaaggaaggcatggggaaggcaaggcaaggcaaggcaaggcaaggcaaggcaaggcaaggcaaggaaggcatggggaaggcaaggcaaggcaaggcaaggcaaggcaaggcaaggcaaggcaaggcaaggcaaggcaaggcaaggcaaggcaaggcaaggaaggcatggggaaggcaaggcaaggcaaggcaaggcaaggcaaggcaaggcaaggcaaggcaaggcaaggcaaggaaggcatggggaaggcaaggcaaggcaaggcaaggcaaggcaaggcaaggcaaggcaaggcaaggaaggcatggggaaggcaaggcaaggcaaggcaaggcaaggcaaggcaaggcaaggcaaggcaaggaaggcatggggaaggcaaggcaaggcaaggcaaggcaaggcaaggcaaggcaaggcaaggaaggcatggggaaggcaaggcaaggcaaggcaaggcaaggcaaggcaaggcaaggcaaggaaggcatggggaaggcaaggcaaggcaaggcaaggcaaggcaaggcaaggcaaggcaaggaaggcatggggaaggcaaggcaaggcaaggcaaggcaaggcaaggcaaggcaaggaaggcatggggaaggcaaggcaaggcaaggcaaggcaaggcaaggcaaggcaaggaaggcatggggaaggcaaggcaaggcaaggcaaggcaaggcaaggcaaggaaggcatggggaaggcaaggcaaggcaaggcaaggcaaggcaaggcaaggaaggcatggggaaggcaaggcaaggcaaggcaaggcaaggcaaggcaaggaaggcatggggaaggcaaggcaaggcaaggcaaggcaaggcaaggcaaggaaggcatggggaaggcaaggcaaggcaaggcaaggcaaggcaaggcaagggccgaaggaaggaaggaaggaaggaaggaaggaaggaaggaaggaaggaaggaaggaaggaaggaaggaaggaaggaaggaaggaaggaaggaaggaaggaaggaaggaaggaaggaaggaaggaaggaaggaaggaaggaaggaaggaaggaaggaaggaaggaaggaaggaaggaaggaaggaaggaaggaaggaaggaaggauggaaggaaggaaggaaggaaggaaggaaggaaggaaggaaggaaggaaggaaggaaggaaggaaggaaggaaggaaggaaggaaggaaggaaggaaggaaggaaggaaggaaggaaggaaggaaggaaggaaggaaggaaggaaggaaggaaggaaggaaggaaggaaggaaggaaggaaggaaggaaggaaggaaggaAGGAAGGAAGGAAGGAAGGAAGGAAGGAAGGAAGGAAGGAAGGAAGGAAGGAAGGAAGGAAGGAAGGAAGGAAGGAAGGAAGGAAGGAAGGAAGGAAGGAAGGAAGGAAGGAAGGAAGGAAGGAAGGAAGGAAGGAAGGAAGGAAGGAAGGAAGGAAGGAAGGAAGGAAGGAAGGAAGGAAGGAAGGAAGGAAGGAAGGAAGGAAAGGAAGGAAGGAAGGAAGGAAGGAAGGAAGGAAGGAAGGAAGGAAGGAAGGAAGGAAGGAAGGAAGGAAGGAAGGAAGGAAGGAAGGAAGGAAGGAAGGAAGGAAGGAAGGAAGGAAGGAAGGAAGGAAGGAAGGAAGGAAGGAAGGAAGGAAGGAAGGAAGGAAGGAAGGAAGGAAGGAAGGAAGGAAGGAAGGAAGAAGGAAGGAAGGAAGGAAGGAAGGAAGGAAGGAAGGAAGGAAGGAAGGAAGGAAGGAAGGAAGGAAGGAAGGAAGGAAGGAAGGAAGGAAGGAAGGAAGGAAGGAAGGAAGGAAGGAAGGAAGGAAGGAAGGAAGGAAGGAAGGAAGGAAGGAAGGAAGGAAGGAAGGAAGGAAGGAAGGAAGGAAGGAAGGAAGGAAGAAAGGAAGGAAGGAAGGAAGGAAGGAAGGAAGGAAGGAAGGAAGGAAGGAAGGAAGGAAGGAAGGAAGGAAGGAAGGAAGGAAGGAAGGAAGGAAGGAAGGAAGGAAGGAAGGAAGGAAGGAAGGAAGGAAGGAAGGAAGGAAGGAAGGAAGGAAGGAAGGAAGGAAGGAAGGAAGGAAGGAAGGAAGGAAGGAAGGAACGAAGGAAGGAAGGAAGGAAGGAAGGAAGGAAGGAAGGAAGGAAGGAAGGAAGGAAGGAAGGAAGGAAGGAAGGAAGGAAGGAAGGAAGGAAGGAAGGAAGGAAGGAAGGAAGGAAGGAAGGAAGGAAGGAAGGAAGGAAGGAAGGAAGGAAGGAAGGAAGGAAGGAAGGAAGGAAGGAAGGAAGGAAGGAAGGAAGGAACGAAAGGAAGGAAGGAAGGAAGGAAGGAAGGAAGGAAGGAAGGAAGGAAGGAAGGAAGGAAGGAAGGAAGGAAGGAAGGAAGGAAGGAAGGAAGGAAGGAAGGAAGGAAGGAAGGAAGGAAGGAAGGAAGGAAGGAAGGAAGGAAGGAAGGAAGGAAGGAAGGAAGGAAGGAAGGAAGGAAGGAAGGAAGGAAGGAAGGAAACGAAAGGAAGGAAGGAAGGAAGGAAGGAAGGAAGGAAGGAAGGAAGGAAGGAAGGAAGGAAGGAAGGAAGGAAGGAAGGAAGGAAGGAAGGAAGGAAGGAAGGAAGGAAGGAAGGAAGGAAGGAAGGAAGGAAGGAAGGAAGGAAGGAAGGAAGGAAGGAAGGAAGGAAGGAAGGAAGGAAGGAAGGAAGGAAGGAACGAAACGAAAGGAAGGAAGGAAGGAAGGAAGGAAGGAAGGAAGGAAGGAAGGAAGGAAGGAAGGAAGGAAGGAAGGAAGGAAGGAAGGAAGGAAGGAAGGAAGGAAGGAAGGAAGGAAGGAAGGAAGGAAGGAAGGAAGGAAGGAAGGAAGGAAGGAAGGAAGGAAGGAAGGAAGGAAGGAAGGAAGGAAGGAAGGAACGAAACGAAAAGGAAGGAAGGAAGGAAGGAAGGAAGGAAGGAAGGAAGGAAGGAAGGAAGGAAGGAAGGAAGGAAGGAAGGAAGGAAGGAAGGAAGGAAGGAAGGAAGGAAGGAAGGAAGGAAGGAAGGAAGGAAGGAAGGAAGGAAGGAAGGAAGGAAGGAAGGAAGGAAGGAAGGAAGGAAGGAAGGAAGGAAGGAAGGAAGGAAGGCAAACGAAAGGAAGGAAGGAAGGAAGGAAGGAAGGAAGGAAGGAAGGAAGGAAGGAAGGAAGGAAGGAAGGAAGGAAGGAAGGAAGGAAGGAAGGAAGGAAGGAAGGAAGGAAGGAAGGAAGGAAGGAAGGAAGGAAGGAAGGAAGGAAGGAAGGAAGGAAGGAAGGAAGGAAGGAAGGAAGGAAGGAAGGAAGGAAGGAAACGAAAAGGAAGGAAGGAAGGAAGGAAGGAAGGAAGGAAGGAAGGAAGGAAGGAAGGAAGGAAGGAAGGAAGGAAGGAAGGAAGGAAGGAAGGAAGGAAGGAAGGAAGGAAGGAAGGAAGGAAGGAAGGAAGGAAGGAAGGAAGGAAGGAAGGAAGGAAGGAAGGAAGGAAGGAAGGAAGGAAGGAAGGAAGGAACGAAACGAAAAACGAAAAACGAAAAACGAAAAACGAAAAACGAAAAACGAAAAACGAAAAACGAAAAACGAAAAACGAAAAACGAAAAACGAAAAACGAAAAACGAAAAACGAAAAACGAAAAACGAAAAACGAAAAACGAAAAACGAAAAACGAAAAACGAAAAACGAAAAACGAAAAACGAAAAACGAAAAACGAAAAACGAAAAACGAAAAACGAAAAACGAAAAACGAAAAACGAAAAAACGAAAAACGAAAAACGAAAAACGAAAAACGAAAAACGAAAAACGAAAAACGAAAAACGAAAAACGAAAAACGAAAAACGAAAAACGAAAAACGAAAAACGAAAAACGAAAAACGAAAAACGAAAAACGAAAAACGAAAAACGAAAAACGAAAAACGAAAAACGAAAAACGAAAAACGAAAAACGAAAAACGAAAAACGAAAAACGAAAAACGAAAAACGAAAAACGAAAAACCAGAAACGAAAAACGAAAAACGAAAAACGAAAAACGAAAAACGAAAAACGAAAAACGAAAAACGAAAAACGAAAAACGAAAAACGAAAAACGAAAAACGAAAAACGAAAAACGAAAAACGAAAAACGAAAAACGAAAAACGAAAAACGAAAAACGAAAAACGAAAAACGAAAAACGAAAAACGAAAAACGAAAAACGAAAAACGAAAAACGAAAAACGAAAAACGAAAAACGAAAAAAAAACGAAAAACGAAAAACGAAAAACGAAAAACGAAAAACGAAAAACGAAAAACGAAAAACGAAAAACGAAAAACGAAAAACGAAAAACGAAAAACGAAAAACGAAAAACGAAAAACGAAAAACGAAAAACGAAAAACGAAAAACGAAAAACGAAAAACGAAAAACGAAAAACGAAAAACGAAAAACGAAAAACGAAAAACGAAAAACGAAAAACGAAAAACGAAAAACGAAAAACTCAGAAACGAAAAACGAAAAACGAAAAACGAAAAACGAAAAACGAAAAACGAAAAACGAAAAACGAAAAACGAAAAACGAAAAACGAAAAACGAAAAACGAAAAACGAAAAACGAAAAACGAAAAACGAAAAACGAAAAACGAAAAACGAAAAACGAAAAACGAAAAACGAAAAACGAAAAACGAAAAACGAAAAACGAAAAACGAAAAACGAAAAACGAAAAACGAAAACTCAGAAACGAAAAACGAAAAACGAAAAACGAAAAACGAAAAACGAAAAACGAAAAACGAAAAACGAAAAACGAAAAACGAAAAACGAAAAACGAAAAACGAAAAACGAAAAACGAAAAACGAAAAACGAAAAACGAAAAACGAAAAACGAAAAACGAAAAACGAAAAACGAAAAACGAAAAACGAAAAACGAAAAACGAAAAACGAAAAACGAAAAACGAAAAACGAAAAACTCAGAACCAAACCAAACCAAACCAAACCAAACCAAACCAAACCAAACCAAACCAAACCAAACCAAACCAAACCAAACCAAACCAAACCAAACCAAACCAAACCAAACCAAACCAAACCAAACCAAACCAAACCAAACCAAACCAAACCAAACCAAACCAAACCAAACCAAACCAAACCAAACCAAACCAAACCAAACCAAACCAAACCAAACCAAACCAAACCAAACCAAACCAAACCAAACCAAACCAAACCAAACCAAAACCAAACCAAACCAAACCAAACCAAACCAAACCAAACCAAACCAAACCAAACCAAACCAAACCAAACCAAACCAAACCAAACCAAACCAAACCAAACCAAACCAAACCAAACCAAACCAAACCAAACCAAACCAAACCAAACCAAACCAAACCAAACCAAACCAAACCAAACCAAACCAAACCAAACCAAACCAAACCAAACCAAACCAAACCAAACCAAACCAAACCAAACCAAACCAAACCAAACCATCCCATTCCCATTCCCATTCCCATTCCCATTCCCATTCCCATTCCCATTCCCATTCCCATTCCCATTCCCATTCCCATTCCCATTCCCATTCCCATTCCCATTCCCATTCCCATTCCCATTCCCATTCCCATTCCCATTCCCATTCCCATTCCCATTCCCATTCCCATTCCCATTCCCATTCCCATTCCCATTCCCATTCCCATTCCCATTCCCATTCCCATTCCCATTCCCATTCCCATTCCCATTCCCATTCCCATTCCCATTCCCATTCCCATTCCCATTCCCATTCCCATTCCCATTCCCATCCCATTCCCATTCCCATTCCCATTCCCATTCCCATTCCCATTCCCATTCCCATTCCCATTCCCATTCCCATTCCCATTCCCATTCCCATTCCCATTCCCATTCCCATTCCCATTCCCATTCCCATTCCCATTCCCATTCCCATTCCCATTCCCATTCCCATTCCCATTCCCATTCCCATTCCCATTCCCATTCCCATTCCCATTCCCATTCCCATTCCCATTCCCATTCCCATTCCCATTCCCATTCCCATTCCCATTCCCATTCCCATTCCCATTCCCATTCCCATTCCCATTCCCCATTCCCATTCCCATTCCCATTCCCATTCCCATTCCCATTCCCATTCCCATTCCCATTCCCATTCCCATTCCCATTCCCATTCCCATTCCCATTCCCATTCCCATTCCCATTCCCATTCCCATTCCCATTCCCATTCCCATTCCCATTCCCATTCCCATTCCCATTCCCATTCCCATTCCCATTCCCATTCCCATTCCCATTCCCATTCCCATTCCCATTCCCATTCCCATTCCCATTCCCATTCCCATTCCCATTCCCATTCCCATTCCCATTCCCATTCCCATTCCCATTCCCATTCCCCATCCCATTCCCATTCCCATTCCCATTCCCATTCCCATTCCCATTCCCATTCCCATTCCCATTCCCATTCCCATTCCCATTCCCATTCCCATTCCCATTCCCATTCCCATTCCCATTCCCATTCCCATTCCCATTCCCATTCCCATTCCCATTCCCATTCCCATTCCCATTCCCATTCCCATTCCCATTCCCATTCCCATTCCCATTCCCATTCCCATTCCCATTCCCATTCCCATTCCCATTCCCATTCCCATTCCCATTCCCATTCCCATTCCCATTCCCATTCCCATTCCCATTCCCGATCCCATTCCCATTCCCATTCCCATTCCCATTCCCATTCCCATTCCCATTCCCATTCCCATTCCCATTCCCATTCCCATTCCCATTCCCATTCCCATTCCCATTCCCATTCCCATTCCCATTCCCATTCCCATTCCCATTCCCATTCCCATTCCCATTCCCATTCCCATTCCCATTCCCATTCCCATTCCCATTCCCATTCCCATTCCCATTCCCATTCCCATTCCCATTCCCATTCCCATTCCCATTCCCATTCCCATTCCCATTCCCATTCCCATTCCCATTCCCATTCCCATTCCTTTGGATCCCATTCCCATTCCCATTCCCATTCCCATTCCCATTCCCATTCCCATTCCCATTCCCATTCCCATTCCCATTCCCATTCCCATTCCCATTCCCATTCCCATTCCCATTCCCATTCCCATTCCCATTCCCATTCCCATTCCCATTCCCATTCCCATTCCCATTCCCATTCCCATTCCCATTCCCATTCCCATTCCCATTCCCATTCCCATTCCCATTCCCATTCCCATTCCCATTCCCATTCCCATTCCCATTCCCATTCCCATTCCCATTCCCATTCCCATTCCCATTCCCATTCCAAGAAAGAAAGAAAGAAAGAAAGAAAGAAAGAAAGAAAGAAAGAAAGAAAGAAAGAAAGAAAGAAAGAAAGAAAGAAAGAAAGAAAGAAAGAAAGAAAGAAAGAAAGAAAGAAAGAAAGAAAGAAAGAAAGAAAGAAAGAAAGAAAGAAAGAAAGAAAGAAAGAAAGAAAGAAAGAAAGAAAGAAAGAAAGAAAGAAAGAAAGAAGAAAGAAAGAAAGAAAGAAAGAAAGAAAGAAAGAAAGAAAGAAAGAAAGAAAGAAAGAAAGAAAGAAAGAAAGAAAGAAAGAAAGAAAGAAAGAAAGAAAGAAAGAAAGAAAGAAAGAAAGAAAGAAAGAAAGAAAGAAAGAAAGAAAGAAAGAAAGAAAGAAAGAAAGAAAGAAAGAAAGAAAGAAAGAAAGAAAGAAAACCGATCCCGATCCCGATCCCGATCCCGATCCCGATCCCGATCCCGATCCCGATCCCGATCCCGATCCCGATCCCGATCCCGATCCCGATCCCGATCCCGATCCCGATCCCGATCCCGATCCCGATCCCGATCCCGATCCCGATCCCGATCCCGATCCCGATCCCGATCCCGATCCCGATCCCGATCCCGATCCCGATCCCGATCCGATCCCGATCCCGATCCCGATCCCGATCCCGATCCCGATCCCGATCCCGATCCCGATCCCGATCCCGATCCCGATCCCGATCCCGATCCCGATCCCGATCCCGATCCCGATCCCGATCCCGATCCCGATCCCGATCCCGATCCCGATCCCGATCCCGATCCCGATCCCGATCCCGATCCCGATCCCGATCCCGATCCCGCATCCCGATCCCGATCCCGATCCCGATCCCGATCCCGATCCCGATCCCGATCCCGATCCCGATCCCGATCCCGATCCCGATCCCGATCCCGATCCCGATCCCGATCCCGATCCCGATCCCGATCCCGATCCCGATCCCGATCCCGATCCCGATCCCGATCCCGATCCCGATCCCGATCCCGATCCCGATCCCGATCCCGATCCTTGGATCCCGATCCCGATCCCGATCCCGATCCCGATCCCGATCCCGATCCCGATCCCGATCCCGATCCCGATCCCGATCCCGATCCCGATCCCGATCCCGATCCCGATCCCGATCCCGATCCCGATCCCGATCCCGATCCCGATCCCGATCCCGATCCCGATCCCGATCCCGATCCCGATCCCGATCCCGATCCCGATCCCGATACTTGGATCCCGATCCCGATCCCGATCCCGATCCCGATCCCGATCCCGATCCCGATCCCGATCCCGATCCCGATCCCGATCCCGATCCCGATCCCGATCCCGAT | |
- Prato: ref. 5843858
- Grelha: ref. 5933216
- Piatto : ref. 5843858
- Griglia : ref. 5933216
- Placca raccogli-briciole : ref. 5933219
L Timer knapp (modellene CH3)
③3) Tilbehør
M Reversibel grill
M1 Høy posisjon
M2 Lav posisjon
Grill skuff ( avhengig modell)
- Total kraft: 1500 watt
- Ovnskraft: 1500 watt Grill: 750 watt
- Energi forbruk:
. Foroppvarming i 200°C 0,06 kWt
. 1 times bruk i 200°C 0,37 kWt
. TOTALT: 0,43 kWt