
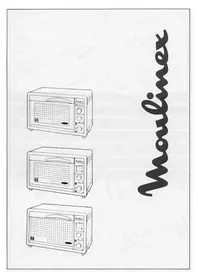
Compact Chef AP2 - Convection Oven MOULINEX - Free user manual and instructions
Find the device manual for free Compact Chef AP2 MOULINEX in PDF.
| Brand | Moulinex |
| Model | Compact Chef AP2 |
| Product type | Natural convection oven |
| Capacity | 26 liters |
| Total power | 1700 W |
| Power in oven mode | 1300 W |
| Power in grill and rotisserie mode | 1700 W |
| Energy consumption (heating to 200°C) | 0,20 kWh |
| Energy consumption (maintaining 1h at 200°C) | 0,68 kWh |
| Total consumption (heating + 1h) | 0,88 kWh |
| Interior coating | Self-cleaning enamel |
| Thermostat | From 100°C to 270°C (positions 1 to 10) |
| Timer | From 0 to 120 minutes |
| Cooking functions | Oven, grill, rotisserie (spit) |
| Included accessories | Reversible grid, drip tray, baking sheet (depending on model), complete rotisserie (spit and forks) |
| Cooking levels | 3 levels |
| Safety | Mandatory grounding, resistance lock, insulated door |
| Maintenance | Clean with a damp soapy sponge; self-cleaning enamel; do not use metal pads |
| Installation | On worktop (supports 90°C) or wall mounting with bracket (ref. 5-852-130) |
| Repairability | Moulinex approved service center; cord replacement by a professional |
| Warranty | Warranty void if incorrect connection |
Frequently Asked Questions - Compact Chef AP2 MOULINEX
User questions about Compact Chef AP2 MOULINEX
0 question about this device. Answer the ones you know or ask your own.
Ask a new question about this device
Download the instructions for your Convection Oven in PDF format for free! Find your manual Compact Chef AP2 - MOULINEX and take your electronic device back in hand. On this page are published all the documents necessary for the use of your device. Compact Chef AP2 by MOULINEX.
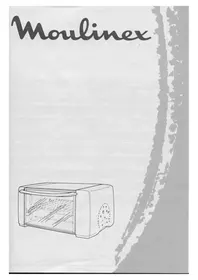
USER MANUAL Compact Chef AP2 MOULINEX
natural_image
Line drawing of a microwave oven with control panel and display unit (no text or symbols on the device itself)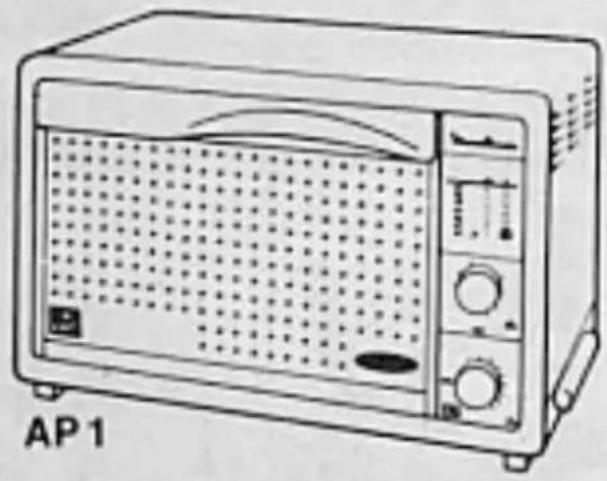
natural_image
Line drawing of a microwave oven with control panel and display (no text or symbols on the device itself)
natural_image
Line drawing of a microwave oven with lid and tray (no text or symbols)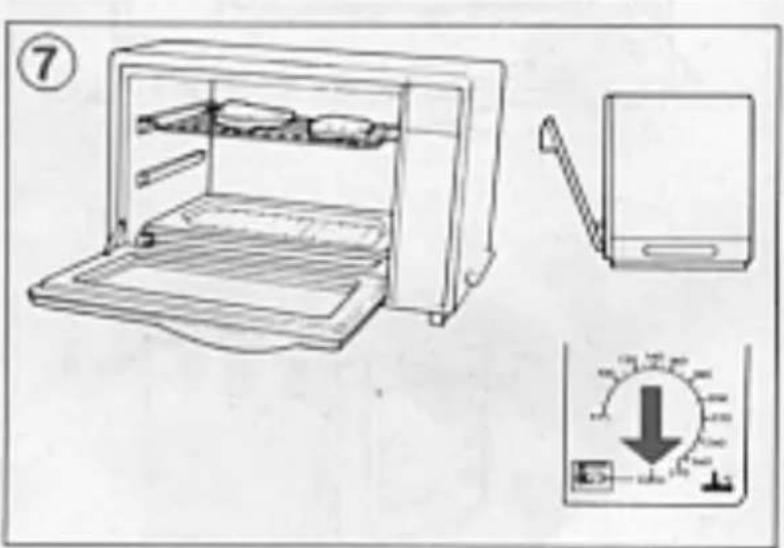
natural_image
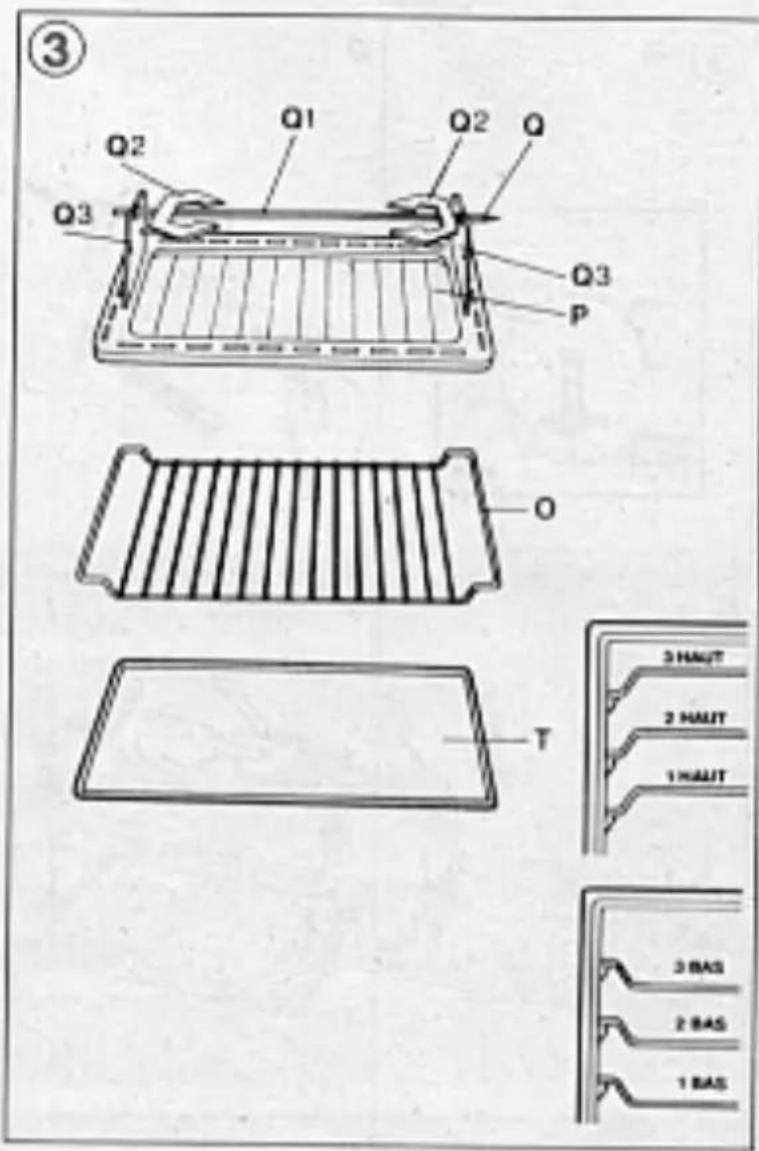
Illustration showing two steps of a mechanical assembly: one with a tool and the other with a cutting tool (no text or symbols present)Q Ensemble Tournebroche
Q1 Broche
Q2 Fourchettes
Q3 Supports de broche
Familiarise yourself with the various parts and accessories of your Compact Chef mini oven. Open out the diagram sheets inside the cover. The red numbers correspond to the diagrams of the various parts of your oven and are used throughout the following pages.
① 1/ The Oven
A Door
A1 Door handle
B Top element
S Bottom element
C Three cooking levels
D Rotisserie drive
R Air vents
V Locking device for heating element
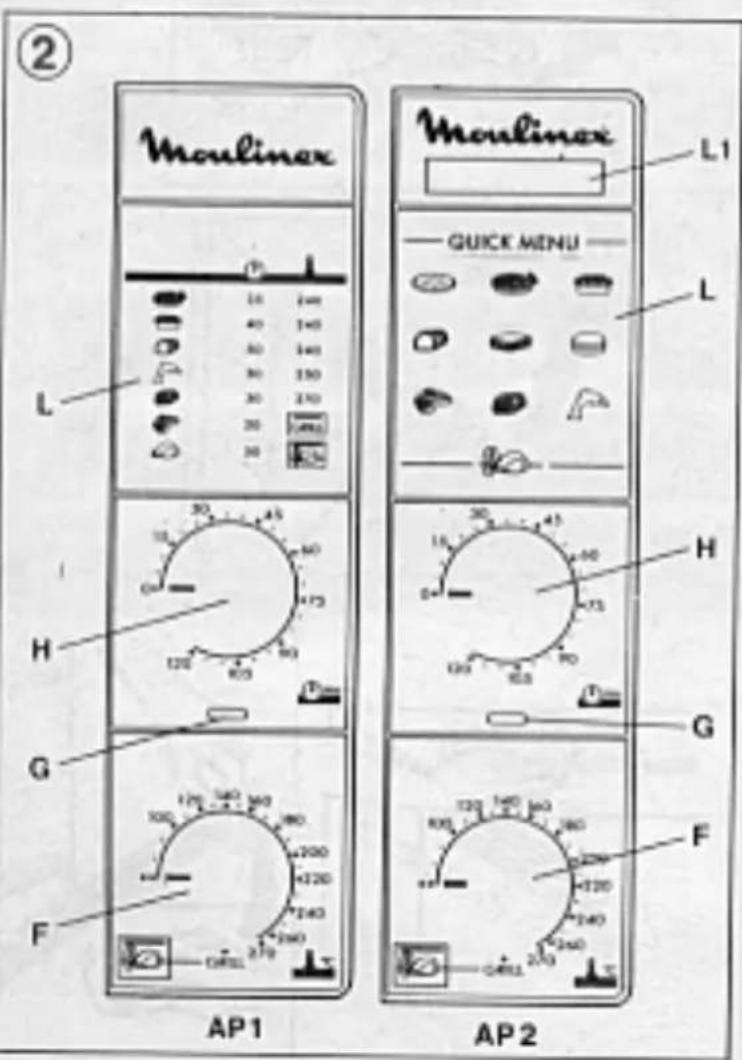
② 2/ Control Panel
F Thermostat dial
G Temperature control light
H Timer (0-120 min)
L Cooking guide for 1 kg of food (AP1 model)
or Recipe guide (quick menu) for 1 kg of food (AP2 model)
③ 3/ Accessories
O 1 reversible grill shelf
P Tray (drip pan)
T Baking tray on some models
Q Rotisserie unit
Q1 Spit
Q2 Forks
Q3 Brackets
Features
- Walls lined with a self-cleaning enamel
- 26-litre capacity
- Total power 1700 Watts
- Oven power: 1300 Watts
- Grill + Roast power: 1700 Watts
- Power consumption:
. Heating to 200°C 0.20 Kwh
. Maintain at 200°C for 1 h 0.68 Kwh
. TOTAL 0.88 Kwh
Safety Recommendations
1/ Connection
Check that the voltage on the appliance rating plate corresponds to the voltage on your mains
supply meter. For safety reasons it is essential to connect your appliance to an earthed socket which complies with electrical standards. Avoid any electrical installation which does not comply with them.
Any error in connecting the appliance invalidates the guarantee.
Make sure your electric meter and fuse box are marked 10 Amps. or more.
Wiring instructions for U.K and Ireland only :
APPLIANCES WITH FITTED PLUG
Important : For your convenience this appliance is supplied complete with a plug incorporating a 13 amp fuse.
In the event of replacing a fuse in the plug supplied, a 13 amp fuse approved by ASTA to BS1362 must be used.
If the socket outlets are not of the 13A BS 1363 type, and therefore do not accept the plug connected to this appliance, cut off the plug. When cut off, this plug is a shock hazard if inserted into a socket outlet and must therefore be disposed of safely.
Fit the appropriate plug according to the instructions in paragraph "Fitting a plug". With alternative plugs a 15 amp fuse must be fitted either in the plug or adaptor or at the main fuse box.
FITTING A PLUG - IMPORTANT
The wires in the mains lead are coloured in accordance with the following code:
GREEN & YELLOW : EARTH
BLUE: NEUTRAL - BROWN : LIVE
As the colours in the mains lead of this appliance may not correspond with the coloured markings identifying the terminals in your plug, proceed as follows:
The wire which is coloured GREEN & YELLOW must be connected to the terminal in the plug which is marked with the letter 'E' or by the earth symbol or coloured green or green and yellow. The wire which is coloured BLUE must be connected to the terminal which is marked with the letter 'N' or coloured black. The wire which is coloured BROWN must be connected to the terminal which is marked with the letter 'L' or coloured red.
This appliance is manufactured to conform to the Low Voltage Electrical Equipment (Safety) Regulations 1989 and is designed to comply with BS 3456. It complies with the EEC Directive (89/336 EEC).
2/ Installation
Depending on the layout of your kitchen, you can
- Place your mini oven on a kitchen unit or work surface capable of withstanding temperatures of at least 90 c without causing any damage
or
- You can attach your oven to the wall. In this case, obtain wall bracket reference 5-852-130 from a Moulinex approved service agent.
Never build it in or place it in a fitted unit.
Always ensure that there is nothing blocking the air vents of the appliance. Do not lay teatowels or plates on your oven.
3/ Safety recommendations
This is a domestic appliance designed for cooking food only.
- Do not touch the hot surfaces of your oven while the oven is on, in particular the glass panel in the door.
- For safety reasons, keep children well away from the oven
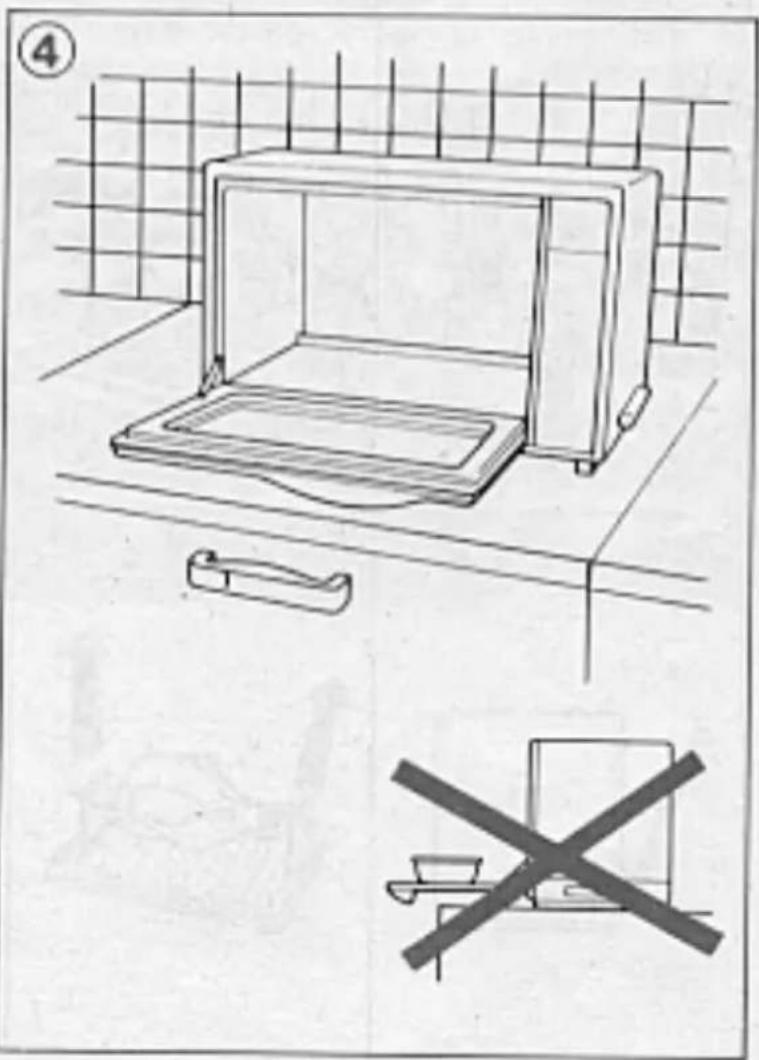
④ - Never rest dishes etc. on the oven door when it is open, unless it is supported by a worktop underneath.
- Do not line the oven with aluminium foil. This may interfere with the thermostat and could seriously damage your oven.
Before using your Oven for the First Time
- Unpack, wash and carefully dry all accessories.
- Turn the thermostat dial (F) to 270°C and operate using the oven function with nothing inside it and the door open for 15 minutes. This will get rid of the “new” smell.
Using your Oven
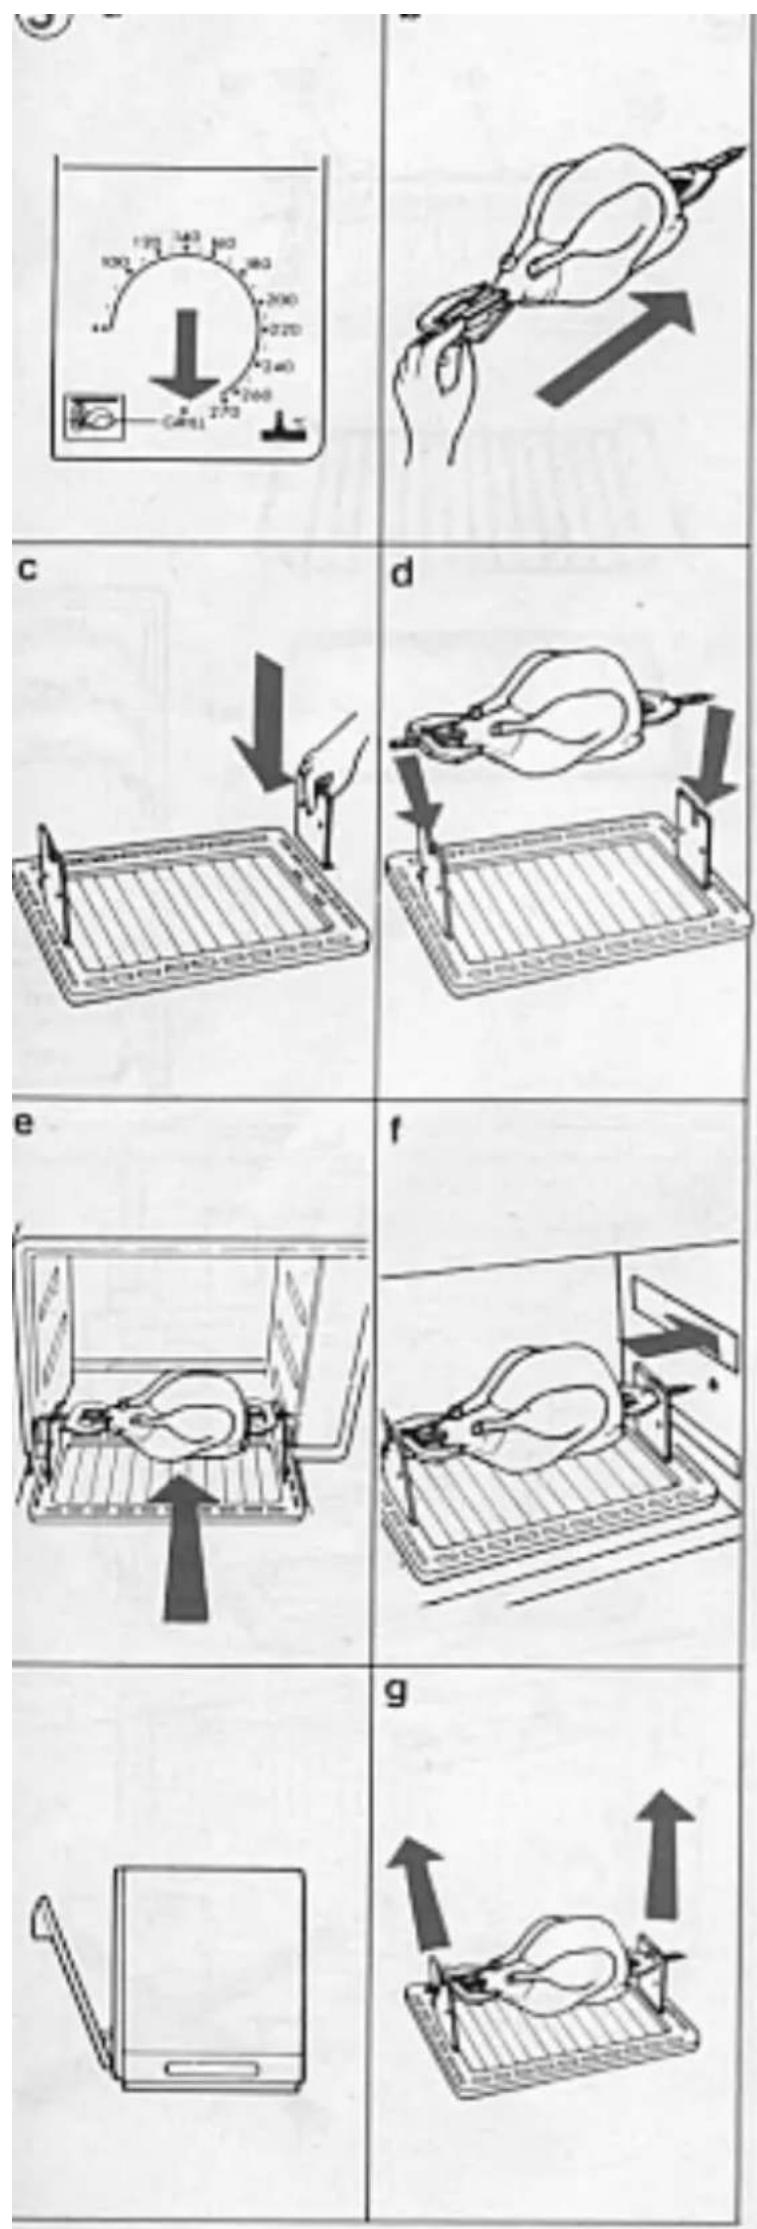
⑤ 1/ Cooking using the Rotisserie
The rotisserie (spit) is for evenly roasting meat and poultry.
5a - Set the thermostat dial (F) to the grill-rotisserie position.
- Set the timer (H) to the desired cooking time. Add about 4 minutes' pre-heating time.
The indicator light (G) will come on.
⑤b - Pierce the joint for roasting with the spit (Q1)
- Hold the joint on with the forks, and tighten the locking screws (Q2)
5c- Place the brackets (Q3) on the tray (P) in the slots provided.
5d- Place the spit on the brackets. Ensure that the tip of the spit follows the arrow on the tray (drip pan)
5e- Place the tray (drip pan) (P) with the joint into the oven at level 1, tipping the brackets towards the left.
⑤f- Engage the spit in the drive (D) by moving the brackets towards the right.
- Check that the spit turns. If it does not, make sure you have engaged it in the drive properly.
- Leave the door ajar to allow the air to circulate properly. This is important for this type of cooking
When the cooking time has elapsed the oven will automatically stop.
- Open the door, disengage the spit with an oven glove and take out the dripping tray.
5g - Remove your roast using oven gloves.
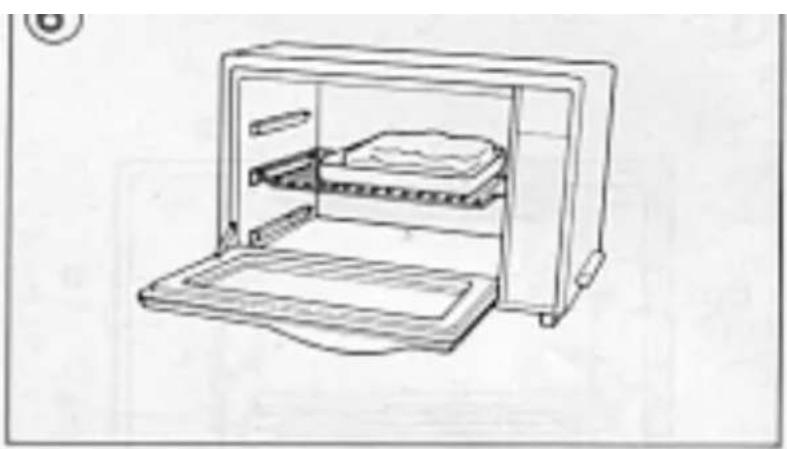
⑥2/ Oven Cooking
- Select the cooking temperature using the thermostat dial (F). Do not exceed 270° or you will be in the “grill” function.
- Set the timer (H) to the cooking time you want plus an additional few minutes preheating time.
The indicator light (G) will come on. The light will go off again when the oven reaches the temperature you have chosen.
- Place the dish in the oven on the grill shelf (O) positioned at the appropriate level (see cooking table)
- Shut the door.
When the cooking time has elapsed, the oven will automatically stop
- Open the door and remove your dish.
- Never use the tray (drip pan) when using the "oven" function. It would stop the heat circulating properly in the oven.
To help you select the correct cooking time, refer to the cooking tables which can be found at the end of this instruction leaflet. For certain dishes, they suggest a recommended cooking time, temperature and shelf level.
⑦3/ Grilling
The grill can be used for cooking and grilling meat and fish and browning gratins.
- Turn the thermostat dial to the GRILL position.
- Set the cooking time you want using the timer dial (H) plus an additional preheating time of approximately 4 minutes.
The indicator light (G) will come on.
- Place your food on the shelf at level 2 or 3. The grill shelf can be positioned facing up or down, depending on the size of the dish you want to grill.
- When grilling, place the food at least 2 cm from the upper heating element.
- Place the tray (drip pan) beneath the grill at level 1 to catch splashes of grease or fat.
- Leave the door ajar to allow the air to circulate properly. This is important when using this cooking mode.
- Keep an eye on the food/dish you are grilling, and turn half-way through.
When the cooking time has elapsed the oven will stop automatically.
- Open the door and remove your grilled dish. When cooking fatty meat, grease may splash on the upper heating element (grill) and can catch fire during the cooking process. It will go out by itself and will not damage the oven in any way.
Practical Hints
Steam and sometimes smoke is released during the cooking process. This will escape at the front of the oven.
You can reduce the quantity of smoke by keeping the oven walls clean. You will also reduce it by:
- Adding a little water to the base of your dish or the tray before starting to cook.
- Using (or slightly lowering) the recommended cooking temperatures
- Preferably using earthenware dishes.
Cleaning
- Always disconnect your oven and leave it to cool before cleaning it.
- Wipe down the oven body using a damp soapy sponge while it is still warm. It will clean more easily. Wipe it dry thoroughly.
. The inside walls are lined with self-cleaning enamel. To ensure a long, efficient life, as soon as grease or smoke marks appear, we recommend cleaning most of the grease marks with a sponge dipped in soapy water. Then turn the oven on for 30 minutes with the thermostat at 270°C.
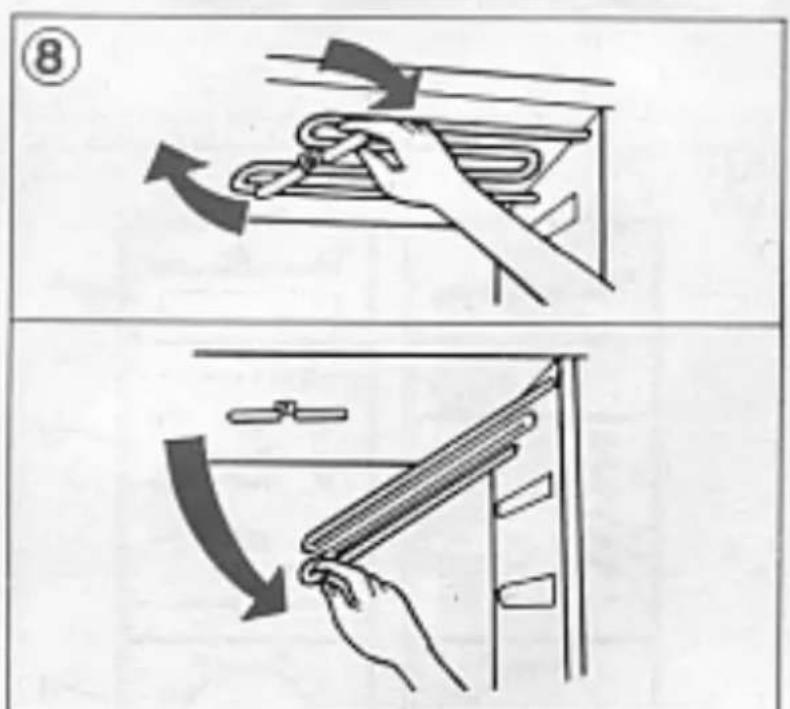
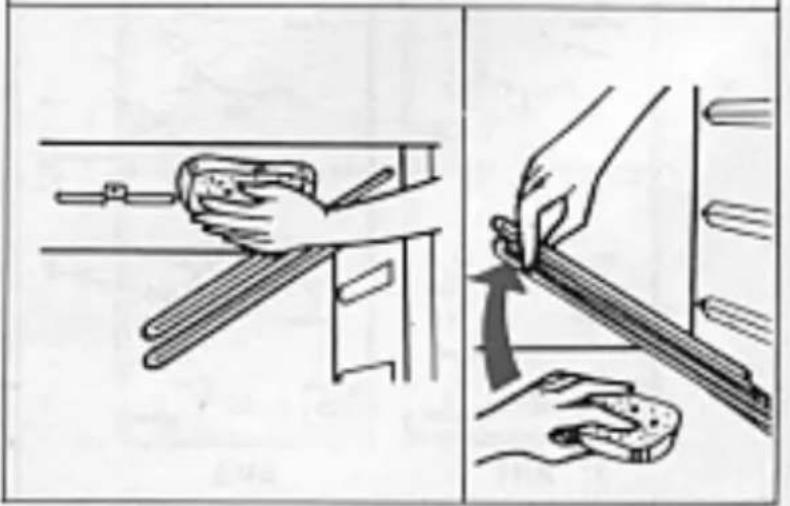
⑧. To clean the roof thoroughly (inside the top of oven), swivel the locking device (V) 90° from its original position.
- Pull down the upper heating element and clean thoroughly with a sponge dipped in hot soapy water.
- Replace the element and lock into its original position. Make sure the lock correctly supports the 2 arms of the element.
. To clean the base thoroughly (inside the bottom of oven), raise the bottom element and clean thoroughly with a sponge dipped in hot soapy water.
. The drip tray, grill shelf, spit (rotisserie) and rotisserie forks can also be cleaned with hot water and washing up liquid.
. Never use scouring pads, steel wool, scouring powders or special oven cleaners.
Maintenance
If your oven does not work, contact a Moulinex approved service agent (see list in the «Moulinex Service» booklet).
. Replacing the lead
If the mains lead is damaged, special tools are required, and it is essential to have it replaced by a Moulinex approved service agent(see list in the «Moulinex Service» booklet).
Cooking Tables
. Conversion Table:
Conversion table between thermostat temperatures in some cookbooks and your Compact Chef oven.
100° 1 200° 6
120° 2 220° 7
140° 3 250° 8
160° 4 270° 9-10
180^5
All the times and temperatures stated are only to be used as a guideline. They can vary depending on which recipe or dish is being prepared.
Roasting (Preheat for approx. 4 minutes)
(door ajar)
| Dish Thermostat Cooking Traytime level(min) | ||
| Meat (500 g)Beef 12 - 15 1Lamb(shoulder, leg) 15 1Pork, veal 30 1Poultry (500 g)Chicken 25 1Game 20 - 30 1 |  | |
Oven Cooking
| Dish Thermostat Cooking C^o | Shelf time (min) | position | |
| Starters | |||
| Cheese soufflé 2003 | 5 - 40 | 1 Up | |
| Quiche | 240 45 - 50 | 2 Down | |
| Stuffed tomatoes | 240 40 - 45 | 1 Down | |
| Gratin | 240 40 - 50 | 1 Up | |
| Pizza | 230 26 - 30 | 1 Up | |
| Scotch eggs | 270 | 10 | 1 Down |
| Cheese sticks 240 | 10 | 1 Up | |
| Croque-monsieurs | 240 | 10 | 1 down |
| Meat (500 g) | |||
| Beef | 270 12 - 15 | 2 down | |
| Lamb (shoulder, leg) | 270 12 - 15 | 2 down | |
| Pork | 240 | 25 | 1 up |
| Veal | 230 | 25 | 1 up |
| Chicken | 260 20 - 25 | 2 down | |
| Rabbit | 240 | 30 | 1up |
| Fish(500g) | 250 | 15 | 2 down |
| Bream | 260 | 15 | 2 down |
| Pastries | |||
| Biscuits | 180 30 - 35 | 1up | |
| Cake | 210 | for 15 | 1up |
| then | 180 | for 50 | |
| Pie | 230 45 - 50 | 1 up | |
| Baked apples 240 | 25 - 30 | 2 Up | |
Grilling
(Oven door ajar) (Preheating approx. 4 minutes)
| Dish | Cooking times Shelf | position | |
| Side 1 | Side 2 | ||
| Steaks | 7 min | 6 min | 3 Up |
| Lamb chops 8 min | 6 min | 3 Up | |
| Entrecotes | 10 min | 6 min | 3 Up |
| Beef chops | 15 min | 15 min | 3 Down |
| Pork chops | 9 min | 7 min | 3 Up |
| Sausages | 9 min | 6 min | 3 Up |
| Black pudding | 12 min | 10 min | 3 Up |
| Cod steaks | 10 min | 8 min | 3 Up |
| Veal chops 8 min | 6 min | 3 Up | |


- ① 1/ The Oven
- ② 2/ Control Panel
- ③ 3/ Accessories
- Features
- Safety Recommendations
- 1/ Connection
- Any error in connecting the appliance invalidates the guarantee.
- Wiring instructions for U.K and Ireland only :
- APPLIANCES WITH FITTED PLUG
- FITTING A PLUG - IMPORTANT
- 2/ Installation
- 3/ Safety recommendations
- Before using your Oven for the First Time
- Using your Oven
- ⑤ 1/ Cooking using the Rotisserie
- Practical Hints
- Cleaning
- Maintenance
- Replacing the lead
- Cooking Tables
- Conversion Table:
- Grilling
Brand : MOULINEX
Model : Compact Chef AP2
Category : Convection Oven