
Relaxx'x ProSilence Plus BGS5320R - Vacuum Cleaner BOSCH - Free user manual and instructions
Find the device manual for free Relaxx'x ProSilence Plus BGS5320R BOSCH in PDF.

User questions about Relaxx'x ProSilence Plus BGS5320R BOSCH
0 question about this device. Answer the ones you know or ask your own.
Ask a new question about this device
Download the instructions for your Vacuum Cleaner in PDF format for free! Find your manual Relaxx'x ProSilence Plus BGS5320R - BOSCH and take your electronic device back in hand. On this page are published all the documents necessary for the use of your device. Relaxx'x ProSilence Plus BGS5320R by BOSCH.
USER MANUAL Relaxx'x ProSilence Plus BGS5320R BOSCH
Densitization and Preoperative Isolation for Solvents 100-120 pp. ISBN 978-7-503-0146-1
()08594642
Robert Rich Halage, Géraldine Carney
Carry Wainwright
81739 Nuchen, GERMANY
www.zouchhome.com
1
0616632
NOSS
BOSCH
A
-
2017年4月16日 传真:010-83595366 邮箱:ir@hongkong.com
-
120m^3 400kg·s-1
- 100m^3 400kg·s-1
- 100m^3 400kg·s-1
1
· = 14 ( + AC) ^2 - ( - ) ^2
M. M. Kudryashvili
I. Zebkovska
1. 用法
g(1)g(2)g(3)g(4)g(5)g(6)
H
1
Sicherheit 2
de Gebrauchsanleitung 38
Safety information 4
en Instructions for use 42
Consignes de sécurité 5
rr Mode d'emploi 46
Normedi securezza 7
Istruizioni per I'uso 50
Veiligheidsvoorschriften. 9
Hl Gebruiksaanwijzing 54
Sikkerhedsanvisninger 11
a Brugsanvisning 58
Sikkerhetsanvisninger 12
Bruksanvisning 62
Sakerhetsanvisningar 14
Bruksanvisning 66
i: Turvaohjeet 15
Kayttöohje 70
Consejos y advertencias de seguridad 17
es Instrucciones de uso 74
Indicações de seguranca 19
pt Manual de instruções 78
Yno8eiEic aogpaaleiaç 21
08nyiec Xpohong 82
Güvenlik bilgileri 23
Kullanma kilavuzu 86
Wskazówki dotyczne bezpieczestewa 25
PI Instrukcja uzytkowania 90
Biztonsági utmutató 27
hu Hasznalatiutasitas. 94
IpaBnlaTexHnKn6e3oNaChocTn 29
UouncaHne npnbopa 98
Kayinci3ik HyckanaapbI 31
Kc 102
安全信息 33
zh 使用說明 106
th 34
110
37.
117
de
Please keep this instruction manual. When passing the vacuum cleaner on to a third party, please also pass on this instruction manual.
Intended use
This appliance is intended for domestic use only. This appliance is intended for use up to a maximum height of 2000 metres above sea level. Only use this vacuum cleaner in accordance with the instructions in this instruction manual.
In order to prevent injuries and damage, the vacuum cleaner must not be used for:
Vacuum-cleaning persons or animals
Vacuuming up:
- hazardous, sharp-edged, hot or glowing substances.
-damp or liquid substances.
- highly flammable or explosive substances and gases.
- ash, soot from tiled stoves and central heating systems.
- toner dust from printers and copiers.
Spare parts, accessories, dust bags
Our original spare parts, original (special) accessories and original dust bags are designed to work with the features and requirements of our vacuum cleaners. We therefore recommend that you only use our original spare parts, original (special) accessories and original dust bags. This will ensure that your vacuum cleaner has a long service life and that the quality of its cleaning performance will remain consistently high throughout.
Please note:
Using unsuitable or inferior-quality spare parts, (special) accessories and dust bags can damage your vacuum cleaner. Damage caused by the use of such products is not covered by our guarantee.
Safety information
This vacuum cleaner complies with the recognised rules of technology and the relevant safety regulations.
The appliance may be used by children over the age of 8 years and by persons with reduced physical, sensory or mental capacity or by persons with a lack of experience or knowledge if they are
supervised or have been instructed on the safe use of the appliance and the have understood the potential dangers of using the appliance.
Children must never play with the appliance.
- Cleaning and user maintenance must never be carried out by children without supervision.
- Plastic bags and films must be kept out of the reach of children before disposal.
>= Risk of suffocation.
Proper use
Only connect and use the vacuum cleaner in accordance with the specifications on the rating plate.
- Never vacuum without the dust bag or dust container, motor protection or exhaust filter.
> This may damage the vacuum cleaner.
Always keep the vacuum cleaner away from your head when using nozzles and tubes.
> This could cause injury!
- When vacuuming stairs, the appliance must always be positioned below the user.
- Do not use the power cord or the hose to carry or transport the vacuum cleaner.
For safety reasons, if this appliance's mains power cable becomes damaged, it must be replaced by the manufacturer, their after-sales service department or a similarly qualified person.
If using the appliance for longer than 30 minutes, pull out the power cord completely.
- When disconnecting the appliance from the mains, pull on the plug itself to remove it; do not pull on the power cord.
- Do not pull the power cord over sharp edges or allow it to become trapped.
- When the cable is being automatically rewound, ensure that the mains plug is not thrown towards persons, body parts, animals or objects.
>= Use the mains plug to guide the power cord.
Pull out the mains plug before carrying out any work on the vacuum cleaner.
- Do not operate the vacuum cleaner if it is damaged. Unplug the appliance from the mains if a fault is detected.
For safety reasons, only authorised after-sales service personnel are permitted to carry out repairs and fit replacement parts to the vacuum cleaner.
- Protect the vacuum cleaner from the weather, moisture and sources of heat.
- Do not pour flammable substances or substances containing alcohol onto the filters (dust bag, motor protection filter, exhaust filter, etc.).
The vacuum cleaner is not suitable for use on construction sites.
>= Vacuuming up building rubble could damage the appliance.
- When not in use, switch off the appliance and pull out the mains plug.
At the end of its life, the appliance should immediately be rendered unusable, then disposed of in an appropriate manner.
Please note
The mains socket must be protected by at least a 16 amp circuit breaker.
If a circuit breaker is tripped when you switch on the vacuum cleaner, this may be because other electrical appliances which have a high current draw are connected to the same power circuit.
To prevent the circuit breaker from tripping, select the lowest power setting before switching the appliance on, and increase the power only once it is running.
Disposal information
■ Packaging
The packaging is designed to protect the vacuum cleaner from being damaged during transportation. It is made of environmentally friendly materials and can therefore be recycled. Dispose of packaging that is no longer required at an appropriate recycling point.
Old appliance
Old appliances still contain many valuable materials. Therefore, please take appliances that have reached the end of their service life to your retailer or recycling centre so that they can be recycled. For current disposal methods, please enquire at a retailer or your local council.
Disposal of filters and dust bags
Filters and dust bags are manufactured from environmentally friendly materials. Provided they do not contain substances that are not permitted in household waste, you can dispose of them with your normal household waste.
Notes on the energy label
This vacuum cleaner is a general purpose vacuum cleaner with a primary hose.
To achieve the declared energy efficiency and cleaning performance class on carpet, please use the interchangeable universal nozzle.
To achieve the declared energy efficiency and cleaning performance class on hard floor with nooks and crannies, please use the hard floor nozzle provided.
These calculations are based on the Commission Delegated Regulation (EU) No. 665/2013 of 3rd May 2013 supplementing Directive 2010/30/EU.
Unless otherwise stated, all the procedures referred to in these instructions were carried out in accordance with the EN 60312-1:2017* standard.
*As the motor service test is carried out with the dust collector empty, the stated motor service life must be increased by 10% for tests with the dust collector half filled.
fr
Ynoeicic yia nV anooupon
Sigmaeuaia
H oukeuaia npoatee ie tny nkeptikn okouna ano zmuia kata tn metapopá. Anoteleitai ano pfiká npoc to nepiβaalov uika kal y' auto evai avakukwaiun. Napadwote ta uika oukeuaiaac nou de xpeiazovtai allo, ota onuela oukyevtpwanctowukov avakukwongc.
PiAia ouakeun
Oi naIiec oukeuec nepieoxouv noa akoua xnoia uika. I' auto napabiiedete tny axpnotn ouokeun aac o' eva eiko kataoTma n o' eva kevtpo avakukawonc. Touc pnonouc anoupanc mnpeite va touc nnnpopnpntheta tca iiko kataoTmuata n otic unnpoeiec tou 8nou oac.
Anoupan Tou piaItpou kai Tnc oakoulaac tou piaItpou
UNTKINIODeNJKNBOTHbIX;
BCaCbBaHnH:
-BpeHbIXIJIy3IOPOBByBeIecTB,OCTpbIX,TropaHX IINpackaJIeHHbIXIpeMeTOB;
-MOKpbIX ppeDMTeOB JXnKoCTeN;
- 莫KOBOCnPaMeHJUOxXcR IIN B3pbIByaTbIX BeIeCTB INra3OB;
-пennialа, сади ИЗ каделльные Neчай И системцентрально OTONПЕн; -слары -слары -слары -слары -слары -слары -слары -слары -слары -слары -слары -слары -слары -слары -слары -слары -слары -слarkу -слarkу -слarkу -слarkу -слarkу -слarkу -слarkу -слarkу -слarkу -слarkу -слarkу -слarkу -слarkу -слarkу -слarkу -слarkу -слarkу -стг. -стг. -стг. -стг. -стг. -стг. -стг. -стг. -стг. -стг. -стг. -стг. -стг. -стг. -стг. -стг. -стг. -стг. -стг. -стг. -стг -стг. -стг. -стг. -стг. -стг. -стг. -стг. -стг. -стг. -стг. -стг. -стг. -стг. -стг. -стг. -стг. -стг. -стг. -стг. -стogr. -стogr. -стogr. -стogr. -стogr. -стogr. -стogr. -стogr. -стogr. -стogr. -стogr. -стogr. -стogr. -стogr. -стogr. -стogr. -стogr. -стogr. -стogr. -стogr. -стigr. -стogr. -стogr. -стogr. -стogr. -СТВ -СТВ -СТВ -СТВ -СТВ -СТВ -СТВ -СТВ -СТВ -СТВ -СТВ -СТВ -СТВ -СТВ -СТВ -СТВ -СТВ -СТВ -СТВ -СТВ -СТВ
ToHepa H3 npHTepoB nn KOnnpoBaIbHbIX annapaTOB.
3anachbIe qactn, npHaJneJXHocTn, MeuKN dIy nbIIN
Haun opnHnHaNbHbIe 3aJacHbIe qactn n npnHaJnxKHOCTN, a TaKKe opnHnHaNbHbIe DOONHnTeNbHbIe PnHaJnxKHOCTN, KaK N opnHaNbHbIe MeuKN DnA PbIn, ONTmAmNbHO NOxOaT K CBOINCTBaM N Tpe6oBaHNAM Haux PbInecocob. NoTOMy MbI peKomeHnyem Bam HcNoB3OBaTB NCKLIOHTeNbHO opnHaNbHbIE 3aNaChbIe QACTN IN PnHaJnxKHOCTN, a TaKKe IINsb OPnHnHaNbHbIe DOONHtEnbHbIe npnHaJnxKHOCTN MewKn DnA PbIn. ToIbKO taKIM O6pa3OM ObecneuHbAEcT DaIrN cPOK cnJx6bl H rapaHTnpyETcB BlicOKN pe3yIbTaT y6OpKn C NOMOsbu BaWero PbInecoca.
YkaaHne:
NCN0b3OBaHHeHEnoDxOJHxHnHKeAueCTBeHHbIX 3aNaChbIX qacte, npHaadJeKHOCTe/ DOnONHHTeBbIX npHaADJeKHOCTe Hn MeKOB dIy NIOIMoKeT Bb3BaTb NOBpeXDeHne NbIeCocA. Ha7a rapaHTn He pacnpocTpahReTcHa ycTaPaeHne NOBpeXdEHN, BB3BaHHbIX NCNoJIb3OBaHHeM NoDo6hIx n3denn.
IpaBnlaTexHnKn 6e3oNaChOCTN
Данныпылесoc COOTBETCTByet 6шeприЗнньIM TexHnueckm Tpe6OBaHnЯm n CpeuaJIbHbIM npaBnIaM TexHnKn 6e3OpaCHOCTN.
IcnoIb3OBAHne nbIeCoca
deTbMn cTapwe 8 let n
IIuamN C OrpaHnueHHbIMN
fN3nuecknMn
HIn yMCTBeHHbIMN
CNoOC6HOCTaMn, a TaKKe
IIuamN, He NMeHOzHMN
OnbTa o6paUeHnca
IOo6HbIM o6OpyIDOBaHHeM,
DOpyCKaETcra TOnbKO
IOd IprncmOTpOM HIn
IocNe HHCTpykTaJa
IIO 6e3OpacHomy
HCNoIb3OBAHnO prn6opa n
OCo3HaHnA daHHbIMN IIuamN
ONaCHOCTe, CBa3aHHbIX C
ero 3KcPnyatauanei.
-ДетямЗапеценьИграТьСприбором.
UHCTKa H yXoI He IOnJHbI pOu3BOiNTbCra DeTbMn 6e3 npHcMOtpa.
Пл actNKOBbIe MeShKn I NOJIIMepHyIO PIIeHky XpaHnte N yTnIN3NpyTe B HeOCTyINHom DIna DeTei MeCTe.
> = ONaCHoCTb ydyuBja!
PpaBnIbHoe nCNoIb3ObaHne
I OJKnUoyHHe N 3neKtpocetn H BKNUoyHHe Nblncoca DOJXHO npON3BOoNTbcr TOnbKO C yyETOM DaHHbIX TINOBOTo Ta6nnuKn.
Hnkorda He nCnoB3yIte nbIeNcO 6e3 cMeHHoro nbIeNc6OpHnka IIn6o KOHTeHepa IInr c6opa nbIiIN, MOTOPHOrO N BblNyCKHOrO fHbTPOB.
=Пылесoc moKet 6bITb NOBpeKdEH!
He noHocHTe BCacbIBaHOu HacaIky I Tpy6ky K roIIOBe.
3To MoKeT npHBecT K TpaBMe!
■Pn y6opke IecTHNcbl nbIeCoc Bcerda DonKeH HaxoNTbcra Hxke NoB3OBaTeJI.
He nCnoB3yIe cTeBoN Ka6eNb N IuaHr dInepeHoCKn /TpaHCnpTnpOBKn nbIeocca.
■Bo n36exkHne onaCHOCTn 3aMeHa NOBpeXeHHORo ceTeBOrO Ka6en DaHHoro np6opa MoKeT 6bIb BblONHeHa TOnbKO IpOn3BOJNTeMe Hn aBTOpH3OBaHHo IM CepBnCHo CnyK6o N6o NNOC, IMeIOUIM aHaIOnHyU KBaIINΦNkaUIO.
Pn npoOJKeTbHocTn 3KcnIyatauHn 60nee 30 MHHyt ceTeBoi Ka6eB Heo6xOdmo NOnHOCTbBO BbITAHyTb.
PnOTcoeHHeHH np6opa oT 3neKtpocetN BceIa 6epntecb pykO 3a BNky, a He 3a cTeBoN ka6enb.
CneIte 3a TeM, yTo6bI ceTeBOH Ka6eBn He 6bln 3axKaT HHe IonoJaHa Ha ocTpblc Kpa npeMeTOB.
■ Npea aBtOMaTnueckm CMaTbIbAHnEM ceTeBOrKa6eYbEiTeCbBTOM,TO eRO ITeKeP He cenPaETc3aIIOeJ,uaCTN TeNa,KNBOTbIX ININ Dpyne o6beKbl.
> = OToeHNHte cTeBOKa6Enb OT 3NeKtpocetN, NotAHyB 3a WTeKeP.
He noIb3yIeTcB HeHcnpaBHyIM nbIeCocOM. PnB O3HnKHOBeHHn HeHCnpaBHOCTN BbIHMaTe BnKy n3 po3eTKn.
Bo n36eXaHne onaChocn Bce pa6oTb no peMoHTy n 3aMeHe DeTaIe Nblncocca CneJeT BblIOJIHrTb TOnbKO B aBTOpH3OBaHHoCepBnCHoC cnYk6e.
3aunuayTe nIeococ OT BO3deNCTBnHe6laonnpnATHbIX MeTeopolorHuecknx ycNoBn, BnaXHOCTH N HCTOUYHKOB TENla.
He noDBepraTe fHbTpBcMeHHbI bIe6OpHNK, MOTOPHb FnbTp, BbInyckHO HbTp nT. D.) BO3DeIECTBnIO BOCIIaMeHHOUHXCnIN CnNpTOCoDEpKaUx BeueCTB.
■Пьilecoc He npedHa3HauenДЯ 3KcnnyatauHn HcTPOHTeBbIX 06bEKTax.
>> Pn3acacbBaHnCTponTeIbHO Mycopa nIineCOC MOKeT BbIHTn I3 CTPOJ.
Iocne OKOHuaHn 3KcNpyataunn BbIKNoHTe np6op nCMotaTe ceTeBOk6eb.
OtnyKBnne np60bpI cdaTe HeepnroHbIMn nDaIbHeIero IcNoB3oBaHHa, a 3aTEM yTINN3npyHTBE COOTBeCTBnH C DeICTByUOUMN PpaBNaMn.
BHHMaHHe:
CeteBa po3eTKa DOnJXHa 6bTb 3aunueHa npedeoxpaHnteMe He MeHee yem Ha 16A.
PnB BkIIOeHnn np6bopa npedeoxpaHntb MoKet cpa3y cpa6oTaTb, ecnn OndHOBpeMeHHo B daHHyo 3NeKtpueeckyU ueh BkIIOeHbl DpyrHe np6bOpbl C 60nbOoi o6uienotpe6JIeMoM MoHocTbIO.
Cpa6aTbIbAHne npedoxpahnte moKHO npedOBpaNTb,ecnn nepeBkHoueHem np6opa yCTaHOBTb MHHMaJIbHyO MOUHOCTb,a 3aTeM NOCTeNEHNO yBENuHTb e.
Hnctpykunno ytnnn3aunn
ynaKOBka
Ynakobka cnjxnt dna 3auntbI nbinecoca ot NOBpeKdHn np TpaHCnpTnpOBke. OHa N3ROTOBHeHa n3kOJorueckn uCtBX MaTePnAIOB, IO3Tomy eMooHNO HcNoJIb3OBaTB dNl BTOpHOn Ipepea60TKn. HcNoJIb3OBAHHbIe ynakOBouhble MaTePnAblOTHOCTBe bnyKtbl pniEma BTOpcbIpba.
OtcnykBnne np6opbl
OtcnykBwne np6opbIyBnIOTcEHHbIM cbIpbeM DnAaBHeWero HcNoJIb3OBAHn. NToTomy OTCnyKWBn np6Op cNeJyET OTHeCTN dInIepy INB PyHK TpIeMa BTOpcBpa DnAaBHeWe yTHIN3aun. HOpMaun o BO3MOxHocTH yTHIN3aunn HaxoDITcY yDInepa INN B MeCTHO aDMNHCTpaunn.
YTHIN3aHcHbTPOB hCMeHHORo nbine6OpHnKa
Фиьтпи И смehнь nbilec6opнИ n3roTOBJIeHbI 3 ekONOrnueckn 6e3BpeNbIX MaTePnaIOB. Ecnn OHH He copejkat B ce6e HNKaKnx BeIecTB, 3anpeHnBX K yTININ3aCIN C bITOBbIM MycopOM, TO Bbl MoKeTe yTININ3InpoBaTb IN BMeCTe C bITOBbIM MycopOM.
OcbI ShaHcOpfblTexHnKa TaHbINFaH KaFnDaIapbHa JHe dAn Kayinci3dk KaFnDaIapbHa cai.
■Бул Крьлгынblжасbl 8-deri xhe OdaH yIken 6anapdbH, cohIme KaTAP K03fany, ce3y xhe OIlaHy MymKInDiIKTepi WeKTeJrReH xHe/ Hemece XetKlIikTi 6ilimi JOK TynFaIapDbH naJaIaHaHybHa Tek Olanpbl 6ipey KaDaFanaFaH XaFdaIaHemece OcbI KpyBllbHbl Kayinci3 NaIdaIaHy aNy ywiH, HycKaynapbIMeH TaHbIC BoJca XHe Dypbc I naJaIaHa6bay caIapbIHah KaHdai KayintepdiH opbIH aJaTbIHbIH TyciHeTI 6OJca fHa naJaIaHaNApbHa 6OJaBl.
Bana napfa ocbi 6ynbIMMeH O'Hayfa pyKcT eTneHi3.
BaIaIapra epeceKTepeH KaIaIaybIHcbl3 Ta3anay KHe aIbH any KbImeTi uH HOpbIHaIaTbH opeKeTTepi OpbIHaYra pyKcat etneHi3.
Пл actкkanтap meнпленka napblбаалanap колыжетпгінъдяcaKaTafbl3ЖэHe KOKbICKa TactaHbI3.=>THyHsbIFyKayni6ap!
Tnicti peTTe naIdaJaanHy
HaHcOpfblWbI TeK 3ayblTbIK TaKTaHwa 6oHbHwa Kocbin icKe KocblHbI3.
Ewkaaah 7aH Ka6bl Hemece KOHTeHepic3 MOTOpdbi Kopfay Hemece ypney cy3ricn WaHcOpMaHbI3. Kip xyfbu MaunHa 6y3blnKetyi MymKiH!
Ewkaaan 6acbl andbHda fopcyHka MeH Ky6bipdbi
waHCOPMaHbI3. Kapakat any kayni 6ap!
CaTbInapda WAnHcOpFaHda KypblbIfbl ePdaiBIM naDanaHybI acTbIHDa Tpybi KepeK.
■ Kenire kocy kaBeni MeH WnHaHTbI WaHCopfbTbI Tacy / TaBImaJdA ywiH naDanaH6aHbI3. Ocb 6yibIMhbiH Keni KaBeni 6y3blbn 3aKbIMdaHraH Kynde 6oJca, KayInTePdiN naiDa 6onybH 60ndbpMay ywiH OHBI WBIFapwBi HeMece TexHNkaJIbIK Kb3MET Kepcety OPtaNbIfbIH MAmHbApkblbl, Hemece ocblnapra YKcac apHaBbl 6iimi 6ap aam TapabHaH aybCTbIPbIyblKaXeT.
Kymbic aici 30 MNHyTTaH y3ak 6oIca, xenire Kocy Ka6eniTOJbIFbIMeHTapTbIN aJIbIHbI3.
Kocy ka6eJIiHe emec,po3eTKaJaH TapTbI IN KypblfblHbI XeJIeH aXbIpaTbIHbI3.
Xenire Kocy Ka6enin etkip Kbipnapan TapTnAb3 Xehe 6acbnKoMaHb3.
Xeni aasacbi KaebIb ABTomattbl TapTbImaca aamdap, deHe MyweJIepi, xaYaNap Hemece 3aTTap MeHETapTbIN KetneyiHE Ke3 KeTki3iHi3.
=>Xenire kocy ka6eniH aIa Kaemerimeh anapbIbI3.
aCopfbuTa eKisineH KymbicapdbH 6apnbfbn ETK3y anDbHaH Jei aBipbH WbIrapbn anbHb3.
3aKbIMdaIraH WaHcOpFbIUtb IcKe KocnaHbI3. AkaynbIk naJa 6oNca aWahbI TapTbIn KObHbI3.
aInTeepin anbH any yuH uHcOpfbuHTbI TEK ekineTki Kbi3MeT Kepcety opTaBbFbI fHa XeHdeyi Hemece 6enweKeTpH aybCTbpyb Kepek.
WanCOPfblWTblyaaypaBlaeepiHeH,bnFaIdbkTaHxHEKbIyKe3depiHeh KopraHbI3.
KahatbH Hemece KpambHa aankorolb 6ap 3aTKeTepdi cy3ire naDanaH6aHbI (waH Ka6bl, MOTOpDbI Kopray cy3rci, yPney cy3rici T.6.).
aHcopfbIbTbkypbblbCTa naIaNanahy Mymkih emec.
=Kpbblbc KObictapbH copy Kypblfbl 3aKbIMdaHybHa aBnIKenyi MyMkiH.
Erep wahcnpmacaHb3 ToHa3blTkbIWTbI eWipin ahaHb1 po3ETkanaH WbIFapbHb3.
Eckipreh KpybIfblapdbi naaandaHbn 6oJMaTbIH KbIbIHb3,coCbIH KpyblfblbITnicti pette KeDere XapaTyFa anapbIbI3.
Eckepihi3
Keji po3eTKacbHa KaMHne 16A caKaTHDbipfbuBb6oyJI Tnic.
ErepcaKtahdbipbIu KpyblfnbKocblfnaHaia icen Kanca, OHda 6yn 6acka 3neKtp Kpyblfnbnap da 6ipdei Tok Xenicie H KofapbkyocmyHimekocblfanhce6e6iHeh 6onybMyMKIH.
CaKaTaHDbIpbIi icTeN KanybIH KypblIbfHbI KocyaHa anDbIH eH Temehri backbIka petten COcbIH fHa Jxorapbipak Kyat backbIbHa etiH3.
Kādere ākapaTy 6oBbIHwa HycKaynap
Opama
Kantama shaHcopfbIbITbTacbIMdayda 3akbIMdahcakTaNb. On KopwafAH optafa 3nH KeNTipMeiTINMatpnaIapdAn JacaanfAH cOyuH INbIK KeDereJxapaty M yMkH.Keperi KOK opam MaTePnaIapbH »Gruner Punkt« KeDere Jxapaty KByeciHi KInHay KaJIapbHa anapbHb3.
Eckipren Kypblrbnap
Eck KpybIbInap iwiHne ani de xorapbl mHnik 3aTteKtep 6ap. Con yuin eck KpybIbIbHbI caTyubifa Hemece KeDere Xapaty optaIbIbHa bepiH3. AfbIMdk KaDere Xapaty konDapbl TypaIbIaknapaTTb CaTyBdaH Hemece KOFamDbIK YnbIMHa cypaHbI3.
Cy3rMeHwaKa6bHKeJeReXapaTy
Cy3ri MeH raH Ka6bI KOp7aHaH opTa 3nH KeTTipMeTih MaTePnAnDapdAn Xac anFaH. ErepOndaYy Ko8bcI yUHH TbiuM CaBnHa 3aTKeTp JOK 60JcA, OHb KaJIbINTbI YIKoKbICbHa Tactay MYMKIH.
3Heprn 3TNKeTKacbI TypaBl eCkeptne
OcbI wahcnpbIw eM6e6an wahcnpbIw anraukbl Wnahrnen 6oJaB1.
Xa3bIiHa 3heprn TImdInirine XeHe KINem Ta3anay cbHbNbHa KeTy ywiH aybcBn KocblNaTbH eM6e6an fOpcyHKaHb NaDanaHbHb3.
Ka3blfah 3heprn TImdiinire XeHe KaTbI eDen TecikTepi XeHe OyBkTapbl Men Ta3anay CbHbInbHa XeTy yuIN HNtAftbl KaTbI eDen CONIOcbH naDanaHbHbI3.
EcenTep KOMnCCnHbIH (EO) Nr. 665/2013 3. Mai 2013 xapHaMaCbHa 2010/30/EU nipeKTHBaCbHa KocankbI 6oNraHa Heri3dEnreH. OcbI HycKayda dAn cnaTTaMaraH a icTeP DIN EN 60312-1:2017* herizihde opbIHDaIraH.
*ErepMOTOPKmbicicteyMe3imH TeKbIbCbime HopblnlaNtblH6oJca,petTeteti HMeHdIMOTO pKmbicictey Me3imH KapTbJaTtoBlaWahbIdbcimeTekepyuHHeepinreHmHeh 10 % KOrapbpetteyKepek.
zh
請妥善保存使用說明書。
WHTW
nntnnn nnnn nnnn nnnn nnnn nnnn nnnn nnnn nnnn nnnn nnnn nnnn nnnn nnnn nnnn nnnn nnnn nnnn nnnn nnnn nnnn nnnn nnnn nnnn nnnn nnnn nnnn nnnn nnnn nnnn nnnn nnnn nnnn nnnn nannn nnnn nnnn nnnn nnnn nnnn nnnn nnnn nnnn nnnn nnnn nnnn nnnn nnnn nnnn nnnn nnnn nnnn nnnn nnnn nnnn nnnn nnnn nnnn nnnn nnnn nnnn nnnn nnnn nnnn nnnn nnnn nnnn nnn
yayanannnaaann
i 1
a 1
8 1
1
1
1
1
1
1
1
1
1
nnnnnnnnnnnn
1
nunwnanannnnnnaaunnnaaunnnnnnnnnnn
=>u u anmwnnnnna
muaunnna
shouuunueaegnueeaeaeaeaeaeaeaeaeaeaeaeaeaeaeaeaeaeaeaeaeaeaeaeaeaeaeaeaeaeaeaeaeaeaeaeaeaeaeaeaeaeaeaeaeaeaeaeaeaeaeaeaeaeaeaeae
Wnggduuulquduunuauduquonadnnaaannrnnrnn
i 1
uuaaunuuuuaa aannnnnnae
nnnnnnnnnnnnnnnnnnnnnnnnnnnnnnnnnnnnnnnnnnnnnnnnnnnnnnnnnnnnnnnnnnnnnnnnnnnnnnnnnnnnnnnnnnnnnnnnnnnnnnnnnnnnn
Huaanuununununununununununununununununununununununununununununununununun
Tuaaegdunuun 30 wannwannnnae
mangnnaaennnnnnnnnnnnnnnnnnnnnnnnnnnnnnnnnnnnnnnnnnnnnnnnnnnnnnnnnnnnnnnnnnnnnnnnnnnnnnnnnnnnnn
W
mnnnne nannnnnnae nnne nnnnnnnnnnnnnnnnnnnnnnnnnnnnnnnnnnnnnnnnnnnnnnnnnnnnnnnnnnnnnnnnnnnnnnnnnnnnnnnnnnnnnnnnnnnnnnnnnnnnnnn
iiananlnd
nnaannnnneennnnnnnnnnnnnnnnnnnnnnnnnnnnnnnnnnnnnnnnnnnnnnnnnnnnnnnnnnnnnnnnnnnnnnnnnnnnnnnnnnnnnnnnnnnnnnnnnnnnnnnnnnnnnnnnnnnnnnnnnnnnnnnn
1
Tnnaa nnnn nn nnnnnnnnnnnnnnnnnnnnnnnnnnnnnnnnnnnnnnnnnnnnnnnnnnnnnnnnnnnnnnnnnnnnnnnnnnnnnnnnnnnnnnnnnnnnnnnnnnnnnnnnnnnnnnnnnnnnnnnnnnnnnnn
UJauuaagauanmnaaannnnaa
mnnnne nnnnnae nnnnnae nnnnnae nnnnnae nnnnnae
iuiuulunununununununununununununununununununununununununununununununununununununun
nntnnnnnnnnnnnnnnnnnnnnnnnnnnnnnnnnnnnnnnnnnnnnnnnnnnnnnnnnnnnnnnnnnnnnnnnnnnnnnnnnnnnnnnnnnnnnnn
mnnnne nnnnnnnnnnnnnnnnnnnnnnnnnnnnnnnnnnnnnnnnnnnnnnnnnnnnnnnnnnnnnnnnnnnnnnnnnnnnnnnnnnnnnnn
aannnnnnaan anananaan anananaan anananaan anananaan anananaan anananaan anananaan anananaan anananaan anananaan anananaan anananaan anananaan anananaan anananaan anananaan anananaan anananaan anananaan anananaan anananaan anananaan anananaan anananaan anananaan anan anaannnnaaannnnaaannnnaaannnnaaannnnaaannnnaaannnnaaannnnaaannnnaaannnnaaannnnaaannnnaaannnnaaannnnaaannnnaaannnnaaannnnaaannnnaaannnnaaannnnaaannnnaaannnnaaannnnaaannnnaaannnnaaannnna
V
nnnnnnnnnnnnnnnnnnnnnnnnnnnnnnnnnnnnnnnnnnnnnnnnnnnnnnnnnnnnnnnnnnnnnnnnnnnnnnnnnnnnnnnnnnnnnnnnnnnnnnnnnnnnnnnnnnnnnnnnnnnnnnnnnnnnnnnnnnnnnnnnnnnnnn nn nannn nannn nannn nannn nannn nannn nannn nannn nannn nannn nannn nannn nannn nannn nannn nannn nannn nannn nannn nannn nannn nannn nannn nannn nannn nannn nannn nannn nannn nannn nannn nannn nannn nannn
inai
Tnnnnnnnnnnnnnnnnnnnnnnnnnnnnnnnnnnnnnnnnnnnnnnnnnnnnnnnnnnnnnnnnnnnnnnnnnnnnnnnnnnnnnnnnnnnnnnnnnnnnnnnnnnnnnnnnnnnnnnnnnnnnnnnnnnnnnnnnnnnnnnnnn
mnnnnaaauuaunu
aannnnnnaanennnnnnnnnnnnnnnnnnnnnnnnnnnnnnnnnnnnnnnnnnnnnnnnnnnnnnnnnnnnnnnnnnnnnnnnnnnnnnnnnnnnnnnnnnnnnnnnnnnnnnnnnnnnnnnnnnnnnnnnnnnn
wnnnnnaannnnnnnnnn
a aae aee
Wnannnnnnnnnnnnnnnnnnnnnnnnnnnnnnnnnnnnnnnnnnnnnnnnnnnnnnnnnnnnnnnnnnnnnnnnnnnnnnnnnnnnnnnnnnnnnnnnnnnnnnnnnnnnnnnnnnnnnnnnnnnnnnnnnnnnnnnnnnnnnnnnnnnnnnn nn nannn nannn nannn nannn nannn nannn nannn nannn nannn nannn nannn nannn nannn nannn nannn nannn nannn nannn nannn nannn nannn nannn nannn nannn nannn nannn nannn nannn nannn nannn nannn nannn nannn nannn nn annn nn annn nn annn nn annn nn annn nn annn nn annn nn annn nn annn nn annn nn annn nn annn nn annn nn annn nn annn nn annn nn annn nn annn nn annn nn annn nn annn nn annn nn annn nn annn nn annn nn annn nn annn nn annn nn annn nn annn nn annn nn annn nn annn nn ann
jiall yS jiall noaill
Lalb Aiyjy jy 100000000000000000000000000000
i j 1
Aalai jai aiai jia iia jai jai ai
aill 1
aee aae ae eae aeae aeae aeae aeae aeae aeae aeae aeae aeae aeae aeae aeae aeae aeae aeae aeae aeae aeae aeae aeae aeae aeae aeae aeae aeae aeae aeae aeae aeae aeae aeae aeae aeae aeae aeae aeae aeae aeae aeae aeae aeae aeae aeae aeae aeae aeae aeae aeae aeae aeae aaee
y
1
chokill 1alball pss
jolll 10
a 2000 a
i 1
1
g 1
- 以 3 - 1 ,求 2x + 1( x + 2) ( x + 3)
aallll lalall, aalalal yalalal lalalol, alalal lal
a
plssjll juaill aaiil lly aalll sall bia,
alall yaiu 1 ayuokill liuao Li jie
1,aaalal alalal
yjgbl jae jaaai agjall aaiill
S木弟形 COBD = S COD + S_ BDO
:45g2la
a jil uS1, aolal ciaIa/laIaSi ci IaIaIog. Jie gai plsiinl
y
jul 1
iiaai 102
aill 1gll
aall jla 1g
LgGwA Joo 1
y
jgl 0g2dall a1a11 g
1/0
018 p1211 45
1 1
a
1
Aisoll JabJy
aikai jibj jy
13.2 gannall all JocI eJz!
aai j 1
de
Congratulations on your purchase of the Bosch Relaxx'x vacuum cleaner.
This instruction manual describes various Relaxx'x models, which means that some of the equipment features and functions described may not apply to your model. You should only use original Bosch accessories, which have been specially developed for your vacuum cleaner, to achieve the best possible vacuuming results.
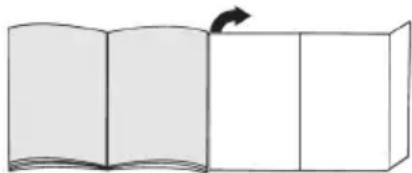
Fold out the picture pages.

Your vacuum cleaner
1 Adjustable floor tool with accessory connection
2 Telescopic tube with sliding switch and accessory connection
3 Accessories holder
4 Flexible hose
5 Handle
6 Brush ring (to fit on the upholstery nozzle)
7 Parking aid on the side of the appliance
8 Power cord
9 Dust container
10 Upholstery nozzle
11 Crevice nozzle
12 "Clean" filter cleaning button
13 Power level indicator
14 On/Off button with electronic suction regulator
15 Appliance lid
16 Carrying handle
17 Storage aid on the underside of the appliance
18 Plate filter
19 Fluff filter
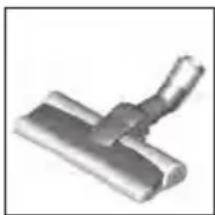
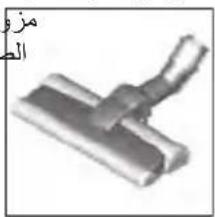
20 Professional upholstery nozzle
21 Professional crevice nozzle
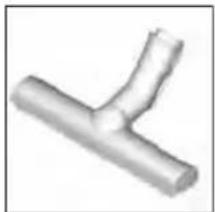
22 Hard-floor tool
23 Hard-floor tool
Replacement parts and special accessories
A Hard-floor nozzle BBZ123HD
For vacuuming hard floors (parquet, tiles, terracotta, etc.)
B Hard-floor nozzle BBZ124HD
With 2 rotating brush rollers For caring for expensive hard floors and for the improved collection of coarse dirt.
Before using your appliance for the first time
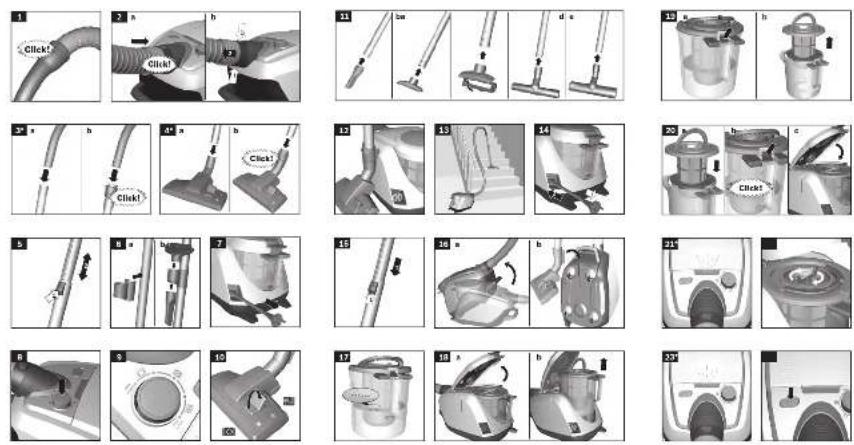
Fig. 1
- Push the handle onto the flexible hose and lock it in place.
Initial use
Fig. 2
a) Push the flexible tube adapter into the air intake opening on the appliance and lock it in place. You will hear an audible 'click'.
b) To remove the flexible hose, press the two catches together and pull out the hose.
Fig. 3
a) Push the handle into the telescopic tube. To remove it, turn the handle slightly and pull it out of the tube.
b) Push the handle into the telescopic tube until it locks into place. To release the connection, squeeze the collar sleeve and pull the handle out.
Fig. 4
a) Insert the telescopic tube into the connecting piece of the floor tool. To release the connection, turn the tube slightly and pull it out of the floor tool.
b) Push the telescopic tube into the connecting piece of the floor tool until it locks in place. To release the connection, press on the locking collar and pull out the telescopic tube.
Fig. 5*
- Unlock the telescopic tube by moving the sliding switch in the direction of the arrow and adjust to the desired length. The slide resistance on carpet is at its lowest when the telescopic tube has been completely pulled out.
Fig. 6*
a) Place the accessories holder in the required position on the telescopic tube.
b) Use some pressure to insert the upholstery nozzle with brush ring and the crevice nozzle into the accessories holder from above or below.
Fig. 7
Holding the power cord by the plug, pull out to the required length and insert the plug into the mains socket.
Fig. 8
To switch the vacuum cleaner on or off, press the ON/OFF button.
Controlling the suction level
Fig. 9
The required suction level can be set to any level by turning the control knob.

Low power range
>> = For vacuuming delicate materials, such as delicate upholstery, curtains, etc.

Medium power range
>= For daily vacuuming of floors which are only slightly dirty.

High power range
> = For vacuuming durable floor coverings, hard floors and heavy deposits of dirt.
Vacuuming
Caution
- Floor tools are subject to a certain amount of wear, depending on the type of hard floors you have (e.g. rough, rustic tiles). Therefore, you must check the underside of the floor tool at regular intervals. Worn undersides of floor tools may have sharp edges that can damage sensitive hard floors, such as parquet or linoleum. The manufacturer does not accept any responsibility for damage caused by worn floor tools.
Fig. 10
Set the adjustable floor nozzle:
Rugs and carpets

Hard floors/parquet

If you are vacuuming up larger particles, make sure that you vacuum them up successively and carefully to ensure that the vacuum channels of the floor tool do not become blocked.
If necessary, you should raise the nozzle in order to better vacuum up the dirt particles.
Vacuuming with accessories
Fig. 11
Attach the nozzles to the suction pipe or hand grip as required:
a) Crevice nozzle for vacuuming crevices and corners, etc.
b) Upholstery nozzle for vacuuming upholstered furniture, curtains, etc.
c) Upholstery nozzle with fixed brush ring for vacuuming window frames, cupboards, profiles, etc. After use, reinsert the crevice nozzle and upholstery nozzle into the accessories holder.
d) Professional crevice nozzle Extra-long crevice nozzle for cleaning crevices, corners and narrow spaces, e.g. in a car.
e) Professional upholstery nozzle For gently and thoroughly cleaning upholstered furniture,curtains,etc.
To clean the professional upholstery nozzle, simply vacuum it using the handle.
f) Hard-floor tool for vacuuming hard floor coverings (tiles, parquet flooring, etc.)
Fig. 12* Cleaning the hard-floor tool
a) Vacuum from below to clean the tool.
b) Use scissors to cut through threads and hairs wound round the rollers, then vacuum them up.
Fig. 13
You can use the parking aid on the side of the vacuum cleaner if you wish to stop vacuuming for a short time.
After switching off the appliance, slide the hook on the floor tool into the parking aid.
Fig. 14
When vacuuming stairs, the appliance must be positioned at the bottom of the stairs. If it does not reach far enough, the appliance can also be carried using the carrying handle.
When your work is finished
Fig. 15
- Switch off the appliance.
- Pull out the mains plug.
- Briefly pull the power cord and release. (The power cord retracts automatically).
Fig. 16
- Unlock the telescopic tube by moving the sliding switch in the direction of the arrow and slide one tube into the other.
Fig. 17
To store the appliance, use the storage aid on the underside.
a) Stand the appliance up by the handle.
b) Slide the hook on the floor tool into the storage aid.
Emptying the dust container
Fig. 18
In order to achieve good vacuuming results, the dust container should be emptied after every use or, at the latest, when dust or dirt has visibly collected on the fluff filter or when dust at one point in the container has reached the height of the marking.
When emptying the dust container, always check how dirty the fluff filter is and, if necessary, clean it as detailed in the "Cleaning the fluff filter" instructions.
Fig. 27
Fig. 19
a) Open the appliance lid by pulling the locking tab.
b) Use the handle to remove the dust container from the appliance.
Fig. 20
a) Release the filter unit of the dust container by pressing the release button.
b) Take the filter unit out of the dust container and empty the dust container.
Fig. 21
a) Insert the filter unit into the dust container, making sure it is correctly seated. The arrow on the filter cover must point in the direction of the locking tab.
b) Press on the container lid until you hear it click into place.
c) When reinserting the dust container into the appliance, make sure it is correctly seated. Close the appliance lid until the locking tab clicks into place again.
Caution
If you notice any resistance when closing the lid, check that the filter is complete and that the filter and dust container are correctly seated. Cleaning and care
Filter care
Cleaning the plate filter
Your appliance is equipped with a "Sensor Control" Function. Fig. 22 + Fig. 24
This function constantly monitors whether your vacuum cleaner is reaching its optimum power level. The indicator light lets you know when you need to clean the plate filter, so that the vacuum cleaner can reach its optimum power level once more.
Vacuum cleaner with "RotationClean" function
Fig. 22*
The indicator lights up blue when the appliance is working at its optimum level. Once the indicator turns red and flashes, the plate filter must be cleaned. The appliance is automatically adjusted back to the lowest power setting.
Fig. 23*
- Switch the appliance off in order to clean the plate filter.
Caution: the filter can only be cleaned if the appliance is switched off.
- Open the appliance lid by pulling the locking tab.
To clean the plate filter, turn the knob at least three turns through 180^
You can also clean the filter if the suction is becoming less powerful, even if the indicator has not lit up. We recommend that you clean the plate filter each time before emptying the dust container. It must be cleaned at the latest when the "Sensor Control" indicator lights up.
If the indicator flashes three times in quick succession, even though the plate filter is clean, this is probably due to a dirty fluff filter or a blockage. In this case, the appliance automatically adjusts to the lowest power setting and the indicator lights up red permanently.
- Switch the appliance off, empty the dust container and clean the fluff filter according to the instructions in "Cleaning the fluff filter". Fig. 27
Vacuum cleaner with "SelfClean" function
Fig. 24*
The indicator lights up blue when the appliance is working at its optimum level. Once the indicator turns red and flashes, the appliance switches off automatically
Filter cleaning is activated and performed by the integrated cleaning motor.
If the appliance cleans three times in quick succession, this is probably due to a dirty fluff filter or a blockage. In this case, the appliance automatically adjusts to the lowest power setting and the indicator lights up red.
- Switch the appliance off, empty the dust container and clean the fluff filter according to the instructions in "Cleaning the fluff filter". Fig. 27
Fig. 25*
If required, you can also activate the cleaning procedure manually by pressing the "Clean" filter cleaning button when the appliance is switched on.
If suction power is reducing, you can also clean the filter even if the indicator has not lit up. We recommend that you clean the plate filter each time before emptying the dust container.
Tapping out the plate filter
Fig. 26
If the plate filter is particularly dirty, the dirt can also be tapped out.
- Tap out the filter over a dustbin.
The dirt will fall down out of the filter.
Cleaning the fluff filter
The fluff filter should be cleaned at regular intervals in order to ensure optimum operation of the vacuum cleaner.
Fig. 27
- Open the appliance lid and remove the dust container from the appliance. Fig. 19
a) Take the filter unit out of the dust container.
b) It is usually sufficient to lightly shake or tap out the whole filter unit when the dust container is emptied in order to dislodge any particles of dirt.
If this is not sufficient, you can use a dry cloth to remove dirt particles from the fluff filter.
Cleaning the motor protection filter
The motor protection filter should be cleaned regularly by knocking out the dirt and rinsing.
Fig. 28
a) Open the appliance lid and remove the motor protection filter.
b) Clean the motor protection filter by tapping out the dirt. If it is very dirty, the motor protection filter should be rinsed. Then allow the filter to dry completely.
c) After cleaning the motor protection filter, reinsert it into the appliance and close the appliance lid.
Cleaning the exhaust filter
The exhaust filter is designed so that it does not need to be replaced, provided the appliance is used as intended in the household.
To ensure that the vacuum cleaner is working at its optimum power level, the exhaust filter should be rinsed out after 1 year. The filtering action of the filter remains intact, even if the filter surface becomes discoloured.
Cleaning the HEPA filter
Fig. 29*
- Open the appliance lid and remove the dust container. Fig. 19
a) Use the locking tab to open the side flap.
b) Pull the two locking tabs to unlock the filter unit with HEPA filter and remove it from the appliance.
c) Tap out the filter unit and rinse it under running water.
d) Only reinsert the filter unit into the appliance after it has dried completely and ensure that it audibly clicks into place.
e) Close the side flap until you hear the locking tab click into place again.
f) Insert the dust container into the appliance and close the appliance lid.
Cleaning the micro filter
Fig. 30*
- Open the appliance lid and remove the dust container. Fig. 19
a) Use the locking tab to open the side flap.
b) Pull the two locking tabs to unlock the filter unit with foam filter and micro filter and remove it from the appliance.
c) Remove the foam filter and micro filter from the filter frame.
d) Foam filter and micro filter and rinse it under running water.
e) Do not re-insert the foam filter and the micro filter into the filter frame until it has dried completely
f) Insert the filter unit in the appliance and ensure that the locking tabs audibly click into place.
g) Close the side flap until you hear the locking tab click into place.
h) Insert the dust container into the appliance and close the appliance lid.
Cleaning instructions
Always switch off the vacuum cleaner and disconnect the power cord from the mains before cleaning the vacuum cleaner. The vacuum cleaner and plastic accessories can be cleaned with an ordinary plastic cleaner.
Caution:
- Do not use a scourer, glass-cleaning agent or multipurpose cleaning product. Never immerse the vacuum cleaner in water.
Subject to technical modifications.
fr
I modifications.
MaKcHMaJIbHaM OuHOCtB
= ONUOHCKN pOuHbIX N TBepdbix HAnoIbHbIX NOKpbTNI INPn CINbHOM 3aqrpa3HeHHN.
y6opka
BhimaHne
Hacdkn dny ucnTk nona/koBpa noDBepKehbl, B 3aBnCHMOCTN OT KaucctBa TBepDoro HanoIbHoro nOKpbTnB BaWeM Dome (HaNPmep, WepoxOBataa, pycTOBaHHa Kepamuecka nnTKa), onpeDenEHOMy n3Hocy. N03tomy Heo6xOJMo perynpno npOBeprTa pa6ouyIO NobepxHOCTb hacaKn. N3HoWeHHbIe, C3aoCTpNBWHMNcKpaAMn pa6oune NOBepXHOCTn HacaKn MoryT npNBecTN K NOBpeXDeHNo y3BMbIX TBepDbIX HaNOIbHbIX NOKpbTn, TaKnx KaK napKeT nIn IINHOJeM. POn3BODntEnb He HecET OTBETCTBEHHOCTH 3a BO3MOXHbIe NOBpeXDeHn, KOtOpbIe Bbl3BaHbl n3HOWeHHo HacakOn dnn nona.
Pnc.10
PerynnpOBka nepeKJIouaEMoHacaKn dnyuNTkn noJa/KOBpa:
ДЯ KOBPOВ И KOBPOBbIX NOKpbITH >
ДЯ TBePbIx HAnOJIbHbIX NOKpbITN n napKeTa


Ecn Tpe6yETc ydaHnTb nbInecocom 6onbHue qactnUcbl, cneHte, yTO6bl OH BCaCbIBaHncb NO OHO3a pa3 n YTO6bl He 3a6nnc KaHaI HacaKn.
Pn Heo6xOIMOCtN CneNyET NOHHTb HacaKy, yTo6bl aactnUpr3n lyuwe BTRHyncb B nbineCoc.
y6opka c nCNoIb3OBAHHeM dOnoIHTeIbHbIX npHaadJeXHOCTe
Pnc.11
HacaKn HaneBaTe Ha pyky nn BCacbIbaOuTo Tpy6Ky:
a) ΜεneBaŋ HacaKaДЯЧСТКИ ΜεeNe, yrgNoB nT. n.
b) HacaKa dIa MraKoM Me6eN dIa YIcTKn MraKoM e6eN, WTop n T. d.
c) HacaKa dIy MraKoM Me6eN C yCTaHOBneHHoB BCTaBKO Co 5eTHHO DnI YHCTKN OKOHbIX paM, IkaΦOB, npOΦHne N T. D. IIO OKOHuaHN y6opKn BCTaBbTe 5eNeByo HacaKy HacaKy dIy MaRKO Me6eN B DEpxaTeNb dIy npHaadJeXHoCTeN.
d) LeneBaH hacaKa Profi
Oco6o nnHHnHnIeNeBaHa cAaKa dna YnCTKn Ie, yTIOB nY3KNX npomexyTKOB, HApnMep, B aTOMo6nne, n T. d.
e) HacaKa dЯ MяrkоМe6eHn Profi
IJIeKoH NTaTeBHOuNCTKN MraKoMbeHn, TOp N.T.D.
Iy ouhctkn hacaikn Iy MraKoM Me6eHn Profi npocTo nponblneocobte e.
f) HacaKa dIa TBepbIX HaONbHbIX NOKpbITNI (kaΦeNbHO nnTkn, napKeTa n T. n.)
Pnc. 12\* Ounchka uetkn dnn TBepdbix HanoNbHbIX nokpbitn
a) OuNTKn HacaKn npObnecocbTe e e ChN3y.
b) HamoTaBwneCn HNTKn BOLocbl pa3peKbTe HOxHnCaMn co6epnte nbinecocom.
Pnc.13
Bo Bpem KopoTkx NpepeBIOB B npoecce y6opkn HcnoIb3yIte napKOBky Tpy6Kn Ha 3aJHe cToPOHe np6opa.
-ПослЕ Выкночени NBilecoca BCTaBbTe KpOчКИ HacaIGNДЯ UNCTKN Пona/KOBpaВ napKOBky Трубки.
Pnc.14
Pn y6opke neCTHnCbI nbInecoc Bcerda DonKeH HaxoNTbcBn3y, y Naaya neCTHnCbI. Ecnn 3tOrO HeIOCTaTOUHO, To nbInecoc MOxHo nepeHOCHTb 3a pyuKy.
Pocne y60pkn
Pnc.15
BbIKNIOHTeNbIneCoc.
BbHbTe BnIky n3 po3eTKN.
Cnerka notaHnTe 3a ceTeBOK Ka6eN b Otnyctte er. (Ka6eNb ABTOMaTHueckn CMotaTc).
Pnc. 16
HaKaTHnEM Ha KHOJky-NOJ3yHOK B HApBaBHeHH, yKa3aHHOM CTpeNko, pa36NoKnpuTe Tpy6Ky n cNoXHTe ee.
Pnc.17
IpaHHeHnIbIeCocaMOxHOHCNoB3oBaTb npkoBOUHbIEΦKCaTopbl,pacnoLoKeHHbIe CHN3y.
a) IopHmMte nbinecoc 3a pyky.
a) BCTaBbTe KpHouKn HacaIKN IJN qHcTKn nona/KOBpaB NapKOBOUHbI eKCaTOpbl.
OnopoxKHeHne KOHTeHepa dna c6opa nbinn
Pnc.18
Длд дocнжнх xopoшнpe3yntaTOB zenateIbHO onopoxnTb KOHTeHep dЯ c6opa nbInnoCne KaJdoI y6opkn,ВIO6OMcnyae HeNo3Ke, chKOrda nbInb nIN rpa3b cTaHyT BnDhlHa 无NbtpUoSeI CETke,nN ypoBeHb nbInn B KaKOM- nIbO MecTe KOHTeHep daocTHrHET MapKnpOBKn. OnopoxnKaHTeHep dЯ c6opa nbInn,BCerDa npOBepnTeCTeneHb 3arPra3HeHHaФnlbTpUoSei CETkn In pN Heo6xOIMOCtOn OuNsaIte eE corNaCHO HnCTpykUnn «OuncTKaФnlbTpUoSeI CETKN》.Pnc.27
Pnc.19
a) OTKPOTe KpbIkw Ky nbinecoca, nOraHyB 3auElyKy.
b) BbInbTe KOHTeHep dIa c6opa nbInn n3 nbinecoca 3a pyky.
Pnc.20
a) Pa36noknyte nnbtpoBaIbHbI 6nok KOHTeHepa dIra c6opa nbIIN, HaxaB Ha KhoNky fKcaun.
b) BbInBe 6nok n3 KOHeIeHepa dna c6opa nbnn n onopoxhnte KOHTeHep.
Pnc.21
a) YctaHOBHTe 0nIbTpOBAHbHb6IOK B KOHTeHep, npu 3TOM 06raTeNbHO CneHte 3a npaBnHbOCTbHO yCTaHOBKn. CtpeNka Ha KpbIwKe 0nIbTpapoDJIKHa NOKa3bBaTb HnPaBNeHH 3aueJKN.
b) Haxmte Ha KpbIkwky KOHTeHepa Do e e Kcauu co uKUkOM.
c)Пи установке контейнера сбoga nbiln B nbilecoC cneinte 3a npabHbHocTbIO erO nonoxeHna.3akpoite KpbIkw ny binecoca do cpa6aTBBaHHa 3aueKn.
BHHMaHne
B cnyuae Bo3HnKHOBeHHa conpoTHbneHH npn 3aKpbIbAHHH KpbIshKN npOBepbTe KOMIIKeKTHOCTb FInbTPOB IN ppaBnBHOCTb NOnOKeHHa FInbTPOB IN KOHTeHepa dna c6opa nbinn.
06cnykBaHne HnbltpoB
OuHcTa Ka nameBHoro qHbTp a
B Baaem nbIeocoe npedymoTeHa yHKuH «Sensor Control».Pc. 22+ Pc. 24
3TaФyHKcHNoCToHHNpOBepReT,IOCTHraeTCa NOnTNMaJIbHbIyPOBeHbMOUHOCTnNbIeCoca.PnCHNXeHNyPOBHRMOUHOCTnCBETOBoINHdNKaTOP yKa3bIbAetHaHeo6XoIMOCtBOuHCTKNNaMeIbHOrO 1hIbTpA.
Пьлесocсфункиев《RotationClean》
PNC. 22*
Korda nbilecoc pa6oTaET Ha ONTImaIbHOH MOUHOCn, HNdkatop CBETTCs CHHM. Ecn OH HauHaet MIRaTB KpaChbIM, lamEnbHbI ΦnBtp Heo6xOJMo OCHNTb. MoHOCt b nbilecoCA aBTOMaTIueeCKn CHXKaETCdo MHHMaJIbHOH.
Pnc.23\*
BbIKIOUHTe nbIeCOC, UTo6bl OuHCTnTb naMeHBHbI ΦnIbTp.
BHHM
- npN BbIKIOueHHOM nbIinecoce.
-OTKpoTe KpbIwKy nbIeNcoCa,NotaHyB 3aIeNky.
Для ouнсткл ameьного Фньтра NOBepHHTe pyuakok Ha 180° He Mehee tpex pa3.
OuNTKa BO3MOxHa TaKHe npH CHNKeHH MoUHOCTH BCaCbIBaHHa, DaKe KOrTa HNDnKaTOp He CBeHTcra. Mbl peKOMeHdEm YnCTNb NaMeIbHbI ΦnIbTp nepead KaJdbIM ONopOxHHeHem KOTheHepa dIra c6opa nbIN. Ondako UcSTky Heo6xoDmO npOBecTu, ecnn 3arOpHTcra INnKaTOp «Sensor Control».
Ecnn Hndnkatop, HeCMOTpHa npoBeeHHyO uocTk y naMeIbHoro fInbTppa, HauHnaet Tpr pa3a MngTb uepe3 KopoTKe npomexkyTKn BpeMeHN, 3Haun TpeDnOxKntEnbHO 3aRpn3HnIacb fNbTppyUoJcA CETKa nn npOn3oWNo 3acOpHe. B 3tOM cnyae MoHOCtb nbIeCoca aBtOMaTHueckn CHNJaETcra Do MmHMaJIbHo, a Hndnkatop CBETITcKpacHbIM.
BbIKIouHTe nbIeococ, onopoxKHTe KOHTeHep dIa c6opa nbINn OuNCTte 0nbltpyOuyo CeTKy cornaCHO nHcTpyKunn «Oounctka 0nbltpyUouei CEKN》.Pnc.27
Пылесoccfункиев«SelfClean»
Pnc.24\*
Korda nbIneCoc pa6oTaet Ha ONTmAmNbHOH MOUHOCTN, HNDNKATOP CBeNTTCsCNHM. Korda INndnKaTOp HAUNHaet MrraTb KpaChbIM, NblneCOC aBTOMaTHueeCKN BbIKIOuayTcR.
AKTNBnpyeTc nporpamma no ouncTke fnlbTp,a nya yero BkHouaetc HnterpnpoBaHHbIO uNCNTeHbHbI dBuraTeNb.
Ecnn nbIeococ uHCTnncTprKdb3a KopoTkn npomexyTok BpeMeHH, Bo3MOxHo, npuHHO RAJIETc3 aIrp3HeHne pNbIbTpUoSe cTeKN HIN 3acopeHne. B 3tOM cnuyae moHOCb nbIeococa ABTomatueckn CHNkaTcdo MNHMamlbHO, a INDnKaTOP CBeHTTCg KpaChbIM.
BbIKIouHte nbIeococ, onopoKHTe KOHTeHep dna c6opa nbInu n ouNCTne fNbtpyUOuyo ceTky cornacHO HHCTpyKcunn «Oounctka fNbTpuyoue CETKU>.Pnc.27
Pnc. 25\*
Pn Heo6xOAnMoCTm MoKHO BpyHyIO aKTHBnPoBaTb npoueeCC ouHCTKn, HaaKAB pnp BKIoUeHHOM nbIineCocc KHONky ouHCTKn fHnbTpA «Clean».
OuNTKa BO3MOxHa TaKHe npn CHNXeHm MOUHOCTN BCaCbIBaHnI, DaKe KOrTa HINKAtOp He CBeTITcR. Mbl peKOMeHnyem UcHTNb lamEnbHbIy fHnbTp nepekKaJdbIM ONopoxHHeHem KOHTeHepa dJa c6opa nbInn.
BbikonaunBaHne naMeNBHOro qnubtpa
Pnc. 26
Ecnn lamenbny nIbtp cnIbHO 3aIpa3Heh,ero MOxHo BblONOTb.
BbIKoNtHTe HnIbTp NaKoHTeHepom dJa Mycopa.
H3ФnIbTpaprpa3b ynaTeBHN3.
OuHCTKa fHnIbTpYIOUe CEtKIN
IOnTHMaHbHO paOToI nbinecoCa hNbtpyIOuyo ceTKy HxKHO perynrpo NCTNTb.
PNC. 27
-OTKpoTe KpbIUKy NblneCocA IN BbIHbTe KOHTeHep dna c6opa nblnn. Pnc. 19
a) BbHbTe ΦnBtpoBaIbHbI 6nOK n3 KOHTeHepa dJIc6opa nII.
b) KApBnO, yTo6bI ydaHnTb YactuKn rpa3n, DOCTaTOUHO, ONOPoXHHa KOHTeHep dNc6opa nbHn, HEMHOro Notpactn fHbTpObaHbN b6nOK nnIeKoNoCTyAub No HeMy.
Ecnn 3TOro HeNoctaToUHO, Bo3bMnTe cyxuTo TpAnky n C e ee NMOOuBo ydaHnTe uactnKn rpa3n C cnBtpyUoSe cETKn.
UHCTKa MOTOPHORO HnIbTpA
MotopHbIΦnIbTp Heo6xOaHMo peryIpaHO ouuTa bIyTEm npombIKN NIN BbIKOnaunBaHHa!
Pnc. 28
a) OTKpoTe KpbIuKy nbIeCocA H BbIHbTe MOTOpHbI ΦnIbTp.
b) BbIKoNtnte nbIb n3 MOTOPHOro fNbIbTpA. B cnYuae cunbHorO 3aRpa3HeHn npOMoIte erO. 3aTeM daIte fNbTppy NnHOCTbIO BBICOXHyTb.
c) Tocne ounctkn yctaHOBHTe MOTOpHbI ΦnNbTp Ha MeCTO N 3akpoTKe KpbIwKy nbInecoca.
UcTka BbInyckHoro qunbtpa
PnHaJnEJaemHcNoJIb3OBAHHnbIeCocBaBOMaHEmXo3AICTBe3aMeHaΦnIbTpHa He Tpe6yEtca.
Дя obecneuehen onTImaIbHoro ypOBHЯ MoUHocTn peKomeHdyetc npombyt bHbTp uepe3 1 rod 3Kcnnyatau nnbcocca.ФyHKuHOHaNbHocTb 3TOO fNlbTpacoXpaHareTc daKe pRn BO3MOxHOM n3MeHeHH cBeTa NOBepxHocTn fNlbTpA.
OuInctkaΦnIbItpaHEPA
Pnc.29\*
-OTKpoTe KpbIuKy nbIeocCa n BbIHbTe KOHTeHep dnnc6opa nbln. Pnc.19
a) OTKpoTe 60KOByo KpbIkwky c NOMOuBIO 3auenKn.
b) Pa36noKnpyTe 6IOK ΦnHbTpca C ΦnHbTpom HEPA, notaryB 3a DBe 3aueKn, n BbHbTe ero n3 nbinecoca.
c) Bb6eTe nbIb n3 6noka fHnbTp a n npomOte noD cTpyen BObl.
d) Nocne BbCbxAHnB BcTaBbTe 6Iok fHnbTp a6paTHOBnIEcOCn3aΦNkCnpyTe 3aUeKN.
e) 3aKpoIte 60KOByIO KpbIuKy I 3aΦHKcnpyIte 3aUeNky.
f) YcTaHOBnTe KOHTeHep dIa C6opa nbIIN Ha MeCTO n 3aKpOnTe KpbIWKy nbIInecoca.
OuHCTka MmKpOoHnIbTpA
Pnc.30\*
-OTKpoTe KpbIbKy nbIeCocA n BbIHbTe KOHTeHep dnnc6opapbln.Pnc.19
a) OTKpoTe 60KOByo KpbIkwky c NOMOuBIO 3auEiKN.
b) Pa36noknyte 6nok qnhbtpa c noponoHObIM nIbTpom MmKpOchnbTpom,NOTaHyB 3a DBe 3aueKN, IN BbIHbTe ero n3 nbinecoca.
c) BbHbTe npoHObBi n mKnpoHnbTp n3 paMKn.
d) IpnomOte npoIHObIu HnIbTp u MnkpoHnbTp noD cTpye BODbl.
e) Nocne BbCbxAHn BCTaBbTe nOpOnHObBi nMbtp MmKpOunbTp o6paTHo B paMKy.
f) BcTaBbTe 6nok fHnbTpapo6paTHOBnIeCoc n 3aФнКсчpyTe 3aUeNKn.
g) 3akpoTe 6okobyo KpbIkw Ky n 3aΦnKcnpyTe 3aUeNky.
h) YctaHOBNTe KOHTeHep dIЯ c6opa nbIIN Ha MeCTO n 3akpoTe KpbIUKy nbIneCocca.
Yka3aHnnoOuHCTke
Ipeed kaxdoon uNCTKO nblneocaca BbIKIOaHTe erO n BbHMaTe BNky ceTeBOro Ka6enr H3 po3eTKn. Iblncoc n IIactMacCOBbie npHaJNeXHOCTn MOxHO uNCTHTb O6bluHbIMn CpeDCTBaMn dJa uNCTKN IIactMacCbI.
BHHMaHHe: He nCnoIb3yIte a6pa3nBhIbe uHCTaIune
cpeCTBa, cpeCTBa dnn MbITbA CTKoN HnnyHNBepcaNbHbIe MOIOUne cpeCTBa. He norpyxKaTe nbInecoc B Body.
OCTaBnIeM 3a co6oI npaBO Ha BHeceHne TexHnuecknx n3MeHeHH.
kk
Relaxx'xc cepnacbHdafb Bosch uHaHcOpfbuH TaHdaFaHbHb3fa eTe KyaHbUThbImbI3.
Ocbi naDanaHy HcckayIbIbIHda Tpyni Relaxx'X - yInrepi KepeTinre.H Con yiwH cunatlanfah Ka6dbkTay 6enriepinih 6apIbIbI da yInir3de KOK 60nybl Mymkih. TeK tyNyckanblB Bosch KepeK- JapakTapbln KaKet, Onap ci3diH waHcopfbWbI 60bnE hJkaKcbI wHcopy HtNKeciH kAMTaMaCbI eTei.
PnDanaHy HcaybIKTapBH CaKtan KObHbI3.
Wahcopfbltbi 6aca aamra 6epreHne naaanaHy HcyaybIbIH da 6epiH3.
Bettik kafbHah kain aubh3!
AcnanTap cHnataTamacbl
1 aybicaTbH eDeH cOnIOcbl KepeK-JapaKTap 6aJIaHbICbIMeH
2 TeneckoTbIK Ky6bIp KblNkbima TyMMeH KepeKkapaKaTapMeH
3 KepeK-KapaKaTap yTaTbIuBbl
4 Copy wHaHbI
5 Tyka
6blckbi(kantaybi connoa ophaty yuiH*
7 TokTaty KEMeri Kpyblfbi XaHbIHda
8 Kenire kocy kaebi
9 HaKoHTHepi
10 KaTaybIc connocbl
11 OuiK conIOcbI
12 "Clean" cy3ri ta3anay Tyimemeucci
13 Kyat dehre iKepeTeKiWi
14 Kocy/ewipy nepheci 3neKtpoHdbik copy kywi peTteriui
15 KypbJIfbl KaKaTnAfbl
16 Tacy Trkacbi
17 KOIO KEMERI KpybIFbTeMeH XaFbIHda
18 Katnapbl cy3ri
19 Tanlbyk Topwacbl
20 PpOKnTaybUcOnnocB
21 Profi oubik connocbi
22 KaTbIeHcnnocbl
23 KaTbIeHcnnocbl
KocajkbI 6eTep MeH apHaBKepeKxapakTap
A KaTbI eHeH connlocbi BBZ123HD
Teric eDHeDepi waHCopy yuHIN (napKeT, nIITKa, TeppaKota,...)
B KaTbI eE connocbl BBZ124HD
2aHaIaTbIH KblIbIKTBIK
DeHreIeKneH
KbIM6at KaTbI eEHeIepDi KyTy XaHe
depeki NaCTapDbI KaKcbIpaK any ywiH.
Bipinwi naJaIaHydAn aIdbH
Cyper 1
KontyTkahbI copy wJnaHrbHa cabIn 6ekitih3.
Xymbictbi 6actay
Cypert 2
a) Copy wnaHrbHbH KeTe Ky6bpnapbH KypbIrfbHbH copy tecirihe canbin 6ekiti3.
b) Copy wnaHrbH any ywiH eki 6ekitkiw imMeKti Kbcbl Wnahrbl WbifapbHb3.
Cyper 3
a) KonTytKaHbI copy/TeNecKoNTbIK Ky6bpda KblnxbltbHb3. BaJnHaHbICtB 6ocaty yWIn KOntyTKaHbI a3 6ypbn Ky6bpDAn Taptbn anBlbI3.
b) KonTytKaHbI tipenreHwe teneckonTbIK Ky6bipra XblnXblTbHb3. BaJnaHbcTbI axkbipaty yuH 6ocaty TyMeWirHe 6acBIn KonTytKaHbI WbIFapbHb3.
Cyper 4
a) Copfbiw/TeJeckoNTbIK Ky6bpIbIeEH conNIOcbIHbIN KeJIte K6bpIbHa caIbHbI3. BaINaHbIcTb I 6Ocaty yuHIN Ky6bpIbIa3 6ypbln eEH conNIOcbIHah Tapbln aIbHbI3.
b) TeNeCKoNTbIK Ky6bIPdbTipety ywiH eeden CONNOCbIHbIH KeJIte Ky6bIPbHa cAnbHbI3. BaJNaHbICTbI axbipaty 6ocaty TynMeWirHe 6acBIn TeNECKoNTbIK Ky6bIPdbI WbIFapbHbI3.
Cyper 5
KbIMaBly TMyMeWeHITeneckontbIK Ky6bip Kepcetkici 6aftbHnDa XblkbTbn 6ocatbn KepeKTI Y3bHbIKbI peTeHi3. KineMderi XblXbity KapcbInbfbl TeNECKONTbIK Ky6bip ToNbIK WbIFapbINFaHa eH KiWi 60naDbI.
Cyper 6
a) KepeK-kaapakTap TacyuBicih KepeKti opbHda TeJeCKoNTbIK Ky6bpFa caJIbHbI3.
b) KanTaybiw CONIOHbI bICbI WxHE OyBiK CONIOcbIMeH XOFapbIaH HemeCe TEMeHHEn a3 6acbln KepeK-XapaKTap TacyWBcIBHa CaNbIHbI3.
Cyper 7
Keire Kocy Kaebin H aibpihan yctan Keepti 3bHdbkka wifapbin xeni aibpbiH caIbHb13.
Cyper 8
-山HaHcOpfbiWtBi Kocy/eWippy nepheciH 6acbin Kocbih3 Hemece eWipiH3.
Copy kyyin peTrey
Cyper 9
Pettey Tymecin 6ypan Kepekti copy KywiH 6ac pettey MymkiH.

TeMeH KyaT aMafbl
> = Ceimtan matepnaIapdbI copy ywiH, = Mbicanbl, = H3ik nepdenepei, KanTaybIITapdbI T.6.

OpTa Kyat aMafbl
> = A3 nactaHraH Ke3eKyH caBbIH Ta3anay yuH.
Kofapbl Kyat aMaFbl

> = KaTbI eEN KanTaMaJnApBIn, = 1 KaTbI eENdepdi XeHeCatbInapda WAncOpyda KpyblfBiHbCatbInap6acblHaKaTbI NaCTapDb Ta3aJalyuH. opHaJIcTbIpy KepeK.Erep6ynKeTePNIk 6oJMaCa,KpyblfBi
Copy
Ha3apbIbI3da 6oJcbH
EeH=connonapbI=KaTbI=eHHi3=canacbHa 6aunhaBcTbMbicanbl,6yKbIp,pepeki nnntkanaP 6enriri aepexeJe To3aBb. CoI ywiH connohbin eteri H Kyneik =Typpe =TeKcepy =Kepek. =To3bIfaH, =etkip =kbipnB conno eteri napket Heeem JInHOJeM CnAeTb Ce3iMaJ KaTbI eEHdi 3aKbIMdaybl MymKIn. ΘHdipywi To3bIfaH eEH connoCbApKbIbn MyMKIn 3raHdap yuiH kayankep emec.
Cyper 10
AybcnabIeH connonapb peTey:
■Kinemep men KinemdkanTamanap
KaTbIeH/napKeT
Erep ypken 6eIweKtepei copcaHb3, OHda onapbl 6ip 6ipinen coH xhe aabn an copbHb3, eTnece ehen connocbHIn copy apacb 6itein kanaDb.
Kepek 6oIca, nac 6eIweKtepi H JAKcbipak copy ywiH conIOhbl KeTepy Kepek 6oIaIbI.
KocbIMwa kepek-kaapakTapMeH copy
Cyper 11
ConnonapdbKepek 60nca copy Ky6bipbHa Hemece KOITyTKaFa caJIbIHbI3:
a) WETTEP MeH 6ypbIHTapDbI WaHCOPY YuIH WETTK C=ON=n=0, T.6.
b) KanTaybiw conNoCbl KanTaybiWtBik Xnha3dapbl, nepdepepi T.5.waHcopy ywiH.
c) KaTaybiu connocbi opHaTbInFaH bICbIwneH Tepe3e pamanapbIH, ukaΦTapdbI, npoΦnIbIepdi, T.6. wAncopy ywiH. PaJdaJaanFahHHacon OH oubIK conNocbIH XaHe KaTaybiH conNIOcbIH KepeK-xapakTap TacyuBicbHa KaTa caJIbHbI3.


d) PpoΦn OoBbK cOJIIOcBi
OnbikTapbl, 6ypbilTapblxHe Kxyka apalbIK 6eJImeIepdi, Mbicalbl, = MaunHada, = T.6. = Ta3anay = yuH eTe y3biH ONBk CONNOCbl.
e) PpOoKanTaybIw connocbl
PpOoH KanTaybiw CONIOcBiH KOITyTKaMeH WaHcOpbIn Ta3aHaHbI3.
f) KaTbI eEN KanTamaJapbIH WaHcopy ywiH KaTbI eEN connocbl (nnNTkAnap, napket T.6.)
Cypet12 Kaattb iehen connocbH Ta3anay
a) Ta3anay ywih connohbi TeMeHHHeH copbIn anbHb3.
BbIbn KaIHaN XIN neH WauTapDbI KaIbIMeH Kecin aIbIHb3. XIN neH WauTapDbIObIK CONIOcbIMeH copbIn aIbIHb3.
Cyper 13
Kbicka copy y3inictepiHde TOKTaTy KEMeriH KypblfBkHaHbHda naDanahy MymKiH.
YpbInfbHbI =ewiprehHHen =coH =eDen =connocbHaBbI inReKTI TOkTaTy KEmeriHe KblNkbTbHb3.
Cyper 14
eCatbnapa wahcopyda KpbblfnbHc catbnap 6acbHda ophancbpy Kepek. Erep 6yn XeTeepnik 6oJmaca, KpbblfnbTytKacbHaH YCTan Tacy MYMKIH.
Kmbictah KeiH
Cyper 15
KypbIfnbIHbEwipH3.
AshaHbpo3eTkaaHwhfapbHbI3.
Kei Kocy Ka6eJIiHEn KbIcKa TaptbIn Xi6epiHi3. (Ka6enb abTomatbl XnHaIaBl).
Cyper 16
KbIINXbIMaJI TyMeWeHi TeNECKONTbIK Ky6bp KepceTkici = 6aftbIHda XblNkbITbn 6ocatbn 6ip = 6ipH XblNkbITbHb3.
Cyper 17
Kypblfblbl=KOIO=ywH=Kypblfbl=TeMeHri KaFbIHbH=aNbN KOIO KEMeHIN naDanaHaBhl3.
a) KypbIfblHbI TyTKaHaH yCTan typanaHbI3.
b) Edeh conIocbHdafti iIReKti KOIO KEMeriHe XblJXbITbIHb3.
UaH KOHTeHepiH 6ocaty
Cyper 18
Kakcbi copy HtJxkeiHe KeTy yuH waH bIbICbH ap WaHcopydah coH 6ocaty Kepek, eH KeWImeH, waH HeMece JIac waH TopwacbIHda KepiHetIH pette XHaJIca Hemece WaH bIDbcHBH iWiHderi BeJrCicHe KTeKeHde.
Wah bIbIcIH 6ocatyda epaanbIM TaIWBk TOPwacbiHbIH NaCTAHy depexecicn 6aKbIaNbI3 da, Kepe 6oIraHaDa OHbl
"TaIbIK TopaBcH Ta3aNay HcKaybIfHda
Ja3blfHaHdaTaaJNaHbI3.Cyper 27
Cyper 19
a) KypbInfbl KaKnafbH 6yraTTay KOybHdbicbH TapTbIn aWbHb3.
b) WAn bIDbcBIn TyTKa KEmerImeH KypblfbiHaH Wblfapblb3.
Cyper 20
a) ⅢaH KOHTeINHePiH cy3rIney 6IorbIH 6ocaty nepheciH 6ocatbIN 6ocatbIHb3.
b) Cy3riny 6norbH wah bibcbiHaH wbfapbn wAH bdbicblb6ocatblb3.
Cyper 21
a) Cy3riny 6nOrbIH WAn bIDbcBa caBIn dypbic opHaTbIraHbHa Ha3ap aydApbIb3. Cy3ri KaNarfbHdaFbI KepcTeKi 6yFaTTay KoYbHbICbl 6aftbTHDa Kepcety Tnic.
b) bIbIC KaKNaFbHa on eCTin Xa6bJrFaHua 6acBHe3.
c) WAn bIbICbIH KypblfBfa KaTaNayda dypbc TpybHa Ke3 XeTki3H3. KypblFb KaNaRbH 6yTaTTay KObIHDbCbI KaTaNipeNReHweKa6bHb3.
Ha3apbHbI3da60JIcbH
ErepKaKNaTbI Xa6yda KApcbiNbIK ce3inetIH 60nca, cy3ri TOblkTbIFH XaHe Cy3ri MeH WaH bIDbcI dypbic TypybHa Ke3 KeTki3iH3.
Cy3riHi KyTy
KatnapbI cy3riHt a3anay
Kypblfblhbl3 "Sensor Control" (e3iH 6aikbnyay)
fhyHKnraCbImeHxabTaNFaH. Cypet 22 + cypert 24
OcbfynkunwahcnpfbwOnTmamdbkyat dpejecie He kteHH6akbnaiNb. Wamdk KepceTkiw ONTManDb kyat dapejecine KaetaeTy yuH kATnapJI cy3riHi Ta3anay kepktirih 6inipei.
Wahcopfbw "RotationClean"fynKcnraCbIMeH
Cyper 22
KypblfblontmamblkyatdpexekieHcKymbicictereHc KepceTkli KeTycTe JhaHbI. KepceTkli Kb3bI TyCte KaHaHda KaTnapbl cy3riH taanay kepe. Kypblfbl abTomattb peTte eh TEmeH Kyat backbibaHa opalaabi.
Cyper 23*
KatnapnbCy3riH Ta3aJaiy uH KypbNfBHBleuipiH3.
Ha3ap aydpbHb3: Cy3riHi TEK KaHa KypbInfbEwipinreHde rha
MymkiH 6oJaIbI.
KypbInfBkKaNafBih6yFaTTay KOybHdbicbIH TapTbIN aWbIHb3.
KatnapbI cy3riHI Ta3anay yuH TTKaHb KEMiHe 3 pet 180^ 6ypaHbI3.
Erep KepceTkiu JkaHbaca, cyarhi copy Kyatbl
TeMeHdIeHHe da Ta3anayra 60naDbI. Bi3 kaTnapIb cy3riHi WaH bIDbcIH ep 6ocatyaH anDbIH Ta3anaydbI ycbIHAmbl3.
Bipak 6yN KeiImeH "Sensor Control" (ceHcopdb6ackapy)
KepceTkiiJxKaHybHaH anIdbH opbIHaJIybl KaKTe.
Erep KepcetKiw KaTnapIb cy3ri Ta3anaFaHHaH coH da 3 pet XblnbIbIbTKaca,6yHbIH ce6eBi TaIbIK TopaCbI JactaHaBH Hemece 6iTein KanydbI 6iJipeDi. Byn KaJaDaJa Kypblfbl ABTomAttIb pette eH TeMeH 6ackblTbI petten KepcetKiw Kb3bIn TyCTe XaHaDbI.
KypblfnbHbEwipin WAn bDbcBn BocatbIn TaIbIK TopawcbN "TaNbIK TopwacbH Ta3anay"
HcyaybIbIHda CnNaTTaJIFaHda Ta3anaHbi3.Cyper 27
WahcopbIi "SelfClean" (e3iH Ta3aJay) fYHKnraCbIMeH
Cyper 24
KpybIfbl ONTmAmDbl Kyat dApexekHe JyMbIC icTeHDe KepcTeKlW KeK TyCte JxHaDbl. KepcTeKlW Kb3bl TycTe KaHaHaDa KpybIfbl ABTomAtB1 petTE oWeDi.
Cy3rhi Ta3anay KocbInb Kipictipinre H Ta3anay MOHITOpbl apKbIbI opbHaJaAa.
Erep Kypblfbl Kblica apanbikTapda yw pet e3iH Ta3anaca, 6HybH c6e6bi TaIbIK TopaCbl Ta3aHa6faHbIH a Hemece 6itEnin KaIFaHda KaTAbI. Byn XaFdaJa KaPbInfl bATOMATTb peTTeEH TEmeH 6ackbltbpETEN KepcetkiW Kb3bl TYCTe XaHaDbI.
KypbInfbHbEwipin WAn bDbcBbN BocatbN TaIwbk TopwacbN "TaNbIK TopwacbN Ta3anay"
Hcyaybfbda CnNaTaNFaHda Ta3anaHb3.Cyper 27
Cyper 25*
Kepek 6oIca, "Clean" (ta3anay) cy3ri ta3anay tyMeuiriH
6acbin ta3anay aicih KpybInfbl kocynbl 6onFaHda konMeH
6actayfa 6oIaBl.
Erep KepcetkiX KaH6aca, cy3riHi copy KyaTbI
TeMeHeJIreHne da Ta3anayfa 60naDbI. Bi3 kaTnapbl cy3riHi
Wah bIDcbIH ep 6ocatyaH anDbIH Ta3anaydbI yCbIHMaB13.
KatnapbI cy3rHi kary
Cypet 26
TbIMKaTTblJaCTaHFaH KaFdaIaKaTnapIbI Cy3rHi KaFyra 60JIaBl.
Cy3riHi KOKbcKOFapb1CbHda Kafb1Hb13.
Jac cy3riEHN TEmHRe TcyeJI.
Talubk TopaacbH Ta3anay
UHcopfbw ONTmamdbi icTeyi ywiH TaIbIK TopaacBH KyeJIk peTTa3anay Tnic.
Cypet 27
KypblrfaKaKnarfbHaBn WaaH bIdbcbH KpybnfbaH WbIfapbHb3.Cyper 19
a) Cy3riney 6IorbIH WAn bIDbcIHn HbIFapbHbI3.
b) Kaibntb JkaFda TaTobnCyr3irey 6norbHwa H bDcbH 6ocatkAn Ke3de a3 c9knDey Hemece KaBn nac 6enweKtepi Akbipatyra 6ona.
ErepKeTePNIK 60IIMaca, nac 6eJIWeKTePih TaIWBk TopwacbHaH aXbIpaTy yuIH Kpyfak wybepeKti naJdanaHbHb3.
MotopbI Kopray cy3ricin ta3anay
Motopblkopray cyricin Kyyenik pette Kaftin Xee Kyybin Ta3anay Kepek!
Cyper 28
a) Kypblfbl KaKnaflbH aWbIn MOTop Kopray cy3ricH WblfapblHb3.
b) Motopdbi Koprfay cy3ricih Karfbin Ta3anaHb13. KaTbI NaCTaHyda MOTOpdbi Koprfay cy3ricih kyy kepek. Cocbi Cy3riHI TOJIbIFBIMeH KypTaTbIHb13.
c) Ta3anaydah coH, MOTOpdbI Kopray cy3riciK KypbInfbifa canbin Tipetini3 XHe KpybInfbI KaKaNaFBH Ka6bIHbI3.
Ypney cy3ricin Ta3anay
Ypney cy3ricih KpybIbfy ynde Tnicti pette naJaHaHa aJMaCTbipy kaxet 60MaTbH pette Xacaanfah.
Wahcopfbw ONTmamdb Kyat dapekeciHxymbcicicteyi yuih ypney cy3ricin 1 kbldaH coH xyy Tnic. Cy3riHH cy3riney acepi caKtanaab,6etinh peHi e3repce da.
Hepacy3ricinra3anay
Cyper 29*
Kypblfbl KaNafbH aWbIn WaH bIdbcH WbIfapblHb3.
Cyper 19
a) KaHaKaNaKtbl 6yFaTTay KOnbIHDbICbIMeH aUbIHb3.
b) Cy3riny6IorbHepa cy3ricimEn eki 6yraTay KObIHdbIapBH TapTBIN 6OcaTbIN KypblfbaH WbIfapbHb3.
c) Cy3ri 6norbIH Karfbin Ta3anan aRaTbH cyda JyibHbI3.
d) Cy3ri 6norbiH ToIbIFbIMeH KpyraFaHaH coH KypblfBaCaIbIn Kynblntay KOHbIPMaIapbH Tipetin3.
e) KaH KaNakTbI 6yFaTTay KOnbIHbICbI eCTinIn TipeHreHwe Xa6bHb3.
f) WAn bIDbICbIH KypblIFbIfa CaIbIN KypblIFbl KaKaNaFBH Xa6bIHbI3.
Mnkpocy3rhi ta3anay
Cyper 30*
Kypblfbl KaKaNaBbIn aWbIn WaH bIdbcIH WbIfrapbHbl3. Cper 19
a) KaHa KaNaKaTbI 6yFaTTay KOuBnDbicbimeHaWbHb3.
b) Cy3riny Ke6iri MeH MmKpocy3ri 6ap cy3ri 6norbH eki 6yfarTay KOnbHdbcBHaH TapTBIn 6ocaTbHbI3 da KypblfDah wewiH3.
c) Cy3riney Ke6iri MeH MmKpocy3riHi cy3ri pamacbHaH Wblfapblhbl3.
d) Cy3riney Ke6iri MeH MInKpocy3riHi aRaTbIH cyda KByblbl3.
e) Cy3riney Ke6iri MeH MmKpOcy3riHi ToIbIfbIme H KpyfbHaHH coH KypbInfBira KaTc aJIbHbI3 da cy3ri paMaCbIH Ka6biHbI3.
f) Cy3ri 6IorbIH KypbInfbira canbIN KynbInTay KOHdbIpMaJapbIH TiPeTiHi3.
g) KaH KaKnakTbI 6yraTay KoBihDbicbI ecTinir TipenreHwe Xa6bHb3.
h) Waa bIbIcBih KypblIbfIaCaJIbIN KypblIbfI KaKnaFbIH Xa6blHbI3.
Ta3aay HycKaynapbl
Hcopbbl Tbep Ta3aJaf H Je i aBpbH TaPTbI KOIO Kepe nnactKKepeK-kaapakTapdbCTaHApTTbI nnaCTMaCCa Ta3apTKbIbIMeH KTY MymKiH.
Ha3apbHbI3da60ncbH:
bck a nauybiu 3aTKeTpdi, uBHbHemece om6e6an Ta3apTkbiuTbi naDanaHbHb13. HaHcopfbuTbi ewkaawan cyra 6aTbipMaHb13.
Bi3e TexHnKaIbIe3epicTepeHri3y KyKbIbIb6ap.
zh
感謝您購買博世Relaxx×吸塵器。
19 0a. a jai jia jia jia jia jia jia jia jia
a
a Jda jia jilg jiall jiall qaij jialld a g jy b (b
aill jao Lgj gll
jilll jil! jil jil jil lll jil
clll jilj jill jil
y jilal jIb! g jilj,swll jilill jil 5i y (e
Lolai
f
.
g
a jia jia jia jia jia jia jia jia jia jia jia jia jia jia jia jia jia jia jia jia jia jia jia jia jia jia jia jia jia jia jia jia jia jia jia jia jia jia jia jia jia jia jia
1
- 28.
jilll 100 jai jai gai jg k jie all
S. 1234567890
Jooa Jooaa aaii
111 1
y j 1
(9)
(b
aaii aiee jie ai
aaii jia aaii iie jie aiaiy jilai
| 1 + u1 - 1| = | 1 + u1 - 1| - 1 > ( 1 + u) u1 = 1 - u
28
8
aJalal ayas jilj g jil, aikaiol alb
jie 1iil aia iiaai jiaia jiaai jiaai jiaai (b
jilil jilil ell s 1s
Lolai
jia jia jia jai jia jia jia jia jia jia jia jia jia jia jia jia jia jia jia jia jia jia jia jia jia jia jia jia jia jia jia jia jia jia jia jia jia jia jia jia jia jia jia jia
auiisall cbc
aill 15
i j
jll jie jie gaiy gaiiallgai gaiy uaiail Jai
aaii ailll aillaaie lalil jllla 128 iLs. sial y
jilll jll llll jlll jlll
Hepa gali jali
29*
1
19 0gaa jzjia jzjia aaiis albc
a
a jollll lally Ielulc, jilll oioi iia (c
jlll laii j 1000000000000000000000000000000000000000000000000000000000000000000000
aiee eae ee eee eae eae eae eae eae eae eae eae eae eae eae eae eae eae eae eae eae eae eae eae eae eae eae eae eae eae eae eae eae eae eae eae eae eae eae eae eae eae eae eae eae eae eae eae eae eae eae
27 8
"SelfClean"
24*
8
Lg 100000000000000000000000000000000000000000000000000000000000000
1 1 1 1 1 1 1 1 1 1 1 1 1 1 1 1 1 1 1 1 1 1 1 1 1 1 1 1 1 1 1 1 1 1 1 1 1 1 1 1 1 1 1
27 8
25*
I 1111111111111111111111111111111111111111111111
jilil jiaai
26
8
aikall jlll ygall sall alal kail kai kai jil
y
18
alall 1y jll jll (...yjll bll ayl)
alusn Bosch as Jia kiao ie juiai gao ad liuayy Relaxx' x 1jll
cljrrall alusn no aolizc cyggo hdo pssw l jgliy
aillbglz cJusill nge bjiig YjZrJglln JepReiXxx' X
plisiul ic Juaiy slie ney. dniikso ygo le agswall
la yaleicie pc Boseh oae aLsille aullsall
aikoo calii ayiii Jauai gaii
i 1
1gall 2

BBZ124HD
y 1
J
1 3
jglg
1
a
J 1 - 1 1 1 1 1 1 1 1 1 1 1 1 1 1 1 1 1
山
2
aalglal jaiy gaaayssallg aaijall (b
jill jall aal wul yail ala gl bial
4
a
a 1111111111111111111111111111
1
a. f( x) sill loll 3
S OBC = S COD + S_ BOC
a_5^3 = 7^3
*()
a_4 = 8
AE United Arab Emirates,
BSH Home Appliances FZE
Round About 13
Plot Nr MO-0532A
Jebel Ali Free Zone - Dubai
Tel.: 04 881 4401
mailto:service.uae@bshg.com
www.bosch-home.com/ae
AL Republika e Shqiperise, Albania
ELEKTRO-SERVIS sh.p.k
Rr. Shkelqim Fusha, Selite,
Pallati "Matrix Konstrukturson",
Kati 0 dhe +1
1023 Tirane
Tel.: 42278130, -131
Fax:42278130
mailto:info@elektro-servis.com
EXPERT SERVIS
Rruga e Kavajes,
Kulla B Nr 223/1 Kati I
1023 Tirane
Tel.: 44806061
Tel.: 42274941
Fax: 42270448
Cel: +355 069 60 45555
mailto:info@expert-servis.al
Gate 1, 1555 Centre Road
Clayton, Victoria 3168
Tel.: 1300 369 744*
Fax: 1300 306 818
mailto: aftersales.au@bshg.com
www.bosch-home.com.au
*Mo-Fr: 24 hours
01/17
BA Bosna i Hercegovina, Bosnia-Herzegovina
"HIGH" d.o.o.
Gradačačka 29b
71000 Sarajevo
Tel.: 061 10 09 05
Fax: 033 21 35 13
mailto:bosch_siemens_sarajevo@yahoo.com
BE Belgique,Belgié,Belgium
BSH Home Appliances S.A.
European Trade Center Building, 5th floor
1784 Sofia
Tel.: 0700 208 17
Fax:028787972
mailto:informacia.servis-bg@bshg.com
www.bosch.home.bg
BH Bahrain
Khalaifat Est.
P.O.Box 5111
Manama
Tel.: 017400553
mailto:service@khalaifat.com
BY Belarus, Bénapycb
OOO“BCXБbITOBaTExHnKa"
ten.: 495 737 2961
mailto:mok-kdhl@bshg.com
CH Schweiz, Suisse, Svizzera, Switzerland
BSH Hausgeräte AG
To arrange an engineer visit, to order spare parts and accessories or for product advice please visit www.bosch-home.co.uk
or call Tel.: 0344 892 8979*
*Calls are charged at the basic rate, please check with your telephone service provider for exact charges
GR Greece, EAAac
BSH Ikiakes Siskeves A.B.E.
Central Branch Service
17 km E.O. Athinon-Lamias &
Potamou 20
14564 Kifisia
Unit 1 & 2, 3rd Floor
North Block, Skyway House,
3 Sham Mong Road
Tai Kok Tsui, Kowloon
Hong Kong
Tel.: 2565 6151
Fax: 25656681
mailto:bosch.hk.service@bshg.com
www.bosch-home.cn
HR Hrvatska, Croatia
BSH kučni uredaj di.o.o.
Kneza Branimira 22
10000 Zagreb
Tel.: 015520888
Fax: 01 640 36 03
mailto:informacije.servis-hr@bshg.com
www.bosch-home.com/hr
HU Magyarorszag, Hungary
www.bosch-home.com/hu
IE Republic of Ireland
BSH Home Appliances Ltd.
Unit F4, Ballymount Drive
Ballymount Industrial Estate
Walkinstown
Dublin 12
Service Requests, Spares and Accessories
Tel.: 01450 2655*
Fax: 01450 2520
www.bosch-home.co.uk
*0.03 € per minute at peak.
Off peak 0.0088 € per minute.
IL Israel.
C/S/B/ Home Appliance Ltd.
- Hamasger St.
North Industrial Park
Lod, 7129801
Tel.: 089777222
Fax: 089777245
mailto:csb-serv@csb-ltd.co.il
www.bosch-home.co.il
IN India, Bharat,
BSH Household Appliances
Mfg. Pvt. Ltd. Arena House, Main Bldg, 2nd Floor.
Plot No. 103, Road No. 12
MIDC, Andheri East
Mumbai 400 093
Toll Free 1800 266 1880*
www.bosch-home.com/in
- Mo-Sa: 8.00am to 8.00pm
(exclude public holidays)
IS Iceland
Smith & Norland hf.
Noatuni 4
105 Reykjavik
Tel.: 05203000
Fax: 0520 3011
www.sminor.is
IT Italia,
www.bosch-home.com/it
KZ Kazakhstan, Ka3akctah
IP Turebekov Yerzhan
Nurmanovich
Jangeldina str. 15
Shimkent 160018
Tel.: 0252 31 00 06
mailto:evrika_kz@mail.ru
LB Lebanon.
Teheni, Hana & Co.
Boulevard Dora 4043 Beyrouth
P.O.Box 90449
Jdeideh, 1202 2040
Tel.: 01 255 211
mailto:Info@Teheni-Hana.com
LT Lietuva, Lithuania
Senuku prekybos centras UAB
Jonavos g. 62
44192 Kaunas
Tel.: 0372 12146
Fax: 0372 12165
www.senukai.lt
UAB "AG Service"
R. Kalantos g. 32
52494 Kaunas
Tel.: 070055655
Fax:037331363
mailto:servias@agservice.lt
www.agservice.lt
Baltic Continent Ltd.
Luk\$ioq.23
09132 Vilnius
Tel.: 052741788
Fax: 05 274 1722
mailto:info@balticcontinent.lt
www.balticcontinent.It
LU Luxembourg
S.R.L. "Rialto-Studio"
yI. UyceBa 98
2012 KIshneB
TeJ./ΦaKc:022 23 81 80
mailto:bosch-md@mail.ru
ME Crna Gora, Montenegro
Elektronika komerc
Ul. Slobode 17
84000 Bijelo Polje
Tel./Fax:050432575
Mobil: 069324812
mailto:ekobosch.servis@t-com.me
MK Macedonia,Makeonna
GORENEC
Jane Sandanski 69 lok.3
1000 Skopje
Tel.: 022454600
Mobil: 070 697 463
mailto:gorenec@yahoo.com
MT Malta
Oxford House Ltd.
Notabile Road
Mriehel BKR 14
Tel.: 021 442 334
Fax:021488656
www.oxfordhouse.com.mt
MV Raajjeyge Jumhooriyyaa, Maledives
Lintel Investments
Ma. Maadheli, Majeedhee Magu
Malé
Tel.: 0331 0742
mailto:mohamed.zuhuree@
lintel.com.mv
NL Nederlande, Netherlands
Unit F 2, 4 Orbit Drive
Mairangi Bay
Auckland 0632
Tel.: 0800 245 700*
Fax:0800256535
mailto: aftersales.nz@bshg.com
www.bosch-home.co.nz
- Mo-Fr: 8.30am to 4.00pm
(exclude public holidays)
PL Polska, Poland
SA Kingdom Saudi Arabia,
Abdul Latif Jameel Electronics
and Airconditioning Co. Ltd.
BOSCH Service centre,
Kilo 5 Old Makkah Road
(Next to Toyota), Jamiah Dist.
P.O.Box 7997
Jeddah 21472
Tel.: 800 244 0043
mailto:kunnumalsp@aj.com
www.aljazeera.com.sa
SE Sverige, Sweden
BSH Home Appliances AB
Landsvagen 32
169 29 Solna
Tel.: 0771112277 local rate
mailto:Bosch-Service-SE@bshg.com
www.bosch-home.se
SG Singapore, 新加坡
BSH Home Appliances Pte. Ltd
Block 4012, Ang Mo Kio Avenue 10
01-01 Techplace 1
Singapore 569628
Tel.: 6751 5000*
Fax: 6751 5005
mailto:bshsgp.service@bshg.com
www.bosch-home.com.sg
- Mo-Fr: 8.30am to 7.00pm, Sa: 8.30am to 5.30pm
(exclude public holidays)
SI Slovenija, Slovenia
BSH Hišni aparati d.o.o.
Litostrojska 48
1000 Ljubljana
Tel.: 015830700
Fax: 01 583 08 89
mailto:informacije.servis@bshg.com
www.bosch-home.com/si
SK Slovensko, Slovakia
www.bosch-home.com/tr
- Cagli merkezini sabit hatlardan
aramanin bedeli sehir icücretlendirme,
Cep telefonlarindan isekullanlan
BSH Home Appliances Private Limited
台北市內湖區洲子街80號11樓
11F., No.80, Zhouzi St., Neihu Dist.
Taipei City 11493
Tel.: 0800368888
Fax: 02 2627 9788
mailto:bshtzn-service@bshg.com
TOB "BCX NObyToBa TexHika"
TeJ.: 044 490 2095
mailto:bsh-service.ua@bshg.com
Service-General SH.P.K.
Rruga Mag Prishtine-Ferizaj
70000 Ferizaj
Tel.: 0290 321 434
Tel.: 0290 330 723
mailto:a_service@
gama-electronics.com
XS Srbija, Serbia
BSH Kučni aparati d.o.o.
Milutina Milankovica br. 9ž
11070 Novi Beograd
Tel.: 011 353 70 08
Fax: 011 205 2389
mailto:informacije.servis-sr@
bshg.com
www.bosch-home.rs
ZA South Africa
BSH Home Appliances (Pty) Ltd.
15th Road Randjespark
Private Bag X36, Randjespark
1685 Midrand-Johannesburg
Tel.: 086 002 6724
Fax:0866171780
mailto:applianceserviceza@bshg.com
www.bosch-home.com/zai

de
This appliance is labelled in accordance with European Directive 2012/19/EU concerning used electrical and electronic appliances (waste electrical and electronic equipment - WEEE). The guideline determines the framework for the return and recycling of used appliances as applicable throughout the EU.
fr
((waste electrical and electronic equipment - WEEE
ωωωωωωωω
1sucuogbubcsossswJWgslgUcUul
SUsuogosuljususgssuSs
Sousususususssus.
DE Garantie
GB Conditions of guarantee
For this appliance the guarantee conditions as set out by our representatives in the country of sale apply. Details regarding same may be obtained from the dealer from whom the appliance was purchased. For claims under guarantee the sales receipt must be produced.
FR Conditions de garantie
Bosch Su Isitici (Kettle)
Bosch Mikser
Bosch Mutfak Robotu
Bosch Kahve Degirmeni
Bosch Tost Makinas
Bosch Kiyma Makinas
Bosch Sac Kurutma Mak.
Bosch Baskul
Bosch Sarjli EI Suppurgesi
Bosch Utu
Bosch Blender
Bosch Sac Sekillendirme cihazi
Bosch Meyya Sikacagi
www.bosch-home.com/tr
www.bosch-yetkiliservisi.com

Pa3pa6oTaHOAIAKIN3HN

Adepeca cepBnchbix ceHtpOB no 06cnyKbAHNIO 6bIROBtTexHKn http://www.bosch-home.com/ru/
| COHNO.000 Cao#Cepnch, 354000, Topp#o##yn, #8, 89, ter (862), 264-33-22, 261-30-90 |
| COHNO.000 T#x#epnch, 354008, I#o#ck##y, #3, 3/3, ter (862), 62-02-95, d#ac (862), 67-02-95 |
| CTABPONIOI.000 T#oxo#epnch, 355005, 7 H#p#m#u#h#ny, #1, 14, ter (77,25) 262-27, 262-27, 262-27 |
| CTBNTMAI.000 T#oxo#epnch, 355005, 7 H#p#m#u#h#ny, #1, 14, ter (862), 62-02-95, d#ac (862), 67-02-95 |
| CYPYRT.000 P###no#o#epnch, 352400, P###no#o#h#ny, #1, 14, ter (77,25) 262-27, 262-27, 262-27, 262-27, 262-27, 262-27, 262-27, 262-27, 262-27, 262-27, 262-27, 262-27, 262-27, 26 |
| CYPYRT.000 P###no#o#epnch, 352400, P###no#o#h#ny, #1, 14, ter (862), 62-02-95, 20-37-20 |
| CBtKBrBAP.000 CCU#D#m#e#n# B#k#op#nch, 352400, P###no#o#h#ny, #1, 14, ter (862), 62-02-95, 20-37-20 |
| CBtKBrBAP.000 CCU#D#m#e#n# B#k#op#nch, 352400, P###no#o###ny, #1, 14, ter (862), 62-02-95, 20-37-20 |
| CBtKBrBAP.000 CCU#D#m#e#n# B#k#op#nch, 352400, P###no#o###ny, #1, 14, ter (862), 62+37-33-24 |
| CBtPAHOP.000 EBCT Cepnch, 347900, C##mpoc#c#n#ne, #45 |
| eb#r (862), 66-70-86, d#ac (862), 67-89-85 |
| TAMEBO.000 T##m#A#epnch, 352400, Vokop#ck##ny, #1, 23A |
| TBEPI.000 T##m#A#epnch, 170031, M#b#ok##o#p#n#. #1, 14, ter (822), 32-03-23, 20-37-20 |
| TBEPI.000 T##m#A#epnch, 170031, M#b#ok##o#p#n#. #1, 14, ter (822), 32-03-23, 20-37-20 |
| TBEPI.000 T##m#A#epnch, 170031,#1, 14, ter (822), 32-03-23, 20-37-20 |
| TBEPI.000 T##m#A#epnch, 170031,#1, 14, ter (822), 32-03-23, 20-37-20 |
| TBEPI.00## T##m#A#epnch, 170031,#1, 14, ter (822), 32-03-23, 20-37-20 |
| TBEPI.00## T##m#A#epnch, 170031,#1, 14, ter (822), 32-03-23, #1, 14, ter (822), 32-03-23, 20-37-20 |
| TBEPI.00## T##m#A#epnch, 170031,#1, 14, ter (822), 32-03-23, 20-37-20 |
| TBEPI.000 T##m#A#epnch, 170031,#1, 14, ter (822), 32-03-23, #1, 14, ter (822), 32-03-23, 20-37-20 |
| TBEPI.00## T##m#A#epnch, 170031##, #1, 14, ter (822), 32-03-23, #1, 14, ter (822), 32-03-23, #1, 14, ter (822), 32-03-23, #1, 14, ter (822), 32-03-23, #1, 14, ter (822), 32-03-23, #1, 14 |
| TYAII.000 T##m#A#epnch, 692525, Co##o#ck##ny, #1, 14, ter (822), 32-03-23, #1, 14, ter (822), 32-03-23, #1, 14, ter (822), 32-03-23, #1, 14, ter (822), 32-03-23, #1, 14 TOMHEII.000 ##P#cc#nch, 692535, Co##o#ck##ny, #1, 14, ter (822), 32-03-23, #1, 14, ter (822), 32-03-23, #1, 14, ter (822), 32-03-23, #1, 14 |
| YAI#YLD.000 ###P#cc#nch, 692547, Co##o#ck##ny, #1, 14, ter (822), 32-03-23, #1, 14, ter (822), 32-03-23, #1, 14 |
| TAYAOHBCK.000 ###M#te#n#n#n#n#n#n#n#n#n#n#n#n#n#n#n#n#n#n#n#n#n#n#n#n#n#n#n#n#n#n#n#n#n#n#n#n#n#n#n#n#n#n#n#n#n#n#n#n#n#n# n#1, 14, ter (822), 32-03-23, #1, 14 |
| YAL##OBCK.000 ###M#te#n#n#n#n#n#n#n#n#n#n#n#n#n#n#n#n#n#n#n#n#n#n#n#n#n#n#n#n#n#n#n#n#n#n#n#n#n#n#n#n#n#n#n#n#n# YAL##OBCK.000 ###M#te#n#n#n#n#n#n#n#n#n#n#n#n#n#n#n#n#n#n#n#n#n#n#n#n#n#n#n#n#n#n#n#n#n#n#n#n#n#n#n#n#n#n#n# YAL##OBCK.000 ###M#ce##n#n#n#n#n#n#n#n#n#n#n#n#n#n#n#n#n#n#n#n#n#n#n#n#n#n#n#n#n#n#n#n#n#n#n#n# YAL##OBCK.000 ###M#ce##n#n#n#n#n#n#n# YAL##OBCK.000 ###M#ce##n#n#n#n#n#n#n#n# YAL##OBCK.000 ###M#ce##n#n#n#n#n# YAL##OBCK.000 ###M#ce##n#n#n#n# YAL##OBCK.000 ###M#ce##n#n#n# YAL##OBCK.000 ###M#ce##n#n#n# YAL##OBCK.000 ###M#ce##n#n#n# YAL##OBCK.000 ###M#ce##n#n#n# YAL##OBCK.000 ###M#ce##n#n#n# YAL##OBCK.000 ###M#ce####n#n# YAL##OBCK.000 ###M#ce##n#n#n# YAL##OBCK.000 ###M#ce##n#n#n# YAL##OBCK.000 ###M#ce##n#n#n# YAL##OBCK.000 ###M#ce##n#n#n# YAL##OBCK.000 ###M#ce##n# YAL##OBCK.000 ###M#ce##n# YAL##OBCK.000 ###M#ce##n# YAL##OBCK.000 ###M#ce##n# YAL##OBCK.000 ###M#ce##n# YAL##OBCK.000 ###M#ce##n# YAL##OBCK.000 ###M#ce##n# YAR##O##.000 ###M#ce##n# YAR##O##.000 ###M#ce##n# YAR##O##.000 ###M#ce##n# YAR##O##.000 ###M#ce##n# YAR##O##.000 ###M#ce##n# YAR##O##.000 ###M#ce##n# YAR##O##.00## ###M#ce##n# YAR##O##.00## ###M#ce##n# YAR##O##.00## ###M#ce##n# YAR##O##.00## ###M#ce##n# YAR##O##.00## ###M#ce##n# YAR##O##.00## ###M#ce##n# YAR##O##.00## ###M#cesn# YAR##O##.00## ###M#ce##n# YAR##O##.00## ###M#ce##n# YAR##O##.00## ###M#ce##n# YAR##O##.00## ###M#ce##n# YAR##O##.00## ###M#ce##n# YAR##O##.00## ###M#ce##n# YOR##O##.00## ###M#ce##n# YOR##O##.00## ###M#ce##n# YOR##O##.00## ###M#ce##n# YOR##O##.00## ###M#ce##n# YOR##O##.00## ###M#ce##n# YOR##O##.00## ###M#ce##n# YOR##O##. YOR##O##.00## ###M#ce##n# YOR##O##.00## ###M#ce##n# YOR##O##.00## ###M#ce##n# YOR##O##.00## ###M#ce##n# YOR##O##.00## ###M#ce##n# YOR##O##.00## ###M#ce##n# YOR## O##.00## ###M#ce##n# YOR##O##.00## ###M#ce##n# YOR##O##.00## ###M#ce##n# YOR##O##.00## ###M#ce##n# YOR##O##.00## ###M#ce##n# YOR##O##.00## ###M#ce##n# YOR##O##.0## ###M#ce##n# YOR##O##.0## ###M#ce##n# YOR##O##.0## ###M#ce##n# YOR##O##.0## ###M#ce##n# YOR##O##.0## ###M#ce##n# YOR##O##.0## ###M#ce##n# YOR##O##.0## ###M#ce##n# YNOR##O##.00## ###M#ce##n# YOR##O##.00## ###M#ce##n# YOR##O##.00## ###M#ce##n# YOR##O##.00## ###M#ce##n# YOR##O##.00## ###M#ce##n# YOR##O##.00## ###M#ce##n# YOR##O####.00## ###M#ce##n# YOR##O####.00## ###M#ce##n# YOR##O####.00## ###M#ce##n# YOR##O####.00## ###M#ce##n# YOR##O####.00## ###M#ce##n# YOR##O####.00## ###M#ce##n# YOR##O####.00#### ###M#ce##n# YOR##O####.00## ###M#ce##n# YOR##O####.00## ###M#ce##n# YOR##O####.00## ###M#ce##n# YOR##O####.00## ###M#ce##n# YOR##O####.00## ###M#ce##n# YOR##O####.00## ###M#cesn# YOR##O####.00## ###M#ce##n# YOR##O####.00## ###M#ce##n# YOR##O####.00## ###M#ce##n# YOR##O####.00## ###M#ce##n# YOR##O####.00## ###M#ce##n# YOR##O####.00## ###M#ce##n# YAR##O####.00## ###M#ce##n# YAR##O####.00## ###M#ce##n# YAR##O####.00## ###M#ce##n# YAR##O####.00## ###M#ce##n# YAR##O####.00## ###M#ce##n# YAR##O####.00## ###M#ce##n# YAR##O####. YAR##O####.00## ###M#ce##n# YAR##O####.00## ###M#ce##n# YAR##O####.00## ###M#ce##n# YAR##O####.00## ###M#ce##n# YAR##O####.00## ###M#ce##n# YAR##O####.00## ###M#ce##n# YAR## O####.00## ###M#ce##n# YAR##O####.00## ###M#ce##n# YAR##O####.00## ###M#ce##n# YAR##O####.00## ###M#ce##n# YAR##O####.00## ###M#ce##n# YAR##O####.00## ###M#ce##n# YAR##O####.0## ###M#ce##n# YAR##O####.0## ###M#ce##n# YAR##O####.0## ###M#ce##n# YAR##O####.0## ###M#ce##n# YAR##O####.0## ###M#ce##n# YAR##O####.0## ###M#ce##n# YAR##O####.0## ###M#ce##n# YNOR##O####.00## ###M#ce##n# YOR##O####.00## ###M#ce##n# YOR##O####.00## ###M#ce##n# YOR##O####.00## ###M#ce##n# YOR##O####.00## ###M#ce##n# YOR##O####.00## ###M#ce##n# YOR##O#####.00## ###M#ce##n# YOR##O####.00## ###M#ce##n# YOR##O####.00## ###M#ce##n# YOR##O####.00## ###M#ce##n# YOR##O####.00## ###M#ce##n# YOR##O####.00## ###M#ce##n# YOR##O####.006 ### M YOR##O####.006 ### M YOR##O####.006 ### M YOR##O####.006 ### M YOR##O####.006 ### M YOR##O####.006 ### M YOR##O####.006 ### M YOR##O####.006 ### M YOR##O####.006 ### M YOR## O####.006 ### M YOR##O####.006 ### M YOR##O####.006 ### M YOR##O####.006 ### M YOR##O####.006 ### M YOR##O####.006 ### M YOR##O####.006 ### M YOR##O####.006 ### M YOR##O####.0## ### M YOR##O####.0## ### M YOR##O####.0## ### M YOR##O####.0## ### M YOR##O####.0## ### M YOR##O####.0## ### M YOR##O####.0## ### M YOR##O####.0## ### M YOR##O####.0## ### M YOR##O####.0## #1, 14, 14, 14, 14, 14, 14, 14, 14, 14, 14, 14, 14, 14, 14, 14, 14, 14, 14, 14, 14, 14, 14, 14, 14, 14, 15, 14, 14, 14, 14, 14, 14, 14, 14, 14, 14, 14, 14, 14, 14, 14, 14, 14, 14, 14, 14, 14, 14, 14, 14, 16, 16, 16, 16, 16, 16, 16, 16, 16, 16, 16, 16, 16, 16, 16, 16, 16, 16, 16, 16, 16, 16, 16, 16, 16, 17, 17, 17, 17, 17, 17, 17, 17, 17, 17, 17, 17, 17, 17, 17, 17, 17, 17, 17, 17, 17, 17, 17, 17, 17, 18, 18, 18, 18, 18, 18, 18, 18, 18, 18, 18, 18, 18, 18, 18, 18, 18, 18, 18, 18, 18, 18, 18, 18, 18, 19, 19, 19, 19, 19, 19, 19, 19, 19, 19, 19, 19, 19, 19, 19, 19, 19, 19, 19, 19, 19, 19, 19, 19, 19, 18, 18, 18, 18, 18, 18, 18, 18, 18, 18, 18, 18, 18, 18, 18, 18, 18, 18, 18, 18, 18, 18, 18, 18, 15, 14, 14, 14, 14, 14, 14, 14, 14, 14, 14, 14, 14, 14, 14, 14, 14, 14, 14, 14, 14, 14, 14, 14, 15, 15, 15, 15, 15, 15, 15, 15, 15, 15, 15, 15, 15, 15, 15, 15, 15, 15, 15, 15, 15, 15, 15, 15, 15, 16, 16, 16, 16, 16, 16, 16, 16, 16, 16, 16, 16, 16, 16, 16, 16, 16, 16, 16, 16, 16, 16, 16, 16, 18 YAR##OBCK.006 ###M#ce##n#n#n#n#n#n#n#n#n#n#n#n#n#n#n#n#n#n#n#n#n#n#n#n#n#n#n#n#n#n#n# YAR##OBCK.006 ###M#ce##n#n#n#n#n#n#n#n#n#n#n#n#n#n#n#n#n#n#n# YAR##OBCK.006 ###M#ce##n#n#n#n#n#n#n#n#n#n#n#n#n# YAR##OBCK.006 ###M#ce##n#n#n#n#n#n#n#n#n#n# YAR##OBCK.006 ###M#ce##n#n#n#n#n#n# YAR##OBCK.006 ###M#ce##n#n#n#n# YAR##OBCK.006 ###M#ce##n#n#n# YAR##OBCK.006 ###M#ce##n#n# YAR##OBCK.006 ###M#ce##n# YAR##OBCK.006 ###M#ce##n# YAR##OBCK.006 ###M#ce##n# YAR##OBCK.006 ###M#ce##n# YAR##OBCK.006 ###M#ce##n# YAR##OBCK.006 ###M#ce##n# YAR##OBCK.006 ###M#ce##n# YOR##O####.006 ###M#ce##n# YOR##O####.006 ###M#ce##n# YOR##O####.006 ###M YOR##O####.006 ###M YOR##O####.006 ###M YOR##O####.006 ###M YOR##O####.006 ###M YOR##O####.006 ###M YOR##O####.006 ###M YOR##O####.006 ###M YOR##O####.006 ###M YOR## O####.006 ###M YOR## O####.006 ###M YOR## O####.006 ###M YOR## O####.006 ###M YOR## O####.006 ###M YOR## O####.006 ###M YOR## O####.006 ###M YOR## O####.006 ###M YOR## O####.0 YOR## O####.0 YOR## O####.0 YOR## O####.0 YOR## O####.0 YOR## O####.0 YOR## O####.0 YOR## O####.0 YOR## O####.0 YOR## O####.0 YOR## O####.0 YOR## O####.0 YOR## O####.0 YOR ## O####.0 YOR ## O####.0 YOR ## O####.0 YOR ## O####.0 YOR ## O####.0 YOR ## O####.0 YOR ## O####.0 YOR ## O####.0 YOR ## O####.0 YOR ## O####.0 YOR ## O####.0 YOR ## O####.0 YOR ## O####. |
| HAXOKDAI, HIXKAPKOB, HIXKAPKOB, HIXKAPKOB, HIXKAPKOB, HIXKAPKOB, HIXKAPKOB, HIXKAPKOB, HIXKAPKOB, HIXKAPKOB, HIXKAPKOB, HIXKAPKOB, HIXKAPKOB, HIXKAPKOB, HIXKAPKOB, HIXKAPKOB, |
| HIXKAPKOB, HIXKAPKOB, HIXKAPKOB, HIXKAPKOB, HIXKAPKOB, HIXKAPKOB, HIXKAPKOB, HIXKAPKOB, HIXKAPKOB, HIXKAPKOB, HIXKAPKOB, HIXKAPKOB, HIXKAPKOB, HIXKAPKOB, HIX KAPKOB, HIX KAPKOB, HIX KAPKOB, HIX KAPKOB, HIX KAPKOB, HIX KAPKOB, HIX KAPKOB, HIX KAPKOB, HIX KAPKOB, HIX KAPKOB, HIX KAPKOB, HIX KAPKOB, HIX KAPKOB, HIX KAPKOB, HIX KAP KOB, HIX KAP KOB, HIX KAP KOB, HIX KAP KOB, HIX KAP KOB, HIX KAP KOB, HIX KAP KOB, HIX KAP KOB, HIX KAP KOB, HIX KAP KOB, HIX KAP KOB, HIX KAP KOB, HIX KAP KOB, HIX KAP KOB, HIX KAP KOB |
| HIXKAPKOB, HIXKAPKOB, HIXKAPKOB, HIXKAPKOB, HIXKAPKOB, HIXKAPKOB, HIXKAPKOB, HIXKAPKOB, HIXKAPKOB, HIXKAPKOB, HIXKAPKOB, HIXKAPKOB, HIXKAPKOB, HIXKAPK OB, HIX KAP KOB, HIX KAP KOB, HIX KAP KOB, HIX KAP KOB, HIX KAP KOB, HIX KAP KOB, HIX KAP KOB, HIX KAP KOB, HIX KAP KOB, HIX KAP KOB, HIX KAP KOB, HIX KAP KOB, HIX KAP KOB, HIX KAP KOB, |
| HIXKAPKOB, HIXKAPKOB, HIXKAPKOB, HIXKAPKOB, HIXKAPKOB, HIXKAPKOB, HIXKAPKOB, HIXKAPKOB, HIXKAPKOB, HIXKAPKOB, HIXKAPKOB, HIXKAPKOB, HIXKAPKOB, HIXK APON, HIX KAP KOB, HIX KAP KOB, HIX KAP KOB, HIX KAP KOB, HIX KAP KOB, HIX KAP KOB, HIX KAP KOB, HIX KAP KOB, HIX KAP KOB, HIX KAP KOB, HIX KAP KOB, HIX KAP KOB, HIX KAP KOB, HIX KAP KOB, 015467832720000000000000000000000000000000000000000000000000000000000000000000000000000000000000000000000000000 |
| HIXKAPKOB, HIXKAPKOB, HIXKAPKOB, HIXKAPKOB, HIXKAPKOB, HIXKAPKOB, HIXKAPKOB, HIXKAPKOB, HIXKAPKOB, HIXKAPKOB, HIXKAPKOB, HIXKAPKOB, HIXKAPKOB, HIXKAPKob, HIXKAPKOB, HIXKAPKOB, HIXKAPKOB, HIXKAPKOB, HIXKAPKOB, HIXKAPKOB, HIXKAPKOB, HIXKAPKOB, HIXKAPKOB, HIXKAPKOB, HIXKAPKOB, HIXKAPKOB, HIXKAPKOB, HIXKAPKOB, 0154783272000000000000000000000000000000000000000000000000000000000000000000000000000000000000000000000 |
| HIXKIP, HIX KAP KOB, HIX KAP KOB, HIX KAP KOB, HIX KAP KOB, HIX KAP KOB, HIX KAP KOB, HIX KAP KOB, HIX KAP KOB, HIX KAP KOB, HIX KAP KOB, HIX KAP KOB, HIX KAP KOB, HIX KAP KOB, HIX KAP KOB, L1478967327200000000000000000000000000000000000000000000000000000000000000000000000000000000000000000000000 |
| HINCKO, HIX KAP KOB, HIX KAP KOB, HIX KAP KOB, HIX KAP KOB, HIX KAP KOB, HIX KAP KOB, HIX KAP KOB, HIX KAP KOB, HIX KAP KOB, HIX KAP KOB, HIX KAP KOB, HIX KAP KOB, HIX KAP KOB, HIX KAP KOB, T6462478967327200000000000000000000000000000000000000000000000000000000000000000000000000000000000000000 |
| OPCCK, OX CNTA, 19781832228663248832633833383333333333333333333333333333333333333333333333333333333333333333333333333333333333333333333333333333 |
| OPCCK, OX CNT A, 19781832228663248832632488326324883263248832632488326324883263248832632488326324883263248832632488326324883263248832632 |
| OPCCK, OX CNT A, 1978183222866324883263248832632488326324883263248832632488326324883263248832632488326 |
| OPCCK, OX CNT A, 1978183222866324883263248832632488326324883263248832632488326324883263248832632488326 3 |
| OPCCK, OX CNT A, 197818322286632488326324883263248832632488326324883263248832632488326324883263248832 |
| OPCCK, OX CNT A, 19781832228663248832632488326324883263248832632488326324883263248832632488326324883 |
| OPCCK, OX CNT A, 197818322286632488326324883263248832632488326324883263248832632488326324883263248832 6 |
| OPCCK, OX CNT A, 197818322286632488326324883263248832632488326324883263248832632488326324883263248832 7 |
| OPCCK, OX CNT A, 1978183222866324883263248832632488326324883263248832632488326324883263248832 8 |
| OPCCK, OX CNT A, 197818322286632488326324883263248832632488326324883263248832 9 |
| OPCCK, OX CNT A, 1978183222866324883263248832632488326324883263248832 10 |
| OPCCK, OX CNT A, 19781832228663248832632488326324883263248832 11 |
| OPCCK, OX CNT A, 19781832228663248832632488326324883263248832 12 |
| OPCCK, OX CNT A, 19781832228663248832632488326324883263248832 13 |
| OPCCK, OX CNT A, 197818322286632488326324883263248832 14 |
| OPCCK, OX CNT A, 197818322286632488326324883263248832 15 |
| OPCCK, OX CNT A, 197818322286632488326324883263248832 16 |
| OPCCK, OX CNT A, 197818322286632488326324883263248832 17 |
| OPCCK, OX CNT A, 197818322286632488326324883263248832 18 |
| OPCCK, OX CNT A, 197818322286632488326324883263248832 19 |
| OPCCK, OX CNT A, 197818322286632488326324883263248832 20 |
| OPCCK, OX CNT A, 197818322286632488326324883263248832 21 |
| OPCCK, OX CNT A, 197818322286632488326324883263248832 22 |
| OPCCK, OX CNT A, 197818322286632488326324883263248832 23 |
| OPCCK, OX CNT A, 197818322286632488326324883263248832 24 |
| OPCCK, OX CNT A, 197818322286632488326324883263248832 25 |
| OPCCK, OX CNT A, 197818322286632488326324883263248832 26 |
| OPCCK, OX CNT A, 197818322286632488326324883263248832 27 |
| OPCCK, OX CNT A, 197818322286632488326324883263248832 28 |
| OPCCK, OX CNT A, 197818322286632488326324883263248832 29 |
| OPCCK, OX CNT A, 197818322286632488326324883263248832 30 |
| OPCCK, OX CNT A, 197818322286632488326324883263248832 31 |
| OPCCK, OX CNT A, 197818322286632488326324883263248832 32 |
| OPCCK, OX CNT A, 197818322286632488326324883263248832 33 |
| OPCCK, OX CNT A, 197818322286632488326324883263248832 34 |
| OPCCK, OX CNT A, 197818322286632488326324883263248832 35 |
| OPCCK, OX CNT A, 197818322286632488326324883263248832 36 |
| OPCCK, OX CNT A, 197818322286632488326324883263248832 37 |
| OPCCK, OX CNT A, 197818322286632488326324883263248832 38 |
| OPCCK, OX CNT A, 197818322286632488326324883263248832 39 |
| OPCCK, OX CNT A, 197818322286632488326324883263248832 40 |
| OPCCK, OX CNT A, 197818322286632488326324883263248832 41 |
| OPCCK, OX CNT A, 197818322286632488326324883263248832 42 |
| OPCCK, OX CNT A, 197818322286632488326324883263248832 43 |
| OPCCK, OX CNT A, 197818322286632488326324883263248832 44 |
| OPCCK, OX CNT A, 197818322286632488326324883263248832 45 |
| OPCCK, OX CNT A, 197818322286632488326324883263248832 46 |
| OPCCK, OX CNT A, 197818322286632488326324883263248832 47 |
| OPCCK, OX CNT A, 197818322286632488326324883263248832 48 |
| OPCCK, OX CNT A, 197818322286632488326324883263248832 49 |
| OPCCK, OX CNT A, 197818322286632488326324883263248832 50 |
| OPCCK, OX CNT A, 197818322286632488326324883263248832 51 |
| OPCCK, OX CNT A, 197818322286632488326324883263248832 52 |
| OPCCK, OX CNT A, 197818322286632488326324883263248832 53 |
| OPCCK, OX CNT A, 197818322286632488326324883263248832 54 |
| OPCCK, OX CNT A, 197818322286632488326324883263248832 55 |
| OPCCK, OX CNT A, 197818322286632488326324883263248832 56 |
| OPCCK, OX CNT A, 197818322286632488326324883263248832 57 |
| OPCCK, OX CNT A, 197818322286632488326324883263248832 58 |
| OPCCK, OX CNT A, 197818322286632488326324883263248832 59 |
| OPCCK, OX CNT A, 197818322286632488326324883263248832 60 |
| OPCCK, OX CNT A, 197818322286632488326324883263248832 61 |
| OPCCK, OX CNT A, 197818322286632488326324883263248832 62 |
| OPCCK, OX CNT A, 197818322286632488326324883263248832 63 |
| OPCCK, OX CNT A, 197818322286632488326324883263248832 64 |
| OPCCK, OX CNT A, 197818322286632488326324883263248832 65 |
| OPCCK, OX CNT A, 197818322286632488326324883263248832 66 |
| OPCCK, OX CNT A, 197818322286632488326324883263248832 67 |
| OPCCK, OX CNT A, 197818322286632488326324883263248832 68 |
| OPCCK, OX CNT A, 197818322286632488326324883263248832 69 |
| OPCCK, OX CNT A, 197818322286632488326324883263248832 70 |
| OPCCK, OX CNT A, 197818322286632488326324883263248832 71 |
| OPCCK, OX CNT A, 197818322286632488326324883263248832 72 |
| OPCCK, OX CNT A, 197818322286632488326324883263248832 73 |
| OPCCK, OX CNT A, 197818322286632488326324883263248832 74 |
| OPCCK, OX CNT A, 197818322286632488326324883263248832 75 |
| OPCCK, OX CNT A, 197818322286632488326324883263248832 76 |
| OPCCK, OX CNT A, 197818322286632488326324883263248832 77 |
| OPCCK, OX CNT A, 197818322286632488326324883263248832 78 |
| OPCCK, OX CNT A, 197818322286632488326324883263248832 79 |
| OPCCK, OX CNT A, 197818322286632488326324883263248832 80 |
| OPCCK, OX CNT A, 197818322286632488326324883263248832 81 |
| OPCCK, OX CNT A, 197818322286632488326324883263248832 82 |
| OPCCK, OX CNT A, 197818322286632488326324883263248832 83 |
| OPCCK, OX CNT A, 197818322286632488326324883263248832 84 |
| OPCCK, OX CNT A, 197818322286632488326324883263248832 85 |
| OPCCK, OX CNT A, 197818322286632488326324883263248832 86 |
| OPCCK, OX CNT A, 197818322286632488326324883263248832 87 |
| OPCCK, OX CNT A, 197818322286632488326324883263248832 88 |
| OPCCK, OX CNT A, 197818322286632488326324883263248832 89 |
| OPCCK, OX CNT A, 197818322286632488326324883263248832 90 |
| OPCCK, OX CNT A, 197818322286632488326324883263248832 91 |
| OPCCK, OX CNT A, 197818322286632488326324883263248832 92 |
| OPCCK, OX CNT A, 197818322286632488326324883263248832 93 |
| OPCCK, OX CNT A, 197818322286632488326324883263248832 94 |
| OPCCK, OX CNT A, 197818322286632488326324883263248832 95 |
| OPCCK, OX CNT A, 197818322286632488326324883263248832 96 |
| OPCCK, OX CNT A, 197818322286632488326324883263248832 97 |
| OPCCK, OX CNT A, 197818322286632488326324883263248832 98 |
| OPCCK, OX CNT A, 197818322286632488326324883263248832 99 |
| OPCCK, OX CNT A, 197818322286632488326324883263248832 100 |
| OPCCK, OX CNT A, 197818322286632488326324883263248832 101 |
| OPCCK, OX CNT A, 197818322286632488326324883263248832 102 |
| OPCCK, OX CNT A, 197818322286632488326324883263248832 103 |
| OPCCK, OX CNT A, 197818322286632488326324883263248832 104 |
| OPCCK, OX CNT A, 197818322286632488326324883263248832 105 |
| OPCCK, OX CNT A, 197818322286632488326324883263248832 106 |
| OPCCK, OX CNT A, 197818322286632488326324883263248832 107 |
| OPCCK, OX CNT A, 197818322286632488326324883263248832 108 |
| OPCCK, OX CNT A, 197818322286632488326324883263248832 109 |
| OPCCK, OX CNT A, 197818322286632488326324883263248832 110 |
| OPCCK, OX CNT A, 197818322286632488326324883263248832 111 |
| OPCCK, OX CNT A, 197818322286632488326324883263248832 112 |
| OPCCK, OX CNT A, 197818322286632488326324883263248832 113 |
| OPCCK, OX CNT A, 197818322286632488326324883263248832 114 |
| OPCCK, OX CNT A, 197818322286632488326324883263248832 115 |
| OPCCK, OX CNT A, 197818322286632488326324883263248832 116 |
| OPCCK, OX CNT A, 197818322286632488326324883263248832 117 |
| OPCCK, OX CNT A, 197818322286632488326324883263248832 118 |
| OPCCK, OX CNT A, 197818322286632488326324883263248832 119 |
| OPCCK, OX CNT A, 197818322286632488326324883263248832 120 |
| OPCCK, OX CNT A, 197818322286632488326324883263248832 121 |
| OPCCK, OX CNT A, 197818322286632488326324883263248832 122 |
| OPCCK, OX CNT A, 197818322286632488326324883263248832 123 |
| OPCCK, OX CNT A, 197818322286632488326324883263248832 124 |
| OPCCK, OX CNT A, 197818322286632488326324883263248832 125 |
| OPCCK, OX CNT A, 197818322286632488326324883263248832 126 |
| OPCCK, OX CNT A, 197818322286632488326324883263248832 127 |
| OPCCK, OX CNT A, 197818322286632488326324883263248832 128 |
| OPCCK, OX CNT A, 197818322286632488326324883263248832 129 |
| OPCCK, OX CNT A, 197818322286632488326324883263248832 130 |
| OPCCK, OX CNT A, 197818322286632488326324883263248832 131 |
| OPCCK, OX CNT A, 197818322286632488326324883263248832 132 |
| OPCCK, OX CNT A, 197818322286632488326324883263248832 133 |
| OPCCK, OX CNT A, 197818322286632488326324883263248832 134 |
| OPCCK, OX CNT A, 197818322286632488326324883263248832 135 |
| OPCCK, OX CNT A, 197818322286632488326324883263248832 136 |
| OPCCK, OX CNT A, 197818322286632488326324883263248832 137 |
| OPCCK, OX CNT A, 197818322286632488326324883263248832 138 |
| OPCCK, OX CNT A, 197818322286632488326324883263248832 139 |
| OPCCK, OX CNT A, 197818322286632488326324883263248832 140 |
| OPCCK, OX CNT A, 197818322286632488326324883263248832 141 |
| OPCCK, OX CNT A, 19781B5-55-55-55-55-55-55-55-55-55-55-55-55-55-55-55-55-55-55-55-55-55-55-55-55-55-55-55-55-55-55-55-55-55-5 |
| OPCCK, OX CNT A, 197B5-55-55-55-55-55-55-55-55-55-55-55-55-55-55-55-55-55-55-55-55-55-55-55-55-55-55-55-55-55-55-55-55- |
| OPCCK, OX CNT A, 197B5-55-55-55-55-55-55-55-55-55-55-55-55-55-55-55-55-55-55-55-55-55-55-55-55-55-55-5 |
| OPCCK, OX CNT A, 197B.5-55-55-55-55-55-55-55-55-55-55-55-55-55-55-55-55-55-55-55-55-55-55-55-55-55-55-55-55-55-55-55-55-5-55-55-55-55-55-55-55-55-55-55-55-55-55-55-55-55-55-55-55-55-55-55-55-55-55-55-55-55-55-55-55-55-5 -55-55-55-55-55-55-55-55-55-55-55-55-55-55-55-55-55-55-55-55-55-55-55-55-55-55-55-55-55-55-55-55-55- |
| MYPKTYC OOO 60000000000000000000000000000000000000000000000000000000000000000000000000000000000000000000000000000 | |
| KIAAHAYA OOO 482-492-22-27-32-23-20-16-56,ΦΦΦ(1392)29-20-16-48 | |
| KIAAHAYA OOO 482-492-22-27-32-23-20-16-56,ΦΦΦ(1392)29-20-16-48 | |
| KIAAHAYA OOO 482-492-22-27-32-23-20-16-56.ΦΦΦ(1392)29-20-16-48 | |
| KIAAHAYA OOO 482-492-22-27-32-23-20-16-56.ΦΦΦ(1392)29-20-16-48 | |
| KIAAHAYA OOO 482-492-18-21-54-76-61,ΦΦΦ(1482)25-47-61 | |
| KIAAHAYA OOO 482-492-18-21-54-76-61,ΦΦΦ(1482)25-47-61 | |
| KIAAHAYA OOO 482-492-18-21-54-76-61,ΦΦΦ(1482)25-47 | |
| KIAAHAYA OOO 482-492-18-21-54-76-61,ΦΦΦ(1482)25-47 | |
| KIAAHAYA OOO 482-492-18-21-54-76-61,ΦΦΦ(1482)25-47 | |
| HAIJIYI YIN JI HUAN CHPYI HAIJING CHEN YI, LULUO, HAIJING CHEN YI, LULUO, HAIJING CHEN YI, LULUO, HAIJING CHEN YI, LULUO, HAIJING CHEN YI, LULUO, HAIJING CHEN YI, LULUO, HAIJING CHEN YI, LULUO, HAIJING CHEN YI, LULUO, HAHJING CHEN YI, LULUO, HAIJING CHEN YI, LULUO, HAIJING CHEN YI, LULUO, HAIJING CHEN YI, LULUO, HAIJING CHEN YI, LULUO, HAIJING CHEN YI, LULUO, HAIJING CHEN YI, LULUO, HAIJNG CHEN YI, LULUO, HAIJNG CHEN YI, LULUO, HAIJNG CHEN YI, LULUO, HAIJNG CHEN YI, LULUO, HAIJNG CHEN YI, LULUO, HAIJNG CHEN YI, LULUO, HAIJNG CHEN YI, LULUO, HAIJNG CHN, 198000000000000000000000000000000000000000000000000000000000000000000000000000000000000000000000000000 | KIAAHAYI YIN JI HUAN CHPYI HAIJING CHEN YI, LULUO, HAIJING CHEN YI, LULUO, HAIJING CHEN YI, LULUO, HAIJING CHEN YI, LULUO, HAIJING CHEN YI, LULUO, HAIJING CHEN YI, LULUO, HAIJNG CHEN YI, LULUO, HAHJING CHEN YI, LULUO, HAIJNG CHEN YI, LULUO, HAIJNG CHEN YI, LULUO, HAIJNG CHEN YI, LULUO, HAIJNG CHEN YI, LULUO, HAIJNG CHEN YI, LULUO, HAIJNG CHEN YI, LULUO, HAIJING CHEN YI, LULUO, HAIJNG CHEN YI, LULUO, HAIJNG CHEN YI, LULUO, HAIJNG CHEN YI, LULUO, HAIJNG CHEN YI, LULUO, HAIJNG CHEN YI, LULUO, HAIJNG CHN, 19800000000, KIAOHYI YIN JI HUAN CHPYI HAIJING CHEN YI, LULUO, HAIJING CHEN YI, LULUO, HAIJING CHEN YI, LULUO, HAIJING CHEN YI, LULUO, HAIJING CHEN YI, LULUO, HAIJING CHEN YI, LULUO, HAI JING CHEN YI, LULUO, HAIJING CHEN YI, LULUO, HAIJING CHEN YI, LULUO, HAIJING CHEN YI, LULUO, HAIJING CHEN YI, LULUO, HAIJING CHEN YI, LULUO, HAIJING CHEN YI, LULUO, HAIJINGCHEN YI, LULUO, HAIJING CHEN YI, LULUO, HAIJING CHEN YI, LULUO, HAIJING CHEN YI, LULUO, HAIJING CHEN YI, LULUO, HAIJING CHEN YI, LULUO, HAIJING CHEN YI, LULUO, HAIJING CHENYI, LULUO, HAIJING CHENYI, LULUO, HAIJING CHENYI, LULUO, HAIJING CHENYI, LULUO, HAIJING CHENYI, LULUO, HAIJING CHENYI, LULUO, HAIJING CHENYI, LULUO, HAIJING CHENYI |
| KIAAHAYI YIN JI HUAN CHPYI HAIJING CHEN YI, LULUO, HAIJING CHEN YI, LULUO, HAIJING CHEN YI, LULUO, HAIJING CHEN YI, LULUO, HAIJING CHEN YI, LULUO, HAIJING CHEN YI, LUL/UO, HAIJING CHEN YI, LULUO, HAIJING CHEN YI, LULUO, HAIJING CHEN YI, LULUO, HAIJING CHEN YI, LULUO, HAIJING CHEN YI, LULUO, HAIJING CHEN YI, LULUO, HAIJING CHEN YI, LULUO HAIJING CHEN YI, LULUO, HAIJING CHEN YI, LULUO, HAIJING CHEN YI, LULUO, HAIJING CHEN YI, LULUO, HAIJING CHEN YI, LULUO, HAIJING CHEN YI, LULUO, HAIJING CHEN YI, LULUO, HAUJOYI YIN 13-26-37-38-39-40-41-42-43-44-45-46-47-48-49-50-51-52-53-54-55-56-57-58-59-60-61-62-63-64-65-66-67-68-69-70-71-72-73-74-75-76-77-78-79-80-81-82-83-84-85-86-87-88-89-90-91-92-93-94-95-96-97-98-99-100-101-102-103-104-105-106-107-108-109-110-111-112-113-114-115-116-117-118-119-120-121-122-123-124-125-126-127-128-129-130-131-132-133-134-135-136-137-138-139-140-141-142-143-144-145-146-147-148-149-150-151-152-153-154-155-156-157-158-159-160-161-162-163-164-165-166-167-168-169-170-171-172-173-174-175-176-177-178-179-180-181-182-183-184-185-186-187-188-189-190-191-192-193-194-195-196-197-198-199-200-201-202-203-204-205-206-207-208-209-210-211-212-213-214-215-216-217-218-219-220-221-222-223-224-225-226-227-228-229-230-231-232-233-234-235-236-237-238-239-240-241-242-243-244-245-246-247-248-249-250-251-252-253-254-255-256-257-258-259-260-261-262-263-264-265-266-267-268-269-270-271-272-273-274-275-276-277-278-279-280-281-282-283-284-285-286-287-288-289-290-291-292-293-294-295-296-297-298-299-300-301-302-303-304-305-306-307-308-309-310-311-312-313-314-315-316-317-318-319-320-321-322-323-324-325-326-327-328-329-330-331-332-333-334-335-336-337-338-339-340-341-342-343-344-345-346-347-348-349-350-351-352-353-354-355-356-357-358-359-360-361-362-363-364-365-366-367-368-369-370-371-372-373-374-375-376-377-378-379-380-381-382-383-384-385-386-387-388-389-390-391-392-393-394-395-396-397-398-399-400-401-402-403-404-405-406-407-408-409-410-411-412-413-414-415-416-417-418-419-420-421-422-423-424-425-426-427-428-429-430-431-432-433-434-435-436-437-438-439-440-441-442-443-444-445-446-447-448-449-450-451-452-453-454-455-456-457-458-459-460-461-462-463-464-465-466-467-468-469-470-471-472-473-474-475-476-477-478-479-480-481-482-483-484-485-486-487-488-489-490-491-492-493-494-495-496-497-498-499-500-501-502-503-504-505-506-507-508-509-510-511-512-513-514-515-516-517-518-519-520-521-522-523-524-525-526-527-528-529-530-531-532-533-534-535-536-537-538-539-540-541-542-543-544-545-546-547-548-549-550-551-552-553-554-555-556-557-558-559-560-561-562-563-564-565-566-567-568-569-570-571-572-573-574-575-576-577-578-579-580-581-582-583-584-585-586-587-588-589-590-591-592-593-594-595-596-597-598-599-600-601-602-603-604-605-606-607-608-609-610-611-612-613-614-615-616-617-618-619-620-621-622-623-624-625-626-627-628-629-630-631-632-633-634-635-636-637-638-639-640-641-642-643-644-645-646-647-648-649-650-651-652-653-654-655-656-657-658-659-660-661-662-663-664-665-666-667-668-669-670-671-672-673-674-675-676-677-678-679-680-681-682-683-684-685-686-687-688-689-690-691-692-693-694-695-696-697-698-699-700-701-702-703-704-705-706-707-708-709-710-711-712-713-714-715-716-717-718-719-720-721-722-723-724-725-726-727-728-729-730-731-732-733-734-735-736-737-738-739-740-741-742-743-744-745-746-747-748-749-750-751-752-753-754-755-756-757-758-759-760-761-762-763-764-765-766-767-768-769-770-771-772-773-774-775-776-777-778-779-780-781-782-783-784-785-786-787-788-789-790-791-792-793-794-795-796-797-798-799-800-801-802-803-804-805-806-807-808-809-810-811-812-813-814-815-816-817-818-819-820-821-822-823-824-825-826-827-828-829-830-831-832-833-834-835-836-837-838-839-840-841-842-843-844-845-846-847-848-849-850-851-852-853-854-855-856-857-858-859-860-861-862-863-864-865-866-867-868-869-870-871-872-873-874-875-876-877-878-879-880-881-882-883-884-885-886-887-888-889-890-891-892-893-894-895-896-897-898-899-900-901-902-903-904-905-906-907-908-909-910-911-912-913-914-915-916-917-918-919-920-921-922-923-924-925-926-927-928-929-930-931-932-933-934-935-936-937-938-939-940-941-942-943-944-945-946-947-948-949-950-951-952-953-954-955-956-957-958-959-960-961-962-963-964-965-966-967-968-969-970-971-972-973-974-975-976-977-978-979-980-981-982-983-984-985-986-987-988-989-990-991-992-993-994-995-996-997-998-999-900-901-902-903-904-905-906-907-908-909-910-911-912-913-914-915-916-917-918-919-920-921-922-923- 924 -925 -926 -927 -928 -929 -930 -931 -932 -933 -934 -935 -936 -937 -938 -939 -940 -941 -942 -943 -944 -945 -946 -947 -948 -949 -950 -951 -952 -953 -954 -955 -956 -957 -958 -959 -960 -961 -962 -963 -964 -965 -966 -967 -968 -969 -970 -971 -972 -973 -974 -975 -976 -977 -978 -979 -980 -981 -982 -983 -984 -985 -986 -987 -988 -989 -990 -991 -992 -993 -994 -995 -996 -997 -998 -999 - 900 - 901 - 902 - 903 - 904 - 905 - 906 - 907 - 908 - 909 - 910 - 911 - 912 - 913 - 914 - 915 - 916 - 917 - 918 - 919 - 920 - 921 - 922 - 923 - 924 - 925 - 926 - 927 - 928 - 929 - 930 - 931 - 932 - 933 - 934 - 935 - 936 - 937 - 938 - 939 - 940 - 941 - 942 - 943 - 944 - 945 - 946 - 947 - 948 - 949 - 950 - 951 - 952 - 953 - 954 - 955 - 956 - 957 - 958 - 959 - 960 - 961 - 962 - 963 - 964 - 965 - 966 - 967 - 968 - 969 - 970 - 971 - 972 - 973 - 974 - 975 - 976 - 977 - 978 - 979 - 980 - 981 - 982 - 983 - 984 - 985 - 986 - 987 - 988 - 989 - 990 - 991 - 992 - 993 - 994 - 995 - 996 - 997 - 998 - 999 - 1000 - 1001 - 1002 - 1003 - 1004 - 1005 - 1006 - 1007 - 1008 - 1009 - 1010 - 1011 - 1012 - 1013 - 1014 - 1015 - 1016 - 1017 - 1018 - 1019 - 1020 - 1021 - 1022 - 1023 - 1024 - 1025 - 1026 - 1027 - 1028 - 1029 - 1030 - 1031 - 1032 - 1033 - 1034 - 1035 - 1036 - 1037 - 1038 - 1039 - 1040 - 1041 - 1042 - 1043 - 1044 - 1045 - 1046 - 1047 - 1048 - 1049 - 1050 - 1051 - 1052 - 1053 - 1054 - 1055 - 1056 - 1057 - 1058 - 1059 - 1060 - 1061 - 1062 - 1063 - 1064 - 1065 - 1066 - 1067 - 1068 - 1069 - 1070 - 1071 - 1072 - 1073 - 1074 - 1075 - 1076 - 1077 - 1078 - 1079 - 1080 - 1081 - 1082 - 1083 - 1084 - 1085 - 1086 - 1087 - 1088 - 1089 - 1090 - 1091 - 1092 - 1093 - 1094 - 1095 - 1096 - 1097 - 1098 - 1099 - 1100 - 1001 - 1002 - 1003 - 1004 - 1005 - 1006 - 1007 - 1008 - 1009 - 1100 - 1001 - 1002 - 1003 - 1004 - 1005 - 1006 - 1007 - 1008 - 1009 - 1100 - 1001 - 1002 - 1003 - 1004 - 1005 - 1006 - 1007 - 1008 - 1009 - 1100 - 1001 - 1002 - 1003 - 1004 - 1005 - 1006 - 1007 - 1008 - 1009 - 1100 - 1001 - 10 |
| P.O.C.N. | |
| ABAKAH, IIT KebiHem Hohm CepreBHe 855010, Topocnayn, n.15, 59, 38(302) 26-65-84, q#k: (6302) 22-65-64 | |
| ANJ METBECK, OOO AmBeHopc Coppeh CepreBHe 824340, K.LcknKny, n.17, 80, 18a, 18a (8553) 37 17-99, 32-22, 11, q#k: (8553) 37 17-99 | |
| ANJ METBECK, OOO AmBeHopc Coppeh CepreBHe 824340, P#kHmH#y, n.17, 80, 18a, 18a (8553) 37 17-99, 32-22, 11, q#k: (8553) 37 17-99 | |
| APMAM, VIT CHIN CHEN Cepre BHKHNN, 352000, KCMOMCMLKHN, n.15, 18a, 18a (8511) 37-99, 73-82, q#k: (8511) 37-99, 73-82 | |
| APMAM, VIT CHIN CHEN Cepre BHKHNN, 352000, KCMOMCMLKHN, n.15, 18a, 18a (8511) 37-99, 73-82, q#k: (8511) 37-99, 73-82, q#k: (8511) 37-99, 73-82, q#k: (8511) 37-99, 73-82, q#k: (8511) 37-99, 73-82, q#k: (8553) 37-99, 73-82, q#k: (8511) 37-99, 73-82, q#k: (8511) 37-99, 73-82, q#k: (8511) 37-99, 73-82, q#k: (8511) 36-84, 97-90, q#k: (8511) 37-96-01, q#k: (8511) 37-96-01, q#k: (8511) 37-96-01, q#k: (8511) 37-96-01, q#k: (8511) 37-96-01, q#k: (8511) 37-96-001, q#k: (8511) 37-96-01, q#k: (8511) 37-96-01, q#k: (8511) 37-96-01, q#k: (8511) 37-96-01, q#k: (8511) 37-96043, TpOeTAPKAnyn, n.11, 18a, 18a (8553) 37-99, 73-82, 22, 24-21, q#k: (8511) 37-22, 24-21, q#k: (8511) 37-22, 24-21, q#k: (8511) 37-22, 24-21, q#k: (8511) 37-22, 24-21, q#k: (8511) 37-22, q#k: (8511) 37-22, q#k: (8511) 37-22, q#k: (8511) 37-22, q#k: (8511) 37-22, q#k: (8511) 37-22, q#k: (8511) 37 | |
| APXAHN, VIT CHIN CHEN Cepre BHKHNN, 352000, KCMOMCMLKHN, n.15, 18a, 18a (8511) 37-99, 73-82, q#k: (8511) 37-99, 73-82, q#k: (8511)37-99, 73-82, q#k: (8511) 37-99, 73-82, q#k: (8511) 37-99, 73-82, q#k: (8511) 37-99, 73-82, q#k: (8511) 37-17-99, 32-22, 24-21, q#k: (8511) 37-22, 24-21, q#k: (8511) 37-22, q#k: (8511) 37-22, q#k: (8511) 37-22, q#k: (8511) 37 | |
| APXAHN, VIT CHIN CHEN Cepre BHKHNN, 352000, KCMOMCmlKHN, n.15, 18a, 18a (8511) 37-99, 73-82, q#k: (8511) 37-99, 73-82, q#k: (8511) 37-99, 73-82, q#k: (8511) 37-17-99, 32-22, 24-30, q#k: (8511) 37-99, 73-82, q#k: (8511) 37-99, 73-82, q#k: (8511) 37-99, 73-82, q#k: (8511) 37-99, 73-82, q#K: (8511) 37-99, 73-82, q#k: (8511) 37-99, 73-82, q#k: (8511) 37-99, 73-82, q#k: (8511) 37-99, 73-82, q#k: (8433), 963400, TpOeTAPKAnyn, n.15, 18a, 18a (8511) 37-99, 73-82, q#k: (8511) 37-99, 73-82, q#k: (8511) 37-99, 73-82, q#k: (8511) 37-99 | |
| BEPOLOP, VIT CHIN CHEN Cepre BHKHNN, 352000, KCMOMCMLKHN, n.15, 18a, 18a (8511) 37-99, 73-82, q#k: (8511) 37-99, 73-82, q#k: (8511) | BEPOLOP, VIT CHIN CHEN Cepre BHKHNN, 352000, KCMOMCMLKHN, n.15, 18a, 18a (8511) 37-99, 73-82, q#k: (8511) 37-99, 73-82, q#k: (B511) 37-99, 73-82, q#k: (8511) 37-99, 73-82, q#k: (8511) 37-99, 73-82, q#k: (8511) 37-99, 73-82, q#k: (8511)37-99, 73-82, q#k: (8511) 37-99, 73-82, q#k: (8511) 37-99, 73-82, q#k: (8511) 37-99, 73-82, q#k: (8511) 37-89, 73-82, q#k: (8511) 37-99, 73-82, q#k: (8511) 37-99, 73-82, q#k: (8511) 37-99, 73-82, q#k: (8511) 37-99, 660200, TpOeTAPKAnyn, n.15, 18a, 18a (8511) 37-99, 73-82, q#k: (8511) 37-99, 73-82, q#k: (8511) 37-99, 73-82, q#k: 8511) 37-99, 73-82, q#k: (8511) 37-99, 73-82, q#k: (8511) 37-99, 73-82, q#k: (8511) 37-99, 73-82, q#k: (851) 37-99, 73-82, q#k: (8511) 37-99, 73-82, q#k: (8511) 37-99, 73-82, q#k: (8511) 37-99, 73-82, q#k: (8511) 40-00-01, q#k: (8511) 37-99, 73-82, q#k: (8511) 37-99, 73-82, q#k: (8511) 37-99, 73-82, q#k: (8511) 37-99, 73-82, q#lK: (8511) 37-99, 73-82, q#k: (8511) 37-99, 73-82, q#k: (8511) 37-99, 73-82, q#k: (8511) 37-99, 73-82, q#k: (B511) 37-99, 73-82, q#k: (B511) 37-99, 73-82, q#k: (B511) 37-99, 73-82, q#k: (B511) 37-99, 73-82, q#k: (B511)37-99, 73-82, q#k: (B511) 37-99, 73-82, q#k: (B511) 37-99, 73-82, q#k: (B511) 37-99, 73-82, q#k: (B511) 37-00-01, q#k: (B511) 37-00-01, q#k: (B511) 37-00-01, q#k: (B511) 37-00-01, q#k: (B511) 37-00-01, q#k: (B511) 37-00-00, q#k: (B511) 37-00-00, q#k: (B511) 37-00-00, q#k: (B511) 37-00-00, q#k: (B511) 37-00-00, q#k: (B511) 37-00-01, q#k: (B511) 37-00-00, q#k: (B511) 37-00-00, q#k: (B511) 37-00-00, q#k: (B511) 37-00-01, q#k: (B511) 37-00-01, q#k: (B511) 37-00-00, q#k: (B511) 37-00-00, q#k: (B511) 37-00-01, q#k: (B511) 37-00-00, q#k: (B511) 37-00-01, q#k: (B511) 37-00-00, q#k: (B511) 37-00-00, q#k: (B511) 37-00-01, q#k: (B511) 37-00-01, q#k: (B511) 37-00-01, q#k: (B511) 37-00-00, q#k: (B511) 37-00-01, q#k: (B511) 37-00-00, q#k: (B511) 37-00-01, q#k: (B511) 37-00-01, q#k: (B511) 37-00-00, q#k: (B511) 37-00-01, q#k: (B511) 37-00-01, q#k: (B511) 37-00-01, q#k: (B511) 37-00-01, q#k: (B511) 37-00-02, q#k: (B511) 37-00-02, q#k: (B511) 37-00-02, q#k: (B511) 37-00-02, q#k: (B511) 37-00-02, q#k: (B511) 37-00-00, q#k: (B511) 37-00-00, q#k: (B511) 37-00-00, q#k: (B511) 37-00-00, q#k: (B511) 37-00-02, q#k: (B511) 37-00-00, q#k: (B511) 37-00-00, q#k: (B511) 37-00-00, q#k: (B511) 37-00-02, q#k: (B511) 37-00-02, q#k: (B511) 37-00-02, q#k: (B511) 37-00-02, q#k: (B511) 37-00-04, q#k: (B511) 37-00-04, q#k: (B511) 37-00-04, q#k: (B511) 37-00-04, q#k: (B511) 37-00-04, q#k: (B511) 37-00-05, q#k: (B511) 37-00-05, q#k: (B511) 37-00-05, q#k: (B511) 37-00-05, q#k: (B511) 37-00-05, q#k: (B511) 37-00-06, q#k: (B511) 37-00-06, q#k: (B511) 37-00-06, q#k: (B511) 37-00-06, q#k: (B511) 37-00-06, q#k: (B511) 37-00-07, q#k: (B511) 37-00-07, q#k: (B511) 37-00-07, q#k: (B511) 37-00-07, q#k: (B511) 37-00-08, q#k: (B511) 37-00-08, q#k: (B511) 37-00-08, q#k: (B511) 37-00-08, q#k: (B511) 37-00-08, q#k: (B511) 37-00-09, q#k: (B511) 37-00-09, q#k: (B511) 37-00-09, q#k: (B511) 37-00-09, q#k: (B511) 37-00-09, q#k: (B511) 37-00-08, q#k: (B511) 37-00-08, q#k: (B511) 37-00-08, q#k: (B511) 37-00-08, q#k: (B511) 37-00-07, q#k: (B511) 37-00-07, q#k: (B511) 37-00-07, q#k: (B511) 37-00-07, q#k: (B511) 37-00-07, q#k: (B511) 37-00-06, q#k: (B511) 37-00-06, q#k: (B511) 37-00-06, q#k: (B511) 37-00-06, q#k: (B511) 37-00-05, q#k: (B511) 37-00-05, q#k: (B511) 37-00-05, q#k: (B511) 37-00-05, q#k: (B511) 37-00-04, q#k: (B511) 37-00-04, q#k: (B511) 37-00-04, q#k: (B511) 37-00-04, q#k: (B511) 37-00-03, q#k: (B511) 37-00-03, q#k: (B511) 37-00-03, q#k: (B511) 37-00-03, q#k: (B511) 37-00-03, q#k: (B511) 37-00-02, q#k: (B511) 37-00-02, q#k: (B511) 37-00-02, q#k: (B511) 37-00-02, q#k: (B511) 37-00-01, q#k: (B511) 37-00-01, q#k: (B511) 37-00-01, q#k: (B511) 37-00-00, q#k: (B511) 37-00-02, q#k: (B511) 37-00-02, q#k: (B511) 37-00-02, q#k: (B511) 37-00-00, q#k: (B511) 37-00-02, q#k: (B511) 37-00-02, q#k: (B511) 37-00-02, q#k: (B511) 37-00-01, q#k: (B511) 37-00-00, q#k: (B511) 37-00-00, q#k: (B511) 37-00-00, q#k: (B511) 37-00-02, q#k: (B511) 37-00-01, q#k: (B511) 37-00-00, q#k: (B511) 37-00-00, q#k: (B511) 37-00-02, q#k: (B511) 37-00-02, q#k: (B511) 37-00-00, q#k: (B511) 37-00-02, q#k: (B511) 37-00-00, q#k: (B511) 37-00-02, q#k: (B511) 37-00-02, q#k: (B511) 37-00-00, q#k: (B511) 37-00-00, q#k: (B511) 37-00-02, q#k: (B511) 37-00-02, q#k: (B511) 37-00-01, q#k: (B511) 37-00-01, q#k: (B511) 37-00-00, q#k: (B511) 37-00-00, q#k: (B511) 37-00-02, q#k: (B511) 37-00-00, q#k: (B511) 37-00-02, q#k: (B511) 37-00-00, q#k: (B511) 37-00-00, q#k: (B511) 37-00-02, q#k: (B511) 37-00-00, q#k: (B511) 37-00-01, q#k: (B511) 37-00-00, q#k: (B511) 37-00-00, q#k: (B511) 37-00-02, q#k: (B511) 37-00-01, q#k: (B511) 37-00-02, q#k: (B511) 37-00-02, q#k: (B511) 37-00-02, q#k: (B511) 37-00-00, q#k: (B511) 37-00-01, q#k: (B511) 37-00-00, q#k: (B511) 37-00-02, q#k: (B511) 37-00-02, q#k: (B511) 37-00-00, q#k: (B511) 37-00-01, q#k: (B511) 37-00-02, q#k: (B511) 37-00-02, q#k: (B511) 37-00-02, q#k: (B511) 37-00-01, q#k: (B511) 37-00-02, q#k: (B511) 37-00-02, q#k: (B511) 37-00-00, q#k: (B511) 37-00-02, q#k: (B511) 37-00-01, q#k: (B511) 37-00-02, q#k: (B511) 37-00-00, q#k: (B511) 37-00-02, q#k: (B511) 37-00-02, q#k: (B511) 37-00-01, q#k: (B511) 37-00-02, q#k: (B511) 37-00-00, q#k: (B511) 37-00-00, q#k: (B511) 37-00-02, q#k: (B511) 37-00-01, q#k: (B511) 37-00-01, q#k: (B511) 37-00-02, q#k: (B511) 37-00-02, q#k: (B511) 37-00-00, q#k: (B511) 37-00-00, q#k: (B511) 37-00-01, q#k: (B511) 37-00-02, q#k: (B511) 37-00-02, q#k: (B511) 37-00-00, q#k: (B511) 37-00-01, q#k: (B511) 37-00-01, q#k: (B511) 37-00-02, q#k: (B511) 37-00-02, q#k: (B511) 37-00-01, q#k: (B511) 37-00-02, q#k: (B511) 37-00-01, q#k: (B511) 37-00-02, q#k: (B511) 37-00-02, q#k: (B511) 37-00-01, q#k: (B511) 37-00-00, q#k: (B511) 37-00-02, q#k: (B511) 37-00-02, q#k: (B511) 37-00-01, q#k: (B511) 37-00-00, q#k: (B511) 37-00-01, q#k: (B511) 37-00-02, q#k: (B511) 37-00-02, q#k: (B511) 37-00-01, q#k: (B511) 37-00-01, q#k: (B511) 37-00-02, q#k: (B511) 37-00-00, q#k: (B511) 37-00-02, q#k: (B511) 37-00-01, q#k: (B511) 37-00-00, q#k: (B511) 37-00-02, q#k: (B511) 37-00-01, q#k: (B511) 37-00-02, q#k: (B511) 37-00-01, q#k: (B511) 37-00-00, q#k: (B511) 37-00-02, q#k: (B511) 37-00-00, q#k: (B511) 37-00-02, q#k: (B511) 37-00-01, q#k: (B511) 37-00-01, q#k: (B511) 37-00-00, q#k: (B511) 37-00-02, q#k: (B511) 37-00-01, q#k: (B511) 37-00-00, q#k: (B511) 37-00-01, q#k: (B511) 37-00-00, q#k: (B511) 37-00-02, q#k: (B511) 37-00-01, q#k: (B511) 37-00-01, q#k: (B511) 37-00-01, q#k: (B511) 37-00-02, q#k: (B511) 37-00-00, q#k: (B511) 37-00-01, q#k: (B511) 37-00-02, q#k: (B511) 37-00-00, q#k: (B511) 37-00-02, q#k: (B511) 37-00-00, q#k: (B511) 37-00-01, q#k: (B511) 37-00-02, q#k: (B511) 37-00-01, q#k: (B511) 37-00-02, q#k: (B511) 37-00-00, q#k: (B511) 37-00-01, q#k: (B511) 37-00-00, q#k: (B511) 37-00-01, q#k: (B511) 37-00-02, q#k: (B511) 37-00-00, q#k: (B511) 37-00-01, q#k: (B511) 37-00-01, q#k: (B511) 37-00-00, q#k: (B511) 37-00-02, q#k: (B511) 37-00-00, q#k: (B511) 37-00-01, q#k: (B511) 37-00-01, q#k: (B511) 37-00-01, q#k: (B511) 37-00-02, q#k: (B511) 37-00-01, q#k: (B511) 37-00-02, q#k: (B511) 37-00-01, q#k: (B511) 37-00-01, q#k: (B511) 37-00-02, q#k: (B511) 37-00-01, q#k: (B511) 37-00-00, q#k: (B511) 37-00-00, q#k: (B511) 37-00-01, q#k: (B511) 37-00-02, q#k: (B511) 37-00-01, q#k: (B511) 37-00-00, q#k: (B511) 37-00-01, q#k: (B511) 37-00-01, q#k: (B511) 37-00-02, q#k: (B511) 37-00-01, q#k: (B511) 37-00-01, q#k: (B511) 37-00-00, q#k: (B511) 37-00-01, q#k: (B511) 37-00-02, q#k: (B511) 37-00-01, q#k: (B511) 37-00-01, q#k: (B511) 37-00-01, q#k: (B511) 37-00-01, q#k: (B511) 37-00- |
bosch-infoteam@bshg.com


