DAB 4138 - Radio AEG - Free user manual and instructions
Find the device manual for free DAB 4138 AEG in PDF.
User questions about DAB 4138 AEG
0 question about this device. Answer the ones you know or ask your own.
Ask a new question about this device
Download the instructions for your Radio in PDF format for free! Find your manual DAB 4138 - AEG and take your electronic device back in hand. On this page are published all the documents necessary for the use of your device. DAB 4138 by AEG.
USER MANUAL DAB 4138 AEG
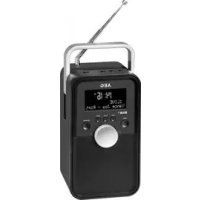
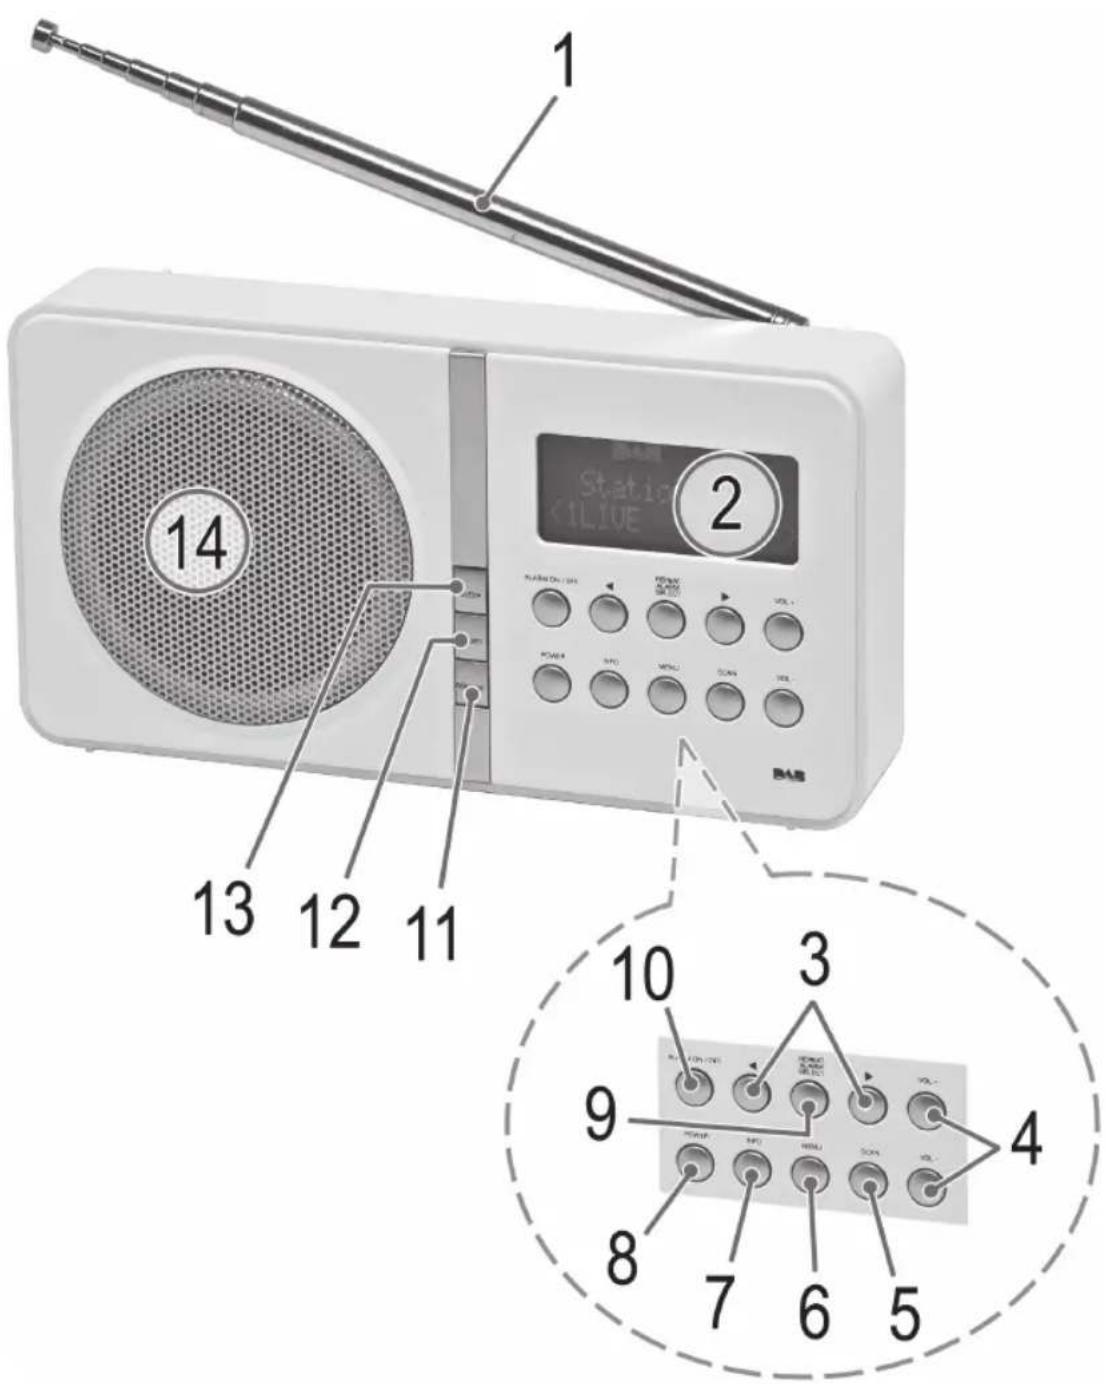
Location of Controls
4 Menu Übersicht
Menuoverzicht
Aperçu du menu Resumen del menú
Panorama menu Menu Overview
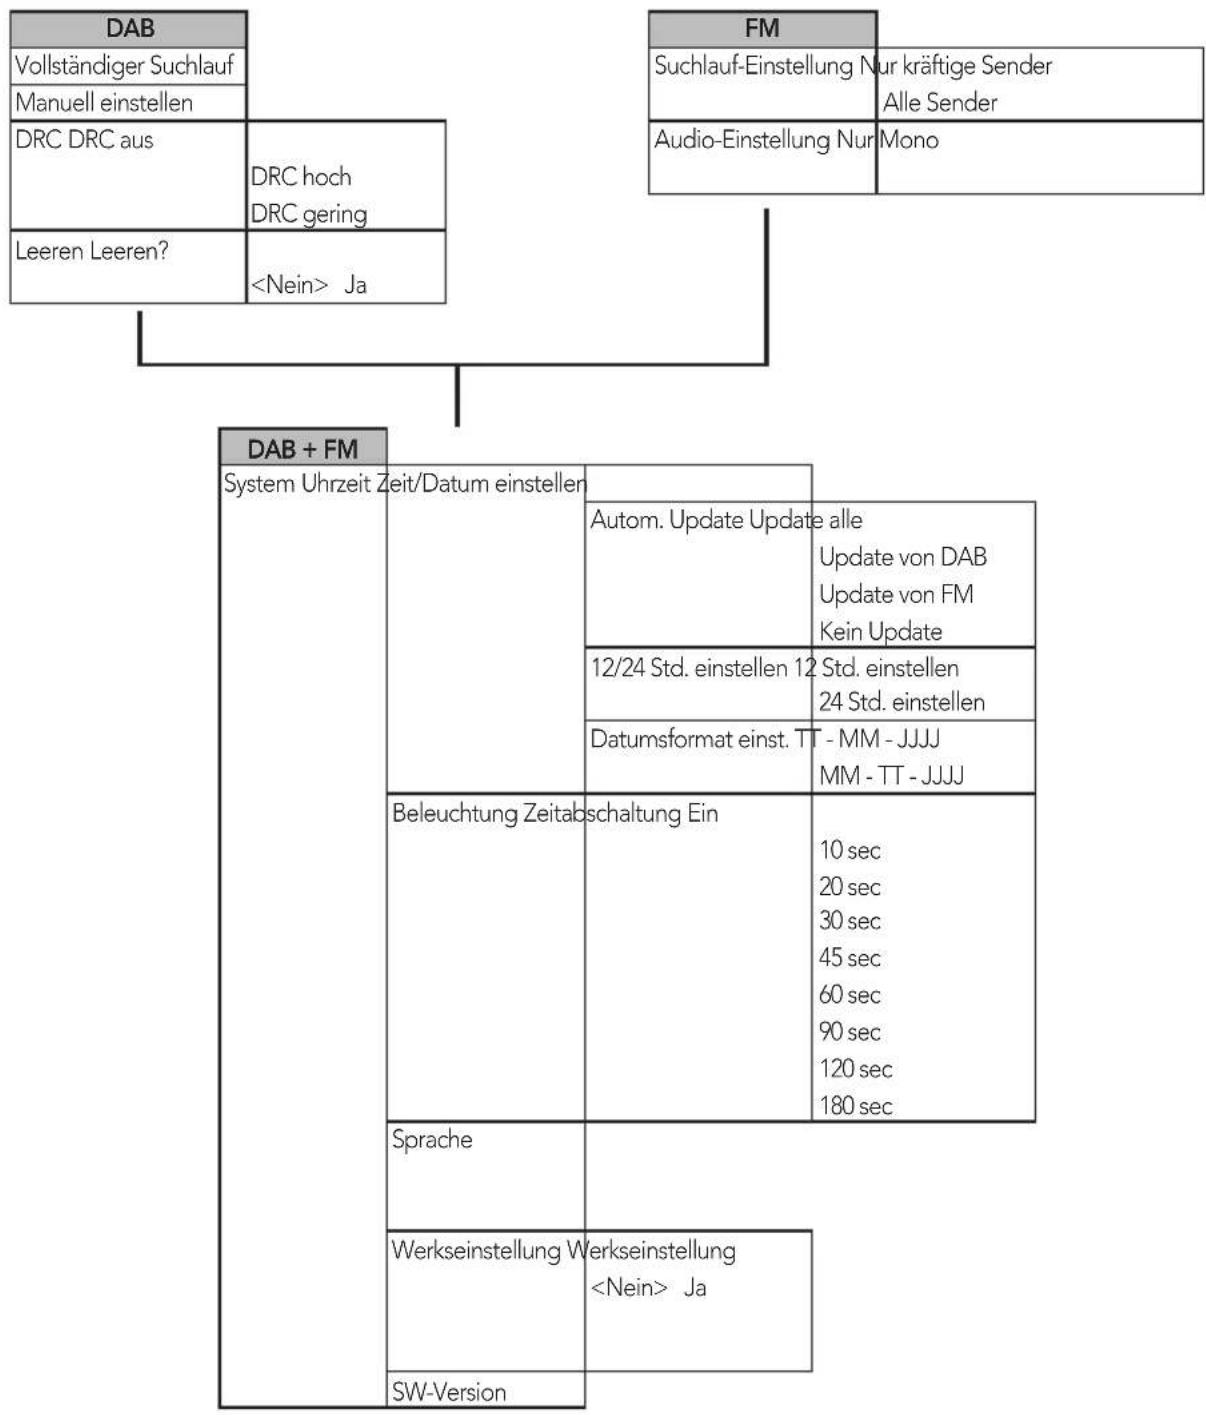
| DAB | FM | |||
| Full scan | Scan setting Strong stations only | |||
| Manual tune | All stations | |||
| DRC DRC off | DRC high DRC low | Audio setting Forced mono | ||
| Prune Prune? | <No> Yes | |||
| DAB + FM | ||||
| System Time Set | Time/Date | Auto update Update from Any Update from DAB Update from FM No update | ||
| Set 12/24 hour Set | 12 hour Set 24 hour | |||
| Set date format DD - MM - YYYY MM - DD - YYYY | ||||
| Backlight Timeout | On | 10 sec 20 sec 30 sec 45 sec 60 sec 90 sec 120 sec 180 sec | ||
| Language | Factory reset Factory Reset? <No> Yes | |||
| SW version | ||||
DAB/DAB+174,92~239,20MHz
Externes Netzteil
VOL+/VOL- Volume (4)
DAB stations scanners
VOL+/VOL- Volume (4)
Balayer les stations FM
Digital Audio Broadcasting (DAB) is an institution for the distribution of radio and broadband information. The DAB system is a system of radio broadcasting, which is based on the use of digital technology. Digital Radio Information Service (DRS) is one of the most popular systems for radio broadcasting in the United States. It provides a variety of services including radio news, television, and radio broadcast services.
NOTE:
VOL+/VOL- Volume (4)
Thank you for choosing our product. We hope you will enjoy using the appliance.
Symbols in this user manual
Important notes for your safety are marked distinctively. Pay absolute attention to them to avoid accidents and damage to the device:

WARNING:
Warns of dangers for your health and indicates potential risks of injury.

CAUTION:
Indicates potential dangers for the device or other objects.

NOTE: Highlights tips and information for you.
General Safety Guidelines
Before using this device, carefully read this user manual and keep it together with the Warranty Certificate, cashier receipt and if possible, the original package inclusive its interior packing. If you hand on the device to any third person, include the user manual as well.
- To avoid the risk of fire or an electric shock, you should not expose the device to rain or moisture. Consequently, do not use the device in the immediate vicinity of water - for example near a bath tub, a swimming pool or in a damp cellar.
- Use the appliance only for the intended, private use. This appliance is not intended for commercial use.
- The power adaptor is only intended for use in dry environment.
- Ensure that the output voltage, currency and polarity of the power adaptor correspond to the nameplate specifications!
- Do not touch the power adaptor with wet hands!
- Unplug the power adaptor from the appliance when cleaning or if a fault occurs.
Make sure that the adaptor cable is not bent, crushed, run over or does not come into contact with heat sources. - Only connect the device at a properly installed plug socket. Pay attention that the specified voltage corresponds to the voltage of the plug socket.
- When using external mains supply, pay attention to the correct polarity and voltage. Always place the batteries in the correct direction.
- Assemble the device in such a way that the available ventilation openings are not covered.
- Never open the housing of the device. Incorrect repairs can constitute a considerable risk for the user. Should the
device become damaged, in particular the mains supply cable, do not operate the device any longer, but rather have it repaired by an expert. Check the mains supply cable regularly for damage.
- For safety reasons a broken or damaged mains lead may only be replaced by an equivalent lead from the manufacturer, our customer service department or a similar qualified person.
- If the device is not used for a longer period, remove the plug connector from the plug socket or take out the batteries.
These symbols may be found on the device and are intended as warnings:

The lightning flash is intended to alert the user to the presence of dangerous voltage within the device.

The exclamation mark is intended to alert the user to the presence of important operating and maintenance instruction accompanying this device.
Children and disabled persons
- For the safety of your children, keep any packing parts (plastic bags, cartilage, Styrofoam etc.) out of their reach.

WARNING!
't let small children play with foils for danger of suff- tion!
- This device is not intended for use by persons (including children) with reduced physical, sensory or mental capabilities, or lack of experience and/or knowledge unless they have been given supervision or instructions concerning the use of the device by a person responsible for their safety.
Supervise children to ensure they do not play with the device.
Special Safety Instructions
- Do not use the device in locations that are extremely hot, cold, dusty or moist.
- Select a suitable location for the radio recorder, such as a dry, flat, non-slip surface on which it is easy to operate the machine.
- Ensure that the radio recorder is sufficiently ventilated!
- Do not cover any ventilation slits with objects such as magazines, tablecloths, curtains etc.
- Never touch the mains plug or lead with wet hands.
- Keep the mains lead away from heaters.
- Never put a heavy object on the electric lead.
- Keep the device away from vases, baths, wash basins etc. If liquid enters the device this may cause serious damage.
Overview of the components
Front
1 Telescopic antenna
2 LCD display
3 buttons (Scan forwards/ backwards)
4 VOL+VOL buttons (volume)
5 SCAN button (scan)
6 MENU button (open menu)
7 INFO button (show information)
8 POWER button (standby/ operation)
9 REPEAT ALARM/SELECT button (repeat alarm/ confirm)
10 ALARM ON/OFF button (alarm On/ Off)
11 SOURCE button
12 PRESET button
13 SLEEP button (snoopze)
Rear view (without illustration)
Battery compartment
DC IN 6 V connector
OFF/ON switch (On / Off)
Installation
- Read the manual thoroughly before operating the device!
- Choose a suitable location for the device. Suitable locations are dry, even and antislip surfaces on which you may operate the device easily.
Make sure there is proper ventilation for the device! - Remove, if necessary, the protection sheet from the display.
Power supply (Adaptor)
- Insert the grid plug into a properly installed three prong socket. Connect the device with the plug connector by inserting its plug into the DC 6 V jack of the device.
Make sure the grid voltage corresponds to the figures on the rating plate.
CAUTION:
Only use the supplied power adaptor for this device. Do not use for other devices.
Only use power adaptor with 6V( - -) other adaptors may cause damage to the device.
NOTE:
Disconnect from mains power supply during longer periods of non-use.
Battery Operation
You also have the option of operating the unit with 4 Type R6 "AA" batteries.
- Open the battery compartment on the back.
English
- Insert 4 R6 "AA" batteries 1.5 V. Mind the correct polarity (indicated on the bottom of the battery case)!
- Close the battery case.
- If the device is not used for an extended period of time, remove the batteries from the device to avoid any leaking of battery acid.
CAUTION:
- Never use different battery types or new and used batteries together.
- Batteries must not be disposed of in the garbage. Please bring used batteries to competent collection centers or back to the dealer.
WARNING:
Do not expose batteries to any high temperatures such as sunlight, fire, or the like. There is a danger of explosion!
NOTE:
If you have connected the power supply, the batteries are automatically deactivated.
Always switch off the device during non-use with the OFF ON switch on the back, to not unnecessarily stress the batteries. To display the time as accurately as possible, the device will synchronize the time with the radio station in the background. This results in a higher battery consumption. In the worst case scenario, the batteries could be discharged prematurely.
When shutting off the device with the OFF ON switch, the time/ alarm time will be lost.
Installation
- Fully extend the telescopic antenna (1). Stand it upright for initial installation.
- Switch the device on at the back of the device using the OFF/ON switch. The device automatically searches for DAB stations. SCANNING... and a progress bar appears on the display. The figure on the right of the display shows the number of radio stations found. The first alphanumeric DAB station is played.
When playing a radio station, the time and date is taken from the broadcasting service. If the device does not receive DAB stations in your location, set the time manually as described in "Settings menu".
Changing the OSD language
The OSD menu is set in German ex factory. To change the language, proceed as follows:
- Press the MENU button (6).
- Select the menu option "SYSTEM" with the / buttons (3). Set it with the REPEAT ALARM/SELECT button (9).
- Select the menu option "LANGUAGE" with the button. Set it with the REPEAT ALARM/SELECT button.
- Select the desired language with the buttons. Set it with the REPEAT ALARM/SELECT button.
40
English

NOTE:
The menu is described with the selected language "ENG-LISH" in the instruction manual.
General operation
Switch the device on/off
- Switch the device on by setting the OFF ON switch on the back of the device to ON.
- Standby / On: Now you can switch the device between Standby and On. Press the POWER button in order to do so. The time and the date appear on the display in standby.
- To switch off the device, set the OFF ON switch to OFF. The time will be lost.

NOTE:
The device notes the last mode and the volume before switching off. After switching on again the device starts in this mode and this volume.
- The storage of the time/ date will get lost as soon as the device has been shut off with the OFF ON switch, or if the power supply is interrupted.
SOURCE button (11)
For switching between DAB and FM mode.
VOL+/VOL- Volume (4)
Adjust to your preferred volume level. The higher the volume, the more blocks are filled in.
Delayed shut-off (SLEEP)
The delayed shut-off function can be used in radio mode. The device automatically switches off when the selected time is reached.
- Select the time by repeatedly pressing the SLEEP button (13), after which the device switches off. Select from: 15, 30, 45, 60, and 90 minutes.
The SLEEP OFF setting deactivates this function.

NOTE:
Briefly press the SLEEP button to show the remaining time.
Listening to the radio
Scan FM stations
- Repeatedly press SOURCE button (11) until the display shows "FM MODE".
-
You have two options for tuning a station:
-
Press the / buttons (3).
- Press the SCAN button (5). The device is scanning the entire frequency band for stations. The stations found will be stored by ascending frequencies.

NOTE:
Possibly previously stored stations are automatically deleted after pressing the SCAN button.
- If the reception is too weak and there is noise on the received station, try to improve the reception by changing the position of the telescopic antenna.
Show FM information
Press the INFO button (7) to show the following information, if broadcasted by a radio station.
- Radio Text is shown by default on the display. If no information is available, [No RadioText] appears on the display.
The program type (PTY) of the station is displayed (e.g. Pop music, news etc.). If no PTY is received, [No PTY] appears on the display. - Display of the radio frequency.
The audio mode is displayed. - Display the time.
- Display the date.
Scan DAB stations
Digital Audio Broadcasting (DAB) is a digital broad casing standard for terrestrial reception of digital radio. A list of radio stations which can be received in Germany is available on the Internet at www.digitalradio.de.
i NOTE:
In Germany approx. 70% of the country's area is covered by digital radio broadcasts (as of Nov. 2011). In the individual areas however, coverage and provision vary greatly. If the DAB stations in your region cannot be received or only with interferences depending on location, in this case you can switch to the FM band to receive this station. This is only possible however if these stations are broadcast via VHF. Find out more on the internet site of the radio station.
- Press the SOURCE button (11) repeatedly until "DAB MODE" appears on the display.
- Press the SCAN button (5). The device then searches for the radio stations which can be received.
- You can select the next or the previous station by using the / buttons (3). Confirm your selection with the REPEAT ALARM/SELECT button (9).
- If the reception is too weak and the received station "motorboats", try to improve the reception by changing the position of the antenna.
NOTE:
- For optimum DAB reception, we recommend to align the telescopic antenna vertically.
English
NOTE:
- You cannot toggle between Mono and Stereo during DAB reception.
To manually set a DAB frequency, proceed as described in the "Settings menu" section.
Display additional DAB information
In DAB mode, you can display the following additional information if broadcast by the radio station. To do so, press the INFO button (7).
The DLS text is shown on the display by default.
- DLS: Short for Dynamic Label Segment. This involves complementary data. This content may be e.g. information about the station or the music title and artist being played.
- Displays the received signal strength.
This indicates the station category (e.g. Pop-Music, News etc.). - Displays the name of the station group (e.g. DR Deutschland).
Frequency of the current radio station.
The "SIGNAL ERROR" display shows the signal quality. The lower the adjacent figure, the better the quality. - Displays the digital Audio Bit Rate.
- Display the time.
- Display the date.
Save station
- If you have found the desired station, hold down the PRESET button (12). The first preset location appears on the display. If the preset location is still empty the word EMPTY appears under PRESET STORE.
- For choosing the memory position, please press / buttons (3).
- Press REPEAT ALARM/SELECT to save the settings.
Select a preset station
- Press the PRESET button (12).
- Press the / buttons (3) to chose a memory position.
- Confirm your selection with the REPEAT ALARM/SELECT button (9).
Settings menu
Numerous settings are made via the Settings menu (see page 5).
In the Settings menu you can find the main menu and the related submenus with the individual options.
To open the menu, press the MENU button (6) during operation.
- Use the buttons (3) to navigate in the menu.
- Use the REPEAT ALARM/SELECT button (9) to select a submenu, or confirm a setting.
- To exit the menu, press the MENU button (6).
NOTE:
- If you do not press any button within 30 seconds, the menu is hidden.
The currently set option is highlighted by 串 ^
A Settings menu can be found in DAB mode, as well as in FM mode. The DAB and FM menu is explained below along with the general SYSTEM menu.
DAB Menu
The DAB menu is divided into menus: Full scan, Manual tune, DRC and Prune.
Full scan: Starts the station scan. The DAB frequency band is scanned for stations.
-
Manual tune: To do so you need to know the station frequency. This can be found on the internet site of the broadcasting service. Select individual frequencies using the buttons (3).
-
DRC: short for Digital Range Control (dynamic range). The term DRC describes the ratio between the quietest and the loudest sound. If the dynamic range is very high there are very soft sounds as well as very loud sounds. Under some circumstances this may present a problem with playback. Let us assume that you are listening to a radio station in a relatively loud environment. By increasing the volume you can play the quiet sections louder. This however has the disadvantage that the loud sections become uncomfortably loud. It makes sense here to reduce the dynamic range. Select between the options:
-
DRC off: The dynamic range is not reduced.
- DRC high: The dynamic range is sharply reduced.
-
DRC low: The dynamic range is slightly reduced.
-
Prune: It may be that you can no longer receive some stations after a station scan or change of location. With this function you can delete these stations from the reception list. Select "YES" and confirm with the REPEAT ALARM/SELECT button.
FM Menu
-
Scan setting: Select the desired option in order to perform an automatic station scan.
-
Strong stations only: Only search for strong radio stations.
- All stations: Search for all receivable radio stations. In doing so, the scan also pauses on weak stations.
Audio setting:
- Forced mono: Every radio station is played back in mono irrespective of the transmitted signal.
42 English
DAB + FM Menu (SYSTEM)
The following submenus can be found in the SYSTEM menu.
-
Time: Set the time and the date manually. You can also set the automatic update and the display format of the date.
-
Set Time/Date: Here, you can manually set the time and date.
- Auto update: Here, select the source from which the automatic update of time and date should be carried out. Select from: Update from all sources, DAB only, FM only and no update.
- Set 12/24 hour: Select between 24 hour and 12 hour display.
NOTE: In 12 hour display
AM = morning, PM = afternoon appears.
-
Set date format: Select between the two options for displaying the date. Day-Month-Year or Month-Day-Year.
-
Backlight: Set the time after which the display light should be dimmed. If "ON" is selected, the display light remains on permanently.
Factory reset: Select the "YES" command if you want to reset the device again to the factory defaults. All settings which you have made will be lost. - SW version: Here, you can display the Software Version of the device.
Alarm function
You can set the device in such a way that it switches on at a specific time.
To select an option, press the / buttons (3).
- Select an option with the REPEAT ALARM/SELECT button (9).
Setting the alarm time
- Press the ALARM ON/OFF button (10). "ALARM 1 SETUP" appears on the display.
- Now set the alarm time.
- DURATION: Set the time, after which the device will switch off automatically.
- SOURCE: Select a source by which you want to be awaken- ened. Select from: BUZZER (beep), DAB, FM.
4a If DAB or FM has been selected, now select the desired radio station which should play when the set alarm time is reached. Select from: LAST LISTEND and the preset radio stations on the station buttons. -
Select the time at which the alarm time needs to be activated. Select from: DAILY, ONCE, WEEKENDS, WEEK-DAYS.
5a If ONCE is selected, now set the date at which you want to be awakened. -
Finally select the volume at which you want to be awakened. The lowest volume is indicated by four blocks.
- Activate the alarm time by selecting "ALARM ON".
After you have made all your settings, the message "ALAR" briefly appears. The activated alarm function is shown on the display by the "D" symbol.
Turn off the alarm signal
To shut off the alarm signal, press the ALARM ON/OFF button (10).
Snoopze
The automatically set alarm function can be shut off for 5 or 10 minutes. Press the SLEEP button repeatedly to select the desired time.
NOTE:
If the Snooze function is activated, the time until the next alarm is shown on the display.
Deactivate alarm function
- Press the ALARM ON/OFF button (10).
- Press the button.
- Use the / buttons to select "ALARM OFF". Confirm with the REPEAT ALARM/SELECT button.
Cleaning and maintenance
CAUT
Do not immerse the device in water.
- Disconnect the mains plug before cleaning.
- You may wipe off external stains, using a slightly damp cloth without any additives.
Troubleshooting
| Problem Cause | Solution | |
| The unit cannot be operated | The unit is blocked and "hangs" | Pull the mains plug for approximately 5 seconds. Then connect the unit again |
| Reset the device to the factory defaults. ➔ see "Settings menu" | ||
| No DAB Radio reception | Telescopic antenna incorrectly aligned | Fully extend the telescopic antenna and align it vertically. |
| No Digital Radio can be received in your area | ||
| Problems with DAB radio reception | Depending on the location, you may not be able to receive some stations at all or with interference in your region. ⇒ see also note on page 41 | Switch to FM mode to receive these stations. If these stations are transmitted via VHF. Find out more on the internet site of the radio station. |
| No sound Volume | me is too low Increase the volume | |
| Poor sound quality | Radio signal too weak | Try to adjust the antenna position. |
| Batteries too weak I | Insert new batteries or operate the device with the mains cable. | |
Technical Specifications
Model: DAB 4138
Battery operation: 4x 1.5 V Type AA, R6
Power consumption: 1,5W
Net weight: 0.312 kg
Radio:
Frequency ranges: VHF/FM 87,5\~108.0 MHz
DAB/DAB+174.92~239.20MHz
External power adaptor
Input: AC 100-240 V, 50/60 Hz
Output: DC6V/1.0A
Polarity: -C-+
Protection Class:
The right to make technical and design modifications in the course of continuous product development remains reserved.
This device complies with all current CE directives, such as electromagnetic compatibility and low voltage directive and is manufactured according to the latest safety regulations.
Disposal
Meaning of the "Wheelie Bin" Symbol
Take care of our environment, do not dispose of electrical.
applicances via the household waste.
Dispose of obsolete or defective electrical appliances via municipal collection points.
Please help to avoid potential environmental and health impacts through improper waste disposal.
You contribute to recycling and other forms of utilization of old electric and electronic appliances.
Your municipality provides you with information about collecting points.


GARANTIEKARTE
warranty card · garantiekaart · carte de garantie · schedadi garanzia · tarjeta de garantia · cartao de garantia · garantikort karta gwarancyjna · zaru.cnI list · karta jamstva · carte de garantie · IapaunonHa Kapra · zaru.cny list · garancijski list · garanciajegy · rapaHTiHnHOpMynp · rapaHTiHnHbTaN0H
DAB 4138
24 Monate Garantie gemäß Garantiererklarung - 24 months warranty according to warranty declaration - 24 maanden garantie volgens garantieverklaring - 24 mois de garantie selon la déclaration de garantie - 24 mesi de garanzia secondo la dichiarazione di garanzia - 24 meses de garantia de acuworde con la déclaration de garantia - 24 meses de garantia, de accordo com a déclaration de garantia - 24 mandes garanti i henchold til garantibetingelsene - 24 misise gwarancjna podstawie oswiadcenia garwancynego - zaruka 24 misioc podle prohalienoi o zaruca - 24 mesejencn jamsto u skladu s jamstvenom declarajoron - 24 luni garanjcie conform declarejel de garantie - 24 mecaea rapanhui B cboaertBtne C rapanhaonn H derknapaun - 24 mezacna zaruoka poda vhyalnesio o zaruka - 24-mesece na garancija, skladno z garancijskoj Izavoo - 24 honap garancia a garanciafeitelekeben leirtak szerint - rapanthn ha 24 micni biudnoho zaraai npo rapantho - rapanthn 24 mecaua cornaccho zaraenennHMM ranpanHHMnpnnpnnnnn-100000000000000000000000000000
Kaufdatum, Handlertempor, Unterschied - date of purchase, dealer stamp, signature - aankoopdatum, dealtemspel, handleckenigkeit - date d'achat, tampon du concessionaire, signature - date de acquisto, timbre di riveidotto, firma - fecha de compo, sello di distributodor, firma - data de compria, cartismo de distributodor assinatura - kjaedpasta, ferdantherstempel, signature - data ziaukip, pieciez tazewady, pedipod - datum zaukopent, nazitke predicje, podipis - datum katunovie, big trogova, portos - datum achatizy, pampila furumcarii, semnitskii - data na novemvica, Tverni na Ptoponava, Thugunac - datum nukupi, paticola obchodnik/predajcu, podipis - datum natukic, Big trogova, vaskelskii dinama, koreanské/Belgorodje, akiraš - data protaplenjdn, nenatka protaplenjau, iugurne - Data protaplenjepimil, ilustarni protaplenjau, thugunac - cagluiu/nyuanskiyavov, Vorder

www.etrv.de