
RXE600 - Home cinema amp YAMAHA - Free user manual and instructions
Find the device manual for free RXE600 YAMAHA in PDF.

| Product Type | Home Theater Amplifier |
| Brand | YAMAHA |
| Model | RXE600 |
| RMS Output Power | 40 W + 40 W (6 Ω, 20 Hz to 20 kHz, 0.1% THD) |
| Impedance | 6 Ω |
| Frequency Response | 20 Hz to 20 kHz, ±0.5 dB |
| Total Harmonic Distortion | 0.04% (20 W, 6 Ω) |
| Signal-to-Noise Ratio | 98 dB (IHF-A) |
| Input Sensitivity | 150 mV / 47 kΩ |
| Subwoofer Output | Yes (SUBWOOFER OUT) |
| FM/AM Tuner | FM 87.5-108 MHz / AM 530-1710 kHz |
| RDS (Radio Data System) | Yes (PS, PTY, RT, CT) |
| Integrated Timer | Delayed playback/recording, standby |
| Remote Control | Yes (also controls DVD, cassette, MD) |
| System Connectivity | SYSTEM CONNECTOR for DVD, cassette deck, MD |
| Power Supply | 110/120/220/230-240 V AC, 50/60 Hz (depending on model) |
| Power Consumption | 125 W (other models) |
| Standby Power Consumption | 0.8 W (other models) |
| Dimensions (W × H × D) | 217 × 108 × 372 mm |
| Weight | 5.4 kg |
| Included Accessories | Remote control, AM loop antenna, FM indoor antenna |
| Maintenance | Clean with a dry, clean cloth. Do not use chemical solvents. |
| Safety | Do not open the casing, unplug during storms, use the prescribed voltage. |
| Repairability | Consult a YAMAHA authorized service center. Do not attempt to repair yourself. |
Frequently Asked Questions - RXE600 YAMAHA
User questions about RXE600 YAMAHA
0 question about this device. Answer the ones you know or ask your own.
Ask a new question about this device
Download the instructions for your Home cinema amp in PDF format for free! Find your manual RXE600 - YAMAHA and take your electronic device back in hand. On this page are published all the documents necessary for the use of your device. RXE600 by YAMAHA.
USER MANUAL RXE600 YAMAHA
micro component system
PIANOCRAFT
CAUTION: READ THIS BEFORE OPERATING THIS UNIT
1 To assure the finest performance, please read this manual carefully. Keep it in a safe place for future reference.
2 Install this unit in a well ventilated, cool, dry, clean place away from direct sunlight, heat sources, vibration, dust, moisture or cold. In a cabinet, allow about 10cm (4 in.) of free space all around RX-E600 for adequate ventilation.
3 Locate this unit away from other electrical appliances, motors, or transformers to avoid humming sounds.
4 Do not expose this unit to sudden temperature changes from cold to hot, nor locate this unit in an environment with high humidity (i.e., a room with a humidifier) to prevent condensation inside this unit, which may cause an electrical shock, fire, damage to this unit, and/or personal injury.
5 Avoid installing this unit in a location where foreign objects may fall onto this unit or where this unit may be exposed to liquid dripping or splashing. On the top of this unit, do not place:
- Other components, as they may cause damage and/or discoloration on the surface of this unit.
- Burning objects (i.e., candles), as they may cause fire, damage to this unit, and/or personal injury.
- Containers with liquid in them, as they may fall, spilling the liquid and causing an electrical shock to the user and/or damage to this unit.
6 Do not cover this unit with a newspaper, tablecloth, curtain, etc. in order not to obstruct heat radiation. If the temperature inside this unit rises, it may cause fire, damage to this unit, and/or personal injury.
7 Do not plug in this unit to a wall outlet until all connections are complete.
8 Do not operate this unit upside-down. It may overheat, possibly causing damage.
9 Do not use excessive force on switches, knobs and/or cords.
10 When disconnecting the power cord from the wall outlet, grasp the plug; do not pull the cord.
11 Do not clean this unit with chemical solvents; this might damage the finish. Use a clean, dry cloth.
12 Use only the voltage specified on this unit. Using this unit with a higher voltage than specified is dangerous and may cause fire, damage to this unit, and/or personal injury. YAMAHA will not be held responsible for any damage resulting from use of this unit with a voltage other than as specified.
13 To prevent damage by lightning, disconnect the power cord from the wall outlet during an electrical storm.
14 Do not attempt to modify or fix this unit. Contact qualified YAMAHA service personnel when any service is needed. The cabinet should never be opened for any reason.
15 When not planning to use this unit for long periods of time (i.e., vacation), disconnect the AC power plug from the wall outlet.
16 Be sure to read the "Troubleshooting" section on common operating errors before concluding that this unit is faulty.
17 Before moving this unit, press STANDBY/ON to set the unit in standby mode, then disconnect the AC power plug from the wall outlet.
18 VOLTAGE SELECTOR (General model only)
The VOLTAGE SELECTOR on the rear panel of this unit must be set for your local main voltage BEFORE plugging into the AC main supply. Voltages are 110/120/220/230-240 V AC, 50/60 Hz.
To reduce the risk of fire or electric shock, do not expose this appliance to rain or moisture.
The unit is not disconnected from the AC power source as long as it is connected to the wall outlet, even if this unit itself is turned off. This state is called the standby mode. In this state, this unit is designed to consume a very small quantity of power.
SPECIAL INSTRUCTIONS FOR U.K. MODEL
IMPORTANT:
The wires in the mains lead are coloured in accordance with the following code:
Blue: NEUTRAL
Brown: LIVE
As the colours of the wires in the mains lead of this apparatus may not correspond with the coloured markings identifying the terminals in your plug, proceed as follows: The wire which is coloured BLUE must be connected to the terminal which is marked with the letter N or coloured BLACK. The wire which is coloured BROWN must be connected to the terminal which is marked with the letter L or coloured RED. Making sure that neither core is connected to the earth terminal of the three pin plug.
For U.K. customers
If the socket outlets in the home are not suitable for the plug supplied with this appliance, it should be cut off and an appropriate 3 pin plug fitted. For details, refer to the instructions described above.
Note: The plug severed from the mains lead must be destroyed, as a plug with bared flexible cord is hazardous if engaged in a live socket outlet.
(U.S.A., Canada and General models)
The nameplate is located on the bottom of the unit.
FEATURES
Minimum RMS output power per channel 40W + 40W (6Ω, 20 Hz to 20 kHz, 0.1% THD)
- System remote control
- 40-station FM/AM preset tuning
- Multi-function RDS reception
- SUBWOOFER output terminal
The receiver (RX-E600) and DVD player (DVD-E600) are the main units of the YAMAHA Piano Craft Series.
You can upgrade the system by adding the cassette deck (KX-E300) and MD recorder (MDX-E300)*.
- MD recorder (MDX-E300) may not be available for some areas.
CONTENTS
SUPPLIED ACCESSORIES 2
GETTING STARTED
Remote control 3
Connecting the speakers and antennas 4
Connecting the system. 5
Setting the clock 6
NAMES OF BUTTONS AND CONTROLS
Front panel 7
Display. 7
Remote control 8
BASIC OPERATIONS
Listening to a source. 9
TUNING
Listening to the radio 10
Preseting stations 11
RECEIVING RDS STATIONS
Receiving RDS data 12
PTY SEEK mode. 13
Optional settings for RDS functions 14
USING THE BUILT-IN TIMER
Before using the timer 15
Timer play and recording 15
Sleep timer 16
SYSTEM CONTROL
Controlling other components 17
Before recording 19
Dubbing setting 19
ADDITIONAL INFORMATION
Troubleshooting 20
Specifications 22
SUPPLIED ACCESSORIES
After unpacking, check that the following parts are contained.
- Remote control
AM loop antenna
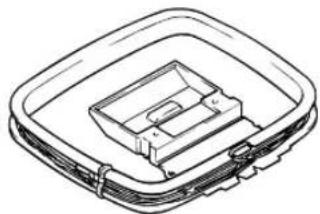
- Indoor FM antenna

- Batteries (AA, R6, UM-3)

Remote control
The remote control for the RX-E600 also controls the DVD-E600 DVD player, KX-E300 cassette deck, and the MDX-E300 MD recorder. Operating buttons for each unit are explained on the pages below:
Receiver, RX-E600: P.8
DVD player, DVD-E600: P.17
Cassette deck, KX-E300: P.18
MD recorder, MDX-E300: P.18
Battery installation
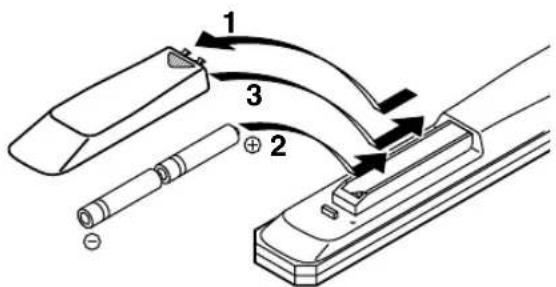
1 Remove the battery compartment cover.
2 Insert batteries into the battery compartment.
3 Replace the battery compartment cover.
Battery replacement
If you find that the remote control must be used closer to the main unit than usual, the batteries are weak. Replace batteries with new ones.
Notes
- Use only AA, R6, UM-3 batteries for replacement.
- Be sure the polarities are correct. (See the illustration inside the battery compartment.)
- Remove the batteries if the remote control will not be used for an extended period of time.
- If batteries leak, dispose of them immediately. Avoid touching the leaked material or letting it come in contact with clothing, etc. Clean the battery compartment thoroughly before installing new batteries.
Remote control operation range
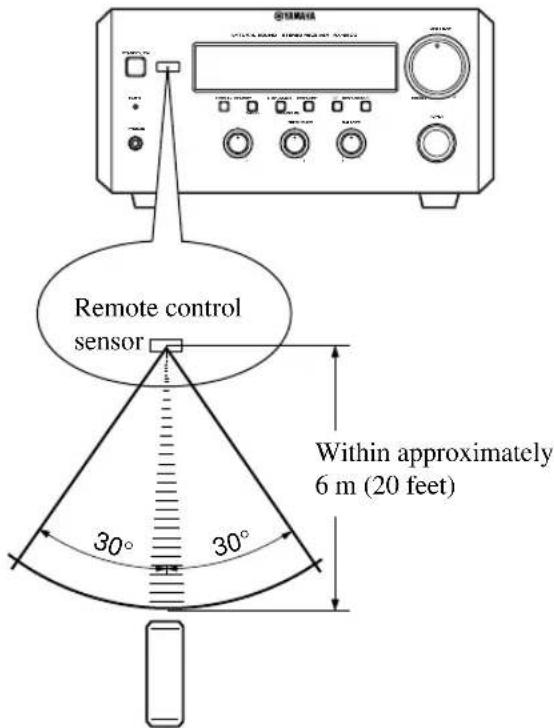
Notes
- There should be no large obstacles between the remote control and the main unit.
- Strong light (especially light from inverter-type fluorescent lamps etc) on the remote control sensor may impede the functioning of the remote control. In this case, reposition the main unit to avoid direct lighting.
Removing the protection sheet
The remote control is shipped with a protection sheet to prevent the surface from being scratched during transportation.
When removing the sheet, first put adhesive tape on an edge of the remote control so that the tape sticks to the sheet. Then peel the sheet off with the tape.
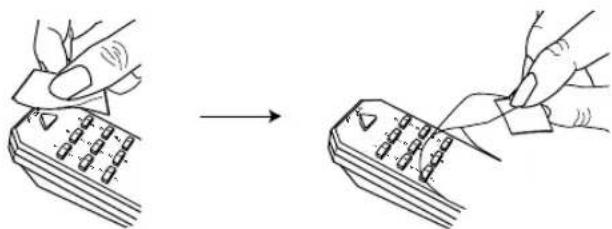
Note
- Do not scratch the remote control surface when peeling the sheet off.
Connecting the speakers and antennas
Do not connect the AC power cord to the wall outlet until all connections have been completed.
Follow the steps as shown below to connect the system using the supplied cords and accessories. Be sure all connections are made correctly, that is to say L (left) to L, R (right) to R, +^ to + and - to - .
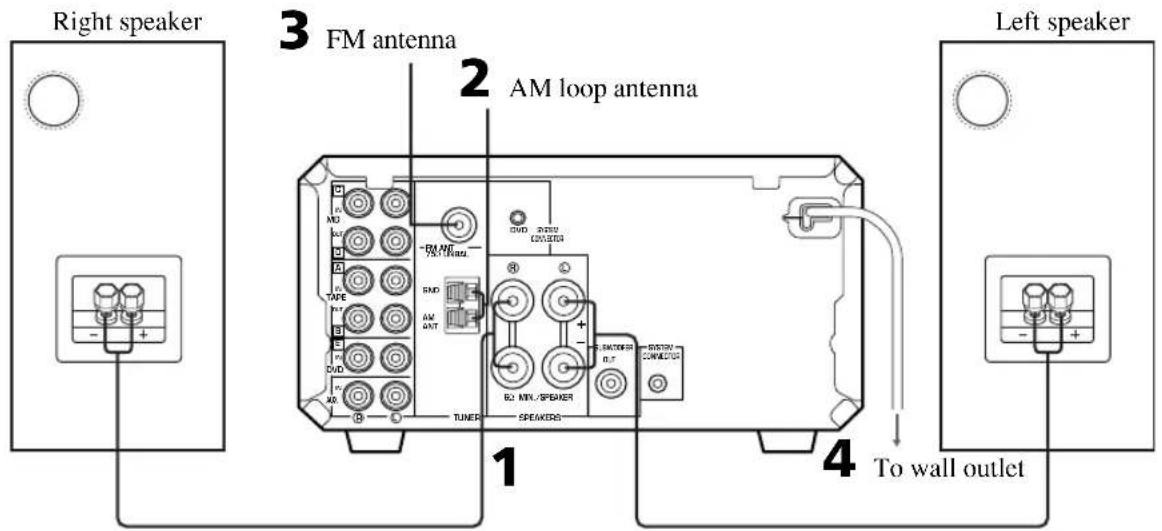
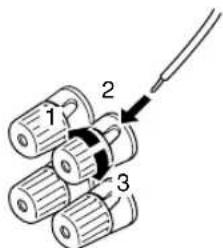
1 Connect the Speakers.
① Unscrew the knob.
② Remove approx. 10mm (0.4") of insulation from each of the speaker wires and insert the bare wire into the terminal.
③ Tighten the knob to secure the wire.
Red: positive(+)
Black: negative(-)
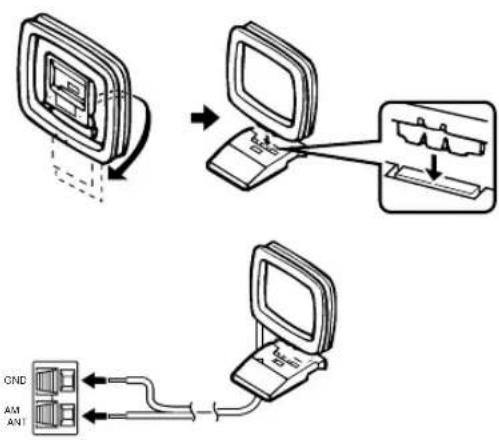
2 Connect the AM Antenna.
Set up the AM loop antenna, then connect it.
3 Connect the FM Antenna.
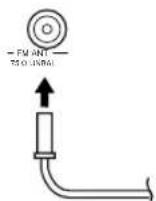
4 Connect the AC power cord to a wall outlet.
Notes
- Use external FM/AM antennas if you need better reception. Consult your dealer.
- The AM loop antenna should be placed apart from the main unit. The antenna may be hung on a wall.
To connect the subwoofer (optional)
You can reinforce the bass frequencies by adding a subwoofer (optional).
Connect the SUBWOOFER OUT terminal of the unit to the INPUT terminal of the subwoofer.
Connecting the system
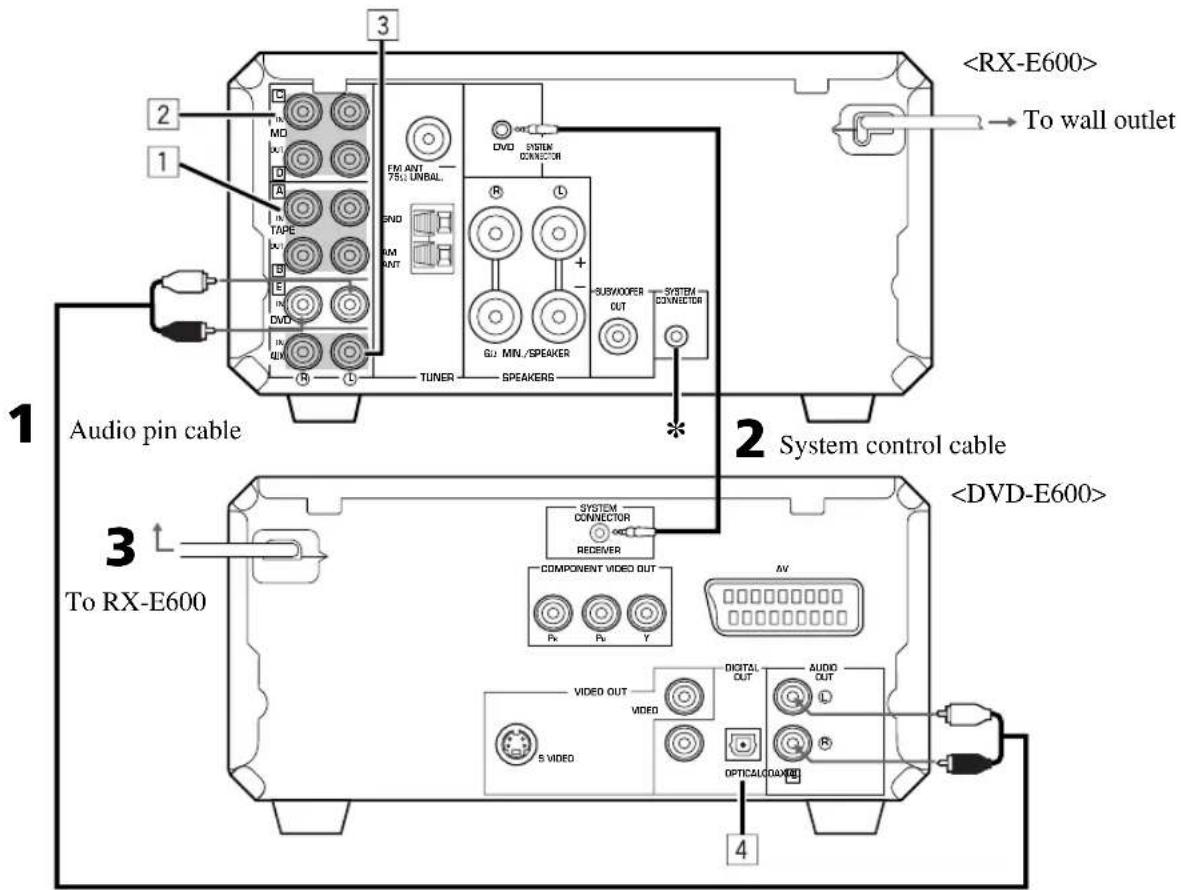
Connecting the RX-E600 and the DVD-E600
1 Connect E to E using the Audio pin cable.
Insert the plugs into the jacks of the same color.
2 Connect the SYSTEM CONNECTOR (DVD) of the RX-E600 and the SYSTEM CONNECTOR (RECEIVER) of the DVD-E600 with a system control cable (supplied with the DVD-E600).
*The other SYSTEM CONNECTOR of the RX-E600 is for connecting the MDX-E300 or KX-E300.
3 Connect the AC power plug of the DVD-E600 to AC OUTLET of the RX-E600.
This configuration allows you to turn all components in the system on and off with one touch, and reduces the standby power consumption of the DVD-E600.
Adding KX-E300 and MDX-E300 to the above system
(For details, refer to the owner's manual supplied with the respective component.)
1 Connect A and B of RX-E600 to A and B of KX-E300.
2 Connect C and D of RX-E600 to C and D of MDX-E300.
3 Connect an external component to the AUX terminal of RX-E600.
4 Connect DIGITAL OPTICAL OUT of DVD-E600 to DIGITAL OPTICAL IN of MDX-E300.
Take off the covers of the optical fiber cable plug, the DIGITAL OPTICAL OUT jack, and the DIGITAL OPTICAL IN jack before making digital connections. Be sure to replace the terminal's cover when the terminal on the rear panel is not being used, in order to protect from dust.
Caution
- Do not turn RX-E600 on until all connections between components have been completed.
- Do not connect or disconnect the system control cable and/or power cord while the system components are turned on.
Setting the clock
You must set the clock before you use the timer functions. The clock is based on a 24-hour system.

1 Turn on the power by pressing STANDBY/ON on the front panel, or POWER on the remote control.
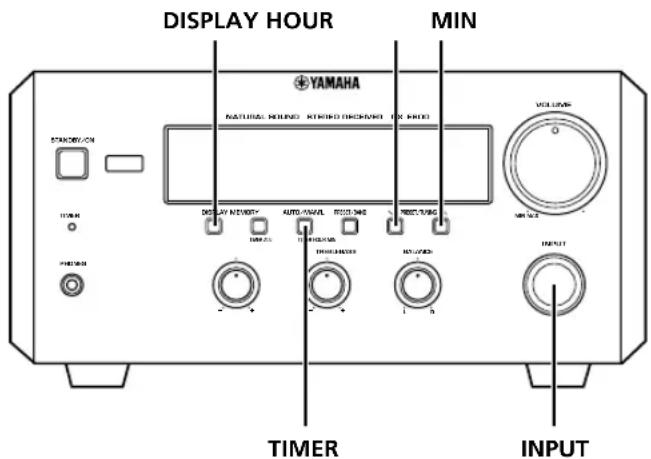
2 While the power is on, press DISPLAY to display the time.
3 Press HOUR while holding TIME ADJ to advance the hour setting.
Press HOUR while holding TIME ADJ and PRESET/BAND to reverse the hour setting.
4 Press MIN while holding TIME ADJ to advance the minute setting.
Press MIN while holding TIME ADJ and PRESET/BAND to reverse the minute setting.
To display the clock
Press DISPLAY.
The current time appears for about 8 seconds, then the normal display returns. Some buttons and controls may not work while the current time is displayed.
Note
- In the event of a power failure or when the AC power cord is disconnected for more than five minutes, you must reset the clock.
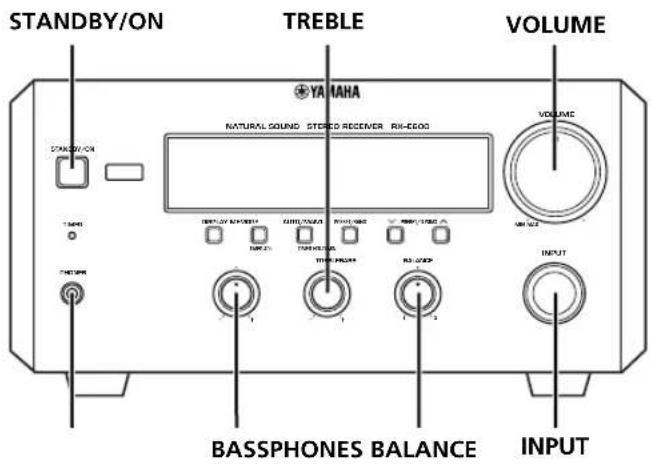
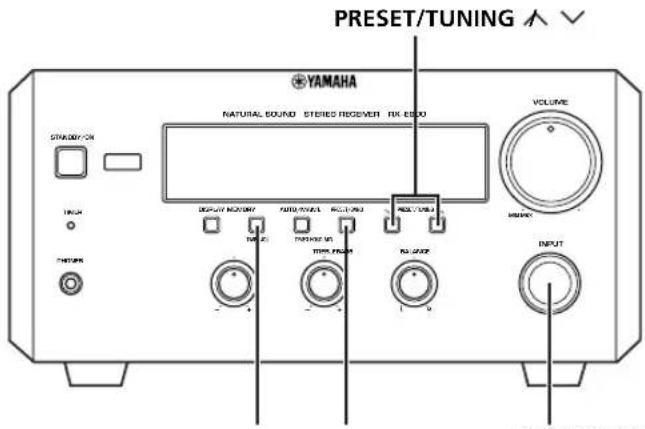
Front panel
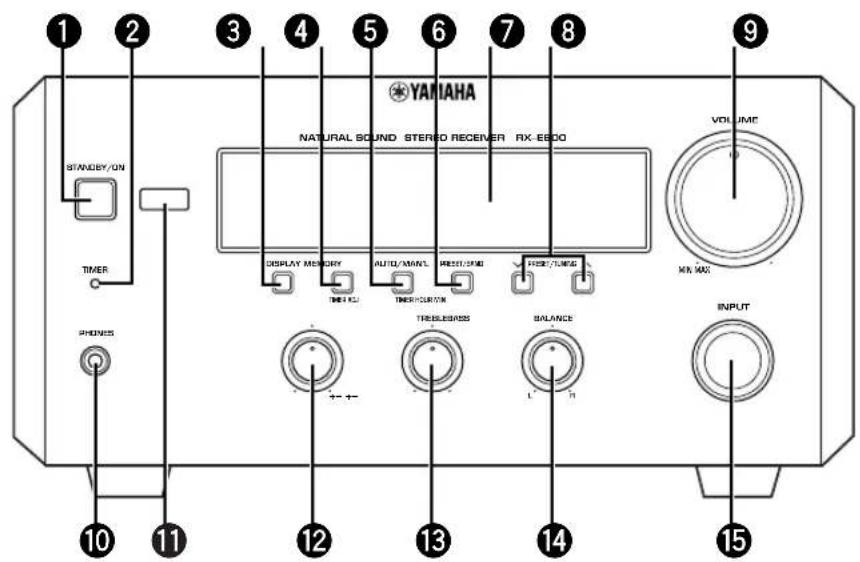
STANDBY/ON (P.9)
2TIMER indicator (P.15)
3DISPLAY(P.15)
MEMORY/TIME ADJ (P.6/P.11)
AUTO/MAN'L/TIMER (P.10/P.15)
6 PRESET/BAND (P.10)
Display (P.7)
8 PRESET/TUNING (PA10) HOUR/MIN (P.6/P.15)
9VOLUME (P.9)
10PHONES (P.9)
Remote control sensor (P.3)
BASS (P.9)
13TREBLE (P.9)
14BALANCE (P.9)
INPUT (P.9)
Display

Multi-information display
2EDIT indicator
3 PRESET indicator (P.11)
STEREO indicator (P.10)
TUNED indicator (P.10)
AUTO indicator (P.10)
7MEMORY indicator (P.11)
RDS indicator (P.12)
RDS mode indicators (P.12)
10PTY HOLD indicator (P.13)
1TIMER indicator (P.15)
②SLEEP indicator (P.16)
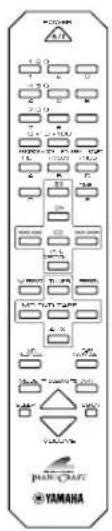
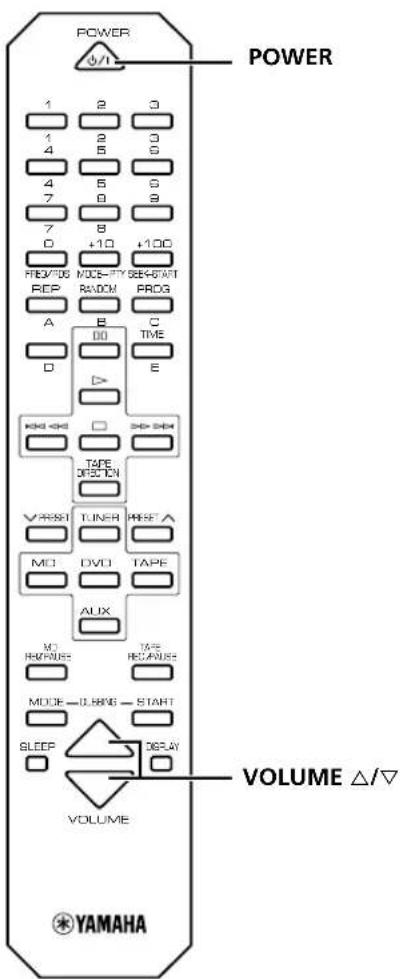
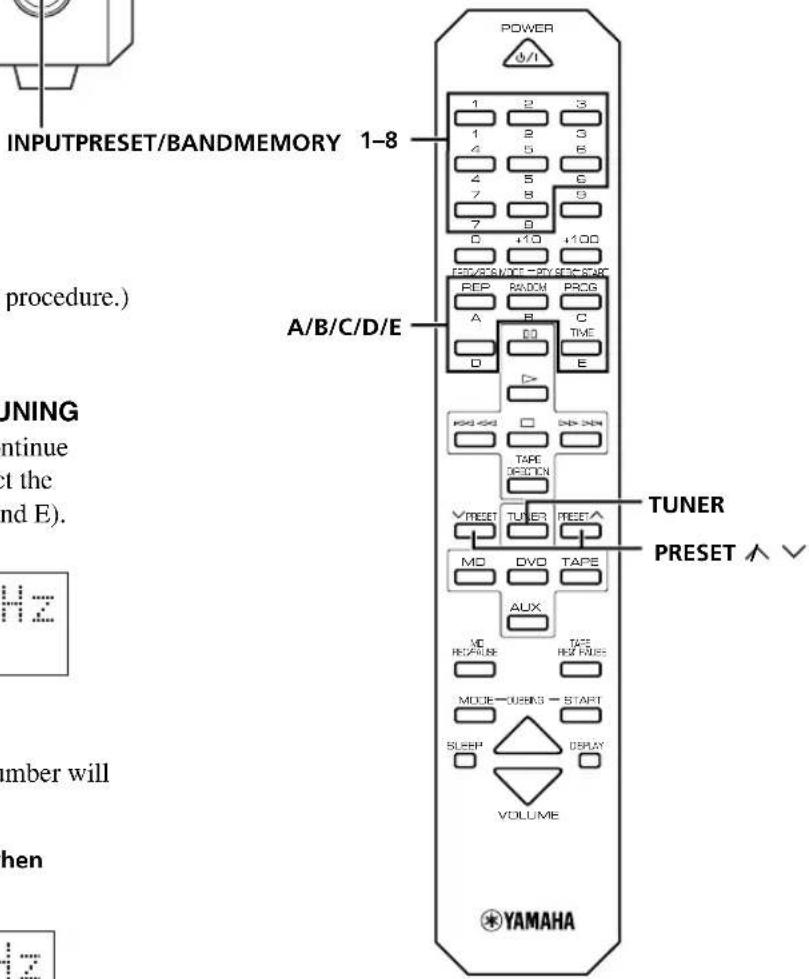
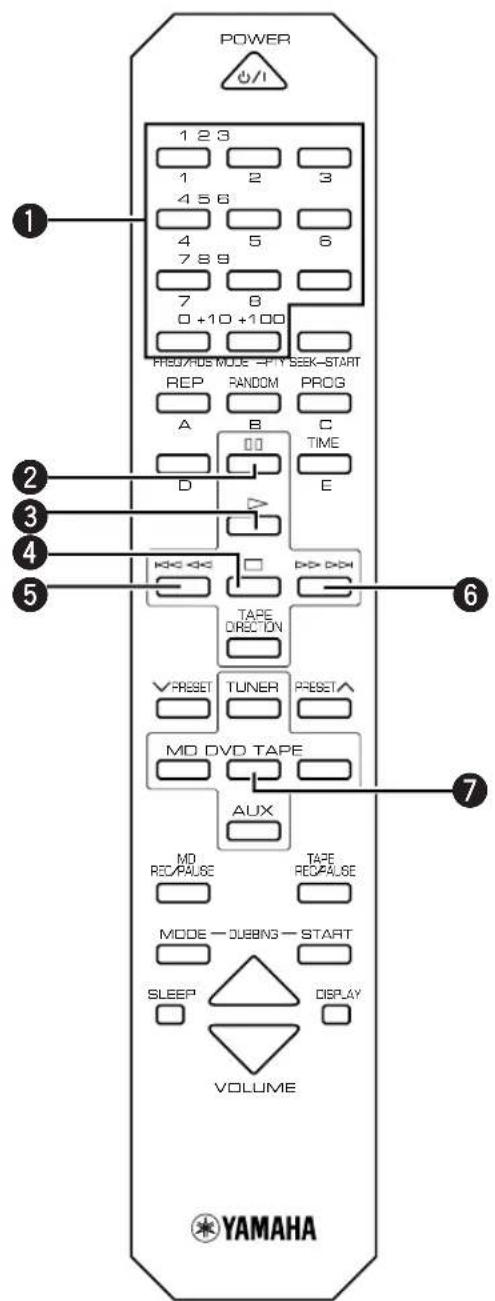
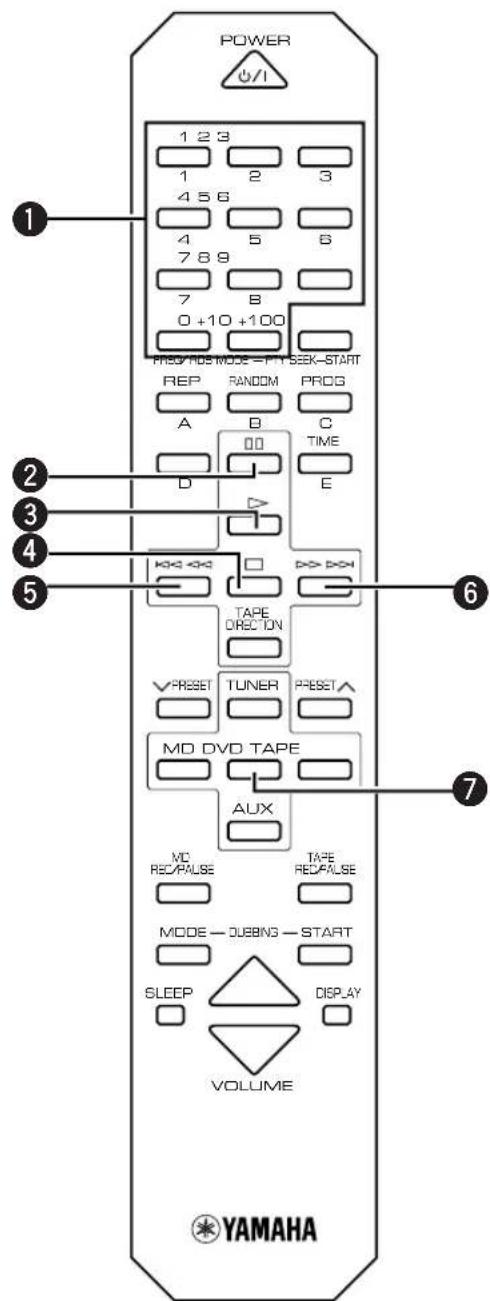
Remote control
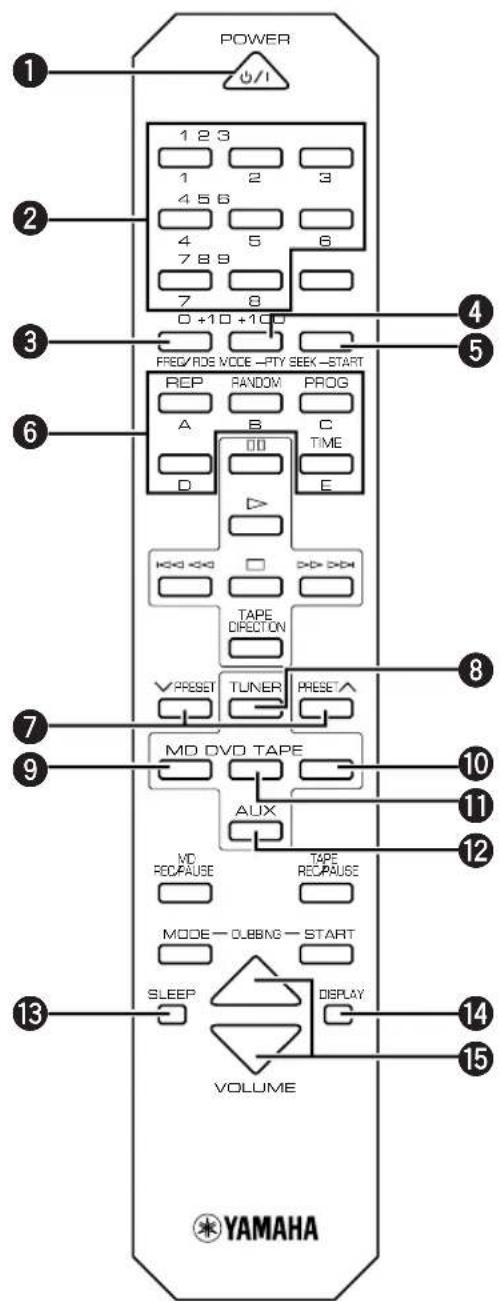
1 POWER (P.9)
Preset numbers (P.11)
FREQ/RDS (P.12)
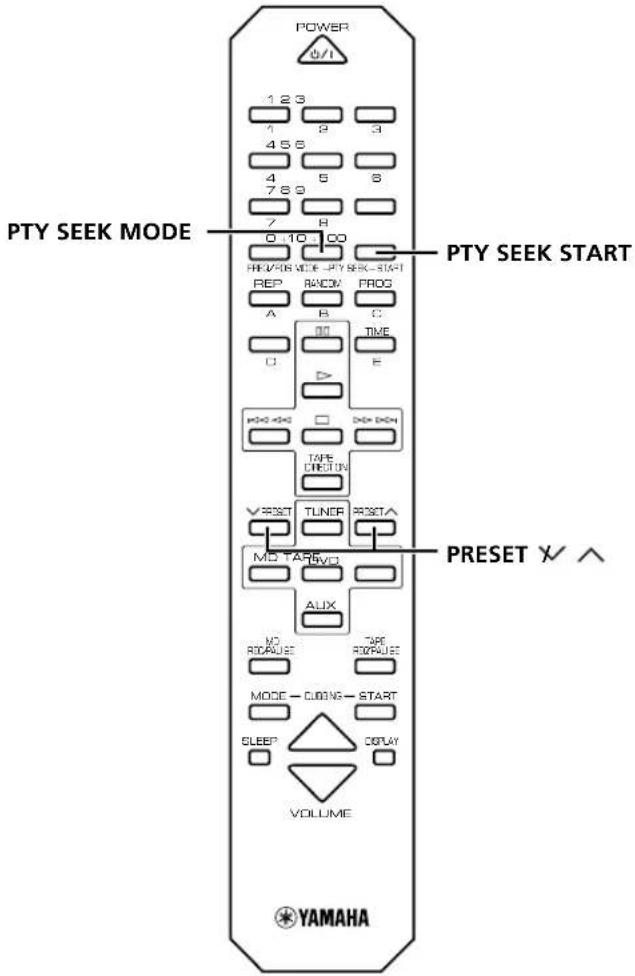
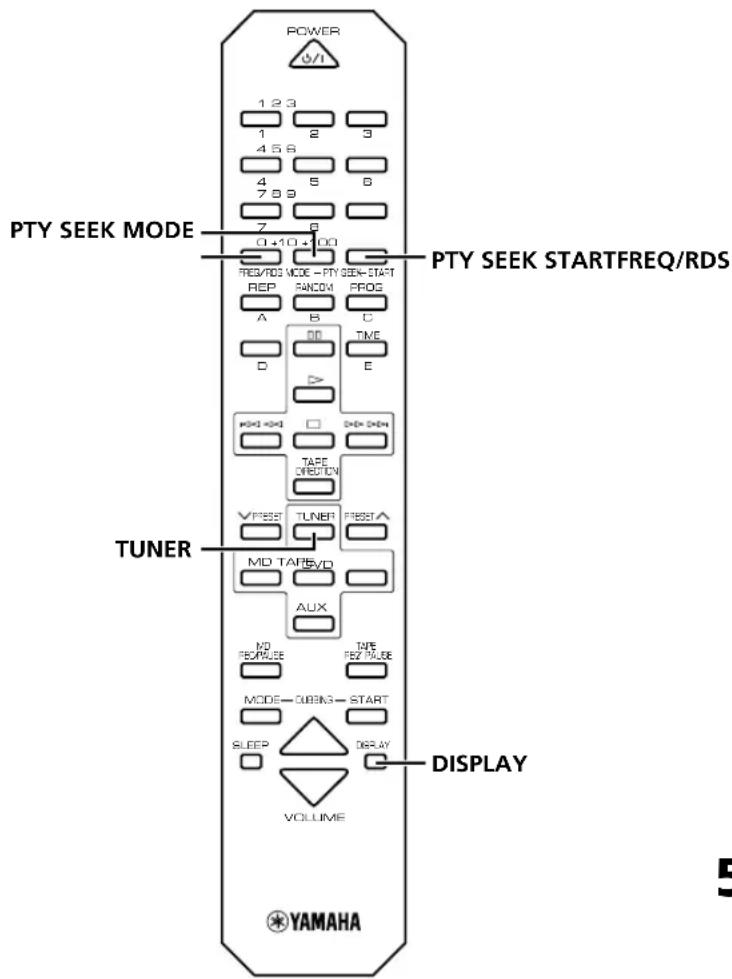
4 PTY SEEK MODE (P.13/P.14)
5 PTY SEEK START (P.13/P.14)
A/B/C/D/E (P.11)
7 PRESETx(P.11)
8 TUNER (RX-E600) (P.11)
MD input (MDX-E300) (P.18)
10 TAPE input (KX-E300) (P.18)
DVD input (DVD-E600) (P.17)
AUX (The equipment connected to the AUX terminal) (P.5)
13 SLEEP (P.16)
14 DISPLAY (P.15)
VOLUME / (P.9)
Note
- 8~12 are operation buttons and input selectors for each component.
Listening to a source
1 Set the volume to "MIN" by turning VOLUME.
2 Turn on the power by pressing STANDBY/ON on the front panel, or POWER on the remote control.
- Piano Craft series components that have correct system connections made to RX-E600 can be controlled to turn to the on or standby mode by RX-E600. However, once the connected components are turned to the standby mode with their respective STANDBY/ON button, they cannot be controlled by RX-E600 STANDBY/ON button.
3 Select the desired input source by turning INPUT until a suitable source component name appears on the display.
- When you operate the component connected to the AUX terminal, turn INPUT to select AUX.
4 Start playback on the source component. (Refer to the owner's manual supplied with each selected component.)
5 Adjust the volume level by turning VOLUME on the front panel or pressing VOLUME / on the remote control.
6 If desired, adjust BASS, TREBLE, and BALANCE.
BASS: Turn this control clockwise to increase (or counterclockwise to decrease) the low frequency response.
TREBLE: Turn this control clockwise to increase (or counterclockwise to decrease) the high frequency response.
BALANCE: Adjust the balance of the output volume from the left and right speakers to compensate for sound imbalance caused by the speaker location or listening room conditions.
When you use headphones
Connect the headphones to the PHONES jack. You can listen to the sound to be output from the main speakers through the headphones.
When you have finished using this unit
Press STANDBY/ON on the front panel again or POWER on the remote control to set this unit to the standby mode.
Auto standby function
This unit will automatically place itself in standby mode under the following conditions:
- When you select a component connected to this unit with a system control cable as an input source.
The source component is stopped and has not been operated for 30 minutes.
Listening to the radio
You can find radio stations automatically and manually.
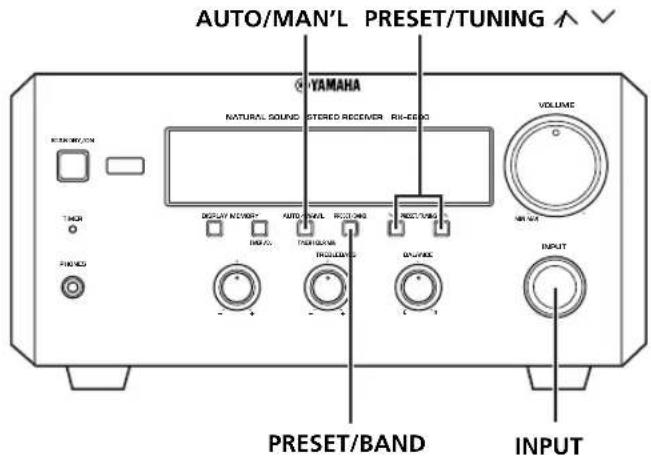
Automatic tuning
1 Select TUNER by turning INPUT so that the frequency of a radio station appears in the display.
2 Press PRESET/BAND to select the reception band. Do not select the preset tuning mode (in which "PRESET" appears on the display).
3 Press AUTO/MAN'L so that "AUTO" appears in the display.
4 Press PRESET/TUNING For a higher frequency) or (For a lower frequency).
5 The unit starts searching for a station.
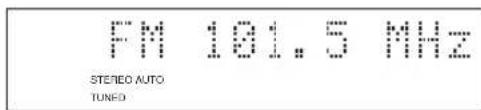
When the unit finds a station, it stops searching and "TUNED" appears on the display.
6 If the station located is not the one you want, repeat steps 4 and 5 until you find a suitable station.
Notes
- If automatic tuning search does not find the desired station, try manual tuning as described next.
- When an FM stereo broadcast with sufficient signal strength is received, "STEREO" appears on the display and you can listen to stereo sound.
Manual tuning
1 Follow steps 1 and 2 described in "Automatic tuning."
2 Press AUTO/MAN'L so that "AUTO" disappears from the display.
3 Press PRESET/TUNING for a higher frequency) or (for a lower frequency) to select your desired station.
The frequency changes incrementally each time you press PRESET/TUNING.
Presetting stations
The unit can store station frequencies selected using Automatic or Manual tuning as presets. Up to 40 stations can be stored. With this function, you can select any desired station by pressing the corresponding preset station number.
To preset stations automatically
1 Select TUNER as input source by turning INPUT.
2 Press MEMORY for about 2 seconds.
- The unit starts presetting stations, "AUTO" and "MEMORY" will flash on the display.
Received stations are stored to A1, A2...A8 sequentially. After 40 stations or all FM and AM stations are stored, the display will show the preset station A1.
To recall a preset station
Press TUNER and select the desired number by pressing PRESET/BAND and PRESET/TUNING on the front panel or PRESET A/B/C/D/E and 1-8 on the remote control.
To preset stations manually
1 Tune in a desired station.
(Refer to the previous page for the tuning procedure.)
2 Press MEMORY.
3 Within about 5 seconds, use PRESET/TUNING / to select a desired preset number. Continue pressing PRESET/TUNING / to select the group of the preset stations (A, B, C, D, and E).
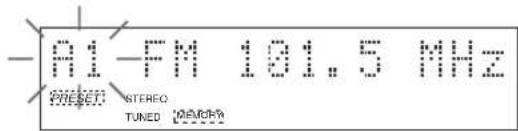
4 Press MEMORY.
- "MEMORY", "PRESENT", and preset number will appear on the display.
The arrow will appear for a second when it is preset.

5 Repeat steps 1 to 4 until all desired stations are preset.
Notes
- A new setting can be preset in place of a previous one.
- The preset stations are retained for a week after you disconnect the AC power cord or a power failure occurs.
Receiving RDS data
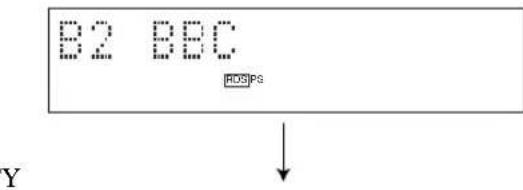
RDS (Radio Data System) is a data transmission system used by FM stations in many countries. Stations using this system transmit an inaudible stream of data in addition to the normal radio signal. RDS data contains various types of information, such as PS (Program Service), PTY (Program Type), RT (Radio Text), and CT (Clock Time).
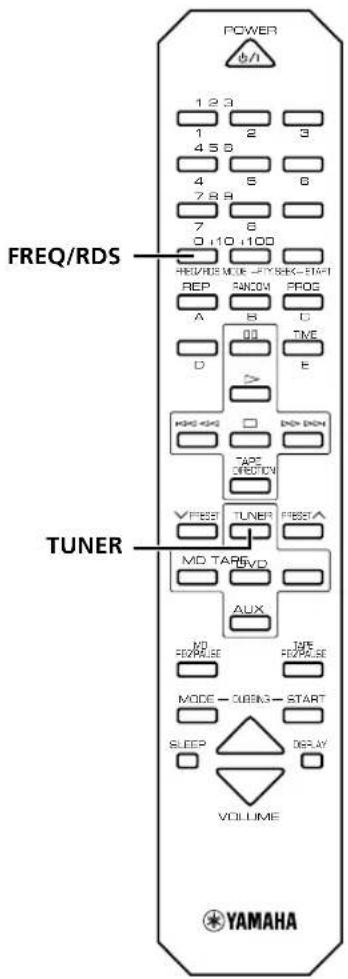
1 Tune in the FM station. (Refer to page 10, or you can simply press TUNER on the remote control.)
2 Press FREQ/RDS to choose the mode. Each time you press FREQ/RDS, the type changes as follows:
PS
The name of the RDS station being received is displayed.
- If the unit cannot find a station with PS data, the unit stops searching and "NO PS" appears on the display.
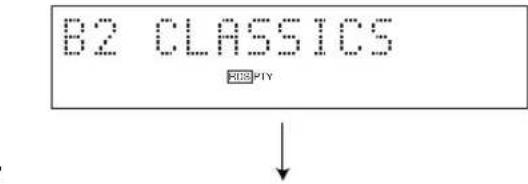
The type of the program on the RDS station now being received is displayed. You can make this unit search for a station which is broadcasting a program of a desired program type. (Refer to PTY program mode in the next section for details.)
Information about the program (such as the title of the song, name of the singer, etc.) on the RDS station being received is displayed by a maximum of 64 alphanumeric characters, including the umlaut symbol. If other characters are used in the RT data, they are displayed with an under-bar.
- If the unit cannot find a station with RT data, the unit stops searching and "NO RT" appears on the display.

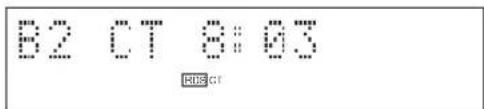
CT
Current time is displayed.
- If the unit cannot find a station with CT data, the unit stops searching and "NO CT" appears on the display.
Notes
- RDS may not work properly if the station you are tuned to is not transmitting the RDS signal properly or if the signal strength is weak.
- Some FM stations do not offer RDS service. Of those that do, not all provide the same types of services. The types provided by the received RDS station are dimmed on the display. Check with your local radio stations for details on RDS services in your area.
PTY SEEK mode
You can locate a desired station by selecting a program type. The unit searches all preset stations into the type of programs currently being broadcast from the RDS stations.
List of PTY (Program Type)
| NEWS | News |
| AFFAIRS | Current Affairs |
| INFO | General Information |
| SPORT | Sports |
| EDUCATE | Education |
| DRAMA | Drama |
| CULTURE | Culture |
| SCIENCE | Science |
| VARIED | Light Entertainment |
| POP M | Pops |
| ROCK M | Rock |
| M.O.R. M | Middle of the Road Music (Easy-listening) |
| LIGHT M | Light Classics |
| CLASSICS | Serious Classics |
| OTHER M | Other Music |
To locate a station
1 Tune in the FM station. (Refer to page 10, or you can simply press TUNER on the remote control.)
2 Press PTY SEEK MODE once so that "PTY" and a PTY program flashes on the display.
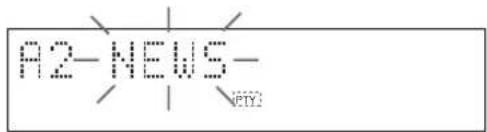
3 Within about 20 seconds, press PRESET / repeatedly until the desired program type appears on the display.
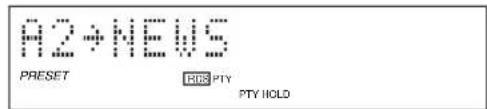
4 Within about 20 seconds, press PTY SEEK START. If a station broadcasting the selected program type is found, the unit stops searching and the Program Service name appears on the display. "PTY HOLD" appears on the display.
5 Repeat step 4 until the desired station is located.
If there is no station broadcasting the program type you select, "NO PTY" appears on the display, then the Program Service name or frequency appears on the display.
Optional settings for RDS functions
The tuner has the following functions which make use of the RDS data service. These functions are set to ON by default. However, you can turn these functions OFF, if so desired.
1 Select the FM band by pressing TUNER.
2 Press DISPLAY to display the current time.
3 Press FREQ/RDS.
4 Each time you press PTY SEEK MODE the display will change as follows:
- CT CLOCK (ON/OFF) The tuner corrects the time of the built-in clock automatically by synchronizing it with the CT data on the RDS station being received.
CT+Clock: ON
- If the unit is tuned to an RDS station of another country the built in clock synchronizes to the time of that country.
-
If the built-in clock is not set to the current time or has been reset due to a power failure or other incident, it will be set to the time specified by the CT automatically, regardless of whether this setting is set ON or OFF.
-
LOCAL CT (ON/OFF) If the RDS station being received employs the local time (summer time, etc.) data service, its time is displayed in the CT mode.
Local+CT:0N
- A.M. RDS (ON/OFF) The unit searches RDS stations instead of FM stations in the automatic preset tuning operation when this setting is set to ON. (Refer to page 11).
A. M. +RDS: ON
- RT SPEED: ± 0 Changes the scroll speed of the radio text. Decrease the value to reduce the speed.
RT Speed: 10
Control Range: ± 0 to ± 3 (Preset value: ± 0 )
5 Choose the function ON or OFF by pressing PTY SEEK START, confirming it in the display. Press PTY SEEK START repeatedly to change the value for RT SPEED.
- If the unit is not operated for 20 seconds or more, this mode is cancelled and the unit returns to the frequency display. If the current station is transmitting PS data, the unit changes to the PS mode.
6 Press FREQ/RDS again to restore the frequency display mode.
Before using the timer
If you want to use the cassette deck, KX-E300 or the MD Recorder, MDX-E300 for timer play or recording, you must first make the connections as shown in "Connecting the system" on page 5. For details, refer to the instructions supplied with the MDX-E300 or KX-E300.
Timer play and recording
By using the built-in timer, you can have the unit turn on at a specified time and begin playing or recording automatically. You can also specify the time at which you want the unit to turn off.
1 Press DISPLAY.
Whenever DISPLAY is pressed, the display mode changes as follows:
- Clock Time (TIMER on/off mode)
If you have not set the clock yet "Set Clock" appears. You need to set the current time as described on page 6.
- Timer Input
Select the source to be played by turning INPUT.
- Timer recording is possible only when you select TUNER or AUX.

- Timer REC
Select the recording component by turning
INPUT. If you wish to enjoy timer playback with the TUNER or AUX settings, select "REC Mode OFF".
(Example)
TUNER:THFE

- ON Time
"ON Time" appears on the display for a second, and changed to the time setting mode.
Press HOUR to set the hour.
Press MIN to set the minute.

- OFF Time
Set the time the same way as above.
If you set the ON time but not OFF time, timer play or recording will finish automatically after an hour.
Notes
- The display mode changes after approximately 8 seconds. If you change the mode before completing setting, press DISPLAY once or more to return to the desired mode.
- If you select the input other than TUNER and AUX on "2. Timer Input", "3. Timer REC" is skipped.
2 Press TIMER to complete the timer setting.
The system changes to the standby mode.
- TIMER indicator lights up.
If you continue using the system, press STANDBY/ON to turn on this unit.
To cancel the timer play setting
Press DISPLAY to show the current time, then press TIMER so that "TIMER" disappears from the display. You can also cancel the timer play setting by pressing TIMER when the unit is in standby mode.
Note
- In the event of a power failure or when the AC power cord is disconnected for more than five minutes, you must reset the clock.
Sleep timer
The unit can be set to automatically place itself in standby mode after a designated time.
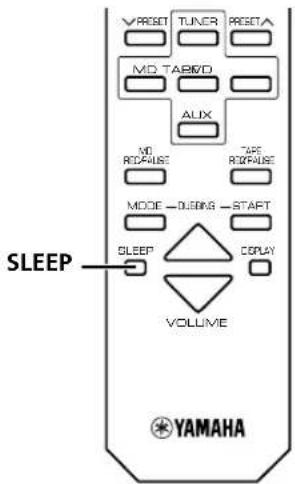
1 Play the desired sound source.
2 Press SLEEP repeatedly until the desired sleep time appears in the display. Each time you press SLEEP, the sleep time changes as follows:

About 4 seconds after setting, the normal display will resume.
"SLEEP" will appear in the display.
3 The unit will turn off automatically when the selected sleep time is reached.
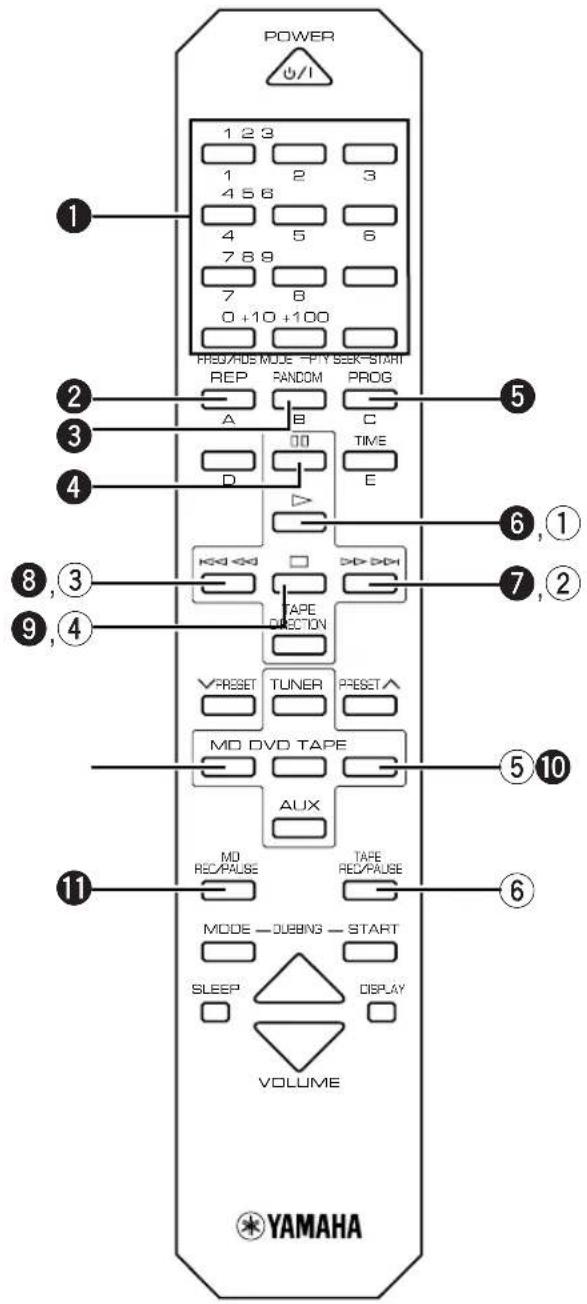
Controlling other components
DVD-E600
1Numeric buttons
+100 button is used when operating MDX-E300.
2 (Pause)
3> (Play)
4□(Stop)
(Shift/Scatch Backward)
6> D> (Skip/Scach Forward)
DVD input
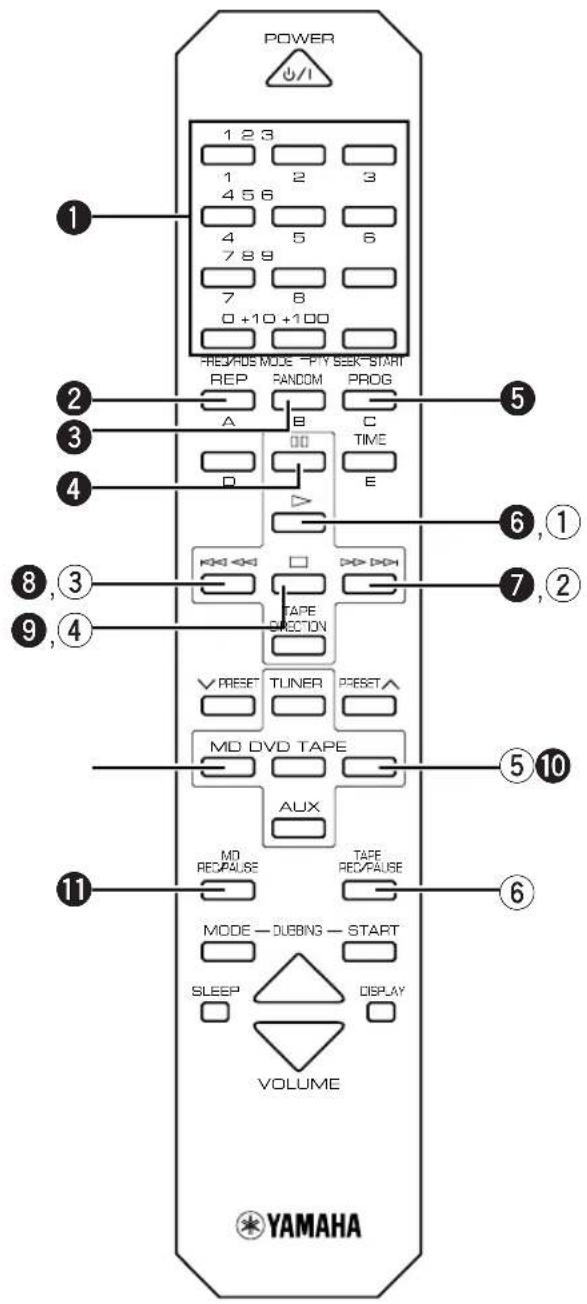
MDX-E300
1Numeric buttons
2REP (Repeat)
3RANDOM
4 (Pause)
PROG (Program)
(Play)
7 D D (Skip/Search Forward)
8 (Skip/Search Backward)
9□(Stop)
10MD input
MD REC/PAUSE
KX-E300
(Play)
② D D D (Fast-forward)
③ (Rewind)
④ (Stop)
⑤TAPE input
⑥TAPE REC/PAUSE
Before recording
Follow the instructions as described in "Connecting the system" on page 5 before using the MDX-E300 or KXE300 to record. For details, refer to the instructions supplied with the MDX-E300 or KX-E300. Sources connected to the AUX terminal can be recorded to tape or MD.
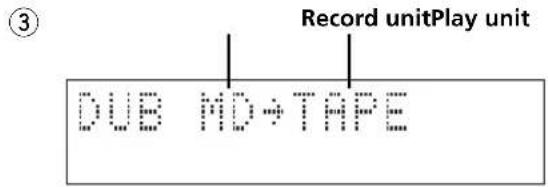
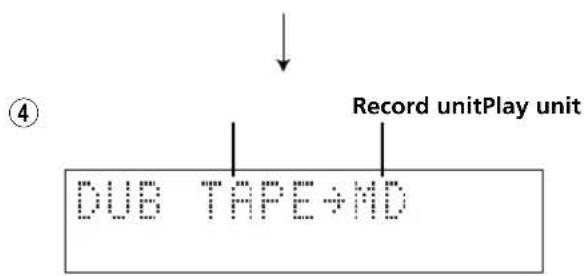
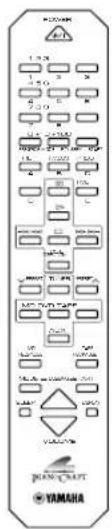
Dubbing setting
There are six combinations of components. When you select a mode, recording for mode starts and ends automatically in a manner preset for that mode.
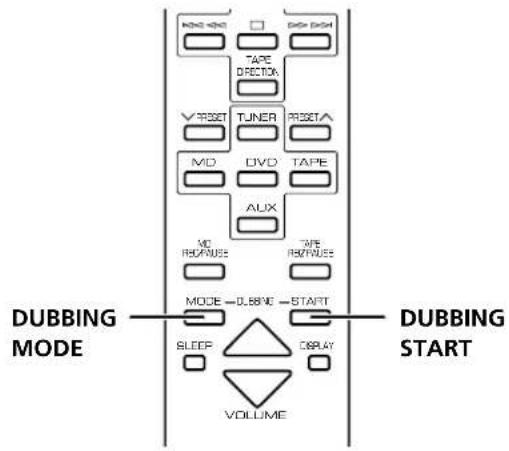
1 Select a component combination. Each time you press DUBBING MODE, the mode changes in the following order:
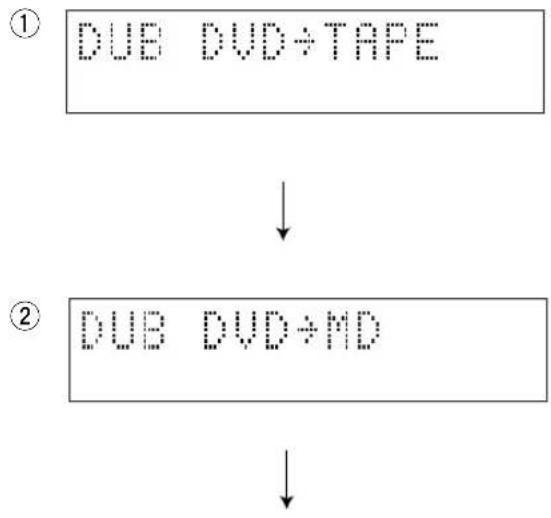
- Recording automatically starts at the beginning of the tape. (Pressing DUBBING START automatically rewrites the tape to the beginning)
- Recording automatically starts at the beginning of the tape. (Pressing DUBBING START automactially rewrites the tape to the beginning)
2 Press DUBBING START to start recording.
Note
The displays ① 4 which include the component you have not connected to your receiver (RX-E600) will be skipped.
To stop dubbing
Press
Note
- If DVD playback stops or completes when you are using the DVD player as a recording source, the recording component records 10 additional seconds of silence.
Troubleshooting
If the unit fails to operate normally, check the following points to determine whether the fault can be corrected by the simple measures suggested. If it cannot be corrected, or if the fault is not listed in the SYMPTOM column, disconnect the power cord and contact your authorized YAMAHA dealer or service center for help. When receiving service, other Piano Craft components you are using together with this unit may be needed.
| SYMPTOM CAUSE REMEDY | ||
| The unit does not switch ON when the STANDBY/ON switch is pressed. | The AC power cord is not connected or not completely connected. | Securely connect the power cord. |
| No sound from one speaker. | Loose speaker connections. | Connect properly. |
| The sound suddenly goes off. | The protection circuit has been activated because of a short circuit, etc. | Check the speaker wires are not touching each other and then turn the unit back on. |
| No sound from an external unit connected with this unit or play does not begin. | Incorrect cord connections. | Connect the cords properly. If the problem persists, the cords may be defective. |
| Input source selection is not proper. | Make a proper input source selection. | |
| Sound distorted. | The component connected to this unit is disconnected from AC outlet. | Connect the AC power cord of the component to an AC outlet. |
| Excessive static in FM broadcasts. | Interference from starting motor of a nearby car. | Position the FM antenna as high and as far away from nearby roads as possible. Connect using a coaxial cable. |
| Interference from the thermostat of a nearby electrical appliance. | ||
| Noise increases during stereo broadcasts. | Antenna input is too weak due to obstructions or excessive distance from the broadcasting station. | Check the antenna connection. |
| Install a multi-element type FM antenna if possible. | ||
| Stereo broadcasts are noisy and STEREO indicator blinks on and off. | Insufficient antenna input. | Install an antenna appropriate for the electric field strength of your area. |
| Cannot select preset stations. | Preset memory has been erased. | Reprogram memory presets. |
| Buzzing or static during AM broadcasts. | Interference from sources such as lightning, fluorescent lights, electric motors or thermostat of nearby electrical appliance. | The problem is difficult to eliminate, but can be lessened by grounding AM loop antenna. |
| TV or microprocessor is being used nearby. | Move away from TV or microprocessor. | |
| AM broadcast sensitivity is poor. | Radio signal is weak or the antenna is not properly connected. | Properly connect the AM loop antenna. |
| Change orientation of the AM loop antenna. | ||
| Install an external AM loop antenna. | ||
| Cannot set timer. | Current time is not set. | Set current time. |
| The unit does not work normally. | The internal microcomputer has been frozen by an external electric shock (lightning, excessive static electricity, etc.) or the power supply with low voltage. | Unplug the AC power cord from the wall outlet, and then plug in again after about one minute. |
| The remote control does not work. | The batteries of the remote control are too weak. | Replace the batteries with new ones. |
| Remote control is too far away or is being used at an incorrect angle. | Use within 6 meters and 60 degree radius. | |
| Direct sunlight or lighting (of an inverter type of fluorescent lamp, etc.) is striking the remote control sensor of the unit. | Change the position of the unit. | |
| TV functions strangely when the remote control is being used. | Remote control is being used near TV set with a remote control sensor. | Relocate this unit away from the TV or cover the TV's remote control sensor. |
Specifications
Amplifier section
Minimum RMS output power per channel 55 W + 55 W (6Ω1kHz 0.1% THD) 40 W + 40 W (6Ω20 Hz to 20 kHz 0.1% THD)
DIN Standard output power per channel (Europe model) 60 W + 60 W (4Ω 1kHz 0.7% THD)
Input sensitivity/Impedance DVD/TAPE/MD/AUX 150 mV/47 kΩ
Frequency response DVD etc. 20 Hz to 20kHz,± 0.5 dB
Total Harmonic Distortion (20 Hz to 20 kHz)
DVD etc. 20 W, 6 Ω 0.04%
Signal-to-Noise ratio (IHF-A Network) DVD etc. (250mV Input shorted) 98 dB
Output level/Impedance PHONES 0.43 V/330Ω
Tuner section
Tuning range
FM [U.S.A.and Canada models] 87.5-107.9 MHz [U.K., Europe, Australia and Korea models] 87.50-108.00 MHz [Asia and General models] 87.5/87.50-108.0/108.00 MHz
AM [U.S.A.and Canada models] 530-1710 kHz [U.K., Europe, Australia and Korea models] 531-1611 kHz [Asia and General models] 530/531-1710/1611 kHz
Sensitivity FM (S/N 30dB) . 1.0~ V AM . 300~ V / m
General
Power supply [U.S.A.and Canada models] AC 120 V,60 Hz [Australia model] AC 240 V,50 Hz [U.K.and Europe models] AC 230 V,50 Hz [Asia and General models] AC 110/120/220/230-240 V,50/60 Hz [Korea model] AC 220 V,60 Hz
Power consumption [U.S.A.and Canada models] 110 W [Other models] 125 W
Power consumption (standby mode) [U.S.A.and Canada models] .0.7 W [Other models] .0.8 W
Dimensions (W× H× D) 217× 108× 372(8 - 5 / 8"× 4 - 1 / 4"× 14 - 8 / 5")mm Weight .5.4 (11.9 lbs) kg
Specifications are subject to change without notice.
RECEPTION DES STATIONS RDS
- Piles (AA, R6, UM-3)

Télécommande
Platine cassette KX-E300:p.18
Platine minidisc MDX-E300: p.18
- A.M. RDS (ON/OFF)
Receiver RX-E600: S.8
DVD-Player DVD-E600: S.17
Kassettendeck KX-E300: S.18
MD-Rekorder MDX-E300: S.18
- A.M. RDS (ON/OFF)
ATT ANVANDA DEN INBYGGDA TIMERN
Kassettdack, KX-E300: Sid.18
MD spelare, MDX-E300: Sid.18
1 Stall in onskad station.
(Se foregående sida für installingsprocedur.)
- A.M. RDS (ON/OFF)
$$ R T S P E C D: \pm 0 $$
Receiver, RX-E600: blz. 8
- A.M. RDS (ON/OFF)
IPNEM PAANOCTAHU CNCTEMBI RDS
PpneM nHopmaun RDS 12
Pexm PTY SEEK 13
Bo3MOxHbIe HeuCnPaBHOCTn n CnOc6blnx yCTpaHeHn .20
TexHnueckne XapaKTepeNCTnKn ... 3aDnKa KpbIuKa
IOCTABJRAEMbIEAKCECCYAPbl
Y6eHntecb HnIyHn CneIyOux DeTaJe Nocpe pacnaKOBKn.
- NyblT dy
- Pamouhya AM-aHTeHha
BHyTpEnHnA yM-aHTeHHa
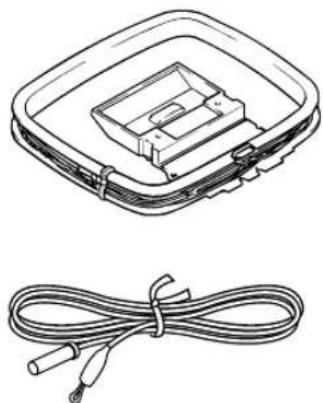
BaTapeuKn (AA, R6, UM-3)

NyIbT dy
IyblT Dv RX-E600 TaKke MoXe TynpaBnTb DVD- npOnrpbBaTeJem DVD-E600, KaccetHoi DeKoI KX-E300, n MD-MaHHTofoHOM MDX-E300. KhoIkn ynpabHeHn Ia KaXDoTO KOMNoHEHa OINcaHbHa cNeDyUOxN x CtpaHnucx:
PecuBep, RX-E600: cTp.8
DVD-npounrpbBateNB, DVD-E600: ctp.17
KacceTha n deKa, KX-E300: cTp.18
MD-MarHnToΦoH, MDX-E300: ctp.18
YctaHOBka 6aTapeek

1 N3BneKeTe KpbIshky OTdJeHnA dJa 6aTaapeek.
2 BCTaBbTe 6aTapeeKn B OTdJeHne dIa 6aTapeek.
3 YcTaHOBInTe KpbIuKy OTdEnHnI dIaTapeek Ha MeCTO.
3aMeHa 6aTapeek
EcnBb3aMeTnI,TO npblT Dy MoKet ynpabJIaTb OCHOBbIM aIInapaTOM TOJbKO C 6n3KOrO paCToHn,3TO O3Haaye,TTO 6aTapeKn Ocna6n.3aMeHnte 6aTapeKn Ha HOBbie.
PpmeHn
- Пи заме He,пьзунтсь только 6атAPEйКamn AA, R6, UM-3.
- Y6eHNTecb B npabunbHocTn nonpHocTe. (CMOTPte nllnoctpaunIOB OTdeneHHn dIaTapeek.)
- EcIN Bbl He co6bnpaTeecb NOIb3ObaTbca NyIbTom DvB TeueHne npoDOnKnteJIbHO rPOMeKytKa BpeMeHn, n3BnKeNTe 6atapeKn.
Bcnyae npoteKaHn6baTapeek,HeMeIeHHo ydaJInte Hx.36eraaTe KOHTaKTa C MaTePnaOM npoteKaHn HnH He daBaTe OExKe I T.I.PnKacatbC K Hemy. Npeed yctaHOBko HObIx 6baTapeek,TuaTeNbHO npotpnte OTdJeHne dHa 6baTapeek.
3oha ynpaBneHn nyIbTa Dv
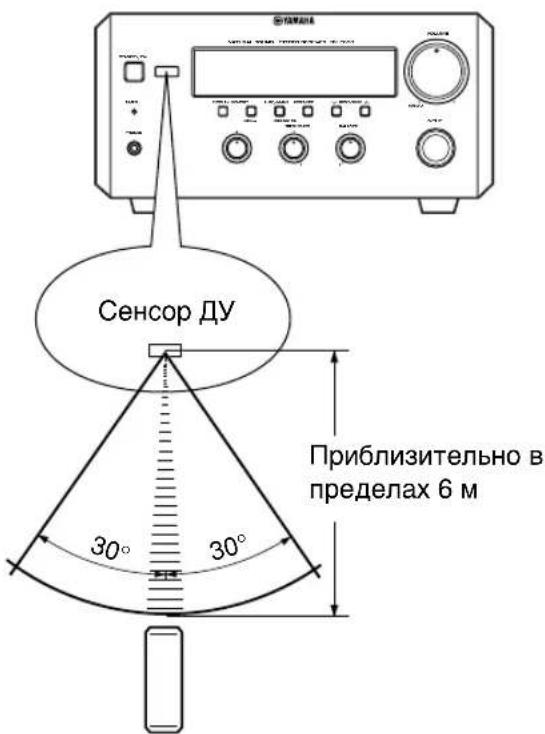
Ppimcaynna
Mekny npbTom NIO OCHOBHm annapaTOM He DOJXHO 6bITb HnKaNX KpyNHBx npenrTCTBn.
-Пonaдане сильно CBeta (OCOбeнho CBETOTлambli
Дhevно CBeta npeo6pa3yIoцero Tnla)Ha ceHcop DVMoKet MeaTa NylTa DY. B TaKOM cIyuae,
NOMEHЯITEpacnoJoxHe OCHOBHoro annapata TAKIM
obpa3OM, YTO6bHa Hero He nonaDan npAmoB CBET.
YdaJIeHHe 3aUHTHOI PJIeHKN
C ueIbIO npedOTBpaueHnIapaHnHa NOBepxHOCTn pIbTa DY BO Bpem IpeBo3Kn, PylbT DY OTRpyXaETcR C 3aunTHoN PIIeHKo. Pn ydaJIeHn IIeHKn, ChauJa IpnIOKnte IINKyIO JeHTy K KpaIO pIbTa DY TaKIM O6pa3OM, YTObI JeHTa npJIneHnAcb K IIeHKe. 3aTeM, YdepXIBa 3aJeHTy, CHIMITE 3aUnTHyIO IIeHky.
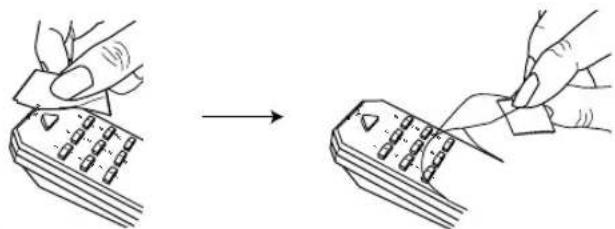
PpimeyaHne
BoBpemy ydaJeHnI pHeKN,6yNbTe oCToPOxHbI Hne noapanaTe NOBepxHOCTyNtA dy.
3 PoiKIOUHTe UM-aHTeHHy.

4 IopKJIIOUHTe CINOBOINPOBOID NpeMeHHORToKa K po3eTke.
PpmeaHn
- Pn Heo6xoJIMOCtI JyUweRo KaueCTBa npMeMa paIOBOH, IcNoJIb3yIe BHeUHHe YM/AM aHTeHHbl. TocobetyTecb C dIJIepOM.
- PamOuHaAM-aHTeHHa dONxHa yCTaHaBnBaTbca Ha HeKOTOpOM pacCToHmO t OCHOBHO annapaTa. AHTeHHy MoXHo NOdBecuMb Ha CTeHy.
Noekluohne ca6byepa (OTdJIbHo)
BbMOXeTe yCNNTb HN3Kne YAcTOTbl, D06aBNB ca6Bypep (OTdJIbHO).
IopKnIOuHTe TepMnHa1 SUBWOOfer OUT Ha annapate K TepMnHa1y INPUT Ha ca6Bypepe.
Повлухене систembl
IcnoJb3ObaHne HayuHnKOB
IopKIOHTe HayuHnKn K rHe3dy PHONES. BblMOxTe npocLyuBaTb NO HayuHnKaM 3ByaHne,BOcPon3BOdIMoeYepe3 OCHOBHble KOJOhKn.
Pn3aBepWeHm NcNoIb3ObHaNJa dAnHOro annapata
Haxkab KhoNky STANDBY/ON Ha cpoHTaJIbHOI naHei nn KhoNky POWER Ha nyIbTe Dy, ycTaHOBnTE daHbI annapaT B pexm OxuHaHn.
Функиа abTomatuecko yctaHOBKn B peXIM OxuaHn Дань annapaT abTomatueckn yctaHaBnBaetcB peXIM OxuaHn B cIeDyUoxN CnyaX:
- PnBbIbopeKOMNoHENTa-NCTOCHNka,NOKJIuOeHNHO K daHHOMy annapaty uepe3 Ka6eby npabHeHcNCTeMoJ.
- Пиocтановке komnohoeнта-ИсточникaNприOTcYtCTBnUypaBNeHnIMВTeueHne30MnHyT.
EcnHnOHa n3 paAnocTaHcH He nepedaet Bb6paHHbI TnnporpaMMbl,Ha dncnlee OTobpaXaTcNnDnKaUa "NO PTY",3aTeM Ha DCnJIeB BbcBeyNBaeTc HAmMeHOBaHne nporpaMMHO yCnyr nn Yactota.
- A.M. RDS (ON/OFF)
Pn ycTaHOBKe DaHHoH HAcTpoKn Ha ON, BO BpeM aOpauaN aBTOMaTuYeCKo HAcTpoKn n PpeDyCtAHOBKn, BMeCTO yMpaoDIOCTaHcN annapaT pON3BOJNT NOnCK paDIOCTaHcN cncTeMbRDS.
H. M. +RDS: ON
4.RTSPEED: ± 0
I3mHeHneCKOpOCTn npOKpyTKn paDnOteKcTa. Ia CHNXeHNA CKOpOCTN, yMeHbWnte 3HaueHne.
RT Speed: 10
Ecn,ДЯ BOCPON3BedeHn INI 3aINcN IO TaIMepy, Bbl XOTIne BOCNoJIb3OBaTbcN KACCETHOJ DeKoI, KX-E300 nIN MD-MarHnTOcoHOM,MDX-E300, ChauHa NHyXHO BblIOJIHNb IODKJIIOHeHn, IOKa3AHHbIe B pa3dJe "IOnkJIIOUeHne CnCTeMbI" Ha cTp.5.BOone noDpO6Ho, CMOTpIne INHCTpyKuH O K MDX-E300 nIN KX-E300.
Bocnpon3BedeHne n 3aIncB IO TaMepy
IcnoJb3yBCTpoEHbTaimep,BblMOXeTe yCTaHOBTb annapat Ha BkIOUeHHe B yKa3aHHoe Bpemn I aBTOMATuueCKoE HaayIO BOCpON3BeDEHnI INI 3aINCn. Bbl TaKxe MOxTe yKa3aTb Bpemr OTKIOUeHnA annapata.

1 HaxmTe KhoNky DISPLAY.
EcnBpemBce eue He 6bIyo yCTaHOBJeHO, OTo6paKaTcHnDnKaun "SetClock".
Tpe6yeTc8yCTaHOBnTB TeKyuuee BpemKaK OINCAHO Ha Ctp. 6.

2. Timer Input
Поворачва ручу INPUT, Вьбэрп龟TOUHHK ДЯ BOCnpoUNBEdHNA.
3No DoCTnXkeHIO Bbl6paHHoro BpeMeHN
3acbinaHn, annapaT abTomatueckn
OTKIOUaETCA.
YnpaBJIeHne dpyrIMN KOMNoHeHTaMn
DVD-E600
Lcnpobbie KhoNk
- Khonka +100 innoJb3yeTcA dny ynpabHeHn MDX-E300.
2 (Pay3a)
(BoCpOn3BedeHne)
4□(OcTaHOBka)
5(Pponyck/NonckHa3a)
6> D> (Pponyck/Nonck Bnepe)
7ФункцИDVD
MDX-E300
3aINc b aTOMaTnueCKn HaunHaetC n haana kacceTbI. (HaxaTne Ha KhoNky DUBBING START aTOMaTnueCKn nepemaTbIBaET Kaccety Ha hauano.)
2 Haxmte KhoNky DUBBING START nHaayana 3aNNcN.
PpimcyaHne
- Ecnn Ha dncnneAx ①~4 coepxntcKOMnoHENT, KOtOpBn He 6bl nOdknOHeN K pecnBepy (RX-E600), To OHn npOnyckaOTc.
OctahOBka KOnnUpoBaHna
HakmTe KhONKy □.
PpmeaHne
Ecnn,BO BpemnncnoB3OBaHmDVD-nponrpbBaTeJn KaNcTOUHnKa 3aNNCn,BOcnpoN3BeDeHne Ha DVD- npOnrpBbATEJe npocTaHaBnBaETcN nn 3aBepwaeTcN, KOMNoHENT 3aNNCn 3aNNCbBaET DOONHNTEbHO 10ceKyND TNIINHbI.
Bo3MOxHbIe HencpapBHOCTn n cNoCo6bI nx yCTpaHeHn
Ecnn annapat pa6oTaET HeCOOTBETCTByUOIM O6pa3OM, npoBepbTe CneDyUOINe NyHKtI dHaxOXJHeHHN pOcTO rpeNaarAemoro cNooc6a HcnpabHeHH Own6Kn. Ecnn HeNCnPabHOCTb HeBO3MOXHO 6blNO NCnPabNTb, INI OH He CoDEpKHTCB KOnOHKe CUMTTOM, OTCoEHNHTe CNIOBOI Ka6JIb IITAHNI O6patNTecb K 6bnXeIwEMy ABTOPn3nPOBaHHOMy DInIepy YAMAHA INI PyHKT o6CnyxHBAnH. B TAKOM cnYue, MOryt npiroTbca n DpyrNe KOmnoHeTb cepin Piano Craft, nCnObn3yEmble c daHHbIM annapatom.
[MoJenI DnI CoeHHeHOrO KopoJIeBCTaB BeNIOKoBpHTAHm N CeBepHOI rPaHdIN, EbpOnbl, ABcTpaHm I Kopen] 531-1611 kT
[MoDJIbIaA3nnIO6uaMoJeb] 530/531-1710/1611K
UyBCTBNTeJIbHOCTb
M (CunHan/30dB) 1,0 MB
AM 300 MB/M
O6nn pa3deJ
3neKtponntaHne
[Moelen dIa CwA n Kaanab] ... 120 B nepeMeHHoro Toka, 60 T
[MoIeJIbIy ABcTpAun] ... 240 B nepeMeHHoro ToKa, 50 T
[MoDennn CoeHHeHHoro KoponeBcTba
Belenko6pntaHnN CeBepHOn IVpaHdnn, n Ebponbl] 230 B nepemehHoro ToKa, 50 T
[MoelbA3nnnO6aMa Moelb] 110/120/220/230-240BnepeMeHHoroToKa,50/60Tc [MoelbKopen] 220BnepeMeHHoroToKa,60Tc
3Hepronotpe6nneHne
[MoDenn nIa CIIa N KaHaDb] 110 BaTT [Dpyrne moen] 125 BaTT
3Hepronotpe6neHnE (peXMMOxNdaHnR)
[MoJen nIa CIIA n KaHaIbI] 0,7 BaTT
[Дугп модени] 0,8 BaTT
Габары (ш x В x Г) 217 x 108 x 372 MM
Bec 5,4 K
Texnueckx xapakTeepntk MOryT N3MeHrbc 6e3 npedBapntelbHorO yBeDomJeHHN.


- CAUTION: READ THIS BEFORE OPERATING THIS UNIT
- SPECIAL INSTRUCTIONS FOR U.K. MODEL
- IMPORTANT:
- For U.K. customers
- FEATURES
- CONTENTS
- SUPPLIED ACCESSORIES 2
- GETTING STARTED
- NAMES OF BUTTONS AND CONTROLS
- BASIC OPERATIONS
- TUNING
- RECEIVING RDS STATIONS
- USING THE BUILT-IN TIMER
- SYSTEM CONTROL
- ADDITIONAL INFORMATION
- SUPPLIED ACCESSORIES
- Remote control
- Battery installation
- Battery replacement
- Notes
- Remote control operation range
- Removing the protection sheet
- Note
- Connecting the speakers and antennas
- Do not connect the AC power cord to the wall outlet until all connections have been completed.
- Connect the Speakers.
- Connect the AM Antenna.
- Connect the FM Antenna.
- Connect the AC power cord to a wall outlet.
- To connect the subwoofer (optional)
- Connecting the system
- Connecting the RX-E600 and the DVD-E600
- Adding KX-E300 and MDX-E300 to the above system
- Caution
- Setting the clock
- To display the clock
- Press DISPLAY.
- Front panel
- Display
- Listening to a source
- When you use headphones
- When you have finished using this unit
- Auto standby function
- Listening to the radio
- Automatic tuning
- Manual tuning
- Presetting stations
- To preset stations automatically
- To recall a preset station
- To preset stations manually
- Receiving RDS data
- PS
- CT
- PTY SEEK mode
- To locate a station
- Optional settings for RDS functions
- Before using the timer
- Timer play and recording
- Press DISPLAY.
- Press TIMER to complete the timer setting.
- To cancel the timer play setting
- Sleep timer
- Controlling other components
- Before recording
- Dubbing setting
- To stop dubbing
- Troubleshooting
- Specifications
- Amplifier section
- Tuner section
- General
- RECEPTION DES STATIONS RDS
- Télécommande
- ATT ANVANDA DEN INBYGGDA TIMERN
- IPNEM PAANOCTAHU CNCTEMBI RDS
- IOCTABJRAEMbIEAKCECCYAPbl
- NyIbT dy
- YctaHOBka 6aTapeek
- 3aMeHa 6aTapeek
- PpmeHn
- 3oha ynpaBneHn nyIbTa Dv
- Ppimcaynna
- YdaJIeHHe 3aUHTHOI PJIeHKN
- PpimeyaHne
- PpmeaHn
- Noekluohne ca6byepa (OTdJIbHo)
- Повлухене систembl
- IcnoJb3ObaHne HayuHnKOB
- Pn3aBepWeHm NcNoIb3ObHaNJa dAnHOro annapata
- Bocnpon3BedeHne n 3aIncB IO TaMepy
- HaxmTe KhoNky DISPLAY.
- Timer Input
- YnpaBJIeHne dpyrIMN KOMNoHeHTaMn
- DVD-E600
- MDX-E300
- PpimcyaHne
- OctahOBka KOnnUpoBaHna
- PpmeaHne
- Bo3MOxHbIe HencpapBHOCTn n cNoCo6bI nx yCTpaHeHn
- O6nn pa3deJ
Brand : YAMAHA
Model : RXE600
Category : Home cinema amp