SRV400 Digital Video - Baby monitors TOMY - Free user manual and instructions
Find the device manual for free SRV400 Digital Video TOMY in PDF.
User questions about SRV400 Digital Video TOMY
0 question about this device. Answer the ones you know or ask your own.
Ask a new question about this device
Download the instructions for your Baby monitors in PDF format for free! Find your manual SRV400 Digital Video - TOMY and take your electronic device back in hand. On this page are published all the documents necessary for the use of your device. SRV400 Digital Video by TOMY.
USER MANUAL SRV400 Digital Video TOMY
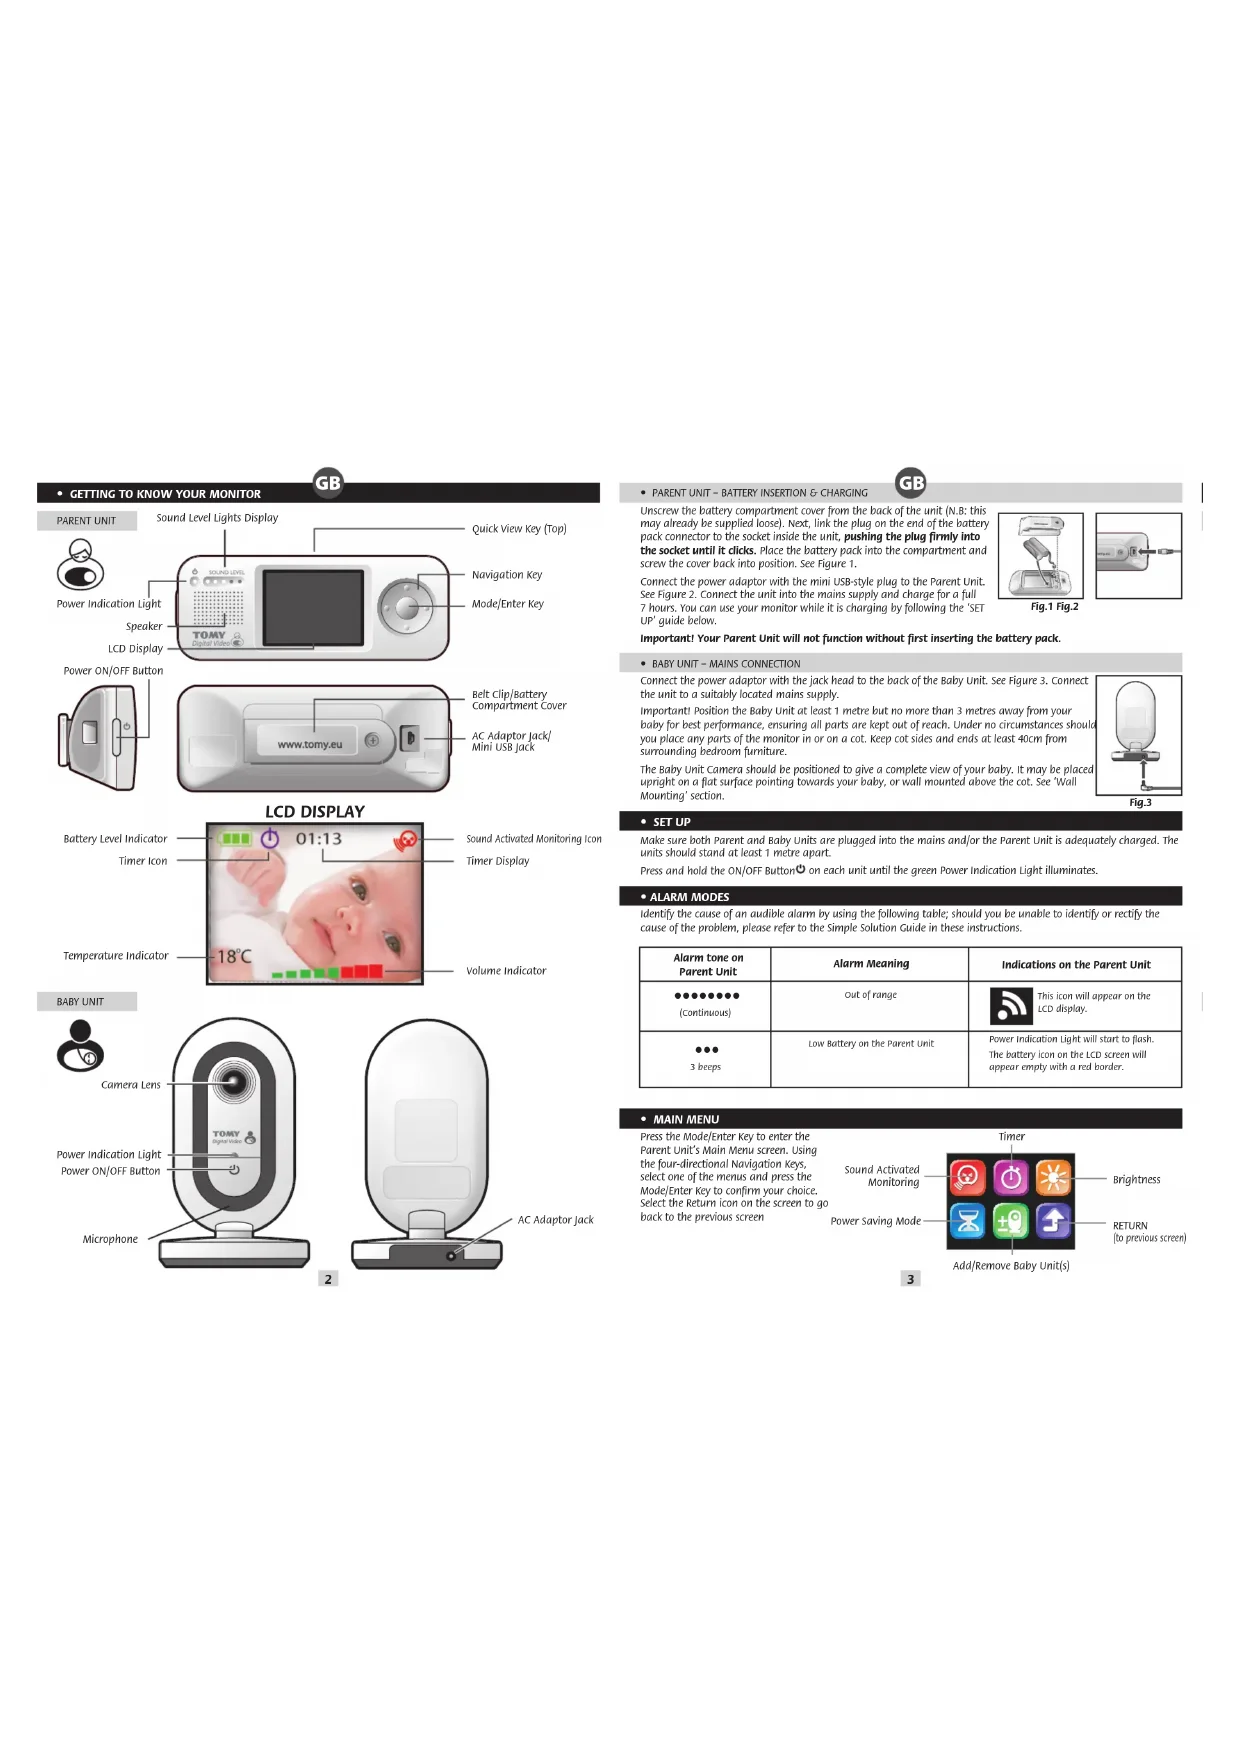
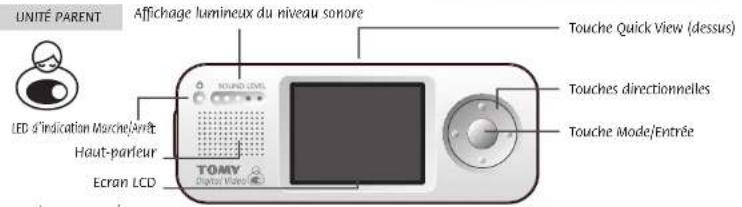
To conserve battery life, your monitor has a power saving feature that will automatically make the video screen go blank and transmit sounds only if no buttons have been pressed on the Parent Unit for 5 minutes (you can change this interval to 60 or 30 seconds if you prefer). To reactivate the screen at any time, press the Quick View Key on top of the Parent Unit.
To disable Power Saving mode and ensure constant video monitoring, connect the Parent Unit to the mains or a PC.
- SOUND ACTIVATED MONITORING
For those quiet moments or when your baby is a little older, you may not want to hear every sound in your baby's room. Your Baby Monitor has a Sound Activated Monitoring mode, a feature that only captures sounds above a pre-set threshold, for example a cry rather than a guzzle.
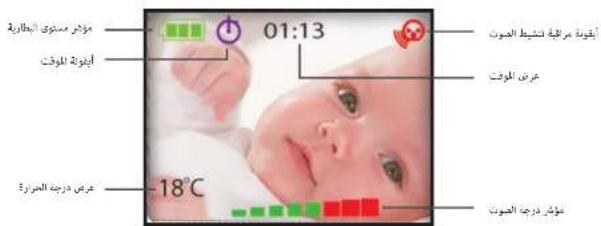
When Sound Activated Monitoring is selected from the Main Menu, the Parent Unit (and its video display) will go into sleep mode 10 seconds after your baby settles. Every time your baby's sounds rise above the threshold, this feature will be interrupted instantly and normal sound and video monitoring will continue until your baby settles again. The Sound Activated Monitoring Icon will show on the Parent Unit's LCD Display.
- TIMER

Use the Timer on the Parent Unit's LCD Display to keep track of the interval between feeds; doses of medication, how long your child has been asleep and so on. Select the Timer from the Main Menu and then select the Start and Stop icons when ready, using the Navigation Keys and the Mode/Enter Key. For the first minute, the Timer will count in seconds. After that, it will count in minutes. To check the Timer when Sound Activated Monitoring is on or when in Power Saving Mode, simply press the Quick View key.
- SOUND LEVEL LIGHTS DISPLAY
The Sound Level Lights Display on your Parent Unit reacts to the sounds of your baby. The louder your baby, the more lights illuminate on the display. You can lower the volume of the Parent Unit while still watching out for baby, ideal for when you're relaxing or entertaining.
QUICKVIEW
Press the Quick View Key on top of the Parent Unit whenever you want to reactivate the video on the LCD Display. If you are using more than one Baby Unit, you can toggle between pictures by pressing the Quick View Key repeatedly.
ZOOM
Press the Navigation Key's up and down arrows on the Parent Unit to zoom in and out.
PAGING
Locate a lost Parent Unit by pressing the ON/OFF Button on the Baby Unit 3 times in quick succession and the Parent Unit will sound a 3-minute long alarm. To silence the alarm, press any button on the Parent Unit. Please note that the paging feature will only work when both units are switched ON and monitoring as normal.
USING MULTIPLE BABY UNITS

You can add up to 3 additional Baby Units and monitor their audio and video, all from one and the same Parent Unit. Additional Baby Units with instructions on pairing up and using them are available from www.tomy.eu
PC CONNECTION
You can connect the Parent Unit to your Personal Computer (PC) to monitor your baby, or to record and replay video. Start by downloading and installing the Tomy PC Viewer software from our website: www.tomy.co.uk/srmonitors
Once installed, open the Tomy PC Viewer programme and, using the USB cable supplied, connect the Parent Unit to your PC. Video monitoring will divert to your PC's screen. Sound monitoring will continue through the Parent Unit. Its LCD screen will go into standby but all alarm functions will continue as normal.
Your PC should have one of the following Operating Systems: Windows XP (Service Pack 3), Windows Vista (Service Pack 2) or Windows 7, with the following recommended system requirements: 2.8 GHz dual core processor or faster, 2 GB of RAM; 10GB of available disk space; 65k colour or higher display card and support DirectX 9.
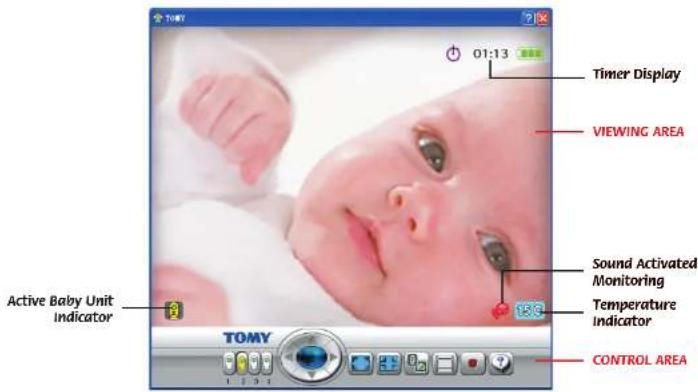
- CONTROL AREA BUTTONS

Baby Unit selector - Use your PC's cursor to select the Baby Unit to be displayed on screen.

Zoom / Pan control - Click repeatedly on the blue button to zoom in [normal size X2 X3 X4 normal size...]. Use the arrow buttons around the outside to pan around the picture.

Full screen - Click once to enlarge the picture to full screen with the Control Area showing at the bottom of the screen. Press again to make the Control Area disappear. Press your PC's Esc key to return to small screen without the Control Area panel and again to restore to its default setting.

Viewing Area icons on/off - Press repeatedly to show or hide the on-screen icons.

View video library - Click to select and playback pictures in your video library (see below).

Record - Click to start recording. Pictures will be stored in your video library (see below). Click again to stop recording.
When your Tomy PC Viewer starts up, it will default to monitoring live video from any selected Baby Unit. If no pictures appear on the screen, see our PC Troubleshooting guide below or use the on-screen help section.
Click on the Record button to store treasured footage of your baby. Showing or hiding the screen icons will not affect your recording. If left unattended, recording will continue for one hour and then stop automatically. While recording is in progress, you cannot use the Baby Unit selector to choose another camera.
Any recorded video will be saved to your PC's hard disk, in a location and format of your choice. NOTE: no sound will be recorded to your PC.

Click on the View video library button to playback the recorded video. The following screen will appear:
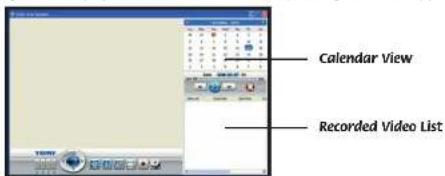
Calendar View
The current date is highlighted in blue. If a recording has been made on a given date, it will be highlighted in orange. Click on that date to play the recorded video.
Recorded Video List This panel shows the list of recorded video files shot on the selected date.

Play/Pause - Click to playback or pause the selected video. Alternatively, double-click a title in the Recorded video list.

Slow motion - Click to toggle in and out of slow motion.

Fast forward - Click to toggle in and out of accelerated view.

Progress Bar - Shows how much video has elapsed/is left to run.

Restart( previous - Click to restart video (if currently selected file is first in the list) or to skip to the previous file listed in the Recorded Video List.

Next - Click to skip to the next file listed in the Recorded Video List.

Delete - To delete a file from the Recorded Video List, first select it from the list with your cursor and then click on the Delete button.
USING MULTIPLE BABY UNITS WITH THE PC VIEWER

Full instructions on how to connect additional Baby Units are supplied when purchasing the units from www.tomy.eu
With up to 4 Baby Units connected to a single Parent Unit, you can manually toggle between video feeds on your PC screen by clicking on the matching numbered icon on the Baby Unit selector.
Switching between video feeds automatically

When you select Sound Activated Monitoring from the Parent Unit's Main Menu and you have more than one Baby Unit connected, the video feed to your PC will automatically come from whichever Baby Unit detects sound above the preset threshold.
- if only one Baby Unit is detecting sound above the threshold, video pictures will continue to be transmitted from that unit until that baby settles or until another Baby Unit picks up sound above the preset threshold.
- If more than one Baby Unit detects sound above the threshold, the two video feeds (or more) will toggle at 3-second intervals between those Baby Units. For example, if Baby Units #2 and #4 pick up sound above the preset threshold, the video feed will toggle between these two cameras. Pictures from Baby Units #1 and #3 will not appear unless they in turn pick up sound above the threshold.
- if all the babies being monitored are quiet (with their sound levels below the preset threshold) for a period longer than 10 seconds, the video pictures on your PC will simply toggle between ALL connected Baby Units at regular intervals until one or more of the babies stir and trips Sound Activated Monitoring.
- IMPORTANT if you choose to record video while in Sound Activated Monitoring mode, the automatic switching between Baby Units described above will affect what is recorded.
Losing a connection
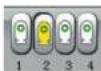
If a connection is lost with one or more Baby Units, the video feed on your PC will be replaced with the 'Loss of Link' icon opposite, together with a number indicating which Baby Unit is affected. See Figure 4.
To avoid the Loss of Link icon appearing on your PC screen when you turn off one of the Baby Units, be sure to remove it from the Parent Unit's Main Menu (see below) so that the other Baby Units can go on monitoring without interruption.

Fig.4
Removing a Baby Unit
Select the Add/Remove Baby Unit(s) option from the Parent Unit's Main Menu. Next, choose the number Baby Unit you want to stop monitoring by moving the green circle using the Navigation Keys. Press the Mode/Enter Key and then select the Remove' icon with the minus symbol. See Figure 5.
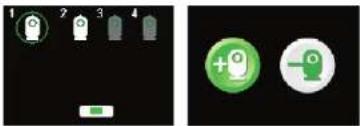
Fig. 5
WALL MOUNTING
The Baby Unit can be placed on any sturdy, level surface that will provide a good view of your baby. It can also be wall mounted as follows: drill two holes in the wall 32mm apart and fix the screws, using wall plugs as necessary, leaving 6mm of each screw proud of the wall. Next, with the AC Adaptor Jack connected, slide the back of the Baby Unit down onto the screws until it is secured to the wall. If necessary, remove the Unit and adjust the screws in or out. Plug the adaptor into the mains supply.
Twist the camera on the Baby Unit 180 degrees so the camera is facing the floor when the base is mounted on the wall. Once fixed, adjust the angle of the camera to get the best view of your baby.


CARING FOR YOUR MONITOR
Do not immerse any parts in liquid. Do not place in direct sunlight. Periodically examine product for signs of damage to electrical parts and do not use until damage has been properly repaired.
GUARANTEE
We guarantee your monitor against manufacturing defects for 2 years from the date of purchase on production of a valid receipt. In the first instance of a manufacturing defect, we recommend that you return your monitor to its place of purchase. If this does not satisfactorily resolve your problem, please visit our website for further advice. Full terms and conditions can be also found on our website: www.tomy.eu
- TECHNICAL SPECIFICATIONS
- Batteries: Parent Unit - Rechargeable 1800mAh 2.4V Ni-MH battery (included).
- Power Supply: Mains adaptor rating: PRI: 100-240V~50/60Hz SEC: 5V 1000mA
- Operating Range: 250m in optimum 'open field' conditions.
-Operating Temperature: 0 - 50^
Frequencies:2410~2470MHz
SAFETY INFORMATION
IMPORTANT! This monitor is restricted for indoor use only! The Tammy Baby Monitor is designed to help you monitor your child and is not a substitute for adult supervision. This product is not a toy. Always keep electrically operated items and their cables out of reach of babies and younger children. Under no circumstances should you place any part of your monitor in or on a cot. Ensure all wiring is positioned safely so that children cannot become entangled and that no trip hazard is created. Under no circumstances should the adaptors supplied with this monitor be used with any other equipment. No other adaptors than those supplied should be used with your monitor. Be careful not to position the adaptor where a child is likely to use it as a step. Putting weight on the adaptor while it is plugged in could damage the unit or cause injury to your child. It is normal for chargers to become hot during use - take care when handling, allow heat to disperse. DO NOT COVER. Disconnect charger if the product will not be used for several days. To prevent a shock hazard, please disconnect from power supply before cleaning. The rechargeable battery within the Parent Unit should be recycled. Do not dispose in normal waste. Do not attempt to dismantle any part of this product.
BATTERY SAFETY
Charg, r a t. n p available by contacting Tomy Webcare. Please note that the guarantee becomes void if you use any other battery pack. Clean all contact surfaces before installing the supplied battery pack. Take special care to ensure battery pack is inserted correctly, observing + and - polarity marks on battery and product. Do not short circuit the contacts in the battery compartment or the battery pack terminals. Remove the battery pack and unplug the pigtail of the battery pack when storing the product for a long period of time or when the battery is dead. Disperse of exhausted battery packs safely, and never dispose of batteries in a fire. Remove exhausted batteries from product. Do not mix old (used) and new batteries or batteries of different types, e.g. rechargeable and alkaline or batteries of different makes/brands. Remove batteries from product after use or if storing for long periods. Only use batteries of the same or equivalent type to those recommended. Removal and recharging of rechargeable batteries should be carried out by an adult or under adult supervision. Do not attempt to recharge non-rechargeable batteries.

Help the environment by disposing of your product and packaging responsibly. The wheele bin symbols indicate the product and batteries must not be disposed of in the domestic waste as they contain substances which can be damaging to the environment and health. Please use designated collection points or recycling facilities when disposing of the item or batteries.
- SIMPLE SOLUTION GUIDE
Should your monitor not be operating as expected, the information listed below should be adequate to resolve your problems.
FREQUENTLY ASKED QUESTIONS
Q. Does my Parent Unit need to be switched on or off whilst charging?
A. Either. Your Parent Unit will charge while switched ON or OFF. However, charging the unit when switched ON will allow you to monitor your baby while charging.
Q. I have measured the temperature of my baby's room using another device and I get a different reading than that on my monitor - why?
A. The temperature measuring device within your tomy monitor is designed to give you an indication of the baby's room temperature to within a small tolerance of +1^ or -1^ . Other devices will also have a similar tolerance.
Q. Can I use my monitor abroad?
A. You can use your monitor in the country it was purchased and anywhere in the EU. Although your monitor may function correctly in other countries, its operating frequency may affect (or be affected by) other devices and could be illegal. Tomy cannot accept any liability for use outside of the country in which you purchased your monitor or the EU.
Q. Will I hear the out-of-range and low battery alarms even when the volume on my monitor is set to zero (mute)?
A. Yes, alarms are unaffected by the volume controls.
Q. Can my monitor coexist with Wi-Fi and other 2.4GHz devices?
A. Your Tomy SR Monitor operates on a 2.4GHz frequency using Direct-Sequence Spread Spectrum (DSSS) technology designed to coexist with Wi-Fi and similar wireless digital equipment. However, if multiple 2.4GHz devices are operating in close proximity, some interference is inevitable. Should you experience reduced performance in either your monitor or wireless devices, select another channel by pressing the Mode/Enter Key for 3 seconds, repeating as necessary until you find a vacant channel.
FAULT FINDING
GB
| PROBLEM | POSSIBLE CAUSE | SOLUTION | PACE |
| My Parent Unit will not switch ON. | The rechargeable battery supplied has not been installed correctly. | Insert the battery as instructed within this booklet or the Quick Start Guide. Once installed, place the Parent Unit on charge and leave for several minutes before switching ON. | 3 |
| The rechargeable battery may be below the critical voltage to activate your monitor. | Place the Parent Unit on charge and leave for several minutes before switching ON. | ||
| Mains power is not connected correctly. | Check the power cable connections (including wall socket). | ||
| My Baby Unit will not switch ON. | Mains power is not connected correctly. | Check the power cable connections (including wall socket). | 3 |
| The Power ON/OFF Button is not being held long enough. | Press and hold the Baby Unit's Power ON/OFF Button until the Power Indication Light illuminates. | ||
| There is a continuous beeping noise from the Parent Unit. | Loss of contact alarm. | Make sure that the Baby Unit is switched ON. | 3 |
| Make sure the Parent Unit is adequately powered and move it nearer to the Baby Unit. | |||
| An alarm beeps 3 times every minute from the Parent Unit. | Low battery in the Parent unit. | Place the Parent Unit on charge. | 3 |
| I cannot hear anything through my Parent Unit. And/or its sound is only intermittent. | Volume on Parent unit is set too low. | Increase Parent Unit volume. | 4 |
| Units are set to Sound Activated Monitoring mode. | Refer to the Sound Activated Monitoring section. | ||
| Parent Unit's LCD display keeps turning off. | Power Saving mode is switched on. | When Power Saving function is activated, the LCD display will switch off after a set time to conserve battery life. See Power Saving section. | 4 |
| Parent Unit's LCD screen turns off every 10 seconds. | Sound Activated Monitoring is on, if baby is quiet, sound and video automatically go into sleep mode after 10 seconds. | Switch off Sound Activated Monitoring, or leave on and leave the unit to switch on if your baby makes a louder noise. | 4 |
| Parent Unit is switched on, but the LCD display, sound level lights and audio are all off. | Units are set to sound Activated Monitoring mode. | Refer to the Sound Activated Monitoring section. | 4 |
| I hear a high-pitched noise. | Units are too close together. | Move units apart. | 3 |
| Volume is too high. | Decrease volume. | ||
| Power Indication Light on the Parent Unit is blinking. | Low battery. | Place the Parent Unit on charge. | 3 |
| Parent Unit loses video when I connect it to my PC. | This is normal. | Continue monitoring pictures through your PC screen and sounds through your Parent Unit. Alarms will still sound from the Parent Unit when appropriate. | 5 |
| I think my Baby Monitor may be having an effect on another electronic device in my home. | The monitor may have chosen a band similar to your electronic device. | Press the Mode/Enter Key for 3 seconds. This will prompt the monitor to seek a different band. Repeat as necessary. | 9 |
| Battery life after charging is becoming shorter. | As with any rechargeable battery, it has a finite life and may need replacing. | Please visit our website for replacement parts. www.tomy.eu | 9 |
| I cannot hear the baby's sound clearly because of static. | Radio waves from other devices may be affecting your monitor. | This product has Auto-Channel Selection feature. If you experience static sound, place the Parent Unit closer to the Baby Unit. If this does not solve the problem, move your Parent Unit away from other 2.4GHz devices such as microwave ovens, wireless phones or a wireless access point. | 3 |
1011
PC TROUBLESHOOTING
GB
| PROBLEM | POSSIBLE CAUSE | SOLUTION | PAGE |
| I cannot start the Programme. | Your PC may not have the required minimum hardware. | Check your PC's specification. If the problem persists, try reinstalled the programme. | 5 |
| After disconnection from my PC, there are no pictures on my Parent Unit's LCD screen. | Parent Unit may be in USB mode. | When you unplug the Parent Unit, press the quick view button to exit USB mode. Video pictures should now appear on the Parent Unit. | 5 |
| I have connected the Parent unit to my PC but there's no video on my PC screen. | Problem with the USB connection. | Disconnect the Parent Unit's USB cable from the PC, press the quick view button to check you can see pictures on your Parent Unit. Reconnect USB of Parent Unit to PC. | 5 |
| video is slow when viewed on the PC. | |||
| There is no sound monitoring on my PC. | This is normal. | Connecting the Parent Unit to your PC lets you view pictures of your baby. Sound Monitoring remains with the Parent Unit and cannot be recorded or transmitted through a PC. | 5 |
LIMITED WARRANTY & LICENSEE INFORMATION
-
BECAUSE THE PROGRAMME IS LICENSED FREE OF CHARGE, THERE IS NO WARRANTY FOR THE PROGRAMME, TO THE EXTENT PERMITTED BY APPLICABLE LAW. EXCEPT WHEN OTHERWISE STATED IN WRITING THE Copyright HOLDERS AND/OR OTHER PARTIES PROVIDE THE PROGRAMME "AS IS" WITHOUT WARRANTY OF ANY KIND, Either EXPRESSED OR IMplied, INCLUDING, BUT NOT LIMITED TO, THE IMPLIED WARRANTY OF MERCHANTABILITY AND FITNESS FOR A PARTICULAR PURPOSE. THE ENTIRE RISK AS TO THE QUALITY AND PERFORMANCE OF THE PROGRAMME IS WITH YOU. SHOULD THE PROGRAMME PROVE DEFECTIVE, YOU ASSUME THE COST OF ALL NECESSARYServICING, REPAIR OR CORRECTION.
-
IN NO EVENT UNLESS REQUIRED BY APPLICABLE LAW OR AGREED TO IN WRITING WILL ANY COPYRIGHT HOLDER, OR ANY OTHER PARTY WHO MAY MODIFY AND/OR REDISTRIBUTE THE PROGRAMME AS PERMITTED ABOVE, BE LIABLE TO YOU FOR DAMAGES, INCLUDING ANY GENERAL, SPECIAL, INCIDENTAL OR CONSEQUENTIAL DAMAGES ASRISING OUT OF THE USE OR INABILITY TO USE THE PROGRAMME (INCLUDING BUT NOT LIMITED TO LOSS OF DATA OR DATA BEING RENDERED INACCURATE OR LOSSES SUSTAINED BY YOU OR THIRD PARTIES OR A FAILURE OF THE PROGRAMME TO OPERATE WITH ANY OTHER PROGRAMMES), EVEN IF SUCH HOLDER OR OTHER PARTY HAS BEEN ADVISED OF THE POSSIBILITY OF SUCH DAMAGES.
- THIS PRODUCT IS LICENSED UNDER THE AVC PATENT Portfolio License FOR THE PERSONAL AND NON-COMMERCEL USE OF A CONSUMER TO (I) ENCODE VIDEO IN COMPLIANCE WITH THE AVC STANDARD ("AVC VIDEO") AND/OR (II) DECODE AVC VIDEO THAT WAS ENCODED BY A CONSUMER ENGAGED IN A PERSONAL AND NON-COMMERCEL ACTIVITY AND/OR WAS OBTAINED FROM A VIDEO PROVIDER LICENSED TO PROVIDE AVC VIDEO. NO LICENSE IS GRanted OR SHALL BE IMplied FOR ANY OTHER USE. ADDITIONAL INFORMATION MAY BE OBTAINED FROM MPEG IA, L.L.C., SEE HTTP://WWW.MPEGIA.COM
FAMILIARSEZ-VOUS AVEC VOTRE ECOUTE-BEBE
Bouton MARCHE/ARRET

Quick View-toets (bowenaan)

AAN/UT-kinop

LCD-schem
BABY-UNIT

1
Cameralens

Khoonka BkJ/Bb/KN mTaHa.


DETCKN BIOK
6263

-POITENBCKM BOK-YCTAHOBKA 3APARKA BATAPEN
CHIMITE KbIyUO YTcEBAgAPe3 C3dJIH CYA OoBpATBeBHMMAHIE: OH MOKET BbIb 3aPbOaHOM BIAJI E bCTABTe BxOaYIOU b COMIKNE T BApKe, PnabNbHO nOcoaDmHIN UTenCENb GbAPe c HEmdBM BYTPN 6NoKa -On eJcNkA.3akpORe KbIyUO IN pKpyiUTe ee.C.M. cyPcNOK 1
NpOoCoHnHTe aadTep nHTAHc oI tTeKepOMPomATA mini USB K PoiDITbckOMy BnOxy. CM.PHC.2. NpOoCoHnHTe 6bnk c cetn 3ekTpOntNHAn h aapdAte rE O T cTuHne 7 qacou. Bbl KOMeTe NOB3BaTBcB bIEOnHHRe Hb OpeM aapdKM, cNeyDA HnHexPBIbHEOMHy PkyOBCTy.
Baxho! Pountenbckn Bnok He 6ydt pa6oTaTb do Tex nop, noka BbHe bctabnte 6aTapeo.
- DETCKM BLOK - NOOKIOUHNEK 3NEKTPNHECKO CETN
NIOKHOHHTNE TKEEAPAETPAIHTAHNIE KFEADYH na3aEDHTCTOPOHE DTeKORO BNOKA.CM.PMC.3. NIOKHOHHTNE BOKK HAOXIDAEBCN NO3b3nKCTPOEKT CEN AENTOPONITAHNA
BaoHoi Jn DnctxKHeHHaHnyuXh XapakTePiNtK PeKoMeHyDm PaeMaIaTb DetChk Bnok HapacotONHHAK MKNHMMy 1 MeTpa, HO He nae3 MePobOt pe6BeHHa, YbEaBnHc, YTO Bce detAnH KApOATCB HBE eTo DoCraAeMOn. Hn npn KaKHX oBCTonrCTbXb Hne NMOaJIe HNAKAAKe Cactn BHeoEHHa Hn AHB bKpOaTH. Cnpdite, OTo6b KpAl n BokOHNbI KpOaTHN KAOHINHc Ka KIMHMMy HapocTANR 40 cm ot dpyro MEBen cAnbHe.
Kamepa detcKoro 6noka DonKha 6bItb p3aMeuHa TAK, YTObI daBabT bNoHoe XIObpaKeHe Bauero MAnbUHa. Ea MoKHo p3aMeHITb HA CTHe H KpOBaTKM WYt cTAHOBHr BA NIOCKyo NOEbXPOCTb BERTKlAHbOM NONOKENHI, HAPBANb HA PeEHsC.M. HIKNE paDaTeN MOHTk HA CTHe.
HACTPOKNI
Y6eBNTecbTOM,TOPODInbcknN DcckbnBoknNOknoKNoHcyKcTeNekpOtnaHmHnPoDInbckn BokocdatoaHO zapRKe.HoKNOdOKnblcStoTBHa pAcToaHHnKaKMMHmym T metpdpyOr aDpyra. AKTHNPuyte KAKDbN kOkyTm HApKaTHn HyePknBaHHn KHONK BkJI/BoKII, noka He 3aoropntch eienh bceTODIOHN HINKATOPnTnAHH.
-IPDEUYIPEXDAIOUIMECNTHAJIbI
OpOnedene pRnHbN 3yBkoBO rCnHnA pRnNOMO iCmHOJIOe TaONIOIe TcNIOIe. EcnB bHe moKete opeOpEnltb INY UcTpaHbN pRnHbN IOpMbE6, oBpatrTeBc K paZdEy RyPoKODbEOCT NOXkBa IPOCTkBx peUeHN.
| Преунгхадаший сагнан на Poditel新股сомБиke | Зразимпни_PREурбдения | Индikашия на Poditel新股сомБиke | ||||||||||||||
| ********** (Herpebials) | Светь мени Poditel新股сим и Дектим Блесалу регашия | Наддддддддддддддддддддддддддддддддддддддддддддддддддддддддддддддддддддддддддддддддддддддддддддддддддддд • | • Carotidashim mshkato odzhi mshnch noctohno Podetepu zheho kHerpetsbny HnHtceKp Kacnha • Na dacte noanmna nmoa nmoa nmoa nmoa nmoa nmoa nmoa nmoa nmoa nmoa nmoa nmoa nmoa nmoa nmoa nmoa nmoa nmoa nmoa nmoa nmoa nmoa nmoa nmoa nmoa nmoa nmoa nmoa nmoa nmoa nmoa nmoa nmoa nmoa • | • Carotidashim mshkato odzhi mshnch noctohno Podetepu zheho kHerpetsbny HnHtceKp Kacnha • Na dacte noanmna nmoa nmoa nmoa nmoa nmoa nmoa nmoa nmoa nmoa nmoa nmoa nmoa nmoa nmmn • | • Carotidashim mshkato odzhi mshnch noctohno Podetepu zheho kHerpetsbny HnHtceKp Kacnha • Na dacte noanmna nmoa nmoa nmoa nmoa nmoa nmoa nmoa nmoa nmoa nmoa nmoa nmoa nmoa n • | • Carotidashim mshkato odzhi mshnch noctohno Podetepu zheho kHerpetsbny HnHtceKp Kacnha • Na dacte noanmna nmoa nmoa nmoa nmoa nmoa nmoa nmoa nmoa nmoa nmoa nmoa nmoa nmoa n moa • | • Carotidashim mshkato odzhi mshnch noctohno Podetepu zheho kHerpetsbny HnHtceKp Kacnha • Na dacte noanmna nmoa nmoa nmoa nmoa nmoa nmoa nmoa nmoa nmoa nmoa nmoa nmoa nmoa • | • Carotidashim mshkato odzhi mshnch noctohno Podetepu zheho kHerpetsbny HnHtceKp Kacnha • Na dacte noanmna nmmn nmmn nmmn nmmn nmmn nmmn nmmn nmmn nmmn nmmn nmmn nmmn nmmn nmmn nmmn nmmn nmmn nmmn nmmn nmmn nmmn nmmn nmmn nmmn nmmn nmmn nmmn nmmn nmmn nmmn nmmn nmmn nmmn nmmn • | • Carotidashim mshkato odzhi mshnch noctohno Podetepu zheho kHerpetsbny HnHtceKp Kacnha • Na dacte noanmna nmmn nmmn nmmn nmmn nmmn nmmn nmmn nmmn nmmn nmmn nmmn nmmn nmmn n • | • Carotidashim mshkato odzhi mshnch noctohno Podetepu zheho kHerpetsbny HnHtceKp Kacnha • Na dacte noanmna nmmn nmmn nmmn nmmn nmmn nmmn nmmn nmmn nmmn nmmn nmmn nmmn nmmn n mmn • | • Carotidashim mshkato odzhi mshnch noctohno Podetepu zheho kHerpetsbny HnHtceKp Kacnha • Na dacte noanmna nmmn nmmn nmmn nmmn nmmn nmmn nmmn nmmn nmmn nmmn nmmn nmmn nmmn • | • Carotidashim mshkato odzhi mshnch noctohno Podetepu zheho kHerpetsbny HnHtceKp Kacnha • Na dacte noanmna nsmn nsmn nsmn nsmn nsmn nsmn nsmn nsmn nsmn nsmn nsmn nsmn nsmn nsmn nsmn nsmn nsmn nsmn nsmn nsmn nsmn nsmn nsmn nsmn nsmn nsmn nsmn nsmn nsmn nsmn nsmn nsmn nsmn nsmn • | • Carotidashim mshkato odzhi mshnch noctohno Podetepu zheho kHerpetsbny HnHtceKp Kacnha • Na dacte noanmna nsmn nsmn nsmn nsmn nsmn nsmn nsmn nsmn nsmn nsmn nsmn nsmn nsmn • | • Carotidashim mshkato odzhi mshnch noctohno Podetepu zheho kHerpetsbny HnHtceKp Kacnha • Na dacte noanmna ntmn ntmn ntmn ntmn ntmn ntmn ntmn ntmn ntmn ntmn ntmn ntmn ntmn ntmn ntmn ntmn ntmn ntmn ntmn ntmn ntmn ntmn ntmn ntmn ntmn ntmn ntmn ntmn ntmn ntmn ntmn ntmn ntmn ntmn • | • Carotidashim mshkato odzhi mshnch noctohno Podetepu zheho kHerpetsbny HnHtceKp Kacnha • Na dacte noanmna ntmn ntmn ntmn ntmn ntmn ntmn ntmn ntmn ntmn ntmn ntmn ntmn ntmn • | • Carotidashim mshkato odzhi mshnch noctohno Podetepu zheho kHerpetsbny HnHtceKp Kacnha • Na dacte noanmna nsmn nsmn nsmn nsmn nsmn nsmn nsmn nsmn nsmn nsmn nsmn nsmn nsmn |
- TJIABHOEMHIO
HAKMITE KHONY KEPKIM/BXOJ, QTOB6 BOKI IN TANHOE MEHOPOJDNTBCKORI BIOKA. IOTIOY3Y KHONK HAHINAPUM, BbBepOE ODOHO MEHOHN HAKMITE HA KHONY KEPKIM/BXOJ, QTOB6 NOITBEPDNTB BbBOP. HAKMITE HA KHONKY HAZAD HA DcNCEE, QTOB6 BEPHyTbcN ppeDutyuemy P3aeny.
-TEXHINCHECKNEXAPAKTEPNCNTIKN
-Батapeste:Родпелбкнблok -песаразражамг 1800Ma/ч 2,4В Ni-MH 6aTapeг (BxOДТВ KOMПNeKT).
-5nK nHTAHn: Pekm pa60tb aadTepa: PRI: 100 240B-50/60Tu SEC: 5B 1000mA
-Pa60uH dHaana3OH:250M npn onTmAbhBx ycNoBnx OTKpbItoe none
- PYKOBODCTBO NONCKA INPOCTbIX PEWEHIN
B cnyeae enn BneoHHe pa6o3eDnKHM o6pa30m, HhOpmaun, npdctabneHHan Hxke, dNkHa Bam nomoyb.
ACTO3ADABAEMBEBOPTPOCBI
B.Bo Bpema 3apraKn PoDntenbckn 6nok Donxhen 6bTB BKIOHcEN MNN BBKIOHcH?
O.IIooH3EYbXBaPnHOBt. POBteBcNk 6NO B6yETAPaKbTAK BO KIO BHIOHOHOM, TAK N B bIOHOHOM COOTHOHIN. OIIAOKc, CIOHOHBMIOKO BOPM3aApADIK, BblCMOKETeClNDITb 3aCBOMP eEOHKOH.
B. By MemeprnEMeHemepatpy B KOMATE P6EHNCA HONL3y4pyoT npHbOp H OHA OKAZALCb OTNIHNOIOT TEmepatpy B MemeprnEHmou Bawae BuDeHOHNHEN- NoMey?
O.Ip6bmeHneMnTepeTmBvBaBteTomBvBeOneHnPacCtTHaN MeMeHneMeTepeMnTePbHTBdckToKOMHATEcNOprueuHcObtBb+1-CN Hn-1.CJpyrtnpIooBoPbI MEIOX NOxOyIO rOpEHIObCT.
B. Moriynnnncnonb3oBaT bueeohraHIO 3a rpaHnei?
O. BmKoTe HcNnBbTaB bHeOnHbB C TpaH e npNo6pTeHH Ha TeppTOpHN EC. XToa BBeOnHb MoKet npAbuHb OyHKnHOHOBaBtB pRyTHx CTPHaX, epeabOaH cTauta oMeKot NoBHb (MnMoKet 6BbT noDBepHTaB BNHH) dpYrXg YCTPOCTB, H e NcNtBbOBAHMOe KMeT 6BbHe3AOKHbM. Tomy He Hecet OTBETCBEHOCTMa IcNbnBbOaHBeONHbI 3a PnpEaAMn CTPaH, B KOTopo OHa 6Ba nPnp6pTeHa, mN EC.
B. CbybIyH N pndynPeydNkdoOuCnHrBnO T OTO, KNO BOK AnDokmT B H DoCRAAeMOCTM Nn TOM, TOT PpaRNDNacb 8aTepae, DaJIe cKU yPoBBeB rPOMKOEt HA BIIeOHeaNE YCTAHOBEN HANHOJI?
0.Дa, npedynpekkaoune cunhaJIe He 3aBnCrt OT peryIHTOPOB rPOMKoCTA.
B. MoKTe Tn BnDEoHAna FyHKuHOHPOBaTb npaIIeIbHo C WI-FI n DpyrUm 2.4GHz yCtpoIcTBAMn?
O.BDoeOHnH Tomy pa6oataet Ha cactote 2.4GHz, hcnnohyn (DSSS) texhonorho, paa6o3aHTHOcneauHbNo, OTOb6y fhykunHOHpoBatnapbnHeNc 5CwI HnEeMecpOBOBmHiknOPOBBmOBOpOyBaONHEM. ODAhck, eCNKIOKY UCTPOiBt C cactotOn 2.4GHz pa6oataot B HnOpeOCTBeHNH 6n03OToB OAnMOxHNO NOBANHE NOMEK.
EcnBb cTnHbNc b cnoHKeHN pabOToocNoHbTO Baue BnpeOHn Hn6 BePobDnHx npHbOpB.
Bb6epTe DpytoKan CBAa, hKmMa n depKa KOnkny Pekmm/BXo3 cekyhd n NobTpna 30 eCn HneO6xoMnO,
noka Bb He naTe CboOdoh khan.
- INOCK HENCIPABHOCTEIN

| HEKUTPABHDCTb | B034OKHANIIPIVYHNA | XCTPAHEHIE | STNHN |
| Podarotemboi bokn.Ke h mawuHTc. | Bekpuzan 8 konmikant 6atapert yctahnoHHa Hneppazitbo. | 5eBtue Batape 1k KINHIOH 8 nhtcypnnn HmpyoAte 26hckpmy cIepny.Fouce 8ytaehn 8atapert.10nTae Tpaee Paoetumbo 6ho 9a zapzay 0 0rbae 10nHaHIOH 10nHIOH 10nHIOH 10nHIOH 10nHIOH 10nHIOH 10nHIOH 10nHIOH 10nHIOH 10nHIOH 10nHIOH 10nHIOH 10nHIOH 10nHIOH 10nHIOH 10nHOOH. | 63 |
| 3apod 8batapert Moej6b6bHKoKoKoKoKoKoKoKoKoKoKoKoKoKoKoKoKoKoKoKoKoKoKoKoKoKoKoKoKoKoKoKoKoKoKoKoKoKoKoKoKoKoKoKoKoKoKoKoKoKoKo Kuaoh 8nKoKoKoKoKoKoKoKoKoKoKoKoKoKoKoKoKoKoKoKoKoKoKoKoKoKoKoKoKoKoKoKoKoKoKoKoKoKoKoKoKoKoKoKoKoKoKoKoKoKO Kuaoh 8nKoKoKoKoKoKoKoKoKoKoKoKoKoKoKoKoKoKoKoKoKoKoKoKoKoKoKoKoKoKoKoKoKoKoKoKoKoKoKoKoKoKoKoKoKoKoK0 | 102376 | 63 | |
| 3eKoKoKoKoKoKoKoKoKoKoKoKoKoKoKoKoKoKoKoKoKoKoKoKoKoKoKoKoKoKoKoKoKoKoKoKoKoKoKoKoKoKoKoKoKoKoKoKoKoK0 | 102367 | 63 | |
| Podarotemboi bokn.Ke iudat npodarotembo 3 aqauHb cTcHnKa KaQdoHcyH. | 10pDunpncuAnuui CcnHnCnnpocn KOnTak. | 102367 | 63 |
| Podarotemboi bokn.Ke iudat npodarotembo 3 aqauHb cTcHnKa KaQauHb KOnDyH. | 10uDunpncuAnuui CcnHnCnnpocn KOnTak. | 102367 | 64 |
| Podarotemboi Podarotembo 3 aqauHb cTcHnKa KaQauHb KOnDyH. | Bukonu Hcpu Kpu Kpu Kpu Kpu Kpu Kpu Kpu Kpu Kpu Kpu Kpu Kpu Kpu Kpu Kpu Kpu Kpu Kpu Kpu Kpu Kpu Kpu Kpu Kpu Kpu Kpu Kpu Kpu Kpu Kpu Kpu Kpu Kpu Kpu Kpu Kpu Kpu Kpu Kpu Kpu Kpu Kpu Kpu Kpu Kpu Kpu Kpu Kpu Kpu Kpu Kuu Kuu Kuu Kuu Kuu Kuu Kuu Kuu Kuu Kuu Kuu Kuu Kuu Kuu Kuu Kuu Kuu Kuu Kuu Kuu Kuu Kuu Kuu Kuu Kuu Kuu Kuu Kuu Kuu Kuu Kuu Kuu Kuu Kuu Kuu Kuu Kuu Kuu Kuu Kuu Kuu Kuu Kuu Kuu Kuu Kuu Kuu Kuu Kuu Kuu KUU Kuu Kuu Kuu Kuu Kuu Kuu Kuu Kuu Kuu Kuu Kuu Kuu Kuu Kuu Kuu Kuu Kuu Kuu Kuu Kuu Kuu Kuu Kuu Kuu Kuu Kuu Kuu Kuu Kuu Kuu Kuu Kuu Kuu Kuu Kuu Kuu Kuu Kuu Kuu Kuu Kuu Kuu Kuu Kuu Kuu Kuu Kuu Kuu Kuu Kuv Kuu Kuu Kuu Kuu Kuu Kuu Kuu Kuu Kuu Kuu Kuu Kuu Kuu Kuu Kuu Kuu Kuu Kuu Kuu Kuu Kuu Kuu Kuu Kuu Kuu Kuu Kuu Kuu Kuu Kuu Kuu Kuu Kuu Kuu Kuu Kuu Kuu Kuu Kuu Kuu Kuu Kuu Kuu Kuu Kuu Kuu Kuu Kuu Kuu Kau Kau Kau Kau Kau Kau Kau Kau Kau Kau Kau Kau Kau Kau Kau Kau Kau Kau Kau Kau Kau Kau Kau Kau Kau Kau Kau Kau Kau Kau Kau Kau Kau Kau Kau Kau Kau Kau Kau Kau Kau Kau Kau Kau Kau Kau Kau Kau Kau Kau KAU Kau Kau Kau Kau Kau Kau Kau Kau Kau Kau Kau Kau Kau Kau Kau Kau Kau Kau Kau Kau Kau Kau Kau Kau Kau Kau Kau Kau Kau Kau Kau Kau Kau Kau Kau Kau Kau Kau Kau Kau Kau Kau Kau Kau Kau Kau Kau Kau Kau Kuu Kau Kau Kau Kau Kau Kau Kau Kau Kau Kau Kau Kau Kau Kau Kau Kau Kau Kau Kau Kau Kau Kau Kau Kau Kau Kau Kau Kau Kau Kau Kau Kau Kau Kau Kau Kau Kau Kau Kau Kau Kau Kau Kau Kau Kau Kau Kau Kau KAU KAU KAU KAU KAU KAU KAU KAU KAU KAU KAU KAU KAU KAU KAU KAU KAU KAU KAU KAU KAU KAU KAU KAU KAU KAU KAU KAU KAU KAU KAU KAU KAU KAU KAU KAU KAU KAU KAU KAU KAU KAU KAU KAU KAU KAU KAU KAU KAU KAU Kau Kau Kau Kau Kau Kau Kau Kau Kau Kau Kau Kau Kau Kau Kau Kau Kau Kau Kau Kau Kau Kau Kau Kau Kau Kau Kau Kau Kau Kau Kau Kau Kau Kau Kau Kau Kau Kau Kau Kau Kau Kau Kau Kau Kau Kau Kau Kau KAU KAA KAU KAU KAU KAU KAU KAU KAU KAU KAU KAU KAU KAU KAU KAU KAU KAU KAU KAU KAU KAU KAU KAU KAU KAU KAU KAU KAU KAU KAU KAU KAU KAU KAU KAU KAU KAU KAU KAU KAU KAU KAU KAU KAU KAU KAU KAU KAU KAU KAU KUU KAU KAU KAU KAU KAU KAU KAU KAU KAU KAU KAU KAU KAU KAU KAU KAU KAU KAU KAU KAU KAU KAU KAU KAU KAU KAU KAU KAU KAU KAU KAU KAU KAU KAU KAU KAU KAU KAU KAU KAU KAU KAU KAU KAU KAU KAU KAU KAU KAU KUA KAU KAU KAU KAU KAU KAU KAU KAU KAU KAU KAU KAU KAU KAU KAU KAU KAU KAU KAU KAU KAU KAU KAU KAU KAU KAU KAU KAU KAU KAU KAU KAU KAU KAU KAU KAU KAU KAU KAU KAU KAU KAU KAU KAU KAU KAU KAU KAU KAU KAI ONU AINU ONU AINU ONU AINU ONU AINU ONU AINU ONU AINU ONU AINU ONU AINU ONU AINU ONU AINU ONU AINU ONU AINU ONU AINU ONU AINU ONU AINU ONU AINU ONU AINU ONU AINU ONU AINU ONU AINU ONU AIN U ONU AINU ONU AINU ONU AINU ONU AINU ONU AINU ONU AINU ONU AINU ONU AINU ONU AINU ONU AINU ONU AINU ONU AINU ONU AINU ONU AINU ONU AINU ONU AINU ONU AINU ONU AINU ONU AINU ONU AINUNO AINU ONU AINU ONU AINU ONU AINU ONU AINU ONU AINU ONU AINU ONU AINU ONU AINU ONU AINU ONU AINU ONU AINU ONU AINU ONU AINU ONU AINU ONU AINU ONU AINU ONU AINU ONU AINU ONU AINU ONX. | 102376 | 63 |
| Podarotemboi bokn.Ke iudat npodarotembo 3 aqauHb cTcHnKa KaQauHb 0000000000000000000000000000000000000000000000000000000000000000000000000000000000000000000000000000 | 102367 | 63 | |
| Podarotemboi bokn.Ke iudat npodarotembo 3 aqauHb cTcHnKa KaQauHb 000000000000000000000000000000000000000000000000000000000 | 102367 | 63 | |
| Podarotemboi Podarotembo 3 aqauHb cTcHnKa KaQauHb 0000000000000000000000000000000000000000000000000000000000000000000000000000 | 102367 | 63 | |
| Podarotemboi Podarotembo 3 aqauHb cTcHnKa KaQauHh 00000000000000000000000000000000000000000000000000000000000000000000 | 102367 | 63 | |
| Podarotemboi Podarotembo 3 aqauHh 000000000000000000000000000000000000000000000000000000000000 | 102367 | 63 | |
| Podarotemboi Podarotembo 3 aqauHh 000000-000000-000000-000000-000000-000000-000000-000000-000000-000000-000000-000000-000000-000000-000000-0 | 102367 | 63 | |
| Podarotemboi Podarotembo 3 aqauHh 000000-000000-000000-000000-000000-000000-000000-0 | 102367 | 63 | |
| Podarotemboi Podarotembo 3 aqauHh 000000-000000-00 | 102367 | 63 | |
| Podarotemboi Podarotembo 3 aqauHh 000000-000000-00 | 102367 | 63 | |
| Podarotemboi Podarotembo 3 aqauHh 000000-000000-000 | 102367 | 63 | |
| Podarotemboi Podarotembo 3 aqauHh 000000-000000-00 | 102367 | 63 | |
| Podarotemboi Podarotembo 3 aqauHh 000000-000000-0 | 102367 | 63 | |
| Podarotemboi Podarotembo 3 aqauHh 000000-000000-0 | 102367 | 63 | |
| Podarotemboi Podarotembo 3 aqauHh 000000-000000-0 | 1 | 1 | 63 |
- PPOBJEMbIC IIO N KOMIbIOTEPOM

| HEKUTPABXCTb | 803MOKHNAI PIPMHNA | YCTPAHHEH | C7414 |
| HeBOMOKHO ZAHCYTHTB IPOVAKHAN. | Baa KOMTHOTER, BOKOMHO, He YOZDRETEPOPTET MHNKMBAHNAK CNTEMHNA TPEBOHAN. | IPOBETMEKHEKCHN CNTEADKCHN BuaaONKMAHETERA. EKHNHO HE IPOBETHEK OYUQHNA, BILTAENTEOY UYCNATNN HOPORAYA ZHACHO | 65 |
| IPOCT EOMOHENa POpETETKHO BIOHA a KOMKOTEP,Ha XeRae POpETETKHO BIOHA HET HcOPOBENHAN. | POpETKHO BIOHA, BOKOMHO, KANOPOTET PcKHO MNE. | IPOCT EOMOHENa POpETETKHO BIOHA, KANOPOTET KANOPOTET PcKHO MNE, TcNO POI BAI NAO POKETAM USB, TcNO POI POpETETKHO BIOHA PcKHO MNE, TcNO POI BAI NAO POKETAM USB, TcNO POI POpETETKHO BIOHA PcKHO MNE, TcNO POI BAI NAO POKETAM USB | 65 |
| IPOPOBENHAN; POpETETKHO BIOHA KOMKOTEP,Ha XeRae KOMKOTEP,Ha HcOPOBENHAN. | IPOBENHAN c USB COEDHNNHO. | IPOSTAKHNE USB KOHES POpETETKHO BIOHA KANOPOTET, KANOHNE Ha KANOY BCAITB PLOKOT, TcNO POIPOPTET MOKOZAMHNA Ha KANOHNE POpETETKHO BIOHA, POpETETKHO BIOHA KANOPOTET MOKOZAMHNA | 65 |
| BIOKOTEPHEHNE HcOPIAHPHNTOT Ha KANOPOBENHAN. | |||
| Ha KANOPOBENHAN e ChsIHINH Bzhya. | 3rO He ANONETO HcKOTPABHCTHO. | IPOSTAKHNE POpETETKHO BIOHA KOMKOTEP,HaONHNE PcKHO PPOTETKHO BIOHA KANOPOTET, 3rO octanETHO POpETETKHO BIOHA e He MOCET HbI ZAMCHEN KIMKCCPPOBHTEDH KANOPOBENHAN. | 65 |
-OTPAHUEHEIETAPAHTHINHbIXOB3ATEJIbCTB
- TAK KAK LINHENHA DAHNHYO IPOPTPAMME BECNATHE, FAPANTHYA HDAHNHYO IPOPTPAMME HE
IPEYDCMATTBAETCB RIPNEELAX, DONTYCTMAHBX BOOTBTACTBNN C DEVCTBYOUOM 3AKOH.OECN
YEKAHAHO HAUEBNCBEHNO FOPMME, BIADEBLLABTBOTPCKIX PABW ABNIVDPRTYTE CTOPOBH
PIEIOCTABNRIOTIPOPTPAMME EKCTEBE EK KAOJI-NLOPAIAPTAHN, BBIPAKAEHNO INI PIQDA3YMEBAEMO,
BKJIOAA, HO HE OPAHANHIBARCB, POIPA3YMEBAEME BAPHTAHNPTFOJTHODNTI JIPOADAKHN
KHOKPHTOTO PIPMHNEHNE, BECP PNCK, CB3AHHbI KCAHECTBOM INAEOTON DAHNHOI IPOPTPAMMBI, JEXNIT
HA POJIb8BOATEIE.BCJYAE, ECIOIPOPTPAMMA OKAKETCH DEEKFTHOH, BBI PPINHMAETA HE CAESIIOBble
3ATPATB, CB3AHHbI CEHE6OXJDIM MBOSCYKBAHEME, PEMOTOH NIN HACTPOIKOM.
2.HNIPKAKIXYCNIOBHX,ECIMTOLIbKO3TOHETPBEYTCERDAECTBYOUUM3AKOHOMHINHE OIOABPAIEACTB TMCMEHHONHOPOFME,HNODHNBIAIDLIEBEEBOPACIKXIVPABIAPAYAETCPOHAOTOKOPAEMETOKMEXHTMEHNEHBINHNNPEEPACNPOTCAHPAHBDAAHHNOPTPAMPMBYCOOTBTCTBNB CBBLIUECKA3AHBMHEVDETHECHNIEPEDNBAMNDETBCTBEHOCTB3A Yb6bTKN,BKIOJKAOBIAEBOAHMEMEH KOKHPETHB,CJHNAHBIHNIPOCNEQUOLIOENBPOEKJIENHMB,RiBA3BAHNBIEHCIOE3OBAHMEMEH HEOB3MOKHOCTBOIACIOB3OBAHMAIHOPIPOMPAMMB(KBIOJKAHO,HO EORPAHNB4BCB,NOTEPIO DAHBJNXHNETHOHYNPOEEDAADHHBX,NINYBbTKN,OIOECEHHNEBAMNIVITPETBMMNCTOPOHAMN,VHINHEBO3MOKHOCTDBAHNOINTOPAMMBaPABOTCATCBPNPYMPOPTAMMM),DAXE ECIANBIADEIEL ABOTCPKIXTPABINJDPAROTCOBAHUYBVEBOEMOEJIH BO3MOKHOCTNTAKKX BYBtIKOB.

gog
| 78 | |||
| 78 | USB port 1, USB port 2, USB port 3, USB port 4, USB port 5, USB port 6, USB port 7, USB port 8, USB port 9, USB port 10, USB port 11, USB port 12, USB port 13, USB port 14, USB port 15, USB port 16, USB port 17, USB port 18, USB port 19, USB port 20, USB port 21, USB port 22, USB port 23, USB port 24, USB port 25, USB port 26, USB port 27, USB port 28, USB port 29, USB port 30, USB port 31, USB port 32, USB port 33, USB port 34, USB port 35, USB port 36, USB port 37, USB port 38, USB port 39, USB port 40, USB port 41, USB port 42, USB port 43, USB port 44, USB port 45, USB port 46, USB port 47, USB port 48, USB port 49, USB port 50, USB port 51, USB port 52, USB port 53, USB port 54, USB port 55, USB port 56, USB port 57, USB port 58, USB port 59, USB port 60, USB port 61, USB port 62, USB port 63, USB port 64, USB port 65, USB port 66, USB port 67, USB port 68, USB port 69, USB port 70, USB port 71, USB port 72, USB port 73, USB port 74, USB port 75, USB port 76, USB port 77, USB port 78, USB port 79, USB port 80, USB port 81, USB port 82, USB port 83, USB port 84, USB port 85, USB port 86, USB port 87, USB port 88, USB port 89, USB port 90, USB port 91, USB port 92, USB port 93, USB port 94, USB port 95, USB port 96, USB port 97, USB port 98, USB port 99, USB port 100, USB port 101, USB port 102, USB port 103, USB port 104, USB port 105, USB port 106, USB port 107, USB port 108, USB port 109, USB port 110, USB port 111, USB port 112, USB port 113, USB port 114, USB port 115, USB port 116, USB port 117, USB port 118, USB port 119, USB port 120, USB port 121, USB port 122, USB port 123, USB port 124, USB port 125, USB port 126, USB port 127, USB port 128, USB port 129, USB port 130, USB port 131, USB port 132, USB port 133, USB port 134, USB port 135, USB port 136, USB port 137, USB port 138, USB port 139, USB port 140, USB port 141, USB port 142, USB port 143, USB port 144, USB port 145, USB port 146, USB port 147, USB port 148, USB port 149, USB port 150, USB port 151, USB port 152, USB port 153, USB port 154, USB port 155, USB port 156, USB port 157, USB port 158, USB port 159, USB port 160, USB port 161, USB port 162, USB port 163, USB port 164, USB port 165, USB port 166, USB port 167, USB port 168, USB port 169, USB port 170, USB port 171, USB port 172, USB port 173, USB port 174, USB port 175, USB port 176, USB port 177, USB port 178, USB port 179, USB port 180, USB port 181, USB port 182, USB port 183, USB port 184, USB port 185, USB port 186, USB port 187, USB port 188, USB port 189, USB port 190, USB port 191, USB port 192, USB port 193, USB port 194, USB port 195, USB port 196, USB port 197, USB port 198, USB port 199, USB port 200, USB port 201, USB port 202, USB port 203, USB port 204, USB port 205, USB port 206, USB port 207, USB port 208, USB port 209, USB port 210, USB port 211, USB port 212, USB port 213, USB port 214, USB port 215, USB port 216, USB port 217, USB port 218, USB port 219, USB port 220, USB port 221, USB port 222, USB port 223, USB port 224, USB port 225, USB port 226, USB port 227, USB port 228, USB port 229, USB port 230, USB port 231, USB port 232, USB port 233, USB port 234, USB port 235, USB port 236, USB port 237, USB port 238, USB port 239, USB port 240, USB port 241, USB port 242, USB port 243, USB port 244, USB port 245, USB port 246, USB port 247, USB port 248, USB port 249, USB port 250, USB port 251, USB port 252, USB port 253, USB port 254, USB port 255, USB port 256, USB port 257, USB port 258, USB port 259, USB port 260, USB port 261, USB port 262, USB port 263, USB port 264, USB port 265, USB port 266, USB port 267, USB port 268, USB port 269, USB port 270, USB port 271, USB port 272, USB port 273, USB port 274, USB port 275, USB port 276, USB port 277, USB port 278, USB port 279, USB port 280, USB port 281, USB port 282, USB port 283, USB port 284, USB port 285, USB port 286, USB port 287, USB port 288, USB port 289, USB port 290, USB port 291, USB port 292, USB port 293, USB port 294, USB port 295, USB port 296, USB port 297, USB port 298, USB port 299, USB port 300, USB port 301, USB port 302, USB port 303, USB port 304, USB port 305, USB port 306, USB port 307, USB port 308, USB port 309, USB port 310, USB port 311, USB port 312, USB port 313, USB port 314, USB port 315, USB port 316, USB port 317, USB port 318, USB port 319, USB port 320, USB port 321, USB port 322, USB port 323, USB port 324, USB port 325, USB port 326, USB port 327, USB port 328, USB port 329, USB port 330, USB port 331, USB port 332, USB port 333, USB port 334, USB port 335, USB port 336, USB port 337, USB port 338, USB port 339, USB port 340, USB port 341, USB port 342, USB port 343, USB port 344, USB port 345, USB port 346, USB port 347, USB port 348, USB port 349, USB port 350, USB port 351, USB port 352, USB port 353, USB port 354, USB port 355, USB port 356, USB port 357, USB port 358, USB port 359, USB port 360, USB port 361, USB port 362, USB port 363, USB port 364, USB port 365, USB port 366, USB port 367, USB port 368, USB port 369, USB port 370, USB port 371, USB port 372, USB port 373, USB port 374, USB port 375, USB port 376, USB port 377, USB port 378, USB port 379, USB port 380, USB port 381, USB port 382, USB port 383, USB port 384, USB port 385, USB port 386, USB port 387, USB port 388, USB port 389, USB port 390, USB port 391, USB port 392, USB port 393, USB port 394, USB port 395, USB port 396, USB port 397, USB port 398, USB port 399, USB port 400, USB port 401, USB port 402, USB port 403, USB port 404, USB port 405, USB port 406, USB port 407, USB port 408, USB port 409, USB port 410, USB port 411, USB port 412, USB port 413, USB port 414, USB port 415, USB port 416, USB port 417, USB port 418, USB port 419, USB port 420, USB port 421, USB port 422, USB port 423, USB port 424, USB port 425, USB port 426, USB port 427, USB port 428, USB port 429, USB port 430, USB port 431, USB port 432, USB port 433, USB port 434, USB port 435, USB port 436, USB port 437, USB port 438, USB port 439, USB port 440, USB port 441, USB port 442, USB port 443, USB port 444, USB port 445, USB port 446, USB port 447, USB port 448, USB port 449, USB port 450, USB port 451, USB port 452, USB port 453, USB port 454, USB port 455, USB port 456, USB port 457, USB port 458, USB port 459, USB port 460, USB port 461, USB port 462, USB port 463, USB port 464, USB port 465, USB port 466, USB port 467, USB port 468, USB port 469, USB port 470, USB port 471, USB port 472, USB port 473, USB port 474, USB port 475, USB port 476, USB port 477, USB port 478, USB port 479, USB port 480, USB port 481, USB port 482, USB port 483, USB port 484, USB port 485, USB port 486, USB port 487, USB port 488, USB port 489, USB port 490, USB port 491, USB port 492, USB port 493, USB port 494, USB port 495, USB port 496, USB port 497, USB port 498, USB port 500, USB port 501, USB port 502, USB port 503, USB port 504, USB port 505, USB port 506, USB port 507, USB port 508, USB port 509, USB port 510, USB port 511, USB port 512, USB port 513, USB port 514, USB port 515, USB port 516, USB port 517, USB port 518, USB port 519, USB port 520, USB port 521, USB port 522, USB port 523, USB port 524, USB port 525, USB port 526, USB port 527, USB port 528, USB port 529, USB port 530, USB port 531, USB port 532, USB port 533, USB port 534, USB port 535, USB port 536, USB port 537, USB port 538, USB port 539, USB port 540, USB port 541, USB port 542, USB port 543, USB port 544, USB port 545, USB port 546, USB port 547, USB port 548, USB port 549, USB port 550, USB port 551, USB port 552, USB port 553, USB port 554, USB port 555, USB port 556, USB port 557, USB port 558, USB port 559, USB port 560, USB port 561, USB port 562, USB port 563, USB port 564, USB port 565, USB port 566, USB port 567, USB port 568, USB port 569, USB port 570, USB port 571, USB port 572, USB port 573, USB port 574, USB port 575, USB port 576, USB port 577, USB port 578, USB port 579, USB port 580, USB port 581, USB port 582, USB port 583, USB port 584, USB port 585, USB port 586, USB port 587, USB port 588, USB port 589, USB port 590, USB port 591, USB port 592, USB port 593, USB port 594, USB port 595, USB port 596, USB port 597, USB port 598, USB port 599, USB port 600, USB port 601, USB port 602, USB port 603, USB port 604, USB port 605, USB port 606, USB port 607, USB port 608, USB port 609, USB port 610, USB port 611, USB port 612, USB port 613, USB port 614, USB port 615, USB port 616, USB port 617, USB port 618, USB port 619, USB port 620, USB port 621, USB port 622, USB port 623, USB port 624, USB port 625, USB port 626, USB port 627, USB port 628, USB port 629, USB port 630, USB port 631, USB port 632, USB port 633, USB port 634, USB port 635, USB port 636, USB port 637, USB port 638, USB port 639, USB port 640, USB port 641, USB port 642, USB port 643, USB port 644, USB port 645, USB port 646, USB port 647, USB port 648, USB port 649, USB port 650, USB port 651, USB port 652, USB port 653, USB port 654, USB port 655, USB port 656, USB port 657, USB port 658, USB port 659, USB port 660, USB port 661, USB port 662, USB port 663, USB port 664, USB port 665, USB port 666, USB port 667, USB port 668, USB port 669, USB port 670, USB port 671, USB port 672, USB port 673, USB port 674, USB port 675, USB port 676, USB port 677, USB port 678, USB port 679, USB port 680, USB port 681, USB port 682, USB port 683, USB port 684, USB port 685, USB port 686, USB port 687, USB port 688, USB port 689, USB port 690, USB port 691, USB port 692, USB port 693, USB port 694, USB port 695, USB port 696, USB port 697, USB port 698, USB port 699, USB port 700, USB port 701, USB port 702, USB port 703, USB port 704, USB port 705, USB port 706, USB port 707, USB port 708, USB port 709, USB port 710, USB port 711, USB port 712, USB port 713, USB port 714, USB port 715, USB port 716, USB port 717, USB port 718, USB port 719, USB port 720, USB port 721, USB port 722, USB port 723, USB port 724, USB port 725, USB port 726, USB port 727, USB port 728, USB port 729, USB port 730, USB port 731, USB port 732, USB port 733, USB port 734, USB port 735, USB port 736, USB port 737, USB port 738, USB port 739, USB port 740, USB port 741, USB port 742, USB port 743, USB port 744, USB port 745, USB port 746, USB port 747, USB port 748, USB port 749, USB port 750, USB port 751, USB port 752, USB port 753, USB port 754, USB port 755, USB port 756, USB port 757, USB port 758, USB port 759, USB port 760, USB port 761, USB port 762, USB port 763, USB port 764, USB port 765, USB port 766, USB port 767, USB port 768, USB port 769, USB port 770, USB port 771, USB port 772, USB port 773, USB port 774, USB port 775, USB port 776, USB port 777, USB port 778, USB port 779, USB port 780, USB port 781, USB port 782, USB port 783, USB port 784, USB port 785, USB port 786, USB port 787, USB port 788, USB port 789, USB port 790, USB port 791, USB port 792, USB port 793, USB port 794, USB port 795, USB port 796, USB port 797, USB port 798, USB port 799, USB port 800, USB port 801, USB port 802, USB port 803, USB port 804, USB port 805, USB port 806, USB port 807, USB port 808, USB port 809, USB port 810, USB port 811, USB port 812, USB port 813, USB port 814, USB port 815, USB port 816, USB port 817, USB port 818, USB port 819, USB port 820, USB port 821, USB port 822, USB port 823, USB port 824, USB port 825, USB port 826, USB port 827, USB port 828, USB port 829, USB port 830, USB port 831, USB port 832, USB port 833, USB port 834, USB port 835, USB port 836, USB port 837, USB port 838, USB port 839, USB port 840, USB port 841, USB port 842, USB port 843, USB port 844, USB port 845, USB port 846, USB port 847, USB port 848, USB port 849, USB port 850, USB port 851, USB port 852, USB port 853, USB port 854, USB port 855, USB port 856, USB port 857, USB port 858, USB port 859, USB port 860, USB port 861, USB port 862, USB port 863, USB port 864, USB port 865, USB port 866, USB port 867, USB port 868, USB port 869, USB port 870, USB port 871, USB port 872, USB port 873, USB port 874, USB port 875, USB port 876, USB port 877, USB port 878, USB port 879, USB port 880, USB port 881, USB port 882, USB port 883, USB port 884, USB port 885, USB port 886, USB port 887, USB port 888, USB port 889, USB port 890, USB port 891, USB port 892, USB port 893, USB port 894, USB port 895, USB port 896, USB port 897, USB port 898, USB port 899, USB port 900, USB port 901, USB port 902, USB port 903, USB port 904, USB port 905, USB port 906, USB port 907, USB port 908, USB port 909, USB port 910, USB port 911, USB port 912, USB port 913, USB port 914, USB port 915, USB port 916, USB port 917, USB port 918, USB port 919, USB port 920, USB port 921, USB port 922, USB port 923, USB port 924, USB port 925, USB port 926, USB port 927, USB port 928, USB port 929, USB port 930, USB port 931, USB port 932, USB port 933, USB port 934, USB port 935, USB port 936, USB port 937, USB port 938, USB port 939, USB port 940, USB port 941, USB port 942, USB port 943, USB port 944, USB port 945, USB port 946, USB port 947, USB port 948, USB port 949, USB port 950, USB port 951, USB port 952, USB port 953, USB port 954, USB port 955, USB port 956, USB port 957, USB port 958, USB port 959, USB port 960, USB port 961, USB port 962, USB port 963, USB port 964, USB port 965, USB port 966, USB port 967, USB port 968, USB port 969, USB port 970, USB port 971, USB port 972, USB port 973, USB port 974, USB port 975, USB port 976, USB port 977, USB port 978, USB port 979, USB port 980, USB port 981, USB port 982, USB port 983, USB port 984, USB port 985, USB port 986, USB port 987, USB port 988, USB port 989, USB port 990 |
y1 = 12( x1 - 3)
a a a a a a a a a a a a a a a a a a a a a a a a a a a a a a a a a a a a a a a a a a a a a a a a a a a a a a a a a a a aaa

2019-03-04 15:00:00
| 80 | |||
| 80 | |||
| 80 | |||
| 80 | |||
| 80 | |||
| 80 | |||
| 80 | |||
| 80 | |||
| 80 | a#e#e eae eae eae eae eae eae eae eae eae eae eae eae eae eae eae eae eae eae eae eae eae eae eae eae eae eae eae eae eae eae eae eae eae eae eae eae eae eae eae eae eae eae eae eae eae eae eae eae eae eae eee | ||
| 80 | |||
| 80 | |||
| 80 | |||
| 80 | |||
| 80 | |||
| 80 | |||

4.10.11 20%
aagaaagaaagaaagaaagaaagaaagaaagaaagaaagaaagaaagaaagaaagaaagaaagaaagaaagaaagaaagaaagaaagaaagaaagaaagaaagaaagaaagaaagaaagaaagaaagaaagaaagaaagaaagaaagaaagaaagaaagaaagaaagaaagaaagaaagaaagaaagaaagaaagaaagaaagaaa
yay yay jay yay yay yay yay yay yay yay yay yay yay yay yay yay yay yay yay yay yay yay yay yay yay yay yay yay yay yay yay yay yay yay yay yay yay yay yay yay yay yay yay

224
12345678901011111111111111111111111111
gaaa aaii jiaai i jiaai aai i jiaai aai i jiaai aai i jiaai aai i jiaai aai i jiaai aai i jiaai aai i jiaai aai i jiaai aai i jiaai aai i jiaai aai i jiaai aai i jiaai aai i jiaai aai i jiaai aai i jiaai aai i jiaai aai i j
001 23
gaaa aagaaa aagaaa aagaaa aagaaa aagaaa aagaaa aagaaa aagaaa aagaaa aagaaa aagaaa aagaaa aagaaa aagaaa aagaaa aagaaa aagaaa aagaaa aagaaa aagaaa aagaaa aagaaa aagaaa aagaaa aagaaa aegaaa
y 1
(gall)jdlalhlaie"jihai jiljia jilj
0001 0001
2.4 2.4 2.4 Wl-Fl
Wl FI 145 145 145 145 145 145 145 145 145 145 145 145 145 145 145 145 145 145 145 145 145 145 145 145 145 14

g 32 100000000000000000000000000000000000000000000000000000000000000000000000
100 100 100 100
e 1000000000000000000000000000000000000000000000000000
4.2.11.44
(aiaaa) Ni-MH gue 2.4 aaiuuiy jay yae 1800 ayaua uaiy aaiy aaiy aaiy aaiy aaiy aaiy aaiy aaiy aaiy aaiy aaiy aaiy aaiy aaiy aaiy aaiy aaiy aaiy aaiy aaiy aaiy aaiy aaiy
"J 250:
50-0:1
2470-2410
a a a a a a a a a a a a a a a a a a a a a a a a a a a a a a a a a a a a a a a a a a a a a a a a a a a a a a a a aaa

pss
www.tomy.eu gaiy jayi aag yjg jay jay jay jay jay jay jay jay jay jay jay jay jay jay jay jay jay jay jay jay jay jay jay jay jay jay jay jay jay jay jay jay jay jay jay jay jay jay
pA 100
y
y

1 2 3 4 5 6 7 8 9 10 11 12 13 14 15 16 17 18 19 20 21 22 23 24 25 26 27 28 29 30 31 32 33 34 35 36 37 38 39 40 41 42 43 44 45 46 47 48 49 50 51 52 53 54 55 56 57 58 59 60 61 62 63 64 65 66 67 68 69 70 71 72 73
10 10 10 10 10 10 10 10 10 10 10 10 10 10 10 10 10 10 10 10 10 10 10 10 10 10 10 10 10 10
eep eep

4
4 4
aee 7 eae aee aee ae aee aee aee aee aee aee
aannnnn nnnnnnnnnnnnnnnnnnnnnnnnnnnnnnnnnnnnnnnnnnnnnnnnnnnnnnnnnnnnnnnnnnnnnnnnnnnnnnnnnnnnnnnnnnnnnnnnnnnnn
3
y
a 3
a 1000000000000000000000000000000000000000000000000000000000
a 1
4
a 1
| ### | ### | |
| LCD lndz de liq#y 100% | ### | ### |
| ### | ### | ### |

()0/2
80 81
1000000000000000000000000000000000000000000000000000000000000000
A
j#
LCD
1
AEIOTYPTIA EEOKONOMH2E ENEPTEIAZ

Tio vao 40nepie. TIO DAPKAE GAI, TIO MNTAOPIAC, N OOKKEI NAPKAKOPOKIN, AEG, pia IAEKUPOYEAEOKOUPOJNG, EEPVPOA, TIO BAE KAEU CATEPAYI TIO BOVNI VO AOOTWADAI KOVA KENKNEI MOU POCK. H UKKEEVE TOE BAO TEIE DE AELKUPDIA EOPKONQNPG. EEPVPOA, DAV PABTIATIK KOBMOKOMQA VSA 5 LEMI (eauuueae) ooipeoae ioua aaldeet aun TIO SI KAMO 60 CX 30 SEETPOPA, TIO NACAT TAOUEPOYEAEOKOUPOJNG, EEPVPOA, TIO BOOKO MeVOI, TIO EVPOYONPORTEAE FAX TIO BOVNI TIO
omoiyotn ouyi, nonto to hikpco npoyoc Baeonnto to hikpco npoyoc Baeon no nau poeoc n Toe. Tua va anepytoanoe t neitouayla Eecovouanoe Evpeyiaac kai va Eaagapnaieote aotepa napakooBn jivteo, ouvseod Teuokwe Foeae va ney kepiokouoH/Y.
IAPAKOAOYOHSHAPZTHPIOHYXOY

Tia ekelevc Tc nyuec stt oto mpoo ac tiv aly yoeautepe, taoc va n beteva ve akoute kbe yto 07
sauiaioi tou mpooac h. SaKeuiv Mpuoac oae ieiat leouyipia Napakoiolooanpa Odoptnupu Hxuyu, uia leouyipia ouu ulauiuiej yoio nyouk cat ano top-puaioueo opio, ia npadapoej eva kaija nape dya youyoupia
Otaev Etnaeyet NapakokooBnAn Dpaotipov Hou an to Baoko Mevoi, n Suokoe Tovae (kaia n obov bivteo)Ba tebeir ae leuotyia uvm oup o to mpo aoc Ekej nuayzai 10e 10epeoAe. Kabe opo n o hoi tou mpo aoe vaoatov nao aofo pia, autn l neuoyia Bdoikemtai otniuaia kai npolnyknapokokooBnO bouycTetau wotou va nauo dae i nto fo mpo oac H Ekova NapakokooBnAn Cpaotipov Hou oan eapovietotnv Obovov LCD Tc Suokoe Tovae.
XPONOMETPO

XpOJIOAETo To XpvOJETo OYm OBvLCD TcUeKeurFovA yia va daTnpoEto To oauKo KpOaI kata to diaotma auadoe atra talopata, taipopapakaeukc dooeic,doo to maIac koutai kai npaouolac Eekovit To XpvOJETo Ntavto KouMJI AAAkyi Ka to Kouji XpvOJETo uTo NsEUKeR FovA. ErnakaBete YAva to AnepeyponoRte. Iia to npito letto To XpvOJETo meta de SeutroPentta. Yotepa anuto, BApetpa ae. Tia va eEefeto To XpvOJETo otav evai evpyonanoyen napanakaoBnAn DaaatnoHxoun Hn tareuypia Eekovonny EvEvya, ama nnta to nnkTPO rhynpoc Deaean.
ΦQTEINH ENAEIEHENTAEHXOY
H (O) EviEiEiEvIaNc Hyou om ZUKeun Fovea oac aotipoda otuc houoc Tou mpuo oac Ooo nduvto BOpu Kaev tomuo ooc, toe moepoe paeqa qutwai ooty evEn. Mnpoeite va quanAoWte Tt EvToaTn Tc zuKeurFoveva Ev npaozyeAokia tomuo, iadkio ytaatovaoapeve t dexse poaeovouevoc.
- PPHTOPH IPOBOAH
Pnntote to PnKpO npOpC Oeao nto nau npoc nC Suakeur Covae oote BcEte va tnevepytonoae To bEvoe aTNOv OBvCN Ld VApnoepie naparad an ao lau Keun Mpuo, mpoepie an EkoV ae EKOVA natuvacraneaupey
- ZOOM
PnTnote TnMnKtpo Pnepinyonnc nawkai kaw ot npuokun Fovea va eaoaete kalva enavalee aen knavovikni Baean.
EKDQNH2EH
Evroniote jia xuevin uokunr Voea nattvac to Koumi ON/Off 0tn uokunm Mpuo3 oepoc me yipnyopakolouhka N2uokunr Voea th anuavai maekuyapeo 3Aenl. Iva vaaynate To avuyapeo, npntne Otoiohnete Kounmi otuukunr Naapakaleleva no paoee tdo taapankptnokto knc EKPOVONBa Ateouypoei mvo ToTov Kaoi dvo uokueev eivvepyoimueve Kai pkoovatoe ae Oauovpuiy Kauovikicnpaoakolouhong.
XPHEIMONIOIONTA NOAAANEE SYKEYE MPOY

Mnopelte va npooeTepeyka 3 emolau Suakeuec Mpuo ka va npakaooubaeta Oaou, Touk rjouk cai to bivtoe tou, aotnv idia Suakeun Tovea. Enmlov Suakeuec Mpuo paie tO oynoe vnuuuaou ta xipohontou eivai diabeaeoc are to www.tomy.edu
SYNAAEEHHY
Mnopeite va uovdeet n Tsuekeiouva Teu HAcKpovka YmoLoyHr(PC) aoc yia na papaokoute To mpo oac, n ia va eyyapae h va anavapayete bivtoe. Eekniote katebaovtac kyaikotwrtac to loyakuo To koneutpu Kaepac r/H/Y Tomo anr tvn tatoaAla macw.com/tony.co.uk/srmontors
Mnck ykaataaB, aovteo to npoyapau kou Kuepaac H/YY tomk xpnqpanonvta o napeyoeu kauadoo USB ouvdeae tJ uokueun Fovce ae ue tv Hcyeet Hnapakaoohan bVteo 8a
biepaei otj oyovtoun H/yyoc H nytnknpakaoouen o auovxote iouc Tc Kuevcnt Voc H. hOboh LCD tnc 304 e katoatana anovayoc aale oieitayucic vayayepai o auyiaovu kavovka.
O unnoythctac ac npeneva va exa taakooa Oauutjuaa keitouyla:Windows XP (Service Pack 3), Windows Vista (Service Pack 2)Windows 7,me tic akoloubec ootnuvee npodaiyapagc npypdipatoc
Enepeyaatc me 6mlo npvyu 2.8 GHz yypopotepa 2: GB RAM; 10GB BhoBiou npovot ovKnpo
biko: kappa yapipikiv 65k wupawit na nappnpiTcTto DireCTK 9

KOYMIIA EAEXF XOY IIEPIOXH2

Emayoeac Suokun Mpuo - Xpnaonoinate tov kepoapou tou H/ yaoa va emaeetene Tsuokun Mpuo.

IeKavovko yEeOec-X→X2→X3→Kavovko yEeBocipoiTOnTe To KauMJI PeTo BLOc oyo aTo EotepkeIO pOec yio Voe EvkiN ekovda.

Obov -Kovate kux pao yva yoeBve Tny Eeov an ny Npoyn Eeyou nupuivcna o Kauo npoc Tnv Oovnnpnmpnncnnpnne vya eapawntn npoyn Eeyou. nnoyto mApknp Sc Ecu H/Y ooc va anmpejte aepk npoyn gucip nnpoyk npoyk kai yea va enpmpieotr otny paopnla

Evoynioe yevnoyionc/aneveynpoiOnie (on/off) NpOhoK PnOboAik - Tovote EnoaveAnupeVia vao 1epoivoe ovo KpOkeTae ToEVOIOB OBOvN

PBoaBtBbAoBtKnC Btveo-Kovte Kua yva emeEke Ka va ovapolye Eekwoc ern (Bbiohkn Btveo oac [he n npakvai.

Eyyapn -Kavetek kai via oekovotetnye yyyapn. Oi eikovc aoonogouov ot npBoiuohn avteoc (delta pntkatoct) Kavetek kai via ooiomotaroyetnye yyyapn.
DfO1n, apaoi eai kai oktakataoanrTc seqdiab nptapotipov hbo nperey vye aev ovEv iynAiku n 10n Tnv Eaeun evnAiku AnouoEeote to kaiioo npooayopov npv ny tnv Aotatkatoaonpntapovx Xpnnojnoepoeo nvo Tnv napexoyev decolia npatupov nTn dBceoi dequlia npatnapov axnnauovtke pnu Tny Tomy Webcar. Npapaokoebe v npaoeEeTe on y enyauo ankyoavv aty npaaonnpoee Oanae oohd qalapov npatapov Kappapoe oek cTne npapovseet npuykivn Tnv npapovnncn Tnv npapovnykny, seqdiab npatapov npatapov npatapov npatapov npatapov npatapov npatapov npatapov npatapov npatapov npatapov npatapov npatapov npatapov npatapov npatapov npatapov npatapov npatapov npatapov npatapov npatapov npatapov npatapov npatapov npatapow npatapov npatapov npatapov npatapov npatapov npatapov npatapov npatapov npatapov npatapov npatapov npatapov npatapov npatapov npatapov npatapov npatapov npatapov npatapov npatapov npatapov npatapov npatapov npatapov npatapopv npatapov npatapov npatapov npatapov npatapov npatapov npatapov npatapov npatapov npatapov npatapov npatapov npatapov npatapov npatapov npatapov npatapov npatapov npatapov npatapov npatapov npatapov npatapov npatapov npatapawnpatawnpatawnpatawnpatawnpatawnpatawnpatawnpatawnpatawnpatawnpatawnpatawnpatawnpatawnpatawnpatawnpatawnpatawnpatawnpatawnpatawnpatawnpatawnpatawnpatawnpatawnpatawnpatawnpatawnpatawnpatawnpatawnpatawnpatawmpatawnpatawnpatawnpatawnpatawnpatawnpatawnpatawnpatawnpatawnpatawnpatawnpatawnpatawnpatawnpatawnpatawnpatawnpatawnpatawnpatawnpatawnpatawnpatawnpatawnpatawnpatawnpatawnpatawnpatawnpatawnpatawnpatawnpATAWNPATAWNPATAWNPATAWNPATAWNPATAWNPATAWNPATAWNPATAWNPATAWNPATAWNPATAWNPATAWNPATAWNPATAWNPATAWNPATAWNPATAWNPATAWNPATAWNPATAWNPATAWNPATAWNPATAWNPATAWNPATAWNPATAWNPATAWNPATAWNPATAWNPATAWNPATAWNPATAWNPATAWNPFTA WNTNNTNNTNNTNNTNNTNNTNNTNNTNNTNNTNNTNNTNNTNNTNNTNNTNNTNNTNNTNNTNNTNNTNNTNNTNNTNNTNNTNNTNNTNNTNNTNNTNNTNNTNNTNNTNNTNNTNNTNNTNNTNNTNNTNNTNNTNNTNNTNNTNNTNNT NTTNNNNNNNNNNNNNNNNNNNNNNNNNNNNNNNNNNNNNNNNNNNNNNNNNNNNNNNNNNNNNNNNNNNNNNNNNNNNNNNNNNNNNNNNNNNNNNNNNNNNNNNNNNNNNNNNNNNNNNNNNNNNNNNNNNNNNNNNNNNNNNNNNNNNNNNNNNNNNNNNNNNNNNNNNNNNNNNNNNNNNNNNNNNNNNNNNNNNNNNN NNNE

BonBATE to papovov ovapovovac uevuovu to piovovcak kai n oukucuaia. Ta ouboka amopoupnc on oukueauov ovovn to npovov kaui patarape dev npereva ov apopovvotra ot oikokd amopupuata KauKecpeyov ouocce, nov umoavovu v bdoovu to paoivov kai npuynu. Papaoklae va xipnojntoe t aoepaemayu cmei auowchic h icumugoe cie aukowckonovtov anoppimerte to ovukelvo uunartape.
OAHFOAIIAHZENIAYEHZ
Se nne toun ouekun oukouei auokouoloojoc acse leitoupeiy otoue ovueveetai, o npakakut mnpopopoe ctni Iaota 9n peine va etopaoiv yia uakouv ta npoaIpaiaatac.
-2YXNEEPOTTHZEIE
E. XpeiaZeta N UoKeun Fovea ou v eivai Evpyonoineyn n aneepyonoineyn kara th opiction;
A. Kai ta doo, H Suokeun Fovea ooc a fo popti et w eiv eevay ovoynne n an eveay ovoynne. Qatoo, no poptian Tc uoeokn ot aviv eevay ovoynne ooc amertpej va npakaoauoite to mpu ooc ewo poptetctal.
E. Metypnoa th Eppokpaiaou 6duaiou Tou paou ou xpanoanowrtac aann oukeun kai ppiakwa diapepotik tui ano autn stn oukeun napakolooanogcn ouy - yiati
A. O. Jnayaviauoc, Me tonanBepuokpaiaac, mea ot n ouakeun npakokooohonc oac Tomy elva ayediauvc oac dileva mla evdehnc thc bepuokpaiaoc to du waiatou tou mpuo oac me ia kpn anokkion tou +1^ -1°C.AAee c ouakeue exov enioc napoiota anokkion.
E.Mnpovva xpaonoiow tn ouakeunnapakaoohnoqouoToeEwepikó;
A. Mnpetre va xonoiionoane t n oukeun npakolooohnac oan tn xupa onu ayopaatne otouldnote vtoc nce EE. Iapolo nou n oukeun npakolaoohnccn cnc mopei va letopye owtae o aeele xupe, n letoupknyk auovytoa n mopei va entpeae (n va empeatae an) dala yauvajna kai ta maupoeia v evia naupavoia. H Tomy de fepei kaiya euvyn va xpon ekctc nx pauc anou ayopaatee ta uokuek npakolaoohnnc n ekctc nce EE.
E. Gα ακαοντου ουαυεριδε τος εἰβελείσα κα γαμαπας ἀπαταρλίας καόμι κανην εἰτασην έύουσην παύκειν πάραλούθουδη μου εἰντος Μηνεύ (aβόμοβα);
A. Na, oi ouvayepoiδev επηρεαστοι από toupθμiστε ενταοί nχou.
E.Mnopei n oukeun npapakolouonnc nuvaouunapxei me WI-Fikai aalec ouokeuc tw 2,4GHz;
A. H. oukeui TOMY SROAC, LEIOUPEY Oe uovvOITnTg ME Direct-Sequence Spread Spectrum (DSSS) TeyoVOLyK Aky EYE oxdiatei va ouuvapexei me Wi-Fi kai napoiueo aoupatec ypiHAcE ooukeuec, OTOAO, eav anupxoyu nepoootepec npoiouieoc uoukeuec tw 2.4 GHz oe KOVNI ANOATAO, n Tepioipioev ENTEBAON eivai avanopoekt, EvEegeta i auvtjIooitete XaunAi AnoBOon n ot ouakeui npakaoalouohicac n ot icauoatec quokueei, emkte ev aALKO kavai pntuvTac to PAnKTo PO IeTuOpUc/ElOuyyNc v3 DeutpoLantra, enavaalabavovrtac av elivai atapaitto m eXprvi bpertre eaepeko kavai.
EYPESHZDAAMATOZ

| ПОВАМА | ПОANН AITI | АУЗH | БЕДAL |
| H Zuokuei Fowea muou sev Be eveyponounoi. | H erovopoeitjQeayn mertapia deyexeykatootei oowotia. | БугдьтЯ Trm kumatna Ossm cng hengdya ro nrope yuddaon a stn Oevdo ApoKs Tukpuc, Vosk opzauofoi, opoziprion t Nsukcei Tovo kai aupnne in papehme nry kuyuoyepocua. | 83 |
| H zuokuei mazniqmpaee kao kao kao kao kao kao kao kao kao kao kao kao kao kao kao kao kao kao kao kao kao kao kao kao kao kao kao kao kao kao kao kao kao kao kao kao kao kao kao kao kao kao kao kao kao kao kao kao kao kao koo. | Toivbokhtere Tn Suokkei Tovoe Kao opprte Tn megida Aerma nny nny Evnyonolnye. | ||
| Dav gnuuulai duwta rny kaukoi npopobaa. | Blyfie Tc kaukai Tnv Kuukai ngin (nunmukauuunununununununununununununununununununununununununununununununununununununununununununununununununununununununununununununununununununununununununununununununununununununununununununununununununununun ununununununununununununununununununununununununununununununununununununununununununununununununununununununununununununununununununununununununununununununununununununununununununununununununununununUNU. | 83 | |
| H Zuokuei Mowou muou sev Be e vayponounoi. | Dy e uuuiu wouu duiu uu uu uu uu uu uu uu uu uu uu uu uu uu uu uu uu uu uu uu uu uu uu uu uu uu uu uu uu uu uu uu uu uu uu uu uu uu uu uu uu uu uu uu uu uu uu uu uu uu uu uu. | Dyuc Tc kaukai Tnv Kuukai ngin (nunmukauuununununununununununununununununununununununununununununununununununununununununununununununununununununununununununununununununununununununununununununununun unununununununununununununununununununun unununununununununununununununununununununununununununununununununununununununununununununununununununununununununununununununununununununununununununununununun ununununununununununununununununununununUNU. | 83 |
| Yurdpxie evac ouwkyduoxoc nyco ouwkyduoxoc anio tn Zukuei Fowoa. | Suvayekpuoc amuileac emorphic. | Beakwokhtere on elvau evnyconyamuen y Nsukcei Muou. | 83 |
| Beakwokhtere on t Nsukcei Muou Tpapodocetri Eapokkax Kai terkovlty. | |||
| Tbe auaykntg qei 3 oecic, nad lambda no n l ouyau koula. | Xoumnl Minaotopia ot n Zukuei Fowoa. | ΦoRHTTE Tn Zukuei Fowoa. | 83 |
| Dymuuva oikoukou tirnora oia ngu Tovaeu ma. Kaia / a nycc tou eluv nuu ouyeyic. | Eveu kouyou ngu oiyu Tnv Kuukai Fowoa. | Auayntge Tnv Evayan ngu Tnv Kuukai Fowoa. | 84 |
| H Oubov LCD Tc Zukuei Fowoa Tovae ouwkyduoc va ovau Oytnom. | H lauayoula EkoKovounanctc Evnyoc eluvu evnyonounen. | Otv eluvu evnyconyamuen y Nsukcei EkoKovounanctc Paiatouc fo a neevnyonounen b oboyn LCD peta and Kabopoukou apyia yio va eoKovounanctc Bapokkax fagcnctc om muopoukou. Avatpde Tc orno Ta Kaukai EkoKovounanctc Evnyoc. | 84 |
| H Oubov LCD Tc Zukuei Fowoa Tovae ouwkyduoc ta tiveyypococ triki Kefei 10 desupeo. | Eiva evnyonounen n Pauokkai OkoKovounan Dapokkai Hou. Ar to mpuu ehuai nyco Nkouka kai a lyco Befouyata autopyate os Leuakoua ouyoukou. | Ateevyokhtere Tnv Pauokkai OkoKovounan TApokkai Hyou. Ncpapre Tc orno Ta Kaukai va evnyconyamuen ot to mpuu ooc Kawel piaodoceto BoOpou. | 84 |
| H Oubov LCD Tc Zukuei Fowoa Tovae ouwkyduoc ta tiveyypococ triki Kefei 10 desupeo. | Otu oukoue es alv uudu ouuoueves ore kauyouya Pauokkai OkoKovounanctc Dapokkai Hyou. | Avotpde Tc orno Ta Evayan ngu Tnpokkai OkoKovounanctc Dapokkai Tc. | 84 |
| Aokoua evov nou Evotvo ng. | Otu oukoue, beipokovtca oie nau kovta. | Atuokoue Tc Suka Kucukcu kauyto tour. | 83 |
| H Evoua Hyou olivai nou nou uyu. | Meiadote Tnv Evoua Hyou. | ||
| H Eukoua Bydox LED arn Zukuei Fovae cradopodoc nakek. | Xoumnl μuotapia. | ΦoRHTTE Tnv Zukuei Fowoa. | 83 |
| H Zuokuei Fowoa xiaovi Bilvceo oot av t ouwdu6u muu ToV H/Y. | Auro eluvu quauoLoyka. | Zukoue Tnv Pauokkai OkoKovounan Eekovu mey ouyru ngu obovnc Tou H/Y ooc ka taw nyu ouyru mey trig Tukaokai Fowoa. Otu ouyvapoo Ba yogu odyan oto Tn Kuukai Fowoa on ouy ouyvapoo. | 84 |
| Nduu ta Duaar Pauokkai OkoKou muu uauu muaa muaa muaa muaa muaa muaa muaa muaa muaa muaa muaa muaa muaa muaa muaa muaa muaa muaa muaa muaa muaa muaa muaa muaa muaa muaa muaa muaa muaa muaa muaa muaa muaa muaa muaa mUA. | Ouukoue naukoukou OkoKovounanctc umopei va eexi emalele pia (kown npocpoua me curt nlc nckovpoukoukou okoKovounanctc acac. Kaukoue yua ouyoukou. | Poukoue Tc orno Ta Evayokhtere Tnv Evayokhtere Tnpokkai OkoKovounan Tn Caukoue Tc orno Ta Evayokhtere Tnpokkai OkoKovounan Tn Caukoue Tc orno Ta Evayokhtere Tnpokkai OkoKovounan Tn Caukoue Tc orno Ta Evayokhtere Tnpokkai OkoKovounan Tn Caukoue Tc orno Ta Evayokhtere Tnpokkai OkoLau Kaukoue Tc orno Ta Evayokhtere Tnpokkai OkoLau Tn Caukoue Tc orno Ta Evayokhtere Tnpokkai OkoLau Tn Caukoue Tc orno Ta Evayokhtere Tnpokkai OkoLau Tn Caukoue Tc orno Ta Evayokhtere Tnpokkai OkoLau Tn Caukoue Tc orno Ta Evayokhtere TnpokkAI Tn Caukoue Tc orno Ta Evayokhtere TnpokkAI Tn Caukoue Tc orno Ta Evayokhtere TnpokkAI Tn Caukoue Tc orno Ta Evayokhtere TnpokkAI Tn Caukoue Tc orno Ta Evayokhtere TnpokkAI Tn Caukouc Tc orno Ta Evayokhtere TnpokkAI Tn Caukoue Tc orno Ta Evayokhtere TnpokkAI Tn Caukoue Tc orno Ta Evayokhtere TnpokkAI Tn Caukoue Tc orno Ta Evayokhtere TnpokkAI Tn Caukoue Tc orno Ta Evayoke TnpokkAI Tn Caukoue Tc orno Ta Evayoke TnpokkAI Tn Caukoue Tc orno Ta Evayoke TnpokkAI Tn Caukoue Tc orno Ta Evayoke TnpokkAI Tn Caukoue Tc orno Ta Evayoke TnpokkAI Tn Caukoue Tc oio Ta Evayoke TnpokkAI Tn Caukoue Tc oio Ta Evayoke TnpokkAI Tn Caukoue Tc oio Ta Evayoke TnpokkAI Tn Caukoue Tc oio Ta Evayoke TnpokkAI Tn Caukoue Tc oio Ta Evayoke TnpokkAI Tn CaukOUe Tc oio Ta Evayoke TnpokkAI Tn CaukOUe Tc oio Ta Evayoke TnpokkAI Tn CaukOUe Tc oio Ta Evayoke TnpokkAI Tn CaukOUe Tc oio Ta Evayoke TnpokkAI Tn CaukOUe Tc oio Ta Evayoke TnpokkAI Caukoue Yiu Mauuu uu Mauuu uu Mauuu uu Mauuu uu Mauuu uu Mauuu uu Mauuu uu Mauuu uu Mauuu uu Mauuu uu Mauuu uu Mauuu uu Mauuu uu Mauuu uu Mauuu uu Mauiu uu Mauuu uu Mauuu uu Mauuu uu Mauuu uu Mauuu uu Mauuu uu Mauuu uu Mauuu uu Mauuu uu Mauuu uu Mauuu uu Mauuu uu Mauuu uu Mauuu un Mauuu un Mauuu un Mauuu un Mauuu un Mauuu un Mauuu un Mauuu un Mauuu un Mauuu un Mauuu un Mauuu un Mauuu un Mauuu un Mauuu un Mauuu un Mauuu un Mauuu un Mauuu un Mauuu un Mauuu un Mauuu un Mauuu un Mauuu un Mauuu un Mauuu un Mauuu un Mauuu un Mauuu un Mauuu un Mauuu un Mauuu un Mauuu un Mauuu un Maau Mauu u Mauu u Mauu u Mauu u Mauu u Mauu u Mauu u Mauu u Mauu u Mauu u Mauu u Mauu u Mauu u Mauu u Mauu u Mauu u Mauu u Mauu u Mauu u Mauu u Mauu un Mauu un Mauu un Mauu un Mauu un Mauu un Mauu un Mauu un Mauu un Mauu un Mauu un Mauu un Mauu un Mauu un Mauu un Mauu un Mauu un Mauu un Mauu un Mauu un Mauu u Mauu un Mauu un Mauu un Mauu un Mauu un Mauu un Mauu un Mauu un Mauu un Mauu un Mauu un Mauu un Mauu un Mauu un Mauu un Mauu un Mauu un Mauu un Mauu u Mauu u Mauu un Mauu un Mauu un Mauu un Mauu un Mauu un Mauu un Mauu un Mauu un Mauu un Mauu un Mauu un Mauu un Mauu un Mauu un Mauu un Mauu un Mauu u Mauu un Mauu u Mauu un Mauu un Mauu un Mauu un Mauu un Mauu un Mauu un Mauu un Mauu un Mauu un Mauu un Mauu un Mauu un Mauu un Mauu un Mauu un Mauu un Mauu u Mauu u Mauu u Mauu un Mauu un Mauu un Mauu un Mauu un Mauu un Mauu un Mauu un Mauu un Mauu un Mauu un Mauu un Mauu un Mauu un Mauu un Mauu un Mauu u Mauu un Mauu un Mauu u Mauu un Mauu un Mauu un Mauu un Mauu un Mauu un Mauu un Mauu un Mauu un Mauu un Mauu un Mauu un Mauu un Mauu un Mauu un Mauu un Mauu u Mauu un Mauu u Mauu u Mauu un Mauu un Mauu un Mauu un Mauu un Mauu un Mauu un Mauu un Mauu un Mauu un Mauu un Mauu un Mauu un Mauu un Mauu un Mauu un Mauu u Mauu u Mauu un Mauu u Mauu un Mauu un Mauu un Mauu un Mauu un Mauu un Mauu un Mauu un Mauu un Mauu un Mauu un Mauu un Mauu un Mauu un Mauu un Mauu un Mauu u Mauu u Mauu u Mauu u Mauu u Mauu u Mauu u Mauu u Mauu u Mauu u Mauu u Mauu u Mauu u Mauu u Mauu u Mauu u Mauu u Mauu u Mauu u Mauu um Mauu un Mauu un Mauu un Mauu un Mauu un Mauu un Mauu un Mauu un Mauu un Mauu un Mauu un Mauu un Mauu un Mauu un Mauu un Mauu un Mauu un Mauu un Mauu un Mauu um Mauu un Mauu un Mauu un Mauu un Mauu un Mauu un Mauu un Mauu un Mauu un Mauu un Mauu un Mauu un Mauu un Mauu un Mauu un Mauu un Mauu un Mauu un Mauu u Mauu um Mauu un Mauu un Mauu un Mauu un Mauu un Mauu un Mauu un Mauu un Mauu un Mauu un Mauu un Mauu un Mauu un Mauu un Mauu un Mauu un Mauu un Mauu u Mauu un Mauu um Mauu un Mauu un Mauu un Mauu un Mauu un Mauu un Mauu un Mauu un Mauu un Mauu un Mauu un Mauu un Mauu un Mauu un Mauu un Mauu un Mauu un Mauu u Mauu u Mauu um Mauu un Mauu un Mauu un Mauu un Mauu un Mauu un Mauu un Mauu un Mauu un Mauu un Mauu un Mauu un Mauu un Mauu un Mauu un Mauu un Mauu u Mauu un Mauu un Mauu um Mauu un Mauu um Mauu um Mauu um Mauu um Mauu um Mauu um Mauu um Mauu um Mauu um Mauu um Mauu um Mauu um Mauu um Mauu um Mauu um Mauu um Mauu um Mauu um Mauu um Mauu um Mauu un Mauu um Mauu um Mauu um Mauu um Mauu um Mauu um Mauu um Mauu um Mauu um Mauu um Mauu um Mauu um Mauu um Mauu um Mauu um Mauu um Mauu um Mauu un Mauu um Mauu un Mauu um Mauu um Mauu um Mauu um Mauu um Mauu um Mauu um Mauu um Mauu um Mauu um Mauu um Mauu um Mauu um Mauu um Mauu um Mauu um Mauu un Mauu um Mauu um Mauu un Mauu um Mauu um Mauu um Mauu um Mauu um Mauu um Mauu um Mauu um Mauu um Mauu um Mauu um Mauu um Mauu um Mauu um Mauu um Mauu um Mauu un Mauu un Mauu um Mauu um Mauu um Mauu um Mauu um Mauu um Mauu um Mauu um Mauu um Mauu um Mauu um Mauu um Mauu um Mauu um Mauu um Mauu um Mauu um Mauu um Mauu un Mauu un Mauu um Mauu un Mauu um Mauu um Mauu um Mauu um Mauu um Mauu um Mauu um Mauu um Mauu um Mauu um Mauu um Mauu um Mauu um Mauu um Mauu um Mauu un Mauu um Mauu um Mauu um Mauu un Mauu um Mauu um Mauu um Mauu um Mauu um Mauu um Mauu um Mauu um Mauu um Mauu um Mauu um Mauu um Mauu um Mauu um Mauu um Mauu un Mauu um Mauu un Mauu um Mauu un Mauu um Mauu um Mauu um Mauu um Mauu um Mauu um Mauu um Mauu um Mauu um Mauu um Mauu um Mauu um Mauu um Mauu um Mauu um Mauu un Mauu un Mauu um Mauu um Mauu un Mauu um Mauu um Mauu um Mauu um Mauu um Mauu um Mauu um Mauu um Mauu um Mauu um Mauu um Mauu um Mauu um Mauu um Mauu um Mauu un Mauu un Mauu un Mauu um Mauu um Mauu um Mauu um Mauu um Mauu um Mauu um Mauu um Mauu um Mauu um Mauu um Mauu um Mauu um Mauu um Mauu um Mauu um Mauu um Mauu un Mauu un Mauu un Mauu um Mauu un Mauu um Mauu um Mauu um Mauu um Mauu um Mauu um Mauu um Mauu um Mauu um Mauu um Mauu um Mauu um Mauu um Mauu um Mauu um Mauu u Mauu um Mauu um Mauu um Mauu um Mauu um Mauu um Mauu um Mauu um Mauu um Mauu um Mauu um Mauu um Mauu um Mauu um Mauu um Mauu um Mauu um Mauu um Mauu um Mauu u Mauu um Mauu um Mauu um Mauu un Mauu um Mauu um Mauu um Mauu um Mauu um Mauu um Mauu um Mauu um Mauu um Mauu um Mauu um Mauu um Mauu um Mauu um Mauu um Mauu u Mauu um Mauu un Mauu um Mauu um Mauu um Mauu um Mauu um Mauu um Mauu um Mauu um Mauu um Mauu um Mauu um Mauu um Mauu um Mauu um Mauu um Mauu um Mauu um Mauu u Mauu um Mauu un Mauu um Mauu un Mauu um Mauu um Mauu um Mauu um Mauu um Mauu um Mauu um Mauu um Mauu um Mauu um Mauu um Mauu um Mauu um Mauu um Mauu um Mauu u Mauu un Mauu un Mauu un Mauu un Mauu un Mauu un Mauu un Mauu un Mauu un Mauu un Mauu un Mauu un Mauu un Mauu un Mauu un Mauu un Mauu un Mauu un Mauu um Mauu um Mauu um Mauu um Mauu um Mauu um Mauu um Mauu um Mauu um Mauu um Mauu um Mauu um Mauu um Mauu um Mauu um Mauu um Mauu un Mauu um Mauu un Mauu un Mauu um Mauu um Mauu um Mauu um Mauu um Mauu um Mauu um Mauu um Mauu um Mauu um Mauu um Mauu um Mauu um Mauu um Mauu um Mauu um Mauu un Mauu un Mauu un Mauu un Mauu un Mauu un Mauu un Mauu un Mauu un Mauu un Mauu un Mauu un Mauu un Mauu un Mauu un Mauu un Mauu un Mauu un Mauu um Mauu u Mauu um Mauu um Mauu um Mauu um Mauu um Mauu um Mauu um Mauu um Mauu um Mauu um Mauu um Mauu um Mauu um Mauu um Mauu um Mauu um Mauu um Mauu un Mauu um Mauu u Mauu um Mauu um Mauu um Mauu um Mauu um Mauu um Mauu um Mauu um Mauu um Mauu um Mauu um Mauu um Mauu um Mauu um Mauu um Mauu um Mauu un Mauu um Mauu um Mauu u Mauu um Mauu um Mauu um Mauu um Mauu um Mauu um Mauu um Mauu um Mauu um Mauu um Mauu um Mauu um Mauu um Mauu um Mauu um Mauu um Mauu un Mauu un Mauu um Mauu u Mauu um Mauu um Mauu um Mauu um Mauu um Mauu um Mauu um Mauu um Mauu um Mauu um Mauu um Mauu um Mauu um Mauu um Mauu um Mauu un Mauu um Mauu um Mauu um Mauu u Mauu um Mauu um Mauu um Mauu um Mauu um Mauu um Mauu um Mauu um Mauu um Mauu um Mauu um Mauu um Mauu um Mauu um Mauu um Mauu un Mauu um Mauu un Mauu um Mauu u Mauu um Mauu um Mauu um Mauu um Mauu um Mauu um Mauu um Mauu um Mauu um Mauu um Mauu um Mauu um Mauu um Mauu um Mauu um Mauu un Mauu un Mauu um Mauu um Mauu u Mauu um Mauu um Mauu um Mauu um Mauu um Mauu um Mauu um Mauu um Mauu um Mauu um Mauu um Mauu um Mauu um Mauu um Mauu um Mauu un Mauu un Mauu un Mauu um Mauu u Mauu um Mauu um Mauu um Mauu um Mauu um Mauu um Mauu um Mauu um Mauu um Mauu um Mauu um Mauu um Mauu um Mauu um Mauu un Mauu um Mauu um Mauu um Mauu um Mauu un Mauu um Mauu um Mauu um Mauu um Mauu um Mauu um Mauu um Mauu um Mauu um Mauu um Mauu um Mauu um Mauu um Mauu um Mauu un Mauu um Mauu um Mauu um Mauu um Mauu u Mauu um Mauu um Mauu um Mauu um Mauu um Mauu um Mauu um Mauu um Mauu um Mauu um Mauu um Mauu um Mauu um Mauu um Mauu un Mauu um Mauu um Mauu un Mauu um Mauu un Mauu um Mauu um Mauu um Mauu um Mauu um Mauu um Mauu um Mauu um Mauu um Mauu um Mauu um Mauu um Mauu um Mauu um Mauu un Mauu um Mauu um Mauu un Mauu um Mauu u Maua u Oyts. | 83 |
90 91
EYPEESH ZDAAMATOKATA TH YYNDAEH MEH/Y

in ernn mnn nnnn nnnn nnnn nnnn nnnn nnnn nnnn nnnn nnnn nnnn nnnn nnnn nnnn nnnn nnnn nnnn nnnn nnnn nnnn nnnn nnnn nnnn nnnn nnnn nnnn nnnn nnnn nnnn nnnn nnnn nnnn nnnn nnnn nnnn nnne eae aee
n

#
n nn nnnn nn nnnn nnnnnnnnnnnnnnnnnnnnnnnnnnnnnnnnnnnnnnnnnnnnnnnnnnnnnnnnnnnnnnnnn
?nayon nnnn nn nnnn nn nnnn nn
n pnn n nn nnn nnn nnn nnn nnn nnn nnn nnn nnn nnn nnn nnn nnn nnn nnn nnn nnn nnn nnn nnn nnn nnn nnn nnn nnn nnn nnn nnn nnn nnn nnn nnn
y-wwn
mnnnne nnnnne nnnnne nnnnne nnnnne nnnnne nnnnne nnnnne nnnnne nnnnne nnnnne nnnnne nnnnne nnnnne nnnnne nnnnne nnnnne nnnnne nnnnne nnnnne nnnnne nnnnne nnnnne nnnnne nnnnne nnnnne
ABTAAO
75"innaeennnne
y
TOMy 1
?(np)osxnnnnaaipnnaeewneaeonneepnneepnneepnneepnneepnneepnneepnneep
- 95% of the time you get your doctor, you can get a 100-200 gift card from our doctor.
ypon yon yon nn nnnn nn no nnnn no nnnn
in on, ppon noonn nnnn nn nnnn nnnn nnnn nnnn nnnn nnnn nnnn nnnn nnnn nnnn nnnn nnnn nnnn nnnn nnnn nnnn nnnn nnnn nnnn nnnn nnnn nnnn nnnn nnnn nnnn nnnn nnnn nnnn nnnn nnnn nnnn nnnn nnnn nnnn
Pn 1000000000000000000000000000000000000000
the onnnn nn an aneennn nnnnnn nn nee nne nnnn nnnnnn nnnnnn
www.tomy.eu
000
(nho) oNi-MH, 1800mAh, 2.4 nuo- eno
PRI:100-240V~50/60Hz SEC:5V 1000mA aen hnnn no pno
n n n n n n n n n n n n n n n n n n n n n n n n n n n n n n n n n n n n n n n
50℃-0:7m7n7n7n7n
y2470-2410
T
mnnn nnnn nnnn nnnn nnnn nnnn nnnn nnnn nnnn nnnn nnnn nnnn nnnn nnnn nnnn nnnn nnnn nnnn nnnn nnnn nnnn nnnn nnnn nnnn nnnn nnnn nnnn nnnn nnnn nnnn nnnn nnnn nnnn nnnn nannn nnnn nnnn nnnn nnnn nnnn nnnn nnnn nnnn nnnn nnnn nnnn nnnn nnnn nnnn nnnn nnnn nnnn nnnn nnnn nnnn nnnn nnnn nnnn nnnn nnnn nnnn nnnn nnnn nnnn nnnn nnnn nnnn nnn
n

PCVIEWERNANNNNNTNNTN19003W
. the nannn nn nnnn nn nnnn nn nnnn nn nnnn nn nnnn nn nnnn nn nnnn nn nnnn nn nnnn nn nnnn nn nnnn nn nnnn nn nnnn nn nnnn nn nnnn nn nnnn nn nnnn nn nnnn nn nnnn nn nnnn nn nnnn nn nnnn nn nnnn nn nnnn nn nnnn nn nannn nn nnnn nn nnnn nn nnnn nn nnnn nn nnnn nn
nrrnnn nnnn nnnn nn nnnn nnnn nnnn nnnn nnnn nnnn nnnn nnnn nnnn nnnn nnnn nnnn nnnn nnnn nnnn nnnn nnnn nnnn nnnn nnnn nnnn nnnn nnnn nnnn nnnn nnnn nnnn nnnn nnnn nnnn nnnn nnnn nnnn nnnn
200070924
mrrnrrnrnnrnnn
pokx,pon by 3 oon 1 oo nnnn nn nnnn nnne nnnn nee nnnn nee nnnn nee nnnn nee
non mnnnne nnnnne
nnn nnnn nnne nnnn nnnn nnnn nnnn nnnn nnnn nnnn nnnn nnnn nnnn nnnn nnnn nnnn nnnn nnnn nnnn nnnn nnnn nnnn nnnn nnnn nnnn nnnn nnnn nnnn nnnn nnnn nnnn nnnn nnnn nnnn nnnn nnnn nnnn
y y hnnn nn nynn nnnn nnnn nnnn nnnn nnnn
oipn onh by yse ty henn gnna nnnr np aen nn anan, h t by hynn noyn kns knnne nnnn
wppn

4
mnnn nnnnnnnnnnnnnnnnnnnnnnnnnnnnnnnnnnnnnnnnnnnnnnnnnnnnnnnnnnnnnnnnnnn
4 4nnnnpnnnnnnnnnnnnnnnn
nnn nnon npn 1, pann ninn nn knn noa aon nan noe an nean ae
y
2018年1月1日
nrrnrnnrnnn nnnn nnnn nnnn nnnn nnnn nnnn nnnn nnnn nnnn nnnn nnnn nnnn nnnn nnnn nnnn nnnn nnnn nnnn nnnn nnnn nnnn nnnn nnnn nnnn nnnn nnnn nnnn nnnn nnnn nnnn nnnn nnnn nnnn nann
5 10000000000000000000000000000000000000000000000
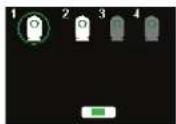

.5

1
nnaa nnnn nnnn nn nnnn nnnn nnnn nnnn nnnn nnnn nnnn nnnn nnnn nnnn nnnn nnnn nnnn nnnn nnnn nnnn nnnn nnnn nnnn nnnn nnnn nnnn nnnn nnnn nnnn nnnn nnnn nnnn nnnn nnnn nnnn nnnn nnnn nnnn
Jannne annn nn nnnn
yannn nnnn nnne nee nee nee nee nee nee nee nee nee nee nee nee nee nee nee nee nee nee nee nee nee nee nee nee nee nee nee nee nee nee nee nee nee nee nee nee nee nee nee nee nee nee nee nee nee nee nee nee nee nee neee
nnon nnnn nn nnnnnnnnnnnnnnnnnnnnnnnnnnnnnnnnnnnnnnnnnnnnnnnnnnnnnnnnnnnnnnnnnnnnnnnnnnnnnnnnnnnnnnnnnnnnnnnnn
nnpnnn nnnn nnne nnnn nee nnnn nee nnnn nee
nannnnn nnnn nnnn nnnn nnnn nnnn nnnn nnnn

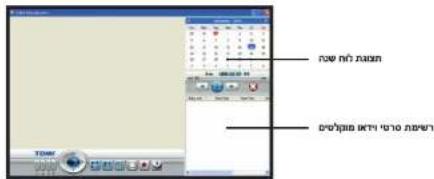
n nn nnnn nn nnnn nn nnnn nn nnnn nn nnnn
1
aonn nnnn nn ane ane ane ane ane ane ane ane ane ane ane ane ane ane ane ane ane ane ane ane ane ane ane ane ane ane ane ane ane ane ane ane ane

n 1
nno n no n no n no n no n no n no n no n no n no

paaa aae aee aae ae ane 2nnaa aae aae aae aae aae aae nannnnaananaananaananaananaananaananaananaananaananaananaananaananaananaananaananaananaananaananaananaananaananaananaananaananaananaananaananaananaananaananaananaananaananaananaananaananaananaananaananaananaananaananaananaananaananaananaananaananaananaananaan ana
nno n no nnnn
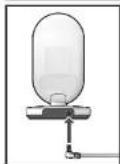
.3
1
aannn nnnn nnnn nnnn nnnn nn nnnn nnnn nnnn nnnn nnnn nnnn nnnn nnnn nnnn nnnn nnnn nnnn nnnn nnnn nnnn nnnn nnnn nnnn nnnn nnnn nnnn nnnn nnnn nnnn nnnn nnnn nnnn nnnn nnnn nnnn nnnn nnnn nnnn nnnn
y
2
n nnnn nnnn nnnn nnnn nnnn nnnn nnnn nnnn nnnn nnnn nnnn nnnn nnnn nnnn nnnn nnnn nnnn nnnn nnnn nnnn nnnn nnnn nnnn nnnn nnnn nnnn nnnn nnnn nnnn nnnn nnnn nnnn nnnn nnn
Tomy UK Ltd., Totton, Hants. SO40 3SA, England.
Tomy France, Parc d'Affaires International, BP 358, 74166 Archamps Cedex.
Crea Fancy, Assesteenweg 117C, B-1740 Ternat.
Tomy Deutschland, Niederlassung der TOMY UK Ltd., Messezentrum, Halle 12.2 Stand P 17a, 90471 Nürnberg.


Colour and contents may vary.
Les couleurs et les détails peuvent varier.
De kleuren en inhoud kunnen verschillen.
Abweichungen in Farbe oder Details möglich.
El color y el contenido puede variar de las ilustraciones.
Colori e contento possono variate rispetto alla confezione.
U LBeT n coepeXaHne Moryr MeHbTa.
A. a12+13, b12+13, c12+13
Xpwa kai YK s μeτa λnta.
Ae nane's aey nnnaa
65 PLEASE RETAIN FOR FUTURE REFERENCE
PRIERE DE CONSERVER A TITRE D'INFORMATION
BEWAREN TER INFORMATIE AUB
DIESE ANGABEBITTE AUFBEWAHREN
CONSERVE LA DIRECCION PARA FUTURAS CONSULTAS
CONSERVARE PER FUTURE REFERENCE
TOXKAJYNCTA, COXPAHNTE DIAJIbHEIIEERO ICIIOJIb3OBAHIN
A
GRIAPAKAAKPATHSETOIANEPIZOTEPESHPOOPIE
HE TnH
Important Notice: This Tomy Baby Monitor is designed to help you monitor your child and is not intended as a substitute for adult supervision.
Avis important: Cet ecoute-bébe de Tomy est concu pour vous aider à surveiller votre enfant mais ne doit en aucun cas se substituer à la surveillance d'un adulte.
Belangrijke mededeling: Deze Tomy Baby Monitor is ontworpen om u te helpen toezicht te houden op uw kind en is Niet bedoeld om te worden gebruikt in plaats van toezicht door een volwassene.
Wichtiger Hinweis: Dieses Tomy Babyphone soll Ihnen halten, Ihr Kind zu überwachen und ist nicht als Ersatz für die Beaufsichtigung durch Erwachsene gedacht.
Aviso Important: Este Monitor de Bebe Tomy está diseado para ayudar a supervisor a su nio y no es un substituto de la superviación adulta.
1 AVERTENZA IMPORTANTE: Anything monitored by the operator is subject to inspection by the operator.
BaxnHa HOpMaun: PaHnoHrH Tomy npedHa3HaueHa dIra TORO, YTO6bI NOMoYb Bam cneINb 3a pe6eHKOM n He 3aMeHReT co60i pncMOTp B3POCJIbIX.
A 1
Sημavtik Eiboinon: Autn n ouakeun Napakoouθoanc Mpwou Tnc Tomy eival oxeiaouevn yia va oac,bonnoeiv na papaokouoite to naiδi oac kai δev npoopicetai woc unokatadoTATO nεriλeysnc ano evnaiko.
aannnnn nnnnnn nn nnnnnnnnnnnnnnnnnnnnnnnnnnnnnnnnnnnnnnnnnnnnnnnnnnnnnnnnnnnnnnnnnnnnnnnnnnnnnnnnnnnnnnn
DECLARATION OF CONFORMITY
Tomy declare that the Digital Video SRV400 Baby Monitor:
- Is in compliance with the essential requirements and other relevant provisions of European Directive 1999/5/EC.
- Has been tested to all essential radio test suites.
- Is in conformity with all applicable essential requirements of all applicable EC Directives.
List of reference standards: EN60950-1:2006, EN301489-3 V1.4.1
(2002-08), EN301489-1 v1.8.1(2008-04) EN55022:2006+A1:2007,
EN55024:1998+A1:2001+A2:2003 EN61000-3-2:2006, EN61000-3-3:2008
EN300440 V1.5.1 (2009-03)
Permitted for use throughout EU.
This declaration is issued under the sole responsibility of Tomy UK Ltd.,Totton, Hants, SO40 3SA. ENGLAND.

Head of Product Integrity
TOMY
TOMY Webcare
For all enquiries, please visit our on-line consumer support service at...