
RAVSM802KRTE - Air-conditioner TOSHIBA - Free user manual and instructions
Find the device manual for free RAVSM802KRTE TOSHIBA in PDF.

| Brand | Toshiba |
| Model | RAVSM802KRTE |
| Product Type | Air conditioner (indoor unit) |
| Air conditioner type | Heat pump |
| Refrigerant | R410A |
| Operation modes | Auto, Cool, Dry, Heat, Fan only |
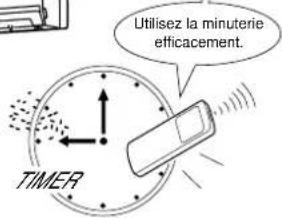
| Special functions | Hi POWER, ECO, QUIET, Timer (combined ON/OFF), Preset |
| Remote control supplied | Wireless (infrared); wired remote control optional |
| Remote control batteries | 2 AAA batteries (battery life about 1 year) |
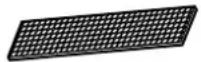
| Filters supplied | 2 Sasa-Zeolite plus filters + 2 Bio-enzyme & Gingko filters |
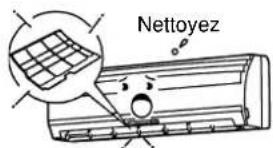
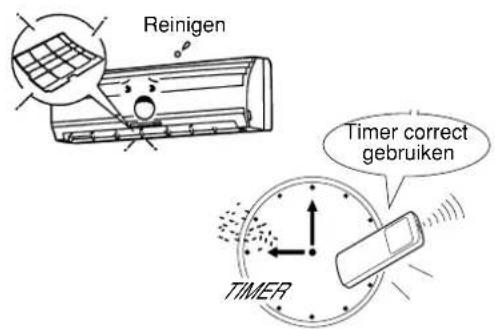
| Air filter maintenance | Clean every 15 days |
| Special filter maintenance | Clean every 6 months; replace every 2 years |
| Indoor unit cleaning | With a dry cloth; do not use water or chemicals |
| Power supply | Circuit breaker or switch with contact separation ≥ 3 mm; 25A type D fuse |
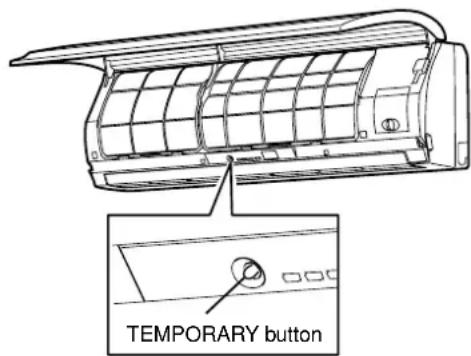
| Automatic restart | Enabled/disabled via TEMPORARY button (3 to 10 seconds) |
| Compressor protection | Delayed restart of about 3 minutes |
| Operating temperatures (cooling) | Outdoor: -5°C to 43°C; Indoor: 21°C to 32°C (dry) |
| Operating temperatures (heating) | Outdoor: -15°C to 15°C (wet); Indoor: 15°C to 28°C (dry) |
| Airflow direction | Vertical: adjustable with remote control; Horizontal: manual |
| Unit combination | Up to 8 indoor units per remote control (paired/grouped) |
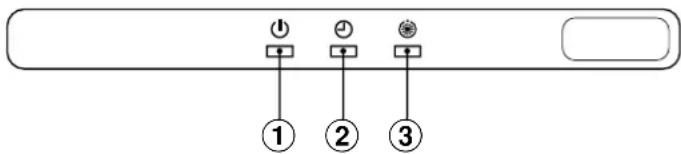
| Panel indicators | Operation (green), Timer (green), Standby (orange) |
Frequently Asked Questions - RAVSM802KRTE TOSHIBA
User questions about RAVSM802KRTE TOSHIBA
0 question about this device. Answer the ones you know or ask your own.
Ask a new question about this device
Download the instructions for your Air-conditioner in PDF format for free! Find your manual RAVSM802KRTE - TOSHIBA and take your electronic device back in hand. On this page are published all the documents necessary for the use of your device. RAVSM802KRTE by TOSHIBA.
USER MANUAL RAVSM802KRTE TOSHIBA
CLIMATISEUR (TYPE SPLIT)
KLIMAGERÄT (SPLIT-SYSTEM)
CONDIZIONATORE D'ARIA (TIPO SCOMPONIBILE)
Thank you very much for purchasing TOSHIBA Air Conditioner.
Please read this owner's manual carefully before using your Air Conditioner.
- Be sure to obtain the "Owner's manual" and "Installation manual" from constructor (or dealer).
Request to constructor or dealer
Please clearly explain the contents of the Owner's manual and hand over it.
natural_image
Line drawing of a cylindrical air conditioner unit with ventilation grille and control buttons (no text or symbols)ADOPTION OF NEW REFRIGERANT
This Air Conditioner is a new type which adopts a new refrigerant HFC (R410A) instead of the conventional refrigerant R22 in order to prevent destruction of the ozone layer.
UTILISATION DU NOUVEAU REFRIGERANT
PRECAUTIONS FOR SAFETY .... 1
PARTS NAME 3
NAMES AND FUNCTIONS OF INDICATORS AND CONTROLS ON INDOOR UNIT .... 3
WIRELESS REMOTE CONTROLLER AND ITS FUNCTIONS .... 4
NAMES AND FUNCTIONS OF INDICATIONS ON WIRELESS REMOTE CONTROLLER .... 5
PREPARATION AND CHECK BEFORE USE 5
LIMITED OPERATION BY TWIN AND GROUP COMBINATION .... 7
HANDLING THE REMOTE CONTROLLER 8
ADJUSTING AIR FLOW DIRECTION 14
NAMES AND FUNCTION OF WIRED REMOTE CONTROLLER 15
CORRECT USAGE 17
AUTOMATIC OPERATION (AUTO CHANGEOVER) 18
ADJUSTMENT OF AIR FLOW DIRECTION 19
TIMER OPERATION 20
HOW THE AIR CONDITIONER WORKS 22
TEMPORARY OPERATION 23
MAINTENANCE 24
AIR CONDITIONER OPERATIONS AND PERFORMANCE 26
TROUBLES AND CAUSES 27
SOMMAIRE
ACCESSOIRES/COMPOSANTS DU FILTRE A AIR .... 1
MESURES DE SECURITE .... 1
WERKING MET HOOG VERMOGEN (HI POWER) 11
TEMPORARY FUNCTIE 23
ONDERHOUD 24
WERKING EN PRESTATIES AIRCONDITIONING 26
PROBLEMEN EN OORZAKEN 27
ПЕРИЕХОМЕНА
Bio-enzyme & Gingko filters (two)

PRECAUTIONS FOR SAFETY
DANGER
- DO NOT ATTEMPT TO INSTALL THIS UNIT BY YOURSELF. THIS UNIT REQUIRES QUALIFIED INSTALLER.
•DO NOT ATTEMPT TO REPAIR THE UNIT BY YOURSELF. THIS UNIT HAS NO COMPONENTS WHICH YOU CAN REPAIR. - OPENING OR REMOVING THE COVER WILL EXPOSE YOU TO DANGEROUS VOLTAGES.
- TURNING OFF THE POWER SUPPLY WILL NOT PREVENT POTENTIAL ELECTRIC SHOCK.

natural_image
Illustration of two people painting a large cylindrical object, one on a ladder and the other standing beside it (no text or symbols)WARNING
WARNING ABOUT INSTALLATION
- Make sure to ask a dealer or a store specialized in electric work to install the air conditioner. If the air conditioner is imperfectly installed by yourself, it may cause some problems such as water leak, electric shock, fire, and so on.
- Ground the air conditioner without fail. Do not connect the ground wire to gas pipe, water pipe, lightning rod or ground wire of telephone. If the air conditioner is imperfectly grounded, it may cause electric shock.
natural_image
Illustration of two cats reacting to a large cylindrical object emitting smoke (no text or symbols)CAUTION
TO DISCONNECT THE APPLIANCE FROM THE MAIN POWER SUPPLY This appliance must be connected to the main power supply by means of a circuit breaker or a switch with a contact separation of at least 3 mm.
The installation fuse (25A D type ⏻) must be used for the power supply line of this conditioner.
WARNING ABOUT OPERATION
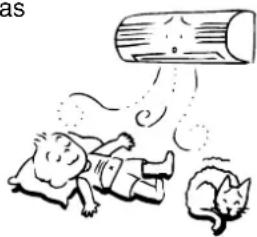
- Avoid cooling the room too strong or exposing the human body to cool wind for a long time, because it is bad for the health.
- Do not insert fingers and sticks into the air outlet and air inlet to avoid getting injured and damaging the machine, because there are fans running at a high speed inside both the air inlet and air outlet.
- When you are aware of something abnormal with the air conditioner (smells something scorching, cools weak, etc.), immediately turn off the main switch, the circuit breaker, from the main power supply to stop the air conditioner, and make contact with the dealer. If the air conditioner is continuously operated with something abnormal, it may cause machine failure, electric shock, fire, and so on.
- Do not spill water or other liquid on the indoor unit. If the unit is wet, it may cause an electric shock.
WARNING ABOUT MOVEMENT AND REPAIR
- Do not move nor repair any unit by yourself. Since there is high voltage inside the unit, you may get an electric shock when removing the cover and main unit.
- When moving the air conditioner for re-installing in another place, ask the dealer to do it. If it is imperfectly installed, it may cause electric shock or fire.

natural_image
Cartoon illustration of two children reacting to a large wooden log on a TV (no text or symbols present)
natural_image
Simple line drawing of a person shouting with an alarm (no text or symbols)CAUTION
CAUTIONS ABOUT INSTALLATION
•Certainly lay the drain hose for perfect draining.
Wrong drainage may cause flooding in the house and getting furniture wet.
- Make sure to connect the air conditioner to an exclusive power supply of the rated voltage; otherwise, the unit may break down or cause a fire.
- Do not install the unit in a place where inflammable gas may leak. If inflammable gas accumulates around the unit, it may cause a fire.
CAUTIONS ABOUT OPERATION
- Carefully read this manual before starting the air conditioner. The manual includes many important things for daily operation.
- Do not use this air conditioner for other purposes such as preserving food, precision instruments, art objects, breeding animals, growing potted plants, etc.
- Do not install this air conditioner in a special-purpose room such as a ship or any kind of vehicle, otherwise it deteriorates the machine performance.
- Avoid exposing potted plants and animals to wind of the air conditioner, because it badly affects the health and growing of them.
- When the air conditioner is operated together with a combustion appliance in the same place, be careful of ventilation to let fresh air into the room. Poor ventilation causes oxygen shortage.
- When the air conditioner is used in a closed room, be careful of sufficient ventilation of the room. Poor ventilation causes oxygen shortage.
- Do not touch operation button with wet finger; otherwise, you may get an electric shock.
- Do not place any combustion appliance in a place where it is directly exposed to wind of the air conditioner; otherwise, it may cause imperfect combustion.
- When the air conditioner won't be used for a considerably long time, turn off the main switch or the circuit breaker, for safety. Disconnection from the power supply prevents the unit from lightning and power source surge.
- Do not put a vessel with water such as a vase on the unit, because water may possibly sink into the unit and will bring about electric shock because of deterioration in electric insulation.
- Check the concrete blocks, etc. underneath the outdoor unit occasionally. If the base is left damaged or deteriorated, the unit may topple over and inflict an injury on a person as the worst case.
- Do not wash the unit with water. It may cause an electric shock.
- Do not use alcohol, benzene, thinner, glass cleaner, polishing powder, etc. for cleaning the unit, because they deteriorate or damage the air conditioner.
- When cleaning the unit, make sure to turn off the main switch or circuit breaker beforehand for preventing you from getting injured by the electric fan running inside.
For details of cleaning method, refer to "Maintenance" on page 24 and 25. - Do not put anything on the outdoor unit nor step onto it. If you do so, it may not only topple over the unit but also injure yourself.
- To make the air conditioner demonstrate its original performance, operate it within the range of the operating temperature specified in the instructions. Otherwise it may malfunction, break down or water may leak from the unit.

natural_image
Illustration of various household and industrial scenes with cartoon characters, no text or symbols presentPARTS NAME
Indoor unit
①Room temperature sensor
②Front panel
③Air inlet grille
④Air filter
⑤Air outlet
⑥Horizontal air flow flap
⑦Vertical air flow flap
①Display panel
⑨Infrared signal receiver
⑩ Remote controller (wireless)
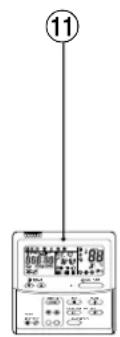
⑪ Remote controller (wired, sold separately)


NAMES AND FUNCTIONS OF INDICATORS AND CONTROLS ON INDOOR UNIT
Display panel
The operating conditions are indicated below.
-
⏻ (OPERATION) lamp (green)
This lamp goes on during operation. -
⏻ (TIMER) lamp (green)
This lamp goes on white the timer reserved.
flowchart
graph TD
    A["①"] --> B["②"]
    C["②"] --> D["③"]
NOTES
In case of timer setting by wired remote controller, lamp does not light. In case of twin and group combination, lamp goes on main unit only. (see page 7.)
- (STAND BY) lamp (orange)
This lamp lights up when the power is turned on or right after heating operation starts or during defrost operation and thermo control.
CAUTION
When the power is turned on for the first time after installation, lamp lights up for approximately 5 minutes for setting of addresses of systems and units. When the power is turned on the next time, lamp lights up for approximately 1 minute.
While the above lamp is on, all the commands from the remote controller cannot be received. However, this is not a malfunction or failure.
TEMPORARY button
If you misplace or lose the remote controller or its batteries are exhausted, push the TEMPORARY button.
-
Open the air inlet grille to push the TEMPORARY button. You can lift the grille up to an angle wherever it will remain fixed. Do not lift the grille any further when it stops with a clicking sound.
-
Push the TEMPORARY button to start the air conditioner. Push this button once again to stop it. (see page 23.)
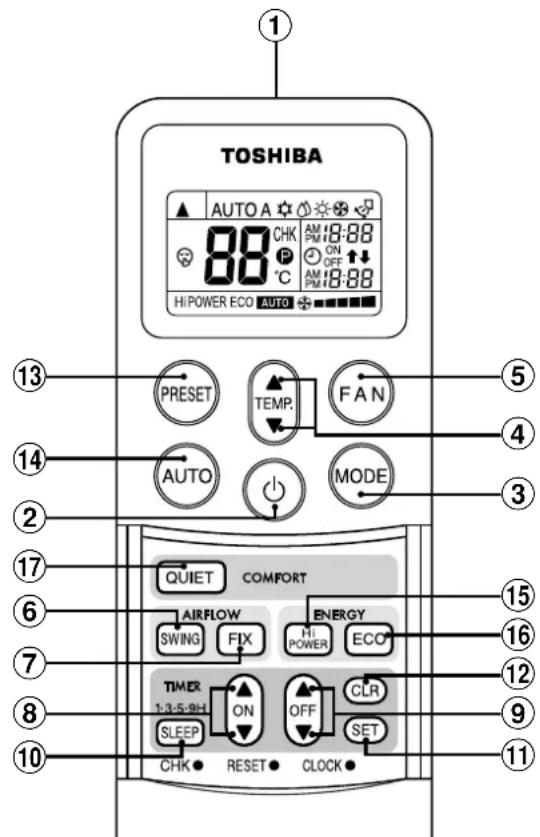
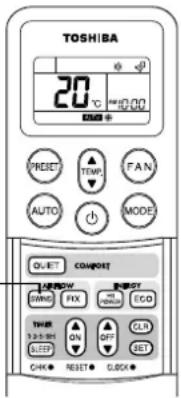
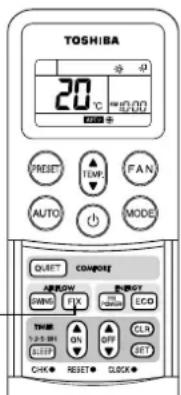
WIRELESS REMOTE CONTROLLER AND ITS FUNCTIONS
①Infrared signal emitter
Transmits a signal to the indoor unit.
②START/STOP button
Push the button to start operation.
(A receiving beep is heard.)
Push the button again to stop operation.
(A receiving beep is heard.)
If no receiving sound is heard from the indoor unit, push the button twice.
③Mode select button (MODE)
Push this button to select a mode.
Each time you push the button, a mode is selected in a sequence that goes from A: Auto changeover control, ⚙ : Cool, ⚠ Dry, ⚡ Heat, : F on only, and back to A. (A receiving beep is heard.)
④Temperature button (TEMP.)

⑤Fan speed button (FAN)
Push this button to select fan speed. When you select AUTO, the fan speed is automatically adjusted according to the room temperature. You can also manually select the desired fan speed from among five settings.

(A receiving beep is heard.)
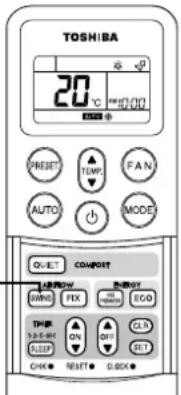
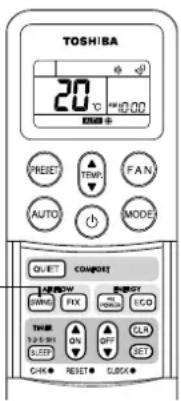
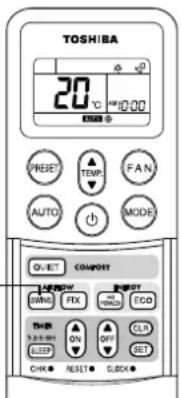
⑥ Auto flap button (SWING)
Push this button to swing the flap.
(A receiving beep is heard.)
Push the SWING button to stop the flap swinging.
(A receiving beep is heard.) (see page 14.)
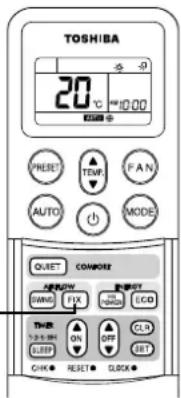
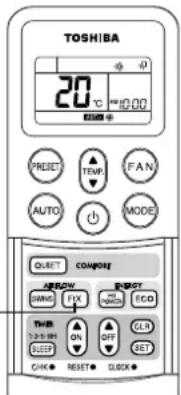
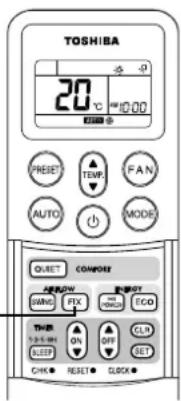
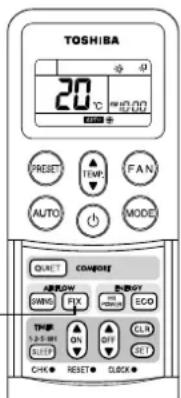
⑦Set flap button (FIX)
Push this button to adjust the air flow direction.
(A receiving beep is heard.) While this button is kept depressed, the receiving tone continuously sounds. (see page 14.)
⑧On timer button (ON)
Push this button to set the ON timer.
To forward the time, push the "▲" button.
To set back the time, push the "▼" button.
⑨Off timer button (OFF)
Push this button to set the OFF timer.
To forward the time, push the "▲" button.
To set back the time, push the "▼" button.
⑩SLEEP button (SLEEP)
This function is not operated twin and group combination. (see page 7.) Push this button to start the SLEEP timer (OFF timer) operation. You can select the OFF timer time from among four settings (1, 3, 5 or 9 hours). (see page 22.)
⑪ Reserve button (SET)
Push this button to reserve time settings. (A receiving beep is heard.)
⑫Cancel button (CLR)
Push this button to cancel ON timer and OFF timer. (A receiving beep is heard.)
⑬Memory and Preset button (PRESET)
Push this button to operate the air conditioner according to settings memorized by the unit for future operation.
Push the button again for more than 3 seconds to memorize the setting indicated on the remote controller and Ⓟ mark is indicated. (see page 13.)
⑭Automatic operation button (AUTO)
Push this button to operate the air conditioner automatically. (A receiving beep is heard.)
⑮ High power button (Hi POWER)
This function is not operated twin and group combination. (see page 7.) Push this button to start the high power operation. (see page 22.)
⑯ ECO button (ECO)
This function is not operated twin and group combination. (see page 7.) Push this button to start the ECO (save energy) operation. (see page 22.)
⑰ QUIET button (QUIET)
This function is not operated twin and group combination. (see page 7.)
Push this button to start the quiet operation. (see page 22.)
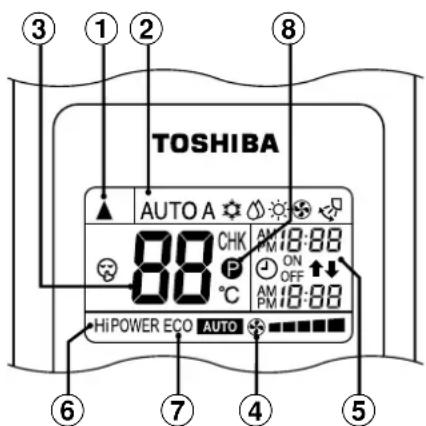
NAMES AND FUNCTIONS OF INDICATIONS ON WIRELESS REMOTE CONTROLLER
Display
All indications, except for clock time indication, are indicated by pushing the START/STOP button.
①Transmission mark
This transmission mark (▲) indicates when the remote controller transmits signals to the indoor unit.
②Mode display
Indicates the current operation mode.
(AUTO : Automatic control, A : Auto changeover control, ⚙ : Cool,
: Dry, Heat, an only)
③Temperature display
Indicates the temperature setting (17°C to 30°C).
When you set the operating mode to ⚙ : Fan only, no temperature setting is indicated.
④FAN speed display
Indicates the selected fan speed. AUTO or one of five fan speed levels

HIGH - - - - - can be indicated.
Indicates AUTO when the operating mode is either AUTO or ⚙ : Dry.
⑤TIMER and clock time display
The time set for timer operation or clock time is indicated.
The present time is always indicated except for TIMER operation.
⑥Hi POWER display
Indicates when the Hi POWER operation starts.
Push the Hi POWER button to start and push it again to stop the operation.
⑦ ECO display
Indicates when the ECO (save energy) operation starts.
Push the ECO (save energy) button to start and push it again to stop the operation.
⑧ (PRESET) display
Push another button to turn off the mark.
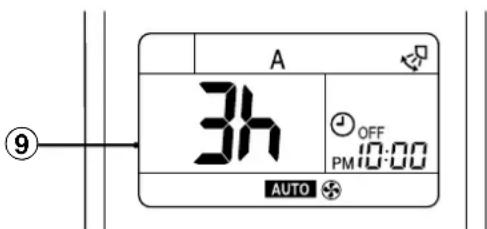
⑨SLEEP TIMER display
Indicates when the SLEEP TIMER is in operation.
Each time you push the SLEEP button, the display changes in the sequence of 1, 3, 5 or 9h.
•In the illustration, all indications are indicated for explanation.
During operation, only the relevant indications will be indicated on the remote controller.
PREPARATION AND CHECK BEFORE USE
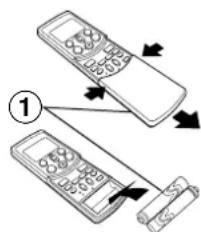
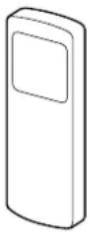
Loading the remote controller batteries.
①Remove the cover, and insert the batteries.
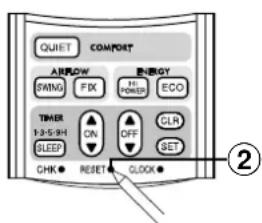
②Push the RESET button.
The clock display flashes.
Adjust the clock.
Place back the cover.
- Slide off the cover while pressing the sides.
- Battery replacement
Be careful not to reverse the
(+) position and the (−)
position.
flowchart
graph TD
    A["Add a keypad"] --> B["Add a scroll"]
    style A fill:#f9f,stroke:#333
    style B fill:#bbf,stroke:#333
Batteries
•To replace the batteries, use two new batteries (AAA type).
- In normal use, the batteries will last about one year.
- Replace the batteries if there is no receiving beep from the indoor unit or when the air conditioner cannot be operated using the remote controller.
- To avoid malfunctions by battery leakage, remove the batteries when not using the remote controller for more than one month.
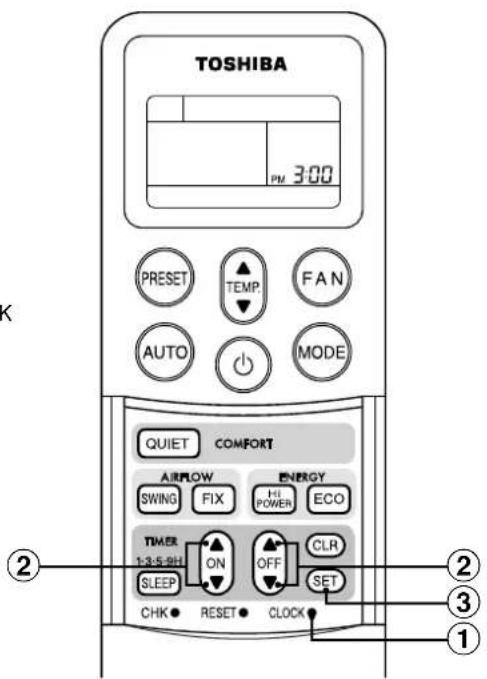
Setting the clock
Before you start operating the air conditioner, set the clock of the remote controller using the procedures given in this section. The clock panel on the remote controller will indicate the time regardless of whether the air conditioner is in use or not.
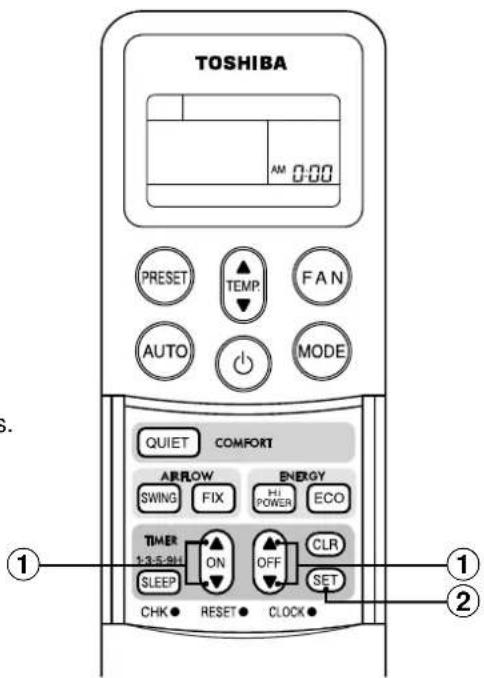
Initial setting
When batteries are inserted in the remote controller, the clock panel will indicate AM 0:00 and will flash.
①ON/OFF TIMER button
Push or button to set the current time. Each push of the TIMER button changes the time in one minute steps. Pushing the TIMER button continually changes the time in ten minute steps.
②SET button
Push the SET button. The current time is indicated and the clock starts.
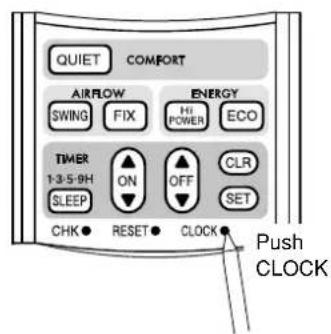
Clock adjusting
①CLOCK button
Push the CLOCK button. The CLOCK display flashes.
②ON/OFF TIMER button
Push or button to set the current time. Each push of the TIMER button changes the time by one minute. Pushing the TIMER button continually changes the time by ten minutes.
③SET button
Push the SET button. The current time is indicated and the clock starts.
Preparing the filters
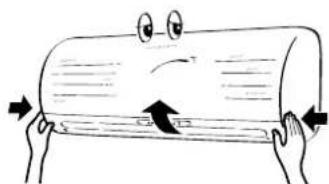
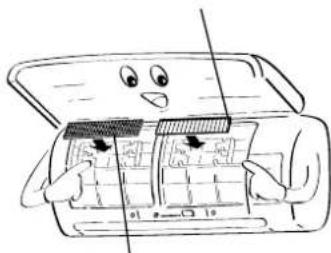
①Open the air inlet grille, and remove the air filters.
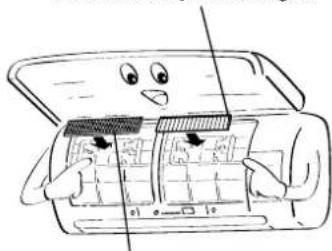
②Attach the supplied Sasa-Zeolite plus filter and Bio-enzyme & Gingko filter (two each).
natural_image
Cartoon illustration of two hands holding a cylindrical object with an arrow indicating compression (no text or symbols)
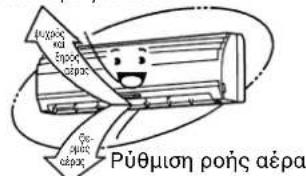
natural_image
Cartoon illustration of a smiling refrigerator with a grid and directional arrows (no text or symbols)
natural_image
Cartoon illustration of a car interior with open door and dashboard, showing no text or symbolsBio-enzyme & Gingko filter
Sasa-Zeolite plus filter
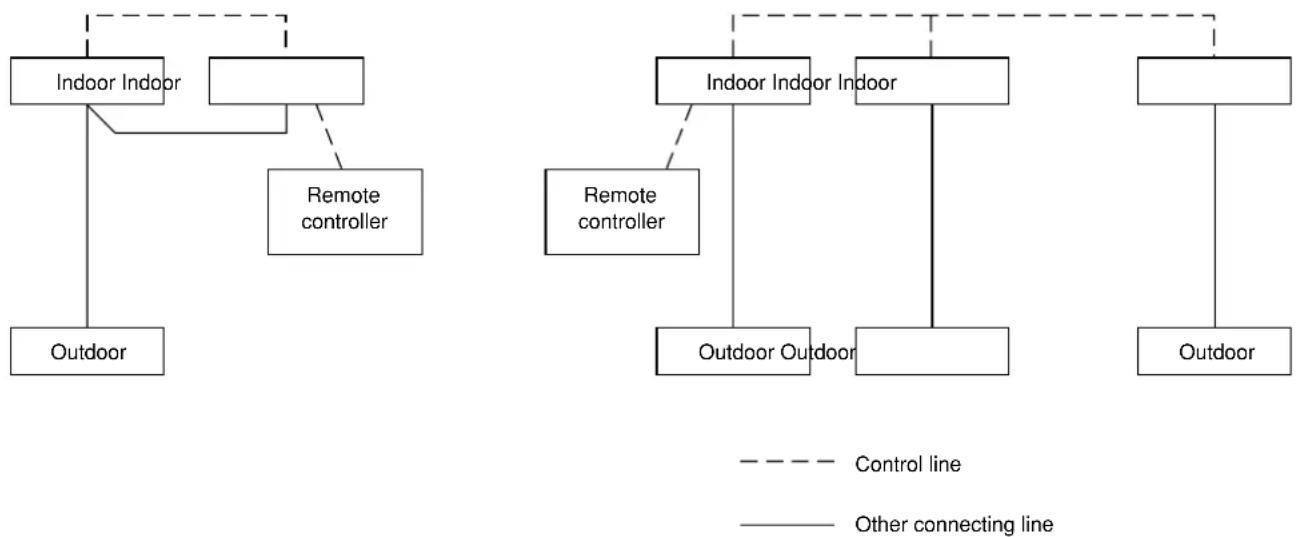
Twin combination: The combination where 2 indoor units are installed for 1 outdoor unit.
Group combination: Operate air conditioners in more than one system (such as single combination and twin combination) in same time.
Header unit: The representative unit during twin and group operation. Receive commands from remote controller and transmit the commands to follower units.
(The header unit is indoor unit that receives START/STOP signal from the wireless remote controller.)
Follower unit: Indoor units other than the header unit are called follower unit.
Example of twin combination Example of group combination
flowchart
graph TD
    A["Indoor Indoor"] --> B["Outdoor"]
    C["Remote controller"] --> A
    D["Indoor Indoor Indoor"] --> E["Outdoor Outdoor"]
    F["Remote controller"] --> G["Outdoor Outdoor"]
    H["Control line"] -.-> I["Indoor Indoor Indoor"]
    I -.-> J["Indoor Indoor Indoor"]
    K["Other connecting line"] -.-> L["Indoor Indoor Indoor"]
    L -.-> M["Indoor Indoor Indoor"]
    N["Outdoor Outdoor"] -.-> O["Indoor Outdoor"]
    P["Outdoor Outdoor"] -.-> Q["Indoor Outdoor"]
CAUTION
When using indoor unit in twin and group combination,
- Hi POWER, ECO and QUIET operation will not function.
When Hi POWER or ECO or QUIET is transmitted from wireless remote controller, the receiving sound will be heard from the indoor unit and display on the remote controller will also change. (see page 22.) However, the indoor unit does not operate Hi POWER or ECO or QUIET. Restore the display on the remote controller pushing Hi POWER or ECO or QUIET button.
- Units other than the header unit cannot be operated with remote controller and the TEMPORARY button.
When operating air conditioner with wireless remote controller, transmission should be sent to the header unit. Header and follower units are decided through address setting upon installation. Follower unit will not receive any signals from remote controller.
Air conditioner will not work even if the TEMPORARY button on the follower unit is pushed.
(Some follower units may receive SWING and FIX, but these operations are performed only on the unit that received the signal.)
(When wireless remote controller is used, only the header unit receives SWING signal. If the SWING signal is transmitted to follower unit, the sound to refuse receiving signal (3 beeps) is heard and the follower unit does not receive the signal.
For FIX operation, both header and follower unit perform the operation by itself.
When wired remote controller is used, air flow direction can be changed on each unit by selecting the indoor unit.)
- ⏻ lamp lights up only on the header unit.
When the timer is set with wired remote controller, even the ⏻ lamp on the header unit will not light up.
ACCESSOIRES COMPOSANTS DU FILTRE A AIR
natural_image
Illustration of two people painting a large cylindrical object, one on a ladder and the other standing beside it (no text or symbols)
natural_image
Illustration of two cats playing with a large cylindrical object above them (no text or symbols)
natural_image
Cartoon illustration of two children reacting to a wooden log being hit by a TV (no text or symbols present)
natural_image
Simple line drawing of a person waving while using a phone to listen (no text or symbols)ATTENTION
PRECAUTIONS CONCERNANT L'INSTALLATION
natural_image
Cartoon illustration of various household and commercial behaviors, including a computer, washing machine, and household items (no text or symbols)NOM DES PIECES
Unité intérieure
NOM ET FONCTION DES INDICATEURS ET COMMANDES DE L'UNITE INTERIEURE
Panneau d'affichage
LA TELECOMMANDE SANS FIL ET SES FONCTIONS
flowchart
graph TD
    A["Step 1"] --> B["Step 2"]
    B --> C["Arrow to next step"]
    style A fill:#f9f,stroke:#333
    style B fill:#bbf,stroke:#333
Piles
natural_image
Cartoon illustration of two hands holding a cylindrical object with a sad face and directional arrows (no text or symbols)
natural_image
Cartoon illustration of a person holding a car with visible wheels and directional arrows (no text or symbols)
natural_image
Cartoon illustration of a smiling computer with open lid and internal components (no text or symbols)Filtre Bio-enzyme & Gingko
Filtre Sasa-Zeolite plus
UTILISATION LIMITEE PAR UNE COMBINAISON JUMELEE OU GROUPEE
REMARQUES
natural_image
Line drawing of a wall-mounted air conditioner emitting sound waves to a remote control unit (no text or symbols)
natural_image
Diagram showing two mechanical device configurations with directional arrows indicating movement (no text or symbols)FONCTIONNEMENT AUTOMATIQUE
natural_image
Cartoon illustration of a smiling cylindrical object with a downward arrow, no text or symbols present①

natural_image
Cartoon illustration of a smiling cylindrical object with eyes, standing on a stack of papers (no text or symbols)①

ATTENTION
natural_image
Cartoon illustration of a smiling cylindrical object with arms and legs, standing on a stand (no text or symbols)NOMS ET FONCTIONS DES ELEMENTS DE LA TELECOMMANDE AVEC FIL
Section d'affichage
①Affichage de SET DATA (PARAMETRAGE)
HIGH (ELEVE)
LOW (FAIBLE)
COMMENT ANNULER LE REDEMARRAGE AUTOMATIQUE
MODE DE FONCTIONNEMENT DU CLIMATISEUR

natural_image
Illustration of a person opening a window with explosion effects (no text or symbols)
MAINTENANCE
AVERTISSEMENT
natural_image
Line drawing of a hand holding a grid-like object with a curved handle (no text or symbols)
natural_image
Cartoon illustration of two hands holding a cylindrical object with an arrow indicating rotation (no text or symbols)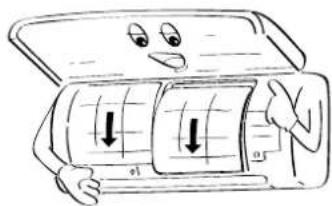
Filtre Bio-enzyme & Gingko

natural_image
Cartoon illustration of a car interior with open door, showing dashboard and steering wheel (no text or symbols)Filtre Sasa-Zeolite plus
5
natural_image
Cartoon illustration of a rolled-up document with arrows indicating tension or pressure (no text or symbols)
natural_image
Cartoon illustration of a smiling car with arrows indicating airflow or movement (no text or symbols)FONCTIONNEMENT ET PERFORMANCES DU CLIMATISEUR
natural_image
Cartoon illustration of a woman reacting with surprise to a surprised cat (no text or symbols)natural_image
Illustration of two people painting a large cylindrical object, one on a ladder and the other standing beside it (no text or symbols)WARNUNG
WARNHINWEIS ZUR INSTALLATION
natural_image
Illustration of two children playing with a large cylindrical object above their head, no text or symbols present
natural_image
Cartoon illustration of two children reacting to a large wooden log being hit by a computer screen (no text or symbols present)
natural_image
Simple line drawing of a person shouting while holding a phone to their ear (no text or symbols)VORSICHT
natural_image
Cartoon illustration of various household and industrial scenes including a computer, washing machine, fire extinguisher, and household items (no text or symbols)TEILEBEZEICHNUNG
Raumgerät
KABELLOSE FERNBEDIENUNG UND IHRE FUNKTION
①Infrarotsignalsender
Einstellen der Uhr
natural_image
Cartoon illustration of two hands holding a cylindrical object with a sad face and directional arrows (no text or symbols)
natural_image
Cartoon illustration of a smiling car with a grid inside, showing a person holding the door (no text or symbols)
natural_image
Cartoon illustration of a car interior with open door and internal compartments (no text or symbols)Bio-enzyme & Gingko-Filter
Sasa-Zeolite plus-Filter
EINGESCHRÄNKTER BETRIEB BEI TWIN- UND GRUPPENKOMBINATIONEN
HINWEIS
natural_image
Line drawing of a wall-mounted air conditioner emitting sound waves to a remote control unit (no text or symbols)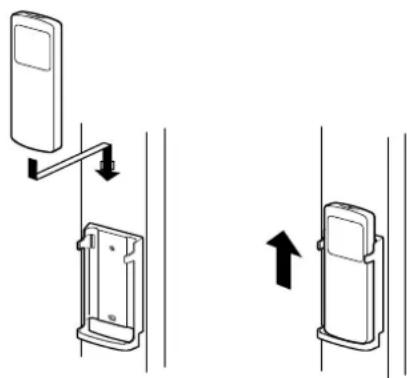
natural_image
Diagram showing two mechanical device configurations with directional arrows indicating movement (no text or symbols)AUTOMATIKBETRIEB
④Ventilator-Taste (FAN)

natural_image
Cartoon illustration of a smiling cylindrical object with a downward arrow, no text or symbols present①
natural_image
Cartoon illustration of a smiling cylindrical object with arms and legs, standing on a stack of papers (no text or symbols)①

natural_image
Cartoon illustration of a smiling cylindrical object with arms and legs, standing on a platform (no text or symbols)①SET DATA Anzeige
WIE DIE KLIMAANLAGE FUNKTIONIERT
STROMSPARMODUS (ECO)
natural_image
Illustration of a person opening a window with decorative patterns and sunburst effects (no text or symbols)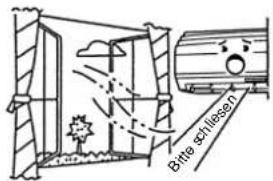
WARTUNGSHINWEISE
WARNUNG
natural_image
Line drawing of a hand using a tool to clean or spread a grid-patterned sheet (no text or symbols)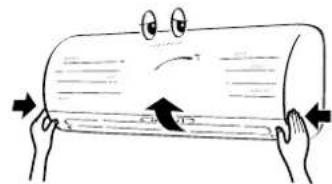
natural_image
Cartoon illustration of two hands holding a cylindrical object with a sad face and directional arrows (no text or symbols)
Bio-enzyme & Gingko-Filter

natural_image
Illustration of a cartoon-style open refrigerator with a face and buttons, no text or symbols presentSasa-Zeolite plus-Filter
5
natural_image
Cartoon illustration of a rolled-up document with arrows indicating tension or pressure (no text or symbols)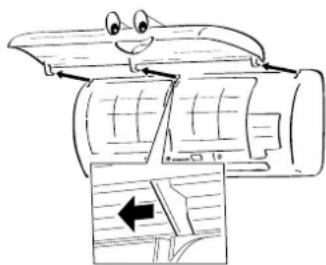
natural_image
Cartoon illustration of a smiling car with arrows indicating airflow or movement (no text or symbols)natural_image
Illustration of a person reacting with surprise or shock to another person (no text or symbols present)natural_image
Illustration of a person blowing a large cylindrical object with motion lines (no text or symbols)
ACCESSORI COMPONENTI DEI FILTRI DELL'ARIA
Telecomando
natural_image
Illustration of two people painting a large cylindrical object, one on a ladder and the other standing beside it (no text or symbols)
natural_image
Illustration of two cats playing with a large cylindrical object above them (no text or symbols)
natural_image
Cartoon illustration of two children reacting to a TV screen showing a broken log, with no text or symbols present.
natural_image
Simple line drawing of a person talking on a phone with expressive gestures (no text or symbols)AVVERTENZA
natural_image
Illustration of various household and industrial scenes with cartoon characters, no text or symbols presentNOMI E FUNZIONI DEGLINDICATORI E DEI COMANDI SULL'UNITÀ INTERNA
TELECOMANDO SENZA CAVO E RELATIVE FUNZIONI
natural_image
Cartoon illustration of two hands holding a cylindrical object with a sad face and an arrow, no text or symbols present.
natural_image
Cartoon illustration of a person holding a car with visible wheels and buttons, no text or symbols present
natural_image
Cartoon illustration of a car with a smiling face and open door, showing internal compartments (no text or symbols)Filtro Bio-enzyme & Gingko
Filtro Sasa-Zeolite plus
natural_image
Line drawing of a wall-mounted air conditioner with a remote control unit emitting sound waves (no text or symbols)
natural_image
Diagram showing two mechanical device configurations with directional arrows indicating movement (no text or symbols)natural_image
Cartoon illustration of a smiling car with a downward arrow, no text or symbols present①
NOTA
natural_image
Cartoon illustration of a smiling cylindrical object with eyes and a stack of books underneath (no text or symbols)①
AVVERTENZA
natural_image
Cartoon illustration of a smiling cylindrical object with arms and legs, standing on a stand with arrows (no text or symbols)natural_image
Illustration of a person observing through a window with sun rays and explosion effects (no text or symbols)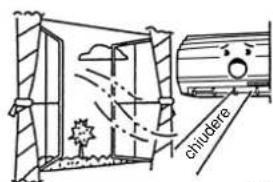
MANUTENZIONE
ATTENZIONE
natural_image
Line drawing of a hand holding a small object over a grid-patterned surface (no text or symbols)
natural_image
Line drawing of a hand holding a grid-like object (no text or symbols)
natural_image
Cartoon illustration of two hands holding a cylindrical object with a sad face and directional arrows (no text or symbols)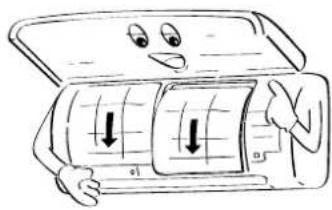
natural_image
Cartoon illustration of a person holding a car with arrows indicating downward motion (no text or symbols)Filtro Bio-enzyme & Gingko

natural_image
Cartoon illustration of a smiling computer with open lid and keyboard (no text or symbols)Filtro Sasa-Zeolite plus
5
natural_image
Illustration of a hand holding a cylindrical object with arrows indicating motion or force (no text or symbols)
natural_image
Cartoon illustration of a smiling car with arrows indicating airflow or movement (no text or symbols)natural_image
Illustration of a person reacting with surprise or shock, showing a distressed expression and a surprised child (no text or symbols)natural_image
Illustration of two people painting a large cylindrical object, one on a ladder and the other kneeling beside it (no text or symbols)
natural_image
Illustration of two children playing with a large cylindrical object above their feet, no text or symbols present
natural_image
Cartoon illustration of two children reacting to a large wooden log on a TV (no text or symbols present)
natural_image
Simple line drawing of a person shouting while holding a phone to their ear (no text or symbols)PRECAUCIÓN
natural_image
Illustration of various household and industrial behaviors including a computer, washing machine, fire extinguisher, and household items (no text or symbols present)ventilador (LOW —, LOW+ —MED , MED
Pilas
natural_image
Cartoon illustration of two hands holding a cylindrical object with a sad face and directional arrows (no text or symbols)
natural_image
Cartoon illustration of a smiling car with a grid inside, showing a person holding the door (no text or symbols)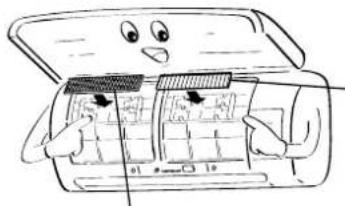
natural_image
Cartoon illustration of a smiling computer with open lid and internal components (no text or symbols)Filtro Bio-enzyme & Gingko
Filtro Sasa-Zeolite plus
natural_image
Line drawing of a wall-mounted air conditioner with a remote control unit emitting sound waves (no text or symbols)
natural_image
Diagram showing two mechanical device configurations with directional arrows indicating movement (no text or symbols)natural_image
Cartoon illustration of a smiling cylindrical object with a downward arrow, no text or symbols present①
natural_image
Cartoon illustration of a smiling cylindrical object with eyes and a base, supported by stacked documents (no text or symbols)①
natural_image
Cartoon illustration of a smiling cylindrical object with arms and legs, standing on a platform (no text or symbols)①Indicador SET DATA
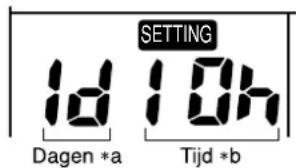
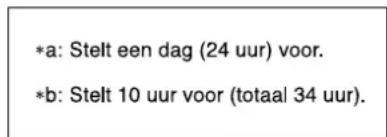
*a: Representa un día (24 horas)
*b: Representa 10 horas
(total: 34 horas).
natural_image
Illustration of a person using a solar panel to interact with a window and explosion sparks (no text or symbols)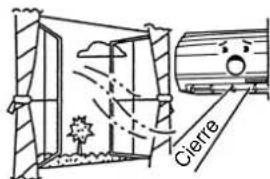
natural_image
Line drawing of a hand holding a grid-like object (no text or symbols)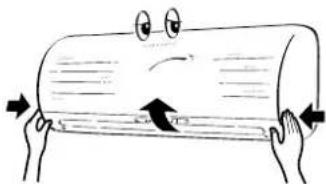
natural_image
Cartoon illustration of two hands holding a cylindrical object with a sad face and directional arrows (no text or symbols)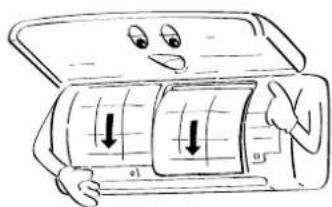
Filtro Bio-enzyme & Gingko
natural_image
Cartoon illustration of a smiling car with open lid and control panel, no text or symbols presentFiltro Sasa-Zeolite plus
5
natural_image
Illustration of a hand holding a cylindrical object with arrows indicating motion or force (no text or symbols)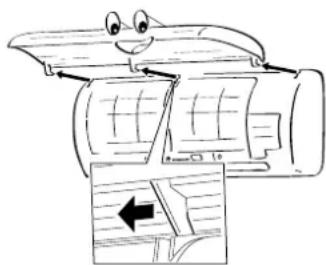
natural_image
Cartoon illustration of a smiling car with arrows indicating airflow or movement (no text or symbols)natural_image
Illustration of a person reacting with surprise or shock, showing a distressed expression and a surprised child (no text or symbols)natural_image
Illustration of two people painting a large cylindrical object, one on a ladder and the other standing nearby (no text or symbols)AVISO
natural_image
Illustration of two cats playing with a large cylindrical object above them (no text or symbols)CUIDADO
PARA DESLIGAR O APARELHO DA REDE PÚBLICA
natural_image
Cartoon illustration of two children reacting to a TV screen with a large log, no text or symbols presentnatural_image
Simple line drawing of a person shouting while holding a phone to their ear (no text or symbols)CUIDADO
natural_image
Illustration of various household and industrial behaviors including a computer, washing machine, fire, and household appliances (no text or symbols present)de velocidade (LOW —, LOW+ —, MED , MED +
Baterias
natural_image
Cartoon illustration of two hands holding a cylindrical object with a sad face and an arrow indicating compression (no text or symbols)
natural_image
Cartoon illustration of a person holding a car with visible wheels and directional arrows (no text or symbols)
natural_image
Cartoon illustration of a car interior with open door and internal compartments (no text or symbols)Filtro Bio-enzyme & Gingko
Filtro Sasa-Zeolite plus
natural_image
Line drawing of a wall-mounted air conditioner with a remote control unit emitting sound waves (no text or symbols)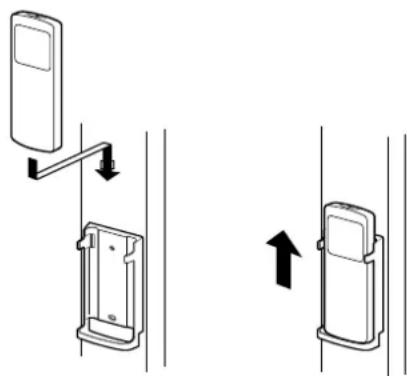
natural_image
Diagram showing two mechanical device configurations with directional arrows indicating movement (no text or symbols)natural_image
Cartoon illustration of a smiling rectangular object with a downward arrow, no text or symbols present①
natural_image
Cartoon illustration of a smiling cylindrical object with arms and legs, standing on a stack of papers (no text or symbols)①
Ajustar caudal de ar horizontal
Preparação:
natural_image
Cartoon illustration of a smiling cylindrical object with arms and legs, standing on a stand (no text or symbols)①Visor SET DATA
natural_image
Illustration of a person opening a window with decorative elements (no text or symbols)
natural_image
Line drawing of a hand holding a grid-patterned object (no text or symbols)
natural_image
Cartoon illustration of two hands holding a cylindrical object with a smiling face and directional arrows (no text or symbols)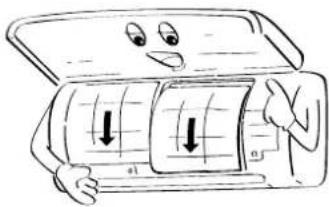
Filtro Bio-enzyme & Gingko
natural_image
Cartoon illustration of a smiling car interior with a handle and door panel (no text or symbols)Filtro Sasa-Zeolite plus
5
natural_image
Illustration of a hand holding a cylindrical object with arrows indicating motion or force (no text or symbols)
natural_image
Cartoon illustration of a smiling car with arrows indicating airflow or movement (no text or symbols)natural_image
Cartoon illustration of a person reacting with surprise or shock, showing a distressed face and a surprised face (no text or symbols)natural_image
Simple line drawing of a person looking up at a hanging object with a downward arrow (no text or symbols)natural_image
Cartoon illustration of a computer monitor with arms and legs, no text or symbols present

natural_image
Illustration of a man holding a baby while another child is looking surprised (no text or symbols)natural_image
Cartoon illustration of a dog reacting to a TV screen, no text or symbols presentnatural_image
Simple line drawing of a person blowing a cloud or smoke from a cylindrical object (no text or symbols)
natural_image
Cartoon illustration of a person reacting with surprise or shock to a computer monitor (no text or symbols present)WAARSCHUWING BETREFFENDE DE INSTALLATIE
WAARSCHUWING BETREFFENDE VERPLAATSING EN REPARATIE
natural_image
Illustration of two people painting a large cylindrical object, one on a ladder and the other standing nearby (no text or symbols)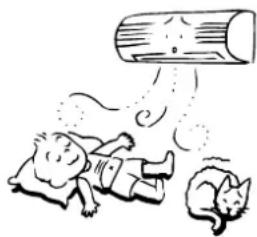
natural_image
Illustration of two cats reacting to a large cylindrical object with motion lines (no text or symbols)
natural_image
Cartoon illustration of two children reacting to a large wooden log being hit by a computer screen (no text or symbols present)
natural_image
Simple line drawing of a person shouting while holding a phone to their ear (no text or symbols)OPGELET
OPGELET BIJ HET INSTALLEREN
natural_image
Cartoon illustration of various household and industrial behaviors, including cleaning, heating, and storage (no text or symbols)ONDERDELEN
Binnenmodule
BENAMING EN FUNCTIE VAN INDICATOREN EN BEDIENINGSELEMENTEN OP BINNENMODULE
Display
DRAADLOZE AFSTANDSBEDIENING EN FUNCTIE
①Infraroodsignaalzender
natural_image
Cartoon illustration of two hands holding a cylindrical object with a sad face and directional arrows (no text or symbols)
natural_image
Cartoon illustration of a smiling car with wheels and buttons, showing motion arrows (no text or symbols)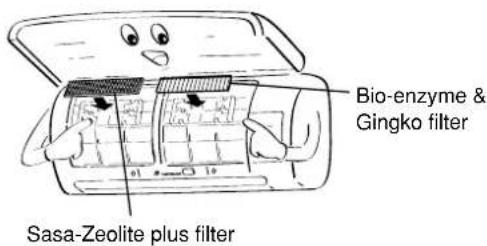
BEPERKTE WERKING BIJ DUBBELE OPSTELLING EN GROEPSOPSTELLING
OPMERKINGEN
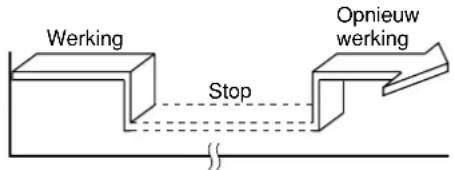
WERKING MET HOOG VERMOGEN (Hi POWER)
Hoog vermogen (Hi POWER)
(Stop → Werking → Stop)
natural_image
Cartoon illustration of a smiling rectangular object with a downward arrow, no text or symbols present①

natural_image
Cartoon illustration of a smiling cylindrical object with eyes and a smile, standing on a stack of books (no text or symbols)①
Regel de horizontale luchtstroom
Voorbereiding:
natural_image
Cartoon illustration of a smiling cylindrical object with arms and legs, standing on a platform with arrows (no text or symbols)BENAMINGEN EN WERKING VAN DE DRAADAFSTANDSBEDIENING
Display
①SET DATA
AUTOMATISCHE HERSTARTFUNCTIE ANNULEREN
WERKING VAN DE AIRCONDITIONING
natural_image
Illustration of a person opening a window with sun and explosion effects (no text or symbols)
ONDERHOUD
WAARSCHUWING
natural_image
Line drawing of a hand holding a grid notebook with a pen resting on it (no text or symbols)
natural_image
Cartoon illustration of two hands holding a cylindrical object with an arrow indicating compression or rotation (no text or symbols)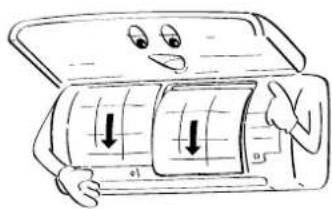
natural_image
Cartoon illustration of a person holding a car with visible airflow arrows (no text or symbols)Bio-enzyme & Gingko filter

natural_image
Illustration of a cartoon car with a face on top, showing its open status and buttons (no text or symbols)Sasa-Zeolite plus filter
5
Sasa-Zeolite plus filter
Bio-enzyme & Gingko filter
natural_image
Illustration of a hand holding a cylindrical object with arrows indicating motion or force (no text or symbols)
natural_image
Cartoon illustration of a smiling car with arrows indicating airflow or movement (no text or symbols)WERKING EN PRESTATIES AIRCONDITIONING
Adresinstelling
natural_image
Illustration of a person reacting with surprise or shock, showing a cloud of smoke and a surprised child (no text or symbols)natural_image
Cartoon illustration of a computer monitor character with arms and legs (no text or symbols)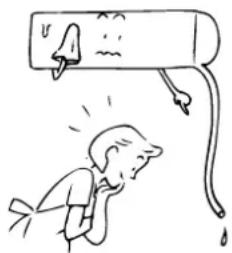
natural_image
Simple line drawing of a person looking up at a hanging object with arrows and droplets (no text or symbols)

natural_image
Illustration of a man holding a baby while another child is covering his face (no text or symbols present)
natural_image
Cartoon illustration of a dog reacting to a large TV screen, no text or symbols present
natural_image
Simple line drawing of a person blowing a cloud or smoke from a cylindrical object (no text or symbols)

natural_image
Cartoon illustration of a person reacting with surprise or shock, standing beside a computer monitor (no text or symbols present)

natural_image
Illustration of two people painting a large cylindrical object, one on a ladder and the other standing nearby (no text or symbols)ΠΡΟΕΙΔΟΠΟΙΗΣΗ
natural_image
Illustration of two cats reacting to a large cylindrical object with motion lines (no text or symbols)ΠΡΟΦΥΛΑΞΗ
natural_image
Cartoon illustration of two children reacting to a large wooden log being hit by a computer screen (no text or symbols present)natural_image
Simple line drawing of a person waving while talking on a phone (no text or symbols)ПРОФУЛАЕН
natural_image
Illustration of a cartoon scene with multiple scenes: a computer, a newspaper, a person holding a scroll, a steaming cylinder, a distressed TV, and a cat reacting in fear (no text or symbols present)natural_image
Cartoon illustration of two hands holding a cylindrical object with a sad face and directional arrows (no text or symbols)
natural_image
Cartoon illustration of a smiling car with a grid and downward arrows, no text or symbols present
natural_image
Cartoon illustration of a smiling computer with open lid and internal components (no text or symbols)natural_image
Line drawing of a wall-mounted air conditioner with a remote control unit emitting sound waves (no text or symbols)
natural_image
Diagram showing two mechanical device configurations with directional arrows indicating movement (no text or symbols)ΑΥΤΟΜΑΤΗ ΛΕΙΤΟΥΡΓΙΑ
natural_image
Cartoon illustration of a smiling rectangular object with a downward arrow, no text or symbols present①
ΣΗΜΕΙΩΣΗ
natural_image
Cartoon illustration of a smiling cylindrical object with arms and legs, standing beside stacked books (no text or symbols)①

ΠΡΟΦΥΛΑΞΗ
natural_image
Cartoon illustration of a smiling cylindrical object with arms and legs, standing on a platform (no text or symbols)①'Evδειξη SET DATA
natural_image
Illustration of a person viewing a window with sun and explosion effects (no text or symbols)
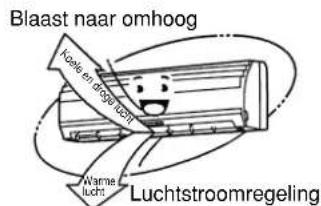
Φυσά προς τα επάνω
ΣΥΝΤΗΡΗΣΗ
ΠΡΟΕΙΔΟΠΟΙΗΣΗ
natural_image
Line drawing of a hand holding a grid-based object with a brush (no text or symbols)
natural_image
Cartoon illustration of two hands holding a cylindrical object with a sad face and directional arrows (no text or symbols)
natural_image
Cartoon illustration of a smiling car with open lid and hands interacting with the dashboard (no text or symbols)natural_image
Cartoon illustration of a rolled-up document with arrows indicating tension or pressure (no text or symbols)
natural_image
Cartoon illustration of a smiling car with arrows indicating airflow or movement (no text or symbols)natural_image
Illustration of a person reacting to a crying face with a thought bubble (no text or symbols)natural_image
Simple line drawing of a person looking up at a hanging object with a frowning face (no text or symbols)
natural_image
Cartoon illustration of a computer monitor character with arms and legs (no text or symbols)
natural_image
Illustration of a child holding a baby with a distressed expression (no text or symbols)

natural_image
Cartoon illustration of a dog reacting to a large TV screen, no text or symbols present
natural_image
Illustration of a person blowing a cloud of smoke or vapor (no text or symbols)
natural_image
Cartoon illustration of a person reacting with surprise or shock to a computer monitor (no text or symbols present)
TOSHIBA CARRIER CORPORATION

- ADOPTION OF NEW REFRIGERANT
- UTILISATION DU NOUVEAU REFRIGERANT
- SOMMAIRE
- ПЕРИЕХОМЕНА
- PRECAUTIONS FOR SAFETY
- DANGER
- WARNING
- WARNING ABOUT INSTALLATION
- CAUTION
- WARNING ABOUT OPERATION
- WARNING ABOUT MOVEMENT AND REPAIR
- CAUTIONS ABOUT INSTALLATION
- CAUTIONS ABOUT OPERATION
- PARTS NAME
- Indoor unit
- NAMES AND FUNCTIONS OF INDICATORS AND CONTROLS ON INDOOR UNIT
- Display panel
- NOTES
- TEMPORARY button
- WIRELESS REMOTE CONTROLLER AND ITS FUNCTIONS
- ①Infrared signal emitter
- ②START/STOP button
- ③Mode select button (MODE)
- ④Temperature button (TEMP.)
- ⑤Fan speed button (FAN)
- ⑥ Auto flap button (SWING)
- ⑦Set flap button (FIX)
- ⑧On timer button (ON)
- ⑨Off timer button (OFF)
- ⑩SLEEP button (SLEEP)
- ⑪ Reserve button (SET)
- ⑫Cancel button (CLR)
- ⑬Memory and Preset button (PRESET)
- ⑭Automatic operation button (AUTO)
- ⑮ High power button (Hi POWER)
- ⑯ ECO button (ECO)
- ⑰ QUIET button (QUIET)
- NAMES AND FUNCTIONS OF INDICATIONS ON WIRELESS REMOTE CONTROLLER
- Display
- ①Transmission mark
- ②Mode display
- ③Temperature display
- ④FAN speed display
- ⑤TIMER and clock time display
- ⑥Hi POWER display
- ⑦ ECO display
- ⑧ (PRESET) display
- ⑨SLEEP TIMER display
- PREPARATION AND CHECK BEFORE USE
- Loading the remote controller batteries.
- ①Remove the cover, and insert the batteries.
- ②Push the RESET button.
- - Battery replacement
- Batteries
- Setting the clock
- Initial setting
- ①ON/OFF TIMER button
- ②SET button
- Clock adjusting
- ①CLOCK button
- ②ON/OFF TIMER button
- ③SET button
- Preparing the filters
- ACCESSOIRES COMPOSANTS DU FILTRE A AIR
- ATTENTION
- PRECAUTIONS CONCERNANT L'INSTALLATION
- NOM DES PIECES
- Unité intérieure
- NOM ET FONCTION DES INDICATEURS ET COMMANDES DE L'UNITE INTERIEURE
- Panneau d'affichage
- LA TELECOMMANDE SANS FIL ET SES FONCTIONS
- Piles
- UTILISATION LIMITEE PAR UNE COMBINAISON JUMELEE OU GROUPEE
- REMARQUES
- FONCTIONNEMENT AUTOMATIQUE
- NOMS ET FONCTIONS DES ELEMENTS DE LA TELECOMMANDE AVEC FIL
- Section d'affichage
- COMMENT ANNULER LE REDEMARRAGE AUTOMATIQUE
- MODE DE FONCTIONNEMENT DU CLIMATISEUR
- MAINTENANCE
- AVERTISSEMENT
- FONCTIONNEMENT ET PERFORMANCES DU CLIMATISEUR
- WARNUNG
- WARNHINWEIS ZUR INSTALLATION
- VORSICHT
- TEILEBEZEICHNUNG
- Raumgerät
- KABELLOSE FERNBEDIENUNG UND IHRE FUNKTION
- ①Infrarotsignalsender
- Einstellen der Uhr
- EINGESCHRÄNKTER BETRIEB BEI TWIN- UND GRUPPENKOMBINATIONEN
- HINWEIS
- AUTOMATIKBETRIEB
- ④Ventilator-Taste (FAN)
- ①SET DATA Anzeige
- WIE DIE KLIMAANLAGE FUNKTIONIERT
- STROMSPARMODUS (ECO)
- WARTUNGSHINWEISE
- ACCESSORI COMPONENTI DEI FILTRI DELL'ARIA
- AVVERTENZA
- NOMI E FUNZIONI DEGLINDICATORI E DEI COMANDI SULL'UNITÀ INTERNA
- TELECOMANDO SENZA CAVO E RELATIVE FUNZIONI
- NOTA
- MANUTENZIONE
- ATTENZIONE
- 5
- PRECAUCIÓN
- Pilas
- AVISO
- CUIDADO
- Baterias
- Ajustar caudal de ar horizontal
- Preparação:
- WAARSCHUWING BETREFFENDE DE INSTALLATIE
- WAARSCHUWING BETREFFENDE VERPLAATSING EN REPARATIE
- OPGELET
- OPGELET BIJ HET INSTALLEREN
- ONDERDELEN
- Binnenmodule
- BENAMING EN FUNCTIE VAN INDICATOREN EN BEDIENINGSELEMENTEN OP BINNENMODULE
- DRAADLOZE AFSTANDSBEDIENING EN FUNCTIE
- ①Infraroodsignaalzender
- BEPERKTE WERKING BIJ DUBBELE OPSTELLING EN GROEPSOPSTELLING
- OPMERKINGEN
- WERKING MET HOOG VERMOGEN (Hi POWER)
- Hoog vermogen (Hi POWER)
- Regel de horizontale luchtstroom
- Voorbereiding:
- BENAMINGEN EN WERKING VAN DE DRAADAFSTANDSBEDIENING
- ①SET DATA
- AUTOMATISCHE HERSTARTFUNCTIE ANNULEREN
- WERKING VAN DE AIRCONDITIONING
- ONDERHOUD
- WAARSCHUWING
- Sasa-Zeolite plus filter
- Bio-enzyme & Gingko filter
- WERKING EN PRESTATIES AIRCONDITIONING
- Adresinstelling
- ΠΡΟΕΙΔΟΠΟΙΗΣΗ
- ΠΡΟΦΥΛΑΞΗ
- ПРОФУЛАЕН
- ΑΥΤΟΜΑΤΗ ΛΕΙΤΟΥΡΓΙΑ
- ΣΗΜΕΙΩΣΗ
- ΣΥΝΤΗΡΗΣΗ
- TOSHIBA CARRIER CORPORATION
Brand : TOSHIBA
Model : RAVSM802KRTE
Category : Air-conditioner