
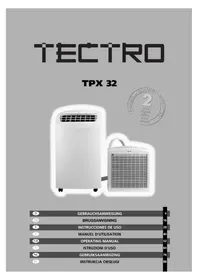
T8000 - Air Conditioning TECTRO - Free user manual and instructions
Find the device manual for free T8000 TECTRO in PDF.

| Product Type | Portable monoblock air conditioner |
| Brand | Tectro |
| Model | T8000 |
| Cooling capacity (Btu/h) | 8000 |
| Cooling capacity (kW) | 2,3 |
| Power consumption (W) | 750 |
| Current consumption (A) | 3,6 |
| Connection voltage (V/Hz) | 220-240 / 50 |
| Refrigerant | R407C / 410 |
| Dehumidification capacity (L/24h) | 13,5 |
| Recommended room area (m³) | 45 |
| Max air flow (m³/h) | 385 |
| Thermostat (°C) | 18 - 32 |
| Fan speeds | 2 (slow, fast) |
| Timer (hours) | 1 - 8 |
| Dimensions (W x D x H, mm) | 350 x 450 x 778 |
| Weight (kg) | 34 |
| Compressor | Rotary |
| Main functions | Cooling, dehumidification, ventilation |
| Maintenance and cleaning | Clean the filter with vacuum cleaner or water (<40°C); exterior with damp cloth |
| Safety | Do not cover openings, free space >50 cm, do not use in humid environments |
| Spare parts and repairability | Air filter, water tank, exhaust hose, foam strips; 24-month warranty |
| General information | Portable air conditioner with casters; indoor use |
Frequently Asked Questions - T8000 TECTRO
User questions about T8000 TECTRO
0 question about this device. Answer the ones you know or ask your own.
Ask a new question about this device
Download the instructions for your Air Conditioning in PDF format for free! Find your manual T8000 - TECTRO and take your electronic device back in hand. On this page are published all the documents necessary for the use of your device. T8000 by TECTRO.
USER MANUAL T8000 TECTRO
H CONDITIONS DE GARANTIE
Congratulations on the purchase of your Tectro air conditioner. The mobile Tectro air conditioner is extremely easy to operate and move. You have acquired a high quality product that will provide you with many years of pleasure, on condition that you use it responsibly. Reading these instructions for use before operating your Tectro will optimise its life span. We wish you comfort with your Tectro.
Yours sincerely,
PVG International b.v.
Customer service department
- READ THE DIRECTIONS FOR USE FIRST.
- IN CASE OF ANY DOUBT, CONTACT YOUR DEALER.
CONTENTS
A Specifications page 52
B Parts page 53
C Before use page 54
D Installation page 55
E Operation page 57
F Drainage page 58
G Maintenance page 59
H Guarantee page 60
I Problem shooting page 61
To be used as indication, subject to modifications
| Model | T8000 | |
| Cooling capacity * | ||
| - enthalpy difference nominal | Btu/hr 8000 | |
| - enthalpy difference | kW 2.3 | |
| - conform EC regulation | W 1800 | |
| Power supply | V/Hz 220-240 / 50 | |
| Power consumption | W 750 | |
| Current nominal | A 3.6 | |
| Air delivery maximum | m³/h | 385 |
| Dehumidification maximum ** | L/24h 13.5 | |
| Room size | m³ | 45 |
| Compressor model | rotary | |
| Refrigerant | grR407C/410 | |
| Thermostat range | °C 18 - 32 | |
| Fan speeds | 2 | |
| Timer | hr 1-8 | |
| Dimensions (b x d x h) | mm 350 x 450 x 778 | |
| Weight | kg 34 | |
- Cooling capacities are measured at 27^ C,60% RH
** Moisture removal at 32^ , 80% RH

PARTS
Front
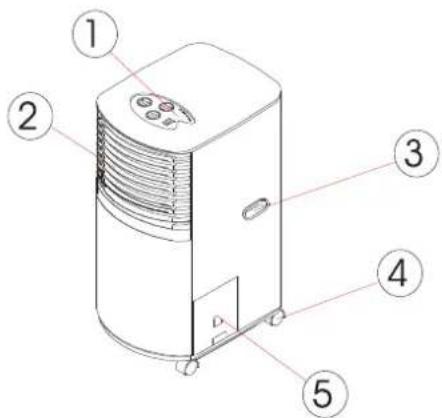
Control panel
Cooling air outlet
3 Handle
Caster
5 Water tank
Back
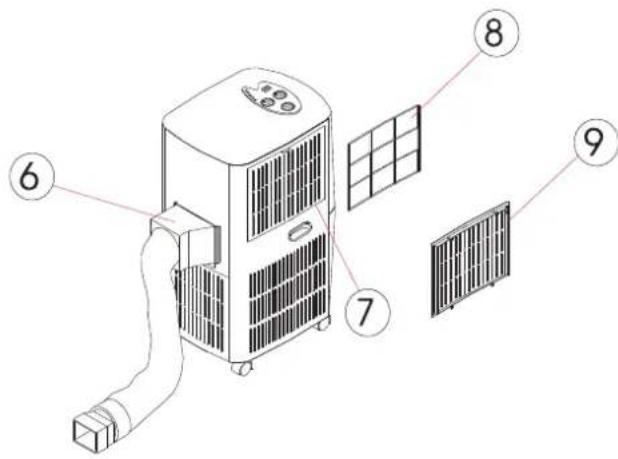
6 Exhaust air outlet
Air inlet
8 Plastic air filter
9 Grill
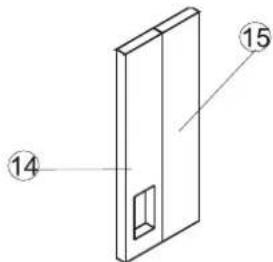
Accessoires
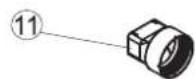

Adaptor - for insertion over hose and into back of the air conditioner.
Adaptor - for insertion over hose and into foam strip.
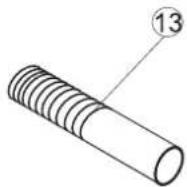
3 Exhaust hose
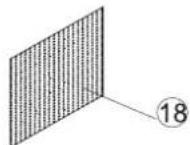
Foam strip - for filling the open window space and with hole for connection to exhaust hose.
Foam strip - for filling the open window space
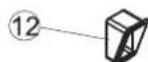
16 Round window connector
7 Cap for round window connector
Active carbon filter (to be inserted between the plastic air filter and grill)
C BEFORE USE
Caution!
- Make sure the unit is connected to a earthed, power supply of the correct rating. (Please refer to the rating label locating at the back side of the unit.)
- Do not use this product for functions other than those described in this instruction manual.
- Always place the unit on a stable groundbase (fig. 1).
- The unit must always stand or be transported in a vertical position.
- Do not cover or obstruct the appliance's inlet and outlet grilles (fig. 2).
- Do not use the product in a wet room, such as bathroom or laundry room (fig. 3).
- Keep an air path of at least 50~cm from walls, furniture and curtains (fig. 4).
- Do not sit or place objects on the unit.
- Do not touch the unit with wet or damp hands or when barefoot.
- Do not let chemical substances come into contact with the unit.
- Do not use the product in the presence of inflammable substance or vapor such as alcohol, insecticides, petrol etc.
- Never use the plug to start and stop the unit. Always use the switch on the control panel.
- Turn off the product when not in use.
- Always remove the mains plug before carrying out maintenance.
- If the electrical socket is different from the plug, have a professionally qualified electrician replace the socket with a suitable one. Avoid the use of adapter plugs, multiple sockets and / or extension leads. If their use is necessary, ensure they conform to current safety regulation.
- Do not pull the supply cable or place it near a source of heat: always unroll it completely to avoid dangerous overheating.
- If the supply cord is damaged, it must be replaced by the service agent or a similarly qualified person, in order to avoid a hazard.
- Never use the unit without the filter.
- Especially, younger, elder and disabled people are often not aware of the danger that might occur from the usage of electrical appliances. Therefore, the product should never be used without supervision.
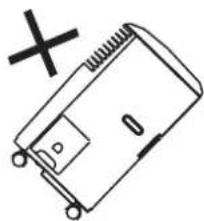
fig.1
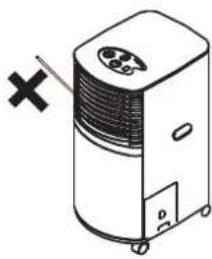
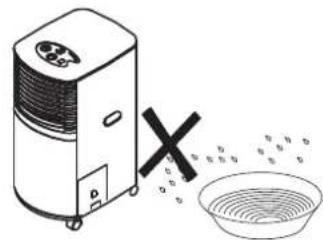
fig. 2
fig. 3
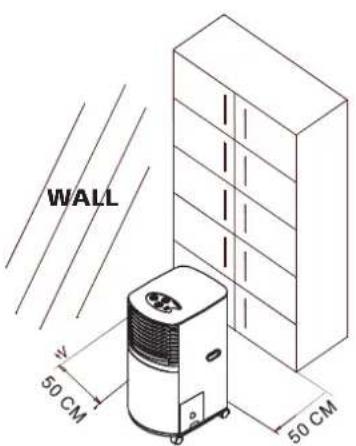
fig.4

ATTENTION!
The manufacturer/distributor disclaims any responsibility, if the above instructions are not followed.
Energy save tips
- Please use the unit in the recommended room size. (Please refer to the Specifications).
- Do not locate air conditioner where furniture or other objects can obstruct the air flow.
- Keep blinds/curtains closed during the sunniest part of the day.
- Close the fireplace damper, floor and/or wall registers, so cool air does not escape through the chimney or duct work.

NOTE!
Never close the room completely. Avoid under pressure in the room; this disturbs exhaust flow from geyser, (kitchen exhausters and/or oven).
- Keep the filters clean.
- Set the unit to maximum cooling and high speed ventilation for the initial startup, then adjust the unit to a comfortable setting.
D INSTALLATION
Mounting of the unit
This unit is a PORTABLE AIR CONDITIONER. It can be moved from room to room, so, the cooling can follow you anywhere. The mounting is easy, beneath a window or wall. Please refer to either of the following ways:
- Using the foam strips
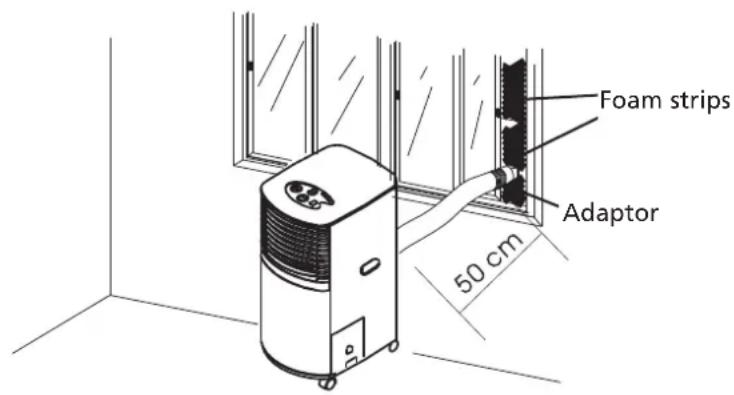
1 Connect the supplied foam strips with the exhaust pipe, let the hot air flow to the outside.
2 Should the foam strip(s) be too large, cut off the extra part to fit the window.
- Using the round window connectors
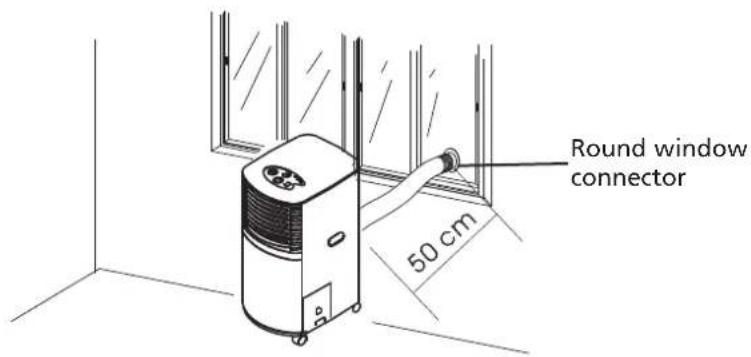
1 Dig a hole (diameter >112mm ) on the wall/glass to fit the supplied round window connector.
2 Take off the adaptor one which does not connect with the unit), fit the hose directly to the round window connector.
3 When the hole is not in use. Use the cap for the round window connector to cover the hole.
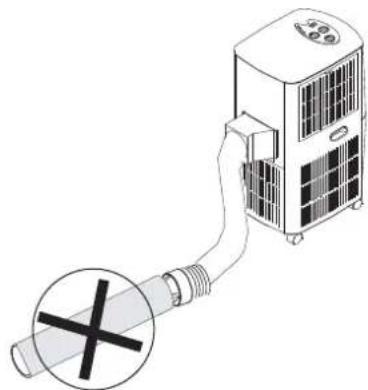
Mounting of the exhaust pipe
1 The supplied exhaust hose can be extended from 300 to 1500mm for mounting. It is recommended that you use the hose in the shortest possible length.
2 Take care to prevent any bow or bend in the middle of the exhaust hose, as this will trap hot exhaust air, which will radiate into the room and cause this unit to shut itself off due to overheating.
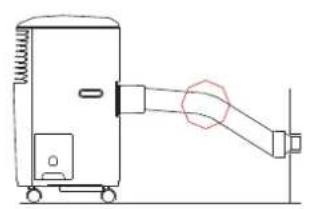
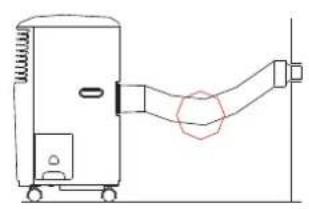
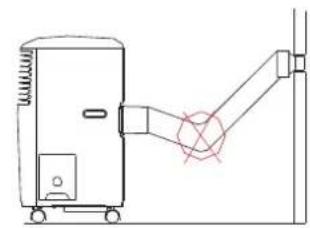

WARNING!
The length of the exhaust pipe is specially designed according to the specification of this product. Do not replace or prolong it with your own private hose as this could cause the unit to mal-function.
E OPERATION
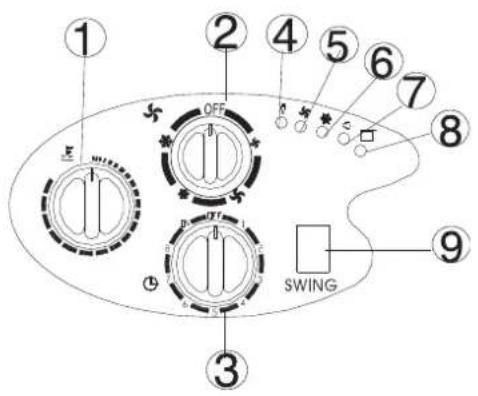
Thermostat
Speed switch with options for - LOW FAN, HIGH FAN, LOW COOL, HIGH COOL
3 Timer
Power indicator
Fan operating indicator
Cooling operating indicator
Swing operation indicator
Full water indicator
Swing switch
Turning ON/OFF
1 Set TIMER to ON for continuous operation (the unit will operate as long as it is not turned off). Power indicator comes on.
2 To turn off the unit, turn the TIMER to OFF position.
Setting function / ventilation speed
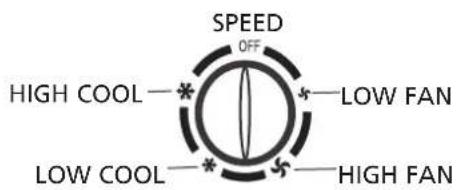
1 Turn the speed switch to select required setting: LOW FAN, HIGH FAN, LOW COOL, HIGH COOL
Setting temperature
1 Turn the THERMOSTAT to regulate the temperature you desired, the cooling intensity is increased clockwise.
Set timer
1 Set the TIMER to the desired operating time (1 to 8 hours). When the set time has been reached, the machine will shut off automatically.
Regulating air flow direction
Press the SWING switch to position " I ", the vertical louvers will swing from side to side for even air distribution. The horizontal louvers must be adjusted by hand.

NOTICE!
- To prolong the compressor's life, after switch-off of the unit, please wait for 3 minutes (at least) before re-switch.
- The cooling system will switch off if the ambient temperature is lower than the set one. The ventilation, however, keeps working on the set level. If the ambient temperature rises above the selected level, the cooling will return to work.
- On the contrary, the heating will switch off if the ambient temperature is higher than the set one (still, the ventilation keeps working on the set level). As the ambient temperature drops below the selected level, the heating will return to work.
- This machine is equipped with ANTI-FROST function. While using the heating function during low temperature, sometimes the heating will stop for a while in order to melt the frost. As this occurs, just wait for the heating returns to work.
F DRAINAGE
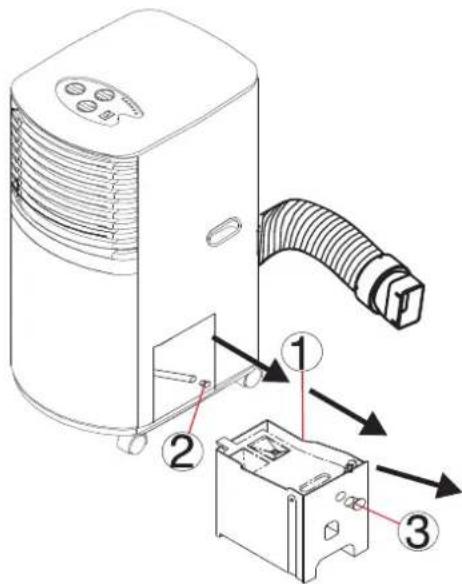
During the process of cooling, some water will be extracted from the air into the unit. If the reservoir is full, the compressor will stop, only the fan to circulate the air. The "FULL WATER" indicator will light now to remind you. To make the cooling work again, please empty the water by one of the following ways:
By water tray
1 Turn off the unit. Unplug the unit from the electrical outlet.
2 Grasp the attached handle, pull the water tank slightly up and then pull lightly out for easy removal.
3 Empty the tank.
Push the water tank back into place.
Reset the unit to desired functions as previous description to continue normal operation.
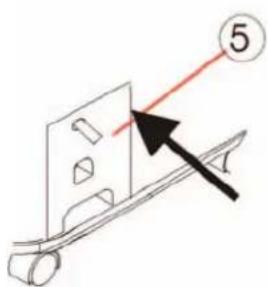
By water tube (continuous drainage)
1 Pull out the water tank.
Pull out the water tube inside the unit. Take off the cap on the tube.
3 Remove the cap of the drain hole.
4 Connect the water tube through the drain hole.
5 Push the water tank into place.
6 Connect the water tube of the unit with a water tube of O.D. 12 mm
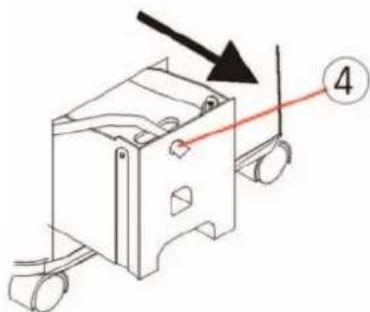
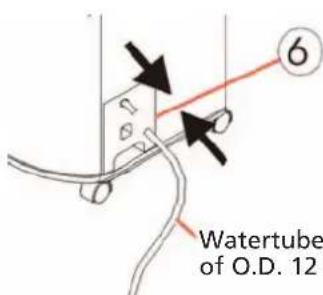
Watertube of O.D. 12 mm
G MAINTENANCE

NOTICE!
Always unplug the unit from the mains before beginning the cleaning.
Cleaning the housing
Use a soft, damp cloth to wipe the body clean.
Never use aggressive chemicals, gasoline, detergents, chemically treated cloths, or other cleansing solutions. These all could possibly hurt the cabinet.
Cleaning the filter
Use a vacuum cleaner or tap the filter lightly to remove loose dust and dirt from the filters and then rinse thoroughly under running water (no hotter than 40^ ).
Dry thoroughly before replacing.

NOTICE!
Never operate the unit without the filters.
End season storage
Unplug the unit.
2 Drain the condensed water COMPLETELY.
As there may have some remained water inside the unit, please also drain the unit as below:
3 Pull out the water tank and the water tube inside the unit.
4 Take off the cap of the water tube, make the water drain to the water tank.
5 Empty the water tank.
6 Return the cap and the water tank into place.
7 Clean or change the filter.
8 On a shiny day, turn on the unit in ventilation mode for a couple of hours, so, the inside can dry out completely.

NOTICE!
It is recommended that the unit be put back into the original carton for storage. And do not stack heavy objects on top of the unit.
H GUARANTEE CONDITIONS
The air conditioner is supplied with a 24-month guarantee, commencing on the date of purchase. All material and manufacturing defects will be repaired or replaced free of charge within this period. The following rules apply:
- We expressly refute all further damage claims, including claims for collateral damage.
- Repairs to or replacement of components within the guarantee period will not result in an extension of the guarantee.
- The guarantee is invalidated if any modifications have been made, non genuine parts are fitted or repairs are carried out by third parties.
- Components subject to normal wear, such as the filter, are not covered by the guarantee.
- The guarantee is valid only when you present the original, dated purchase invoice and if no modifications have been made.
- The guarantee is invalid for damage caused by neglect or by actions that deviate from those in this instruction booklet.
- Transportation costs and the risks involved during the transportation of the air conditioner or air conditioner components shall always be for the account of the purchaser.
To prevent unnecessary expense, we recommend that you always first carefully consult the instructions for use. Take the air conditioner to your dealer for repairs if these instructions do not provide a solution.
GB
60
| Symptom Check Solution | ||
| The machine doesn't run. | Is the machine plugged in? | |
| Is the house power supply on? | ||
| Is the 'FULL WATER' indicator on? | Empty the condensed water. | |
| Is the room temperature in the working range? | ||
| The machine seems to do little. | Is there direct sunshine? | Put down the curtain. |
| Are too many windows or doors open? | ||
| Are there too many people in the room? | ||
| Is there something in the room producing lots of heat? | ||
| The machine seems to do nothing. | Is the filter dusty, contaminated? | Clean or replace the filter. |
| Is the air intake or output blocked up? | ||
| Is the room temperature below your selected temperature? | ||
| Too noisy. | Is the machine positioned unevenly so as to create vibration? | |
| Is the floor underneath the machine uneven? | ||
| The compressor doesn't run. | If so, it is possible the overheat protection of the compressor is on. | Just wait for the temperature to drop. |

WARNING!
Never try to repair or dismantle the machine yourself.
Holloway Bank, Wednesbury
West Midlands WS10 OAW
Tel.: +44 121 506 1818
Fax: +44 121 505 1744
email: gases@lister.co.uk
ITALIA
PVG Italy SRL
Via Niccolò Copernico 5
50051 CASTELFIORENTINO (FI)
tel: +39 571 628500
fax: +39 571 628504
email: pvgitaly@zibro.com
N NORGE
Sunwind-Gylling A/S
Rudsetta 71-75 / P.O. Box 64
N-1309 RUD
tel: +47 67 17 13 70
fax: +47 67 17 13 80
email: pvgint@zibro.com
ND NEDERLAND
PVG International b.v.
P.O.Box 96
5340 AB OSS
tel: +31 412 694694
fax: +31 412 622893
email: pvgnl@zibro.com
PORTUGAL
Gardena, Lda

- H CONDITIONS DE GARANTIE
- CONTENTS
- PARTS
- Front
- Back
- Accessoires
- C BEFORE USE
- Caution!
- ATTENTION!
- Energy save tips
- NOTE!
- D INSTALLATION
- Mounting of the unit
- Mounting of the exhaust pipe
- WARNING!
- E OPERATION
- Turning ON/OFF
- Setting function / ventilation speed
- Setting temperature
- Set timer
- Regulating air flow direction
- NOTICE!
- F DRAINAGE
- By water tray
- By water tube (continuous drainage)
- G MAINTENANCE
- Cleaning the housing
- Cleaning the filter
- End season storage
- H GUARANTEE CONDITIONS
- ITALIA
- N NORGE
- ND NEDERLAND
- PORTUGAL
Brand : TECTRO
Model : T8000
Category : Air Conditioning