DCH2590ER - Heating DELONGHI - Free user manual and instructions
Find the device manual for free DCH2590ER DELONGHI in PDF.
| Brand | DeLonghi |
| Model | DCH2590ER |
| Product type | Fan heater with oscillation |
| Use | Supplemental room heating |
| Power supply | 220-240 V ~ 50/60 Hz |
| Operating modes | LOW, HIGH, AUTO |
| Thermostat | Adjustable, automatic temperature maintenance |
| Timer | 1 to 8 hours in 1-hour increments |
| Oscillation | Yes, motorized (rotating base) |
| Remote control | Yes, with AAA batteries included |
| Anti-freeze function | Yes, maintains approx. 5 °C |
| Temperature display | In °C or °F, selectable (simultaneous + and – buttons) |
| Minimum room area | 4 m² |
| Safety | Automatic shut-off in case of overheating, thermal fuse |
| Safety distance | At least 50 cm in front of the appliance |
| Cleaning | Vacuum the grilles, no solvents or abrasives |
| Operating position | Vertical only |
| Main switch | ON/OFF at the back of the appliance |
| Power cord | Replace exclusively by a professional |
| Standards | Complies with directive 89/336/EEC (anti-interference) |
| Safety device | Thermal relay switch (do not use with external timer) |
| Disposal | Do not throw in household waste, selective recycling |
Frequently Asked Questions - DCH2590ER DELONGHI
User questions about DCH2590ER DELONGHI
0 question about this device. Answer the ones you know or ask your own.
Ask a new question about this device
Download the instructions for your Heating in PDF format for free! Find your manual DCH2590ER - DELONGHI and take your electronic device back in hand. On this page are published all the documents necessary for the use of your device. DCH2590ER by DELONGHI.
USER MANUAL DCH2590ER DELONGHI
TERMOVENTILATORE CERAMICO
CERAMIC FAN HEATER
RADIATEUR SOUFFLANT CÉRAMIQUE
KERAMIKHEIZER
KERAMISCHE VENTILATORKACHEL
KEPAMUHECKNI TEPMOBEHTNJIATOP
TEPELNY KERAMICKY VENTILATOR
KERAMICKI TERMOVENTILATOR
KERAMICKY TEPELNY VENTILATOR
TEPMOBEHTIATOP C KEPAMUHO
CbPOTNBJIEHNE
TERMOVENTILATOR CERAMIC
A) If your appliance comes fitted with a plug, it will incorporate a 13 Amp fuse. If it does not fit your socket, the plug should be cut off from the mains lead, and an appropriate plug fitted, as below.
WARNING: Very carefully dispose of the cut off plug after removing the fuse: do not insert in a 13 Amp socket elsewhere in the house as this could cause a shock hazard.
With alternative plugs not incorporating a fuse, the circuit must be re-fitted when changing the fuse using a 13 Amp Asta approved fuse to BS 1362. In the event of losing the fuse cover, the plug must NOT be used until a replacement fuse cover can be obtained from your nearest electrical dealer. The colour of the correct replacement fuse cover is that as marked on the base of the plug.
B) If your appliance is not fitted with a plug, please follow the instructions provided below:
IMPORTANT
The wires in the mains lead are coloured in accordance with the followin code:
Blue: Neutral
Brown: Live
As the colours of the wires in the mains lead of this appliance may not correspond with the coloured markings identifying the terminals in your plug, proceed as follows:
The wire which is coloured blue must be connected to the terminal which is marked with the letter N or coloured black. The wire which is coloured brown must be connected to the terminal which si marked with the letter L or coloured red.
1
- Before plugging into the mains, make sure the voltage of your mains supply corresponds to the V value indicated on the appliance and that the socket and power line are appropriate for the load required.
- THIS APPLIANCE COMPLIES WITH DIRECTIVE 89/336/EEC ON RADIO INTERFERENCE SUPPRESSION.
INSTALLATION
The appliance can be used on any horizontal surface.
Do not overload the electrical circuit. Avoid using the same socket for other appliances.
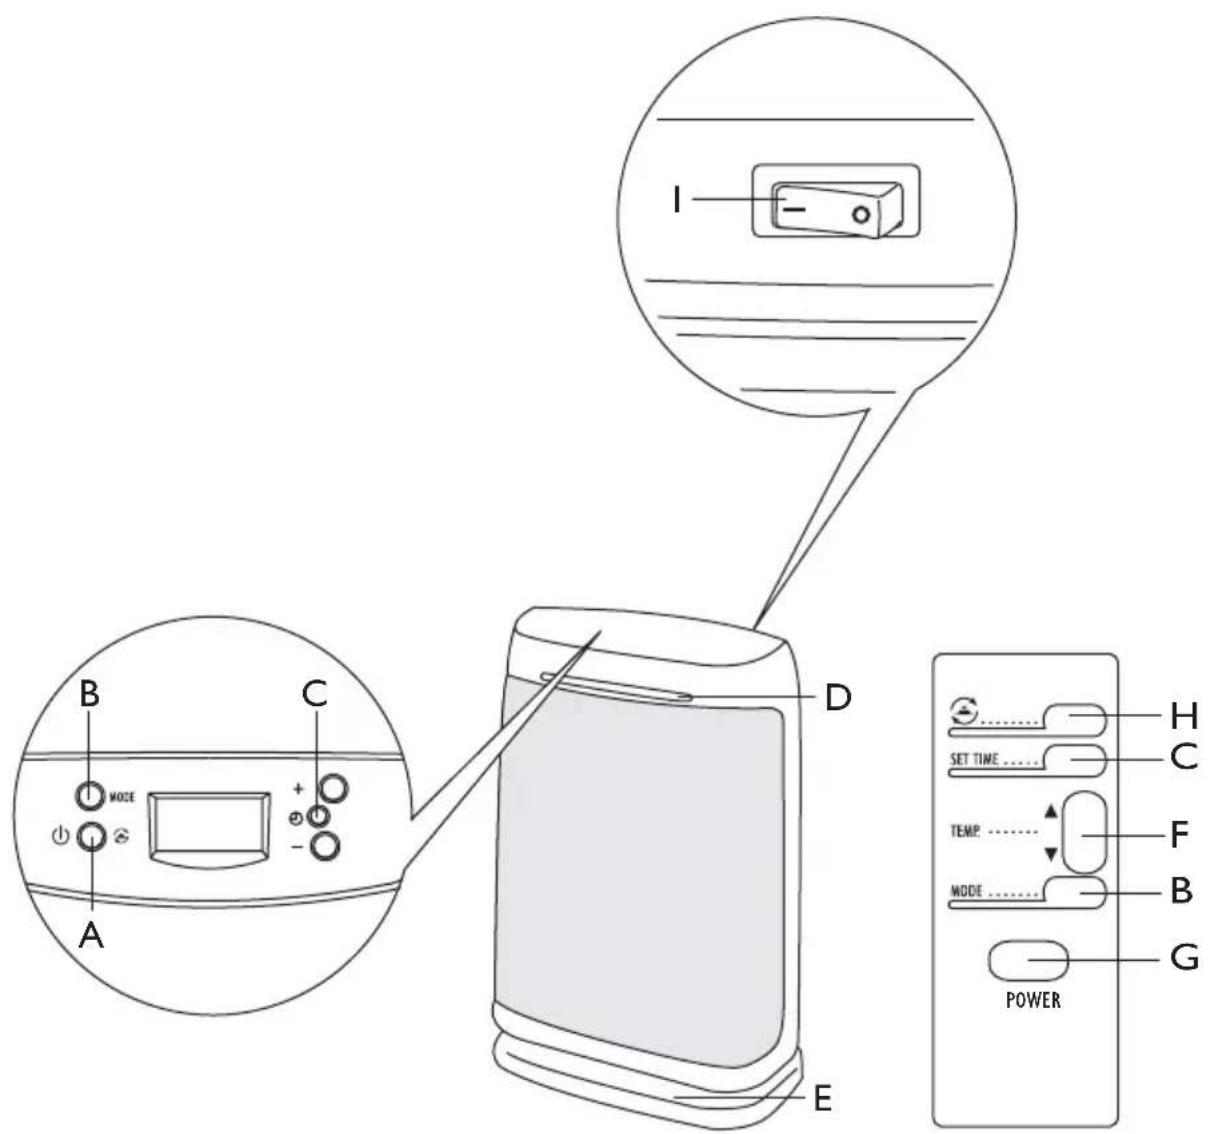
DESCRIPTION
A "Stand-by" and swing button
B Pulse MODE
C SET TIME button
DONlight
E Motorised rotating base
F Temperature adjustment button
G POWER, stand-by button (remote control)
H Swing button (remote control)
I ON/OFF switch
OPERATION AND USE
- Make sure the appliance is off before plugging into the mains
- To turn the appliance on, the switch at the back must be in the I position. The appliance emits a beep. The "ON" light also comes on and remains lit while power to the appliance is on.
- Press button A to turn the appliance on.
- The appliance starts up in LOW mode (minimum heat output). The display shows room temperature.
- Press the MODE button (B) to switch to HIGH mode (maximum heat output). The display shows room temperature.
- Press the MODE button (B) again to switch the appliance to AUTO mode. The set temperature flashes and can be modified using the + and - buttons. After a few seconds, room temperature is shown on the display.
- Press the MODE button (B) a fourth time to switch the appliance back to LOW mode. When the MODE button is pressed continuously, the appliance switches through the following modes in sequence: LOW HIGH AUTO.
- To turn the appliance off, press button A for a few seconds and place the switch on the back in the 0 position.
Adjusting the thermostat
- Press the MODE button (B) until AUTO is displayed.
- Use the + and - buttons (or F on the remote control) to increase or reduce the temperature set point. The thermostat will then keep room temperature at the selected level automatically.
- When room temperature is 2^ above the set temperature, the appliance goes off.
- When room temperature drops below the set temperature, the appliance comes on automatically.
Frost prevention mode
You can keep the room at a temperature of about 5^ to prevent freezing with minimum energy consumption.
Press the MODE button (B) until AUTO is displayed. Press the "=" button to select a temperature set point of 5^ .
When the room temperature drops below the set temperature, the appliance comes on automatically.
Timer function
The timer function can be activated in any operating mode. The timer can be used to programme the time the appliance remains in operation from 1 to 8 hours.
Each time button (C) is pressed, the operating time increases by one hour.
Once set, the operating time decreases each hour and the remaining time is displayed. At the end of the set time the appliance goes off.
If you do not want to use the appliance with the timer function, press button (C) again to go back to manual mode.
Note: The display shows room temperature in either ^ C or ^ F . To select the required unit of measurement, press the + and - buttons together for a few seconds, then release.
MOTORIZED ROTATING BASE
To distribute the air flow over a larger area, with the appliance on press A button once more. The appliance swings from right to left.
To stop the appliance in the desired position, simply press the A button again.
To turn the appliance off, press button A for a few seconds and place the switch on the back in the 0 position.
USING THE REMOTE CONTROL
The remote control should be handled with extreme care and respect.
- Press button (G) to turn the appliance on.
- To use the SWING (button H), SET TIME (button C), MODE (button B) and temperature regulation (button F) functions, see the OPERATION AND USE section.
- To replace the batteries, remove the cover on the back of the remote control unit. The remote control uses two AAA type alkaline batteries (included, but packaged separately).
- Do not mix used and new batteries with different values.
WARNING
D o not use this heater near showers, bathtubs, sinks, swimming pools, etc.
- Always use the heater in an upright position.
- Do not use the heater to dry laundry. Never obstruct the intake and outlet grilles (danger of overheating).
- Do not allow children or unfit persons to use the appliance without adequate supervision.
- Do not allow children to play with the appliance.
- The heater must be positioned at least 50cm from furniture or other objects.
- Do not use the appliance near walls, furniture, curtains, etc.
- The use of extension leads is not recommended. However if they cannot be avoided, follow the instructions accompanying the extension lead and never exceed the power limit marked on the extension.
If the power cable is damaged, it must be replaced by the manufacturer, an authorised service centre or a qualified electrician in order to eliminate all risk.
- The appliance must not be positioned directly underneath a fixed power point.
- Do not use the appliance in rooms with a floor area of less than 4m^2 . The heater is fitted with a safety device which switches it off in the event of accidental overheating (eg. obstruction of air intake and outlet grilles, motor turning slowly or not at all). To reset, unplug the appliance from the mains socket for a few minutes, remove the cause of overheating then plug in again.

WARNING: In order to avoid overheating, never under any circumstances cover the appliances during operation, as this would lead to dangerous overheating.
CAUTION: In order to avoid a hazard due to inadvertent resetting of the thermal cutout, this appliance must not be supplied through an external switching device, such as a timer, or connected to a circuit that is regularly switched on and off by the utility.
IMPORTANT INFORMATION FOR CORRECT DISPOSAL OF THE PRODUCT IN ACCORDANCE WITH EC DIRECTIVE 2002/96/EC.
At the end of its working life, the product must not be disposed of as urban waste.
It must be taken to a special local authority differentiated waste collection centre or to a dealer providing this service.
Disposing of a household appliance separately avoids possible negative consequences for the environment and health deriving from inappropriate disposal and enables the constituent materials to be recovered to obtain significant savings in energy and resources. As a reminder of the need to dispose of household appliances separately, the product is marked with a crossed-out wheeled dustbin.
FR
RACCORDEMENT ELECTRIQUE
Regulering at termostaten
He neperpykaTe IHHIO 3NeKtpOniTahnI, n36eray nCNoJIb3OBAHnI ToJ Xe pO3eTKn DnI NOkIIoueHnI dpyrnx npnbopOB.
ONUCAHNE
A Khonka BkI/ BblkI + nobopoT noDCtABKN
B Khonka MODE
C KHonKa SET TIME
D INdkaTOp BKJIIOueHnA
E NobopOTHa NoCTaBc C MOTOpOM
F Khonka peryynpobk TeMnepaTpybI
G Khonka ON/OFF (ДиСТанцоHhoe ynpaBneHne)
H Khonka noBopota noCTaBKn (nctaHcHOnHoe ynpabHeHne)
I INaBbIi BbIKJIIOuTaTeJb ON/OFF
ФУнКЦИОНПОВАHЕ И 3КСПЛYATAЦИ
MEPbI INPEIOCTOPOXKHOCTN
- He yctaHaBnBaIte 3OT HarpeBaTeIbHbI np6op B HENOCpeIcTBeHHoJ 6JIIN3OCTN OT dySha, BaHbI, pyKOMOHNiKa, 6accEHa N T.D.
- IcnoJIb3yIte np6Op TOnbKO B BepTnKaIbHOM NOLOXKeHN.
- He IncnoIb3yIe np6op dIa cyuKn 6eIb, He 3akpbIbAitpe peWeTKn IoJaH N BbIXOda BO3dyxa (BO3MOKeH nepepeB np6opa).
- He pa3pewaIte DeTAM IJIH HeDeecnOC6NbIM IIOJAM 6e3 npncMOtpa noIb3OBaTbcra npnbopom.
- He pa3pewaIte JeTAM nIgpaTb c np6opom.
- Пибору Ньзя Нховся на пасстони 6лжxe 50 cm ot Meбени ип друг nx npedmetob.
- He 3KcnIpyaTnpyIte np6op pIaOM co CTeHaMn, Me6JIbIO, 3aHaBeCMAH N T.D.
- He pekomeHdyetc noIb3ObaTbc ydInHnteJem. Ecnn nCnoJIb3ObaHne ydInHnteJnCTaHOBNTc HEO6XoDnMbIM, BHIMATEJbHO CNe dyTe INHCTpyKUHM, npNJraEmbIM KyDNHNTeJIO, He npebbla NapdeJeBHO MOuHOCtN, yka3aHHo HA ydInHnteJ.
- Ecnn shHyp nITaHnIOBpeJdeH, OH dONJKeH 6bITb 3aMeHeH npOn3BOOnTeJIem nIIN erO cepBnCHoTexHNueCKoCnyXbOu IIN, B JIObOM Clyuae, KBaJIuΦNcIPOBaHHbIM CneUaJIInCTOM, YTO N03BOJNT N36ExKaTb JIObOTo pNcKa.
- pibop He dOJKeH hXoDnTbC HEnOCpeDCTBeHHo NOp po3eTKo 3JeKtpOnITaHHa.
- He nCnOJb3yIe npi6Op B nOmeUeHm C nlouaDbIO MeHbIe 4 M
YcTpoIcTBo abapnHoi 6JoknpOBKn OTKJIIOHT TepMOBeHTNJATOp B clyuae erO cIyauHoro neperpeBa (HaPIMeR, B clyuae eCNI 3aKpbITb peWETKN IODaHN N BbIXOda BO3dyaX, MeDJIeHHoro BpaUeHNA MOTopa ININ ERO OCTaHOBKn). IIN BA03bHOBJIeHNA paObTb HE06XoIMo Ha HeCKOJIbKO MmHyT IN3BLeueB BNkky IN3 PO3ETKN 3JeKTPoNtAHN, YcTpaHNTb PpUHNY neperpeBa n 3aTEM BHOBb BCTaBNTb BNkY B PO3ETKy.

OBPATNTE BHIMAHHE: IINI TORO, YTO6bI N36exKaTb NepepeBa, HN B KOem Cnyae He HaKpbIbAte np6op BO BpEMpa60Tb, TaK KaK 3TO Bbl3OBet ONaCHOe NOBblWeHne TEMnepaTypbl.
BHIMAHNE:ДЯТOrO,ЧTOБИ N36ExKaTb OAnCHOCTeN, CB3aHHbIX CO CNYaHbIM C6pOcOM NepeKJIIOUaTeIЯ TepMOpEne, HAnPRAKeHne ПNTaHnA HeIb3Я NOdaBaTb Ha npIbOp Yepe3 BHeUHee YCTPOIcTB BKNIOUeHnA/BbIKJIOUeHnA, HApPIMeP, TaIMeP, a TaK Jxe NOdKJIIOuHaTb ERO K CetN, KOTOPa PeryIaRPhO OTKJIIOUaETcN INoDKJIIOUaETcN NOCTaBUnKOM 3JIeKTpo3HeprN.
ELEKTRICKÉ ZAPOJENI
0gglgglgglgglgglgglgglgglgglgglgglgglgglgglgglgglgglgglgglgglgglgglgglgglgglgglgglgglgglgglgglgglgglgglgglgglgglggl
pala 1
jG (G) j1.1
(B, ) MODE, (C, SET TIME, (H, SWING Y.2
.OPERATION AND USE (F)
j 3
(jglallgdo)AAGgllgno
4
1
aai gaii aai aiiaai aiiaai aiiaai
1 1
(2)
aJ 1
jgl 1 jll: JabSpuu
50 50 50
jll jlll jll lal jll
i 1
aalallge jnall ae baiy i jai pao ooiy, ailjball
aall jao aalaaan jao jao jao jao jao Jao
j 1
y 1
2.4 1a j 1j 1j 1j 1j 1j 1j
aaii i 1
()
1 1
,
i 1
j 1

y
476/92 89/336/CFF
yj1
100 100
J 1
$$ \left. \right.\left. \right.\left. \right.\left. \right.\left. \right.\left. \right.\left. \right.\left. \right.\left. \right.\left. \right.\left. \right.\left. \right.\left. \right.\left. \right.\left. \right.\left. \right.\left. \right.\left. \right.\left. \right.\left. \right.\left. \right.\left. \right.\left.\left.\left.\left.\left.\left.\left.\left.\left.\left.\left.\left. \text {i} _ {j} ^ {j} j _ {k} ^ {j} j _ {l} ^ {j} j _ {m} ^ {j} j _ {n} ^ {j} j _ {o} ^ {j} j _ {p} ^ {j} j _ {q} ^ {j} j _ {r} ^ {j} j _ {s} ^ {j} j _ {t} ^ {j} j _ {u} ^ {j} j _ {v} ^ {j} j _ {w} ^ {j} j _ {x} ^ {j} j _ {y} ^ {j} j _ {z} ^ {j} j _ {w} ^ {j} j _ {x} ^ {j} j _ {y} ^ {j} j _ {z} ^ {j} j _ {w} ^ {j} j _ {x} ^ {j} j _ {y} ^ {j} j _ {z} ^ {j} j _ {w} ^ {j} j _ {x} ^ {j} j _ {y}\right)\right| \right| \right| \right| \right| \right| \right| \right| \right| \right| \right| $$
$$ \text {M O D E} \quad \text {B} $$
$$ \text {S E T T I M E} \quad \text {C} $$
$$ O N \cong D $$
$$ f _ {i} f _ {j} \Delta y _ {i j} \text {a l l} s, t, \mathcal {L} $$
$$ i j \text {p a i r} \quad j j \quad F $$
$$ (\text {a n d -} \text {P O W E R}) $$
$$ O N / O F F \text {,} $$
1
1.
J 2.
yog jg jn j 1xel g jzj g jzj g jzj g"bccp""cog j
$$ \dots \mathrm {d i f} \quad \mathrm {d i f} \quad \mathrm {d i f} \quad \mathrm {d i f} $$
A
LW 4.
HIGH HIOILOO MODE (B) 5.
$$ \text {i} _ {\text {a l l}} \text {s} _ {\text {j a}} \text {a l l} _ {\text {y i}} \text {s} _ {\text {g a l l}} $$
AUTO MODE (B) 6.
-1+g#n#dally Jall 0j, jall aeg gaa jia jai all o jali aeg gaa
B 7.
:ALIILBGLJL,MODEJIaLIyLIJ.LOW
$$ \mathrm {L O W} \rightarrow \mathrm {H I G H} \rightarrow \mathrm {A U T O}. $$
jlll llll 10 jlll 118, A llll llo blll jlll 10 8.
$$ . 0 \text {a} _ {\text {i}} ^ {\text {i}} \text {i} _ {\text {i}} ^ {\text {i}} $$
s
AUTO MODE (B) 1.
aegaa jdyj (a) jpe aill aagagall,Fj)-j+jj21palsly 2
aai 1
$$ \int_ {0} ^ {1} \frac {1}{x} d x $$
3.
$$ \therefore \text {g i b i y j i g a l} \text {j i}, \text {l a y s i n} $$
4.
$$ \left. \cdot \right| _ {i} \cdot \left. \cdot \right| _ {j} \cdot \left. \cdot \right| _ {l} \cdot \left. \cdot \right| _ {u} \cdot \left. \cdot \right| _ {v} $$
i
5 5
aill jao sLo Jai
"." AUTO MODE (B)
5 1
4n n nn nnnn nnnn nnnn nnnn nnnn nnnn nnnn nnnn nnnn nnnn nnnn nnnn nnnn nnnn nnnn nnnn nnnn nnnn nnnn nnnn nnnn nnnn nnnn nnnn nnnn nnnn nnnn nnnn nnnn nnnn nnnn nnnn nnnn nnnn
$$ \therefore \angle A D C = 1 8 0 ^ {\circ} $$
24
1