
Smart 64 - Cordless phone AEG - Free user manual and instructions
Find the device manual for free Smart 64 AEG in PDF.
| Product Type | DECT Cordless Phone with Touchscreen |
| Brand | AEG |
| Model | Smart 64 |
| Operating System | Android 4.2.2 Jelly Bean |
| Display | 4-inch (10.16 cm) TFT LCD, 800 x 480 pixels, capacitive multi-touch |
| Battery | Li-ion 3.7 V, 1500 mAh (model 465155) |
| Internal Memory | 4 GB |
| Expandable Storage | microSD card up to 32 GB |
| Connectivity | Wi-Fi 802.11b/g/n, Bluetooth 4.0, DECT |
| Camera | Front VGA (640 x 480) |
| Ports | Micro-USB, 3.5 mm headphone jack |
| Speaker | Mono |
| Base Power Supply | AC adapter 5 V DC, 300 mA (model S003IB0500030) |
| Handset Power Supply | AC adapter 5 V DC, 1 A (model MLF-A00060501000FE0021) |
| Warranty | 24 months |
| Maintenance | Clean with a damp cloth, avoid solvents and chemicals |
| Safety | Do not expose to moisture or excessive heat, use only the provided battery |
| Spare Parts | Replaceable battery (model 465155), specific AC adapters |
| Repairability | Contact after-sales service via www.aegtelephones.eu |
| General Information | Compliant with R&TTE Directive 1999/5/EC |
Frequently Asked Questions - Smart 64 AEG
User questions about Smart 64 AEG
0 question about this device. Answer the ones you know or ask your own.
Ask a new question about this device
Download the instructions for your Cordless phone in PDF format for free! Find your manual Smart 64 - AEG and take your electronic device back in hand. On this page are published all the documents necessary for the use of your device. Smart 64 by AEG.
USER MANUAL Smart 64 AEG
natural_image
Black Android phone with AEG branding and a colorful app interface (no readable text or symbols on device body)P1
P2 P4

natural_image
Diagram showing four views of a smartphone with internal components and a separate open panel (no text or symbols)P3
P5

natural_image
Line drawing of a mobile phone with a cable inserted into the body (no text or symbols)
natural_image
Line drawing of a mobile phone device with exploded view showing internal components (no text or symbols)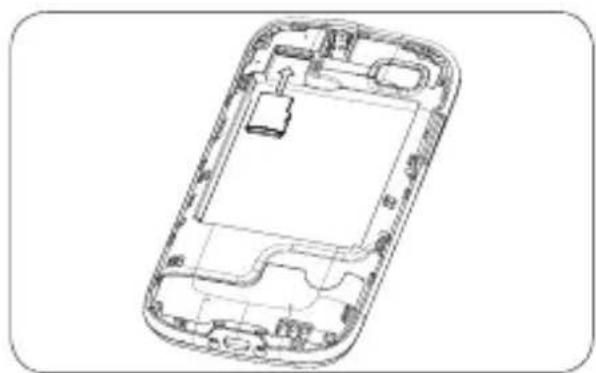
natural_image
Line drawing of a smartphone interior showing internal components and casing (no text or symbols)1 BECAUSE WE CARE
Thank you for purchasing this product. This product has been designed and assembled with utmost care for you and the environment. This is why we supply this product with a quick installation guide to reduce the number of paper (pages) and therefore save trees to be cut for making this paper. A full and detailed user guide with all the features described can be found on our website www.aegtelephones.eu. Please download the full user guide in case you want to make use of all the advanced features of your product. To save the environment we ask you not to print this full user guide. Thank you for supporting us to protect our environment.
2 IMPORTANT SAFETY INSTRUCTIONS
When using your telephone equipment, basic safety precautions should always be followed to reduce the risk of fire, electric shock and injury, including the following:
- Read and understand all the instructions.
- Follow all warnings and instructions marked on the product.
- Unplug this product from the wall outlet before cleaning. Do not use liquid cleaners or aerosol cleaners. Use a damp cloth for cleaning.
- Keep your phone away from hot, humid conditions or strong sunlight, and don't let it get wet or use this product near water (for example, near a bath tub, kitchen sink, swimming pool).
-
Do not overload wall outlets and extension cords as this can result in the risk of fire or electric shock.
-
Unplug this product from the wall outlet and refer servicing to our Repair Centre under the following conditions:
-
When the power supply cord or plug is damaged.
- If the product does not operate normally by following the operating instructions.
- If the product has been dropped and the cabinet has been damaged.
-
If the product exhibits a distinct change in performance.
-
NEVER use your phone outdoors during a thunderstorm-unplug the base from the telephone line and the mains socket when there are storms in your area. Damage caused by lightning is not covered by the guarantee.
- Do not use the telephone to report a gas leak in the vicinity of the leak.
- Use only the supplied battery! The operation periods for the handsets are only applicable with the default battery capacities
- The use of other battery types or non-rechargeable batteries/primary cells can be dangerous. These may cause interference and/or damage to the unit or surroundings. The manufacturer will not be held liable for damage arising from such non-compliance.
- Do not use third party charging bays. Damage may be caused to the batteries.
- Please ensure the batteries are inserted in the correct polarity.
- Dispose of batteries safely. Do not immerse them in water, burn them, or put them where they could get punctured.
3 INTENDED USE
This telephone is intended to be connected to a public analogue telephone network or to an analogue extension of a compatible PBX system.
4 SETTING UP YOUR PHONE
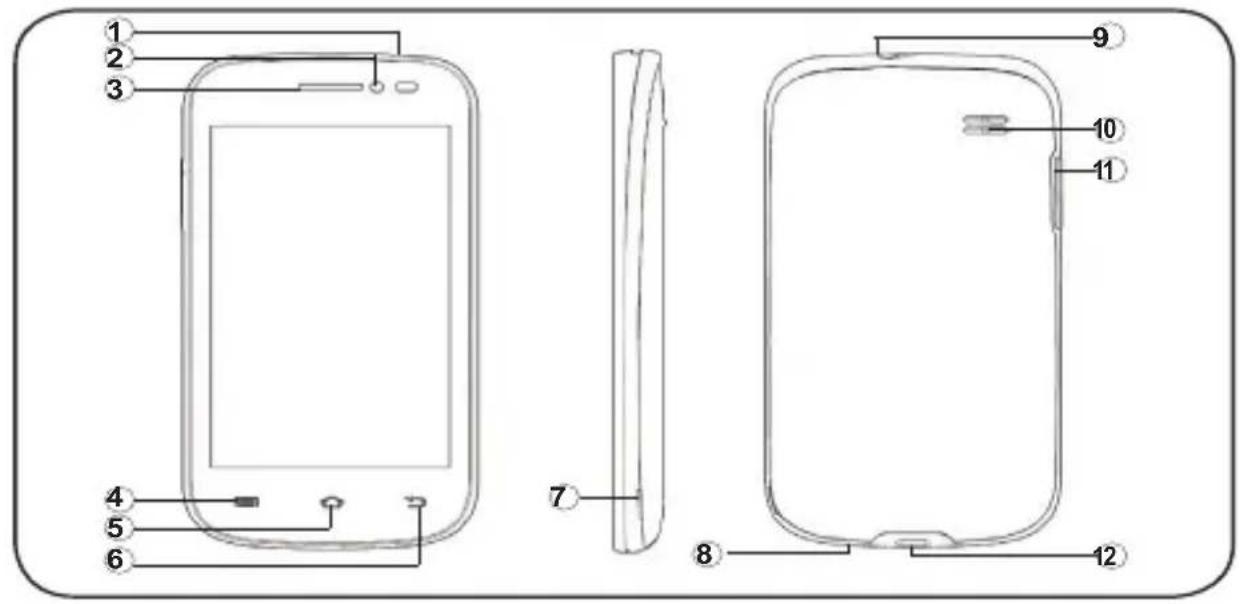
4.1 Handset overview (see P1)
| # Meaning | ||
| 1 | Power ButtonPress and hold to turn the handset power on / off.Press briefly to put the handset in to or out of sleep mode. | |
| 2 | CameraFront facing camera lens. | |
| 3 | EarpiecePlace your ear against this when making normal phone calls. | |
| 4 |  | MenuTap to access menus and sub-menus. |
| 5 |  | HomeTap to return to the Home screen. |
| 6 |  | BackTap to return to the previous screen.Tap to hide the on-screen keyboard, dialogue box, menu, or notification panel. |
| 7 | Remove Back CoverUse this slot to help take the back cover off. | |
| 8 | Microphone | |
| 9 | Earphone SocketPlug in a headset with 3.5mm jack plug to listen through earphones. | |
| 10 | LoudspeakerUsed in Speakerphone mode and when playing music or videos. | |
| 11 | VolumeAdjust the volume up + / down -. | |
| 12 | Micro USB / Charging PortConnect your handset to your computer to transfer files.Connect a 5V DC micro-USB socket AC Adaptor to charge the phone. | |
4.3 Inserting the Handset Battery (See P2)
To access the battery compartment, carefully remove the cover by lifting from the small cut-out in the bottom corner as shown, Then insert the battery into position and replace the cover.
4.4 Charge the Handset Battery (See P3)
When using your S64 Android Smart Home Phone for the first time, connect the supplied power cord to the handset or stand the handset in a charger pod (if supplied), and charge for at least 6 hours.
• Means the battery is still charging.
• Means the battery is fully charged.
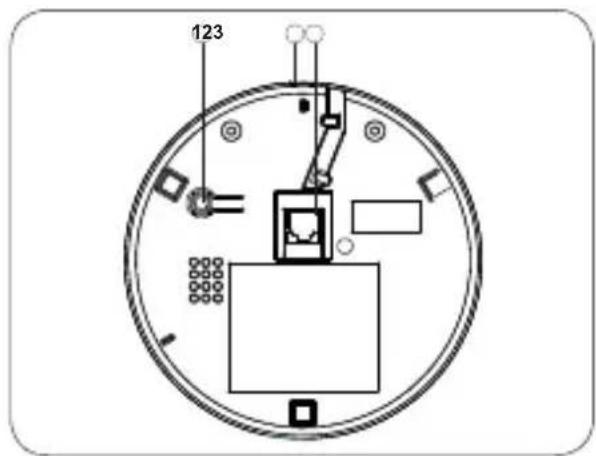
4.5 Connect the Power Cable and Telephone Line Cord (See P4)
-
Plug the end of the power cable into Power Line In, and the mains adapter plug into a mains power socket.
-
Plug one end of the phone cable into Phone Line In, and the other end into a telephone wall socket.
1 Register Button
Press and hold this to register a new handset to the base.
2 Power Line In
Connect to the micro-USB plug of the base power adaptor.
3 Phone Line In
Plug your phone line into this socket.
4.6 Switching Your Phone On
-
Press and hold Power on the top of the handset until the startup image appears. It takes about one minute for the handset to power up completely.
-
By default, the phone screen will be locked, tap and slide

the right until shows.
- The Home screen will be displayed.
4.7 Switching Your Phone Off
-
Press and hold the Power button.
-
Tap Power Off.
-
Tap OK to confirm.
4.8 Inserting a Memory Card (See P5)
Your handset supports micro SD birdsup to 32GB.
You can store music, pictures, fles and applications on a memory card and access them on the handset.
- Turn your phone off.
- To access the memory card slot, open the back case see „Inserting the handset battery“.
- Remove the battery.
- Insert the memory card by sliding the card firmly into the memory card slot as shown in the diagram.
- Insert the battery.
- Put the cover back on.
- Turn the phone on.
5 BASIC OPERATION
 | Tap once to access the dialler.Tap once to answer a call. |
 | Tap once to access menu options. |
 | Tap once to return to a previous screen.Tap once to hide the on screen keyboard,dialogue box, options menu or notifications panel. |
 | Tap to return to the home screen. |
 | Tap the Program Launcher to access your APPS and WIDGETS. |
| Action | Function Operation | |
| Tap | Select on-screen items such as applications and settings icons.Select on-screen buttons.Type using the on-screen keyboard. | Gently tap an item on the screen to select the item that you wish to activate. |
| Tap & Hold | Open other options for an item, for example, tap and hold a contact or a link on a web page. Think of this as using the right-click button on a mouse. | Tap an item on the screen then hold in place for 2 ~ 3 seconds. |
| Drag | Move items on screen or switch between screens. | Tap an item on the screen then hold in place for 2 ~ 3 seconds, then slide it to desired position. |
| Slide | Move vertically or horizontally across the screen. | Slide finger across screen. |
| Flick | Quickly browse a list of items in a vertical direction. | Flick is similar to slide, except that flick involves swiping the screen in lighter and quicker strokes. |
| Zoom | Zoom in or out of the screen to view a larger or smaller part of the image. | When viewing photos or a web page, use two fingers on the screen and pinch together to zoom out or spread apart to zoom in. |
7 WIRELESS CONNECTION (WI-FI®)
The handset Wi-Fi can be accessed at any time using the settings menu. To use Wi-Fi, you must first make sure it is turned on.
- From the Home screen, tap ⏻ > Settings.
- Slide bar next to Wi-Fi to the ON position.

-
Tap Wi-Fi and select a network you want to connect to.
-
If the network is secured, you will be prompted password.
-
If your Wi-Fi network is not shown on the menu, try scanning for it by tapping ☐Scan.
-
Tap on the Password edit box to launch the on-screen keyboard.
- Enter the Wi-Fi network password and tap Done.
-
Tap Connect.
-
The handset will search for the IP address of the network you have selected. This may take a few minutes.
- When connected, 📤 appears on the status bar of the handset.
8 REGISTERING HANDSET TO BASE
Note: This should only be required if you want to register another handset. The handset supplied with your base should already be registered and not need registering again.
- Press and hold the Register Button on the base for at least 5 seconds.
- On the handset screen tap ⏻ > Settings > Dect manager > Register the handset > OK.
9 GUARANTEE AND SERVICE
The phone is guaranteed for 24 months from the date of purchase shown on your sales receipt. This guarantee does not cover any faults or defects caused by accidents, misuse, fair wear and tear, neglect, faults on the telephone line, lightning, tampering with the equipment, or any attempt at adjustment or repair other than through approved agents.
Please keep your sales (till) receipt this is your proof of guarantee.
9.1 While the unit is under Guarantee
- Disconnect the base unit from the telephone line and the mains electricity supply.
- Pack up all parts of your phone system, using the original package.
- Return the unit to the shop where you bought it, making sure you take your sales receipt.
- Remember to include the mains adapter.
9.2 After the Guarantee has expired
If the unit is no longer under Guarantee, contact us via www.aegtelephones.eu
10 TECHNICAL SPECIFICATIONS
| Operating System Android OS 4.2.2 (Jelly Bean) | |
| Battery Information Shenzhen JETECH Energy Technology Co., Ltd. | |
| Battery Model 465155 | |
| Battery Type 3.7V Li-ion, 1500mAh Only use the provided battery | |
| Screen Size 4" TFT LCD, WVGA , 800 x 480 pixel | |
| Panel Capacitive Multi Touch (5 Fingers) | |
| Connectivity Bluetooth 4.0 (For Data transfer) | |
| Supported Memory Card | Micro-SD (not included) up to 32GB SDHC |
| Handset port-type Micro-USB | |
| Headphone 3.5mm jack | |
| Handset Speaker Mono | |
| Wi-Fi Connection 802.11b/g/n | |
| Handset Camera Front facing VGA (640x480) | |
| Internal Memory 4GB | |
| DECT Frequency Band | 1.88G - 1.90 GHz (bandwidth 20MHz) |
| Base Power Adaptor | Only use the provided power adaptor |
| Manufacturer Ten Pao International LTD. | |
| Model S003IB0500030 | |
| Input Rating | 100~240VAC, 180mA |
| Output Rating | 5VDC, 300mA |
| Handset Power Adaptor | Only use the provided power adaptor |
Manufacturer DongGuan MLF Tech. Co., Ltd.
Model MLF-A00060501000FE0021 / MLF MLF-A00060501000FU0021
Input Rating 100\~240VAC, 180mA
Output Rating 5VDC 1A
11 CE DECLARATION

This product is in compliance with the essential requirements and other relevant provisions of the R&TTE directive 1999/5/EC.
The Declaration of conformity can be found on:
www.aegtelephones.eu
12 DISPOSAL OF THE DEVICE (ENVIRONMENT)
At the end of the product lifecycle, you should not throw this product into the normal household garbage but bring the product to a collection point for the recycling of electrical and electronic equipments. The symbol on the product, user guide and/or box indicate this. Some of the product materials can be re-used if you bring them to a recycling point. By reusing some parts or raw materials from used products you make an important contribution to the protection of the environment. Please contact your local authorities in case you need more information on the collection points in your area.
Batteries must be removed before disposing of the device. Dispose of the batteries in an environmental manner according to your country regulations.
13 CLEANING AND CARE
Do not clean any part of your phone with benzene, thinners or other solvent chemicals as this may cause permanent damage which is not covered by the Guarantee.
When necessary, clean it with a damp cloth.
Keep your phone system away from hot, humid conditions or strong sunlight, and don't let it get wet.
7 DRAADLOZE VERBINDING (WI-FI®)
1 Register Button (Tasto Registra)
7 CONNESSIONE WIRELESS (WI-FI®)
© 2014 Binatone Electronics International Limited
All rights reserved Subject to availability. Rights of modification reserved.
AEG is a registered trademark used under license from AB Electrolux (publ)
www.aegtelephones.eu


- BECAUSE WE CARE
- IMPORTANT SAFETY INSTRUCTIONS
- INTENDED USE
- SETTING UP YOUR PHONE
- Handset overview (see P1)
- Inserting the Handset Battery (See P2)
- Charge the Handset Battery (See P3)
- Connect the Power Cable and Telephone Line Cord (See P4)
- Register Button
- Power Line In
- Phone Line In
- Switching Your Phone On
- Switching Your Phone Off
- Inserting a Memory Card (See P5)
- BASIC OPERATION
- WIRELESS CONNECTION (WI-FI®)
- REGISTERING HANDSET TO BASE
- GUARANTEE AND SERVICE
- While the unit is under Guarantee
- After the Guarantee has expired
- TECHNICAL SPECIFICATIONS
- CE DECLARATION
- DISPOSAL OF THE DEVICE (ENVIRONMENT)
- CLEANING AND CARE
- DRAADLOZE VERBINDING (WI-FI®)
- Register Button (Tasto Registra)
- CONNESSIONE WIRELESS (WI-FI®)
Brand : AEG
Model : Smart 64
Category : Cordless phone