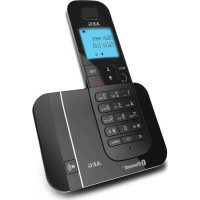
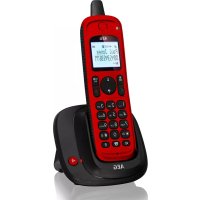
Voxtel C110 - Cordless phone AEG - Free user manual and instructions
Find the device manual for free Voxtel C110 AEG in PDF.
| Product Type | Cordless Phone |
| Brand | AEG |
| Model | Voxtel C110 |
| Handset Power Supply | 3 AAA alkaline batteries 1.5V (not included) |
| Base Power Supply | Via telephone line (no power adapter) |
| Display | LCD screen with backlight |
| Main Functions | Caller ID display (20 entries), incoming/outgoing call lists, 3 direct memories (M1-M3), 10 indirect memories, hands-free speakerphone, hold, mute, redial, pause, time/date settings, LCD contrast, ringer and speaker volume |
| Number of Handsets | 1 (single handset) |
| Network Compatibility | Analog telephone network (PSTN) |
| Operating Temperature | 0°C to 40°C |
| Storage Temperature | -20°C to 60°C |
| Warranty | 24 months |
| Maintenance | Clean with a damp cloth, do not use solvents |
| Disposal | Recycle electronic components and batteries according to local regulations |
Frequently Asked Questions - Voxtel C110 AEG
User questions about Voxtel C110 AEG
0 question about this device. Answer the ones you know or ask your own.
Ask a new question about this device
Download the instructions for your Cordless phone in PDF format for free! Find your manual Voxtel C110 - AEG and take your electronic device back in hand. On this page are published all the documents necessary for the use of your device. Voxtel C110 by AEG.
USER MANUAL Voxtel C110 AEG
Thank you for purchasing this product. This product has been designed and assembled with utmost care for you and the environment. This is why we supply this product with a quick installation guide to reduce the number of paper (pages) and therefor save trees to be cut for making this paper. Thank you for supporting us to protect our environment.
2 UNPACKING YOUR PHONE
In the box you will find:
- Base Unit
- Handset
- Coiled Handset cord
- Telephone line cord for base unit
- User manual
- Wall mount bracket
Keep the packing materials in a safe place in case you later need to transport the unit.
Important note - batteries:
The Voxtel C110 requires 3 × 1.5V AAA size Alkaline batteries installed into the battery compartment before use.
Warning:
The caller display will not work and you will only be able to make and receive basic handset calls without batteries installed.
3 INTENDED USE
This telephones is intended to be connected to a public analogue telephone network or to an analogue extension of an approved compatible PBX system.
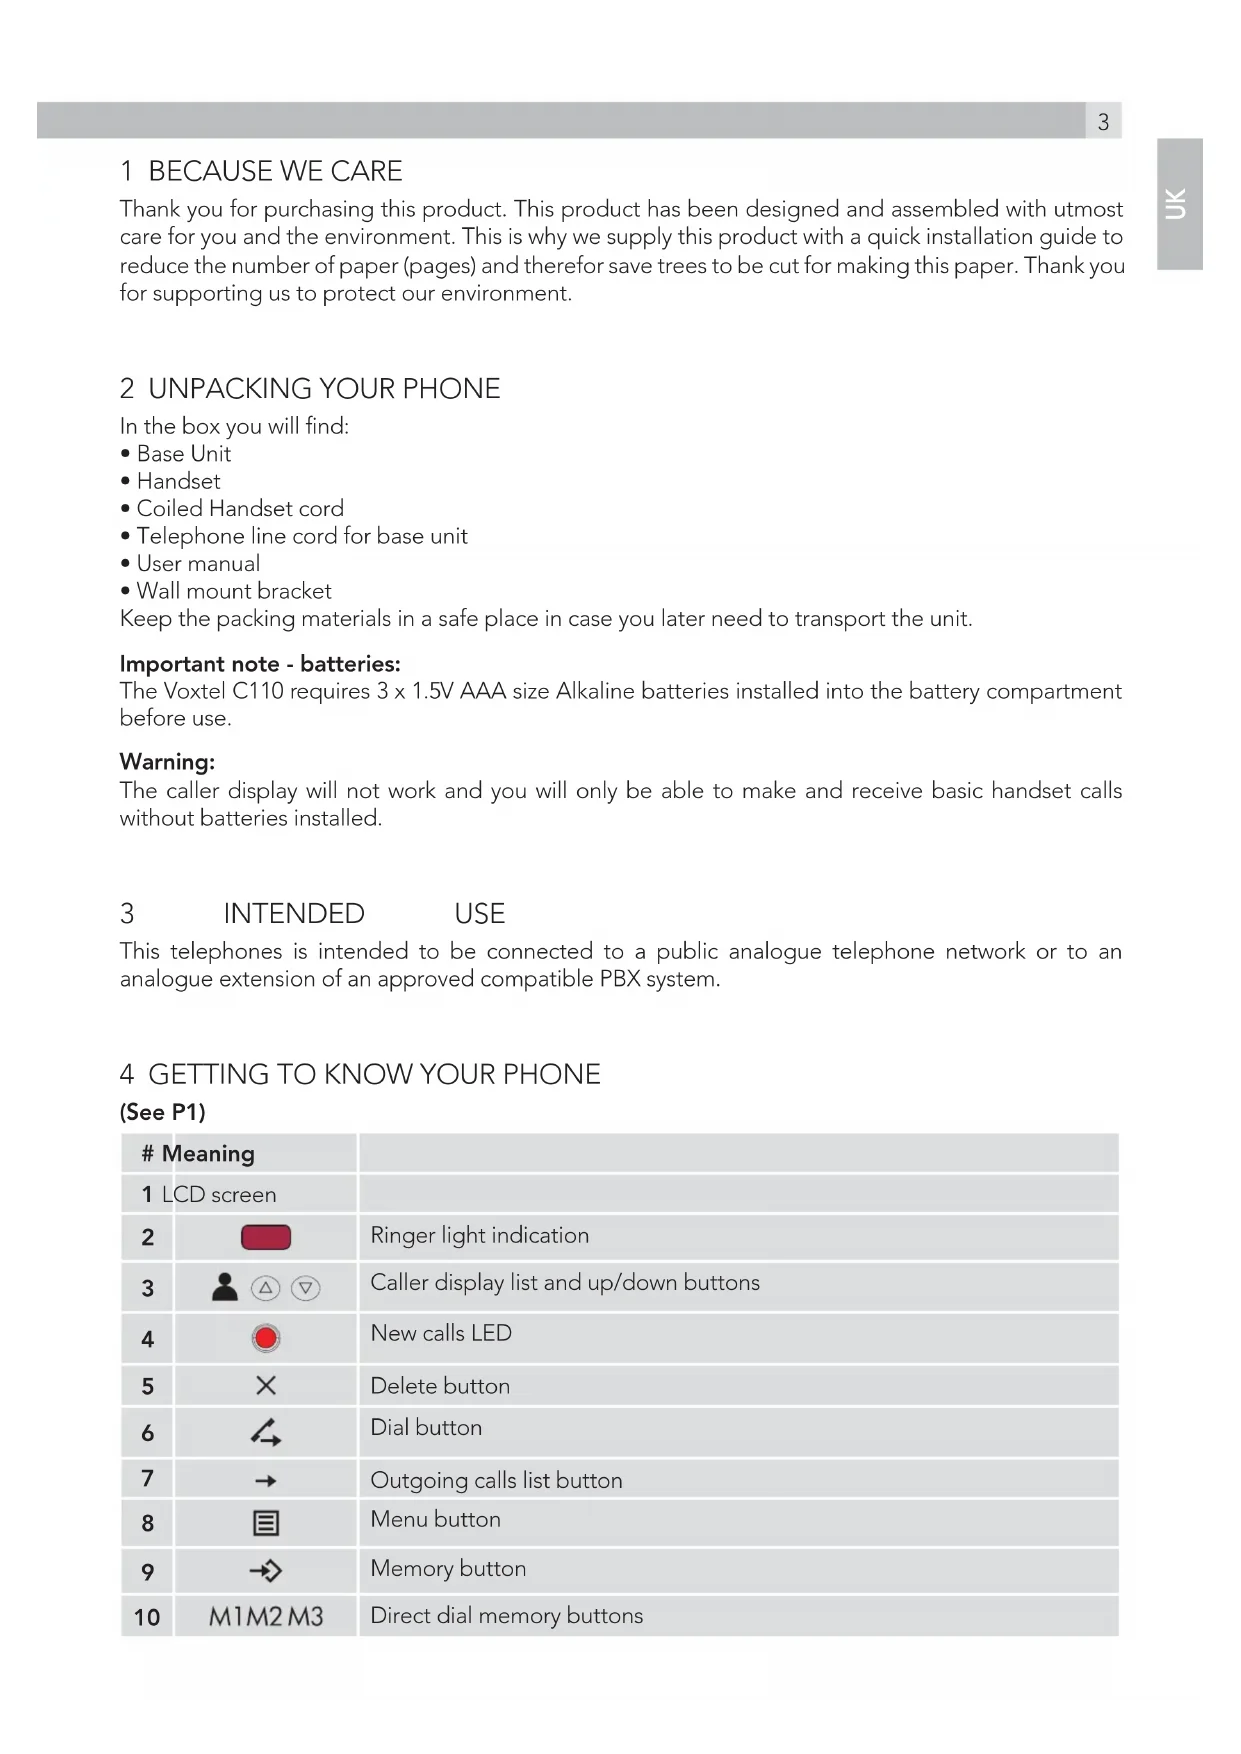
4 GETTING TO KNOW YOUR PHONE
(See P1)
| # Meaning | ||
| 1 LCD screen | ||
| 2 | Ringer light indication | |
| 3 | Caller display list and up/down buttons | |
| 4 | New calls LED | |
| 5 | × | Delete button |
| 6 | Dial button | |
| 7 | → | Outgoing calls list button |
| 8 | Menu button | |
| 9 | → | Memory button |
| 10 | M1M2 M3 | Direct dial memory buttons |
| 11 | ⊗ | Mute button |
| 12 | - | Hold button |
| 13 | R | Recall/flash button |
| 14 | P | Pause button |
| 15 | ◎ | Last number radial button |
| 16 | ◎ | Speakerphone light |
| 17 | ▲ | Handsfree button |
| 18 | ← | Store button |
| 19 | Handset cord socket on the handset | |
| 20 | Handset cord socket on the base unit | |
| 21 | ▲▲ | Ringer high/low switch |
| 22 | Phone line socket on the base unit | |
| 23 | ▲-▲+ | Speaker volume control |
5 INSTALLATION
1. Locating the base unit (See P2 and P3)
The base unit should be placed on a level surface, in a position where:
- the telephone line cable will reach your telephone line socket or extension socket.
- it is not close to a sink, bath or shower, or anywhere else where it might get wet.
- it is not close to other electrical equipment - fridges, washing machines, microwave ovens, TVs, fluorescent lights, etc.
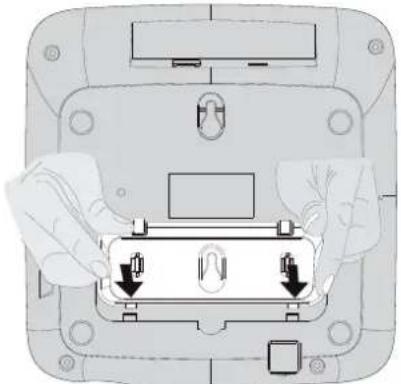
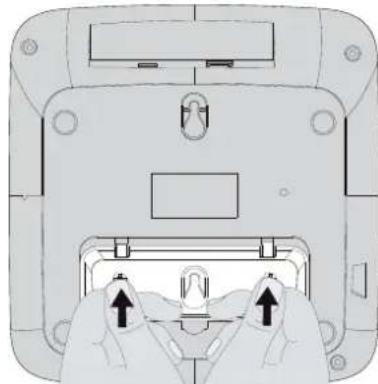
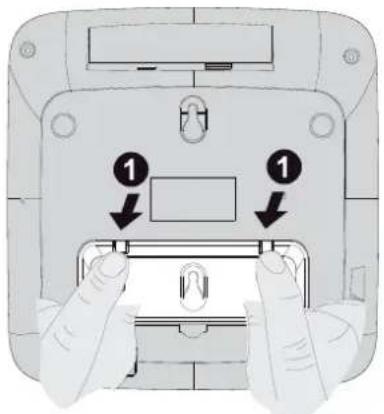
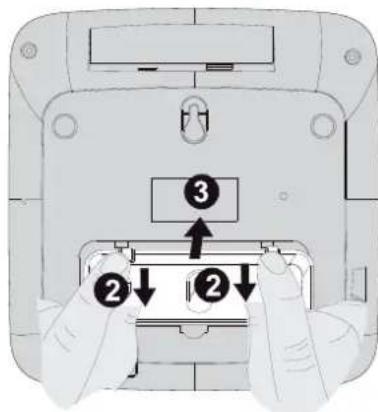
2. Installing (or replacing) the battery (See P4)
IMPORTANT:
Before removing the battery compartment cover, always make sure the base unit is disconnected from the telephone line.
- Install 3 Alkaline AAA batteries into the battery compartment in the underside of the base and re-fit the cover before use.
Note:
1) Please do NOT use Rechargeable batteries in this phone.
2) Batteries are not included with the unit.
3) The battery life is typically about 6 months, depending on usage.
When the battery is low, will flash on the display. If you do not replace the batteries, they will become totally discharged and your display screen will not work. You may lose all the telephone memories and settings.
- Plug the coiled handset cord into the handset 19. Plug the other end into the socket on the side of the base unit 20.
- Place the handset on the base unit.
- Plug the telephone line cord into the phone line socket at the back of the base unit 22 and the other end into your telephone line socket.
- Lift the handset and check for dial tone in the earpiece.
6 WALL MOUNT INSTALLATION
To place the Voxtel C110 on a wall, connect the wall mount bracket to the bottom of the phone in the slots near the front of the base as shown below
Insert the rigid clips of the bracket into the slots on the bottom of the phone (nearer the front of the base). Press down firmly until the flexible clips click into place in the slots nearer the centre of the base. To remove the bracket, (1) pinch the flexible clips, (2) back the bracket, and then (3) slide up and forward as shown below.
Mark two points on the wall that are 80mm apart to lay the fixing centres as shown below.
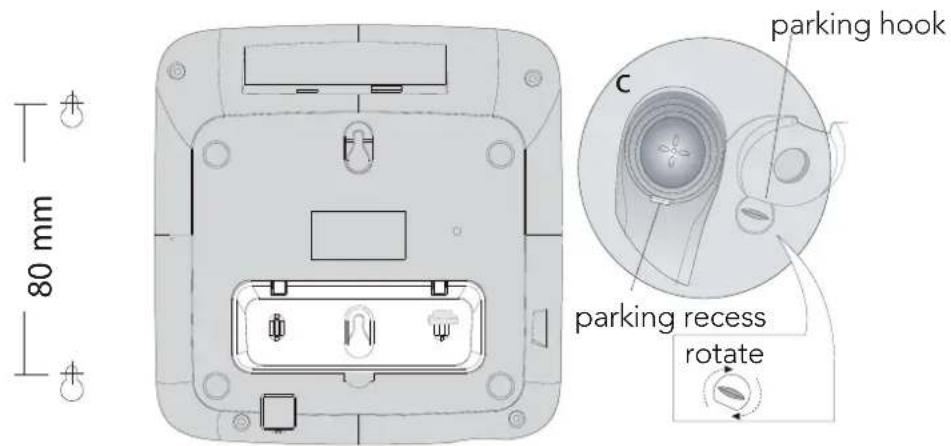
BE CAREFUL to check that there are no pipes or electrical wires hidden in the wall.
Fix two screws (7mm head screws required, not supplied) at the marked locations, leaving approximately 7mm between the wall and the screw head.
Hang the telephone on the screws using the wall mount slots. You may need adjust the screws so that the telephone is securely fixed and does not wobble.
Place the handset on the cradle with the parking hook on the cradle arranged to fit in the parking recess under the earpiece on the handset.
7 SETTING UP YOUR PHONE
Press the menu store button to enter the menu and then use up and down buttons to cycle through the following options:
- SET 1 DATE
- SET 2 LCD
- SET 3 FLASH
Note:
The system will time out if you leave more than 8 seconds between key presses.
7.1 Set time/date
You will need to set the time and date so they can be shown correctly on the display.
If you subscribe to a caller display service, the time and date will be set automatically on receipt of your first incoming call, but you may still need to set the correct year.
- In standby mode, press the store button . >The display shows "SET 1 DATE".
- Press the store button to confirm.
The "year" icon will be blinking.
- Press the up or down button to set the year.
- Press the store button to confirm.
The "month" icon will be blinking.
- Press the up or down button to set the month.
- Press the store button to confirm.
The "date" icon will be blinking.
- Press the up or down button () () to set the date.
- Press the store button to confirm.
The "hour" icon will be blinking.
-
Press the up or down button to set the hour (24 hour format only).
-
Press the store button confirm.
The "minute" icon will be blinking.
- Press the up or down button to set the minute.
- Press the store button to confirm the setting.
The display shows, "SET 2 LCD", you can continue with programming, or press the delete button X to return to standby mode.
7.2 Set LCD contrast
- In standby mode, press the store button .
The display shows "SET 1 DATE".
- Press the up or down button until the display shows "SET 2 LCD".
- Press the store button to confirm.
- Press the up or down button to select your comfortable display viewing level (1~8).
The default setting is 4.
- Press store button to confirm the setting.
The display shows "SET 3 FLASH" you can continue with programming, or press the delete button × to return to standby mode.
7.3 Set flash time
This telephone gives you the possibility to use the special services of your network provider.
When pressing the recall button R, the phone generates a line interruption and the length depends on your flash time setting.
The default value is 100ms, which is correct for most exchanges and should not need changing, but if the phone is connected to a PBX that requires a different timing, there are options for 300ms, 600ms or 1000ms.
- In standby mode, press the store button .
The display shows "SET 1 DATE".
- Press the up or down button until the display shows "SET 3 FLASH".
- Press the store button to confirm.
- Press the up or down button () () to select 100.
> (default),300,600,or 1000.
- Press the store button to confirm the setting.
The display shows "SET 1 DATE", you can continue with programming, or press the delete button × to return to standby mode.
8 TELEPHONE OPERATIONS
8.1 Making a call
- Lift the handset or press the speakerphone button and listen for a dial tone.
The display shows "00-00".
- Dial the telephone number you wish to call.
The display shows the number as you dial (maximum of 14 digits)
- To end the call, return the handset to the base unit or press the speakerphone button if speakerphone is selected.
OR
you can pre-dial the number and check it on the display before dialling it.
Key in the telephone number you wish to call.
The display shows the number as you dial, and if you make a mistake you can press the delete button × to delete the last digit.
- When you have entered the full number (maximum 32 digits), lift the handser or press the speakerphone button or dail button on the base, and the number will dial out automatically.
- To end the call, return the handset to the base unit or press the speakerphone button if speakerphone was selected.
8.2 To answer a call
When the phone rings;
- Lift the handset or press the speakerphone button on the base unit.
The call timer starts after going on line and the speakerphone light will turn on if speakerphone is selected.
8.3 To adjust the speakerphone volume
During a call;
Adjust the volume of the speakerphone to your comfortable volume level using the speakerphone volume slide control - + located on the right side of the base unit.
8.4 To end a call
- Replace the handset on the base unit cradle or press the speakerphone button on the base unit.
The speakerphone light indicator will turn off.
8.5 To switch between the handset and the speakerphone
During a phone conversation through the handset, press the speakerphone button to speak hands-free.
The conversation remains through the handset until the handset is replaced on the base unit cradle.
Then the speakerphone light will turn on. While in speakerphone mode, lift the handset to switch off the speakerphone and talk if through the handset.
8.6 Last number redial
- Lift the handset or press the speakerphone button on the base unit.
- Press the radial button
The phone automatically dials the last number you called (maximum of 32 digits).
Automatic redial
If the number you have called is busy, you can redial it automatically by simply pressing the dial button
4, which will release the current call, wait a few seconds and then redial the last number.
8.7 Outgoing call list
The Voxtel C110 automatically stores the number (up to 16 digits) and duration of the last 10 calls made.
8.8 Viewing the outgoing call list
- In standby mode, press the out button .
The display shows the most recent dialled call and its position in the outgoing calls list.
If there are no outgoing records, the display will show "End".
- Press the out button again to show the duration of that call.
Press the out button repeatedly to step through each call record in turn.
8.9 To redial a call
- When the outgoing record is displayed. Lift the handset or press the speakerphone or dial button on the base unit.
The phone automatically dials out the displayed record.
8.10 To delete an outgoing call record
- In standby mode, press the out button repeatedly until the display shows the outgoing call record you want to delete.
- Press the delete button × to delete the outgoing record.
The display shows the next outgoing record.
- Press and hold the delete button × for 3 seconds to delete all the outgoing call records.
The display automatically returns to standby mode.
8.11 Mute function
During a call press the mute button
When the mouthpiece is muted, the "mute" symbol is shown on the display and the person at the other end of the call cannot hear you, but you can hear his side.
To get back to the call, press the mute button again.
8.12 Hold function
- During a call press the hold button
When the hold is on, the display shows "hold", a melody is played to line and the mouthpiece is muted so the person at the other end of the call cannot hear you, but you can still hear them.
- To get back to the call, press the hold button again.
8.13 Inserting a pause in the dialling sequence
For some PABX, an access number must be dialled (usually an 0 or 9) to get an outside line, before dialling the rest of the number.
- Press the pause button P after the access number and then dial the rest of the number you require.
This will insert a pause of about 3 seconds between the access number and the rest of the number.
8.14 Storing a number in M1-M2-M3 memories
- In standby mode, key in the telephone number you wish to store.
Up to a maximum 14 digits.
- Press store button
The display shows "SAVE"
- Press the M1, M2 or M3 button to store it in the selected memory.
8.15 To delete direct records memory
To delete a number from a direct memory (M1-M3).
- In standby mode, press the M1, M2 or M3 button.
The display shows the memory number.
- Press the delete button × to delete the stored number.
The display shows "dEL"
8.16 Dial out a direct memory
- Lift up the handset or press the speakerphone button then press the M1, M2 or M3 button you want to dial.
The number dials automatically.
8.17 Storing a number in (0-9) two-touch memories
- In standby mode, key in the telephone number you wish to store.
Up to a maximum 14 digits.
- Press store button
The display shows "SAVE"
- Press a (0-9) button to store the number in the selected memory.
8.18 To delete two-touch memory records
To delete a number from a two-touch memory (0-9).
- In standby mode, press the memory button .
The display shows "LoAd".
Key in the memory location number (0-9).
The display shows the memory number. - Press the delete button × to delete the stored number.
The display shows "dEL"
8.19 Dial out a (0-9) two-touch memory number
To dial a number stored in a two-touch memory (0-9)
- Lift up the handset or press the speakerphone or dial button.
- Press the memory button .
The display shows "LoAd".
Key in the memory location number (0-9).
The number dials automatically.
8.20 Ringer volume
The ringer high/low switch located at the back of the base unit allows you to adjust the volume of the ringer.

High volume

Low volume
To use caller display you must first subscribe to your network provider's caller display service. If you subscribe to a caller display service, you can see the phone number of the person calling you before you answer and in the calls list afterwards.
The caller display information includes:
- The caller's number (up to 14 digits)
The date and time of the call
| Condition of Incoming caller Information LCD | Screen will display |
| It is a repeated call REP | |
| It is a new call NEW | |
| A call from someone whose number is unavailable (for example an international call) | UNAVAILABLE |
| A call from someone whose number is with held (private call) | WITHHELD |
| The caller display is incomplete or corrupted ERROR | |
| Your have a new voice mail message. (this is a network service provided by your network operator) | × |
Caller display list
Voxtel C110 automatically stores the caller display information from the last 20 (14 digits) incoming calls. If new calls are stored, the new calls LED flashes and the display icon is on with the number of new calls indicated.
The total number of calls is shown on the main standby screen by "00 CALL", "01 CALL" or "XX CALLS".
If a call is received when the call list is full, then the new entry will replace the oldest one.
9.1 Viewing the caller display list
- In standby mode, press the up or down button .
The display shows the most recent record.
If there are no caller display records, the display will show "End".
- Press the up or down button again to scroll to the next caller display record.
9.2 To return a call
- When the caller display record is displayed. Lift the handset or press the speakerphone or dial button on the base unit.
The phone automatically dials out the displayed record.
9.3 To delete caller display records
- When the caller display record is displayed. Press the delete button × to delete the caller display record.
The display shows the next caller displayed record.
- Press and hold the delete button × for 3 seconds, all the caller display records will be deleted.
The display automatically return to standby mode.
10 GUARANTEE AND SERVICE
The unit is guaranteed for 24 months from the date of purchase shown on your sales receipt. This guarantee does not cover any faults or defects caused by accidents, misuse, fair wear and tear, neglect, faults on the telephone line, lightning, tampering with the equipment, or any attempt at adjustment or repair other than through approved agents.
Please keep your sales (till) receipt this is your proof of guarantee.
10.1 While the unit is under Guarantee
- Disconnect the base unit from the telephone line and the mains electricity supply.
- Pack up all parts of your unit, using the original package.
- Return the unit to the shop where you bought it, making sure you take your sales receipt.
- Remember to include the mains adapter.
10.2 After the Guarantee has expired
If the unit is no longer under Guarantee, contact us via www.aegtelephones.eu
11 TECHNICAL DETAILS
Model Voxtel C110 Telephone
Temperature range Operating 0^ to 40^
Storage -20 °C to 60 °C
PBX compatibility Flash: 100 ms.
Pause length: 3.6 seconds.
Signalling type:DTMF (dual-tone multifrequency)
12 CE DECLARATION
This product is in compliance with the essential requirements and other relevant provisions of the R&TTE directive 1999/5/EC.
The declaration of conformity can be found on: www.aegtelephones.eu
13 DISPOSAL OF THE DEVICE (ENVIRONMENT)

At the end of the product lifecycle, you should not throw this product into the normal household garbage but bring the product to a collection point for the recycling of electrical and electronic equipments. The symbol on the product, user guide and/or box indicate this. Some of the product materials can be re-used if you bring them to a recycling point. By reusing some parts or raw materials from used products you make an important contribution to the protection of the environment. Please contact your local authorities in case you need more information on the collection points in your area.
Batteries must be removed before disposing of the device. Dispose of the batteries in an environmental manner according to your country regulations.
14 CLEANING AND CARE
Do not clean any part of your phone system with benzene, thinners or other solvent chemicals as this may cause permanent damage which is not covered by the Guarantee.
When necessary, clean it with a damp cloth.
Keep your phone system away from hot, humid conditions or strong sunlight, and don't let it get wet.
- SET 1 DATE
- SET 2 LCD
- SET 3 FLASH
Hinweis:
- SET 1 DATE
- SET 2 LCD
- SET 3 FLASH
Remarque :
-
SET 1 DATE
-
SET 2 LCD
-
SET 3 FLASH
Opmerking:
Signaaltype:DTMF (dual-tone multifrequency)
12 CE-VERKLARING
- SET 1 DATE
- SET 2 LCD
- SET 3 FLASH
Nota:
- SET 1 DATE
- SET 2 LCD
- SET 3 FLASH
Obs:
- SET 1 DATE
- SET 2 LCD
- SET 3 FLASH
Uwaga:
- SET 1 DATE
- SET 2 LCD
- SET 3 FLASH
Inmuo:
8 XEPIEMO2 TOY THAEQNOY
8.1 Ppaatponoinon
- SET 1 DATE
- SET 2 LCD
- SET 3 FLASH
Bemærk:
SignaItype:DTMF (dual-tone multifrequency)
12 CE-ERKLÄERING
7 HACTPOIBAHE HA TEAEΦOHA
HaTnCHeTe 6yToHa Ha MeHIOTo MAn To3n 3a 3anametraBaHe 3a Da Bae3eTe B MeHIOTo, H CEAd TOBa H3NoA3BaIte 6yToHnte 3a NocOKa HArope H HAdOAY , 3a Da IpeBbPTHTe CAedHnte OIIuN:
- SET 1 DATE
- SET 2 LCD
- SET 3 FLASH
3a6eAekka:
BpeMeTo Ha n3aKbAHe Ha cnCTeMaTa Ie n3Teue, aKO n3MnHAT NOBuee ot 8 cekyHAn, 6e3 Da HATNCHEte 6yToH.
7.1 3aabahe Ha yac/aTa
LsTe Tp6Ba Da HAcTpoHte Yaca N DaTata, Taka Ye Da CE NOKa3BAt PnabHaHO Ha DnCnAe. Ako Cte abOnHpaHn 3a YcAYrata 3a NOKa3BAHe Ha BXoAun NobNKBAHn, YacbT n DaTata Lle CE HAcTPOAT ABtOMaTHNo Prn NoayuABaHE Ha NpBTO BxOaIIO NobNKBAHe, HO MOKe BCE NaK Da Ce HAoXn Da 3aAaDeTe PnabHaHata RoAnHa.
BpeKIM Ha rTOBHOCT HATNCHEte 6yToHa 3a 3anamETBAHe >Ha dncnAe Ce noka3Ba ,SET1 DATE".
- Hatnchete 6yToHa 3a 3anametrahe -3a NOTBbpxKdEHHe. >NkOHata 3a ,roAnHg" MHe Mna.
- Hatnchete 6ytoHa 3a nocoka Harope nn Hdoay 品 7, 3a da HactponTe roHnata.
- Hatnchete 6yToHa 3a 3aametrahe 3a NOTBbpxkdeHne. >IKOHATA 3a Meceu" Ue Mna.
- Hatnchete 6ytoHa 3a nocoka Harope nn Haaoy A, 3a da HactponTe Meceua.
- Hatnchete 6yToHa 3a 3aametrahe 3a NOTBbpxKdEHNIE. >IKOHATA 3a "Aata" Lue Mna.
- Hatnchete 6ytoHa 3a nocoka Harope nn Hdoay△, 3da HactOnTe dAtata.
- Hatnchete 6yToHa 3a 3anametrahe 3a NOTBbpxkdeHne.
ИКOHATA 3a „uac" LJIe MIna.
- Hatnchete 6ytoHa 3a nocoka Harope nn HaOaly 品 7, 3a da Hactponte yaca (cAmo B 24acob opomat).
- Hatnchete 6yToHa 3a 3anametrahe -3a NtBbpxkdeHHe.
IKOHATA 3a ,MnHyTa" Lue Mna.
- Hatnchete 6ytoHa 3a nocoka Harope HAHOy ⑦ 3a Da HactponTe MHyTnte.
- Hatnchete 6yToHa 3a 3anametrahe , 3a Da NOTBbpAnte HactpoiKaTa.
ДиспаERT NOKa3Ba „SET 2 LCD", MOKTe DA ПpoAbxNte C nporpaMnpaHTo HAn DA HATnCHete 6yToHa 3a ИЗТрИВaH e X, 3a DA CE BbPHeTe B pexm Ha TOTOBHOCT.
7.2 3aabahe Ha KOHTpacta Ha LCD aHcnae
BpeKIM Ha rTOBHOCT HATUCHETe 6yToHa 3a 3anametrahe
△HcπAeT NOKa3Ba „,SET 1 DATE".
- Hatnche 6ytoHa 3a nocoka Harope nn HaOaly 豆 DOKATO HA dnCnAe Ce nokaxe SET2LCD".
- Hatnchete 6yToHa 3a 3anametrahe 3a NtBbpxkdeHHe.
- Hatachete 6ytoHa nocoka 3a Harope nn HaDoAly 当 7, 3a Da H36epTe ydo6Ho HnBO HaHabIoJeHne Ha DnCnAe (1~8).HaCtpoIkaT a no nOpa3bIpaH e 4.
- Hatnchete 6yToHa 3a 3anametrahe , 3a Da NOTBbpAnTE HactpoiKaTa.
ДиспаягпOKa3Ba „SET 3 FLASH", можete Да пpoьхиTe C поррампаHTO ИАн DA HATUCHEte 6byToHa 3a ИЗТРИВан X, 3a Дa ce BbpHete B pexm Ha rOTOBHOCT.
7.3 3aabaHa BpeMa NpeKcbaHe
To3n TeAedpoH Bn ABA Bb3MOXHOCT Da H3PNO3BATE CNEUaAHHTe YCAUYH Ha M OCTABYHK.
Korato HATNCHEte 6yToHa 3a NOBTOPO NOBnKBaHe R, TeAefoHbT reHepnpa npeKbcBaHe Ha AHHrTa I PNOAbXkTeAHOCCTTA 3ABNCN OT HAcTpOuKaT a BpeMe HA npeKbcBaHe.
CTOHHOCTTa no NOpa36bnpahe e 100 ms, KOeTo e npabnHO 3a NOBcHTo Te/ UHTpAAu HHe e Heo6xoAHa pomraHa, Ho aKO TeAefohT e Cbbp3an KbM PBX UHTpAAa, KOTo N3NCKBA dpyrO cHxpoHN3IpaHe, cbUeCTByBAT OUnn 3a 300 ms, 600 ms nAn 1000 ms.
BpeKIM HA rTOBHOCT HATNCHEte 6yToHa 3a 3anamETBAhe
△HcπAeT NOKa3Ba „,SET 1 DATE".
- Hatnchete 6ytoHa 3a nocoka Harope nn HaOay 当 DOKATO Ha dnCnAe Ce nokaxe SET 3 FLASH".
- Hatnchete 6yToHa 3a 3anametrahe 3a NtBbpxkdeHHe.
- Hatnchete 6ytoHa 3a nocoka harope Hn HaOay , 3a da n36epete 100.
(no noaopa3bnpahe), 300, 600 nn 1000.
- Hatnchete 6yToHa 3a 3anametrahe , 3a Da NOTBbpAnte HactpoiKaTa.
ДиспаягпOKa3Ba SET 1 DATE", moKTe a npOaJxNte C npOrpaMnpaHTo HAn dHaTnCHete bYToHa 3a n3TpNbAHe X, 3a Da ce BbPheTe B pExm Ha rOTOBHOCT.
8 ONEPAUNC TEAEPOHA
8.1 HnHnHaHe Ha o6aKahe
BAnHHeTe CAYUaAkaTaN Hn HATNCHeTe 6yToHa HA BnCOKOrOBOpnteYn U n Ue yyeTe CnHaA "CBO6oAoHO".
△NcPAAeT NOKa3Ba ,00-00
- HahepeTe XeAHHaTneAeOHeH Homep.
ДиспаERT NOKa3Ba HOMepa,ДOKATO rHa6npuTe (MaKcHmym 14 uHppn)
3a da npekpatte NOBnKBAHe, NOCTABETe CAYLIAKATA BbpxO OCHOBHOTO yCTPOIcTBo HAn HATNCHETe 6yToHa Ha BnCOKOROBOpHTeA aKO e N36paH BnCOKOROBOpHTeA.
M
MOKETe Aa BbBeAte TpeBAPHTeHOMep Haa TpoBepTe Ha dnCnAe, Ppeu DaTgHa6epete.
BbBeTe TeAeOHHnHOMep,Ha KOTo XeAaTe Da ce oBaNTe.
ДиспаERT NOKa3Ba HOMePa,ДOKATO TO BbBExKdAte,И aKO dOnyChete rpeLka,MOxTe aHATnCHete 6yToHa 3a n3TpNaBeX,3a DA n3TpneTe NOcAeHata UNppa.
Korato BBBeTe NbAHnH Omep (MAKcHMaH0 32 uOppn), BAnrHete CAYLJAAKAT HATNCHEte 6yToHa HA BnCOKOrOBOpHTeA nn 6yToHa 3a HaBnpaHe 4Ha OCHOBATA HOMepbT Ue Ce 6bDe Ha6paH ABTOMaTHNo.
3a Da NpeKpATHe NOBnKBaHe, BbPHeTe CAYlaAkaTa BbpxO OCHOBHOTO yCTPOINCTe HATnCHete 6yToHa Ha BnCOKOrOBOpHTeA aKO e 6nA n36paH BnCOKOrOBOpHTeA.
8.2 3a npneMaHe Ha NOBnKBaHe
Korato TeAeDpoHbT 3BbHN;
BAnHHeTe CAYUaAkaTa HAN HATnCHete 6yToHa Ha BnCOKoROBpOHHr OCHOBHOTO yCTPOIcTBO.
TaImepbT 3a NOBnKBaHeto Ce CTaptnpa CaeA aKTbBnPaHe Ha AINHnra, a HAnKATOpbT Ha BnCOKOROBOPHTeA CBETBa, aKO e N36paH BnCOKOROBOPHTeA.
8.3 3a peryampane Ha cnaTa Ha 3Byka Ha BnCOKOROBOpTeA
△NCHPAAERIPOKA3BACAeABALUNAANNOCOTCINCBKACBXOADLIIOBNKBAHNA.
- Hatnche 3aApbXte 6yToHa 3a H3NHBHe npOaXkeHne Ha 3 ceKHydN. BcN 3aPiNCB CnncbKa C BXoAaLNI NOBkBAHnI LCe CE N3TpHrT.
ANCnAeR ABTOMaTHUHO CE BpbluaB PEXKIM Ha rTOBHOCT.
10 TAPAHUNIOBCAYXBAHE
TeAefoHHata cHCTema e c rapaHnB IpoaBXKeHne Ha 24 Meceua O T aTATAHa NOKynpka, Yka3aHa Ha pa3nNcKata 3a npOax6a. Ta3n rapaHnR He oxbaUa HEn3npabHOCTn HAn DepeKTn, PnPHHeHn Prn INuIeHTn, HEnpABnHa H yNtpe6a, HopMaAno H3HOCBAH He6peXHoCT, Hen3PpABHOCTn B TeAefoHHata AINHra, MbAHIn, MoAnfKaUIn B UCTPOICTBOTo HAN KAKBTO n Da e ONNT 3a HAcTPOkA HAn pEmOH, INBbplSeH OT HeynbAHOMoUeHN Anuca.
3ana3eTe pa3nckata 3a NOKynka (KACOB 60H), TbN KATO TOBa e BAwata rapaHua.
10.1 Dokato yctpoicTBOTO eB rapaHnra
- I3KAIOUeTe OCHOBHOTo yCTpoHCTBO OT TEAEPOHHATA AINHn I NT eAEKtpueckata MpeXa.
-Пибереть BCИЧКУ actH Na TeAeФОHHATA CnCTeMa B OpIHINHaHATA ONAKOBka.
Bbphete yctpoiCTBOTo B MaRa3nHa, OT KOITo CTe Tc KynHAn, KATO He 3a6paBrTe Da B3emTe CBOrTa pa3nNcKa 3a NOKyPkA.
He 3a6paBnTe da aO6abnte n aanTepa 3a eAekTpueckata Mpeka.
10.2 CAnEaN3TuHaHeTo Ha cPoka Ha rapaHuaTAt
Ako rapaHnIyTa Ha yCTpoNCTBOTO e n3TEKla, CbpxKeTe Ce c Hac Ha aDpec www.aegtelephones.eu
11 TEXHnueCKn DAHHN
Moae TenepoH Voxtel C110
Temnepatypen Anana3OH
Pa6ota oT 0°C △o 40°C
CbxpahHeHne -20°Cdo60°C
CbbMeCTHMOCTcPBX
BpeMe Ha npekbcBaHe: 100 ms.
PpOaBxKHTeAHOCT Ha pay3a: 3,6 cekyHAn.
TIN CnHaaH3npaHe:DTMF (BByTOHaHO MHOroyeCTOTHO)
12 CE AEKAAPAUJIA

To3n pOaYKT e B CbOTBETCTBHe C OCHOBHnTe N3NCKBAHnI ApyrN Cbbp3aHn pa3nope6n Ha
AnpeKTHBa R&TTE 1999/5/EO.
AekapauTAta 3a cbotbETCTBnE MOKTe Da HamepHTe Ha aDpec: www.aegtelephones.eu
13 I3XBbPAAHE HA YCTPOINCTBOTO (OKOANCAPEA)

B KpA Ha EKcPAAOATAUHOHHa UKbA Ha PPOyKTa He Tp8Ba Da To H3XBpAraT 6HTOBtE OTnAdbu, a Tp8Ba DaTo PpeAdTe B Cb6nPateAen PyHKT 3a pezIKAnpaHe Ha eAEKTPnueCKo H AEKTPoHNO O6OpyBAhe. TOBa e Yka3aHo ype3 CmBOA BbpxY PPOyKTa, B pBKOBoADCTBOTO 3a Notpe6nteAHa KyTna. HkON OT MaTePnaIte B PPOyKTa Moat da 6bDat N3NoA3BAHn IOBTOpHO, aKO rN PpeAdTe B NyHK T3a pezIKAnpaHe. Ype3 NOBTOpHoto
H3N0A3BAHe Ha HЯКО YACTN HAN CypOBHH OYNOTpe6eHN NPOyKTN BNE DABAI
PpHOC 3a ONa3BAHETO Ha OKoAHATA Cpea. CbpxkTe ce C MeCTHnte BAACTV
HyXdaete OT DOIpAHHTeHA INΦopMaζη OTHOCHO cbHpateAHHTe ΠyHKTO Be BbbB B
pernoH.
BaTepeHnTe Tp86Ba Da Ce H3BaAaT PpeAn H3XBbPAAHeTo Ha yCTpoNCTBOTo. H3XeB 6aTepeHnTe no 6e3onaceH 3a OKoAHata CpeA NaHH Cbo6pa3Ho HaunohAhnTe pa3nopeA6n.
14 IOUHCTBAHE N OBCAYXBAHE
He nouchTbaIte HNKAKBa Yact OT TealepoHHata CnCTema C 6eH30A, pa3peAnTe APytn Pa3TBaprauXHMnHN BeIeCTBa, Tb' KATO TOBA MOKe Da npHnTpaHa NOBpeDa, KOrTO He Ce POKPbBA OT rapaHcNtA.
Pn Heo6xoAMoCT NOHCTBaIe C BAAxHa KbPna.
Tae TepeHHa Cnctema aee OT ropeu H BAAxHn yCAOBn n CHA h cBeTAnHa. He no3BOABAe Ta Ce Hamokpn.
1 NAČEM NÁM ZÁLEŽI
- SET 1 DATE
- SET 2 LCD
- SET 3 FLASH
Poznámka:
© 2012 Binatone Electronics International Limited
All rights reserved
Subject to availability. Rights of modification reserved.
AEG is a registered trademark used under license from AB Electrolux (publ)
www.aegtelephones.eu