
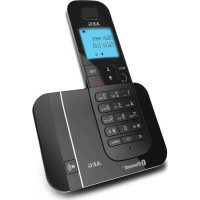
SOLO COMBO 10 - Cordless phone AEG - Free user manual and instructions
Find the device manual for free SOLO COMBO 10 AEG in PDF.
| Product type | Cordless phone with wired handset and answering machine |
| Brand | AEG |
| Model | SOLO COMBO 10 |
| Standard | DECT |
| Frequency | 1.88 to 1.9 GHz |
| Outdoor range | Up to 300 meters |
| Indoor range | Up to 50 meters |
| Standby time | 168 hours |
| Talk time | 10 hours |
| Charging time | 15 hours |
| Base power supply | Power adapter 100-240V AC, output 6V DC / 500mA |
| Charger power supply | Power adapter 100-240V AC, output 6V DC / 500mA |
| Battery type | 2 AAA NiMH rechargeable batteries 1.2V 650mAh |
| Directory capacity (cordless handset) | 100 contacts |
| Directory capacity (base) | 30 contacts |
| Call log (handset) | 40 entries |
| Call log (base) | 20 entries |
| Answering machine | Up to 59 messages, maximum recording time 30 minutes, message up to 3 minutes |
| Main features | Intercom, speakerphone, mute, keypad lock, alarm, caller ID, voicemail |
| Safety | Use only provided NiMH batteries; do not expose to water, heat or direct sunlight; disconnect before cleaning |
| Care and cleaning | Clean with a damp cloth; do not use solvents or detergents |
| Warranty | 24 months from date of purchase |
| Operating temperature | 0°C to 40°C |
| Storage temperature | -20°C to 60°C |
Frequently Asked Questions - SOLO COMBO 10 AEG
User questions about SOLO COMBO 10 AEG
0 question about this device. Answer the ones you know or ask your own.
Ask a new question about this device
Download the instructions for your Cordless phone in PDF format for free! Find your manual SOLO COMBO 10 - AEG and take your electronic device back in hand. On this page are published all the documents necessary for the use of your device. SOLO COMBO 10 by AEG.
USER MANUAL SOLO COMBO 10 AEG
Thank you for purchasing this product. This product has been designed and assembled with utmost care for you and the environment. This is why we supply this product with a quick installation guide to reduce the number of paper (pages) and therefor save trees to be cut for making this paper. A full and detailed user guide with all the features described can be found on our website www.aegtelephones.eu. Please download the full user guide in case you want to make use of all the advanced features of your product. To save the environment we ask you not to print this full user guide. Thank you for supporting us to protect our environment.
2 IMPORTANT SAFETY INSTRUCTIONS
Please follow these safety instructions when using your telephone equipment to reduce risk of fire, electric shock and injury:
- Read and understand all the instructions.
- Follow all warnings and instructions marked on the product.
- Unplug this product from the wall outlet before cleaning. Do not use liquid cleaners or aerosol cleaners. Use a damp cloth for cleaning.
- Keep this product away from hot, humid conditions or strong sunlight, and don't let it get wet or use it near water (for example, near a bath tub, kitchen sink, or swimming pool).
- Do not overload wall outlets and extension cords as this can result in the risk of fire or electric shock.
-
Unplug this product from the wall outlet and obtain the service of our Repair Centre under the following conditions:
-
When the power supply cord or plug is damaged or frayed.
- If the product fails to operate normally despite following the operating instructions.
- If the product has been dropped and the cabinet has been damaged.
-
If the product exhibits a distinct change in performance.
-
NEVER use your phone outdoors during a thunderstorm. Unplug the base from the telephone line and the mains socket when there are storms in your area. Damage caused by lightning is not covered by the guarantee.
- Do not use the telephone to report a gas leak in the vicinity of the leak.
- Use only the supplied NiMH (Nickel Metal Hydride) batteries that came with your phone or an authorised replacement recommended by the manufacturer. There is a risk of explosion if you replace the battery with an incorrect battery type. The use of other battery types or non-rechargeable batteries/primary cells can be dangerous. They may cause interference and/or damage to the unit or surroundings. The manufacturer will not be held liable for damage arising from such non-compliance.
- Do not use third party charging pods. Damage may be caused to the batteries.
- Please ensure that the batteries are inserted in the correct polarity.
- Dispose of batteries safely. Do not burn, immerse them in water, disassemble, or puncture the batteries.
3 INTENDED USE
This telephone is intended to be connected to a public analogue telephone network or to an analogue extension of a compatible PBX system.
4 PACKAGE CONTENT
The package contains the following items:
1 Cordless Handset
1 Corded Handset
1 Corded Base Station
- 1 Charging Pod for the Cordless Handset
- 1 Mains Power Adapter for the Coreded Base Station
- 1 Telephone Line Cord for the Coreded Base Station
- 1 Coiled Telephone Handset Cord for the Coreded Handset
- 2 AAA NiMH Rechargeable Batteries for the Cordless Handset
- 1 Back Cover for the Cordless Handset
- 1 User Guide
5 INSTALLING YOUR PHONE
5.1 Connecting the corded base station (see P6)
- Plug the mains power cable, telephone line cord and coiled handset cord into the corded base station.
- Plug the other end of the coiled handset cord into the corded handset.
- Place the corded handset in the cradle of the corded base station.
- Plug the power adapter into a 100 - 240Vac, 50 - 60Hz mains power socket and the telephone line cord into a telephone line socket.
Warning:
Always use the cables provided in the box.
Use only the supplied adaptor. Using other power cables may damage the unit.
Note:
Place the corded base unit within easy reach of the mains power socket. Never try to lengthen the mains power cable.
The corded base station needs mains power for normal operation and the handsets will not work without it.
5.2 Installing the cordless handset and charging the batteries (see P5)
- Insert the 2 supplied batteries into the battery compartment of the cordless handset, observing the correct polarity (see markings inside battery compartment).
Warning:
Use only the supplied NiMH rechargeable batteries.
- Place the back cover over the back of the cordless handset and press down until it clicks into place.
- Place the cordless handset on the charging pod and charge for 15 hours before using the cordless handset for the first time.
- The cordless handset will give a double beep when it is properly placed on the charging pod.
- The battery charging indicator on the charging pod lights up to indicate charging.
Note:
The cordless handset may become warm when the batteries are being charged or during prolonged periods of use. This is normal and does not indicate a fault.
6 GETTING TO KNOW YOUR PHONE
6.1 Cordless handset overview (see P1)
| # Icon Meaning | ||
| 1 | ☐/OK | In standby mode, press to enter the Main Menu list. Press to select an item, or to save an entry or setting. |
| 2 | +/▲/▲ | In menu mode, press to scroll up. During a call or message playback, press to increase the volume. In standby mode, press to access the call log. |
| 3 | C | Press to make or answer a call. During a call or message playback, press to switch between speakerphone and earpiece. |
| 4 | * / ☑ | Press and hold to switch the key lock on or off. |
| 5 | R | During a call, press to send a Flash signal for network services. |
| 6 | ◎ | In standby mode, press to access the radial list. |
| 7 | INT | In standby mode or during a call, press to initiate an intercom call or transfer a call. |
| 8 | ☐/☑ | Press to cancel an action. During pre-dialling, press to delete the last digit entered. During a call, press to mute the microphone, and press again to resume conversation. |
| 9 | - / ▼ | In menu mode, press to scroll down. In standby mode, press to access the phonebook list. During a call, or message playback, press to decrease the volume. |
| 10 | ○ | During a call, press to hang up. During programming, press to cancel and exit without making changes. In standby mode, press and hold to power the handset on/off. |
| 11 | #/P/○ | Press and hold to turn the handset ringer off. Press and hold to add a dialling pause when dialling or entering numbers into the phonebook. |
6.2 Cordless handset display (see P2)
The LCD display gives you information on the current status of the telephone.
| Icon Meaning | |
| Displays when the battery is almost empty. | |
| Displays when the battery is fully charged. Blinks when the battery level is low. | |
| Displays when the line is in use. Blinks when there is an incoming call. | |
| Displays when you have new voicemail messages*. | |
| Displays when you have new missed calls, or the call log is being viewed. | |
| Displays when the phonebook is accessed. | |
| Displays when the alarm is set. | |
| Displays when handset ringer is turned off. | |
| Displays when the handset is registered and within range of the base station. Blinks when the handset is out of range or is searching for a base. | |
| Displays when the answering machine is on. Flashes slowly when there are new answering machine message(s). | |
| Displays when the handset is in speaker mode. | |
| OK | Turns on when confirmation of selection or programming is available. |
| WCK | Turns on during phonebook editing mode to delete the last digit. Turns on during menu mode when you can return to the previous state or previous step. |
*You must subscribe to Voicemail service or Caller ID from your network providers for this feature to work. You may need to pay a subscription fee.
6.3 Corded Base Station (see P3 and P6)
| # Icon Meaning | ||
| 12 | K | Press to go back to the previous message during message playback. |
| 13 | #/?/C | During a call, press to mute the microphone and press again to resume conversation. Press to cancel an action. During pre-dialling or number editing, press to delete the last digit entered. During number editing, press and hold to delete all digits. |
| 14 | R | During a call, press to send a Flash signal for network services. |
| 15 | ▲ | In standby mode, press to access the Phonebook. |
| 16 | Hookswitch: press to end a call. | |
| 17 | ☐ | In standby mode, press and hold to playback message on the answering machine. Press to stop playback. |
| 18 | ☐ | During message playback, press to skip to the next message. |
| 19 | ☐/OK/▲ | In standby mode, press and hold to set date and time. In settings mode, press to confirm a setting. In standby mode, press to access the call log (CID). |
| 20 | ☐ | In standby mode, press to enter the radial list. |
| 21 | P | When dialling, press and hold to add a dialling pause. In standby mode, press and hold to turn the ringer On/Off. |
| 22 | ☐ | In standby mode, press and hold to switch the key lock on or off. |
| 23 | ☐ | Press to make or receive a call in speaker mode. |
| 24 + - | In standby mode, press to adjust ring volume. During a call, press to adjust the speaker volume. Press to browse through the phonebook or call log. | |
| 25 | (▲) | Press to find / page all registered handsets. Press again to turn off the page signal. Press and hold to start registration process. |
6.4 Base Station Display (see P4)
| AN ON | Displays when the answering machine is On. |
| AN OFF | Displays when the answering machine is Off. |
| Displays when the microphone is muted. | |
| Displays when the line is in use. Flashes when there is an incoming call. | |
| Flashes when you have a new voicemail message. (This is network service) | |
| Displays when you have new missed calls, or the call log is being viewed. | |
| Displays when the phonebook is accessed. | |
| Displays when the keypad is locked. | |
| Displays when the base unit is in speakerphone mode. | |
| Displays when the base unit ringer is turned off. | |
| Flashes slowly when there are new answering machine message(s). Flashes quickly when the answering machine is full. Displays when all answering machine messages have been read. | |
| Phonebook and Call Log record number indicator. | |
| Turns on when there are more digit(s) on the left for display. Press OK to view more digits on the left. | |
| Time/date display. The time is displayed in 24-hours format and the date in DD/MM format. | |
| Turns on when there are more digit(s) on the right for display. Press OK to view more digits on the right. |
6.5 Menu Map and Menu Navigation
- From the home screen, press OK to access "PHONEBOOK", the first option in the Main Menu list.
- Press or go to other options in the menu list.
- Press OK to enter a sub-menu or function.
- Press to go back to the previous level.
- Press to cancel the current operation and return to the home screen.
Note:
If you do not press any key on the handset for 15 seconds, the display will automatically return to standby.
6.6 Text and Number Entry
You can enter text via the keypad, by using repeated presses of the alphanumeric keypad. This should be used when storing a name in the phonebook or renaming your handset.
For example, to enter the name Tom
T Press 8 once
Press 6 three times
M Press 6 once
In editing mode, a cursor is displayed to indicate the current text entry position.
It is positioned at the right of the last character entered.
Writing Tips:
Once a character is selected, the cursor will move to the next position after a short pause.
Press to delete the last letter or number.
7 HANDSET & BASE CONNECTION
- When purchased, all handsets are already registered to the base unit and should link to it when they are all powered up.
- To use your cordless handset and base unit together, you must be able to establish a radio link between them. The signal between the handset and the base unit is in accordance with the normal standards for a DECT phone: Maximum range up to 300 metres outdoors or 50 metres indoors. Be aware that:
Large metal objects, such as refrigerators, mirrors or filing cabinets, between the handset and the base unit may block the radio signal.
Solid structures, such as walls, may reduce the signal strength.
Electrical equipment may cause interference and/or affect the range.
- Do not place the base unit close to another telephone, TV or audio equipment - it may cause interference.
- Putting the base unit as high as possible ensures the best signal.
- Out of Range warning. If you hear a warning tone during a call, and/or the sound in the earpiece becomes faint or distorted, you may be going out of range of the base unit. Move nearer to the base unit within 20 seconds; otherwise the line may be cut off.
8 USING YOUR CORDLESS HANDSET
8.1 Make a Call
8.1.1 Pre-dialling
- Enter the phone number (maximum 24 digits).
- If you make a mistake, press to delete the last entered number.
- Press to dial the phone number.
8.1.2 Direct Dialling
- Press C.
- Dial the number (maximum 24 digits).
8.1.3 Call from the Redial List
- Press key in standby mode.
The last number dialled is displayed.
- Press / to select the desired entry in the radial list and then press (to dial out the selected radial number.
8.1.4 Call from the Call Log
- Press +// in standby mode.
- Press / to select the desired entry in the call log and then press to dial out the selected call log number.
Note:
You need to subscribe to Caller Line Identification service to be able to see the caller's number or name in the call log.
8.1.5 Call from the Phonebook
- Press - / key in standby mode.
- Press / to select the desired entry in the phonebook and then press to dial out the selected phonebook number.
8.2 Answer and End a Call
- When the phone rings, press C.
To end a conversation, press
Warning:
When the handset is ringing, please do not hold it too close to your ear as the volume of the ringing tone may damage your hearing.
Note:
You can simply place the handset back on its base station or charger pod to end the call. Make sure that you have not deactivated the Auto hang-up feature.
8.3 Handset Speakerphone
During a call, you can press to alternate between hands-free speakerphone and handset earpiece.
8.4 Adjust Earpiece Volume
There are 3 levels of earpiece volume.
- During a call, press / to select from "VOLUME 1" to "VOLUME 3".
The current setting is shown.
When you end the call, the setting will remain at the last selected level.
8.5 Adjust Speaker Volume
There are 5 levels of speaker volume.
- During a call, press / to select from "VOLUME 1" to "VOLUME 5".
The current setting is shown.
When you end the call, the setting will remain at the last selected level.
8.6 Mute/Unmute the Microphone
When the microphone is muted, the handset displays "MUTE ON", and your caller cannot hear you.
- During a call, press to turn on/off the microphone.
8.7 Paging
The paging feature enables you to locate a missing handset if the handset is in range and contains charged batteries.
- Press under the base unit.
All the registered handsets that are in range will start to ring.
You can stop the paging by pressing any key on the handset or the under the base unit again.
8.8 Switching the Handset On/Off
- Press and hold for more than 2 seconds to switch the handset on or off in standby mode.
The display will show "SEARCHING..." until the handset finds the base.
Note:
You can switch the handset off to save battery life, if the handset is not on the base or a charger pod and you do not want to use it for a while.
IMPORTANT:
When the handset is OFF, it cannot be used for making calls including emergency calls. It will not ring when there is an incoming call. To answer a call, you will need to switch it back on and it may take some time for the handset to re-establish a radio link with the base unit.
8.9 To Lock/Unlock the Keypad
You can lock the keypad to avoid making calls or pressing the keys accidentally.
- In standby mode, press and hold × / 日 key for 2 seconds to lock the keypad.
The handset displays "KEYS LOCKED".
- To turn the keypad lock off, press and hold × / 面 again.
Note:
Incoming calls can still be answered even if the keypad is locked.
8.10 Initiate an Intercom Call to the Coreded Base
- In standby mode, press INT.
Intercom with the corded base is established immediately if there is only one registered cordless handset.
If there are more registered cordless handsets, the handset numbers which are available for intercom will be displayed. Press 0 to call the corded base.
- Press or pick up the corded handset from the corded base to answer the internal call, where both internal callers can talk.
- To end the intercom call, press on the corded base or return the corded handset to the cordless base.
Note:
If there is no answer from the corded base, or you wish to cancel the intercom call before it is answered, press INT to return to the external call.
9 USING YOUR CORDED BASE
9.1 Make a call
9.1.1 Pre-dialling
- In standby mode, enter the phone number (maximum 24 digits).
- If you make a mistake, press / / C to delete the last digit entered.
- Pick up the corded handset from the base unit or press to dial the number.
- When you complete the call, return the handset to the corded base unit or press.
9.1.2 Direct dialling
- Pick up the corded handset from the base unit or press.
- Listen for the dial tone and then enter the phone number.
- When you complete the call, return the handset to the corded base unit or press.
9.2 Adjust Earpiece or Speaker Volume
There are 5 volume levels.
During a call, press + or - to select from L1 to L5.
The current setting is shown.
When you end the call, the setting will remain at the last selected level.
9.3 Set Ringer Volume
You can set the ringer volume on the corded base from L0 (ringer off) to L5.
- In standby mode, press + or - to select the desired setting (each volume level will play as it is select).
Note:
The corded base will ring at the selected volume level when it receives an incoming call.
If you set ringer volume to L0, will appear on the LCD and the corded base will not ring when it receives an incoming call.
9.4 Turn off Ringer
- In standby mode, press and hold # to turn off ringer.
is displayed on the LCD.
- To turn the ringer back on, press and hold # again.
9.5 Lock/Unlock the Keypad
- In standby mode, press and hold to lock the keypad.
is displayed on the LCD. - To unlock the keypad, press and hold again.
Note:
Incoming calls can still be answered even if the keypad is locked.
9.6 Mute/Unmute the Microphone
- During a call, press to turn off the microphone.
is displayed. - To unmute the microphone, press again.
9.7 Initiate an Intercom Call from the Corded Base to a Cordless Handset
The system allows an intercom call between the corded base and another registered cordless handset.
- Pick up the corded handset from the corded base or press.
- Press (at the bottom of the corded base. >All registered cordless handsets will start to ring.
- Press on any handset to intercom with the corded base.
The paging tone on all handsets and the corded base will stop.
Note:
- You can cancel the intercom call before it is answered by pressing (at the bottom of the corded base.
- If there is no answer from the cordless handset within one minute, the paging will be cancelled automatically.
9.8 Transfer an External Call from the Coreded Base to a Cordless Handset
- During the call, press (at the bottom of the corded base to put the external call on hold. > Intercom is established immediately with all registered cordless handsets.
Note:
If there is no answer from the cordless handset, or you wish to cancel the intercom call before it is answered, press (at the bottom of the corded base to return to the external call.
- Press on the cordless handset to answer the internal call, where both internal callers can talk.
- Return the corded handset to the corded base or press to transfer the external call to the cordless handset.
9.9 Call from the Redial List
The corded base stores only the last number dialled.
- In standby mode, press on the corded base.
The last number dialled is displayed.
- Press or lift up the handset from the corded base.
The number will be dialled out automatically.
9.10 Access the Phonebook
The corded base can store up to 30 phonebook entries. Each phonebook entry can have a maximum of 24 digits for the phone number. However, you cannot store the names of your contacts on the phonebook.
- In standby mode, press to view the first record on the phonebook.
- Press +or - to scroll through the list of entries in the phonebook.
01 to #30 is displayed on the top right of the LCD to indicate the record number, where #01 represents the first record on the phonebook.
Note:
If the phone number is too long, press OK to view additional digits.
Phonebook entries are stored in LAST IN, FIRST OUT order.
9.11 Store a Number to the Phonebook
In standby mode, press and hold
- Enter the telephone number. If you make a mistake, press C to delete the last digit entered.
- Press OK to confirm.
A confirmation tone is played and the corded base returns to standby mode.
9.12 Delete a Phonebook Entry
In standby mode, press and hold
The first record in the phonebook is displayed.
- Press + or - to select the desired entry in the phonebook.
- Press C.--- is displayed.
- Press OK to confirm.
A confirmation tone is played and the corded base returns to standby mode.
9.13 Access the Call Log
If you have subscribed to the Calling Line Identification (CLI) service with your network service provider, the phone number of your caller will appear on the handset display when there is an incoming call and then stored in your Call Log.
The corded base can store up to 20 call log entries. Each call log entry can have a maximum of 24 digits for the phone number.
Note:
If the call is from someone whose number is unavailable, withheld or if you have not subscribed to Caller Line Identification service, then only the date and time of the call will be displayed.
In standby mode, press
The first record in the call log is displayed along with the date and time of the call.
01 on the top right of the LCD indicates that this is the first record on the call log.
- Press + or - to browse through the call log.
Note:
If the caller's number is too long, press OK to view additional digits.
9.14 Delete a Call Log Entry
- In standby mode, press.
- Press + or - to select the desired entry in the call log.
- Press C.
--- is displayed.
- Press OK to confirm.
A confirmation tone is played and the corded base returns to standby mode.
9.15 Answering Machine Operations
You can use the answering machine keys on the corded base to access some of the answering machine functions. (see 6.3)
10 PHONEBOOK ON THE CORDLESS HANDSET
Each cordless handset can store up to 100 phonebook entries. Each phonebook entry can have a maximum of 24 digits for the phone number and 12 characters for the name.
10.1 Store a Phonebook Entry on your Cordless Handset
From the home screen, press OK.
- Press OK again to select "PHONEBOOK".
- Press OK to select "NEW ENTRY".
- Enter the name of the contact (maximum 12 characters) using the keypad.
If you make a mistake, press to delete the last character entered.
- Press OK to confirm the name entry.
- Enter the number of the contact (maximum 24 digits) using the keypad.
If you make a mistake, presa/ to delete the last digit entered.
- Press国/OK to confirm.
A confirmation tone is played.
- Press to return to standby mode.
Note:
You cannot store a new phonebook entry when the memory is full. In this case, you have to delete existing entries to make space for new ones.
10.2 Access the Phonebook on your Cordless Handset
- From the home screen, press to open the phonebook list.
Alternatively, from the home screen, you can press OK twice to select "PHONEBOOK", then / 口 "LIST" and again to open the phonebook list.
- Press to scroll through the list of entries
The phonebook entries are listed in alphabetical order.
- Press OK to view the details of the selected entry.
- Press to return to standby mode.
Note:
Instead of pressing / to browse the phonebook entries, you can press the numeric key corresponding to the first letter of the entry you wish to locate.
For example, pressing 2 will show the first entry starting with A. Pressing 2 again will show the first entry starting with B, and so on..., and then press / if necessary, to find the entry you want.
11 CALLER DISPLAY ON THE CORDLESS HANDSET
If you have subscribed to the Calling Line Identification (CLI) service with your network service provider, the phone number of your caller will appear on the handset display when there is an incoming call and then stored in your Call Log.
If the caller's number is stored in your phonebook along with a name, the name will appear on the handset display when the call is received and in the Call Log.
Note:
If the call is from someone whose number is unavailable, the handset will display "UNAVAILABLE" when you receive the call.
If the call is from someone whose number is withheld, the handset will display "WITHHELD" when you receive the call.
If you have not subscribed to Caller Line Identification service, the handset will display "UNKNOWN" when you receive the call.
11.1 Call Log on your Cordless Handset
The Call Log stores the last 40 external calls, whether or not you have answered the call.
Only the most recent call is saved if there are repeat calls from the same number.
When the Call Log is full, the next new call will replace the oldest entry.
11.1.1 Access the Call Log on your Cordless Handset
From the home screen, press
- Press / to browse through the call list.
The calls are displayed in chronological order with the most recent call at the top of the list.
11.1.2 Delete a Call Log Entry on your Cordless Handset
From the home screen, press
- Press /to select an entry and then press. 国/OK
- Press / 空 "DELETE" and then press select. >"DELETE?" is displayed.
- Press OK again to confirm.
A confirmation tone is played.
- Press to return to standby mode.
12 PERSONAL SETTINGS ON YOUR CORDLESS HANDSET
12.1 Set the Display Language on your Cordless Handset
You can select different display languages.
From the home screen, press国/OK.
- Press / to "PERSONAL SET" and then press OK to select.
- Press / to "LANGUAGE" and then press ☑Glect.
- Press / to select your preferred language and then press #okfirm.
A confirmation beep is played.
- Press to return to standby mode.
Note:
Once the display language is set, the handset will switch to display this language immediately
12.2 Reset the Cordless Handset
You can reset your cordless handset to its default settings with this feature.
Note:
Upon reset, all your personal settings, call log and radial list entries will be deleted and the phone will return to its default settings. However, your phonebook will remain unchanged after reset. Also, if you have an answering machine model, any recorded messages will remain unchanged, while all other settings will be reset.
From the home screen, press OK.
- Press / to "ADVANCED SET" and then press OK to select.
- Press / to select "RESET" and then press to select.
- Press OK again to confirm.
A confirmation tone is played and the unit is reset to its default settings.
13 OPERATING THE ANSWERING MACHINE ON YOUR CORDLESS HANDSET
Your phone includes a telephone answering machine that records unanswered calls when it is on.
The answering machine can store up to 59 messages within the maximum recording time of approximately 30 minutes and each message can be up to 3 minutes long.
When the answering machine is on, calls are answered after the set "RING DELAY".
If you have selected "ANSW.&RECORD" mode, the caller can leave you a message after hearing your announcement.
If you have selected "ANSWER ONLY" mode, the caller can only listen to your announcement but cannot leave you a message.
If the answering machine memory is full, "MEMORY FULL!" appears on the handset, and you will have to delete some messages before any new ones can be recorded.
13.1 Turning the Answering Machine On/Off
From the home screen, press OK.
- Press / to "ANSW MACHINE" and then press Select.
- Press / to "ANSW. ON/OFF" and then press OK select.
- Press / to select "ON" or "OFF" and then press confirm.
A confirmation tone is played.
- Press to return to standby mode.
Note:
If the answering machine is off and the Master PIN is still set at its default 0000, the answering machine will not answer any incoming calls.
However, if the Master PIN has been changed, it will answer incoming calls after 10 rings to allow remote access.
13.2 Answer Mode
The phone comes with two pre-recorded outgoing messages (OGM) for the respective answer modes: "ANSWER ONLY" and "ANSW. &RECORD".
By default, the answer mode is "ANSW.&RECORD", which allows a caller to leave a message on the answering machine after hearing the announcement. This can be changed to "ANSWER ONLY" mode, which does not allow callers to leave any messages on the answering machine after hearing the announcement.
13.2.1 Set Answer Mode
From the home screen, press OK.
- Press / to "ANSW MACHINE" and then press OK Select.
- Press / to "ANSWER MODE" and then press #select.
- Press / to select "ANSWER ONLY" or "ANSW.&RECORD" and then press OK to confirm. >A confirmation tone is played.
- Press to return to standby mode.
13.2.2 Change the Voice Language
You can select a different language for the answering machine's pre- recorded outgoing message.
From the home screen, press OK.
- Press / to "ANSW MACHINE" and then press #select.
- Press / to " SETTINGS" and then press to select.
- Press / to "LANGUAGE" and then press Select.
- Press / to select your preferred language and then press OK confirm.
A confirmation tone is played.
- Press to return to standby mode.
13.3 Message Playback
When there are new messages on the answering machine, the tape icon flashes on the handset screen.
From the home screen, press OK.
- Press / to "ANSW MACHINE" and press Go select.
- Press回/OK to select "PLAY".
Your messages will automatically playback through the handset's speakerphone.
Press to listen to your messages privately through the earpiece of your handset.
During playback, press the following options:
REPEAT Repeat the currently playing message
NEXT Play the next message
PREVIOUS Play the previous message
DELETE Delete the current message
- Press to return to standby mode.
13.4 Delete All Messages
Note:
Only old messages can be deleted. New messages must be played before they can be deleted.
From the home screen, press国/OK.
- Press / to "ANSW MACHINE" and then press #select.
- Press / to select "DELETE ALL" and then press OK
- Press OK again to confirm.
A confirmation tone is played.
- Press to return to standby mode.
13.5 Outgoing Message (OGM)
When the answering machine answers a call, the pre-recorded outgoing message is played to the caller unless you have recorded your own outgoing message.
The phone comes with two pre-recorded outgoing messages (OGM) for the respective answer modes: "ANSWER ONLY" and "ANSW. &RECORD".
By default, the answer mode is "ANSW.&RECORD", which allows a caller to leave a message on the answering machine after hearing the announcement. This can be changed to "ANSWER ONLY" mode, which does not allow callers to leave any messages on the answering machine after hearing the announcement.
13.5.1 Record a Personalised Outgoing Message
You can choose to replace the default OGM with your own personalised messages.
From the home screen, press国/OK.
- Press / to "ANSW MACHINE" and then press OK to select.
- Press / to "RECORD OGM" and then press #to select.
- Press / to select "ANSWER ONLY" or "ANSW.&RECORD" and then press OK to confirm.
- Press / to "RECORD OGM" and press OK
A confirmation tone is played.
- Speak into the handset to start recording your new outgoing message and press OK again to end the recording.
A confirmation tone is played.
- Press to return to standby mode.
Note:
The maximum length of an outgoing message is 2 minutes.
14 GUARANTEE AND SERVICE
The phone is guaranteed for 24 months from the date of purchase shown on your sales receipt. This guarantee does not cover any faults or defects caused by accidents, misuse, fair wear and tear, neglect, faults on the telephone line, lightning, tampering with the equipment, or any attempt at adjustment or repair other than through approved agents.
Please keep your sales (till) receipt this is your proof of guarantee.
14.1 While the unit is under Guarantee
- Disconnect the base unit from the telephone line and the mains electricity supply.
- Pack up all parts of your phone system, using the original package.
- Return the unit to the shop where you bought it, making sure you take your sales receipt.
- Remember to include the mains adapter.
14.2 After the Guarantee has expired
If the unit is no longer under Guarantee, contact us via www.aegtelephones.eu
This product works with rechargeable batteries only. If you put nonrechargeable batteries in the handset and place it on the base, the handset will be damaged and this in NOT covered under the warranty conditions.
15 TECHNICAL DETAILS
| Standard Digital Enhanced Cordless Telecommunication (DECT) | |
| Frequency range 1.88 to 1.9 GHz (bandwidth = 20 MHz) | |
| Channel bandwidth 1.728 MHz | |
| Operating range Up to 300m outdoors; Up to 50m indoors | |
| Operating time Standby: 168 hours, Talking: 10 hours Battery charge time: 15 hours | |
| Temperature range Operating 0°C to 40°C, Storage -20°C to 60°C | |
| Electrical power Base unit power adapter: Ten Pao: S003IB0600050 & S003IV0600050 Input 100-240Vac 50-60Hz; Output 6Vdc/500mA Charger unit power adapter: Ten Pao: S003IB0600015 & S003IV0600015 Input 100-240Vac 50-60Hz; Output 6Vdc/150mA Battery information: 2 X 1.2V AAA size, 650mAh NiMH (Rechargeable) |
16
CE
DECLARA

This product is in compliance with the essential requirements and other relevant provisions of the R&TTE directive 1999/5/EC.
The Declaration of conformity can be found on: www.aegtelephones.eu
17 DISPOSAL OF THE DEVICE (ENVIRONMENT)

At the end of the product lifecycle, you should not throw this product into the normal household garbage but bring the product to a collection point for the recycling of electrical and electronic equipments. The symbol on the product, user guide and/or box indicate this. Some of the product materials can be re-used if you bring them to a recycling point. By reusing some parts or raw materials from used products you make an important contribution to the protection of the environment. Please contact your local authorities in case you need more information on the collection points in your area.
Batteries must be removed before disposing of the device. Dispose of the batteries in an environmental manner according to your country regulations.
18 CLEANING AND CARE
Do not clean any part of your phone with benzene, thinners or other solvent chemicals as this may cause permanent damage which is not covered by the Guarantee.
When necessary, clean it with a damp cloth.
Keep your phone system away from hot, humid conditions or strong sunlight, and don't let it get wet. Every effort has been made to ensure high standards of reliability for your phone system. However, if something does go wrong, please do not try to repair it yourself, but consult your supplier or call the Helpline.
14 GWARANCJA I SERWIS
Akoyetyai evac tovoe tipebaiwns.
- Natnote yia va etioptpeyete otny katotaon avapovns.
Inueiwo:
ev mnpie va aioekeoet e vecs yypaoc otov nlepwviko kataloyo otav n pvnivai pnpns. Tnv pittwn aut, 0a ptei va siaypaete utapxouoe c yypapc yia va eueoepwote xwpo yi vecs.
10.2 IpopoBaon oToV nAeWviko kataLoYo e aoupato akouotiko
- Anto Tny apxikn oboyn, TatnoTe yia va avoiete Tn AioTa Tnaepovikou kataIoyou.
> EvaaakTiká, aTó TnV apxikn oOvN, mTOpEITE va TnTnOeTE SDO φopEc I/OK yia va EπIaEeTe (THA. KAT/ROE) (PHONEBOOK), 0tn ouvExia △/Via TnV EπIaoyn «AIIZTA KAHE.» (LIST) kai TnTne I/OK πaI yia va avoiEe Tn λIoTa TnλeφwviKoKataaoyou. - Patnote / via va μετakivnθeite με κλion σtn λiota εγραφv.
Öi εγγραφές του τηλεφωνικόν καταλόγου εμρανίζονται σελίστα με αλαφβητική σερά.
- PatnoTeI/OK yia va TpoBaaTe TIG AENTTOpeEies TNG EIIAEyEvns EyypaNs.
- Patnote yia va etioptpeyete otny katotaon avapovns.
Inueiwo:
Avti va Tnnoe /yia va Tepinyneite otis eyyapcctou nAevovou, mtoe va Tnnoe to apiuntko nnktpo tou avtioixei oTo npto ypaum TaTc Eyypans Toue vEvtonie.
Tia papaediyama, patawta2, eupavicieta n npwtn yypapn tnc oioiac to ovupa apxizai anto A). Patawta c gava 2, eupavicieta n npwtn yypapn tnc oioiac to ovupa apxizai anto B K.o.k. Tn ouvexia, patnoTeA/Veviv aIAPAITnTo, ia va bpceite Tnv yypapn ToueEAETE.
11 EMΦANISH KAIYOYNTA ΣTO AΣYPMATO AKOYETIKO
Eav eioe ouvspountc otny utnpesia Avaywpiang Klnons Tou npoxea utnpoeiow
siktou oac, o apiOoC tnAepovou kaTe atouou aoc Kaai epavietai otny oovn tou
akovotikou oTote dExote EIOEPxOevn Kaon kai, otN ouvexia, anoNkEutai oTo Apxio
Knoewv.
Eav o apiθμoc tnlεφawov tou kalouvta εivai aTOnkεuμεvos OTOV TLεφwviKo kataloyo μaζ i μe to ovoua, toTE kata Tn ληψι nC Kλησης ΣTnv oθovn Tou akouotikou εμφaviζεtai to oloua tou kalouvta oTiwC kai σTO Apxεio kλησεωv.
Inneiwo:
Akoyetai evac tovoe tipebaowns.
- Nañóte yia va επιορεψετε σην kataσtaon avaovns.
Inmuio:
Eav o autoatoc nIeepovntns eivai anevpyoioinevoC kai to yeviko PIN eakolouvci va exTnv Tpoetlleyevn tiun (0000), o autoatoc nIeepovntns 6ev aattva oekia ioepxoevn khaon.
OToo, eav To yEviko PIN exi aalaaei, o autouato ts nEepwntns anavta otic eoepxoeves Knoicmu ta 10 kouosovioaata, etoi wote va enipenei tvn aoapkuovevn npoaan.
13.2 Aetroupyia anavtnoons
To tnaepwvo dbaetai doo exwpiota pponxoypaepnueva eepxoeva unvupata (OGM) yia tic avtoixc aeoupye c aattan: MONO ANANTHE (ANSWER ONLY) kai (ANANT & HXOPR) (ANSW.&RECORD).
Anio pnoeioy, n aeoupyia aattnongs evai puoioevn otnv eioy (ANANT&HXOTP) (ANSW.&RECORD), n otoia eipetie otous kaovtec va oac apnvovu ma autoato tnaepwntn apou akouosov to nuvua avayeaic oac. Mtopeite va aalaeve autnv tn puoiion kai va evpyotoinoe tnv eioy (MONO ANANTHs) (ANSWER ONLY), n otoia dev eipetie otous kaowvtes va oac apnvovu myvua otov autoato tnaepwntn apou akouosov to nuvua avayeaic oac.
13.2.1 Opios nss Aetoupyias anavtnons
- Antó tvv apxikn oθovn, πatnoεr/OK.
- PatnoTe / yia va eTny ETIIOyN (THAEONHTH) (ANSW MACHINE) kai otn Ouvexia patnoTe #/OK yia eTIIOyN.
- Patnote / yia va etaite oTny EIT. ANANT. (ANSWER MODE) kai, O
- ouvexia, Patnote / OK yia eTIAoyn.
- PatnoTe / yia va eTIAeEeTE (MONO ANANTHE) (ANSWER ONLY) n (ANANT&HXOTP) (ANSW.&RECORD) kai, otn ouvexia, patnoTe 0K yia eTIIeBaiwOn.
Akoyetyai evac tovoe tipeaowns.
- NatnotE yia va etioptepesTe OTNV kataotaan avapovns.
13.2.2 Alambda n ts yawosoc omia
MTopeite va eTIAeTe pia diaopotikn yawsigma yia to eepxoevo npoxoypaqnevo nVua Tou autoataou tnAePwnt.
- Anto tvn apxik oThev, nntote/OK.
- PatnoTe / yia va i oTnv ETIIOyN (THAEΦONHTH) (ANSW MACHINE) kai Otn Ouvexia patnoTe #/OK yia ETIIOyN.
- PatnoTe / yia va oTny (PYOMIeEIS) (SETTINGs) kai, oTn ouvexia, PatnoTe #/OK yia
- Patnote / yia va μεtaβeite σην επλογή «ΓΑΩΣΑ» (LANGUAGE) kai, σηνεχία, Patnote Μ/K yia επλογή.
- PatnoTe △/V ia va επiεξετη γλωσα tcns προιμης σας και, σθη συνεχεία, PatnoTe Μ/D OK για επiβεβaiωση.
AKoyetai evac tovoe TIIebetaiwo
- NatnotE yia va etioptpeyete otny katotaon avapovns.
13.3 Avanapayoyn mnuopatov
AKooyetai evac tovoe iipbaicns.
MIAHO TE OTO akouotIKo Yia va EKIVNOEi n NxOypaPnon Tou vEvou EEPxoEvou mnuUpaTc KaI TnHOte Gava/OK yia va TepuaTioEe Tnv NxOypaPnon.
Akoyetyai evac tovoεπiβεbaiwons.
- Patnote yia va etioptpeyete otny katotaon avapovns.
Inmuic:
H 13 13 13 13 13 13 13 13 13 13 13 13 13 13 13 13 13 13 13 13 13 13 13 13 13 13 13 13 13 13 13 13 13 13
14 EΓYHΣH KAI ΣEPBIΣ
To tnAeewo napexetai eyyonn diapkeiac 1oxo24 mnuov a n to n npopunvia ayopac n oioia avaypapetai otny aodseign ayopac. H eyyonn autn dev kaottei n eattouata tou opielovtai o atuxmuata, kcn xphon, quoioloyikn oopa, aelia, es otny tnAeawrikn ypaumn, TOWON Kepauvou, n EGOIO8OTNeVn Papeubaon OTN OVAKEUH n aTTEIPA puOUIGNC n EITIOEUNC ano OTIOIO8NTNE TpTO EKTOS TWV EGOIAO8OTNEVW AVTTPOOOTWV.
8.9 For at lase/abne tastaturet
9.5 Las/abn tastaturet

- I standby tilstand tryk og hold nede for at lase tastaturet.
vil blive vist i LCD'et. - For at abne tastaturet tryk pa og hold nedeigen.
Bemerk:
8.5 HactpoKa Ha cHaTa Ha 3ByKa Ha roBOpHTeA.
HMa 5 HnBa Ha CnA Ha 3ByKa Ha ROBOpTeA.
- IIO BpeMe Ha pa3roBOp, HATnCHeTe / , 3a Da n36epete ot "HnBO 1" (VOLUME 1) DO "HnBO 5" (VOLUME 5).
Пока3Ba ce n3бpaHata Hactpoиka.
Korato npekpatnte pa3robopa, HactpoiKaTa Ce 3ana3Ba Ha NocAeHOTo H36paHO HnBO.
8.6 3KIAIOYBaHe/BKIAIOYBaHe 3ByKa Ha MHKPOΦOHa
Korato 3Bykbt Ha MInKpofoHa e N3KAIOueH, CAYlaAkaT a NOKa3Ba „N3KA.3BYK" (MUTE ON), n obaxdaunr Ce He MoKe da Bn Yye.
- No Bpeme Ha pa3roBop HATnCHete 3a Da BKAOHTe/N3KAIOHTe MHKPOpoHa.
8.7 NOBUKBAHe Ha cAYwaAKaTa
Функшая NOВКBAHe Ha CAYlaKa Bn NO3BOABya Da OTKpHte ANNCBALUata CAYlaKa, aKO Tc Ce HAMnpa B OxbaTa N 3apeDeHnte 6atepn Ca NoCTabeHn.
- Hatnchete (P) Oa 6a3OBATA CTaHcIy.
BCnKn peHCTpnpaHn CAYsAAkN, HAMIPAuN Ce B O6XBATA, 3e 3aONHAT Da 3BbHrT. MoKe Da cPpe TNOBHKBaHTo Ha CAYsAAkATA, KATO HATNCHETe KOITOn I da e 6yToCAYsAAkATA HAN (1) NOA 6a3OBATA CTAHUra OTHOBO.
8.8 BKAIOUBAHe/N3KAIOUBAHe Ha CAYUAKaTa
- Hatnchete 3aapbxte) 3a noBee ot 2 cekyHAn, 3a Da BKAIOHTe HAN N3KIAOHTe CAYUAKATA B pEXHM Ha rTOBHOCT.
Диспягше рожакеш „ТьрсЕС"..."(SEARCHING...), дokato салшakata otКрпe 6a3atura.
3a6eAnkka:
Moxete 3a n3KIAOHTe CAYLAAkATA, 3a Da yAbXHnTe XHBOTA Ha 6aTePNITE, aKO CAYLAAkATA He e Ha 6a3ata HAn 3apraHOTo YCTpOInCTBO N Bne He nCKATE Da r n3noA3BATE 3a OnpedeAeHO BpeMe.
BAXHO:
Korato caywaakata e N3KAIOUOHEA, He moke da 6bde n3noa3bHa 3a npOBexdahe H pa3ROBOpH, B TOBA YnCAo n pa3ROBOpH pni HnpeABnDEHN o6CTOReTBA. Hma da 3BbHN, KORATO IMATE BXODAAIO O6AXDAHe. 3a da OTROBOpHTe Ha 6axDAHe, Tp6Ba da r BKAOHTe OTHOB, KATO BB3CTAHOBRAHETO HA paADNOBpb3KATA MEXdy CAYWAAkATA n 6a3OBATA CTAHUN MoKe Da OTHEMe N3BECTHO BpeMe.
8.9 3aKaIOUbaHe/OTKaIOUbaHe Ha KaABNaTypata.
Mоже Да 3аКаIOчITE KλaBиATypaTа, 3a Дa He ПpoBEdTe pa3ROBOp ИИ HATnCHeTe 6yToHInTe IIO CAYHaIHOCT.
BpeKIM HA rOToBHOCT HATnCHTe N 3aApbXkTe */06yTOH 3a 2 CEkyHAn, 3a Da 3aKaIIOHTe KAABnAtypata.
CaYwaaKaTa noka3Ba „3AKA. KaAB." (KEYS LOCKED).
- 3a Da OTKAIOHTe KAABnATypata, HATNCHEt N 3aApbXkTe*/O THOBO.
3a6eAeKka:
Mokete Da OTROBAPrte Ha BXOaRLLnte 06aXaHnA, OOp n aKO KaabNAtypata e 3akIoUheHa.
8.10 3BbPwBaHe Ha BbTppeWHO6aXdahe (no HHTepKoma)
BpeKIM HA FOTOBHOCT, HATNCHEtNT.
AKo hMa cAmO eHa peHCTpnpaHa 6e3KnUHa CAYlaAka, BbTpEiHata Bpb3Ka C KInHATA 6a3a ce yctAHOBra He3a6abHO.
AKO hMa nOBeue peHnCTpnpaHn 6e3KuHn CAYUaAKn, Ue 6bDat NOKa3AHn HOMepata HA CAYUaAKeTe, KOnTO Ca AOCTbHn 3a BbTpEulHa Bpb3Ka. HatncHete 0 3a NOBnKBaHe dO XnHATA 6a3a.
- Hatnchete nn BAnHETe KnHATA CAYLAAKA OT KnHATA 6a3a, 3a Da OTROBOPHTe BbTpEulHO o6aKaHaHe, Taka Ye n ABamata yuactHnCn B O6aKaHaHTo Da MoTat Da ToBopr.
3a Da CLOXHTE Kpa HbTpeLHO NOBINKBAHe, HATNCHTeHa XNHyATA 6a3a IAA NoCTABETe XNHyATA CAYsAka HA XNHyATA 6a3a.
3a6eAeXka:
Pn Anca Ha OTROBOP OT XnHata 6a3a, nn aKO nCKate Da npeKbChete oBaXdaHe
PpeAn da Ca Bn OTROBOpnAn, HATNCheTe INT da Ce BbpHeTe Ha BbHlo ObaXdaHe.
9 N3NOΛ3BAHE HA XKNUHATA BA3A
9.1 Побекдае на pa3roBop
Cnata Ha 3BbHe He Ha XnHata 6a3a Pn BxOaIIO NOBnKBAHe Ie OTROBaPra Ha n36paHOTo HnBO.
Ako 3a a a te cna Ha 3Byka npn 3BbHehe L0,Ha ekpaHa Ie ce n3o6pa3n N JxuHata 6a3a Hma Da 3BbHn, KOrato Ce Noayu BxoAaIIO NobKBAhe.
9.4 N3KAIOYBAHe Ha 3BBHeHETO
BpeKIM HA TOTOBHOCT, HATNCHETe N 3aApbXTe #, 3a Da N3KAIOHTe 3BbHeHETo. >Ha ekpaHa ce n3o6pa3ra.
- 3a Dα BΚΑΙΟΥΝΕ ΘΟΒΟ 3ΒβΗΕΗΤΟ, ΘΟΒΟ HΑΤΗΝΗΤΕ Ι 3αρβχΤΕ #.
9.5 3aKAIIOYBAHe/OTKAIIOYBAHe Ha KaABnATypaTa
BpeKIM HA rTOBHOCT, HATNCHETe 3aApbXTe * , 3a Da 3aKAIOHTe KAABnAtypata. >Ha ekpaHa ce n3o6pa3raB
3a da OTKAIOHTe KAABNATypata, OTHOBO HATNCHEte 3aapbXTe *
3a6eAeKka:
Mokete Da OTROBAPrTe Ha BXOaRlUte O6aXaHnA, Apn n aKO KaABnAtypata e 3aKIoUeHa.
9.6 3KAIOUBAHe/BKIAOUBAHe 3ByKa Ha MHKpOPOHa
- Поваме Ha pa3roBop, HATNCHETe 3a Da N3KAIOHTe 3ByKa Ha MInKpOPOHa. >Poka3Ba ce
3a Da BKAIOHTe 3BYKa HA MKNPOOHOHA, HATNCHETe OTHOB
9.7 3aNooyBaHe Ha BbTppeWeH pa3roBOp ot XnUHaTa 6a3a KbM 6e3XnUHa cAlywaAka.
CnCTemata Daba Bb3MOxHOCT 3a BbTpeUHN pa3ROBOpN MExdy XnHATA Ba3a n apyra perInctpnpaHa 6e3XnHn CaUaKa.
BAnrHete XnHata CAYaAka O T XnHata 6a3a HAN HATnCHete1.
- HatncheteBdoHataaactHaXnHata6a3a. >BcnKn peHCTpnpAH 6e3xNHyCAYsAakN 3aNoHAT Da 3BbHrt.
- Hatnchete Ha HrkOa OT CAYLAAKITE, 3a Da npOBeTe BbTpEWeH pa3ROBOp C 6e3XHHATA CAYLAKA.
ToHbT 3a NOBnKBaHe Ha BCnHKn CAYLAAKIn XnHATA 6a3a Iue cnpe.
3a6eAekka:
- MoXeTe Da OTMeHInTe BbTpEWeH pa3roBOp IpeAn Da Ca BN OTROBOpHAn, KATO HATnCHeTe B DOAHATA YAcT Ha JxuHATA 6a3a.
- Ako do eHa MInHyTa HrMa OTROBOp OT 6e3KnHATA CAYLAAKA, NOBnKBaHTo N Iue 6bDe OTMeHeHO ABTomATNuHo.
9.8 IpxBbpaIHe Ha BbHweH pa3roBOp OT XnHatha 6a3a KbM 6e3XnHcAlywaKa
- ПО ВЕME На pa3ROBOP, HATNCHETE (BdoHATA YACT Ha JKNHATA 6a3a, 3a DA NOCTABITE BbHLHOTO NOBINKBAHE B pEXHM HA 3aDbpxAHe.
He3a6abHo ce ocblueCTBra BbTpEulHa Bpb3Ka C BCnKn peHCTpnpaHn 6e3xuHn CAYUaKn.
3a6eAeKka:
Ako HrMa OTROBOp OT 6e3xHnHaTc CAYaAka, HAn XeAaTe Da OTMeHnTe BbTpEiHnPa3ROBOp, PpeAn Da CTe NpAyHnAn OTROBop, HATNCHeTe (B DOAHATA YACT Ha XnHATA 6a3a, 3a Da Ce BbPHETe KbM BbHLHOTO NOBNKBAHe.
- HatncheteHa 6e3KnHata CAYaAka, 3a Da OTROBOpTe Ha BbTpEaHO oBaXaAHe, Taka He N ABAMATA yACTHnCn B OaXaHETO a MoT a RoBOPrT.
Bbphete xHHTa CAYWAAKA Bbpxy XnHATA 6a3a Hn HATNCHE 3a npexBpAHe HA BbHsHo NOBKBAHe KbM 6e3XnHa CAYWAAKA.
9.9 N36epete oT cnncbka 3a nobTOPOHa6HpaHe
XnHata 6a3a 3ana3Ba cAmo nocaeHna Hapan Homep.
BpeKIM HA rTOBHOCT, HATNCHETe Bbpxy KINHATA 6a3a.
Ha dncnAe Ce n3PiCBA nocaeHnT Ha6paH Homep.
- Hatnchete nn BAnrHete CAYwaakata OJKNHATA 6a3a.
HomepbT 1e 6bAe Ha6paH aBtOMaTHNo.
9.10 AocTbI AO TeAefoHHata KHnKka
XnHATA 6a3a MoKe Da CbXpaHra Do 30 3aNcB TeAefoHHata KnHexKa. BceKn 3aNc B TeAefoHHata KnHexKa MoKe Da NMa MAKCmym 24 uOppn Ha TeAefoHeH Homep. Bne Obaue He MoKeTe Da 3ana3Bate NMeHATA Ha BAUnTE KOHTAKTN B TeAefoHHata KnHexKa.
BpeKIM HA IOTOBHOCT, HATINCHETe 3a Da BnAITE PpBn3aHNC B TeAepoHHATA KHnKKa.
- HatncheTe + nAn -, 3a Da npereAeDATE CbXpaHHeT B TeAefoHHata KHNKKa 3aInnc. >#01do #30e n3o6pa3eHo OTrope BArCHO Ha DnCpAe, 3a NOKa3BaHe Ha Homepa 3aInca, KbDeTo #01OTROBapr Ha NbpBnR 3aInc B TeAefoHHata KNKKa.
3a6eAekka:
Ako TealeoHHnT HOMep e IpeKaaleHO abbI, HATINCHeTEOK, 3a Da BnNTe DOINbAHHTeAHHTe UncpH.
3aHnCte B TeAefoHHata KHXKc Ce 3aHNCBAT NO MeToDa ,PiocAedHnT BAn3a, IbpBNnI3An3a".
9.11 3ana3BaHe Ha HOMep B TeAeOHHaT a KHnKka
BpeKIM HA FOTOBHOCT, HATNCHETe N 3aApbXTe
BbBeTe TeAeOHHnHOMep Ako CrpeWnte, HATNCHeTc, 3a da n3TpneTe NocAeaHata BbBeEHa Uppa.
- HatnchTe OK, 3a Da NOTBbpaNTe.
LUe yyeTe CnHAn 3a NOTBbPxxdHne n KnuHata 6a3a Lue Ce BbPhe B pexnHa rTOBHOCT.
9.12 3tpnbHe Ha 3aHc OT TeAeOHHata KHNKKA
BpeKIM HA FOTOBHOCT, HATNCHETe N 3aApbXTe
ПОКАЗВСЕ ПБРВИТ 3АПИСВЕАLEФОHHATA KHNKKA.
- Hatnchete + nAN -, 3a da n36epete XeAHHra 3aHNC B TeAedpoHHata KHnKka.
- Hatnichete C.
---CE NOKA3BA.
- HatnchTe OK, 3a Da NOTBbpaNTe.
LUe yyeTe CnHAn 3a NOTBbPjXdEHNHe IN KNUHATA 6a3a Lue Ce BbPhe B pEXKIM HA rOTOBHOCT.
9.13 DoctbI AO cncbka C 06xHaHnTa
Ako cte ce aboHpaann 3a ycayrata ,NdeHTnphiKaunna Ha oaxdaunca" ot Baunn AOCTABYNK, TealeoHHnT Homep Ha oaxdaunna Ce Iue Ce NOBn Ha dncnAer Ha CAYsAAkata, KORATO HMA BXOAnIO oaxdAHe, n CaeTobA Iue 6bde 3aapanen Bbb Baunn CINcBk C oaxdAHH.
XnHata 6a3a Moxe Da 3aHa3nAo 20 3aHa C cnscbKa C oBXdAHn. B cekn 3aPi CnncbKa C obaxdAHn Moxe Da HMa MaKcHmym 24 uppn Ha TeAefoHen Homep.
3a6eAekka:
Ako o6aKaHaTe O e OT HeoCTbIeH HOMep,OT cKpNTHomep nn AKO He CTe Ce a6ohnpaAn 3a ycayrata „NdeHTnOkaun Ha o6aKaAunCe",Ue 6bDat Noka3aHn Camo dAtata n BpeMeTo Ha o6aKaHaTe.
BpeKIM HA rOTOBHOCT, HATNCHETe
ПокаЗВа ce пьвят 3апсьВ C спсьКa C obжданя, 3aeДHо C dAtata n Yaca H a Oбжданe.
01 OTROpe BdACHO HA DnCnAe NOKa3Ba, Ye TOBa E NpBnT 3AnC B CnHcBka C O6aXdAHn.
- Hatnchete + nnn -, 3a da npereAeate CnncbKa C o6axdaHn.
3a6eAeKka:
Ako HOMepbT Ha o6aKaAaIaNc e e TBbpae abb, HATNCHEK, 3a da BnNTe OONbAHHTeAHHTe Unpn.
9.14 N3tpnBaHe Ha 3aHc ot CnncbKa c o6aXdHaHn
BpeKIM HA rOTOBHOCT, HATNCHETe
- Hatnchete + nAN -, 3a da n36epete JkeAHHra 3annc OT cnncbka C o6axdaHHra.
- Hatnichete C.
---CE NOKA3BA.
- Hatnchete OK, 3a a da NOTBbPAnTe.
Ue ueyeTe CNHa 3a NOTBbPxKdEHNHe i KNUHATA 6a3a Ue Ce BbPhe B pexnM Ha rTOBHOCT.
9.15 PpHcHn Ha dEInCTBHe Ha TeAeOHHn cekpeTap
3a doctbI AO cyHKunnte Ha TealecoHnca Kepetap Moxete Da N3NOA3BATE 6yToHIne My Bbpxy KnuHaTa 6a3a. (BnK 6.3)
TealepoHbT Bn BkAIOUBA TealefoHeH cekpeTap, KOITo 3aIHCBA HeIpnEHTe o6aKaHaHna, KOrATO e BkAIOUeH.
B Hero Morat Da 6bDat 3anameteHn Do 59 Cbo6uEHHa C o6Uo BpeMe np6An3HTe/ 30 MNHyTN HBCKO Cbo6uEHHe MOKe Da 6bDe Do 3 MNHyTN.
Korato TealeoHnTcKepeTap e BkAIOueH, o6aXdAHnTa Ce 3aIHCbAT CEAHaHCTpoiKaTa..3A6AB.3BbH." (RING DELAY).
Ako cTe n36paI npexnMa "PPNEM& 3ANUC" (ANSW.&RECORD), o6aKdaunr ce moKe daBn octabn cbObSeHne, cAe kato yye BaUeTo cbObSeHne.
Ako cTe n36paHn peXnMa ,CAMO OTROBOP" (ANSWER ONLY), 6aXdaIaIaIaIaIaIaIaIaIaIaIaIaIaIaIaIaIaIaIaIaIaIaIaIaIaIaIaIaIaIaIaIaIaIaIaIaIaIaIaIaIaIaIaIaIaIaIaIaIaIaIaa
Ako nametta Ha TealeoHnna CekpeTap e NbHa, Ha CaylaaKata uce Ce noBn ,NAMET NbHA! (MEMORY FULL!) n ige TpaBa Da n3tpneTe HkON Cbo6uEHH, npedn da moKeTe DA 3aINCBATE HOBn.
13.1 BKAIOUBAHe/IMKIAIOUBAHe Ha TeAeOHHnCeKpeTap
- OT HauaHnE ekpaH HATiCHeTe国/OK.
- HatnchTe△/V,TEA.CEKPETAP" (ANSW MACHINE), CaeKoETo HATnCHete,
- HatncheTe,△/V 3a Da n36epete ,OTR.BKAN3KA" (ANSW. ON/OFF) n CaeTobHATNCHeTe.
- Hatnchete / 3a da n3bepete ,BKA. " (ON) nn ,N3KAIOU" (OFF) n cAed TOBa HATnCHete #/OK 3a notBbpxKdEHNHe. >LcyeTe cnHaA 3a notBbpxKdEHNHe.
- Hatnchete, 3a da ce Bbphete BpeKIM Ha rTOBHOCT.
3a6eAekka:
Ako TealefoHHnT CeKpeTap e n3KAIOUeH IraBHNr TINH e Bce oIe cfa6pnHnT 00 TealefoHHnT CeKpeTap HMA DA 3aNNuE HNKAKBn BXOAAuN O6aKaAHn.
Ho aKo rABnIe NHe e 6HcMeH, To TOrBa Toi Ie 3aNcBa BXOaJUu ObaXaHna CaeA 10 No3BbHbAHn, 3a Da No3BOAn OTaAueH AOCTbI.
13.2 PekmHa OTrobaprHe
TeAefoHbT pa3noaara C npEaBapnteHaHO 3aHcAHn Cbo6uHn (OGM) 3a CbOTBHTHepeKIMn Ha OTROBApHe: CAMO OTROBOP" (ANSWER ONLY) n ,PPNEM& 3AINC" (ANSW.&RECORD).
IIO NOpa3bnpaHe,peXmbl Ha OTROBapRe He ,IPNEM& 3AINC" (ANSW.&RECORD),KoHTO I03BOABA HA O6aJaHc Ce Da OCTABn Cbo6eHHe Ha TeLeaoHHra CeKeTAp, Caed KATO I3CAUHa Cbo6LHeHTo. TOBa MoKe Da 6bde npomeHHe Ho peXm ,CAMO OTROBOP
(ANSWER ONLY), KOIto He No3BOAraBa Ha O6aKaDauNc Ce Da OCTABn HNKAKBn CbObLHeHnHa TeAEoHHnCeKpeTap, Caed KATO ca yuAn CbObLHeHnTo.
13.2.1 HactpoKa Ha peXm Ha OTROBapAne
OTHauaAHnEeKpaH HATiCHTe国/OK.
- Hatnchete△/V, 3a da n36epete „TEA.CEKPETAP" (ANSW MACHINE) n CaeTBA HATnCHETE.
- Hatnchete / , 3a da n3bepete ,PEXUM OTT. " (ANSWER MODE) n cAeT TOBa HATnCHete /OK, 3a da n3bepete.
- Hatnchete / 3a da n36epete "CAMO OTBOOP" (ANSWER ONLY) nn "PHEM& 3AINC" (ANSW.&RECORD) n cae TOBa HATnCHete #/OK 3a notBbpxxHHe. >Ie yyeTe cnHaA 3a notBbpxxHHe.
- Hatnchete, 3a da ce Bbphete B pexm Ha rTOBOHOCT.
13.2.2 CmHa Ha e3nKa Ha rAacobTo cbo6eHne
Mоже дa n3берete pa3auney e3NK 3a Baшето пpeвapnteHaNo 3a\PuCAHO cboшeHne Ha TealefoHHn CekpeTap.
- OT HauaHnE ekpaH HATiCHeTe国/OK.
- Hatnchete / 3a da n3bepete ,TEA. CEKPETAP" (ANSW MACHINE), cea Koeto HATnchete 国 / OK 3a da n3bepete.
- Hatnchete / 3a da n36epete "HACTPOIKN" (SETTINGs) n cae TaTOBa HATnCHete #/OK, 3a da n36epete.
- Hatnchete / , 3a da n36epete „E3NK" (LANGUAGE), cAeKoeto HATnchete #/OK, 3a da n36epete.
- Hatnchete / 3a da n36epete npednoHTAHnO T Bac e3NK, a cAeT OBA HATnCHete
/OK, 3a da NOTBbPAnTe.Ue yyeTe CNHAA 3a NotBbpXdEHNie.
·HaTnCHete),3a Da Ce BbPHeTe BpeXIM Ha rTOBHOCT.
13.3 N3caywbahe Ha cbo6eHnTa
Korato Ha TealeoHHncaKepeTap HMa HOBcO6eHn, Ha ekpaHa HA CAYaAkaTc CBtN IKOHATA 3a 3aPiNC.
OTHauaHnEeKpaH HATiCHTe国/OK.
- Hatnchete / 3a da n36epete ,TEA.CEKPETAP" (ANSW MACHINE) n hatnchete 国 / O K 3a da n36epete.
- Hatnchete/OK, 3a Da n36epete "NYCHN" (PLAY). >BaHTe cbo6uHnI yue 6bDat aBtOMaTHNO pChATn Ipe3 MnkpofoHa Ha CAYsAaKata. >HatnchTe, 3a Da yyeTe BAHTe cbo6uHnI AunHO Ipe3 CAYsAaKata.
- ПО Врeme На порочушва themselves OK, за за Имате достыд о саедни вьз金融机构:
IOBTOPI (REPEAT) Taka noBtapTe HACKopo n3caUshaHTo CbO6uHHe
CAEAB (NEXT) Iyckate CAeBAUTo Cbo6LHeHne
PpeAnuEH (PREVIOUs) Nyckate npdeAnuHTo cbo6ueHne
N3TPNBAHE (DELETE) N3TPNBATE ceaunhoTo cbo6uHne
- Hatnchete), 3a da ce Bbphete B pexm Ha rTOBHOCT.
13.4 N3TpNBaHe Ha BCNUcBc06eHHa
3a6eAekka:
Morat da 6bDat n3tpnTcMo cTapn cbobuHn. Hobnte cboBSeHn Tp6Ba da 6bDa npocaywahn, ppeAn da Morat da 6bDat n3tpnT.
- OT HauaHnE ekpaH HATiCHeTcI/OK.
- Hatnchete / 3a da n36epete ,TEA.CEKPETAP" (ANSW MACHINE), cea Koeto HATnCHete O/OK, 3a da n36epete.
- HatncheTe / , 3a da n36epete „N3TP. BCNUKO" (DELETE ALL) n cAed TOBa HATNCHeTe #/OK.
- Hatnchete OTHOBO国/OK, 3a Da NOTBbPdHte. >Lue yyeTe CnHaA 3a NOTBbPxKdHne.
- Hatnchete, 3a da CE Bbphete BpeKIM Ha rTOBHOCT.
13.5 IxOaIoo cbo6ueHne (OGM)
Korato TeAefoHHnT CekpeTap npneMe o6aXdaHe, 6oaxdaunr Ce yyBa npeBaPHTaHO 3aIncAo CbO6uHHe, OCBEN aKO BnE He CTe 3aIINCAAN BAWe Co6CTBeHo CbO6uHHe.
TeAefoHbT pa3noAra c npeBapnteAHO 3aHcAHn Cbo6ueHn (OGM) 3a CbOTBETHtepeKIMn Ha OTROBApHe: ,CAMO OTROBOP" (ANSWER ONLY) n ,IPHEM& 3AINC" (ANSW.&RECORD).
ПО NOДРАЗБИРАНЕ, рекIMьТ Ha OTROВAPЯне e „ПРИМ& 3ANIC" (ANSW.&RECORD), koITO ПОЗBOАЯBA Ha OBAXDAUINI CE DA OCTABN CbOБшЕнe Ha TeLEeФОHHNЯ CekpeTAp, CAED KATO ИЗСАУSHA CBОБшЕнeTO. TOBa можe Дa 6Бe ПоменeHo Ha pexm „CAMO OTROBOP" (ANSWER ONLY), KOИТо He NOЗBOАЯBA Ha OBAXDAUINI CE DA OCTABR HNKAKBn CbOБшЕнЯ HA TeLEeФОHHNЯ CekpeTAp, CAED KATO Ca YUH CbOБшЕнeTO.
13.5.1 3aHc Ha AnyHo HxOaIc cbo6eHne
Mozhe da n3bepete da cmeHnte fapbHOTo n3XoAaIcbo6eHne c BaJe AnuHo Cbo6uHne.
OT HaaHnE ekpaH HATiCHete国/OK.
- Hatnchete / , 3a da n36epete ,TEA.CEKPETAP" (ANSW MACHINE), cae KaeTo HATnCHete. OK, 3a da n36epete.
- Hatnchete / 3a da n36epete ,3AInC.CbObU. " (RECORD OGM), cAeDA KOETO HATnCHete #/OK, 3a Da n36epete.
- Hatnche / 3a da n36epete ,CAMO OTROBOP" (ANSWER ONLY) nn ,PHEM& 3AINC" (ANSW.&RECORD) n cAeToba HATNCHe T/OK 3a NOTBbpxKdHne.
- Hatnchete / 3a da n36epete ,3AINC.CbO5U. " (RECORD OGM) n HATnCHete #/OK. >Ie yyeTe CnHgA 3a NtBbPxKaEHe.
- TOBOPETECAYUAAKATA,3a Da 3aNoHETe 3aHnca Ha BaIeTO HOBO N3XoAaIO CbO6UeHN HATNCHETE OTHOBO国/OK,3a Da CNPeTe 3aHNCa.
LIe yETe CnHgA 3a NOTBbPxJAEHHe.
HqTCHETe),3a Da CE BbPHTe B PEXHM HQ TOTOBHOCT,
3a6eAeXka:
MaKcHmaaHATAIPOaBXHTAHOCTHaN3XoAaLTO CbO6UeHHe e 2 MnHyTH.
14 TAPAHUNI N OBCAYXBAHE
TeAeOohbT HMa rapaHua 3a nepnoa ot 24 Meceua, cHTaHO OT dataHa NOKyIKAOTBeAraHa Ha BaWata Kacoba BeAexka. Ta3n rapaHua He obXbaa HEn3npabBOCTN HAn DeqekTN, PruHHeHn Prn HUAdeHTn, HEnpaBnaHa yNOTpe6a, HopMaAHO n3HocBaHe, He6pExHoCT, Hen3PpABHOCTn B TeAeOHHata AINHn, MbAHn, MoAnΦKauuB YCTPOIcTBOTO HAN KcKBTO n Da e ONIT 3a HAcTPOJKa HAn PEmoHT, N3BbPseH OT HeVpbHOMOueHn Anua.
3ana3eTa pa3nckata 3a nokynka (kacob 60H), TbN KATO TOBa e BawaTa rapaHun.
14.1 DOKATO yCTPOHCTBOTO e B rapaHnra
- N3KAIOUOYE OCHOBHOTO VCTPOINCTBO OT TEAEDOHHATA ANHNA ON TEAEKTPDNECKATA MDEKA.
- PnH6peTe BCNUKn yactn Ha TeAedOHHata CnCTeMa B OpTNHgHATA ONQKBq.
Bbphete yctpoiCTBOTo B MaIa3HnA,OT KOITo CTe TcKynnA, KATO He 3a6paBte Da B3MeTe CBOrTa Pa3NCKa 3a NOKvNk.
He 3a6p8nTe aao6BnTe n aqntepa 3a eAEKPNueCKQa MPexq.
14.2 CaeA n3TnuaHeto Ha cpoKa Ha rapaHuaTa
Ako rapaunra Ha yctpoNCTBOTO e H3TEKAA, CbpxTe Ce c Hac Ha aDpec www.aegtelephones.eu
TOBA yCTPOINCTBO pa6OTn cAmO C npe3apexkaun Ce 6aTePN. AKO NOCTABNTe B CAYsAAkATA eHOKPATN 6aTePN I NOCTABNTe Ha 6a3ata, CAYsAAkATA Ue Ce NOBpeDN I TOBA HE CE NOKPINA OT rapaHuaTAt.
15 TEXHINueCKN XAPAKTEPNCNUKNI
| Стандат DECT | |
| Чеб尊ов几乎所有 1.88 до 1.9 GHz (широчи на чеб尊ова сента = 20 MHz) | |
| Чеб尊ова сента на санда 1.728 MHz | |
| РавOTEN obxbat До 300 м habьн; до 50 м вътpe | |
| РавOTNO ВрemeВ ржим на говост: 168 уа ca, на говоре: 10 уа ca Врeme за заразождане на сбатерия: 15 уа ca | |
| Temператуpen диапазон | При павота 0° C до 40°C,При съхсанни -20°C до 60°C |
| Зхсанын Адаллер на сазовата станця: Ten Pao: S003IB0600050 & S003IV0600050 Ha вхда 100-240Vac 50-60Hz; Ha在其хда 6Vdc/500mA Адаллер на заразною уст四项: Ten Pao: S003IB0600015 & S003IV0600015 Ha вхда 100-240Vac 50-60Hz; Ha在其хда 6Vdc/150mA Инфомашия за сбатерiate : 2 X 1.2V AAA, 650mAh NiMH (akumуалаторни) |
16 CE ΕΚΑΝΑΡΙΟΥ
CE
To3n npOaYKT E B CbOTBcTCTBnE C OCHOBHnTe N3NCKBAHn I Apyr n Cbbp3AHn pa3nopeA6n Ha
AnpeKtInBa R&TTE 1999/5/EO.
AekapauTAta 3a CbotbETCTBHe MOKTe Da HamePHTe Ha aDpec: www.aegtelephones.eu
17 IN3XBbPAnHE HA YCTPOINCTBOTO (OKOANHCA PEDA)

B =Kpa =Ha =EKCnAoatauHnn =LHKbA =Ha =npOaYkTa =He =Tp8Ba =Da =TO =N3XbpaTe =3aeHbINTOBITE OTnAdbu, a Tp8Ba Da to npedeAte B cb6nPateAen NyHKT 3a peUKNAPane Ha eAEKTPnuecKO n eAEKTPoHNO o6OpyBAhe. TOBa e yKa3aHO ype3 CmBOA Bbpxy npOaYkTA, B pboBOADCTBOTO 3a NOTpe6nteA HA KyTHa. Hkoon OT MaTePnaNTe B npOaYkTA Moat da ObdAT N3NoA3BAHN NOBTOPO, aKO nn npeaTe B nyHKT 3a peUKNAPane. Ype3 NOBTOPHOT O N3NoA3BAHe =Ha =HkoN =actn =HAN =CypOBHH =OT =ynotpe6eHN =npOaYkTN =BNE =DABATE =BAXe npHOC =3a =ONa3BAHTo =Ha =OKoAHATA =Cpea. =Cb6Pxe =Ce =C=MeCTHne =BAACTN, =AKO = Hykaete =OT =OnbAHHTeAHA =INOpMaun =OTHOCHO =Cb6nPateAHHTe =NyHKTOBE BB BA W PErnoH.
BaTepeHnTe Tp86Ba Da Ce H3BaAaT IpeAn H3XBbPaAHeTo Ha yCTpoNCTBOTo. H3Xe 6aTepeHnTe no 6e3oNacen 3a OKoAHaTa CpeAn HauHH Cbo6pa3Ho HauNoHaAHnTe pa3nopeA6n.
18 NOUHCTBAHE N OBCAYXBAHE
He nouchte HNKAKBA qact OT TealepoHHata CnCTema C 6eH30A, pa3peaHTeAn HA
ApTu PA3TBAPAA XIMNUH BELEcTBA, Tb KATO TOBA MOKe Da npuHn TpaHa NOBpeDa,
KoTo He Ce NOKPNA O T rapaHua.
Pn Heo6xoAMOCT NOHCTBaIe C BAAxHa KbPna.
Ia3eTe TeAedeOHHATA CnCTema DaAey OT ropeuN BAAxHN yCAOBH N CHaHa C/CBETAHHa H He IIO3BOAraBaIte Da Ce HAMOKpn.
Hapabeho e BCNUKO Bb3MOXHO, 3a Da Ce rapaHTnpa BnCOKN CTAHApTN 3a HAeKHOCT
Ha Balaata TeAeepoHnCnCTema.AKO BbIpeKn TOBa, HeIcO Ce NOBpeAn, He Ce ONHTBaIte
a ro nonpaBTe cAmn, a ce KOHCyATnpaIe Tc HauHra DOCTABYHK HAN IO3Bropeuata TeAefoHHa AHHN.
1 NAČEM NÁM ZÁLEŽI
© 2012 Binatone Electronics International Limited
All rights reserved
Subject to availability. Rights of modification reserved.
AEG is a registered trademark used under license from AB Electrolux (publ)
www.aegtelephones.eu


- IMPORTANT SAFETY INSTRUCTIONS
- INTENDED USE
- PACKAGE CONTENT
- INSTALLING YOUR PHONE
- Connecting the corded base station (see P6)
- Warning:
- Note:
- Installing the cordless handset and charging the batteries (see P5)
- GETTING TO KNOW YOUR PHONE
- Cordless handset overview (see P1)
- Cordless handset display (see P2)
- Corded Base Station (see P3 and P6)
- Menu Map and Menu Navigation
- Text and Number Entry
- Writing Tips:
- HANDSET & BASE CONNECTION
- USING YOUR CORDLESS HANDSET
- Make a Call
- Pre-dialling
- Direct Dialling
- Call from the Redial List
- Call from the Call Log
- Call from the Phonebook
- Answer and End a Call
- Handset Speakerphone
- Adjust Earpiece Volume
- Adjust Speaker Volume
- Mute/Unmute the Microphone
- Paging
- Switching the Handset On/Off
- IMPORTANT:
- To Lock/Unlock the Keypad
- Initiate an Intercom Call to the Coreded Base
- USING YOUR CORDED BASE
- Make a call
- Pre-dialling
- Direct dialling
- Adjust Earpiece or Speaker Volume
- Set Ringer Volume
- Turn off Ringer
- Lock/Unlock the Keypad
- Mute/Unmute the Microphone
- Initiate an Intercom Call from the Corded Base to a Cordless Handset
- Transfer an External Call from the Coreded Base to a Cordless Handset
- Call from the Redial List
- Access the Phonebook
- to #30 is displayed on the top right of the LCD to indicate the record number, where #01 represents the first record on the phonebook.
- Store a Number to the Phonebook
- Delete a Phonebook Entry
- Access the Call Log
- Delete a Call Log Entry
- Answering Machine Operations
- PHONEBOOK ON THE CORDLESS HANDSET
- Store a Phonebook Entry on your Cordless Handset
- Access the Phonebook on your Cordless Handset
- CALLER DISPLAY ON THE CORDLESS HANDSET
- Call Log on your Cordless Handset
- Access the Call Log on your Cordless Handset
- Delete a Call Log Entry on your Cordless Handset
- PERSONAL SETTINGS ON YOUR CORDLESS HANDSET
- Set the Display Language on your Cordless Handset
- Reset the Cordless Handset
- OPERATING THE ANSWERING MACHINE ON YOUR CORDLESS HANDSET
- Turning the Answering Machine On/Off
- Answer Mode
- Set Answer Mode
- Change the Voice Language
- Message Playback
- Delete All Messages
- Outgoing Message (OGM)
- Record a Personalised Outgoing Message
- GUARANTEE AND SERVICE
- While the unit is under Guarantee
- After the Guarantee has expired
- TECHNICAL DETAILS
- DISPOSAL OF THE DEVICE (ENVIRONMENT)
- CLEANING AND CARE
- GWARANCJA I SERWIS
- Inueiwo:
- IpopoBaon oToV nAeWviko kataLoYo e aoupato akouotiko
- EMΦANISH KAIYOYNTA ΣTO AΣYPMATO AKOYETIKO
- Inneiwo:
- Inmuio:
- Aetroupyia anavtnoons
- Opios nss Aetoupyias anavtnons
- Alambda n ts yawosoc omia
- Avanapayoyn mnuopatov
- Inmuic:
- EΓYHΣH KAI ΣEPBIΣ
- For at lase/abne tastaturet
- Las/abn tastaturet
- Bemerk:
- HactpoKa Ha cHaTa Ha 3ByKa Ha roBOpHTeA.
- 3KIAIOYBaHe/BKIAIOYBaHe 3ByKa Ha MHKPOΦOHa
- NOBUKBAHe Ha cAYwaAKaTa
- BKAIOUBAHe/N3KAIOUBAHe Ha CAYUAKaTa
- 3a6eAnkka:
- BAXHO:
- 3aKaIOUbaHe/OTKaIOUbaHe Ha KaABNaTypata.
- 3a6eAeKka:
- 3BbPwBaHe Ha BbTppeWHO6aXdahe (no HHTepKoma)
- 3a6eAeXka:
- N3NOΛ3BAHE HA XKNUHATA BA3A
- Побекдае на pa3roBop
- N3KAIOYBAHe Ha 3BBHeHETO
- 3aKAIIOYBAHe/OTKAIIOYBAHe Ha KaABnATypaTa
- 3KAIOUBAHe/BKIAOUBAHe 3ByKa Ha MHKpOPOHa
- 3aNooyBaHe Ha BbTppeWeH pa3roBOp ot XnUHaTa 6a3a KbM 6e3XnUHa cAlywaAka.
- IpxBbpaIHe Ha BbHweH pa3roBOp OT XnHatha 6a3a KbM 6e3XnHcAlywaKa
- N36epete oT cnncbka 3a nobTOPOHa6HpaHe
- AocTbI AO TeAefoHHata KHnKka
- 3ana3BaHe Ha HOMep B TeAeOHHaT a KHnKka
- 3tpnbHe Ha 3aHc OT TeAeOHHata KHNKKA
- DoctbI AO cncbka C 06xHaHnTa
- N3tpnBaHe Ha 3aHc ot CnncbKa c o6aXdHaHn
- PpHcHn Ha dEInCTBHe Ha TeAeOHHn cekpeTap
- BKAIOUBAHe/IMKIAIOUBAHe Ha TeAeOHHnCeKpeTap
- PekmHa OTrobaprHe
- HactpoKa Ha peXm Ha OTROBapAne
- CmHa Ha e3nKa Ha rAacobTo cbo6eHne
- N3caywbahe Ha cbo6eHnTa
- N3TpNBaHe Ha BCNUcBc06eHHa
- IxOaIoo cbo6ueHne (OGM)
- 3aHc Ha AnyHo HxOaIc cbo6eHne
- TAPAHUNI N OBCAYXBAHE
- DOKATO yCTPOHCTBOTO e B rapaHnra
- CaeA n3TnuaHeto Ha cpoKa Ha rapaHuaTa
- TEXHINueCKN XAPAKTEPNCNUKNI
- CE ΕΚΑΝΑΡΙΟΥ
- CE
- IN3XBbPAnHE HA YCTPOINCTBOTO (OKOANHCA PEDA)
- NOUHCTBAHE N OBCAYXBAHE
- NAČEM NÁM ZÁLEŽI
Brand : AEG
Model : SOLO COMBO 10
Category : Cordless phone