Silence Steam Eco DG8980 - Generator ROWENTA - Free user manual and instructions
Find the device manual for free Silence Steam Eco DG8980 ROWENTA in PDF.

User questions about Silence Steam Eco DG8980 ROWENTA
0 question about this device. Answer the ones you know or ask your own.
Ask a new question about this device
Download the instructions for your Generator in PDF format for free! Find your manual Silence Steam Eco DG8980 - ROWENTA and take your electronic device back in hand. On this page are published all the documents necessary for the use of your device. Silence Steam Eco DG8980 by ROWENTA.
USER MANUAL Silence Steam Eco DG8980 ROWENTA
Important recommendations
Safety instructions
Downloaded from www.vandenbore.be
Downloaded from www.vandenborre.be
PLEASE RETAIN THIS INSTRUCTION BOOKLET FOR FUTURE REFERENCE
Environment protection first!

FR
Recommendations importantes
Downloaded from www.vandenbore.be
Downloaded from www.vandenborre.be
MERCI DE CONSERVER CE MODE D'EMPLOI
Downloaded from www.vandenbore.be
Downloaded from www.vandenborre.be
Downloaded from www.vandenbore.be
Downloaded from www.vandenbore.be
CONSERVARE QUESTE ISTRUZIONI
Downloaded from www.vandenbore.be
Downloaded from www.vandenbore.be
CONSERVE ESTAS INSTRUCCIONES DE USO
Downloaded from www.vandenbore.be
Downloaded from www.vandenbore.be
FOCT P 51317.3.2-2006 (Pa3A, 6, 7)
FOCT P 51317.3.3-2008
Cpok cnyyk6bl n3dennn 2 roda c daTb npdaXn.

MO04
PL
Wañne zalecenia
3A BALIATA B3OPIACHOCT
BG
Ipei Da nycheTe ypea 3a NpBn PbT, pOeTabrTe IOTnra BbpxN NOCTaBkata N, ce
yeTe BHNMaTeJIHO pbKOBoDcTBOTO 3a yNO-yBepTe, ye NobbpXHocTTa, BbpxKOJTO JNo-
Tpe6a: hnpMaTa He Hocn HnKaKBa CTABrTe, e ctaBnHa.
OTROBOPHOCT npu ynoTpeba He no npedHaYpebT He e npedBnDeH da 6ne n3NoI3BaH 3NaueHne. OT Iua (BkIouHTeH0 OT dca) HnITO n
3a BaWata 6e3OnacHocT To3n ypeD CbOTBeBnueCKn, CeTNBn Nll YmCTBHeN cNoC6HOCTBa Ha CTaNapTnte N Ha DeiCTBaAata Hn- Ca OpAHueHN, Nn OT Nua 6e3 ONNT MaTUBHa ypeD6a (DInpeKTnBa 3a HnCKO 3HaHn, OCBen Ako OTROBOPHO 3a TxHata HaPexHne, DInpeKTnBa 3a eJekTpOMarHHT-6e3OnacHocT Nlce Rn Ha6IHOdaBa Nll NmE HaTa CbBMecTImoCt, DInpeKTnBa 3a Ona3BaHeJaIo npeDbapntEnH yKa3aHnra OTHOCHO Ha OKJHaTa CpeDa N T.H.). NOJ3BaHeTo Ha ypeDa.
Baata TOTn c naporehepatop e eleKtpuHaTneJaTe deaTa, 3a da ce yBepnte,Ye He Ckn ypei: Tp6Ba Da 6bJe n3non3BaH no MOpaparT c ypeia.
MaIeH Naun. Ipei nblHe He npOBepTe daH ypeBt e Toe npedHa3HaueH cmo 3a domaHa yKIOUeH OT 3axpaHbaHeTo n daH e n3CT Tpe6a. HJI.
Cna6dene c 2cncTeMn 3a 6e3oNaacHocT: Hnkora He ocTabraIte ypeDa 6e3 Ha3Op: -KlaPAn, npeDoTbPaTaBaU, CBpbXHaJIraHe, -KOraTo e BkIIOueH B eJNEKtpuYeCKOTO 3a-KoITo B CnyaH Ha Hen3npaBHOCT N3NpckxpaHBAHe;
I3JIshHOTOKoJIuYeCTBOnapa;-akoHe e OCTaBeH da n3CTnHe OKoNo 1ac. -TePMnHO CbIpOToNtBLeHne, PpeIoTbPaTa- IlaJeMaTa NOBbpXHOCT Ha IOTnra N IIIOuata BaIo npePraBaHe. Ha NoCTaBkata N Bbpx npoReHepaTopa
BnHarn BkHouBaHTe BaWata cnaporMoraT da ce HarpeT do MHoro BnCOKn Tem- HepaTop: nepaotypu n da npuunHrT u3rapaHn: He rN
-B eIeKtpnuecka HNCTaIauJy, YneTo Hanpe-DOKocBaIte. Hnkora He DoInpaTe eIeKtpn-JeHHe e MeKdy 220 n 240 V; yecknte Ka6enn do rnaDeuata NOBbpxHOCT
-B 3a3eMeH eJektpnueckn KOHTaKT. Ako nHa IOTnTa.
IOn3BaTe yDbJxHtEn, ce yBepTe, ye uen- Baunr ypei n3nycka npa, kOTo MoKe da CeIbTe oT DByNoJIocEH TnI, 10 A cbc npuHH n3rapHn.
3a3emeh Ka6eI. BbTe BHNMaTeJHn, KOrato pa6oTHe C HenpabInHoto 3axpaHbAHe MoKe Da npu- IOTnTa N Oco6eHO KOrato rJaIte BB BepuHH Heo6paTmN IOBpei, KOtO npaBrt TnKaJIHo NIOJOxEHe. Hnkora He HacouBaTe rapaHcIyTA HeBaJIndHa. napata KbM Xopa nn JXIBOTn.
Pa3BnIte HapbIHo eIekTpueckn Ka6eI, Ipei Da n3PnAkeHeTe KOleKTopa, n3uKaaiTe npEi Da rO BkIoUHTe B 3a3eMeH eIekTpOnTna Tc naporehepaTOp Da n3CTnHe i Ja n3-ueckn KOHTaKT. KIOUeTe Dba Yaca Ipei Da pa3BnTe KOleK-
Ako 3axpaHbauT Ka6eI nn MapkybT 3aopa.
napata e nobpehen, 3a da n36berhe TcA-Ako 3ary6nte nn NobpeDHTe KolekTopa, KaBn pncOBe,Toi 3aIbJxHTeNHO Tp8Ba dMeTe HOB nn rno POnMeHete B Odo6peh 6bJe CmeHen OT Odo6peh cepBN3. cepBN3.
He dIbpnaIte 3axpaHbAsnKa6en, 3a Da nBHKora He NotanTte IOTnTa c naporehepaKlIOHTe ypeDa ot MpeXata. BInHaru n3KIOeB bB Boda nn B KaKBaTo N da e Dpyra BaTe BaShnYpeD: HocT. Hkora He JnoCTabYne nod TeyaSha
-преди даNBнHnTe pe3epBoapa ИлддпakHeTe KOLEkTOpa;
-npeDn NOuchTbaHe;
- Cnei BcKa ynoTpe6a.
YpeBbT Tp6Ba Da ce n3noJ3Ba n Da ce cTaBb Bbpxy Cta6nHa NOBbpXHocT. Korato
BODa. He n3noJ3BaIte ypeDa, ako e naJaI, ako no Hero HMa ABHn NOBpeDi, aKO Teue nn He 60Tu npabuHNo.Hnkora He pa3rIo6BaIte HuaHyaPei:daIte ro 3a npOBepKa B Odo6peH cepBn3, 3a Da n36erHeTe BCraKaKbB pNCK.
CS
Duležitá doporučeni
Bezpečnostní pokyny
TENTO NÁVOD K POUŽITÍ SI PROSÍM USCHOVEJTE
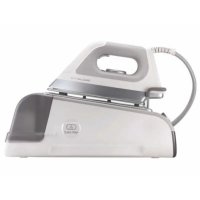
- Iron handle
a. Iron with plastic handle
b. Iron with cork handle - Precision shot button (concentrated steam command)
- Steam trigger
- Precision tip
- Safety lock (to hold the iron on the base unit)
- Removable 1.5L tank
- Base unit
- Tank filling shutter
- "Calc Away System" scale collector valve
-
Automatic cord rewind button
-
Electric cord storage compartment
- Iron rest
- Steam cord
- Steam cord storage clip
- "Calc Away System" scale collectoi
- Control panel
a. On/Off button and "auto off" light
b. Fabric selection dial
c. Selected fabric lights
d. "Calc Away System" indicator
e. Tank empty button and light
f. "Boost / vertical steam" command
- depending on model
PREPARATION
1·Safety lock
- Your steam generator is equipped with a safety lock that holds the iron on to the base unit in order to facilitate transport and storage:
Pull up -fig. 1. - Push down - fig. 2.
The safety lock allows you to carry your steam generator by the iron handle:
- place the iron on the iron rest of the steam generator and lock it into place (you will hear an audible "click" sound) -fig. 1.
- Hold the iron by its handle in order to transport your steam generator-fig. 3.
2·Water recommendations
Tap water
- Rowenta steam generators are designed to be used with Untreated TAP WATER. If your water is very hard, Rowenta recommends mixing half untreated tap water with half distilled water which reduces the hardness.
Softened water :
- There are many types of household water softeners and the water from many of them is perfectly acceptable for use in the steam generator. However,
some types of softeners, particularly those that use chemicals such as salt, can cause the appliance to leak or spit during use, this is notably the case with filtering jugs. Therefore we would not recommend using this type of water.
- If you experience this type of problem, we recommend that you try using untreated tap water or store-bought distilled water which can be mixed 50% distilled with 50% untreated tap water. Once you have changed water it will take several uses to correct the problem. Rowenta recommends trying the steam function for the first time on an old towel or cloth that can be discarded to avoid potentially damaging your clothes.
Always remember :
- Heat concentrates the elements in water during evaporation. The types of water listed below may contain organic waste, mineral or chemical elements that can cause spitting, brown staining or premature wear of the appliance: water from clothes dryers, scented or softened water, water from refrigerators, batteries, air conditioners, rain water, boiled, filtered or bottled water. These types of water should not be used in your ROWENTA steam generator.
3. Preparing your steam generator
- Place the steam generator on a flat, stable, horizontal and heat-resistant surface.
- We recommend that you use an ironing board that is suitable for use with steam generators; (steam generator rest must be tray-type rather than mesh-type). The board should be a mesh type to allow any excess steam to escape and to avoid steam venting sideways.
- Lift the removable water tank (located at the front of the steam generator) pressing on the lock screw located on the tank handle - fig. 4.
- Fill the tank with untreated tap water, taking care not to exceed the maximum level - fig. 5.
- Slide the tank back into its housing until it "clicks" into place.
- Unwind the electrical power cord completely and remove the steam cord from its housing - fig.6.
Plug your steam generator into a mains socket with an earth pin -fig.7.
USE
4 • Switching on your steam generator
- Press the on/off switch, it lights up - fig.8. The green lights located inside each fabric section start to flash. After around one minute, and regularly while it is being used, your steam generator's electric pump injects water into the boiler. It makes a noise but this is quite normal.
- Your steam generator is ready for use when the green lights stop flashing.
The first time that the appliance is used there may be some fumes and smell but this is not harmful. They will not affect use and will disappear quickly.
5.Operating the control panel
- When one of the lights on the control panel is flashing this means that your steam generator is not yet ready for ironing the selected fabric.
If all of the green lights have stopped flashing, your steam generator is at the correct temperature and steam setting for ironing the selected fabric. A beep will confirm that your steam generator is ready - fig.10.
While you are ironing, if you select a higher programme, you can continue ironing.
- Red "tank empty" light is flashing - fig: 14: the tank is empty.
- Blue "on/off" light is flashing: your appliance is on standby.
- Orange "Calc-Away" light is flashing - fig. 17: the collector needs to be rinsed.
6 • Using your steam generator
Eco Intelligence
- Your steam generator is fitted with an Eco Intelligence electronic control system that provides optimal control of the iron's steam output and temperature according to the selected fabric: this reduces energy consumption and guarantees optimum ironing for each type of fabric.
- Set the control button to the type of fabric to be ironed (see table below).
| SYNTHETICS (Polyester, Acetate, Acrylic, Polyamide) | ||
| SILK | ||
| WOOL | ||
| COTTON | ||
| LINEN |
"Boost "function
- Your generator is equipped with a "Boost" function that allows you to increase steam release during use at particular moments and for particularly difficult areas, for example if you are ironing very thick or very creased fabrics. To use this function, press the Boost button on the control panel, a blue light turns on - fig.16.
-
To deactivate the Boost function, press the button again. The blue light will then turn off. You can also deactivate it by turning the fabric selection dial.
-
The Boost function is deactivated automatically after 15 minutes. The blue light flashes to indicate that the Boost function will turn off, then turns off.
The Boost function can only be used on the "Wool", "Cotton" and "Linen" positions. For other fabrics, there is no need to use the Boost function as the combinations of "Synthetic" and "Silk" settings are sufficient.
- For steam output, press the steam control below the iron handle - fig.11. The steam stops when the control is released.
If you are using starch, spray it on the reverse side of the fabric to be ironed.
Recommendation: when using for the first time or if you have not used steam for several minutes, press the steam control repeatedly several times - fig. 11 holding it away from your linen. This will enable any cold water to be removed from the steam circuit.
Fabric selection: your iron heats up quickly, start with fabrics that are ironed at low temperatures and end with those that require a higher temperature. Please note, if you start by ironing fabrics that require a higher temperature, the appliance may take some time to cool down. If you wish to accelerate the process you can activate the steam control, holding the iron away from your linen to cool it down more quickly. On each change of fabric, wait for the lights to stop flashing. If you are ironing fabrics made from mixed fibres, set the iron for the most delicate fabric. For delicate fabrics () , press the steam control button (under the handle of the iron) intermittently to avoid possible water droplets appearing with the steam.
When pausing during ironing, never place the iron on a metal iron stand, which could damage it, but on the rest plate of the unit: it is fitted with nonslip pads and has been designed to withstand high temperatures.
7·Using the Precision Shot
- Your appliance comes with a Precision Shot function: it allows you to make a concentrated steam injection when ironing difficult creases, intricate and difficult access areas.
- To use this function, press fully on the Precision Shot located on the top of your iron as many times as necessary.
ATTENTION! use the Precision shot function carefully as the steam comes out with exceptional force and could cause burns.
8·Vertical steam ironing
- To iron a wool, cotton or linen garment, select the fabric and press on the "Boost/vertical steam" button for powerful vertical steam ironing.
- For delicate fabrics such as synthetics or wool, it is not necessary to use the "Boost/vertical steam" button, as the "synthetics" and "silk" setting buttons are sufficient for removing creases.
- Hang the garment on a coat hanger and hold the fabric slightly taut with one hand.
- Press the steam control button -fig.11 repeatedly, moving from top to bottom -fig.13.
Examples of how to use the vertical steam ironing function:
- Removing creases from delicate fabrics that you do not want to come into contact with the hot iron
- Refreshing a shirt or suit just before putting it on.
As the steam produced is very hot, never attempt to remove creases from a garment while it is being worn; always hang garments on a coat hanger. For fabrics other than linen or cotton, hold the iron a few centimetres away so as not to burn the fabric.
9·Dry ironing
- Do not press the steam control button.
10. Filling the water tank up again
- When there is no more steam and the "water tank empty" light flashes - fig.14: the water tank is empty.
- Remove the water tank using the handle (on the front of the steam generator) by pressing on the locking screw located on the tank handle - fig.15 and fill it up - fig.5 taking care not to exceed the maximum level.
If this occurs, pour away the excess water.
- Push the water tank into position until it "clicks" into place.
- Press the "tank empty" Restart button under the control panel.
- Your steam generator is ready for use when the green lights stop flashing.
11·“Auto-off” system
- For your safety your steam generator is fitted with an "auto-off" system which places it on standby after it has been left unused for 8 minutes or in the event of it being left on accidentally.
- Three beeps sound and the blue light on the "On/Off" button flashes to indicate that the appliance is going on standby.
- To reactivate the steam generator: press the "On/Off" button and wait for the green lights to stop flashing before starting to iron again.
- The steam generator can also be reactivated by pressing the steam button.
- For your safety, after around 30 minutes without being used, the "auto-off" system will switch off your steam generator. To restart your ironing session, press the "On/Off" button.
12 • Storing the steam generator
- Turn off the steam generator by pressing the "On/Off" button.
-
Unplug the appliance and press the automatic cord rewind button.
-
Place the iron on the steam generator iron rest. Lock the iron on the base unit by pulling up the safety lock and pressing it until you hear an audible click, so your iron is secure - fig 1. Fold the steam cord in two and place it in its housing.
- Leave the steam generator to cool for at least one hour before putting it away if you want to store it in a cupboard or confined space. You can then store your steam generator safely.
MAINTENANCE AND CLEANING
13 · Cleaning the steam generator
Never hold the iron or the base unit under a running tap.
Do not use any maintenance or descending product to clean the soleplate or the base unit.
- The iron soleplate: clean the soleplate of your iron when it is cool with a damp cloth or non-abrasive sponge.
- The base unit: clean the plastic parts of the appliance occasionally with a soft cloth.
14·Easy descending of your steam generator
Do not use any descending substances (industrial descending products, etc.) when rinsing the scale collector or boiler tank, they could damage it. Before emptying your steam generator, it must always be left to cool for 2 hours to avoid any risk of scalding.
- To extend the life of your steam generator and avoid scale being deposited on your ironing, your steam generator is equipped with a built-in scale collector. This collector, located in the tank, automatically removes the scale that forms inside.
Operation:
An orange "Calc-Away" light - fig.17 located on the control panel starts flas
hing to let you know that the collector needs rinsing.
- Once the steam generator has completely cooled down, remove the scale collector - fig.18.
Important! This operation must not be carried out unless the steam generator has been unplugged for at least two hours and has cooled down completely. To carry out this operation, the steam generator must be close to a sin as water may come out of the tank.
- Unscrew the scale collector valve and remove it from the base unit; it contains the scale that has built up in the tank - fig.18.
To clean the collector properly, just rinse it under running water to remove the scale it contains - fig.19. You can soak the collector in white vinegar or lemon juice for a few hours to remove any stubborn scale stuck to the collector. - Put the collector back in its housing and screw it in completely to keep it watertight but do not overtighten it - fig.20.
- Put the scale collector cover back in place - fig.20.
Next time you use the appliance, press the "Calc-Away" button located on the control panel to switch off the orange light.
Apart from this regular maintenance process, we recommend that you rinse the boiler completely every 6 months, or every 25 times you use your iron.
Make sure that the steam generator has been unplugged and allowed to cool for at least 2 hours.
- Place the steam generator on the edge of your sink and the iron to one side, on its base.
- Remove the collector cover and unscrew the scale collector - Fig.18.
- Hold your steam generator at an angle and use a jug to fill the boiler with 1/4 litre of tap water - Fig.21.
- Shake the base for a few seconds then empty it completely into the sink - Fig.22 and 23.
- Fit the collector back in its housing and screw it on tightly to ensure it is watertight but do not over-tighten it - Fig.20.
- Put the scale collector cover back in place - Fig.20.
Next time you use the appliance press the "Calc-Away" button located on the control panel to switch off the orange light.
The steam generator does not work without the scale collector.
Regular descending of your steam generator will help to maintain its steam performance over time.
EN
IS THERE A PROBLEM?
| Problems Possible causes Solutions | ||
| The steam generator does not switch on or the control panel lights and ON/OFF indicator lights do not switch on. The appliance is not switched on. Check that your appliance is correctly plugged in and press the illuminated on/off switch (on the front of the base-unit). | ||
| Water runs through the holes in the soleplate. You are using the steam control button before the iron is hot enough. Wait for the green lights to stop flashing before activating the steam control. | ||
| Water has condensed in the pipes be-cause you are using steam for the first time or you have not used it for some time. Press the steam control on the iron away from the ironing board until steam comes out of the iron. | ||
| You are using the steam command too often when ironing delicate fabrics (*)Activate the steam command moderately when ironing delicate fabrics (*) | ||
| Problems Possible causes Solutions | ||
| The Boost function blue light si-gnal flashes/turns off. | The Boost function shuts off automat- cally after 15 minutes: the blue light flashes and then switches off. | This is completely normal. The Boost function is designed for occasional use only (see § 6). |
| Your are using the "Synthetics" or "Silk" position. | The Boost function can only be used in the "Wool", "Cotton" and "Linen" position. For other fabrics, there is no need to use the Boost function, the combinatlons of "Synthetics" and "Silk" settings are sufficient. | |
| White streaks come through the holes in the soleplate. | Your boiler has a build-up of scale because it has not been rinsed out regularly. | Rinse the collector when the "Calc-Away System" indicator flashes. If your water is very hard, rinse it more often. |
| Brown streaks come through the holes in the soleplate and stain the linen. | You are using chemical descaling agents or additives in the water for iro- ning. | Never add this type of product in the water tank or in the boiler (see § 1). |
| The soleplate is dirty or brown and may stain the linen. | Your linen is not rinsed sufficiently or you have ironed a new garment before washing it. | Ensure linen is rinsed thoroughly to remove any soap de- posits or chemicals on new garments which may be sucked up by the iron. |
| You are not using the correct programme for the fabric. | See our advice about settings (see § 5). | |
| You are using starch. Always spray starch on the reverse side of the fabric to be ironed. | ||
| There is no steam. The tank has not been fitted correctly into its housing. | Push it back into its housing until you hear a "click". | |
| The water tank is empty (red light is flashing). | Fill the water tank and press the "Restart" button on the control panel. | |
| There is little steam. | The soleplate temperature is set to the maximum. | The generator is working but steam is very hot and dry. As a consequence, it is less visible. |
| Water streaks appear on the linen. | Your ironing board cover is soaked with water because it is not suited to the po- wer of a steam generator. | Check that your ironing board is suitable. A mesh type iro- ning board must be used avoid condensation. |
| The "empty tank" signal light is flashing. | You have not pressed the "empty tank" restart button. | Press the "empty tank" restart button on the control panel. |
| The tank is not correctly fitted in its housing. | Push it into the housing until you hear a "click". | |
| Steam escapes from the scale collector valve. | The scale collector valve has not been tightened correctly. | Tighten the collector valve. |
| The scale collector valve is damaged. | Contact an Approved Service Centre. | |
| The generator is faulty. Do not use the steam generator and contact an Approved Service Centre. | ||
| Steam escapes under the appliance. | The generator is faulty. Do not use the steam generator and contact an Approved Service Centre. | |
| The "Calc-Away" light is flas- hing. | You have not pressed the "Calc-Away" restart button. | Press the "Calc-Away" restart button located on the control panel. |
| The red "tank empty" light is flashing and the "On/Off" button is not working. | The appliance has been stored in a cold place (approx. <10C°) | Unplug the appliance. Wait for 3 hours so that the ap- pliance is at room temperature |
If you have any product problems or queries with your product, please telephone our Customer Relations team on:
0845 602 1454 (UK) - (01) 677 4003 (ROI)
Consult our web site: www(rowenta.co.uk
MERCI DE VOUS RÉFERER AUX CONSIGNES DE SECURITE AU DÉBUT DE CETTE NOTICE AVANT D'UTILISER VÔTURE APPAREIL.
DESCRIPTION
- Poignée du fer