
Hipnos Power - Beard trimmer TAURUS - Free user manual and instructions
Find the device manual for free Hipnos Power TAURUS in PDF.

| Product type | Multifunctional beard trimmer |
| Brand | Taurus |
| Model | Hipnos Power |
| Color | Not specified (generally black/silver) |
| Power source | Built-in rechargeable battery + mains via charger |
| Charger input voltage | 100-240 V ~ 50/60 Hz |
| Charging time | 8 to 10 hours (first charge 10 hours) |
| Runtime | Not specified |
| Number of heads | 4 interchangeable heads |
| Heads included | U-blade, T-blade, precision blade, nose/ear cutter head |
| Guide combs | 2 guide combs (for U/T blade and precision blade) |
| Usage | Cordless (battery) or corded (mains) |
| Blade material | Stainless steel (assumed) |
| Maintenance | Water cleaning for heads, brushing, blade lubrication |
| Safety | Do not use near water, unplug before cleaning, blades are very sharp |
| Included accessories | Charger, charging base, cleaning brush, lubricating oil, flat comb |
| Repairability | Replaceable battery at end of life (opening case) |
| Warranty | Standard manufacturer warranty (not specified) |
| Country of origin | Not specified |
| Weight | Not specified |
Frequently Asked Questions - Hipnos Power TAURUS
User questions about Hipnos Power TAURUS
0 question about this device. Answer the ones you know or ask your own.
Ask a new question about this device
Download the instructions for your Beard trimmer in PDF format for free! Find your manual Hipnos Power - TAURUS and take your electronic device back in hand. On this page are published all the documents necessary for the use of your device. Hipnos Power by TAURUS.
USER MANUAL Hipnos Power TAURUS
Many thanks for choosing to purchase a TAURUS brand product.
Thanks to its technology, design and operation and the fact that it exceeds the strictest quality standards, a fully satisfactory use and long product life can be assured.
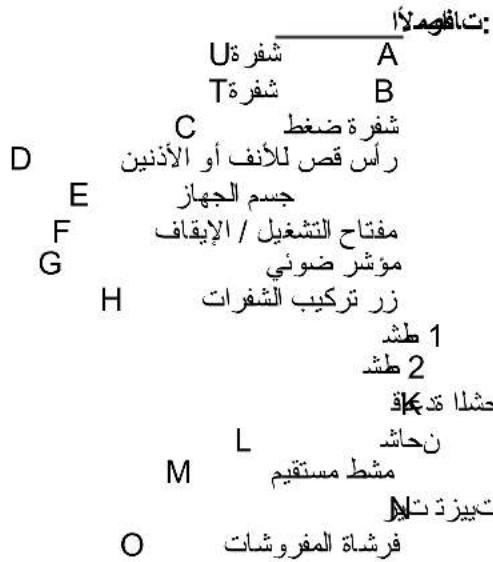
Description
A U blade
B Tblade
C Precision blade
D Nose/ear trimming head
E Appliance body
F On/Off button
G Pilot light
H Blade attachment switch
I Guide comb 1
J Guide comb 2
K Charging base
L Battery charger
M Flat comb
N Lubricating oil
O Cleaning brush

Safety advice and warnings
- Read these instructions carefully before switching on the appliance and keep them for future reference. Failure to follow and observe these instructions could lead to an accident.
Electrical safety:
- Do not use the appliance if the cable or plug is damaged.
- Ensure that the voltage indicated on the rating label matches the mains voltage before plugging in the appliance.
- Connect the appliance to a base with an earth socket withstanding a minimum of 16 amperes.
- The charger's plug must fit correctly into the mains socket. Do not alter the plug. Do not use plug adaptors.
- Only use the appliance with the specific electric connector provided.
- If any of the appliance casings breaks, immediately disconnect the appliance from the mains to prevent the possibility of an electric shock.
- Do not use the appliance if it has fallen on the floor, if there are visible signs of damage or if it has a leak.
- CAUTION: Maintain the appliance dry. Blades are washable but must not be attached to the appliance while being washed.
- CAUTION: Do not use the appliance near water.
- Do not use the appliance near bathtub, showers or swimming pools.
- Do not use the appliance with damp hands or feet, or when barefooted.
- Do not force the power cord. Never use the power cord to lift up, carry or unplug the battery charger.
- Do not wrap the power cord around the appliance.
- Do not clip or crease the power cord.
-
Check the state of the power cord. Damaged or tangled cables increase the risk of electric shock.
-
As an additional protection to the electrical supply for the appliance, it is advisable to have a differential current device with a maximum sensitivity of 30mA . Ask for advice from a competent installer.
- Do not touch the plug with wet hands.
Personal safety:
- Take the necessary measures to avoid starting the appliance involuntarily.
- Before using the appliance ensure that the blade is properly fixed in place.
- Do not touch any of the appliance's moving parts while it is operating.
- Do not use the appliance with wet feet.
Use and care:
- Fully unroll the adaptor's power cable before each use.
- Do not use the appliance if its accessories are not properly fitted.
- Do not use the appliance on wet hair.
- Do not use the appliance if the on/off switch does not work.
- Disconnect the battery charger from the mains before undertaking any cleaning task.
- This appliance is for household use only, not professional or industrial use.
- This appliance is not a toy. Children should be supervised to ensure that they do not play with the appliance.
- This appliance is intended for adult use. Ensure that this product is not used by the disabled, children or
people unused to its handling.
- This appliance should be stored out of reach of children and/or the disabled.
- Keep the appliance in good condition. Check that the moving parts are not misaligned or jammed and make sure there are no broken parts or anomalies that may prevent the appliance from operating correctly.
- Use the appliance and its accessories and tools in accordance with these instructions, taking into account the working conditions and the work to be performed. Use the appliance for operations different from those intended could result in a hazardous situation.
- Do not open the battery/ies under any circumstances whatsoever.
- Do not use the appliance with pets or animals.
- Pay special attention when assembling and removing the accessories, as the blades are sharp. Be careful and avoid direct contact with the blades' cutting edges.
- Recharge the battery/ies only with the charger supplied by the manufacturer. A charger that is suitable for one type of battery may cause explosion or fire hazard when used with other battery/ies.
Service:
- The appliance has been oiled in origin. In order to maintain the appliance in a good operation conditions we suggest greasing the blades every time you clean it by putting a few drops of oil on the ends of the blade, and finally switching on the appliance
during a few seconds.
- Make sure that the appliance is serviced only by specialist personnel, and that only original spare parts or accessories are used to replace existing parts/accessories.
- Any misuse or failure to follow the instructions for use renders the guarantee and the manufacturer's liability null and void.
Charging the battery
Caution: A new battery is not fully charged and must therefore be charged before the appliance is used for the first time.
- Charge the battery at an atmospheric temperature of between 4 and 40^ .
- Plug the charger (L) into the mains.
- Approximately 8 to 10 hours are needed for a complete charge of the battery. Never attempt to over charge the battery (although it is recommended that the first charge of the battery be of 10 hours in duration).
- Connect the charger (L) to the charging base (K) or to the appliance (E) using the sockets in them. The socket is located at the lower/back part of the appliance and on the back of the charging base.
- The pilot light will come on to indicate that the charger is charging the battery.
-- When the battery is charged disconnect the charger from the mains supply.
NB: For a long battery life, it is advisable to charge the battery, only, when it has run out completely.

Instructions for use Before use:
- Before using this product for the first time, it is important to make a full charge of batteries.
- Prepare the appliance according to the function you wish to use:
Insertion of cutting head:
- Press down the blade attachment switch and place the blade head until it fits correctly. Release the blade attachment switch (Fig.1).
- To extract the blade head, press down the blade attachment and pull out the head.
Insertion of comb guide:
- Guide comb 1 fits in Precision and U blades only.
- Guide comb 2 fits in T blade only.
- Take the guide comb 1 for both ends and fit the end of the comb to the end of the blade head.
- Press in the middle of the comb until it gets inserted correctly, hearing a "click".(Fig.2).
- To extract the comb guide, just pull out.
- Take the guide comb 2 and fit the end of the comb to the end of the blade head.
- Press in the middle of the comb until it gets inserted correctly, hearing a "click"
- To remove the guide comb 2 pull the side of the trimmer comb to get it removed (Fig.3)
Interchangeable heads (Fig 4): U blade (A)
- Suitable for trimming beard, moustache and sideburns.
- Can be used with or without guide comb 1, depending on the desired cutting height.
Tblade (B)
- Suitable for nape and extended areas.
- Can be used with or without guide comb 2, depending on the desired cutting height.
Precision blade (C)
- Suitable for precision trimming, to achieve a perfect finish or making "drawings" on hair.
- Can be used with or without guide comb 1, depending on the desired cutting height.
Nose/ear trimming head (D)
- Suitable for trimming hair from the nose and ears.
- IMPORTANT: do not insert it more than 5mm inside the nose or ears.
- Slowly move in and out while the trimmer revolves to remove the unwanted hair. For improved results, ensure that the end of the trimming head touches the skin. This will reduce the tickling sensation that can be caused by nasal hair.
Use:
- The appliance can be used directly connected to the mains, or by using his batteries.
-
Unroll the cable completely before plugging it in.
-
Ensure that the electronic connector is properly attached to the appliance.
- Connect the appliance to the mains.
- Turn the appliance on, by pressing the on/off button.
Once you have finished using the appliance:
- Turn the appliance off, pressing the on/off button.
- Clean the appliance.

Cleaning
- Disconnect the appliance from the mains and allow it to cool before undertaking any cleaning task.
- Remove the head from the appliance.
- Use the cleaning brush (O) to remove the hair from inside the appliance and the blades.
- Put the head under running water to achieve a cleaner result if needed.
- Clean the equipment with a damp cloth with a few drops of washing-up liquid and then dry.
- Do not use solvents, or products with an acid or base pH such as bleach, or abrasive products, for cleaning the appliance.
- Never submerge the appliance in water or any other liquid or place it under running water.
- During the cleaning process, take special care with the blades, as they are very sharp.

Anomalies and repair
- Take the appliance to an authorised technical support service if a product damage or other problems arise. Do not try to dismantle or repair without assistance, as this may be dangerous.
- If the connection to the mains has been damaged, it must be replaced and you should proceed as you would in the case of damage.
For EU product versions and/or in case that it is requested in your country:
Ecology and recyclability of the product
- The materials of which the packaging of this appliance consists are included in a collection, classification and recycling system. Should you wish to dispose of them, use the appropriate public recycling bins for each type of material.
- The product does not contain concentrations of substances that could be considered harmful to the environment.
- This appliance contains, or could contain, oil. Remember that one should abide by the regulations concerning the elimination of this type of contaminant.
This symbol means that in case you wish to dispose of the product once its working life has ended, take it to an authorised waste agent for the selective collection of
Waste from Electric and Electronic Equipment (WEEE).
This symbol means that product may include a battery or batteries; user must to remove them
before disposing of the product.
Remember that batteries must be disposed of in duly authorised containers. Do not dispose of them in fire.
How to remove the batteries from the interior of the device:
CAUTION: It is important that the batteries are fully discharged prior to its withdrawal from the apparatus.
To remove the batteries, once the life of the appliance, proceed as follows:
- Open the top shell of the apparatus, removing previously with the help of a screwdriver fixing screws (Fig. 5)
- Cut the batteries connections. (Fig.6)
This appliance complies with Directive 2006/95/EC on Low Voltage and Directive 2004/108/EC on Electromagnetic Compatibility.
Kak n3BneKaTb aKKymyJrTopbln3 np6opa:
IpeKHe yem npHcTynITb K n3BLeueHIO aKKyMylrTOPOB H3
npnbopa, y6eNTecb B TOM, YTO OHN NOJHOCTbIO pa3pndnncb.
ДЯ n3BJeHn6aTapei n3 OTCnyxNBwero np6opab BbINOJHnTe CNeyUOuNe DeIcTBn:
- OTKpoITe BepxHIOU KpbIuKHy
npi6opa, npeBapnteJIbHO BblKpyTnB
BnHTbIC NOMOUsbIO OTBepTkN (Pnc.5)
-OTcoEduHnte npoBoDa ot 6aTapeN.
(Pnc.6)
a a a a a a a a a a a a a a a a a a a
1234567890

x1 = -b - ^2 - 4ac2a,y1 = -b + ^2 - 4ac2a
J 1
12
1 1
1 1
a a a a a a a a a a a a a a a a a a a a a a a a a a a
.(RAEE)

i 1
y( 1) y( 2) y( 3) y( 4) y( 5) y( 6)
a
j 1
(5)(204
(6)
EC/2004/108 4jgill jssial lll EC/2006/95 4jgill jssial
1102 > 103 < 10_4
:
1 1
(1)
:
j 1 1
2 1
1 1
(2) (2018, 2019)
jolol jolil 1
2 2
a 1
(3a)
:(4)
(A)U
a 1
(B)T
aalwaiy, y
y 2
aeea)C
J 1
yag yall jgl g lgsjg 1 p a j
(D)
5 5 5
J 1
1
1
y
J 1
y
j 1
jiauii jie
a/1jai jai bai (Jao jie jia
150 = 150( 1 - x) x
i
j 1
15
alii iic jaiil gis jaiil aaii y
Jai jia jia jiaui
jll jll jll jll jll jll jll jll jll
Xble 1
i 1
aill j jaiiuiuui uui g bia iiaiuiuiua aaa j
jll 1 k
.
y 1
J 1234567890
a 1
aayu ay jy jye
jai jiali jia jia jia jia jia jia jia
J 1
J 1
田
AD = AC
aiaiaiaiaiaieaegei JgJiaaiuui Jok Jk
40 4
(L)
8 8
10 10 10
L(L)J (K) (E).
a a a a a a a a a a a a a a a a a
y j 1
a aae ae eae ae ae ae ae ae ae ae ae ae ae ae ae ae ae ae ae ae ae ae ae ae ae ae ae ae ae ae ae ae ae ae ae ae ae ae ae ae ae ae ae ae ae ae ae ae ae ae ae ae ae ae ae ae ae ae ae ae ae ae ae ae ae ae ae ae ae ae ae ae ae ae ae ae ae ae ae ae ae ae ae ae ae ae ae ae ae ae aaee
Jolk Jki jia jia jia laiie lii i aaiy
JLae 1
i
J 1
jai

y 1


- Description
- Safety advice and warnings
- Electrical safety:
- Personal safety:
- Use and care:
- Service:
- Charging the battery
- Instructions for use Before use:
- Insertion of cutting head:
- Insertion of comb guide:
- Interchangeable heads (Fig 4): U blade (A)
- Tblade (B)
- Precision blade (C)
- Nose/ear trimming head (D)
- Use:
- Once you have finished using the appliance:
- Cleaning
- Anomalies and repair
- Ecology and recyclability of the product
- How to remove the batteries from the interior of the device:
- To remove the batteries, once the life of the appliance, proceed as follows:
- Kak n3BneKaTb aKKymyJrTopbln3 np6opa:
- ДЯ n3BJeHn6aTapei n3 OTCnyxNBwero np6opab BbINOJHnTe CNeyUOuNe DeIcTBn:
- JLae 1
- i
- jai
Brand : TAURUS
Model : Hipnos Power
Category : Beard trimmer