
2VFT320S - Cooker FAGOR - Free user manual and instructions
Find the device manual for free 2VFT320S FAGOR in PDF.
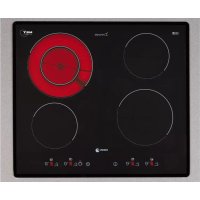



| Product type | Ceramic hob |
| Brand | Fagor |
| Model | 2VFT320S |
| Number of burners | 4 (according to illustration, multiple burners including double/triple) |
| Burner type | Ceramic, halogen burners (some models) |
| Dimensions (W x D x H) | 60 cm (standard) or >60 cm depending on variant |
| Electrical supply | 220-240 V~, 30 A (for 60 cm) or 34 A (>60 cm) |
| Total power | 6.8 kW (60 cm) / 7.8 kW (>60 cm) |
| Main functions | Double/triple burner, Large Plate, Fast Heating, Timer, Child Lock |
| Control | Electronic touch slide control (bar + + and - keys) |
| Display | Digital (time, power, programming) |
| Timer | Programmable up to 99 minutes (max. 60 min at power level 9) |
| Safety | Control lock, automatic shut-off after 5 s without selection, overheat sensor, residual heat indicator |
| Care and cleaning | Clean with damp cloth and soapy water, scraper for encrusted dirt, specific ceramic hob cleaner (VITROCLEN) |
| Installation | Flush mounting in cabinet with foam seal, fixing by clips |
| Connection | 5-wire cable (dark blue, light blue, brown, red, green/yellow) for 230 V~ or 220-240 V~ |
| Compatible cookware | Ceramic, copper, stainless steel (avoid aluminium unless stainless steel base) |
| Weight | Approx. 10 kg (estimate) |
Frequently Asked Questions - 2VFT320S FAGOR
User questions about 2VFT320S FAGOR
0 question about this device. Answer the ones you know or ask your own.
Ask a new question about this device
Download the instructions for your Cooker in PDF format for free! Find your manual 2VFT320S - FAGOR and take your electronic device back in hand. On this page are published all the documents necessary for the use of your device. 2VFT320S by FAGOR.
USER MANUAL 2VFT320S FAGOR
Very important: Read this manual thoroughly before using the hob.
This manual is designed so that the texts relate to the corresponding illustrations.

Identification
Identify the model of your hob ("a", "b", "c", "d", "e", "f", "g", "h", "i", "j", "k", "l", "m", "n", "o") by comparing the number and layout of the elements on your appliance with that shown in the illustrations.
1 Installation
1.1 Unpacking. Remove all the protective materials. 1.2 Insertion into the unit. Always take into account the details on the characteristics plate (1.2.1) and the measurements of the unit into which the hob is going to be inserted (1.2.2, 1.2.3). If you are not going to fit an oven beneath the hob, you must install a protective panel in accordance with the measure indicated (1.2.4). Stick the foam join along the outer edge of the hob to make it watertight (1.2.5). Turn the hob over and insert it into the hole (1.2.6). Secure it to the unit with the four hooks supplied (1.2.7). Do not use non-removable materials such as silicone. 1.3 Connection to the power supply. The hob is supplied with a power cable.
- With 5 wires: a) dark blue, b) light blue, c) brown, d) red, e) green yellow. (1.3.1) Prepared for a 230V~ hob. (1.3.2) Prepared for a 220-240V~ hob: see table. (1.3.3) Total power: 60cm hob 6.8kW, >60cm hob 7.8kW
| 220-240V~ Nominal switch by phases | |
| 60 cm hob 30 A | |
| >60cm hob 34 A | |
If the type of connection is other than 220-240V~, remove the cable and make the connection as per diagrams (1.3.3, 1.3.4).
| 220-240V 3~ Nominal switch by phases | |
| 60 cm hob 14 A | |
| >60cm hob 16,5 A | |
| 380-415V 3N~ Nominal switch by phases | |
| 60 cm hob 11 A | |
| >60cm hob 13 A | |
| 380-415V 2N~ Nominal switch by phases | |
| 60 cm hob 16 A | |
| >60cm hob 19 A | |
| This appliance is compliant with European directives 73/23/EEC and 89/336/EEC | |
Recommendation: The hob must be installed by an authorised installer, who shall follow the manufacturer's instructions and diagrams.
2 Use
Clay, copper or stainless steel receptacles can be used with vitroceramic hobs. Aluminium receptacles are not recommended as they can stain the glass of the hob.
2.1 Selecting the cooking zone. You have various elements on which to place the receptacles. Choose the most suitable one depending on the size of the receptacle.
2.2 Turning on the hob. Press for 3 seconds to turn on the hob; the of the different cooking zones will be activated.
N.B.: In order to be able to select whether the child safety function is activated, deactivate it by pressing the key for 3 seconds (2.13)
2.3 Activating the element. Activate the element on which you have placed the receptacle by pressing the corresponding key (2.3.1, 2.3.2). or press + (2.4.2)
N.B.: If you take longer than 5 seconds to select the element, the hob will automatically turn itself off, as a safety measure.
2.4 Selecting the power. Adjust it by sliding your finger along the bar (2.4.1) or by pressing + or - (2.4.2, 2.4.3).
SPECIAL ELEMENTS
2.5 Double element, Triple element. Once you have selected the power, press , and this will activate the double element (2.5.1, 2.5.3). If you press (2.5.2) or (2.5.4) again, this will activate the triple element. To cancel, press ( , , , ).
2.6 Large hotplate. You can use this element in a circular way or in a joint way, as a large hot plate. Press to activate it and press again to deactivate it.
Recommendation: on the models with halogen elements, the light is so bright that we advise you not to look at it when it is on without the receptacle.
TIMER FUNCTIONS
2.7 Setting the time L . When the hob is plugged in, the digits on the clock will flash and will show 12.00 (2.7.1). Adjust the time with the keys + , (2.7.2). Follow the same procedure whenever the appliance is unplugged or the power supply is cut off.
To change the time, press the key for 5 seconds (2.7.3). The time will start to flash and you will hear a beep; adjust it with the keys + -
2.8 Selecting the time.
Models abc: Once an element has been activated and the power selected, you have 5 seconds of flashing in which to press the key (2.8.1). Select the time required by pressing +, - (2.8.2). After five seconds the timer is set and the time will be displayed with an illuminated dot beneath the icon of the timed element (2.8.3). To alter or see the time remaining, press the icon of the timed element (2.8.4). To cancel the programming, press + keys simultaneously (2.8.5).
Models dfghkmo: Once an element has been activated and the power selected, press the + key on the clock. 00 and a will appear on each element (2.8.6). Press + on the element to be timed and will
flash (2.8.7). Select the time with +, on the clock (2.8.8). After 5 seconds the time will be set and the power and t will be displayed alternately on the timed element. Once the time has passed, you will hear a sound and o will flash. To cancel the timing, press on the icon until 00 is displayed.
N.B.: The timer will automatically turn itself off if you take longer than 10 seconds to select the time.
Models e: Once an element has been activated and the power selected, press again the selection key of the element to be timed, and a will appear. (2.8.11). Select the time with + (2.8.12) and set it by pressing the timed element key again (2.8.13). The power will be displayed with a dot indicating that the element is on a timer. You will hear a sound and see - to indicate that the time has passed (2.8.14). Press any key and the sound will stop.
N.B.: The timer will automatically turn itself off if you take longer than 10 seconds to select the time.
Observations on timing: If the power level is 9, the maximum time for the timer will be 60 minutes. Otherwise, the maximum will be 99 minutes.
Once the time has passed, the alarm will sound until you press any key.
PROGRAMMING FUNCTIONS
2.9 Rapid heating. Reaches maximum temperature quickly to automatically go to the constant temperature.
Models abc: Activates an element and takes the bar to the maximum power. Press and a R will appear on the display screen of the selected element (2.9.1). You have 5 seconds to select the desired level, you are advised to use levels from 3 to 6 (2.9.2). After five seconds the rapid heating will be set and R and the power will be displayed alternately. Once the maximum temperature has been reached, R will disappear, leaving the power constant. The element will continue operating in the conventional way. If you want
to cancel the rapid heating, press the icon of the programmed element and select a new power.
Models dfghjklmo: Select an element and set it at the maximum power by pressing + until a 9 and a dot 9 are displayed (2.9.3). Adjust the power by pressing -; levels 3 to 6 are recommended (2.9.4). After 5 seconds, fast heating is set and the power will be displayed followed by a dot (2.9.5). Once the maximum temperature has been reached, the decimal point will disappear and the element will continue operating in the conventional way. To cancel the function, press the key of the programmed element and select a new power.
2.10 Vitros with controls. Make sure that the element you are going to activate is the element you want to use (2.10.1). Turn the control to the desired position and the 'on' light will come on (2.10.2) which also indicates the residual heat when the element is turned off.
On the models with double elements or a large hotplate, turning the control to the left will adjust a part of the element and turning the control to the right will adjust the whole element (2.10.3).
2.11 Turning the element off. Select the power of the element you want to turn off. 2.12 Residual heat. After using the hob, the elements will stay hot for some time, which will vary according to the power selected and a H or a dot will be displayed on the elements that are still hot. Do not touch these elements, as there is a risk of burning yourself.
Caution: If the power supply is cut off, when it is restored, the H icon will not be displayed even if the cooking zone is hot. It is important to remember this fact.
2.13 Locking function. To prevent children from handling the appliance. Press down the key for 3 seconds and this will activate the lock. To unlock it, repeat the procedure.
Recommendations:
- Avoid knocking receptacles against the glass. Aluminium receptacles are not advisable as
they can stain the glass, unless they have a stainless steel protective base.
- The heat elements should not be operated without a receptacle.
- The base of the receptacle must be flat and dry.
- Make sure that the diameters of the receptacles are larger than or the same as the element to be used and place them in the centre of the heat source.
- Try not to move the receptacles as this can scratch the glass.
- Only use the appliance for cooking food. Do not use the hob as a worktop.
- Do not apply cold water directly onto the hob when it is hot.
Caution: Intermittent operation of the cooking zones is not a fault. They operate with longer or shorter on and off periods depending on the desired power.
Maintenance and cleaning

- Do not use a steam cleaner.
- Clean the surface of your hob regularly once it has cooled down. Do not use abrasive products or sponges. Clean with a damp cloth and soapy water (3.1.1).
- Once a week, clean thoroughly with products specifically designed for vitroceramic hobs. We recommend VITRO-CLEN for cleaning and maintaining your vitroceramic hob.
- Stubborn stains can be removed with the glass scraper (3.1.2).
- If you accidentally burn some sugar, sugary elements or plastic on the hob, remove it as soon as possible with a scraper while it is still hot. If this is not done, you may be left with permanent marks.
- Use the blade of the scraper in perfect condition; replace it if it is damaged.
4
Safety

- The power circuit supplying the hob must have an all-pole circuit breaker with at least 3mm space between contacts.
- The hob must be installed by an authorised installer, who shall follow the manufacturer's instructions and diagrams.
- The installation must be of the appropriate size for the maximum power indicated on the characteristics plate and the power socket with the regulatory earth.
- If the cable is damaged, it must be replaced by the post-sales service or similarly qualified personnel for safety purposes.
- The element is equipped with an inner temperature limiter which turns the element off in the event of the hob overheating. After each use, switch the element off using its control.
- If the surface of the glass is cracked or broken, unplug the appliance immediately to avoid the possibility of an electric shock. Do not use the hob until the glass has been replaced (4.1.1).
- If anything spills onto the control keys, the hob will stop and emit a sound (4.1.2).
- If you press a sensor down for too long or there is an object activating the sensors, the hob will stop and emit a sound (4.1.3).
- Do not place receptacles with hot bases onto the sensors; you can burn yourself when pressing them (4.1.3).
- Keep young children well away; the heating surfaces can be extremely hot when in use. Use the locking system to prevent children from playing with the controls.
- This appliance is not designed for use by people with disabilities. Always stay nearby when cooking dishes or food with fat or oil. Excessive heat could cause them to catch fire.
- If the hob is installed above a drawer, no flammable objects must be stored inside.
5
Environment

The hob has been designed with protection of the environment in mind.
Be environmentally aware. Use the adequate power for each cooking operation and select the receptacles of a suitable size for the food you are going to prepare. The heat transmission is best when the base of the receptacle and the diameter of the cooking zone are the same size.
When you have finished cooking, if you like you can leave the receptacle where it is to make use of the residual heat accumulated. This will save energy.
Use a lid whenever you can in order to reduce the heat lost through steam.
Electrical and electronic appliance waste management.
Do not dispose of appliances by mixing them with general domestic waste.
Take your hob to a special collection centre.
The recycling of domestic appliances avoids negative consequences to our health, the environment and enables us to save energy and resources.
For further information, contact your local authority or the establishment from where you purchased your hob.
Bedienungsanleitung
The manual has been prepared in such a way that the texts refer to the corresponding figures.

Identification
On the control panel, there are symbols ("a", "b", "c", "d", "e", "f", "g", "h", "i", "j", "k", "l", "m", "n", "o"), compare the position of the knobs of your appliance with the appliance shown in the figure.
1 Installation
1.1 Unpacking. Remove all packaging parts.
1.2 Install the hob into the kitchen furniture. Always keep in mind the characteristics of the hob (1.2.1), as well as the dimensions of the kitchen furniture into which you will install the hob (1.2.2, 1.2.3). If you will not install an oven under the hob, you must place a protective panel according to the specified dimensions (1.2.4). Apply insulating material to the outer edges of the hob to ensure good sealing (1.2.5). Turn the hob over and place it in the cutout (1.2.6). Secure the hob to the kitchen furniture using the supplied brackets (1.2.7). Do not use materials that cannot be removed, such as silicone. 1.3. Electrical connection. The hob is supplied with a power cable.
- For the hob: a) dark blue, b) light blue, c) brown, d) red, e) yellow-green. (1.3.1)
- For 230V~ supply. (1.3.2)
- For 220-240V~ hob: see table. (1.3.3)
- Total power: hob 60 cm 6.8 kW, hob >60 cm 7.8 kW
| 220-240V~ | Вн. Нominьno Фазам |
| ПлITA 60 cm | 30 A |
| ПлITA >60 cm | 34 A |
- If the type of connection is 220-240V~, disconnect the cable and connect according to the diagrams (1.3.3, 1.3.4).
| 220-240V 3~ BH. HOMINHAN NO φa3am |
| ПлNTа 60 CM 14 A |
| ПлNTа >60 CM 16,5 A |
| 380-415V 3N~ BH. HOMINHAN NO φa3am |
| ПлNTа 60 CM 11 A |
| ПлNTа >60 CM 13 A |
| 380-415V 2N~ BH. HOMINHAN NO φa3am |
| ПлNTа 60 CM 16 A |
| ПлNTа >60 CM 19 A |
This appliance complies with European Directives 73/23/CEE and 89/336/CEE
Recommendation: Installation of the hob must be carried out by a specialist who will perform it in accordance with the instructions and diagrams of the manufacturer.
Use
If the hob is made of glass-ceramic, then cookware made of clay, copper, or stainless steel can be used. It is not recommended to use aluminum cookware, as it may leave marks on the glass surface of the hob.
2.1 Selection of cooking zones. You have several cooking zones at your disposal on which you can place cookware. Choose the most suitable one according to the size of the cookware. 2.2 Turning on the hob. Press and hold for 3 seconds the button ① to turn on the hob; the indicators of the different cooking zones will activate.
Note: To deactivate the child lock system, which prevents children from using the hob, press and hold for 3 seconds the button (2.13)
2.3 Selecting the hob. Turn on the hob on which you have placed the pan by pressing the corresponding key (2.3.1, 2.3.2). Press + (2.4.2).
Note: If you need to select a cooking zone for more than 5 seconds, the key must be pressed again; the hob will automatically turn off for safety reasons. 2.4 Selecting the power level. Set it by sliding your finger over the display (2.4.1) or by pressing + or - (2.4.2, 2.4.3).
SPECIAL HOB FUNCTIONS
2.5 Double hob, triple hob.
After selecting the power level, press , and the double hob will turn on (2.5.1., 2.5.3). If you press again (2.5.2) or (2.5.4), the triple hob will turn on. To turn off, press ( , , , , ).
2.6 Hob with booster. This hob you can
use for quick heating or together as a hob with booster.
Press to turn it on and press again to turn it off.
Recommendation: In models with halogen hobs, the surface is so hot that it is not recommended to look directly at the lit hob if there is no pan on it.
TIMER FUNCTIONS
2.7 Setting the time. After turning on the hob, the digits start flashing and then show the time 12.00 (2.7.1). Set the time by pressing the + key (2.7.2). Repeat this operation every time the hob is turned off, or when the power supply is interrupted.
To change the time, press and hold the key for 5 seconds (2.7.3). The digits will start flashing, and you will hear a beep. Correct the time using the + and - keys.
2.8 Selecting the cooking time
Model: As soon as the hob is turned on and the power level is selected, you have 5 seconds to press the key (2.8.1). Select the desired time by pressing the + or - keys (2.8.2). After five seconds, the time is set; you can see it, and on the programmed hob, a light indicator will appear (2.8.3). To change the time or see how much time is left, press the indicator of the programmed hob (2.8.4). To cancel
the program, press simultaneously the + key (2.8.5).
Mode: As soon as the hob is switched on and a power level is selected, press the + button on the timer. The display will show 00 and the symbol for each hob (2.8.6). Press the + button for the hob you want to program, then press the timer button (2.8.7). Select the time using the + button on the timer. (2.8.8). After five seconds, the time will be set, and you can alternately see the power level and the time on the programmed hob. When the time has elapsed, an audible signal sounds, and the timer button flashes 00. To cancel the program, press the - button on the hob and hold it until 00 appears.
Note: The timer switches off automatically if you select a time longer than 10 seconds.
Mode: As soon as the hob is switched on and a power level is selected, press the hob selection button again for the hob you want to program, and the symbol appears (2.8.11). Select the time using the + button (2.8.12) and set it, pressing the button of the hob being programmed again. (2.8.13). The power level is displayed as a dot, which means the hob is programmed. An audible signal and a symbol indicate that the time has finished (2.8.14). Press any button, and the audible signal stops.
Note: The timer switches off automatically if you select a time longer than 10 seconds.
Considerations regarding programming:
If the power level is 9, the maximum programming time should be 60 minutes. If the power level is lower, the maximum value can be 99 minutes.
When the time is up, an audible signal sounds, unless you press any button.
PROGRAMMING FUNCTIONS
2.9 Rapid heating. Quickly reaches the maximum temperature to automatically switch to the maintained cooking temperature.
Mode: Switch on the hob and select the maximum power level. Press the rapid heating button for the selected hob; the symbol appears (2.9.1). In the second row, there is a second scale to select the desired level; it is recommended that
The hob will switch off automatically after 6 seconds (2.9.2). After 6 seconds, rapid heating will be established and the power will be indicated alternately. As soon as the maximum temperature is reached, the digital display will disappear and the hob will continue to operate in normal mode. If you want to stop rapid heating, press the key of the programmed hob and select a new power level. Model dfghjklmo: Select the hob and switch it on to maximum power. To do this, press 1 until the symbol (2.9.3) appears. Adjust the power by pressing the recommended levels from 1 to 6 (2.9.4). After 6 seconds, rapid heating will be established and the power value will be displayed, followed by the current. (2.9.5). As soon as the maximum temperature is reached, the current display will disappear and the hob will continue to operate in normal mode. To stop operation, press the key of the programmed hob and select a new power level. 2.10 Cooking with the hob. Make sure that the hob you are going to switch on corresponds to the one you want to use. (2.10.1). Turn the switch in the desired direction and lock it in the operating position (2.10.2), which also shows residual heat when the hob is switched off. In models with a double hob or a hob with a heat source, turning the switch to the left regulates the left part of the hob, and turning the switch to the right regulates the right part (2.10.3). 2.11 Switching off the hob. Select power level 0 for the hob you want to turn off. 2.12 Residual heat. After use, the hobs remain hot for some time, depending on the selected power level. The symbol or current will appear on the still hot hobs. Do not touch these hobs to avoid burns. Warning: If the power supply is interrupted, after it is restored the indicator will not appear, although the hob will still be hot. Keep this in mind. 2.13 Child lock. To activate the child lock, press and hold the key for 3 seconds. The symbol will appear.
To activate the child lock, press and hold the key for 3 seconds. To deactivate the child lock, repeat these operations.
Recommendations:
- Use cookware with a flat bottom on the glass surface. Aluminum cookware is not recommended, as it may leave stains on the glass surface. Exclude aluminum cookware with a protective coating on the bottom, made of stainless steel. The heating zones should not operate if there is no cookware on them. - The cookware should be dry. Make sure that the diameter of the cookware is the same as the diameter of the hob you intend to use. Place the cookware in the center of the hob. - Try not to move the cookware, as scratches may remain on the glass. - Use the appliance exclusively for cooking. Do not use it as a work surface. Do not pour cold water directly onto the hob if it is in a heated state.
The flashing of the hob zones does not mean that an accident has occurred. The zones are controlled for more or less long periods, either switched on or off depending on the selected power level.
Cleaning

Do not use a steam cleaner. - Clean the surface of your hob regularly, when it has cooled down. Do not use abrasive products or cleaning pads of the same type. Clean with a damp cloth and soapy water. (3.1.1). Once a week, carry out a thorough cleaning using special products for glass-ceramic hobs. We recommend the product BIPRO-KLEN for cleaning to maintain the glass-ceramic plate.
Heavy dirt can be removed with a glass scraper (3.1.2). - If, due to carelessness, sugar, sugary products, or plastic items burn onto the hot surface of the hob, remove them as quickly as possible with the scraper while the hob surface is still hot. If this is not done, the stains may remain forever.
Safety

The power supply network supplying the hob must be equipped with a single-pole circuit breaker, the contacts of which must be at least 3 mm apart. - The installation of the hob must be carried out by a specialist who will do it in accordance with the manufacturer's instructions and diagrams. - The installation must be carried out taking into account the maximum power indicated on the rating plate, and the socket must be earthed. - If the cable is damaged, it must be replaced during operation or after sale by any qualified specialist to avoid danger. - The hob is equipped with an internal temperature limiter which switches off the hob if it overheats. - After each use, switch off the hob using the switch. - If the glass surface of the hob shows cracks or breaks, immediately disconnect the appliance from the power supply to avoid electric shock. Do not use the hob until its glass surface has been replaced (4.1.1). In case of a malfunction, the control panel switches off, emitting an audible signal (4.1.2). - If you press any of the sensors for a long time or if any object activates the sensors, the hob switches off, emitting an audible signal (4.1.3).
Do not place cookware with a heated bottom on the sensors, as you may burn yourself when pressing them (4.1.3). Do not allow small children near the hot hob, as the surfaces of the hobs can become very hot during operation. Use the blocking system so that children cannot play with the switches. - This appliance is not intended for use by persons with limited capabilities. Always stay nearby during cooking when using fat or oil. Excessive heat can cause them to ignite. - If the hob is installed above any drawer, flammable objects must not be stored in it.
Environment

The hob is designed with consideration for the preservation of the environment.
Using the residual heat to warm the surroundings. Using the power corresponding to each burner, select a pot whose size corresponds to the amount of food you intend to cook. When the pot and the burner zone match in size, the cooking process is optimal. After cooking, if you wish, you can leave the pot in the same place to use the residual accumulated heat. In this way, you save electrical energy.
Use the lid whenever possible to reduce heat loss due to radiation.
Disposal of used electrical and electronic appliances.
Do not mix used appliances with ordinary household waste.
Take your appliance to a special collection point. Recycling of electrical goods helps to avoid negative effects on health and the environment and allows saving electrical energy and resources. For more detailed information, contact local authorities or the store where the appliance was purchased.

2.4 all
(2.4.2,2.4.3) -1/2 (2.4.1)
∴ S ΔOBC = S ΔCOD + SΔBOC
. 25
gall
a
2.5.1,2.5.3
(2.5.4) (2.5.2)
Jia jia jiall. a jilai jj
(,,),
2xy = 4
i j 10
Lgai 10
j
:
10 gallons, 1 year. (2.8.3)
(2.8.4)
(3.1.1)
15
a
(3.1.2)
a 1
∴ S ΔOBC = S ΔCOD + SΔBOC
j 1
∴ a 1 = 1,b 2 = 9
a
. solly
all
.
Juslll Jusil, Cio galeall no jol
LgEgill gll
Instruction manual
- IDENTIFICATION
- INSTALLATION
- USE
- SPECIAL ELEMENTS
- TIMER FUNCTIONS
- PROGRAMMING FUNCTIONS
- RECOMMENDATIONS
- MAINTENANCE AND CLEANING
- SAFETY
- ENVIRONMENT
- THE HOB HAS BEEN DESIGNED WITH PROTECTION OF THE ENVIRONMENT IN MIND
- ELECTRICAL AND ELECTRONIC APPLIANCE WASTE MANAGEMENT
- BEDIENUNGSANLEITUNG
- SPECIAL HOB FUNCTIONS
- SELECTING THE COOKING TIME
- CLEANING
- THE HOB IS DESIGNED WITH CONSIDERATION FOR THE PRESERVATION OF THE ENVIRONMENT
- DISPOSAL OF USED ELECTRICAL AND ELECTRONIC APPLIANCES
- INSTRUCTION MANUAL
Brand : FAGOR
Model : 2VFT320S
Category : Cooker