PianoCraft MCRE810 - Audio System YAMAHA - Free user manual and instructions
Find the device manual for free PianoCraft MCRE810 YAMAHA in PDF.
| Product Type | Audio system with amplifier-tuner and DVD player |
| Dimensions (amplifier-tuner RX-E810) | 215 x 108 x 363 mm |
| Dimensions (DVD player DVD-E810) | 215 x 108 x 330 mm |
| Weight (amplifier-tuner) | 5.7 kg |
| Weight (DVD player) | 2.3 kg |
| Power supply (European model) | AC 230 V, 50 Hz |
| Power consumption (amplifier-tuner) | 130 W (max), 0.1 W in standby |
| Power consumption (DVD player) | Approx. 12 W, <1.0 W in standby |
| Audio output power | 2 x 65 W (6 Ω, 1 kHz, 1% THD) |
| Supported formats | DVD, VCD, SVCD, CD, MP3, WMA, JPEG, DivX |
| Main functions | DVD player, amplifier-tuner, FM/AM tuner (40 stations), iPod dock, Pure Direct, timers, component/S-Video/SCART video outputs |
| Care and cleaning | Clean with a dry, clean cloth. Do not use chemical solvents. |
| Safety | Do not expose to rain or moisture. Use the prescribed voltage. Do not open the casing. |
| Spare parts and repairability | Consult an authorized YAMAHA service. Do not attempt to repair yourself. |
| Laser type | GaAlAs semiconductor laser, 650 nm (DVD) / 780 nm (VCD/CD), 7 mW / 10 mW |
Frequently Asked Questions - PianoCraft MCRE810 YAMAHA
User questions about PianoCraft MCRE810 YAMAHA
0 question about this device. Answer the ones you know or ask your own.
Ask a new question about this device
Download the instructions for your Audio System in PDF format for free! Find your manual PianoCraft MCRE810 - YAMAHA and take your electronic device back in hand. On this page are published all the documents necessary for the use of your device. PianoCraft MCRE810 by YAMAHA.
USER MANUAL PianoCraft MCRE810 YAMAHA
micro component system
PIANOCRAFT
OWNER'S MANUAL
MODE D'EMPLOI
CLASS 1 LASER PRODUCT
LASER KLASSE 1 PRODUKT
LUOKAN 1 LASERLAITE
KCLASS 1 LASER APPARAT
PRODUIT LASER DE CLASSE
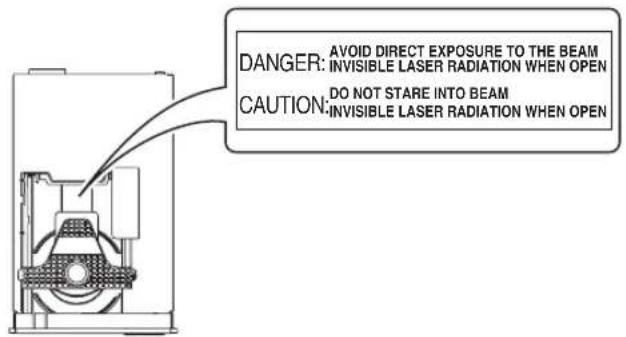
CAUTION VISIBLE AND INAVAILABLE LASER RADIATION
WHEN OPEN. AVOID EXPOSURE TO BEAM.
ADVARSEL SYNLIG OG USYNLIG LASERSTRÄLING
VED ÅBNING. UNDGÅ UDSÄETALSE FOR STRÄLING.
ADVARSEL SYNLIG OG USYNLIG LASERSTRÄLING
När DEKSEL ÅPNES. UNNGÅ EKSPONERING FOR STRÄLEN.
VARNING SYNLIG OCH OSYNLIG LASERSTRÄLNING
När DENNA DEL ÅR ÖPPNAD. BETRAKTA EJ STRÄLEN.
VARO! AVATTAESSA OLET ALTIINA NAKYVILLE JA
NAKYMÄTTÖMÄLLE LASER SÄTEILYLLE. ALÄ KATSO SÄTEESEEN.
VORSICT SICHTBARE UND UNSICHTBARE
LASERSTRAHLUNG WENN ABDECKUNG GEÖFFNET. NICHT DEM STRAHL AUSSETSEN.
DANGER VISIBLE AND INAVAILABLE LASER RADIATION
WHEN OPEN. AVOID DIRECT EXPOSURE TO BEAM.
ATTENTION RAYONNEMENT LASER VISIBLE ET
INAVAILABLE EN CAS D'OUVERTURE. EXPOSITION
DANGEREUSE AU FAISCEAU.
LASER
Type Semiconductor laser GaAlAs
Wave length 650nm (DVD)
780nm (VCD/CD)
Output Power 7mW (DVD)
10mW (VCD/CD)
Beam divergence 60 degrees
CAUTION
Use of controls or adjustments or performance of procedures other than those specified herein may result in hazardous radiation exposure.
LASER
- Other components, as they may cause damage and/or discoloration on the surface of this unit.
- Burning objects (i.e. candles), as they may cause fire, damage to this unit, and/or personal injury.
- Containers with liquid in them, as they may fall and liquid may cause electrical shock to the user and/or damage to this unit.
1 To assure the finest performance, please read this manual carefully. Keep it in a safe place for future reference.
2 Install this unit (RX-E810 and DVD-E810) in a well ventilated, cool, dry, clean place with at least 10cm on the top (2.5cm for DVD-E810), 10cm on the left and right, and 10cm at the back of this unit — away from direct sunlight, heat sources, vibration, dust, moisture, and/or cold.
3. Locate this unit away from other electrical appliances, motors, or transformers to avoid humming sounds.
4 Do not expose this unit to sudden temperature changes from cold to hot, and do not locate this unit in an environment with high humidity (i.e. a room with a humidifier) to prevent condensation inside this unit, which may cause an electrical shock, fire, damage to this unit, and/or personal injury.
5 Avoid installing this unit where foreign object may fall onto this unit and/or this unit may be exposed to liquid dripping or splashing. On the top of this unit, do not place:
6 Do not cover this unit with a newspaper, tablecloth, curtain, etc. in order not to obstruct heat radiation. If the temperature inside this unit rises, it may cause fire, damage to this unit, and/or personal injury.
7 Do not plug in this unit to a wall outlet until all connections are complete.
8 Do not operate this unit upside-down. It may overheat, possibly causing damage.
9 Do not use force on switches, knobs and/or cords.
10 When disconnecting the power cable from the wall outlet, grasp the plug; do not pull the cable.
11 Do not clean this unit with chemical solvents; this might damage the finish. Use a clean, dry cloth.
12 Only voltage specified on this unit must be used. Using this unit with a higher voltage than specified is dangerous and may cause fire, damage to this unit, and/or personal injury. YAMAHA will not be held responsible for any damage resulting from use of this unit with a voltage other than specified.
13 Do not attempt to modify or fix this unit. Contact qualified YAMAHA service personnel when any service is needed. The cabinet should never be opened for any reasons.
14 When not planning to use this unit for long periods of time (i.e. vacation), disconnect the AC power plug from the wall outlet.
15 Be sure to read the "Troubleshooting" section on common operating errors before concluding that this unit is faulty.
16 Before moving this unit, press STANDBY/ON to set this unit in standby mode, and disconnect the AC power plug from the wall outlet.
17 Condensation will form when the surrounding temperature changes suddenly. Disconnect the power cable from the outlet, then leave the unit alone.
18 When using the unit for a long time, the unit may become warm. Turn the power off, then leave the unit alone for cooling.
19 Install this unit near the wall outlet and where the AC power plug can be reached easily.
This unit is not disconnected from the AC power source as long as it is connected to the wall outlet, even if this unit itself is turned off. This state is called the standby mode. In this state, this unit is designed to consume a very small quantity of power.
DANGER
When this unit is plugged to the wall outlet, do not place your eyes close to the opening of the disc tray and other openings to look into inside.
The laser component in this product is capable of emitting radiation exceeding the limit for Class 1.
WARNING
TO REDUCE THE RISK OF FIRE OR ELECTRIC SHOCK, DO NOT EXPOSE THIS APPLIANCE TO RAIN OR MOISTURE.
For U.K. customers
If the socket outlets in the home are not suitable for the plug supplied with this appliance, it should be cut off and an appropriate 3 pin plug fitted. For details, refer to the instructions described below.
Note
The plug severed from the mains lead must be destroyed, as a plug with bared flexible cord is hazardous if engaged in a live socket outlet.
Special Instructions for U.K. Model
IMPORTANT
THE WIRES IN MAINS LEAD ARE COLOURED IN ACCORDANCE WITH THE FOLLOWING CODE:
Bluc: NEUTRAL
Brown: LIVE
As the colours of the wires in the mains lead of this apparatus may not correspond with the coloured markings identifying the terminals in your plug, proceed as follows: The wire which is coloured BLUE must be connected to the terminal which is marked with the letter N or coloured BLACK. The wire which is coloured BROWN must be connected to the terminal which is marked with the letter L or coloured RED.
Making sure that neither core is connected to the earth terminal of the three pin plug.
Contents
INTRODUCTION
Features 2
Supplied Accessories 2
Controls and Functions. 3
Receiver (RX-E810) 3
DVD player (DVD-E810). 6
Remote control. 8
PREPARATION
Connecting the System 12
Connecting a TV. 14
Connecting Antennas 15
Connecting the AM loop antenna. 15
Connecting the FM antenna. 15
Connecting External Components 16
Connecting an MD player or a tape deck 16
Connecting an MD recorder or a CD recorder 16
Connecting a YAMAHA iPod universal dock 17
Connecting the Power Cables. 18
Setting the System. 19
Step1:Turn on the power and select the DVD input 19
Step 2: Adjust the clock. 19
Step 3: Set the aspect ratio. 20
Step 4: Set the OSD language. 20
Step 5: Set the default audio, subtitle, and disc menu languages 21
BASIC OPERATIONS
Basic Receiver Operations 22
Changing the front panel display settings. 23
Supported Disc Types. 24
Basic DiscPlayback Operations. 25
Repeating disc playback (Repeat Play) 26
Playing back randomly (Shuffle Play) 26
Specifying an elapsed time for playback (Time Search) 27
Specifying a preview picture for playback (Scan Search). 28
Customizing playback order (Program Play) 29
Selecting audio and subtitle languages/ audio channel settings. 30
Zooming the picture 30
Selecting a viewing angle 31
Operating the disc menu 31
Playing back MP3/WMA/JPEG/DivX discs 32
Viewing or changing playback settings on the TV (OSD menu) 34
Restricting DiscPlayback 35
Setting the parental control level 35
Locking a disc. 36
Changing the password.. 36
TUNER OPERATIONS
FM/AM Tuning 37
Automatic tuning 37
Manual tuning. 37
Automatic preset tuning. 38
Manual preset tuning 39
Selecting preset stations. 39
Radio Data System Tuning (U.K. and Europe Models Only) 40
Selecting the Radio Data System program 40
Displaying the Radio Data System information .... 41
OTHER OPERATIONS
Setting the Timer. 43
Setting the clock timer. 43
Setting the sleep timer 44
Setting the auto-standby mode. 45
Controlling External Components. 46
Available operations 46
Setting remote control codes 48
Using iPod 49
Configuring the DVD Player Settings (Setup Menu) 51
Setup menu items. 52
Resetting the DVD player settings 56
ADDITIONAL INFORMATION
Language Codes 57
Troubleshooting 58
Receiver (RX-E810) 58
DVD player (DVD-E810). 61
Remote control 62
Notes on Discs 63
Disc information 63
Handling a disc 64
Glossary 65
Audio information 65
Video information. 66
Copyright and logo marks 66
Specifications 67
Features
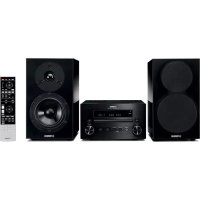
Receiver (RX-E810)
Maximum RMS output power per channel 65W + 65W (6 Ω, 1 kHz, 1%THD)
- 40-station FM/AM preset tuning
- iPod dock terminal
Pure Direct mode
DVD player (DVD-E810)
- Plays DVDs, Video CDs, Audio CDs, MP3 CDs, WMA CDs, DivX CDs and JPEG CDs.
- Progressive-scan video output
- Optical and coaxial digital output jacks
About this manual
- In this manual, "RX-E810" is described as "receiver" and "DVD-E810" is described as "DVD player".
This manual describes how to operate the system using a remote control except when it is not available. Some of these operations are also available using the front panel buttons. - Remote control descriptions and illustrations in this manual are based on the U.K. and Europe models unless otherwise specified.
indicates a tip for your operation. - Notes contain important information about safety and operating instructions.
This manual is printed prior to production. Design and specifications are subject to change in part as a result of improvements, etc. In case of differences between the manual and the product, the product has priority.
Supplied Accessories
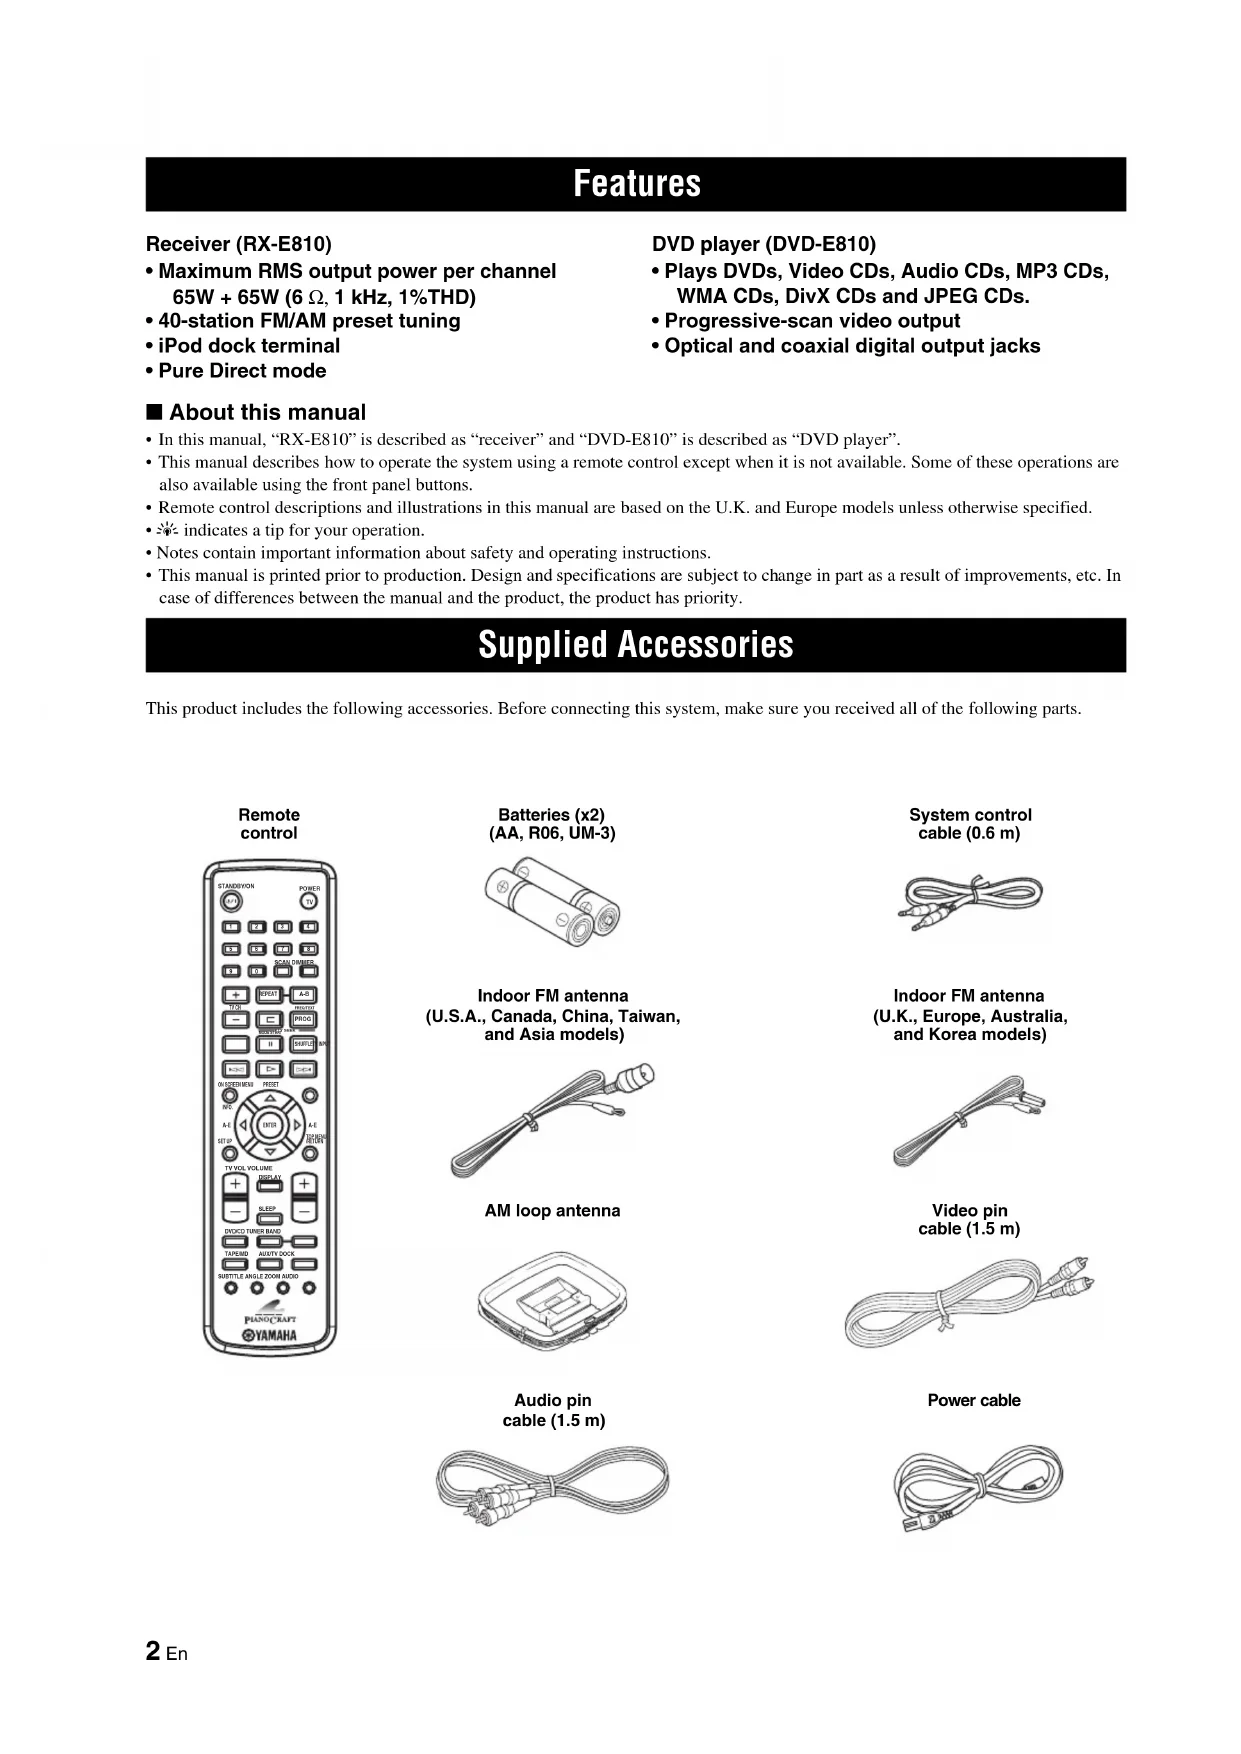
This product includes the following accessories. Before connecting this system, make sure you received all of the following parts.
Remote control

Batteries (x2) (AA, R06, UM-3)

System control cable (0.6m)

Indoor FM antenna (U.S.A., Canada, China, Taiwan, and Asia models)

Indoor FM antenna (U.K., Europe, Australia, and Korea models)

AM loop antenna

Video pin cable (1.5 m)

Audio pin cable (1.5 m)

Power cable
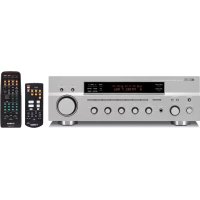
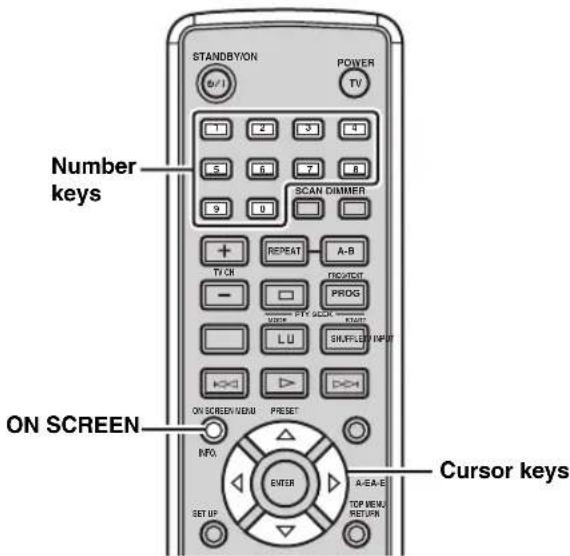
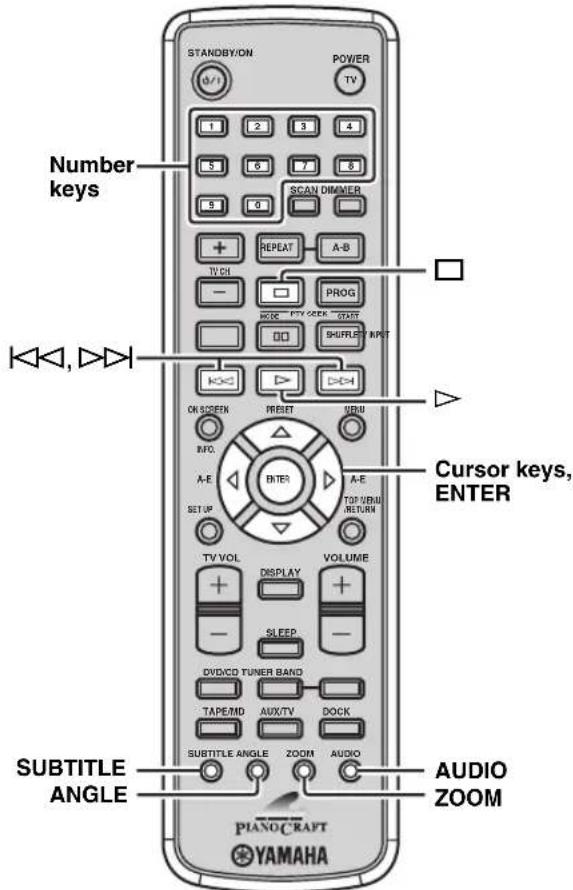
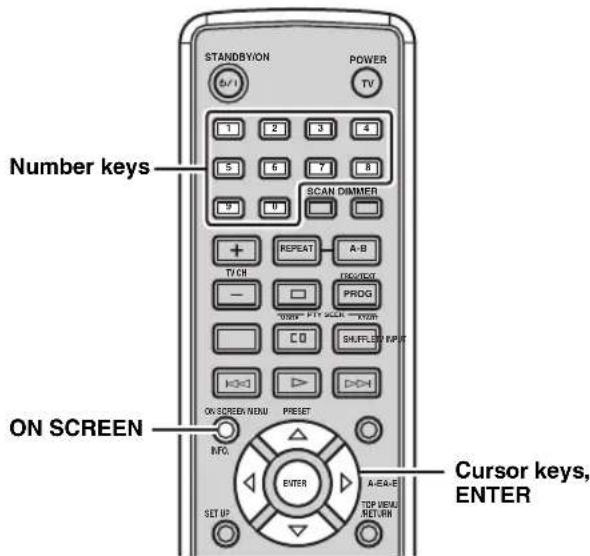
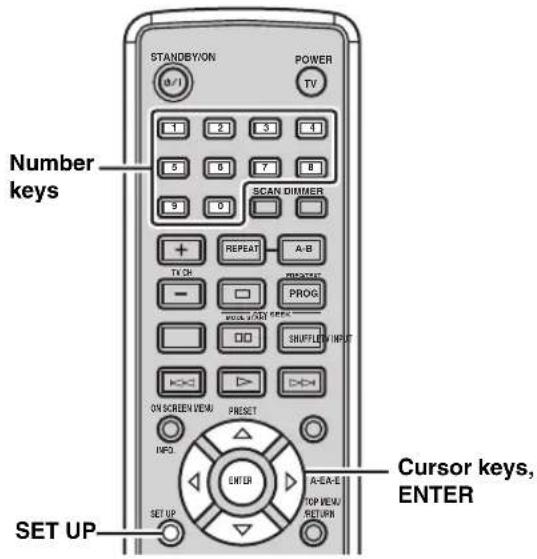
Controls and Functions
Receiver (RX-E810)
Front panel
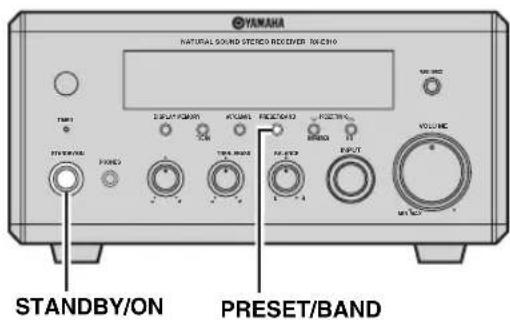
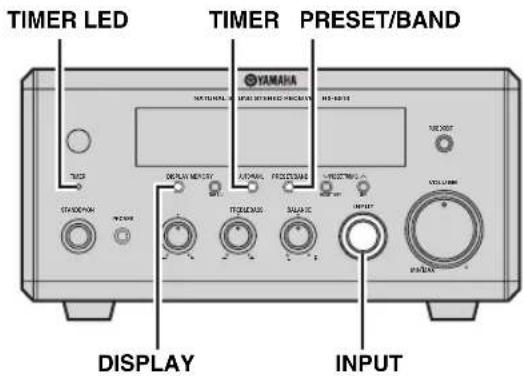
①STANDBY/ON
Turns the receiver on or sets it to the standby mode (see page 19).
② Remote control sensor
Receives signals from the remote control.
③DISPLAY
Switches the information shown in the front panel display (see page 23).
④Front panel display
Shows the various infomaiton such as the clock time or the tuning frequency.
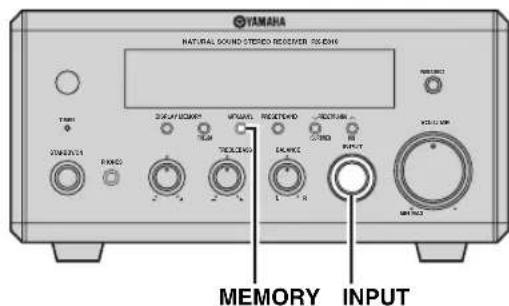
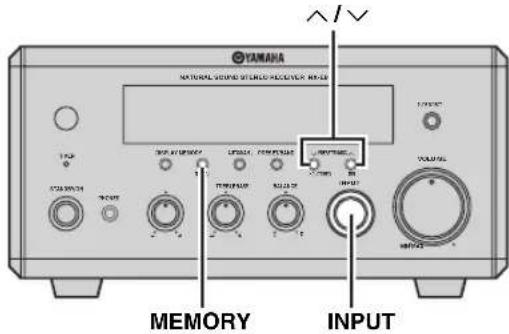
⑤MEMORY (TIME ADJ)
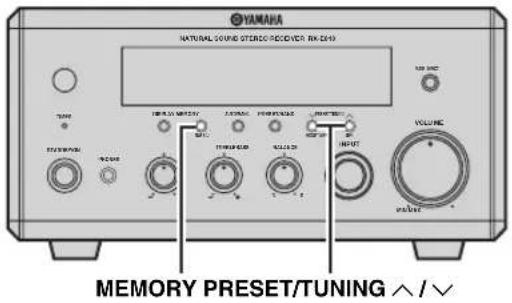
Stores a preset station in the memory. Hold down this key for more than 2 seconds to preset radio stations automatically (see page 38).
- Sets the clock before using the timer function (see page 19).
⑥ AUTO/MAN'L (TIMER)
- Switches between Auto Tuning mode and Manual Tuning mode when tuner is selected as an input source (see page 37).
Turns the clock timer function on or off (see page 43).
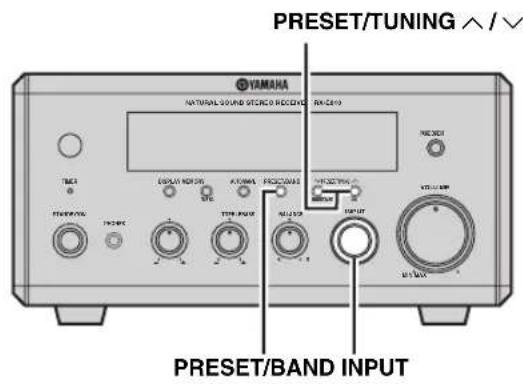
⑦PRESET/BAND
Switches between FM, AM, and the preset mode when tuned is selected as an input source.
⑧ PRESET/TUNING I (HOUR, MIN)
Selects a tuning frequency when tuner is selected as an input source.
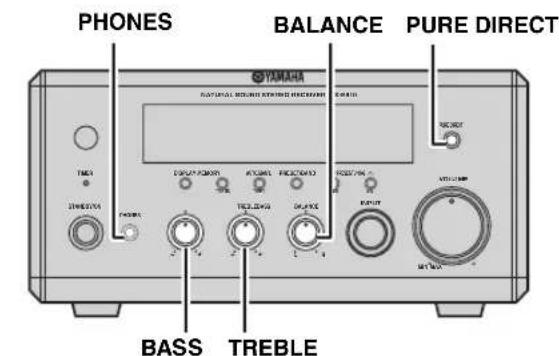
PURE DIRECT
Turns on or off the Pure Direct mode (see page 22).
⑩ TIMER LED
Lights up when the clock timer is on (see page 43).
PHONES
Outputs audio signals for private listening with headphones.
BASS
Adjusts the low frequency response (see page 22).
13TREBLE
Adjusts the high frequency response (see page 22).
14BALANCE
Adjusts the volume level of each left and right speaker channel (see page 22).
15INPUT
Selects an input source.
16VOLUME
Adjusts the volume level.
Rear panel
①DOCK terminal
Use to connect a YAMAHA iPod universal dock (such as YDS-10 sold separately) where your iPod can be stationed (see page 17).
② Antenna terminals
See page 15 for connection information.
③Speaker terminals
See page 13 for connection information.
④ DVD/CDjacks
See page 12 for connection information.
⑤TAPE/MD IN/OUT jacks
See page 16 for connection information.
AUXjacks
Use to connect the external components.
⑦SUBWOOFER OUT jack
Use to connect the subwoofer.
System connector (TO DVD-E810) jack
See page 12 for connection information.
AC OUTLET(S)
See page 18 for connection information.
■ Front panel display

①SLEEP indicator
Lights up when the sleep timer is on (see page 44).
② PRESETindicator
Lights up when you preset radio stations manually (see page 39).
③STEREO indicator
Lights up when the receiver is receiving a strong signal from an FM stereo broadcast.
④ AUTO indicator
Lights up when the receiver is in the Auto Tuning mode (see page 38).
⑤DOCK indicator
Lights up when you station your iPod in a YAMAHA iPod universal dock (such as YDS-10 sold separately) connected to the DOCK terminal of the receiver (see page 17).
⑥SHUFFLE indicator
Lights up when you set your iPod in shuffle mode.
⑦REPEAT indicator
Lights up when you set your iPod in repeat mode.
^8 Radio Data System indicators (U.K. and Europe models only)
The name of the Radio Data System data offered by the currently received Radio Data System station lights up.
PTY HOLD indicator
Lights up when the receiver is searching for the Radio Data System stations in the PTY SEEK mode (see page 40).
Multi-information display
Shows the various infomaiton such as the clock time or the tuning frequency.
10 TIMER indicator
Flashes when the receiver is in the clock timer setting mode (see page 43).
TUNED indicator
Lights up when the receiver is tuned into a station.
⑫MEMORY indicator
Lights up or flashes when you preset radio stations.
iPod menu indicators
Light up the iPod menu currently selected (see page 49).
iPod operation indicators
Show operable cursor keys when operating the iPod menu with the menu browse mode (see page 49).
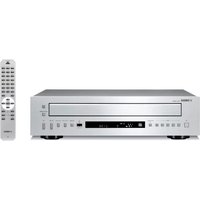
DVD player (DVD-E810)
■ Front panel
①Disc tray
Holds a disc to be played back.


Opens and closes the disc tray.

Stops playback (see page 25).

Starts or pauses playback (see page 25).
⑤STANDBY/ON
Turns the DVD player on or sets it to the standby mode (see page 22).
⑥PROGRESSIVE indicator
Lights up when the progressive scan mode is on (see page 54).
⑦Front panel display
Shows the current status of the DVD player.
Remote control sensor
Receives signals from the remote control.

Skipping to the beginning of the current chapter/track. Press and hold to fast reverse (see page 25).

Skipping to the next chapter/track. Press and hold to fast forward (see page 25).
Rear panel
① AV terminal (U.K. and Europe models only)
See page 14 for connection information.
②SVIDEO jack
See page 14 for connection information.
③VIDEO jack
See page 14 for connection information.
④COMPONENT jacks
See page 14 for connection information.
⑤COAXIAL jack
See page 16 for connection information.
⑥ OPTICAL jack
See page 16 for connection information.
⑦ AUDIO OUT jacks
See page 12 for connection information.
System connector (TO RX-E810) jack
See page 12 for connection information.
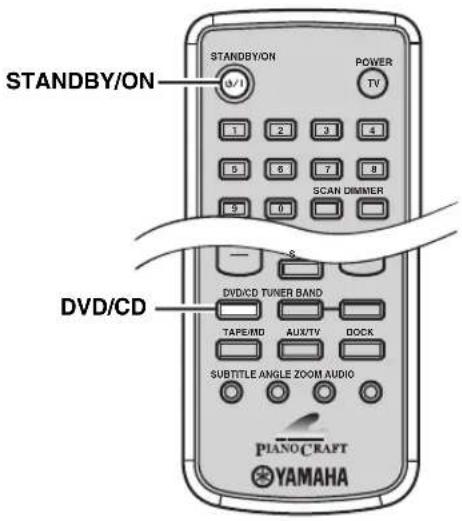
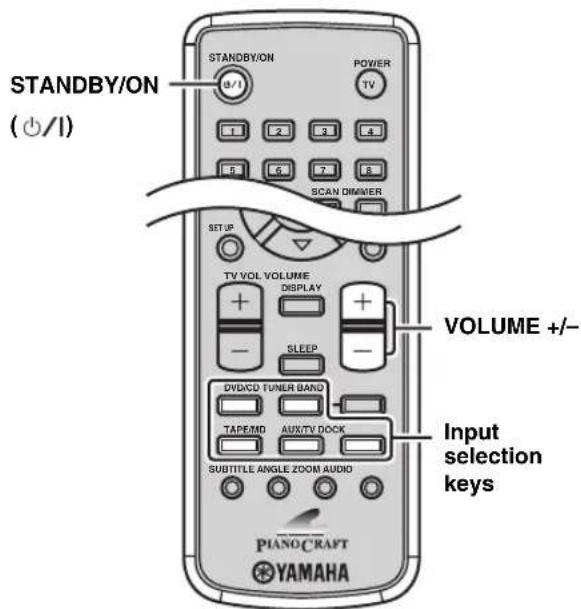
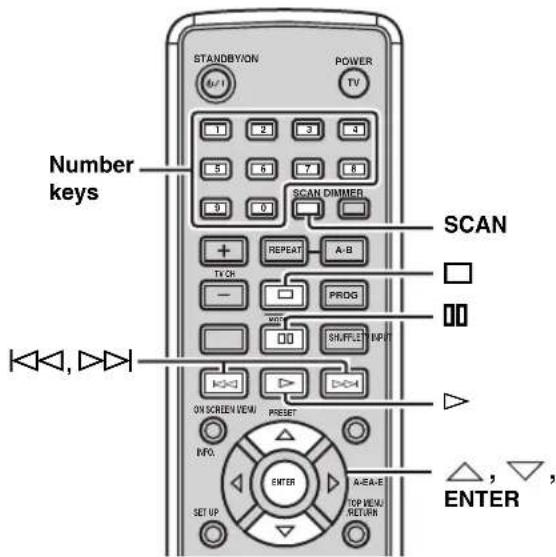
Remote control
Common functions
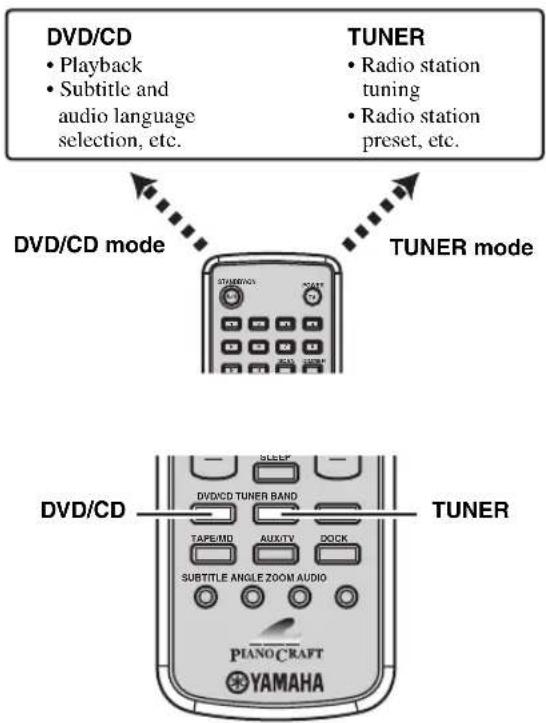
This remote control has two main operation modes to control this system. Before operating functions in each mode, you need to select a mode to change the remote control key assignments.
To switch the operation mode
DVD/CD mode: Press DVD/CD.
TUNER mode: Press TUNER.
#
You can also operate the TV and other components (such as an iPod) connected to the receiver using the remote control. For details, see "Controlling External Components" on page 46.
Note
Remote control descriptions and illustrations in this manual are based on the U.K. and Europe models unless otherwise specified.
Operations common to all modes
The following operations are available for the receiver when the remote control is in any operation modes.
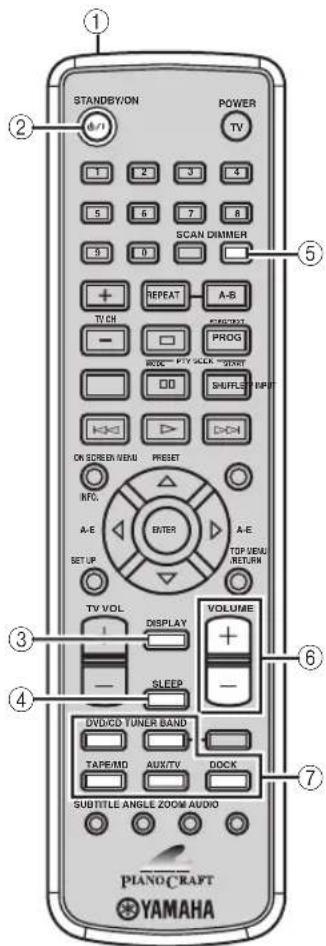
① Infrared signal transmitter
Sends signals to the component you want to control.
②STANDBY/ON()/1
Turns the receiver on or sets it to the standby mode (see page 19).
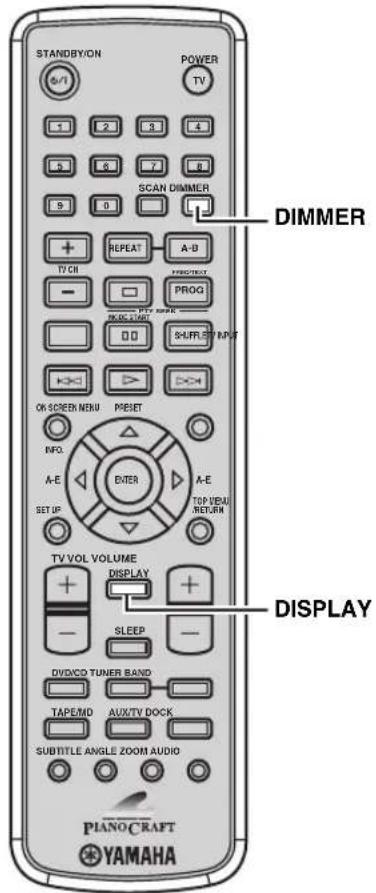
③DISPLAY
Switches the information shown in the front panel display (see page 23).
④SLEEP
Sets the sleep timer on the receiver (see page 44).
⑤ DIMMER
Changes the brightness of the receiver's front panel display (see page 23).
⑥VOLUME+/-
Adjusts the overall volume level on the receiver.
⑦Input selection keys
Select the input source on the receiver.
中
STANDBY/ON, DIMMER and SLEEP operations also control the DVD player when the DVD player is connected to the receiver with the supplied system control cable (see page 12).
DVD/CD mode
Operations available in DVD/CD mode
The following operations are available for the DVD player.
中
Press DVD/CD to set the remote control to the DVD/CD mode before carrying out the following operations.
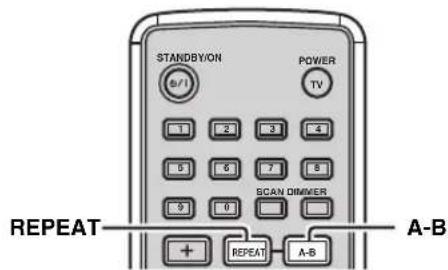
①REPEAT
Selects the Repeat Play mode (see page 26).
②
Stops playback (see page 25).
③
Pauses playback (see page 25).
(4)
Starts playback (see page 25).
⑤,
Skipping to the beginning of the current chapter/track or next chapter/track. Press and hold to fast reverse or fast forward (see page 25).
⑥ON SCREEN (INFO.)
Displays the OSD menu on the TV screen or switches the time display of CDs (see page 34).
⑦SETUP
Displays the setup menu on the TV screen (see page 51).
SUBTITLE
Selects the subtitle language (see page 30).
⑨ ANGLE
Selects a viewing angle (see page 31).
Number keys (1 to 9, 0)
Input numerals to specify parameters or chapter/track numbers.
SCAN
Previews the content of a DVD or VCD (see page 28) or plays back the first few seconds of each track on a CD (see page 25).
12A-B
Repeats a specified section within a chapter/track (see page 26).
PROG
Displays the program list used for the Program Play feature (see page 29).
④SHUFFLE
Turns on/off the Shuffle Play feature (see page 26).
15.MENU
Displays the DVD menu (see page 31) or PBC menu of a VCD (see page 31).
⑥TOP MENU/RETURN
Returns to the top of the DVD menu (see page 31) or to the previous PBC menu (see page 31). Press and hold to return to the previous DVD menu.
⑦ Cursor keys ( /\$ENTER
Selects an item in the menu screen or specify the selected parameter.
⑱AUDIO
Selects the audio language (see page 30).
19ZOOM
Zooms in a specified part of picture (see page 30).
TUNER mode Operations available in TUNER mode
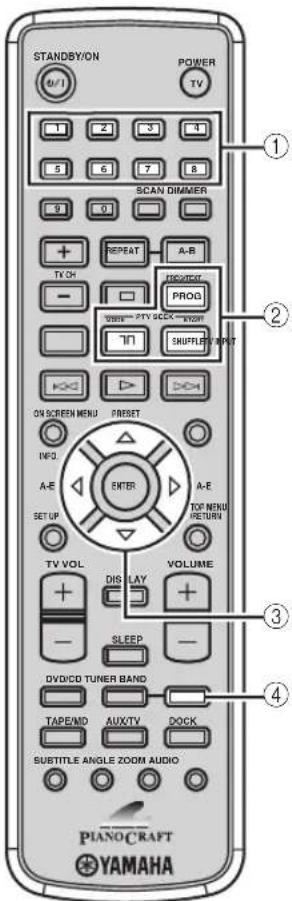
The following operations are available for the receiver.
中
Press TUNER to set the remote contol to the TUNER mode before carrying out the following operations.
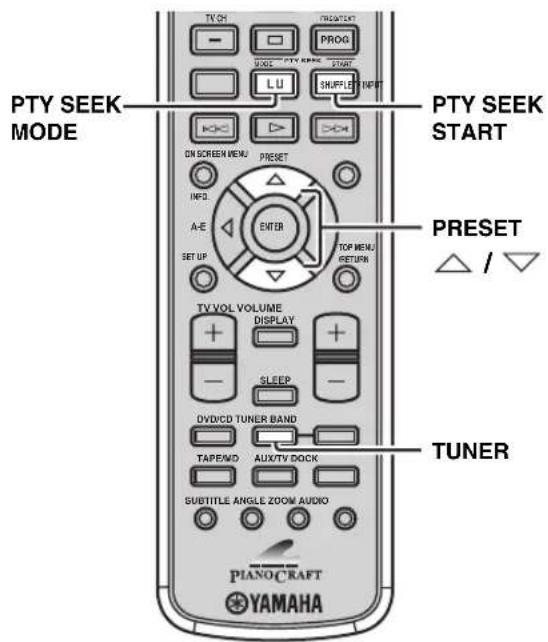
①Number keys (1 to 8)
Selects preset station number (see page 39).
② Radio Data System tuning keys (U.K. and Europe models only)
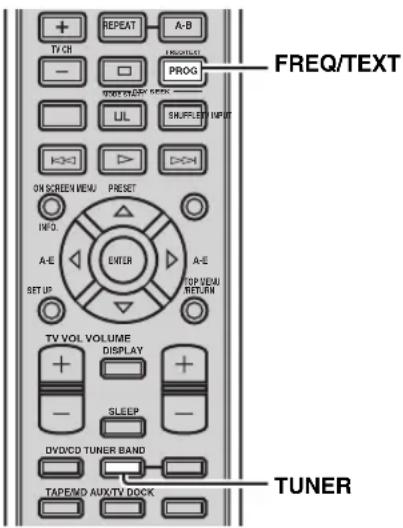
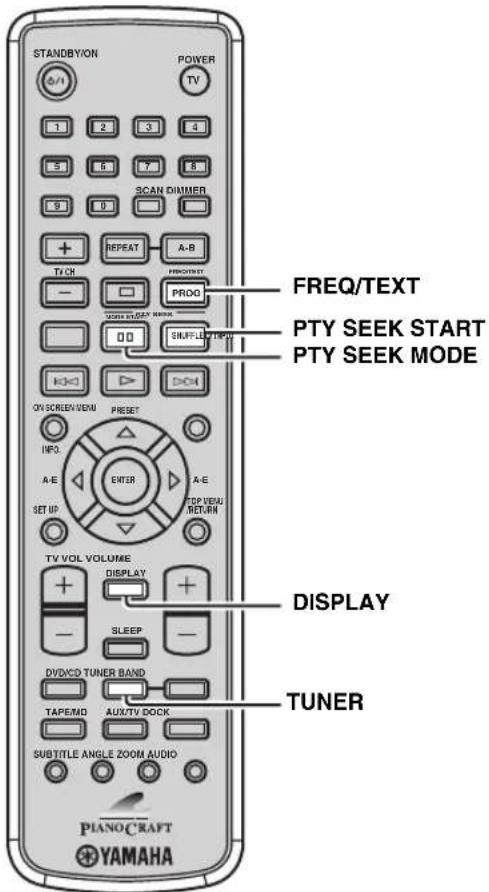
FREQ/TEXT
Switches the Radio Data System display between the PS mode, PTY mode, RT mode, CT mode (if the station offers the corresponding data services) and the frequency display (see page 41).
PTY SEEK MODE
Sets the receiver to the PTY SEEK mode (see page 40).
PTY SEEK START
Starts searching for a station once the desired program type is selected in the PTY SEEK mode (see page 40).
A-EI,PRESET△I
Press A-E to select a preset station group (A to E) and PRESET to select a preset station number (1 to 8) (see page 39).
④BAND
Switches the radio reception mode between FM, AM and the preset mode.
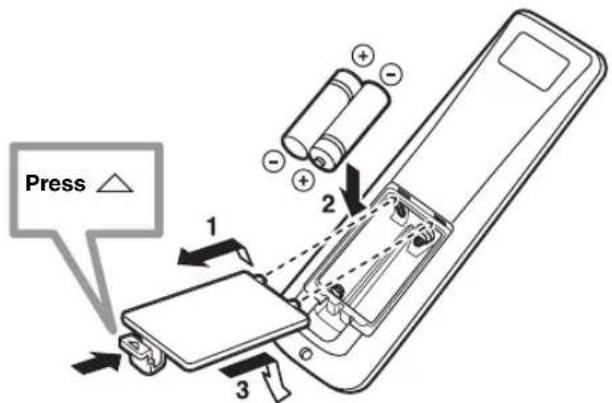
■ Installing the batteries in the remote control
1 Press the mark on the battery cover and open the cover.
2 Insert the two supplied batteries (AA, R06, UM-3) into the battery compartment.
Make sure you insert the batteries according to the polarity markings (+ and -) .
3 Close the battery cover.
Notes
- Do not use an old battery together with new one.
- Do not use different types of batteries (for example, alkaline and manganese) together. Each type of battery has its own characteristics even if they are similar in shape.
- If the batteries run out, immediately remove them from the remote control to prevent an explosion or acid leak.
- Dispose of the batteries according to the regional regulations.
- If a battery starts leaking, dispose of it immediately. Be careful not to let leaking battery acid come into contact with your skin or clothing. Before inserting new batteries, wipe the compartment clean.
- Replace the batteries within two minutes to preserve the memory in the remote control.
Using the remote control
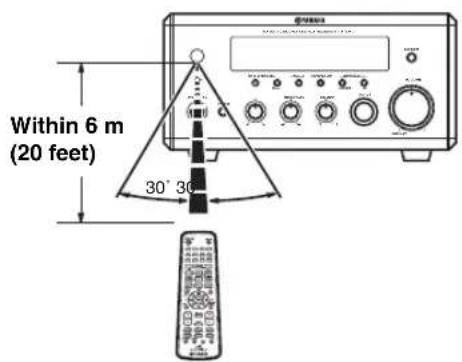
Use the remote control within 6m (20 feet) of the component you want to control and point it toward its remote control sensor (see pages 3 and 6).
Notes
- Be careful not to spill liquid on the remote control.
- Be careful not to drop the remote control.
- Do not leave the remote control in the following places:
- hot or humid places, such as near a heater or in a bathroom
- extremely cold places
-dustyplaces
Connecting the System
Make sure you read the following procedure and notes carefully before connecting the system. For information on the speakers (NX-E800), refer to the owner's manual supplied with it.
Note
Do not connect the power cable of the receiver, DVD player, or other components to the wall outlet until all cable connections are completed.

① Connect the DVD/CD (L/R) jacks of the receiver to the AUDIO OUT (L/R) jacks of the DVD player using the supplied audio pin cable.
② Connect the system connector (TO DVD-E810) jack of the receiver to the system connector (TO RX-E810) jack of the DVD player using the supplied system control cable.
③ Connect the speaker terminals (L) of the receiver to the speaker terminals of the left speaker and the speaker terminals (R) of the receiver to the speaker terminals of the right speaker using the speaker cables supplied with the speaker set (NX-E800). See page 13 for details.
#
The system control connection is used to synchronize the specific operations between the receiver and the DVD player.
- If you want to connect an amplifier with a digital input instead of the RX-E810, use the DIGITAL OUT (COAXIAL or OPTICAL) jacks of the DVD player and configure the "DIGITAL OUTPUT" setting in the setup menu (see page 52).
- Connecting the speaker cable
Notes
- Be sure to connect the left channel (L), right channel (R), “+” (red) and “-” (black) properly. If the connections are faulty, no sound will be heard from the speakers, and if the polarity of the speaker connections is incorrect, the sound will be unnatural and lack bass.
- Do not let the bare speaker wires touch each other or do not let them touch any metal part of the receiver. This could damage the receiver and/or the speakers.
- When connecting another speaker set instead of the NX-E800, be sure to use speakers with the specified impedance shown on the rear panel of the receiver and magnetically shielded. In case the magnetically shielded speakers interfere with the monitor, place the speakers away from the monitor.
1 Remove approximately 10mm (3/8 in) of insulation from the end of each speaker cable and then twist the exposed wires of the cable together to prevent short circuits.

2 Unscrew the knob.

Red: positive (+) Black: negative (-)
3 Insert the bare wire into the terminal.
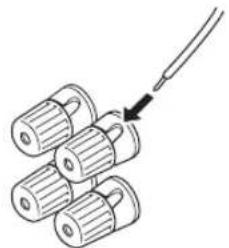
Red: positive (+) Black: negative (-)
4 Tighten the knob to secure the wire.
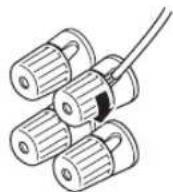
Red: positive (+) Black: negative (-)
Connecting a TV
Follow the procedure below to connect your TV to the DVD player using the supplied video pin cable. Also, you can enjoy high-quality pictures with a S-video connection, a component video connection or a scart connection (U.K. and Europe models only) using a corresponding commercially available cable. For information on your TV, refer to the owner's manual supplied with it.
Note
Do not connect the power cable of the receiver, DVD player, or other components to the wall outlet until all cable connections are completed.
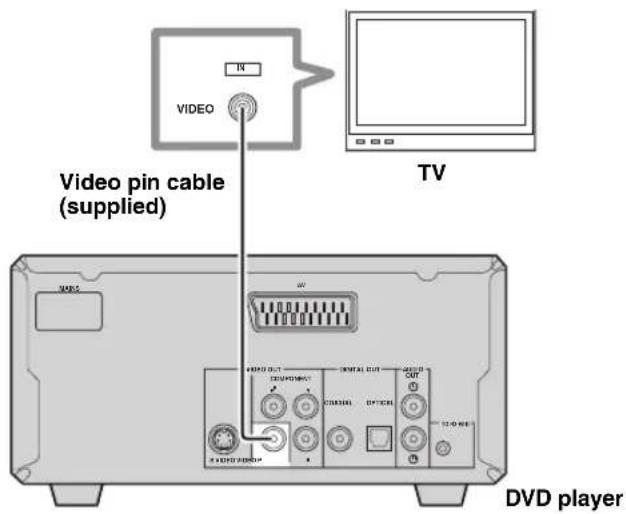
Connect the VIDEO jack of the DVD player to the video input jack of your TV using the supplied video pin cable.

To enjoy TV sounds with the receiver, connect AUX (L/R) jacks of the receiver to the audio output jacks of your TV using a commercially available audio pin cable.
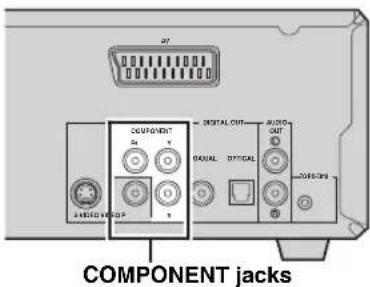
■ Component video connection
Connect the COMPONENT jacks of the DVD player to the component video input jacks of your TV using a commercially available component video cable.
Note
(U.K. and Europe models only)
When you make a component video connection, set
"COMPONENT" to "YUV" in the setup menu of the DVD player (see page 54).
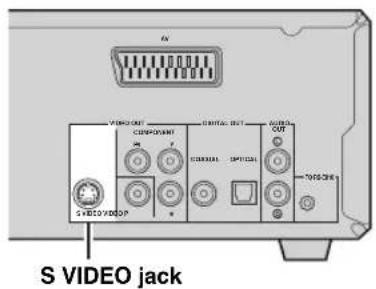
S-video connection
Connect the SVIDEO jack of the DVD player to the S-video input jack of your TV using a commercially available S-video cable.
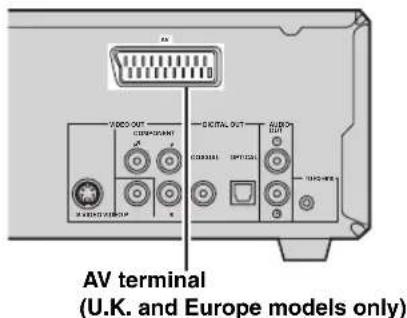
Scart connection
(U.K. and Europe models only)
Connect the AV terminal of the DVD player to the scart input terminal of your TV using a commercially available scart cable.
Note
(U.K. and Europe models only)
When you make a scart connection, set "COMPONENT" to RGB in the setup menu of the DVD player (see page 54).
Connecting Antennas
To enjoy radio on the receiver, connect the supplied AM and FM antennas to the designated terminals. If there is a problem of weak radio wave reception in your area or you want to improve radio reception, we recommend that you use optional outdoor antennas. For details, consult the nearest authorized YAMAHA dealer or service center.
Note
Be sure to set the timer frequency step (Asia and Taiwan models only) according to the frequency spacing in your area (see page 38).
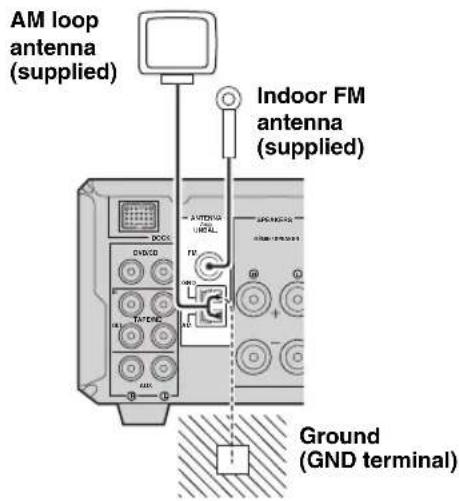
About grounding
For maximum safety and minimum interference, connect the antenna GND terminal to a good earth ground. A good earth ground is a metal stake driven into moist earth.
Connecting the AM loop antenna
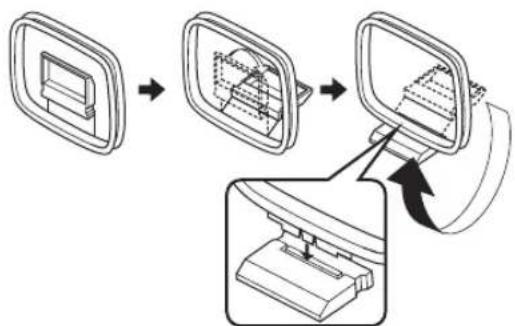
1 Attach the antenna stand to the antenna.
When attaching the antenna to the wall, you do not need to use the antenna stand.
2 Press down the tab of the AM terminal.
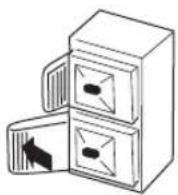
Note
Depending on the product, the shape of the tab is different from the described illustr.
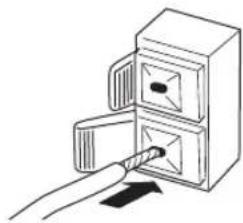
3 Insert the AM loop antenna lead wires into the AM terminal.
4 Replace the tab back to secure the wire.
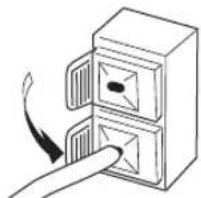
5 Repeat steps 2 to 4 to insert the AM loop antenna lead wires into the GND terminal.
6 Place the antenna away from the receiver and speaker cables.
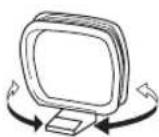
While listening to the radio, rotate the antenna head to find the best angle for reception.
Connecting the FM antenna
1 Connect the supplied indoor FM antenna to the FM jack of the receiver.
2 Place the antenna away from the receiver and speaker cables.
Connecting External Components
You can connect various audio components, such as an MD player, a tape deck or a YAMAHA iPod universal dock to the receiver. Also you can connect an MD recorder or a CD recorder to the DVD player using the DIGITAL OUT jacks. For information on your external component, refer to the owner's manual supplied with each component.
Note
Do not connect the power cable of the receiver, DVD player, or other components to the wall outlet until all cable connections are completed.
Connecting an MD player or a tape deck
If you connect an MD player or a tape deck to the receiver, you can enjoy audio sources played on the component.
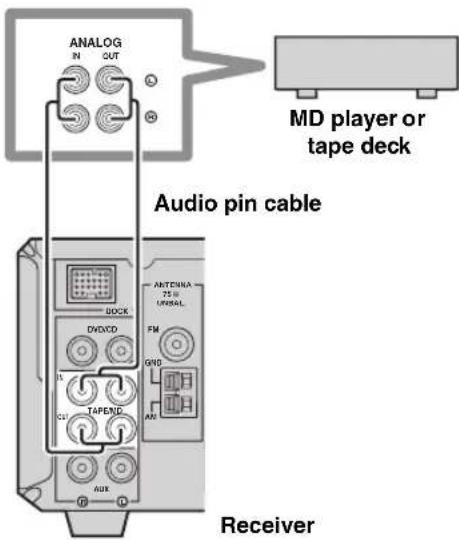
1 Connect the TAPE/MD IN (L/R) jacks of the receiver to the analog output jacks of an MD player or a tape deck using a commercially available audio pin cable.
2 To record audio output from the receiver, connect the TAPE/MD OUT (L/R) jacks of the receiver to the analog input jacks of an MD player or a tape deck using a commercially available audio pin cable.
Connecting an MD recorder or a CD recorder
If you connect an MD recorder or a CD recorder to the DVD player with a digital connection, you can make a digital recording.
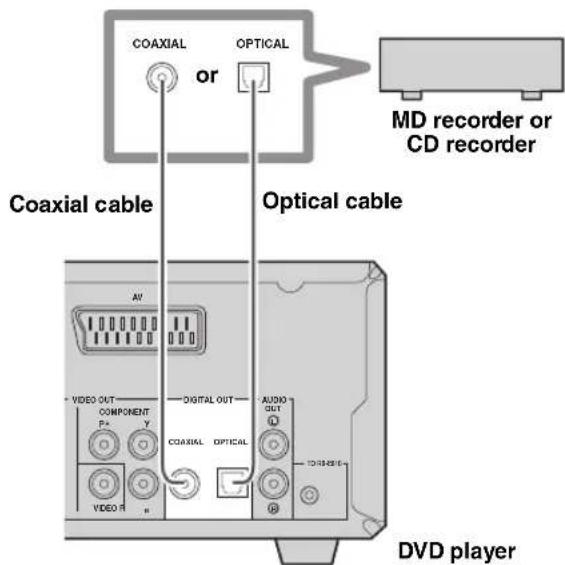
Connect the DIGITAL OUT (COAXIAL or OPTICAL) jack of the DVD player to the digital input (coaxial or optical) jack of an MD recorder or a CD recorder using a commercially available coaxial or optical cable.
Notes
The DIGITAL OUT jacks are compatible with PCM, Dolby Digital and DTS signals.
- The DIGITAL OUT (OPTICAL) jack is designed based on EIA standards. To make a digital connection, use an optical cable that meets EIA standards.
Connecting a YAMAHA iPod universal dock
The receiver (RX-E810) is equipped with the DOCK terminal on the rear panel that allows you to connect a YAMAHA iPod universal dock (such as YDS-10 sold separately) where you can station your iPod and control playback of your iPod using the supplied remote control. Connect a YAMAHA iPod universal dock (such as YDS-10 sold separately) to the DOCK terminal on the rear of the receiver using its dedicated cables. Once the connection is complete, station your iPod in the YAMAHA iPod universal dock.

Notes
- Do not connect the power cable of the receiver, DVD player, or other components to the wall outlet until all cable connections are completed.
- Only iPod (Click and Wheel), iPod nano, and iPod mini are supported.
- You need a YAMAHA iPod universal dock (such as YDS-10 sold separately) and its dedicated cable compatible with the DOCK terminal of the receiver.
- Do not connect any iPod accessories (such as headphones, a wired remote control, or an FM transmitter) to your iPod when it is stationed in a YAMAHA iPod universal dock (such as YDS-10 sold separately).
- Unless your iPod is firmly stationed in a YAMAHA iPod universal dock (such as YDS-10 sold separately) connected to the DOCK terminal of the receiver, audio signals may not be output properly.
- Once the connection between your iPod and the receiver is complete and the receiver is set to DOCK mode (see page 47), "iPod connected" appears in the front panel display. If the connection between your iPod and the receiver fails, a status message appears in the front panel display. For a complete list of connection status message, see the iPod section in "Troubleshooting" on page 60.
- Your iPod battery is automatically charged when your iPod is stationed in a YAMAHA iPod universal dock (such as YDS-10 sold separately) connected to the DOCK terminal of the receiver as long as the receiver is turned on.
- Depending on the type of the iPod, you may need to insert one of the iPod adapters supplied with a YAMAHA iPod universal dock (such as YDS-10 sold separately) into the dock slot before you station your iPod.
Connecting the Power Cables
Once all connections are complete, connect the power cable of the DVD player to the AC OUTLET(S) terminal on the rear of the receiver (or the AC wall outlet if the AC OUTLET(S) terminal is not available), and then plug the power cable of the receiver into the AC wall outlet.

AC OUTLET(S) (SWITCHED)
U.K. and Australia models 1 outlet
Korea model None
Other models 2 outlets
Use these outlet(s) to supply power to the DVD player or any connected components. Connect the power cable of your other components to these outlet(s). Power to these outlet(s) is supplied when the receiver is turned on. For information on the maximum power or the total power consumption of the components that can be connected to these outlet(s), see "Specifications" on page 67.
Setting the System
Before starting playback operation, follow the procedure below to configure the system settings.
Step 1: Turn on the power and select the DVD input
1 Turn on your TV and then press STANDBY/ON to turn on the receiver.
If the DVD player is connected to the receiver with the system control cable, the DVD player turns on automatically. Otherwise, press STANDBY/ON on the front panel of the DVD player to turn on it. The front panel display of each component lights up.
2 Press DVD/CD to select "DVD/CD" as an input source.
3 On your TV, select the input to which the DVD player is connected (EXT1, AV1, etc.). For details, refer to the manual supplied with your TV.
The default screen appears on the TV screen.
Note
If the picture is distorted on your TV, the color system (NTSC and PAL) setting of the DVD player may not match your TV.
To switch the color system setting in such case, press and then AUDIO while the disc tray is open.
Step 2: Adjust the clock
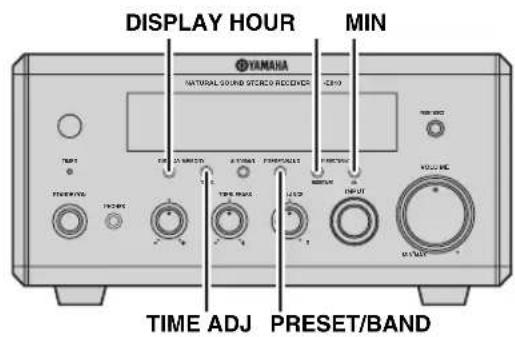
1 Press DISPLAY on the front panel of the receiver.
"Clock Time" appears in the front panel display for a few seconds, and then "Set Clock" appears.

2 Press TIME ADJ for about two seconds to enter the clock setting mode.

3 To set the hour setting ahead, press HOUR repeatedly. To set the hour setting backward, press HOUR repeatedly while holding down PRESET/BAND.

4 To set the minute setting ahead, press MIN repeatedly. To set the minute setting backward, press MIN repeatedly while holding down PRESET/BAND.

5 Press TIME ADJ once again to confirm the clock setting.
"Adjusted" appears in the front panel display for a few seconds, and then the clock appears.
9:15

You can switch between 12-hour (AM/PM) format and 24-hour format by pressing HOUR or MIN while the clock is displayed in the front panel display.
Step 3: Set the aspect ratio
Follow the procedure below to configure the aspect ratio setting of the DVD player. (The default setting is "4:3 PAN SCAN")

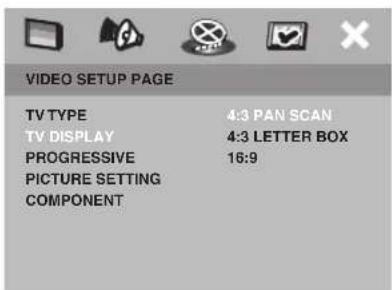
1 Press SET UP.
The setup menu appears on the TV screen.
2 Press or repeatedly to select "VIDEO SETUP PAGE".
3 Press or to select "TV DISPLAY", and then press
4 Press or to select the desired setting, and then press ENTER to confirm the selection.
4:3 PAN SCAN
Select this if the aspect ratio of your TV is 4:3 and you want both sides of the picture to be trimmed or formatted to fit your TV screen.
4:3 LETTER BOX
Select this if the aspect ratio of your TV is 4:3. In this case, a wide picture with black bands on the upper and lower portions of the TV screen are displayed.
16:9
Select this if you have a widenscreen TV.
5 To exit from the setup menu, press SET UP once again.
Step 4: Set the OSD language
Follow the procedure below to configure the language setting used for the OSD and setup menus. (The default settings is "ENGLISH".)
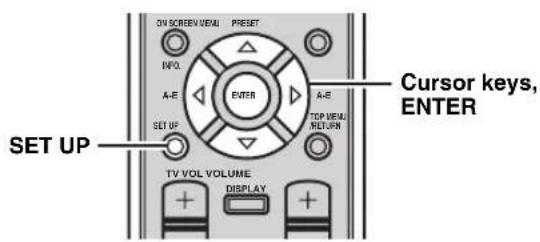
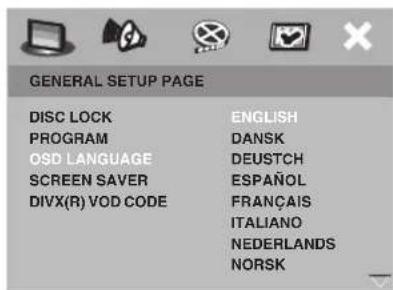
1 Press SET UP.
The setup menu appears on the TV screen.
2 Press or to select "GENERAL SETUP PAGE".
3 Press or to select "OSD
language, and then press ENTER to confirm the selection.
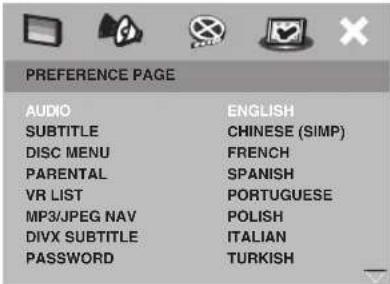
Step 5: Set the default audio, subtitle, and disc menu languages
If you set the default audio, subtitle, and disc menu languages, the DVD player automatically switches to the selected language when a disc is loaded. If the selected language is not available on the disc, the default language of the disc will be used instead. (The default setting is "ENGLISH" for audio and disc menu and "OFF" for subtitle.)
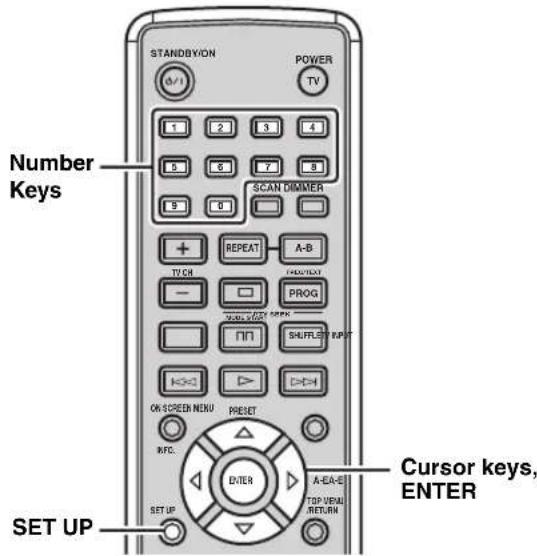
1 Press SET UP.
The setup menu appears on the TV screen.
2 Press or to select "PREFERENCE PAGE".
Note
"PREFERENCE PAGE" is available only when no disc is loaded or the DVD player is in the Stop mode (see page 25).
3 Press or to select "AUDIO", "SUBTITLE", or "DISC MENU", and then press.
4 Press or to select the desired language, and then press ENTER to confirm the selection.
If the desired language is not listed, select "OTHERS", use the number keys to enter the 4-digit language code (see page 57), and then press ENTER.
5 To exit from the setup menu, press SET UP once again.


Basic Receiver Operations
Follow the procedure below to select an input source and adjust the sound settings on the receiver.
1 Press STANDBY/ON to turn on the receiver.
If the DVD player is connected to the receiver with the system control cable, the DVD player turns on automatically. The front panel display of each component lights up.

This system has the auto-standby function (see page 45) which automatically set to the system to the standby mode if you do not operate the system for 30 minutes while the receiver is set to the DVD/CD input mode.
2 Press one of the input selection keys to select the desired input source.
3 Start playback on the selected source component or select a broadcast station.
For information on the disc playback, see page 25, and for information on tuning, see page 37.
4 Press VOLUME + / - to adjust the volume to the desired output level.
5 Rotate BASS, TREBLE, or BALANCE on the front panel of the receiver to adjust the following settings.
BASS: Adjusts the low frequency response.
TREBLE: Adjusts the high frequency response.
BALANCE: Adjusts the volume level of each left and right speaker channel.
Pure Direct mode
The Pure Direct mode shuts down the tone control circuitry, allowing you to enjoy pure high-fidelity sounds from analog sources.
Press PURE DIRECT on the front panel of the receiver to turn on the Pure Direct mode.
PURE DIRECT lights up, and the front panel display automatically dims.
Notes
- While the Pure Direct mode is turned on, neither BASS, TREBLE, nor BALANCE are available.
- If you carry out any operation while the Pure Direct mode is turned on, the front panel display lights up briefly to acknowledge the command and dims again.
To turn off the Pure Direct mode
Press PURE DIRECT again so that PURE DIRECT turns off and the front panel display lights up.
To use headphones
Connect the headphones to the PHONES jack. You can listen to the sound to be output from the speakers through the headphones.
Changing the front panel display settings
Follow the procedure below to change the settings of the receiver's front panel display.
To switch the display mode
You can switch the information displayed in the receiver's front panel display between the current input and clock.
Note
You cannot display the clock unless you adjust it (see page 19).
Press DISPLAY repeatedly to select the desired display mode.
Each time you press the key, the display changes as follows.
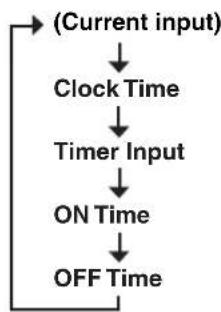
中
"Timer Input", "ON Time", and "OFF Time" are used to set the clock timer (see page 43).
To dim the display
You can dim the front panel display of the receiver. The front panel display of the DVD player also dims if it is connected to the receiver using a system control connection (see page 12). (The default setting is "DIMMER OFF".)
Press DIMMER to select "DIMMER ON".
To return to normal brightness
Press DIMMER to select "DIMMER OFF".
Supported Disc Types
You can enjoy movie or music discs with the DVD player. Since some disc operations are limited to specific disc types, the supported disc types are indicated using the icons shown below. Each means that the operations is limited to the corresponding disc type. Operations with no icon indicated are available for all disc types.
Note
Depending on a disc format, some discs may not be compatible with the DVD player. Before loading a disc into the DVD player, be sure to check the disc compatibility of the DVD player (see page 63).
| DVD/DVD-VR | VIDEO CD/ SUPER VIDEO CD | Music CD |
| DVD | VCD | CD |
■ About data discs (MP3, WMA, JPEG, and DivX)
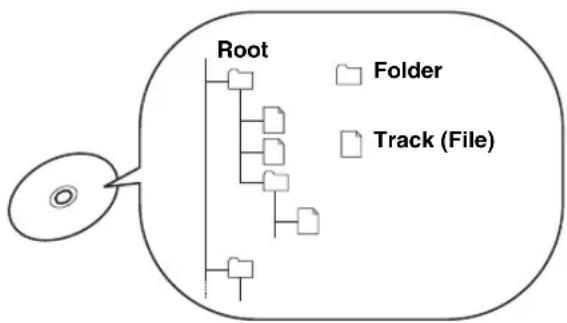
You can play back MP3 and WMA format files recorded on a CD-R/RW, DVD+R/RW, and DVD-R/RW with similar uses as a music CD. The DVD player regards files in the disc as tracks (as shown on the left). Also you can play back JPEG picture files and DivX video files recorded on a CD-R/RW, DVD+R/RW, or DVD-R/RW. For details about how to play those discs, see "Playing back MP3/WMA/JPEG/DivX discs" on page 32.
Note
Depending on recording conditions such as recording software settings, the DVD player may not be able to play the disc or play tracks in the order they were recorded. For information on disc compatibility of the DVD player, see page 63.
Basic DiscPlayback Operations
Follow the procedures below to carry out basic disc playback operations.
Notes
- If the inhibit icon ( ) appears on the TV when a button is pressed, it means the function is not available on the current disc or the current status.
- Depending on the disc, some operations may be different or restricted.
To start playback
Load the disc (press an the front panel of the DVD player to open/close the disc tray).
中
- This unit automatically starts playback when a disc is loaded. In case that the disc has the start menu, you may need to press to start playback.
- For CDs, you can play back the first few seconds of each track sequentially by pressing SCAN while the plalyback stops. Press to return to normal playback.
To stop playback
Press
#
This unit automatically memorizes the stopping position when playback is stopped. If you press , playback resumes from where it left off. If you press once again, the stopping position will be cleared from the memory. (This is called "Stop mode".)
To pause playback
Press.
To return to normal playback, press
To advance frame-by-frame DVD VCD
Press to pause playback, then press repeatedly. Each time you press, playback advances one frame at a time. To return to normal playback, press
To fast reverse or fast forward
To fast reverse, hold down for a few seconds.
To fast forward, hold down for a few seconds.
Each time you press the button after holding down it, the speed increases (decreases).
To slow reverse or slow forward DVD VCD
To slow reverse press to slow forward, press. Each time you press the button, the speed increases (decreases).
Note
The slow reverse feature is not available for VCDs and SVCDs.
To skip chapters (tracks)
To skip to the start of the current chapter (track), press
To skip to the next chapter (track), press To skip to the previous chapter (track), quickly press twice.
Note
The skip feature may not work properly when playing back a VCD or SVCD using the PBC menu (see page 31).
To specify a chapter (track) for playback
Use the number keys to enter the chapter (track) number you want to play.
To specify 1-digit number, press a number key to enter the track number and then ENTER, or press 0 and then a number key to enter the track number.
Note
This feature may not work properly when playing back a VCD or SVCD using the PBC menu (see page 31).
Repeating disc playback (Repeat Play)
You can repeat the playback of the selected item in a disc. Also, you can set two points to repeat the specified section of a chapter (track) with A-B Repeat.
Notes
- Repeat Play may not work depending on DVD disc types.
- Repeat Play does not work while playing back a VCD or SVCD using the PBC menu (see page 31).
1 Play back the disc, title, or chapter (track) you want to repeat.
2 Press REPEAT to select the desired Repeat Play mode.
Each time you press the key, the mode changes as follows.
DVD
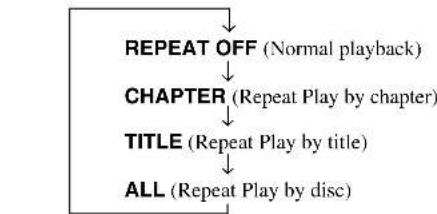
VCD/CD

MP3/WMA/JPEG/DivX

To cancel Repeat Play
Press REPEAT to select "REPEAT OFF".
中
When playing back a JPEG or picture CD with the slide show mode, "REPEAT ALL" (Repeat Play by disc) appears instead of "REPEAT FOLDER".
To repeat between two points (A-B Repeat)
You can repeat the specified section of a chapter (track) by setting two points (start and end points).
Note
You can use A-B Repeat only within one chapter (track).
1 Play back the chapter or track that includes the section you want to repeat.
2 At the position where you want to set as the start point of the repeat section, press A-B.
"A" appears on the TV screen.
3 At the position where you want to set as the end point of the repeat section, press A-B once again.
"AB" appears on the TV screen and A-B Repeat starts.
To cancel A-B Repeat
Press A-B once.
Playing back randomly (Shuffle Play)
You can play back chapters or tracks in the disc in random order.
Notes
- Shuffle Play is not available for DVD-VRs.
- Shuffle Play does not work while playing back a VCD or SVCD using the PBC menu (see page 31).
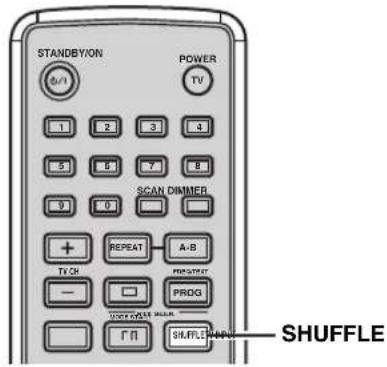
1 Play back the disc.
2 Press SHUFFLE to select the desired Shuffle Play mode.
Each time you press the key, the mode changes as follows.

To cancel Shuffle Play
Press SHUFFLE to select "SHUFFLE OFF".
Specifying an elapsed time for playback (Time Search) DVD VCD
You can specify an elapsed time where you want playback to start.
Notes
- Using the Time Search feature for a VCD or SVCD automatically closes the PBC menu (see page 31).
- You cannot specify an elapsed time that exceeds the total time.
Time Search on DVD
1 While playing back a disc, press ON SCREEN.
The OSD menu appears on the TV screen.
2 Press or to select "TT TIME" or "CH TIME", and then press
TT TIME:
Select this if you want to specify an elapsed time for the current title.
CH TIME:
Select this if you want to specify an elapsed time for the current chapter.
3 Use the number keys to enter hours, minutes, and seconds.
Playback skips to the specified position.
中
To return to the previous menu, press To exit from the OSD menu, press ON SCREEN.
Time Search on VCD
1 While playing back a disc, press ON SCREEN.
The OSD menu appears on the TV screen.
2 Press or to select "DISC TIME" or "TRACK TIME", and then press DISC TIME:
Select this if you want to specify an elapsed time for the entire disc.
TRACK TIME:
Select this if you want to specify an elapsed time for the current track.
3 Use the number keys to enter hours, minutes, and seconds.
Playback skips to the specified position.
中
To return to the previous menu, press To exit from the OSD menu, press ON SCREEN.
Specifying a preview picture for playback (Scan Search) DVD VCD
You can preview the content of a DVD or VCD with pictures selected at regular intervals, and specify a preview picture for playback.
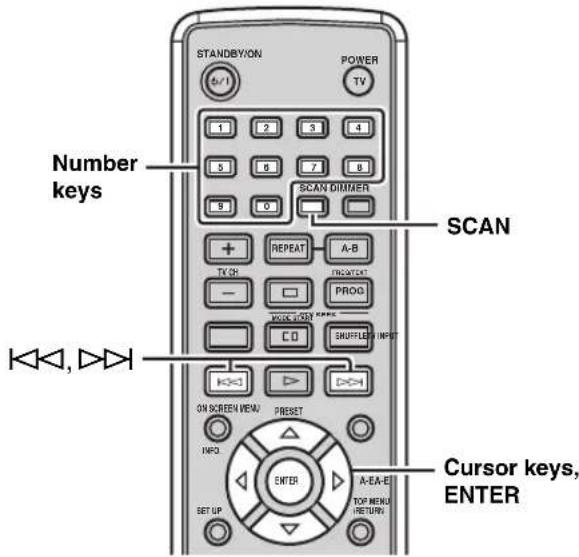
1 While the disc is loaded into the DVD player, press SCAN.
2 Press or to select one of the following preview modes, and then press ENTER.
DVD TITLE DIGEST:
Displays the beginning of each title.
CHAPTER DIGEST:
Displays the beginning of each chapter.
TITLEINTERVAL:
Divides a title into parts at 10 minutes intervals and play back the first 3-4 seconds of each part.
CHAPTER INTERVAL:
Divides a chapter into parts at 10 minutes intervals and play back the first 3-4 seconds of each part.
VCD TRACK DIGEST:
Displays the beginning of each track.
TRACK INTERVAL:
Divides a track into six parts at regular intervals, and displays the beginning of each part.
DISCINTERVAL:
Divides a disc into six parts at regular intervals, and displays the beginning of each part.
Notes
- You can only select "TRACK INTERVAL" during VCD playback when the PBC menu (see page 31) is turned off.
- CHAPTER DIGEST and CHAPTER INTERVAL are not available for DVD-VR discs.
3 Use the cursor keys to select the desired preview picture or number keys to input the picture number.
Pressing or switches the preview list to the previous/next page.
- To select another preview mode, use the cursor keys to select "MENU" in the preview list, and then press ENTER.
- To cancel Scan Search, use the cursor keys to select "EXIT" in the preview list, and then press ENTER or press SCAN again.
4 Press ENTER to start the playback of the selected item.
Customizing playback order (Program Play)
You can customize the playback order for chapters or tracks stored in the disc. This unit can memorize playback order of 10 discs (20 chapters or 20 tracks for each disc).
Notes
The PBC menu (see page 31) is not available during Program Play of a VCD or SVCD.
The Program Play feature is not available for MP3, WMA, JPEG, and DivX discs.
1 While the disc is loaded into the DVD player, press PROG.
The program list appears on the TV screen.
2 Use the cursor keys to select a program number, and then press ENTER.
Pressing or switches the program list to the previous/next page.
3 To program the order for a DVD disc, use the number keys and ENTER to enter a title number, and then enter a chapter number. To program the order for a VCD, SVCD, or CD, use number keys and ENTER to enter a track number.
Repeat steps 2 and 3 until you select all desired chapters (tracks).
4 To start playback with Program Play, use the cursor keys to select "START", and then press ENTER.
#
- To cancel the Program Play feature, use the cursor keys to select "EXIT" in the program list, and then press ENTER.
- To remove a chapter or track programmed in the list, use the cursor keys to select the program number to be cleared, and then press ENTER.
Selecting audio and subtitle languages DVD /audio channel settings VCD
You can select audio and subtitle languages for DVD disc playback and audio channel settings for VCD. If no language is selected, the default languages specified in the setup menu (see page 21) are selected.
Note
The selections of audio and subtitle languages are available only with multi-language compatible discs. Also, languages available for each disc may vary. For information on your disc, refer to the operating instructions in the disc's menu or on its jacket.
For DVD
To select an audio language while playing back a disc, press AUDIO repeatedly until the desired language appears on the TV screen.
To select a subtitle language while playing back a disc, press SUBTITLE repeatedly until the desired language appears on the TV screen.
For VCD
To switch the audio channel settings (stereo, monaural, etc.), press AUDIO repeatedly.
中
To turn off the subtitle, press SUBTITLE repeatedly to select "OFF".
Zooming the picture DVD VCD
You can zoom in or zoom out the picture during disc playback.
1 While playing back a disc, press ZOOM.
Each time you press the key, the picture scale changes as follows.
$$ 2 X \rightarrow 3 X \rightarrow 4 X \rightarrow 1 / 2 \rightarrow 1 / 3 \rightarrow 1 / 4 \rightarrow \text {o r i g i n a l s c a l e} (1 X) $$
$$ \uparrow $$
2 If you select "2X", "3X" or "4X" in step 1, use the cursor keys to pan through the enlarged picture.

To return to the original picture scale, press ZOOM repeatedly to select the original scale.
Selecting a viewing angle DVD
You can select the desired viewing angle during DVD playback.
Note
This selection is available only with multi-angle compatible discs. Also, viewing angles available for each disc may vary. For information on your disc, refer to the operating instructions in the disc's menu or on its jacket.
While playing back a disc, press ANGLE repeatedly until the desired viewing angle is selected.
Operating the disc menu
Many DVDs and VCDs (SVCDs) include original navigational menus called "DVD menu" and "Playback Control (PBC) menu". These menus provide a convenient way to operate the disc. Follow the procedure below to use those menus on the DVD player.
Note
Menu contents or operation method of each disc may vary. For information on your disc, refer to the operation instructions in the disc's menu or on its jacket.

To operate the DVD menu DVD
1 While playing back a disc, press MENU.
The DVD menu of the disc appears on the TV screen.
中
Depending on the disc, the DVD menu may automatically appear after the disc is loaded.
2 Use the cursor keys to select a menu item, and then press ENTER to confirm the selection.
To operate the PBC menu VCD
If you load a VCD or SVCD that includes the Playback Control (PBC) feature (version 2.0 only), the PBC menu automatically appears on the TV screen. To operate the menu with the remote control, use the following keys.
Number keys or / : Selects an item.
RETURN: Returns to the menu screen.
MENU: Displays or closes the PBC menu.
中
If you set "PBC" to "OFF" in the setup menu of the DVD player (see page 55), the PBC menu does not appear automatically when a disc is loaded.
Playing back MP3/WMA/JPEG/DivX discs
You can play back MP3, WMA, and DivX format files recorded on a CD-R/RW, DVD+R/RW, and DVD-R/RW. Also you can view JPEG files in the commercially available JPEG discs (such as KODAK Picture CDs) or recorded on a CD-R/RW, DVD+R/RW, and DVD-R/RW.
Notes
- This unit cannot display special characters such as double-byte characters used for folder and file names.
- Depending on the disc format, characteristics, or recording conditions, the unit may not read or play back some discs properly. For information on disc compatibility of the DVD player, see page 63.
- If a disc contains a folder consisted of more than 500 files, the unit may not read or play back the disc properly.
1 Load a disc into the DVD player.
For MP3 and WMA discs, the disc menu appears. For JPEG discs, the disc menu appears on the TV screen. Press to start the slide show (the slide show may start automatically with some commercially available JPEG discs). For a DivX disc, the interactive menu appears if the disc includes DivX Media Format (DMF). Refer to "About DivX Media Format (DMF)" for details. Otherwise, follow the steps below.
2 Press or to select a folder, and then press ENTER.
The file list of the selected folder appears on the TV screen.
3 Press , or number keys to select a file, and then press ENTER.
Playback starts from the selected file to the end of the folder.

While viewing a JPEG file, you can zoom in the picture by pressing ZOOM. Also, you can pan through the enlarged picture using the cursor keys.
While viewing a JPEG file, you can flip the picture vertically by pressing on flip it horizontally by pressing. Also you can rotate it 90 degrees by pressing or
While viewing a JPEG file, you can select a scan effect by pressing ANGLE repeatedly.
Viewing JPEG pictures in zoomed form
You can view the JPEG files stored in the selected folder or the disc as small thumbnail images.
1 While viewing a JPEG disc, press .
The JPEG pictures appear in thumbnailed form. Pressing or switches the thumbnail list to the previous/next page.
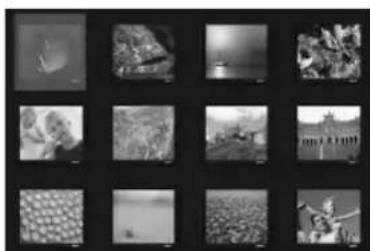
2 To view a specified picture in full size, use the cursor keys to select a thumbnail image, and then press ENTER.

To start the slide show from the first picture of the current page, use the cursor keys to select and then press ENTER.
To return to the disc menu, press MENU.
About DivX Media Format (DMF)
DivX Media Format (DMF) enables you to play back the DivX files with interactive features such as interactive menus, alternate audio and subtitles. Follow the procedure below to operate the interactive menu.
1 Load a disc into the DVD player.
The interactive menu appears on the TV screen.
2 Use the cursor keys to select a chapter.
3 Press ENTER or to start playback from the selected chapter.
To access the interactive menu during playback Press MENU.
To return to the data disc menu when the disc menu is displayed
Press
中
- You can select an audio or turn on/off the subtitle by pressing AUDIO or SUBTITLE during playback.
- To select an external subtitle language, you need to set "DIVX SUBTITLE" in the setup menu of the DVD player (see page 55).
Viewing or changing playback settings on the TV (OSD menu) DVD VCD
You can view and change the settings for the DVD or VCD (SVCD) currently played back.
Note
Displaying the OSD menu for a VCD or SVCD automatically closes the PBC menu (see page 31).
1 While playing back a disc, press ON SCREEN.
The OSD menu appears on the TV screen. The menu items vary depending on the disc type.
中
For CDs, each time you press ON SCREEN, the time display changes as follows: TOTAL ELAPSED TOTAL REMAIN SINGLE ELAPSED SINGLE REMAIN.
2 To select a menu item, press or, and then press
3 To change the setting of the selected menu item, press r. To specify numbers or time, use the number keys.
中
To return to the previous menu, press To exit from the OSD menu, press ON SCREEN.
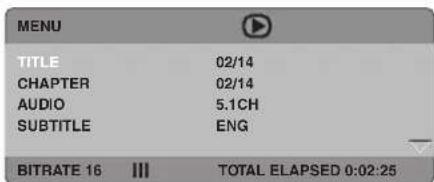
OSD menu items
| Items for DVD Description | |
| TITLE | The current title and the number of titles in the disc |
| CHAPTER | The current chapter and the number of chapters in the disc |
| AUDIO | The current settings for audio channels and audio language |
| SUBTITLE | The current setting for subtitle language |
| ANGLE | The current angle and the number of angles in the disc |
| TT TIME | The total time of the current title |
| CH TIME | The total time of the current chapter |
| REPEAT | The current setting for the Repeat Play feature |
| TIME DISP. | The current setting for the time display |
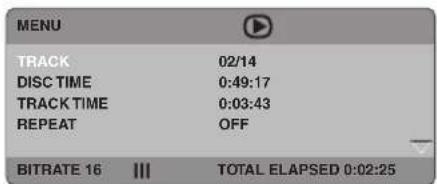
| Items for VCD/SVCD | Description |
| TRACK | The current track and the number of track in the disc |
| DISC TIME | The total time of the disc |
| TRACK TIME | The total time of the current track |
| REPEAT | The current setting for the Repeat Play feature |
| TIME DISP. | The current setting for the time display |
Restricting Disc Playback DVD
You can set playback restrictions for certain discs using the parental control or disc lock feature. Only users who know the password (see page 36) can access the locked discs.
Setting the parental control level
You can restrict playback according to a predetermined level (parental control level). For information on the parental control level of each disc, refer to the instruction on its jacket.
1 Press SET UP.
2 Press or to select "PREFERENCE PAGE", press or to select "PARENTAL", and then press
| PREFERENCE PAGE | |
| AUDIO | 1 KIDS SAFE |
| SUBTITLE | 2 G |
| DISC MENU | 3 PG |
| PARENTAL | 4 PG 13 |
| VR LIST | 5 PGR |
| MP3/JPEG NAV | 6 R |
| DIVX SUBTITLE | 7 NC 17 |
| password | 8 ADULT |
Note
"PREFERENCE PAGE" is available only when no disc is loaded or the DVD player is in the Stop mode (see page 25).
3 Press or to select a parental control level, and then press ENTER.
1 to 7: Users cannot play a disc that is rated above the level without entering the password. (The smaller the number, the stricter the Parental Control level.)
8 ADULT (Default setting): Users can play all discs without entering the password.
4 Press the number buttons to enter the 6-digit password, and then press ENTER.
Notes
- The default password is "000000". To change the password, carry out the "Changing the password" procedure (see page 36).
- If you forget your password, enter "000000" instead of your password.

- To return to the previous menu, press To exit from the setup menu, press SET UP.
- To unlock the parental control temporarily for playback, use the number keys to enter the password in the password input area (displayed when the locked disc is loaded), and then press ENTER.
Locking a disc Changing the password
You can prevent up to 40 specific discs from playback by locking the discs.
1 While the disc to be locked is loaded into the unit, press SET UP.
2 Press or to select "GENERAL SETUP PAGE", press or to select "DISC LOCK", and then press
3 Press or to select "LOCK", and then press ENTER.
To disable a lock applied to a disc
Select "UNLOCK" in step 3.
#
To return to the previous menu, press To exit from the setup menu, press SET UP.
- To unlock the disc lock temporarily for playback, use the number keys to enter the password in the password input area (displayed when the locked disc is loaded), and then press ENTER.
Follow the procedure below to change the password to access locked disc temporarily.
1 Press SET UP.
The setup menu appears on the TV screen.
2 Press or to select "PREFERENCE PAGE", press or to select "password", then press
Note
"PREFERENCE PAGE" is available only when no disc is loaded or the DVD player is in the Stop mode (see page 25).
3 Press ENTER to display the Password change screen.
4 Use the number keys to enter the current 6-digit password in the "OLD PASSWORD" area, enter the new 6-digit password in the "NEW PASSWORD" and "CONFIRM PWD" areas, then press ENTER.
Notes
The default password is "000000".
- If you forget your password, enter "000000" instead of your password.
中
To return to the previous menu, press To exit from the setup menu, press SET UP.
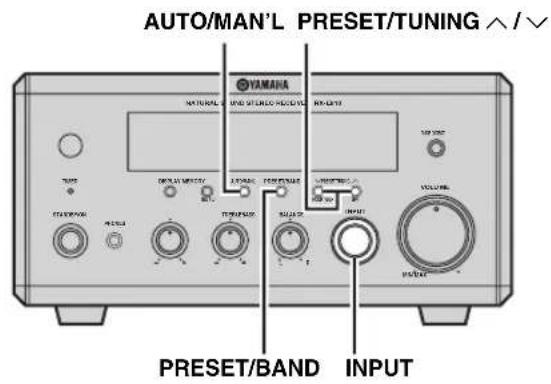
FM/AM Tuning
There are 2 tuning methods: automatic and manual. Automatic tuning is effective when station signals are strong and there is no interference. If the signal from the station you want to select is weak, tune into it manually. You can also use the automatic and manual preset tuning features to store up to 40 stations (A1 to E8: 8 preset station numbers in each of the 5 preset station groups).
Automatic tuning
Automatic tuning is effective when station signals are strong and there is no interference.
Manual tuning
If the signal received from the station you want to select is weak, tune into it manually.
1 Rotate INPUT on the front panel of the receiver to select "TUNER" as an input source.
2 Press PRESET/BAND repeatedly to select "FM" or "AM".
中
When the preset indicator lights up, the receiver is in the preset mode. For details, see pages 38 and 39.
3 Press AUTO/MAN'L so that the AUTO indicator lights up in the front panel display.
4 Press PRESET/TUNING / to begin automatic tuning.
When the reciever is tuned into a station, the TUNED indicator lights up and the frequency of the received station is shown in the front panel display.
- Press to tune into a higher frequency.
- Press to tune into a lower frequency.
1 Rotate INPUT on the front panel of the receiver to select "TUNER" as an input source.
2 Press PRESET/BAND to select "FM" or "AM".
When the preset indicator lights up, the receiver is in the preset mode. For details, see pages 38 and 39.
3 Press AUTO/MAN'L so that the AUTO indicator disappears from the front panel display.
4 Press PRESET/TUNING / to tune into the desired station manually.
Hold down the button to continue searching.
To switch the frequency step (Asia and Taiwan models only)
Because the interstation frequency spacing differs in different areas, you may need to switch the frequency step mode.
1 While the receiver is in the standby mode, hold down PRESET/BAND on the front panel, and then press STANDBY/ON.
The receiver turns on.
2 Press PRESET/BAND repeatedly to select "FM 50k/AM 9k" or "FM 100k/AM 10k".
3 To confirm the setting, press STANDBY/ON.
Automatic preset tuning
Follow the procedure below to preset radio stations automatically.
1 Rotate INPUT on the front panel of the receiver to select "TUNER" as an input source.
2 Hold down MEMORY for more than two seconds.
The AUTO and MEMORY indicator flash in the front panel display.
- Auto Preset starts at the lowest frequency toward the highest frequency.
- The receiver automatically applies a preset number to each detected station.
Notes
- You can preset up to 40 of AM and FM stations by automatic preset tuning.
- (U.K. and Europe models only) Only Radio Data System broadcasting stations and AM stations are stored automatically by automatic preset tuning.
Manual preset tuning
You can also store up to 40 stations (A1 to E8: 8 preset station numbers in each of the 5 preset station groups) manually.
1 Tune into a radio station you want to preset. See page 37 for tuning instructions.
2 Press MEMORY. The MEMORY indicator flashes in the front panel display for about 5 seconds.
3 Hold down PRESET/TUNING / to select a preset station group (A to E) while the MEMORY indicator is flashing.
4 Press PRESET/TUNING / repeatedly to select a preset station number (1 to 8) while the MEMORY indicator is flashing.
5 Press MEMORY while the MEMORY indicator is flashing. The PRESET and MEMORY indicators light up in the front panel display.
6 Repeat steps 1 to 5 until all desired stations are preset.
Selecting preset stations
You can tune into any desired station simply by selecting the preset station group and number under which it was stored (see page 38).
1 Rotate INPUT on the front panel of the receiver to select "TUNER" as an input source.
2 Press PRESET/BAND repeatedly so that the preset indicator lights up in the front panel display.
3 Hold down PRESET/TUNING / to select a preset station group (A to E), and then press PRESET/TUNING / repeatedly to select a preset station number (1 to 8).
You can also use the remote control to select preset stations. While the remote control is in the TUNER mode (see page 8), press BAND repeatedly to select "PRESET". To select a preset station group (A to E), press A-E repeatedly. To select a preset station number (1 to 8), press PRESET repeatedly or use the number keys (1 to 8).
Radio Data System Tuning (U.K. and Europe Models Only)
Radio Data System (U.K. and Europe models only) is a data transmission system used by FM stations in many countries. The Radio Data System function is carried out among the network stations. This unit can receive various Radio Data System data such as PS (program service), PTY (program type), RT (radio text), CT (clock time), and EON (enhanced other networks) when receiving Radio Data System broadcasting stations.
Selecting the Radio Data System program
Use this feature to select one of the 15 Radio Data System program types and search for all the available preset stations of the selected program type.
1 Set the receiver to the "FM" tuning mode.
See page 37 for tuning instructions.
2 Press PTY SEEK MODE to set the receiver to the PTY SEEK mode.
The PTY indicator and the name of the program type flash in the front panel display of the receiver.
中
To cancel the PTY SEEK mode, press PTY SEEK MODE once again.
The PTY SEEK mode is automatically cancelled if you do not operate any key for about 20 seconds.
3 Press PRESET / repeatedly to select the desired program type.
The name of the selected program type appears in the front panel display.
| Program type | Descriptions |
| NEWS | News |
| AFFAIRS | Current affairs |
| INFO | General information |
| SPORT | Sports |
| EDUCATE | Education |
| DRAMA | Drama |
| CULTURE | Culture |
| SCIENCE | Science |
| VARIED | Light entertainment |
| POP M | Popular music |
| ROCK M | Rock music |
| M.O.R. M | Middle-of-the-road music (easy-listening) |
| LIGHT M | Light classics |
| CLASSICS | Serious classics |
| OTHER M | Other music |
4 Press PTY SEEK START to start searching for available Radio Data System preset stations.
If a station broadcasting the selected program type is found, the receiver stops searching, and then program service name and the PTY HOLD indicator lights up in the front panel display.
If there is no station broadcasting the selected program type, the frequency currently selected appears.

To stop searching for stations, press PTY SEEK START once again.
5 Repeat step 4 until the desired station is found.
Displaying the Radio Data System information
Use this feature to display the 4 types of the Radio Data System information: PS (program service), PTY (program type), RT (radio text) and CT (clock time). The corresponding indicators light up in the front panel display.
Notes
- You can select one of the Radio Data System modes only when the corresponding Radio Data System indicator lights up in the front panel display. It may take a while for the receiver to receive all of the Radio Data System data from the station.
- You can select only the available Radio Data System modes being offered by the station.
- If the signals being received are not strong enough, the receiver may not be able to utilize the Radio Data System data. In particular, the "RT" mode requires a large amount of data and may not be available even when the other Radio Data System modes are available.
- In case of poor reception conditions, press AUTO/MAN'L on the front panel of the receiver so that the AUTO indicator disappears from the front panel display.
- If the signal strength is weakened by external interference while the receiver is receiving the Radio Data System data, the reception may be cut off unexpectedly and "...WATT" appears in the front panel display.
- When the "RT" mode is selected, the receiver can display the program information by a maximum of 64 alphanumeric characters, including the umlaut symbol. Unavailable characters are displayed with the " _" (underscore).
While tuning into a Radio Data System station, press FREQ/TEXT repeatedly to select the desired Radio Data System display mode.

- Select "PS" to display the name of the Radio Data System program currently being received.
- Select "PTY" to display the type of the Radio Data System program currently being received.
- Select "RT" to display the information on the Radio Data System program currently being received.
- Select "CT" to display the current time.
Additional CT (clock time) settings
You can use CT information received from the Radio Data System stations to adjust the built-in clock of the receiver.
3 Press PTY SEEK MODE repeatedly to select "CT Clock" or "Local CT", and then press PTY SEEK START to switch the setting between "ON" and "OFF".
CT Clock
Set this to "ON" if you want to apply CT information received from the Radio Data System stations to the built-in clock of the receiver. (The default setting is "ON".)
Local CT
Set this to "ON" if you want to apply the daylight saving time or summer time to CT information received from the Radio Data System stations. (The default setting is "ON".)
4 Press FREQ/TEXT to confirm the settings.
1 While tuning into a Radio Data System station, press DISPLAY repeatedly so that the clock appears in the front panel display of the receiver.
2 Press FREQ/TEXT once.
"CT Clock" appears in the front panel display.
Setting the Timer
The receiver is equipped with 2 types of timer functions: clock timer and sleep timer. The clock timer automatically turns the receiver on or sets it to the standby mode at the specified time. The sleep timer sets the receiver to the standby mode after the specified time elapses. The DVD player also turns on or sets to the standby mode automatically if it is connected to the receiver using a system control connection (see page 12).
Setting the clock timer
The clock timer automatically turns the receiver on or sets it to the standby mode at the specified time. You can also specify an input which the receiver automatically selects when the clock timer turns it on.
Notes
- You cannot set the clock timer unless you adjust the clock (see page 19).
- If you do not touch any key for more than 30 seconds after the previous key operation, the operations you made are cleared from the memory and the normal display reappears.
1 Press DISPLAY on the front panel of the receiver repeatedly to select "Timer Input". The TIMER indicator flashes in the front panel display.
2 Rotate INPUT to select an input which the receiver automatically selects when the clock timer turns it on.
If you select "TUNER", you can select a band by pressing PRESET/BAND. To select a preset station, carry out steps 2 and 3 in the "Selecting preset stations" procedure (see page 39).
3 Press DISPLAY again to select "ON Time".
4 Specify the time when you want to turn on the receiver.
Carry out the steps 3 and 4 in "Step 2: Adjust the clock" (see page 19) to adjust the hour and minute settings.
5 Press DISPLAY again to select "OFF Time", and then specify the time when you want to turn off the receiver as well as step 4.
6 To turn off the receiver now with the clock timer set, press TIMER.
TIMER LED lights up. The receiver will be turned on or set to the standby mode automatically at the specified time.
If you want to turn off the receiver by "OFF Time", press DISPLAY repeatedly to display the clock in the front panel display, and then press TIMER. The TIMER indicator lights up in the front panel display.
To set or cancel the clock timer
Press TIMER on the front panel while the clock is displayed or the receiver is in the standby mode.
Setting the sleep timer
The sleep timer sets the receiver to the standby mode after the specified time elapses.

Press SLEEP repeatedly to select the desired duration.
Each time you press the key, the duration changes as follows.
The SLEEP indicator lights up in the front panel display.


- The sleep timer is canceled if you set the receiver to the standby mode.
- If you press SLEEP once while the sleep timer is set, the ongoing duration appears in the front panel display.
To cancel the sleep timer
Press SLEEP repeatedly to select "SLEEP OFF".
Setting the auto-standby mode
You can turn on/off the auto-standby feature which automatically set the system to the standby mode if you do not operate the system for 30 minutes while the receiver is set to the DVD/CD input mode. (The default setting is "AUTO STANDBY ON".)
Notes
- Unless you connect the receiver and the DVD player properly with the supplied system control cable (see page 12), this feature does not function for the system.
- This feature does not function for the system during playback.
1 Rotate INPUT on the front panel of the receiver to select "DVD/CD" as an input source.
2 Press MEMORY.
The current setting appears in the receiver's front panel display for about five seconds.
3 While the current setting is displayed in the front panel display, press or to switch between "AUTO STANDBY ON" or "AUTO STANDBY OFF".
4 Press MEMORY or wait for five seconds without any operation to confirm the setting.
Controlling External Components
In addition to controlling the receiver (RX-E810) and DVD player (DVD-E810), you can operate the specific functions for external components made by YAMAHA or an iPod connected with a YAMAHA iPod universal dock (such as YDS-10 sold separately) using the supplied remote control. To control a TV made by other manufactures, you need to set up the appropriate remote control code (see page 48).
Note
Depending on the product, the remote control may not be able to operate the external component. In this case, use the remote control supplied with the product.
Available operations
■ AUX/TV mode Operations available in AUX/TV mode
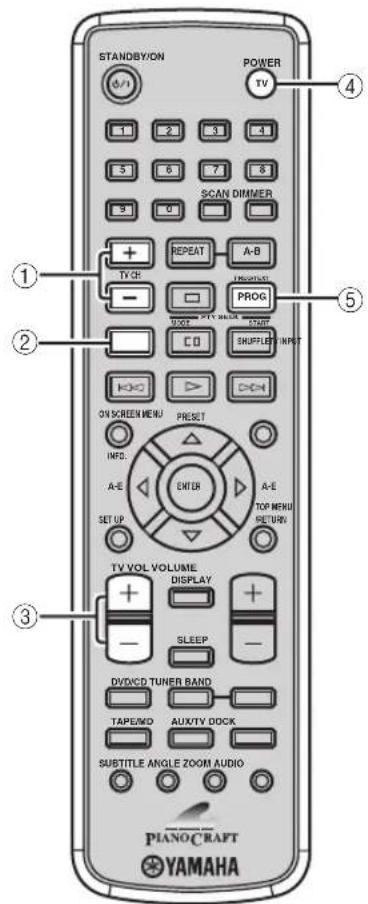
The following operations are available for the TV if you set up the appropriate remote control code (see page 48).
中
Press AUX/TV to set the remote control to the AUX/TV mode before carrying out the following operations.
①TV CH +/-
Switches the TV channels.
②TV INPUT
Switches the TV inputs.
③ TVVOL + / -
Adjusts the TV volume level.
④ POWER TV
Turns the TV on, or set it to the standby mode.
⑤PROG
Use to set a remote control code.
■ DOCK mode
Operations available in DOCK mode
The following operations are available for the iPod connected with a YAMAHA iPod universal dock (such as YDS-10 sold separately). For details on iPod operations, see "Using iPod" on page 49.
中
Press DOCK to set the remote control to the DOCK mode before carrying out the following operations.
①
Stops playback.
②
Pauses playback.
③K
Skipping to the previous track. Press and hold to fast reverse.
④INFO.
Switches between the simple remote mode and menu browse mode.
⑤REPEAT
Selects the repeat playback mode during playback in the menu browse mode.
⑥SHUFFLE
Selects the shuffle playback mode during playback in the menu browse mode.
7
Starts playback.
⑧
Skips to the next track. Press and hold to fast forward.
⑨ MENU
Returns to the upper level in the iPod menu.
Cusor keys ( ENTER
Press to return to the upper level in the iPod menu. Press or to select an item in the selected group. Press ENTER to enter the selected group. (Pressing ENTER starts playback when a song is selected.)
TAPE mode
Operations available in TAPE mode
The following operations are available for the tape deck made by YAMAHA.
#
Press TAPE/MD to set the remote control to the TAPE mode before carrying out the following operations.
①
Stops playback.
②
Pauses recording.
③
Fast reverses.
(4)
Starts playback.
(5)
Fast forwards.
⑥ Cursor keys (A)
Press to play back the front side of the tape, and to play back the back side. Press to start recording on the tape deck.
Press to play back both sides of the tape in sequence.
Setting remote control codes
You can control TVs made by other manufactures by setting the appropriate remote control code (refer to "LIST OF REMOTE CONTROL CODES" at the end of this manual). Follow the procedures below to set the remote control code.
1 Press AUX/TV to set the remote control to the AUX/TV mode.
2 While holding down PROG, press AUX/TV, and then use the number keys to enter the three-digit remote control code (refer to "LIST OF REMOTE CONTROL CODES" at the end of this manual) for the manufacturer of your TV.
3 See "AUX/TV mode" on page 46 and try one of the key operations for your TV to check that the setting is working properly.
If the key operation does not work properly, the remote control code may be incorrect. In this case, perform step 2 again.
Notes
- Even if you set a remote control code, it will be cleared about two minutes after the remote control batteries run out. In this case, store remote control codes again after replacing the batteries. (Be careful not to press the remote control keys while replacing the batteries. Doing so may clear the settings.)
- If the manufacturer of your component has more than one code, try each of them until you find the correct one.
Using iPod
Once you have stationed your iPod in a YAMAHA iPod universal dock (such as YDS-10 sold separately) connected to the DOCK terminal of the receiver (see page 17), you can enjoy playback of your iPod using the supplied remote control. The operations of your iPod are available with the aid of the receiver's front panel display (menu browse mode) or without it (simple remote mode).
Notes
- Only iPod (Click and Wheel), iPod nano, and iPod mini are supported.
- Some features may not be compatible depending on the model or the software version of your iPod.
中
- For a complete list of the remote control functions used to control your iPod, refer to "DOCK mode" (see page 47).
For a complete list of status messages that appear in the front panel display, refer to the "iPod" section in "Troubleshooting" (see page 60).
1 Press DOCK to select the iPod as the input source.
2 Press INFO. to switch between the simple remote mode and menu browse mode.
Simple remote mode
View the screen of the iPod to control the menu.
- Operate the iPod using the iPod controls or the supplied remote control.
Menu browse mode
View the front panel of the receiver to control the menu.
- Operate the iPod using the supplied remote control.
- You can configure the "Setup" parameters of the iPod.
3 Use the cursor keys to operate the iPod menu, and then press to start playback of the selected song (or group).
For details on how to operate the iPod menu with the menu browse mode, refer to "Menu browse mode" (see page 50).
中
In the simple remote mode, you can also use the iPod controllers to operate the menu.
■ Menu browse mode
In the menu browse mode, you can operate the iPod menu using the receiver's front panel display. Also you can configure the "Setup" parameters with the menu browse mode.
Note
There are some characters that cannot be displayed in the front panel display of the receiver. Those characters are replaced with underscore " _".
iPod menu

1 Select the menu browse mode (see page 49).
The top of the iPod menu appears in the front panel display.

iPod operation indicators
中
The iPod operation indicators (see page 5) show the operable cursor keys in each step.
2 Press or to select the menu, and then press ENTER to enter the selected menu.
The name of the first item stored in the selected menu appears.


中
- The iPod menu indicators (see page 5) show the iPod menu currently selected.
To return to the upper level in the iPod menu, press or MENU.
3 Repeat step 2 until you select the desired item, and then press to start playback of the desired item (group or song).
If you select "Setup" in step 2, press to select the desired setup menu, and then press ENTER repeatedly to configure the parameter.
Setup menu
Shuffle: Off, Songs (Shuffle Play by song), Albums (Shuffle Play by album)
Repeat: Off, One (Repeat Play by song), ALL (Repeat Play by selected group)
FL Scroll: Cont (Scrolls the song name continuously, default setting), Once (Scrolls the song name once)
#
While playing back a track (or group) with the menu browse mode, you can switch the playback information (such as song name, elapsed time, artist name, or album name) displayed in the front panel display by pressing or
Configuring the DVD Player Settings (Setup Menu)
In the setup menu, you can configure the various parameters or operate useful functions related to the DVD player. Follow the procedure below to operate the setup menu. For details on each menu or available parameters, see "Setup menu items" on page 52.
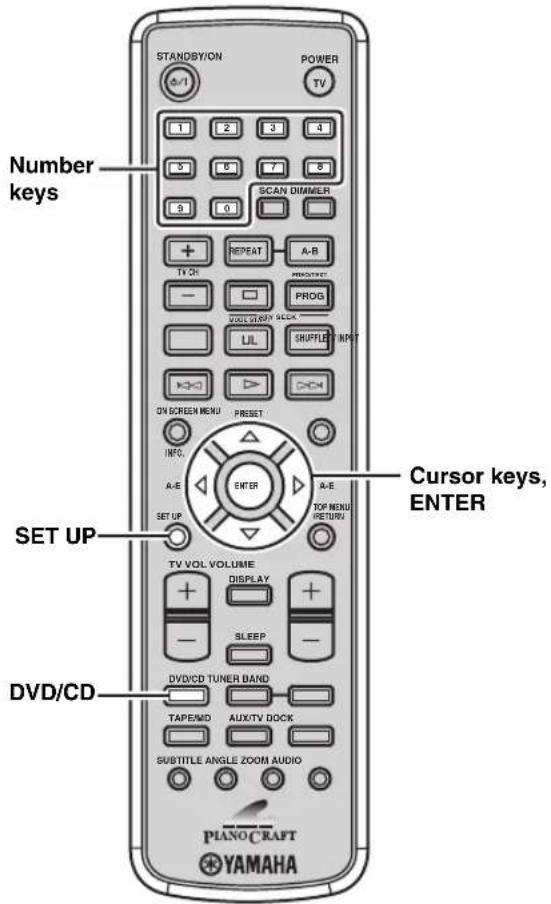
1 Press DVD/CD to set the remote control to the DVD/CD mode.
2 Press SET UP. The setup menu appears on the TV screen.
3 Press or to select "GENERAL SETUP PAGE", "AUDIO SETUP PAGE", "VIDEO SETUP PAGE" or "PREFERENCE PAGE".
Note
"PREFERENCE PAGE" is available only when no disc is loaded or the the DVD player is in the Stop mode (see page 25).
4 Press or to select the desired menu, and then press
If the selected menu contains one submenu, press ENTER.
If the selected menu contains two or more submenus, press or 空 select the desired submenu, and then press ENTER.
5 Press or to select the desired parameter, and then press ENTER.
For configuring some parameters, you need to enter the password by pressing the number keys.
To return to the previous menu, press To exit from the setup menu, press SET UP.
Setup menu items
The following table explains details on the setup menu items of the DVD player. For instructions on operating the setup menu, see "Configuring the DVD Player Settings (Setup Menu)" on page 51.
| Page Menu | Submenu Parameter | ||
| GENERAL SETUP PAGE | DISC LOCK | See page 36 for details. (Default: UNLOCK) | |
| PROGRAM INPUT MENU | See page 29 for details. | ||
| OSD LANGUAGE | See page 20 for details. (Default: ENGLISH) | ||
| SCREEN Saver | The screen saver function allows you to prevent the TV screen from burn-in. (Default: ON) ON: Turns on the screen saver when disc playback is stopped or paused for more than 15 minutes. OFF: Disables the screen saver function. | ||
| DIVX(R) VOD CODE | You can display the DivX® VOD (Video On Demand) registration code that allows you to rent or purchase videos using the DivX® VOD service. For more information, visit the website at www.divx.com/vod. | ||
| AUDIO SETUP PAGE | ANALOG OUTPUT | You can configure the analog output setting. (Default: STEREO) STEREO: Delivers sounds from only the two front speaker channels. LRT: Delivers sounds from the multi speaker channels if the DVD player is connected to a Dolby Pro Logic decoder using an analog connection. VIRTUAL SURR: Reproduces the surround channel sounds virtually. | |
| DIGITAL AUDIO | DIGITAL OUTPUT | You can configure the digital output setting according to your optional audio equipment connections. (Default: ALL) OFF: Disables the digital output. ALL: Select this if you connect the DVD player to a multi-channel decoder/amplifier using a digital connection. PCM ONLY: Select this if your amplifier is not capable of decoding multi-channel audio. | |
| LPCM OUTPUT | If you connect the DVD player to a PCM compatible amplifier using a digital connection, configure the LPCM output setting. The higher the sampling rate, the better the sound quality. (Default: 48KHz) 48KHz: Plays back a disc recorded at the sampling rate of 48 kHz. 96KHz: Plays back a disc recorded at the sampling rate of 96 kHz. | ||
| Page Menu | Submenu Parameter | |
| AUDIO SETUP PAGE | CD UPSAMPLING *1 | You can convert your music CD to a higher sampling rate using sophisticated digital signal processing for better sound quality. If you have activated the upsampling, the DVD player will automatically switch to the stereo mode. (Default: OFF)OFF:Disables the CD upsampling function.88.2kHz (X2):Converts the sampling rate of the CDs twice higher than original.176.4kHz (X4):Converts the sampling rate of the CDs four times higher than original. |
| NIGHT MODE | You can soften the high volume output and enhance the low volume output to an audible level. This setting is effective only when a Dolby Digital 2-channel source is played back. (Default: OFF)ON:Enables the night mode.OFF:Disables the night mode. | |
| LIP SYNC | You can adjust the delay time (00 to 200 ms) for the sound output in order to synchronize it with video image. (Press or adjust the delay time and then press ENTER to confirm adjustment.) (Default: 00 ms) | |
| VIDEO SETUP PAGE *2 | TV TYPE *3 | You can set the color system of the DVD player according to the TV. (Default: NTSC for U.S.A. and Canada models, MULTI for Korea model, and PAL for other models)PAL:Select this if the TV connected to the DVD player adopts the PAL system.NTSC:Select this if the TV connected to the DVD player adopts the NTSC system.MULTI:Select this if the TV connected to the DVD player is compatible with both PAL and NTSC (such as a multi-system TV). |
| TV DISPLAY | You can set the aspect ratio of the DVD player according to the TV. When the selected format is not available on the disc, this setting will not affect the disc playback. (Default: 4:3 PAN SCAN)4:3 PAN SCAN:Select this if you have a normal TV and want both sides of the picture to be trimmed or formatted to fit your TV screen.4:3 LETTER BOX:Select this if you have a normal TV. In this case, a wide picture with black bands on the upper and lower portions of the TV screen will be displayed.16:9:Select this if you have a wide-screen TV. |
1 "CD UPSAMPLING" is available only when a music CD is loaded in the DVD player.
2 The video settings of your TV also affect the display image. Make sure you configure the video settings of your TV as well as these settings.
*3 If the picture is distorted on your TV, the color system (NTSC and PAL) setting of the DVD player may not match your TV. To switch the color system setting in such case, press and then AUDIO while the disc tray is open.
Configuring the DVD Player Settings (Setup Menu)
| Page Menu | Submenu Parameter | |
| VIDEO SETUP PAGE*2 | PROGRESSIVE *4 | When connecting the DVD player to a progressive scan compatible TV using a component video connection, you can enjoy high-quality DVD video with the progressive scan mode. (Default: OFF)ON:Enables the progressive scan.OFF:Disables the progressive scan. |
| PICTURE SETTING | You can select the picture color setting from three predefined sets or configure in detail. (Default: STANDARD)STANDARD:Uses standard TV picture settings.BRIGHT:Makes the TV picture brighter.SOFT:Makes the TV picture softer.PERSONAL:You can adjust Brightness, Contrast, Tint and Color (saturation) individually. (Press △ or ▼ to select an item, press ▲ or □ to adjust the parameter, then press ENTER to confirm the adjustment.) | |
| COMPONENT(U.K. and Europe models only) | You can switch the jack (terminal) at which the component video signals are output between the COMPONENT jacks and AV terminal. (Default: RGB)YUV:Select this if you connect the TV to the COMPONENT jacks.RGB:Select this if you connect the TV to the AV terminal (scart). | |
| BLACK LEVEL(U.S.A. and Canada models only) | You can set the black level to improve color contrast during disc playback. This setting is effective only when "TV TYPE" is set to "NTSC". (Default: OFF)ON:Select this to enhance the black level.OFF:Select this for the standard black level setting. | |
| CLOSED CAPTION(U.S.A. and Canada models only) | Closed captions are data hidden in the video signals of specific discs, and are invisible without the use of a special decoder. The difference between subtitles and captions is that subtitles are intended for hearing persons and captions are for the hearing impaired. Subtitles rarely show all of the audio. For example, captions show sound effects (e.g., "phone ringing" and "footsteps"), while subtitles do not. Before you select this function, please ensure that the disc contains closed caption information and your TV set also supports this function. (Default: OFF)ON:Enables the closed caption function.OFF:Disables the closed caption function. |
2 The video settings of your TV also affect the display image. Make sure you configure the video settings of your TV as well as these settings.
4 The progressive scan mode is only available if you connect the player to a progressive scan compatible TV using a component video connection. For U.K. and Europe models, "PROGRESSIVE" is available only when you connect a TV with a component video connection and "COMPONENT" is set to "YUV".
To set this parameter to "OFF" without using the Setup menu, open the disk tray, press on the remote control and then press ANGLE.
| Page Menu | Submenu Parameter | ||
| PREFERENCE PAGE *5 | AUDIO | See page 21 for details. (Default: ENGLISH) | |
| SUBTITLE | See page 21 for details. (Default: OFF) | ||
| DISC MENU | See page 21 for details. (Default: ENGLISH) | ||
| PARENTAL | See page 35 for details. (Default: 8 ADULT) | ||
| VR LIST | You can select the original list or play list used for playback of VR (Video Recording) format discs. (Default: ORIGINAL LIST)ORIGINAL LIST:Select this to play the originally recorded titles on the disc.PLAY LIST:Select this to play the edited version of the disc. (This feature is available only when a play list has been created.) | ||
| MP3/JPEG NAV | You can enable or disable the navigator menu function when an MP3 disc or JPEG disc includes the menu. (Default: WITH MENU)WITHOUT MENU:Displays all the files contained in the MP3 disc or JPEG disc.WITH MENU:Displays only the folder menu of the MP3 disc or JPEG disc. | ||
| DIVX SUBTITLE *6 | You can select a language group to assign the desired font sets used as external subtitles for DivX files. (Default: GROUP1)GROUP1:Albanian, Basque, Catalan, Danish, Dutch, English, Faroe, Finnish, French, German, Icelandic, Irish, Italian, Norwegian, Portuguese, Rhacto-Romanic, Scottish, Spanish, SwedishGROUP2:Albanian, Croatian, Czech, Hungarian, Polish, Romanian, Slovak, SlovenianGROUP3:Bulgarian, Byelorussian, Macedonian, Russian, Serbian, UkrainianGROUP4:Hebrew, YiddishGROUP5:Turkish | ||
| password | CHANGE | See page 36 for details. | |
| PBC | You can enable or disable the auto-display function of the playback control (PBC) menu for VCDs and SVCDs. (Default: ON)ON: Displays the PBC menu automatically when a disc is played backOFF: Starts playback of a disc without displaying the PBC menu. | ||
| DEFAULT RESET | See page 56 for details. | ||
5 “PREFERENCE PAGE” is available only when no disc is loaded or the DVD player is in the stop mode (see page 25).
6 The file names of the DivX movie and external subtitle should be identical (except extensions). The file extensions supported for external subtitles are ".srt", ".sub", ".ssa", and ".smi". Some external subtitles may be displayed incorrectly depending on the disc characteristics or recording conditions.
Notes
- Consumers should note that not all high definition television sets are fully compatible with this DVD player and may cause artifacts to be displayed in the picture. In case of 525 or 625 progressive scan picture problems, it is recommended that the user switches the connection to the "Standard Definition" output. If there are questions regarding your video monitor compatibility with this DVD player, please contact our customer service center.
- The DVD player is compatible with the complete line of YAMAHA products, including the projectors DPX-1300, DPX-830 and the plasma monitor PDM-4220.
Resetting the DVD player settings
You can reset all options and your personal settings to the initial factory settings, except your password for "PARENTAL" and "DISC LOCK".
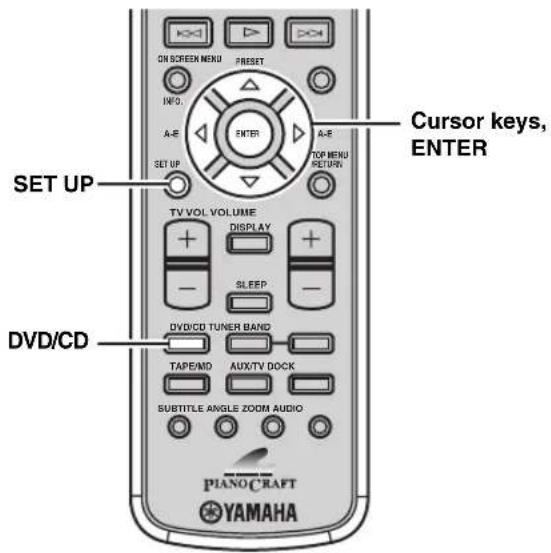
1 Press DVD/CD to set the remote control to the DVD/CD mode.
2 Press SET UP. The setup menu appears on the TV screen.
3 Press to select "PREFERENCE PAGE".
Note
"PREFERENCE PAGE" is available only when no disc is loaded or the the DVD player is in the Stop mode (see page 25).
4 Press or to select "DEFAULT", and then press to select "RESET".
5 Press ENTER to reset the settings.
All DVD player settings (except password) are reset to the initial factory settings.
Language Codes
If your desired language for "AUDIO", "SUBTITLE" and "DISC MENU" is not listed in the setup menu (see page 21), select "OTHERS", then enter the 4-digit language code for your desired language.
| Abkhazian 6566 | Khmer | 7577 | Somali | 8379 | |
| Afar | 6565 | Kikuyu; Gikuyu 7573 | Sotho, Southern | 8384 | |
| Afrikaans | 6570 | Kinyarwanda | 8287 | South Ndebele | 7882 |
| Albanian | 8381 | Kirghiz | 7589 | Spanish; Castilian | 6983 |
| Amharic | 6577 | Komi | 7586 | Sundanese | 8385 |
| Arabic | 6582 | Korean | 7579 | Swahili | 8387 |
| Armenian | 7289 | Kuanyama; Kwanyama 7574 | Swati | 8383 | |
| Assamese | 6583 | Kurdish | 7585 | Swedish | 8386 |
| Avestan | 6569 | Kwanyama; Kuanyama 7574 | Tagalog | 8476 | |
| Aymara | 6589 | Lao | 7679 | Tahitian | 8489 |
| Azerbaijan | 6590 | Latin | 7665 | Tajik | 8471 |
| Bashkir | 6665 | Latvian | 7686 | Tamil | 8465 |
| Basque | 6985 | Letzeburgesch; | 7666 | Tatar | 8484 |
| Belarusian | 6669 | Limburgan; Limburger | 7673 | Telugu | 8469 |
| Bengali | 6678 | Limburger; Limburgan | 7673 | Thai | 8472 |
| Bihari | 6672 | Lingala | 7678 | Tibetan | 6679 |
| Bislama | 6673 | Lithuanian | 7684 | Tigrinaya | 8473 |
| Bokmal, Norwegian 7866 | Luxembourgish | 7666 | Tonga (Tonga Islands) | 8479 | |
| Bosnian | 6683 | Macedonian | 7775 | Tsonga | 8483 |
| Breton | 6682 | Malagasy | 7771 | Tswana | 8478 |
| Bulgarian | 6671 | Malay | 7783 | Turkish | 8482 |
| Burmese | 7789 | Malayalam | 7776 | Turkmen | 8475 |
| Castilian, Spanish 6983 | Maltesc | 7784 | Twi | 8487 | |
| Catalan | 6765 | Manx | 7186 | Uighur | 8571 |
| Chamorro | 6772 | Maori | 7773 | Ukrainian | 8575 |
| Chechen | 6769 | Marathi | 7782 | Urdu | 8582 |
| Chewa; Chichewa; Nyanja 7889 | Marshallese | 7772 | Uzbek | 8590 | |
| Chichewa; Chewa; Nyanja 7889 | Moldavian | 7779 | Vietnamese | 8673 | |
| Chinese | 9072 | Mongolian | 7778 | Volapuk | 8679 |
| Chuang; Zhuang 9065 | Nauru | 7865 | Walloon | 8765 | |
| Church Slavic; Slavonic 6785 | Navaho, Navajo | 7886 | Welsh | 6789 | |
| Church Slavonic; Church 6785 | Navajo; Navaho | 7886 | Wolof | 8779 | |
| Chuvash | 6786 | Ndebele, North | 7868 | Xhosa | 8872 |
| Cornish | 7587 | Ndebele, South | 7882 | Yiddish | 8973 |
| Corsican | 6779 | Ndonga | 7871 | Yoruba | 8979 |
| Czech | 6783 | Nepali | 7869 | Zhuang; Chuang 9065 | |
| Danish | 6865 | North Ndebele | 7868 | Zulu | 9085 |
| Dutch | 7876 | Northern Sami | 8369 | ||
| Dzongkha | 6890 | Norwegian | 7879 | ||
| English | 6978 | Norwegian Bokmål; Bokmål | 7866 | ||
| Esperanto | 6979 | Norwegian Nynorsk | 7878 | ||
| Estonian | 6984 | Nyanja; Chichewa; Chewa 7889 | |||
| Faroeese | 7079 | Nynorsk, Norwegian | 7878 | ||
| Fijian | 7074 | Occitan; Provencal | 7967 | ||
| Finnish | 7073 | Old Bulgarian; Old Slavonic | 6785 | ||
| French | 7082 | Old Slavonic; Old Bulgarian | 6785 | ||
| Frisian | 7089 | Oriya | 7982 | ||
| Gaelic; Scottish Gaelic 7168 | Oromo | 7977 | |||
| Gallegan | 7176 | Ossetian; Ossetic | 7983 | ||
| Georgian | 7565 | Ossetic; Ossetian | 7983 | ||
| German | 6869 | Pali | 8073 | ||
| Gikuyu; Kikuyu 7573 | Panjabi | 8065 | |||
| Greek | 6976 | Persian | 7065 | ||
| Guarani | 7178 | Polish | 8076 | ||
| Gujarati | 7185 | Portuguese | 8084 | ||
| Hausa | 7265 | Provençal; Occitan (post) 7967 | |||
| Hebrew | 7269 | Pushto | 8083 | ||
| Herero | 7290 | Quechua | 8185 | ||
| Hindi 7273 | Raeto-Romance | 8277 | |||
| Hiri Motu 7279 | Romanian | 8279 | |||
| Hungarian | 7285 | Rundi | 8278 | ||
| Icelandic | 7383 | Russian | 8285 | ||
| Ido | 7379 | Samloan | 8377 | ||
| Interlingua (International) 7365 | Sango | 8371 | |||
| Inuktitut | 7385 | Sanskrit | 8365 | ||
| Inupiaq | 7375 | Sardinian | 8367 | ||
| Irish | 7165 | Scottish Gaelic; Gaelic 7168 | |||
| Italian | 7384 | Serbian | 8382 | ||
| Janesesc | 7465 | Shona | 8378 | ||
| Javanesc | 7486 | Sindhi | 8368 | ||
| Kalaallisut | 7576 | Sinhalese | 8373 | ||
| Kannada | 7578 | Slavonic; Church Slavic | 6785 | ||
| Kashmiri | 7583 | Slovak | 8375 | ||
| Kazakh | 7575 | Slovenian | 8376 |
Troubleshooting
Refer to the table below when this unit does not function properly. If the problem you are experiencing is not listed below or if the instruction below does not help, turn off this unit, disconnect the power cable, and contact the nearest authorized YAMAHA dealer or service center.
Receiver (RX-E810)
General
| Problem Cause Remedy | See page | ||
| The receiver fails to turn on or enters the standby mode soon after the power is turned on. | The power cable is not connected or the plug is not completely inserted. | Connect the power cable firmly. | 18 |
| The receiver has been exposed to a strong external electric shock (such as lightning or strong static electricity). | Set the receiver to the standby mode, disconnect the power cable, plug it back in after 30 seconds and then use it normally. | — | |
| No sound Incorrect input or output cable connections. | Connect the cables properly. If the problem persists, the cables may be defective. | 12 | |
| No appropriate input source has been selected. | Select an appropriate input source with the INPUT selector on the front panel (or the input selection keys on the remote control). | — | |
| Speaker connections are not secure. Secure the connections. | 13 | ||
| The volume is turned down. Turn up the volume. | — | ||
| Signals the receiver cannot reproduce are being input from a source component, such as a CD-ROM. | Play a source whose signals can be reproduced by the receiver. | — | |
| The sound suddenly goes off. | The timer has turned off the receiver. Turn on the receiver, and play the source again. | — | |
| Sound is heard from the speaker on one side only. | Incorrect cable connections. Connect the cables properly. If the problem persists, the cables may be defective. | 13 | |
| There is noise interference from digital or radio frequency equipment. | The receiver is too close to the digital or high-frequency equipment. | Move the receiver further away from such equipment. | — |
Tuner
| Problem Cause Remedy | See page | |||
| FM | FM stereo reception is noisy. | The characteristics of FM stereo broadcasts may cause this problem when the transmitter is too far away or the antenna input is poor. | Check the antenna connections. | 15 |
| Try using a high-quality directional FM antenna. | — | |||
| Use the manual tuning method. | 37 | |||
| There is distortion, and clear reception cannot be obtained even with a good FM antenna. | There is multi-path interference. Adjust the antenna position to eliminate multi-path interference. | — | ||
| The desired station cannot be tuned into with the automatic tuning method. | The signal is too weak. Use a high-quality directional FM antenna. | — | ||
| Use the manual tuning method. | 37 | |||
| Previously preset stations can no longer be tuned into. | The receiver has been disconnected for a long period. | Set preset stations | 38 | |
| AM | The desired station cannot be tuned into with the automatic tuning method. | The signal is weak or the antenna connections are loose. | Tighten the AM loop antenna connections and orient it for the best reception. | 15 |
| Use the manual tuning method. | 37 | |||
| There are continuous crackling and hissing noises. | Noises result from lightning, fluorescent lamps, motors, thermostats and other electrical equipment. | Use an outdoor antenna and a ground wire. This will help somewhat, but it is difficult to eliminate all noise. | — | |
| There are buzzing and whining noises. | A TV set is being used nearby. Move the receiver away from the TV set. | — | ||
Troubleshooting
iPod
Note
In case of a transmission error without a status message appearing in the front panel and in the OSD, check the connection to your iPod (see page 17).
| Status message Cause Remedy | See page | |
| Loading... | The receiver is in the middle of recognizing the connection with your iPod. | |
| The receiver is in the middle of acquiring song lists from your iPod. | ||
| Connect error | There is a problem with the signal path from your iPod to the receiver. | Turn off the receiver and reconnect the YAMAHA iPod universal dock to the DOCK terminal of the receiver.17 |
| Try resetting your iPod. — | ||
| Unknown type | The iPod being used is not supported by the receiver. | Only iPod (Click and Wheel), iPod nano, and iPod mini are supported. — |
| iPod connected | Your iPod is properly stationed in a YAMAHA iPod universal dock (such as YDS-10 sold separately) connected to the DOCK terminal of the receiver, and the connection between your iPod and the receiver is complete. | |
| Disconnected | Your iPod was removed from a YAMAHA iPod universal dock (such as YDS-10 sold separately) connected to the DOCK terminal of the receiver. | Station your iPod back in a YAMAHA iPod universal dock (such as YDS-10 sold separately) connected to the DOCK terminal of the receiver.17 |
| Unable to play | The receiver cannot play back the songs currently stored on your iPod. | Check that the songs currently stored on your iPod are playable. — |
| Store some other playable music files on your iPod. — | ||
DVD player (DVD-E810)
| Problem Cause Remedy | See page | ||
| Power turns on but immediately shuts off. | The power cable is not connected or the plug is not completely inserted. | Connect the power cable firmly. | 18 |
| Power immediately shuts off during playback. | Auto-standby function of the receiver works when the receiver can not receive the playing signal transmitted from the DVD player with the system control cable for 30 minutes. | Check the connection of the system control cable between the receiver and the DVD player. | 12 |
| The TV (monitor) does not show the picture properly. | The component video signal output setting may not match the video connection. | Set “COMPONENT” of the DVD player to match the connection method. | 54 |
| The color system setting of the DVD player may not match the specification of your TV. | Check that the color system of your TV, and then set “TV TYPE” of the DVD player to match it. | 53 | |
| The progressive scan mode may be used with a TV that does not support it. | Set “PROGRESSIVE” to “OFF”. | 54 | |
| The disc being played back may not be compatible with the DVD player. | Check that the disc is compatible with the DVD player. | 63 | |
| Occasionally, a small amount of picture distortion may appear depending on the disc being played back. This is not a malfunction. | |||
| The screen size of the TV or monitor looks strange (the image is distorted or the subtitle is missing). | The TV size setting of the DVD player to match the connection method. | Set “TV DISPLAY” of the DVD player to match your TV, or check the screen size setting of your TV. | 53 |
| When the progressive scan mode is activated, image with a 4:3 aspect ratio are played back on a 16:9 wide television screen. | Set “TV DISPLAY” of the DVD player to adjust the screen size. If you cannot adjust it, set “PROGRESSIVE” to “OFF”. | 53 | |
| No sound or distorted sound | The sampling rate of a MP3 or WMA file may not be compatible with the DVD player. | Check the sampling rate and bit rate of an MP3 or WMA file are compatible with the DVD player. | 63 |
| No audio at digital output | Incorrect digital cable connections. Connect the digital cables properly. | 16 | |
| The disc being played back may not be compatible with the DVD player. | Check that the disc is compatible with the DVD player. | 63 | |
| The digital output settings of the DVD player may not be set properly. | Set “DIGITAL OUTPUT” of the DVD player according to your external audio equipment connections. | 52 | |
Troubleshooting
Remote control
| Problem Cause Remedy | See page | ||
| Disc playback does not start. | You may use a CD-R/RW, DVD+R/RW or DVD-R/RW that is not finalized. | Finalize the CD-R/RW, DVD+R/RW or DVD-R/RW. | — |
| The disc label may not be facing up. Check that the disc label is facing up. | — | ||
| The disc may be defective. Try to play back another disc. If the same problem does not happen, the disc you want to play back is defective. | — | ||
| JPEG or MP3/ WMA disc may not contain sufficient picture files or music tracks to be played back. | Check that your JPEG or MP3/ WMA disc contains at least 10 JPEG picture files or 5 MP3/WMA music files. | — | |
| For MP3/WMA files, the sampling rate and bit rate may not be compatible. For JPEG files, the resolution may not be compatible. | For MP3/WMA files, check that the sampling rate and bit rate are compatible. For JPEG files, check that the resolution is compatible. | 63 | |
| The region code of the disc may not be supported with the DVD player. | Check the region code. | 63 | |
| Picture freezes momentarily during playback. | The disc may be dirty. Check the disc for fingerprints/scratches and clean it with a soft cloth wiping from center to edge. | 64 | |
| The DVD player does not read CDs and DVDs. | The disc lens may be dirty. Use a lens cleaner to clean the lens. | 64 | |
| Unable to turn on or off a progressive scan | The component video signal output setting may not match the video connection. | Set “COMPONENT” of the DVD player to match the connection method. | 54 |
| No sound during DivX movie playback | The audio code may not be supported with the DVD player. | ||
| Problem Cause Remedy | See page | |
| The remote control does not work nor function properly. | Wrong distance or angle. The remote control functions within a maximum range of 6 m (20 ft) and no more than 30 degrees off-axis from the front panel. | 11 |
| Direct sunlight or lighting (from an inverter type of fluorescent lamp, etc.) is striking the remote control sensor of this unit. | Reposition this system. | |
| The batteries are weak. Replace all batteries. | 11 | |
| The remote control code is not correctly set. | Set the remote control code correctly using “LIST OF REMOTE CONTROL CODES” at the end of this manual. | |
| Try setting another code for the same manufacturer using “LIST OF REMOTE CONTROL CODES” at the end of this manual. | ||
| Even if the remote control code is correctly set, there are some models that do not respond to the remote control. | ||
Notes on Discs
Disc information
The following tables explain the disc types supported by the DVD player.

中
Disc logo marks are printed on the disc and the disc jacket.
Note
Do not load any other type of disc into the DVD player. Doing so may damage the DVD player.
The DVD player can play:
DVD+R/RW and DVD-R/RW discs recorded in DVD-Video compatible format.
DVD-RW discs recorded in VR format (compatible with CPRM).
The DVD player can play the following data discs (For MP3 and WMA files, the parenthetic words represent the compatible sampling rate and bit rate):
-MP3 files, recorded on CD-R/RW, DVD+R/RW and DVD-R/RW (fs 32,44.1, 48kHz / 96 - 320 kbps (CBR only))
WMA files, recorded on CD-R/RW, DVD+R/RW and DVD-R/RW (When in fs 44.1 kHz: 64-192 kbps/When in 48kHz :128-192 kbps CBR only))
-JPEG (except progressive JPEG) files, recorded on CD-R/RW,DVD ^+ R/RW and DVD-R/RW (compatible resolution: 3072× 2048 or less)
DivX Video files, recorded on CD-R/RW, DVD+R/RW and DVD-R/RW
KODAK Picture CD
- FUJICOLOR CD
- Official DivX ® Ultra Certified product
- Plays all version of DivX® video (including DivX® 6) with enhanced playback of DivX® media files and the DivX® Media Format
-ISO 9660 Level1/Level2 for CD-R/RW
- Up to 299 folders per disc and up to 648 files per folder with 8 hierarchies
Notes
- The following discs cannot be played on the DVD player. CD-ROM, DVD-ROM, DVD-RAM, CDV. (This product can play some types of DVD-R (Video format only).)
CD-R/RW, DVD+R/RW and DVD-R/RW cannot be played unless finalized. - Only the first session of DVD+R/R DL and DVD-R/RW/R DL can be played.
Copyright-protected WMA files cannot be played back with the DVD player. - Some discs cannot be played depending on the recording conditions such as PC environment and application software. Failure can also result from disc characteristics and condition, like material quality, scratches or curvature.
- Do not use any non-standard sized or shaped (heart-shaped, etc.) discs.
- Do not use discs with tape, seals, or paste on their surface.
- Do not use discs with many scratches on their surface.
DVD region codes
The region code (an ID number assigned to each market region) is set for normal DVD players and DVD video discs. The DVD player supports the discs with the region codes shown in the table below. For details, read the information on the disc jacket.
| Destination | Region code of DVD player | Playable discs |
| U.S.A. Canada | 1 | 1 ALL |
| U.K. Europe | 2 | 2 ALL |
| Australia | 4 | 4 ALL |
| Korea Taiwan Asia | 3 | 3 ALL |
Handling a disc
- Do not touch the surface of the disc. Hold a disc by its edge and center hole.
- Do not leave a disc in the tray when you are not playing it.
- Do not write on the disc with a pencil or other marker.
- Do not stick tape, seals or other attachments to a disc, and do not bring into contact with glue.
- Do not use a protective cover to prevent scratches.
- Do not use a disc whose surface can be printed with a commercially available label printer.
- Do not put a disc in a place with direct sunlight, high temperature, high humidity or a lot of dust.

Caution


- If a disc becomes dirty, wipe it with a clean, dry cloth from the center out to the edge. Do not use record cleaner or paint thinner.
- To avoid malfunction, do not use a commercially available lens cleaner.
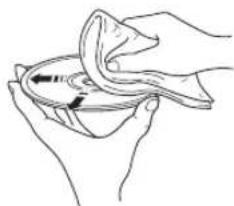
Glossary
Audio information
Dolby Digital
Dolby Digital is a digital surround sound system that gives you completely independent multi-channel audio. With 3 front channels (left, center, and right), and 2 surround stereo channels, Dolby Digital provides 5 full-range audio channels. With an additional channel especially for bass effects, called LFE (low frequency effect), the system has a total of 5.1-channels (LFE is counted as 0.1 channel). The receiver downmixes the multi-channel audio to 2 channels so that you can enjoy Dolby Digital sources easily.
MP3 (MPEG Audio Layer-3)
One of the audio compression methods used by MPEG. It employs the irreversible compression method, which achieves a high compression rate by thinning out the data of hardly audible part to the human ears. It is said to be capable of compressing the data quantity by about 1/11 (128 kbps) while maintaining a similar audio quality to music CD.
PCM (Pulse Code Modulation)
A signal that is changed to digital format without compression. A CD is recorded with 16-bit sound at 44.1kHz while DVD recording is anywhere from 16 bits at 48kHz to 24 bits at 192kHz , which makes it a higher quality sound than CD. This signal also has a type called Packed PCM (PPCM) that can be compressed without any loss of data.
Sampling frequency
The number of sampling (process for digitalizing analog signals) per second. In principle, the higher the sampling rate, the wider the frequency range that can be played back, and the higher the quantized bit rate, the finer the sound that can be reproduced.
Title, Chapter (DVD)
DVD video lets you divide a disc in a big way by titles or a small way by chapters. Each division is either called a title number or a chapter number.
■ Track (CD/Video CD/Super Video CD)
A CD, VCD or SVCD can be divided into a number of segments (tracks). Each division is called a track number.
■WMA (Windows Media Audio)
An audio compression method developed by Microsoft Corporation. It employs the irreversible compression method, which achieves a high compression rate by thinning out the data of hardly audible part to the human ears. It is said to be capable of compressing the data quantity by about 1/22 (64 kbps) while maintaining a similar audio quality to music CD.
Video information Copyright and logo marks
■ Component video signal
With the component video signal system, the video signal is separated into the Y signal for the luminance and the P_B and Pr signals for the chrominance. Color can be reproduced more faithfully with this system because each of these signals is independent. The component signal is also called the "color difference signal" because the luminance signal is subtracted from the color signal.
NTSC (National Television System Committee)
NTSC is a video signal system (525 lines, 30 frames per second) used in North America, Central America, a number of South American countries, and some Asian countries, including Japan.
PAL (Phase Alternating Line)
PAL is a video signal system (625 lines, 25 frames per second) used in the United Kingdom, much of the rest of western Europe, several South American countries, some Middle East and Asian countries, several African countries, Australia, New Zealand, and other Pacific island countries.
Pan & Scan and Letterbox
In general, DVD Video is produced for viewing on a wide television screen with an aspect ratio of 16:9. This means you can now view most material with the intended aspect ratio on a wide-screen television.
This ratio will not fit on a standard television that has an aspect ratio of 4:3. Two picture styles, Pan & Scan and Letterbox, deal with this problem.
- Pan & Scan cuts off the left and right portions of the picture to fill the screen.
- Letterbox inserts black bands at the top and bottom of the picture to reproduce an aspect ratio of 16:9.
Progressive scan
A method of displaying all scanning lines in a frame at once, reducing flicker noticeable on a larger screen and creating a sharp and smooth image.
Title, Chapter (DVD Video)
DVD video lets you divide a disc in a big way by titles or a small way by chapters. Each division is either called a title number or a chapter number.
This product incorporates copyright protection technology that is protected by method claims of certain U.S. patents and other intellectual property rights owned by Macrovision Corporation and other rights owners. Use of this copyright protection technology must be authorized by Macrovision Corporation, and is intended for home and other limited viewing uses only unless otherwise authorized by Macrovision Corporation. Reverse engineering or disassembly is prohibited.

Manufactured under license from Dolby Laboratories. "Dolby" and the double-D symbol are trademarks of Dolby Laboratories.
MPEG Layer-3 audio decoding technology licensed from Fraunhofer IIS and Thomson multimedia.


DivX, DivX Ultra Certified, and associated logos are trademarks of DivX, Inc. and are used under license.
iPod®
"iPod" is a trademark of Apple Computer, Inc., registered in the U.S. and other countries.
Specifications
RX-E810
AMPLIFIER SECTION
Minimum RMS output power per channel (6 ,1kHz,0.1% THD) 55 W + 55 W
Maximum RMS output power per channel (6 ,1kHz,1% THD) 65 W + 65 W
- Input sensitivity/Impedance DVD/MD/TAPE/AUX etc. 150 mV/47 kΩ
Frequency Response (20 Hz to 20 kHz) DVD etc. 0 ± 0.5 dB
Total Harmonic Distortion (20 Hz to 20 kHz) DVD etc. 30 W, 6 Ω 0.04% or less
- Signal to Noise ratio (IHF-A network)
DVD etc. (150 mV, Input shorted). 93 dB or more
Output level/Impedance PHONES. 0.23 V/120
TUNER SECTION
FM Section
Tuning Range U.S.A., Canada, Asia, and Taiwan models 87.50-107.90 MHz Other models.. 87.50-108.00 MHz
AM Section
Tuning Range U.S.A., Canada, Asia, and Taiwan models. 530-1710 kHz Other models. 531-1611 kHz
Sensitivity FM (S/N 68 dB) . 6.0 V AM. 600 V / m
GENERAL
Power Supply U.S.A.and Canada models.. AC 120 V,60 Hz Australia model. AC 240 V,50 Hz U.K.and Europe models. AC 230 V,50 Hz Korea model. AC 220 V,60 Hz China model. AC 220 V,50 Hz Asia model. AC 220-240 V,50/60 Hz Taiwan model. AC 110-120 V,50/60 Hz
Power consumption U.S.A., Canada, and Taiwan models 115 W Other models. 130 W
- Standby Power consumption .0.1 W
- AC Outlets
U.K. and Australia models. 1 (Total 100 W max.)
Korea model. None
Other models. 2 (Total 100 W max.)
Dimensions (W x H x D) 215 x 108 x 363 mm
Weight. 5.7 kg
DVD-E810
PLAYBACK SYSTEM
DVD video, video CD and SVCD, CD, picture CD, CD-R/RW, DVD+R/RW, DVD-R/RW
VIDEO PERFORMANCE
Video (CVBS) Output. 1 Vpp into 75
S-Video output. Y: 1 Vpp into 75 C:305 mVpp into 75
RGB (Scart) output. 700 mVpp into 75Ω
- Component video output. Y: 1 Vpp into 75 Ω PBcPRc: 700 mVpp into 75 Ω
AUDIO FORMAT
Dolby Digital/DTS/MPEG. Compressed Digital PCM 16,20,24 bits fs,44.1,48,96 kHz MP3 (ISO 9660). .96,128,256,320 kbps fs,32,44.1,48 kHz WMA. .64 kbps -192 kbps fs,44.1,48 kHz
- Analog Sound. stereo
LASER
- Type. Semiconductor laser GaAlAs
Wave length. 650 nm (DVD) 780 nm (VCD/CD)
Output power. 7mW (DVD) 10mW VCD/CD - Beam divergence 60 degree
AUDIO PERFORMANCE
DA Converter 24 bit/192 kHz
- Signal-Noise (1 kHz) 105 dB
- Dynamic range (1 kHz) 97 dB
DVD fs 96kHz2Hz - 44kHz fs 48kHz2Hz - 22kHz
SVCD fs 48kHz2Hz - 22kHz fs 44.1kHz2Hz - 20kHz
CD/VCD fs 44.1 kHz 2 Hz - 20 kHz Distortion and Noise (1 kHz) .0035 %
TV STANDARD (PAL/50 Hz) (NTSC/60 Hz)
Number of lines 625 525
- Playback Multistandard (PAL/NTSC)
CONNECTIONS
SCART .Euroconnector
- Y output. Cinch (green)
- P_B / C_B output.. Cinch (blue)
- P_R / C_R output.. Cinch (red)
S-Video output ....... Mini DIN, 4 pins
Video output Cinch
Audio output (L + R) . Cinch
- Digital output
.........1 coaxial, 1 optical (IEC60958 for CDDA/LPCM)
(IEC61937 for MPEG2, Dolby Digital)
GENERAL
- Power supply U.S.A. and Canada models AC 120 V, 60 Hz Australia model AC 240 V, 50 Hz U.K. and Europe models AC 230 V, 50 Hz Korea model AC 110-240 V, 50/60 Hz China model AC 220 V, 50 Hz
- Standby Power consumption. < 1.0 W
Power consumption.. Approx. 12 W
Dimensions (W x H x D) 215 x 108 x 330 mm
Weight 2.3 kg
*Specifications are subject to change without notice.
ATTENTION: VEUILLEZ LIRE CE QUI SUIT AVANT D'UTILISER L'APPAREIL.
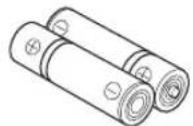
Piles (x2) (AA, R06, UM-3)
⑤Prises TAPE/MD IN/OUT
⑦Prise SUBWOOFER OUT
Cetteborne sert a raccorderlecaissondegraves.
Dolby Digital is an international company specializing in the production of high-quality digital audio and music. The company produces sound engineering products, including digital video compression (DVD), digital recording (CD), digital music (MP3) and digital music files (MP4). Dolby Digital has been working on a variety of projects that have focused on the development of digital systems for sound engineering applications.
MP3 (MPEG Audio Layer-3)
NTSC (National Television System Committee)
PAL (Phase Alternating Line)
STANDARD TV (PAL/50 Hz) (NTSC/60 Hz)
- Nombre de lignes 625 525
- Lecture Multistandards (PAL/NTSC)
RACCORDEMENTS
Receiver (RX-E810) 58
DVD-Player (DVD-E810) 61
Fernbedienung 62
⑦SUBWOOFER OUT-Buchse
NTSC (National Television System Committee)
PAL (Phase Alternating Line)
TV-NORM (PAL/50 Hz) (NTSC/60 Hz)
Receiver (RX-E810) 3
DVD-spelare (DVD-E810) 6
Fjarrkontroll 8
FORBERDELSER
Manuell stationsinstalling 37
Automatisk forinstalling 38
Manuell forinstalling 39
Stilla in en forinstalld station 39
Radiodatasystem-mottagning (Galler endast
Receiver (RX-E810) 58
DVD-spelare (DVD-E810) 61
Fjarrkontrollen 62
⑤TAPE/MD IN/OUT-jack
Se sidan 16 for information om anslutningar.
⑥AUX-jack
Dessa ingangar kan anvandas for anslutning av externakomponenter.
SUBWOOFER OUT-jack
Anslut subwoofern tillenna utgang.
⑧Systemkoppling (TO DVD-E810)
Sc sidan 12 for information om anslutningar.
AC OUTLET(S)
Se sidan 18 for information om anslutninger.
■ Frontpanelens display
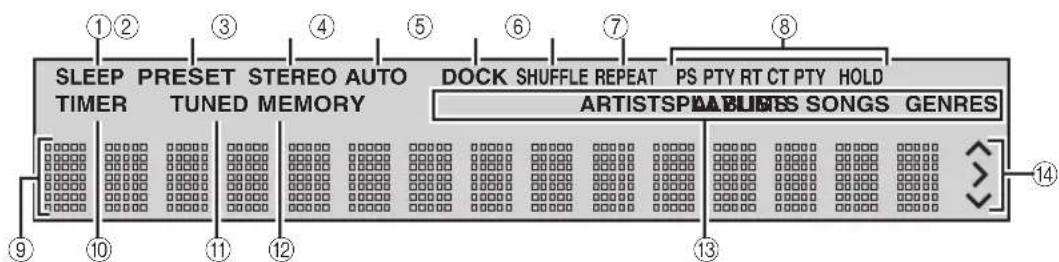
①Indikatorn SLEEP
Denna indikering visas nar insomningstimern ar inkopplad (se sid. 44).
②Indikatorn PRESET
Tryck pa PURE DIRECT pa frontpanelen pa receivern for att koppla in laget Pure Direct.
FM/AM-stationsinstalling
Manuell stationsinstalling
Om de mottagna signalen fran en viss onskad station ar svag, sa prova att stalla in den manuellt.

NTSC (National Television System Committee)
PAL (Phase Alternating Line)
TV-STANDARD (PAL/50 Hz) (NTSC/60 Hz)
Antal linjer 625 525
- Atergivning Multistandard (PAL/NTSC)
ANSLUTNINGAR
SCART-utgang .........Euroconnector
Y-utgang .Cinch-jack (gron)
PB / CB -utgang.. Cinch-jack (bla)
- Pr / Cr -utgang .Cinch-jack (rod)
S-videooutgang Mini DIN-jack, 4 stift
- Videoutgang . Cinch-jack
Ljudutgangar (vander hoge) .Cinch-jack
- Digital utmatning
............1 koaxial, 1 optisk (IEC60958 for CDDA/LPCM)
(IEC61937 for MPEG2 och Dolby Digital)
ALLMÄNT
Tipididisocospupportati 24
⑤Prese TAPE/MD IN/OUT
NTSC (National Television System Committee)
PAL (Phase Alternating Line)
Pan & Scan and Letterbox
STANDARD TV (PAL/50 Hz) (NTSC/60 Hz)

Pilas (x2) (AA, R06, UM-3)

Cable de control del problema (0,6 m)
⑤Jacks TAPE/MD IN/OUT
Vealapagina16paraconcerinformaciondeconexion.
⑥Jacks AUX
NORMAS DE TV (PAL/50 Hz) (NTSC/60 Hz)
- Nstreamo de lineas 625 525
Reproducciono Multiestandar (PAL/NTSC)
CONEXIONES
SCART .Euroconector
Salida Y. Cinch (verde)
Salida P_B / C_B . Cinch (azul)
- Salida P_R / C_R . Cinch (roja)
Salida S-Video Mini DIN, 4 contactos
- Salida de video . Cinch
- Salida de audio (L+R) .Cinch
Salida digital 1 coaxial, 1 optico (IEC60958 para CDDA/LPCM) (IEC61937 para MPEG2, Dolby Digital)
GENERALIDADES
Receiver (RX-E810) 3
DVD-speler (DVD-E810) 6
Afstandsbediciing 8
VOORBEREIDINGEN
Basisbediening receiver 22
Receiver (RX-E810) 58
DVD-speler (DVD-E810) 61
Afstandsbediening 62
Opmerkingen over discs 63
Basisbediening receiver
NTSC (National Television System Committee)
PAL (Phase Alternating Line)
DVD Video's发展格局 in the Netherlands.
DVD Video's发展格局 in the Netherlands.
DVD Video's发展格局 in the Netherlands.
DVD Video's发展格局 in the Netherlands.
DVD Video's发展格局 in the Netherlands.
DVD Video's发展格局 in the Netherlands.
TV STANDAARD (PAL/50 Hz) (NTSC/60 Hz)
OCHOBHOE YNPAJBIEHHE
OchOBIIe opeaHH pechBepa 22
IpeekJIOueHHe HAcTpoeK JINcIIJIeJ 1pOHTaJIbHOI IaHEJI.. 23
IopJepKHaembte Tnbl dckOB 24
OchOBIIbe onepaHH BocpOH3BeJeHHA HcKa 25
IIOBTOHoe BOCIIPOH3BEJHeHne IINcKa (IOBTOHoe BOCIIPOH3BeJeHne) 26
ClyuahHoe Bocpon3BeJeHne (CmeHaHoe Bocpon3BeJeHne) 26
Yka3aHHe IpoIIeIJIIEero BpeMeHH BocIpOnIHBeJeHHA (BpeMeHHoIIOHc) 27
Yka3aHHe KapTHHKn IpeBapHTe.TbHOro IpocMOTpa JIA BOCIIPOH3BeJeHHN (CkAHHpyIOHN IIONCK) .... 28
HactpoHaIopKa BocPiOn3BeJeHHa (Program Play) ... 29
Bb6op 3bIKOB 3ByaHn H cy6HTpOB/ NaCTpoKHaaynoKaHaJa 30
ΦokycnpoBka n3o6paXceHH 30
Bb6op yrTa npocMoTpa 31
YIIpaBJIeHHe MCHIO IINCKa 31
BocpoH3BcEHHc MP3/WMA/JPEG/DivX-dckOB 32
IpocMOtp HIN H3MeHeHHe HaTpoek BOCIIPOHN3BeJeHHHa TcJIeBH3Opc (MeHIO IIChIIe-Ha-9KpaHc) 34
OrpanHueHHe BocnpOn3BedeHnHa HcKa 35
YcTaHOBka yPOBnPoIHTeJIbckOTo KOHTpOIJI 35
BIOKINPOBka IIeKa 36
H3meHenHe IapOJIa 36
ONEPAÇΥM T(IO)HEPA
Hactpoika paanonporpamM M/AM 37
ABTOMaTHueckKa HacToPkKa 37
Puyna nactpoika 37
ABROMATHuecka IIpcdyctahOBka 38
PyHnA IpeynctaHOBka 39
Bb6op npcyaetahOBJIeHHbIX paHocTaHnI ... 39
HactpoKa CnCTeMb PaHnoaHaHHbIX (TOJIbKO MoJeHn IIO CoeHNHeHHoro KopoJIeBcTbBeJHKo6pHTaHHN HeCbePhoH HpTaHdHH, H EBpOnbI) 40
BbI6op IiporpaMMbI ChTeMbI PaHHOaHHbIX 40
OTo6paKeHHe HnΦopMaIIIN CnTeMbI PaHIOaHHbIX 41
DPyTNE ONEPAUIN
YctaHOBKa TaHMepa 43
YcTaHOBKa TaHMepa YacOB 43
YcraHOBka TaMepa cHa 44
YctaHOBka B aBTOMaTHueCKn peKHM OxHJaHHA 45
YupabTeHHe BHeHHHMKOMIOHeHTAMH 46
IocryHbIe OHepaHn 46
YcTaHOBKa KOIOB IIcTaHIOHOHoro VpabTeHHa.... 48
HcIOJIb3OBAHnE iPod 49
KoHpfHypaunHaNactpoeK DVD-HPoHrpblBaTe.Ia (MeHIO HactpOHK) 51
IapameTpbi MeHIO HAcTpoKKn 52
Ipe3aRpy3ka HacTpoek DVD-IIPOINrpBbATcJIa .... 56
DONOHHTEJIbHAR INΦOPMALNA
3bIKOBbie KOJIb 57
YcTpaHHe HEnCnPaBnOCTe 58 PecnBep (RX-E810) 58
DVD-ⅡpoHrpbIbAteJIb (DVD-E810) 61
PuyJTy 62
PpHmeeaHaIIO Dnckam 63
Hopmaia o nncke 63
O6paIeHHe c IuNcKOM 64
CipabovHHK 65
AynnoHHphiMaIIH 65
BunoeonHΦopMauiu 66
JorotnHbH 3HaKH 06 aBTOpcKHX npabax 66
TexHHueckHe npapameptbI 67
OnncaHne
PecuBep (RX-E810)
- MakcImaIbHoe cpeDHeKBaIpaTmYeCKoe BbIXoHoe HapJxKeHne Ha KaHaI 65 BaTT + 65 BaTT (6Ω,1KΓU,1% OH)
HacpoKa npeyctaHObKa 40 YM/AM paadocTaHcN - TepMNan doka iPod
- PeXMM Pure Direct
DVD-npounrpbBaTeNb (DVD-E810)
- Bocnpoun3BeJeHne DVD, Video CD, Audio CD, MP3 CD, WMA CD, DivX CD and JPEG CD etc.
BndeOBbIXoI nporpeccNBHO pa3BepTKI - LufpoBbIe BbIXoHbIe ONTueckne N KOaKcnaJIbHbIe rHe3da
O HactoIeM pyKOBoDCTBe
B DAHHo HnHcTpkyuHn, "RX-E810" OINcaH KaK "peCHebp" n DVD-E810" OINcaH KaK DVD-HPOnHrpBaTeJIb
B DAHHOH HNCTpyKINH ONHCAHBI ONEPaIHIN NO yipabJIeHNIO cHcTeMOI c NOMOIIbIO IyJIbTa IY, KpOME cIyAeB, KOrJa eTO HeBO3MOXHO. HeKOTOpBIC IN 3 DaHHbIX ONepaIH TaKKe BblIOJIHrOITcI NOMOIIbIO KHOIIOK fpoHTaJIbHOI HAHCJIN.
- OIIHCAHH H IJIIOCTPAHH IIbTa DY B DAHHOM pyKOBOCTBE OCHOBAHb HA MOeJAX JIA CoeIHHeHHORO KopoJIeBcTBa BeIHKo6pHTAHHH H CeBepHOH IpHaHH, H EBPOHb, cCn HETpyHX orOBOPOK.
O3Haayet COBETJINIO6JIeYHNNyIpaJIeHHN.
B npHmeaHnx coepKHTcBaXha HΦopMaIII NO 6e3OiaacHOH N HcTpyKIIIM NO ynpabTeHHIO.
-ⅡaHHOe pyKOBOCTBO OTHeHaTANO IIPOHO3BOCTBA. H3aHH TeXHHueckHE XapaKTepeHCTKN MOrY TAcTHNO H3MeHHTbCcIeJIbO yIyIeHn KaeeCTBa H.T.D.B cIyue, ecH NMeKOTc pa3IHn MeJy pyKOBOCTBOM n aIIHapATOM. IInpOpHTet OTJaETcAIIHapATy.
Noctablanemble akceccyapbl
K JaHHOMy aHapay npHaIraTc r cJeIyoIe aKceccyapbI. Ipeep NOIKJIIOyeHem IaHHoI cHCTeMbI, y6eHTecb, TTO HMeIOTc cJeIyoIe nctaiJH.

Nybld

Batapeu (x2) (AA, R06, UM-3)

Ka6eIb ynpaBHeHnCnCTemO(0,6M)

BHTpeHHaM-ahTeHHa (MoJeN nAaCwA,KaHaDbI,KnTa,TaBaHa,N A3n)

BHytpenHHa QM-ahTeHHa (MoJeI IJIr CoeHNHeHOro KoponeBCTBa BeNko6pTuAHn n CeBepHo npnaHnn, EbpOnbl, AbcTpaHn n Kopen)
PamouhaAM-aHTehHa

WtbpoeBn Bndeokaebb (1,5M)

山TbipeBoa aynokabe1b(1,5M)

Ka6eIb nTaHn
CnCTeMbI ynpaBJIeHnI nФyHKcnn
Pecnbep (RX-E810)
ΦpoHTaJIbHaJaNaHeJIb
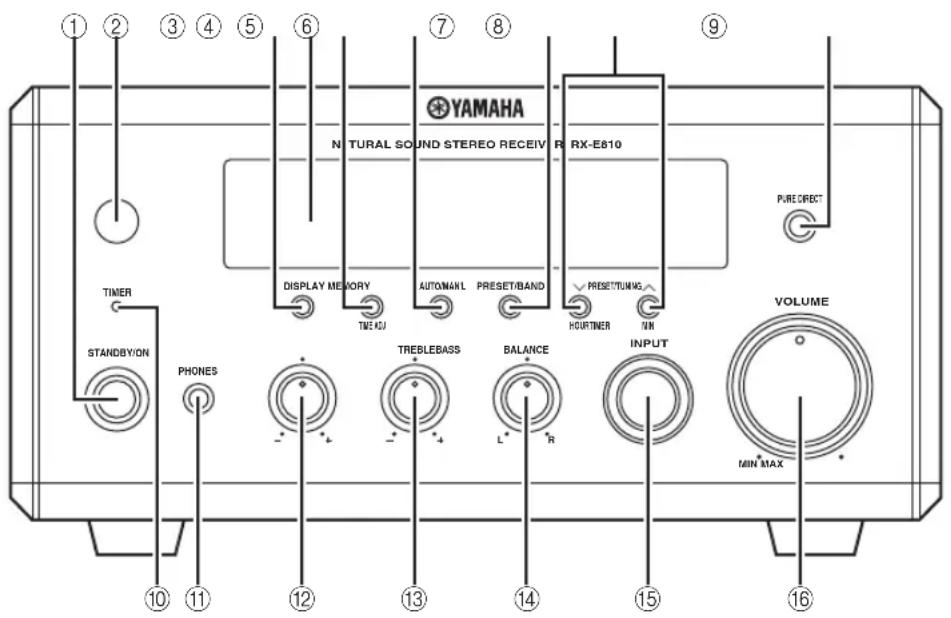
①STANDBY/ON
BkIIOueHHe pecHBepa Hn erO yTaHOBka B peXHM OxHaHH (CMOTpHTe cTp.19).
②CehcopДиctaHUNHOrOуnpaBJIeHnA
PnemcnHraJIOB OIT nyIbTa NY.
③DISPLAY
IpeekJIOueHHe HOpMaunn,OTo6paKeHHoHa IINCHJIeec pOHTaJIbHOH NaHEJN (CMOTPnTe cTp.23).
④DucnJIeFpOHTaIbHOI naHeJI
OTo6paXeHne pa3JIuHoi HhfoPmaun KaK TekyIeec Bpemn HJIN YacTota HaCTpoNk.
⑤MEMORY (TIME ADJ)
CoxpaHHe HpeJyCtAHOBJIeHHo paIHocTaHINB IaMaTH. YIepKHBaHTe HaKaToH daHHyIO KHOIIky 60JIee cEkyHbI dIa ABTomathueckO HpeJyCtAHOBKn paIHocTaHIN (cmOTpHTe cTp.38).
- YcTaHOBka YacOB IO HcHIOJIb3OBAHHa yHKUHN TaHMepa (CMOTpHTe cTp.19).
⑥ AUTO/MAN'L (TIMER)
- IIepeKJIIOueHHepeXHMa aBTOMaTHUeCKoH NaCTPOIN HpeXHMa pyHOn HaCTPOIN, INpN BbIbOpe cyHKINn TIOHEpa KaK hctOuHnKa IprHema (CMOTPHTe cTp.37).
BkJIOueHHe HIN OTKJIOueHHe yHKIIIN TaMepa YacOB (CMOTpHTe Ctp. 43).
⑦PRESET/BAND
IpeekJIOueHHe YM,AM,IpeKnMa IpeynycTaHOBKn,IIpN BbI6ope cyHKuHH TIOhepa Ka Kc HcToUHkA IIpHEma.
⑧ PRESET/TUNING I (HOUR, MIN)
Bb6op TaCTObIKn, nPn Bb6ope fynKnnn TIOhepa KaN hctOuHnKa IIpHeMa.
PURE DIRECT
BkIOueHHe HnB bIKIOueHne pexHMa Pure Direct (cmoTpTe cTp.22).
⑩ TIMER LED
3aropaeTcI np BkJIIOueHnn TaHMepa YacOB (cmOTpHTe cTp.43).
1PHONES
BbIOaynocnHaIOB IJIHINHBNyAJIbHOI npocIyHHBaHHYepe3HayHHKn.
BASS
HactpoKa Hn3KoyacToTHoXapaKTepeNCTHK (cmOtpHe cTp.22).
13TREBLE
HactpoKa BbICOKOaCTOTHOXapaKTepeNCTHK (cmOpHTe cTp.22).
④BALANCE
HaTPOKa yPoBnI rPOMKoCTH OTeJIbHO JIEBOrO n IpaBOrO KaHaJa KOJOHOK (CMOTpHTe cTp.22).
15INPUT
Bb6op HcToHnka IIpHaMa.
16VOLUME
PeryJINpOBKa yOpOBH rPOMKocTH.
3aHnnaHeJIb
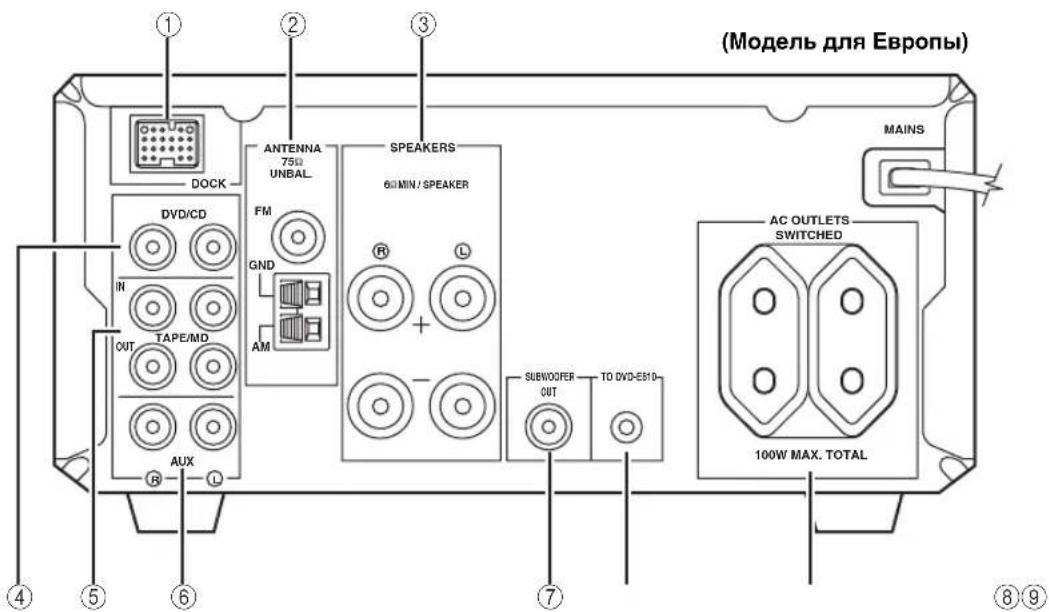
①TepMNHaJ DOCK
Bb6epHTe IJII NIOKJIIOUcHEnyHNBepcaJIbHOro JOKa YAMAHA IJIa iPod (HaipnMep, YDS-10, IPOJAIIOUIINc OTJeJIbHO), K KOToPOMy MOXHO IOIKIIIOuHTb iPod (CMOTpHt e cTp.17).
②TepMNHaJIbI aHTeHH
HOPMaHHIO NO NOKJIOueHHIO, CMOTpHTe cTp.15.
③TepMnHaJIbI KOJIOHOK
HOPMaH NIO NOKJIOeHHIO,CMOTpHTcTp.13.
④ΓHe3daDVD/CD
IIHΦopMaIIN IIO IIOKJIHOeHHIO, CMOTpHTc ctp. 12.
⑤ΓHe3da TAPE/MD IN/OUT
IIHΦopMaIIH NO IIOKJIHOeHHO, CMOTpTe cTp.16.
⑥ΓHe3da AUX
NCHIOJIb3yOTcJIINIOJKJIOUChHNR BHCIIHHX KOMIOHEHTOB.
⑦ THe3do SUBWOOFER OUT
HcIOJIb3yETcI IIOIKJIOUeHnca6ByΦepa.
⑧The3DO CNTEMHORO COEHNHTENA (TO DVD-E810)
IIHΦopMaIINIO IIOKJIHOeHHO,CMOTpTe cTp.12.
AC OUTLET(S)
IIHΦopMaIINIO IOnKJIHOeHHIO,CMOTpHTe cTp.18.
DucnneI pOHTaIbHoi naHeJI
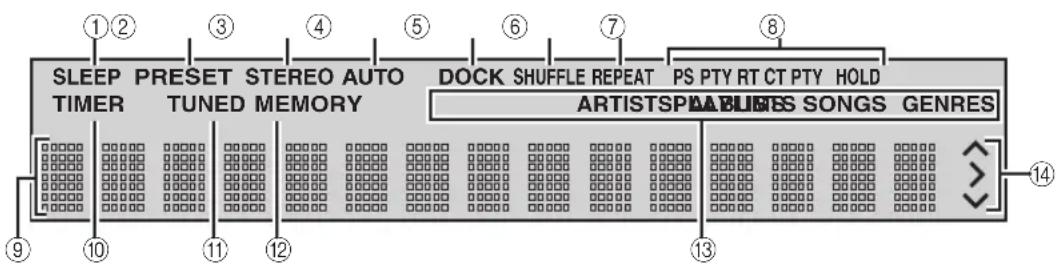
①ИнданkaTop SLEEP
3aropaeTcI np BkJIIOueHnn TaMepa cHa (CMOTpTe cTp.44).
②ИнданkaTop PRESET
3aropaetc np pyuho npyeuctahOBke paHocTaHn (cmOTpnte ctp. 39).
③ндкаTop STEREO
3aropaetc npn npheMe pecHBepom cnIbHOro cnHaJa ot crepeofoHNuecko YM tpaHcJIuH.
4MnKaTop AUTO
3aropaeTc np yctanOBKe pecnBepa B peXHM ABTomatueckoH hactpoKu (CMOTpHte ctp. 38).
⑤ндкатop DOCK
BbCBeuHBaETcI pIINIOKJIIOUeHHN iPod K yHMBepcaJIbHOM IOky YAMAHA IJIa iPod (HaIIpHMeP, YDS-10, IIpoJaIOUHcS OTeJIbHo), IIOKJIIOUeHHOMy K TepMHHaJIy pecHBepa DOCK (cmOTpHTe cTp. 17).
⑥ндкaTop SHUFFLE
BkIIOaTeTc npu yCTaHOBe iPod B CMeIIaHHbI pEKM.
⑦ MnKaTop REPEAT
BkIIOuAeTc npu ycTaHOBke iPod B peXHM IOBTopa.
⑧MHДиKaTOpbI CnCTeMbI PaDIOaHhbIX (ToJIbKO MoDeJI NДЯ CoEINHeHHoro KopOJIeBcTbA BeJINKo6pNTaHmN n CeBepHO npJHaHnn, n EbpOnbl)
BbCBeYBaETcHa3BaHHe HhΦopMaHn CnCTeMbI PaHNoaHHbI, TpaHCJInpyEmoN PpHHMaemO paHocTaHHe CnCTeMbI PaHNoaHHbI.
Инд�示КатОР PTY HOLD
BbICBeYHbAeTcR BO BpeM rONcKa peCnBepOM paHocTaHm CnCTeMbI PaHNoJHaHHbIX BpeXHMe PTY SEEK (cmOTpHTe cTp.40).
⑨MHorofoyHKUHOHaJIbHbI INHΦopMaUHOHHbI DnCnJe
OTo6paXeHne pa3JInuHOI HnΦopMaun KaK TeKyIeec Bpemn HJIN YacTota HaCTpoNk.
10HdkaTop TIMER
MnraeI npu ycTaHOBke pecHBepa BpeKHM HacTpoKN TaHMepa YacOB (cMOTpHte cTp.43).
①HdkaTop TUNED
3aropaeTc npn Hacptponke pechBepa Ha paHIOCTaHIO.
② HdkaTop MEMORY
3aropaetc HIN MHaET BO BpemI IpeynctaHOBKn paHIOCTaHn.
13HnKaTopbMeHIO iPod
3aropaeTc,ecJIN BbIbpaHO MeHIO iPod (cmOTpnte ctrp.49).
14MHAnKaTopbIpa6oTbI iPod
OTo6paXaIOT pa6oYHe KypCopHbIe KHOIIKN IIpH HcIOJIb3OBAHH MeHIO iPod B pexHMe IpocMOTpa MeHIO (CMOTpHte cTp.49).
DVD-пponгьвателb (DVD-E810)
ΦpoHTaJIbHaЯ naHeJIb

①ЛотOK диска
YJepKHBaHHe NsKa JIg BOCIpON3BeJeHH.


OTkpbltne n 3aKpbItne JIoTK aNcKa.

OcTaHOBka BocIpOn3BeJeHn (cmOTpHTe cTp.25).

Haayn np3a Bocnpn3BedeHna (cmotpntcTp.25).
⑤STANDBY/ON
BKnIOueHHe DVD-IIpOHHrpBbAteJI HIN erO yctaHOKBa BpeKHM OxHJHaHHa (CMOTPte cTp.22).
⑥ MnDkaTop PROGRESSIVE
BbCBeuHBaETc npn BKJIOueHH pekHa nporpeccHBHO pa3BepTKN (CMOTpHTe cTp.54).
⑦ DnCnJeiΦpOHTaJIbHOI naHeJI
OTo6paKaetekyuiee coctoHneDVDnponrpbIbATEJ.
⑧Cechop ductaHOnHHoro ynpabJIeHnA
Pnem cHraIOB OT nyIbTa IY.

IepexoHa HauaIO TeKyuero pa3eJa/
HOHOrpaMMbI. HaxMHTe H ydepxBaHTe JJI
6bICTPOI pOKpyTKn Ha3aI (CMOTPte cTp.25).

IepexoHa cJeIyIOHn pa3neJ/foHOrpaMMy. HaxMHTe n yIepxHBaHTe JIA 6bICTPO IpOKpyTKBIIpeE (CMOTPHTe cTp.25).
3aHnaHaHeJb
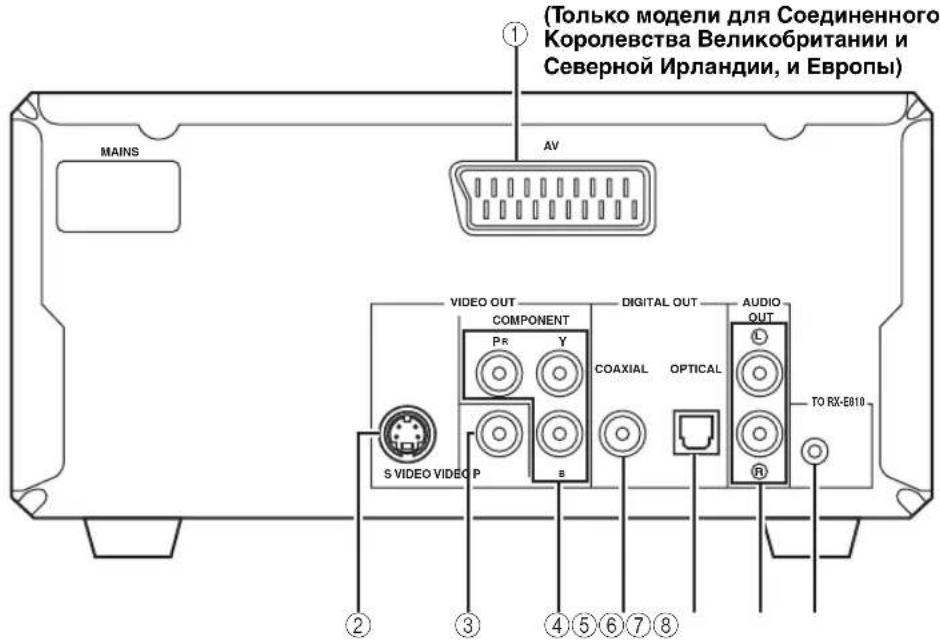
①TepMNHaJ AV (ToIbKO MoJeN dJa CoeHHeHHoro KoponeBCTBa BeNKo6pTuHn n CeBepHOuPnaHn, n EbpOnbl)
IIJIa HnΦopMaunu IIIOIouKJIOUeHHIO, CMOTpntcTp.14.
②ΓHe3Do SVIDEO
IIJIa HnΦopMaHn HIO IIOJKNIOUeHHIO, CMOTpntcTp.14.
③ГнэзdoVIDEO
IIJIa HOpMaHIN IO NOJIKIIOUeHHIO, cMOTpIe Ctp.14.
④Гнеба COMPONENT
IIJIa HnΦopMaHn HIO NIOKJIIOueHHIO, cMOTpHTe Ctp. 14.
⑤Гнэздо COAXIAL
JINHΦOpMaIIHHIOIIOKJIHOChHIO,CMOTpHTcTp.16.
⑥ГнeЗДо OPTICAL
IINHOPMaHHIOIOIKJIOHHeHHO,CMOTpHTcTp.16.
⑦ Hne3da AUDIO OUT
IIHΦOpMaHHIIO IIOKJIHOeHHO,CMOTpHTcTp.12.
⑧The3do CnCTemHOro CoeHNHTeJIa (TO RX-E810)
IINHOpMaUNNIOIOKJIIOUeHHIO,CMOTpHTcTp.12.
NyIbT dy
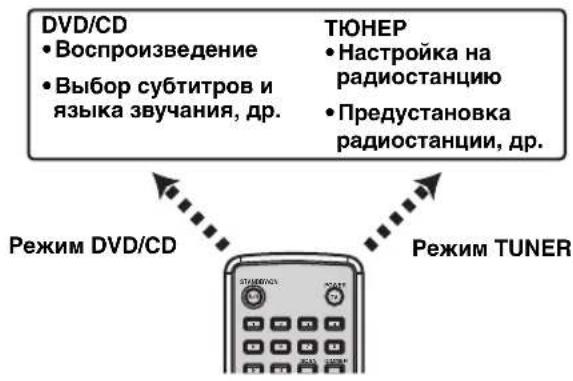
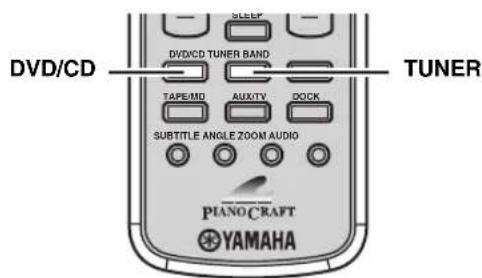
06uueyHKcnn
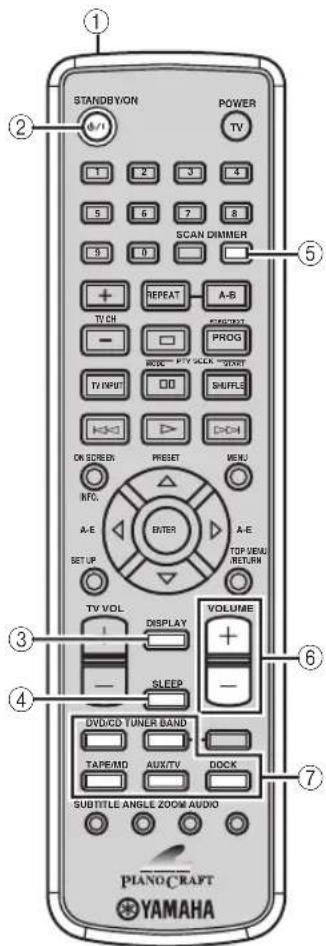
JaHHbI NyIbT IY yIpaBJIaTe JAnHO CHCTeMOB B IByX OCHOBHbIX paOuyx peKHMax. Jo hauJa yIpaBJIeHNr YHKIIHMn KaJIOrOpeKHMa, cJeNyET BbI6paTb peKHM IIra H3MeHeHnaHaueHnn KIOIOK IyJIbTa IY.
PepekloueHne pexmay npaBHeHn
- PexMM DVD/CD: HaxMMtC KHOIIky DVD/CD.
- Pekm TUNER: Haxmte Khoiky TUNER.
C IOMOIOIyIbTaIY, TaKKe MoKHO yIpaBJIrTb TeJIeBH3OpOM HpyHMN KOMIOHeHTaMH (HaIIpHMeP, iPod), IOIKIOUeHHBM K pecHbepy. IIOIpO6Hee, CMOTpHTe "YIpaBIEHHe BcIHHHM KOMIOHeHTaMH" Ha cTp. 46.
PpMueaHne
OIIHCAHH H IJIIOCTpaHH IIyIbTa IY B DAHHOM pyKOBOCTBe OCHOBAHbHa MOeJIaX IIr CoeINHeHHORo KopoiJEcTBa BeJIHKo6pHTaHHN H CeBepHOI PpHaHHN, H EbpOnbI, cJIn Het npyrx orOBOPok.
Oepeaunn Iy BcexpemMOB
Korda IIyIbT IY haoHntcB JIO60m paOoem peKHMe, CJEDyIOUHnE OIIepaHHN IOCTyIHbI IIN YIIPABJIeHHpeCNBepOM.
①IpepaTuk INΦpaKpacHoro cnHaHa
NocbIJaTe CHTHaJIb Ha KOMIOHeH TIIa yIpaBJIeHH.
②STANDBY/ON()/1
BKnIOueHHe peCnBepa HIn erO yCTaHOBka BpeKHM OxHaHH (CMOTpHTe cTp.19).
③DISPLAY
IpekeKIOUeHHe HOpMaUHN,OTo6paKeHHoHa IINHJIe cpoHTaJIbHOIIaHEJIN (CMOTPITc Ctp.23).
④SLEEP
YcTaHOBka TaHMepa Cha Ha pecHepe (CMOTpHTe cTp.44).
⑤ DIMMER
HactpoKa npKocTH nCnIeepoHTaJIbHOI nAHeJIpecnBepa (cmOtpHte cTp.23).
⑥ VOLUME + / -
HaetpoKa 06Iero ypOBnI rpmKocTpeCBepa.
⑦ Khonkn Bb6opa nCTOuHnKa
Bb6op HcToHnKa IIpHeMa Ha peCnBepe.
OnepaHH STANDBY/ON, DIMMER u SLEEP TaKke yipabraIOT DVD-ipoHrpBbATcIeM, KOrJa DVD- ipoHrpBaTeJIb IOJIKIOUeH KpeChBepy Upe3 IocTaBIAEmbIK Ka6JIb cHCTeMHOrO yipabJIeHHa (CMOTpHTe cTp.12).
Pexm DVD/CD

Onepaun,doctynbIeBpeXmE DVD/CD
IJRA DVD- npOnpBbAteJIa,doCTyINbI cJeIyUoiNe oIepaIIH.
IpeBbHHeHHemCJyIOuHX OepaHn,HaXMHTe DVD/CD yTaHOBKn Iy BpeKm DVD/CD.
①REPEAT
Bb60peXHaIOBTOphOBOCINpOH3BeDeHHA (CMOTpHt cTp.26).
②
OcTaHOBKa BocPOn3BeDeHnna (CMOTpHTe cTp.25).
③
Iay3a Bocpon3BeDenHn (CMOTpHTe ctp.25).
(4)
Haayao BoCippon3BeneHHa (CMOTpTe ctp.25).
⑤,
IpepxoHa Haayao Tekyuero pa3eJa/foHOrpAmMbI HIN cJeIyUOeRo pa3eJa/foHOrpAmMbI. HaxMITE H yepKnBaTe HaKaToH JIA yCKOpEHNO IpeMeOTKn Ha3aH IN BInBHePd (CMOTPHTe CTP.25).
⑥ON SCREEN (INFO.)
OTo6paXeHHe MeHIO DcIIeIe-Ha-3KpaH He TB 3KpaH e HIn IpeKIOUeHHe IIcIIeR BpeMeHH CD-dHcKB (cmOTpHTe ctp.34).
⑦SETUP
OTo6paXeHHe McHIO HAcTPOKn Ha TB 3KpaHc (CMOTpIte cTp.51).
SUBTITLE
Bb6op 3b1ka cy6HTpOB (cmOTpuTe ctp. 30).
⑨ ANGLE
Bb6op yrJia npocmoTa pa (cmToptte ctp. 31).
10LcnpoBbIe KhoNkn (1-9,0)
BBoI IINΦpOBbIX 3HaYeHn IJIy yKa3aHnI npaMeTPOB HIN HOMePOB pa3JeIOB/ΦoHOrpaMM.
⑪SCAN
IpeBapHTeJIbHbI O63Op coepKaHHa DVD-Jncka HIN VCD-Jncka (CMOTpHTe cTp.28) HIN BOCIpON3BeJHeNc IepBbIX HeCKOJIbKnx CeKyHk KaXIOI ΦOHORpaMMbI Ha CD-ⅡncKe (CMOTpHTe cTp.25).
12A-B
IIOBTOPOIpeJeJIeHHoroOTpe3Ka BHyTpnaPa3Ja/foHOrpaMMbI (CMOTpHTe cTp.26).
PROG
OTo6paKeHHe IporpamMHO rCnNcKa, HIOJIb3yeMOr OIIa FyHKIIN IporpamMHO BOCIpOn3BeJeHn (CMOTPte cTp.29).
④SHUFFLE
BKKIOUeHHe/BbIKIOUeHHe ΦyHKuHH CMeIaHHO BOCIIPOUN3BeJeEHn (CMOTpHTe cTp.26).
15 MENU
OTo6paKeHHe MeHIO DVD-Ⅱncka (cMoTpIte cTp.31) HJIMeHIO yIpaJIeHHa BocIIpOH3BeJeHHem VCD-Ⅱncka (cMoTpIte cTp.31).
16TOP MENU/RETURN
IpcexoHa HaHaJIO McHIO DVD-JnCka (cMOTpTe cTp.31) HIN IpeBbIyIe ee MeHIO ynpaBJIeHHa BOCIIPOHN3BeIeHHa (CMOTpTe cTp.31).HaXMMte H yIepKnBaIte IIa BO3BpaTa Ha IpeBbIyIe ee MeHIO DVD-JnCka.
⑦KypcopHbIe KHOIIKN (11) ENTER
BbI6op Iapametpa Ha 9KpaHe MeHIO Hn yKa3aHne BbI6paHHoro Iapametpa.
18AUDIO
Bb6op 3bika 3ByaHnna (cMoTpHte cTp.30).
19:ZOOM
YBeJIHHeHne OIIpeIeJIeHHoJ YacTHn KapTHHKN (CMOTpHTe cTp.30).
PexmTUNER
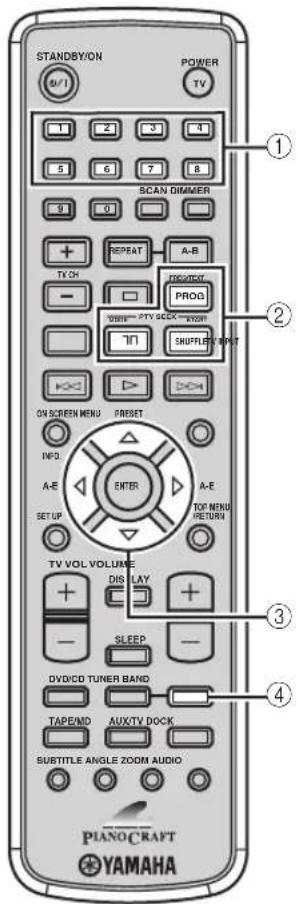
Onepaun,doctynbIeBpeXnmeTUNER
IpecnBepaIOCTyINHbCJeyKIOHNcOIEpaIIH.

Pepd BbHIOJIeHHem CJeIyIOIIx OHepaHn,HaKMHTc TUNER yctaHOBKn IyBaTay BpeKmTUNER.
①LunΦpoBbIe KhoNKn (1-8)
Bb6op Homepa IIpeyctaHOBJeHHoI paHIOCTaHIIIN (CMOTpHTe cTp.39).
②KHOHKn HAcTpoKn CnCTeMbI PaHNOaHHbIX (ToJIbKO MoDeJI nДЯ CoeINHeHHoro KopOJIeBcTBa BeJIHKo6pNTAHm N CeBepHoJ UplAnDm, n EbpOnbl)
FREQ/TEXT
IpeekJIOUeHHe IncJIeE ChCTeMbI
PaHNOaHHbIX Ha peXHM PS,peXHM PTY,peXHM RT,peXHM CT (ccn paHIOcTAHnna
IIpcIOCTaBJIeT COOTBcTCTByIOIInc ycJyTH) HnHa
IHCJIeN YacTObI (CMOTpHTe cTp.41).
PTY SEEK MODE
YcTaHOBka pecHBepa BpeKm PTY SEEK (CMOTpHTe cTp.40).
PTY SEEK START
Haiaio IIOHcKa paHocTaHnH HocIe BbI6opa HyKHO TIIa IIporpaMMbIBpeKHMe PTY SEEK (cmOTpIte cTp.40).
③ A-E, PRESET △I
HaKaB KHOIIKy A-E , BbI6epHTe rpyIpy
IpeYcTaHOBJIeHHbIX paIIOcTAHIN (A - E) H 3aTeM c
HOMOIIbIO PRESET / BBI6epHTe HOMe
IpeYcTaHOBJIeHHoI paIIOcTAHIN (1 - 8) (CMOTpHTe
ctp.39).
④BAND
IpeekJIOueHne peKIma paIIIOIIpHema UM,AM,H peKIma IIpeDyCTaHOBKn.
YctaHOBka 6aTaapeek B nynbT dy
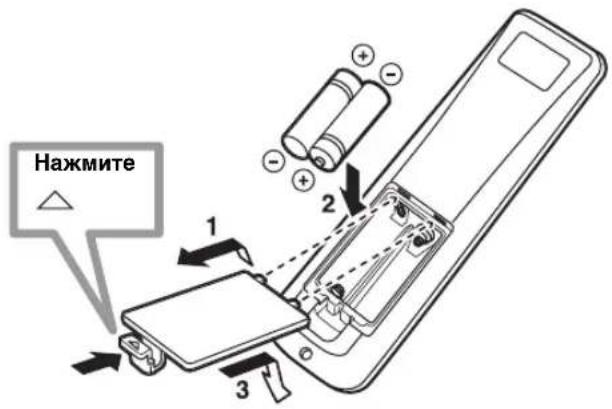
1 HaXMMTe Ha 3HaOK HaKpbIuKe OTDeJIeHnA Jn86aTapeek N OTKpoTe KpbIuKy.
2 BCTaBbTe IBe NOcTaBJIeMbIe 6aTapeKn (AA, R06, UM-3) B OTeJeHne IIn 6aTapeek. Y6eHITecb, YTO 6aTapeKn YcTAHOBJEHI B COOTBeTCTBUN C O6O3HaueHHMaN IIOJIaRPHOCTH (+工 -)
3 3akpoTe KpbIshKy.
PnmuMeaHn
He nioJIb3yIte cTapyIO 6aTapeIKy BMcTe c HOBoN.
Hc HIOJIb3yIte paJINHbIe TIIbI 6aTapeck OIOHOBpeMeHHO (HaIPnMEp, IIeJOuHbIe I MapraHHeBOuHHKOBbc).KaJbIi THI 6aTapeck O6laJaact yHkaJIbHbIMx XapaKTcPcHTHKaMn, JaXe cCJIH Hx φOpMbI COBIIaIaOT.
EeH 6aTapeKn 3aKOHnIHcB, HeMeJIeHHo H3BJeKHTe Hx nIyIbTa IY IINIpeNOrTbaIeHNBa IIIN IPOTeKaHHN KHCIOBTi.
Bb6paCbBAHTe 6aTapeKn B COOTBeTCTBHN C MecTHbIMN IIpaBnJaMn.
Ecn6aTaapeKn HauaHn IpoteKaTb, HeMeJieHNO H36abBtec b HTHX. ByIbTe BHHMaTeJIbHbI H He daBaHTe KHCIOTe, BBTEKaIOHe H3 6aTapeKn, coPpHKacTaBc c BaIIe K0Ke HIN OJekIo. IpeJe yctAHOBKOHOBBIX 6aTaapeK, HaHcTo BItPHTe OTdJIeHHe IIa6TaapeK.
-ⅡIa coxpanenHn HAMrTH NylbTa IY, npoN3BcHHTe 3amchy 6aTaapeek B TeYeHHe DByX MHHyT.
IcnoJb3ObaHne npJbTa Dv
IyIbT IY IOJIJKCH HcHIOJIb3OBA Tbce B IIpeJeJax 6 M OT yIpaBJIeMOrO KOMIOHcHTa N IOJIJKeH 6bITb HAipabJen Ha ceHCop IY (CMOTpIte cTp. 3 n 6).
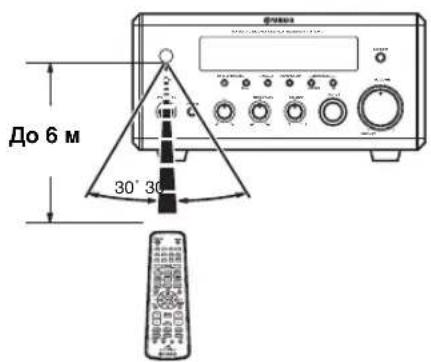
Приимechanicals
EyTe octopoxHbH He npoHbaTe XnKocTb Ha HylbT
- Bynte octopoxHb Hhe poHnTe npIbT IY.
HeocrabTneIyBtNyBCJeIyIOHmMecTx: -KapKHX HIN BIAxKHbIX MecTaX,HaIIpHMeP,BO3JIe 06oRpBaTeJHIN BBAHHO
-01eHbXOJOIDhBIX MecTaX
-ⅡbljblbIXMCCCTAX
Поdkлючени систembl
IpejIOIKJIOUeHHem CnCTeMbI, BHIMATEJIbHO H3yHTe CJJeYIOIIyIO IPOuepyu II pHmecAHn. BoJIce IOpO6Ho O KOJIOHKax (NX-E800), cMOTpHTe pyKOBOCTBO IO 3KcIIyataHN K HNM.
PnmeaHne
Ioka He 3aBepHe Bce Ka6eJIbHbIe coeHHHeHn, He IIOKJIIOYaTe cHIOBOH Ka6eJIb pecHBepa, DVD-IPoHrPbIBaTeJIA, HIN JpyTHX KOMIOHCHTOB K CcTH.
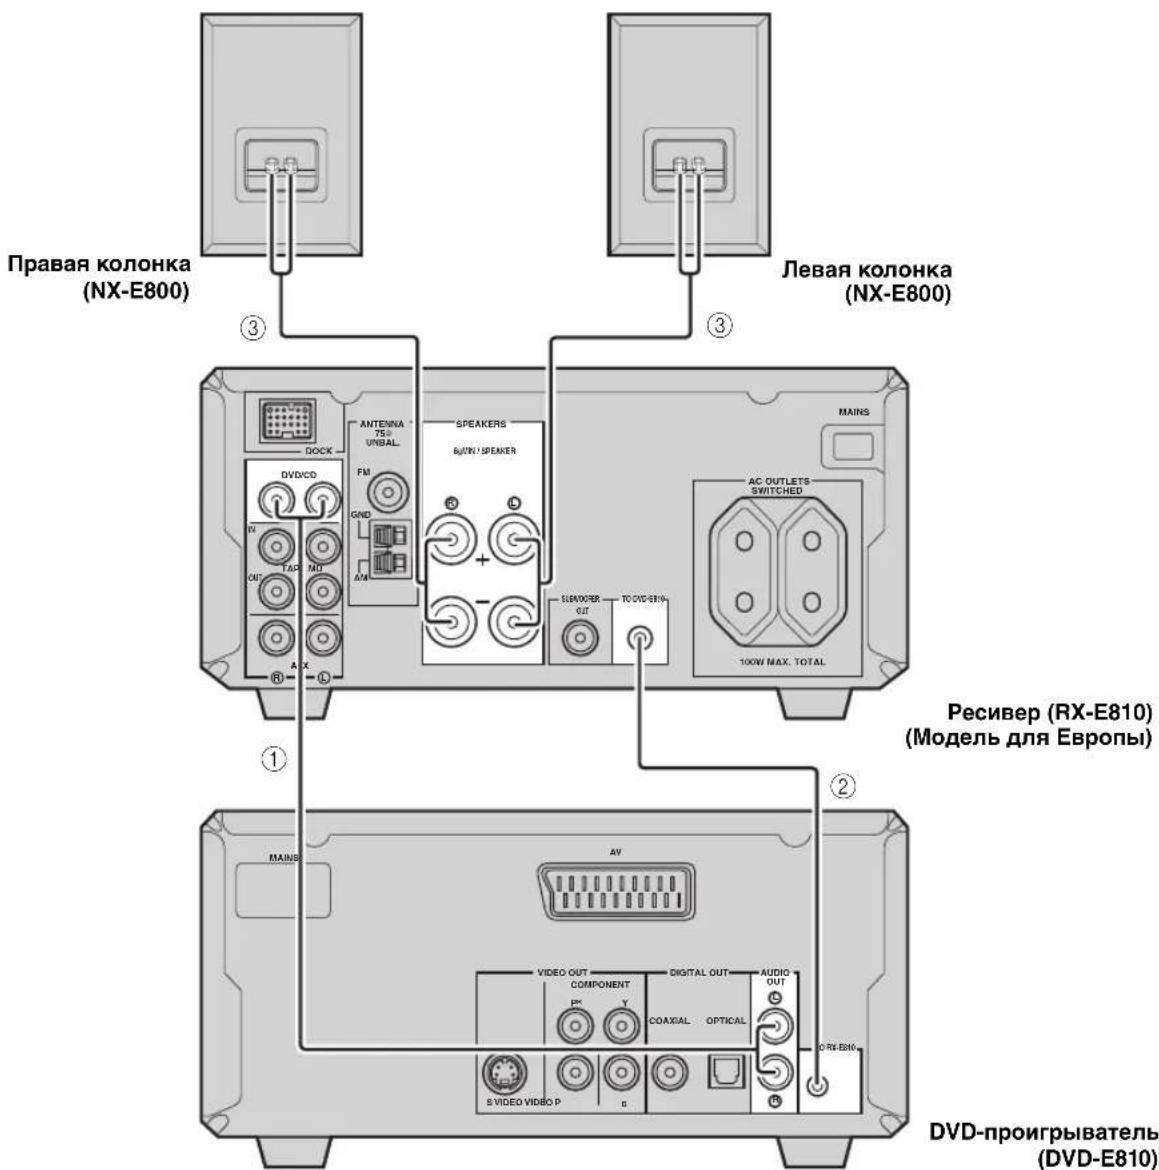
① C I IOMOIIIO IOCTABJIeMoro IIITbIpeBOrAO ayHOKa6eJI, IIOKJIIOUHTe rHe3Ja DVD/CD (L/R) pecHBepa K rHe3JAM AUDIO OUT (L/R) DVD-IPoONrPBbIbATEJI.
② C I IOMOIIIOIOCTABIAEMOROKa6JIa CNCTeMHORYIpaBJIeHNA,IOIKJIOUHTeRHe3IO CNCTeMHOROCoeINHITeJI (TO DVD-E810)pechBepaKrHe3IyCNCTeMHOROCeINHITeJI(TO RX-E810)DVD-IPoONHPbIBaTeJI.
③ПОДКЛIOчHTe TepMHHaJIbI KOJOHKN (L)peCBepa K TepMHHaJAM KOJOHKN JTeBOI KOJOHKN H TepMHHaJIbI KOJOHKN (R)peCBepa K TepMHHaJAM KOJOHKN IIpaBON KOJOHKN, HIOJIb3yR Ka6eJIN KOJOHOK, HOCTaBJIeMbIe c akyCTHueCKO cnCTeMoN (NX-E800).CMOTpHTe cTp.13 nIЯ nOIIpo6HoCTeH.
#
CoeHHHe cHCTeMHOrO yIpaJIeHn HcIOJIb3yETcra IITc HxPOHn3aIIH OIIpeJIeHbIX OIIpaII MckIy peCHBepOM H DVD-IOpoHRpbIbaTeJem.
- Ecin BxOTHTIIOKIIHOHTb yCINTEJIb CIIHPOBIM BXOJOM BmecrTO RX-E810, HcIOJIb3yTe rHe3Ja DIGITAL OUT (COAXIAL IN OPTICAL) DVD-IPoHrPBtAEJIH cKOHPhIpyHpye IapamTp "UHPOBOB BbIXOJI" B MeHIO HaCTpoKN (cmotprte crp. 52).
IopKnluoyehne Ka6eJkoJohKn
PnmeaHn
Y6eHTecbBIIpaBnHbOMIOKJIIOueHHJIEBOrKaHaJa (L),IpaBoro KaHaJa (R) " + " (KpaChbI) II " - " (YepeHbI). 3ByaHHeOTKOHOK6yIDCTOTCYTCTBOBaTbIpy HEPaBnHbOM BbIOJIHeHHNIOKJIIOteHH,II 3ByaHHe 6yIDCT HcCCTCBHbIM COTcyTCTBhCM HIN3KoHaCTOTHO RCHHaJa IprH Heco6IOJeHH NIOJpHocTHIpy IOIKIOUChHH KOJOHOK.
- OTKpbIbIc IIPOBOJa KOJIIOHOK Ic IOJIJKbI COIIpHKaCaTbc Jpyr cIpyROM, HIN C IIOBOJ MeTaJIINYeCKOJ TAcTBIO pccNBepa. 3TO MOKCT IIpHBecTH K IIIOJOMKe pccNBepa H/IIH KOJIIOHOK.
IIpnIOKIIIOUcEHINIpyrOaKyCTHueckoCHCTeMBmecTO NX-E800,y6eITTEcb,HTO HcIOIb3yeMbIEKOJIOHKINHEOTHMIIeHaYKa3aHHnHa 3aIHHeIaHeJIpeCBHepa,HTO OHNC MaHTHTbIM KpAHO.MCJyaeBO3HHKOBeHHINOMEX HaKpAHe H3-3a KOJOHOKCMaHHTHBIM KpAHO,pacIOJOXHTeKOJIOHHHaPacCTOHHNOTKpAHa.
1 ydaHnTe np6n3ntbHo 10 MM (3/8 IIOMa) n3OJauNoHHoHO cIOn Ha KOHax KaXdOro Ka6eJI KOLOHKn 3aTeM CKpyTHe OTKpbITbIe npOBDa Ka6eJI dJI ppeDToBpaueHn KOpOTKOrO 3AmbKaHn.

2 OtkpyTnte roJIOBky.

Kpachbl: noIOXHTeHbHbI (+)
YePbHb: oTpuaTeHbHbI (-)
3 BctabbTe oroneHHbI npoBd TepMNHaJ.
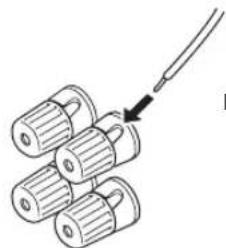
H CeBepHO HpJIaHIN, H ABCTpaIIHH 1 BbIXoI
MoJIb IIa Kopen. OTCyTCTByeT
IpyrHe MoJeJIH. 2 BbIXOJa
JaHHb(bie) bixOJ(bi) HIOJIb3yOTc JI IIOJauH IIITaHn Ha DVD-IPoONrPbIBaTeJB HIN JIOBbIe IOIKJIOUeHIIbIE KOMIOHEHTbI. IIOKJIIOHTe CHIOBBie Ka6eJI INpyTHX KOMIOHENTOB K DaHIOMY(bIM)
BbIXOy(am).ПИТаHHe NaДaHbIe(e) BbIXoI(bI) ПОДaETCЯ ПИВКЛIOUeHHN peCnBepa.ДЯ ИHΦopMauIN NO MaKcHMaJIbHOMy HAnpJxKeHIIIO HIn OБIeMy 3IePronOTpe6JIeHIO KOMIOHeITOB, IIOJKIOuaeMbIX K JdAHHom(bIM) BbIXOy(am), CMOTpHTe "TexHnueckNe IIapamETpbI" Ha cTp.67.
HactpoIka cnCTembl
IohauaOnepaunBocponn3BcHEnn, cJeyn npoune Hxke, cKOHpynpyTe npametpbcnCTeMbI.
War 1:Включени рntани n Bыбор Функцин DVD
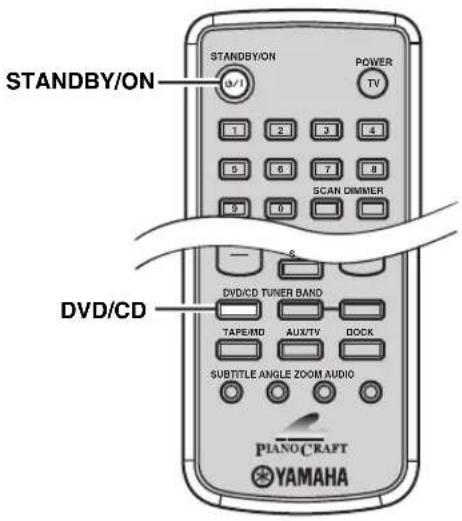
1 BkIIOHTe TeJIeBn3Op n 3aTeM HaXMMTe KhoNky STANDBY/ON n BkIIOHTe pecNBep.
EcH DVD-ppoHrpBbAteJIb IOIKJIOueH K pecHbepy Yepe3 Ka6eJIb CnCTeMHORO ynpabJIeHN, DVD-ppoHrpBbAteJIb BKIIHOaETcra ABTomATNueckn. B HHom cIyae, HaXMITE STANDBY/ON Ha φpoHTaJIbHOI NaHeJIH DVD-ppoHrpBbAteJIa IN BKIIIOHTe erO. BKIOUaETcIaIcIIe IpOHTaJIbHOI NaHeJIK KaJIOrO KOMIOHeHTa.
2 Haxab DVD/CD, Bbl6epnte yHKuHIO "DVD/ CD" kak nctouhik noctyanaojo cunhaJa.
3 Ha TeJebn3ope, BbI6epnte BXoJ, K KOtOpomy noKJIouH DVD-npOurpbIbaTeJb (EXT1, AV1, np.). BoJe e noDpo6Ho, CMOTpTe HNCTpyKUIO K TeJebn3opy.
Ha TB 3KpaHe IIOBJIeTcI KpaH IO yMOJTuHHIO.
PpmeaHne
Pn HCKaKcHHKapTHHKnHaTeJIeBb3ope,HaCTpoKa IBcTOBOH ChTeMbI (NTSC H PAL) DVD-IIpOHNpBbATcJIa MOKeT He COBIIaTb C TeJIeBb3OpOM.
IIJIIEpeKJIIOUcHnHaCTpOuKNIIBeTOBOINCHCTeMbIB TaKOM CJyueae,HaXMMTe H3aTeM AUDIO,IOKaOTKpbITJIOTK IIHcKa.
War 2: HacrtpoiKa yacob
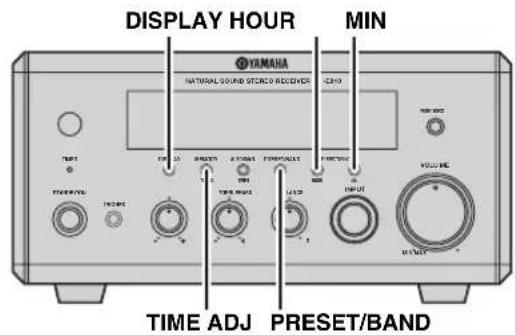
1 Haxmte DISPLAY Ha pOHTaIbHOI nHeIpeCnBepa. Ha IINJIeE φpOHTaJIbHOI IIaHEJH HA HeCKOJIbKO cKyHIO TO6paKaTcra "Clock Time", H 3aTeM oTo6paKaTcra "Set Clock".
Set Clock
2ДЯ BXOda BpeKIM HacTpoiKN YacOB, HaxmMaTe TIME ADJ npImepHo DBe ceKyHdbI.
Clock Adjust
3ДЯ yctaHOBKn HacTPOkN YacOB Bnepei, NOBTOpHo HaxKMaIte HOUR.ДЯ yCTaHOBKn HAcTPOkN YacOB Ha3ad, NOBTOpHo HaxKMaIte HOUR,ydePKNBaHaxKaToI PRESET/BAND.

4ДЯ yctaHOBKn HAcTPOiKN MmHyT BnpeEd, NOBTOPOHaXIMaTe MIN.ДЯ yCTaHOBKn HAcTPOiKN MmHyT Ha3aD, NOBTOPOHaXIMaTe MIN,ydepxHBaHxaToI PRESET/BAND.

5ДЯ ПОДТВЕРЖDEHЯ HAcTpoIKN YacOB, CHOBA HaXMMTe TIME ADJ.
HaHcIIiee pOHTaJIbHOI HaHeJIH Ha HeCKoJIbKO cKyuND OTo6paKaerTcA“Adjusted”, H3aTeM OTo6paKaHOTcYacbl.
9:15
#
MoKHO IpeKJIIOuATb 12-YacoBOI (AM/PM) fOpMaT H 24-YacoBOI fOpMaT, HaxHMaH HOUR HIN MIN, KOrJa YacBb BbICBeHeHb Ha IIcIIeC fPoHTaJIbHOI NaHCJH.
War 3: YctaHOBKa COOTHOseHnCTOpOH
CJIeJy IpoIeIype HnKc, cKOHfHpyHpyTe HaCTPOky COOTHOIIeHnC TcOpH DVD IIPOINrPBbATEJ. (HaCTPOkO II yMOJIuaHIO JBIAETc4:4:3 PAN SCAN).
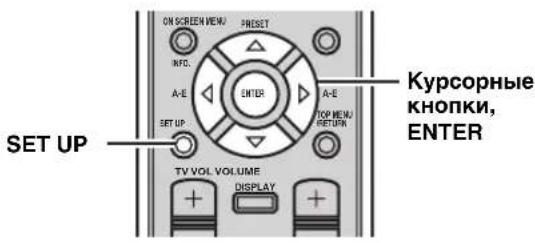
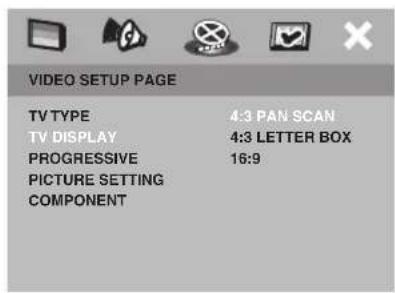
1 HaKmTe KhONky SET UP.
Ha əKpIe TeJIeBn3Opa IIOBHTcMHeIIO HAcTPOKn.
2 NOBTOPO Haxmam KhoNky nn, BBi6epTe "VIDEO SETUP PAGE".
3 Haxmam KhoNky WIn BBI npaMeTp "TV DISPLAY" n 3aTeM HaXMMTE KhoNky
4 Haxmamn, BbIepeHnyxhbl npaMeTp, n 3aTe m Haxmte KhoNky ENTER dna noDTBePKeHnBbIbopa.
4:3 PAN SCAN
Bb6epHTe 3TO,ecnIO OKHO IPOCMOTpa TeJEBH3Opa 4:3 H NyKHO, Yo6bl Obc CTOpHbI KapTHHK bIIN O6pe3aHI HIN OTOpMaTHPOBaHbI H BMeHaJIbC B 3KpaH.
4:3 LETTER BOX
Bb6epHTe 3TO,ecIN OKHO IPOCMOTpa TeJIeBH3opa4:3.B TaKOM cIyae,Ha TB 3KpaHc 6yIeT OTO6paKaTbc8 IIHPOKa KapTHHkCa YepHBIMN IOLOCKAMn CBepxH CnH3y.
16:9
Bb6epTe daHHyIO hAcTpOky IJIa IIHpOKo3KpaHHORo TeJIeBu3Opa.
5ДЯ ВьIXOdaи3 MeHIO HAcTpoiKN,CHOBa HaxMnte KHonky SET UP.
War 4: YctaHOBka Ra3bika Диспел-нa-эКранe
Cleyu npoueIype HnHexe, cKoHfHrypnyte HaCTPOKY 3bIka, HCIOJIb3yEmOro IINJINJIe-Ha-9KpaIe H MeHIO HaCTPOKN. (HaCTPOIKoI IO yMOJIaHHIO YBJIeTcR "ENGLISH".)
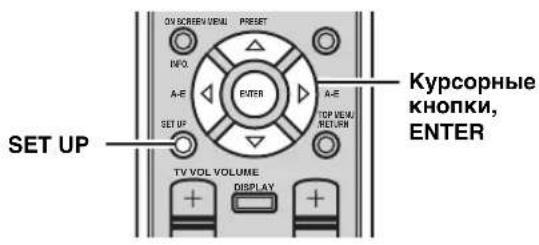
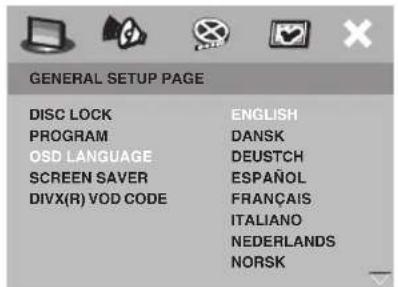
1 HaKMTe KONky SET UP.
Ha 3KpaHe TeJIeBn3opa NoaBnTcMa MeHIO HacTpOKn.
2 Haxmam KhoNky m, BbIepePte "GENERAL SETUP PAGE".
3 Haxmam KhoNky Mnn, BbIepeHte npaMeTp "OSD LANGUAGE" n 3aTeM HaxmTe KhoNky
4 Haxmam BbIepeHyXhbln 3bIK, n 3aTe m Haxmte KhoNky ENTER Ira noTBepxdeHn Bbl6opa.
Uar 5: YctaHOBka Ra3bika no yMOJIyAHnIO dIa 3ByuHaHna, cy6THTPOB, n DnCKOBORo MeHIO
Ipn yctaHOBKe 3bIKOB IO yMOJIuaHIO IJIy 3ByaHINr, cy6THTPOB, H INCKOBORo MeHIO, DVD-IPponrPbIBaTeJIb ABTOMaTHUeCKN IIpeKJIIOuAeTCra Ha Bbl6paHHb J3bIK Iprn yCTaHOBKe IINcKa. Ecln Bbl6paHHb J3bIK He IMeETcHa IINcKe, BmecTo HrO 6yJeT HcIOJIb3OBAtbcra 3bIK IIO yMOJIuaHIO Ha IINcKe. (HAcTPOJKOII IO yMOJIuaHIO IJIy 3ByaHINr II INCKOBORo MEHIO IBIJeTcR "AHIGJINCKNI" H cy6THTPOB - "BblKJI".)
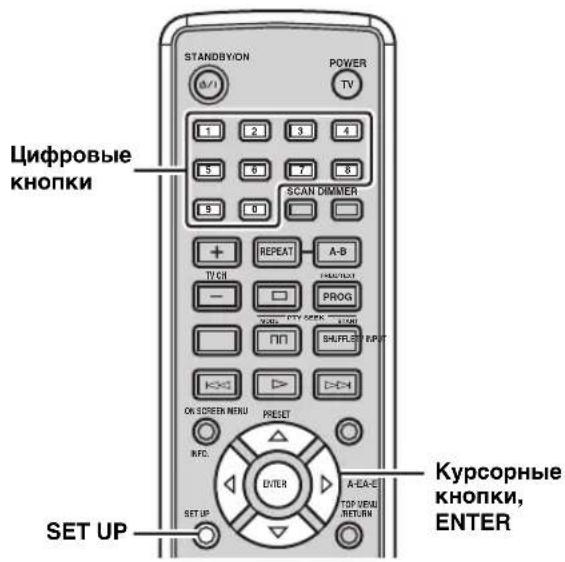
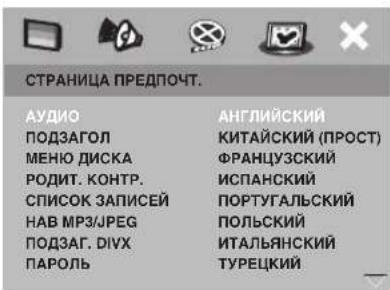
4 Haxmamn , BbIePnte Hyxhbln 3bIK, n 3aTe m Haxmte KhoNky ENTER dna NOdTBePKeHnB BbIopa.
EcHn HxKbI J3bIK He yKa3aH, BbI6paB "IPYTNIE", c IIOMOIIbIO IIHΦpOBbIX KHOIOK BBeIHTe 4-3HaUHbI J3bIKOBOI KOI (CMOTPITc Ctp.57), II aTeM HaXMMTE ENTER.
5ДЯ ВьIxOda ИЗ MeHIO HAcTpoIKN, ChOBa HaxMnte KHonky SET UP.
1 HaXMMTe KOnKy SET UP.
Ha 3KpaIe TeJIeBn3opa IIOBHTcMeHIO HAcTpoKn.
2 Haxmam KhONky nn, BbIepeNTe "CTPAHnla IPEdnoHT."
PnmeaHne
"CTPAHIIA IIPEIIIOHT." IOcTpyIeN TOJIbKO IIpH OTCyTcTBHN yCTaHOBJIcHHOrO IIcKa HIN KOrIa DVD-IIpOHrpbIBaTeJIb HAXOHTCBypeKHMc OcTaHOBKN (CMOTpHrte cTp.25).
3
Haxmam KhoNky Nn BBiepuTe
napaMeTp “AUYNO”,“I0D3AFOJ”,nIN“MEHIO
ДИСКА", n 3aTeM HαχмITE KHONky
OchOBhble opepaun pecnBepa
CJIeyy IIpoIeIype HIXke, BBIbepHte IcTOUHNK IIpHema, H NaCTpOITe 3ByKOBoIe IapAmETpbHa peCNBepc.
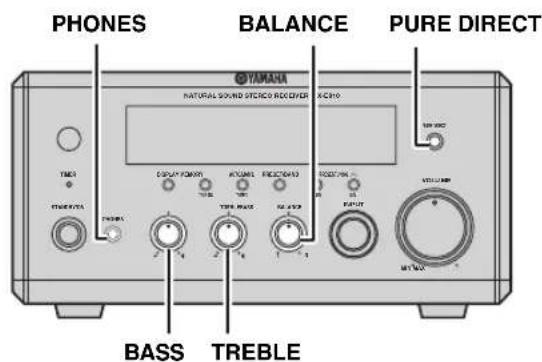
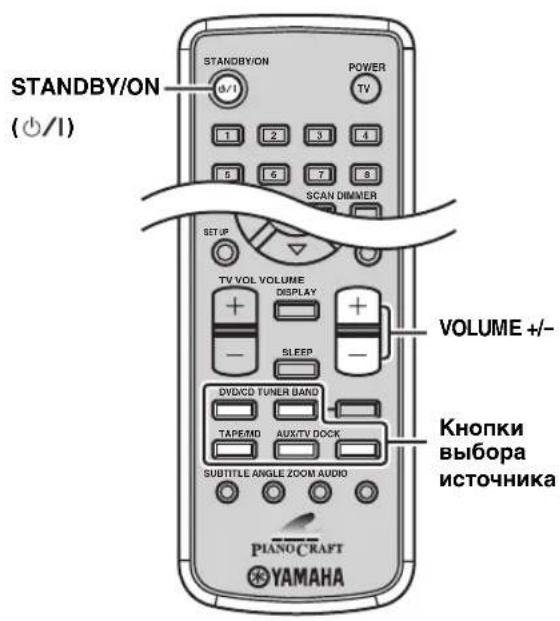
1 Haxab KhoNky STANDBY/ON, BkIIOHTe pecnBep.
EcIN DVD-INOHPBbATEJBIOKJIIOueH K pecnBepyYepe3 Ka6eJb CnCTEmHO r yIupaJIeHH, DVD-IPOHrpBaTeJB BKJIHOaETcABTOMaTHueCKN.BKJOHOaTcJINCHJIe IpOHTaJIbHOIIaHEJIN KaKJIORO KOMIOHeHTa.
中
JaHHa CHCTcMa O6OpyIOBaHa FyHKInCh ABTOMaTHcCKOro
peXHMa OxHnAHHa (CMOTpHTe cTp.45),KOTopaa
ABTOMaTHueckn yCTaHaBJIbAcT CnCTcMy Ha pcXHM
OxHnAHHa,ecn ChTeMa He yIpaBJIacb B TeYeHHe 30
MHHy,IOKa pcsHBeP yCTaHOBInH Ha peXHM DVD/CD.
2 Haxmte OndHy n3 celeKTophbx KhoNOK nCTOuHnka N Bbl6epnte HyxHbIM nCToHnK npema.
3 Haunte Bocnpon3BeDeHne Ha BbI6paHHOM KOMnoHeTe-NCToHnKe HnBbI6epnte paAnocTaHnIO.
IIOIpo6Hee O BOCIIPOIN3BeIeHH INsKa, CMOTpNTe cTp.25,a IIO HnΦOpMauH N O HaCTpOKe, CMOTpNTe cTp.37.
4 Haxmam VOLUME + / - ,HacptpoTe HxKbIypoBeHrpoMkoCTn.
5 NOBOPaHbA BASS, TREBLE, HnB BALANCE Ha pOHTaJIbHOI NaHeI npCINBepa, hAcTpoIe cJeDyUoIne napametpbI.
BASS: HAcTpoIKa Hn3KoYacToTHoXapaKTepNtKN.
TREBLE: HactpoKa BBICOKOaCTOTHOXapaKTePHeTnKn.
BALANCE: HactpoKa yPoBnI rPOMKocTH OTJeJIbHO JIEBOrH IIpaBOrO KaHaJa KOJIOHOK.
Pexm Pure Direct
PexHM Pure Direct otKIOuae CTxemy KOHTPOJIA TOHaJIbHOCTH,IO3BOJRA IPOCSlyuHBaTB uHcTOe BbICOKOTOUHOE 3ByaHHe OT aHaIIOROBbIX HcTOUHKOB.
Haxmte PURE DIRECT Ha pOHTaIbHOI naHeI peCIBepa IJI BKJIIOUeHnpeXIMa Pure Direct.
BbCBeHbAcTcPURE DIRECT,INnncnIe IpoHTaJIbHOIIaHeJINABTOMaTHueeCKN TyckHeeT.
PnmueyaHne
IIoka BKJIOueH peKHM Pure Direct, fyHKINBASS, TREBLE, IN BALANCE HeIOCTyIbI.
IIpN BbIOJIHeHHIIO60IonepaHHIINBKKIOHTeHHOM pcKIMc Pure Direct,INCHIEF pOITraHOBn HAnCIn HBICBeTHBaETcHa KOpOTKnMOMeHT IINIOITBepKJHeHHa KOMaHbI, IN CHOBA TyckHcct.
OTKJIIOUeHHepeXmua Pure Direct
CHOBA HAXMITE PURE DIRECT,IOOTKJIHOyeHHA PURE DIRECT IN BBICBeHbAHnIINcIIeJpOHtAJIbHOI NaHeJI.
IcnoJIb3OBAHnE HayuHnKOB
IoiKJIIOUHTe HayHINHK K rHe3Iy PHONES. MoXHO IipocIyIINBaTb 3ByKN, IIpeJHa3HaueHHbIe IJIa BbIBOda H3 KOJOHOK, Yepe3 HayHINK.
IpeeknueHne hactpoek dncnnen foPoHTaNbHO naHeJI
JIIEIepeKJIIOueHnHaCTPOeK IINCHIIeIe FpOHTaJIbHOI NaHeJIN PecHBepa, cJeNyTe IIpoUeType HnKe.
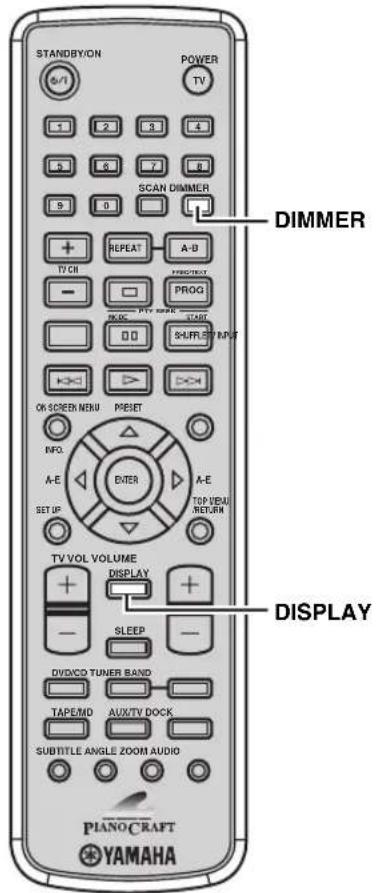
■NepeKJIoueHne pexnma dncnna
Moxno IpekeNIOaTB HOpMaHIO, OTO6paKeHHyU HaIINCIJIe e pOHTaJIbHOI IIaHeJIN, HA TeKyuIIN HCTOUYHK N acbl.
PpmeaHne
EcJH qacbI Hc HAcTPOChbI, HcBO3MOKHO OTO6pa3HTbHX (CMOTpHTe cTp.19).
IobtopHO haxmna Khonky DISPLAY, Bb6epnte keenaembei pexum dncnla.
IIpn KaJOM HaxaTHN KHOIN, INCJIIEI IpeKJIIOHaTc CJEyIOINM O6pa3OM:
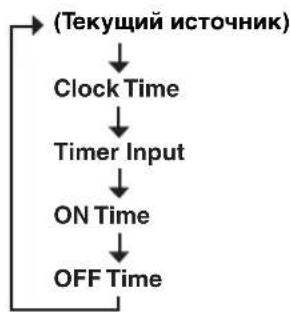

“Timer Input”, “ON Time”, „OFF Time“, „HcnoJIb3yIOTcIJI yctaHOBKn TaIMepa YacOB (cMOrpIte cTp. 43).
YMeHbWeHHe RPKoCTn DnCnpeA
MOxH0 yMeHbHHTb npKoCTb HcHIIeae pOHTaJIbHOI IaHeJIpeCHBepa.TakKe TycKHeET HcHIIeI pOHTaJIbHOI IaHeJI DVD-IPoONrPbIBaTeJI,ecJIH OH IOJIKIOueH K pcCHBepy uepe3 cocINHcHcncCTmHO rYpabJIeHH (CMOTpHTe cTp.12). (HaCTpoHkoI IO yMOJIuaHHIO ABJIeTcra "DIMMER OFF".)
HaKIma KhoNky DIMMER, BbIepeTe peKIM "DIMMER ON".
YCTaHOBka 06bIuHoi RpKoCTn
HaKHMa KHOIIky DIMMER, BbI6epHTe peKHM "DIMMER OFF".
IIpn OTo6paKeHH HKOHN 3aIpeHHeHH (Ha TeJIeBH3ope np HaKaTHN KHOHN, 3TO O3Haayact, YTO cyHKnH HeIOCTyHnHa TEkyIeM IIcKe IIN B TEkyIeM COCTOHH.
B3aBnCHMOCTHOTNHCKa,1KcOTOpbIeOHepaHIMORYT OTJHHTbCRAHHOMYr6bITbOpaHHHebl.
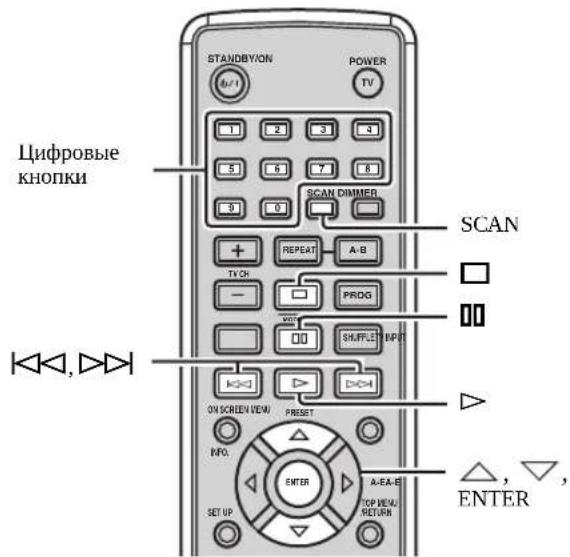
HaayaoBocpon3BeDeneHn
YcTaHOBHTe NCK (HaxMHTe Ha φpoHTaJIbHON IaHeJN DVD-ⅡpOHTpBIBateJIA JIA OTKpbITTH/3aKpbITTH JOtKa IIncKa).
中
JaHHbI aIInapaT aBtOMaTHueckn HaHHaet BocpOn3BeDeHHe npH yctaHOBKe JnCKa. B ciYyae, eCIN HaJNCke HMeetc STapTOBOe MeHIO, MOxET IOTpe6oBaTbCa HaKaTb>JH HAJAA BoCpON3BeDEHN.
-CD-ⅡHCKOB,MOKHO BOCIOHNBecTHIepBbIE HeckOJIbKOceKyHkKaJIOHΦOHOrpAMMBI HIOCEJEIOBATEJIbHOCTH,HaKaAB SCAN BOBpeMgOCTaHOBKnBOCIOHN3BeJeHH.ⅡTBA036HOBJEHNObHORO BOCIOHN3BeJeHH.HaKMITE KHOIIky>
OctaHOBka BocpoH3BeJeHHa
HaKMMTe KHOIIKy
#
JaHHb annapaT ABtOMaTHYeCKH 3aONOMHaeT MecTo OCTaHOBKn IpH OCTaHOBKe BOCIPOH3BeDEHH. ECH Bbl HaKMTe KHOIIky ,BOCIOHN3BeJeHHe BO3O6HOBBnCTc CmCTaOCTAHOBKn. ECH CHOBn Haaatb MccTO OCTaHOBKn 6yEt YdaIEHO HnMaHTh. (3To Ha3bBaetc PekHM OCTaHOBKn.)
Pay3a BocponBedeHn
HaKMTe KHOIIky
IIJIa BO3O6HOBJIeHnpeXHMa O6bIyHOrO BOCIpON3BeJHeHHaHXMITE KHOINKy>
IokaipoBoe BocIpOn3BeJeHne
DVD VCD
HaKaB KHOIIKy, yCTaHOBHTE IIay3y BOCIpON3BcIeHHN, 3aTeM IOBTOPOH HAKMTe KHOIIKy
IIpn KaJIOm HaxaTHN KHOINK N, BOCIpoH3BOJNTcR OINH KaIp 3a pa3. IJIa BO3O6HOBJIeHH pEXHMa O6bIHORO BOCIPOH3BeHeHH, HAXMITE KHOINKy>.
BbICTpaIpeMeOTKaHa3aIINHII BIIpePeI
IJIb6bCTPOINpOKpyTKHa3aIyepKXBAAHTe HecKOJIbKOceKYH.
IIb6bCTPOINpOKpyTKBnpeIyepKXBAAHTe HecKOJIbKOceKYH.
PiN KaKdOM HaKaTHN KHOKN NocJe ee
yepKBAHn,CKOPoCTb BOCpactaET (CHXaeTc).
3aMeIeHHa IepEMToKa Ha3aI HJI
BHepeI DVD VCD
JI3aMeHHOHepcMOTKnHa3aI,HaXMMTe △
JI3aMeHHeHHoHpeMOTKnBHepeI,HaXMMTe CkopocbBo3pactaET(CHKaTc)PiH KaKJOM HxKaTHN KHOKN.
PnmeaHne
ФИКИЗ 3AMENICHNOI HcpcMOTKN HA3JIHIOCTYINHA VCD N SVCD-нскOB.
PpOnyck pa3JeIOB (oHOrpaMM)
IIIIEpexoHaHaHaJIOHAcToaero pa3JeJa (foHorpaMMbI),HaKMHTe KHOINKy
IIIepeXoHa hCJIeIyIOuHn pa3IeJI (foHOrpaMMy), HaxMMTe KHOIIKy
IIIIEPExOHa HIIpeBbIyHn pa3JI (FOHOrpaMMy), IBAJbI 6bICTpo HAKMHTe KHOINKy
PnmeuHne
_HKIIH HPOHcyka MoKeT HeIpaBnIbHO cpa6aIbIbArbI HpH BOCIpOHN3BeHeHH VCD IIIN SVCD-ⅡncKa c IOMoIIbHO MeHIO KOHTPOJIIBOCHPoHN3BeHeHH (cMOTPHTe cTp.31).
Bb6op pa3deJa (foHOrpaMMbI) IJIY BOCIIPOH3BeDeHHN
C IOMOIIbIO IINDPoBbIX KHOIOK BBeIHTe HOMep pa3JeJa (ΦOHOrpaMMbI) IIa BOCIpOn3BeIeHn. Iyka3aHH1-3aHuHOrHOmepa,HaXMITE IHDPoBYIO KHOIKy IJI BBOHaHMePAΦOHOrpaMMbIH 3aTeMaHAKMITE ENTER,IIHaKMITE O IIIaTeMaHAKMITE IHDPoBYIO KHOIKy IJI BBOHaHMePaΦOHOrpaMMbI.
PnmeaHne
JaHHaIyHKIIIMMOKET HeIpaBbJIbHO cpa6aTbIbAITbI npH BOCIOIN3BeJeHHVCD HIN SVCD-ⅡnCKa C IIMOIOB MeHIO KOHTPOJIA BOCIOIN3BeJeHHN (CMOTPHTe CTp.31).
Повторhoe BOCпpon3ВeДeнe ДИСКa (Повторhoe BOCпpon3ВeДeнe)
MOxHIO IOBTOPOHO BOCIIPOHN3BecTH BbIbpaHHbI IapAMeTp Ha HnCke. TaKKe, MOxH0 yCTaHOBBt IBc TOUKN IIIOBTOPA OIIpeJIeENHOrO yuaTka pa3JeJa (foHOrpaMMb) c IIOMOuBIO fYHKUN A-B Repeat.
PnmeuHaH
B 3aBACMHOCTH OT THIIa DVD-1nCKa, yHKnIa Repcat Play MoKcT H cpaBaTbBaTb.
ΦYHKIIHIOBTOpHOrOBOcPOn3BeEHHeHOCTyHnAIIHPOBCIPOHN3BcEHHN VCD HIN SVCD-ICKa c IHOOMIO BIO MeHIO KOHTPOJIABOCIPOn3BeEHHN (cmOTpHTe cTp.31).
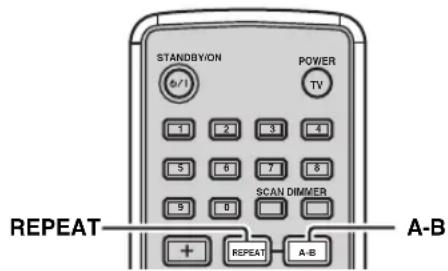
1 NaHHTe BOCnpOn3BedeHne DnCKa, HAMMeHOBaHnA, INI pa3dena (foHOrpAmMb), KOTOpYIO Bbl XOTHTe NOBTOPnTb.
2 Haxmam KhoKy REPEAT, BbI6epnte XeHaembl peXMM NOBTOPHOrO BOCnpon3BeDeHnA.
IIph KaKOM HaKaTHN KHOIIKN,peKM NepeKIOHoyaETcCJeDyIOUHM O6pa3OM.
DVD

VCD/CD

MP3/WMA/JPEG/DivX

Otmeha yHKnRepeat Play
HaKIma KOnKy REPEAT, BbIbePHTe peKm "IOBTOPT BBIKJIOYEH".
PnBOCIOH3BeIeHHJPEG HINΦOTCD-ⅡHcKa BpeKHe IOKa3a cIaIIOB,“REPEAT ALL”(IOBTOPHOCBOPOH3BCeHHe IO DHCky) OTo6paKaAETCBMeCTO“IOBOTOPIIANKI”.
■Повторhoe BOCPON3BedeHne MeKdY dByx Toyek (A-B Repeat)
YcTaHOBnB JBe TOUKN (HaJaIO H KOHeII), BbMoKTe IOBTOPOBOCHINOH3BcCTH OINpeJeIeHHbOITpe3OK pa3JIa (FOHOrpaMMbl).
PnmeaHne
ФункинA-BRepeatIocTyHaToJIbKOДЯоJHOro pa3eJa(ΦoHOrpaMMbl).
1 HauHnTe BocnpOn3BeDeHne pa3deHa nn foHOrpaMMbl, coepJauee OTpe3OK dIy IOBtOpHO BocnpOn3BeDeHn.
2 Ha MeCTe, rIe HUxHObTb TOnKy HaHaJa oTpe3Ka dIa IIOBTopa, HaxMITE KHOKNy A-B. “A” OTO6pa3HTcRa HTeJIeBn3HOHHOM 9KpaHe.
3Ha MeCTe, rDe HUxHNO yCTaHOBnTb TOnKy KOHua OTpe3Ka dIra IOBTOpa, cHOBa hXMMTe KhoNky A-B. Ha ekpaHe TeJIeBn3Opa IIOBJIaeTcR HIIHKaIIIN "AБ", n 3aIySCaETcR cyHKIIIN A-B Repeat.
OTMeHaФyHKcHnA-BRepeat
CHOBa HaxMHTe A-B.
CnyaHoe BocnpOn3BeDeHne (CmeaHHOe BocnpOn3BeDeHne)
Pa3cIbHJINΦOHOrpAMMbHa HnCKe MOKHO BOCPON3BOINTB CJIyTuAHOM IOPaKe.
PnmeaHna
-ФункиmaMeHHaHHOBOCIIpOHHBeHnHHeIOCTyHnDAVDV-VR-THcKOB.
-ФункиясмшаHHOrOBOcIpoH3BeJeHHHeIOCTyHnHaIIpH BOCIpOuH3BeJeHHVCD HIN SVCD-JIcKa c IOMOJIbIO MeHIO KOHTPOJIA BOCIpOuH3BeJeHHa (CMOTpHTe cTp.31).

1 Haunthe Bocnpon3BeDeHne Dncka.
2 Haxmna KhoNky SHUFFLE, BbI6epTe XeNaembl peXMM CMeaHnOBOcnpOn3BeDeHnA.
IIpnKaJOM HaKaTHN KHOIKN,peKHM IIpeKJIIOHaCTc CJJeIyIOUIM O6pa3OM.

Otmeha yHKm CmewHOro Bocnpoun3BeHeHn Haxmna KhoIky SHUFFLE, bIbepeTre peKIM "IPEPEMH BIKIOYEOH".
Yka3aHne npoWeJbero BpeMeHn BocnpOn3VeJeHn
(BpemeHnoI nonck) DVD VCD
BbMOKeTe yKa3aTb IIPOIIIEIIEe BpEM BAOCIPON3BeJeHHN, cKOTOPORo BxOHTte HaATb BOcIPON3BeJeHHe.
PnmuMeaHn
IIpH HcIOJIb3OBAHHI cyHKINB BpeMeHHOr IOHcKa IJY VCD HIN SVCD-ⅡNCKOB, MCHIO KOHTPOJIB BOCHPON3BCJeHHA BtOMaTHueckn 3aKpbHbAcTc (CMOTPHe cTp.31).
HeBO3MOXHOyKa3aTbIPOIIeIIIEeBpEm BOCHPOIN3BCdHnH,IPCBbIIHaIOUccO6IeCCBpEM.
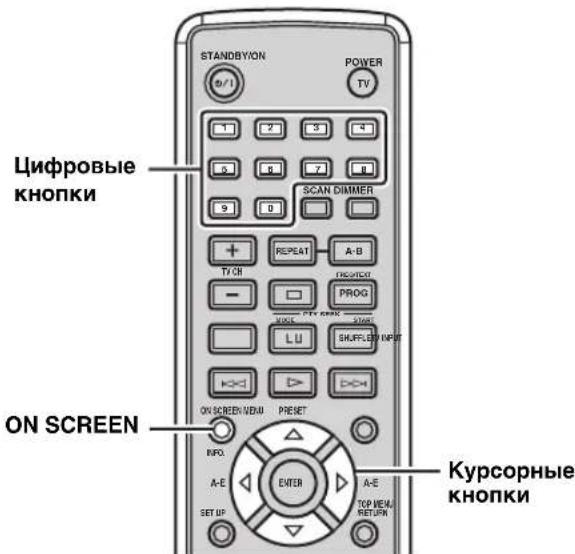
BpeMeHHoN nonck Ha DVD-dncke
1 Pn Bocnpon3BeDenn ncka, HaxmnTe ON SCREEN. Ha 3KpaHe TeJIeBn3opa IIOBnTcR MeHIO nIcIIeR-Ha-3KpaHe.
| MEHIO | |
| HAMD | 02/14 |
| PASДЕЛ | 02/14 |
| АдДИО | 5.1КH |
| ПОДЗАГOL | ENG |
| СБМТ 16 | BCEFGONПОШ 0:02:25 |
2 Haxmam KhONky nI, BbI6epnTe napametp "BP. HAM." nIu "BPEM PA3d," n 3aTem HaxmITE KhONKy
BP.HAM.:
BbI6epHTe 3TO, cCJIN XOTHTe yKa3aTb IIpoIIeIIie BpeM BAocIpOn3BeJeHHN IJIy TEkyIeTo HAnMeHOBaHn.
BPEM PA3Д:
Bb6epHTe 9TO,ecJIN XOTHTe yka3aTb IPOIIIEIIIE BpEMBAOCpON3BeIeHnI TReKyIero pa3JeJa.
3 C nOmoBIO uHpOBoBbIX KHONoK BBeIInTe HaCbl, MmHyTbI, N CeKyHDbI.
Bocnpo3BeJeHHe IepexoIHT Ha yKa3aHHyIO IO3HIOHO.
中
IIIBO3Bpata Ha IIpeIbIyIiuee MeHIO, HAXMITE KHOIky IIBYIXoHa III MeHIO INCIIeE-Ha-OKpaHe, HAXMITE KHOIky ON SCREEN.
BpemeHHoNnCKHaVCD-ndncke
1Пи ВocрпоиЗБeДeнm ДИСКa,нжмTe ON SCREEN.
Ha ekpahe TeJIeBn3opa IIoRbHTcMaHIO IINIIIEHa-ekpaHe.

2 Haxkab KhoNky nMn , BbIbePnte napameTp "BP DNCKA" nNn "BP 3AINCH", n 3aTEM Haxmnte KhoNky
BPДИСКА:
Bb6epHTe 3TO,ecHxOTHe yKa3aTb npoiueiie Bpem BAocpon3BeHnI IINBCero nCKa.
BP 3AIPINC:
Bb6epHTe 3TO, cCJIN XOTHTe yKa3aTb IIpoIIeIIIE BpEMBAOCIIpON3BeIeHHN IJIa TEkyIeI FOHOrpaMMbl.
3 C nomoubIu ufoPoBbIX KHONoK BBeHnte Yacbl, MmHyTbI, N CeKyHdbI.
Bocnpn3BeHne IepexoHT Ha yka3aHHyIO IO3HIOHO.
中
JIIBO3BpTaHaIIpeIbIyIiuee MeHIO,HaXMMTe KHOIIKy IJIIBxOJa H3MeHIOIICIIeE-Ha-3KpaHe,HaXMMTe KHOIIKy ON SCREEN.
Yka3aHne KapTnHKn npedBapnteIbHoro npocMOTpa IJI BOCpOu3BeDeHn (CkaHnpUoUsn PONc) DVD VCD
MooHIO IIpeIBaHPteIbHO IIpocMoTpeTB coepkaHHe DVD HIN VCDIIHcKa c IOMOIIbIO KAPTHIOK, BbI6paHHbIX C peryIaRPHbIM HHTepBaJOM, H yka3aTb KAPTHIKY IIpeIOCMToPa IJIb BOcIPoN3BeDeHH.
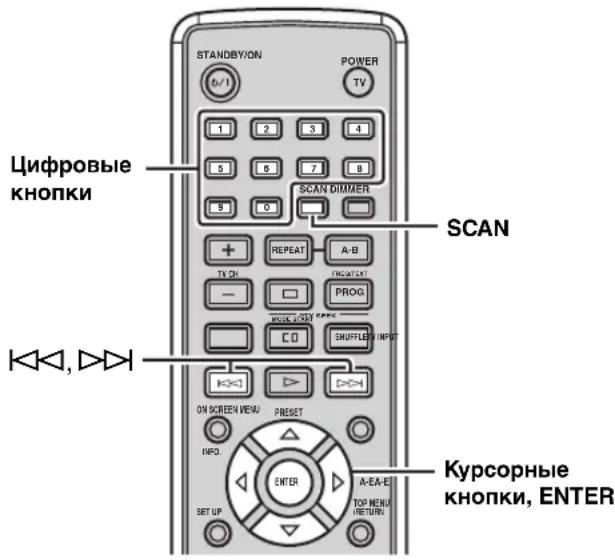
1 Pn yctaHOBJIeHHOM dIscKe B DVD npOnrpbBaTeJe, HaxMnte SCAN.
2 Haxmam AIN, BbIbePnte OINH n3 cneDyoux pexmOB npedocMOTpa, n 3aTe m Haxmnte ENTER.
DVD
ПОСМ. HANM.:
OTo6paKaT HaJaIO KaKJIOrHaUMcHOBaHH.
KOHcNEKT YACTN:
OTo6paKaet NaJIO KaKJOro pa3JeJa.
NHTEPBAAHAM.:
IeJIHT HaHMeHOBaHHe Ha OTpE3KN C
10-MHHyTHbIM HHTepBaJOM I BOCIIPOH3BOJNT IIePbIe 3-4 cekyHJI KaKJIOrO OTe3Ka.
NHTEPBALI YACTN:
JeHT pa3eJI Ha OTpe3KN c 10-MHHyTHbIM HHTepBaIOM H BOCINPOH3BOJNT IEPBbIe 3-4ceKHyI KaKJIOrO OTe3Ka.
VCD
PPOCMΦOHOr:
OTo6paKaet HaJaIO KaKJIo FOHOrPaMMbI.
NHTEPBAJI ΦOHOr:
JeHHT FOHOHPaMMbHa IeCTb OTe3KOB cpeyIaRbIM HHTepBaJOM, HOTOppaKaet Haayo KaJIOrO OTpe3Ka.
NHTEPBJIДИСКА:
IeJIHT IINCK HAnIEcTB OTpe3KOB c peryIpaHbIM INHTepBaIOM, HOTOpaKaet HaAio KaKIOrO OTe3Ka.
PnmeuHn
_HKIIIO "HHTEPBAJ FOHOI" MOxHO BbI6paTb TOJBKO BO BpemBocIpOn3BeJeHHN VCD-Ⅱncka c OTKJIIOUChHHbIM MeHIO KOHTpoJIBoCHIpOn3BCJeHHN (cmOTpHt e Ctp. 31).
- KOHCIEKTHACTN u INHTEPBAJI YACTH HeIOCTyINbI dIA DVD-VR-ⅡnCKOB.
3 C NOMOusbIO KypcOpHbIX KHOJOK Bbl6epnTe HxKHyIO KapTHNKy dIa IpeDoCMOTpa NIIc NOMOsbIO cHpObIX KHONOK BBeDHTe Homep KapTHKN.
Ipn HaxkataHnKnn D>>, IpekeJIOyAOTcN
IpeBnyuHa/cJeNyUOua cTpaHnua cnNcKa
IpeIOOCMToPa.

-ⅡIIBbIbOpaIpyrTOpeKHMa IpeIOcMOTpa, C IIOMOIIbIO KypCopHBIX KHOIIOK, BbI6epHTe "MEHIO" B cINcKe IpeIOcMOTpa, H 3aTeMaHaKMITE ENTER.
-ITMaOTMeHbI FyHKINn CKaHHpyIOIIe Ro IOHcKa, C HOMOIOIO KypCopHbIX KHOIOK, BbI6epHTe "BbIXOJ" BCINCKe IpeIOOCMOtpa, IIaTeM HaKMITE ENTER INH CHOBA HAKMITE SCAN.
4 HaXmTe ENTER nHaayaJa
Bocnpon3BeDenHb6paHHoro NapameTpa.
Hac tropona npraKa Bocnpo3VeJeHn (Program Play)
Moxno Hacptponb IopnOK BocpOn3BeHeHnIaIpa3JeIOB HIN FOHOrpaMM Ha NcKe. DaHHbI aIIapat MoKet 3aIIOMHHTb IOpNOK BOCpON3BeHeHn10 HsCKOB (20 pa3neIOB HIN 20 FOHOrpaMM KAKJOrO HsKa).
PnmuMeaHna
MeHIO KOHTpOJI BOCIpON3BeJeHHN (CMOTpHTe cTp. 31) HeIOCTyIHO BO BpEMI IIporpaMMHO BOCIpON3BeJeHHN VCD HIIIN SVCD-ⅡHcKa.
ΦYHKIIINI IPOIpaMMHOrO BOCIpOn3BeJeHHeHeIOCTyIIHa MP3, WMA, JPEG, H DivX-ⅡNcKOB.

NobTopaTe ⅢaHn2 n3do OKOHuaHnBbI6opa BCex HxKhbIX pa3JeIOB (foHOrgpamM).
4 Дя Нал ВocpoN3BedeHnC cyHKcnei nporpaMMHO Bocpon3BedeHn, c nOMObKypcopNbIX KHOJOK Bbl6epnte "CTAPT", n 3aTeM haxmnte ENTER.
#
-ITRAOTMeHbIyHKINIIPOrpaMMHOBOcIpOn3BeEHH, c IOMIOBIO KypCopHBIX KHOIOK BbI6epHTe "BbIXOJI" B HpOrpaMMHom CINCKE, H 3aTeM HaKMITE ENTER.
- yIaJIeHn3aIporpaMMNPOBaHHOro pa3JeIa IIN 0HOHorpAMMbB CINHCKe, C HOMOIIbIO KYPcOPHBIX KHOHOK BbI6epHTe IIpoIpaMMHbI HOMeP IJIyIaJIeHn, H 3aTeM HaXMMrE ENTER.
BbI6Op Ra3bIKOB 3ByuHaHnI cy6THTPOB DVD/HacTpOuKn aydNOKaHaJa VCD
MoxHOBbIbPaTBa3bIKN3ByuHaHHNc6HTPOBIIBAOcnpoH3BeDeHHN DVD-Ⅱncka HNaCTpOHKnyDIOKHaJaⅡIA VCD-Ⅱncka.EcJIN 3bIK HeBbIbpaH,BbIbHpAOTcya3bIKNIO yMOJIaHHO,yKa3aAHHbIE BMeHNO HaCTpOKn (CMOTpHte Ctp.21).
PnmeaHne
Bb6op 3bIKOB 3ByaHn H cy6HTnPoB IOcTyHbI TOJIbKO Ha
Hckax, IIOIIepKHBaIOHx MHOrO83bHyIO fYHKINIO.
TaKke, IOcTyIHbIE 3bIKN JIA KAKJIORO JNcKa MOryt
pa3JIuHaTbc. BoIee IIOpO6Ho O IIncKe, CMOTpHte
HHCTpyKHN, COJIepKaIInecB MEHIO JNcKa HIN Ha erO
yNAKOBe.
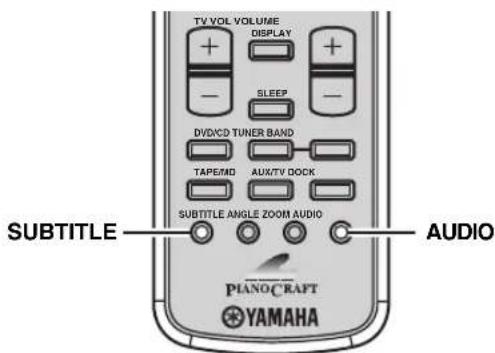
ДдяDVD
IIIy Bb6opa 3bka 3ByaHn BO BpeM BocnpOn3BeJeHn Dncka, IOBTOpHO HaXHMaTe AUDIO OTo6paXeHn HyXHO r3bKa Ha TB 3KpaHe.
IJIy BbI6opa 3bIka cy6HTpOB BO BpcMBAOcIIPOH3BeHnA HnCKa,IOBTOpHO HaXHMaTeSUBTITLE IO OTo6paKeHHa HyxHOrO 3bIka Ha TB3KpaHe.
VCD
IIIEpeKJIIOHcHnIapamCTpOB ayINOKaHaJa (ctpeo,MOHO,Ip.)IOBTOphO HaxkMaHTe AUDIO.
TIOKIOHc6HTPOB,IOBTOPHOHaKMAs SUBTITLE,BbI6cpHTe“BBIKJ".
Фокс neuropа n30обрахенья DVD VCD
Bo BpemBocippon3BcIeHnIuCKa,MOxHO yBCJINHTb HJIn yMChbIINHTb H3O6paKeHHe.

1 PnB BOCPON3BeDeHnn DnCKa, HaxMMTe ZOOM.
Pn KaKJOM HaxaTHN KHOIN, MacHTa6 H3o6paKeHHIpeKJIIOyaeTcraJeDyIOHm 06pa3OM.
2X 3X 4X 1 / 2 1 / 3 1 / 4 nCxOndhMyMacuTa6(1X)
2 PnBbI6ope "2X", "3X" nIi "4X" Ha ware 1, nCNoJIb3yIe KypcOpHbIe KHOIIKn dIa npOKpyTKu yBeJInueHHOrO n3o6paKeHnA.
中
IIIBO3BpTaHaHxOHHbMaMacHaT6I3o6paKeHH, HOBTOPHO HAKMMA ZOOM,Bb6epHTe HxCOHHbMaCHHaTa6.
Bb6op yrna npocmoTpa DVD
BbMOXeTc BbI6paTb HxKbIyroJI IPOCMOTpa BO BpemBAOCIIPOH3BcEHeHHa DVD-ⅡNcKa.
PnmeaHne
BbMOKeTe BbIbpaTb 3bIKN TOJIbKO IIpH NcIOJIb3OBAHH INCKOB,IIIOIECPKHNBAIOIHX MHOJcCTBO yIIOB IIPOCMOTpa. TaKKe,IOCTyINHbIe YIbI IIPOCMOTpa IIN KaKIOHO INCKa MOrY pa3INuATbcra. BoJIee IOIpO6Ho O INCe, CMOTpHTe HInCTpyKUnn, COIIepKaUNncsB MCHIO INcKa HIN Ha cRO yIaKOBKe.
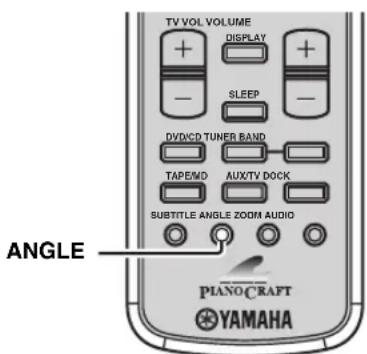
Bo BpemBocnpOn3BeDeHnA DnCKa, NOBtOpHo haxmaiTe ANGLE Do BbIbopa HxKHoro yrna npocMOTpa.
YnpaBJIeHne MeHIO nCKa
HaMHOrHxDVD-Ⅱckax H VCD-Ⅱckax (SVCD-Ⅱckax) coIepKataOpHnHaJIbHbIe HABHraIHOOHHbIe MeHIO, H3BecTHbIe KaK "MeHIO DVD" H "MeHIO KOHTPOJIBAOCIIPOHN3BeJcEHN".JaHHbIe MeHIO yIO6HbI,IIyIYPaJIbIEHN IIcKOM. IJIa HcIOJIb3OBAHn TaKHX MeHIO HaDVD-ⅡpoHrpIBaTeJe, cIeYITte IpoIeType HIXe.
PnmuMeaHne
CoepKaHHe MeHIO HMeToI yIpAaJIeHHa KaKJOrO IINcKa MOrYT pa3IIuHaTbC. BoJIcc IIOp6HO O INcKe, cMOTpHTc HnCTpyKUHN, coepKaIIHecB MeHIO INcKa Hn Ha erO yNaKOBKe.
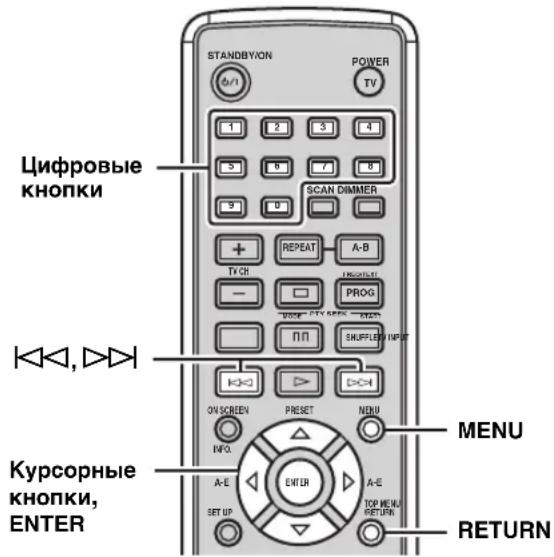
■ YnpaBJIeHne MeHIO DVD DVD
1ПиВOCnpoN3BeDeHmNДnCKa,HaxMnTe MEnU. HaekpaHe TeJIeBnOpa OTo6paXaEcTcMeHIO DVD-ДnCKa.
B3aBnCHMOCTNOTINCKa,MeHIODVDMOKKeT aBTOMaTHUeCKHBICBEHbTaBcI INh 3aRpy3Ke INcKa.
2 C nOMOsbIO KypcOpHbIX KHOJOK Bbl6epnte napameTp MeHIO, 3aTeM HaXMMTe ENTER dIJI NOdTBePxxDeHnB Bbl6opa.
YnpaBHeHne MeHIO KOHTPOJI BOCnpon3BeDeHnem VCD
IpyaHOBke VCD HIN SVCD-ⅡnKa c cyHKHe ynpabJIeHHBocpOHN3BeJHHeM (TOJBKO BepCn 2.0),Ha TB 9KpaHe aBTOMaTHueCKNOTobpaKaTcMeHIO KOHTPOJIIB BOCpOHN3BeJHHeM.IJIyIpaJIeHHMeHIO Yepe3 IIyJBt IV,HCIOJIb3yIte CJIeDyIOUHe KHOIIKN.
UΦpoBbIe KHONKn Hnn |/D>: BbI6op IapaMeTpA. RETURN: Bo3BpaT Ha əkpaH McHIO.
MENU: OTo6paKeHHe HJIN 3aKpbITHe MeHIO KOHTPOJI RA BOCIIPOHN3BeJeHHem.
Ipy yctaHOBKe PBC"Ha "BbIKJI" B MeHIO hactpoKIN DVD- IponrpbIBateJIA (CMOTpHTe ctp.55), IIpy 3arpy3Ke JnckA, MeHIO KOHTPOJIA BOCIIPOH3BeJeHHem He OTO6paKaTcABTOMaTHueCKn.
Bocnpon3BeJeHne MP3/WMA/JPEG/DivX-ДиСкOB
MOxHO BOCINPOH3BOIDHTb FaiJIbI FOpMaTa MP3, WMA, H DivX, 3aIIncAHbIe Ha CD-R/RW, DVD+R/RW, H DVD-R/RW-1nCKe. TaKke MoxHO IIPOcMaTIPBaTb FaiJIbI JPEG Ha IIpoJaIOuHXcJ JPEG-JnCKax (HaIIpHmep KODAK Picture CD-Jnck) IIn 3aIIncAHbIe Ha CD-R/RW, DVD+R/RW, H DVD-R/RW-JnCKe.
PnmeuHaH
IaHHbI aHnapaT He MoKTe OTO6pa3HTb OcO6bIe 3HaKH KaIbYbXbAIIOBbIe 3HaKH, HcIOJIb3yCMbIe B Ha3BaHHx IIaIOK HpaIIOB.
B3aBnCHMOCTHOTΦopMaTaJNCKa,XapaKTepHCTHK.HINycIOBHN 3aIHCH, aIIIapAT MOKET IIOXO CHTbIBaTB HIN BOCIIPOH3BOIHTb HeKOTOpbIE JNCKH. IIOIpObHee O IOJIepKJBBaEMbIX INcKaX DVD-IPoHRpBbAteJIa, CMOTpHTe cTp.63.
EHN HA NnCKe HmeeTc HnKa c 6oJIe Yem 500 faiamH, aHapAT MOKe TIOXO CHTbIbAITb HIN BOCIIPOH3BOIDHTbJHK.

1 YcTaHOBInTe DnCK B DVD-mpoNrpBbAteJIb.
IIJMP3H WMA-DCKOB,OTO6paXaeTcIHKOBOE MeHIO.IJIaJPEG-DICKOB,Ha TB 3KpaHe OTo6paXaeTcIHKOBOE MeHIO.HaXMHTe>IIHaHaJaIPOKa3a CTAIDOB (NOKa3 cIAHIOB MOKeT HaYHNaTBcA aBTOMaTHueckn Ha HeKOTOpbIX IpoJIoIHxCRA JPEGDHCkax).IIaDivX-DIcKa,OTo6paXaeTcIHTepaKTHBHOE MeHIO,ecJIN DCCK coIEpKHT MeHHbIΦopMat DivX (DMF).Piop6hee,cmOTPHTe“OMeHHHOMΦopMaTe DivX(DMF).BNOM CIyAc,BBIOJHHTe IIIaH HIXc.
2 Haxmam KhoNky , BbIepeHte nnKy, n 3aTeM HaxmTe KhoNky ENTER. Ha TB ekpaHe OTO6paKaetc cIncok faJIIOB BbI6paHHoIIaIKn.
3 Haxmam Khonky, NnncpObIe KhoNk, Bbl6epnte paJI, n 3aTeM HaxmTe KhoNkY ENTER.
Bocpon3BeHHe NaHHaTc8 OT Bb16paHHoro
paJa H npOIOJkaeTc8 KOHua PaIKn.

IIpnIipocmTope paHJa JPEG,MOKHO yBcJInyHTb H3o6paXckHnC,HaKHMaa ZOOM.TaKKe,MOKHO IpoKpyINBaTb yBEJIuYHeHHoe H3o6paXkeHne,HcIOJIb3yK KypCopHBIE KHOIIKN.
BoBpemIipocmToPaaHaJPGMOKHOBeptHKaJIbHo HepeBopayHBaTBH3OpaXeHHe,HaxHMaH HHepeBopayHBaTBrOpH3OHaJIbHO,HaxHMaTakKe, MOxHOIOBepHyTbEroHa90rpaYcoB,HaxHMaH
- IIph IIPOCMOTpe faIIa JPEG, MoXHO BBI6paTb eΦΦeKT IIPOCMOTpa, IIOBTOPHO Haxmam ANGLE.
PpocMToK KapTuHok JPEG BΦopMe NIKTORpAMM
MOxHIO IIPOCMaTPnBaTb faiJIbI JPEG, coXpaHeHHbIE B BBi6paHHoIIaIKe IJIN JnCKe, KaK MaJIeHbKne INKTOTpamMbI.
1 Ipn npocmTope JPEG-dnUcKa, haxMnte
KapTHKN JPEG oTo6paKaIOTcBΦOpMe IIKTOrpamM.
IIpn HaxkaTnH KINH D>>, IpeKeJIOuHaOTcN
IpeBbIyIa/ClJeIyIooIa cTpaHnla cIncka IIKTOrpamM.
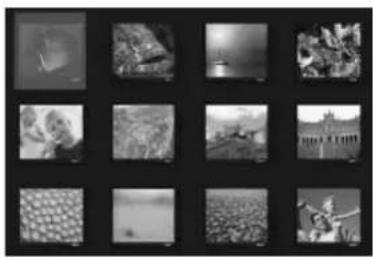
2ДляпрсмOTpa onpeDEJIeHHoI KapTNHKn B NOJHOM BnDE, c NOMOuBIO KypcOpHBIX KHOJOK BbI6epNTe NIKTORpamMy, n 3aTeM haxmTe ENTER.

-ⅡHauJaIIOKa3a cIaIIOB OT IepBOI KApTINKHeKyIeI CTpaHHbI, C IIOMOIIbIO KypCopHBIX KHOIIOK, BbI6epHT EHaM HaxMMTe ENTER.
-ДИВОЗВРаТаHAДССКOBOCМсHIO,HAЖМИТс KHOПКY MENU.
OmeiHOMΦopMaTeDivX(DMF)
McHbIΦopMaTDivX(DMF)IO3BOJIaET BOCIpOIN3BOJNTbFaJIbIDivXc HHTepaKTNBbIMn ΦHKIIHMKaHHTepaKTHBHOe MeHIO, IIOJIHNTeJIbHOe 3ByaHHe N cy6THpbl.ДлЯ yIpaBJIeHnI HHTepaKTNBHbIM MeHIO, cJIeIyIte IIpoUeIype HNKe.
1 YctaHOBnte DnCK B DVD-npOHRpbIbATEJIb. Ha 3KpaHe TeJIeBN3Opa IIOBHTc HHTepaKTNBHO MeHIO.
2 C nomoubky KypcopHbIX KHOJOK Bbl6epnte pa3dien.
3 HaxmTe ENTER nIIN dIaHaJbABoCnpOn3BeDeHnO T BbI6paHHOro pa3deJa.
OCTyn K INHTepaKTNBHOMY MEHIO BO BpemB BOCnpon3BeDeHHN
HaxmTe KhoNkY MENU.
ДлЯ BO3BpaTa Ha MeHIO ДИСКа C ДАнHBIMпрОTO6paXeHHOMДИСКOBOMMeHIO
HaKMHTe KHOIIKy
#
MOKHO BbIbpaTb 3ByaHHe HIN BKIOHTb/OTKIOHTb cy6HTtpb,HaKMMA AUDIO HIN SUBTITLE BO BpcMBOcIpOnH3BeJeHH.
-ⅡIa BbIbopa BHeIIHrero 3bIka cy6HTnPoB, Tpe6yeTc HAcTpOHTb “IOJ3AΓ. DIVX" B McHIO IacTpOuKn DVDI npOHrpblBaTeJIa (cmOTpHrTe cTp.55).
Прсмотр Или ИЗMeHeHne HabTpoE K BOCnpon3BeDeHЯ Na TeJIeBn3Ope (MeHIOДиСплЕ-нa-эКpaHe) DVD VCD
MOxHIOIPOCMOTpeb HnH3MeHHTb HAcTpoKn JIA BOCIIPOUN3BOJIMMOrO DVD HJIN VCD (SVCD)-JNCKa.
Pnmeuahne
OTo6paJxHcMCHIOIINCHJIe-Ha-3KpAHC JnVCD Hn SVCD-1nCKOB IIpHBODHT K ABTOMATHCCKOMy 3aKpbTTHIO MCHIO KOHTPOJ BOCIIPOHN3BeHeHH (CMOTPHTe cTp.31).
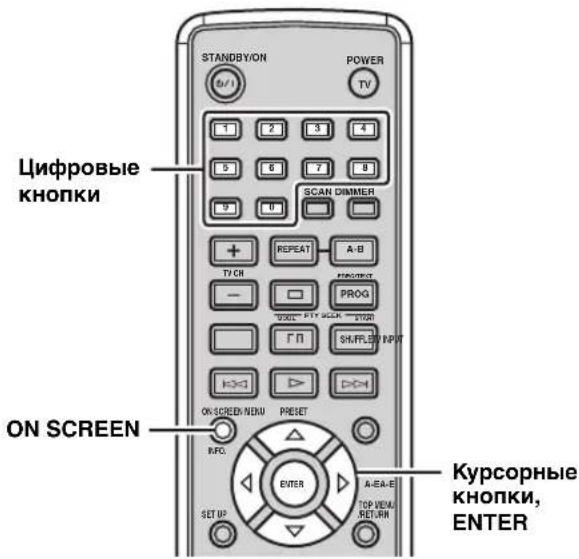
1 PnBocnpOn3BeDeHnn Dncka, HaxMnte ON SCREEN. Ha 3KpaHe TeJIeBH3Opa IIOBHTcMeHIO IINCIJIeHa-3KpaHe. IIapameTpbl MeHIO MOryT pa3IuiaTbC8 B 3aBHCMOCTN OT TnIIa Dncka.
CD-ⅡHCKOB,IIpN KaJOM HaKaTHN KHOINK ON SCREEN, HcHJIeB BpeMeHH IpeKJIIOHaTeC cIeIyIOHM 6pa3OM: BCEFO IIPOU OINH IPOUI OINH OCT BCEFO IPOUI.
2ДЯ BBI6opa napaMeTpma MeHIO, HaxmMaTe ⅡNIM3aTEM HaKMITE.
3 IINH3MeHeHHn HAcTPOkN BbI6paHOro napameTp a MeHIO, HaxmMaTe AIN .JyKa3aHNuΦp INN BpeMeHN, nCNoB3yIne UΦpOBBle KONKN.
IIBO3BpTaHa IIpcIbIyIiCC MeHIO, HAXMHTe KHOIky IITBbIXOJa H3 MeHIO IIcIIeIe-Ha-3KpaHe, HAXMHTe KHOIky ON SCREEN.
NapametpbMeHIO dncnneHa-3KpaHe
1 Haxmte Khonky SET UP.
2 Haxmam KhONky nI , BbIbepnte napameTp "CTPAHnla I PEPINOHT." Haxmam KhONky nn , BbIbepnte POINT. KOHTP." n 3aTeM HaxmTe KhONky
| CTPAHILA ПЕДПОЧ. | |
| Адモ | 1 3АР. PБ |
| ПОДЗАГOL | 2 G |
| МЕЦДСКА | 3 PG |
| POДТ. KOНТ | 4 PG 13 |
| СПИСК 3АПЕСЕN | 5 PGR |
| HAB MP3/JPEG | 6 R |
| ПОДЗАF DIVX | 7 NC 17 |
| ПAPОЛь | 8 B3P0C |
PnmeuHne
"CTPAHIIA IIPEIIOHT." IOcTyIeH TOnbKO IIpH OTCyTcTBHH ycTaHOBJIeHHOrO JINCKa HIN KORJa DVD-IPoHrPbIbATEJIb HAXOJNTcB BpeKHMc ocTaHOBKN (cmOTpHrTe cTp.25).
3 Haximam KhoNky nn, BbIepePte ypoBeHb poHnteJIbckOro KOHTpOJa, 3aTeM HaxmTe KhoNky ENTER.
1-7: Bocippon3BcHHe HNCKOB, JIK KOTOpbIX yCTaHOBJe 6OJIee BBICOKH yPOBEH, HeBO3MOKeH 6e3 BBOJI aPoj. (YcM McHbIe IINppa, TcM XcCTYe yPOBeHb Parental Control.)
8 B3POC (HactpoKa no ymoJuaHIO): IoiB3ObaTeJIH MOryT BocIpOn3BoIHTb JIObIe HcKHe 6e3 BBoJa npoJIa.
4 Haxmamu cnpobbie KhoNk, BBeNTe 6-3HaHbI napOJIb, n 3aTeM HaxmTE ENTER.
PnmeuHn
- Iapoiem IO ymoJIuaHHIO RAJIETcR "000000".IJIa H3MeHeHnIpaOJIa, BbIOJIHTe IIpoIeIpy "I3MeHeHnI npoJIa" (CMOTpHTe cTp. 36).
- EcnBb3ab6bn Hapoi, BBeHNTe "000000" BmecTo npoJra.
中
- IJIa BO3BpaTa Ha IIpeIbIyIiuec McHIO, HaxMMTe KHOIIKY .IJIa BbIXOJa H3 MeHIO HAcTpOoiKN, HaxMMTe KHOIIKy SET UP.
IIIBBpeMeHHo pa36IOKHPOBKN poINTeJIbCKORO KOHTPOJI IJIa BOCIIPOH3BcEDHHa, C IIOMOIbIO IIΦpOBbIX KHOIIOK, BBeINTE IAPoiJI B OKOIIKO BBOJa IapoiJI (OTobpaKaCTc IIpy yctAHOBKe 6IOKHPoBAHHoro IIscKa), H 3aTEM HaKMITE ENTER.
IJIa ABTomaTHuecko IIpeYcTaHOBKn paHocTaHnN, CJeIyIte IPOUeIype Hxke.
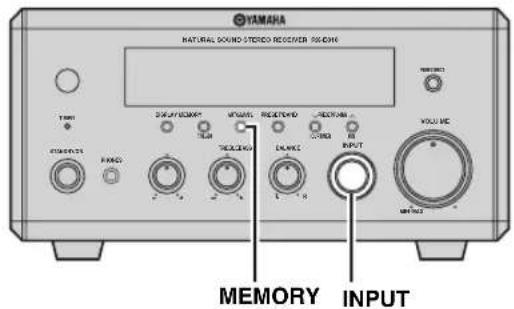
IIOCTaHOBKN IONCKa paHOCTaHH,CHOBa HaKMITE PTY SEEK START.
5 NOBTOPRte 4, noka He haJeHa HxKHa paNocTaHcua.
OTo6paXeHne HΦopMaunn CnCTembl PaNODaHHbIX
JaHHaФyHKHnHcNoJIb3yeTcIJIgOTOpaxKeHH4THIOB HΦopMaHnCnCTeMbI PaHNOHaHHbIX:PS(HaHMeHOBaHHe IporpaMMbI),PTY(THIuPOrpaMMbI),RT(paHnoTeKcT)HCT(tekUeeBpeM).HaHNCJIeepoHTaJIbHOIIaHEJIIN3aRopaIOTcCOOTBeTcTBYIOHHeHHNKaTOPbl.
PnmeaHna
OHH n3 peXHMOB CnCTeMBI PaHNOaHHbIX MOxHO Bb16paTb TOJbKO IINB KBNIOUcHHN COOTBCCTBYIOIE HnHKaTopa CnCTeMBI PaHNOJAAHHbIX Ha JINCIJIe fpoHTaJIbHOIIaHEJI. IIO 3aBepIeHHN IIpHeMa Bcei HnΦopMaIIHN CnCTeMBI PaHNOJAAHHbIX OT paHNOctAHHH, pecHBepy MoKeT IOITpe6oBaTBcR HeKOTOpoe BpeM.
- MoKHO BBi6paTb TOJIbKO IOCTYINHbIe peKHMbl CnCTeMBI PaIOHOAHbIX, IIpeIOCTaBIIeMbIe paIOHOCTAHIIe.
IIpn cIa6bOM IOCTYIIaIOJIe mCHHaJIe,peChBep MOKeT He 06pa6oTaTB HhOpMaIIIO CnCTeMbI PaJHOJaHHbIX.B OcO6eHHocTH,peKHM "RT" coJIepKHT 6oJIbIIoe KOJInueCTBO HhOpMaIIHN MOKeT 6bITb HeIOCTyIIeH, JaXe IIpH HaJIIN IpyrHx peKHMOB CnCTeMbI PaJIOJaHHbIX.
IIpnIIOxHx yCIOBHX IIpHEMa, HAXHMaHTe AUTO/MAN'L Ha poHTaJIbHOI IaHEJIN peCHBepa OOTKIOUChHHIHKaTOPa AUTO HA JINcHJIec poHTaJIbHOI IaHEJIN.
- Ecln cnla cHrHaJa ocJa6JIeHa HIO npuHHe BHeHHnx IOMex BO BpeMa IpHema pecHBepom HOpMaIIHH ChCTcMbI PaJHOaAHbIX, IIpHem MoKet BHe3aIIHO IIpeBaTbc Ha JINCIJIee poHTaJIbHOI NaHeJIH OTo6pa3HTcra "...WAIT".
- IIpy BbI6ope pcKHMa "RT", pecHBep MOKeT OTo6paKaTb IporpamMHyIO HhOpMaIIHIO IN3 MaKCHMyM 64 6yKBeHHO HPOBbIX 3HaKOB, BKIOUaY a CHMBOI yMJIaYT. HeIOCTyIIHbIe 3HaKn OTo6paKaIoTc Ka K _" (IOINePKNBaHHe).
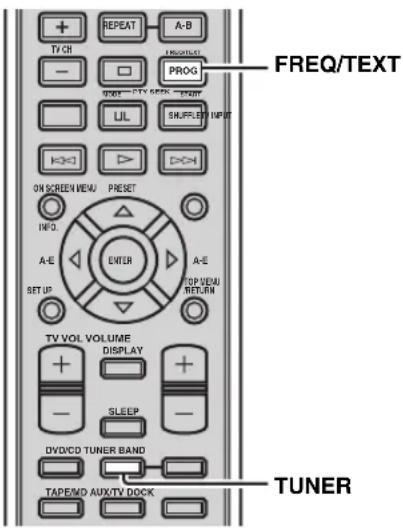
Bo BpeMa HAcTpoiKn Ha paAnocTaHcNIO CnCTeMbI PaNoDaHHbIX, NOBTOpHO hXkMaaFREQ/TEXT,BbI6epnte HxKbI pExm DnCnJe CaCTeMbI PaNoDaHHbIX.
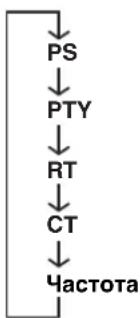
TOHEPA
OTEPALW
- BbI6epHTe "PS" IJIa OTO6paXKeHnHaHMeHOBaHHaTeKUSeI IIpHHMaEmoIIpOgPamMbI CnCTeMbl PaINOnaHHbIX.
BbI6epHTe "PTY" JIIa OTO6paKeHn TnHa TeKyuIe IIpHHMaemIO pOgpaMMbICnCTeMbI PaHNOaHHbIX. - BbI6epHTe "RT" IJIa OTO6paKeHn HΦopMaIIIN O TeKUIIeI IIpHHMaemIO IIporpAmMe CnCTeMbI PaJHOJaHHbIX.
- BbI6epHre "CT" JIIa oTo6paKcHnra TekyIeTO BpeMeHH.
Дононтеловьie CT (Tekyшee Bpema) NaCTpoiKN
C IOMOIIbIO HhΦopMaIIH CT, IIoJIyuaeMoI OT paIIOCTaHIIN CnCTeMbI PaIIOJAAHHbIX, MOXHO NaCTpaIbATB BCtpoEIIbIe YacBi peCBepa.
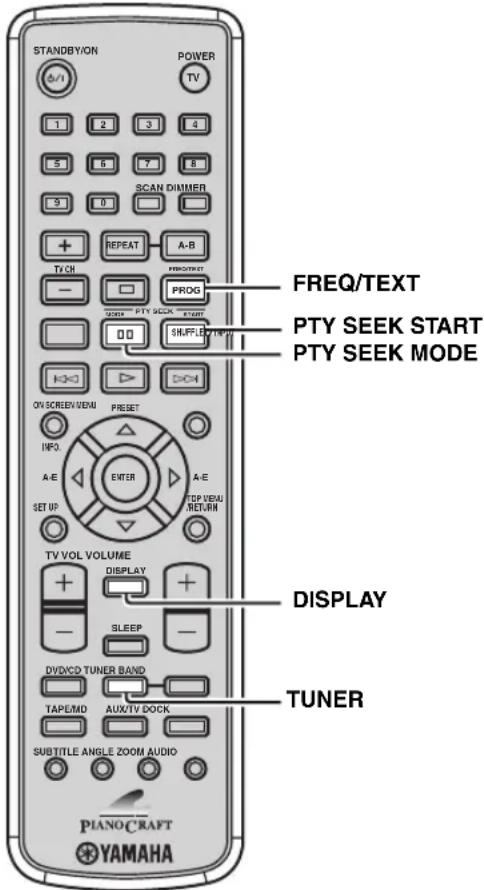
3 Повторно нахима PTY SEEK MODE, ВьIBLEпe“CT→Clock"ил“Local CT",и 3atem нахимаite PTY SEEK START дя поpeкlioчения настpoйкни“ON”и“OFF".
CT Clock
YcTaHOBHTe TaHHbI InapaMeTp Ha“ON”,ecJH XOTHe HcIOJIb3OBaTb HhΦOpMaIuHO CT, IIIOJIyuaemyo OT paINOCtAHII CNCTembl PaIOIOaAHbIX,IJIa BCTPOeHHbIX YacOB pecHBepa. (HAcTPOHKO II yMOJIyAHII IO JBJIeTcra“ON”).) Local CT YcTaHOBHTe DaHHbI InapaMeTp Ha“ON”,ecJH XOTHe HcIOJIb3OBaTb IIepexOJ Ha JIeTHee BpeM K INHΦOpMaIuH CT, IIIOJIyueHHoI OT paINOCtAHII CNCTeMbI PaIOIOaHHbIX. (HAcTPOHKO II yMOJIyAHII IO JBJIeTcra“ON”).
4 HaxmTe KhoNky FREQ/TEXTДЯ NOdTBepKdEHHaCTpoeK.
1 Bo BpemHaCTpoKn Ha paAdnoctaHcNIO CnCTeMbI PaNoDaHHbIX, NOBTOPO HaxmMaTe DISPLAYdo OTo6paXeHNY qacOB Ha dncPJIee fpoHTaBHO nAHeN pecNBepa.
2 CHOBA HAXMnte FREQ/TEXT.
HaHnCIIIEeΦpoHTaJIbHOI NaHeJIN oTo6paKaTaTcR“CT→Clock”.
YctaHObKa TaMepa
PecnBep 60pOBOAH 2 TINAMH cyHKIIH TaMcpa: TaMepOM YacOB H TaMepOM CHA. TaMep YACOB ABTOMATNueckn BKIOUaET peCnBep HIN yCTaHaBJIHBAeT erO B pexHM OXHaHH B yka3aHIOE BpeM. TaMep CHa YcTaHaBJIHBAeT peCnBep B pexHM OXHaHH NocTe OKHuaHH yKa3aHIOr BpeMeHH. DVD-IPoHrpBbATEJIb TaKKe aBTOMATNueckn BKIOUaET cH IN yCTaHaBJIHBAeTcBpeXHM OXHaHH, ecH ON IIOKJIIOUeH K peCnBepy uee3 coeHNHeHne cHCTeMHOrO KOHTPOJI (CMOTpIte cTp.12).
YcTaHOBKa TaMepa YacOB
TaHmep YACOB aBTOMaTHueCKN BKJIOuayeT peChBep HIN yCTaHaBJIbAeTeero BpeXHM OXHJaHHB yKa3aHHoe BpeM. TaKKe MOxHO yKa3aTb HCTOuHNK, aBTOMaTHueCKN BB6HpAembl peCnBepom IIpH bKJIOUeHH Taimepom YacOB.
PnmuMeaHn
- Ecin YacbI He HactpoeHbI, HeBO3MOxHO yCTaHOBHTb TaMep YacOB (CMOTpHTe cTp.19).
EeINB TeueHHe 6oJee He 30 cekyHn He 6bIJa HxKaTa HnKaKaK KHOHKA IocJIpeIbIyIero HaKaTH, BbIOJIHeHHBe OepaIIH yJaIyOTcH ⅡMaTHi, H OTo6paKaAeTcObUHbI JInCJIJe.
1 NOBTOPOH HAXIMAR KHONKY DISPLAY Ha pOHTaJIbHOI nAHeJIpeCnBepa, BbI6epnte pExm "Timer Input". Ha IIcIIee pOHTaJIbHOI nAHeJI mHaer HnIHkaTOp TIMER
2 NobopaunBaI INPUT, Bb6epnte nCTOHNK, aBTOMaTnueckn Bb6npaembI peCNBepom np BNIOUeHNI TaMepom YacOB. Ipn Bb6ope "TUNER", moXIO Bb6paTB dHaia30H, HaxHMa PRESET/BAND. IIra Bb6opa IIpeyctaHOBJeHHoI paIOCTAHIN, BbIOJIHTe ⅢaHn 2 H 3 IIpoJeDpyb"I "Bb6op IIpeyctaHOBJeHHbIX paIOCTAHIN" (CMOTpIte cTp.39).
3 CHOBA HAXIMAR KHONKY DISPLAY, BBI6epnte "ON Time".
4 YkaXHTe BpMaIbBKnIOueHnpeCnBepa. BblIOJIHTe Ⅲar3 IV 4B "IIar 2: HacTPOKa YacOB" (CMOTpHTe cTp.19) HacTPOHTe IapamETpbI YACOB MmHyT.
5 CHOBA HAXIMAR DISPLAY, BbIbepnte "OFF Time", 3aTeM yKaXHTe BpEmr OTKJIIOUeHnpeCINBepa TaKKe, KaN Ha Ware 4.
6ДЯOTKIOUeHnpeCnBepa TaIMePOM YacOB,HaXmTe TIMER.
BbCBeuHBeTcHnHkAToP TIMER LED. PecnBep 6yIeT BkJIIOUeH HIn yCTaHOBJIeH B peXHM OxHJaHH aBTOMaTHueCKn ByKa3aHHoe BpcMra.
ECJH HxKHO OTKIOHTb peCHBep c IOMOIIbIO "OFF Time", IOBTOPO HAKMma DISPLAY, OTo6pa3HTe HaJIH JINCIJIe e pOHTaJIbHOI HaeHH, H3aTeM HAKMTte TIMER. Ha JINCIJIe e pOHTaJIbHOI HaeHH 3aropactc HnIKKatOP TIMER.
YCTAHOBKa NIN OTMeHa TaIMepa YacOB
HaXmIe TIMER Ha φpoHTaJIbHOI nAHeJIN npH oTo6paXeHHbIX Yacax IIn KOrJa peCnBep HaxOITcR BpeKIMe OKnIaHH.
YcTaHOBka TaMepa Cha
TaHmep cHa yCTaHaBJIbNAeT peChBep BpeKHM OxHaHHIIOCJIc OKOHuaHHyka3aHHOro BpemHn.
NoBToPHo HaxkMaJ KOnKy SLEEP, Bbl6epnte XeJaemyo npoJnxTeJbHocTb.
Pn KaKJOM HaKaTHN KHOIKN, IPOIOJIJKHTeJIbHOCTb HepeKJIIOUaETcCJeNyIOHMM O6pa3OM.
HaHcJIeepoHTaJIbHOIpaJIH3aRopaETca HnHKaTOp SLEEP.

中
Taimep chaOTMeHHeTCn np yctaHOBKe pecHBepa B peKHM OXHuaHH.
- EcHn CHOBA HxKaTb SLEEP npy yctaHOBJeHHOM TaMepe cHa, Ha DnCIIeep fpoHTaJIbHOI NaHeJN OTo6paXaETcra TeKyua IIPOIOJIKTeJIbHOCTb.
OTMeHa TaMepa cHa
Onepaun,doctynHbIeBpeKmE AUX/TV
Ipy yctaHOBKe COOTBeCTByIOIeRO KOJa Iy, IOCTyINbI CJIeNyoIIne OIIepaII INIgTeJIeBN3Opa (CMOTpHTe Ctp.48).
IpeBbIOJIHeHEm CJIeIyIOxOIEpaHn, HaxMTe AUX/TV IyIyTa IV B peKIM AUX/TV.
①TVCH+/-
IpekeJIIOueHne TeJIeKaHaJIIOB.
②TV INPUT
IpeekJIOueHHe IocTyNaIOUHX CNHaJIOB Ha TeJIeBnOpe.
③TV VOL +/-
PerynpoBka ypOBHr rpmKocTeJeBn3opa.
④ POWER TV
BkIIOueHHe TeJIeBn3Opa, HIn erO ycTaHOBka B peKIM OXIIaHHa.
⑤PROG
PpeHa3HaeHaJyCtAHOBKn KOJa NY.
Pexm DOCK
Onepaun,doctynbIeBpeKmE DOCK
Ii iPod,IOKIOHHeO K yHHepcJIbHOMy IOKy YAMAHA iPod (HaipnMep, YDS-10, IpOdaOnuNcra otJeBHO),IOCTyIIbI cJeIyIOUHe OePaaHH. IOpPobHee 6b npabIeHH iPod,cmOTpHTe "HCnoIb3OBaHHe iPod" Ha cTp.49.
IpeBbIOJIHeHHeM cJeYIOIIx OepaHn,HaXMHTe DOCK yTaHOBKn IyIbTa DY BpcKHM DOCK.
①
OcTaHOBKa BocPOn3BeJeHn.
②
Iay3a Bocpon3BeJeHn.
③
IepexoHa IpeBiyuIyO pOHorpamMy. HaxMHTe ydepKBAte 136bICrpoN pOKpyTKn Ha3aI.
④INFO.
IpeekJIOueHnE IIpoCTORo peKnMa Iy n peKnMa IIPOCMOTpa MeHIO.
⑥REPEAT
Bb6oppeKHMIOBTOPHORBOCINpON3BeEHHNBO BpcMBOcIPON3BeEHHN BpeKHMIIPOCMOTpa McHIO.
⑥SHUFFLE
Bb6op pexHMa CMeIIaHHOro BocIpOn3BeJeHHa BO BpeMa BocIpOn3BeJeHHa B pexHMe IIpOCMOTpa MeHHO.
(7)
HaJao BoCippon3BcEHeH.
8
IepexoHa cJeIyIOUyIO fOHOrpaMMy. Haxmnte n yepKbAte IJI 6bICTPO IIpOKpyKn BIIpei.
⑨MENU
Bo3BpaHbCpxHn ypOBeHb MeHIO iPod.
10 KypcOpHbIe KhONKn (A/ ,ENTER
HaKMHTe ⅡIa BO3BpaTa Ha BepxHn ypoBeHb MeHIO iPod.
HaKmam AIN, BbOpHTe IapametpB BbipahHOI rpyIIIE.
HaKHMa KHOIIKy ENTER, BBeIInTe BbI6paHHyIO rpyHny. (PpH haxKaTHN ENTER, HauHHaeTcBocIpOn3BedeHne,ecHN BbI6paHa IecHra.)
PekmTAPE
Onepaun,doctynbIeBpexnme TAPE
ClenyIOUne OpeaUN IOCTyINbI IJIa KaccTeHoi JeKN IIPOUN3BOOCTBa YAMAHA.
IpeBbIIIOJIHeHHem CICdyIOIHx OIIcpaIIH,HaKMHTe TAPE/MD ⅡyctAHOBKN IIyIbTa IY BpeKHM TAPE.
①
OcTaHOBKa BocPOn3BeJeHHa.
②
Pay3a 3aimmn.
③K
BbIeTpaa npOMOTka Ha3a.
(4)
Haayao Bocnpn3BeJeHna.
⑤
БыетрайпомOTka Виеред.
⑥KypcopHbIe KhoNKn (1/7
HaKMHTe HnBocIpOn3BeJeHnIepeHHe CTOpOHBi KaccTeB, n BOCIpOn3BeJeHnOBpaTHoCTOpOHBi.
HaKMnTe HaHaJa 3aHcH Na KaccEThoIe.
HaKMHTe JIA BOCINPOH3BeHeHnO6eHX CTOPOH KACCCTbI BIOCJIcIOBATeJIbHOCTN.
YcTaHOBKa KODOB DnCTaHcNoHHOrO ynpaBJIeHnA
MOKHO yIpaBJIbTb TeJIcBUN3OpaMn IpyHx
IIPOIN3BOJNTeJIe, yCTaHOBbN B COOTBeTCTBYIOHN KOJ
IY (CMOTpHTe "CINCOK KOIOB
IINCTAHUHOHNO YIIPABJIeHNA" B KOHue
daHHOro pyKOBoIDCTBa). CJIeJy IpoUeIypam HIXKe,
ycTaHOBbTE KOJ IY.
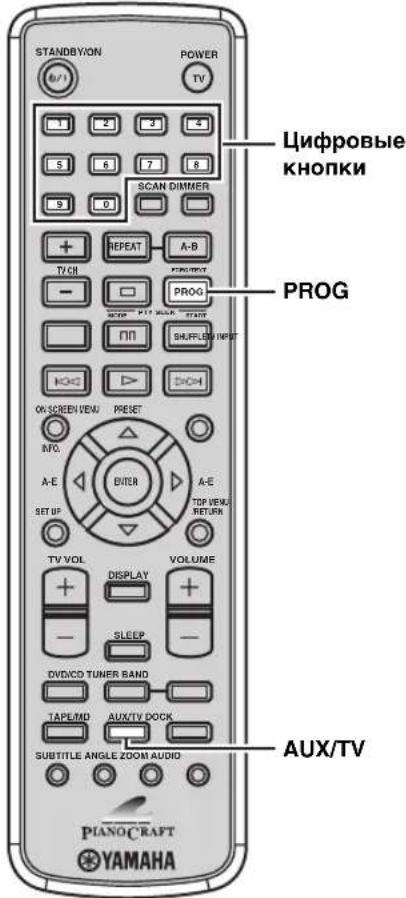
1 Haxmte KhoNky AUX/TV dny yctaHOBkn nybTa DY BpeKmAUX/TV.
2 YdepxnBaHaxaToi KhoNky PROG, HaxMnte KhoNky AUX/TV, n 3aTeM, c NOMOsbUcnofoBbIX KHONoK, BBeDInTe TpeX3NaHbI KoD y (cmOptnPe pa3dEn "CINCOK KOIOB INCTAHUHOHOrO UNPABJIENRA" B KOHe daHHoro pyKOBOdCTBa) dJa npOn3BOdTeJr TeJeBu3Opa.
3 CMOTPnTe "PexnM AUX/TV" Ha cTp. 46 n nonpo6ynte HaxaTb OndHy n3 KhoNOK ynpabIeHH TeJeBn3Opom dIy npOBepKn TORO, YTO yCTAHOBKa 6bla npOn3BeDeHa. Ecln KHOIIKa HC pa6oTaET COOTBcTcTBYIOHm 06pa3OM, KOJ IY MOKeT 6bITb OIIH6OuHbIM. B TaKOM Clyuae, CHOBA BbIIOJIHNTe IIar 2.
PnmuMeaHna
JaKe npH ycaHOBK KoJa DY, OH MoKcT ydaJIHTbcB TeueHHe DByx MmHyT NocJe TORO, KAK 3aKOHnJIncb 6aTapeKn. B TaKOM cIyuae, 3aMeHNb 6aTaapeKn, 3aHOBO ycTaHOBHTc KoJbI DY. (He HaXHMaHTc KHOINH IIyJbTa IY BO Bpem3 aMeHbI 6aTaapeek. HHaYe HAcTpOKN MOrYT 6bITb ydaJIChbl.)
EeHIN POnH3BOJITeJIb KOMIOHeHTa OJIaIaeT BoJIee YEM OIIHM KOJOM, IIIOpO6yIte Bce H3 HIX, IOKa Bbl Hc HaJITe HxKbI.
Испобзовке iPod
YcTaHOBn iPod Ha yHHeBpcAJIbHOM JOKe YAMAHA IJa iPod (HaIprHmep, YDS-10, IpOdaIOIIncs OTeJIbHo), IOKJIIOueHHbIK TepMHaJy DOCK pecHBepa (CMOTpHte cTp. 17), MOXHO BOCIpON3BOINTB iPod C IOMOIIbIO IIocTAbJREMO IyIbTa IY. OIepaIHH iPod MOrYT BbIOJIHrTbcR C IIMOUbIO IInCIJIIEe φpoHTaJIbHO IIaHEJIH peCBepa (peKHM IIPOCMOTpa MeHIO) HIN 6e3 Hero (IPOCTORe peKHM IY).
PnmuMeaHna
-Подерхьаются тлькoi iPod (Click and Wheel), iPod nano, n iPod mini.
- HcKOTOpbIe cyHKnH MOryT He IIOJIepKHBaTbCra, B 3aBHCnMOCTn OT MOJIeHN HJN BcPCH NIpOprpaMMHO O6ecHeCHN iPod.
#
-Полнь синсok Функий IyIbTa IY, HcIOJIb3yEmbIX IJIЯ yIpaBJIeHnIya Pod, cMOTpHTc B “PeXHM DOCK” (cMOTpHTc cTp. 47).
-Полнь синсok coo6eHnO pa60Te, oTo6paKaIOxXcH a HnCIIe cfoHTaIbHO nHaCJIH nHnCIIeC-Ha-3KpaHc, yka3aH B pa3Je "iPod" B "YcTaPHeHne HeNCnPabHocTe" (cmOTpHte ctp. 60).
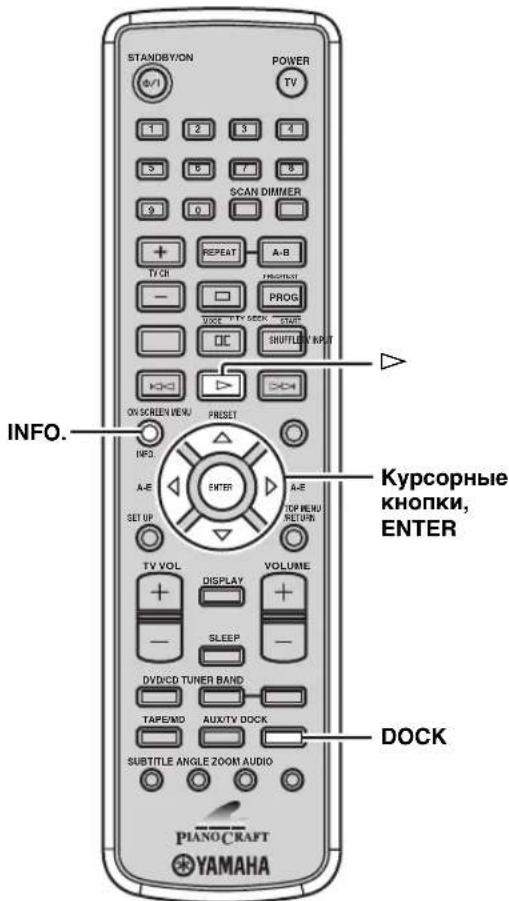
1 HaKmAR DOCK, BbI6epnte cyHKcHIO iPod KAK nCTOuHK NOCTyNAIOUero CnRHaJa.
2 Haxmaite INFO. npeeknoehn npoctoro pexma Dy n pexma npocmotpa MeHIO.
PpocToI pekm Dv
-ДяупайьенЯMeHIO,смOTPteэКранiIPod.
- YIpaJIaIte iPod c IIOMOUbIO opraHOB yIpaJIeHnI aPd HIN IOCTaJIeMOrO IIyJIbTa IV.
PeknmpocmTopa MeHIO
-ⅡIyIpaBJIeHHMeHIO,CMOTnTEINcIIeI φpoHTaJIbHOIIaHeJIINpeCHBepa.
- YnpabJIaIe iPod c IOMOIIbIO IOCTaBJIeMOrO nyIbTa IY.
- MoXHo cKoHΦhIpyHpObaTb IapaMeTpbl "Setup" iPod.
3 IcnoIb3yIe KypcOpHbIe KhONKn dIynpaBHeHn MeHIO iPod, n 3aTeM hXMMTe
DJaHaayana BOCnpon3BeDeHn
BbI6paHHo neChn (Jnn rpynnbl).
Iopno6He 06 ynpaBJIeHH MeHIO iPod B pexHMe IPOcMOrpa MeHIO, cMOrPHTe "PexHM IPOcMOrpa MeHIO" (cMOrPHTe cTp. 50).
#
B IIpoCTOM pcKHMc IY, TaKKe MoKHO HcHIOJIb3OBA Tb KOHTPOJIcpebl iPod JIyIypaBICIHH MCHIO.
Pexm npocMTopa MeHIO
BpeKHMc IPOCMOTpa McHIO,MOXHO yIpaBJIaTb MeHIO iPod c IIOMOIIbHO JINCIJIe 4pOHTaJIbHOI paHeJIH peCnBepa. TaKKe MOXHO cKOHΦHyprnpoBaTb NapaMeTpbi "Setup" c IIOMOIIbIO peKIma IPOCMOTpa MeHIO.
PnmeuHne
EcTB HeKOToPbIE 3HaKN, KOToPbIE He Moryr OTo6paKaTbcn Ha IIcIIJIe cpoNTaJIbHOI IaHcIJN pcCHBepa. TaKHe 3HaKn 3aMeHJOTcH HxKHHM YepTOKAMH "
MeHIO iPod

1 BbI6epnte pexnmpocmotpa MeHIO (CMOTpnte cTp. 49).
HaHcHJeeΦpOHTaJIbHOI HaHeJINOTOBpaXaETcBepXHee MeHIO iPod.

HdkaTopbIpa60tbi iPod

HnKAtOpb paOToB iPod (CMOTpHe cTp.5) Ioka3bIaIO t pa6OuHe KypCopHbIE KHOIIHa KaJOM IIIare.
2 Haxmamn , BbIepeHTe MeHIO, n 3aTeM HaxmTe nIIN ENTER dJa BXOda B BbI6paHHoe MeHIO.
Oro6paKaacTcHa3BaHHe IepBOro IIapametpa, coXpaHeHHoro B BBb6paHHOM MeHIO.


- INHINKA TOPbMeHIO iPod (CMOTPTe ctp.5) IOKa3bIBAHT Tekyiue BbipapHHoe MeHIO iPod.
- JI81 BO3Bpata Ha BepxHn ypoBeH MeHIO iPod, HaxMHTe
MIMEMENU.
3 NOBTOPAte war 2do BbI6opa HxHOROpnapaMeTpa, n 3aTeM haxMMTe dnaHaHauanaBocnpoN3BeDeHHBaI6paHHoro napaMeTpa(rpynnbln neCHN).
Pn BbI6ope "Setup" Ha ware 2, Haxmam
HAcTpoKn, n 3aTeM NOBTOpHO HaxmamTe
ENTER IJI KOnΦIrpyaunnapaMeTpTa.
Mehio Setup
Shuffle: Off, Songs (CmeHaaHHoe BOCnPOH3BcEChHe IIO IecHe), Albums (CmeHaaHHoe BOCnPOH3BeJehne IIO aJIb6Omy)
YcTpaHHeHHeNcPpaBHOCTeI
EcJyBACBO3HKNJINIO6bcN3CJIeIyUOIIHX TpyHIOCTe BO BpEmaKcJIyAtaIHN daHHoro aIIIapata, BocnoJIb3yITecb Ta6JIuIe HIXKe IJIy ycTpaHHeHH OIIH6Kn. B cIyuae, ecJH HeHCnPaBIOCTb He yKa3aHa B Ta6JIuIe HIN BbI He CMOrJH HcPiPaBHTb OIIH6Ky, cJIeIy HcHCTpyKIIIM Ta6JIuIbI, OTKJIIOHTe JaHHbI aIIIapAT, oTcoEINHTe CIIIOBOI Ka6JIb, I o6paTHTeCB K 6JIIXaIIHMeMy oΦHuaJIbHOMy dJIepy IIIN cepBNC IeHTP YAMAHA.
Pecubep (RX-E810)
067a yactb
DVD-npounrpbIbaTeIb MoXeT BOCnpon3BOdntb:
-DVD+R/RW DVDs-R/RW-ДИСКИ,ЗАПИСАньICВформATE,COBМЕСТHMOMcDVD-Video.
DVD-RW-ⅡNCKH,3aIIINcaHHbIe BΦopMaTe VR (coBmecTHMbIe c CPRM).
DVD-npounrpblBaTeMb MoKET BOCPOn3BODHTb CneyuOuNe DnCKn C daHHbIMN (Dna paJnoB MP3 n WMA, cNoBA B CkO6kax O6o3NaqOT NOpdepknBaemyU oactoty Bbl6opKn 6ntOBYIO CKOpocTb):
-ФаиьМP3,ЗаиcaHHbIe Ha CD-R/RW, DVD+R/RWИDVD-R/RW-нскax (Фс 32, 44.1,48KII/96-320K6/ceK(TOJIbKO CBR))
-Фаилbl WMA,3aHncaHbIe Ha CD-R/RW,DVD+R/RW DVDs-R/RW-dncKax (KorTaBΦc 44.1 KΓι:64-192 K6/ceKy/KorTba 48 KΓι:128-192 K6/ceK.(ToJIbKO CBR))
- Φαι JPEG (Kpome IIpoIgpeccHBbIX JPEG), 3aIIncahHbIe Ha CD-R/RW, DVD+R/RW n DVD-R/RW-Ⅱnckax (IOJIepKHBacMoe pa3peIIeHHe: 3072 x 2048 IN MeHee)
-BnIeOaJIbI DivX,3aIIncaIIbIe Ha CD-R/RW, DVD+R/RW n DVD-R/RW-ⅡncKaX
- K O D A K P i c t u r e C D
- FUJICOLOR CD
- Jlorotun "DivX ⑧ Ultra Certified"
-Bocipno3BOIDNTBUNeOphiHbBΦopMaTeDivX 忍 BCex Bepn(BKIOUyAaDivX6)IIOIpeKHaBaET paHINpeHHbIE φyHKIIIN IIpeCTabJIeHNMeJHa-KoHTeHTa φaHIOBΦopMa Ta DivX 忍 I BOCIPNO3BeDeHHe φaHIOBΦopMaTaDivX 忍 Media
-ISO 9660 YpOBeHb1/YpOBeHb2 nIa CD-R/RW
-Ⅱo299IaIOKHaIINCKeHIO648ΦaIIOBB IaIIKe H8HeapxH
PnmeuHn
HaDVD-HPONHPbIBaTeJIe HcBO3MOJHO BOCHPON3BcCTn CJeIyOIIHne IINCKN.
CD-ROM, DVD-ROM, DVD-RAM, CDV. (Даинoc H3длпс MeMOKeT BOCПОH3BOIHTb HeKOToPbIe TIIbI DVD-R-ДИСКOB (TOJIbKO BnIeOΦOpMaT).)
Hc3aBcpIeIbIe CD-R/RW,DVD+R/RWnDVD-R/RW HnCKHeMOryBOCIIPOH3BOJNTbcr.
- MoKCT BOCIIPOH3BOOHTbCToJIbKO IePBAc CCCnA DVD+R/R DL n DVD-R/RW/R DL-nCa.
-Фаилб WMA,3aHIIeHHbIe OT KOINHPOBaHH,He MOryT BOCIPoH3BOIDHTbcra Ha DVD-HPoHrPbIbAteJIe.
B3aBHCIMOCTH OYcIOBHN 3aIHNCH, HAnpHMep, cpebli KOMIbIOTepa HIN IIPOIpaMMHOO6ecHeeHH, BOCIIPOH3BeJeHHe HeKOToPbIX INCKOB MoKet 6bITb HEBO3MOXHBIM. XapaKTepHCTKN HnCKa HycIOBHN, HauPMep, KaueCTBO MaTePhJa, IapaAHHbI HIN IN3rN6bl, TaKke MOrTy OTpa3HTbcra Ha HeIpaBnIBHOH pa6ote.
He HIOJIb3yIte JnCKH HeCTaHApTHOro pa3Mepa HJH φopMbI (B BIIe cepua, np.).
He HIOJIb3yIe JnCKn CocrTaKAMN KJIeKoJ JeHTbI, HAKeiKaMn, HIN KJIe Ha IOBepXHOCTH.
Hc HIOJIb3yIe DnCKN C MHOKeCTBOM IapaIIHH Ha NOBepxHOcTH.
PernoHaJIbHbIe KOaBI DVD-uaCKOB
PerHOHaJIbHbI KOJ (HHeHTNΦHKaIIHOHHbI HOMep IJIaKaKdIoro pblIOOHOro perHOHa) yCTaHOBJeH IJIa 06bIYbIX DVD-IPoIHrPbIBaTeJIeH n DVD BHeOIDNCKOB.DVD-IPoIHrPbIBaTeJIb IOIDePJKBaET INCKn CpeHOHaJIbHbIMN KOaAMU, yKa3aHHbIMNB Ta6JIHcE HnKe. BoJee NpIpo6Ho, IN3yUHTe INHΦopMaIIHNo Ha o6JIoxKe JnCKa.
IIJRAHCKOB,ecJIIBI He IPOHrPbIBaTe ero.
He 3aHcBbAHTe Ha HnKc KapaHdHOM Hn npyHMn 3aHHCbBAIOHMn PnHcNOC6JeHHMn.
He IpnKJIeHbAte KJIeKkyIO JeHTy,HaKJIeKHN HIN npYrHc BnBkI KJIeKHX MaTePnaJIOB Ha JINCK, TaKKe, ObeperaTe INCK OT KOHTaKTa C KJIeKHMN BeIecCTBaMH.
He HcnoJIb3yIte 3aIIHTHOIO NKpblTHJnJI npoTbpaHHeHnaPapHH.
He HIOJIb3yIte DNCK,Ha IOBepxHOCTH KOtOpORO MOXHO IPOH3BecTH NeYATb C HIOJIb3OBAHHem IIPOJlBaEMbIX IINHTePOB JIIA 3THKcTOK.
He xpaHHTe INCK B Mecrax, IOINBepKeHHbIX INPIMOMY BO3JEcTBHIO COJIHeuHbIX JyEHN, BBICOKOI TEMIIePaType, IOBbIHINCHHO BJIAxHOCTN HJIN CJIINHKOM IIbIBhIX MeCTaX.
Ipn3aqr3HeHHnHnKa, nctro npotpnte erocxon TkaHbIO,naHHa c ceHTpa K kpaM.He hnoJIb3yIte OCHNTcJIN 3aIIHCn HJIn pa36aBHTeJIN JnKpaKn.
BoH36ckaHHe c6oEBpaOte, HeHCIOJIb3yHTIpoJaBaEMbIE OYHCTHTCJIN JINHH3bl.
PpeDynpexdHne


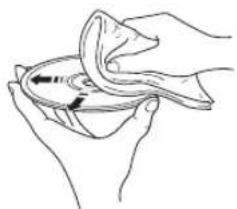
CnpaBOUHnK
AydnonHΦopMaun
Dolby Digital
IuΦpOBa CnCTeMa OKpyKaHOJero 3ByaHn DaLyDolby Digital IO3BOJIaET HacJaIHTbcra IIOJIHOCTbIO He3aBHCIMMbIM MHOROKAHaJIbHBIM 3ByaHnEM.
CnCTema Dolby Digital IO3BOJIaET BOCIpON3BOJNTb5 IOJIHOHaIIa3OHHbIX ayINOKaHaIOB c 3
ΦpoHTaJIbHBiIMn KaHaJIaMn (JeBBi, IeHTpaJIbHBi, N IIpaBBi), II 2 CTpeoΦoHNueCKHMn KaHaJaMn OKpyKaIOJeo 3ByaHn. BKIOUay
IOIOJIHInTeJIbHBiK aHaJI, CIEIIHaJIbHO
IpeJHa3HaYeHHbI JIy HN3KOvAcTOTHbIX eΦΦeKTOB
H IN3BeCTHbIK KaLFE (HIN3KOvAcTOTHbIK eΦΦeKT),
IaHHa CNCTeMa B HTore o6laaet 5.1 KaHaJaMn (KaHaJI LFE cHTaEcTcKa 0.1). PecNBep MKNIHpyET MHOROKAHaJIbHoc 3ByaHnE Ha 2 KaHaJaTaKIM
O6pa3OM, YTO 9TO IO3BOJIaEe T JeTKO HAcJaIHTbcR
NCTOYHKAMn Dolby Digital.
MP3 (MPEG Audio Layer-3)
OINH3 MeTOOB CKaTnB 3ByaHHN, HcIOJIb3yeMbIMPEG. OH hCIOJIb3yeT MeToI 6e3BO3BpaTHOROCKaTnH, KOTOpBn apXHBpyET C BbICOKHM ypOBHEcKaTnH IIyTEM COKpaUeHHN JaHHbIX B 3ByaHHN, TpyIHNO yJIOBMOM IJIY HeJIOBeueCKoro CJyxa. 3TOTMeToI MOKeT CxHMaTB JaHHbIE PpHmepHO Ha 1/11(128 K6/ceK) c OINHOpeMeHHbIM CoXpaHeHHEMOINHaKOBOrO KaueCTBa 3ByaHHN, KaK HaMy3bKaJIbHbIX CD-Ⅱckax.
PCM (Pulse Code Modulation)
CnHaJI, npeo6pa3OBAHHbI B iHDPoBOB φOpMaT 6e3 cKaTHa. 3ByaHHe Ha CD-ⅡNCK 3aIHcMbAeTcHa ha ckopocTH 16 6HT H uactOTE 44,1 KΓII, B TO BpeM KaK ckopocTh 3aINCh Ha DVD-ⅡNcKe BapbHypeT B IIpeJeJax 16 6HT C uactOTOr 48 KΓII J0 24 6HT C uactOTOr 192 KΓII, IIpeIOCTaBJIa 6OJIe C bICOKOKaYcCTBcHHoe 3ByaHHe IIO cpaBHcHHIO C CD-ⅡNcKom. IaHHbI CNHaJI TaKKe BKIIIOuAe TTHI CNHaJIa Packed PCM (PPCM), KOtOpbI MoKeT cKHMATbcS 6e3 IIOTePn DaHHbIX.
Yactota cTpoBupobAHNA
KoJIHueCTBO BbI6OpOK (IIpoUeCC IJIA OUIΦpOBAHnA aHaJIIOROBbIX CnRHaJIIOB) BCekyHny. B IIpuHcIIIE, Yem BBIIIE yAcTOTA AMIIJHTUHO-IMIIyJBbcHO MOJYJIAuHH, TeM IIIInpe IHaIa3OH YAcTOT IJIABOCIIPOIN3BeJeHH, IN YEM 6OJIbIIe cKOpocTB KBaHTOBaHHbIX 6INTOB, TEm YHIIe BOCIIPOIN3BeDeHne yPObHe 3ByaHHN.
HaMeHOBaHne,Pa3JeI(DVD)
TexHOIOHRA DVD Video IO3BOJIAeT pa3JeIHTb INCK Ha HAIMeHOBAHHa,Ha IIHPOKyIO HORY,Ha MaJIbIe pa3JeJIbI. KaJIOc pa3JeJIeHNHe I3BcCTHO KA KHomep HAIMeHOBAHHa IIIN HOMep pa3JeJa.
Фоногамma(CD/Video CD/Super Video CD-нск)
CD,VCD HIN SVCD-IMCK MOXHIO pa3IeJIHTb Ha HeckoJIbKO cerMeHTOB (IopOKeK).KaKIOoe pa3IeJIeHNHe I3BecTHO KaK HOMep FOHOIGpAMMbI.
■WMA (Windows Media Audio)
MeTOI cKaTnI 3ByaHnI, pa3pa6oTaHHbI Microsoft Corporation. OH nIOJIb3yeT MeToI 6e3BO3BpaTHOrO cKaTnI, KOtOpB1 apXHBpyET C BbICOKHM yPoBHeM cKaTnI IyTeM COKpaIeHnI daHHbIX B 3ByaHnn, TpyINHO yIOBMOM IJIyYeJIOBeYeCKORO cIyxa. 3TOT MeToI MOKeT cKImaTb IaHHbIe IIpIMepHO Ha 1/22 (64 K0/ceK) c OJHOBpeMeHHbIM COxpaHeHHeM OINHaKOBOrO KaueCTBa 3ByaHnI, KaK Ha My3bIKaJIbHbIX CD-ⅡNckax.
BndeonHΦopMaun JIorOTnNbI N 3HaKn o6
KOMNOHEHTbI BnDeOcHrHaJI
CnCTema KOMIOHHTHO BnIEOCHHaJa pa3JeJAreT BnIEOCHHaJI Ha CnHaJI Y IJIa RPKoCTn H CnHaJIbI Pn H PR IJI HAcBIIeHHOCTH. CnCTema BOCIpON3BOJNT ICBET 60JIe IIpaBIOIOIO6HO, TaK KaK 3TN CnHaJIbI He3aBNCMbI. KOMIOHcHTbI CNHaJI TaKKe Ha3bIBaETCra "CnHaJIOM pa3JIHmra IBeTa", TaK KaK CnHaJI RPKoCTn OTJeJIeH OT CnHaJIa IBeTa.
NTSC (National Television System Committee)
NTSC-3TO CnCTema BnIeOCHrHaJIa (525 cTpOK, 30 KaIPOB BceKyuHny), HcIOJIb3yEma B CeBepHOJ AmePKe, IeHTpaJIbHOJ AmePKe, pIe cTpaH IOxHOJ AmePHKN, IN B HcKOToPbIX A3NaTcKNX cTpaHax, BKJIIOUaYIIOHNIO.
PAL (Phase Alternating Line)
PAL-3TO cHCTeMa BnIeOCHHaJa (625 cTpOK, 25 KaIpoB BceKyuHny), HcIOJIb3yEmaB CoeINHeHHOM KopoJIeBCTBe BeJInKO6pHTaHHN H CeBepHOI npAHHN, 6OJIbIIHHCTBE cTpaH BOcTOUHO EByoIIbI, HecKOJIbKHX cTpaHax IOxHOJ AMePKN, HekOTOpbIX cTpaHax BJIINXHrO BoCTOKa N A3NaTcKHX cTpaHax, HecKOJIbKHX AΦpHKaHcKHX cTpaHax, ABCtpaJHH, HoBOI 3eJIaHHN, INpyTHX cTpaHax THXORO OKeaHa.
TBCTAHdAPT (PAL/50 Tq) (NTSC/60
525
- KoJIHueCTBO IOIOc 625 525
- BocIpOnn3BcIeHHe MyJIbTHcTaHApTHeO (PAL/NTSC)
NOKJIIOUeHnA
SCART. EbpokOHKeKTop
BbIXoY Cinch (3eJIeHbI)
BbIXoP/B/C. Cinch (cHH)
- BbIXoI Pr / C_R .. Cinch (KpaenbH)
BbIXoI S-Video .MHH DIN,4pa3bema
BnJeobbIXoI .Cinch
- AyIOHOBbIXoI (L+R) .Cinch
-ⅢHΦpOBoB BbIXoI 1 K0aKcHaJIbHbI, 1 OHTNueckn (IEC60958 IJIA CDDA/LPCM) (IEC61937 JMa MPEG2,Dolby Digital)
OBsPNA3DEJ
HaipKHeHne MoJIINIJI CIIA H KaHaJIbI....120V IepeMeHHoro ToKa,60T MoJIeJIbI ABCTpaJIIn 240V IepeMeHHoro ToKa,50T MoJIeIH DIO CoEHHHO KopoJIeBCTBa BeIKIO6pHTAHN H CeBepHO HApHINH,IEPOJIbI.230V IepeMeHHoro ToKa,50T MoJIeJIbI JnKOpH...110-240V IepeMeHHoro ToKa,50/60T MoJIeJIbI KITaI 220V IepeMeHHoro ToKa,50T
-3HepeHOTpe6JIeHHe BpeXHMe OxHHaHH. <1,0 BaTT
-3JIeKtpoITppe6JIeHHe ...Pn6J.12Barr
- a b a p _ 尼 ( II x B x ) 215x108x330MM
Bec. 2,3 K
*TexHHueckHc XapaKTcpHCTKN MORYT N3MCHHTb6c3 IpcBapHTcJIbHORO YBCOMJICHH.
TV
Admiral 292/293/216
Aiwa 294/276/283/284
Akai 295/296
Alba 296
AOC 297
Bell & Howell 292
Bestar 298
Blaupunkt 229/222
Blue sky 298
Brandt 223
Brocsonic 297
Bush 296
By Design 201/202
Clatronic 298
Craig 224
Croslex 225/298
Curtis Mathis 297/226
Daewoo 297/298/224/227/
228
239
Dwin
Emerson 297/224/239/232
Ferguson 223/265/266
First line 298
Fisher 295/233
Fraba 298
Fujitsu 289
Funai
GE 293/297/234/235/
236
Goodmans 296/298/223
Grundig 229/238/249
Hitachi 297/239/242/243/
285
ICE 296
Irradio 296
Iitt/Nokia 244/245
JC Penny 293/297/234/237
JVC (Victor) 296/246/247/286
Kendo 298
KTV 297/239
LG/Goldstar 297/298/239/237
Loewe 298/248
LXI 293/297/225/226/
233/298
Magnavox 297/225/239/298
Marantz 298/210
Matsui 295
Medion 203/204/298
Memorex 297/216
Mitsubishi 299/297/259/287
Nad 226/255
NEC 297/252/282
Nokia 244/245
Nokia Oceanic 245
Nordmende 265/266
Onwa 296
Panasonic 234/235/236/253/
288/211
Philco 297/225/239/298
Philips 225/205/298
Pioneer 226/235/254/255/
268
Portland 297/256
Proscan 293/221
Proton 297/250/260/270
234/235
Radio Shack 299/293/297
RCA 293/297/234/256
257/258/221
SABA 223/269/265/266
Sampo 281/297/280
Samsung 297/239/248/262/
275
Sanyo 295/233/279/272/
273/274/212
Schneider 296
Scott 297
Sharp 292/239/232/213
Siemens 229
Signature 216/292
Sony 263/214
Sylvania 297/225/298
Symphonic 217/218/219
Telefunken 269/264/265/266
Thomson 223/266
Toshiba 292/226/267/215
Videch 297/242
Wards 297/239/232/216
Yamaha 299/292/242/285/
287/253
Zenith 216/261/271

YAMAHA
© 2006 YAMAHA CORPORATION All rights reserved.