
Gallery G17 AirPlay - Docking station KLIPSCH - Free user manual and instructions
Find the device manual for free Gallery G17 AirPlay KLIPSCH in PDF.

| Product Type | Wireless Speaker Dock |
| Brand | Klipsch |
| Model | Gallery G17 AirPlay |
| Connectivity | AirPlay (Wi-Fi), USB 30-pin, 3.5mm auxiliary input |
| Compatibility | iTunes 10.1+, iOS 4.2+, iPod, iPhone, iPad (30-pin) |
| Power | Mains via included DC adapter (100-240 V) |
| Speakers | Bi-amplified: separate tweeter horn and woofer enclosure |
| Technology | Klipsch Horn (derived from audiophile speakers) |
| Grille | Removable fine fabric, held by magnets |
| Mounting | On stand (glass base included) or wall mount (bracket not included) |
| Remote control | Yes, with battery (included) |
| LED indicators | Green: on; blue: Wi-Fi connected; purple: configuration |
| Maintenance | Clean with a dry cloth |
| Safety | Instructions: do not expose to water, do not block openings, unplug during storms |
| Package contents | Main unit, glass base with column, 4 screws, remote control (battery included), power adapter, power cord, manual, white gloves |
| Certifications | FCC Class B, IC, CE, WEEE, RoHS |
| Warranty | Keep the receipt (online registration recommended) |
| Country of origin | Not specified |
Frequently Asked Questions - Gallery G17 AirPlay KLIPSCH
User questions about Gallery G17 AirPlay KLIPSCH
0 question about this device. Answer the ones you know or ask your own.
Ask a new question about this device
Download the instructions for your Docking station in PDF format for free! Find your manual Gallery G17 AirPlay - KLIPSCH and take your electronic device back in hand. On this page are published all the documents necessary for the use of your device. Gallery G17 AirPlay by KLIPSCH.
USER MANUAL Gallery G17 AirPlay KLIPSCH
IMPORTANT SAFETY INSTRUCTIONS!
- READ these instructions.
- KEEP these instructions.
- HEED all warnings.
- FOLLOW all instructions.
- DO NOT use this apparatus near water.
- CLEAN ONLY with dry cloth.
- DO NOT block any ventilation openings. Install in accordance with the manufacturer's instructions
- Do NOT install near any heat sources such as radiators, heat registers, stoves, or other apparatus (including amplifiers) that produce heat.
- DO NOT defeat the safety purpose of the polarized or grounding type plug. A polarized plug has two blades with one wider than the other. A grounding type plug has two blades and a third grounding prong. The wider blade or the third prong are provided for your safety. If the provided plug does not fit into your outlet, consult an electrician for replacement of the obsolete outlet.
- PROTECT the power cord from being walked on or pinched, particularly at plugs, convenience receptacles, and the point where they exit from the apparatus.
- ONLY USE attachments/accessories specified by the manufacturer.
- ONLY USE with a cart, stand, tripod, bracket, or table specified by the manufacturer, or sold with the apparatus. When a cart is used, use caution when moving the cart/apparatus combination to avoid injury from tip-over.
- UNPLUG this apparatus during lightning storms or when unused for long periods of time.
- REFER all servicing to qualified service personnel. Servicing is required when the apparatus has been damaged in any way, such as power-supply cord or plug is damaged, liquid has been spilled or objects have fallen into the apparatus, the apparatus has been exposed to rain or moisture, does not operate normally, or has been dropped.
- DO NOT expose this apparatus to dripping or splashing and ensure that no objects filled with liquids, such as vases, are placed on the apparatus.
- To completely disconnect this apparatus from the AC Mains, disconnect the power supply cord plug from the AC receptacle.
- The mains plug of the power supply cord shall remain readily operable.

The exclamation point, within an equilateral triangle, is intended to alert the user to the presence of important operating and maintenance (servicing) instructions in the literature accompanying the product.

The lightning flash with arrowhead symbol within an equilateral triangle, is intended to alert the user to the presence of uninsulated "dangerous voltage" within the product's enclosure that may be of sufficient magnitude to constitute a risk of electrical shock to persons.
WARNING: To reduce the risk of fire or electrical shock, do not expose this apparatus to rain or moisture.
WARNING: No naked flame sources - such as candles - should be placed on the product.
WARNING: Batteries (battery pack or batteries installed) shall not be exposed to excessive heat such as sunshine, fire or the like.
WARNING: Danger of explosion if battery is incorrectly replaced. Replace only with the same or equivalent type.
WARNING: Do not place batteries in mouth or ingest.
Please dispose of any used batteries properly, following any local regulations. Do not incinerate.

CAUTION
RISK OF ELECTRIC SHOCK. DO NOT OPEN.

WARNING: Do Not Open! Risk of Electrical Shock. Voltages in this equipment are hazardous to life. No user-serviceable parts inside. Refer all servicing to qualified service personnel.
Place the equipment near a main power supply outlet and make sure that you can easily access the power breaker switch.
WARNING: This product is intended to be operated ONLY from the AC Voltages listed on the back panel or included power supply of the product. Operation from other voltages other than those indicated may cause irreversible damage to the product and void the products warranty. The use of AC Plug Adapters is cautioned because it can allow the product to be plugged into voltages in which the product was not designed to operate. If the product is equipped with a detachable power cord, use only the type provided with your product or by your local distributor and/or retailer. If you are unsure of the correct operational voltage, please contact your local distributor and/or retailer.
EU COMPLIANCE INFORMATION:
Eligible to bear the CE mark, Conforms to European Union Low Voltage Directive 2006/95/EC; Conforms to European Union EMC Directive 2004/108/EC, Conforms to Eco-Design Directive 2009/125/EC. Conforms to European Union R&TTE Directive 1999/5/EC
C∈1588①
WEEE NOTICE
Note: This mark applies only to countries within the European Union (EU) and Norway.

This appliance is labeled in accordance with European Directive 2002/96/EC concerning waste electrical and electronic equipment (WEEE). This label indicates that this product should not be disposed of with household waste. It should be deposited at an appropriate facility to enable recovery and recycling.
FCC AND CANADA EMC COMPLIANCE INFORMATION:
This device complies with part 15 of the FCC Rules. Operation is subject to the following two conditions: (1) This device may not cause harmful interference, and (2) this device must accept any interference received, including interference that may cause undesired operation.
NOTE: This equipment has been tested and found to comply with the limits for a Class B digital device, pursuant to part 15 of the FCC Rules. These limits are designed to provide reasonable protection against harmful interference in a residential installation. This equipment generates, uses and can radiate radio frequency energy and, if not installed and used in accordance with the instructions, may cause harmful interference to radio communications. However, there is no guarantee that interference will not occur in a particular installation. If this equipment does cause harmful interference to radio or television reception, which can be determined by turning the equipment off and on, the user is encouraged to try to correct the interference by one or more of the following measures:
Reorient or relocate the receiving antenna.
- Increase the separation between the equipment and receiver.
- Connect the equipment into an outlet on a circuit different from that to which the receiver is connected.
- Consult the dealer or an experienced radio/TV technician for help.
Approved under the verification provision of FCC Part 15 as a Class B Digital Device.
Caution: Changes or modifications not expressly approved by the manufacturer could void the user's authority to operate this device.
This Class B digital apparatus complies with Canadian ICES-003.
The term "IC:" before the radio certification number only signifies that Industry Canada technical specifications were met.
This device complies with part 15 of the FCC Rules and Industry Canada license-exempt RSS standard(s). Operation is subject to the following two conditions: (1) this device may not cause interference, and (2) this device must accept any interference, including interference that may cause undesired operation of the device.
This device is intended for home and office use in all EU countries (and other countries following the EU directive 1999/5/EC) without any limitation except for the countries mentioned below:
Country Restriction Reason/remark
| Bulgaria None | General authorization required for outdoor use and public service | |
| France | Outdoor use limited to 10 mW e.i.r.p within the band 2454-2483.5 MHz | Military Radiolocation use. Refarming of the 2.4 GHz band has been ongoing in recent years to allow current relaxed regulation. Full implementation planned 2012 |
| Italy None | If used outside of own premises, general authorization is required | |
| Luxembourg None | General authorization required for network and service supply (not for spectrum) | |
| Norway Implemented | This subsection does not apply for the geographical area within a radius of 20 km from the centre of Ny-Álesund |
Russian Federation None Only for Indoor applications
Note: Please don't use the product outdoors in France.
THANK YOU
Thank you for your purchase of the Klipsch Gallery™ G-17 Air! You will soon be experiencing not only the newest and easiest way to listen to your favorite music but you will be listening through a system created by a company with a 65 year reputation for building speakers and music devices that recreate the most lifelike sound possible. The Klipsch horn-loaded technology used in the G-17 Air is derived from audiophile speakers costing thousands of dollars. The separate horn-loaded tweeters and woofers are biamplified for the cleanest sound possible.
PRODUCT REGISTRATION
Register your product online at www.klipsch.com/register
- Klipsch Group Inc, (KGl) will keep you up-to-date on new products and promotions
- Your personal information will never be resold
- This registration information is not used for warranty purposes.
Please retain your receipt for warranty claims
WHAT IT DOES
The Klipsch G-17 Air is designed to play your music:
a. Wirelessly from any device equipped with Apple® AirPlay® technology, using your existing Wi-Fi® network.
b. Connected via the rear-mounted USB input, most 30 pin iPods®, iPhones® or iPads™.
c. Connected via the rear-mounted 3.5mm input and to the headphone output of any MP3 player or phone.
If you have iTunes 10.1 or later on your Mac computer or PC, you can wirelessly stream any of the music in your library or stream music from the Internet radio stations accessible to the G-17 Air. You can also wirelessly stream music from your iPhone, iPad or iPod touch to the G-17 Air (iOS 4.2 or later required in these
devices). The 3.5mm auxiliary input also allows you to play any audio device with a 3.5mm output through the G-17 Air (3.5mm cable not included).
AirPlay requires iTunes 10.1 or later to operate from a MAC or PC. Airplay can also operate from an iOS device capable of running iOS 4.2 or later (iPhone 3G, 3GS or 4, iPod touch 2nd, 3rd or 4th gen, iPad or iPad 2). However it is recommended that you update your iOS and iTunes to get the most out of your system.

AirPlay

iPod

iPad

CERTIFIED
PACKING LIST
- G-17 Air Main Unit
- Glass base for G-17 Air with attached feet and post
- Rubber input cover for post
- Four Phillips head screws (to attach post to the G-17 Air)
- Grille
- Remote control (with battery)
- Power supply
- AC power cord (plug into power supply)
- This owner's manual
- Quick AirPlay Setup Guide
- White Gloves
ATTACHING THE BASE TO THE G-17 AIR
For desktop placement you must first attach the supplied base:
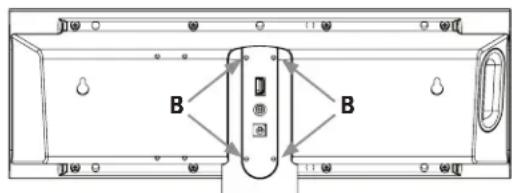
- Gently remove the rubber input cover (A) on rear of the post attached to the tempered glass base exposing four screw holes on post (B).
- Align screw holes on rear of the G-17 main unit with those on the post.
- Using the four screws, attach G-17 Air to the post. Do not over tighten.
- Replace rubber input cover.
A

MOUNTING THE G-17 AIR ON WALL
- Determine a suitable location for the G-17 to wall-mount and complete any wiring to it before mounting to the wall. DO NOT CEILING-MOUNT.
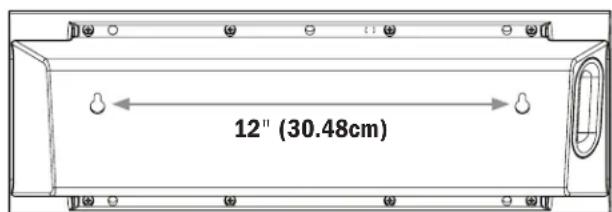
- With a pencil, mark on wall two pilot hole locations 12 inches (30.48cm) horizontally apart.
- Pre-drill pilot holes in marked locations. If drilling into a wall stud (ideal) it is recommended to use #10 mounting screws (not included) to mount the G-17 Air. If there is no stud, install wall anchors (not included) into the pilot holes to hold G-17 Air instead. Wall anchors should be rated to at least 8 lbs. (3.63kg)
G-17 AIR REAR INPUT PANEL
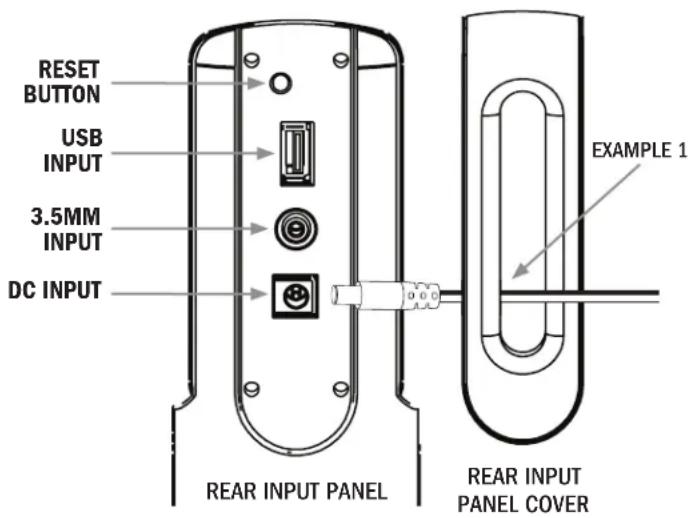
The G-17 Air rear panel has three separate inputs and one reset button:
RESET BUTTON: Clears G-17 Air connection to a wireless network and clears name given to the G-17 Air during wireless setup.
STANDARD USB INPUT: Connects/Plays/Charges most iOS Devices (cable not included) (charge time depends on type of iOS Device).
3.5MM INPUT: Connects/Plays any device with a 3.5mm headphone output.
DC INPUT: Connects to provided power adapter (DO NOT USE ANY OTHER ADAPTER). When connecting to any input, remove Rear Input Panel Cover, run wire through cover first and then plug into appropriate input. Once all connections are made snap cover back onto the G-17 Air Rear Input Panel (See Example 1).
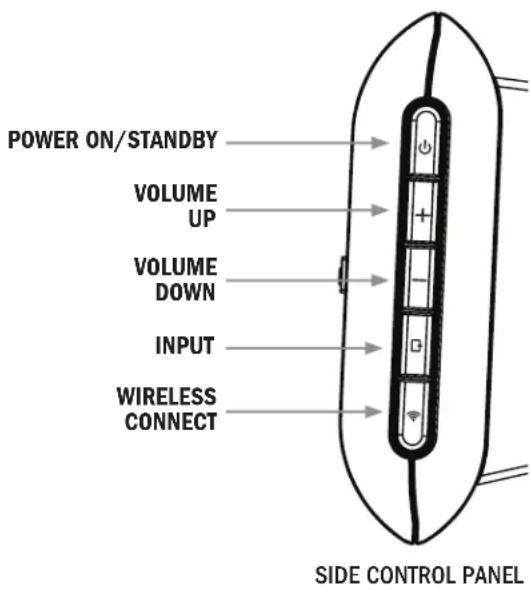
G-17 AIR SIDE CONTROL PANEL
The G-17 Air side panel has five separate control buttons:
POWER ON/STANDBY: When Power On, LED is solid Green, in standby, LED is off.
(Pleases note: in standby the system will draw a minimal amount of power.)
VOLUME UP: To increase volume of any USB or 3.5mm wire connected device or any AirPlay Wireless connected device.
VOLUME DOWN: To decrease volume of any USB or 3.5mm wire connected device or any AirPlay Wireless connected device.
INPUT: First input position is AirPlay, second is USB input, third is 3.5mm input (Wireless Connect LED below flashes Purple to indicate input chosen, see below).
WIRELESS CONNECT: When Power is turned on, Wireless Connect LED flashes fast Blue, then changes to slow Blue flash, indicating G-17 Air is looking for network. When connected to network, LED is solid Blue (if initial network connection setup is completed). LED is flashing Purple during initial network setup (see AirPlay Network Setup) and flashes Purple as you cycle through inputs with the Input button as follows: AirPlay input, flashes Purple once; USB input, flashes Purple twice; 3.5mm input, flashes Purple three times.
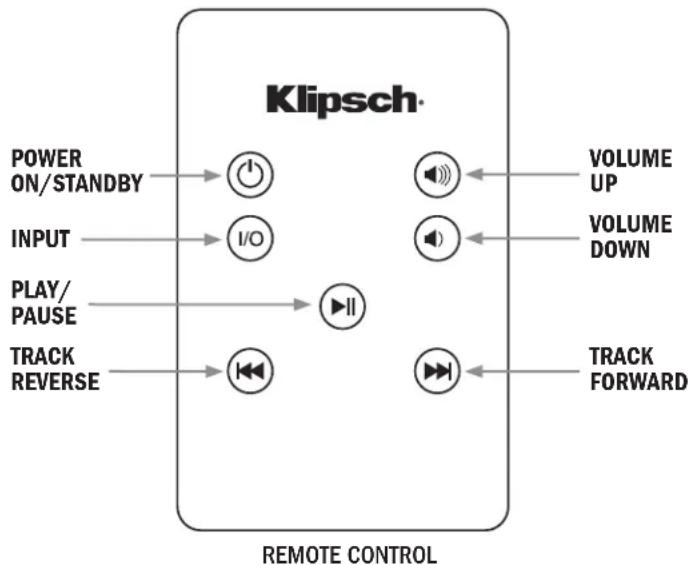
G-17 AIR REMOTE CONTROL
POWER ON/STANDBY:Turns G-17 Air Power On and Off.
INPUT: Changes G-17 Air Input.
PLAY/PAUSE: Engages play and pause mode on compatible Apple and Airplay devices.
TRACK REVERSE: Goes to previous track on compatible Apple and Airplay devices.
VOLUME UP: Increases volume level of G-17 Air.
VOLUME DOWN: Decreases volume level of G-17 Air.
TRACK FORWARD: Goes to next track on compatible Apple and Airplay devices.
AIRPLAY NETWORK SETUP
The Klipsch G-17 Air will connect to your existing home wireless network with the AirPlay Network Setup, then will automatically connect each time you turn the G-17 Air on.
To perform this setup, your PC or Mac must have wireless built-in. If your PC or Mac does not have built-in wireless please use the iOS app or follow these steps using Safari on you iOS Device.
AIRPLAY NETWORK SETUP STEPS
(You MUST know your home wireless network Name (SSID) and Password to perform the setup)
- Disconnect the internet cable from your computer (if one is connected) Plug in the G-17 Air. The Wireless Button LED will show Red then blink Blue rapidly for 25 seconds. Once it is flashing Blue slowly, go to Step 2.
- To access the G-17 Air connect mode, push and hold the Wireless Button until the LED turns Purple and release. It will flash Purple rapidly for 30 seconds. Once flashing Purple slowly, go to Step 3.
- Open the Wireless Connection Utility on your PC or Mac to look for available networks. Klipsch G-17 Air Setup should be present. (If it has not appeared on the list, click refresh to update the list of available networks.) Select the Klipsch_G-17_AirSetup and click connect (Figure 1.) Once the LED turns solid Purple, go to Step 4.
- Open your Internet browser (Internet Explorer®, Firefox®, Safari®, etc.) and type in the IP address: http://192.168.1.12 in the address bar and hit "Enter" (Figure 2), go to Step 5.
- Once you have entered the IP address, a setup screen from the Klipsch G-17 Air will appear in your browser (Figure 3). If you wish to change the name of the Klipsch G-17 Air to something else, you may type in your selected name in the "AirPlay Device Name" box and click "Apply". Whatever name you choose, that name will appear in iTunes or on your compatible iOS Device as the option to connect to in order to wirelessly stream your music to the G-17 Air. After clicking "Apply", click on "Network Configuration" in the left bar to return to the original page, go to Step 6.
- Go to the "Airplay Wireless LAN Settings" area of the screen and select your wireless network from the drop down box next to "Service Set ID (SSID)" or select to enter it manually if you do not see it or it is not being broadcast (Figure 4), go to Step 7.
- Once you select your wireless network, you will be prompted to enter the password for your wireless network if one is required, go to Step 8
- Once you have entered your password click "Apply", a screen will appear stating "Warning, incorrect parameters about to change settings" (wording varies depending on use of Internet Explorer, Firefox, Safari, etc.). Click OK, go to Step 9.
- Your G-17 Air will automatically restart after completing Step 8. When the wireless connect button displays solid Blue, your G-17 Air has successfully connected to your wireless network. If the wireless connect button continues to blink Blue, please perform steps 1-8 again. If you are still having problems, please refer to the troubleshooting section or call Klipsch customer service at 1-800-KLIPSCH.
- Re-connect to your wireless network if you are not automatically re-connected. Re-connect your LAN cable if you disconnected it at the start of this setup.
You have now connected your Klipsch G-17 Air to your wireless network. Each time you turn it on, it will automatically connect to your network!
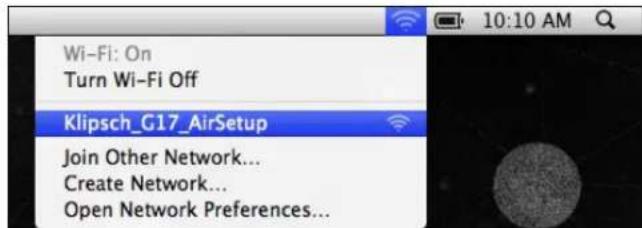
FIGURE 1
Apple Wireless Connections
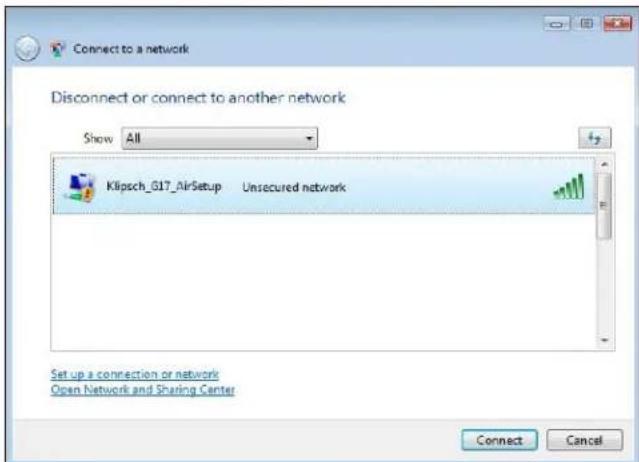
Windows Wireless Connections

FIGURE 2
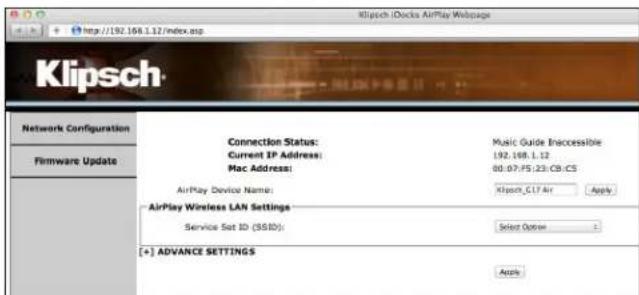
FIGURE 3
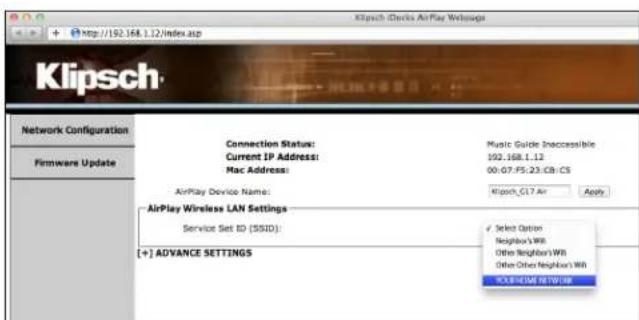
FIGURE 4
PLAYING ITUNES OR STORED MUSIC ON YOURCompatible IPOD TOUCH, IPAD OR IPHONE
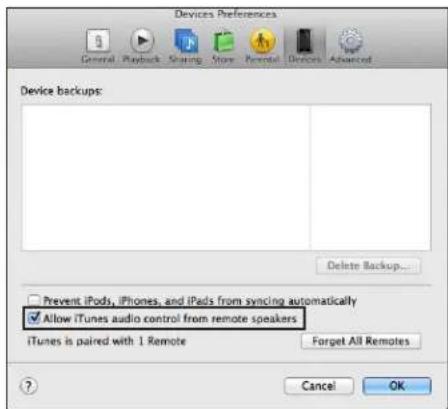
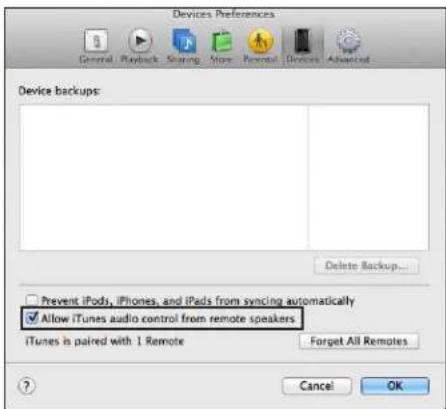
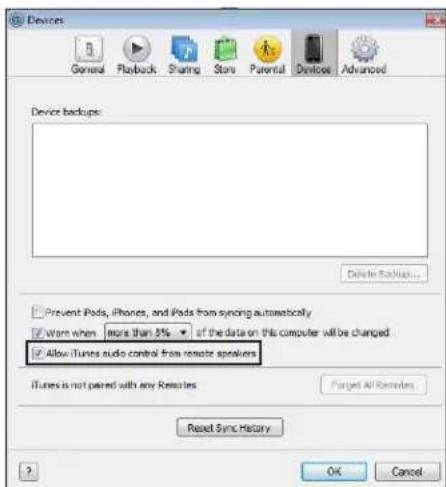
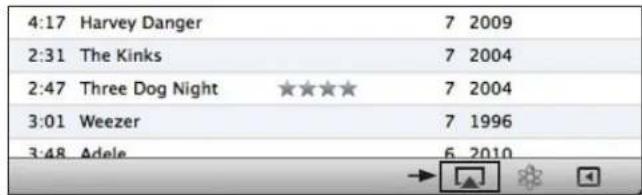
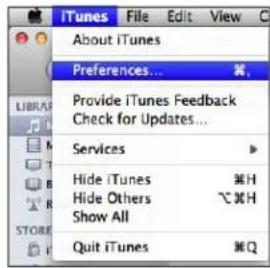
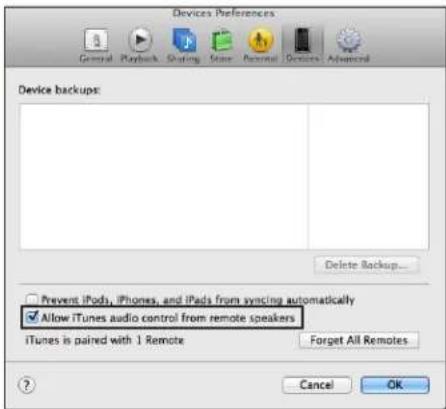
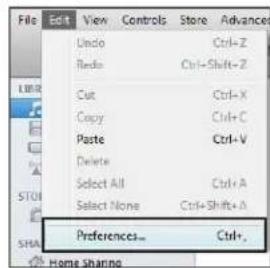
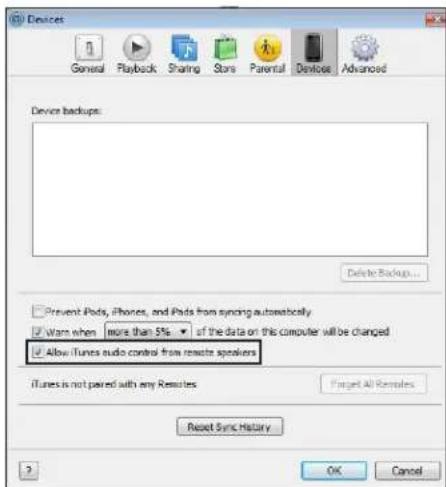
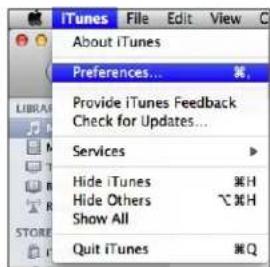
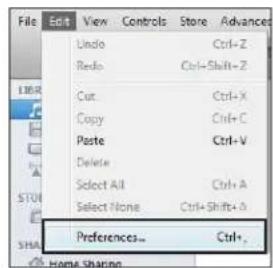
Open iTunes on your computer, find the "AirPlay" icon on the bottom bar of iTunes and click on it. It will give you the option of playing iTunes on your computer speakers or the Klipsch_G17 xxxxx (or other name if you changed it during setup) (Figure 5). Click on the Klipsch_G17 xxxxx, then click on a song to play; iTunes will show it is connecting to the Klipsch_G17 xxxxx and your music will play clearly on your G-17 Air. To allow the G-17 Air to control iTunes volume, you must select "Edit" (if using Windows) or "iTunes" (if using a Mac) and then select "Preferences". In "Preferences", select the "Devices" tab and select the option to "Allow iTunes audio control from remote speakers" (Figure 6).
To play stored music on your compatible iTouch, iPad or iPhone, turn on the G-17 Air and allow time for the AirPlay Connect button LED to turn solid Blue. Access your iTunes music on your compatible iOS Device and go to a song. Click on the AirPlay symbol to the right. It will give you the option of playing iTunes on your iOS Device speakers or the Klipsch_G17xxxxxx (or other name if you changed it during setup). Click on the Klipsch_G17xxxxxx, and then click on a song to play and your music will play clearly on your G-17 Air. Volume can be adjusted on both your iOS Device and on the G-17 Air.
PLAYING A DEVICE CONNECTED VIA USB OR THE 3.5MM INPUT
- Choose appropriate input (USB or Aux) on the G-17 Air by pressing the input button.
- Turn volume all the way down on the G-17 Air.
- Connect device to be played through input in either the USB or 3.5mm input on rear of G-17 Air using a cord with a USB or 3.5mm connector (not included).
- For USB begin playing music from unit and turn up volume on G-17 Air to desired level. For Aux tum volume up on device to max and control volume from the G-17 Air.
GRILLE INSTALLATION
The unique grille for the speaker consists of a piece of sheer rectangular cloth with metal rods along the top and bottom. It is held in place by magnets imbedded in slots at the top and bottom of the rear of the cabinet. Carefully pull the metal rod away from one side, then the other to remove grille. The grille is designed to be as lightweight and acoustically transparent as possible so there is no rigid framework behind it. Because of this, it might be necessary to "smooth" the cloth once the grille is attached to the cabinet by using two thumbs to pull the cloth taut from top to bottom.
CARE AND CLEANING
Your Klipsch G-17 Air speaker system has a durable finish that should only require dry dusting or cleaning with a dry cloth. Avoid the use of abrasive or solvent-based cleaners and harsh detergents.
FIGURE 5
| 4:17 Harvey Danger | 7 2009 |
| 2:31 The Kinks | 7 2004 |
| 2:47 Three Dog Night | 7 2004 |
| 3:01 Weezer | 7 1996 |
| 3:48 Adele | 6 2010 |
AirPlay Icon will turn blue when connected to an AirPlay device.
FIGURE 6
Box must be checked to "Allow iTunes audio control from remote speakers."
Apple® iTunes
| iTunes | File | Edit | View | C |
| About iTunes | ||||
| Preferences... | ||||
| Provide iTunes Feedback | ||||
| Check for Updates... | ||||
| Services | ||||
| Hide iTunes | #H | |||
| Hide Others | #H | |||
| Show All | ||||
| Quit iTunes | #Q | |||
Windows iTunes
| File | View | Controls | Store | Advanced |
| LIRR | Undio | Ctrl+Z | ||
| Radio | Ctrl+Shift+Z | |||
| Cut | Ctrl+X | |||
| Copy | Ctrl+C | |||
| Paste | Ctrl+V | |||
| Delete | ||||
| STUI | Select All | Ctrl+A | ||
| Select None | Ctrl+Shift+A | |||
| SHA | Preferences... | Ctrl+. | ||

TROUBLESHOOTING
G-17 Air will not Power On.
- Make sure DC adapter is plugged securely into wall (LED on power supply is Green) and into the back of the unit.
Make sure there is power at the outlet G-17 Air is plugged into.
G-17 Air has been setup but will not reconnect to your network.
- Restart your wireless network: unplug your wireless router for at least 30 seconds, then re-plug in.
- Unplug the power from the back of the G-17 Air for at least 30 seconds, plug into the outlet again and re-setup
iOS Device locks up.
- Hold power button down on iOS Device until "Slide to Power Off" appears on the screen. Slide the bar to power the device off. Once it is powered off, hold the power button down until Apple logo appears.
G-17 Air is on and connected to your network (wireless connect button is solid Blue and Airplay icon is solid Blue) but will not play music from iTunes or your compatible iOS Device.
- In the "settings" application on your iOS device, turn Wi-Fi off then on again.
- Restart iTunes (PC or Mac), iPod app (iPhone) or Music app (iPod Touch).
Make sure volume on G-17 Air is not muted. - Make sure you have downloaded the latest iTunes software (10.1 or later) and iOS Device software (iOS 4.2).
- Restart your wireless network: unplug your wireless router for at least 30 seconds, then re-plug in.
- Restart your computer or iOS device (to restart iOS device follow instructions from "iOS Device locks up" section above).
G-17 Air Wireless Connect page (192.168.1.12) will not load on my PC or Mac.
- Disable any additional firewall protection that is enabled through anti-virus software before starting to setup the G-17 Air. After you have completed the setup re-enable the firewall protection.
TIPS
The G-17 Air will not work on an N only wireless network nor on a guest network with limited access.
- Before switching to the USB or Aux input stop streaming music via AirPlay.
- Before switching to AirPlay or the Aux input, stop playing music on the USB input.
- When switching between iOS Devices, allow at least 10 seconds to pass before playing the new iOS Device.
- During AirPlay setup, disconnect the LAN cable from your computer if you have one connected. This will eliminate IP conflicts.
- Once your G-17 Air set up is complete, you may exit the Klipsch webpage and reconnect to your home network.
RESET TO FACTORY DEFAULTS
Unit is on.
- Hold reset button until wireless connect button displays Red then release.
FIRMWARE UPDATE
To learn how to install the latest version of the G-17 Air's firmware, if one is available, please go to the G-17 Air's product page on klipsch.com or call 1-800-KLIPSCH.
3RD PARTY APPS
The G-17 Air is compatible with all AirPlay enabled iOS apps.
KLIPSCH CUSTOMER SERVICE
Klipsch Customer Service/Technical Support (US): 1-800-KLIPSCH
Klipsch is a registered trademark of Klipsch Group Inc.
AirPlay, the AirPlay logo, iPhone, iPod, iPod classic, iPod nano, iPod shuffle, iPod touch and Safari are trademarks of Apple Inc., registered in the U.S. and other countries. iPad is a trademark of Apple Inc.
Firefox is a registered trademark of the Mozilla Foundation.
Internet Explorer is a registered trademark of Microsoft Corporation in the United States and other countries.
The Wi-Fi CERTIFIED logo is a certification mark of the Wi-Fi Alliance.
Wi-Fi is a registered mark of the Wi-Fi Alliance.
FRENCH CONSIGNES DE SECURITE IMPORTANTES
FIXATION DE LA BASE AU G-17 AIR
CONFIGURATION AU RÉSEAU AIRPLAY
| iTunes | File | Edit | View | C |
| About iTunes | ||||
| Preferences | ||||
| Provide iTunes Feedback | ||||
| Check for Updates | ||||
| Services | ||||
| Hide iTunes | #H | |||
| Hide Others | #H | |||
| Show All | ||||
| Quit iTunes | #Q | |||
Windows iTunes
| File | View | Controls | Store | Advanced |
| LRR | Undo | Ctrl+Z | ||
| Radio | Ctrl+Shift+Z | |||
| Cut | Ctrl+X | |||
| Copy | Ctrl+C | |||
| Paste | Ctrl+V | |||
| Delete | ||||
| STU | Select All | Ctrl+A | ||
| Select None | Ctrl+Shift+A | |||
| SHA | Preferences | Ctrl+ | ||
Note: Please don't use the product outdoors in France
GRACIAS
| File | EGH | View | Controls | Store | Advanced |
| LIBER | Undo | Ctrl+Z | |||
| Redo | Ctrl+Shift+Z | ||||
| Cut | Ctrl+X | ||||
| Copy | Ctrl+C | ||||
| Paste | Ctrl+V | ||||
| Delete | |||||
| STO | Select All | Ctrl+A | |||
| Select None | Ctrl+Shift+A | ||||
| SHA | Preferences... | Ctrl+... | |||
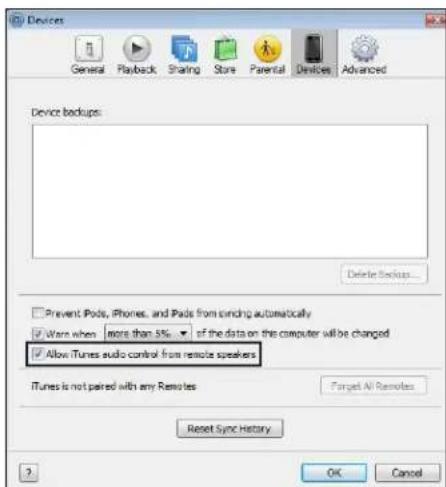
图6
AirPlay Icon will turn blue when connected to an AirPlay device
必须选中“AllowiTunesaudiocontrolfromremotespeakers(允许来自远程扬声器的iTunes音频控制)”方
Apple® iTunes
Windows iTunes
故障排除
G-17 AIR 电源未能接通。
Country Restriction Reason/remark
AIRPLAY NETVÆRKSKONFIGURESPROCEDURE
KLIPSCH KUNDESERVICE
Klipsch kundeservice/teknisk support (USA): 1-800-KLIPSCH
KLIPSCH KLANTENSERVICE
Klipsch klantenservice/technische ondersteuning (VS): 1-800-KLIPSCH
You have now connected your Klipsch G-17 Air to your wireless network. Each time you turn it on, it will automatically connect to your network!
UPPDATERING AV INBYGGD PROGRAMVARA
HHOPMAU O COOTBETCTBUN IPIPABNJAM,IPINHATbIM BEBPONECKOM COIO3E
HaAsaeMooKet 6bHbHaHeeHa MapKpOka (C) oocBETcBn TpeoBaHMM EbponeXoro Co03a: TpeoBaHMM dApkeTHHOIO DOkyMeHTA 2006/95/EC BactH HxHn HapkAnHH, TpeoBaHMM dApkeTHHOIO DOkyMeHTA 2004/108/ EC aacthDMTCpeoBaHMM dApkeTbHBOIO DOkyMeHTA EC 2009/125/EC oTHCHENTbHO COOTBETCBMA KOHCTpyKMUM KOKONHECM TpeoBaHMM TpeoBaHMM dApkeTbHBOIO DOkyMeHTA 1999/5/EC, oTOCAAMCR K OKOHENHOY padHO- TEKOMMYHKAAQHOHOHY OOBpOBAHMO (R&TTE).
YBEOMJIeHNEOTHCNTeIbHO YTNIN3AUIN OTXIOB 3JEKTPUeCKOIO N3JEKTPOHNOOBOPUDOBAHN(WEEE)
IPMNNEAHME.3TA MAPKNP0BKA OTHOCHTCAOTIbKO KCTPAHAM, BXOJIIM BEBPONIECKM COIO3 (EC), A TAKKE K HOPBTIV.
3TOYCTPOHCTBOMPKAPOPBOAHBCOTBETCBMCAPEKTHBNINDOXMEHTOMEC200296/EC,OTHOCHUMCK TAYIMBAHMTOXIOBDNEKTPVNCETOVAEKEPTPOHHOTOSOPDYOBHMA(WEEE).TA MAPKIPOBAKA3bEAET,HTO DAHOHE3DIMEHEDEONXHOHNKBDAPOBATCBMBECTCEB5TOBBNNOTOXDAAMOHODTKHO5tB NOMEUEHO
COOTBETCTBNOIOYTO TAPY IINBO3MOKHOCTN YTVIINBAUHNIEPEPABOTK
HOPMAUROOOTBETCBNTPEBOAHNMK3MC, IPEbABEMbIMNDEEPALbHOKOMCCNEIPO CBA3N(FCC)CUSA)NTEXHNUECKMNCTAHDAPTAMN
KAHAdbl
30yctpoCTBOoCOTBETCTByTpe6obAHHMAHcAa15PiOBHN FCC.PabOta yCTPOCTBA.0DnKHa yDIOBNETOPATb CneDyoumm DymycOBHM.(7)ONHOeDnKHOco3dABTaBnOMekH(2)ONDOpKOHO BOCpHMMAtb IOOble NmExk,BIIOHARNMeXK, KOtOpeMOrfBb3BaTHeKeHAnTeBbIbIbIpeXIMpaObTbYCTPOCTBA.
PIMMEAHHE. DnHoe oOboydoaHHe npoio NcblTAMn, BpeyIbTeKOTopBx6bHO yCTAHOBHe, 10 OHO COBTETCBETeR orpAHHHBM, OPOPEGEHHBM DnIOOPoBx6yCpOHTbKnCA B C OTOBETCBMn CactbO 15 TpeoBHBM FCC.30
OPAHMHHE PnIOB3HbHBOECEiHb IOOOHOBaHIO 33uNIT OI BpDhX NOMEX pPcTAHOBE KBNX NMOeHHEX. DnHO
OoOyDOABHHe TReHepayet, KIOLOB3yET HNOKETNAtb HEPNPOADMAONACTHO CNEKTpa, H, ECLNA OIO HEYTAHOBEHO HKOJIETCRGnAIO NKTPKUM, MOKET BBAATb HEOYCTMbIE NOEMX PAIDOCABM. TEM He Meee, HET rapAHTMn,
TO NOXMeA HEByI NmEB MeCA npia YCTAHOBBe B KOHNPEHbX yCIOXBHX. ECLNA DHOHOOBOHOHE BbBaBaER
HEOYCTMbIX NOMe, dprnpMa paNDIOINTEBKMIOHIO OITIANO, VTO MOKIO ONpEOENrBpyTeE BKNHOHHEIN B
BbIKHOHOHOOPOyOBAHn, IIOIbBoIeBdONKECHIOOCTOBaB yCTpAEHHO NOMEX CNOMOUIO OHJN ANHECKOBHX
33HCIO CNdyIOHk MEp.
PeeppeHtPOBaTb HnH PepeMeCTb PnHemHlyo aIeHly.
YBENIMHTbpaCTOHNHEMxdyOBOPDABHMMNPOWEMKOM
PoaoeHHbO6pOoBaHneKpo3eTKeNtAHHe,OTnHHOITOT,CKoTOPOeOHHeHnMeHHK.
P000HcybTHPOOBaBc CmIePOMMHN ObTHbTMTEXMHHECKHM CTeUAMNCTOM BOBnTAPADNO TENEBDAHMAO
YBepKJHO NOOIOPOBcK COOTBCTTBAHACTA 15 FCC KAK UMOPOBOC yTOPOKTBIO KNACA B.
Pepoepeepnne HmmeHn mmoHnnn nnnn noopnne Hnyeepnne Hne AOTOBnepnabnpa 100b030BATEAekTtaytnpOpaB TaHHOCYcPOCTBO.
DHHH HHPPOBOMI HMOBOP KACCA B COOTIECTBYET PEOOBHMAKAHADCKOCTAHDAPTA ICES-003 HAOBpyoBHAHE, Bb1sBb1ooueTOMEXA.
HNOOPMAUONOTHCNTBHO COOTBETCTBNA BECNPOBOHOIPEDATUKA TPEBOAHNM CTAHAPTOB NO CBA3N
Ooane Hme Icnpepowcpnmpkauupaonpnppepoyo pckpctbaaykaaBaet tonko Na To OooocBETcyET TEmmecmTaeobabnn, npdeabnBnMmCtponbI pnpmbllnHbCTaDaptos Kaabbl.
30 yctpoCTBO cooBETCBYtpeobAHM hAact 15 tpeobAHH OeepaHbH KOOMC H CIIaNoC83 (FCC), aTakke pteobAHN mPcHmHnHx CTAnrptOB KaHd, OHooHIMN K6eHINHIOHNO HNOIPOBAMnRSS-npOcKOBnnpocDnHnHb. Pabota yctpoCTBa DOHMA yOoBETBOPBT cElyoum DmyyOCVBAH: (1) OHO He DoTHHO COaDBAB TOWEX, (2) OHO doTHHO BOCIPAHMAtb IObe nOEMX, EKNHOA NOMEX, KOTOE BMOY BbBbBbHexHeJIATEbHbPEKM PAOBt YcPOCTBA.
HAUHOHJIbHbIE OPGAHUEHNA
DHHHOeYcTPOBIOIpcHdAHHHO DIOAIOHbOBAHMA BDOAMHINM VIOAIOHbX yCIOBHX BO CxepAHx EBpONcKO Co03a (a TAKOE BpyTHX cPahAX, pApdeKpABAOHXA DMEKTHBOHO DOyMeHTA 1999/5/EC EApONcKO Co03a) Be3 KAKoX-MoO OpaHnHmBA, 3A HNOHmE MCTpA, Yka3AHHk Hnke.
CtpaHa OppaHueHn PnpHnHa N KOMMeHTapm
PnnooCoeHHeHHK yctpoTBy AirPlay 3naOaK AirPlay cTaHOBtCnHMM.
PNC.6
Heo6xOIMO NOCTABNTb PnAOK B CTPKc AllowiTunes audio control from remote speakers (Pa3peIMITb nporpAMMe iTunes ynpaBnTb 3BykOBocPon3BcEHNEM OT mCTAHIOHO paCnONKeHHbXr pOMKOrOBOpTene).
Apple® iTunes

Windows iTunes

NONCK N YCTPAHEHNE HENCIPABHOCTEIN
CucTeMa G-17 Air He BKJIOHaeta.
Y6eDNTScb, YTO aIaTnep NocToHHOro ToKa HAdEeKHO NOKIIIOeH K PO3ETKe (CBTeOIOHbIM INDKATOP NTAHMBA CBEITNCR 3JIeHbMI) NK3aHNe CTHeKBe 5IOKA.
Ybendtceb,TOBPOTeK,KOTOPOIOIOKIOUeH6oKG-17Air,IMMeTcHnAPKeHHe.
CuaTeMa G-17 Air HacTpoHa, Ho He NoIooHnHaeTc KaBaei cetN.
IIOBTOPOHOaYCTHbAaBuBcNpOBOHyoCtBuOTcoeHNHTeBaWMapuPyTM3aTOp 6ecnpoBOHOCBaHMeHee,EmHa30CeKyHd,3aTEMIOcEOHNHTeeroKpO3eKteCHOBA.
OToCoeDHHIte PHTAHMEOT3AaHHeCTHKYCTPOIHCTBA G-17Air He MeHHe,HeMa 30 ckyHn, NOcOeDHHITRe ERO CHOBa HIOBTOPIE HAcTPOIKy.
YCTPOICTBO C onepaunHnH CNCTeMoI iOS 610KnyepyTcA.
- DepxHnTe HaxaToH KOnkny NtAHnHa YcTpoiCTBe ConepaHNOHn CnCTeMoIos DoTexnop, noka H3KpAne He NoAByTCra HAdnnCb Slide to Power Off (IpeBnHyTB Ha BbIKNoUHeHne). IpeDnBHeTe NmHeNky B NoIOKeHne, pM KOtOpom NtAHmE OTKNoHeHO. KaK ToBko NtAHmE 6yETOTKIOHeH, HxMMte Ha KOnkny BKNIOHeHn PTTAHn M yDePckBaIte ee B ETOm COCTOHN M Do Tex Nop, noka He NoAByTCra NfOTnApple.
YCTPOICTBO G-17 Air noKIOHeH COeINHeO C BaWe CeTbO (KHONa 6ecpnoBDHO CoeINHEHM CBETTC HEMIRAOUM CINHM UBTOM, M 3HaOH KCTPOICTBA Airplay TAKKE CBETTC HEMIRAOUM CINHM UBTOM), HO My3bka HE BOCnpoB3BODITcR HN OT iTunes, HN OT BaWero COBmectMORO YCTPOICTBa C onepaunHHo CNTemoi IOS.
B Hacpoikax (Settings) npnokeHnHa BaIeM yctpoiCTbe c onepaIOHOH CNTeMOI iOS BbIKIOHTe n CHOBA BKNIOHTe Wi-Fi (6ecnpoBDHAR CB3b).
Ipeepaunyctme nporpammyiTunes (TIK mMMAK),npnnokeHne IPod (IPod app) (iPhone) mMy3bkaJIbHOe npnnokeHne (Music app) (IPod Touch).
Ybndtcb,HTpromKoctbHaycptmctBeG-17AirnepnpyuheHa.
YbDntecb,TOyBac3aPpyKeHa CamaH NoCnEiHBA BepcN IporpamMbI iTunes (10.1nn6onee no3HH) N onepaIOHOH CNTcEMbIos BAIIero yCTpoCTBa (iOS 4.2).
IpeepaTnTBeBaWbBecpOBoDHyIO CTeB:OTcoeMHInTe BaWbBecPpOBoDHOm MappyTH3atOp He MeHee, cH Ma 30 cekyHd, 3aTeM NoCDcoeHNHe erO cHObA.
Ipeepaynctte BaW KOMNbTeP HnY uCtpoCTBO ConepaHNOH CNTeMoi iOS (dna nepe3anycKa yCtpoCTBa ConepaHNOH CNTeMoi iOS cndyTte NHTpyKuIM 13 pa3dena «CtpoCTBO ConepaHNOH CNTeMoi iOS 3abKnupoBAHO, pNBceHHoro Bblie.
CTpaHua 6ecnpobodoro coedHHn c 6bokom G-17 Air (192.168.1.12) He rpy3ntcHa moi PIK mAMK.
IpeHnHnHnHnHnHnHnHnHnHnHnHnHnHnHnHnHnHnHnHnHnHnHnHnHnHnHnHnHnHnHnHnHnHnHnHnHnHnHnHnHnHnHnHnHnHnHnHnHnHnH n Hn Hn Hn Hn Hn Hn Hn Hn Hn Hn Hn Hn Hn Hn Hn Hn Hn Hn Hn Hn Hn Hn Hn Hn Hn Hn Hn Hn Hn Hn Hn Hn Hn Hn Hn Hn Hn Hn Hn Hn Hn Hn Hn Hn Hn Hn Hn Hn Hn Hn H n H n H n H n H n H n H n H n H n H n H n H n H n H n H n H n H n H n H n H n H n H n H n H n H n H n H n H n H n H n H n H n H n H n H n H n H n H n H n H n H n H n H n H n H n H n H n H n H n H n H.
10JE3HbIE COBETbl
CCTeMa G-17 Air He 6yder paobatb,ecnn Bbl MoKTe CBzBbTaBc TaTbko Ype3 6ecPiPoBDHyO cetb taHaapTa IEEE 802.11 BePmN N mB KaHeCTBe roCTa Ype3 6ecPiPoBDHyO cetb C orpaHmEHHbIM DocTyIOM.
- Pered nepeeknoehm Ha USB-nopT mHa dononHInTehBbI (Aux) BBOOCTaHOBHTe nepeaday My3bIKn B nOTKe cepes yCtpoiCTBO AirPlay.
- Ipeep nepeknoeHem Ha yctpoCTBO AirPlay mnn doonnoHTenbHbI (Aux) BBOD npekpatnte Bocnpo3BedeHme My3bIKn uepe3 USB-nopt.
- PnpeeknueHm Mekdy yctpoaTBAAM C onepaunnoHHo CnCTeMo iOS cdenaiTe nay3y He MeHee 10 ckyHn pexJe, Yem BkIouaTb BocIpOn3BedeHne C HOBOr oYcTpoCTBa nOd onepaunnoHHo CnCTeMo iOS.
- Bnpoecce Hactpoikn yctpoCTBa AirPlay oToeDHHte KaebI npokabHoi CETn (LAN) O T BaJTeO KOMNbIOTePa, eCNI OH 6bl NpOCoEINHeH.3To N03BOJNT MCKIIIOHTb KOHfNtKTB MeKdy IP npOTOKaMn.
- Pocie toro, KaHacptponKa yctpoA tBa G-17 Air 3abepeHa, Bbl MoKeTe BbInu N3 INtepHeI CTpaHnBk IIpsch n ChOBA NOcOeHNHTbc K CBOeJ DOWAIHE CEtN.
CBPOCHA3ABODCKHEHACTPOKNI
EOKHAXOIMTCBOBKKIOHCHOMCOCTOHIMAL
- ydepKbAe KhoNky cboa do Tex nop, noka KhoNka bcpnoBHO CBA3C BETTCRAKpachbIM UBETOM, 3ATEM OTTYCTTE.
OBHOBJEHNIEIPOPTPAMMHO-AIIAPATHbIX CPEJCTB
Ytoby3HaTb, KAc yCTaHOBbTb Camyo NocEnHIOBepCNO pOporpAMnO-annapatHBx cpeCTB G-17 Air, eN TAKOBble IMeOTc, nocETNTe Be6-CTpaHmU 3dEIMnG-17 Air ha caIte Klipsch.com nn no3BOHnTe no Tenefohy 1-800-KLIPSCH (1-800-554-7724).
NCIOJIb3OBAHNE INPNIOXEHN CTOPOHHHX OPRAHIN3AUH
YCTPOICTBO G-17 Air COBMEHMO CO BCEMM YCTPOICTBAAM TPAHCIAA M 3ByKo3aHNC, DONYCKAIOUM paOby IOD onepaHOHHO CNTEMOI iOS.
CJYK6A PA60TbI C NOKYNATEJIIM KOMIIAHIN KLIPSCH
Cny6ba paobtbcnokynatenaTm(TexHuecko noepkKn)KOMnaHN KLIPSCH (CLJAA): 1-800-KLIPSCH(1-800-554-7724).
Klipsch -3to 3apeTcTpnpoBaHHa TpOBoa MapKa KommaHHn Klipsch Group Inc.
AirPlay, norotun AirPlay logo, iPhone, iPod, iPod classic, iPod nano, iPod shuffle, iPod touch Safari - 3to Toprobble MapKoMnAHm Apple Inc., 3apertmpobahhbe B CUSA n pyrux ctpaHax. iPad - 3to Toprobab MapKa KOMnAHm Apple Inc.
Firefox - 3to 3apertmpoBHHaTropoBMapka HeKOMMepueckoi KopnpauM Mozilla Founda-tion.
Internet Explorer - 3to 3apertcpnpobaa Toproba Mapka KopnpauuMrcsO B Cua M B Dpynx CTpaHax.
CeptnuipobAHbI Jorotn Wi-Fi CERTIFIED - 3to ceptnukauHbI 3aK obbeHHeMa Wi-Fi Alliance.
Wi-Fi -3to 3apeTnCtpnpoBaHHa MapKa oBbeHHeHn Wi-Fi Alliance.