
KNDIGICON20 - Mixer KONIG - Free user manual and instructions
Find the device manual for free KNDIGICON20 KONIG in PDF.

| Product Type | Mixer / MIDI Controller |
| Brand | König Electronic |
| Model | KN-DIGICON20 |
| Dimensions (approx.) | 410 x 260 x 70 mm |
| Weight (approx.) | 2.5 kg |
| Power Supply | USB 2.0 (5V) or 6V/1A DC power adapter |
| Connectivity | USB 2.0 port |
| System Compatibility | Windows XP SP2, Vista, Mac OS X |
| MIDI Modes | Special MIDI, General MIDI, General MIDI with response |
| Main Functions | Jog wheels, Crossfader, Scratch, Seamless Loop, Kill, Effects, Auto Mix, Pitch Bend, Key Lock |
| Number of Channels | 4 channels (CH-1 to CH-4) |
| Equalizer | 3-band (HI, MID, LOW) with Kill buttons |
| Volume Control | Master Volume, Booth, Cue Level, Gain, Channel Fader |
| Looping | Smart Loop (1/2/4/8 beats), Loop In/Out, Reloop |
| Hot Cue | 2 cue points per deck |
| Sampler / Jingle | Built-in, max 12 seconds |
| Maintenance and Cleaning | Clean with a dry cloth only. Do not use solvents. |
| Safety | Do not open the device. Unplug if problems occur. Avoid water and humidity. |
| Spare Parts and Repairability | No user-serviceable parts. Refer to a qualified technician. |
| General Information | Compliant with EMC standards (EN55022, EN55024). Manufacturer: Necdis B.V., Netherlands. |
Frequently Asked Questions - KNDIGICON20 KONIG
User questions about KNDIGICON20 KONIG
0 question about this device. Answer the ones you know or ask your own.
Ask a new question about this device
Download the instructions for your Mixer in PDF format for free! Find your manual KNDIGICON20 - KONIG and take your electronic device back in hand. On this page are published all the documents necessary for the use of your device. KNDIGICON20 by KONIG.
USER MANUAL KNDIGICON20 KONIG
ME701 is designed for playing computer based music tracks, and to work with devices that either support MIDI feedback or not.
This is accomplished by the implementation of several different control modes within ME701. The control modes are:
1. Special Midi Mode:
Once engaged, ME701 will respond to incoming MIDI message according to its assignment. LEDs will not do anything unless controlled by an specific application (E-MIX, PCDJ) via MIDI.
2. General Midi Mode:
In this mode, all MIDI feedback messages are ignored. A button's LED will light then fade away when pressed.
The buttons, knobs, and sliders will transmit its assigned events to external device through USB cable.
3. General Midi Mode with Response
Some DJ softwares are able to convey message to this unit to light up the LEDs, and allow this unit to control the PC software.
PS. Please refer to the function description.
B. PC SOFTWARE SELECT
You can switch this unit to control different PC software.
1) Connect this unit to PC or laptop by USB cable, and then keep pressing the button "LOAD DECK A" until the KILL LED in DECK A stands for the desired PC program mode is light.
- HI: This LED lights for SPECIAL MIDI MODE
- MID: This LED lights for GENERAL MIDI MODE
- LOW: This LED lights for GENERAL MIDI MODE WITH RESPONSE.
2) Press the corresponding knob which LED is light, until the LED is extinguished
3) Unplug the USB cable, and plug it again, then you can use this unit to control the selected MIDI mode.
4) once the ME-701 is connected to computer, the LEDs are sparking in turn between Search -> Scratch -> Sync.
- In "SPECIAL MIDI MODE", it keep sparking to remind the user that PC software is not activated.
- In General Midi Mode and General Midi Mode with Response, the sparking is keeping few minutes only, then stop, and all LED lights up slightly.
Introduction:
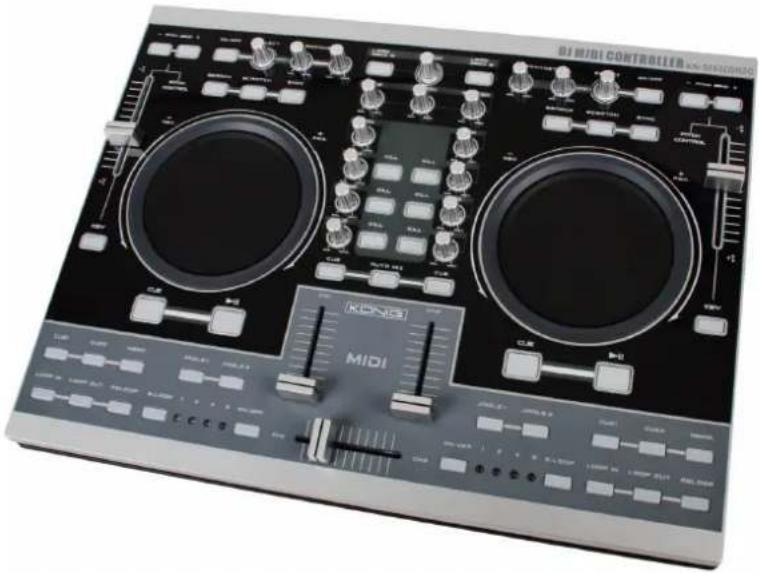
The KN-DIGICON20 is a highly professional MIDI controller with two jog wheels. Together with the crossfader controls it gives the amateur DJ as well as the professional DJer true professional mixer features on this MIDI controller. The controller is suited for MP3/WAV/OGG-fi les from a PC or laptop. The scratch-function, seamless looping, the kill-functions and different effects gives the creative DJ complete control. The KN-DIGICON20 works plug & play with Mac OS X and Windows® XP SP2 and Vista™. Power is attained from a USB 2.0.
Description back view :
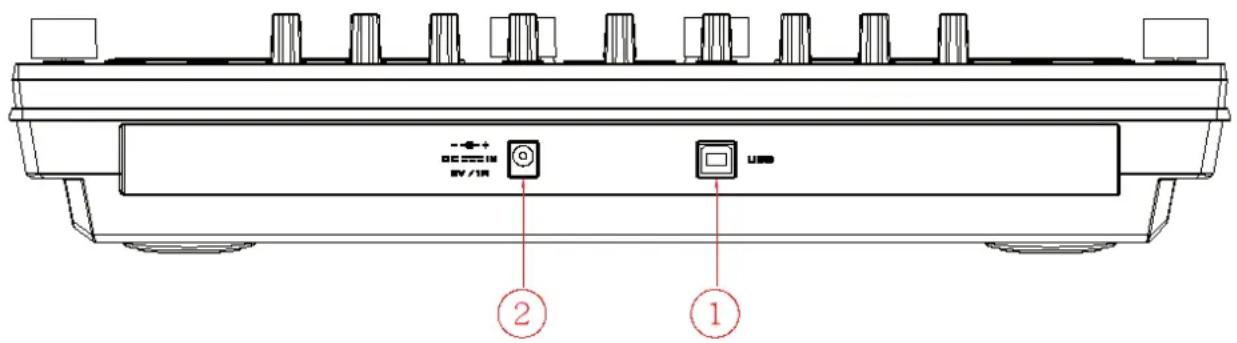
1. USB port:
- Connecting to PC for playing control
- Get power supply from PC or laptop
Before connecting this unit to PC or Laptop, please install the Demo software (Emix) from the attached disc, and upload your music to the program. Test the program from computer, and check if the controller unit gets reaction accordingly (EX The relative LEDs light up).
NOTE: The unit can not be power-on before the computer software (Emix) is activated
2. DC- in power for controller
If the unit can not get enough power from USB bus, power it with extra adaptor (DC type, 6V/1A) via this socket.
Please note the polarity of the adaptor must be
Function of the Control Unit
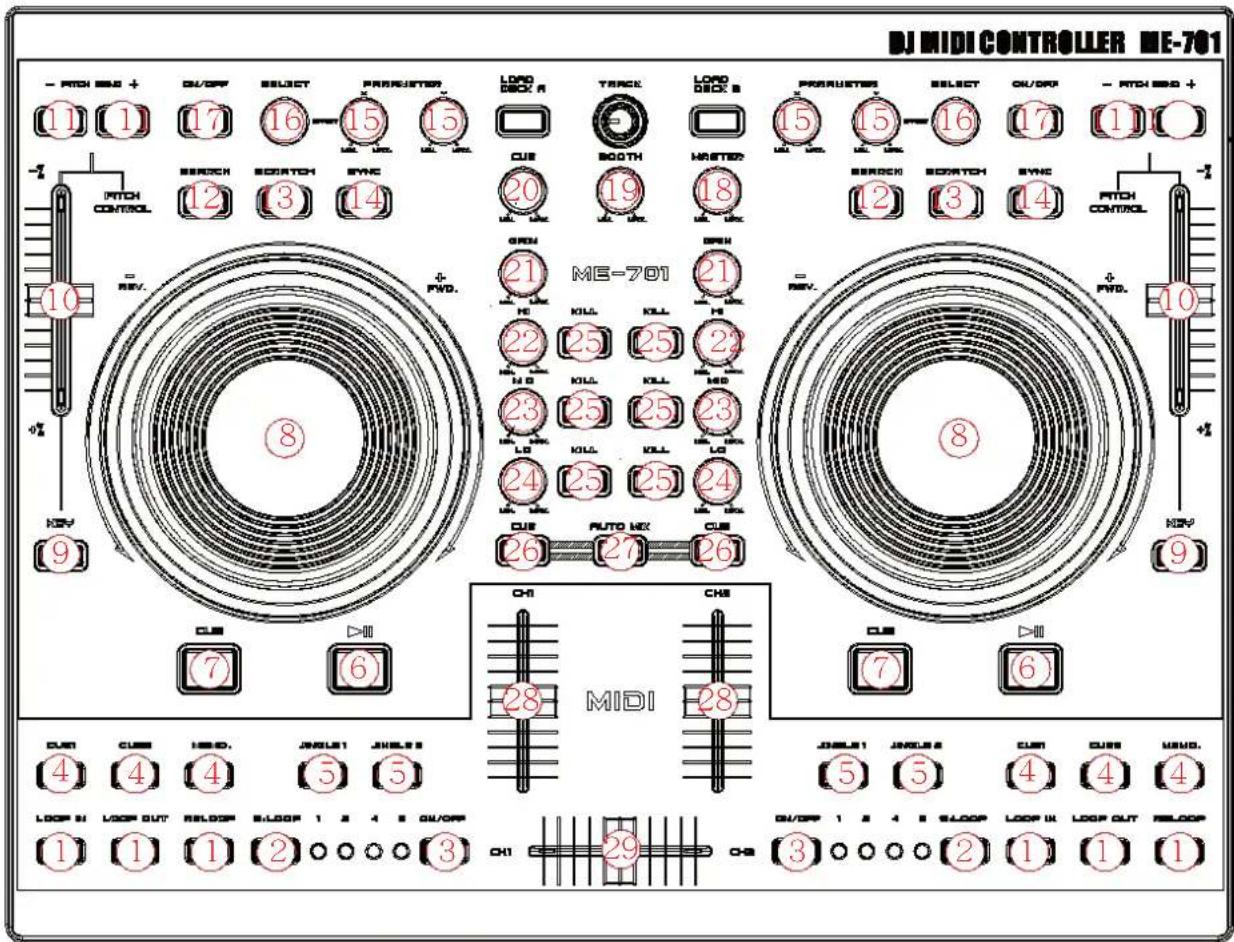
1. SEAMLESS LOOP
a. Loop-in
The Loop in point is able to be recorded during PLAY and PAUSE mode. If Loop-out point is recorded, and Loop-in point is re-set behind Loop-out point, Loop-out point will be cleared
b. Loop out / Exit
i. After Loop-in point is set, press this button to memorize the end point of the LOOP interval, and start looping.
ii. Press this button again to exit Looping.
iii. Reset Loop-out point: Press the button again to reset the Loop-out point and looping starts again
iv. Loop out point must be after the Loop-in Point, or the Loop-out point will be canceled.
c. Reloop
i. Press it to Re-start seamless loop.
ii. No function if Loop-in point is not recorded.
iii. If Loop-out point is not set, will back to Loop-in point and start playing.
(similar to hotcue function)
2. SMART LOOP (RANGE SELECT)
User is able to select the Looping interval between: 1/2/4/8 beat
3. SMART LOOP ON/OFF
LED ON: The Loop is playing at the interval as selected beats.
LED OFF: The Loop is playing at the interval between the Loop-in and Loop-out.
4. HOT-CUE
This unit will allow you to play from 2 cue points instantly.
a. Set CUE memory: Press the MEMO button first, and then press the CUE button to complete the CUE setting, then this CUE button will light up.
b. Play" CUE" memory: Upon pressing specific CUE button, it will flash about 5 seconds.
Note: This function is not available during perform REVERSE sound effect.
5. JINGLE/SAMPLER
User can preset the Effects or Songs for Jingle on a computer.
a. Press Memo button and then press Jingle, a "Sampler track" will be created to the "Jingle list". User can set the recorded sampler to the Jingle from computer.
b. Maximum length of sampler time: 12 seconds.
6. PLAY/PAUSE
Each press of this button causes the operation to change between PLAY and PAUSE modes.
LED indicator:
i. When track is playing, the LED indicator ON.
ii. When track is paused, the LED indicator fl ashes.
7. CUE
The cue function allows the CD returning to the memorized point. In PAUSE mode, pressing the CUE button to set the cue point, and the CUE button blinks; in PLAY mode, press this button to pause the unit at the memorized point.
8. JOGWHEEL
- Speed Control (SEARCH indicator off)
Rotating the wheel, in play mode, will change the playback speed accordingly. While rotating clockwise, the player speed increases; rotating counterclockwise, the speed decreases.
Search (SEARCH indicator lights)
Rotating the wheel, the player will forward or backward quickly. The searching speed changes according to the dialing speed. It can be carried out by one frame increment.
9. KEY ON/OFF SWITCH (MT)
Press the button to switch KEY mode on or off.
If it is ON, unit maintains constant tempo this will not change while the pitch slider is moving.
10. PITCH CONTROL SLIDER
To match the choices of playback speed (8%, 16%, 32%, 100%), you can choose what range you want between minimum (top) and maximum (bottom) by moving the pitch control slider.
11. PITCH BEND + / - BUTTON
When each of the two CD players is playing, the pitch bend function allows the position of the bass beat to be matched after the pitch has been adjusted. The pitch will automatically rise up to +16% from the current setting while pressing the “+” button. While pressing the “-” button, the pitch will automatically drop to -16% from current setting. By the way of changing the pitch the position of the beats can be matched.
12. SEARCH BUTTON
Pressed the button to switch the function of Jog Dial between SEARCH and PITCH BEND.
- When the indicator LED is light, dial the jog for quick search forward and backward.
- When the indicator LED is off, dial the jog for pitch bend function.
If the jog is unmoved for 8 seconds, the indicator is off, and the jog is for pitch bend function.
13. SCRATCH EFFECT
LED ON: Scratch ON
LED Off: Scratch Off
14. SYNC:
This function is to synchronize the BPM of Unit 1 & 2 automatically.
15.EFFECTPARAMETER
Adjust the parameter of the effect by turning adjust knobs. X for Strength control, Y for Length control
16.EFFECT SELECTOR
To select the effects from PC software
17.EFFECT ON/OFF
Effect On/off Switch
Mixer section
18. Master Volume control
Adjusts the master output sound level.
19. BOOTH Volume control
Used to adjust the level of the BOOTH MONITOR output. Level is not affected by the master volume and master balance.
20. CUE LEVEL (Cue level adjustment knob):
Adjusts headphone monitor sound. When CH-1 to CH-2 has been selected, the level is not affected by master volume or master balance adjustment
21. GAIN:
Adjust the input signal level LCD Display shows [ Sam Forward ] or [ Sam Reverse ] for 2 Sec.
22. CHANNEL EQ COINTROL
HI:
Adjusts high-tone input sounds. At the center position, sound will be fl at.
23.MID:
Adjusts mid-tone input sound. At the center position, sound will be fl at.
24. LOW:
Adjusts low-tone input sound. At the center position, sound is fl at.
25. KILL
Press the buttons to mute the selected band (Hi/Mid/Low) of the track
26. CUE:
Used to select the source (CH-1 & CH-2, MASTER) to be monitored with headphones.
Press it again to cancel the selection. Pressing multiple buttons to derive mixed sound from the selected sources.
27. AUTO MIX:
Press the Auto Mix Button to mix unit 1 & unit 2 automatically (with fade in/out effect)
28. CHANNEL (CH-1 TO CH-4) FADER
Adjusts the channel output sound levels.
29. CROSS FADER
Used to adjust the sound mix volume of the sources set to Ch1 or Ch2.
Declaration of conformity
We,
Necdis B.V.
De Tweeling 28
Declare that product:
Name: Konig Electronic
Model: KN-DIGICON20
Description: Digital Controller
Is in conformity with the following standards
EMC: EN 55022:2006
EN 55024:1998+A1:2001+A2:2003
EN 61000-3-2:2000+A1:2005
EN 61000-3-3:1995+A1:2001+A2:2005
Following the provisions of the 89/336/EEC directive.
s-Hertogenbosch, 2008, March 04

Mrs. J. Gilad
Purchase Director
Safety precautions:
To reduce risk of electric shock, this product should ONLY be opened by an authorized technician when service is required. Disconnect the product from mains and other equipment if a problem should occur. Do not expose the product to water or moisture.
Maintenance:
Clean only with a dry cloth. Do not use cleaning solvents or abrasives.
Warranty:
No guarantee or liability can be accepted for any changes and modifications of the product or damage caused due to incorrect use of this product.
General:
Designs and specific cations are subject to change without notice.
All logos brands and product names are trademarks or registered trademarks of their respective holders and are hereby recognized as such.

Attention:
This product is marked with this symbol. It means that used electrical and electronic products should not be mixed with general household waste. There is a separate collections system for these products.
Copyright ©


KN-DIGICON20 DJ MIDI DIGITAL CONTROLLER
MANUAL
ANLEITUNG
MODE D'EMPLOI
GEBRUKSAANWIJZING
MANUALE
MANUAL DE USO
HASZNÁLATI UTMUTATO
KÄYTTÖOHJE
BRUKSANVISNING
NAVOD KPOUZITI
MANUAL DE UTILIZARE
A. MIDI-STEUERUNG
1. SEAMLESS LOOP (BOUCLE PARFAITE)
A. Loop-in
B. VÄLJ DATOR PROGRAMVARA
2. SMART LOOP (INTERVALL)
Du kan valja loopingintervall mellan: 1/2/4/8 takt
3. SMART LOOP TILL/FRAN
LYSDIOD PÅ: Loopen spelas i intervall som valda takter.
B. VOLBA PC SOFTWARE
Tuto jestnotku muzete prepnout tak, aby mohla rfidit ovladani ruzneho PC software.
1. SEAMLESS LOOP (NEKONEČNÁ SMYČKA)
A. Funkce Loop-in
Conform prederilor directivei 89/336/EEC.
's-Hertogenbosch, 4 martie 2008

J. Gilad
Director achizitii