
SAS-SA2002 - Smoke detector KONIG - Free user manual and instructions
Find the device manual for free SAS-SA2002 KONIG in PDF.


| Product type | Smoke detector |
| Brand | Konig |
| Model | SAS-SA2002 |
| Dimensions (diameter x height) | Approx. 10 x 4 cm |
| Weight | Approx. 150 g (with battery) |
| Power supply | 9V battery (included) |
| Sensor type | Optical (photodetector) |
| Main functions | Smoke detection, audible alarm, test button, LED indicator |
| Battery life | Approximately 1 year |
| Alarm volume | 85 dB at 3 meters |
| Operating temperature | 0 °C to 40 °C |
| Operating humidity | 10% to 90% |
| Recommended installation | On ceiling, at least 50 cm from walls |
| Certifications | CE, EN 14604 |
| Maintenance and cleaning | Clean with a soft dry cloth; monthly test |
| Safety | Early fire detection; alarm on smoke |
| Warranty | 2 years |
| Package contents | Detector, 9V battery, mounting base, screws and wall plugs, user manual |
| Color | White |
| Country of origin | China |
Frequently Asked Questions - SAS-SA2002 KONIG
User questions about SAS-SA2002 KONIG
0 question about this device. Answer the ones you know or ask your own.
Ask a new question about this device
Download the instructions for your Smoke detector in PDF format for free! Find your manual SAS-SA2002 - KONIG and take your electronic device back in hand. On this page are published all the documents necessary for the use of your device. SAS-SA2002 by KONIG.
USER MANUAL SAS-SA2002 KONIG
MANUALE (p. 30) KASUTUSJUHEND (Ik. 121)
MANUAL DE USO (p. 37) NÁVOD (s. 128)
MANUAL (p. 44) ROKASGRĀMATA (lpp. 135)
HASZNÁLATI ÚTMUTATÓ (o. 51) NAUDOJIMO VADOVAS (142 p.)
Interconnectable Optical Smoke Alarm

KÖNIG
Table of contents
- Introduction 2
• Safety precautions 2
• Packaging content 2
• Technical specifications 3
• Product and user description 3
• Installation instructions 6 - Maintenance 8
- Warranty 8
- Disclaimer 8
- Disposal 8
ENGLISH
Introduction
This battery operated optical smoke alarm sends out a signal through radio frequency to activate other installed SAS-SA200/2002's in case smoke is detected. When installing multiple SAS-SA200/2002's, the smoke alarm that detects smoke will automatically activate all other SAS-SA200/2002's to give an early warning audible alarm. This provides extra time to leave the house. Equipped with a learn button and a test button for periodic testing.
A smoke alarm has a limited life and should always be replaced 10 years after the date of purchase. Write the purchase date on this manual for future reference. The smoke alarm complies with the EN14604 standard of the Construction Products Directive.
• We recommend that you read this manual before you install the smoke alarm
- Keep this manual in a safe place for future reference
Safety precautions
Do not expose the product to water or moisture Do not paint over the smoke alarm
Packaging content
• 1x Smoke alarm
- 1x 9 V battery
• 3x 1.5 V AA batteries
• 1x Mounting material
- 1x Manual

KÖNIG
Technical specifications
• Radio frequency: 433.92 MHz
• Battery: 1x 9 V DC, 3x 1.5 V AA
• Alarm: > 85 db (3 m)
• Maximum number to connect: unlimited
• Maximum range: 40 metres
- Test button: yes
- Learn button: yes
- Low battery alert: yes
• Operating temperature: -10°C +40°C
Product and user description


1. ALARM indicator
2. TEST button
Testing the smoke alarm
Like any other electronic device, smoke alarms are not foolproof. Smoke alarms contain electronic components that can fail or wear out at any time.
We recommended that you test the smoke alarm every week to make sure it is working properly.
Push and hold the test button until the alarm sounds for a few seconds. The (red) alarm indicator (1) and (green) learn indicator (4) will flash for a moment. If the alarm does not sound, check if the battery indicator flashes once every 45 seconds. If this is not the case and testing fails, please replace the batteries immediately.

KÖNIG
ENGLISH
Battery indicator
The battery indicator flashes every 45 seconds to show that the smoke alarm is working properly. When the battery indicator flashes and gives a short beeping sound, it indicates that the battery has a low capacity and should be replaced immediately.
3. LEARN button
Follow the next steps to set the MAIN smoke alarm and ASSISTANT smoke alarm(s) to create a smoke alarm system with 2 or more SAS-SA200/2002's.
- Press the LEARN button two times. The LEARN indicator turns from red to green. This smoke alarm will be the MAIN smoke alarm. Ensure the LEARN indicator is green before proceeding.
- Press the LEARN button of the ASSISTANT smoke alarm(s) once. The ALARM indicator(s) turns on red. Ensure the ALARM indicator(s) are red before proceeding.
- Press the TEST button of the MAIN smoke alarm for several seconds in order to send out the learn signal to the ASSISTANT smoke alarm(s). The ALARM indicator flashes and the smoke alarm sounds. The ASSISTANT smoke alarm(s) receive the signal and sounds.
- Press the TEST button on each ASSISTANT smoke alarm(s) for several seconds in order to send out the learn signal to the MAIN smoke alarm. The MAIN smoke alarm receives the signal and sounds.
Note: the number of smoke alarms is unlimited. The maximum range between 2 smoke alarms to communicate with each other is 40 metres.
4. LEARN indicator
5. Mounting plate and holes
Use the supplied screws and plugs to mount the mounting plate to the ceiling.
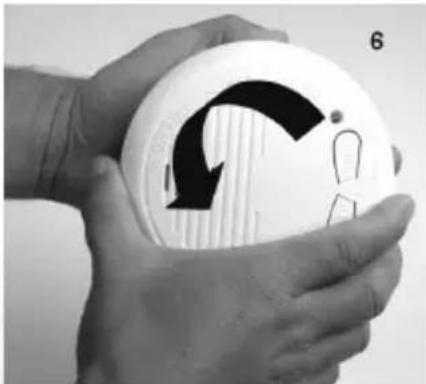
6. Remove the mounting place
Turn the mounting plate of the smoke alarm counter clockwise to get access to the battery compartment of the smoke alarm.

KÖNIG
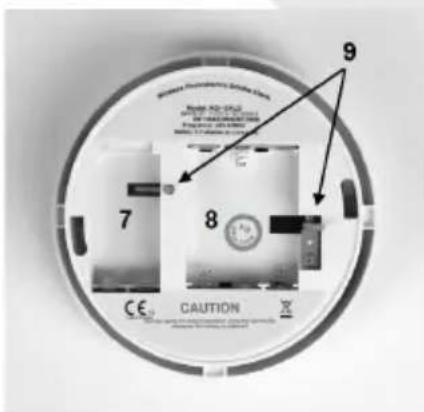
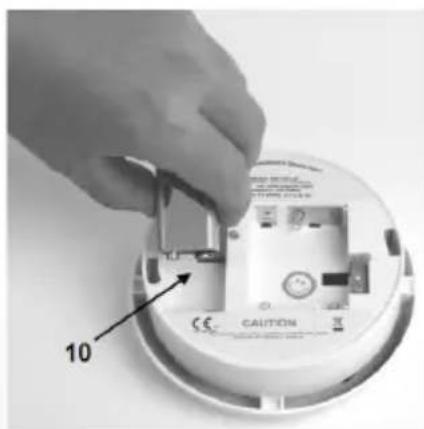
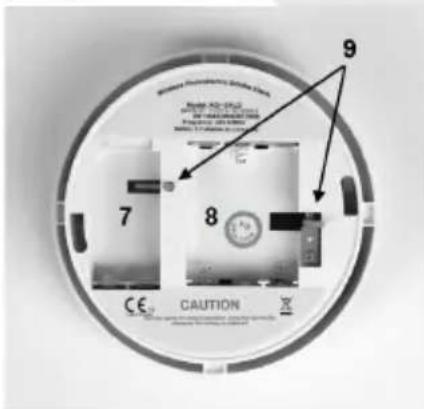
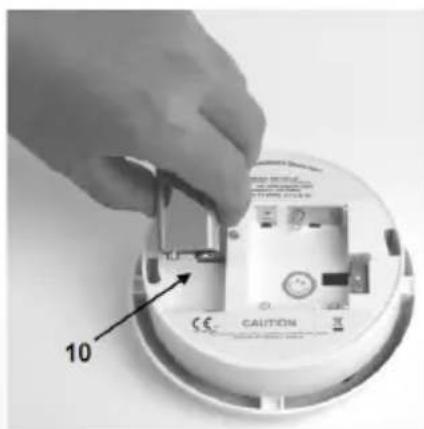
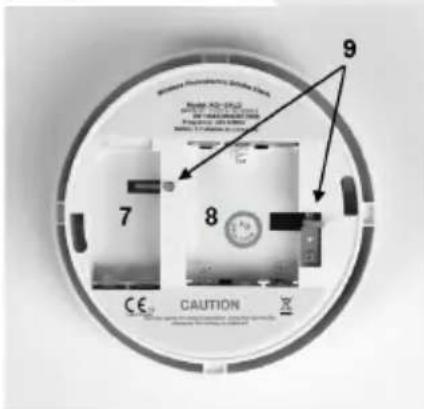
- Battery compartment 9 V battery
- Battery compartment 1.5 V AA battery
- Safety catch
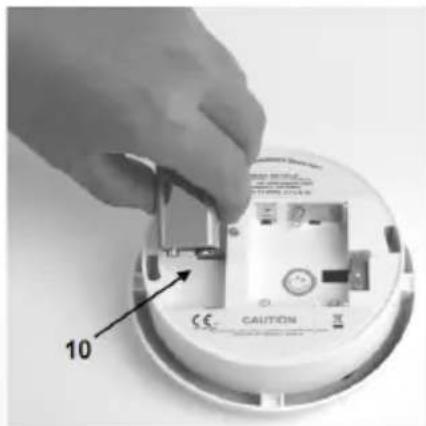
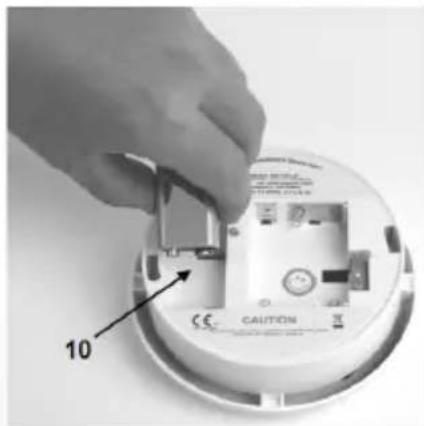
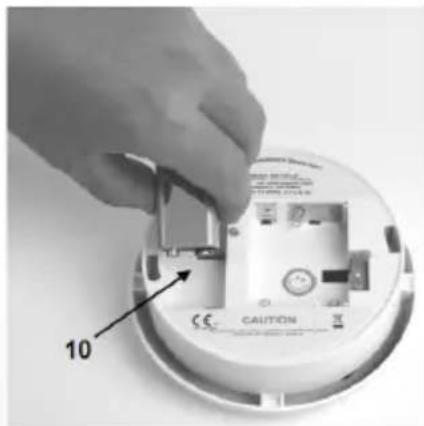
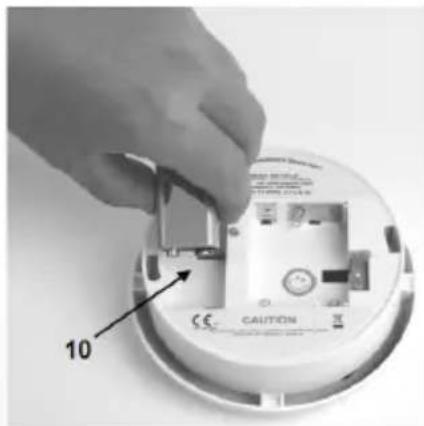
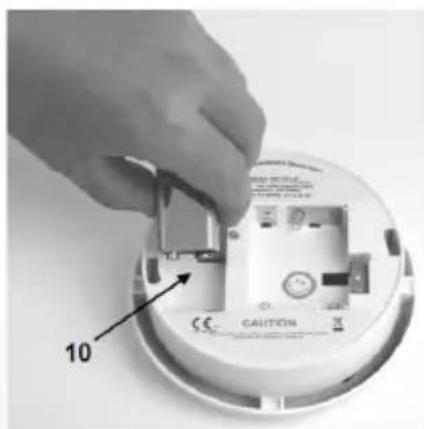
The safety catch prevents installing the smoke alarm on the mounting plate without inserting the battery first. Note: push the safety catch of the 1.5 V AA battery into the battery compartment when placing the batteries.
- Placing the 9 V battery
Take off the plastic seal of the 9 V battery and place the 9 V battery in the battery compartment. Conform to the polarity markings inside the battery compartment.
- Placing the 1.5 V AA batteries
Take off the plastic seal of the 1.5 V AA batteries and place the 1.5 V AA batteries in the battery compartment. Place the 1.5 V AA batteries conforming to the polarity markings inside the battery compartment.
ENGLISH


KÖNIG
ENGLISH
After placing the battery, use the test button to see if the smoke alarm works properly.
(See Testing the smoke alarm.)
When the mounting plate is mounted on the ceiling and the smoke alarm is tested after inserting the batteries, place the smoke alarm on the mounting plate by turning it clockwise.
See the following chapter for where to mount the smoke alarm(s).
Installation instructions
Install a smoke alarm in every room or area on every level of the home.
Smoke may not reach the smoke alarm if it's installed in only one room or area. If a fire starts in another room or area to where the smoke alarm is installed, the smoke alarm will not detect the smoke, or will detect it too late to alert the household members. A smoke alarm will not promptly detect a fire except in the room or area in which it is installed.
Place at least one smoke alarm in every room/area between the bedroom and the exit of the house.
We recommended that you make an emergency escape plan, and practice this with the members of your household, in case of an emergency.
The requirements for the installation of the smoke alarm may differ slightly by region. Please contact your local authorities for any additional requirements.
Example installation of smoke alarms:


KÖNIG
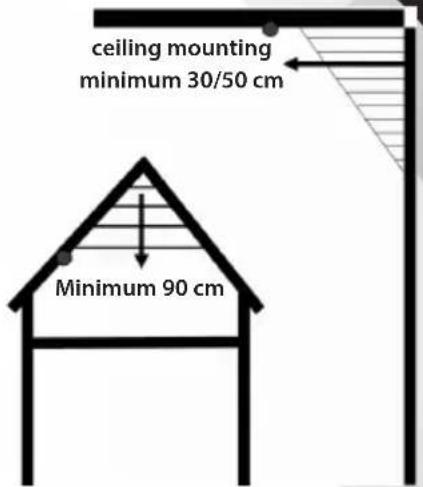
On ceilings
Install smoke alarms as close to the centre of the ceiling as possible. If this is not possible, install the smoke alarm at least 30 to 50 cm from the wall.
(Due to dead air spaces)
Rooms with a gabled ceiling
Install the smoke alarm 90 cm from the highest point.
(Due to dead air spaces)
Note: when installing a smoke alarm in a hallway that is 7.5 metres or longer, we recommended that you install a smoke alarm at the beginning and at the end of the hallway.
Do not install a smoke alarm
- In a humid, dusty and smoky environment
- In rooms or areas where temperatures are below 4 °C or above 38 °C
- In the kitchen, bathroom or garage
- In drafty places
- Near a fan or air vent
- Above heating
Note: when installing a smoke alarm in a hallway that is 7.5 metres or longer, we recommended that you install a smoke alarm at the beginning and at the end of the hallway.

KÖNIG
ENGLISH
Maintenance
We recommended that you clean the smoke alarm once a month. Gently vacuum the outside of the smoke alarm with the soft brush attachment of the vacuum cleaner. Do not use water, cleaning solvents or abrasives.
Warranty
No guarantee or liability can be accepted for any changes and modifications of the product or damage caused due to incorrect use of this product.
Disclaimer
Designs and specifications are subject to change without prior notice. All logos, brands and product names are trademarks or registered trademarks of their respective holders and are hereby recognised as such.
Disposal

- This product is designated for separate collection at an appropriate collection point. Do not dispose of this product with household waste.
• For more information, contact the retailer or the local authority responsible for waste management.
This product has been manufactured and supplied in compliance with all relevant regulations and directives, valid for all member states of the European Union. It also complies to all applicable specifications and regulations in the country of sales. Formal documentation is available upon request. This includes, but is not limited to: Declaration of Conformity (and product identity), Material Safety Data Sheet, product test report.
Please contact our customer service desk for support:
via website: http://www.nedis.com/en-us/contact/contact-form.htm
via e-mail: service@nedis.com
via telephone: +31 (0)73-5993965 (during office hours)
NEDIS B.V., De Tweeling 28, 5215 MC 's-Hertogenbosch, THE NETHERLANDS

13
Model: LM-101LG
DoP: 201308060001
0832-CPR-FR0033
EN 14604:2005/AC:2008
Smoke alarm devices
Intended fire safety and installed in buildings
Essential characteristic 1: Pass
Essential characteristic 2: Pass
Essential characteristic 3: Pass
Essential characteristic 4: Pass
Essential characteristic 5: Pass
Essential characteristic 6: Pass
Essential characteristic 7: Pass
Essential characteristic 8: Pass

KÖNIG
Inhaltsverzeichnis
DEUTSCH
1. ALARM-Anzeige
2. TEST-Taste


KÖNIG


KÖNIG
-
ALARM-indicator
-
TEST-knop
De rookmelder testen


KÖNIG


KÖNIG


KÖNIG
ESPAÑOL
1. Indicador ALARME
2. Botão de TESTE
Testar o detector de fumos


KÖNIG
11. Colocar as pilhas AA de 1,5 V
MAGYAR
1. Riasztásjelző
2. PRÓBA gomb
MAGYAR


KÖNIG
SUOMI

KÖNIG
- Paristotila 9 V paristolle
- Paristotila 1,5 V AA-paristoille
- Turvasuojus
SVENSKA
1. LARM-Indikator
2. TEST-knapp
Att testa rökdetektorn
SVENSKA

KÖNIG

KÖNIG
1. Indicator ALARMĂ
2. Buton TESTARE
Testarea alarmei de fum


KÖNIG
11. Punerea bateriilor de 1,5 V AA


KÖNIG
1. ALARM-indikator
2. TEST-knap

KÖNIG
- Batterirum til 9 V batteri
- Batterirum til 1,5 V AA batteri
- Sikkerhedsanordning
1. Alarmindikator
2. Testknapp
Teste røykvarsleren
NORSK

KÖNIG
- Batterirom 9 V-batteri
- Batterirom 1,5 V AA-batteri
- Sikkerhetshake
NORSK
Merknad: når du installerer en røykvarsler i en gang som er 7,5 meter eller lenger, anbefaler vi at du installerer én røykvarsler i begynnelsen og én i enden av gangen.
Ikke installer en røykvarsler


KÖNIG
TÜRKÇE
1. ALARM göstergesi
2. TEST düğmesine
TÜRKÇE


KÖNIG
TÜRKÇE
1. HÄIRE märgutuli
2. Testnupp
Suitsuanduri testimine

KÖNIG
- Patareipesa patareile 9 V
- Patareipesa patareile 1,5 V suuruses AA
- Turvaelement
Turvaelement takistab suitsuanduri uuesti kinnitamist kinnitusplaadile ilma patareid esmalt sisse panemata. Märkus. Suruge patarei 1,5 V suuruses AA paigaldamisel turvaelement patareipessa.
- Patarei 9 V paigaldamine
1. Indikátor alarmu
2. Testovacie tlačidlo
Testovanie detektora dymu

KÖNIG
- Priečinok na batérie, 9 V batéria
- Priečinok na batérie, 1,5 V batéria typu AA
- Bezpečnostná poistka
1. TRAUKSMES indikators
2. TESTA poga
LATVIEŠU


KÖNIG
1. ALIARMO indikatorius
2. Patikros mygtukas


KÖNIG
LIETUVIŠKAI
1. Indikator ALARM
2. Testni gumb
Testiranje dimnog alarma
Poput drugih elektroničkih uređaja dimni alarmi nisu zaštićeni od neopreznog rukovanja. Dimni alarmi sadrže elektroničke komponente koje se s vremenom mogu pokvariti ili istrošiti.
HRVATSKI

KÖNIG


KÖNIG
11. Поставяне на батерии 1,5 V AA


KÖNIG
SLOVENSKI
- Indikator ALARMA
- TESTNI gumb
Testiranje dimnega alarma

KÖNIG
- Predel za baterijo 9 V
- Predel za baterijo 1,5 V AA
- Varovalo
Varovalo preprečuje, da bi dimni alarm vrnili na montažno ploščo, ne da bi prej vstavili baterijo. Opomba: medtem ko vstavljate baterijo, potisnite varovalo 1,5 V AA-baterije v predel za baterije.
- KÖNIG
- TABLE OF CONTENTS
- INTRODUCTION
- SAFETY PRECAUTIONS
- PACKAGING CONTENT
- TECHNICAL SPECIFICATIONS
- ALARM INDICATOR
- TEST BUTTON
- LEARN BUTTON
- LEARN INDICATOR
- MOUNTING PLATE AND HOLES
- REMOVE THE MOUNTING PLACE
- INSTALLATION INSTRUCTIONS
- ON CEILINGS
- DO NOT INSTALL A SMOKE ALARM
- MAINTENANCE
- WARRANTY
- DISCLAIMER
- DISPOSAL
- INHALTSVERZEICHNIS
- ALARM-ANZEIGE
- TEST-TASTE
- INDICADOR ALARME
- BOTÃO DE TESTE
- COLOCAR AS PILHAS AA DE 1,5 V
- RIASZTÁSJELZŐ
- PRÓBA GOMB
- LARM-INDIKATOR
- TEST-KNAPP
- INDICATOR ALARMĂ
- BUTON TESTARE
- PUNEREA BATERIILOR DE 1,5 V AA
- ALARM-INDIKATOR
- TEST-KNAP
- ALARMINDIKATOR
- TESTKNAPP
- ALARM GÖSTERGESI
- TEST DÜĞMESINE
- HÄIRE MÄRGUTULI
- TESTNUPP
- INDIKÁTOR ALARMU
- TESTOVACIE TLAČIDLO
- TRAUKSMES INDIKATORS
- TESTA POGA
- ALIARMO INDIKATORIUS
- PATIKROS MYGTUKAS
- INDIKATOR ALARM
- TESTNI GUMB
- ПОСТАВЯНЕ НА БАТЕРИИ 1,5 V AA
Brand : KONIG
Model : SAS-SA2002
Category : Smoke detector