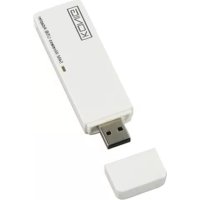
CMPHOMEPL200 - Network card / adapter KONIG - Free user manual and instructions
Find the device manual for free CMPHOMEPL200 KONIG in PDF.

| Product Type | Powerline Adapter (HomePlug) Ethernet |
| Brand | Konig |
| Model | CMPHOMEPL200 |
| Dimensions | 96 mm x 70 mm x 32 mm |
| Power Supply | 100-240 V AC, 50/60 Hz, 5 W max |
| Maximum PHY Rate | 1 Gbps |
| Network Standard | HomePlug AV, Mediaxtream™ |
| Ethernet Interface | 1 RJ-45 port 10/100/1000 Base-T |
| Security | 128-bit AES encryption |
| Buttons | Security, Reset |
| LED Indicators | Power, Powerline Link (high/low speed), Ethernet Link (activity) |
| Operating Temperature | 0 °C to 40 °C |
| Storage Temperature | -20 °C to 70 °C |
| Operating Humidity | 10 % to 90 % (non-condensing) |
| Housing Material | Plastic |
| Package Contents | 1 adapter, 2 RJ45 Ethernet cables, CD manual, warranty card |
| System Compatibility | Windows, Mac, UNIX |
| Certifications | FCC Class B, CE, RoHS, HomePlug AV |
| Maintenance and Cleaning | Unplug before cleaning; use a dry cloth; do not use on a power strip |
| Repairability | No spare parts provided; contact after-sales service |
Frequently Asked Questions - CMPHOMEPL200 KONIG
User questions about CMPHOMEPL200 KONIG
0 question about this device. Answer the ones you know or ask your own.
Ask a new question about this device
Download the instructions for your Network card / adapter in PDF format for free! Find your manual CMPHOMEPL200 - KONIG and take your electronic device back in hand. On this page are published all the documents necessary for the use of your device. CMPHOMEPL200 by KONIG.
USER MANUAL CMPHOMEPL200 KONIG
MANUAL DE USO (p. 27)
HomePlug
KÄYTTÖOHJE (s. 37)
HomePlug
NAVOD KPOUZITI (s.47)
HomePlug
EFXEPIIAIO XPHH257
HomePlug
VEILEDNING (p. 67)
HomePlug
ENGLISH
1 Introduction
The homeplug is an excellent solution that can be used to extend your network. You can use this homeplug Ethernet Bridge Adapter to link multiple locations without the need to run an Ethernet cable, at home or in a small office building. Combined with a broadband DSL/cable connection, every room with electrical power outlets will have easy access to a high-speed internet connection. Your house will have a power line network starting with just two plugs.
The adapter operates on the homeplug AV Standard and Mediaxtream™ specification, providing up to 1 Gigabit per second bandwidth over existing home AC wiring. The added bandwidth is perfect for ultra-high speed HD entertainment networks in homes as well as for areas that are hard to reach by wireless connection.
Since the home powerline is the most pervasive medium in households with multiple outlets in every room, the plug allows multiple network compatible entertainment systems and home desktop/notebooks to be networked, to share internet connections, printers, files, and play games without any additional wiring. The plug is also compatible with any device, including Windows®, Mac®, and UNIX® machines.
Usage Diagram

Features
- Up to 1 Gbps PHY rate over standard home power lines
- Stand-alone unit attaches directly to broadband device and home power line network for seamless integration
- No new wire approach
- Maintains high data throughput even under extreme noise conditions commonly found in power lines
- 128 Bit AES encryption ensures data security
- Co-exist with homeplug 1.0 and 1.0 Turbo networks
LED Details
Power LED Solid green - Powered on
Off - Power off
Blinking green - Security setting up
Solid green - Security setup successful
Double flash - Fail in security
Homeplug link On/Green - The power line network is active and linking to other adapter(s) at high speed
LED PHY rate
On/Red - Power line network is active and linking to other adapter(s) at low speed PHY rate
Off - Power line network is not available - no other homeplug devices were detected
Ethernet link Solid green - 10/100/1000 Mbps port linked
LED Flashing - Data transmitting or receiving
Off - No Ethernet link
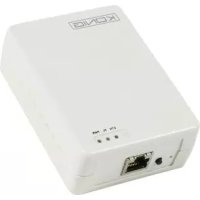
Bottom casing details
The bottom casing contains a recessed Reset Button, a Security Button, and 1 Ethernet Port.
Security This button is designed to generate an individual network group under multiple nodes environment
Reset Please refer to Security Button section for more details.
This button is used to clear ALL data and restore ALL settings to the factory default values.
Press and release the reset button to begin restore factory default.
System requirements
- One or more other homeplug(s) of CMP-HOMEPL200/201/1000/1001 and compatible devices
- Available Ethernet port on the computer or network device
Available power outlet. Please avoid using homeplug devices on power strips as they can affect product performance - Standard home power line wiring
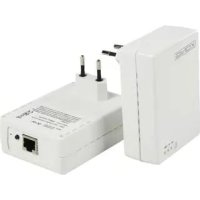
Package contents
- 1 Homeplug Ethernet bridge
- User manual CD
- Limited warranty card
- 2 RJ45 Ethernet cables
2 Installation and hardware setup
Homeplug is a plug and play device; the user is able to plug and play without any complex configuration and settings.
Simply plug the plug directly into any available wall outlet and connect to any network-enabled Ethernet port. Please note that you need at least two Ethernet bridges to create a power line network.
Steps for hardware setup to create a power line network in your house with these Ethernet bridges:
- Plug an Ethernet cable into the device's network-enabled Ethernet port.
- Plug the other end of that Ethernet cable into the Ethernet port of the plug located at the bottom of the casing.
- Plug the prongs in the back of the plug directly into a power outlet in the wall. Please avoid using homeplug devices on power strips as they can affect product performance.
- Repeat the above steps for the second Ethernet bridge to establish a power line network.
3 Configuration
By default, the plug has 128 bit AES encryption ensuring data security by blocking access from outside of the house. However, we strongly recommend you changing the default network password with the Security Button located on the bottom of the product.
Changing network password
- After following the hardware setup and with both Ethernet Bridges plugged into the wall, press down on the Security Button on both units for 10 seconds. This will change the password to a random value.
- Press down the Security Button on one unit for more than 0.5 seconds, but less than 3 seconds.
- You will have 2 minutes to go to the second unit and press the Security Button down for more than 0.5 seconds, but less than 3 seconds.
- The new network password has now been saved to the second unit. The password will not be lost, even if the Ethernet bridges are unplugged from the wall.
Adding a new plug to the existing power line network
If the default power line network password has been setup, a new Ethernet bridge will have to load the new password before it can join the existing power line network.
- Press the Security Button on an already encrypted unit for more than 0.5 seconds, but less than 3 seconds.
- You will have 2 minutes to the new unit and press down its Security Button for more than 0.5 seconds, but less than 3 seconds.
- The new Ethernet bridge has now been loaded with the network password and added to the existing power line network.
Restoring factory settings
Use a pin and hold the Reset Button down for 2 seconds to restore to factory settings on each unit you are trying to connect. The unit will then connect, based on factory settings.
4 Product Specification
| Main chipset Gigle GGL541 | ||
| Computer interface IEEE802.3u; IEEE802.3ab, auto cross-over | ||
| Standards Homeplug AV | ||
| Network interface | One RJ-45 (10/100/1000 Base-T Ethernet) One 1 Gbps power line port fully interoperable with existing homeplug AV products Multicast support via IGMP and MLD snooping | |
| Operating range Estimated range of 300 m in wall power lines | ||
| Cabling 1000/100Base-T; Cat. 5/5e/6 UTP Cable | ||
| Operating temperature | 0°C - 40°C ambient temperature | |
| Storage temperature | -20°C - +70°C ambient temperature | |
| Humidity 10 - 90% Maximum (non-condensing) | ||
| Power input 100 - 240 V AC, 50/60 Hz internal | ||
| Max. power consumption 5 W | ||
| Power connector Embedded US/EU/UK/AU | ||
| Housing Plastic (96x70x32 mm) | ||
| Buttons Simple Connect and Factory Reset buttons | ||
| LED | 2 Power line Link Rate indicators: Rate > 200 Mbps, Rate < 200 Mbps; 2 Ethernet status indicators: Link Rate, Activity; 1 Power indicator | |
| Certifications | Homeplug AV powerline specification FCC Class B/CE Mark/Homeplug AV certification | |
| Power line features Homeplug AV | MediaxtreamTM | |
| Modulation | OFDM 1024/256/64/16/8 QAM, QPSK, BPSK | High speed multi-carrier modulation |
| PHY Rate Up to 200 Mbps | Up to 1 Gbps | |
| Scheduling | CSMA/CA and TDMA | CSMA/CA and TDMA |
| Frequency band | 2 - 28 MHz | 50 - 300 MHz |
| Security | 128 Bit AES encryption | 128 Bit AES encryption |
Safety compliances
FCC
This equipment has been tested and found to comply with Part 15 Class B of the FCC Rules. Operation is subject to the following two conditions:
(1) This device may not cause harmful interference
(2) This device must accept any interference received, including interference that may cause undesired operation.
CE
This equipment is in compliance with the requirements of the following regulations: CE Mark
RoHS
This product is RoHS compliant.

1 Einleitung
Link LED high-speed PHY snelheid
(Securitate) multenoduri