
Precise - Iron MORPHY RICHARDS - Free user manual and instructions
Find the device manual for free Precise MORPHY RICHARDS in PDF.
| Product Type | Iron |
| Brand | Morphy Richards |
| Model | Precise |
| Tank Capacity | 300 ml |
| Estimated Power | 2400 W |
| Power Supply | 220-240 V ~ 50/60 Hz |
| Soleplate Material | Stainless Steel |
| Functions | Dry ironing, variable steam, spray, steam burst, vertical steam |
| Anti-drip System | Yes |
| Auto shut-off | Yes (on certain models) |
| Anti-scale filter | Lifetime anti-scale filter (on certain models) |
| Cord Length | 2 m |
| Estimated Weight | 1.2 kg |
| Maintenance | Monthly self-cleaning, clean soleplate with damp cloth |
| Safety | Auto shut-off, mandatory grounding, overheat protection |
| Warranty | 2 years |
Frequently Asked Questions - Precise MORPHY RICHARDS
User questions about Precise MORPHY RICHARDS
0 question about this device. Answer the ones you know or ask your own.
Ask a new question about this device
Download the instructions for your Iron in PDF format for free! Find your manual Precise - MORPHY RICHARDS and take your electronic device back in hand. On this page are published all the documents necessary for the use of your device. Precise by MORPHY RICHARDS.
USER MANUAL Precise MORPHY RICHARDS
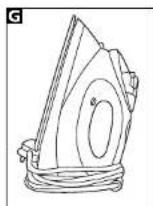
Precise Steam Iron steam/spray shot
Please read and keep these instructions
When using your flotation, basic safety precautions should always be followed, including the following:
- READ ALL INSTRUCTIONS BEFORE USING.
1 Use iron only for its intended use.
2 To protect against a risk of electric shock, do not immerse the iron, cord or plug in water or other liquids.
3 The iron should always be turned to "Off" before plugging or unplugging from outlet. Never yank cord to disconnect from outlet; instead, grasp plug and pull to disconnect.
4 Do not allow cord to touch hot surfaces. Let iron cool completely before putting away. Loop cord loosely around iron when storing.
5 Always disconnect iron from electrical outlet when filling with water or amplying and when not in use.
Do not operate iron with a damaged cord or if the iron has been dropped, damaged or leaking. To avoid the risk of electric shock, do not disassemble the iron, take it to a qualified serviceman for examination and repair. Incorrect reassembly can cause a risk of electric shock when the iron is used.
7 Close supervision is necessary for any appliance being used by or near children.
8 Do not leave iron unattended while connected or on an ironing board.
9 Bums can occur from touching hot metal parts, hot water, or steam. Use caution when you turn a steam iron upside down - there may be hot water in the reservoir.
This appliance is not intended to be used by young children or infirm persons unless they have been adequately supervised by a responsible person to ensure they can use the appliance safely.
11 Young children should be supervised to ensure that they do not play with the appliance.
Other safety considerations
Always locate your iron away from the edge of the worktop/ironing board.
- Ensure that the iron is used on a firm, flat surface.
Do not use the iron in a bathroom.
WARNING: Do not place the iron onto a metal tray or metal surface whilst in use.
- Do not touch hot surfaces, use handles or knobs.
- Do not fill above the MAX mark, otherwise water may be ejected.
- Allow to cool before putting on or taking off parts and before cleaning.
Do not use outdoors.
- Do not place the iron on or near a hot gas or electric burner or in a healed oven.
- Do not use the vertical steam on clothes being worn.
- Always disconnect the iron from the electrical socket when filling with water or emptying and when not in use.
- When placing the iron on its heel, ensure that the surface is flat; the heels placed are stable;
Treating scalds
Run cold water over the affected area immediately. Do not stop to remove clothing, get medical help quickly.
Electrical requirements
Check that the voltage on the rating plate of your appliance corresponds with your house electricity supply which must be A.C. (Alternating Current).
If the socket outlets in your home are not suitable for the plug supplied with this appliance, the plug should be removed and the appropriate one fitted.
WARNING: The plug removed from the mains load, if severed, must be destroyed as a plug with bared flexible cord is hazardous if engaged into a live socket outlet.
Where used, should the fuse in the 13 amp plug require changing, a 13 amp BS1362 fuse must be fitted.
WARNING: This appliance must be earthed.
INSTRUCTIONS FOR USE
Temperatre guide
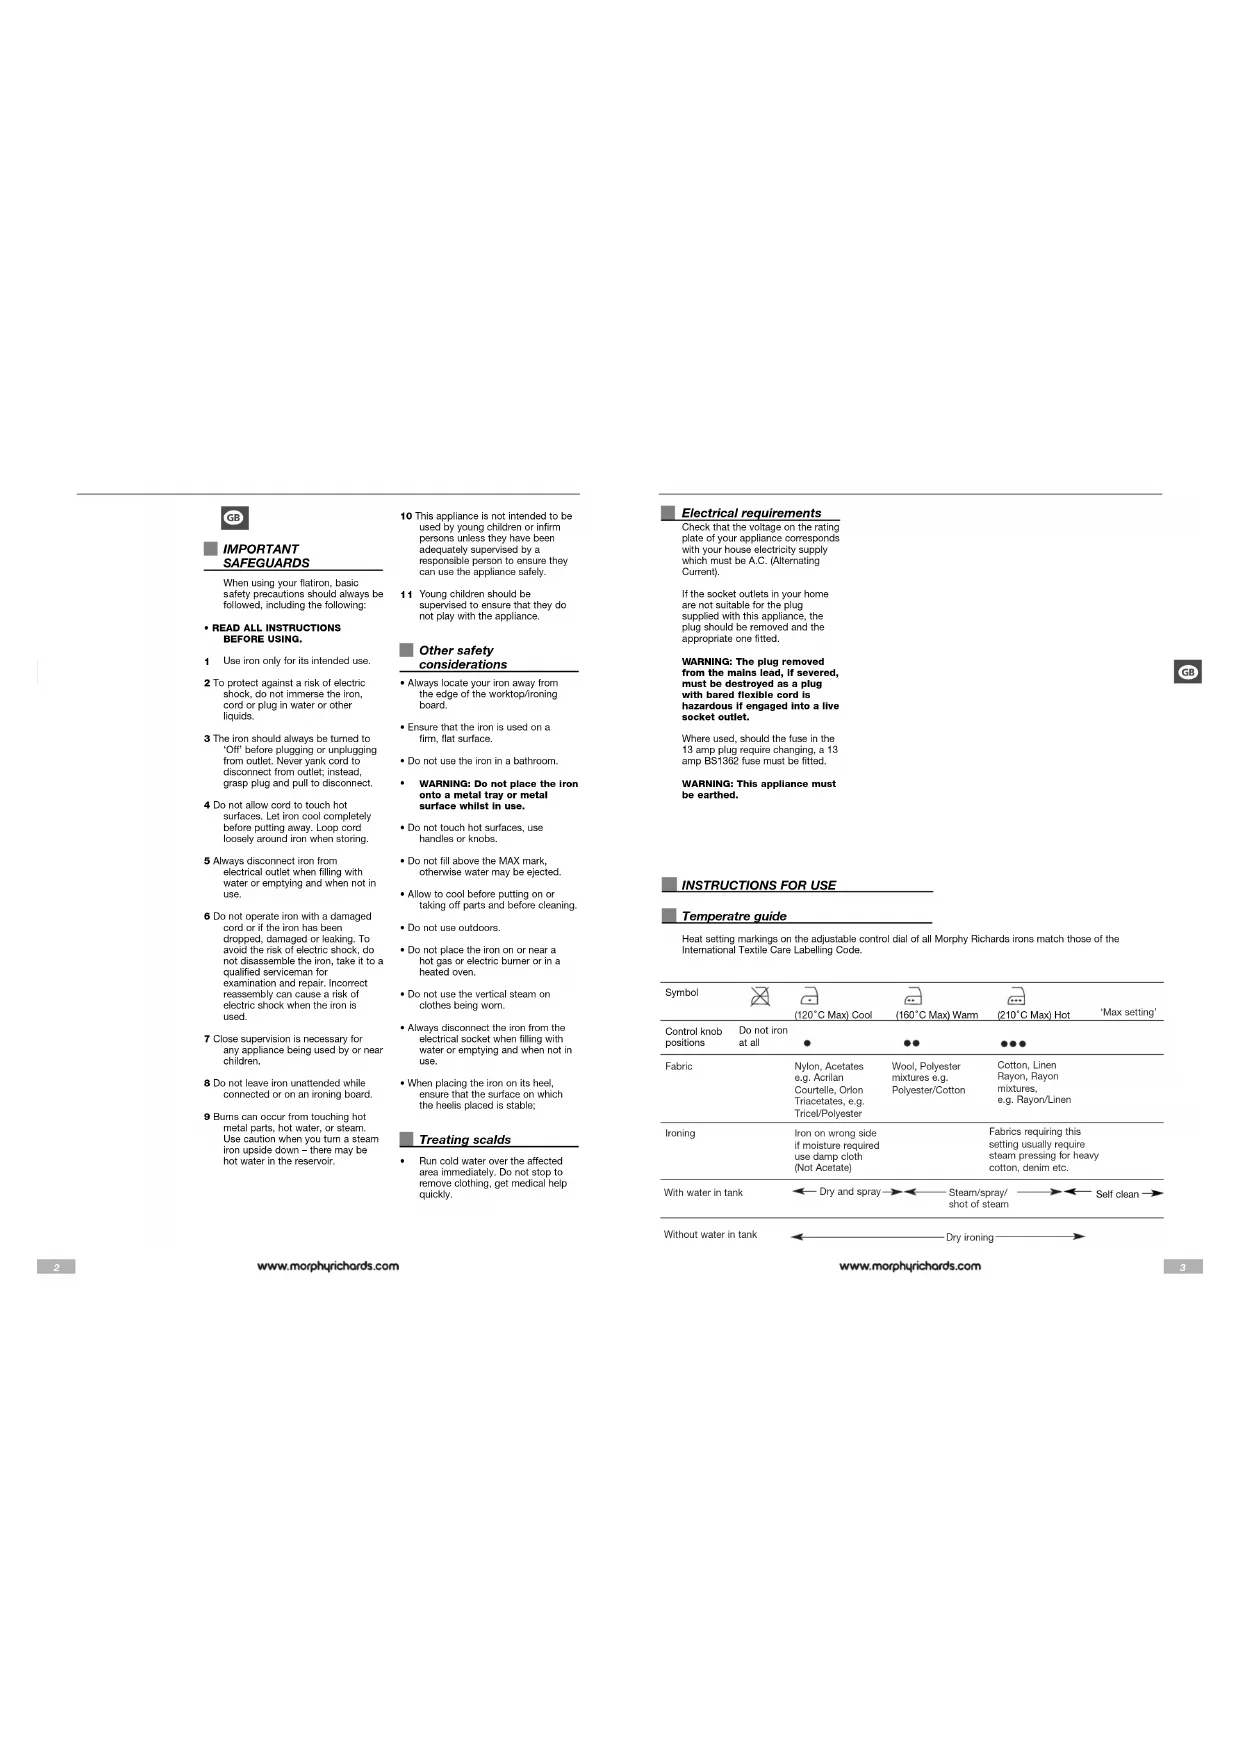
Heat setting markings on the adjustable control dial of all Morphy Richards irons match those of the International Textile Care Labelling Code.
| Symbol | (120°C Max) Cool | (180°C Max) Warm | (210°C Max) Hot | Max setting' | |||
| Control knob positions | Do not iron at all | ● | ●● | ●●● | ●●● | ●●● | |
| Fabric | Nylon, Acetates e.g. Acrylic Courtelle, Orlon Triacetates, e.g. Tricel/Polyester | Wool, Polyester mixtures e.g. Polyester/Cotton | Cotton, Linen Rayon, Rayon mixtures, e.g. Rayon/Linen | ||||
| Ironing | Iron on wrong side if moisture required use damp cloth (Not Acetate) | Fabrics requiring this setting usually require steam pressing for heavy cotton, denim etc. | |||||
| With water in tank | Dry and spray→Steam/spray/shot of steam→Self clean→ | ||||||
| Without water in tank | Dry ironing→ | ||||||
Getting the best from your new iron...
Safety first
Caution must be used when handling this appliance as it does get very hot. Always switch off the unit and allow to cool before cleaning or storing.
Self cleaning button
Your iron will give the best ironing results and will last longer if you use the self clean feature at least once a month.
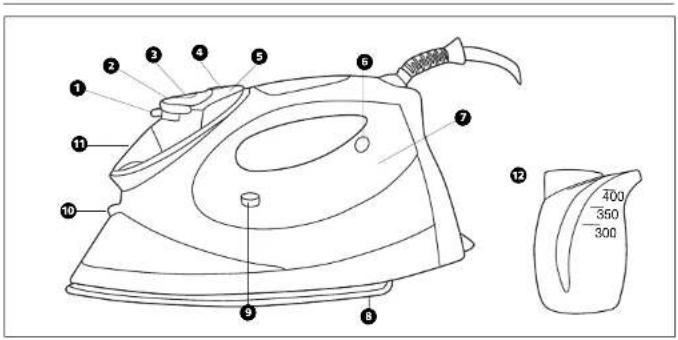
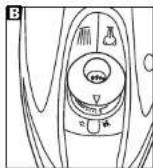
COMPONENTS OF YOUR IRON
Steam to dry iron selector switch
Temperature conti
Steam level indicator window
Spray button
Shot of steam button
Temperature Indicator Light
Water tank
(illuminated certain models)
Solaplate
Self-clean button
Spray nozzle
Filling hole with cap
BEFORE USE
Sort out the items to be ironed according to the type of fabric. This will minimise the frequency of temperature adjustment for different garments.
Note: The steam facility should only be used on garments which are suitable for ironing at the 2 and 3 dot settings.
Textiles and clothes are supposed to carry ironing instructions. If they don't you should follow the fabric guide on page 3, but be sure to test the temperature by ironing the hem of the garment or similar area first.
If you turn the control dial down from a hot setting to a cooler setting, wait until the iron temperature has stabilised before you continue ironing.
Delicate fabrics such as silk, wool, velour, etc. are best ironed with an ironing cloth to prevent shine marks.
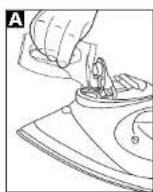
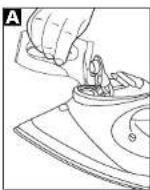
FILLING
1 Make sure that the iron is not plugged in, then set the steam to dry iron selector switch to the "0" position before filling the iron with water.
2 L lift up the filler cap and fill the tank with water through the filling hole, using the beaker provided (300ml). After filling replace the filler cap. In hard water areas the use of distilled or demineralised water is recommended.
WARNING: Never use battery topping up fluid or water containing any substances like starch, or sugar, or defrosted water from a refrigerator.
3 Always pour out the rer water after use.
WARNING: When filling your iron with tap water always use the beaker provided. Never fill directly under the tap.
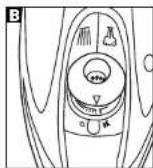
TEMPERATURE CONTROL
Plug in the iron and switch on. Set the temperature control dial to the temperature required, but don't start ironing immediately.
If you wait a few minutes, the iron will stabilise at the required setting. Your Morphy Richards iron is fitted with an indicator light which will go on and off while you are ironing.
This is perfectly normal as it shows that the iron is maintaining the heat setting you have chosen.
It is always a good idea to begin with cool fabrics and work up to higher settings.
An iron heats up quicker than it cools down so you'll save time and electricity.
FEATURES OF YOUR IRON
Temperature indicator light
The indicator light shows that the iron is warming up. When the required temperature is reached the light will go out and will cycle on-off during operation.
Dry ironing
You can use your iron as a dry iron only. Make sure the steam to dry iron selector switch 1 is set to the symbol.
Any temperature setting may be used depending on the garment. The spray feature may be used provided there is water in the tank (see filling section). You do not need to put any water in the tank when dry ironing only.
Spray
Press the spray button and aim the spray of water at stubborn creases. You can do this whilst dry ironing providing there is water in the tank. When using the water spray it may be necessary to push the button a few times to get the spray pump primed.
Automatic variable steam
Fill the iron with water as described in the filling section, and insert the plug into the electrical socket.
1 Set the steam to dry iron selector switch to steam.
2 Select the temperature required by turning the temperature control dial to the desired setting. The amount of steam required is automatically selected and is displayed in window 0.
The shot of steam can be used whilst dry ironing, providing there is water in the tank, and the temperature control is set within the steam range.
Do not use shot of steam at temperatures below the steam range (1-DOT) shown on the control dial.
Note: For optimum steam quality, do not operate the shot more than three times in succession.
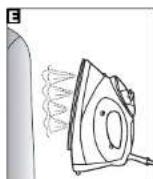
Vertical steam
Hold the iron in a vertical position between 1cm and 2cm away from the item. Press the shot of steam button, this will create vertical steam. This feature is especially useful for removing creases from hanging clothes, curtains, wall hanging, etc.
Note: For optimum steam quality, do not operate the shot more than three times in succession.
No drip system
Your iron is fitted with a no drip system which is designed to prevent water escaping from the soleplate when the Iron is too cold.
During use, the no drip system may emit a loud click, particularly during heat-up or whilst cooling down. This is perfectly normal and indicates that the system is functioning correctly.
Auto shut-off
If your iron is fitted with the auto shut-off function it will automatically shut down after a set period.
If the Iron is left unattended in the horizontal position it will shut down after 1 minute. When this occurs, the indicator light will flash and a beep will be heard.
If it is left in the vertical position it will shut down after 8 minutes.
To reactivate the iron gently shake it, the temperature indicator light will come on indicating the iron is warming up and wait for the iron to heat-up as normal.
LIFE LONG ANTI-SCALE
SYSTEM (certain mode is only)
The life long anti-scale system reduces scale deposits and helps prolong the life of the iron.
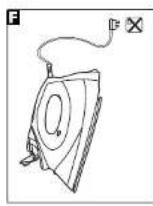
EMPTYING AND STORING
When you have finished ironing, unplug your iron. Ensure that the steam to dry iron selector switch is set at the position, lift up the fill cap and empty any remaining water out of the filling hole.
Do not store in the box, but in an upright position, so that any drops of water remaining cannot leak out and discolour the soleplate.
Important: The flux can be damaged if wound too lightly around the iron after use. Make a loose loop with the flex and wrap it around the iron. The iron must be cool before winding the flex and storing on its heel.
MAINTENANCE
Self clean feature
fall fill the iron with water.
2 Place the iron on its heel.
3 Connect to a mains supply outlet
4 Turn the temperature dial to 'MAX' setting
5 The pilot light will glow indicating the irons switched on.
6 The pilot light will go off when the required temperature is reached
7 W wait for one more cycle: (pilot light glows and goes off.)
8 Turn the temperature dial in anticlockwise direction to 'Min'
9 Disconnect the iron from mains supply outlet.
10 Hold the iron horizontally over a sink.
11 Press and hold down the Self-Cleaning button.
12 Steam and boiling hot water will drain from the holes in the soleplate washing away the scale and minerals that have built up inside the Steam Chamber.
13 Gently move the iron back and forth until the water tank is empty.
14 When Self-Cleaning is complete, release the Self-Cleaning button.
15 Rest your steam iron back on its heel and allow to fully cool down.
16 Wipe the soleplate with a cold clamp cloth.
WARNING: Keep hands and body away from the hot water.
WARNING: Do not attempt to descale the soleplate with descending products.
To clean a stainless steel soleplate
To keep the soleplate of your iron clean and free of limesteel, we recommend that you use one of the gentle chrome, silver or stainless steel cleaners that are generally available. Always follow the manufacturers instructions. To clean off melted man-made fibres set the iron at 3 dot position and pass it over a clean piece of cotton which will draw the deposit off the surface.
To clean a coated
soleplate (certain models only)
In the unlikely event of any manmade fibre fusing to the soleplate, set the iron at the 3 dot position and pass it over a clean piece of cotton which will draw the deposit off the surface.
Do not use scouring powder or solution as this could cause damage to the coating.
To clean the exterior
Allow the iron to cool and wipe over with a damp cloth and mild detergent, then wipe with a dry cloth.
YOUR TWO YEAR
GUARANTEE
It is important to retain the retailers receipt as proof of purchase. Staple your receipt to this back cover for future reference.
Please quote the following information if the product develops a fault. These numbers can be found on the base of the product.
Model no. Serial no.
All Morphy Richards products are individually tested before leaving the factory. In the unlikely event of any appliance proving to be faulty within 28 days of purchase it should be returned to the place of purchase for it to be replaced.
If the fault develops after 28 days and within 24 months of original purchase, you should contact the Helpline number quoting Model number and Serial number on the product, or write to Morphy Richards at the address shown. You may be asked to return a copy of proof of purchase.
Subject to the exclusions set out below (see Exclusions) the faulty appliance will then be repaired or replaced and dispatched usually within 7 working days of receipt.
If for any reason this item is replaced during the 2 year guarantee period, the guarantee on the new item will be calculated from original purchase date. Therefore it is vital to retain your original till receipt or invoice to indicate the date of initial purchase.
To qualify for the 2 year guarantee the appliance must have been used according to the manufacturers instructions. For example kettles should have been regularly descaled.
EXCLUSIONS
Morphy Richards shall not be liable to replace or repair the goods under the terms of the guarantee where:
1 The fault has been caused or is attributable to accidental use, misuse, negligent use or used contrary to the manufacturers recommendations or where the fault has been caused by power surges or damage caused in transit.
2T he appliance has been used on a voltage supply other than that stamped on the products.
3 Repairs have been attempted by persons other than our service staff (or authorised dealer).
4 Where the appliance has been used for hire purposes or non domestic use.
5 Morphy Richards are not liable to carry out any type of servicing work, under the guarantee.
6 Plastic filters for all Morphy Richards kettles and coffee makers are not covered by the guarantee.
This guarantee does not confer any rights other than those expressly set out above and does not cover any claims for consequential loss or damage. This guarantee is offered as an additional benefit and does not affect your statutory rights as a consumer.

CONSIGNES IMPORTANTES
Zonder water in detank
Draog
striken
m = 311
Asmerican Society of Electrical Engineers, 10th Ave. 23rd St., Washington, DC 20046, USA
*Corresponding author: Dr. Antonio Gómez de la Cuesta, Department of Electrical Engineering, University of Washington, Seattle, WA 90085, USA
stryges, after stoltypes
minimerer antallet al
temperaturjustering at hensyn bil for the best quality
damp. Song for: at damp- trust invariance
nortrynglnsgvaegeren 1 er indistitel til smbolet.
funtion under strything.
bamp, nvis ber er vand I undbeholderen. Nir du aor
vanberdiederen Nau du spray yand, kan det vaere podvendigt at
at spade spraypumper.
Automatisk
dampregulering
Fyd vand i strygejemet som
dampskudsnappen 6 for at fa
Iodret damp. Danne fuktion er isar
hytig, har man skai jnele tok.
ahmptotai cardios
opndangto:gardiner, wandekarger pay
Bemerk: For at fá den bedste damp
WOJA DWULETNIA GWARANCJA
npbopa He noxodT K DomaHHM
3NEKTPNHECKM pOeTKAM
HcOeXoIOHOe 3aEHTB BUNKON
NPEyPEXKDEHNE:Noene
ydaeneHHco uHypa nTAHNA
noBpeKdHnO uTenc
BIMK,eeRebokOmmo HINATOKYHT,ROCKORK-10
OROENHHbIM PBOBODM
npedTabJIeR ONaCHOCTB
Cnyyae ee noqknoueynK
HaxoJnHexn HnHnPaXeHnEe
Ecnn Heo6xOJMo 3aMeHHTb
npenoxpaHntenB BnKHe Ha 13A
cpeyeyrctanobnB
PENPYNPEKDEHNE:AnHHoe
yctpoCTBOdoXnHObItb
3a3eMneHo.
Cobetbl no ONTMAnbHO
pabote Baewero HOBORO
yTfora...
B30nacnoctb npexde Bcero
PnHcNoB3O8AHMaHHOr
npncopa chedeyet cooiaaht
HOMOGENESIS: HOMO-STRONG HOMO
PNDODNDAIREEMOCTBnpeep
OHTKoHnXpaHeHMeM
KHONKa cAmOoHcTKn
yiof 000000000000000000000000000000000000000000000
P
CBMOCHCTKHEMBHBEO
pasa D Mecau
COCTABHbIEYACTN
YTKOA
TepeKnichatEnbnapoBor
CYXORO 1NAXBHNR
DnckoBny perynnTop
TneepaypbI
OKOUIKO INHDAKATOPa ypOBH
Hapa
Khonka pacnbintena
3 KhoNka yCHeHHo hOaH npaa
B Caleoror
Pepreymn
HRKOTOPXMPDENX=0
NOAEBTKOH
Nogouna ytnora
KHONKa CaMOO-NCTKM
10 FopcyHka paacnbintenr
OTBepCTne dna 3aonHeHn
BODON C KONHaKOM
12 Yauka HanaonHHTenr (300 mn)
PPEKDEYEM
NPNUNTK
INONJIb3OBAHNIIO
PNUBOPA
OTcopTpyIe npedHa3HaenHHyIO
Hnnae Hnnae OeKny No Tnny
TKHNI 10000000000000000000000000000000000000000000
DEYHMOPKKN TEMPOATPHN 108
P3NHbIXBnO8OaXbI.
OTHOCTeBHOIAXHEH803HBX
BIDOBTKAHNHaCTp.3.HO
083aTeBnHOp npOBepTe
Temnepatpy. nporna.nB chepba
HIOHOHTBKMHNIOHO
EconxBnDnXnBn
Tmepatypc nomouhio
peryraTopa,peep npoDOnKHeHem
Tn
Hoxa fumineparpylora hna
JINKATBHe TKAHH,TAKNAK
Bank, Webers, Benkop n. d. hyd
A
PpDoTbpaueHHNORBnEHNA
H
3ANONHEHNEBOOJ
1Y6aHTeB TOM,HTO YTKOR HE
NOOKIOeH K cETN NtAHNA,
yctaHOHTe nepeKIOaTeNb
naposcrcyxrcrnaekn
nonorehe 0 nepd aonne
2NoHHMMTEKONN4OKOTBepCTM
Hn HsHnHnBbOu
SANSHARE PESEPAYA 8000
H
CTAKAHKOM(300M).A
NoCnB 3aJIeKb BcDyBepHHTe
KoHbok Hc MecTo. B paoHax
KcTkoBdoPbPKOMeHpyTe
HJHJHJHJHJHJHJHJHJHJHJHJHJHJHJHJHJHJHJHJHJHJHJHJHJHJHJHJHJHJHJHJHJHJHJHJHJHJHJHJHJHJHJHJHJHJHJHJHJHJH
PENPYNPEXKDEHNE:He
DonyckaeH npmeneHne
KAKROCT, WANGYUYIOMDPM
Batape, NIO BOBoI, COeepK
KAKHe-NHBO npMmecn, TAKne I
KpaxMaH HnCaxapa, NBO
OHTAHBWEI BOD
3 Nocne nonb30aHn yTTOm
OGRaTeJIbHO BbIMBaNTe
OCTABUHYOCN BODY
PENPYNPEKDEHNE:Pn
HANOJIHHeHHyIHa
BODONPOBOHOHBOHOBCERda
noIb3yITecb npnlaeraMbIM
MepHbim cTakAHqKOM.He
31
TEMNEPATPHBI
KOHTPOJIb
NoiknoHrte WTeNCeIbHyIO BnIKy
yToraK3NeKTPnueckoepo3eTke
BIOHOTe eio. yctanotte
mckobn polyntop Tneepatyp
Ha ABOOxMDNkYc TmHepatpy,
P
EcnnnoaekdaheckonbkoMHHT,
TemnepaTypa yTora ycTaHOBNTc
Ha TpebyemOM yponHe. Bau yTion
Morphy Richards oocopy
CBTOBENHDAKATOPON
RTOPAH 02018/04/03
A
3To a6coJIIOTHO HOpMaIbHO, M
YKa3bIgaeT Ha To, 4To yTnO
noDepexHbAeT bIpaHHbB BAM
TemnepaTpyhbi peKm.
Ueenecooepa3no HaaHnHa
rnaKeHHe cTKaHen, Tpebyounx
Methoxyd teinehepatypy, 10
Hcrenn HepexoR Kooee
BcOKHsSHAeAHXnIemepatyp
YTOCObCTOeHaOpHaeT
Hec6xopmyk TemnepaTy, 3aTeM
OxN8XJAEETCHTO03BOJNET
CAKOHOMHTB BPEM
3neKtpc3HepnIO
BO3MOXHOCTN BALWEFO
YTOCA
CBeTOBn HndNKaTOp
TEMnepaTpybI
CBeHeHnE HnDnKaTopa 6
ykaeaeetHa 16,916 yhlo
HAWA PEGELC. N072 10CT 2018
HxH 1
BKDCHBETCAHKNKHOABTCB 80
BpMa DsOTh
CyxoernaeHne
YICHOIMKHOICIOHOSHTOJIKOOKO HONGKONG HONGKONG TOTOM YINPEKINDKHOIANTOH
napoBoro/cyXorornaxeHm
yCTAHOBENH HCHMBON
Moxho Bbipathy yCTAHOBky
TempepaTpybB3aBcMocnOT
TINHIO
1
PENPHYDNE WONGSOLN
nannnnnne 1
HEOBXOAMMOCTN 3AENBt BDOY E
pe3epByap, KOrDa Bbl rnaNTe
TOnbko Bcyxio.
PacnbineHne
HaxmTe Ha KHonky pacbnneHn
HannpaBte paCnBneMyo
y
0
[FR3XHJNPRDPOPOLOTO]
P
NOKAKKIKBQHUBACOG
DACBUMT01H,BO3MOXHO
NOHbDO6HTCR HAKATb HA KHONKY
HECKOJIbKO p83.

69
Abytomatueckoe perynipobanne npapa
3AnJHnIteYTngOBDK, KaK onnCaHO bpaedene "3aBnIbKa BOIDa, HcBtATEbIyTeNcHbEyH BnIKy BnAeTKPcBcKByoP30kETy
Ytchobu ChoopeBcCTyIOTB A KBTbIKH PEXIM, CIEKBA BCTPCKHTBEO.8APCINTCH CEBTOB H-NNkATOP TEmPApyTbPL YkBa3HB HA TO, VTO yHARPAEETCA.1POoXdTeN.oka YTOH PARPETC DO HOPMALHO TEmPApyTbPL
CNCTEMA
TIPEOTBPAUENHOBPA3OBAHNIHAKUNI(TOLBOK DRA HNKOTOXH MOKENH)
CtChnma nIeDpTaBauHnA
063208AHHN HKNHN CHNJAET
KONKHTECO TOnJIKHN K
PnOJIeBET CPOK cNkSybT yNtora
OTOPOKX XPAHEHM
IOKOHAHIMIJIITKIAEIKOTKIOHIOHTB TYTOIOTCETNIPTNBA.58613TCEB TOM.TTOPEKINHOCTENI
NAPBOOROCYXIOIITKIAEIKOTKIOHIOHTB YCTAHOHBI NTOJOKHEKIN
NOJHKIMANOLIKHANOIKOTBEPTE
DNTA ZAOHNHBM BOIDN H CNEITE
HEP03 310 OTBEPCTNCCTABLYOOH BOY
H Xe HAp7eY TpyrB KxpOBe, NOCTabTe erE BOeRTKAnbHc, YTOcbI KANJI NCTABUINBCRBOy H BMOrN BHTeH. R BY3BbTb. NoTePBO5BcKa NOJIOUIY TYPORG
BIMAHINI: TnKIOIPOOBMOXETNQYHTA NPOEKBENBHUN,ECMNOIE NOHIOBBOAHNYIYTOOMOTATbUHPBCyR HERTOMKNUOHTNC.CenaiNTC BACBOHOYNEHNIuHpyaOoMTOTAE IEOBCYPIYTOA.
PINETKAMKOCMAHPTB.NHUPNCTABHYYTIOHAxPAHOHNIEBEPKIAHBIOMIOXHOYBEyIDETCB,THOYYOTcBIL.
yXoA
ФункунcaMoOuHcTkn
13aneTe bOy B yTIOH HAnoNBOHy.
2 Noctabte ynor Ha nHTky.
3 PnokNIOHHTyTIOK 3NEKT
4.YCTAHOBHIEI KDCNPHYRTOPA TEmePAPyIb HAOTMkTMyX"
5 3aroprrca KOHTpObaHn MaNTOHka, YKs3BaOuaaHa TQ, YTOYTOB KNOCH
6IIOOCTHK EHHN Tpe6yEMOM TMENBAPTBy KOHTOPBNHAR NAMNOKH BkYNKHOWTTC.
7 Nodokdnte eoe nnnn nn (KOHPTONHNAH NAMNOCTA 80paaetcB bblknoaetaC)
8I OBEPHNT DECK PERYNTOPA TEMEPATyPnPTBnHACOBON CTENKIN B HANAPENHEIN Min
OTc0eAaHHTBeIHHyTfOraT 3nKTeKTOHO
16 Kapteinye ynor ropinohantbno HAD PAKOBHNO.
11 CAMKIMTE NpyepkRBAHRE KHOONKY
12 H3 OTBCTPNJNOJUOBH NAHHT BNTKETK, KUNIJIINB BOB C a PONOP BMNVAIBN HKHKTb MNIHAPELHNHb OTNXOHEH N3PONOP KAMEBH.
13 CnEka BCTPKHmTe yTOIe HpeHn Haa, YObIy OIOPOKHTBp PB30OByA DnI BOBy.
14NoOKOHHHIMnpouecca CMOOHOACTKTHMOTCYTAEKHONKY CMOOHOACTKN.
15 YCTaHOBHTe napoBoy yIOT o6pTaHO HAI NITKY IN DAIETE EMY NONIOCTbO OCTHb.
16 TOpTnIeNIOPOUyXOLOHOH BBNKHOK TKNHO
PNEyPKEXDEHHe:He DONYCKAeTe NPHKCHOBENHpy Kyk TEKA KTOPHEB BQe.
PNEVDYTPEXDEHE:He NbTaTBeTc ydAmTc CnBd HAKIMC NOBEXHOCNT NoDouBb, Noh3yBc cpeCTAAM POTIB HAKIMN.

TPEMR KHOKNKAMN, INPONDEHTHE YTHOROM NO KYCKY CTIOH XNTOHOTOBMAXHOK TKAHN, TTO NMOXET CHRTB HACNOEHN C NOBEXHPXCTNOIPOUBl.
OuNTkaNooBbI c NOKpBtIeN (TobkoJnH HekOtOpBxMoJeBn)
B TOM cnyhae, ecnla K nopebXocTHa nnooobbln pnnntnlnn pannlneHbHbMCKcCTBHeHHbB BONOKHa, YCTOBaHcpeyrrTOp HAPBBY yTOKa HA 3 TOKHa NPOBBeIe TAYOTOM NO KYCX HxOToX XNOHtOByMAkHOH TKAHAI nn ydaHaeN octAkoB BNOKCH O nePBbXocTHa nNoIOuB
He pIJIbIyTBeC OUIMIAUeBIO
abpA3mHbN IOCTB N IHN
PACToPDRATEMN, TAK KAK 3TO
MOKET PnVIECTN K NOEPEKDAHNO
NKoBtYbn.
OuNTCA BNEHNE NOBEPXHOCTN
IaTeyIYIOCTbIyNpOTPITBE BTKHbO.CMOCHHHDRMRKHMQOMUIMC CPECTBOB,3AETDPNPOTRBE CYOKT KTHbO.
PNEOCTABJREMAR DBXYJETHRAI PAHTAHN
OCHBA BAKHO COXPAHHTTOBAPHHY KHKKOTOPA HINHETCR NOCTBPRDHEWM NOKNYKOSC BYAMPKPNITB CTnANPOMTOSAPHHB KHK3APDHN 000XXA HARHO PYKOBODTA (K RAPAHNTHMOY TANHO).
Bce HauHnMorphyRichardsnepeo 10aikko C zabo npoxoanr HuaDabayhny npoBepk.
Rapamhthnckpckn Hauhaetca 0
DHNKOKHNI KENCTBYET S
TAEWHE24 Meaee(2 rOra).
PiDTeepkneHmPnPaHa
RapAHTHHOe OocNcHbAHI
RAIRTEC PNEoCTABHHe
NKOPYIATeHcKHa H NOKNYI K
RAPAHTHNOI TAOHA
3AIOHNNHOrO NOINCAHHO
npaADiOM.CepnnHbHONH
NPbObaJDOxAnEH CooBtETCBoBATs
Homepy, yka3aHHOMy D
B TeTHeHAPRAPHTHNOHO cPOKA OcUeCTPnETcRpaTAPHTHAN 23MeHA (ecTNHcNPAHOBCT OAnyIeHaNo BnHE 3a0Da- KANTOTBENTIA).
EeNIO NO KAMHINHO BnPHMN H B TENHEH DXYNTETHO
rapsHTNIHORONEPMDA DAHNHO
MIMNEI 6HNO SAEMHHO HOHMI,
rapsHTNIH H NHOSE DE MYNDE YIET
MCNCHNTB C MONGHTA
NEPOBAHALNHONKOTKY INPBOHO
B C BCRY C T I MM, OYHB A BXHO
COXPAHBT KBNTAHUMN NCHET
ΦKHTyDY, NQDTHKDAOIOW DATY
NEPOBAHALHON NKONYIK.
JyNTHI HAPAHTH
PacnocptpantHeTc TONbKa HA Te
HdJIaH, KOTOpBle
KCNiYAtyPHTcB C COOTBeCTBm
C yka3-HAMM IPOHNBODENTH
HanImpe, MzHdJIaDonKh
ChuATbATCR S HAKHI, KmTpBu
DonKhPi NDepkHBatCB B VCHTOM
CoOTAHNI.
KoMaHmMorphyRichardsnnpabe 0kata3bIrpapainTIOHJ3aMeH B cnDyOuX CUYAUX.
1 PONOMA 6bhu BBAHBA HIN CBR3AHA C VCNIOB3OBAHBM NPMBOPA He TPO HANHA-HENHM, HEMPABN/INMHPMHNBHEM, HEAKKYPATTHIM VCNIOB3OBAHBM HIN KCNIOB3OBAHBM C HCCOIBIOIDCMN POKOMLAHNIPOYBOHOITJLH, PONOMA HNAIUPCIEHCTMBH ENEPIADNOHAPRAXKHIN B ANEKTRPCOTMH INK HAPUWENHIN PPAVTN TPHCNPOTPNCBKE.
2 IzDAJIENHVCNIOB3OBAHOBCN DNOHAPRAXKHIN, OTKHIAUMCIMOR Y OKSAAHIHHO HAIKDIIEM.
PnnpnnnnaHbIbIbIyKn pemOHJI KNDINJNIMI KOTOPHIe H NRIIOHTCR HAHN 06cynjBaIaONM INPOCOHANM (KIN PEOCHANOM dOIIHAAHBOHINepa)
3ПибОМСИНБЛЗВАЯHA YUCYOBANX APEDHДI NIMPIMHRAJ/C DINHE 6BITOBBX UCEH.
4 OTCYCTAYOTN OCHBOHANIAI pnoBEEHNIAKOKO-NHO rapaHTNIHO RPOEMHTA KOMNAHIEMPORHYRICHards.
Pangtian he paoopcnpanencta HAPAOxHHe MATEpHnA, Taikhe KAKNAKETb, FxNTPbTb NCTeKANHHe cccDy.
DAnHAR RAATNHE
npEoDcTaeBnR KAKHX-NIOyAoYrnx
pN86,KPOKTEX,KTOKPbVETKO
MIOKeOHN BHIuIE,PMSTOM
MIOToTBeTNHe PnHHaMAK KAKHX
mNo pNetehyN,CBN3AHxNc
KOCeBHBMUYUePOMi
yBbTKAM.DAnHAR RAATNHE
pNlAIBaTRC BKACTSE
DOIOTNHATEHNOI MyTOBI H
OrpAHINBEATBAAIX
pNAbNToBtTeTI.
morphyrichards
Ybaxaemn nokynatena!
Bnnaaepnn Baa aabop aagannn pmpnMorphyHichards Hnhaeemor,
OcnyKHeHnM, npocm oepnBbKa Kdyney, y kotoporo Ba Bn pncpem 30 nKeMaHn H 6 OJHs As AotropoBnHnnk THeHHNck HLeHTPb LTO CBOBHCEPBNG-CmKxKOTopKoRnK MIOHn y npadabane NnKOBHn H Tcepy HnnHc-Morphy Hichards
+7(095)720-60-92
Hspenne
Modenb:
CepHH
Deta npo8ekn
Topryoue opraHsaia
AMNMRnNOoMnBnpOaB

Inapepe nepnno. PteTne H X BnHnny BnD H KOMPLKNTAUY H NmE, C yONOBHN RAPaHTHO OOCNYXBAHRA corpao
00MnH NODTHNOKyNTEN
morphyrichards
- 法院法例 068972-068973 的法律文件的名称是:《中华人民共和国宪法》。
- TapaHTHnBcPOK HsKdEINMORphyRichdssocTaeNReT 2 rOa c Mowenta npodaxn.
- 1aepnHoe oocryxhBaepeoPcpeRcra HdeFekTu, BocHkUe 2 pOceec HcNtOBc6EHR HOER NPN CNOOcnoenmnpocohnnpnoonnnnno no kckyuranaum aasennn Hs bKooHuaa 3a pAOKnNnHkyu n PcooCOTyQouan HnAPXKeHHnHnTaoQauCetN.
- TaepHTM He PaTPOCTPAHETCA He:
paeepnep
C. VEXEHMHRECKING,POECKDEHVAHADPAHDAVXHNDHECTED
d. nupexkden, uusuHHe KpueTcBOM DCpa
e. napeXdeHHB, Bb3BaHHHbE 3KcOnyatauHer, BbixOuae 3a paMk NnHbIX HxKd - noBpeKdEHH, BuiBaHHbHe HeOpexHcN nn Hn HnPaAHbHOn 3KnpyaTaun, a TckKe BuaAHbne NonaenHem AHyTp
100 - D06E0K0EHH3, Bb3EahHHg OTTOKEHMEN HAKHN BHE 36BMCHOCTN OT TPN8 BOOAL
- NOBPEKDEHRA, EUK38EHHLIE CAMOCTORTELHUM HMOHEHHEM KOHOHTpykUN 3DAENNA IIN 10KOOMNNEKTykoHx.
- NotpeMTeNo MoKer 6bts OTKasaHO B rapaHTHnHOM cOcyKaBaHH ecm
OTcyTCTByET NnHE 3aONHe repaHTNb TaIOH
C. CTPT NIN NCBPEXDEH CEPHPHLN HOMEO A3DENHE
1.13.2019年1月1日(T+2日)至2019年1月18日(T+2日)
a. Heteroeretic polymorphisms and genetic heterogeneity of polymorphism
6.HCTOARAPHTHRHHEYAMRAETDPYHX2AKOHHXPNEBNOTPEEMR.PNDQACTAENHLHXMYDECTBYOKM 3XHOHOHOTIECTBOCMCTBNH
Mortuary Richards products are intended for household use only.
Morphey Rheners has a policy of continuous improvement in product quality and design.
The Company, therefore, reserves the right to change the qualification of its mediators at any time.
P
Marphy Richards Ltd, Moversborough South Yorkshire, England, 854 BAJ
Papins (156 hours) CK 0870 087289 hapublic of lnture 18004616
Australia-Service centre locations
Adn Appianee (Auaa) Pty Ltd
Victoria
35 Surmeos Caa, Moenham. 389 T: 03 2551 200
New South Wales
P3-3-BimsAes.Lkckmna.2141T.C087482900
Ques and
2112FianAea,FagiaFam.409T:0738882985
图中为例题
45 Hampton Road, Kaewc, 5085 T. 08 8093-1833
一、股票交易异常
Western Australia 15 Water Drive, Coburna Park, 6017 T. 08 3244 4396
Glen Dimplex Leguata
9976855281351803506552853
CaleHtpg
2013Barclane,
Linea de yuda horas de ofohal 98247 9570
presat2presat.net
D nproudcten van Morphy Rictards zipraanen beetoldn vort honodijk
pabricMorphy Rhenes stree aae da kewlt an hant ean dvrn in paoeepoondrund te vahetien, he tbeft behout ahssenom ber
rse ror on the specifcations van de producten op ieder ege bil te
wn.
Gc: Cmples Bemius BY
Antennastreat B
1322A0
741636587040E-31636587041
Swvoc+31-03-36-5887055
Ei
Le proilts Mopphy Richards and conqus pour an uagexchualment
nne nnnnne nee eannne ennnne nnnnne
aesrresdng the chst of rne fns a siofion ene as
moe
Bn e nnnnne nnnnne nnnnne nnnnne nnnnne nnnnne nnnnne nnnnne nnnnne nnnnne nnnnne nnnnne nnnnne nnnnne nnnnne nnnnne nnnnne nnnnne nnnnne nnnnne nnnnne nnnnne nnnnne nnnnne nnnnne nnnnnee
Morphy Rictorndt stree wneer che haidet wneh dgnn nn
production vondurundare to vorderanten. Her bedrdd behoedt zich casamort hatrecht voor om de specifiezatie van de produktion op ieder kans te.
W
Goo Dncks Bocchix BV
Gibson Inst. 6
B-9800Aot
日
+3-03-03-03-03-03-03-03-03-03-03-03-03-03-03-03-03-03-03-03-03-03-03-03-03-03-03-03-03-03-03-03-03-03-0
E T C G A S H P X D C W W. H 1345678900000000000000000000000
3 Produktor fB Morphy Richards in protet avedda for huchilebuk.
Mowry Richards for policy for continuing repatriating public policies and institutions, including the return of the donor rather than an 'ascent hand and a new institution' for more models.
Proprnly mthy Pridrderse g prnrnnne wtyepzme duay
davonwge, Mornrgy Richards providce palye sagat, aroayr, anei 1. yasra prudocnica Firsna zozzare cie rarni zkynnj spkndl mskr
Glen Dimpex Pobka Sp. Zoo
U1 Sirneysrides 33
69-47 Pagen
T:10:00:45:00:5:13:00:61:40:59:00
M
VOTON-0000H
mepy Pichnne noe aen eanrnnn en nnnn
1000000000000000000000000000000
00

m = 311
68 For electrical products sold within the European
Community:
eep
Cnck with your Lice Authority or staler for
receiving advice in your country.
Pour laappeaeelelectriquesvandusnla
in media are asabil of dela aalp rels
P2
Angandie elektriska prodcukter, der sasipaa nien fa
EU.
Nad dot elektriske precuik har nobot ondon at sin
sne, m n 1
A
Dct beccos gornbr, mver der or facitertcr hertf.
Fere the lekotee cuntrnne rre 1000000000000
red genegua ld and.
Ciele eaeiae prccnor soms inom
Fumpeake Urianan
Nir aikrskpo produktar Ine Iingra k an arvandos
opportunistic organs administered locally
spreeeweyu uncpdien.
morphyrichards
RN40730MEE 01/07
www.morphyrichards.com

- Precise Steam Iron steam/spray shot
- - READ ALL INSTRUCTIONS BEFORE USING.
- Other safety considerations
- Treating scalds
- Electrical requirements
- INSTRUCTIONS FOR USE
- Temperatre guide
- Getting the best from your new iron...
- COMPONENTS OF YOUR IRON
- BEFORE USE
- FILLING
- TEMPERATURE CONTROL
- FEATURES OF YOUR IRON
- Temperature indicator light
- Dry ironing
- Spray
- Automatic variable steam
- Vertical steam
- No drip system
- Auto shut-off
- LIFE LONG ANTI-SCALE
- SYSTEM (certain mode is only)
- EMPTYING AND STORING
- MAINTENANCE
- Self clean feature
- To clean a stainless steel soleplate
- To clean a coated
- To clean the exterior
- YOUR TWO YEAR
- GUARANTEE
- EXCLUSIONS
- CONSIGNES IMPORTANTES
- Automatisk
- dampregulering
- WOJA DWULETNIA GWARANCJA
- Cobetbl no ONTMAnbHO
- pabote Baewero HOBORO
- yTfora...
- COCTABHbIEYACTN
- YTKOA
- PPEKDEYEM
- NPNUNTK
- INONJIb3OBAHNIIO
- PNUBOPA
- 3ANONHEHNEBOOJ
- TEMNEPATPHBI
- KOHTPOJIb
- BO3MOXHOCTN BALWEFO
- YTOCA
- CBeTOBn HndNKaTOp
- TEMnepaTpybI
- CyxoernaeHne
- PacnbineHne
- Abytomatueckoe perynipobanne npapa
- CNCTEMA
- TIPEOTBPAUENHOBPA3OBAHNIHAKUNI(TOLBOK DRA HNKOTOXH MOKENH)
- OTOPOKX XPAHEHM
- yXoA
- ФункунcaMoOuHcTkn
- OuNTkaNooBbI c NOKpBtIeN (TobkoJnH HekOtOpBxMoJeBn)
- OuNTCA BNEHNE NOBEPXHOCTN
- PNEOCTABJREMAR DBXYJETHRAI PAHTAHN
- morphyrichards
Brand : MORPHY RICHARDS
Model : Precise
Category : Iron