MegaVideo 55 - Digital decoder MARMITEK - Free user manual and instructions
Find the device manual for free MegaVideo 55 MARMITEK in PDF.

User questions about MegaVideo 55 MARMITEK
0 question about this device. Answer the ones you know or ask your own.
Ask a new question about this device
Download the instructions for your Digital decoder in PDF format for free! Find your manual MegaVideo 55 - MARMITEK and take your electronic device back in hand. On this page are published all the documents necessary for the use of your device. MegaVideo 55 by MARMITEK.
USER MANUAL MegaVideo 55 MARMITEK
- To prevent short circuits, this product should only be used inside and only in dry spaces. Do not expose the components to rain or moisture. Do not use the product close to a bath, swimming pool etc.
- Do not expose the components of your systems to extremely high temperatures or bright light sources.
- Do not open the product: the device contains live parts. The product should only be repaired or serviced by a qualified repairman.
- In case of improper usage or if you have opened, altered and repaired the product yourself, all guarantees expire. Marmitek does not accept responsibility in the case of improper usage of the product or when the product is used for purposes other than specified. Marmitek does not accept responsibility for additional damage other than covered by the legal product responsibility.
- This product is not a toy. Keep out of reach of children.
- Adapters: Only connect the adapter to the mains after checking whether the mains voltage is the same as the values on the identification tags. Never connect an adapter or power cord when it is damaged. In that case, contact your supplier.
TABLE OF CONTENTS
INTRODUCTION 3
- USE AND OPERATION OF THE MEGAVIDEO55 3
- SET CONTENTS 4
- CONNECTING APPLIANCES TO THE MEGAVIDEO55 MODULATOR 4
- CONNECTING THE AERIAL SIGNAL TO THE MEGAVIDEO55 MODULATOR.. 5
- SETTING THE CHANNEL 6
- SETTING THE INFRARED RETURN CHANNEL FOR USING REMOTE CONTROL 7
- USING INFRARED RECEIVERS IN DIFFERENT ROOMS 8
- FREQUENTLY ASKED QUESTIONS 9
- TECHNICAL DATA 10
INTRODUCTION
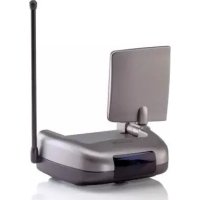
Congratulations on purchasing the MegaVideo55! The MegaVideo55 is a programmable stereo modulator that converts audio and video signals from, for instance, your DVD player, satellite receiver, video recorder, security camera, decoder or PC and adds it to your aerial cable as an extra channel. Then you can receive this signal as a kind of internal TV channel anywhere in the house where you have an aerial connection.
You could say that the modulator is "looped into" the aerial signal. The incoming aerial signal is connected to the aerial input. The audio/video signal (from a DVD player for instance) is
added to the outgoing aerial signal. The added audio/video signal can now be viewed on the channel that has been set on any televisions that are connected after the modulator (on the 'RF ANT OUT' side of your MegaVideo55). You do not need to change any other part of your aerial network.
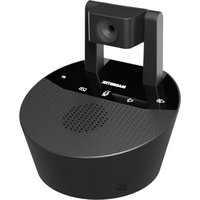
Thanks to the built-in "infrared return channel" you can continue to operate the connected appliances from other rooms using your own remote control. One infrared receiver is supplied as standard. Additional receivers can be purchased should you wish to operate your equipment from different rooms.
The infrared return channel only works with amplifiers, splitters and aerial wall outlets that are return channel compatible. Compatible components are usually marked '5 - 30 MHz' or '5 - 68 MHz'. Your aerial specialist can provide more information on this.
The modulator itself has no effect on the signal strength. The maximum length of cable that can be used depends on the cable network in your house. If you want to connect a number of TVs or use longer cable lengths it is recommended that you use an amplifying splitter. Your aerial equipment supplier can give you advice on this.
2. SET CONTENTS
1x Stereo modulator
1x Infrared receiver
2x Power adapter
1x RCA-RCA cable
2x Adapter F-connector to IEC-connector male
2x Adapter F-connector to IEC-connector female
1x Scart doubler
1x IR extender cable with 1 LED
1x User manual
3. CONNECTING APPLIANCES TO THE MEGAVIDEO55 MODULATOR
Turn off all appliances before making any connections. Now attach the appliance you want to connect (e.g. the DVD player) to the MegaVideo55. There are a number of ways to do this.
Using an RCA cable
All types of composite video signal and audio signal can be connected to the modulator. This can be done using the supplied RCA cable. Ensure that the plug and socket colours match each other. That is, red to red, white to white and yellow to yellow.
Using a scart cable
If the appliance you want to connect has a 'scart connection' you can use the supplied scart doubler. When this is used you do not loose the use of the scart connection, so it can still be
used for other applications. When the MegaVideo55 is connected to the scart doubler (using the RCA cables on the side) and the scart cable that was originally connected to your appliance at the same time, jumper E will have to be removed. The MegaVideo55 ensures that picture quality is maintained.
Connecting a number of appliances
If you want to simultaneously connect several appliances to the modulator there are a number of ways to do this:
Using a suitable A/V switcher
All of your appliances are connected to the AV switcher. This option gives the best quality. A good AV switcher (such as the Marmitek Flat TV Link 4, art. no. 09592) takes care of the correct modification of the signal.
Using a trio RCA splitter
(1x RCA to 2x RCA adaptors). In this case jumper E should be removed. The MegaVideo55 optimises picture quality.
4. CONNECTING THE AERIAL SIGNAL TO THE MEGAVIDEO55 MODULATOR
Two types of aerial plug are used in Europe: the IEC plug and the F plug. The latter has the least loss and is therefore often used in better quality systems. Your Marmitek MegaVideo55 uses this type of plug. Check your situation below:
You are using F plugs
Connect the aerial cable coming from you aerial source to the input marked 'RF ANT IN'. Then connect the aerial cable leading to the rest of your aerial network to the output marked RF ANT OUT'.
You are using IEC plugs
Adaptors are supplied in case you are using IEC plugs. Then follow the same procedure as described above.
Your connecting cables have not yet been fitted with plugs
In this case ensure that the plugs are correctly fitted to the coax cable. Use high frequency screened plugs to avoid external radiation and interference. Only use broadband amplifiers and splitters with a range from 5 - 1000 MHz.
NOTE: If you want to use the infrared return channel for your remote control (see chapter 6) then the aerial wall outlets, amplifiers and splitters that are included IN the cabling between your bedroom and living room should be "return channel" compatible (5 - 30 MHz).
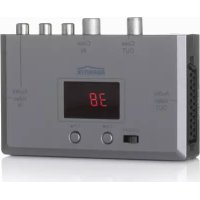
5. SETTING THE CHANNEL
The audio/video signal that has been added (e.g. from a DVD player) is converted into a normal TV channel.
Using the MegaVideo55 you can, in principle, choose any free channel. It is important to select a free channel that is not already being used for an existing TV channel. The channels that are free depend on the incoming aerial signal. For details consult the channel table supplied by your cable company or, if you have your own aerial, the channel summary in your TV magazine.
-
Connect one of the two power adapters to the modulator and plug it into the mains.
-
Check your channel table and find two free channels that are adjacent. Now select the higher of these two channels. Example: if channels 37 and 38 are free then select channel 38. If three adjacent channels are free select the middle channel.
-
Set your selected channel using the dip switches on the front of the modulator.
The white dip switches can be set in two positions: ON (= 1, switch up) and OFF (= 0, switch down). The combination of switches determines the channel setting. It is easier to do this using a small screwdriver or a ballpoint pen.
You can find the correct dip switch positions for the channel you have selected in the table at the end of this manual. For instance, channel 38 would be 01100100. The 2nd, 3rd and 6th dip switches are ON (up) and the remaining dip switches are OFF (down).
NOTE:
- The leftmost 7 switches (1 to 7 incl.) are for setting the channel.
- The 8th switch is used to turn the test picture on or off (up is on). That is why this switch is normally shown in the 0 position in the attached list.
- Use the 9th switch to choose between a high (ON setting = 82dB V ) and a low (OFF setting = 72dB V ) output power. If you see interference (white noise) on the screen of the MegaVideo55, please set this switch to a different setting. NB: if the output power is too high, this can also cause interference!
- After you have set the channel you can turn on a test pattern using the 8th dip switch. To do this set the dip switch to ON (= 1) . This pattern consists of a number of black and white bars on the screen.
- Turn on the TV and find the channel that you have set. Your TV's operating instructions will tell you how to do this. You will now see the test pattern on the set channel. Now check that there is no interference on the neighbouring TV channels. If there is, you should select another two (or if possible) three free channels and set the modulator to these channels.
After you have done this set the 8th dip switch (test pattern) back to OFF. From now on you will be able to watch the attached AV appliance on the channel that you have set.
- Now turn on the required AV appliance (DVD, video recorder, satellite receiver, PC, camera, etc.). You can now view the signal on the TV. If you have a number of TVs connected to the same aerial network then you can also view this signal on the other TVs. To do so you will first have to set the correct channel on each TV.
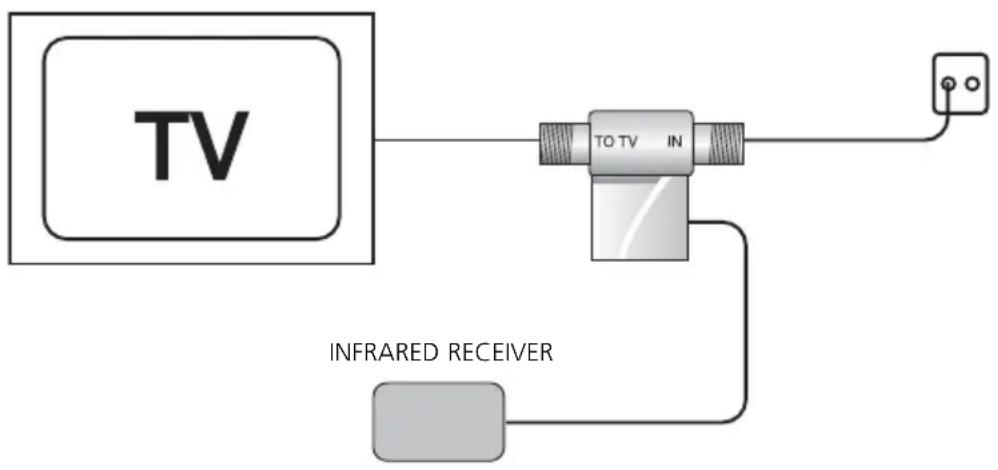
6. SETTING THE INFRARED RETURN CHANNEL FOR USING REMOTE CONTROL
An infrared receiver is supplied with the set. This receiver can be fitted between the TV and the aerial signal. The receiver converts the infrared signal from your remote control and sends this signal back to the modulator through the aerial cable. Works with almost all brands and models of remote controls (except B&O).
Using the supplied infrared eye you can convert this back to an infrared signal and send it to the connected appliance. In this way you can operate the connected appliance (e.g. a DVD player) from another room. It is easier to connect this if someone helps you.
-
Disconnect the aerial cable connected to the back of your TV. Connect this to the 'ANT IN' / 'In' connection on the metal part of your infrared receiver.
-
Reconnect the 'TV OUT' / 'To TV' side to your TV. You can use the supplied adaptors for this (F connector to IEC).
-
Position the red plastic part containing the infrared receiver where it can be seen from where you want to use your remote control. Avoid direct sunlight or light from a plasma screen.
- Connect one of the two supplied transformers to the metal part of the IR receiver.
- Turn the switch on the side of the red plastic part to the ON position.
- Connect the supplied IR extender cable to the side of the modulator, where it is marked 'IR OUT'. The IR LED has a self-adhesive backing. Remove the protective sheet and stick the IR LED carefully over the IR sensor on your video recorder, DVD player or satellite receiver. This IR sensor can usually be recognised by the dark coloured plastic window.
- Point your own remote control at the infrared receiver and press a button, for instance one used to change the channel or select a different function. If all is well the attached appliance will now react. If not, then move the IR LED and try again. The location in which the IR LED responds can sometimes be very small. As soon as the function works correctly you can firmly attach the eye to the appliance. This will not damage your appliance.
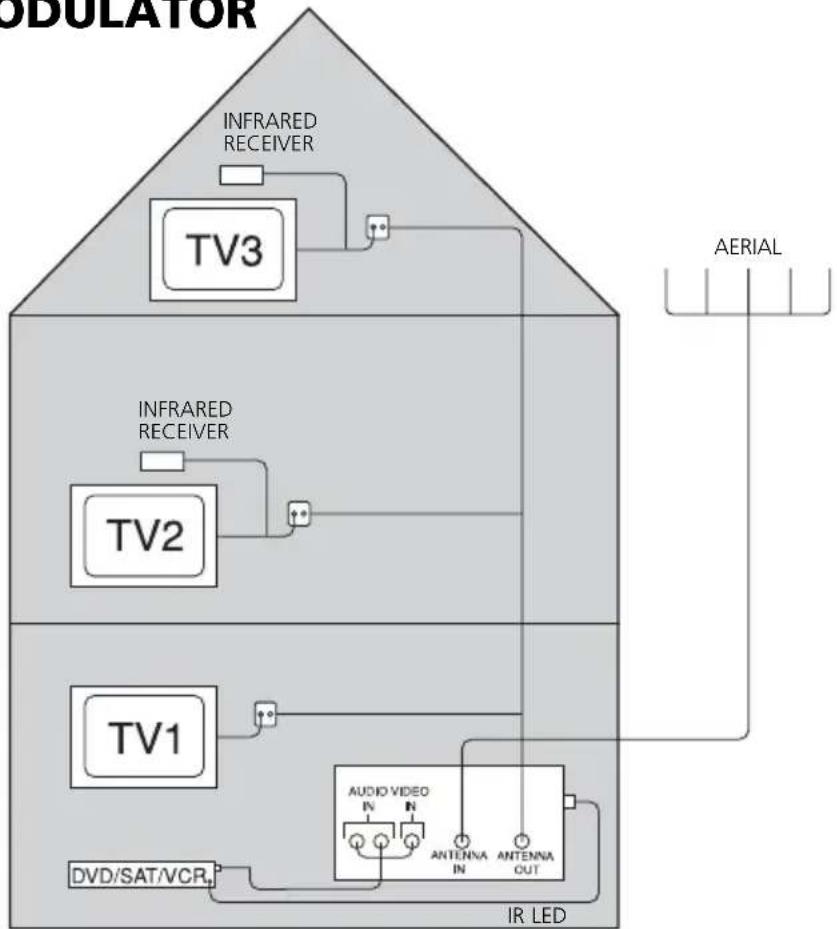
7. USING INFRARED RECEIVERS IN DIFFERENT ROOMS
If you want to operate your appliance from a number of TVs you can purchase extra infrared receivers (art. no. 09586).
NOTE: If you have more than one receiver ensure that only one of these receivers is switched on at any time (one receiver switched 'ON' and the other receivers switched 'OFF'). If you fail to do this your infrared commands will not be transmitted correctly.
Operating more than one appliance
If you want to operate more than one appliance by means of infrared you can purchase the IR Eye (art. no. 09682). This model has 2 IR LED's for, for instance, DVD and satellite receiver.
8. FREQUENTLY ASKED QUESTIONS
No picture, no sound.
a. Check that all cables are correctly connected.
b. Check that the channel has been set correctly.
c. Check that the test pattern is received correctly.
The image on the MegaVideo55 is suffering from interference, while all the other TV stations are shown normally.
a. Use the 9th switch to choose between a high (ON setting = 82dB V ) and a low (OFF setting = 72dB V ) output power. If you see interference (white noise) on the screen of the MegaVideo55, please set this switch to a different setting. NB: if the output power is too high, this can also cause interference!
b. One of the TV channels is too close to the channel used by the MegaVideo55. Choose a different channel for the MegaVideo55 (preferably the middle of three or if possible the middle of five free channels).
I cannot find the image of the MegaVideo55 on my set.
Switch off the MegaVideo55 test picture and connect e.g. a DVD player. Now search for the image of your DVD instead of the test picture.
The picture is far too bright.
Check that the jumper switch has been correctly connected.
The picture is far too dark.
Check that the jumper switch has been correctly disconnected.
Interference with other channels.
Select a different channel, preferably the middle channel of 3 empty channels in the band.
Sound is distorted.
Turn down the volume on the connected appliance.
Infrared does not work.
a. Check that the IR LED is in the correct position on the sensor.
b. Check that the metal part of the infrared receiver is correctly connected.
c. Check that the aerial wall outlets, aerial amplifiers and splitters that are fitted IN the cabling between your bedroom and living room are "return channel" compatible (5 - 30 MHz).
Do you still have questions? Please check out www.marmitek.com for more information.
9. TECHNICAL DATA
Stereo RF Modulator:
Power: 230VAC/50Hz, DC 9V/300mA
Standard: PAL B/G
Modulation frequency range: UHF:470~862MHz Channel 21-69
Input: Video, Audio L+R
Selectable output level: 82dB V / 72dB V in 75 Ohm
Coupling loss: < 1.5dB at 860Mhz
Carrier wave Audio: 5.5 - 5.742MHz
Modulation method: Double sideband modulation
Dimensions: 85.8 × 68.4 × 21.3 mm
IR Receiver:
Power: 230VAC/50Hz, DC 9V/300mA
Centre frequency: 27.045MHz
Infrared: ≤40KHz
Coupling loss: < 3 dB at 860Mhz
Dimensions: 44x47x18mm

Environmental Information for Customers in the European Union
European Directive 2002/96/EC requires that the equipment bearing this symbol on the product and/or its packaging must not be disposed of with unsorted municipal waste. The symbol indicates that this product should be disposed of separately from regular household waste streams. It is your responsibility to dispose of this and other electric and electronic equipment via designated collection facilities appointed by the government or local authorities. Correct disposal and recycling will help prevent potential negative
consequences to the environment and human health. For more detailed information about the disposal of your old equipment, please contact your local authorities, waste disposal service, or the shop where you purchased the product.
SICHERHEITSHINWEISE
Dimensions: 85,8x68,4x21,3mm
Dimensions: 44x47x18mm

VEILIGHEIDSWAARSCHUWINGEN
Channel Frequency (MHz) switch settings
21 471.25 10101000
22 479.25 01101000
23 487.25 11101000
24 495.25 00011000
25 503.25 10011000
26 511.25 01011000
27 519.25 11011000
28 527.25 00111000
29 535.25 10111000
30 543.25 01111000
31 551.25 1111000
32 559.25 00000100
33 567.25 10000100
34 575.25 01000100
35 583.25 11000100
36 591.25 00100100
37 599.25 10100100
38 607.25 01100100
39 615.25 11100100
40 623.25 00010100
41 631.25 10010100
42 639.25 01010100
43 647.25 11010100
44 655.25 00110100
45 663.25 10110100
46 671.25 01110100
47 679.25 11110100
48 687.25 00001100
49 695.25 10001100
50 703.25 01001100
51 711.25 11001100
52 719.25 00101100
53 727.25 10101100
54 735.25 01101100
55 743.25 11101100
56 751.25 00011100
57 759.25 10011100
58 767.25 01011100
59 775.25 11011100
60 783.25 00111100
61 791.25 10111100
62 799.25 01111100
63 807.25 11111100
64 815.25 00000010
65 823.25 10000010
66 831.25 01000010
67 839.25 11000010
68 847.25 00100010
69 855.25 10100010
DECLARATION OF CONFORMITY
Hereby, Marmitek BV, declares that this MegaVideo55 is in compliance with the essential requirements and other relevant provisions of the following Directives:
Council Directive 89/336/EEC of 3 May 1989 on the approximation of the laws of the Member States relating to electromagnetic compatibility
Council Directive 73/23/EEC of 19 February 1973 on the harmonization of the laws of Member States relating to electrical equipment designed for use within certain voltage limits
Marmitek is a trademark of Marmidenko BV I MegaVideo55 is a trademark of Marmitek BV. All rights reserved.
Copyright and all other proprietary rights in the content (including but not limited to model numbers, software, audio, video, text and photographs) rests with Marmitek B.V. Any use of the Content, but without limitation, distribution, reproduction, modification, display or transmission without the prior written consent of Marmitek is strictly prohibited. All copyright and other proprietary notices shall be retained on all reproductions.