RC 40 - Alarm clock radio HAMA - Free user manual and instructions
Find the device manual for free RC 40 HAMA in PDF.
Download the instructions for your Alarm clock radio in PDF format for free! Find your manual RC 40 - HAMA and take your electronic device back in hand. On this page are published all the documents necessary for the use of your device. RC 40 by HAMA.
USER MANUAL RC 40 HAMA
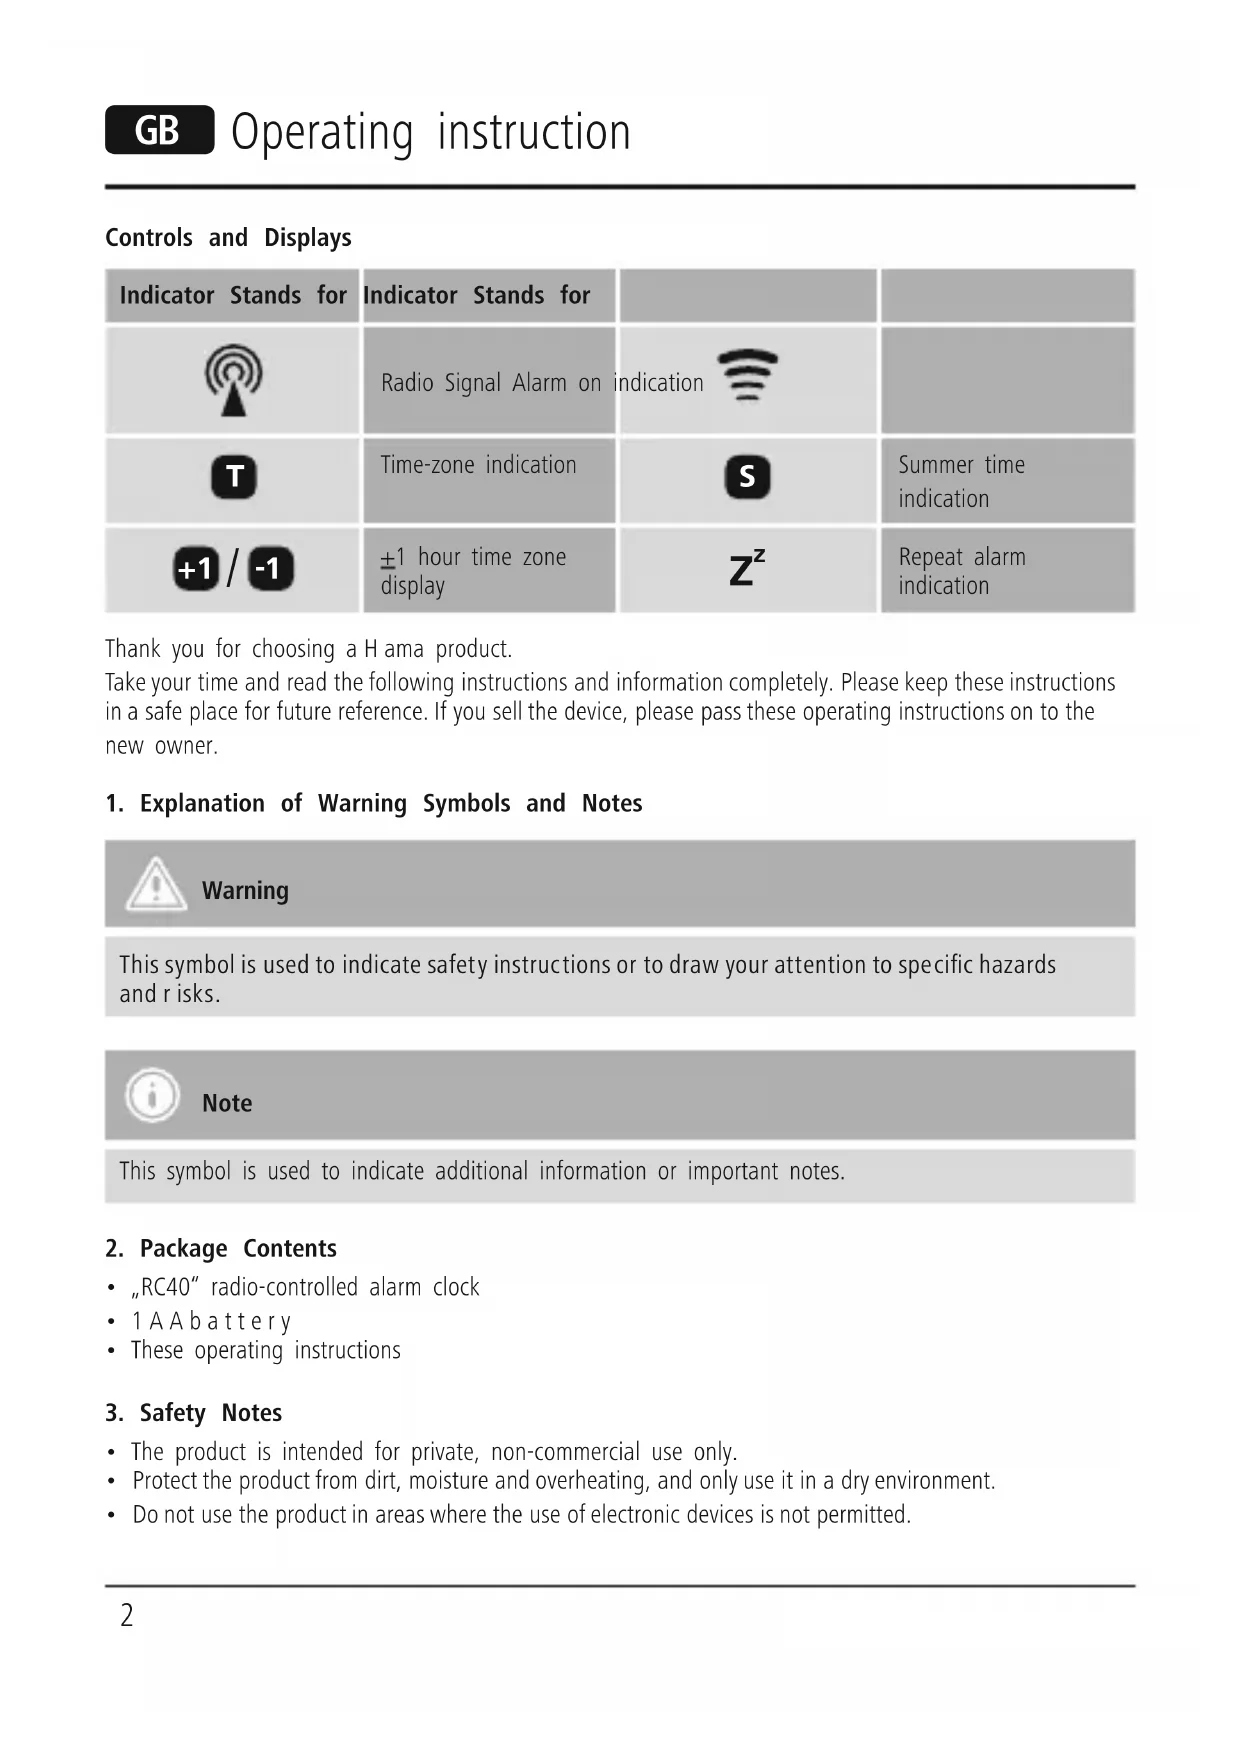
Repeat alarmindicationThank you for choosing aHama product. Take your time and read the following instructions and information completely.Please keep these instructions in asafe place for futurereference. If you sell the device, please pass these operating instructions on to the new owner.1. Explanation of Warning Symbols and NotesWarning This symbol is used to indicatesafetyinstructions or to drawyourattentiontospecic hazards andrisks. Note This symbol is used to indicate additional information or important notes.2. Package Contents• „RC40“ radio-controlled alarm clock• 1AAbattery• These operating instructions3. Safety Notes• The product is intended for private, non-commercial use only.
- Protect the product from dirt, moistureand overheating, and only use it in adry environment.
- Do not use the product in areas wherethe use of electronic devices is not permitted. G Operating instruction3
- Do not place the product near interference elds, metal frames, computers, TVs, etc. Electronic devices and window frames can negatively affect the product’sfunctionality.
- Do not drop the product and do not expose it to any major shocks.
- Do not attempt to service or repair the product yourself.Leave any and all service work to qualied experts.
- Do not modify the product in any way.Doing so voids the warranty.
- Keep the packaging material out of the reach of children due to the risk of suffocation.
- Dispose of packaging material immediately according to locally applicable regulations. Warning –Batteries
- Immediately remove and dispose of dead batteries from the product.
- Only use batteries (or rechargeable batteries) that match the specied type.
- When inserting batteries, note the correct polarity (+ and -markings) and insert the batteries accordingly.Failure to do so could result in the batteries leaking or exploding.
- Do not overcharge batteries.
- Keep batteries out of the reach of children.
- Do not short circuit the batteries/rechargeable batteries and keep them away from uncoated metal objects.
Open the battery compartment, remove the contact breaker and then close the battery compartment.
- After the contact breaker is removed, the display is switched on and an acoustic signal sounds for 2 seconds. The clock automatically searches for the radio signal. This process can take 3to5minutes.
- When the radio signal is received, the date and time areautomatically set and the radio-controlled clock icon is displayed. The clock automatically receives the time code every hour.
- If the clock is unable to receive atime signal wirelessly,the time/temperatureare displayed and the icon is not visible. In this case, you can set the time manually. 5.2. Setting the time manually Press and hold MODE for 2seconds in the time and calendar display to set the system date and time.
- Press the MODE button again: The digits of the year ash. Youcan set the year with the + and – buttons.
- Press the MODE button again: The digits of the month ash. Youcan set the month with the + and – buttons.
- Press the MODE button again: The digits of the date ash. Youcan set the date with the + and – buttons.4
- Press the MODE button: The hour digits ash. Youcan set the hours with the + and – buttons.
- Press the MODE button again: The minute digits ash. Youcan set the minutes with the + and – buttons.
- Press the MODE button one moretime: The normal time display appears. Note If you do not press any buttons for 30 seconds, the clock exits the manual time setting mode. The time/ temperaturedisplay appears again and the information has not been updated. 5.3. 12/24-hour display format Press the + button to switch between the 12 and 24-hour formats. In the 12-hour format, AM or PM appears beforethe time. 5.4. Selecting the display for the alarm and calendar
- If you press the MODE button, the time for the alarm is displayed.
- If you press the Calendar button, the date is displayed. 5.5. Setting the alarm time Setting the alarm
- In the alarm (AL) display,press and hold the MODE button for approx. 3seconds. The hour digits ash. Youcan set the hours with the + and – buttons.
- Press the MODE button again. The minute digits ash. Youcan set the minutes with the + and – buttons.
- Press the MODE button again. The alarm time is set and the icon is displayed. Activate alarm
- Press the ALARM On/Off button to activate/deactivate the alarm function. Alarm and SNOOZE function
- When the alarm goes off,the corresponding alarm symbol ashes.
- Press the ALARM On/Off button to switch off the alarm.
- If you press the SNOOZE/LIGHT (1) button, the alarm stops and the backlighting comes on for 5seconds. The display for repeating the alarm (Z
)ashes. After 4minutes, the alarm goes off again.
- If the alarm is not switched off,itstops automatically after 10 minutes.5 5.6. Setting the time zone
- Press and hold the + button (3) for 3seconds. The
- In the time zone and temperaturedisplay,press and hold the MODE button (5) for 3seconds. Youcan set the time zone (hours only) by pressing the + or – button (3).
- Press the MODE button (5) again to conrm the time zone setting.
- Press and hold the + button (3) for 3seconds to switch between the displays of local and foreign times. 5.7. Adjusting the time zone Setting range: only +/– 1hr. Press and hold + or – for about 2seconds to quickly change the time zone by +/– 1hour.This range covers all current European countries (CET +/–1). If the time zone is adjusted, the time zone icon and/or
will be displayed. 5.8. Light on/off When you press the SNOOZE/LIGHT (1) button, the backlighting is switched on and then switched off again automatically after 5seconds.
6. Care and Maintenance
Only clean this product with aslightly damp, lint-free cloth and do not use aggressive cleaning agents. Make surethat water does not get into the product.
7. Warranty Disclaimer
Hama GmbH &CoKG assumes no liability and provides no warranty for damage resulting from improper installation/mounting, improper use of the product or from failuretoobserve the operating instructions and/ or safety notes.
8. Service and Support
Please contact Hama Product Consulting if you have any questions about this product. Hotline: +49 9091 502-115 (German/English) Further support information can be found here: www.hama.com
10. Note on environmental protection:
After the implementation of the European Directive 2012/19/EU and 2006/66/EU in the national legal system, the following applies: Electric and electronic devices as well as batteries must not be disposed of with household waste. Consumers areobliged by law to return electrical and electronic devices as well as batteries at the end of their service lives to the public collecting points set up for this purpose or point of sale. Details to this aredened by the national law of the respective country.This symbol on the product, the instruction manual or the package indicates that aproduct is subject to these regulations. By recycling, reusing the materials or other forms of utilising old devices/ Batteries, you aremaking an important contribution to protecting our environment.