BOP7303AX - Oven GORENJE - Free user manual and instructions
Find the device manual for free BOP7303AX GORENJE in PDF.
| Product Type | Built-in Oven |
| Brand | Gorenje |
| Model | BOP7303AX |
| Dimensions (W x D x H) | 598 x 565.5 x 600.3 mm |
| Volume | 61 liters |
| Power Supply | 220-240 V, 50/60 Hz, 2.9-3.4 kW |
| Number of Functions | 8 (conventional, fan-assisted, grill, ventilated grill, pizza, defrost, preheat, pyrolysis) |
| Cleaning Type | Pyrolytic (up to 465 °C) |
| Maximum Temperature | 465 °C (pyrolysis) |
| Control Type | Electronic with timer |
| Display | Digital Display |
| Safety | Control lock (child lock), door lock during pyrolysis |
| Supplied Accessories | Wire rack, drip tray, rotisserie |
| Installation Type | Built-in (600 mm wide niche) |
| Weight | Approximately 35 kg (estimate) |
| Energy Class | A (estimate) |
| Color | Stainless steel |
Frequently Asked Questions - BOP7303AX GORENJE
User questions about BOP7303AX GORENJE
0 question about this device. Answer the ones you know or ask your own.
Ask a new question about this device
Download the instructions for your Oven in PDF format for free! Find your manual BOP7303AX - GORENJE and take your electronic device back in hand. On this page are published all the documents necessary for the use of your device. BOP7303AX by GORENJE.
USER MANUAL BOP7303AX GORENJE
natural_image
Black oven with control panel and digital display (no visible text or symbols)
natural_image
Front view of a stainless steel oven with control knobs and a digital display (no visible text or symbols)
natural_image
Exterior view of a modern kitchen oven with digital display and control knobs (no visible text or symbols)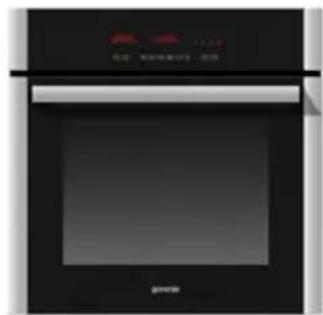
natural_image
Exterior view of a modern kitchen oven with black casing and digital display (no visible text or symbols)The symbol on the product or on its packaging indicates that this product may not be treated as household waste. Instead it shall be handed over to the applicable collection point for the recycling of electrical and electronic equipment. By ensuring this product is disposed of correctly, you will help prevent potential negative consequences for the environment and human health, which could otherwise be caused by inappropriate waste handling of this product. For more detailed information about recycling of this product, please contact your local city office, your household waste disposal service or the shop where you purchased the product.
DE
natural_image
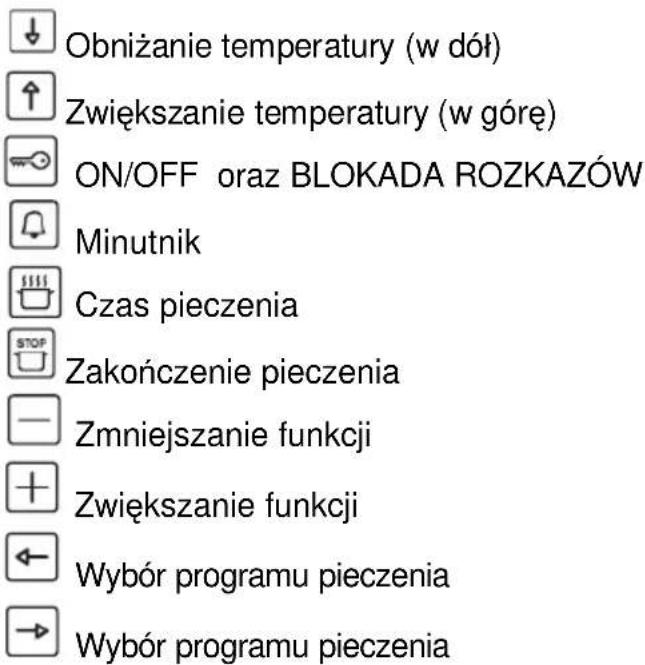
Pure graphical icons and symbols without any text or labelsTIPKE FUNKCIJE

Znižanje temperature

Zvišanje temperature

ON/OFF in BLOKADA UKAZOV

Minutni števec

Trajanje pečenja

Zaključek pečenja

Znižanje funkcije

Zvišanje funkcije

Izbor programa pečenja

Izbor programa pečenja
DELOVANJE
natural_image
Technical line drawing of an open oven or rack unit with internal compartments and ventilation ducts (no text or symbols)Menjava žarnice
natural_image
Close-up of a mechanical component with labeled points A and B, showing internal structure and alignment (no readable text or symbols)natural_image
Diagram showing a mechanical assembly with a red vertical component and a blue diagonal section, both before and after transformation (no text or symbols)text_image
Technical diagram showing a mechanical assembly with labeled components 1, 2, and 3, including red structural elements and a diagonal guide.| Razpredelnica za peko v pečici | ||||
| Vrsta hrane Temp. °C | Položaj police (*) | Čas peke (minute) | Način delovanja | |
| Testo | ||||
| Štručke | 180 | 2 | 55-65 | |
| Sadni kolač | 200 | 1 | 30-40 | |
| Skutina torta 180 2 35-40 | ||||
| Vzhajano testo v modelu | 200 | 1 | 25-35 | |
| Rahlo testo z jajci 190 2 20-30 | ||||
| Rahlo testo brez jajc 200 2 15-25 | ||||
| Biskvitno testo | 190 | 3 | 15-20 | |
| Lazanja | 225 | 2 | 40-50 | |
| Meso | ||||
| File govedine | 225 | 2-3 | 50-80 | |
| Goveja pečenka | 225 | 2-3 | 50-80 | |
| Telečja pečenka | 225 | 2-3 | 60-80 | |
| Svinjska pečenka | 170-180 | 2 | 45-60 | |
| Pečeno ovčje meso | 225 | 2 | 45-55 | |
| Pečena govedina | 225 | 2-3 | 50-60 | |
| Pečen zajec | 200 | 2 | 60-90 | |
| Pečen puran | 180 | 2 | pribl. 240 | |
| Pečena gos | 200 | 2 | 150-210 | |
| Pečena raca | 200 | 2 | 120-180 | |
| Pečen piščanec | 200 | 2 | 60-90 | |
| Srnino stegno | 200 | 2-3 | 90-150 | |
| Jelenovo stegno | 180 | 2-3 | 90-180 | |
| Ribe | 180 | 2-3 | 10-40 | |
| Zelenjava | ||||
| Dušena zelenjava | 170-190 | 2-3 | 40-50 | |
| Pizza | 240 | 1 | 15-25 | |
| Peka pod žarom | ||||
| Zrezki (kotleti) | 4 | 8-12 | ||
| Svinjska klobasa | 4 | 10-13 | ||
| Piščanec na žaru | 3 | 25-35 | ||
| Piščanec na nabodalu | 50-65 | |||
| Teletina na nabodalu | 50-65 | |||
Installation Instruction
Warning and safety instructions
Before using the oven for the first time, read these operating instructions carefully for full information on the safe installation, use and care of your new appliance.
This unit must be correctly installed in accordance with the manufacturer's instructions by a suitably qualified person.
The manufacturers decline responsibility for damage to persons or items due to poor or incorrect installation of this appliance.
Make sure that the voltage and frequency of the mains supply correspond to the details on the rating plate which can be found on the lower part of the front of the oven.
Warning: this appliance must be earthed.
Our company declines any liability for failures in the earth connection or for earth connection that is not in compliance with the regulations in force.
Maintenance and servicing work must only be carried out after the power supply has been disconnected by switching off at the wall socket or removing the mains fuse.
Due to our policy of continuous innovation, we reserve the right to adjust or modify our product without prior notification.
This appliance is not intended for use by persons (including children) with reduced physical, sensory or mental capabilities, or lack of experience and knowledge, unless they have been given supervision or instruction concerning use of the appliance by a person responsible for their safety.
Children should be supervised to ensure that they do not play with the appliance.
Where an oven is built-under with a drawer beneath, this must be made non functioning with a 'dummy' front.
On no account should flammable materials be stored in a drawer beneath a built-under oven as there is a risk of fire.
Do not place heavy objects on the open door or sit on it as this could cause damage to the hinging. When cooking with oil or fat, do not leave the oven unattended as there is a risk of fire.
To avoid damage to the interior enamel, do not place the oven pan or baking trays on the bottom of the oven and do not line the base of the oven with aluminium cooking foil.
During cooking, food natural produces steam which is vented away to prevent an excessive build-up within the oven. As this steam can condense to water droplets on the cool outer trim of the oven, it may be necessary during cooking to wipe away any moisture with a soft cloth.
This will also help to prevent soiling and discoloration of the oven exterior by cooking vapours.
Before using for the first time
Switch off the oven at the wall socket or remove the mains fuse before cleaning. Remove any packaging and the oven accessories from the oven. Wipe the oven interior using hot water and a mild detergent. Rinse carefully using a damp cloth. Wash the oven shelves and accessories in a dishwasher or using hot water and a mild detergent, and dry thoroughly.
Technical details
This appliance conforms to the standard 73/23 CEE and 93/68 CEE EMC 89/336 CEE.
Voltage regulations
220-240 V phase + neutral.
Built-in oven dimension (mm):
Length : 598
Depth : 565,5
Height : 600,3
Volume : 61 Lt
Built-in installation
IMPORTANT: The unit must be correctly installed in accordance with the manufacturer's instructions and by qualified person. Maintenance and service must be carried out after the power supply has been disconnected.
ELECTRICAL CONNECTION: Before connecting the appliance to the mains, ensure that:
- The voltage corresponds to the voltage specified on the rating plate at the bottom of the surround.
- The overload cut-off device and the domestic system can withstand the load of the appliance (see rating plate).
- The power supply system is provided with an efficient earth connection and that the socket or omnipolar switch, with minimum contact opening of 3mm, is easily accessible once the appliance has been installed.
- If the plug is not easily accessible, the installation personnel must provide an omnipolar switch with contact opening distance equal to or greater than 3mm.
If further mains cable is needed, it must be with a minimum section of 1,5 mm - type H05RR-F. Sufficient cable must be left for easy maintenance of the appliance.
Warning: this appliance must be earthed.
Our company declines any liability for failures in the earth connection that is not in compliance with the regulation in force.
This appliance is designed for building-in to a standard 600mm wide oven housing. The housing, adjacent furniture and all materials used in installation must be able to withstand a minimum temperature of 85^ C plus ambient temperature during periods of operation.
In addition, adjacent furniture cabinet doors must be at least 4mm from the appliance at all points.
Certain types of vinyl or laminate kitchen furniture cabinetry are particularly prone to heat damage and discoloration, any delimitation or discoloration of materials which occurs below 85^ C plus ambient temperature or where materials are less than 4mm from the appliance will be the liability of the owner. For building-under a worktop, the installation dimensions are as follows.
Attention: when the qualified person install the oven near other electrical appliances, the power cable mustn't be near or contact with side heat oven.
BOP 8826 AX

natural_image
Pure electrical circuit lines without any symbolsFUNCTION BUTTONS

Decreases temperature

Increases temperature

ON/OFF and Controls Lock Function

Minute minder

Cooking time

End time

Time setting

Time setting

Program setting

Program setting
OPERATION
The timer flashes on the display when switched on for the first time or after a power cut. The oven cannot be operated; follow the "Setting the time" procedure to start it.
SETTING THE TIME
Press buttons

and simultaneously and then release them.
Use buttons

and to set the exact time.
Note: this operation must be completed in 3 sec. time, while the 2 dots on the timer display keep flashing. Once you have completed the time setting, wait for the 2 dots stop flashing.
SOUND SIGNAL
The oven performs sound signals to show different functions, as for example the end of cooking. There are 3 different sound levels, which can be modified:
When the oven is switched off, press the key, and with each pressure the oven performs the sound to a different level; the last one performed will be automatically set.
SWITCHING ON THE OVEN
Press and release the

key, then you will hear a sound signal.
The timer display will show ON, the bulb symbol lights on and the internal oven light turns on. Now you can proceed to set a cooking function.
MINUTE MINDER
The minute minder is only a counter of time and it is totally independent from any cooking function. It can be useful, for example, when set to remember to stop a cooking operation. It can be used also when the oven is switched off.
To set the minute minder, switch on the oven by pressing and releasing the

key, then press the 🔔 key;
the display reset to zero and the 2 dots start flashing for 3 seconds. Now you can
set the desired time by using the - and + keys, up to 23h59m.
Once the set time has elapsed, you will hear a sound signal and the symbol flashes.
To stop the sound and the flashing symbol just press one of the following keys:


MANUAL OPERATION FOR AN INDEFINITE PERIOD OF TIME
Switch on the oven and select an available cooking function using the keys and :
The oven will suggest a preset temperature, which can be changed by using the keys ↓ and ↑. The oven will start working up to the preset temperature and the centigrade degree starts blinking, which means the preheating of the oven.
When the requested temperature is reached this symbol stops blinking and the oven beeps.
To switch off the oven, just press and release the key.
It is recommended to set the duration of cooking
Switch on the oven by pressing and releasing the 📄, then press and release the

. On the timer display the symbol A appears. Set the desired time of cooking with the keys and up to 10h and 00m.
Then you will hear a sound signal and the timer will show the current hour: you can select an available cooking function with the keys ← and →
On the timer display the symbol appears.
The oven suggests a preset temperature for each function, which can be changed
with the keys ↓ and ↑ The oven starts working for the set time; when this time has elapsed the oven automatically stops cooking. You will hear a sound signal, while the temperature display and the cooking function display turn off, the
timer display shows the current hour and the symbols and A blink.
To stop the sound and exit to the program, just press one of the following keys

Now the oven is ready to be programmed again; you can select a new cooking function or switch the oven off by pressing and releasing the key ☑.
It is recommended to set the end of cooking time
Switch on the oven by pressing and releasing the the

On the timer display the symbol A appears. Set the desired end of cooking time with the keys - and up to 23h and 59m.
Then you will hear a sound signal and the timer will show the current hour: you can select an available cooking function with the keys ← and →

On the timer display the symbol appears.
The oven suggests a preset temperature for each function, which can be changed by using the keys ↓ and ↑
The oven starts cooking and when fixed time has elapsed, it will automatically turn off.
At the end of the fixed cooking time, the oven beeps, the temperature display and the cooking function display turn off, the timer display shows the current hour and
the 2 symbols and A blink.
To stop the oven beep or to cancel the program just push one of the following keys:


The symbol 📌 appears on the function display and then the oven light turns on. Now the oven is ready to be programmed again; you can select a new cooking function or switch the oven off by pressing and releasing the 📌.
AUTOMATIC OPERATION
It is recommended to set the duration and the end of cooking
Switch on the oven by pressing and releasing the 🔊, then press and release the and set the duration of cooking with the - and + keys.
Then you will hear a sound signal and the timer will show the current hour. Press
the and set the end of cooking with the - and key.
Another sound signal will be heard and the 2 dots stop blinking: this means the time has been set.
On the display you will see the set time, the temperature and function. The oven light turns off. Now select an available cooking function with the < and > keys.
The oven suggests a preset temperature for each function, which can be changed
by using the keys ↓ and ↑
Once the 2 dots have stopped blinking, the oven begins the delayed start mode: it will automatically start for the requested duration and stop at the requested time.
When the oven is cooking, you see the selected temperature, the current hour and the selected function on the corresponding displays. The internal oven light turns off.
However, both the temperature and the function can be changed by repeating the above mentioned instructions.
At the end of the program, the oven beeps, the temperature display and the cooking function display turn off, the timer display shows the current hour and the 2 symbols

and A blink.
To stop the soud signal or to cancel the program just push one of the following keys


The symbol 🙏️ appears on the function display and then the oven light turns on. Now the oven is ready to be programmed again; you can select a new cooking function or switch the oven off by pressing and releasing the key ON/OFF.
AUTOMATIC AND SEMIAUTOMATIC COOKING RESTRICTIONS
The preheating (PRH) and defrosting functions are not compatible with the above mentioned automatic and semiautomatic operation.
-After setting the preheating or the defrosting function, it is not possible to set either the duration or the end of cooking.
-When programming the oven with the automatic operation, you cannot choose the preheating or the defrosting function.
DISPLAY SYMBOLS

Pot: when it lights up, it shows that a cooking function is on.
The pot does not light up when the oven light, preheating or defrosting function is activated.
When the pot is flashing, it shows the end of a cooking time. During the delayed start phase, the symbol is off and lights up when the oven starts cooking.
A (automatic): when it lights up, it shows that a cooking time has been set; when flashing, it means the end of a cooking program.

Bell: when it lights up, it means that the minute minder is on.
When flashing, it means the end of the minute count.
SELECTING THE COOKING TEMPERATURE
With the oven switched on, the cooking temperature can be selected by using the ↓
and ↑ keys : the temperatures increases between the low and high setting with 5 degrees increases, which are shown on the temperature display.
Note: each cooking function has a preset temperature, which can be changed as described above.
SELECTING THE COOKING FUNCTION
With the oven switched on, the cooking functions can be selected by using the and → keys: the cooking function icons sequentially light up.
COOKING FUNCTIONS

OVEN LIGHT

The internal oven light turns on by pressing and releasing the press and release again the same key.
key. To turn it off
When selecting a cooking function, the oven light turns on, and once the selected temperature is achieved, the light remains on for another 3 minutes.
During a cooking operation or defrosting it is possible to turn on the oven light by pressing one of the following keys. The light remains on for 1 minute.
The light can also be turned on when the Controls Lock function is active by pressing
one of the following keys

PW
PREHEATING
This function allows to preheat faster the oven, before choosing a cooking function. When this function is operating, a moving symbol appears on the temperature display. The preheating ends when its preset temperature is achieved by the oven; this temperature cannot be changed. At this point, the oven beeps, the light symbol and the oven light turn on. Now you can choose an available cooking function with the and → keys.


TRADITIONAL COOKING
This provides traditional cooking with heat from the top and bottom elements.

LOWER ELEMENT MODE
This is for slow cooking or for warming up meals.

GRILL HEATING ELEMENT WITH TURNSPIT
It is suggested for grilling food.

GRILL HEATING ELEMENT WITH FAN AND TURNSPIT
This function is suggested for a gently grilling of food.

PIZZA FUNCTION
This kind of cooking is ideal for pizza and vegetable dishes.

FAN OVEN MODE
This provides even heating with the fan and allows different dishes to be cooked at the same time on different levels.

DEFROST MODE
This function allows to reduce the defrost time for frozen food. The fan runs without any heating of the oven. On the temperature display appears the message dEF, which means this function is active.

PIROLITIC CLEANING
Switch on the oven and select the self-cleaning function.
On the temperature display you will see the message "PIRO", while on the function display you see a self-cleaning set time of 1h 30m.
The 2 dots between 1 and 30 blink for a 4 secs. time, which means you can set your favorite self-cleaning time or the ending time of that operation.
To do that, follow the previous instructions concerning the programming of cooking. The maximum time which can be set is of 3 hours, the minimum is of 30 minutes; to
set the time press the key, then use the + and - keys.
Once the time is set, the symbol A enlights on the time display, which means an automatic operation is on.
The door is locked and the Controls Lock Function is on, as you can see by the key symbol on the display. During the self-cleaning function it is possible to see the remaining time, but you cannot neither change the remaining time nor change the ending time. The oven light remains off during this operation.
This function allows to clean the oven by increasing the temperature up to 465^ C.
The ashes which can result at the end of the operation can be removed with a soft cloth, once the oven has cooled down.
Warning:
All the accessories and all the considerable food residuals must be removed from the oven inside before proceeding with the self-cleaning operation.
OTHER FUNCTIONS
OVEN OFF MODE
When the oven is switched off, the temperature and program displays are off and the timer shows the current hour.
"CHILDREN CARE" – CONTROLS LOCK FUNCTION
This function can be activated in any moment to prevent children to play with the oven. In particular, if this function is activated with the oven turned off, it will not be possible to switch the oven on: to operate with the oven it is necessary to remove the lock.
To activate the locking function, hold down the key until the display shows the symbol of the key (about 5 sec.) followed by ON, then the display shows again the current hour.
Note: once you have done this operation, it cannot be set any program or cooking function, except for the setting of the minute minder. If the lock is activated after any program or cooking function, it will only be possible to set the minute minder or switch
off the oven by pressing and releasing the ☑ key.
By pressing any other key, the key symbol on the display will remember you that the locking function is activated.
The automatic or manual switching off of the oven will not disable the locking function.
To disable the locking function hold down the key until the key symbol on the display (about 5 sec.) followed by OFF, then the display shows again the current hour.
When the locking function is activated it is not possible to switch it on with the key, but only to switch it off.

ON / OFF BUTTON

When the oven is switched on, the ☐ key lets you to switch off the oven whatever function is selected and in any moment. To switch off the oven, just press and release the ☐ key.
When switching off the oven, any cooking function or program is cancelled. To set a new cooking program, follow the corresponding instructions from the beginning.
When the oven is switched on and the locking function is activated, you can switch off the oven just pressing and releasing the ☑ key, but the locking function keeps active.
To disable the lock hold on the key for about 5 seconds until the key symbol on the display followed by OFF, then the display will show the current hour.
“○” SYMBOL
This symbol appears on the temperature display and represents the centigrade degrees. If the symbol is blinking it means the oven is heating up to reach the temperature that has been set.
If the symbol is permanently on it means that the set temperature has been reached.
TIMER RESET
With the oven switched on, it is possible to reset the settings of the timer by pushing together the 📄 and 📋 keys.
Attention: the oven keeps switched on with the set function, and in manual operation. It is possible to set again a cooking program, or also switch off the oven by pressing and releasing the key.
OVEN OPERATION
BOP7303AB - BOP7303AX - BOP8526AX

text_image
4 5 2 3 1- Thermostat
- Selector
- Electronic programmer
- Red light
- Yellow light
Your new oven incorporates a multifunction cooking system, enabling you to select the most appropriate heating method for the type of food you are preparing.
The function required is selected by turning the oven function selector knob in a clockwise direction to the appropriate symbol. The oven interior light will illuminate and the 'On' indicator light will glow.
Oven functions

Light only
The oven interior light comes on.

with turnspit
This function operates the centre grill element as well as the turnspit motor. An ideal way to produce a healthy small roast as all the fats are drained whilst cooking. Always make sure that the oven pan is in place to collect the fats and meat juices when cooking.
Grilling must always take place with the oven door closed.

Lower heating element only
The element under the floor of the oven operates on its own. The oven, should be preheated for 15-20 minutes before use. This function is ideal for ‘blind baking’ pastry cases for quiches and tarts. In this case, the food should be cooked with the oven shelf on the lowest shelf position.

Traditional cooking
The elements in the roof and floor operate to give a conventional static oven heating system. The oven should be preheated before use until the temperature indicator light goes out. It is recommended that food is only placed on one shelf position when cooking with the conventional heating function. Do not use the lowest or highest shelf positions or the food may overcook.

Traditional cooking and forced air convection
This kind of cooking is ideal for pizza, lasagne, bread and vegetable dishes.

Forced air convection
The fan and an element behind the rear wall of the oven circulate hot air to give an even temperature throughout the oven. The oven should be pre-heated before use until the temperature indicator light goes out. Food can be cooked on several shelf positions at once, saving both time and energy.
The oven temperature should be reduced by approximately 10% compared to conventional oven heating systems.

Defrosting
The fan operates but without its element, so the oven is not directly heated. The oven door must remain closed. Frozen food can be quickly defrosted by placing in the oven pan and sliding onto the lowest shelf position. Defrosting time will be reduced by up to one third using this system.

Ventilated grill
The fan operates with the infra-red grill element in the roof of the oven.
The oven should be pre-heated for 5-10 minutes before use. When roasting meats, this function will crisp the outside of the food whilst the circulating hot air ensures even cooking. Semi forced air convection can also be used for grilling, so that food does not need to be turned so often.
Grilling must always take place with the oven door closed.
Do not use aluminium foil to cover the grill pan or heat items wrapped in aluminium foil under the grill – the high reflectivity of the foil can damage the grill element. Keep the oven door closed when using the GRILL.

Oven self-clean mode
Turn the selector knob to this function which can only be set via the timer, the cleaning cycle is 1,5 hours. All internal oven accessories must be removed before using the pyrolitic function. During the pyrolitic function the oven light is disabled.
Helpful hints
Before cooking, check that any unused accessories are removed from the oven.
Preheat the oven at cooking temperature before use.
Place cooking trays in the centre of the oven and allow gaps when using more than one tray for air to circulate.
Be careful when opening the door to avoid contact with hot parts and steam.
ELECTRONIC PROGRAMMER/ TEMPERATURE DISPLAY
text_image
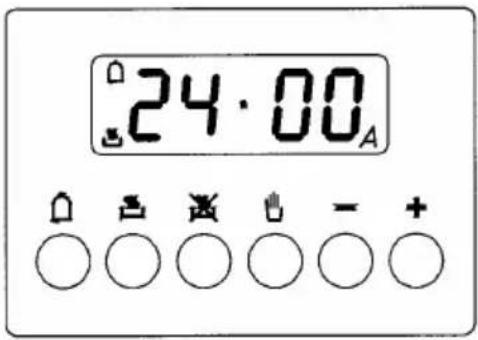
24·00AThe electronic programmer is a device, which groups together the following functions:
- 24 hours clock with illuminated display
- Timer (up to 23 hours and 59 min.)
- Program for automatic beginning and end of cooking
- Program for semi-automatic cooking (either start or finish only)
- Displaying the required temperature.
When selecting a required temperature, the temperature is displayed in centigrade degrees ( ^ C)
Description of buttons

"TIMER"

"COOKING TIME "

"END OF COOKING TIME"

"MANUAL POSITION "

"ADVANCEMENT OF THE NUMBERS OF ALL PROGRAMS - CHECK THE INSERTED TEMPERATURE"

" TURNING BACK OF THE NUMBERS OF ALL PROGRAMS - CHECK THE INSERTED TEMPERATURE"
Description of lighted symbols
« AUTO » - (flashing) - Programmer in automatic position but not programmed. « AUTO » - (always lighted) - Programmer in automatic position with inserted program.

Manual cooking taking place

+ A
Automatic cooking taking place


Timer in operation
NOTE: After having selected the operation, a period of time will pass (about 3-4 seconds) before confirmation, during which the data may be modifies.
Digital clock (the clock must be set before operating with the programmer)
Clock numbers show hours (0-24) and minutes.
Upon immediate hooking up of the oven or after a blackout, three zeros will flash on the programmer panel.
To set the hour it is necessary to first push and release the button.
Then using the “+” or “-” button set the correct time of the day. When the actual time is inserted, release the buttons in order to make function the clock.
Manual cooking without using the programmer
To use manually the oven, that is, without the auxiliary programmer, it is necessary to cancel the flashing «A» by pushing the button.
If the «A» message is displayed in permanent mode, indicating that the oven is programmed, it is impossible to set the timer to manual function and therefore the oven cannot be switched on. In this case the program must be firstly cancelled by pressing, then the manual function can be set. You can now select the required cooking function and temperature.
Timer
The timer can be used to measure a time period between 1 minute and 23 hours & 59 minutes.
1) Automatic cooking (start and end)
Set temperature and cooking program required by using the thermostat and the selector knobs.
Set the length of cooking time by pushing the button.
Set the end of cooking time by pushing the button.
After this setting the symbol «A» will light.
An example: cooking lasts 45 minutes and is expected to stop at 14.00. First select the required temperature and cooking function by using the appropriate control knob.
Push and release the press the + button until you have set 0.45.
Push 📄 and release the press the + button until you have set 14.00.
After having finished the setting, the clock hour will appear on the panel and «A» symbol will light. This means the cooking program has been memorized.
At 13.15 h. (14.00 h. minus 45 minutes) the oven turns on automatically.
At 14.00 h. the oven turns off automatically, a buzzer goes on until it is stopped by pushing the button. The symbol «A» will flash.
2) Semi-automatic cooking
A. Set the length of cooking time
B. Set the end of cooking time
A) Set the length of cooking time by pushing the button
The oven will turn on immediately, the symbol «A» will light.
When the set cooking time has elapsed, the oven will , a buzzer will ring until it is stopped as above described. The symbol «A» will fla
B) Set the end of cooking time by pushing the button .
The oven will turn on immediately, the symbol «A» will light.
At the set time, the oven will turn off and a buzzer will ring until it is stopped as above described. The cooking program may be cancelled at any moment by pushing
the button, the oven can work manually.
NOTE: 1) and 2) functions or 1)+ 2) functions are active only if a cooking function has been selected.
Timer = buzzer
The timer program consists only of a buzzer, which may be set for a maximum period of 23 hours and 59 min.
To set the timer, push the 🔊 button and, at the same time, + or - until you read the desired time on the display.
After the setting, the clock hour and the symbol will appear.
The countdown will start immediately and may be seen at any moment on the display by simply pressing the 🔒 button.
At the end of the set time, the ☐ symbol will turn off and the buzzer will ring until it is stopped by pressing the ☐ button.
It is possible to change the sound (3 levels: low - medium - high): when it sounds, push “-” button.
NOTE: At end of cooking time, the sound beeps every second for a maximum of 7 minutes. To cancel the beeps press and release the 📄 button.
Cancelling an automatic cooking program
An automatic cooking program can be cancelled whenever by pushing the 📊 button. Now the oven can work manually.
It is advisable not to leave food in the oven for long periods of time before automatic cooking proceeds. Always ensure commercially prepared food is well within its use by date and that home prepared food is fresh and of good quality.
When cooking is complete, do not leave food to stand in oven, but remove and cool it quickly if the food is not to be consumed immediately.
(DO NOT PUT HOT FOOD IN THE REFRIGERATOR OR FREEZER).
How to use the turnspit
In same ovens it is possible to use the turningspit and the grill together. Meat has to be inserted onto the skewers and blocked by the two clamps.
Proceed now as follows:
A. Place oven tray on the lowest position of the oven.
B. Place one of the forks support along the stainless steel rod and secure. Insert the meat onto the skewer and then put the other fork support on, securing it firmly into the meat.
C. The spit handle made of isolating material must be used for extracting the stainless steel rod from the oven and must be taken off when cooking.
For example the chicken weighing about 1,3Kg will take approximately 85-90minutes to cook.
natural_image
Technical line drawing of a 3D printer or oven unit with internal compartments and mounting base (no text or symbols)Replacing the oven light
Warning: disconnect the appliance from the power supply.
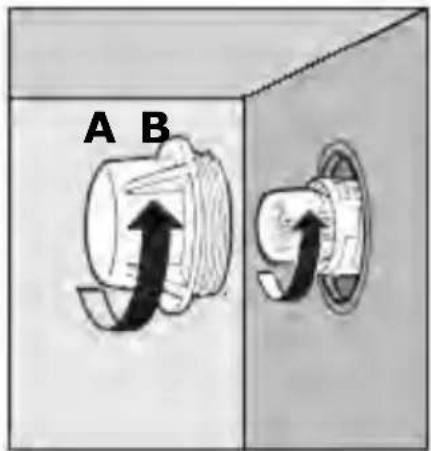
If the oven light needs to be replaced, the protective cover “A” must be removed by turning it anticlockwise. After the light has been replaced, refit the protective cover “A”.
Note: use only 25 W, E-14 type, T 500°C bulbs.
text_image
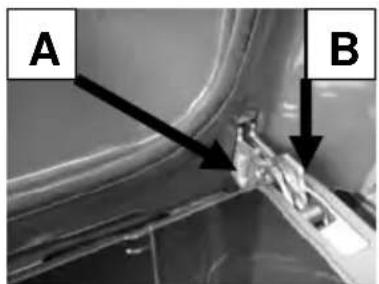
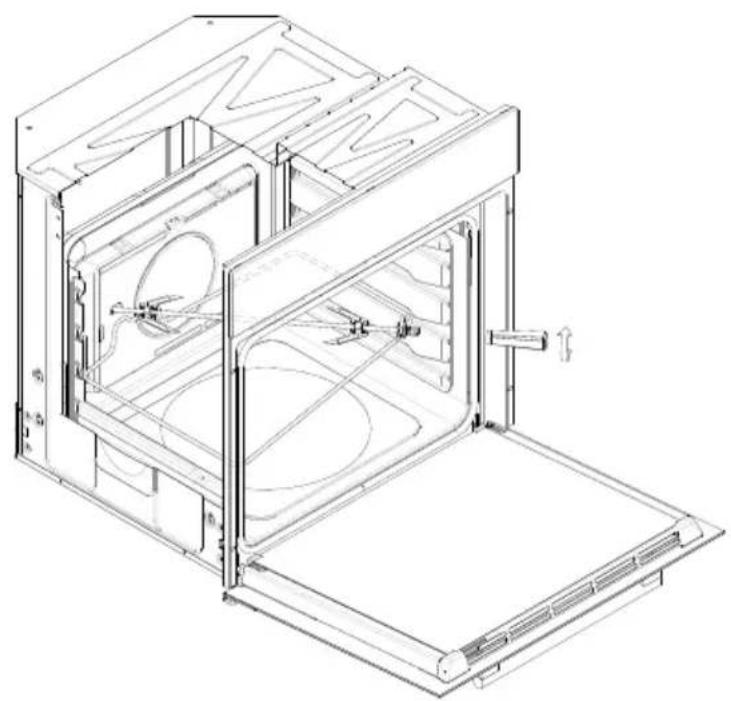
A BRemoving the oven door
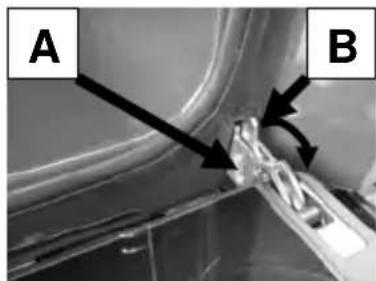
To aid cleaning and make access to the oven interior easier, both oven doors can be simply removed (see diagram). To make the cleaning operation easier, the door can be removed from the hinges as follows:
The hinges A are provided with two movable bolts B.
When bolt B is raised, the hinge is released from its housing. Having done this, the door must be lifted upwards and removed, sliding it towards the outside;
grip the sides of the door near the hinges when performing these operations.
To refit the door, firstly slide the hinges into their slots.
Before closing the door, remember to rotate the two movable bolts B used to hook the two hinges.
Do not soak the door in water.
Clean the enamelled interior surface and the glass using a damp cloth and a proprietary mild cream cleaner, rinse, then dry carefully using a soft cloth.
If necessary, the inner door glass can be removed by unscrewing the two lateral fixing screws. Make sure that the glass is dried thoroughly before re-fitting.
Take care not to over tighten the fixing screws when re-fitting.
Oven accessories
The oven shelves, oven pans and trivets should be washed in hot water with a mild detergent then dried carefully, or they can be washed in a dishwasher.
natural_image
Close-up of a mechanical component with labeled points A and B, showing internal structure and arrows indicating direction (no text or symbols beyond labels)
natural_image
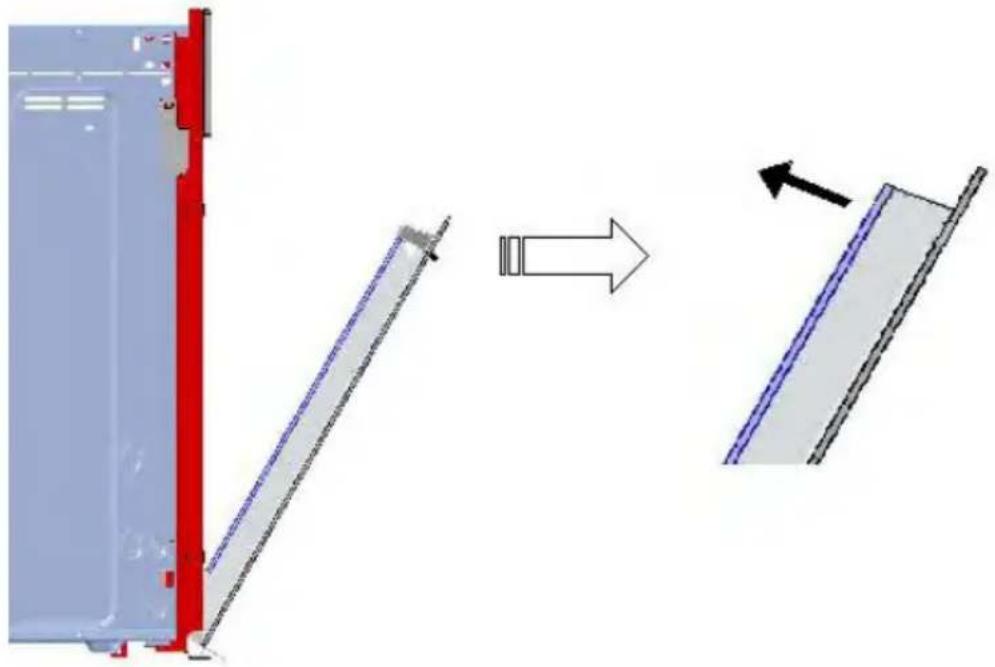
Close-up of a mechanical component with labeled points A and B, showing internal structure and alignment (no readable text or symbols)The door can be disassembled to facilitate cleaning of the glasses: it is possible to remove the upper part, please see the drawing below.
natural_image
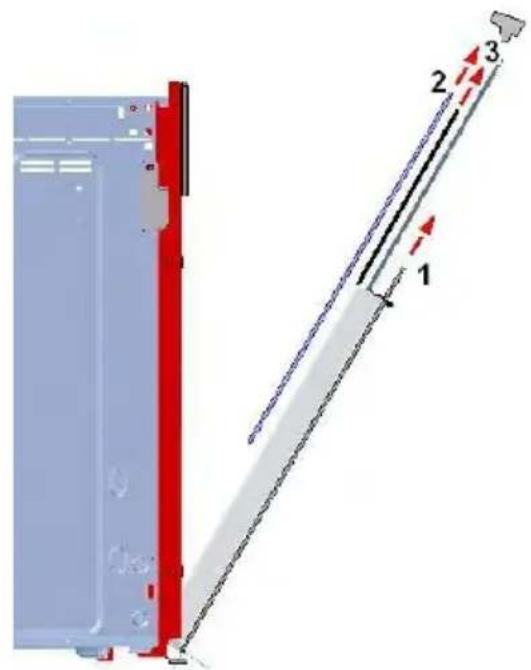
Diagram showing a mechanical assembly with a red vertical panel and a blue diagonal panel, both before and after transformation (no text or symbols)Once having extracted the upper part, slide out the external glass panel (1), and then the internal ones (2 and 3); please see the drawing below. Then fit back the glasses in their places by reversing the procedure.
text_image
Technical diagram showing a mechanical assembly with labeled components and directional arrows indicating motion or force.Oven cooking chart
| Food Temp.°C Shelf position (*) | Cooking time (min) | Cooking function | ||
| Cake | 55-65 | |||
| Bun | 180 | 2 | ||
| Fruit Cake 200 1 30-40 | ||||
| Buttermilk cake | 180 | 2 | 35-40 | |
| Mould leaven cake | 200 1 25-35 | |||
| Choux pastry 190 2 20-30 | ||||
| Puff or flaky pastry | 200 2 15-25 | |||
| Biscuits | 190 | 3 | 15-20 | |
| Lasagne | 225 | 2 | 40-50 | |
| Meat | ||||
| Fillet beef | 225 2-3 | 50-80 | ||
| Roast beef | 225 2-3 | 50-80 | ||
| Roast veal | 225 2-3 | 60-80 | ||
| Roast pork | 170-180 | 2 45-60 | ||
| Roast lamp | 225 2 54-55 | |||
| Roast beef | 225 2-3 | 50-60 | ||
| Roast hare | 200 2 60-90 | |||
| Roast turkey | 180 2 240 | |||
| Roast goose | 200 2 150-210 | |||
| Roast duck | 200 2 120-180 | |||
| Roast chicken | 200 2 60-90 | |||
| Thigh roe deer | 200 2-3 | 90-150 | ||
| Thigh stag | 180 2-3 | 90-180 | ||
| Fish | 180 | 2-3 | 10-40 | |
| Stewing vegetable | 170-190 | 2-3 | 40-50 | |
| Pizza | 240 1 15-25 | |||
| Grill cooking | ||||
| Chop | 4 | 8-12 | ### | |
| Pork sausage | 4 10-13 | |||
| Grill ckichen | 3 25-35 | |||
| Spit chicken | 50-65 | |||
| Spit roast veal | 50-65 | |||
Note: (*) The shelf position number is referred starting from the oven bottom. The oven should be preheated before use.
This function is recommended for cooking delicate food and/or preheated dishes.
This function allows to cook 2 different types of food in the same time, without mixing their flavours.
natural_image
Pure graphical icons and symbols without any text or labelsTASTEN FUNKTIONEN

Temperatursenkung

Temperaturerhöhung

natural_image
Technical line drawing of an open industrial oven or furnace unit with internal components and ventilation ducts (no text or symbols)natural_image
Close-up of a mechanical component with labeled parts A and B, showing internal structure and alignment (no text or symbols beyond labels)natural_image
Diagram showing a mechanical assembly with a red vertical component and a blue-and-white structural element, both before and after transformation (no text or symbols)text_image
Technical diagram showing a mechanical assembly with labeled components 1, 2, and 3, including red structural elements and a diagonal guide.Kochtabelle
natural_image
Pure graphical icons and symbols without any text or labelsTOUCHES FONCTIONS
MODALITÉ FOUR ÉTEINT
6 Convection air forcée
natural_image
Technical line drawing of an open oven or rack unit with internal compartments and ventilation ducts (no text or symbols)Substitution de la lampe du four (fig. 1)
natural_image
Close-up of a mechanical component with labeled parts A and B, showing internal structure and motion arrows (no readable text or symbols)
natural_image
Close-up of a metallic component with labeled points A and B, showing internal structure and mounting detail (no text or symbols beyond labels)natural_image
Diagram showing a mechanical assembly with a red vertical component and a blue diagonal panel, both before and after transformation (no text or symbols)text_image
Technical diagram showing a mechanical assembly with labeled components 1, 2, and 3, including red and blue parts.natural_image
Pure electrical circuit lines without any symbolsBETJENINGSKNAPPER
MANUEL FUNKTION PÅ UBESTEMT TID
" TILBEREDNINGSTID "

"AFSLUTNINGSTIDSPUNKT FOR TILBEREDNING"

" POSITION FOR MANUEL TILBEREDNING "

" BLADRING FREM MELLEM ALLE PROGRAMMER " OG KONTROL AF DEN VALGTE TEMPERATUR
" BLADRING TILBAGE MELLEM ALLE PROGRAMMER " OG KONTROL AF DEN VALGTE TEMPERATUR
natural_image
Technical line drawing of an open oven or rack unit with internal compartments and ventilation ducts (no text or symbols)natural_image
Diagram showing a mechanical assembly with a red vertical component and a blue diagonal section, both before and after transformation (no text or symbols)text_image
Technical diagram showing a mechanical assembly with labeled components 1, 2, and 3, including red and blue parts.Oversigt over tilberedning i ovn
| Madvarer Temp. | °C | Position plade (*) | Tilberedningstid (min) | Tilberednings -symbol |
| Kager |  | |||
| Kringler 180 2 55-65 | ||||
| Frugttærter 200 1 | 30-40 | |||
| Kager med mælk og smør | 180 | 2 | 35-40 | |
| Kager med gær 200 1 25-35 | ||||
| Vandbakkelser 190 2 20-30 | ||||
| Butterdej 200 2 15-25 | ||||
| Småkager 190 3 | 15-20 | |||
| Lasagne 225 2 40-50 | ||||
| Kød | ||||
| Oksefilet | 225 2-3 | 50-80 | ||
| Roastbeef | 225 2-3 | 50-80 | ||
| Kalvesteg | 225 2-3 | 60-80 | ||
| Flæskesteg | 170-180 | 2 45-60 | ||
| Lammesteg | 225 2 54-55 | |||
| Oksesteg | 225 2-3 | 50-60 | ||
| Stegt hare | 200 2 60-90 | |||
| Stegt kalkun | 180 2 240 | |||
| Stegt gås | 200 2 150-210 | |||
| Stegt and | 200 2 120-180 | |||
| Stegt kylling | 200 2 60-90 | |||
| Rådyrskølle | 200 2-3 | 90-150 | ||
| Hjortekølle | 180 2-3 | 90-180 | ||
| Fisk | 180 | 2-3 | 10-40 | |
| Grøntsager | ||||
| Stuvede grøntsager | 170-190 | 2-3 | 40-50 | |
| Pizza | 240 1 15-25 | |||
| Grillstegning | ||||
| Koteletter | 4 8-12 |  | ||
| Pølse af svinekød | 4 10-13 | |||
| Grillkylling | 3 25-35 | |||
| Kylling på grillspyd | 50-65 | |||
| Stegt kalv på spyd | 50-65 |
natural_image
Pure graphical icons and symbols without any text or labelsNÄPPÄIMET TOIMINNOT

Lämpötilan vähennys
Lämpötilan lisäys
ON/OFF ja SÄÄTÖLAITTEIDEN LUKITUS
Minuuttilaskin
natural_image
Technical line drawing of an open oven or rack unit with internal compartments and ventilation ducts (no text or symbols)natural_image
Close-up of a mechanical component with labeled parts A and B, showing no visible text or symbols.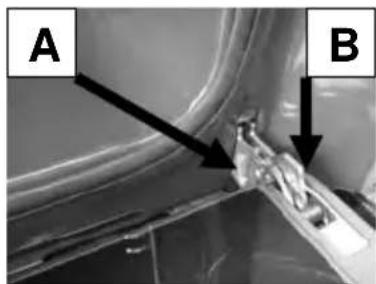
natural_image
Close-up of a mechanical component with labeled parts A and B, showing internal structure and alignment (no readable text or symbols)natural_image
Diagram showing a mechanical assembly with a red panel and a blue panel, both before and after transformation (no text or symbols)text_image
Technical diagram showing a mechanical assembly with labeled components 1, 2, and 3, including red and blue parts.text_image
Vertical sequence of icons representing various symbols and signs, including bell, steam stove, fire extinguisher, plus sign, and minus sign."PROGRAMSKI SAT"
"VRIJEME PEČENJA"
"VRIJEME ZAVRŠETKA PEČENJA"
"RUČNI NAČIN UPRAVLJANJA"
POVEĆANJE VRIJEDNOSTI BILO KOJE PODEŠENOSTI – PROVJERAVANJE IZABRANE TEMPERATURE
SMANJENJE VRIJEDNOSTI BILO KOJE PODEŠENOSTI – PROVJERAVANJE IZABRANE TEMPERATURE
natural_image
Technical line drawing of an open industrial oven or furnace unit with internal compartments and ventilation ducts (no text or symbols)Zamjena žarulje
natural_image
Close-up of a mechanical component with labeled points A and B, showing internal structure and alignment (no readable text or symbols)natural_image
Diagram showing a mechanical assembly with a red panel and a blue panel, both before and after transformation (no text or symbols)Kada izvučete gornji dio, izvucite staklo, koje se nalazi s vanjske strane (1), a potom unutarnja stakla (2 i 3), kao što je prikazano na donjoj figuri. Da biste ponovo namontirali stakla, izvršite opisani postupak u obrnutom redoslijedu.

text_image
Technical diagram showing a mechanical assembly with labeled components 1, 2, and 3, including red and blue parts.natural_image
Pure electrical circuit lines without any symbolsTLAČÍTKA FUNKCIE
MANUÁLNY CHOD S NEDEFINOVANOU DOBOU
natural_image
Technical line drawing of an open oven with internal compartments and ventilation ducts (no text or symbols)natural_image
Close-up of a mechanical component with labeled points A and B, showing internal structure and arrows indicating direction (no text or symbols beyond labels)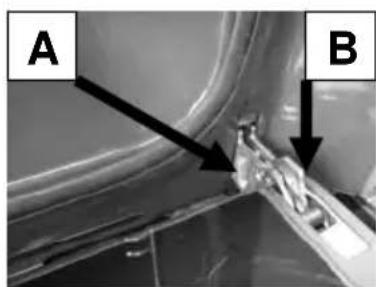
natural_image
Close-up of a mechanical component with labeled points A and B, showing internal structure and alignment (no readable text or symbols)natural_image
Diagram showing a mechanical assembly with a red vertical component and a blue diagonal section, both before and after transformation (no text or symbols)text_image
Technical diagram showing a mechanical assembly with labeled components 1, 2, and 3, including red structural elements and a diagonal guide.Kuchárska tabul'ka
natural_image
Pure geometric shapes and icons without any text, numbers, or symbolsTLAČÍTKA FUNKCE

Snížení teploty
Zvýšení teploty
ON/OFF a ZABLOKOVÁNÍ POKYNŮ
Časovač
Doba pečení
Konec pečení
VOLBA TEPLOTY PEČENÍ
natural_image
Technical line drawing of an open oven with internal compartments and ventilation ducts (no text or symbols)natural_image
Close-up of a mechanical component with labeled points A and B, showing internal structure and arrows indicating direction (no readable text or symbols)
natural_image
Close-up of a mechanical component with labeled points A and B, showing internal structure and alignment (no readable text or symbols)natural_image
Diagram showing a mechanical assembly with a red panel and a blue panel, both before and after transformation (no text or symbols)text_image
Technical diagram showing a mechanical assembly with labeled components 1, 2, and 3, including red and blue parts.natural_image
Pure electrical circuit lines without any symbolsKNAPPAR FUNKTIONER
MANUELL DRIFT I OBEGRÄNSAD TID
natural_image
Technical line drawing of a 3D oven or chamber with internal compartments and ventilation ducts (no text or symbols)Byte av ugnslampa
natural_image
Close-up of a mechanical component with labeled points A and B, showing internal structure and alignment (no readable text or symbols)natural_image
Diagram showing a mechanical assembly with a red vertical component and a blue meshed panel, both before and after transformation (no text or symbols)text_image
Technical diagram showing a mechanical assembly with labeled components 1, 2, and 3, including red and blue parts.natural_image
Pure electrical circuit lines without any symbolsTASTER FUNKSJONER

MANUELL FUNKSJON PÅ UBESTEMT TID
— TRADISJONELL STEKING
natural_image
Technical line drawing of an open oven or oven unit with internal compartments and ventilation ducts (no text or symbols)natural_image
Close-up of a mechanical component with labeled parts A and B, showing no visible text or symbols.
text_image
A Bnatural_image
Diagram showing a structural change from a red panel with blue and gray components to a blue panel with a black arrow indicating direction (no text or symbols present)text_image
Technical diagram showing a mechanical assembly with labeled components 1, 2, and 3, including red and blue parts.Tilberedningstabell
| Matrett | Temp.°C | Innsettingsrille(*) | Tilberedningstid(min) | Symbol |
| Kaker | 40 | |||
| Boller 180 2 55-65 | ||||
| Fruktkake | 200 | 1 | 30 | |
| Kaker med melk og smør | 180 | 2 35-40 | ||
| formkake 200 1 25-35 | ||||
| vannbakkel's | 190 | 2 | 20-30 | |
| butterdeigbakst | 200 | 2 | 15-25 | |
| kjeks | 190 3 15-20 | |||
| Lasagne | 225 | 2 40-50 | ||
| Kjøtt | ||||
| Oksefilet | 225 | 2-3 | 50-80 | |
| Roastbiff | 225 2-3 | 50-80 | ||
| Kalvestek | 225 2-3 | 60-80 | ||
| Svinestek | 170-180 | 2 | 45-60 | |
| Lammestek | 225 | 2 | 54-55 | |
| Oksestek | 225 2-3 | 50-60 | ||
| Harestek | 200 2 60-90 | |||
| Kalkunstek | 180 | 2 | 240 | |
| Gåsestek | 200 2 150-210 | |||
| Andestek | 200 | 2 | 120-180 | |
| Kylingstek | 200 | 2 | 60-90 | |
| Rådyrlår | 200 2-3 | 90-150 | ||
| Hjortelår | 180 2-3 | 90-180 | ||
| Fisk | 180 | 2-3 | 10-40 | |
| Grønnsaker | ||||
| dampkokte grønnsaker | 170-190 | 2-3 | 40-50 | |
| Pizza | 240 1 15-25 | |||
| Grilling | ||||
| Koteletter | 4 | 8-12 | ### | |
| Svinepølse | 4 | 10-13 | ||
| Grillet kyllind | 3 25-35 | |||
| Kyllingkjøtt på spyd | 50-65 | |||
| Kalvekjøtt på spyd | 50-65 | |||
Merk: (*) Tallet for innsettingsrillen tilsvarer ovnsknappen.
Ovnen skal forvarmes før bruk.

natural_image
Pure graphical icons and symbols without any text or labelsКЛАВИШИ
ФУНКЦИИ
natural_image
Technical line drawing of an open oven with internal compartments and ventilation ducts (no text or symbols)natural_image
Diagram showing a structural change from a red panel with blue and gray panels to a blue panel with a black arrow indicating direction (no text or symbols present)text_image
Technical diagram showing a mechanical assembly with labeled components 1, 2, and 3, including red and blue parts.natural_image
Pure electrical circuit lines without any symbolsTOETSEN FUNCTIONS

Temperatuurafname
Temperatuurtoename
ON/OFF en BEDIENINGSBLOKKERING
Minutenteller
Bereidingsduur
Einde bereiding
Afname tijd
Toename tijd
Keuze kookprogramma
Keuze kookprogramma
WERKING
natural_image
Technical line drawing of an open industrial oven or furnace unit with internal compartments and ventilation ducts (no text or symbols)natural_image
Diagram showing a mechanical assembly with a red panel and a blue panel, both before and after transformation (no text or symbols)text_image
Technical diagram showing a mechanical assembly with labeled components 1, 2, and 3, including red and blue structural elements.natural_image
Pure electrical circuit lines without any symbolsBOTONES FUNCIONES

natural_image
Technical line drawing of an open oven with internal compartments and ventilation ducts (no text or symbols)natural_image
Close-up of a mechanical component with labeled points A and B, showing internal structure and mounting features (no readable text or symbols)natural_image
Diagram showing a mechanical assembly with a red vertical component and a blue diagonal section, both before and after transformation (no text or symbols)text_image
Technical diagram showing a mechanical assembly with labeled components 1, 2, and 3, including red and blue parts.Paigaldamise juhised
natural_image
Pure electrical circuit lines without any symbolsNUPUD

natural_image
Technical line drawing of an open oven with internal air ducts and ventilation slots (no text or symbols)Ahjulambi vahetamine
natural_image
Close-up of a mechanical component with labeled parts A and B, showing internal structure and arrows indicating direction (no text or symbols beyond labels)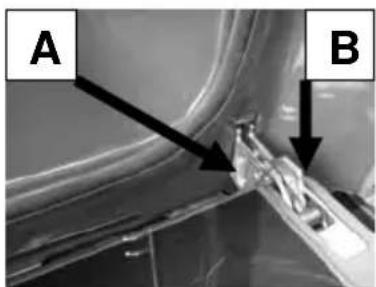
natural_image
Close-up of a mechanical component with labeled points A and B, showing internal structure and alignment (no readable text or symbols)natural_image
Diagram showing a mechanical assembly with a red vertical component and a blue diagonal section, both before and after transformation (no text or symbols)text_image
Technical diagram showing a mechanical assembly with labeled components 1, 2, and 3, including red structural elements and a blue panel.natural_image
Pure electrical circuit lines without any symbolsFUNKCIJU TAUSTINI
natural_image
Technical line drawing of an open industrial oven or furnace unit with internal compartments and ventilation ducts (no text or symbols)natural_image
Close-up of a mechanical component with labeled points A and B, showing internal structure and alignment (no readable text or symbols)natural_image
Diagram showing a mechanical assembly with a red panel and a blue panel, both before and after transformation (no text or symbols)text_image
Technical diagram showing a mechanical assembly with labeled components 1, 2, and 3, including red and blue parts.natural_image
Pure electrical circuit lines without any symbolsSENSORY / SYMBOLE FUNKCYJNE
natural_image
Technical line drawing of a mechanical oven or oven assembly (no text or symbols)Wymiana żarówki
natural_image
Close-up of a mechanical component with labeled parts A and B, showing internal structure and motion arrows (no readable text or symbols)
natural_image
Close-up of a mechanical component with labeled parts A and B, showing internal structure and alignment (no readable text or symbols)natural_image
Diagram showing a mechanical assembly with a red panel and a blue panel, both before and after transformation (no text or symbols)text_image
Technical diagram showing a mechanical assembly with labeled components 1, 2, and 3, including red and blue parts.natural_image
Pure electrical circuit lines without any symbolsFUNKCIÓGOMBOK

Höfok csökkentése
Höfok növelése
natural_image
Technical line drawing of an open oven or oven unit with internal compartments and ventilation ducts (no text or symbols)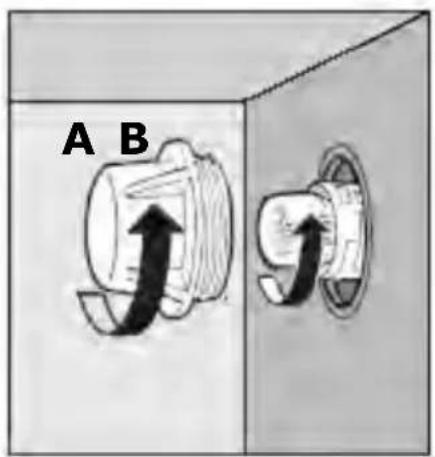
text_image
A Bnatural_image
Diagram showing a mechanical assembly with a red vertical component and a blue diagonal section, both before and after transformation (no text or symbols)text_image
Technical diagram showing a mechanical assembly with labeled components 1, 2, and 3, including red structural elements and a diagonal guide.Sütési táblázat
natural_image
Pure electrical circuit lines without any symbolsFUNKCINIAI MYGTUKAI
natural_image
Technical line drawing of a mechanical oven or oven assembly (no text or symbols)natural_image
Close-up of a mechanical component with labeled parts A and B, showing internal structure and arrows indicating direction (no text or symbols beyond labels)