SP350 - Hand blender FAGOR - Free user manual and instructions
Find the device manual for free SP350 FAGOR in PDF.
User questions about SP350 FAGOR
0 question about this device. Answer the ones you know or ask your own.
Ask a new question about this device
Download the instructions for your Hand blender in PDF format for free! Find your manual SP350 - FAGOR and take your electronic device back in hand. On this page are published all the documents necessary for the use of your device. SP350 by FAGOR.
USER MANUAL SP350 FAGOR
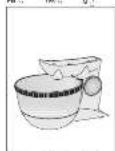
Fig. 5. G and G^ for Cu / Zn see also S29 and S30
for Ni, H
图1 20m 40.2
22.3 0.24 1m-2
u_1 t + v_1 x & = & p_1 x u_2 t + v_2 y & = & p_2 y
ES
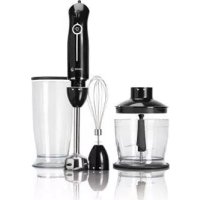
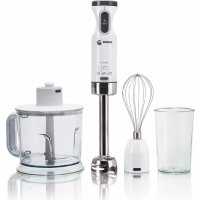
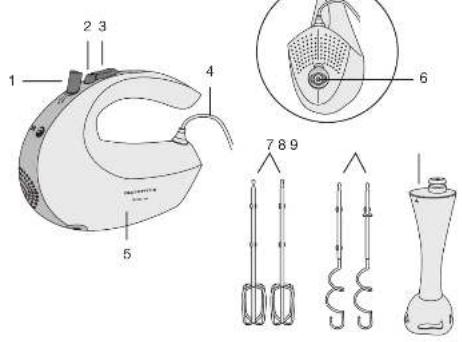
1.DESCRIPTION (Fig.A)
- Bottnce expulso
- Botán turbo
- Selector de velocidad
C. 前者与后者 - Isolation procedure
- Veritas publications
- Varlss ansedors
- Fie mezcdor
Mod. 59-2000
Mod. SP-390 PLOS: 10. Eperolas de la liga:
11. Pseudo linatio
12. Eojan de expulsion querco batidac
13. Galilde de sbioqueo
14. Ease bot
15. E0
16. 00
- Eject button
- Turbo button
- Speed selector
- Power cable
- Mixer unit
- Protective cover
- Mixer blades
- Dough hooks
- Liquidiser attachment
MOD.: SP-350 PLUS:
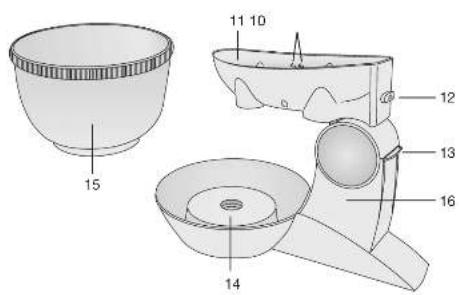
- Stabilising flanges
- Stabilising arm
- Mixer unit release button
- Release trigger
- Bowl base
- Bowl
- Worktop stand
2. TECHNICAL CHARACTERISTICS
See characteristics plate.
This product complies with the European Directives on Electromagnetic Compatibility and Low Voltage.
3. SAFETY PRECAUTIONS
- Before using this appliance for the first time, read the following instructions carefully and keep them for future reference.
- Make sure that the mains voltage in your home corresponds to that indicated on the appliance.
- In the event of incompatibility between the mains socket and the appliance plug, replace the socket with a suitable one, using a qualified professional.
- The electrical safety of the appliance is only guaranteed if it is connected to an efficient earth installation, as foreseen in applicable electrical safety regulations. If in doubt, contact a qualified professional.
- The use of adaptors, multiple sockets
and or extension cables is not recommended. Where it is not possible to avoid their use, only adaptors or extensions that comply with applicable safety regulations should be used, and ensuring that the indicated voltage limit is not exceeded.
- After removing the packaging, check that the appliance is in perfect condition, if in doubt, contact the nearest Technical Support Service.
- Packaging elements (plastic bags, polystyrene foam, etc.), should not be left within the reach of children because they can be dangerous.
The appliance is for domestic use only. Any other use is considered unsuitable or dangerous.
The manufacturer shall not be responsible for any damages that may arise from improper or inadequate use, or for repairs conducted by nonqualified personnel. - Do not touch the appliance with wet or damp hands or feet.
- Keep the appliance separate from water or other liquids, to avoid electric shock; do not connect the appliance to the mains if it is on a damp surface.
- Place the appliance on a dry, firm and stable surface.
- Do not allow children or the disabled to handle the appliance unsupervised.
- This appliance should not be used by physically, sensorially or mentally handicapped people or people without experience or knowledge of it (including children), unless they are supervised or instructed in the use of the appliance by a person responsible for their safety.
Children should be watched to ensure they do not play with the appliance. - For greater protection, we recommend installing a residual current device (RCD) with an operational residual current not exceeding 30mA . Ask your installer for advice.
- Do not leave the appliance unattended when it is turned on because it can be dangerous.
-
When removing the plug never pull on the cable.
-
Unplug the appliance before cleaning or maintenance.
- In the event of fault or malfunction where the appliance is not to be used, turn off the appliance and do not attempt to repair. If a repair is required, contact a Technical Assistance Service authorised by the manufacturer and request the use of original spare parts.
- If the cable for this appliance is damaged, contact an authorised Technical Assistance Service for it to be replaced.
- Do not leave the appliance exposed to the elements (rain, sun, ice, etc.).
- Do not use or let any part of the appliance come into contact or near hot surfaces (kitchen gas or electric hobs or ovens).
- Do not use detergents or abrasive sponges to clean the appliance.
- Do not touch the hot surfaces. Use the handles.
- Do not let the cable come into contact with the hot parts of the appliance.
- This appliance must not be used to stir or mix paints or varnishes such as flammable solvents.
- The accessories must be fitted and removed whilst the appliance is unplugged.
- Before switching on the appliance, check that the accessories you are going to use are fitted correctly to the appliance. Wait until the accessories have completely stopped before removing them from the appliance.
- Avoid touching the moving parts whilst the appliance is in use.
The mixer must not be used continuously for more than 3 minutes. - Do not use the Turbo function for more than 1 minute continuously.
- Keep your hands, hair, clothing and other utensils well away from the blades during use.
- Do not use the blades to mix ingredients which are too solid.
4. ASSEMBLY
The accessories must be assembled and dismantled whilst the appliance is unplugged.
Assembly and use of the liquidiser attachment
- With the appliance unplugged and the speed selector (3) in the "0" position, slide the protective cover (6) upwards (fig. B).
- Fit the liquidiser attachment (9) to the mixer unit. To do this, align the arrow of the mixer unit (5) with of the liquidiser attachment (9) and turn the liquidiser attachment clockwise as far as it will go (Fig. C).
- Put the liquidiser attachment (9) into the bowl containing the ingredients.
- To remove the liquidiser attachment from the mixer unit (5) turn the attachment anti-clockwise until the arrows and are aligned, then remove the liquidiser attachment from the mixer unit.
Assembly and use of the dough hooks (8) and mixer blades (7)
-
With the appliance unplugged, place the speed selector (3) in the "0" position.
To fit the dough hooks (8) or mixer blades (7), hold the mixer handle with one hand and the attachment with the other: -
Mixer blades: insert the blades until they are locked into position as shown in figure D.
-
Dough hooks: insert the blade with the larger washer into the right-hand hole until it is firmly in position. Repeat the same procedure to fit the blade without the washer into the left-hand hole (Fig. E). If you do not assemble them in this way, the food you are processing may come out of the bowl.
-
Plug in the appliance and put the blades into the middle of the ingredients you are going to process.
To remove the blades, press the attachment eject button (1) and pull the blades out (fig. F).
5. OPERATING THE APPLIANCE
-
Plug in the appliance and move the speed selector (3) to the "1" position to turn it on. Then select the speed required for the task you are going to carry out. Use the following as a guide:
-
Off
- Always start the task on this speed. This speed is ideal for dough and dry foods such as flour, butter or potatoes.
- Suitable speed for mixing liquid ingredients such as salad dressings.
- This speed is recommended for cake or biscuit mixtures.
- This position is recommended for making creams with butter and sugar or for beating sweets and desserts which do not need cooking.
- Suitable speed for beating eggs, glazes to be cooked, mashing potatoes, whipping cream, etc.
Always start with speed "1" and then, if required, go to a higher speed. This will prevent the ingredients from splashing.
- Once you have finished, place the speed selector (3) in the "0" position, and turn off the appliance.
IMPORTANT: Do not use the mixer for more than 3 minutes continuously.
Turbo Button (2)
- When in preparing foods you need to increase the speed momentarily, press the turbo button (2). You can also use this function when you are going to process foods which do not take long to prepare.
- This function must be used intermittently for momentary operations, keeping the button pressed for a few seconds.
IMPORTANT: Do not use this function for more than 1 minute continuously.
6. WORKTOP STAND
(MOD. SP-350 PLUS)
The worktop stand (16) is used together with the mixer blades (7) and dough hooks (8). The mixer (5) is secured to the stabilising arm (11) as follows:
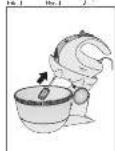
- Place the bowl (15) containing the ingredients onto the bowl base (14) of the worktop stand (16) (fig. G).
- Place the mixer unit (5) onto the stabilising arm (11) and gently press downwards so that it is firmly positioned on the stabilising flanges (fig. H). Check that the mixer is properly fitted onto the stabilising arm (11).
-
Move the release trigger (13) outwards to lift the stabilising arm (11) with the mixer fitted (fig. 1). In this position insert the dough hooks (8) or mixer blades (7) into the holes on the stabilising arm until they are locked into position:
-
Mixer blades: Insert the blades into the holes on the stabilising arm until they are locked into position (Fig. J).
-
Dough hooks: insert the blade with the larger washer into the right-hand hole until it is firmly in position. Insert the blade without the washer into the left-hand hole (Fig. K). If you do not assemble them in this way, the food you are processing may come out of the bowl.
-
Lower the stabilising arm (11) and plug in the appliance.
- Move the speed selector (3) to the "1" position to turn it on. Then select the speed required for the task you are going to carry out as described above.
- Once you have finished, place the speed selector (3) in the "0" position, and turn off the appliance.
To dismantle the worktop stand (16), proceed as follows:
- Move the release trigger (13) outwards and lift the stabilising arm (11).
- Press the attachment eject button (1) and remove the blades.
- Lower the stabilising arm (11) and by pressing the release button on the
mixer unit (12), pull the mixer upwards to remove the mixer unit (5) from the worktop stand as shown in figure L.
7. CLEANING AND MAINTENANCE
- Before cleaning, switch off the appliance and place the speed selector (3) in the "0" position.
- It is much easier to clean the blades (7 and 8), the bowl (15) and the liquidiser attachment (9) immediately after use. Wash them in warm soapy water, rinse and dry thoroughly
- The mixer unit (5) and the worktop stand (16) should be wiped with a slightly damp cloth. Prevent the mixer and the worktop stand from getting wet.
- Do not use bleach or abrasive products to clean the mixer.
- The dough hooks (8) and mixer blades (7) as well as the bowl (15) can be put in the dishwasher.
8. INFORMATION FOR THE CORRECT DISPOSAL OF ELECTRICAL AND ELECTRONIC APPLIANCES

At the end of its working life, the product must not be disposed of as urban waste. It must be taken to a special local authority differentiated waste collection centre or to
a dealer providing this service. Disposing of a household appliance separately avoids possible negative consequences for the environment and health deriving from inappropriate disposal and enables the constituent materials to be recovered to obtain significant savings in energy and resources. To remind you that you must collaborate with a selective collection scheme, the symbol shown appears on the product warning you not to dispose of it in traditional refuse containers.
For further information, contact your local authority or the shop where you bought the product.
FR
1.DESCRIPTION (Fig.A)
2. TEXHUNECKN XAPAKTEPNUCTNIKU
BuxTe pIacTuHaTa cTexHnueckn xapaKTePncTnKn.
ToBa n3dene OTOBapra Ha
n3nCKBaHnTa Ha EBponeNcKnte
DnpeKTnBu 3a eNeKTpOMarHnTHa
CbBMecTmOCT HNCO HanpeXeHne.
3. INHCTPYKUN 3A BE3OJACHOCT
- Ppei Da nol3BaTe 3a nbpBn nbT anapata, npoyeTe BnHMaTeJHo TO3n HapbYnK C nHCTpyKuN I rO 3ana3eTe 3a nocleDbaun cnpaBKn.
-
YBepTe ce, Ye HanpeXeHneTo Ha eNeKtpnueckaTa MpeXa B Doma Bn N MOuHocTTa Ha KOHTaT OTOBapr T Ha NOCOeHnte Ha anapaTa.
BcnyaHa HecbBMeCTMIOCT MeKdy KOHTaKTa NZeNCeNa Ha anapaTa, CMeHTe KOHTaTc cNoDxOJa, KATO NOI3BaTe ycIyrTe Ha KBaINΦuIpaH npoepceOnHaJIncT. -
Be30nacHocCTTa Ha anapaTa e rapaHTnpaHa cAmO, KOraTo ToI e BKNIOueH KbM ePnKacHO 3a3EmeH KOHTaKT, KaKTO n3NCKBaT DeINCTBaUNTe HOpMN Ha eNEKTPnuecka 6e30nacHocT. B cnUyau Ha CbMHeHne, o6bpHeTe Ce KbM KBaJIuΦnCupan npopecnoHaJIncT.
He ce npenopbUba n3noJ3BaHepTo Ha aAnTOPn, pa3KNoHnteNn/ nn yDbJnxTeNn. B cnyaay e HanoXHTeNHO n3NOJ3BaHepTo Nm, Tp6Ba Da ce noJ3BaT caMo aAnTOPn uYdbJnxTeNn, KOnTO OTROBAPrT Ha DeiCTBaUHTe HopMn Ha 6e3OpanchocT, KaTO o6bPheTe BHHMaHne Da He Ce npEBuHaBa MaKcMaJIHaTa MOUHOCT, O603NaYeHa Ha aAnTopa.
CneI KaTo OTCTpaHnTe onaKOBkata, npOBepTe daJI anapaTbTe B OTNIuHO CbCTOAHne. Ako eMaTe cBmHeHnI, ObPheTe ce KbM Ha-6JIu3KNr TexHnueckn cepBn3.
-ОпakOBbUHnTe MaTePnAJI (HaJIOHOBn ПИNKOBe, CTIpONOp n Idr.) He TpIbBa Da ce OCTaBt Ha DOCTbIHN 3a DeuMa MeCTa, TbN KaTO Ca N3ToUHnK Ha ONaCHOCTn.
To3n anapaT Tp6Ba Da ce n3no13Ba camo 3a Domaknckn ceni. BcKa npyra ynotpe6a ue ce cHTa 3a HeadeKBaTHa nn Onacha.
-ПОНЗВОДИТЕЛТ He HOCN OTROBOPHOCT 3a цETи, KONTO MOrat Da ce ДьлжаT Ha HeaIeKBaTHa Илн HeNPaBnHa yNtpe6a Илн Ha peMOHT, n3BbPseH OT HeKBaJIINФИцPAn nepCOHaJI.
To3n ypeI He e npEHa3NaueH 3a n3noJ3BaHe OT Iuca (B TOBa YncNo n Deua) C cn3UeCKN, CETNBn IIn yMCTBeHN YBPExkDaHn IIn 6e3 ONNT NIO3HaHH, OCBEN AKO He ca KOHTpOJIpaHn IIN oBuYeHN da I3NOJ3BaT ypeA OT IuTeTO, KoEtO OTROBApA 3a TxAHATA CNyphOCT. - Deuata Tp6Ba Da 6bDat Na6IIOaBAHn, 3a Da He ce Donycka Da NrpAaT Cypeda.
3a no-do6pa 3aunTa ce npenopbUba nHcTaInpaHeTo Ha npedna3Ho yCTpoiCtBO 3a ocTaTbueH TO (IOVT) c pa6oTeH OCTaTbueH TOK He NOBue O T 30 mA.ObpHeTe Ce 3a CbBET KbM Ba7nA eNeKTPOTEXHk.
He 6opabete c anapaTa c MOKpn nBnBnKn pue nn CTbnana.
3a da n36erHeTe TOKOB yIap, dpbXTe anapaTa daney OT BODa nnDpyr TeHocTn. He ro BKIOUcBaITe, aKO ce HAMnpa Bbpxy BlaJxHa NOBbpxHOCT.
- NocTaBete anapata Bbpxy cyxa, TBbpda n CtaBnHa NOBbpxHOCT.
He no3BoJraBaIte Deca nJIHn HnPaBocNoC6Hn IuCa Da 6opabT c anapata 6e3 Ha3Op.
He octabnTe anapaTa BKnIOueH, TbK KaTO MOKe Da 6bJe N3TOUHNK Ha ONaCHOCT.
3a da n3KIOHnTe UeNCeNa, HNKORA He DbPnaIte 3a Ka6ena.
- I3KlOyTe anapaTa ot eNeKTPnueckaT a MpeXa, npei Da npEeInpneMeTe KaKBInTo n Da ca DeNCTBnI NO NOnCTBaHETo INI NODpBXKaTa My.
B cnyaHa noBpeHa nI IIOso cyHKcnoHpaHe Ha anapata, n3KIOUcTe ro n He ce OINTBaHTe da ro nonpaBArTe. Ako e Heo6xOdmo Da 6bDe peMOHTnpaH, o6bPHeTe ce KbM OTOpN3npaH OT pOn3BOJNTeJIa TEXHNueCKn CepBn3 n N3NCKaHTe N3NOJ3BaHeTo Ha opuRnHaJIHn pe3epBHy qactn.
Ako e yBpeDen Ka6eIbT Ha anapaTa,ObbpHeTe ce KbM OTOpN3npaH TexHnueCKn CepBn3, 3a Da rO CMeHrT.
He octabnTe anapata n3IOxKeHa aTMocpepHnTe BInAHn (IbXd, CJIbHue, IeN np).
He n3no3BaIte Hn NoCTaBnTe HnKaKBa YacT OT anapaTa Bbpx Nn B 6n3OcT Do ropeuN NOBbpxHOCTn (eJeKTpueeCKn nn ra3OBn KOTIOH Nn FpyHn).
He n3noJ3BaITe a6pa3NBHn
Kbprnn nnn npenapatn, 3a da ro nouuctBaTe.
He nnpaTe ropeuNTe NOBbpxHOCTn. N3noJ3BaIte dpbXkata nn pboKoXBaTKaTa.
He onyckaIte KaebIbT da onipa do ropeuTe yactn Ha anapata.
CTo3n ypeI He 6bVa Da ce pa36bpKBaT nIN CmecBaT 60N, IaKOBn 3anaJIIMn pa3TBOpNTeIN.
Pa60HTHnTe npncTabKn Tpr6Ba Da ce nOCTaBnT nCBaJIrT, KOraToypeDbTe n3KJIIOUeH OT mpeXkata.
-Предида ВКлочиуpeда
В КОТаКТа, Роверете Далп
приставкпte са добpe моHTиран
на anapata.ИЗчakай
проставкпteда спразнаньно
предида ГСвалпгOT МИКсера.
He nnaTe NOBnKnTe qactn no BpeMe Ha pa6Ota Ha ypeJa.
MukcepbT He 6nBa Da ce noJ3Ba 6e3 npekcbaHe 3a nobuee ot 3 MNHyTN.
He n3noJ3BaIte cyHKuIra Ta Typ6o 3a noBuee ot 1 MNHyTa 6e3 npekbcBaHe.
Pbue, Koca, dpexn npytn npnbopn Tp8Ba Da ca daJeu OT 6bpkaKNTe no BpeMe Ha pa60Ta.
He n3noI3BaIte 6bPkaknte 3a CMEcBaH e Ha MHOro TBbpDn npOdykTn.
4. MOHTNPAHE
Pa6oTHnTe npncTaBKn Tp6Ba Da ce nocTabrN CBaJIrT, KOrato ypeIbTe e N3KIOUeH OT MpeXkata.
MoHTnpaHe n3nOJ3BaHe Ha NaKpaHnKa 3a NaCnpaHe
-Пи n3KIOUeH OT KOHTaKTA ypei 6byToHbT 3a n3bOp Ha cKopocT (3) Na nOIOxHeNe "0", nIb3HeTe HArope 3aunTHaTa KaNaUka (6) (ФИr.В).
MoHTnpaITe HaKpaHnka 3a nacipane (9) KbM Kopnyca Ha Mnkcepaa.3a ueJa, noCTabeTe eINH cpeuy dpyr HnDnKaTOpbT Na Kopnyca Ha Mnkcepaa (5) n
Ha HaKpaHnka 3a nacnpaHe (9) n 3aBbPTeTe HaKpaHnka B Nocoka Ha YacOBHnKObaTa CTpeJIka DOKaTO cnpe. (Pur.C).
- NocTaBete nacpaunHaKpaHnK (9) B Kynata C npOdyKTnTe.
3a da cbaHnte HaKpaHnka 3a nacnpaHe OT KOpnyca Ha MInKcepa (5), 3aBbPTeTe ro B Nocoka O6paTHa Ha YacOBHNKObAta CTeJka, DOKaTO INdIKaTOPHTe n AactaHaT eINH cpeu y dpy, n CneI TOBa ro dpbHHeTe.
MOnTnpaHe Ha npucTaBKnTe da MeceHe (8) n pa36nBaHe (7)
- Пи n3KIOUeH OT KOHTaKTA ypeI, cNoXeTe 6yToHa 3a n36Op Ha CKoPoCT (3) Ha noJoxKeHne "0".
3a Da NoCTaBnTe npuctaBKnTe 3a MeceHe (8) nnn pa3bnuBaHe (7), XbaHete DpbXkata Ha MmKcepac eHa pKa n npuctaBkata C dpyrata:
-Бьркалкna pa36nbahe: Пьхнeteбьркалкntedo nOLOXKeHne,B KOeTO ca 6NOKupaH, KaKTo e NOKa3aHo HaФИуpaD.
-Бьрkankn 3a MeceHe:ПьхHete 6ьрkankaTа,КОТо Има NO-ROJMA Wai6nUkKa,BДЯСHTO rHe3do,ДО NIOJOxEHne,KORAto ce 6blOKupa.HanpaBete cIooTO, 3aДa NOCTaBnte N 6ьрkankaT a 6e3 WainbA B JABOTO rHe3do (Фиг.E).Ако He Г moHTnpaTe NO TO3N HauIN,OBpa6OTBaHnTe npOdyKtmoKxe Da npeJeT.
BkIIOUe Te ypeBa KOnTaTaN CNoXeTe 6bpKaIKnTe B CpeDaTaHa npOdyKTnTe, KOnto ige Ce o6pa6oTBaT.
3a Da n3BaAnTe 6bPkaknTe, HATNCHeTe 6yToHa 3a OCBO60XdAbaHe Ha npCtAbknte (1) nDbpaTte 6bpKaKnTe, DOkato Tn n3BaAnTe (pnr.F).
5.ФУнклmoHиРаHE HA YPEДA
BknuoyTe ypeDa B mpeXaTa n HaTnCHeTe 6yToHa 3a n3bOp Ha ckopoCT (3)do nOJoxHeNe "1",3a Da 3anOHe pa60Ta.Cnei ToBa n36epTe NdoXoJa caKopoCT, B 3aBnCmOcT OT o6pa6OTkata. BoTe ce ot cIeHnTe yka3aHn:
0.ИЗключedo
-
3aNoUBaIte pa6oTa BnHaR n Ta3n cKOpocT. Ta3n cKOpocTe uDeaHa 3a TeCTa n Cyxu npOdykTn KaTo 6paUHo, MaCNo nn KapTOcHn.
-
CkopoocT, noxOJa7a 3a CmecBaHe Ha TeuHn npOyKTu KaTO caTaTHN COCOBe.
-
Ta3n ckopocT ce npenopb4yBa 3a HanpaBa Ha Cmec 3a KeKCOBe n 6nCKBNTn.
-
Ta3n no3nue Ce npenopbUba 3a MacneHo-3axapHn KpeMOBe nIu 3a pa36nBaHe Ha cIaKnUu NKpeMOBe 6e3 BapeHe.
-
CkopocT, noDxOJa7a 3a pa3bBaHe Ha Rua, rna3ypn 3a neueHe, 3a KapTofoHIOpe, 3a 6neHe Ha cMeTaHa n dp.
Bunhar 3anoybaTe pa6oTa HaCKOpocT "1" n CneTdToBa, n aKo e HuxHo, MInHeTe Ha No-Bucoka ckopocT. NTo3n HauHn Ze n36erHete npOdykTnte da Bn Hanpbckat.
Cne KaTo npKIOUHTe paOTo, NOCTaBeTe 6yTOHa 3a N3bOp Ha CKOpOCT (3) HA NIOJOKeHne "0" IN 3KNIOUte ypeDa OT KOHTaKTa.
BAxHO:He n3noJ3BaIte MmKcepa 3a noBuee ot 3 MNHyTn 6e3 npekbcBaHe.
ByToH 3a Typ6o ckopoCt (2)
Korato 6pa60KaTa Ha npOdyKTnTe Hana yBelenuabaHeTo 3a MOMENT Ha CKOpocTta,HaTnChete 6yToHa 3a Typ6o (2).Moxe da n3PON3BaTe Ta3n FyHKnIg N KORATO 6pa60KaTa Ha npOdyKTnTe He n3NCKBA MHOrO Bpeme.
Ta3nФyHKuIa Tp6Ba Da ce NOJ3Ba C npeKbcAHn, 3a MOMENTHa 6pa6OTka, KaTO 6yToHbT Ce HATNcKa 3a HAKOJIKO CEkyHn.
BAxHO: He noJ3BaIte Ta3n ФункцЯ 3a NOBuee ot 1 MInHyta 6e3 npeKbCbaHe.
6. NOCTABKA 3A MACA (MOД. SP-350 PLUS)
IocTaBkata 3a Maca (16) ce n3noJ3Ba B KOMbHaCn C npCTaBKnte 3a pa3bNahe (7) n MeceHe (8). PnKpeBaHTo Ha MmKcep a (5) KbM onopata 3a QnkCupaHe (11) cTaba no CJeDnHaunH:
-
NocTaBTe KynaTa (15) c npOdyKTInTe Bbpxy OCHOBaTa 3a Kyna (14) Ha NoCTaBkata 3a Maca (16) (pnr. G).
-
NocTaBeTe KOpnyca Ha MmKcepa (5) Bbpxy Onopata 3aФmKcnpaHe (11) nHaTnChETe NeKO HAnOly, 3a Da ce 3actOnOpn Ha 3b6uTe 3aФmKcnpaHe (ФИr. H).ПрOBepTe dann MmKcepBt e NaCHaI neppeKTHO Ha Onopata 3aФmKcnpaHe (11).
-
BytheTe HaBbH 6yToHa 3a pa36IokpAHe (13), 3a Da BmIrHeTe onopata (11) 3aeDHO C MOHTnpAHn MMKcep (fur. I). B TOBa NIOXKeHne IbxHEte npictabknte 3a MeceHe (8) mIu 3a pa36IpaHe (7) B rHe3dTa Ha onopata 3a fIKcnpaHe Do NIOXKeHne, B Koeto ca 6JOKpAHH:
-Бьркалк 3a pa36nBaHe:ПьхнeTe 6ьркалкnteВгe3dataHa onopata 3aФИКсираH eДо NOLOXKeHne,Bkoeto ca 6blOKupaHn (ФИr.J).
-БьрkanKn 3a MecHe:ПьхHete 6ьрkanKaTa, KOrTo IMa NO-ROJMA Wai6Nvka, BДЯCHOTo THe3do, Do NIOJoxKeHne, B KOeTO OCTaba 6JIOKnpaHa. ПьхHete 6ьрkanKaTa 6e3 Wai6a B JABOTO THe3do (Фиr.К). Ako He
MOMHTnpaTe NTO3NHaunH,
O6pa6oTBaHnTe npOdyKTm MoKe Da nppeJrT.
CbaIeTe onopata 3a fNkCupaHe (11) n BkIIOUeTe ypeDa KbM MpeKaTa.
Cnoxete 6yToHa 3a n36op Ha ckopoCT (3) Ha noLoXeHne "1" 3a 3aNoUBaHe Ha pa6Ota.CneT Oba n36epeTe NOxOJaCa ckopoCT, B 3aBnCmOcT OT o6pa6OTkata, Taka KaKTo e yKa3aHO no-rope.
CneKaTo npKIOUHTe pa6Ota, nocTaBeTe 6yToHa 3a N36Op Ha CKOpOCT (3) Ha NpOxHHe "0" IN 3KIOUHTe ypeDa OT KOHTaKTA.
NoCTaBkata 3a Maca (16)pe pa3rno6Ba no cJeDnHaunH:
- ByTheTe HABbH 6yToHa 3a pa36Iokupahe (13), 3a Da BdInrHeTe onopata 3aФNKcupahe (11).
HaTnchete 6yToHa 3a OCBO6OxJaBaHe Ha npNCtABKInTe (1) n3BaJeTe 6bpKaJKNite.
CbaIeHaOnyOnopata3a 6byToHa3aOCBO6OJaBaHe Ha KOpnyCaHaMnKcepA(12),DpbHHeTe MnkcepA(5)Harope,3aDaRoCBaJIte OTNoCTaBkata3aMaca,TakaKaKToe IOKa3aHOHaPnpypaL.
7.ПОЧИСТВАЕ И ПОДДРБЖKA
- Преди поочтван, ИЗк nullуе Teуда оТ конта и NOCTaBeTe 6byToHa 3a ИЗбop Ha ckopoct (3) Ha noLoXeHne "0".
-Почиствано набьркалкite (7 n 8), Куна(T15)иHAнakраинka 3a nacupahe(9)eMHORO no-NeCHO,akO ce BbpHn HENOCpeIcTBeHO CneДуnotpe6a.ИЗмптгсТОпla BOdaи canyH,ИЗплakHTe Ги ng NOdcyweTe Do6pe.
KopnycaHa MmKcepa (5) n NOCTaBkata 3a Maca (16) NOnHCTBaIte CJeKO HbIaxHeHa Kbpna. He DOnyckaIte Da BNe3e Blara B MmKcepa I B NOCTaBkata 3a Maca.
He n3no3BaIte 6eInha n a6pa3nBn npOdyKtn 3a noHCTBaHETo Ha MmKcepa.
- Pnuctabknte 3a Mecehe (8) n 3a pa3bBaHe (7), Taka KaKTo n Kynata (15) Morat da ce nouchTbat N B CbDOMNHa MaunHa.
8.ИHΦOPMAUЯ 3A ПРABUNHOTO EJIIMMHUPAHE HA EJEKTPUCHEKN I EJEKTPOHHI DOMAKHCKN UPEДN

B KpaHa Iono3HnJXNBOT Ha anapaTa He6nBa Da ro n3xBbPnTe B KOHTeHepa 3aO6NKHOBeHN DOMaSHNOTnAbu. Moxe da ceOCBO6oDnte OT Hero,
KATO TO OTHECETE B CNEUAnHNTe
UENTPOBE 3a BTOPuHN CypOBUNH KbM
MeCTHNTe aDMnHnCTpaun Nnn Baun
DOCTABYNK, KOINTO Ca IINbXHN Da
yNecHBAT Ta3n DeHocT. Pa3dEnHOTo
N3XBpPLHa He eNEKTPO-DOMaKNHCKN
YpeDN pPeDOrTBpaTBA peN HeRaTHBHN
NoCleDuN 3a OKONHaTa CpeDa
N 3dpABETO, POn3TNuaN O T
HeADeKBaTHOTO IM N3XBpPLHa,
KaKTO NIO3BOJRABa peuNKnIpaHTo Ha
MaTePnaJIte, OT KOINTO e HAnPaBeH
YpeDA, KaTO NIO To3n HaUnH Ce NOCTnra
CyVBCTBnTEJNa HKOHOmHa CypOBUNH
N eHeprN.
C cen Da ce NoOpertae Oune BeHNbX
3aNbJxKeHnETo 3a pa3dEnHO
N3XBpPLHa He OTNaDbuHTe Ha BCEKN
PiOduyKT e OTBeJn3ah CneuJaEN
3HaK, KOINTO BN ppeDynpexkDaBA n
NoCeUa Da He rO N3XBpPLaTe B
KOHTeHepa 3a ObuKHObeHn DomaHn
OTnAdBuN.
3a Nobeue INΦopMaUaNce ObpHete
KbM MeCTHNTe BnactN NNI KbM
Mara3Ina, OT KbJeTO CTe Kynnn
npOdykTA.
RU
1. YCJIOBHBIE OBO3HAUHIN
(Pnc. A)
- KhoNka OTcoeINHeHnA
- Khonka «Typ60»
- NepeKIOUaTeJIb CKOpocTn
- Ceteboi shyp
- Kopnyc Mkkcepa
- 3aunTHaKpbIiKa
7.HacaKnIbB36BaHNA
8.HacaiknIa3MeuBaHHa
9.Hoxka MmKcepa
Mоделb SP-350 PLUS:
- KpenneHHa
- Puyka KpenneHnA
- KhoNka OTCoeDInHeHnKopnyCa MUKcepa
13.3aueJka pa36nKpOBaHn
14.Ochobahne yauin - Yama
- HactoJIbHaI NOCTaBka
2. TEXHnueCKne
XAPAKTEPNCTUKN
IocmOTpTe nacnOpTHyIO tabnUky np6opa.
JaHbI np6Op COOTBeTCTByeT HOpMaM EC kacaTeNbHO
3JIeKTpOMaHHTHOJ COBMeCTUMOCTn HOBMeCTUMOCTn np6OpOB Hn3KOro HanpaxEHH
3. MEPbI IPEIOCTOPOXHOCTN
- IpeepnepBbIM nCNoB3OBAHHeMaHHORo npnbopa BHNMaTeIbHO npOHTe HactOauee pyKOBODBO NO 3KcNpyaTaunu coxpaHnte erO dIra nCNOJb3OBAHnB KaueeCTBe cnpabOCHOro MaTePnAJa B 6yduem.
- Y6eIITecb, yTO HAnpJxKeHne B CETN B IOMeUeHn N MOUHOCTb PO3ETKn COOTBcTcTByIOT 3HaueHnIO, yKa3aHHOMy Ha npiope.
B Cnyae HecOBMeCTMIOCTN
po3eTKn nCTOCHNk TOKa CO wTeNCeBHO BUNKO np6bopa npo3BeDNTe Heo6xODmYo 3aMeHy po3eTKn, np6eHyB K NOMOUI KBAJIINΦnCUPOBAHhIX CNEUJAINCTOB.
- 3JekTpuecka6e3oNaCHOCb np6opa rapaHTnpyetcT TOIbKO B Cnyae,ecn OH NOdkNIOUeyH K aJeKBATHOMY nCTOuHNky 3a3EmJIeHn, CORlaCHO DeiCTBvUOUM HopMaM 3JekTpuecko6e3oNaCHocTn. Pn HAnuHn COMHeHn ObaTteCb K KBaHnΦnUpOBaHHbIM CneuaJIncTaM.
He peKOMeHdyeTcNcNoJIb3OBaTb aIaNTepbl, TpOHNKn n/ nn yIINHInTeJI. B cIyuae Heo6XODIMOCtN CNeDyET NcIOJIb3OBaTB ToJIbKO aIaNTEpbI n yIINHInTeJI, COOTBeTCTBYUOnne DeIcTBYIOUIm HOpMaM 6e3OJaCHocTN. Pn 3Tom HxKHO CJeINMb, YTObI He 6bl IpeBbIWeH npdeJ MoUHOCrN, yKa3aHHbI Ha aIaNTepe. - Iocne n3BLeueHn i3 ynaKOBKn y6eNTecb, yTO np6Op haxoNTcB B 6e3ynpueHOM COCTOHN. Pn HAnuHm ComHeHn O6paTntEcB B 6nJkaaun cHTp TexHnueCKOrO 06cnyxnbAHn.
KOMNOHEHTbI ynaKOBKn (nlaactNKOBbie naKeTbI, NOINCTnpOJIbHaI neHa n T.D.) CNe dyET xpaHNTb BdaJN OT DeTei, TaK KaK OHN MOrY CTaTb NOTEHuaJIbHbIMN NCTOCHKaMn ONaCHOCTN.
-ДаньnpборсеуET npIMeHЯТb TOnbKO ДЯ 6bITOBOrO nCNoIb3OBAHnI.ЛIObOE dpyroe nCNoIb3OBAHnE paccMaTpNBaeTcA KaK HeaDEKBaTHoe INI ONaCHOe.
-ПОНЗВОДNTeЛь He HeceT OTBETCTBeHHOCTN 3a NOBpeXKeHnI,HaHeCEHHbIe BCJIeIcTBnE HeIpaBnIbHOrO, OUn6OuHOrO nII HeZeJeBOrO IcNoJIb3OBAHnI Prn6Opa,a TaKxke 3a peMOHT,ПОН3BeDeHHbIy
HeKBaJIINΦUncIpObaHHbIM NepCOHaJOM.
He npikacaiTecb K npnbopy MOKpbIMN INBn BnaXHbIMN pyKaMn IN HOrAMN.
Bo n36eKaHne 3neKtpnueckoro pa3pa daepknte np6op Bdann OT BOdbi nn Dpynx KndKOCTe. He BkIouaTe np6op B ceTb, ecnn OH yCTaHOBHe Ha BnaXHoI NOBepxHOCTn.
- YctaHaBnBaIe np6op Ha cyxyIO, TBepyIO u yCTOuHByIO NOBepxHOCTb.
He no3BOJnTe DeTAM nIN HBAJIaAM ICNOJIb3OBaTB np6Op 6e3 npncMOtpa.
3ToT aannapat He npedHa3HaueH dIaNCN0b3OBaHn Iuamn C OrpaHnueHHbIMN DBNrAteJIbHbIMN IIN YMCTBeHHbIMN CIOOC6HOCTAMN (B TOM YncIe DeTbMn), a TaKxE Iuamn, HE IMeIOUIMN COOTBeTCTBYIOUX 3HaHn NOnbITa. Pa3peuaeTcra NOlb3OBaTbcra annapaTom TOJbKO IOd HabIOHeHem IIN pYkoBOIDCTBOM INuca, OTBeTCTBeHHoro 3a erO 6e3oNaCHOe npimHeHne.
- DeTm 3anpeucaetc nrgpaTb c annapaTOM.
Для NOBblsHnCteHn 6e3OanachocTn NcNoJIb3OBaHn npIbopa peKOMeHNdyETcYCTaHOBka yCTpOInCTBa 3aUHTHO OTKJIIOUeHn (V3O) IJr CINbI TOKa, He npeBblaUoSei 30 mA. BocnoJIb3yITeCb npN 3Tom COBeTOM MOHTaXHnKa.
He octabIaIte BkIIOueHHbI yTIOf 6e3 npICMOtpa, TaK KaK OH MOKeT CTaTb NCTOUYHKOM ONaCHOCTN.
BbHIMaI WTeNCeIbHyIO BUNKy I3 pO3ETKn, HNKOrDa He TAHNTe 3a UHyp nITaHn.
- OTKIIOUaIte npIbOp OT cETn nepei HauJOM IIO6bIX OepaCNI PO UcIcTKe N O6CJIyXKIBaHIO.
B cnyuae noIomkn nIIN He npabnIbHoi pa6Otbi npnbopa npeKpaTnte ero nCNoIb3OBaHne, BblIOHTe ero n He nbITaHTecb noHNHTb. B cnyuae heo6xoJIMOCtN
peMOHTa,obpaauTecb NCKIIOUHTeINbHO B CEHTP TexHnueckOro 06cnyXnBaHHa, cePTnΦuNPOBaHHbI INpON3BOJNTeJIem,C 3aNPocOM Ha 3aMeHy OPUNHaNbHbIX DeTaJIeN.
-При повржденишнура ппаньданно рибopa орацайтесьВ срtnфицюразовны центгХнчecкого обслжимьная дяero 3amehbl.
He npDBepraTe np6Op BO3dEiCTBnIO npnpOAnbIX ABLeHn (TaKnx KaK DoXDb, CoINCe, JeI IN T.D.).
He nCnoJb3yIte n He paCnoJaarTe HnKaKne yactn DaHnHO npN6opa Ha rOpAHX NOBepXHOCTaX (ra3OBbIX NIN 3JIeKTPnueCKNX BapOHyBX NOBepXHOCTAX INI nnTax).
He nCnoJb3yInTe moIOUne CpeIcTBA nn a6pa3nBbIe TkaHn IJI YNCTK np6opa.
He npikacaiTecb K ropaym noBepxHocTAM. IcnoIb3yIte pyukn nnpyKoRTkn.
He donyckaIte, YTo6bl HHyp nItaHnKacanCra ropqnx qacte npnbopa.
He nCnoJb3yIte yCTpOInCTBO dIydaJIeHn IIN CMEuINBaHn KpaCOK,JaKOB,JeRKOBOcNJaMeHrIOUxxCpaCTBOpNTeJIe.
- YctaHaBnBaIe N CHMaIte pa6Oue HacaKn TOnbKO TOrda, KOrDa MmKcep OTKIOUeH OT CetN.
- Ipeed noKluHHeHem ycTpoNCTBa K cETn, yBeINTecb, YTO hAcAkn, KOtOpBle Bbl 6yDeTe NcNoJIb3OBA Tb, ycTaHOBJIeHbI npaBUNbHO. Ipeed TEM, KaK OTcoEINHrTb HacaKn OT ycTPOINCTBa, DOxJNTecb INX NOnHOJ OCTaHOBKN.
He npnkacaTecb K DnKxUmCraCTAM BO Bpempa60tbl Mkcepa.
He donyckaiaTe HenpepbBHO pa6oTbIMKcepa B TeueHne 6onee 3 MNHyT.
He nCnoJIb3yIte cyHKcIIO "Typ6o" HnpepbIBHO 60Jee 1 MInHyTbl.
- Пи ИСПОЛБ3OBAHIN MИКCEpa cIeДNTe 3a Tem, YTOБbl pyKn, BOLOcbl, ODEЖДа И почne
npeDmetbI 6blN BdaJI N OTHacaDOK.
He nCnoB3yIte HacaKn IJRA CMeuBaHnCINuKOM TBepDbIX INHpeDneHTOB.
4.CBOPKA
YcTaHaBnBaIe n ChMaIte pa6Oyne HacaIKn TOnbKO TOrda, KOrda MmKcep OTKIOUeH OT CETN.
YctaHOBka NUCNOJIb3OBAHne CbEMHO HOKKMUKcepa
- Y6eINBwncb, yTO yCTpOcTBO BblKJIIOUeHO n3 CeTu N nepeKlIOuATEIb CKOpocTn (3) HaxoINTCBA NOLOXKeHNN «0», NOTAHNTe 3aUNTHyIO KpbIiKy (6) BBepx (pnc. B).
-ПисоeДиНTe HOЖу (9)К корпсу MИКсера.ДЯЗТOrO BblIpOBHЯnte MeTKy Ha KOPnyce MИK cepa (5)c MeTKoI ▲Ha HOxKe I NOBepHInTe HOxKyNo Yacobov CTpeJke Do ynpa (pnc.C). - NomeCTNe HOxKy (9) B uAwy C INHrpEaHEnTAMN.
- Yo6bI OTOeINHHTb HOxKy OT KOpnyCa (5), NOBepHnTe ee npOTNB YacOBoN CTpeJKN Do COBnaDeHNr MEtOK N ▲, NocJe Yero BbIHbTe HOxKy n3 KOpnyCa MmKcepa.
YcTaHOBka N nCNoJIb3OBaHne HacAOK IJRA B36nBaHHN (7) n 3ameuBaHHN (8)
- Y6eINBwncb, yTO yCTpOncTBO BblIOUeHO n3 cETn, yCTaHOBnte NepeKIOuataJIb CKOpOcTn (3) B INoJoxKeHne 0
Дя yctaHOBKn HacaDOKДЯ B36nBaHn8 (7) nIIN 3aMeuBaHn8 (8), BO3bMITE B OdHy pyky MmKcep 3a pyKy, aВ dpyryIO - HacaDky:
HacaKn DnB36nBaHHa: BcTaBbTe hacaKn Do ynpa, YTO6bl OH 3aΦNKcnpoBaIncb, KaK noka3aHO Ha pucyHke D.
HacaKnIa3ameunBaHna: BCTaBbTe HacaKy c 7a#60i
B OTBepCTne Cnpaba, TaK, 7TO6bl OHa 3aФNKcnpOBaJnacb. AHaIOrnUHO, BCTaBbTe HacaKy 6e3 Wai6bl B OTBepCTne CJIeBa (Pnc.E).EcIn yCTaHOBtB HacaKn HeNpaBnIbHo, INHpeDnEHTbI MOryT BbINNeCKnBaTbCn 3 YaSiN.
BknHouHTe yctpoiCTBO B ceTb nIOMecHTe HacaKn B cepenHy CMeUNBaEMbIX npOdyKTOB.
- 4TO6bI BbIHyTb HaCaJKN, HaxMMTe KHOKNY OTCOeINHeHnHaCAdOK (1) IN CHIMITE HACaIKN, NOTAHyB 3a HNX (pnc.F).
5.PABOTA YCTPOICTBA
BkIIOHTe MIKCEp B CeTb N yCTaHOblte nepeKIOUaTeNb CKOpOCTn (3) B nIoXeHne «1», qTO6bl pINBeCTn eO B DeiCTBHe. IocNe 3TOrO cKOpOCTb MOxHo 6yET n3MeHNTb Ha Ty, qTO 6oJIbWe NOxOHT K BbINOJHReMoN 3aJaYe. NepeKIOUaTeNb cKOpOCTn NMeet CJeDyIOUne nOLOXeHnA:
- BbIKIIOUeHO
- Bcerda haunhaite pa6oTaTb Ha 3Toi ckopoctn. 3Ta ckopoctb Lyuwe BCero NOxOuNT dNra TeCTa N cyux INpoDyKTOB, TaKNX KaK MyKa, MacNo nn KapTopeNB.
- Θа ckopocTB NOxOHTДЯ CMeUBAHn JNknx INHpeDneHTOB-HaNPmEp, COycOBДЯ caNaTOB.
- Θа ckopoctb peKOMeHdyeTcAДЯ TeCTa ДЯ ПИPOXHbIX ИИСухOrO NeueHbI.
- ΘTO nOLOXHe NpeKOMeHdyetcA DnRA KpEmOB,CoDEpXaUxMACNo N caxap,INN DnRA C6NBAnHcIaIOCTeN DEcepTob, He Tpe6yIOuNX pnproTOBneHnA.
- CkopocbI dIa cIbAHnI
Iu, rna3ypen, Tpe6yUOux
PnIroTOBNeHnI, IJI
CMeunBaHnI KapToPeJbHOrO
IOpe, PnIROTOBHeHnI CbNTbIX
CINBOK N T.I.
BcerdaHaunhaitepa6oTaTb HaCKOpocTN «1»,3aTeM,ecnI noHaOobntcH,yBeJIuYbTe ee. 3TO npedOTbPaTNT BO3MOxHoe pa36pb3rBaHHe INHpeJneHTOB.
3aKOHnB pa6Otu, yCTaHOBnte nepeKIOUaTeIb cKOpOCTn (3) B nIoXKeHne «0» n BBiKIOUHTe yCTPOINCTBOOTcETn.
BHIMAHHE:HeHcIOJIb3yIte MHKcep HeIpepbIBHO 60Jee 3MHHyT.
KhoNka «Typ6o» (2)
- EcIn BO BpeM CMeUINBaHn HxHo HeHaIOJIO yBeIINuHTb CKOpOCTb, HaxMInTe KHOKy «Typ6o» (2). TaKxe MoXHO nCNoJIb3OBAtB 3Ty KHOKNy B CInyae, ecIn nprirotOBJIeHne IpOdyKTOB He Tpe6yeT DOJrOro BpeMeHN.
- IcnoJb3yIte 3Ty cyHKUIO BpeMOT BpeMeHn, DePka KHOKNy HaxaToB TeueHne HeCKOJIbKnx CEkyHd.
BHIMAHHE:He HcnoIb3yIte yHKiHIO "Typ6o" HeIpepbIBHO 6OJIee 1 MHNyTBI.
6. HACTOJIbHARIIOCTABKA (MOIDEJb SP-350 PLUS)
HactoBnaI NOCTaBka (16) IcnoJb3yETc BmecTe C HacaKamn Dnla 3ameuBaHn8)N B3bnuBaHn8 (7).Mnkcep53akpePnEeTcHa pyUke KpePnEHHa11CneDyUOUM 6pa3OM:
- YCTaHOBnTe YaSy (15) c INHrpeIeHTaMn Ha NODcTaBky IJN YAuN (14) HAcTOJIbHOINoDCTaBKn (16) (pnc.G).
- YctaHOBnTe KOpnyc MmKcepa (5) Ha pyUky KpeIeHn (11) Cbepxu n CnErKa HaxMnTe Ha Hero, YTO6bl OH 3aΦnKcnpoBaIcR KpeIeHnAMn (pnc.H).Y6eDntEc b TOM, YTO MmKcep HaJeXHo 3aΦnKcnpoBaIcRa Ha pyUke KpeIeHn (11).
- Haxmnte Ha 3aueIky pa36loKupOBaHn (13) B
HanpaBHeHn OT Ce6, YTO6bI NOHaTb pyKy KpeNHeHn (11) C ycTaHOBJIeHHbIM Ha Hei MInKcepOM (pnc. I). B 3Tom noLoXeHn UCTaHOBInTe HacaIKn DInr B36NBaHn (7) nnn 3aMeuBaHn (8) B OTBepCTnHa pyUke KpeNHeHn TaK, YTO6bI OHn HaeJxHo 3aФNKcnpOBaJIncb:
HacaKn DIA B36NBaHHa: BcTaBbTe HacaKn B OTBepCTN B pyUke KpePHeHna Do ynpa, YTO6bl OH 3aФNKCuPOBaJIncb (pnc. J).
HacaKn 3aMeINBaHH: BCTabTe HacaKy c waibov B OTBepTne cnpaba, TaK, YTObI OHa 3aФNKcnpoBaIacb. BCTabTe HacaKy 6e3 waibbv B OTBepTne cneBa (pnc.K). Ecn yCTaHOBt b HacaKn He npaBNbHo, INHpeDIneHTbl MOrYT BblJIeCKNBAtbcr n3 YaShn.
Onyctnte pyky kpeIenHn (11) n BkIIOHTe yCTpOJCTBO BCtB.
- 4To6bI BKNIOHTb MNKcep, nepeBeNTe NepeKIOUaTeNb cKOpOCTn (3)B NOJoxKeHne «1». IocJIe 3TOrO cKOpOCTb MOxHO 6yJeT N3MeHNTb Ha TY, YTO 60JbWe NOxOJNT K BblONHReMoN 3aJaYe, KaK 6bIIO ONICAHO BblSe.
3aKOHnB pa60Ty, yCTaHOBnte nepeKJIIOuAteIb CKOpOCTn (3) B nIoXKeHne «0» N BBiKJIIOUHTe YCTPOINCTBO OT CETN.
YTo6bI pa3o6paTb HAcToIbHyIO
NoCTaBky (16), DeIcTByIte CJIeDyIOUIM
O6pa3OM:
HaXMMTe Ha 3aueKpy pa36IoknpoBaHn (13) B HAppaBHeHH OT Ce6n I NOdHMmTE pyUcK KpeJIeHH (11).
- HaxmTe Ha KhoNky OTCoeiHHeHnHaCaOK (1) N BbIhBTe HaCaIK.
Onyctnte pyky kpenlennna (11) HaxMMTe KHOKNy OTCOeINHeHnKopnyCa MInKcepa (12),NOTAHNTe MInKcep BBepx, YTObI OTCOeINHHTbKOpNc MInKcepa (5)OT HAcTOLbHOI NOCTaBKn, KaK NOKa3aHo Ha PncyHKe L.
7. OБСЛУЖИBAHAЕ ИЧИстKA
- PpeXde, Yem npCTynaTb K YnCTKe, OTKJIIOHTe yCTpOINCTBO OT cETn U yCTaHOBInTe nepeKJIIOUaTeIb CKOpOCTn (3) B nONOXHe N<0>.
HacaKn (7 n 8), yawy (15) n HoxKy MInkcepa (9) ropa3do Ierue YIcCTNTb cpa3y nocne uCNOJb3OBAHnB. BbIMoITe INB TEnIOB MbIbHOB BODe, npOMoITe YIcTOn BODoN XOpOio BblCyuINTe.
ДячNTКОрпуca Mнкера (5)иНаTOьHоN NOДCTaВКИ (16) ИСПОЛБ3УITE BлAJKHyIO TKAHb. CNeДITE 3a Tem,ЧТОБbl BHyTpB Mнкера ИНаTOьHоN NOДCTaВКИ He NonaJa BOda.
He nCnoB3yIe 7eJOK n a6pa3nBbIe cpeIcTbA dJIa YNCTKmIKcepa.
HacaKn IJI B3bBAHNA7 (7) n 3aMeuBAHN8, a TaKxuey (15) MOXHO MbITb B NocydomoeyHOM MaUNHe.
8. INΦOPMAÇI R O IPNABUNbHOY UTVJIN3ALÇN N 3JEKTPUÇECKNX N 3JEKTPOHbIX IPNBOPOB

Iocne OKOHuaHn
cPoka cnyx6bl, daHHbI INp6Op He DoJXeH
yTUN3NPOBaTBcBBAMeCTe C 6blTOBbIMN OTXdAMN.
Oh moKet 6blbpeDaH B CneuHaBbIe ceHTpbI
DnΦΦepeHcnpOBaHHoro c6opa OTXODOB, HaxOJaUeCeB BeDMCTBe MYHUNaJIbHbIX BlaCTeN, NIA areHTam, pa6oTaIOuIM B daHHoI cΦepe ycnyr. Pa3dEJIbHaY yTIN3aUIN 6bITOBbIX 3JIeKTPoPnIbOpOB n03BOJAEt I36EkaTb BO3MOXbIX HeRaTINBHbIX NOCLeIDCTBn DnI OKpyxKaIOSeI CpeDbI N 3dOpOBbR IIODeN, KOTOpBIE MOrYT IMETb MeCTO BCNEdCTBNe HEnpaBNbHOyTIN3aUIN, a TaKKe I03BOJARE TNOBTOH NOCNoJIb3OBaTB
MaTePnAJIbI, BxOJaUeB COCTaB 3Tnx Pn6OpOB, I Do6Ntbcra, TaKIM 6pa3OM, cyueCTBeHHoJ 3KOHOMIN 3Hepnn n pecypcoB. 7To6bl NpOJePKHyTB Heo6XoDMOCtB pa3dJIbHOYTuIN3aCUN, Ha daHHOM Pn6Ope HAnEceH 3HaK, npDeynpeKdaIOuM O 3anpeTe NCNoJIb3OBAHnRA TpaDNUOHbIX MycOpHBIX KOHTeHepOB. Dna NpOyuEHn8 BoJee NoDpo6HOH INΦopMaun CBAJNTecb C MeCTHbIM OprAHOM Bnactn INn C MaRa3NHOM, rDe Bbl npno6peJIyDaHHbI npOdyKT.
4a
- 3.4c
- 5.
A. , = 0 .
jai 7
S OBC = S COD + S_ BOC
9.6
Mod.SP_350 PLUS:
10
c.11
25
13
14
Jolll 15
2
iiaol
1 1
jI jI jI jI J I J I J I J
j j j j j j j j j j j j j j j j j j j j
j 1
i 1
aannnnae
a aal aal aal aal aal aal aal aal aal aal aal
a jaiil a ball u w jill a ball g aiall Soal b Jaizi
aal l aai i aie j gai n 1
jill jial jill bieally aal oia Jaxiui
aia 1 jsi ydaal oie Jaae 2:
(MOD. SP-350 PLUS)
(8) · = 10 (1)已知 , 是平面磁场当场为量, , | | 1| | 1
定理成立
)1
Jai jai Jai Jai Jai Jai Jai
)
一
)
: 15 k j s i gslol
)
a 1
)
jL 1
jilll lll
aiaaiiie 11
jll 0"0" (3) aill jll
- a1 + a2 + a_3 = 6
)
i. 18 j.
jai jai jai jai jai jai jai (11)
5 5
4.1.2.2.2.2.2.2.2.2.2.2.2.2.2.2.2.2.2.2.2.2.2.2.2.2.2.2.2.2.2.2.2.2.2.2.2.2.2.2.2.2.2.2.2.2.2.2.2.2.2.2.
aalgl
)aill 1
)
alall alall alal yalal yalal lil
J 1
clll
aiaiill aiil 11, aii jai 11 gai Jao