SF 4006 - Deep fryer ALPINA - Free user manual and instructions
Find the device manual for free SF 4006 ALPINA in PDF.
| Product Type | Electric Deep Fryer |
| Brand | Alpina |
| Model | SF 4006 |
| Dimensions (approx.) | 30 x 30 x 30 cm |
| Weight (approx.) | 3 kg |
| Power Supply | 220-240 V ~ 50 Hz |
| Power (approx.) | 1500 W |
| Oil Capacity | Between min and max mark (approx. 2 L) |
| Maximum Temperature | 190 °C |
| Temperature Setting | Adjustable Thermostat |
| Timer | Mechanical, 0-30 minutes, auto shut-off |
| Odor Filter | Yes, replaceable after 10-15 uses |
| Viewing Window | Yes |
| Tank Material | Stainless steel or non-stick metal |
| Basket | With removable handle, dishwasher safe |
| Safety | Lockable lid, overheat protection, auto shut-off |
| Warranty | 2 years |
| Cleaning | Tank, lid, basket and handle washable with hot water; do not immerse the body |
| Spare Parts | Odor filter, basket, handle available |
| Repairability | Repair by authorized agent; do not open yourself |
Frequently Asked Questions - SF 4006 ALPINA
User questions about SF 4006 ALPINA
0 question about this device. Answer the ones you know or ask your own.
Ask a new question about this device
Download the instructions for your Deep fryer in PDF format for free! Find your manual SF 4006 - ALPINA and take your electronic device back in hand. On this page are published all the documents necessary for the use of your device. SF 4006 by ALPINA.
USER MANUAL SF 4006 ALPINA
EN SF-4006 DEEP FRYER
Instruction for use
DE SF-4006 FRITEUSE
Gebrauchsanweisung
FR SF-4006 FRITTEUSE
Mode d'emploi
IT SF-4006 FRIGGITRICE
Manuale d'uso
NL SF-4006 FRITEUSE
Gebruiksaaanwijzig
ES SF-4006 FREIDORA DE INMERSION
BG SF-4006ΦPHTHOPHVK
Hnctpykun3aynotpe6a
SF-4006
EN: For your own safety read these instructions carefully before using the appliances.
Thank you for choosing Alpina home appliance. You have chosen the best appliances that offer 2 years/24 months warranty and years of service. We stand for quality, dependability and friendship forever. We hope you will choose Alpina again and make ALPINA your first choice in home appliances.
IMPORTANT SAFEGUARDS
When using electrical appliances, basic safety precautions should always be followed, including the following:
- Read all instructions carefully.
- This appliance may only be connected to the same main voltage as shown on the rating plate.
- To protect against risk of electrical shock, do not immerse or rinse housing, cord or plug in water or other liquid.
- Close supervision is necessary when any appliance is used near children.
- Unplug from outlet when not in use, before putting on or taking off parts and before cleaning.
- Do not contact any moving parts while the appliance is operating.
- If the supply cord is damaged, it must be replaced by the manufacturer or its authorized service agent or a similarly qualified person in order to avoid hazard & damage to the unit.
- The use of attachment or accessories which are not supplied with the appliance are not recommended. This could result in electrical shock or injury or permanent damage to the appliance.
- Do not let cord hang over edge of table or counter or touch hot surface.
- Do not use the appliance for other than intended household use.
- Switch off the appliance before changing accessories or approaching parts, which move in use.
- The appliance is not intended for use by young children or infirm persons without supervision. Young children should be supervised to ensure that they do not play with the appliance.
This appliance is for household use and may be plugged into any AC electrical outlet (ordinary household current). Do not use any other electrical outlet.
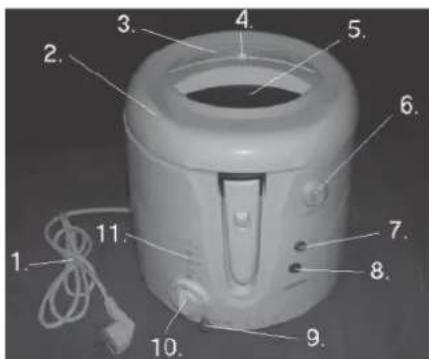

- Power cord
- Lid
- Filter cover
- Filter cover release button
- Viewing window
- Release button for cover
- Power indicator
- Temperature indicator
- Temperature control
- Timer with on/off function
- Cooking times
- Bowl
- Basket
- Handle
- Handle release button
- Anti-odour filter (under filter cover)
Incorrect use of this apparatus may cause personal injury and damage.
The apparatus may only be switched on when the bowl is in place and filled with oil.
NEVER ADD WATER TO THE OIL. THIS IS EXTREMELY DANGEROUS AND CAN CAUSE THE OIL TO SPLASH VIOLENTLY!
- Avoid contact with the hot oil.
- Avoid touching hot surfaces. Always wear gloves.
- Caution! Scalding steam can be emitted from the ventilation holes on the filter cover when frying.
Always allow the oil to cool before moving, emptying or cleaning the apparatus. Keep the lid closed if moving the apparatus when full.
The apparatus or cord must not be submerged in water or any other liquid.
- NOnly use the accompanying accessories.
- Use only metal kitchen implements in the apparatus, as the hot oil can melt plastic implements. Never leave implements in the apparatus, as they will become hot.
Make sure the apparatus is kept clean, as it comes into contact with food.
NB! If a fire starts in the apparatus, never try to put it out with water! Instead, close the lid and try to smother the flames with a damp cloth or wet towel. Remove the plug from the socket.
Positioning the apparatus
Always place the apparatus on a level, dry, stable and heat resistant surface.
Always place the apparatus at the back of a kitchen worktop and at a safe distance from flammable objects such as curtains, tablecloths or similar.
- Never cover the apparatus.
- Do not allow the cord to hang over the edge of a table/counter, and keep it away from hot objects and naked flames. Cord, plug and mains socket
ENGLISH
- If smoke or sparks appear in the apparatus, remove the plug from the socket immediately and get an authorized repair engineer to check it.
- Remove the plug from the socket when cleaning, or when the device is not in use. Avoid pulling the cord when removing the plug from the socket. Instead, hold the plug.
- Check that it is not possible to pull or trip over the cable or any extension cable.
PRIOR TO FIRST USE
- Remove all packaging from the apparatus and prepare for use according to safety instructions.
- Clean lid (2), bowl (12), handle (14), basket (13), filter cover (3) and cabinet as described under 'Cleaning'.
- Check the anti-odour filter (16) is correctly fitted (as described under 'Replacing anti-odour filter').
NB! The apparatus may emit a little smoke and odour the first time it is used which does not come from the food inside. This is due to oil residue from manufacture and is neither abnormal nor dangerous.
USE
Heating the oil
-
Check the apparatus is switched off. Remove basket from bowl.
-
Check bowl is positioned with the hole in the basket at the front.
-
Pour the required amount of oil into the bowl. Fill the oil to somewhere between the minimum and maximum indicator on the bowl o NB! Use only oil recommended for deep frying and not other types of (solid) fats.
-
Close the lid.
-
Set temperature at selector (9) and switch on at mains.
-
Turn timer (10) to "ON" or use the timed frying function to select the desired number of minutes. When the time has expired, a bell will ring and the apparatus will switch off automatically (see 'Using timer' below). Remember that the apparatus must be switched off manually by turning the timer to "OFF" if you have selected the "ON" function. The power indicator light (7) will come on. Do not add the food until the required temperature is reached.
-
Once the oil begins to heat up, the temperature indicator light (8) comes on. The indicator light goes off again once the required temperature has been reached. The thermostat comes on and goes off during use, which merely means that it is maintaining the selected temperature.
It takes around 20 minutes for the oil to reach maximum temperature of 190 C.
Using timer
The apparatus is fitted with a mechanical timer which will switch it off when the time set has expired. The timer can be set between 0 and 30 minutes. Turn the timer clockwise to the required number of minutes. The apparatus will switch on. When the time has expired, a bell will ring and the apparatus will switch off. Remember the oil will still be hot. Remove the food immediately.
Cooking food
Follow the instructions below for cooking food. See also 'Cooking tips'.
Before lowering the basket
Always make sure that the food is dry before lowering it into the hot oil.
- Ensure that the food is roughly the same size so that it cooks evenly. Avoid very thick pieces.
- Make sure you remove as much ice as possible from frozen food.
- Avoid overfilling the basket. Do not fill the basket more than 2/3rds.
- Ensure basket handle is in the horizontal position.
Lowering the basket
- Open the lid by pressing the release button.
NB! Be careful, as the oil may spit. - Place the basket containing the food so that it hangs on the edge of the bowl, and lock the basket handle into place on the front of the bowl.
- Press lid to close. It will emit a 'click' when locked. Always hold the top of the lid.
- When the temperature indicator light is out, press the handle release button (15) and tip the handle downwards to lower the basket into the oil.
NB! The handle may be very hot after any prolonged period of use.
- Switch the apparatus on by turning the timer to "ON" or turn the timer to the required number of minutes. When the time has expired, a bell will ring and the apparatus will switch off.
Raising the basket
- When the food is ready, raise the basket by holding the base of the handle and lifting it up to a vertical position until it locks into place with a click.
- Open the lid by pressing the release button.
- Allow the oil to drip from the food before removing the basket.
- Lift the basket carefully out of the bowl, tip the food into dish covered with absorbent paper, e.g. kitchen roll.
NB! Ensure you do not press the handle release button while moving the basket filled with hot food.
After cooking
- Set the temperature control to the lowest possible temperature by turning it to the left as far as possible.
- Check timer is set to "OFF/0".
- Remove the plug from the socket.
- Allow apparatus to cool completely (1-2 hours), before draining the oil off, putting away or cleaning.
NB! If you are going to cook several portions of food in succession, close the lid and wait until the temperature indicator goes out after every portion, before beginning the next.
Cooking tips
Below is a guide to cooking temperatures and times for various foods: See also the list of cooking times (11) on the cabinet.
| Food item Temperature Minutes | ||
| Battered chicken nuggets,frozen 190 °C 4-5 | ||
| Battered chicken nuggets,fresh/thawed 190 °C 13-18 | ||
| Spring rolls 190 °C 5-6 | ||
| Fish files in bread crumbs,frozen 190 °C 7-8 | ||
| Fish files in bread crumbs,fresh/thawed 170 °C 3-4 | ||
| Battered onion rings,frozen 190 °C 7-8 | ||
| Battered onion rings,fresh/thawed 190 °C 1-2 | ||
| Chips,frozen 190 °C 14-16 | ||
| Chips,fresh/thawed | 170 °C 6-7 | |
| Battered giant prawns,frozen | 190 °C 5-7 | |
| Battered giant prawns,fresh/thawed | 170 °C 3-5 | |
| Baked vegetables,raw | 170 °C 1-3 |
ENGLISH
HANDLING AND STORING THE OIL
Make sure all oil is only handled when it is completely cool!
-
Remove any food residues from the oil after use.
-
Filter the oil regularly.
-
The oil should be changed once it has been used approximately 10 times. The following are signs that the oil should be changed:
-
Oil has gone dark.
- Oil has an unpleasant smell.
- Oil develops thick smoke when heated.
-
Oil foams excessively when cooking.
-
All the oil should be changed at the same time; do not mix old and new oil. The old oil should be disposed of as per the relevant local regulations. Keep the oil in the apparatus or an airtight container in a dry, cool and dark place (not necessarily in the fridge).
CLEANING
- Allow to cool completely and disconnect plug from socket before emptying and cleaning the apparatus.
-
Clean the apparatus every time it has been used: o Wipe the apparatus' cabinet and lid inside and out with a well-wrung cloth which has been dipped in warm water with a little detergent.
-
The bowl, lid and basket and handle can be washed in warm water with washing-up liquid. The basket can also be washed in a dishwasher.
-
The lid can be removed for more thorough cleaning:
-
Open lid using release button.
- Grip the lid at the back edge of the apparatus firmly with both hands, and pull upwards. NB! The lid can be hard to remove.
- Remove filter cover and extract filter as described below.
- Wash the lid and filter cover in warm water with a little detergent. NB! Do not wash filter.
-
Replace lid by squeezing the metal clip on the lid back edge together, insert into the hole in the cabinet and press down until the metal studs click into place.
-
Do not use any kind of strong or abrasive cleaning agent.
- Never use a steel brush or scrubbing brush to clean the apparatus, as the surface may be damaged.
CHANGING THE ANTI-ODOUR FILTER
The anti-odour filter must be replaced after every 10-15 uses. The filter consists of three layers: two white (upper and lower respectively) and one black which goes in the middle. The apparatus should be completely cool before replacement.
- Remove filter cover by pressing the release button (4) towards the back edge of the apparatus, and raise.
- Remove the filter and fit a new one.
- Replace the filter cover by inserting the two studs on the back edge of the cover into the two holes of the filter compartment back edge and press down, until they click into place.
STORAGE
- Wait until the apparatus is completely cool before putting it away.
- The apparatus is best stored with a little oil in it. If you do this, you should check that the lid is closed properly so that no dust or dirt gets into the oil.
INFORMATION ON DISPOSAL AND RECYCLING OF THIS PRODUCT
Please note that this Adexi product is marked with this symbol:
This means that this product must not be disposed of together with ordinary household waste, as electrical and electronic waste must be disposed of separately.
In accordance with the WEEE directive, every member state must ensure correct collection, recovery, handling and recycling of electrical and electronic waste. Private households in the EU can take used equipment to special recycling stations free of charge. In some member states you can, in certain cases, return the used equipment to the retailer from whom you purchased it, if you are purchasing new equipment.
Contact your retailer, distributor or the municipal authorities for further information on what you should do with electrical and electronic waste.
GUARANTEE
This product is guaranteed for a period of 2 years from the date of purchase against defects in materials and workmanship. Under this guarantee the manufacturer undertakes to repair or replace any parts found to be defective, providing the product is brought back to the purchase address. This guarantee is only valid if the appliance has been used in accordance with the instructions, and provided that it has not been modified, repaired or interfered with by any unauthorised person, or damaged through misuse.
This guarantee naturally does not cover wear and tear, nor breakables such as ceramic items, bulbs etc. If the product fails to operate and needs to be returned, pack it carefully, enclosing your name and address and the reason for return and bring it to the address of purchase. If within the guarantee period, please also provide the guarantee card and proof of purchase.
DEUTSCH
LieberKunde,
BELANGRIJKE VEILIGHEIDSWAARSCHUWINGEN
INFORMATIE OVER WEGDOEN EN RECYCLING VAN DIT PRODUCT
JIIO6bIe DeiCTBnC MaCJOM MoXHO IPOUN3BOOHTb TOJIbKO KOrDa OHO NOnHOCTbIO OCTblINO!
- Iocne jkapn ydaJIte n3 macna ocTaKn npOdyKTOB.
Macno peryIapHo Heo6xOdImo fNbTpoBaTb. - CmeHy macna cIeJyET npOn3BOOHTb uepe3 kajdbie 10 kapok. 3aMeHy macna cIeJyET npOn3BOOHTb pN nOBHeHH cIeJyUoHx npn3HaKOB:
Macno nToemHEno.
- Y macna nɔraBnca HnpeTbI 3aNaX.
- Ipi HArpeBaHnMaCNo CNJbHo DbIMrT.
BoBpeMxapKnMaCNo CnIbHo NeHHTcra.
Macno cneJyET MeHrTb NOJIHOCTbO - He CMeUINBaIe HOBoe MacNo co CTapbIM. CInBaTb OTPa6oTaHHoe MacNo cneJyET C CO6JIIODeHNEM DeIcTBYIOxN Xpabn I NO yTIN3aCnn. MacNo cneJyET xpaHHTb BO φpNTHOpHNCe NIN B repMeTNUHOB EMKOCTN B npoxlaADHom IN TEMHOM MecTe (He O6raTeNbHO B XOLOdINbHnKe).
CHCTKA
- Ipeed qnctkoi np6op doljkeH noJHOCTbIO OCTbITb, a BNlka doJXHa 6bITb BblHyTa n3 po3eTKI.
- ΦπTHOpHnUcIeMyET YIcHTb NocLe KaJDoRo HcNoJIb3OBAHn. IpoTpnte HapyXHyu n BHeuHO CTOpOnbI KOpNyCa φπTHOpHnCbl N KpbIaKN XopoWo OTKaToN TkaHbIO, IpeBapNTeJIbHO CMOeHHoB TEnNoB OBe c DoabAbeHnem He6OJIbWOrO KOJIueCTBa MOUoero CpeDCTBa.
- EmKocTb dIy MaCHa, KpbIuKy, Kop3HHy n pyUky CneIeYeT MbITb B TeIIOB OBe cpeIcTBOM dIy MbITb y nocyDbI. Kop3HHy moXHO TaXKe MbITb B NOcyDOMOeHOn MaUNHe.
Kpome TORO,ДЯ TuaTeIbHOn YnCTKN KpbIuKy MoXHo ChrTb.ДЯ 3TORO: - HαχMιTe Ha KHOπKy i ΜΚροΠe Te Kpbιδκγ.
2.Bo3bMnTeCb 3a 3aHIOU qactb KpbIuKo6eunm pykam N BbItaunte BBepx.BHMaHne! Iy n3BJeueHn KpbIuK MoKeT noHaIo6ntbcra 3HaunTeJbHOe ycInne. - Chmnte Kpbikky nIbtpa n I3BleKeNte qnIbTp KaK OINcAHO Hxke.
- Помоimits Кршky Фпгорниьи Кршky ФньтpaВ Teлов Вodeсdoбанем Heбolywo ro KolnuectBa moUoero cpeDCTBa. BhIMaHne! Cam Фньтр мыт b Helb3я!
- PnncoeHNHe MeTaJIHueckyU HAnpaBIAOuyIO K KpbIuKe I yCTaHOBInTe KpbIuKy Ha MeTo Do uenka.
He noIb3yIteCb arpeccnBhIMn IJn a6pa3nBhIMn MOOuIMN CpeCTBaMn.
Bo n36eKaHnnoBpeKdEHHn noBepxHocTe np6opa, He noIb3yTecb MeTaJIInueckmU 1eTKaMn.
3AMEHA YJABJIHBAIOUeTO 3ANAXN HJIbTPA
YnaBnBaOu3n 3aIaxn HnIbTp HxkdaetcB 3aMeHe uepe3 KaKdbie 10-15 Japok. FnIbTp COCTOUT n3 Tpex CIOeB: DByx 6eBix (BBepy N Bn3y) n OJHoro UepHoro (Mekdy HmN). Ipeed 3aMeHoN FInbTpA Heo6XoIMo DoKDaTbc PONHO OCTbBAHn npi6opa.
- Haxmte Ha KhoNky (4) B HnpaBHeHn 3aHne CToPOhbl npu6opa n OTKpoIe KpbIkwky
- 3aMeHHTe ΦnJIbTp.
- YctaHOBInTe KpbIshky Ha MeTo, BCTaBnB WtbpN B OTBepCTna n OnyCTnB INX Bn3 Do IeJka.
XPAHEHNE
- Ipeed Tem, KaK y6npaTb npnbOp Ha XpaHeHne, DOxNTecb erO NOHOrO OCTbBaHna.
- Lyuwe Bcero XpaHnTb φpntHOpHnUc y He6oJIbIIM KOJIueCTBOM Macna. Bo n36eXaHne nonaHaHn Iblnn nn rpr3n B MacNo, KpbIwka φpntHOpHnCbI DOJXHbI 6bl Tb 3aKpbItA.
YTNIN3AUJN OTCJLYKNBWERO CBOI CPOK INBOPA
I3dennr Adexi nmeoT cneyouyio MapknpoBky:

3TO O3Haayet, YTO daHHbI np6Op coepXHT 3JeKtpnueckne I 3JeKtpoHHbIe KOMnoHeHtbl, KOtOpBIE CJIeDyET yTUNIN3NpOBaTb OTdJIbHO OT 6bITOBORO Mycopa.
Corlaacno DnpeKTHBE WEEE cTpaHbI-yuAcTHNcbl 063yUToTc o6ecneuHt b c6op, nepepa60kTu IN BTOpHoe nCNoB3OBAHHe 3JeKTPnuecknx HJNeKTPoHHbIX KOMNoHErOB. XHTeTI N cTpan EC IMeOT BO3MOXHOCTb 6ecnlaTHoro NOJb3OBAHnnyHKTaMn No yTHIN3aunn. B HeKOTOpbIX CTPaHax cyueCTByET BO3MOXHOCTb BO3BpTa OTCnyKHBwero CBOI cPOK npnbopa npodaBuI npn YCLOBNI NOKYNIH HOBOrO.
3a DOnOHnTeBHOHnOopMaueNe 06 yTnIIN3aunn 3neKtpnuecknx n 3neKtpoHHbIX npnbopOB, CBXnTeCb C npOdaBcM, paCnpocTpahnteJem nn MyHnUpaNbHbIMn BnaCTaMn.
TAPAHNTHbIE O63ATEJIbCTBA
Ha daHhoe n3deJnpeoctabIeTc2-letTHra rapaHTnO t DaTbIpOdaJN, KOtopa pacnpoctpaHareTc Ha deFeKTb MaTePnAa N HeoCTaTK npn 3roTOBLeHH. B paMkax HactoJe rapaHTn n3rOToBntelb o63yETc OTPeMOHTnpoBaTb nn 3ameHtB IIObyo DeTalb, KOTOPa 6bln npn3HaHa HenCnpaBHOn, npn ycNoBn OTnpaBKn n3dEInB aAdpec npoDaUa. HactoJra rapaHTn npn3Haetc nnb B Tom clyuae, ecnn n3deJne npImeHnoCb COOTBETCTBN C daHNO nHCTpyKcneB, B HeRo He 6bln BHeceHb n3MeHeHna, OHO He peMOHTnpoBaNoC b He pa3bnapaoLb nepcoHaON 6e3 Heo6xOdmOn KBaIIΦnKaun, INn He 6blno nobpeXdeHo B pe3yIbTaTe HEnpabINbHoro 6paueHn C Hm.
EcTeCTBeHNO, yTo DaHHa rapaHTnHa pacnpoctpaHareTc Ha n3HaunBaHne, a TaKKe Ha xpyKnE npedMeTbI, KaK HapnMep KepaMueckne KOMnoHEtBtI, lamNouchu T.n. Ppi OTka3e n3dennr I npn Heo6xOAnMoCTn erO OTnpabKn Ha3ad, ynaKyIte erO CO Bcemn Heo6xOAnMbIMn MEPamn npedocTopoXHocTn, npinloXitc oopobOnTeJbHoe NncbMo c yka3aHem BaWero ImEHn, adpeca n npuHb Bo3BpaSeHn, n OTnpabBte npodabuy, y kOtporo Bbl erO npno6penn. Ppi Bo3BpaSeHn n3dennr B paMKax rapaHTnHorO cPoka npinojnte rapaHTnHb TaHOn n KBNTaHcUHO O NOkynke.
MAGYAR
Kedves Vásárló!
A SZAGFILTER KICSERÉLÉSE
VAZNE SIGURNOSNE UPUTE
N3noI3BaHe Ha TaMepa
UpeBt cHa6deH C MexaHueH TaIMeP, KOITo rN3KJIouBa aBTOMaTnUHO npu N3TuHa He Ha 3aAdeHTo BpeMe. TaIMePbT MoKe da 6bDe HAcTpoE Ha nepnoD ot O do 30 MNHyTN.
3aBbPTeTe TaMepa no nocoka Ha yacobHkoBaTa CpeIka, 3a da Hactponte JekanHnT 6poi
MnHytn. YpeBbT ige ce BkIIOUH. Korato Bpemeto n3Teue, ige 3BbHHe 3BbHue n ypeBbT ige ce n3KIOUH. POMHete, oBaue, ye Ma3HNHaTa ige e BCE oOe ropeuA. OTrpaHete nprirotBHaTa Xpana BeHara.
TOrBeHe
CneBaIte DonyoHncaHnTe HnCTpyKuN, 3a Da nprirotBnTe BaunTe aTna. BnKTe cbUO n rnaBa "Pone3Hn rotBapcKn cbbetn".
PpeN cnyckaHe Ha KOoHNuKaTa
BHHaHn BHMaBaTe XpaHnte Da ca NoDcySeHn, npeNi Da rN cnYcHete B HaropeuHaTa Ma3HNHa.
BHMaBaIte npnroTbHInTe XpaHInTeHn npOdyKtn Da ca c np6n3nTeHNo eHN n cbu pa3Mep, 3a da Morat da ce n3nbpxaT paBHomepHo. N36raBaiTe da noctabrte npekaJeHO de6e nnapyeTa.
- OtrpaHraBaiTe Bb3MOxHO Ha-NrJMO KOJIueCTBO JeI, npN PbPxHe Ha 3aMpa3eHN XpaHHTeHn npOdyKTI.
- 368aBae Da npenbBaTe KOHnKaTa. He nbHete NOBce oT 2/3TN OT KOHNuKaTa.
BHMaBaIe dpbXkKaTa Ha KOUSHnUkKaTa da e B XOpu3nHTaJHa No3nZna.
CnyckaHe Ha KowHnKkata
- OTbOpete KaNaka KaTo HATnCHe 6yToHa 3a OcBo6OxJaBaHe Ha KaNaka. BHMaHHe! BHMaBaIte TbI KaTo Ma3HnHaT MoKe da Bn n3npbcka.
- NocTabete KoHnHuKaTa C npOdyKTnte Taka, Ye da Bucn OT p6a Ha Kynata n Noctabete dpXkata Ha KoHnHuKaTa Ha MCTOTo I - Bbpxy npEdHaTcPaHa Ha Kynata.
- Hatnche Te Ieko kanaka 3a da ce 3aTbOpn. Korato ce 3akIouH, Toi ue upaKHe. BHaRn DOKocBaIte caMo rOpHaTa Yact Ha Kanaka.
- Korato Иndикаторнata Лamпчka 3a TemператypаиЗгache,Натисные 6уToHbT 3a ocBo6oxkDaBaHe Na ДржКATA (15) и 6yTheTe leko ДржКATA HaOly, 3a DA cnYchete KOWHnKATA B Ma3HnHaTa.
BHMaHne!ДржКATA може де се Haropeшни рпи NO-ДьЛROТраиHa yNoTppe6a. - BkIIOUeTe ypeDa KaTo 3aBbPTnTe TaMepa B nO3nucn "BkIIOUeHo" ("ON") nIi 3aBbPteTe TaMepa Ha JekalHn 6pO mHyTu. KoraTo n36paHOTo BpeMe n3Teue, ue Ce ue 3BbH nypeDbT uce Ce n3KIIIOu H ABTOMaTHUHO.
Bdngrahe Ha kOoHnUkata
- Korato xpaHaTa e roToBa, BdHrHeTe KoHnUcKaTa KaTo XBaHrTe 3a DpbXkKaTa IЯ NOBdHrHeTe HaRope, DOkaTo 3aCTaHe BBB BepTnKaJHa N03uZnI N Ce 3aKJIouN CbC UpaKaBaHe.
- OTbOpete KaNaka, Upe3 HATnCKaHe Ha 6yToHa 3a OcBo6OxJaBaHe Ha KaNaka.
- Octabete Ma3HHaTa da ce oTeue ot XpaHaTa, npedn da n3BaAnTe KoWHNuKaTa.
4.ИЗbaTe BнмATEJIHNO KOWHnUkata OT Kynataи ИЗCINeTe XpaHaTаВ cБД NOKpIc T C a6copbupa,kyxHeHcKa xapTna, KaTO HAnp. XaPTNeHn KyxHeHcKn KbPnBnMaHne! BnMabaiTe Da He HATNCHE 6yToHbT 3a OCBO6OxJaBaHe Ha IpbXkata, DOKaTO N3BaXdaTe PbJHaTa C ropeuza XpaHa KOWHnUka.
CneI rOtBeHe
- HacpoTe 6yToHbT 3a KOHTpoJ Ha TeMepaTypaHa Ha Han-HnCKaTa Bb3MOxHa TeMepaTypHa HactpoJa, KaTO rO 3aBbPTuTe Ha JIABO, BBB Bb3MOxHo Ha- KpaHaTa I03uIy.
- Поберета дал таймера настpoenv В поэць "Изкlioуен/0"("OFF/0").
3.ИЗклоче Teцencena oTe eNeKtpnueKna KOHTaKT. - Octabete ypea ce oxlaan Hnblno (1-2 yaca), npedn da n3touTe Ma3HnHaTa, da ro npnbepete nn nouchte.
BHHMaHHe! B cnya, ye JxelaTe da npnroTbTe HraKoKo, nocJeDoBaTeHn nopCuHn XpaHa, 3aTBopeTe kanaKa n 3uKaAte DOkato INDnKaToPHaTa IaMnUka 3a Te mpePaTypaTa N3rache, CneD BCra Ka npnroTbeHa nopCua, PpeDN Da NoCTaBtE CneDbauata.
БлтAPСКИ
Pone3Hn rotBapckn CbBETN
No-dony ca nocouehn npenopbunTeHnTe TempeaTpHu HaCtpoKn N BpemeHa 3a nprirotBHe Ha pa3nUHN BIDOBe JCTN IN PPOyKTIn: BIXKTe CbIoo N CnncBka C BpemeHa 3a nprirotBHe (11), pa3noJoxKe Hbpxy Kopnyca.
| Ястя и п现代物流 | Temпераразура | Минуши |
| ПанURAни пileшкихалки,замразени | 190 °C | 4-5 |
| ПанURAни пileшкихалки,песни/размразени | 190 °C | 13-18 |
| Проблем рοлца | 190 | |
| Фильета OT риба в галета,замразени | 190 °C | 7-8 |
| Фильета OT риба в галета,песни/размразени | 170 °C | 3-4 |
| ПанURAни лучени кръгчetedа,замразени | 190 °C | 7-8 |
| ПанURAни лучени кръгчetedа,песни/размразени | 190 °C | 1-2 |
| Чирс,замразени | 190 °C | 14-16 |
| Чирс,песен/размразени | 170 °C | 6-7 |
| ПанURAни садри,замразени | 190 °C | 5-7 |
| ПанURAни садри,песни/размразени | 170 °C | 3-5 |
| Пechени зеленчци,субови | 170 °C | 1-3 |
TPETUPAHE N CbXPAHEHNE HA MA3HHATA
YBepete ce, ye Ma3HnHaTa e HAnbJHo OxnaDeHa, npedn da r TpeTupaTe!
OTCTpaHete OT Ma3HHaTb BCnUKN XpaHnteHNn OCTaTbCn, CneI yNtpe6a.
- Φιπτρηραίντε Ma3ΗΝΗτά τρεδΟΒΗ.
Ma3HnHaTa Tp8Ba Da 6bJe NODMeHnHa CneI KaTo e 6bIa yNoTpe6BaHa OkOTo 10 nbTu. IIO-doIy ca nocouHn np3HaunTe, KOITo NOKa3BaT, Ye Ma3HnHaTa Tp8Ba Da 6bJe cMeHeHa:
Ma3HnHaTa e nOTbMnHa;
Ma3HHata mHa HnpiyTeH Mnpnc;
Ma3HnHaTa nyuMmHO npn HarpBaHe;
Ma3HnHaTa ce neHn 06nHnNo BpeMe Ha nbpxhe;
LJIIOTo KOJIHueCTBO Ma3HnHa Tp86Ba Da 6bJe NODMeHrHO HABeHNbX; He CMEcBAIte CTapo HOBO ONNo. CTapoTO ONNo Tp86Ba Da 6bJe N3XBbPnHO KaTO ce CNEdBa INHCTpyKUnTe Ha MeCTHIne peYJatopHn OprAHn. CbXpaHraBaIte Ma3HnHaTa B UpeDa IIN B XepMeTNUeCKN 3aTBapRiC Ce KOHTeHep Ha CyXO, XJaADHO N TBMHO MAcT0 (He e 3aJbIXtEJIHO TOBa da e XJaDnIHnKa).
IOUHCTBAHE
OCTaBeTe ypeDa Da ce OxlaAn HnBbHn N 3KJIIOUeTe UeIcEa O Te eKeKtpueckn KoHTaKT, npEn Da n3npa3HNTe CbDbpXaHHeTo Ha ypeDa n da rnoNouCTnTe.
- Почистваимураза Всени Като CTе ГИЗПОЛЗВАЛ: 3a6bpcaьт И КалakнТ Ha урета, OTbTpe и OTbH, CBlaЖнИdoбп eИЗцeDEHa Kbpna,notoneHa B TOnJa BODa C MaJIko KOJINUcEТВ NOчИСТВaU npenapaT, pa3TbOpeH B Heя.
Kynata, kanaKBt, KowHnUkKaTa N dpBxKkata Morat da 6bDaT MNTN B TOIIa BOHa n C npenapat 3a MneHa Ha cbdoBe. KowHnUkKaTa MoKe da 6bDe MNTa N B MmJIHaTa MaunHa.
KanakbT MoKe Da ce CBAJr 3a Da 6bJe nouCTeH n3zraIIO:
- OTbopete Kanaka KaTo n3nol3BaTe 6yToHa Ha OCbo6oxkDaBaHe Ha Kanaka.
- XbaHete 3dpabo KaanaKa C DBeTe cn Pbue, OTKbM 3aHnna KpaN Ha ypeNa n dpbnHeT e Harope.
BHHMaHHe! OTePraHaBaHeTo Ha KaNaKa MoKe da e MaNko TpydNo.
- OtpaHete Kaaka Ha fntbpa n 3BaTe Te nTba, cnped dolynocohnte HHCTpyKun.
4.ИЗмиTe Kanaka И Kanaka Ha ΦиТьpaВ TOnla BODa,С MaJIko NOUHCTBaI, npenapaT. BHIMAHHe! He MnTe ΦиТьpa. - NocTabete Kanaka o6paTHo KaTo CTnCHete MeTaHata CkOba Ha Tbp6a Ha Kanaka, nbxHeTe ro B npouena Ha Kopnyca HHaTnCHete HAnOly DoKaTo MetaHHTe UInΦTOBe Ha CkObata UpaKaHAT Ha MrcTOTO cn.
He n3noJ3BaIte KaKBrTo I da 6nlo a6pa3uBn NouchTbaun npenapatn.
HnKora He n3noJIbAaTe MeTaIHH YeTkn IIn TeJyEta 3a NoUcTBaHeTo Ha ypeDa, TbN KaTO MoKe Da NOBpeDInTe NOBpXHOCTTa My.
IIOdMeHRe H A ΦNITbPA IPOTINB IOUIN MNPNU3MNI
Филтьрт потив loши мирзмп Тябba Да 6бдп поменг след BCяka 10ta - 15ta ynotpe6a.Филтьрт ce cbcton OT Tpr cIо8:ДBA 6eN (pecneKTHBHO - ropeH ndoJIeH) n eIHH uehen,КoITTo ce HAMIPA B cpeIata.YpeIbT TpЯ6Ba Дa e HAnbIHo oxlaJeH,пpeIи da ce npicTbII KbM ПОмЯHa ha Филтьра.
- OTrpaHeTe kanaKa Ha ΦIITbpa KaTo HATnCHeTe 6yTOhT 3a OCBO6OJaBAHe (4) KbM 3aDnHja KpaHa ypeDa n NOBdHHeTe.
- OtrctpaheTe fntbpa n noCTaBeTe HOB.
- NocTabete o6paTHo Kanaka Ha 9nIbpa KaTo nOCTaBnTe DbTa uNΦTa, HAMnpaCn Ce Ha 3aHnHa KaNaka, B DaBtA CNoTa, Pa3nOLOKeHN Ha 3aHnHa bTbN Ha 9nITbPHOTO OTdJIeHHe N HatNCHEte HaOny, DOkato 9paKHaT Ha MICTOTO cN.
CbXPAHEHNE
OctabeTe ypeDa da ce oxlaaHnAbNo, npdei da ro npnbepete.
HaI-dope e da cbxpaHbATE ypeDa c MaJIko Ma3HnHa B Hero. B cnUayai, ye cIeDbate Ta3n npenopbka, Tp86Ba Da BHIMaBaTe KanaKa Da e npaBnHO 3aTBopeH, Taka Ye B Ma3HnHaTa Da He nonadat npax nn HecntOnn.
NHΦOPMAÇNÖTHOCHO N3XBbPJIaHETO INPEÇUKNJIIPAHETO HA TO3N IPOДуKT
Moln m O76eJekTe, Ye To3n "Adexi" npOdyKT e MapKnpaH cbc CJeDnra CmBOJ:

ToBa 03NaUaBa, Ye To3n npOyKT He 6bBa Da 6bJe n3XbBpJH 3aeJHo C o6NKHOBeHNTe Domaun H OtnaDbu, Tb' KaTO eNeKtpnuecknte N eEKePtoHHTe OTnaDbu Tpr6Ba Da 6bDaT n3XBbPJIHN OToJIHNO.
Cnope pa3npoe6nte Ha WEEE dIpeKTHBaTa (OTnabHHO eIeKtpueecko I eIeKtpoHNO obopydBaHe) BCya cTpaHa -JneHka Tpr6Ba Da oCNpyr npabNlHOTo Cb6puAne, B3CTaHOB8BaHe, TpeTpapaHe n peuKlnpapHe Ha eIeKtpueeCKnte I eIeKtpoHN OToaBc. YactHTte DoMOBe B EC Morat 6e3nlaTHO da Hocr CTBOnte N3NoJ3BaHn ypeDn B CpeuaHn ceHTPOBE 3a peuKlnpae. B HAKON cTpaHn -JneHKn MoKe CbIo, B ONpeJeHn CnyaH, Da BpbUaTe ynoTpe6BaHnTe ypeDn Ha pa3npocTpaHNTeNe, OT KOnTO cTe rN Kynnn, B CnyaH Ye 3aKynBaTe HOB YupeDn.
Cbpxkete c Baunpa3npoctpaHnten, nncptpyTop nnn Cbc CbOTBeHTHe MeCTn Bnactn 3a DonblHNTeHa HOpMaun OTHOCHO KOHKpeTHHe pa3npope6n 3a TpeTnpaHe Ha eNekTpnueecknte n eNekTPOHHn OTnAbu.
TAPAHUN
To3n npOdyKT hMa rapaHcHOnHe nepnoD ot 2 roDHH O T daTata Ha 3aKnyBaHe, npn clyuaH Na DeΦeKTH Ha MaTePnaJIte Nll B n3pa6oTKaTa. Cnped ycNoBnraTa Ha Ta3n rapaHcNpIPOIN3BOIDNTeIaT npiEma Da OTCTpaHn Nll 3aMeHn OTKpnITNe TeΦeKTH, caMo aKO npOdyKTbT 6bJe BbpHaT o6paTHo Ha MactOTO, ot KoEt o 6n3aKynen. FapAnuTaN e BaIndHa cMo aKO yPeDa e 6nI n3NoJ3BaH B cbOTBeTCTBne C nHCTpyKcHnTE n B cLyau, ye He e 6nI MoDnΦnUpan Hnn IoppaBn, HeOTOpn3nPaHn Nlca He ca ONNTBaII camOpbHuO da OTCTpaHrT NOBpeDaT a N aKO NoBpeDaT He e HaCTbNla B pe3yIaT Ha HenpaBnHa yNoTppe6a.
Hactoata rapaunia, eTectBeHO, He NOKPnBa n3HOCBaHe, HHTO yuNnBn YacTN, KaTo KepamuHN apTuKyn, en. KpyuKN u T.H. Ako npodykTBt cnpe da pa60tn u Tp86Ba da 6bde BbpHaT, onakobaiTe ro BnImaTeHNO BnncBaKn IMeTo n aDpeca cn, KaKTo n npuHaTa 3a BpbuaHTo ng 3aHeceTe Ha aDpeCa, ot KOItO cTe ro 3aKyniIN. Ako ToBa ce Cnyu, DOKato npodykTa e BCE oSe B rapaHcui, MOIN, npInOKeTe cbIo n rapaHcHOnHa KapTa n DOkUMeHT ydoCTOBepraBaaN pokynKaTata.