NM 600 - Sewing machine CLATRONIC - Free user manual and instructions
Find the device manual for free NM 600 CLATRONIC in PDF.
| Product type | Electronic sewing machine |
| Brand | Clatronic |
| Model | NM 600 |
| Net weight | Approx. 3.20 kg |
| Power supply | AC power adapter 100-240 V, 50/60 Hz, DC output 12 V, 1500 mA |
| Protection class | II |
| Sewing surface lighting | LED 0.5 W, maintenance-free |
| Number of stitches | 16 stitch types |
| Buttonhole | Yes, 4-step automatic |
| Sewing speed | Variable by foot pedal adjustment |
| Bobbin winder | Integrated, automatic stop |
| Needle system | Flat shank needle 130 (sizes 80/12 to 110/18) |
| Presser foot | Removable, compatible with additional feet (buttonhole, zipper, etc.) |
| Stitch length | Adjustable (not specified, standard estimate) |
| Maintenance | External cleaning with anti-dust cloth, dry brush plate |
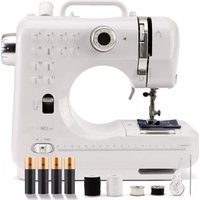
| Included accessories | Foot pedal, adapter, needles (2x), twin needles, buttonhole foot, screwdriver, spool pins, narrow hem foot, feed dog, seam ripper, bobbins, cleaning brush, 100-piece sewing kit |
| Safety | Unplug before maintenance, do not immerse in water, keep out of reach of children |
| Warranty | Not specified, estimated 2 years |
| Dimensions (approx.) | Not specified, typical compact size |
Frequently Asked Questions - NM 600 CLATRONIC
User questions about NM 600 CLATRONIC
0 question about this device. Answer the ones you know or ask your own.
Ask a new question about this device
Download the instructions for your Sewing machine in PDF format for free! Find your manual NM 600 - CLATRONIC and take your electronic device back in hand. On this page are published all the documents necessary for the use of your device. NM 600 by CLATRONIC.
USER MANUAL NM 600 CLATRONIC
Description des pieces/Furniture 21
Description des pieces/Fourniture
Figura C (accessories)
Overview of the Components. 3
Figures C-F 4
General Safety Instructions 41
Symbols in these Instructions for Use 41
Children and Frail Individuals 41
Special Safety Instructions for this Machine 41
Parts description / Scope of delivery 42
Unpacking the machine 42
Application instructions 42
Folding table top 42
Thread reel holder 42
Electrical connection 42
Switching On/Off 42
LED sewing lamp. 42
Choice of needle size and threads 43
Operation 43
Inserting the needle 43
Fastening and removing the presser foot shoe. 43
Threading the upper thread 43
Adjusting the upper thread tension 44
Inserting the bobbin thread reel 44
Fetching the bobbin thread 44
Winding up the bobbin 44
Stitch selection at the stitch selector 45
Sewing 45
Button holes 45
Stop operation 45
Trouble shooting 45
Cleaning 46
Noise development 46
Technical Data 46
Disposal 46
Meaning of the "Dustbin" Symbol 46
General Safety Instructions
Read the operating instructions carefully before putting the appliance into operation and keep the instructions including the warranty, the receipt and, if possible, the box with the internal packing. If you give this device to other people, please also pass on the operating instructions.
- The appliance is designed exclusively for private use and for the envisaged purpose. This appliance is not fit for commercial use.
- The power adaptor is only intended for use in dry environments.
- Ensure that output power, voltage, and polarity of the power adapter match the specifications on the type label!
- Do not touch the connected power adaptor with wet hands!
- Disconnect from mains power supply before cleaning.
-
Ensure that the mains cable is not bent or kinked; do not walk or drive over the cable; do not subject the cable to heat sources.
-
The device and the mains lead have to be checked regularly for signs of damage. If damage is found the device must not be used.
Do not try to repair the appliance on your own. Always contact an authorized technician. To avoid the exposure to danger, always have a faulty cable be replaced only by the manufacturer, by our customer service or by a qualified person and with a cable of the same type. - Use only original spare parts
- Pay careful attention to the following "Special Safety Instructions".
Symbols in these Instructions for Use
Important information for your safety is specially marked. It is essential to comply with these instructions in order to avoid accidents and prevent damage to the machine:
WARNING:
This warns you of dangers to your health and indicates possible injury risks.
CAUTION:
This refers to possible hazards to the machine or other objects.
NOTE: This highlights tips and information.
Children and Frail Individuals
- In order to ensure your children's safety, please keep all packaging (plastic bags, boxes, polystyrene etc.) out of their reach.
WARNING!
Caution! Do not allow small children to play with the foil as there is a danger of suffocation!
- This device is not intended to be used by individuals (including children) who have restricted physical, sensory or mental abilities and/or insufficient knowledge and/or experience, unless they are supervised by an individual who is responsible for their safety or have received instructions on how to use the device.
- Children should be supervised at all times in order to ensure that they do not play with the device.
Special Safety Instructions for this Machine
WARNING:
Always pull the plug of the foot controller out of the machine when working in the area of the needle such as threading, changing the needle, inserting the bobbin or changing the presser foot.
- Use only the supplied accessories or the ones recommended in this manual. Using not recommended accessories can cause injuries.

CAUTION:
-
When turning the stitch selector (1), the needle has to be in upper position.
While sewing do neither push nor pull the fabric. This can cause the needle to break. -
This sewing machine is designed only for home use.
- Position the machine safely on a flat work space.
- In no case use another power supply than the one delivered.
- When leaving the machine, switch the machine off and pull the power supply plug out of the outlet.
Parts description / Scope of delivery
Overview of control elements on page 3: Figure A (front side of the machine)
1Stitch selector
2 Bobbin winder shaft
3 Bobbin winder edge guide
4 Hand wheel
5 Stitch selector symbols
6 Electrical connection
7 Button for reverse sewing
8 Lever for loosening the presser foot shoe
9 Table top with accessory compartment
10 Presser foot
11 Presser foot fastening bolt
12 Needle fastening bolt
13 Thread cutter
14 Upper thread tension control
15 Button for loosening the thread tension
16 Thread lever
17 Needle thread feed hole
18 Thread guide for spooling
Figure B (rear side of the machine)
19 Presser foot lever
20 Thread reel holder
Figures on page 4: Figure C (accessories)
21 Foot controller
22 Power supply
23 Needles (2x)
24 Threading guide
25 Twin needle
26 Buttonhole foot
27 Needle plate elevation for bar tack and embroidery function
28 Screw driver
29 Thread reel holder
30 Zipper foot
31 Presser foot shoe
32 Seam cutter
33 Bobbin thread reels
Without figure:
Cleaning brush
100 piece sewing set
Unpacking the machine
- Take the machine out of the packaging.
- Remove all packaging material such as foils, fillers, cable brackets and card box packaging.
- Check the delivery for completeness.
Application instructions
Folding table top (Fig. D and E)
Empty bobbin thread reels and other accessories are stored in the table top.
- Pull the folding table top out horizontally (Fig. D).
- Shift the accessory compartment lid to the right as indicated by arrow markings and open it (Fig. E).
Thread reel holder (29)
Take the thread reel holder out of the table top and insert it into the guide at the rear side of the machine (20).
Electrical connection (Fig. F)
- Connect the power supply plug with the machine (a).
- Connect the power supply with a 230V 50Hz outlet installed according to regulations (b).
- Connect the foot controller with the machine (c).
- Set the On/Off switch to "1".
- The machine speed can be controlled by pressing the foot controller.
Switching On / Off
- Switch position "I": Machine and LED sewing lamp on.
- Switch position "O": off
LED sewing lamp
The LED sewing lamp is maintenance free and does not need any replacement.
Choice of needle size and threads
Needle system: Flat-shank needle system 130
| Needle size | Fabrics Thread | |
| 80 (12) | Middleweight fabrics: Cotton, satin, work- ing clothes, canvas, double-layered fabrics, lightweight wool | Most threads are of middle size and adequate for these fabrics and needle sizes. For best results use polyester threads for synthetics and cotton or naturally woven fabrics. Use the same kind of thread for the upper and the bobbin thread. |
| 90 (14) | Middleweight fabrics: Wool, heavyweight knit- wear, terry cloth, denim | |
| 100 (16) | Heavyweight fabrics: Wool, canvas and quilted fabrics, denim, furniture fabrics (light to middle) | |
| 110 (18) | Heavyweight: Wool, coat fabrics, furniture fabrics, some leather and vinyl (with leather needles) | Heavy duty thread |
Operation
Inserting the needle (23)

WARNING: Risk of injury!
Pull the foot controller plug out of the machine before inserting the needle.

NOTE:
Replace the needle on a regular basis, in particular if it is bent or the tip is damaged. A bent needle causes skip stitches. Defect needle tips damage the fabric.
Insert the needle in the following way:
The guide of the needle has to be lifted completely. Turn the hand wheel (4) in the direction of the arrow.
Loosen the needle fastening bolt (12) and tighten it again after inserting the new needle.
The flat side of the needle has to face the rear side. Insert the needle until the edge guide.
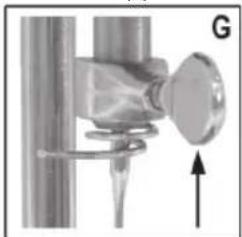
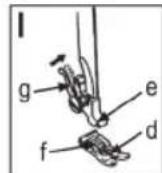
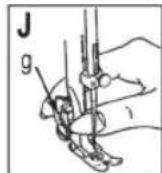
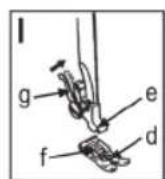
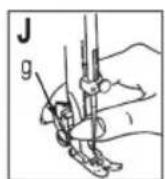
Fastening and removing the presser foot shoe (Fig. H-J)
The machine has a standard presser foot for sewing various kinds of fabrics. For sewing button holes and zippers, you have to mount another presser foot shoe to the presser foot holder. When changing the presser foot shoe, the needle should be lifted completely. Turn the hand wheel (4) in the direction of the arrow.
For replacing the presser foot shoe, see the following description with the figures H-J.
- Fig. H: Pull the presser foot lever (19) upwards. Loosen the presser foot fastening bolt (a). Attach the presser foot holder (b) to the presser foot shaft (c) and tighten the bolt (a).
- Fig. I: Put the presser foot shoe (d) onto the needle plate. Lower the presser foot lever (19) until the notch (e) is positioned exactly above the pin (f) of the presser foot shoe. Press lever (g) until the pin (f) locks in the notch (e).
- Remove presser foot shoe (Fig. J): Lift presser foot lever (19), press lever (g) and the presser foot shoe drops off.
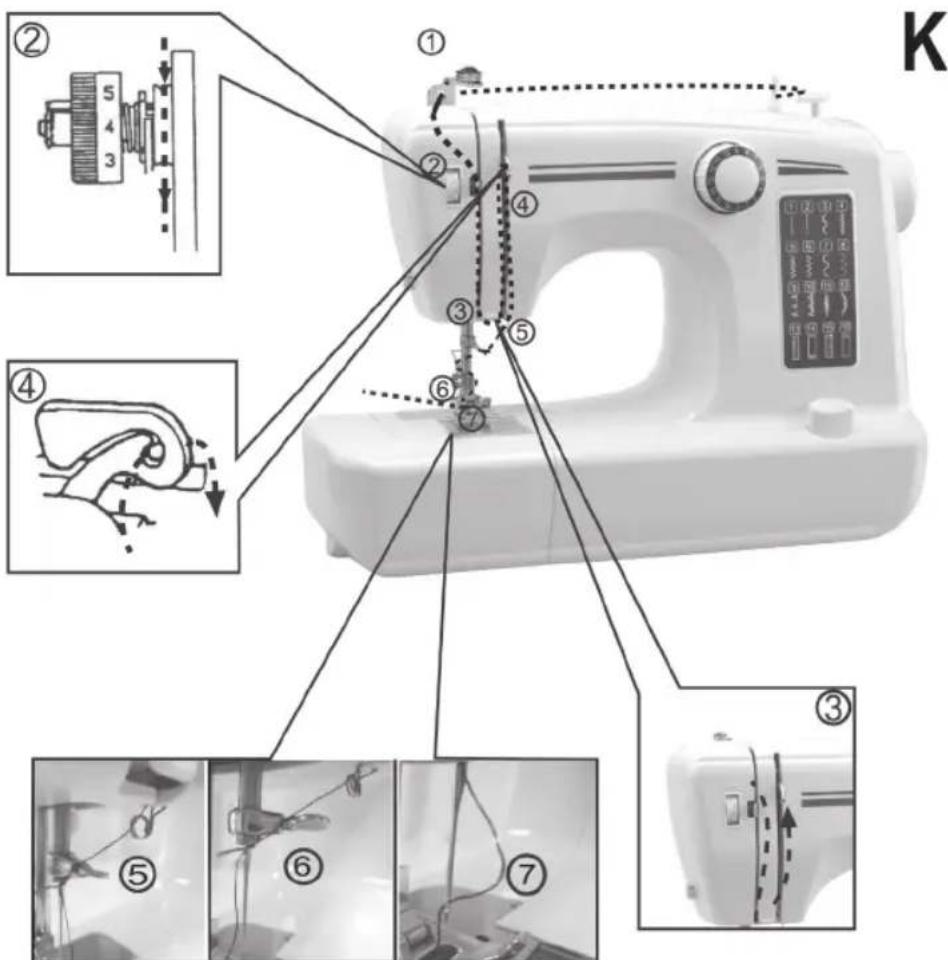
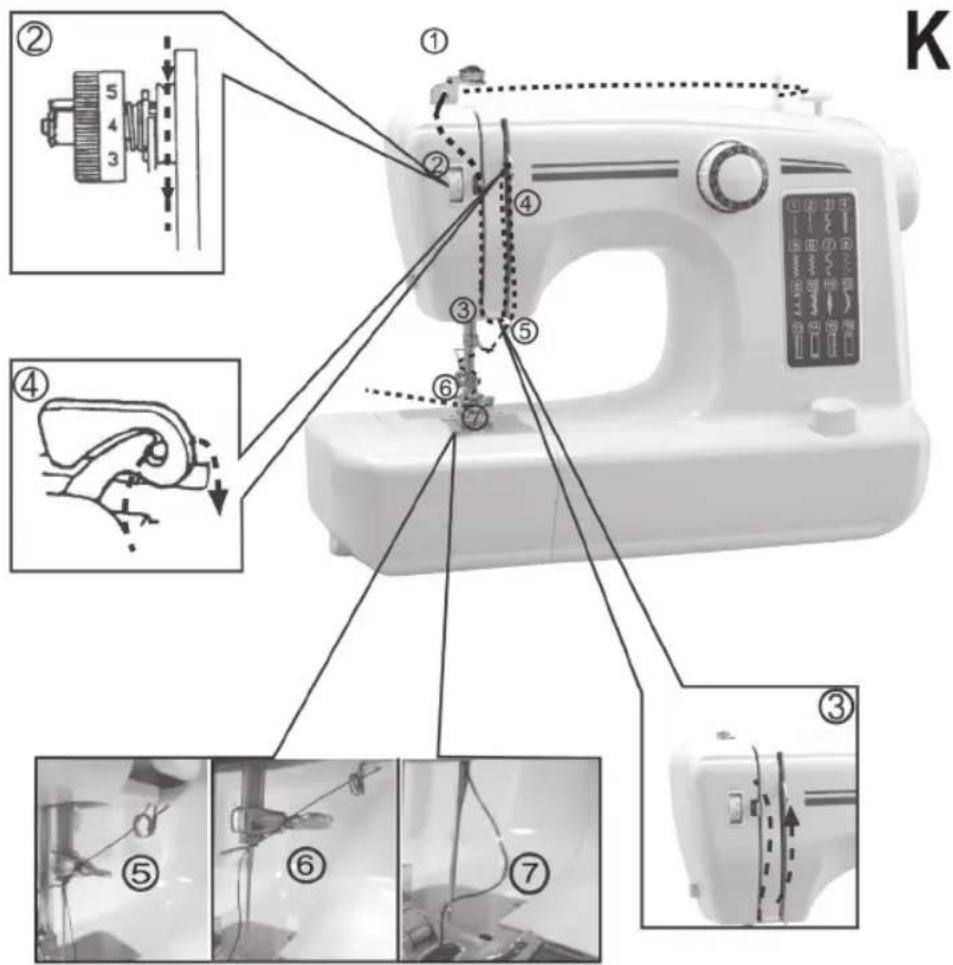
Threading the upper thread (Fig. K)
For quick and easy installation of the upper threads, follow steps 1 to 7, according to the dashed line of figure K below and/or follow the arrows on the machine.
- Set the thread reel onto the thread reel holder (20) and guide the thread through the needle thread feed hole (17) from back to front.
- Push the button for releasing the thread tension (15) to the left, then guide the thread down and make sure that the thread is positioned between the tension discs and release the button (15).
- Pull the thread upwards on the left side of the thread lever (16).
- Insert the thread into the thread lever and guide it down again on the right side of the thread lever.
- Insert the thread through the thread guide eye from front to back.
- Insert the thread through the needle thread guide from top to bottom.
- Finally, insert the thread into the needle from front to back (important !!!).
Adjusting the upper thread tension (14)
The basic setting is between 4 and 5.
Depending on fabric and thread size, adjust by turning the control (14) so that the knot of the upper and the bobbin thread can be recognized as a spot on the upper side of the fabric. If you see loops the thread tension is too loose.
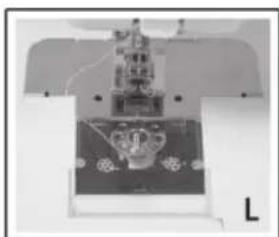
Inserting the bobbin thread reel (Fig. L)
- When inserting or removing the bobbin thread reel (33), the needle has to be lifted completely. Turn the hand wheel (4) in the direction of the arrow.
- Pull off the table top horizontally from the machine. Pull the transparent looper cover out towards the front.
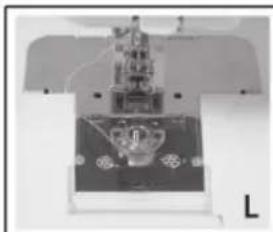
- Insert the bobbin into the looper, having the reel turning clockwise (see right Fig. on the looper cover). Let 5 cm of the thread stay out.
- Slide in again the looper cover.
Fetching the bobbin thread
- Lift the presser foot (10), hold the upper thread with your left hand and turn the hand wheel with the right hand in the direction of the arrow until the needle has arrived at the top again (one complete turn of the hand wheel).
- Pull the upper and the bobbin thread 10 cm towards the back. You can use scissors for this, for example.
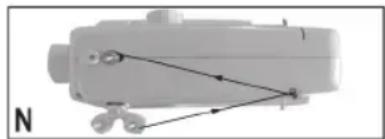
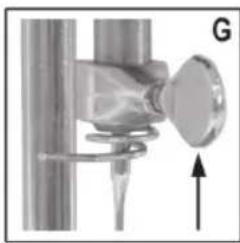
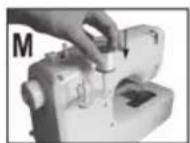
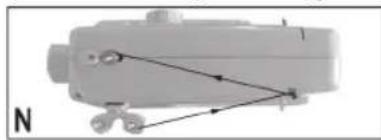
Winding up the bobbin (Fig. M and N)
CAUTION:
Remove the upper thread completely out of the machine. Otherwise, it would wind around the inner parts and block the machine.
NOTE:
You control the amount of the bobbin thread to be wound up by turning the bobbin winder edge guide (3). To the left: less thread on the reel.
- Place an empty reel (33) onto the bobbin winder shaft (2).
- Place a thread reel onto the thread reel holder (20).
-
Guide the thread via the thread guide (18) to the empty reel.
-
Clockwise, wind up the thread several times around the empty reel.
- Push the reel against the bobbin winder edge guide (3).
- Start the winding by pressing the foot controller.
-
When the reel is filled, the winding stops automatically. If you want to stop the winding earlier, release the foot controller.
-
Cut the thread and remove the reel.

Stitch selection at the stitch selector (1)
16 stitch types can be chosen.
- The needle has to be lifted completely. Turn the hand wheel (4) in the direction of the arrow.
- Set the stitch selector to the desired setting. Pay attention that the stitch selector is locking into the desired position.
Sewing
- Make sure that the bobbin winder shaft (2) is set to "SEWING".
- Lift presser foot and pull upper and bobbin thread towards the back (approx. 10 cm).
- Place the fabric underneath the presser foot.
- Lower the presser foot onto the fabric.
- Slowly activate foot controller to begin sewing. Guide the fabric manually in a successive manner.
- Press the button for reverse sewing (7) to sew a bar tack at the end of a seam or in the middle of a seam. Releasing the button, the machine sews forward again.
- At the end of the seam, stop the needle in the upper position to facilitate easy removal of the thread.
- Lift the presser foot and remove the fabric.
- Move the threads over the thread cutter in order to cut them (13).
Button holes
Preparation: Insert the button hole foot
-
The needle has to be lifted completely. Turn the hand wheel (4) in the direction of the arrow.
-
Lift the presser foot lever (19), remove the presser foot shoe by pressing the lever (g) and replace it by the button hole foot (see "Fastening and removing the presser foot shoe (Fig. H-J)"). The red scale of the button hole foot has to be on the left side.
- Determine the button diameter and add 3mm (1 / 8^ ) for the button hole bar tack. For a very thick button, add more to the diameter.
- Mark position and length of the button hole on the fabric.
- Position the fabric in a way that the needle is located at the rear left side of the button hole.
- Pull the button hole foot towards the front as far as possible.
- Bring the foot down.
Button hole sewing:
CAUTION:
When turning the stitch selector (1), the needle always has to be in the upper position.
- Set the stitch selector to program no. 13. Sew the left button hole seam with appropriate speed until the front mark.
- Set the stitch selector to program no. 14 and sew 5-6 bar tacks.
- Set the stitch selector to program no. 15 and sew the right button hole seam until the upper mark (beginning of the button hole).
- Set the stitch selector to program no. 16. Finally, sew again 5-6 bar tacks.
- Remove the fabric underneath the foot. Pull the upper thread through the back side of the fabric and interlace upper and bobbin thread to prevent unintentional dissolving.
- Cut the middle of the button hole with the seam cutter (32). Pay attention that the seam on both sides will not be damaged.
Stop operation
- Set the On/Off switch to to switch off machine and sewing lamp.
- Pull the power supply out of the outlet.
- Pull the plug of the foot controller out of the machine.
Trouble shooting
| Problem Potential cause Correction | ||
| Upper thread breaks The machine is not threaded correctly. New threading of the machine. | ||
| Thread tension is too high. Loosen the thread tension (lower number). | ||
| The thread is too thick for the needle. Choose a bigger needle. | ||
| The needle is not inserted properly. Remove the needle and insert it again (flat side to the rear). | ||
| The needle is damaged. Replace the needle. | ||
| Bobbin thread breaks The bobbin thread reel is not inserted properly. | Check the position of the reel. | |
| Upper thread tension is too loose. Adjust upper thread tension (higher number). | ||
| Problem Potential | Tial cause Correction | |
| Skip stitches The needle | is not inserted properly. Remove the needle. | needle and insert it again (flat side to the rear). |
| Needle is damaged. Insert a new needle. | ||
| The wrong needle size has been used. Choose a needle that is adequate for thread and fabric. | ||
| Presser foot is not fastened correctly. Check position of the presser foot and fasten it correctly. | ||
| Needle breaks Needle | is damaged. Insert a new needle. | |
| The needle is not inserted properly. Insert the needle correctly (flat side to the rear). | ||
| Wrong needle size for the fabric. Choose a needle that is adequate for thread and fabric. | ||
| Presser foot is not fastened correctly. Check position of the presser foot and fasten it correctly. | ||
| Loose stitches Machine | is not threaded correctly. Check threading. | |
| The bobbin thread reel is not inserted properly. | Insert the bobbin thread reel as shown on the looper cover. | |
| Wrong combination of needle/fabric/ thread. | The needle size has to be adequate for fabric and thread (see table). | |
| Wrong thread tension. Correct thread tension. | ||
| Kinking seam The needle | le is too big for the fabric. Choose a finer needle. | |
| The stitch length is set wrongly. | Adjust the stitch length again. | |
| Thread tension is too high. | Loosen thread tension (lower number). | |
Cleaning

WARNING:
Always detach the machine from the power supply before cleaning!
- In no case submerge the machine and the power supply in water for cleaning. This could cause electrical shock or fire.

CAUTION:
- Do not use a wire brush or other abrasive objects.
- Do not use aggressive or abrasive cleaning agents.
Use a dust cloth for outside cleaning of the housing.
- Clean the area underneath the looper cover with a dry brush.
Noise development
The sound pressure level in the ear of an operator (LpA) was measured according to DIN EN ISO 3744.
Sound pressure level detected: 80 dB(A) (no limit)
Technical Data
Model: NM 600
Sewing area illumination LED 0.5 W
Net weight: approx. 3.20 kg
Power Adaptor
Protection class: II
Input: AC 100-240 V, 50/60 Hz
Output: DC 12 V, 1500 mA
Polarity:
Subject to technical changes without prior notice!
This device has been tested according to all relevant current CE guidelines, such as electromagnetic compatibility and low voltage directives, and has been constructed in accordance with the latest safety regulations.
Disposal
Meaning of the "Dustbin" Symbol
Protect our environment: do not dispose of electrical equipment in the domestic waste.
Please return any electrical equipment that you will no longer use to the collection points provided for their disposal.
This helps avoid the potential effects of incorrect disposal on the environment and human health.
This will contribute to the recycling and other forms of reutilisation of electrical and electronic equipment.
Information concerning where the equipment can be disposed of can be obtained from your local authority.
Spis tresci
MaJIHOHKn Ha CTOp. 4:
MaI.C (npunla
21 PedaIb ynpablinnH
22 WTeKepeK XnBneHnH
23 ToliKn (2x)
24 HanpmaHn HHTK
25 PoiBInHa roJka
26 Ianka IJI MaTeHHaNETeIb
27 Mexahi3m NiDImaHHraTOKOoi nlaCTnHKn dIg MeTaHHI BUNBaHH
28 BnKpyTka
29 TpIMaU KOTUuKIN
30 Laika DnB WbHBaHH 6JIuCKaBKn
31Пптискалалka
32 P03npopIOBaU WbIB
33KotyuknIJIHNTOK
Bε3 MaJIIOHKy:
UItka dnyuueHnna
Ha6ip dny wntra 3i 100 enementrib
P03naKaYBaHH MaunHKN
- BmIMtB MaHnHKy 3 ynaKOBKn.
- BnIMtB yBeCb nakyBaIbHm MaTepiA,I HApNkIaD fOJIbIy, HAnOBHIOBaU, fikCaTopi Ka6eJIIO I KapTOH.
3.ПepeBipTe,чнянВи BciЧацHHN.
Ihctpykui no 3actocybaHHIO
CklaaHnCTiJIbHnCi (man. DiE)
BnMItb KOTyKn DnHnTOK Ta iHne npuJaDja, 36epira-ctbca y cInbHuCi.
- TpkaditbcknaedHy cInbHnUO rnp3oHTaIbHo (MaI.D).
- NocyHbTe KpnuKy BiDcKi DnI npnIaI npabOpuy Ha-npIaMky, BkazAHomy CTpiKIOU, Ta BiKnPInTe II (MaI.E).
Tpmau KOTyukn (29)
BnMItb TpMaH KOTyUKN 3i CTINbHuNi i BCTaBte MoRo HaHa- nprMHy 3 TnIbHOi CTOpOH MaunHKn (20).
Enektpnue 3'eHaHHa (MaN.F)
1.ПиД'Енай Te WTeKep XnBnEHHa Do MaunHKn (a).
2.ПiД'Енайтseшт ekрЖиБпeнгЯdoHaIeЖHO BcTaHOBnEHOI po3eTKN 230B\~,50ΓU(b).
3.Пд' enda Te neaJIb ynpabNHHdo MaunHKn (c).
4. BctaHObITb nepemKkauyyBIMKHeHHBIMKHeHHy y noIO- XeHHA "I".
5. Hatnckaoun neaJIb ynpaBniHna, moXHa perynIOBaTn WBNKicTB MaunHKn.
YbIMKHeHHBIMKHeHH
-Перемкayу noloxeHHI ":MaunHka yBIMKHeHa i Cbitntb-craLED-namnoyka dnyuTTT.
-Перемпakу nopoJOKeHHI "O":ВIMKHeHO.
IpeDynpexkaet 6oNacHOCTn DnT3dOpOBbN BO3MOXHOM pncke noJyehn TpaBMbl.
BHIMAHHE:
Yka3bBaet Ha BO3MOxHNoIaCHOCTb IINI3JeNnI INpy
IPIMUEAHNA: Daet COBtBu INHOpMaunIO.
TeHn Hnua HykdaOuIeCeB npncMOtpe
- 13 coo6paKeHn 6e30NaacHOCT nIg ITeTHe octabnI-Te IexKaTb yNakOBky (IInactNKOBble MeUKN, KapTOH, NeHO-nnact n T.D.) 6e3 npncmOTpa.
I PENEYNPKDEHNE!
He no3B0JrTe DeTm IrpTa b c noIIN3TNNEHOBOI nIeHKO. OnachocTB ydyub!
3TOT np60p He npedHa3HaeH dIg NOJb3OBAHn Iuqamn (BkIOUaA detE) C ORpaHueHHbIMN pH3NueCKMn, CEHCOPHBIMN IIN yMCtBEHbIMN cNOcO6HOCTAMN IIN IInaMM, He IMeIOUmm ObIta N/IN INeO6XoDMbIX 3HaHm. NckIOUeHne COCTABnIOT cHyAn, KOrda OHn HaxoJrTCa IOd PnICMOTpOM IIna, OTBeTCTBeHHoro 3a INx 6e3OnacHOCTb, INN KOra OT 3TOI IIna nOlyHebl yKa3AHn No NOJIb3OBAHnIO np60pom.
Heo6xoJIMO npncMaTPnBaT 3a JeTbMn, YTO6bl y6eIHTbCBA TOM, YTO OHN He IrpaHc T npnbopom.
CneuaJIbHbIe yka3aHnno 6e3oNaChocTn Dnra 3TOr npu6opa
IPEyPPEKDEHNE:
Bcerda n3BnkeaTe Bnky HOxHoro KOHTpOJIpepa H3 MaWnHbI, KOrda pa6oTaete B 30He DeiCTBna IInbl, HApnIMep np3anpaBKe HtN, 3aMeHe INbl, BCTABKe WnylbKn Nn 3aMeHe PnKMMHOJ NaKN.
- IVcnoJIb3yIe ToJIbKO npHaJdIeXHocTn 13 KOMIIeKTA NOCTaBKn, IIN6O peKOMeHDoBaHHbIe B DaHOM pyKOBODCTBe. PpIMHeHHe HepeKOMeHDoBaHHbIX npHaJdIeXHOCTe MoKeT Bbl3BaTb TpaBMbl.
BHIMAHHE:
- Pn noBopTe ceNeKtopa cTpouek (1), nroJka doJnxHa 6bITb B BepxHem NIOXKeHN.
BoBpemIHTbI He TAHNTe HHe ToKaiTe TKaHb.3To MOKeT Bbl3BaTb NIOOMky IITbl.
3Ta WBeHnHa MaunHa npeHa3NaYeHa TOnbKO dIg MoaHrO pImeHeHn.
- HαdexHNo yctaHOBnte MaunHy ha poBho pa6oeyn no-BepxHOCTN.
- PIMMeHnTe NCTOuHHK 3JIeKTPoNHTaHnR TOJbKO n3 KOMnNEkTa NOCTaBnK.
-ПипөрөрьговхВ pa6Ote BBkHIOUHTe MaUHHy n 3BJIeKNTe BnKy 3JIeKTPoNTaHry n3 HAcTeHHO n03eTKn.
OnucaHne coCTaBbIX yacte / KOMJIeKT NOCTaBKN
063op opraHOB ynpaBneHn CM. Ha cTp. 3: Pnc.A (nepeHna CTOpHa MaunHbI)
1 CeNeKTop cTPOeK
2BanhamotknwnyneK
3 Kpaebar Haprabnlaosha HAMOTKuynyek
4 PyuHoe Koneco
5 0603haeHnI nI ceIeKTopa cTpoueK
6 3JIeKTpUeCKeO NOdKnIouHeHne
7 Khonka WntbHa3a
8 Pbyar kpenneHn onopbl npnxmHno Iankn
9 BepxHЯ KpbIka OTeKa npHaIeJXHoCTeI
10ПиЖИМнЯлпka
11 BnHT KpennHn npKHMnJ nann
12 BnHT KpennenHnIgblb
13 HnTeo6peaTeIb
14 UnpabJIeHne HATJKeHEm BepxHn HHTN
15 KhoNka ocla6neHnHaTaeKeHn HHTN
16 Pbyar HntepnTBAteTn
17 OTBepctne noaun HnT BnroJky
18 HanpaBriaJouaH HNTn DnHaMoTkn 7nyneK
Pnc.B(3aHnCTopoHaMaunHB)
19 Pyuhar nojbeMa npnxmHno JnanKn
20 DepeKaTeJIb KaTuIeKn C HntKoI
Pnc. Ha cTp. 4:
Pnc.C (npnHaIeXHoCtN)
21 HoXHoI KOHTpOJIeP
22 3JIeKtpoNtTaHne
23 NroIkn (2x)
24 HntkOBdBeBaTeJIb
25 DboHna WroJka
26 Janka dnia o6MeTkn nTeJIb
27 PpOunbHa nroIbHaa pnaCTnHa dIy fpyHoi cTpoKIn BBiINBaHHa
28 OTBepTk
29ДержateьКатушЕСнТКОI
30 LaKa dIa 3aTeXKn-MoJIHn
31 Onopa npnKHMnJnKn
32 06pe3aTeIb wBa
33 Ⅲnybkn
Bε3 pncyHka:
甲CTAaKCTOyKa
UBeHbHa6op n3 100 npedMeTOB
PacnaKOBka MaunHbI
- 13BJIeKInTe MaUHHy n3 yNaKOBKn.
- CHIMMTE BCE ynaKOBOHyBHe MaTePnAbIb, HApPmEp PIneHKN, IpoknAdKn, Ka6eJbHbIe CTaXKn N KApToHHbIe Kopo6Kn.
- Поверп Te KOMПЕКTHOCТи NOCTaBKN.
Hctpykuu no npmuheHHIO
CKJIaIaHoiOTcEi(pnc.DnE)
IyctbIe IuynbKn u npyrne npnaadnexkHOCTN xpaHrTcB CKnAHOm OTCEKe.
- BbITaHHe CkJIaHOn OTCeK B rOpN3OHTaIbHOM HAnpaBneHn (pnc.D).
2.Cdbnhte Kpbilky OTeCeA npHnHaIeXHoCTe BnpaBO, KaK noka3aHO MapkehOHTpeNko, nOTkpoTEr oE (pnc.E).
DepkataeB kAtyweK c HntKoI (29)
N3BnKeKITe depKaTeInb KaTyWeK C HHTKoN I3 CKNaHOrO OTCeKa N BCTaBBTe 3OT depKaTeINb HAnpabIyIOU Yo Ha 3aHHeh CTOpOHe MaunHbl (20).
3Jektpueckoe nodknoeHne (pnc.F)
1.Подкнючiteшурэл ektpoNTaHЯКMaшинe(a).
2.ПОДКЛЮЧNTЕЗЛЕKTРОПТАНUEКорэтke 230В\~,50ΓU, yctahOBHNeHHoCOrnAChO HOpMaM (b).
3.ПодкнчиTeКмшинe HOЖHOKOH KOHTponJIep (c).
4. YctaHOBInTe nepeKIOUaTeIb BKNIOUHeHr/BbIKIOUeHnB NOJIOKeHnE "I".
5. CkopoocTbIO WHTbMaWuHbI MoXHO ynpaBnTb HOxHbIM KOHTpOJInePOM.
BkJIOueHHe / BbIKJIOueHHe
-NoJoxHeHne nepeKIOUaTeJIYI:BKNIOUeHbMaUNHa nCBETOIOOD(LED)nAMNOCHuNTb.
-ПоноженеpekeknioateTЯ"O:BbIKIOUeHO
CBeToaOnoHna(LED) lamnoouka wntb
CBeToIOIOHnA(LED)IaMNoOkaIITbHe Tpe6yEtTexHnueCKOrO 06cIyKuBaHnI He HyKdAeTcB 3aMeHe.
Bb6op Homepa nHn HnTOK
CnCTema nroJOK: CnCTema nroJOK c nnIOCKoN JbICKOIN 130
BCTaBtE INIy CnEDyUOuIM CNOCo6OM:
HanpaBnaOuaa nIbI dONKHa 6bITb NOnHOCTbNO NOHrTa. NoBepHnTe pyuHoe Koneo (4) B yka3aHHOM CTpeNkO HappaBneHN.
Ocna6bTe BnHT KpeHneHn Hnbl (12) n 3aTnHte ero ChOBa noCne BCTABKHOBOHn Hnbl.
Плосьа StOpoHa nIbI (nIbICa)doJIxHa CMOTpeTb Ha3aJ.BCTabJIaIte IyIy Do yPobHЯ KpaEBoHnPaBnIOUeI.
Kpenenne H cHnTne onopbl npnxmho nnKn (pnc.H-J)
MaunHa NMeet cTaNapThy npKmHyI JaNkIy IaI
HtBpa3nHbIX COPTOB TkaHn. IaI O6MetKn neTeIb n
pNunBaHn 3actexek "MonHn" Tpe6yETcYcTaHOBtB
DpyrO onOpny npKmHOn IaKN B DePxaTeIb npKmHOn
lanKn. Bo BpemzamHeI onOpbl npKmHOn IaKNn IroIka
doJxHa 6bITb nonHoCTbIO noHnra. IobepHnTe pyHoe
KoIeco (4) B yKa3aHHOM CTpeIKo HAnpaBHeHH.
O 3amene onopby npnKHMHOJIaKNc mC. cJeIyoUe daJe e OINCAHHe BmecTe C pucyHKAMn H-J.
1.PnC.H:BbITaHNTe BBePx pBvAr NODbMa npNkMHOI NaIKn (19).Ocna6bTe KpeNexKbI BnHT npNkMHOI NaIKn (a).YcTaHOBtE DePkaTeIb npNkMHOI NaIKn (b)Ha BaJ npNkMHOI NaIKn (c) n3aTaNHTe BNHT (a).
2. Puc. I: nomecnte onopy npnKHMHJ naKN (d) Ha ngIbHyu nnaCTHy. OnyckaiTe pbIar npnKHMHJ naKN (19) Do no3nIOHOHPoBaHN BbiEMKn (e) ToHO HAD wTnΦTOM (f) onopbl npKMMHJ naKN. HaxmajTe pbIar (g) do pKaCauN wTnΦTa (f) B BBiEMKe (e).
3. ChTne onOpby npKHMHOJIaIKn (puc.J):noHMMTe pbHar npKHMHOJIaIKn (19), HAKMTE Ha pbHa(r) n OIOPa npKHMHOJIaIKN BbInaTe BHN3.

HaTaeKeHne BepxHeH HHTn (pnc. K)
Дя 6bICTPOn n npocTo3anpaBKn BepxHn HHTN BblONHInTe Warn C 1 no 7, CBepraCb C nyHKtnpHOJ NHHmHa npNBedeHN HOM HnKe pncyHke K n/nnNo cTpeJIkAm Ha MaunHe.
- YctaHOBnTe KATyKc C HNTKO B DEpKaTeJIb KaTyKcN C HNTKO (20) nnpoDeHbTe HNTb CKBO3b OTBepCTne NOaH NHTB INrOJky (17), c3aDn Bnpej.
-
HaxMNTe BnEBO KhONky(15), yTO6bI CHaTb HATXeHne HHTN, 3aTe MnpODeHbTe HHTb BHIN INpOBepbTe, yTO HHTb paCNoIraeTCa MEKdy HAToXHbIMn DnCKaMn, 3aTeM OTnyCTnte KhoNky (15).
3.ПодьтЕНТВБЕРХHAJIБОВCTOPОЕpbIчАнTe- npTЯRnBaTeN(16). -
Bctabte Hntb b pbyar HntenpntraBate n Choba npotrHnte ee BHn3 Ha npaBoi CTopoHe 3TOro pbuara.
-
IpoJeHbTe HnTb CKB03b yUko HnPaBnaIooe HnTn cnepeDu Ha3aI.
-
Пордьт e HHT b CKBO3b HappaBnIooIyHHTn Ha IroJIke CBepxv BHN3.
- Hakoheu, BCTaBtE HHTb B INrOlbHoe yWko Cnepen Ha3aD (3To OueHb BaxHo!!!).
PerynpoBkaHaTaeKeHHaBepXHeH HHTN (14)
Ba30BaHacToPouKa-MexKdy4n5.
B 3aBucnMoCTN OT TKAHn u pa3Mepa HNT BbINOHNHTe perynipOBky 3a CHT nobOpTa oprHa ynpabNeHn (14) TaK, YTO6bl y3eBepxHeH NT N HNT WnyIbKn BByIJeN ToOKo HA BepxHe CTOpOHe TKAH. EcNI KE BVNDbl NeTNI, 3HaHT HATJKeHne HNT CNIuKOM Cna6oe.
3.BctabTe WnyIbkyB neTnTeIb,ObecneuVB BpaueHne KAtyUKNIO YacobOcpeKe (cM. npabBpncyHOK Ha KpbUKe neTnTeJI).OctabTe CBO6oHbIMN 5 CM HHTN.
- BdBnHbTe 6pbAtHO KpbIuKy neTInTeJr.
BcTabka uynybnk (pnc.L)
- PnBCTaBKe Hnn N3BneHm HnybKn (33) nroJka doJHKHa 6bItb NoJIHOCTbIO NOHrTa. NObepHIne pyHoe KOJIeCO(4) B HanpaBHeHm No CTpeJIke.
- BbIaHInTe B rOpN3OHTaJIbHom HApBaNHeHIM BepXHOIO KpbIuKy n3 MaunHbI. OTKpoIte pO3paHyIO KpbIuKy nTJIITeIaB HApBaNHeHIN BnpeI.
aaiill "adll adlclal 1
pL
(EgD)
gall jall glll lal lnae, alsall Iaas
(DJ.11) 5
Culj y jyso yas Ls liy ciaolall aie Ue J.2
(E)
(29)
a + b = 3
(20) 1
17 000000000000000000000000000
(15)jz jz jz 2
aal jai jy jn jn jn jn jn jn
(15)
3
.(16)
e 4
5
Jusu 100
.7
#
(23)
四边形 AOBC 为正方形
J 1
:
a 1000
JL Ls. jy 1
a
aaiiie aiee iie 1
(4)
SAL (12) 2017 2018
0
i 1
jbc j.13 a j cai jll 5c j j j k k jia bui .1
aai 1 aaiell giaiaiaiae s jssll
6-5 j 14 j 20
.
jbs 15 a jai jil 3
(8.8.8)
16 16 16
.5j 6-5
gall gall Jaiil jaiil 5
y
joll (32) jell glbla 1sdy s yell aal .6
.8jgl 15x 16 0g j jdl
J
1
abslilill gusgail
jiaol jao 2011.2
Aisall jie paii aaiy yaiaiy .3
(3) all 15 all 15 all 15 all 15 all 15 all 15
pall 100
Jai 111 111 111 111 111 111 Jao Lioic .7
P( 1,2) .D( -34,34)
.8
(1)j#
j16 j
(4) 1
S OBC = S COD + S_ BOC
plaiy jj yall 1y j jial kia bia 2
yall jjll kiae
1
"biu" (2) all sbj aiid jao aiio 1
(.SEWING)
aaiy 2
10
1olal 3
Jie 1e lei iai jiljia .4
5
A
a1 = 2,a2 = 35,b1 = 97,b2 = 118
glaill jaiie iabilil aiai jjell j
.5jol ojo loal alalal alalal
1.ajaiill jaiall jie Laiil aiSall Jaii 1olll gJgai jia aiall jiaai aiSall jaiy 1aaiai jaiill gai iis yaiy
A

CLATRONIC
INTERNATIONAL GMBH
D-47906 Kempen/Germany - Industriering Ost 40
Internet: http://www.clatronic.de - email: info@clatronic.de