
TD 302 - Cooker CATA - Free user manual and instructions
Find the device manual for free TD 302 CATA in PDF.
| Brand | CATA |
| Model | TD 302 |
| Product type | Ceramic hob |
| Control type | Touch control |
| Number of cooking zones | 4 (estimate from manual) |
| Power levels | 9 (from 1 to 9) |
| Double circuit function | Yes (on some zones) |
| Triple circuit function | Yes (on some zones) |
| Child safety | Yes (key lock) |
| Residual heat indicator | Yes ("H" display) |
| Auto shut-off | Yes (time limited by power level) |
| Protection against unintentional startup | Yes (shut-off if key pressed >10 seconds) |
| Acoustic signal | Yes (buzzer) |
| Power supply type | Electric (mains connection) |
| Maintenance | Clean with scraper and suitable product, avoid abrasive sponges |
| Installation | Built-in, must be performed by qualified personnel |
| Compliance | Directives 2006/95/EC and 2004/108/EC |
Frequently Asked Questions - TD 302 CATA
User questions about TD 302 CATA
0 question about this device. Answer the ones you know or ask your own.
Ask a new question about this device
Download the instructions for your Cooker in PDF format for free! Find your manual TD 302 - CATA and take your electronic device back in hand. On this page are published all the documents necessary for the use of your device. TD 302 by CATA.
USER MANUAL TD 302 CATA
E
Operating and maintenance instructions for hobs
1
THIS APPLIANCE IS DESIGNED FOR DOMESTIC USE ONLY. THE MANUFACTURER SHALL NOT IN ANY WAY BE HELD RESPONSIBLE FOR WHATEVER INJURIES OR DAMAGES ARE CAUSED BY INCORRECT INSTALLATION OR BY UNSUITABLE, WRONG OR ABSURD USE.
The manufacturer declares that this product meets all basic requirements regarding low-voltage electrical equipment established in the 2006/95/EEC Directive of 12 December 2006 and electro-magnetic compatibility established in 2004/108/EEC Directive of 15 December 2004.
User's Instructions
Installation
All operations relative to installation (electric connection) should be carried out by skilled personnel in conformity with the rules in force.
As for the specific instructions see part pertaining to installer.
Use
Touch sensitive keys
All operations can be performed using touch sensitive keys (capacitive sensors) located on the front of the control board; each key has a corresponding display. All actions are confirmed by an audible signal.
TOUCH CONTROL (Fig. 2)
1 ON / OFF
2 Minus -
3 Plus +
4 Double / Triple Circuit
5 Cooking zone
6 Setting level display
7 Dual circuit pilot light
8 Illuminated Segment Multiple Circuits
Installation
All operations relating to installation (electrical connection) must be carried out by qualified personnel in line with current regulations.
See the part reserved for fitters for specific instructions.
Switching the Touch Control on/off
After mains voltage is applied, the touch control initialises for approximately one second before it is ready for use.
All displays and LEDs flash for approximately one second after resetting. Once this period is complete, all displays and LEDs switch off and the touch control is in standby mode.
Press the ON/OFF (1) button to switch the touch control on.
The cooking zone displays indicate "0". If a cooking zone is in "hot" (high temperature) mode, the display will alternately indicate "H" and "0".
After switching the touch control on, it will remain active for 20 seconds. If no cooking zone is selected, the touch control automatically switches back to standby mode.
The touch control can only be switched on by pressing the ON/OFF (1) button.
Pressing the ON/OFF (1) button at the same time as other buttons will have no effect and the touch control will remain on standby.
The touch control can be switched off at any time using the ON/OFF (1) button. This is even the case when the control has been locked by the child safety feature.
The ON/OFF (1) button always takes priority in the switching off function.
Automatic off
Once switched on, the touch control automatically switches off after 20 seconds of inactivity. After selecting a cooking zone, the automatic off time is divided into 10 seconds, after which the zone is deselected and, after another 10 seconds, the touch control switches off.
Switching a cooking zone on/off
If the touch control is switched on, the cooking zone can be selected by pressing the button (5) of the corresponding zone.
The display (6) of the zone selected lights up, while the remaining displays are dimmed. if the cooking zone is “hot”, “H” and “0” are alternately displayed.
Press the PLUS (3) or MINUS (2) button to select a setting and the zone will begin to heat up.
Once the cooking zone has been selected, the setting can be selected by keeping the PLUS (3) button pressed down. The setting begins at level 1 and increases
by 1 level every 0.4 seconds. When setting "9" is reached, the setting will not be changed further.
If the setting level has been selected using the MINUS (2) button, the start level is "9" (maximum level). Keep the button pressed down to lower the active level by 1 every 0.4 seconds. When setting "0" is reached, there will be no further setting changed. The setting can only be changed by pressing the MINUS (2) or PLUS (3) button again.
Switching a cooking zone off
Select the zone to be switched off using the corresponding button (5). The display (6) of the zone selected lights up, while the remaining displays are dimmed. Press the PLUS (3) and MINUS (2) buttons at the same time and the setting level of the zone is changed to 0. Alternatively, the MINUS button (2) can be used to reduce the setting level to 0.
If a cooking zone is "hot", "H" and "0" will be alternately displayed.
Switching all cooking zones off
Press the ON/OFF (1) button to immediately switch off all zones at any time. In standby mode, an "H" is displayed in all cooking zones that are "hot". The remaining displays will be switched off.
Setting level
The cooking zone can be set to 9 levels that are indicated by the numbers "1" to "9" on the seven-segment LED displays (6).
Residual heat indicator
This informs the user that the glass is at a dangerous temperature in the event of touching the area located around the cooking zone. The temperature is determined by a mathematical model and any residual heat is indicated by a “H” on the corresponding 7-segment display.
Heating and cooling are calculated based on:
· The selected setting level (between "0" and "9")
- The ON/OFF time.
After switching off the cooking zone, the corresponding display will indicate "H" until the temperature in the zone has dropped below the critical level ( ≤ 60^ ).
Automatic off function (operating time limitation)
In terms of the setting level, if no operation occurs each cooking zone switches off after an established maximum time.
Each operation in the cooking zone condition (using the PLUS (3) and MINUS (2) or dual zone) restarts the maximum operating time of the zone by resetting it to its initial value.
Protection against unintended switching on
- If the electronic control detects a button being held down for approx. 10 sec. it will switch off automatically. The control sends out an audible error signal to warn the user that the sensors have detected the presence of an object. The displays indicate error code “E R 0 3”. If the cooking zone is in “hot” mode, “H” will be indicated alternately on the display with the error signal.
- If no cooking zone is activated within 20 seconds after switching on the touch control, it will return to standby mode.
- When the control is switched on, the ON/OFF button has priority over all other button and, therefore, the control can be switched off at any time, even when several buttons are pressed at the same time or a button is kept held down.
- In standby mode, no effect will be caused by buttons being kept held down. However, before the electronic control can be switched back on, it has to detect that no button is pressed down.
Button lock (child safety feature)
- Child safety feature:
Button lock:
To activate the child safety feature after having switched on the Touch control, press de rear left cooking zone selection button at the same time as the MINUS button (2) for 3 seconds, followed by just the rear left cooking zone selection button. An "L" standing for LOCKED (child safety feature preventing unintended switch on) will be indicated on all displays. If a cooking zone is in "hot" mode, "L" and "H" will be alternately displayed.
This operation must take place within a 10 successive seconds and no button other than those described must be pressed. Otherwise, the sequence will be interrupted and the hob will not be locked.
The electronic control remains locked until it unlocked by the user, even if it has been switched off and back on meanwhile. Not even touch control resetting
(after a voltage drop) will interrupt the button lock.
Cancelling the button lock:
After switching the touch control on, the child safety feature can be disabled. Press the rear left cooking zone selection button and the MINUS button (2) for 3 seconds, followed by just the MINUS button (2). If all operations are carried out in the right order within 10 seconds, the button lock will be cancelled and the touch control switched off. Otherwise, the sequence will be considered incomplete and the touch control will remain locked and will switch off after 20 seconds.
Switch the touch control back on using the ON/OFF button and all displays will be indicate "0", the decimal points will flash and the touch control will be ready for cooking. If a cooking zone is in "hot" mode, "0" and "H" will be alternately displayed.
Control of multiple circuits
Hobs without double or triple circuit, see Fig. 2A
Hob with double zone. (Fig. 2B)
When a dual cooking zone is activated, the two circuits are switched on at the same time. Activation of the external circuit is indicated by a pilot light (7) in the bottom right corner of the display. If only the internal circuit is to be switched on, the external circuit can be switched off using the dual circuit button (4). Press the dual circuit button (4) again to re-activate the external circuit and the corresponding pilot light (7) will switch on.
Hob with triple zone. (Fig. 2C) / Hob with double and triple zone. (Fig. 2D)
When a dual / triple cooking zone is activated, the 3 circuits are switched on at the same time. The activation / deactivation of each circuit is done with button 4 and it is indicated with an illuminated segment (8).
Sound signal (buzzer)
The following activities are indicated by a buzzer during use:
- Normal button pressing by a short sound.
- Buttons kept pressed down for more than 10 sec. by a long, intermittent sound.
Precautions (Fig. 3)
- When one makes use of heating elements, we advise
receptacles with flat bottom having same diameter
or lightly
higher than that of the hot area.
- Avoid overflows of liquid, therefore when boiling has
happened, or in any case when liquid is heated, reduce the
heat supply.
- Don't leave the heating elements on without receptacles on
the top or with void pots and pans.
- If the surface of the hob is damaged, immediately disconnect the appliance from the mains to prevent the
possibility of electric shock.
- Never use a steam cleaner to clean the hob.
- This appliance hood is not designed to be used by people (including children) with reduced physical, sensorial or mental capacity, or who lack experience or knowledge about it, unless they have had supervision or instructions on how to use the appliance by someone who is responsible for their safety.
- Children must be supervised to ensure that they do not play with the appliance.
Maintenance (Fig. 4)
By means of a scraper immediately remove any allu-minium foil bits, food spills, grease splashes, sugar marks and other high sugar content food from the surface in order to avoid
damaging the hob.
Subsequently clean the surface with some towel and appropriate product, rinse with water and dry by means of a clean cloth. Under no circumstance should sponges or abrasive cloths be used; also avoid using aggressive chemical detergents such as oven sprays and spot removers.
Installer's Instructions
Installation
These Instructions are for the qualified technician, as a guide
to installation, adjustment and maintenance, according to the laws and standards in force. These operations must always be carried out when the appliance has been disconnected from the electric system.
Positioning (Fig. 5)
1 Front view
2 Front side
The appliance can be fitted into a working area as illustrated on the figure. Apply the seal supplied over the whole perimeter of the working area.
I f once the appliance is installed there is access to the lower part, a protection panel (wooden or something similar) ought to be placed at the distance indicated in the figure.
Electrical connection
Prior to carrying out the electrical connection, please ensure that:
the plant charac- teristics are such as to follow what is indicated on the matrix plate placed at the bottom of the working area;
- that the plant is fitted with an efficient earth connection, following the standards and law provisions in force.
- The earth connection is compulsory in terms of the law.
Should there be no cable and/or plug on the equipment, use suitable absorption material for the working temperature as well, as indicated on the matrix plate. Under no circumstance must the cable reach a temperature above 50^ C of the ambient temperature.
Insert in the fixed wiring a mean for disconnection from the supply mains having a contact separation in all poles that provide full disconnection under over-voltage category III conditions, in accordance with the wiring rules. The plug or omnipolar switch must be easily reached on the installed equipment.
This appliance is not intended to be used via an external timer or a remote control system.
The manufacturers decline any responsibility in the event of non-compliance with what is described above and the accident prevention norms not being respected and followed.
To avoid all risk, if the power cable becomes damaged, it must only be replaced by the manufacturer, by an authorised service centre, or by a qualified electrician.
QUESTO PRODOTTO È STATO CONCEPITO PER UN IMPIEGO DI TIPO DOMESTICO. IL COSTRUTTORE DECLINA OGNI RESPONSABILITÀ NEL CASO DI EVENTUALI DANNI A COSE O PERSONE DERIVANTI DA UNA NON CORRETTA INSTALLAZIONE O DA USO IMPROPRIO, ERRONEO O ASSURDO.
natural_image
Illustration of a hand using a paintbrush to brush residue in a container (no text or symbols)Fig.4 - Abb.4 - Afb.4 - Puc.4 - Rys.4 - Kuva 4. - 图4 - 4. ábra - Eik. 4.

| A | B | C | D | E | |
| 298 | 520 | 270 | 494 | ||
| 590 | 520 | 560 | 490 | 74 | |
| 700 | 350 | 680 | 330 | 74 | |
| 700 | 520 | 560 | 490 | 74 | |
74
Fig.5 - Abb.5 - Afb.5 - Puc.5 - Rys.5 - Kuva 5. - 图5 - 5. ábra - Euk. 5.
230 V ~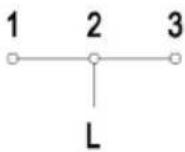 | H05V2V2-F3G2.5*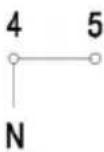 |  ( ) ( ) | 230 V 3 ~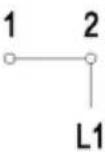 | [H05V2V2-F4G1.5*]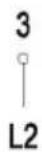 |   |
400 V 2 N ~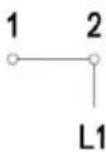 | H05V2V2-F4G1.5*[Gwol] | [Gwol] | 400 V 3 N ~[Gwol] | [H05V2V2-F5G1.5*[Gwol] | [Gwol] |
Fig.6 - Abb.6 - Afb. 6 - Puc. 6 - Rys. 6 - Kuva 6. - 图6 - 6. ábra - Euk. 6.
cataC
CNA
group
CATA ELECTRODOMÉSTICOS, S.L.
C.Ter, 2 - 08570 TORELLÓ (Barcelona) SPAIN
Tel. +34 938 594 100 - Fax +34 938 594 101
www.cnagroup.es - e-mail: cna@cnagroup.es

- User's Instructions
- Installation
- Use
- TOUCH CONTROL (Fig. 2)
- Switching the Touch Control on/off
- Automatic off
- Switching a cooking zone on/off
- Switching a cooking zone off
- Switching all cooking zones off
- Setting level
- Residual heat indicator
- Automatic off function (operating time limitation)
- Protection against unintended switching on
- Button lock (child safety feature)
- - Child safety feature:
- Button lock:
- Cancelling the button lock:
- Control of multiple circuits
- Sound signal (buzzer)
- Precautions (Fig. 3)
- Maintenance (Fig. 4)
- Installer's Instructions
- Positioning (Fig. 5)
- Electrical connection
- QUESTO PRODOTTO È STATO CONCEPITO PER UN IMPIEGO DI TIPO DOMESTICO. IL COSTRUTTORE DECLINA OGNI RESPONSABILITÀ NEL CASO DI EVENTUALI DANNI A COSE O PERSONE DERIVANTI DA UNA NON CORRETTA INSTALLAZIONE O DA USO IMPROPRIO, ERRONEO O ASSURDO.
- cataC
Brand : CATA
Model : TD 302
Category : Cooker