USER MANUAL RO6 T3T1CTB1 NOIR ROSIERES
natural_image
Simple line drawing of a rectangle with three smaller circles above it, no text or symbols present.
natural_image
Simple line drawing of a microwave oven with no text or symbols
natural_image
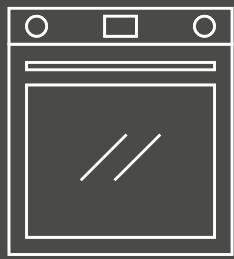
Simple line drawing of an oven with handles and a side panel (no text or symbols)
English
Deutsch
Français
Italiano
Español
Ελληνικά
Nederlands
Português
Slovenčina
Slovenščina
Српски
Polski
Čeština
Dansk
Suomi
Norsk
Svenska
Қазақ
Русский
Українська
Български
Hrvatski
Română
Türkçe
العربيya
中文
Magyar
תְרָה
Lietuvių
Eesti
Latviešu
WELCOME
Thank you for choosing our product. To ensure your safety and get the best results, please read this manual carefully, including the safety instructions, and keep it for future reference.
Before installing the oven note the serial number, which you might need for repairs. Check for any damage during transportation and consult a technician if you're unsure before using it. Keep packaging materials away from children.
NOTE: Please note that the oven's features and accessories may vary depending on the model you purchased.
SUMMARY
2. PRODUCT INTRODUCTION
2.1. Overview of the product
2.2. Accessories
2.3. Control panel
3. BEFORE STARTING
3.1. Information to start
3.2. First usage
3.3. Preliminary cleaning
4. OPERATION OF PRODUCT
4.1. How the product works
4.2. Cooking functions
4.2.1. Standard functions
5. COOKING GUIDELINES
5.1. General Cooking tables
6. CARE & CLEANING
6.1. General recommendations
6.2. Cleaning the oven
6.2.1. Inside the oven: cleaning functions
6.2.2. Outside the oven: removal and cleaning the glass door
6.3. Cleaning of accessories
6.4. Maintenance
7. TROUBLESHOOTING
8. ENVIRONMENTAL PROTECTION & DISPOSAL
9. INSTALLATION
GENERAL WARNINGS
- Do not use a steam cleaner for cleaning operations.
- During use the appliance become hot. Care should be taken to avoid touching heating elements inside the oven.
Use in accordance with attendend use
- Only use the oven for its intended purpose, that is only for the cooking of foods: any other use, for example as a heat source, is considered improper and therefore dangerous. The manufacturer cannot be held responsible for any damage resulting from improper, incorrect or unreasonable usage.
Use limitations
- The appliance can be used by children aged from 8 years and above and persons with reduced physical, sensory or mental capabilities or lack of experience and knowledge if they have been given supervision or instruction concerning use of the appliance in a safe way and understand the hazards involved. Children shall not play with the appliance. Cleaning and maintenance shall not be made by children without supervision.
- This appliance is not intended to be used by persons (including children) with reduced physical, sensory or mental capabilities, or lack of experience and knowledge, unless they have been given supervision or instruction concerning use of the appliance by a person responsible for their safety.
Children should be supervised to ensure that they do not play with the appliance.
- ⚠ WARNING: the appliance and its accessible parts become hot during use. Care should be taken to avoid touching heating elements. Children less than 8 years of age shall be kept at away unless continuously supervised.
- ⚠ WARNING: Accessible parts may become hot during use. Young children should be kept away.
INSTALLATION WARNINGS
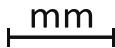
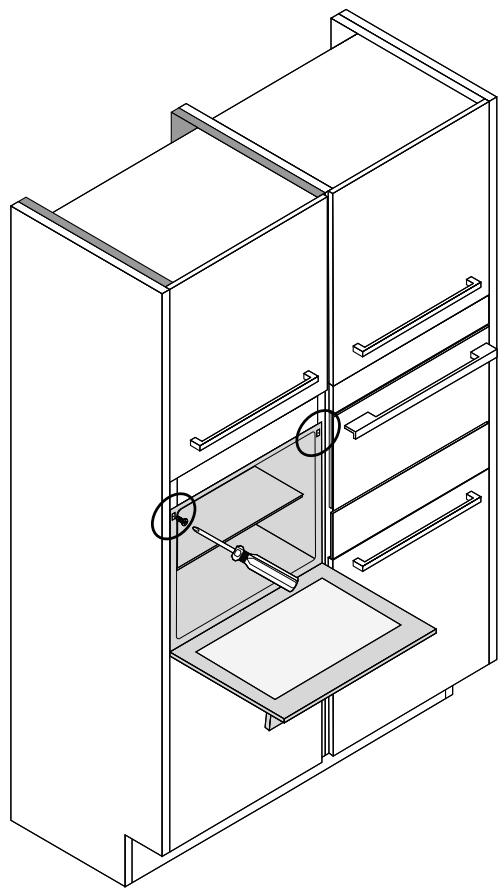
- The oven can be located high in a column or under a worktop.
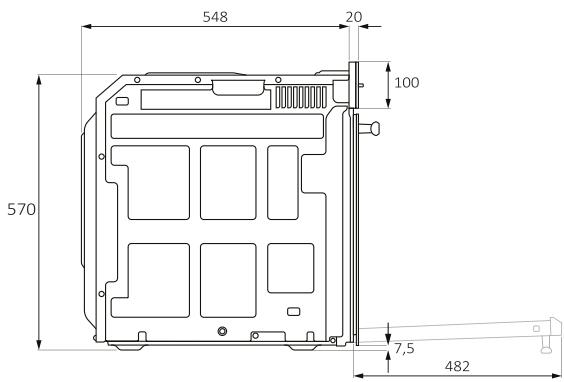
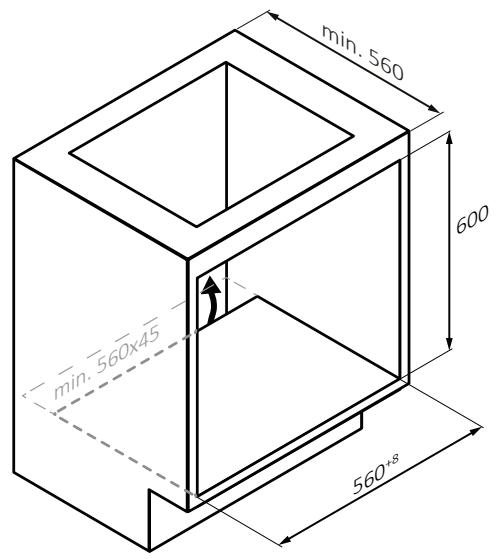
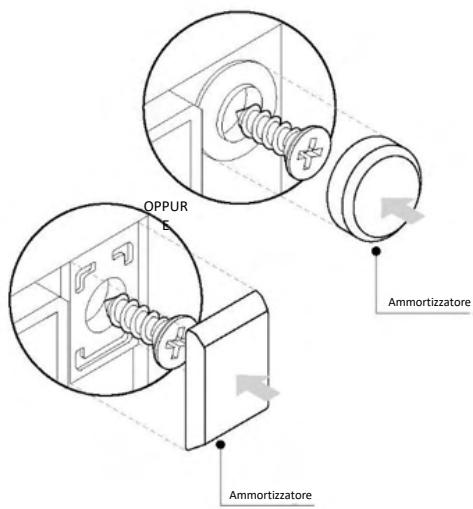
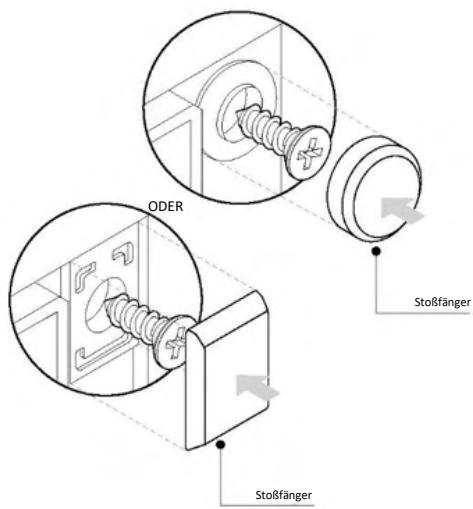
Before fixing, you must ensure good ventilation in the oven space to allow proper circulation of the fresh air required for cooling and protecting the internal parts. Make the openings specified on the illustrations according to the type of fitting. Always fix the oven to the furniture with screws provided with the appliance.
- No additional operation/setting is required in order to operate the appliance at the rated frequencies.
- The appliance must not be installed behind a decorative door in order to avoid overheating.
- During installation the oven should be disconnected from the mains electricity supply.
- If the assistance of the manufacturer is required to rectify faults arising from incorrect installation, this assistance is not covered by the guarantee. The installation instructions for professionally qualified personnel must be followed.
- Incorrect installation may cause harm or injury to people, animals or belongings. The manufacturer cannot be held responsible for such harm or injury.
- Installation must be carried on by a qualified technician who must know and respect the laws in force in the country of installation and the manufacturer's instruction.
- After unboxing the appliance, always check it is not damaged, in case of issue contact the customer service before installing and do not connect to the power supply.
- Remove the packaging material before operating the appliance.
- During installation do not use the oven door's handle to lift and move the oven.
- The installation furniture and the adjacent ones must withstand temperatures of 95^ C.
- It is recommended to wear protective gloves during installation to avoid cut injuries.
- Do not install the product in open environments exposed to atmospheric agents.
- This appliance is designed to be used at altitude lower than 2000m.
- To remove protective films and advertisement stickers on front surface of the oven before first usage.
ELECTRICAL WARNINGS
- The socket must be suitable for the load indicated on the tag and must have ground contact connected and in operation. The earth conductor is yellow-green in colour. This operation should be carried out by a suitably qualified professional.
Connection to the power source can be made by plug or by fixed wiring placing an omnipolar breaker, with contact separation compliant to the requirements for overvoltage category III, between the appliance and the power source that can bear the maximum connected load and that is in line with current legislation.
In case of incompatibility between the socket and the appliance plug, ask a qualified electrician to substitute the socket with another suitable type. The plug and the socket must be conformed to the current norms of the installation country.
The yellow-green earth cable should not be interrupted by the breaker. The socket or omnipolar breaker used for the connection should be easily accessible when the appliance is installed.
appliance and do not tamper with it.
- NOTE: as the oven could require maintenance work, it is advisable to keep another wall socket available so that the oven can be connected to this if it is removed from the space in which it is installed.
- Any repair, installation and maintenance not carried out correctly can seriously endanger the user.
- The manufacturing company hereby states that it does not assume any responsibility for direct or indirect damages caused by incorrect installation, maintenance, or repair work. Furthermore, it is not liable for damages caused by the absence or interruption of the grounding system (e.g., electric shock).
- CAUTION: in order to avoid a hazard due to inadvertent resetting of the thermal cut-out, this appliance must not be supplier through an external switching device, such as a timer, or connected to a circuit that is regularly switched on and off by the utility.
- The appliance is not designed to be activated by an external timer or separate remote control system.
USE & MANTEINANCE
- The dripping pan collects the residues that drip during cooking.
- When you place the Airfry tray or the grid on the side racks, make sure that the shorter section of the side (between the stop and the extremity) is directed towards the interior of the oven. If the grid has a decorative metal bar, pay attention to position it on the exterior of the oven so that the brand logo can be visible and readable. For the correct positioning refer also to the image in the Accessories section of this user manual.
- Do not use harsh abrasive cleaners or sharp metal scrapers to clean the oven door glasses, since they can scratch the surface, which may result in shattering of the glass.
- Only use the temperature probe recommended for this oven.
- During cooking, moisture may condense inside the oven cavity or on the glass of the door. This is a normal condition. To reduce this effect, wait 10-15 minutes after turning on the power before putting food inside the oven. In any case, the condensation disappears when the
oven reaches the cooking temperature.
- Cook the vegetables in a container with a lid instead of an open tray.
- Avoid leaving food inside the oven after cooking for more than 15/20 minutes.
- A long power supply failure during an occurring cooking phase may cause a malfunction of the monitor. In this case contact customer service.
- ⚠ WARNING: Do not line the oven walls with aluminium foil or single-use protection available from stores. Aluminium foil or any other protection, in direct contact with the hot enamel, risk melting and deteriorating the enamel of the insides.
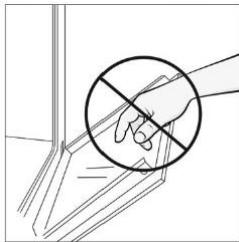
- WARNING: Never remove the oven door seal.
- CAUTION: Do not refill the cavity bottom with water during cooking or when the oven is hot.
- For a correct use of the oven it is advisable not to put the food in direct contact with the racks and trays, but to use oven papers and/or special containers.
- Wash all accessories before first use with a solution of hot water and washing up liquid.
2.1. OVERVIEW OF THE PRODUCT
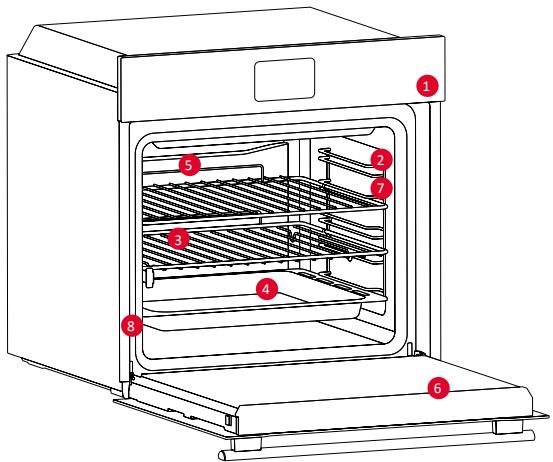
- Control panel
- Shelf positions (lateral wire grid if included)
- Metal grids
- Tray
- Fan cover
- Oven door
- Lateral wire grids (if present: only for flat cavity)
- Serial number & QR Code
natural_image
Empty white rectangle with a thin black border (no text or symbols)
Write here your serial number for future reference.
2.2. ACCESSORIES
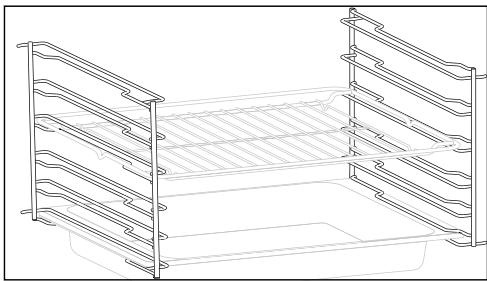
Lateral Wire Grids (only if present*)
natural_image
Line drawing of a multi-tiered rack or storage unit with no text or symbols
Located on both sides of the oven cavity, the side racks are designed for placing baking tray and grids during the cooking.
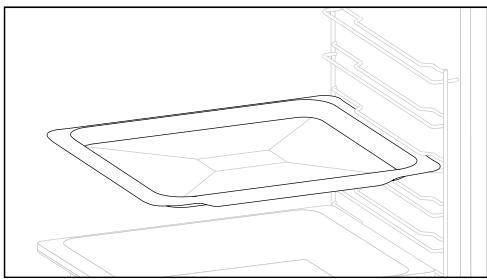
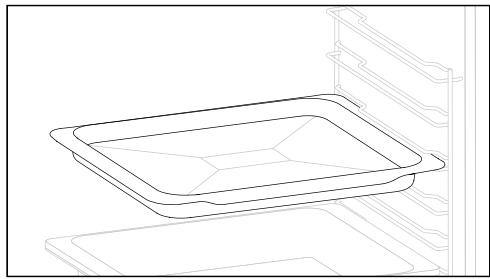
Baking Tray
natural_image
Line drawing of a kitchen appliance with a rectangular tray and side shelves (no text or symbols)
A baking tray is ideal for achieving even bottom browning, making it perfect for cookies and pastries due to its shallow, flat design. Additionally, placing it under a cooking grid can help collect drips and prevent messes in the oven.
Metal Grid
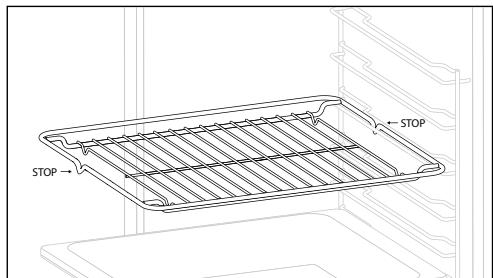
A metal grid in an oven is a removable, adjustable shelf that supports cookware, ensuring even cooking, and makes cleaning easy. It can be used to hold plates and pans at different heights for various cooking needs.
Deeper tray
natural_image
Line drawing of a refrigerator interior showing the front and side panels (no text or symbols)
The deeper tray is ideal for recipes with added liquids or layers, such as casseroles or roasts. Its depth is specifically designed to ensure the desired consistency of the food prepared in it.
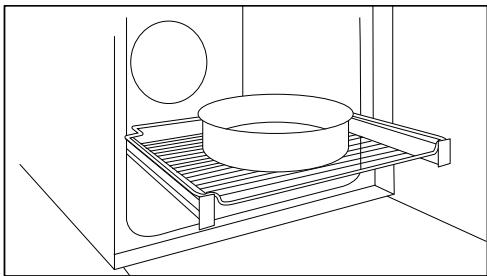
Telescopic Guides
natural_image
Line drawing of a kitchen sink with a bowl and a round object on a rack (no text or symbols)
Telescopic oven rails are shelves that can be extended, making it easier to place or remove items, without the need to reach deep inside a hot oven. They improve safety, stability, and can be adjusted at different level positions.
Dual Tray - STEAM Mode (only if present*)

natural_image
Line drawing of a tray with a grid-like pattern inside, placed on an appliance (no text or symbols)
The concave shape allows a correct circulation of humidity generated in cooking, keeping the food humidity rate high. According to the quantity of water inserted in the tray, a drier or more “wet” cooking will be obtained.
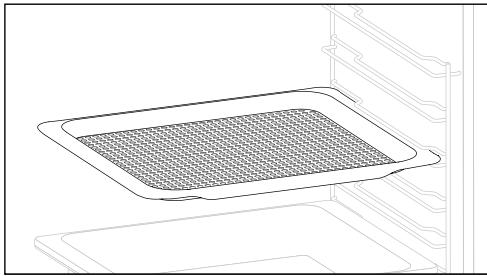
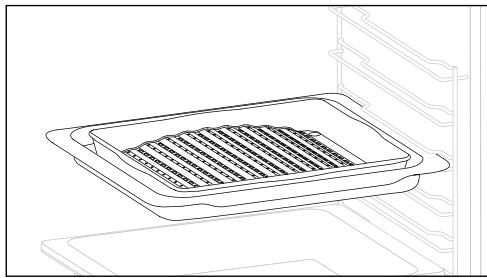
Airfry Tray (only if present*)
natural_image
Line drawing of a microwave oven with a grid-patterned tray inside (no text or symbols)
The airfry tray ensures that hot air reaches the food evenly and tridimensionally, resulting in a crispier exterior while maintaining tenderness inside. A baking tray can be optionally placed at L1 to collect juices or breadings.
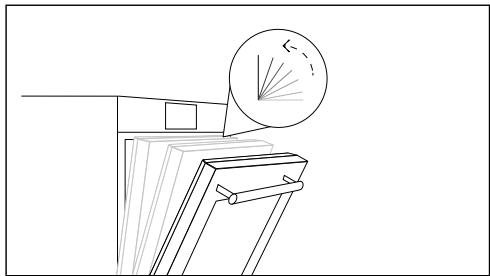
Softclose/Softopen Hinges (only if present*)
natural_image
Line drawing of a desk with books and a magnifying glass showing a fan-like graphic (no text or symbols)
Soft close and open hinges control the door's motion, ensuring smooth movement and preventing slamming.
Dual Tray - BBQ Mode (only if present*)
natural_image
Line drawing of a refrigerator interior showing a tray with grating and a side panel (no text or symbols)
The convex shape is suitable for grilling in the oven at high temperature (220°) allowing a BBQ result even at home with little smoke thanks to the drainage action of the fats on the bottom of the tray.
2.3. CONTROL PANEL
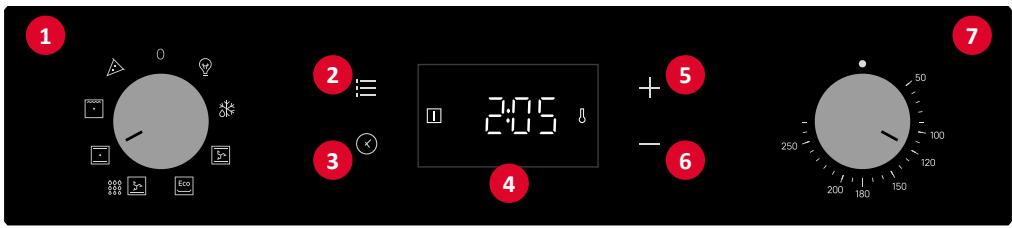
Functions and function ranking can be changed depending on the model.
- Function selector knob
- Main menu
- Timer
- LED display
- Plus button (+)
- Minus button (-)
- Temperature selector knob
MAIN FUNCTIONS
The display has 3 main functions:
| Symbol | Function | Description |
 | Main menu | Press once to activate Child Lock, twice to access to Time of the day, three times for alarm volume, and four times for brightness adjustment mode. |
 | Timer menu | Press once for cooking duration, twice for the minute minder |
| [4500] | +/- | Press these buttons to increase/decrease the values or to activate/deactivate a function in the adjustment modes.Hold + for 5 sec to activate the Time of the day in the display. |
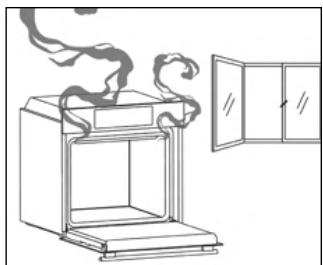
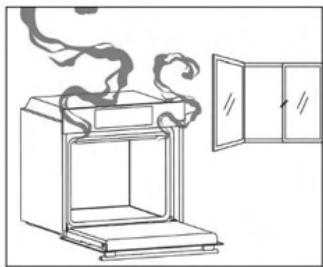
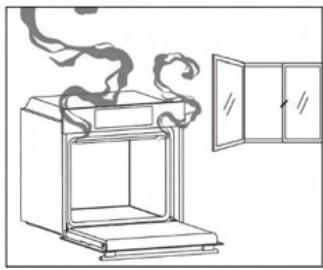
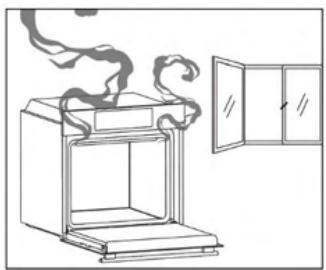
When you first turn on the oven, you might notice some smoke. Don't worry, just wait for the smoke to clear before using the oven.
How illumination works
The oven cavity is illuminated by one or more light bulbs, typically activated each time a cooking function begins.
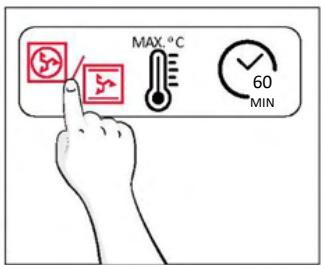
How cooling fan works
The cooling fan is responsible for dissipating the heat, keeping the oven and its surroundings from getting too hot, as well as protecting kitchen appliances from the effects of high temperatures. It operates during and after cooking cycle in relation to the internal temperature of the oven.
When the cooling fan is operational, it usually generates a gentle humming or whirring noise. You may also notice a warm airflow emanating from the gap between the oven door and the control panel.
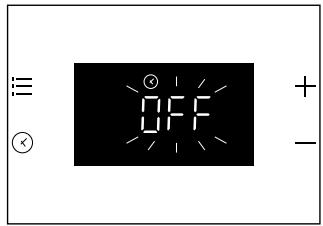
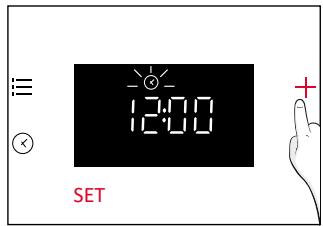
3.2. FIRST USAGE
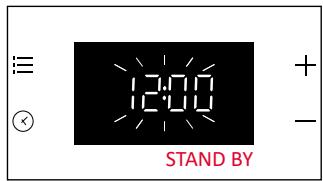
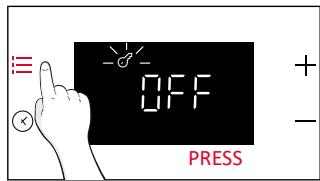
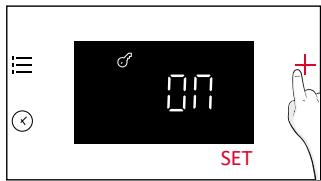
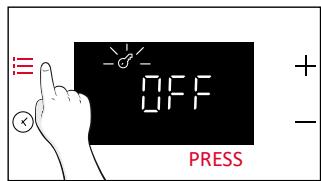
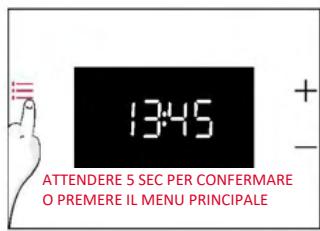
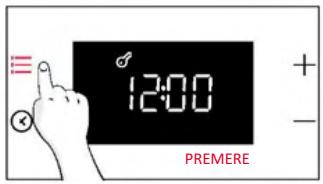
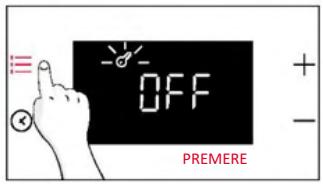
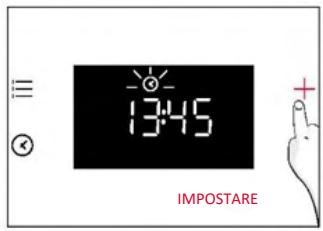
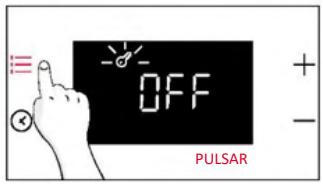
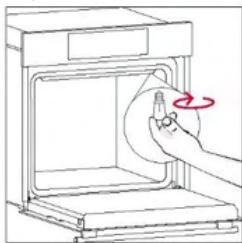
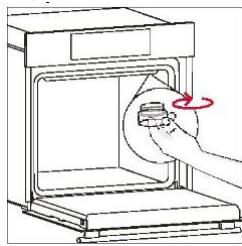
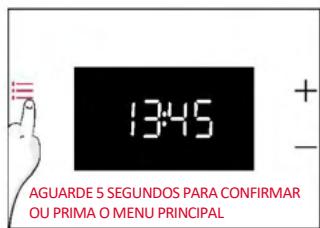
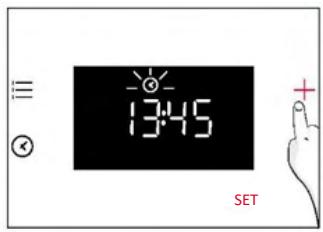
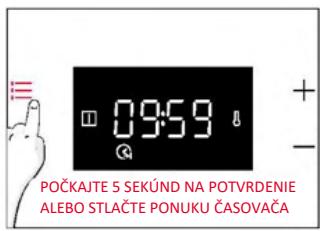
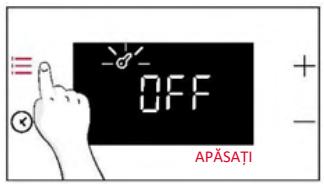
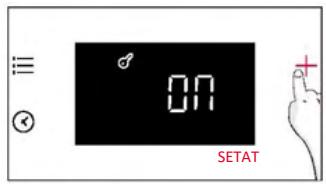
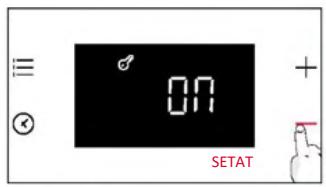
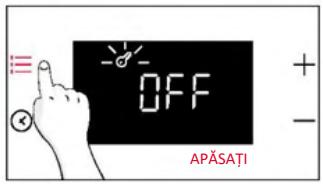
When the appliance is switched On for the first time, the initial step is to set time of day.
SET THE TIME: The display will show "OFF". Press "+" to adjust the current hour. Wait 5 secs for confirmation.

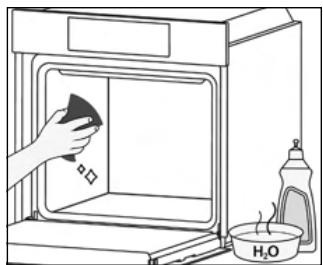
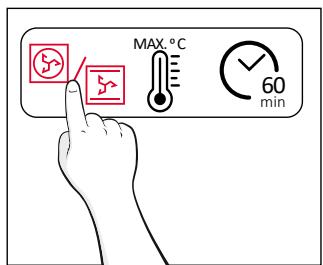
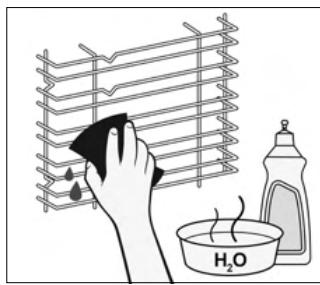
3.3. PRELIMINARY CLEANING
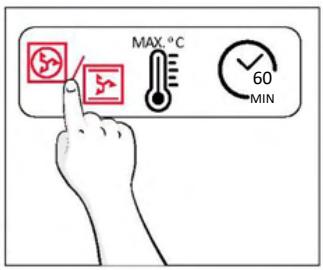
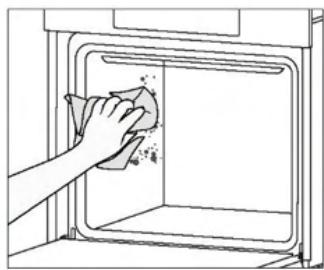
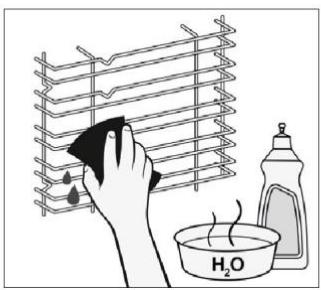
Clean the oven before using for the first time. Wipe over external surfaces with a damp soft cloth. Wash all accessories and wipe inside the oven with a solution of hot water and washing up liquid. Set the empty oven to the maximum temperature and leave on for about 1 hour, this will remove any lingering smells of newness.
natural_image
Line drawing of a kitchen sink with a hand cleaning the interior (no text or symbols)
natural_image
Line drawing of a steam rising from a cabinet to an open door (no text or symbols)
4.1. HOW THE PRODUCT WORKS
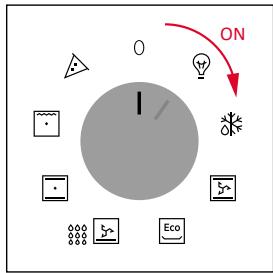
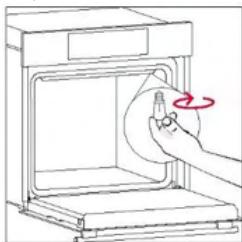
SWITCHING ON/OFF THE OVEN
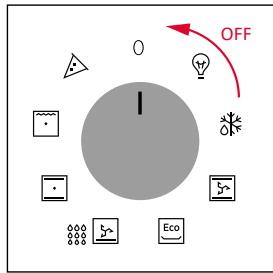
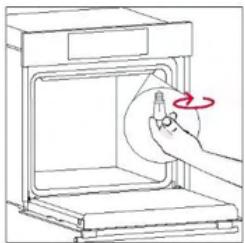
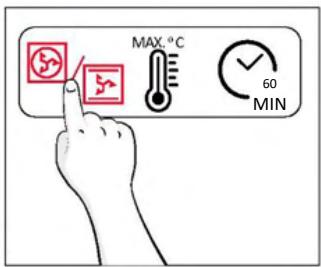
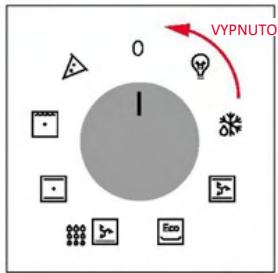
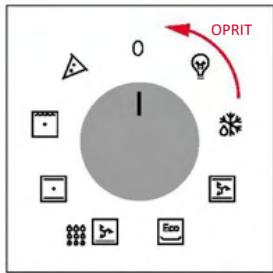
To turn ON the oven rotate the function knob (clockwise/counterclockwise) and select a program. To turn it OFF, set the function knob to the '0' position.
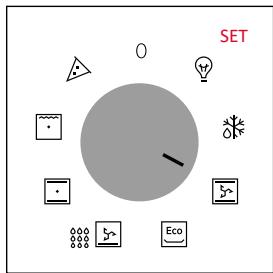
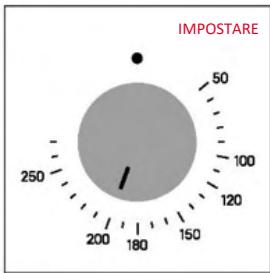
SET COOKING PROGRAM
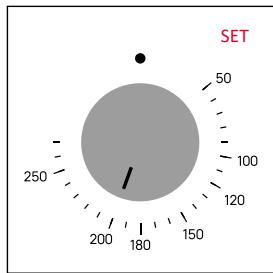
Turn the function knob to select the desired program and turn the temperature selector knob to set the temperature.
radar
| SET Value |
| --------- |
| 180 |
MAIN MENU
Access the Main menu by pressing :≡ . To navigate into tap :≡ as many times as is needed to enter in the following settings:

CHILD LOCK
This function allows you to lock the screen to prevent any unwanted use by minors.
To activate the screen lock, press "Main menu" once, then press "+" to confirm the function.
To deactivate the lock, press "Main menu", then press "-".
Activate
Deactivate
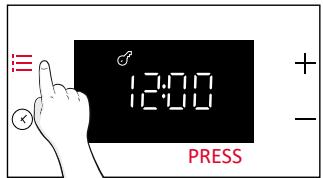
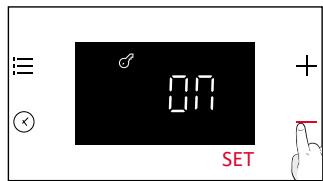

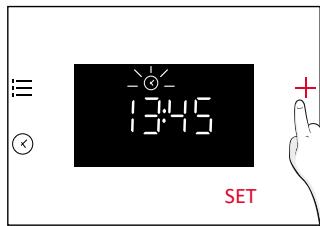
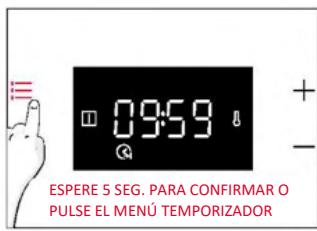
CLOCK SET
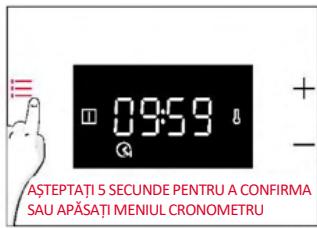
Allows to change the time of the day.
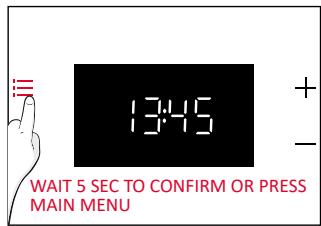
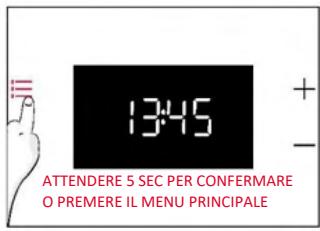
Press :≡ to enter in the Main menu. Tap :≡ as many times (x2) as you need to select "Time of day". Then use "+/-" to regulate the value. To confirm wait 5 secs or press Main menu :≡ once.
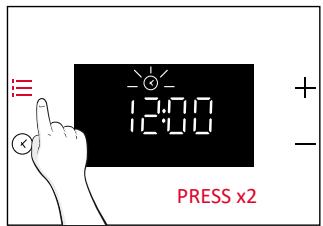

NOTE: the oven is default set on “24h” mode. To switch to “12h” mode hold “+” for 5 secs while and by. Do the same to switch back to “24h” mode.
ALARM VOLUME
Allows to change the volume of the warning tone.
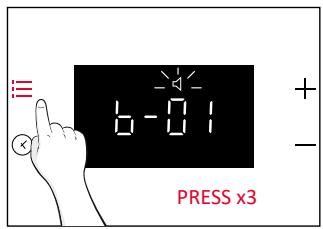
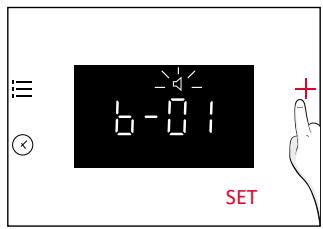
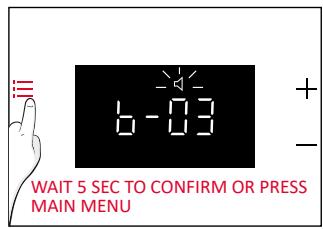
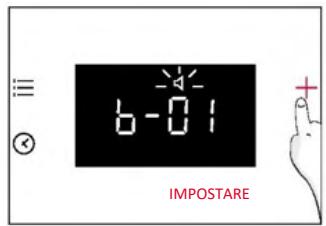
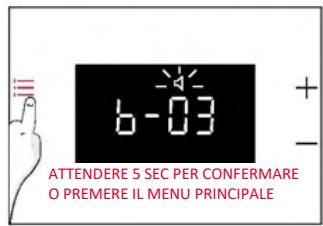
Press :≡ to enter in the Main menu. Tap as many times (x3) as you need to select "Alarm volume". On the display will appear "b-01". The numbers represent the level of sound intensity, editable using "+/-". To confirm wait 5 secs or press menu :≡ once.
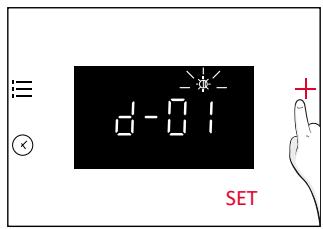
DISPLAY BRIGHTNESS
Allows to change the brightness of the oven display tone.
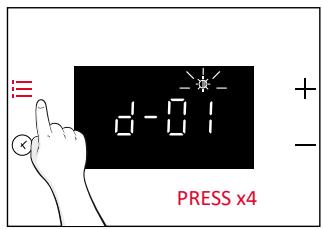
Press :≡ to enter in the Main menu. Tap as many times (x4) as you need to select "Display brightness". On the display will appear "d-01". The numbers represent the level of brightness intensity, editable using "+/-". To confirm wait 5 secs or press menu :≡ once.

Access the Timer menu by pressing ✕. To navigate into tap ✕ as many times as is needed to enter in the following settings:

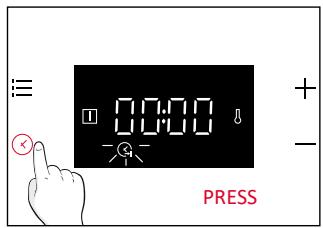
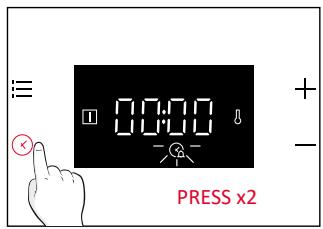
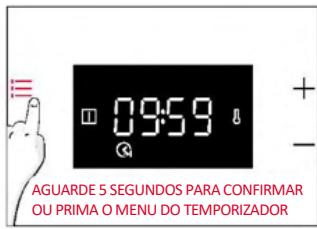
COOKING DURATION
Allows to preset the cooking time required for the recipe chosen.
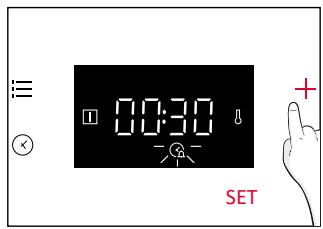
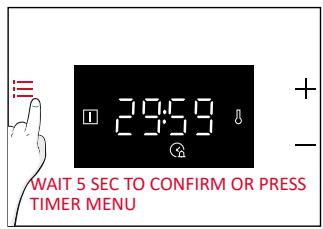
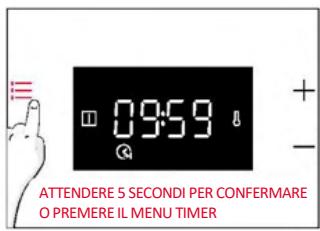
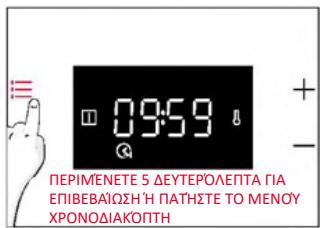
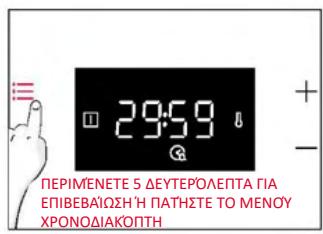
ACTIVATION: press ⏻ to enter in the Timer menu. Then use “+/-” to regulate the value. To confirm wait 5 secs or press “Timer menu”.
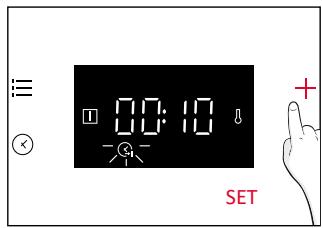
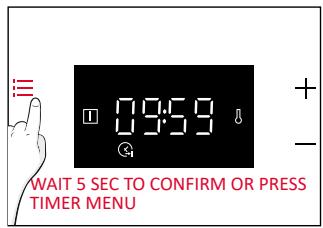
The countdown starts when the timer is set. During cooking phase is possible to change the duration value by entering in “Cooking duration” mode and by using “+/-”. When duration is elapsed, the display will show “End”.
To stop the Cooking Duration hold Timer ⏻ button for 3 secs or reset the timer value using “-”.
When Cooking is Finished:
- "End" appears on the display, a warning tone will be produced for 30 sec. if not cancelled.
- Press the "Timer" button to cancel the warning tone. "End" will disappear from the display the current time of day will be shown instead.
i WARNING: The oven is now in manual mode, oven function and thermostat commutator should be turned off as well, if not, the oven will go on heating.
NOTE: The warning tone will be muted by any button press other than the Timer ⏻ button, with the "End" remaining on the display and the oven remaining inoperative.

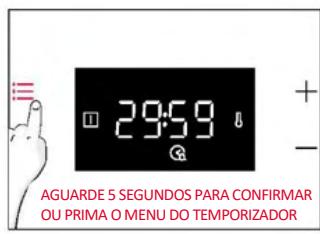
MINUTE MINDER
Allows to use the oven as alarm clock.
ACTIVATION: press Ⓧ to enter in the Timer menu. Tap Ⓧ as many times (x2) as you need to select "Minute minder". Then use "+/-" to regulate the value. To confirm wait 5 secs or press "Timer menu".
When the countdown is completed:
- The Alarm Ⓧ icon flashes on the display and a buzzer tone is produced lasting for 30 sec. if not cancelled.
- Press any key to cancel the alarm tone. The current time of day will be shown on the display. Oven will go on operating until the left knob is turned in 0 position.
To stop the Minute Minder hold Timer button Ⓧ for 3 secs or reset the value using “-”.
OVEN COMMUTATOR STATUS INDICATION
Cooking Function Selector:
When the cooking function selector of the oven is turned to anyone of "ON" positions, the ☐ (Cooking Function ON) icon appears on the display.
Temperature Selector:
Whenever the oven temperature is lower than the set temperature, the ⏻ (Thermostat ON) icon appears on the display.
4.2. COOKING FUNCTIONS
4.2.1. STANDARD FUNCTIONS
NOTE: for function that require preheating, ensure all accessories are removed during this phase. Follow instructions in the table below for what regards preheating.
“YES” means that preheating is required; “NO” means that preheat is not suggested and foods must be inserted with cold oven.
| Symbol | Function | Suggested Shelf Position | Preheat | Suggestions |
| [DSXY] | Defrost | | NO | The fan circulates room temperature air around the frozen food, allowing it to defrost slowly without changing the protein content of the food. |
 | ***Multi-Level | L3/L4 for single level L2+L5 for double level L2+L4+L6 for triple level | YES | IDEAL FOR: cakes, biscuits and pizzas on one or more levels. Ideal to cook different foods. |
 | ***Fan Assisted | L2/L3/L4 | YES | IDEAL FOR: whole chicken, chicken pieces, vegetables, and pastries on one level using the combination of the fan with upper and lower heating elements. |
 | *ECO | L3/L4 | NO | IDEAL FOR: cooking chicken pieces, whole pieces of meat, fish or gratin. Slide the drip tray under the shelf to collect juices. Turn food over halfway through cooking if needed. This function allows to save energy during cooking keeping the food moist and tender. NOTE: Once desired temperature set, temperature adjustment shouldn't be decreased in this function until pre-heat completed. |
 | Bottom+Fan | L3/L4 | NO | IDEAL FOR: tarts, quiches and thin pizzas using fan and lower heating. it helps cook the top part with indirectly radiated heat. |
 | *Conventional | L2/L3 | YES | IDEAL FOR: cakes, breads, biscuits, quiches on one level using both upper and lower heating. |
 | **Supergrill | L6 for thin foods L4 for thicker foods | NO | IDEAL FOR: big quantities of sausages, steaks and toast bread. The entire area below the grill element becomes hot. Use with the door closed. Turn food two thirds of the way through cooking (If necessary). |
 | Pizza | L2/L3 | YES | IDEAL FOR: all kind of pizzas with or without preheating the oven. |
5.1. GENERAL COOKING TABLE
| Category | Recipe | N° of levels | Cooking program | T°C | Preheat | Cooking accessory | Shelf position | Cooking time after preheating *(min) |
| Sweet bakery | Small cakes / Muffins | 1 | Conventional Multilevel Fan assisted | 170°C 155°C 140°C | Y | Deeper tray | L3 L4 L4 | 20-30 30-40 25-35 |
| 2 | Multilevel | 150°C | Deeper + baking trays | L2+L5 | 35-45 |
| 3 | Multilevel | 145°C | Deeper + baking + baking trays | L2+L4+L6 | 40-50 |
| Sponge cakes (26 cm ∅) | 1 | Conventional Multilevel Fan assisted | 160°C 160°C 150°C | Y | Metal grid + Cake tin | L2 L3 L2 | 30-40 30-40 20-30 |
| 2 | Multilevel | 150°C | Metal grids + Cake tin | L1+L4 | 40-50 |
| Biscuits/ Shortbreads | 1 | Conventional Multilevel Fan assisted | 150°C 150°C 130°C | Y | Deeper tray | L3 L3 L4 | 30-40 25-35 15-25 |
| 2 | Multilevel | 140°C | Deeper + baking trays | L2+L5 | 50-60 |
| Choquettes | 1 | Conventional | 190°C | Y | Deeper tray | L3 | 25-35 |
| 2 | Multilevel | 170°C | Deeper tray | L2+L5 | 35-45 |
| Yorkshire pudding | 1 | Conventional | 200°C | Y | Deeper tray | L3 | 20-30 |
| Meringues | 1 | Multilevel | 90°C | Y | Deeper tray | L4 | 80-100 |
| Macaron | 1 | Conventional | 150°C | Y | Deeper tray | L3 | 15-20 |
| Apple pie | 1 | Conventional | 170°C | Y | Metal grid + Cake tin | L2 | 70-80 |
| 1 | Fan assisted | 150°C | Y | Metal grid + Cake tin | L2 | 50-70 |
| Tarte tatin | 1 | Conventional | 170°C | Y | Metal grid + Cake tin | L4 | 60-70 |
| Tarts | 2 | Bottom+fan | 180°C | N | Metal grid + Cake tin | L3 | 30-40 |
| Chocolate souffle | 1 | Conventional | 200°C | Y | Deeper tray + molds | L3 | 10-15 |
| Cheesecake | 1 | Conventional | 150°C | Y | Metal grid + Cake tin | L2 | 50-65 |
| Frozen croissants | 1 | Conventional | 180°C | Y | Deeper tray | L3 | 20-25 |
| 2 | Multilevel | 180°C | Deeper tray | L2+L5 | 25-35 |
| 3 | Multilevel | 160°C | Deeper tray | L2+L4+L6 | 30-40 |
| Strudel, frozen | 1 | Conventional | 200°C | Y | Deeper tray | L3 | 30-45 |
| Breads and Flatbread | Toast bread | 1 | Supergrill | max | N | Metal grid | L6 | 8-10 |
| Focaccia | 1 | Conventional | 200°C | Y | Deeper tray | L3 | 25-35 |
| Bread, whole | 1 | Conventional | 200°C | Y | Deeper tray | L3 | 30-50 |
| Savory pies and casseroles | Salty cakes / Quiches (26 cm ∅) | 1 | Conventional | 200°C | Y | Metal grid + Quiche tin | L1 or L2 | 30-50 |
| 2 | Multilevel | 180°C | Metal grid + Quiche tin | L1+L4 | 50-70 |
| Cheese souffle | 1 | Conventional | 200°C | Y | Deeper tray | L3 | 20-30 |
| Lasagna, fresh | 1 | Conventional | 200°C | Y | Metal grid + ovenproof dish | L3 | 30-45 |
| Lasagna, frozen | 1 | Conventional | 180°C | Y | Metal grid + ovenproof dish | L3 | 35-50 |
| Cannelloni, fresh | 1 | Conventional | 200°C | Y | Metal grid + ovenproof dish | L3 | 35-50 |
| Baked pasta | 1 | ECO | 200°C | N | Metal grid + ovenproof dish | L4 | 25-35 |
| Pizza | Pizza, fresh (Tray) | 1 | Conventional | 230°C | Y | Deeper tray | L2 or L3 | 15-25 |
| Pizza, fresh (Tray) | 1 | Pizza | 230°C | N | Deeper tray | L2 or L3 | 25-35 |
| 2 | Multilevel | 180°C | Y | Deeper + Baking trays | L2+L5 | 30-40 |
| Pizza, fresh (Round) | 1 | Conventional | max | Y | Baking tray | L2 or L3 | 8-15 |
| Pizza, fresh (Round) | 1 | Pizza | max | N | Baking tray | L2 or L3 | 10-25 |
| 2 | Multilevel | 180°C | Y | Deeper + Baking trays | L2+L5 | 30-40 |
| Pizza, frozen (thin crust) | 1 | Pizza | 220°C | Y | Metal grid | L3 | 10-15 |
| 2 | Multilevel | 200°C | Y | Metal grids | L2+L5 | 15-20 |
| 3 | Multilevel | 180°C | Metal grids | L2+L4+L6 | 15-25 |
| Meat & Poultry | Roasted whole chicken** (1-1.5kg) | 1 | ECO | 220°C | N | Metal grid Place deeper tray at L1 | L3 | 50-70 |
| 1 | Fan assisted | 200°C | Y | Deeper tray | L2 | 45-60 |
| Chicken thighs | 1 | ECO | 220°C | N | Metal grid Place deeper tray at L1 | L4 | 30-50 |
| 1 | Fan assisted | 190°C | Y | Deeper tray | L3 | 30-50 |
| Roasted Duck** | 1 | ECO | 220°C | N | Metal grid Place deeper tray at L1 | L3 | 50-70 |
| Meat & Poultry | Roasted Turkey** | 1 | ECO | 220°C | N | Metal grid + Ovenproof dish | L3 | 50-70 |
| 1 | Fan assisted | 200°C | Y | Deeper tray | L2 | 45-60 |
| Pork ribs (1000-1200g) | 1 | Conventional | 200°C | Y | Metal grid + Ovenproof dish | L3 | 80-100 |
| Sausages** | 1 | Supergrill | 230°C | N | Metal grid Place deeper tray at L1 | L4 | 30-40 |
| Roast beef (500g) | 1 | Conventional | 220°C | Y | Baking tray | L3 | 20-40 |
| Meatloaf (1000-1500g) | 1 | Conventional | 180°C | Y | Baking tray | L3 | 40-50 |
| Roasted chicken with potatoes | 1 | ECO | 220°C | N | Deeper tray | L4 | 55-75 |
| 1 | Fan assisted | 200°C | Y | Deeper tray | L2 or L3 | 50-60 |
| Fish and Seafood | Grilled seafood | 1 | Supergrill | 220°C | N | Metal grid | L4 | 15-30 |
| Frozen fish sticks | 1 | Conventional | 200°C | Y | Deeper tray | L3 | 20-25 |
| Fish fillet | 1 | Conventional | 170°C | Y | Deeper tray | L3 | 10-25 |
| Baked fish | 1 | ECO | 200°C | N | Metal grid Place baking tray at L1 | L4 | 20-30 |
| Vegetables | Vegetable gratin | 1 | ECO | 200°C | N | Metal grid + Ovenproof dish | L4 | 25-35 |
| Frozen French Fries (300-500g) | 1 | Multilevel | 200°C | Y | Deeper tray | L4 | 25-35 |
| Potato gratin | 1 | ECO | 200°C | N | Metal grid + Ovenproof dish | L4 | 25-35 |
| Roasted potatoes | 1 | Conventional | 200°C | Y | Deeper tray | L4 | 50-60 |
| 1 | Fan assisted | 180°C | Y | Deeper tray | L4 | 20-30 |
| Complete menu | Chicken pieces + apple pie + baked pasta | 3 | Multilevel | 180°C | N | Deeper tray+ (Metal grid + Cake tin) + (Metal grid + ovenproof dish) | L1+L3+L5 | 50-60 45-55 35-45 |
Cooking times may vary according to consumer's recipe and ingredients.
*if preheating required
** Turn food over halfway through cooking if needed.
*** it depends on oven model
NOTE: For cooking cakes, quiches and other recipes that require a mold or a container on 2 levels, place them staggered: the upper tray on the left side and the lower tray on the right side.
6.1. GENERAL RECOMMENDATIONS
Regular cleaning can extend the lifecycle of your appliance. Wait for the oven to cool before carrying out manual cleaning
• After each use of the oven, a minimum of cleaning will help keep the oven perfectly clean.
- Do not line the oven walls with aluminum foil or single-use protection available from stores. Aluminum foil or any other protection, in direct contact with the hot enamel, risks melting and deteriorating the enamel of the insides.
- In order to prevent excessive dirt of your oven and the resulting strong smokey smells, we recommend not using the oven at very high temperature. It is better to extend the cooking time and lower the temperature a little.
- In addition to the accessories supplied with the oven, we advise you only use dishes and baking molds resistant to very high temperatures.
6.2. CLEANING THE OVEN
6.2.1. INSIDE THE OVEN: cleaning functions

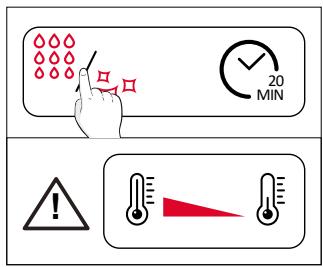
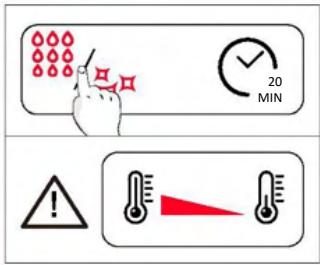
Hydroeasy
The Hydroeasy function is designed to effortlessly tackle light dirt and provide a quick and eco-friendly solution for cleaning your oven cavity using the power of steam.
How does it work:
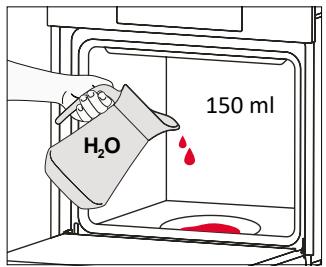
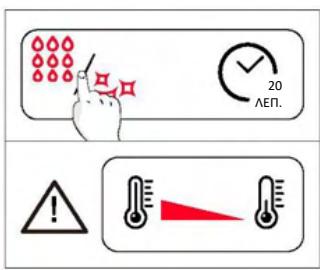
- Pour 150 ml of water with a drop of washing-up liquid into the bottom embossment of the oven.
- Turn the function knob on ^2^3/^2^3 and the temperature knob on “100 °C”. Allow the function to operate for 20 min.
- At the end of the cleaning process, allow the oven to cool down.
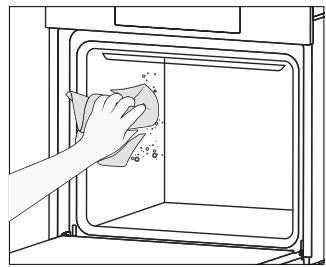
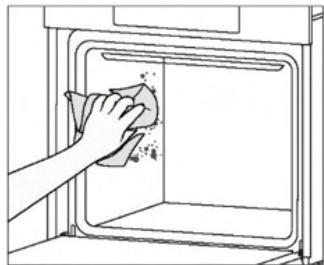
- When the appliance is cool, clean the inner surfaces of the oven with a cloth.
WARNING: Make sure that the appliance is cool before you touch it. Care must be taken with all hot surfaces as there is a risk of burns. Use distilled or drinkable water. Wipe the cooking compartment and allow it to dry completely to avoid possible corrosions.
natural_image
Illustration of a hand cleaning a kitchen appliance with a cloth (no text or symbols)
Catalytic cleaning
The Catalytic panels line the oven cavity and grant you the luxury of never having to contend with a dirty oven.
The panels are coated with a specialized enamel that boasts a microporous structure, adept at absorbing absorbs grease from splashes.
Through a catalytic chemical reaction, they efficiently convert the absorbed grease into gaseous elements when exposed to high temperatures.
Recommendation: Consider replacing the catalytic panels after approximately three years of use, especially if you use your oven for two to three cooking cycles per week. This ensures optimal performance and cleanliness.
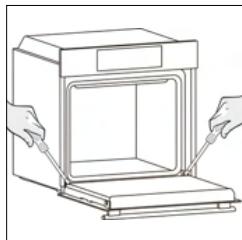
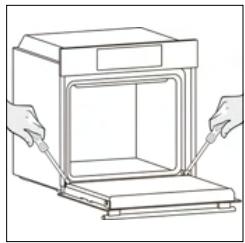
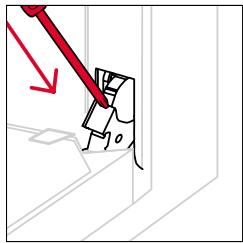
6.2.2. OUTSIDE THE OVEN: removal and cleaning the glass door
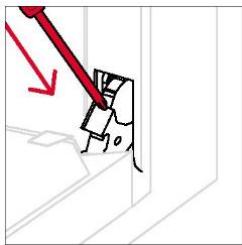
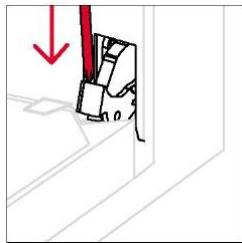
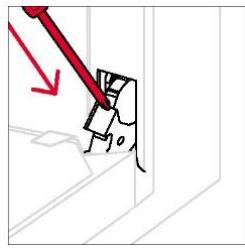
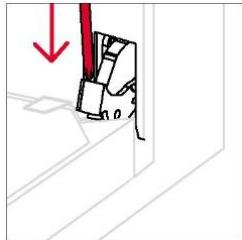
- Open the door at 90^ , rotate the hinge locking tabs outward from the oven.
natural_image
Line drawing of a 3D oven with two hands inserting a plug into the opening (no text or symbols)
natural_image
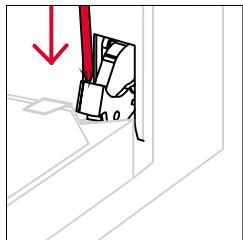
Diagram showing a mechanical component with a red downward arrow and a blue arrow, no text or symbols present.
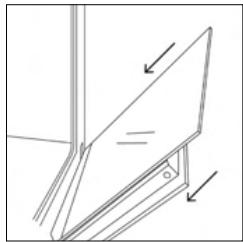
- Position the door at 45°. Simultaneously press the two buttons on both the sides of the door's lateral shoulders and pull towards yourself to remove the upper glasses' door cover.
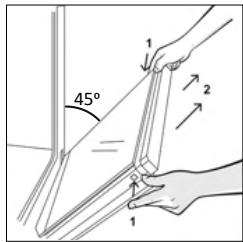
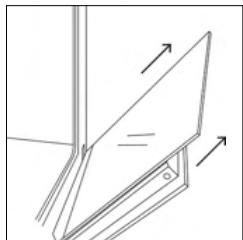
- Very carefully remove the oven glass, starting with the inner one During the procedure, firmly hold the glass with both hands and place them on a cushioned flat surface (e.g., on a fabric).
natural_image
Pure mechanical diagram showing a bracket with arrows indicating direction (no text or symbols)
- ⚠️ WARNING: The outer glass is not removable.

natural_image
Diagram showing a hand holding a tool with a crossed-out circle, no text or symbols present
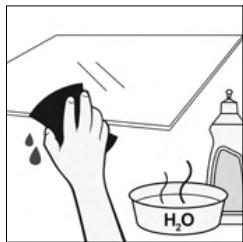
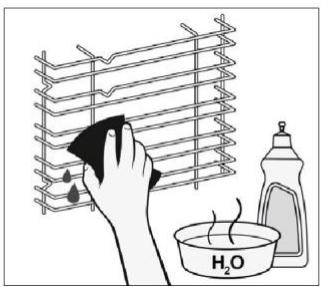
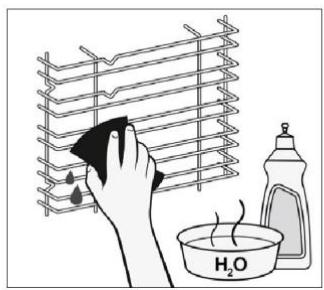
- Clean the glass using a soft cloth and suitable cleaning products.
natural_image
Illustration of a hand cleaning a surface with a cloth, next to a bottle labeled H₂O (no text or symbols on the main subject)
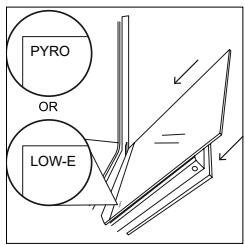
- Insert the glass panels, making sure that the "LOW-E/PYRO" label is correctly readable and positioned on the lower left side of the door, near the left-side hinge. This way, the printed label on the first glass will remain on the inside of the door.
- Reattach the upper glasses' door cover by pushing it inwards until you hear a click from the two side buttons.
natural_image
Pure technical line drawing of a mechanical assembly with no text or symbols
- Then, bring the door back to 90^ and rotate the hinge locking tabs inward towards the inside of the oven.
natural_image
Line drawing of hands operating a 3D oven with a tray (no text or symbols)
natural_image
Diagram showing a red arrow pointing to a mechanical component with a highlighted section (no text or symbols)
6.3. CLEANING OF ACCESSORIES
Ensure that you clean the accessories thoroughly after every use and dry them using a towel. For persistent residues, consider soaking the accessories in a mixture of water and soap for approximately 30 minutes before giving them a second wash.
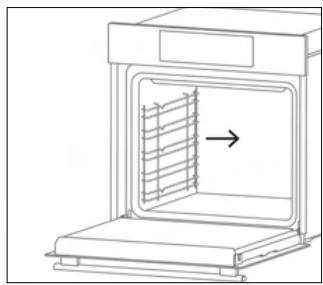
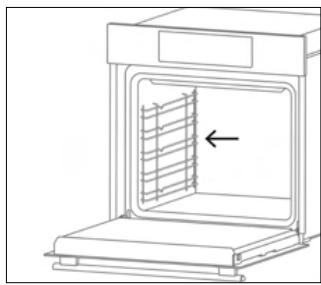
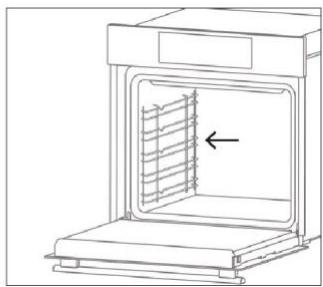
CLEANING OF SIDE RACKS:
- 6 levels model
- Remove the side racks by pulling them in the direction of the arrows.
- To clean the side racks either put them in the dishwasher or use a wet sponge, ensuring that they are dried afterwards.
- After the cleaning process install the side racks in reverse order.
natural_image
Line drawing of an oven with a rack inside, showing airflow direction (no text or symbols)
natural_image
Line drawing of an oven with a rack inside, showing a left vent and a horizontal arrow indicating direction (no text or symbols)
6.4. MAINTENANCE
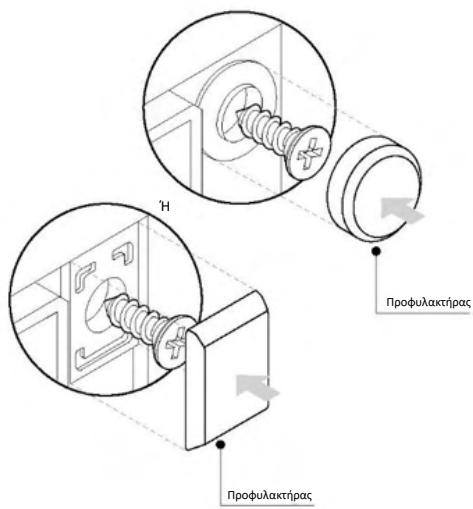
COMPONENTS REPLACEMENT
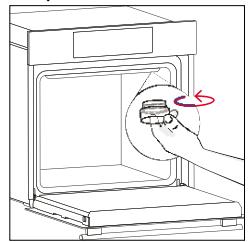
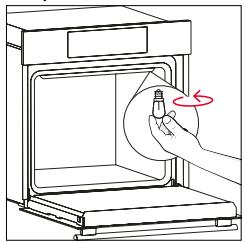
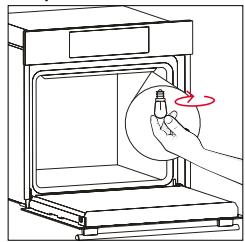
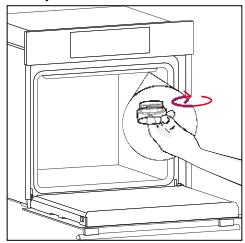
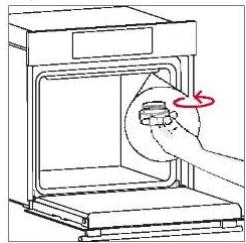
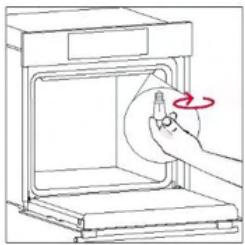
Changing the bulb on top:
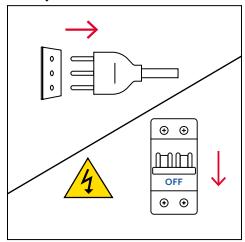
- Disconnect the oven from mains supply.
- Undo the glass cover, disassemble the bulb and replace it with a new bulb of the same type.
- Once the defective bulb is replaced, replace the glass cover.
Step 1
Step 2
natural_image
Line drawing of a hand inserting a component into an oven with a red rotation arrow (no text or symbols)
Step 3
natural_image
Line drawing of a kitchen appliance with a hand holding a bulb, showing a rotating handle (no text or symbols)
Step 4
natural_image
Line drawing of a hand holding a bulb inside an oven, with no text or symbols present
Step 5
natural_image
Line drawing of a hand inserting a small object into an oven (no text or symbols)
Step 6

This product contains one or more light sources of energy efficiency class G (Lamp)
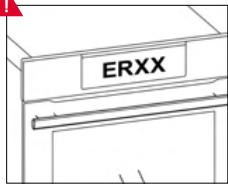
7. TROUBLESHOOTING
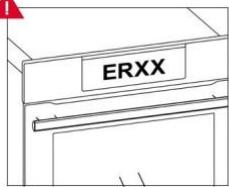
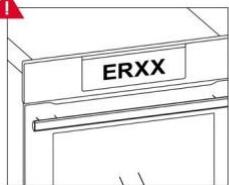
If, during oven use, an error occurs, the display will show the code "ER" followed by two digits, which will identify the error.
Proceed by turn off the oven and un-plug it, wait for a few minutes, and then reconnect it.
If the error disappears, you can resume using the oven. If it doesn't, call customer service and communicate the code (ERXX) you see on the display.
Error
!

natural_image
Illustration of two people observing a rising stock chart (no text or symbols present)
Smoke
!

natural_image
Illustration of two people with a rising trend line and computer monitor, no text or symbols present
8. ENVIRONMENTAL PROTECTION & DISPOSAL
8.1. APPLIANCE DISPOSAL
This appliance is labelled in accordance with European Directive 2012/19/EU regarding electric and electronic appliances (WEEE). The WEEE contain both polluting substances (that can have a negative
natural_image
Symbol of a trash bin crossed with no text or labels, accompanied by a black rectangular block below (no readable text or symbols)
effect on the environment) and base elements (that can be reused). It is important that the WEEE undergo specific treatments to correctly remove and dispose of the pollutants and recover all the materials.
Individuals can play an important role in ensuring that the WEEE do not become an environmental problem; it is essential to follow a few basic rules:
- the WEEE should not be treated as domestic waste;
- the WEEE should be taken to dedicated collection areas managed by the town council or a registered company.
In many countries, domestic collections may be available for large WEEEs. When you buy a new appliance, the old one can be returned to the vendor who must
accept it free of charge as a one-off, as long as the appliance is of an equivalent type and has the same functions as the purchased appliance.
8.2. SAVING AND RESPECTING THE ENVIRONMENT
Where possible, avoid pre-heating the oven and always try to fill it.
Open the oven door as infrequently as possible, because heat from the cavity disperses every time it is opened. For a significant energy saving, switch off the oven between 5 and 10 minutes before the planned end of the cooking time, and use the residual heat that the oven continues to generate.
Keep the seals clean and in order, to avoid any heat dispersal outside of the cavity. If you have an electric contract with an hourly tariff, the "delayed cooking" programme makes energy saving simpler, moving the cooking process to start at the reduced tariff time slot.
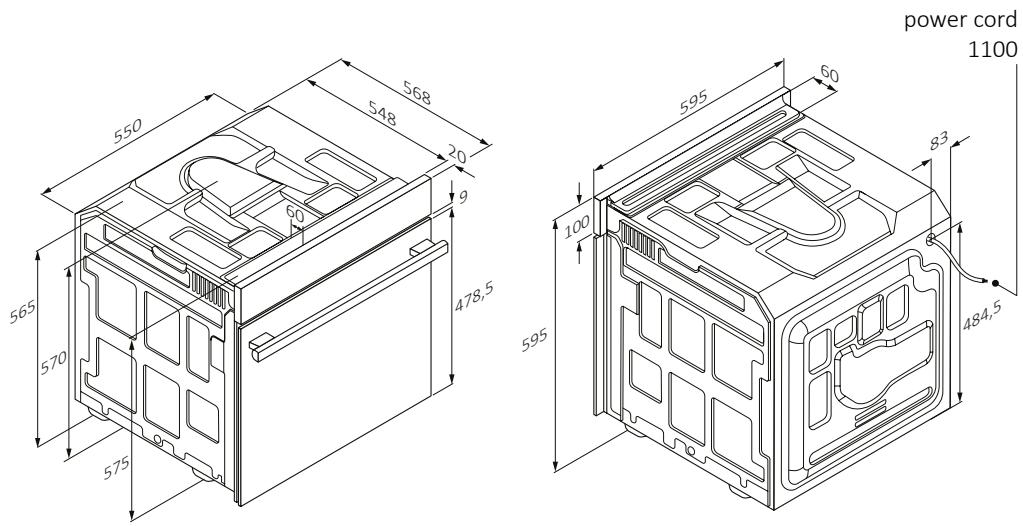
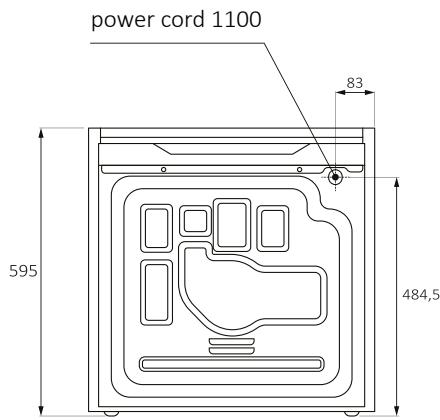

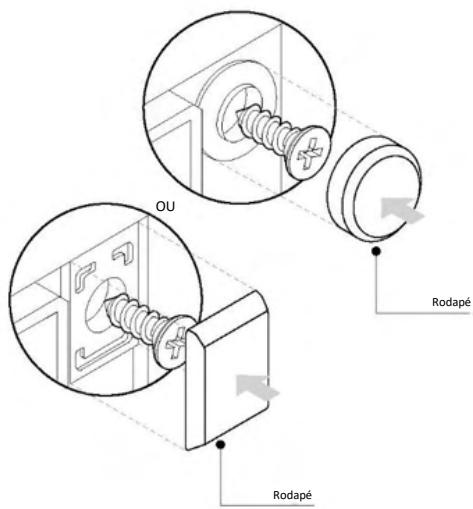
EN If the furniture is covered with a bottom at the back part, provide an opening for the power supply cable.
natural_image
Isometric line drawing of a multi-level refrigerator with shelves and doors (no text or symbols)
BIENVENUE
natural_image
Empty white rectangle with a thin gray border (no text or symbols)
natural_image
Line drawing of a multi-tiered rack or storage unit with no text or symbols
natural_image
Line drawing of a rectangular tray placed inside an appliance rack (no text or symbols)
natural_image
Line drawing of a rectangular tray placed inside an oven (no text or symbols)
natural_image
Pure electrical circuit lines without any symbols
natural_image
Line drawing of a rectangular appliance with internal grating, placed inside an oven (no text or symbols)
natural_image
Line drawing of a microwave oven with a grid-patterned lid placed inside (no text or symbols)
natural_image
Line drawing of a cabinet with a circular diagram showing a fan or pointer (no text or symbols)
natural_image
Line drawing of a rectangular oven with a rack inside, showing internal structure (no text or symbols)
natural_image
Line drawing of a kitchen oven with a hand cleaning the interior and a bottle labeled H2O (no text or symbols on main subject)


natural_image
Line drawing of a steam stove with smoke rising from the chimney, next to an open door (no text or symbols)
4.FONCTIONNEMENT DU PRODUIT
4.1. FONCTIONNEMENT DU PRODUIT
MISE EN MARCHE/ARRÊT DU FOUR

natural_image
Hand cleaning a kitchen oven with a cloth (no text or symbols visible)
natural_image
Line drawing of hands operating a small oven with a door open (no text or symbols)

natural_image
Diagram showing a mechanical component with a red downward arrow, no text or symbols present
natural_image
Pure technical line drawing of a mechanical component with no text or symbols
natural_image
Simple line drawing of a hand holding a tool, no text or symbols present
natural_image
Pure technical line drawing of a mechanical assembly with no text or symbols
natural_image
Line drawing of a double door with two hands inserting a tool into the opening (no text or symbols)
natural_image
Diagram showing a red arrow pointing to a mechanical component with a black outline, no text or symbols present
6.3. NETTOYAGE DES ACCESSOIRES
natural_image
Line drawing of an oven with a rack inside, showing airflow direction (no text or symbols)

natural_image
Line drawing of an oven with a rack inside, showing internal structure and an arrow indicating direction (no text or symbols)
6.4. ENTRETIEN
REMPLACEMENT DES COMPOSANTS
Étape 2

natural_image
Line drawing of a hand inserting a circular component into an oven, with a red rotation arrow indicating clockwise motion (no text or symbols)
Étape 3

natural_image
Line drawing of a hand inserting a bulb into an oven with a red arrow indicating rotation (no text or symbols)
Étape 4
natural_image
Line drawing of a hand washing a circular object into a microwave oven (no text or symbols)
Étape 5

natural_image
Line drawing of a hand inserting a device into an oven with a circular arrow indicating rotation (no text or symbols)
Étape 6

natural_image
Illustration of two people working with a rising trend line and computer monitor (no text or symbols)
Fumée
!


natural_image
Illustration of two people working with a rising trend line and computer monitor (no text or symbols)
8.PROTECTION DE L'ENVIRONNEMENT ET ÉLIMINATION
8.1. ÉLIMINATION DE L'APPAREIL
natural_image
Simple line drawing of a trash bin with crossed lines indicating no waste or discharge (no text or symbols)
natural_image
Isometric line drawing of a multi-level refrigerator with drawers and shelves, no text or symbols present


BENVENUTI
natural_image
Empty white rectangle with a thin gray border (no text or symbols)
natural_image
Line drawing of a multi-tiered rack or storage unit with no text or symbols
natural_image
Line drawing of a rectangular tray placed inside an oven or rack (no text or symbols)
natural_image
Line drawing of a rectangular baking tray placed inside an oven (no text or symbols)
natural_image
Pure electrical circuit lines without any symbols
natural_image
Line drawing of a rectangular appliance with internal grating, placed inside an oven (no text or symbols)
natural_image
Line drawing of a microwave oven with a grid-patterned tray (no text or symbols)
natural_image
Line drawing of a cabinet with a magnified circular inset showing radial lines (no text or symbols)
natural_image
Line drawing of a rectangular oven with a rack inside, showing internal grating (no text or symbols)
3.3. PULIZIA PRELIMINARE
natural_image
Illustration of a kitchen oven with a hand cleaning the interior and a bottle labeled H2O (no text or symbols on main subject)


natural_image
Line drawing of a steam rising from an oven to a cabinet (no text or symbols)
Disattivare


LUMINOSITÀ DEL DISPLAY


natural_image
Hand cleaning a clean appliance into a microwave oven (no text or symbols visible)
Pulizia catalitica
natural_image
Line drawing of hands operating a small oven with a door open (no text or symbols)

natural_image
Diagram showing a mechanical component with a red downward arrow indicating force or direction (no text or symbols present)
natural_image
Pure technical line drawing of a mechanical component with no text or symbols
natural_image
Simple line drawing of a hand holding a tool, no text or symbols present
natural_image
Pure technical line drawing of a mechanical assembly with no text or symbols
natural_image
Line drawing of a double-bowel oven with two hands inserting a plug into the opening (no text or symbols)

natural_image
Diagram showing a red arrow pointing to a small mechanical component, with no visible text or symbols.
6.3. PULIZIA DEGLI ACCESSORI
natural_image
Line drawing of an oven with a rack inside, showing airflow direction (no text or symbols)


natural_image
Line drawing of an oven with a rack inside, showing internal structure and an arrow indicating direction (no text or symbols)
6.4. MANUTENZIONE
Passo 2

natural_image
Line drawing of a hand inserting a circular component into an oven, with a red rotation arrow indicating clockwise motion (no text or symbols)
Passo 3

natural_image
Line drawing of a hand inserting a bulb into an oven with a red arrow indicating rotation (no text or symbols)
Passo 4
natural_image
Line drawing of a hand washing a cylindrical object inside an oven (no text or symbols)
Passo 5

natural_image
Line drawing of a hand inserting a circular component into an oven (no text or symbols)
Passo 6

natural_image
Illustration of two people working with a rising trend line and computer monitor (no text or symbols)
Fumo
!


natural_image
Illustration of two people working with a rising stock chart and computer monitor (no text or symbols)
natural_image
Symbol of a trash bin crossed with diagonal lines, no text or numbers present
natural_image
Isometric line drawing of a multi-level refrigerator with drawers and shelves, no text or symbols present
natural_image
Empty white rectangle with a thin gray border (no text or symbols)
natural_image
Line drawing of a multi-tiered rack or storage unit with no text or symbols
natural_image
Line drawing of a rectangular tray placed inside a rack (no text or symbols)
natural_image
Line drawing of a rectangular tray placed inside an oven (no text or symbols)
natural_image
Pure electrical circuit lines without any symbols
natural_image
Line drawing of a rectangular appliance with internal grating, placed inside an oven (no text or symbols)
natural_image
Line drawing of a microwave oven with a grid-patterned lid placed inside (no text or symbols)
natural_image
Line drawing of a mechanical component with a circular inset showing a diffraction pattern (no text or symbols)
natural_image
Line drawing of a rectangular oven with a rack and lid, no text or symbols present

natural_image
Line drawing of a steam rising from a furnace to a cabinet (no text or symbols)
4.1. SO FUNKTIONIERT DAS PRODUKT


natural_image
Line drawing of a hand cleaning a window with a cloth (no text or symbols)
natural_image
Line drawing of hands operating a small oven with a door open (no text or symbols)

natural_image
Diagram showing a mechanical component with a red downward arrow indicating force or direction (no text or symbols present)
natural_image
Pure technical line drawing of a mechanical component with no text or symbols
natural_image
Simple line drawing of a hand holding a tool, no text or symbols present
natural_image
Pure technical line drawing of a mechanical component with no text or symbols
natural_image
Line drawing of a double door with two hands inserting a tool into the opening (no text or symbols)

natural_image
Illustration of a red tool applying material to a small mechanical component (no text or symbols visible)
natural_image
Line drawing of an oven with a rack inside, showing airflow direction (no text or symbols)


natural_image
Line drawing of an oven with a rack inside, showing internal structure and an arrow indicating direction (no text or symbols)
6.4. WARTUNG
AUSTAUSCH VON KOMPONENTEN
Schritt 2

natural_image
Line drawing of a hand inserting a circular component into an oven, with a red rotation arrow indicating motion (no text or symbols)
Schritt 3

natural_image
Line drawing of a hand inserting a bulb into an oven with a red arrow indicating rotation (no text or symbols)
Schritt 4

natural_image
Line drawing of a hand using a tool to clean or remove a cylindrical object inside an oven (no text or symbols)
Schritt 5

natural_image
Line drawing of a hand inserting a device into an oven with a circular arrow indicating rotation (no text or symbols)
Schritt 6

natural_image
Illustration of two people in a meeting, one standing and gesturing, the other seated at a computer (no text or symbols present)
Rauch
!

natural_image
Illustration of two people working with a rising trend line and computer monitor (no text or symbols)
natural_image
Simple line drawing of a trash bin with crossed lines indicating no waste or discharge (no text or symbols)
natural_image
Isometric line drawing of a multi-level refrigerator with drawers and shelves, no text or symbols present
natural_image
Empty white rectangle with a thin gray border (no text or symbols)
natural_image
Line drawing of a multi-tiered rack or storage unit with no text or symbols
natural_image
Line drawing of a rectangular tray placed inside a rack (no text or symbols)
natural_image
Line drawing of a rectangular tray placed inside an oven (no text or symbols)
natural_image
Pure electrical circuit lines without any symbols
natural_image
Line drawing of a rectangular appliance with internal grating, placed inside an oven (no text or symbols)
natural_image
Line drawing of a microwave oven with a grid-patterned lid placed inside (no text or symbols)
natural_image
Line drawing of a cabinet with a magnified circular inset showing radial lines (no text or symbols)
natural_image
Line drawing of a rectangular tray with a grid inside, placed on an oven (no text or symbols)

natural_image
Line drawing of a steam stove with smoke rising, next to a cabinet (no text or symbols)


natural_image
Hand cleaning a kitchen appliance with a cloth (no text or symbols visible)
Limpieza catalítica
natural_image
Line drawing of hands operating a small oven with a door open (no text or symbols)

natural_image
Diagram showing a mechanical component with a red downward arrow, no text or symbols present
natural_image
Pure technical line drawing of a mechanical component with no text or symbols
natural_image
Simple line drawing of a hand holding a tool, no text or symbols present
natural_image
Illustration of a hand cleaning a tiled surface with a cloth, emitting steam from a bottle labeled H₂O (no text or symbols on the main image)
natural_image
Pure technical line drawing of a mechanical assembly with no text or symbols
natural_image
Line drawing of a double-bowel oven with two hands inserting a plug into the opening (no text or symbols)

natural_image
Diagram showing a red arrow pointing to a small mechanical component, with no visible text or symbols.
6.3. LIMPIEZA DE ACCESORIOS
natural_image
Line drawing of an oven with a rack inside, showing airflow direction (no text or symbols)

natural_image
Line drawing of an oven with a rack inside, showing internal structure and an arrow indicating direction (no text or symbols)
6.4. MANTENIMIENTO
Paso 2

natural_image
Line drawing of a hand inserting a circular component into an oven, with a red rotation arrow indicating clockwise motion (no text or symbols)
Paso 3

natural_image
Line drawing of a hand inserting a bulb into an oven with a red arrow indicating rotation (no text or symbols)
Paso 4

natural_image
Line drawing of a hand using a tool to clean or remove a cylindrical object inside an oven (no text or symbols)
Paso 5

natural_image
Line drawing of a hand inserting a device into an oven with a circular arrow indicating rotation (no text or symbols)
Paso 6

natural_image
Illustration of two people working with a rising stock chart and computer monitor (no text or symbols)
Humo
!


natural_image
Illustration of two people working with a rising trend line and computer monitor (no text or symbols)
natural_image
Simple line drawing of a trash bin with crossed lines indicating no waste or discharge (no text or symbols)
natural_image
Isometric line drawing of a multi-level refrigerator with drawers and shelves, no text or symbols present

ΚΑΛΩΣΗΡΘΑΤΕ
natural_image
Empty white rectangle with a thin gray border (no text or symbols)
natural_image
Technical line drawing of a multi-tiered rack or storage unit (no text or symbols)
natural_image
Line drawing of a rectangular appliance with lid and base, mounted on a shelf (no text or symbols)
natural_image
Line drawing of a rectangular tray placed inside an oven (no text or symbols)
natural_image
Pure electrical circuit lines without any symbols
natural_image
Line drawing of a rectangular appliance with internal grating, placed inside an oven (no text or symbols)
natural_image
Line drawing of a microwave oven with a grid-patterned lid placed inside (no text or symbols)
natural_image
Line drawing of a cabinet with a magnified circular inset showing radial lines (no text or symbols)
natural_image
Line drawing of a rectangular oven with a grating tray inside, placed on an open shelf (no text or symbols)
natural_image
Line drawing of a kitchen appliance with a hand cleaning the interior (no text or symbols)


natural_image
Line drawing of a steam rising from a cabinet to a door, with no text or symbols present.
natural_image
Hand cleaning a kitchen appliance with a cloth (no text or symbols visible)
natural_image
Line drawing of hands operating a small oven with open lid (no text or symbols)
natural_image
Diagram showing a mechanical component with a red downward arrow indicating force or direction (no text or symbols present)
natural_image
Pure mechanical diagram showing a triangular plate with two arrows indicating direction, no text or symbols present
natural_image
Simple line drawing of a hand holding a tool, enclosed in a circle (no text or symbols)
natural_image
Illustration of a hand cleaning a tiled surface with a cloth, water being poured into a bowl labeled H₂O (no text or symbols on the main subject)
natural_image
Pure technical line drawing of a mechanical component with arrows indicating direction (no text or symbols)
natural_image
Line drawing of a double door with two hands inserting a tool into the opening (no text or symbols)

natural_image
Illustration of a red tool applying material to a corner junction (no text or symbols)
6.3. ΚΑΘΑΡΙΣΜΟΣ ΕΞΑΡΤΗΜΑΤΩΝ
natural_image
Line drawing of an oven with a rack inside, showing airflow direction (no text or symbols)


natural_image
Line drawing of an oven with a rack inside, showing internal structure and an arrow indicating direction (no text or symbols)
6.4. ΣΥΝΤΗΡΗΣΗ
Βήμα 2
natural_image
Line drawing of a hand inserting a circular component into an oven, with a red rotation arrow indicating clockwise motion (no text or symbols)
Βήμα 3

natural_image
Line drawing of a hand inserting a circular component into an oven, with a red arrow indicating rotation (no text or symbols)
Βήμα 4

natural_image
Line drawing of a hand washing a circular object inside an oven (no text or symbols)
Βήμα 5

natural_image
Line drawing of a hand inserting a circular component into an oven (no text or symbols)
Βήμα 6

natural_image
Illustration of two people in a meeting, one standing and gesturing, the other seated at a computer (no text or symbols present)
Καπνός
!


natural_image
Illustration of two people working with a rising trend line and computer monitor (no text or symbols)
natural_image
Simple line drawing of a trash bin with crossed lines indicating no waste or discharge (no text or symbols)
natural_image
Isometric line drawing of a multi-level refrigerator with drawers and shelves, no text or symbols present

WELKOM
2. PRODUCTINTRODUCTIE
4. WERKING VAN HET PRODUCT
ALGEMENE WAARSCHUWINGEN
INSTALLATIEWAARSCHUWINGEN
natural_image
Empty white rectangle with a thin gray border (no text or symbols)
natural_image
Line drawing of a multi-tiered rack or storage unit with no text or symbols
natural_image
Line drawing of a rectangular tray placed inside an oven (no text or symbols)
natural_image
Line drawing of a rectangular baking tray placed inside an oven (no text or symbols)
natural_image
Pure electrical circuit lines without any symbols
natural_image
Line drawing of a rectangular appliance with internal grating, placed inside an oven (no text or symbols)
natural_image
Line drawing of a microwave oven with a grid-patterned lid placed inside (no text or symbols)
natural_image
Line drawing of a cabinet with a circular inset showing a fan or pointer (no text or symbols)
natural_image
Line drawing of a rectangular oven with a rack inside, showing internal grating (no text or symbols)


natural_image
Line drawing of a steam stove with smoke rising, next to a cabinet (no text or symbols)
4.WERKING VAN HET PRODUCT
4.1. HOE HET PRODUCT WERKT
DE OVEN AAN-/UITZETTEN


natural_image
Hand cleaning a clean appliance into a microwave oven (no text or symbols visible)
Katalytisch reinigen
natural_image
Line drawing of hands operating a small oven with open lid (no text or symbols)

natural_image
Diagram showing a mechanical component with a red downward arrow, no text or symbols present
natural_image
Pure technical line drawing of a mechanical component with no text or symbols
natural_image
Line drawing of a hand holding a tool with a crossed-out circle (no text or symbols)
natural_image
Pure technical line drawing of a mechanical component with no text or symbols
natural_image
Line drawing of a double-bowel oven with two hands inserting a plug into the opening (no text or symbols)

natural_image
Diagram showing a red arrow pointing to a small mechanical component, with no visible text or symbols.
6.3. SCHOONMAKEN VAN ACCESSOIRES
natural_image
Line drawing of an oven with a rack inside, showing airflow direction (no text or symbols)


natural_image
Line drawing of an oven with a rack inside, showing internal structure and an arrow indicating direction (no text or symbols)
6.4. ONDERHOUD
VERVANGING VAN ONDERDELEN
Stap 2

natural_image
Line drawing of a hand inserting a circular component into an oven, with a red rotation arrow indicating clockwise motion (no text or symbols)
Stap 3

natural_image
Line drawing of a hand inserting a circular component into an oven, with a red arrow indicating rotation (no text or symbols)
Stap 4
natural_image
Line drawing of a hand washing a circular object inside an oven (no text or symbols)
Stap 5
natural_image
Line drawing of a hand inserting a circular component into an oven with a red rotation arrow (no text or symbols)
Stap 6

natural_image
Illustration of two people working with a rising stock chart and computer monitor (no text or symbols)
Rook
!


natural_image
Illustration of two people working with a rising trend line and computer monitor (no text or symbols)
natural_image
Simple line drawing of a trash bin with crossed lines indicating no waste or discharge (no text or symbols)
natural_image
Isometric line drawing of a multi-level refrigerator with drawers and shelves, no text or symbols present

natural_image
Empty white rectangle with a thin gray border (no text or symbols)
natural_image
Line drawing of a multi-tiered rack or storage unit with no text or symbols
natural_image
Line drawing of a rectangular tray placed inside an appliance rack (no text or symbols)
natural_image
Line drawing of a rectangular baking tray placed inside an oven (no text or symbols)
natural_image
Pure electrical circuit lines without any symbols
natural_image
Line drawing of a rectangular appliance with internal grating, placed inside an oven (no text or symbols)
natural_image
Line drawing of a microwave oven with a grid-patterned lid placed inside (no text or symbols)
natural_image
Line drawing of a cabinet with a circular diagram showing a fan or pointer (no text or symbols)
natural_image
Line drawing of a rectangular oven with a grater inside, placed on top of an oven (no text or symbols)
3.3. LIMPEZA PRELIMINAR

natural_image
Line drawing of a steam stove with smoke rising, next to a cabinet (no text or symbols)

RELÓGIO PROGRAMADO
Permite alterar a hora do dia.


natural_image
Hand cleaning a kitchen oven with a cloth (no text or symbols visible)
Limpeza catalítica
natural_image
Line drawing of hands operating a small oven with a door open (no text or symbols)

natural_image
Diagram showing a mechanical component with a red downward arrow, no text or symbols present
natural_image
Pure technical line drawing of a mechanical component with no text or symbols
natural_image
Line drawing of a hand holding a tool with a crossed-out circle (no text or symbols)
natural_image
Pure technical line drawing of a mechanical component with arrows indicating direction (no text or symbols)
natural_image
Line drawing of hands operating a front-loading oven (no text or symbols)

natural_image
Diagram showing a red arrow pointing to a mechanical component with a black outline, no text or symbols present
6.3. LIMPEZA DOS ACESSÓRIOS
natural_image
Line drawing of an oven with a rack inside, showing airflow direction (no text or symbols)


natural_image
Line drawing of an oven with a rack inside, showing internal structure and an arrow indicating direction (no text or symbols)
6.4. MANUTENÇÃO
Passo 2

natural_image
Line drawing of a hand inserting a circular component into an oven, with a red rotation arrow indicating clockwise motion (no text or symbols)
Passo 3

natural_image
Line drawing of a hand inserting a bulb into an oven with a red arrow indicating rotation (no text or symbols)
Passo 4

natural_image
Line drawing of a hand using a tool to clean or remove a cylindrical object inside an oven (no text or symbols)
Passo 5

natural_image
Line drawing of a hand inserting a device into an oven with a circular arrow indicating rotation (no text or symbols)
Passo 6

natural_image
Illustration of two people working with a rising stock chart and computer monitor (no text or symbols)
Fumo
!


natural_image
Illustration of two people working with a rising trend line and computer monitor (no text or symbols)
natural_image
Simple line drawing of a trash bin with crossed lines indicating no waste or discharge (no text or symbols)
natural_image
Isometric line drawing of a multi-level refrigerator with drawers and shelves, no text or symbols present

VITAJTE
natural_image
Empty white rectangle with a thin gray border (no text or symbols)
natural_image
Technical line drawing of a multi-tiered rack or storage unit (no text or symbols)
natural_image
Line drawing of a rectangular tray placed inside an oven (no text or symbols)
natural_image
Line drawing of a rectangular tray placed inside an oven (no text or symbols)
natural_image
Pure electrical circuit lines without any symbols
natural_image
Line drawing of a rectangular appliance with internal grating, placed inside an oven (no text or symbols)
natural_image
Line drawing of a microwave oven with a grid-patterned lid placed inside (no text or symbols)
natural_image
Line drawing of a cabinet with a circular inset showing radial lines (no text or symbols)
natural_image
Line drawing of a rectangular oven with a grating tray inside, placed on an open shelf (no text or symbols)
natural_image
Line drawing of a kitchen oven with a hand cleaning the interior and a water bottle labeled H2O (no text or symbols on main subject)

natural_image
Line drawing of a steam rising from an oven to a cabinet (no text or symbols)
4.OBSLUHA SPOTREBIČA
4.1. FUNGOVANIE SPOTREBIČA
ZAPNUTIE/VYPNUTIE RÚRY

natural_image
Hand cleaning a kitchen oven with a cloth, showing dust removal (no text or symbols)
natural_image
Line drawing of hands operating a small oven with a door open (no text or symbols)

natural_image
Diagram showing a mechanical component with a red downward arrow indicating force or direction (no text or symbols present)
natural_image
Pure technical line drawing of a mechanical component with no text or symbols
- VAROVANIE: Vonkajšie sklo sa nedá vybrat.
natural_image
Simple line drawing of a hand holding a tool, no text or symbols present
natural_image
Pure technical line drawing of a mechanical assembly with no text or symbols
natural_image
Line drawing of a double-bowel oven with two hands inserting a plug into the opening (no text or symbols)

natural_image
Diagram showing a red arrow pointing to a small mechanical component, with no visible text or symbols.
6.3. ČISTENIE PRÍSLUŠENSTVA
natural_image
Line drawing of an oven with a rack inside, showing airflow direction (no text or symbols)

natural_image
Line drawing of an oven with a rack inside, showing internal structure and an arrow indicating direction (no text or symbols)
6.4. ÚDRŽBA
VÝMENA KOMPONENTOV
Krok 2

natural_image
Line drawing of a hand inserting a circular component into an oven, with a red rotation arrow indicating motion (no text or symbols)
Krok 3

natural_image
Line drawing of a hand inserting a bulb into an oven with a red arrow indicating rotation (no text or symbols)
Krok 4

natural_image
Line drawing of a hand using a tool to clean or remove a cylindrical object inside an oven (no text or symbols)
Krok 5

natural_image
Line drawing of a hand inserting a device into an oven with a circular arrow indicating rotation (no text or symbols)
Krok 6

natural_image
Illustration of two people working on a rising trend line graph, one gesturing and the other observing (no text or symbols)
Dym
!


natural_image
Illustration of two people working on a rising stock chart, one gesturing while the other watches (no text or symbols present)
8.OCHRANA ŽIVOTNÉHO PROSTREDIA A LIKVIDÁCIA SPOTREBIČA
8.1. LIKVIDÁCIA SPOTREBIČA
natural_image
Simple line drawing of a trash bin with crossed lines indicating no waste or discharge (no text or symbols)
natural_image
Isometric line drawing of a multi-level refrigerator with drawers and shelves, no text or symbols present


WITAMY
natural_image
Empty white rectangle with a thin gray border (no text or symbols)
natural_image
Technical line drawing of a multi-tiered rack or storage unit (no text or symbols)
natural_image
Line drawing of a rectangular tray placed inside an appliance rack (no text or symbols)
natural_image
Line drawing of a rectangular tray placed inside an oven (no text or symbols)
natural_image
Pure electrical circuit lines without any symbols
natural_image
Line drawing of a rectangular appliance with internal grating, placed inside an oven (no text or symbols)
natural_image
Line drawing of a microwave oven with a grid-patterned lid placed inside (no text or symbols)
natural_image
Line drawing of a cabinet with a magnified circular inset showing radial lines (no text or symbols)
natural_image
Line drawing of a rectangular tray with a grating inside, placed inside an oven (no text or symbols)

natural_image
Line drawing of a steam stove with smoke rising from the chimney, next to a cabinet (no text or symbols)
4.1. JAK DZIAŁA PRODUKT
WŁĄCZANIE/WYŁĄCZANIE PIEKARNIKA


natural_image
Hand cleaning a clean appliance into a stainless steel oven (no text or symbols visible)
natural_image
Line drawing of hands operating a small oven with open lid (no text or symbols)

natural_image
Diagram showing a mechanical component with a red downward arrow indicating force or direction (no text or symbols present)
natural_image
Pure technical line drawing of a mechanical component with no text or symbols
natural_image
Simple line drawing of a hand holding a tool, no text or symbols present
natural_image
Pure technical line drawing of a mechanical assembly with no text or symbols
natural_image
Line drawing of a double-bowel oven with two hands inserting a plug into the opening (no text or symbols)
natural_image
Diagram showing a red arrow pointing to a small mechanical component, with no visible text or symbols.
6.3. CZYSZCZENIE AKCESORIÓW
natural_image
Line drawing of an oven with a rack inside, showing airflow direction (no text or symbols)


natural_image
Line drawing of an oven with a rack inside, showing internal structure and an arrow indicating direction (no text or symbols)
6.4. KONSERWACJA
WYMIANA KOMPONENTÓW
Krok 2

natural_image
Line drawing of a hand inserting a circular component into an oven, with a red rotation arrow indicating motion (no text or symbols)
Krok 3

natural_image
Line drawing of a hand inserting a bulb into an oven with a red arrow indicating rotation (no text or symbols)
Krok 4

natural_image
Line drawing of a hand using a tool to clean or remove a cylindrical object inside an oven (no text or symbols)
Krok 5

natural_image
Line drawing of a hand inserting a device into an oven with a circular arrow indicating rotation (no text or symbols)
Krok 6

natural_image
Illustration of two people in a meeting, one standing and gesturing, the other seated at a computer (no text or symbols present)
Dym
!

natural_image
Illustration of two people working with a rising trend line and computer monitor (no text or symbols)
8.OCHRONA ŚRODOWISKA I UTYLIZACJA ODPADÓW
8.1. UTYLIZACJA URZĄDZENIA
natural_image
Symbol of a trash bin crossed with diagonal lines, no text or numbers present
natural_image
Isometric line drawing of a multi-level refrigerator with drawers and shelves, no text or symbols present


VÍTEJTE
natural_image
Empty white rectangle with a thin black border (no text or symbols)
natural_image
Technical line drawing of a multi-tiered rack or storage unit (no text or symbols)
natural_image
Line drawing of a rectangular tray placed inside an oven (no text or symbols)
natural_image
Line drawing of a rectangular tray placed inside an oven (no text or symbols)
natural_image
Pure electrical circuit lines without any symbols
natural_image
Line drawing of a rectangular appliance with internal grating, placed inside an oven (no text or symbols)
natural_image
Line drawing of a microwave oven with a grid-patterned lid placed inside (no text or symbols)
natural_image
Line drawing of a cabinet with a circular inset showing radial lines (no text or symbols)
natural_image
Line drawing of a rectangular oven with a rack inside, no text or symbols present
natural_image
Illustration of a hand cleaning a kitchen oven with a water bottle and beaker (no text or symbols)


natural_image
Line drawing of a steam rising from a cabinet to an open door (no text or symbols)
4.1. JAK TENTO VÝROBEK FUNGUJE
NASTAVENÍ PROGRAMU PŘÍPRAVY POKRMU


natural_image
Hand cleaning a kitchen oven with a cloth (no text or symbols visible)
Katalytické čištění
natural_image
Line drawing of hands operating a small oven with open lid (no text or symbols)
natural_image
Diagram showing a mechanical component with a red downward arrow indicating force or direction (no text or symbols present)
natural_image
Pure technical line drawing of a mechanical component with no text or symbols
natural_image
Line drawing of a hand holding a tool with a crossed-out circle (no text or symbols)
natural_image
Pure technical line drawing of a mechanical assembly with no text or symbols
natural_image
Line drawing of a double door with two hands inserting a tool into the opening (no text or symbols)

natural_image
Diagram showing a red arrow pointing to a small mechanical component, with no visible text or symbols.
natural_image
Line drawing of an oven with a rack inside, showing airflow direction (no text or symbols)

natural_image
Line drawing of an oven with a rack inside, showing internal structure and an arrow indicating direction (no text or symbols)
6.4. ÚDRŽBA
VÝMĚNA SOUČÁSTÍ
Krok 2

natural_image
Line drawing of a hand inserting a circular component into an oven, with a red rotation arrow indicating clockwise motion (no text or symbols)
Krok 3

natural_image
Line drawing of a hand inserting a bulb into an oven with a red arrow indicating rotation (no text or symbols)
Krok 4
natural_image
Line drawing of a hand using a tool to clean or remove a cylindrical object inside an oven (no text or symbols)
Krok 5

natural_image
Line drawing of a hand inserting a device into an oven with a circular arrow indicating rotation (no text or symbols)
Krok 6

natural_image
Illustration of two people working with a rising trend line and computer monitor (no text or symbols)
Kouř
!


natural_image
Illustration of two people working with a rising stock chart and computer monitor (no text or symbols)
8.OCHRANA ŽIVOTNÍHO PROSTŘEDÍ A LIKVIDACE
8.1. LIKVIDACE SPOTŘEBIČE
natural_image
Pure electrical circuit lines without any symbols
natural_image
Isometric line drawing of a multi-level refrigerator with drawers, shelves, and control panels (no text or symbols)

natural_image
Empty white rectangle with a thin gray border (no text or symbols)
natural_image
Technical line drawing of a multi-tiered rack or storage unit (no text or symbols)
natural_image
Line drawing of a rectangular tray placed inside an oven (no text or symbols)
natural_image
Line drawing of a rectangular tray placed inside an oven (no text or symbols)
natural_image
Pure electrical circuit lines without any symbols
natural_image
Line drawing of a rectangular appliance with internal grating, placed inside an oven (no text or symbols)
natural_image
Line drawing of a microwave oven with a grid-patterned lid placed inside (no text or symbols)
natural_image
Line drawing of a cabinet with a magnified circular inset showing radial lines (no text or symbols)
natural_image
Line drawing of a rectangular oven with a rack inside, showing internal structure (no text or symbols)
natural_image
Line drawing of a kitchen oven with a hand cleaning the interior and a bottle labeled H2O (no text or symbols on main subject)

natural_image
Line drawing of a steam stove with smoke rising from the chimney, next to an open door (no text or symbols)
4. UTILIZAREA PRODUSULUI
4.1. CUM FUNCȚIONEAZĂ PRODUSUL
PORNIREA/OPRIREA CUPTORULUI
SETAREA PROGRAMULUI DE GĂTIT
Dezactivati


SETARE CEAS


natural_image
Hand cleaning a kitchen appliance with a cloth, showing a clean interior and no text or symbols
Curățare catalitică
natural_image
Line drawing of hands operating a small oven with open lid (no text or symbols)

natural_image
Diagram showing a mechanical component with a red downward arrow indicating force or direction (no text or symbols present)
natural_image
Pure technical line drawing of a mechanical component with no text or symbols
natural_image
Simple line drawing of a hand holding a tool, no text or symbols present
natural_image
Pure technical line drawing of a mechanical assembly with no text or symbols
natural_image
Line drawing of a double-bowel oven with two hands inserting a plug into the opening (no text or symbols)

natural_image
Diagram showing a red arrow pointing to a small mechanical component, with no visible text or symbols.
6.3. CURĂȚAREA ACCESORIILOR
natural_image
Line drawing of an oven with a rack inside, showing airflow direction (no text or symbols)


natural_image
Line drawing of an oven with a rack inside, showing internal structure and an arrow indicating direction (no text or symbols)
6.4. ÎNTRETINEREA
ÎNLOCUIREA COMPONENTELOR
Pasul 2

natural_image
Line drawing of a hand inserting a circular component into an oven, with a red rotation arrow indicating clockwise motion (no text or symbols)
Pasul 3

natural_image
Line drawing of a hand inserting a bulb into an oven with a red arrow indicating rotation (no text or symbols)
Pasul 4

natural_image
Line drawing of a hand using a tool to clean or remove a cylindrical object inside an oven (no text or symbols)
Pasul 5

natural_image
Line drawing of a hand inserting a device into an oven with a circular arrow indicating rotation (no text or symbols)
Pasul 6

natural_image
Illustration of two people working with a rising trend line and computer monitor (no text or symbols)
Fum
!


natural_image
Illustration of two people working with a rising stock chart and computer monitor (no text or symbols)
8.PROTECTIA MEDIULUI ŞI ELIMINAREA PRODUSULUI
8.1. ELIMINAREA APARATULUI
natural_image
Simple line drawing of a trash bin with crossed lines indicating no waste or discharge (no text or symbols)
natural_image
Isometric line drawing of a multi-level refrigerator with drawers, shelves, and control panels (no text or symbols)
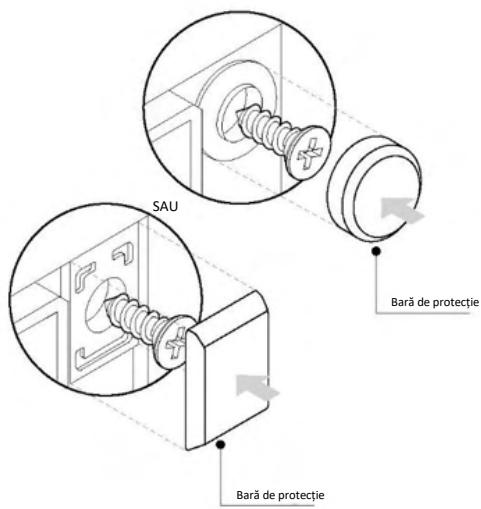
natural_image
Empty white rectangle with a thin gray border (no text or symbols)
natural_image
Technical line drawing of a multi-tiered rack or storage unit (no text or symbols)
natural_image
Line drawing of a rectangular tray placed inside an appliance casing (no text or symbols)
natural_image
Line drawing of a rectangular tray placed inside an oven (no text or symbols)
natural_image
Pure electrical circuit lines without any symbols
natural_image
Line drawing of a rectangular appliance with internal grating, placed inside an oven (no text or symbols)
natural_image
Line drawing of a microwave oven with a grid-patterned lid placed inside (no text or symbols)
natural_image
Line drawing of a bookshelf with a magnified circular icon showing a fan or pointer (no text or symbols)
natural_image
Line drawing of a tray with a grating inside an oven (no text or symbols)
natural_image
Line drawing of a kitchen oven with a hand cleaning the interior and a gas stove emitting water (no text or symbols)


natural_image
Line drawing of a steam锅炉 with smoke rising, next to a cabinet (no text or symbols)
4.A TERMÉK MÚKÖDÉSE
4.1. A TERMÉK MÜKÖDÉSE
A SÜTŐ BE- ÉS KIKAPCSOLÁSA
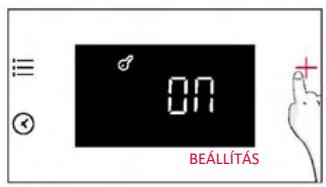
Inaktiválás
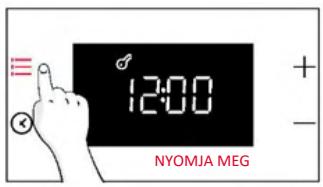
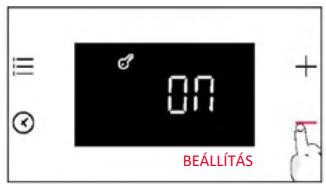
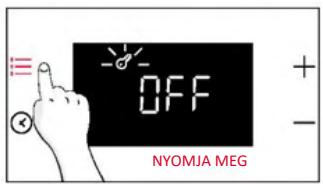

ÓRABEÁLLÍTÁS
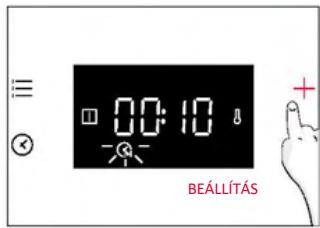
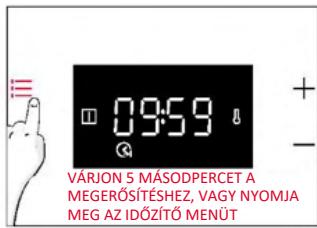


natural_image
Line drawing of a hand cleaning a window with a cloth (no text or symbols)
natural_image
Line drawing of hands operating a small oven with open lid (no text or symbols)

natural_image
Diagram showing a mechanical component with a red downward arrow indicating force or direction (no text or symbols present)
natural_image
Pure technical line drawing of a mechanical component with no text or symbols
natural_image
Simple line drawing of a hand holding a tool, no text or symbols present
natural_image
Pure technical line drawing of a mechanical component with no text or symbols
natural_image
Line drawing of a double-bowel oven with two hands inserting a plug into the opening (no text or symbols)

natural_image
Diagram showing a red arrow pointing to a small mechanical component, with no visible text or symbols.
natural_image
Line drawing of an oven with a rack inside, showing airflow direction (no text or symbols)


natural_image
Line drawing of an oven with a rack inside, showing internal structure and an arrow indicating direction (no text or symbols)
6.4. KARBANTARTÁS
ALKATRÉSZEK CSERÉJE
- lépés

natural_image
Line drawing of a hand inserting a circular component into an oven, with a red rotation arrow indicating clockwise motion (no text or symbols)
- lépés

natural_image
Line drawing of a hand inserting a bulb into an oven with a red arrow indicating rotation (no text or symbols)
- lépés

natural_image
Line drawing of a hand using a tool to clean or remove a cylindrical object inside an oven (no text or symbols)
- lépés

natural_image
Line drawing of a hand inserting a device into an oven with a circular arrow indicating rotation (no text or symbols)
- lépés

natural_image
Symbol of a trash bin crossed with diagonal lines, no text or numbers present
natural_image
Isometric line drawing of a multi-level refrigerator with drawers and shelves, no text or symbols present

natural_image
Empty white rectangle with a thin gray border (no text or symbols)
natural_image
Technical line drawing of a multi-tiered rack or storage unit (no text or symbols)
natural_image
Line drawing of a rectangular tray placed inside an oven (no text or symbols)
natural_image
Line drawing of a rectangular tray placed inside an oven (no text or symbols)
natural_image
Pure electrical circuit lines without any symbols
natural_image
Line drawing of a rectangular appliance with internal grating, placed inside an oven (no text or symbols)
natural_image
Line drawing of a microwave oven with a grid-patterned lid placed inside (no text or symbols)
natural_image
Line drawing of a cabinet with a circular inset showing radial lines (no text or symbols)
natural_image
Line drawing of a rectangular tray with a black grating inside, placed inside an oven (no text or symbols)
natural_image
Line drawing of a kitchen oven with a hand cleaning the interior and a Bunsen burner labeled H2O (no text or symbols on main subject)


natural_image
Line drawing of a steam-burning oven with a cabinet on the right (no text or symbols)
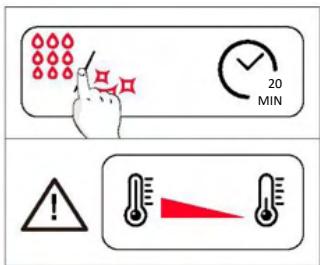

natural_image
Line drawing of a hand cleaning a window with a cloth (no text or symbols)
Čiščenje s katalizo
natural_image
Line drawing of hands operating a small oven with a door open (no text or symbols)

natural_image
Diagram showing a mechanical component with a red downward arrow, no text or symbols present
- Vrata postavite pod kotom 45°. Hkrati pritisnite oba gumba na obeh straneh stranskih ramen vrat in jih povlecite proti sebi, da odstranite pokrov zgornjih stekel vrat.
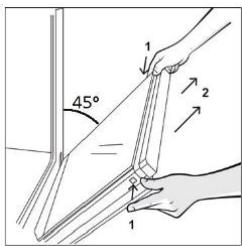
natural_image
Pure technical line drawing of a mechanical component with no text or symbols
natural_image
Simple line drawing of a hand holding a tool, no text or symbols present
- Očistite steklo z mehko krpo in ustreznim čistilnim sredstvom.
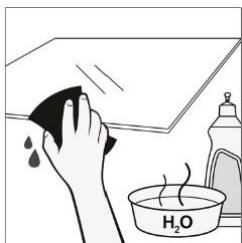
- Ponovno pritrdite zgornji pokrov stekla vrat tako, da ga potisnete navznoter, dokler ne zaslišite klika obeh stranskih gumbov.
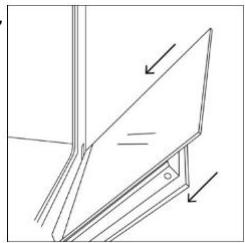
natural_image
Pure technical line drawing of a mechanical assembly with no text or symbols
- Nato vrnite vrata v položaj 90° in zavrtite jezičke za zaklepanje tečajev navznoter proti notranjosti pečice.

natural_image
Line drawing of a double-bowel oven with two hands inserting a plug into the opening (no text or symbols)

natural_image
Diagram showing a red arrow pointing to a small mechanical component, with no visible text or symbols.
6.3. ČIŠČENJE DODATKOV
natural_image
Line drawing of an oven with a rack inside, showing airflow direction (no text or symbols)


natural_image
Line drawing of an oven with a rack inside, showing internal structure and an arrow indicating direction (no text or symbols)
6.4. VZDRŽEVANJE
ZAMENJAVA DELOV
- korak

natural_image
Line drawing of a hand inserting a circular component into an oven, with a red rotation arrow indicating clockwise motion (no text or symbols)
- korak

natural_image
Line drawing of a hand inserting a bulb into an oven with a red arrow indicating rotation (no text or symbols)
- korak

natural_image
Line drawing of a hand using a tool to clean or remove a cylindrical object inside an oven (no text or symbols)
- korak

natural_image
Line drawing of a hand inserting a device into an oven with a circular arrow indicating rotation (no text or symbols)
- korak

natural_image
Simple line drawing of a trash bin with crossed lines indicating no waste or discharge (no text or symbols)
natural_image
Isometric line drawing of a multi-level refrigerator with drawers and shelves, no text or symbols present

DOBRO DOŠLI
- Kontrolni panel
- Položaji polica
(bočna žičana rešetka, ako je deo opreme)
- Metalne rešetke
- Pleh
- Poklopac ventilatora
- Vrata pećnice
- Bočne žičane rešetke (ako su deo opreme: samo za ravnu šupljinu)
- Serijski broj i QR kod

natural_image
Empty white rectangle with a thin border (no text or symbols)
natural_image
Technical line drawing of a multi-tiered rack or storage unit (no text or symbols)
Postavljene na obe strane unutrašnjosti pećnice, bočne rešetke su dizajnirane za postavljanje pleha za pečenje i rešetki tokom kuvanja.
Pleh za pečenje
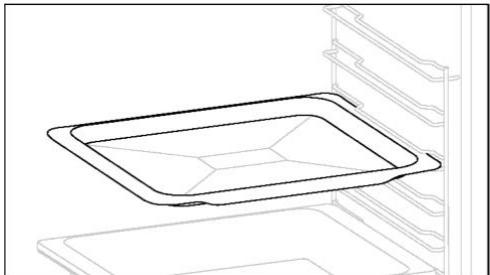
natural_image
Line drawing of a rectangular tray placed inside an oven (no text or symbols)
Pleh za pečenje je idealan za postizanje ravnomernog potamnjivanja sa donje strane, što ga čini savršenim za kolače i peciva zbog svog plitkog, ravnog dizajna. Pored toga, ako se postavi ispod rešetke za kuvanje može pomoći u sakupljanju curenja i sprečava prljanje pećnice.
Metalna rešetka
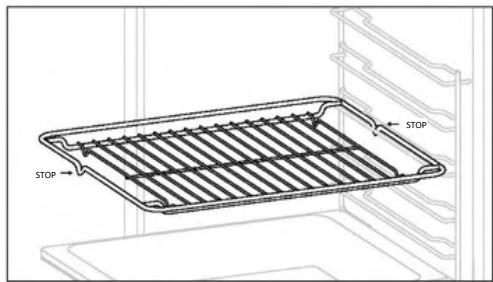
natural_image
Line drawing of a rectangular tray placed inside an oven (no text or symbols)
Dublji pleh je idealan za recepte prema kojima se dodaju tečnosti ili slojevi, kao što su čuveč ili pečenja. Njegova dubina je posebno dizajnirana da osigura željenu ujednačenost hrane pripremljene u njemu.
Teleskopske vođice
natural_image
Pure electrical circuit lines without any symbols
natural_image
Line drawing of a rectangular appliance with internal grating, placed inside an oven (no text or symbols)
natural_image
Line drawing of a microwave oven with a grid-patterned lid placed inside (no text or symbols)
natural_image
Line drawing of a cabinet with a circular inset showing radial lines (no text or symbols)
natural_image
Line drawing of a rectangular oven with a grater inside, placed on top of an oven (no text or symbols)
Konveksni oblik je pogodan za pravljenje roštilja u pećnici na visokoj temperaturi (220°), omogućavajući rezultat roštiljanja čak i kod kuće sa malo dima zahvaljujući dejstvu ceđenja masti na dno posude.
2.3. KONTROLNI PANEL


natural_image
Line drawing of a steam rising from a cabinet to an open door (no text or symbols)
4.1. KAKO PROIZVOD RAD
UKLJUČIVANJE/ISKLJUČIVANJE PEĆNICE
Da biste uključili pećnicu, okrenite funkcijsko dugme (u smeru kazaljke na satu/suprotno od kazaljke na satu) i izaberite program. Da biste je ISKLJUČILI, podesite funkcijsko dugme u položaj „0“.
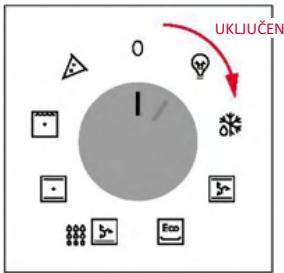

PODEŠAVANJE PROGRAMA KUVANJA
Okrenite funkcijsko dugme da biste izabrali željeni program i okrenite dugme za izbor temperature da biste podesili temperaturu.
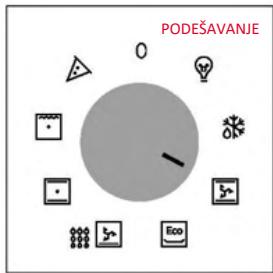
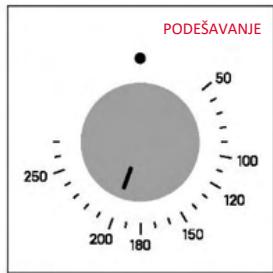
GLAVNI MENI
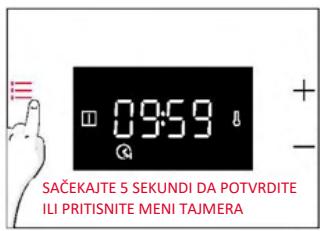

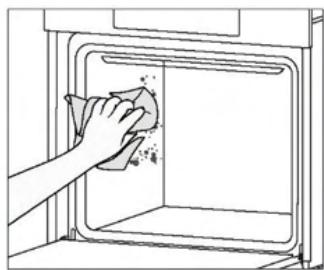
natural_image
Hand cleaning a kitchen oven with a cloth (no text or symbols visible)
Katalitičko čišćenje
Katalitički paneli oblažu unutrašnjost pećnice i pružaju vam luksuz da se nikada ne borite sa prljavom pećnicom. Paneli su obloženi specijalizovanim emajlom koji se može pohvaliti mikroporoznom strukturom koja dobro apsorbuje mast koja prska.
Katalitičkom hemijskom reakcijom oni efikasno pretvaraju apsorbovanu mast u gasovite elemente kada su izloženi visokim temperaturama.
natural_image
Line drawing of hands operating a small oven with a door open (no text or symbols)

natural_image
Diagram showing a mechanical component with a red downward arrow, no text or symbols present
- Postavite vrata na 45°. Istovremeno pritisnite dva dugmeta sa obe strane bočnih strana vrata i povucite prema sebi da biste uklonili poklopac gornjih stakala.

- Veoma pažljivo uklonite staklo pećnice, počevši od unutrašnjeg. Tokom postupka, čvrsto držite staklo obema rukama i stavite ga na mekanu ravnu površinu (npr. na tkaninu).
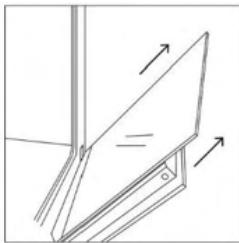
natural_image
Pure mechanical diagram showing a tilted rectangular component with two arrows indicating direction (no text or symbols)
natural_image
Simple line drawing of a hand holding a tool, no text or symbols present
- Očistite staklo mekom krpom i odgovarajućim sredstvima za čišćenje.
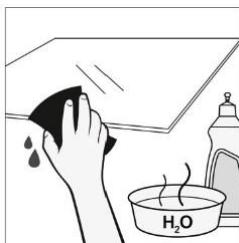
- Umetnite staklene ploče, vodeći računa da oznaka „LOW-E/PYRO“ bude ispravno čitljiva i postavljena na donjoj levoj strani vrata, u blizini leve šarke. Na taj način će štampana etiketa na prvom staklu ostati na unutrašnjoj strani vrata.
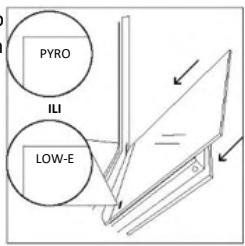
- Ponovo pričvrstite poklopac vrata gornjeg stakla tako što ćete ga gurati prema unutra dok ne čujete klik dva bočna dugmeta.
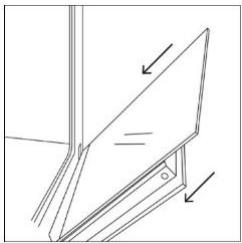
natural_image
Pure technical line drawing of a mechanical component with no text or symbols
- Zatim vratite vrata na 90° i okrenite jezičke za zaključavanje šarki prema unutrašnjosti pećnice.
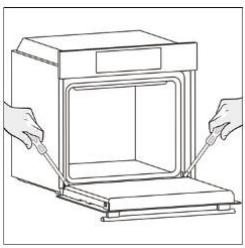
natural_image
Line drawing of a double-bowel oven with two hands inserting a plug into the opening (no text or symbols)

natural_image
Diagram showing a red arrow pointing to a small mechanical component, with no visible text or symbols.
6.3. ČIŠĆENJE DODATNE OPREME
Obavezno temeljno očistite dodatnu opremu nakon svake upotrebe i osušite je peškirom. Za tvrdokorne naslage, natopite dodatnu opremu u mešavini vode i sapuna oko 30 minuta pre nego što je ponovo operete.
ČIŠĆENJE BOČNIH NOSAČA:
- Model sa 6 nivoa
- Uklonite bočne nosače povlačenjem u pravcu strelica.
- Da biste očistili žičane nosače, stavite ih u mašinu za pranje sudova ili koristite vlažni sunđer i obavezno ih posle osušite.
- Nakon procesa čišćenja, postavite žičane nosače obrnutim redosledom.

natural_image
Line drawing of an oven with a rack inside, showing airflow direction (no text or symbols)


natural_image
Line drawing of an oven with a rack inside, showing internal structure and an arrow indicating direction (no text or symbols)
6.4. ODRŽAVANJE
ZAMENA KOMPONENTI
- korak

natural_image
Line drawing of a hand inserting a circular component into an oven, with a red rotation arrow indicating clockwise motion (no text or symbols)
- korak

natural_image
Line drawing of a hand inserting a bulb into an oven with a red arrow indicating rotation (no text or symbols)
- korak

natural_image
Line drawing of a hand using a tool to clean or remove a cylindrical object inside an oven (no text or symbols)
- korak

natural_image
Line drawing of a hand inserting a device into an oven with a circular arrow indicating rotation (no text or symbols)
- korak

natural_image
Illustration of two people working on a rising trend line graph, one gesturing and the other observing (no text or symbols)
Dim
!


natural_image
Illustration of two people working on a rising stock chart, one gesturing while the other watches (no text or symbols present)
8.ZAŠTITA ŽIVOTNE SREDINE I ODLAGANJE NA OTPAD
8.1. ODLAGANJE UREĐAJA NA OTPAD
natural_image
Simple line drawing of a trash bin with crossed lines indicating no waste or discharge (no text or symbols)
natural_image
Isometric line drawing of a multi-level refrigerator with drawers, shelves, and control panels (no text or symbols)
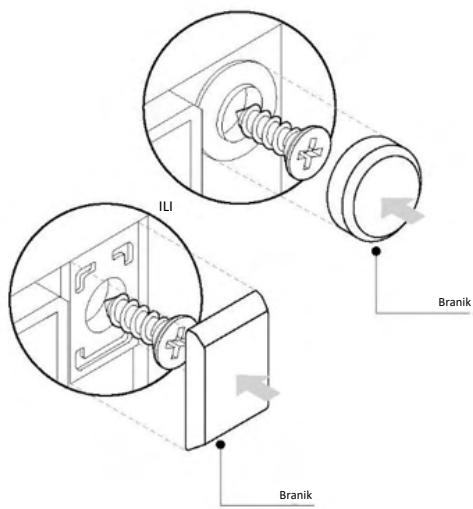

SVEIKI
natural_image
Technical line drawing of a multi-tiered rack or storage unit (no text or symbols)
natural_image
Line drawing of a rectangular tray placed inside an oven (no text or symbols)
natural_image
Line drawing of a rectangular baking tray placed inside an oven (no text or symbols)
natural_image
Pure electrical circuit lines without any symbols
natural_image
Line drawing of a rectangular appliance with internal grating, placed inside an oven (no text or symbols)
natural_image
Line drawing of a microwave oven with a grid-patterned lid placed inside (no text or symbols)
natural_image
Line drawing of a window frame with a magnified circular inset showing radial lines (no text or symbols)
natural_image
Line drawing of a rectangular tray with ribbed contents inside an oven (no text or symbols)
natural_image
Line drawing of a kitchen oven with a hand cleaning the interior and a gas stove emitting water (no text or symbols)


natural_image
Line drawing of a steam锅炉 with smoke rising, next to a cabinet (no text or symbols)
4.1. KAIP GAMINYS VEIKIA
ORKAITĖS IJUNGIMAS / IŠJUNGIMAS
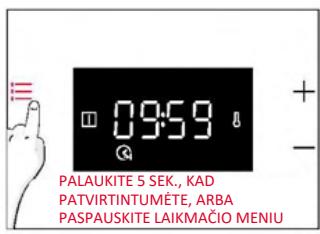


natural_image
Hand cleaning a kitchen appliance with a cloth (no text or symbols visible)
natural_image
Line drawing of hands operating a small oven with a door open (no text or symbols)

natural_image
Diagram showing a mechanical component with a red downward arrow indicating force or direction (no text or symbols present)
natural_image
Pure mechanical diagram showing a tilted rectangular component with two arrows indicating direction (no text or symbols)
natural_image
Simple line drawing of a hand holding a tool, no text or symbols present
natural_image
Pure technical line drawing of a mechanical component with no text or symbols
natural_image
Line drawing of a double-bowel oven with two hands inserting a plug into the opening (no text or symbols)

natural_image
Diagram showing a red arrow pointing to a small mechanical component, with no visible text or symbols.
6.3. PRIEDU VALYMAS
natural_image
Line drawing of an oven with a rack inside, showing airflow direction (no text or symbols)


natural_image
Line drawing of an oven with a rack inside, showing internal structure and an arrow indicating direction (no text or symbols)
6.4. PRIEŽIŪRA
KOMPONENTŲ KEITIMAS
2 veiksmas

natural_image
Line drawing of a hand inserting a circular component into an oven, with a red rotation arrow indicating clockwise motion (no text or symbols)
3 veiksmas

natural_image
Line drawing of a hand inserting a bulb into an oven with a red arrow indicating rotation (no text or symbols)
4 veiksmas

natural_image
Line drawing of a hand using a tool to clean or remove a cylindrical object inside an oven (no text or symbols)
5 veiksmas

natural_image
Line drawing of a hand inserting a device into an oven with a circular arrow indicating rotation (no text or symbols)
6 veiksmas

natural_image
Illustration of two people working on a rising trend line graph, one gesturing and the other observing (no text or symbols)
Dūmai
!


natural_image
Illustration of two people working on a rising stock chart, one gesturing while the other watches (no text or symbols present)
8.APLINKOS APSAUGA IR ATLIEKŲ ŠALINIMAS
8.1. PRIETAISO ŠALINIMAS
natural_image
Simple line drawing of a trash bin with crossed lines indicating no waste or discharge (no text or symbols)
natural_image
Isometric line drawing of a multi-level refrigerator with drawers, shelves, and control panels (no text or symbols)


TERE TULEMAST!
natural_image
Empty white rectangle with a thin gray border (no text or symbols)
natural_image
Technical line drawing of a multi-tiered rack or storage unit (no text or symbols)
natural_image
Line drawing of a rectangular tray placed inside a rack (no text or symbols)
natural_image
Line drawing of a rectangular tray placed inside an oven (no text or symbols)
natural_image
Pure electrical circuit lines without any symbols
natural_image
Line drawing of a rectangular appliance with internal grating, placed inside an oven (no text or symbols)
natural_image
Line drawing of a microwave oven with a grid-patterned lid placed inside (no text or symbols)
natural_image
Line drawing of a cabinet with a circular diagram showing a fan or pointer (no text or symbols)
natural_image
Line drawing of a rectangular tray with ribbed contents inside an oven (no text or symbols)
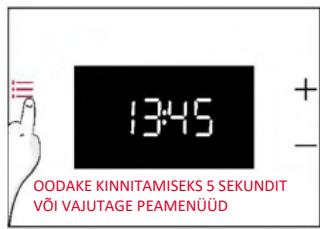
3.3. EELNEV PUHASTAMINE
natural_image
Line drawing of a kitchen appliance with a hand cleaning the oven and a water bottle labeled H2O (no text or symbols on main subject)


natural_image
Line drawing of a steam rising from an oven to a cabinet (no text or symbols)
4.1. KUIDAS TOODE TOIMIB
AHJU SISSE-/VÄLJALÜLITAMINE
Deaktiveerige
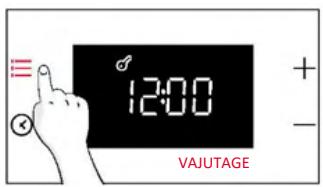
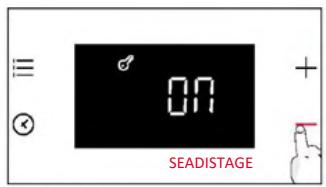
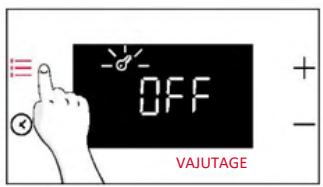

KELLA SEADISTAMINE
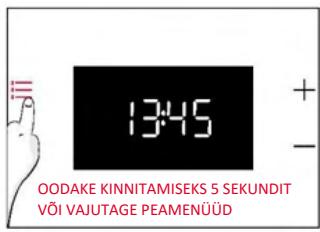

EKRAANI HELEDUS
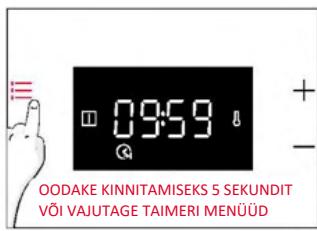
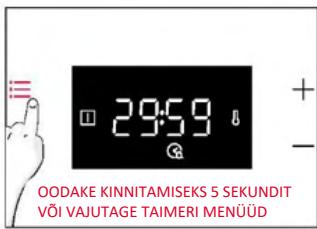


natural_image
Hand cleaning a kitchen appliance with a cloth, showing a clean interior and no text or symbols
natural_image
Line drawing of hands operating a small oven with a door open (no text or symbols)

natural_image
Diagram showing a mechanical component with a red downward arrow indicating force or direction (no text or symbols present)
natural_image
Pure technical line drawing of a mechanical component with no text or symbols
natural_image
Simple line drawing of a hand holding a tool, no text or symbols present
natural_image
Pure technical line drawing of a mechanical component with no text or symbols
natural_image
Line drawing of a double door with two hands inserting a tool into the opening (no text or symbols)

natural_image
Diagram showing a red arrow pointing to a mechanical component with a black outline, no text or symbols present
6.3. TARVIKUTE PUHASTAMINE
natural_image
Line drawing of an oven with a rack inside, showing airflow direction (no text or symbols)


natural_image
Line drawing of an oven with a rack inside, showing internal structure and an arrow indicating direction (no text or symbols)
6.4. HOOLDUS
KOMPONENTIDE VAHETAMINE
Lambipirni vahetamine:
- samm

natural_image
Line drawing of a hand inserting a circular component into an oven, with a red rotation arrow indicating clockwise motion (no text or symbols)
- samm

natural_image
Line drawing of a hand inserting a bulb into an oven with a red arrow indicating rotation (no text or symbols)
- samm

natural_image
Line drawing of a hand using a tool to clean or remove a cylindrical object inside an oven (no text or symbols)
- samm

natural_image
Line drawing of a hand inserting a device into an oven with a circular arrow indicating rotation (no text or symbols)
- samm
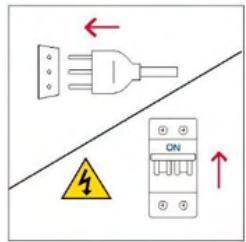
natural_image
Simple line drawing of a trash bin with crossed lines indicating no waste or discharge (no text or symbols)
natural_image
Isometric line drawing of a multi-level refrigerator with drawers and shelves, no text or symbols present


LAIPNI LÜDZAM
2.1. PRODUKTA PÄRSKATS
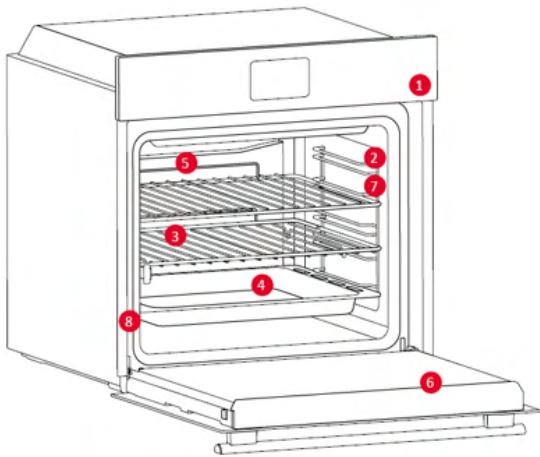
natural_image
Empty white rectangle with a thin gray border (no text or symbols)
natural_image
Technical line drawing of a multi-tiered rack or storage unit (no text or symbols)
natural_image
Line drawing of a rectangular tray placed inside a rack, no text or symbols present
natural_image
Line drawing of a rectangular tray placed inside an appliance rack (no text or symbols)
natural_image
Pure electrical circuit lines without any symbols
natural_image
Line drawing of a rectangular appliance with internal grating, placed inside an oven (no text or symbols)
natural_image
Line drawing of a microwave oven with a grid-patterned lid placed inside (no text or symbols)
natural_image
Line drawing of a cabinet with a magnified circular inset showing radial lines (no text or symbols)
natural_image
Line drawing of a rectangular oven with a grater inside, placed on top of an oven (no text or symbols)


natural_image
Line drawing of a steam stove with smoke rising from the chimney, next to a cabinet (no text or symbols)
4.PRODUKTA DARBĪBA
4.1. KÄ PRODUKTS DARBOJAS
CEPEŠKRĀSNS IESLĒGŠANA/IZSLĒGŠANA
Deaktivizēt
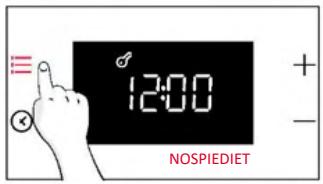
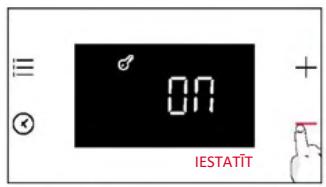
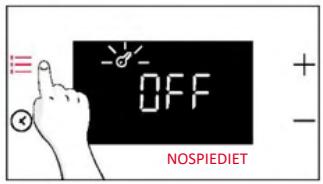

PULKSTENA IESTATIŠANA


natural_image
Hand cleaning a kitchen appliance with a cloth, showing a clean interior and no text or symbols
natural_image
Line drawing of hands operating a small oven with a door open (no text or symbols)

natural_image
Diagram showing a mechanical component with a red downward arrow, no text or symbols present
natural_image
Pure technical line drawing of a mechanical component with no text or symbols
natural_image
Simple line drawing of a hand holding a tool, no text or symbols present
natural_image
Illustration of a hand cleaning a tiled surface with a cloth, emitting steam from a bottle labeled H₂O (no text or symbols on the main subject)
natural_image
Pure technical line drawing of a mechanical component with no text or symbols
natural_image
Line drawing of a double-bowel oven with two hands inserting a plug into the opening (no text or symbols)

natural_image
Simple line drawing of a tool interacting with a small object, no text or symbols present
6.3. PIEDERUMU TİRİŞANA
natural_image
Line drawing of an oven with a rack inside, showing airflow direction (no text or symbols)


natural_image
Line drawing of an oven with a rack inside, showing internal structure and an arrow indicating direction (no text or symbols)
6.4. APKOPE
KOMPONENTU NOMAINA
- darbība

natural_image
Line drawing of a hand inserting a circular component into an oven, with a red rotation arrow indicating clockwise motion (no text or symbols)
- darbība

natural_image
Line drawing of a hand inserting a bulb into an oven with a red arrow indicating rotation (no text or symbols)
- darbība

natural_image
Line drawing of a hand using a tool to clean or remove a cylindrical object inside an oven (no text or symbols)
- darbība

natural_image
Line drawing of a hand inserting a device into an oven with a circular arrow indicating rotation (no text or symbols)
- darbība

7.PROBLÉMU NOVĚRŠANA
natural_image
Illustration of two people working with a rising trend line and computer monitor (no text or symbols)
Dūmi
!


natural_image
Illustration of two people working with a rising trend line and computer monitor (no text or symbols)
8. VIDES AIZSARDZĪBA UN UTILIZĀCIJA
8.1. IERICES UTILIZACIJA
natural_image
Simple line drawing of a trash bin with crossed lines indicating no waste or discharge (no text or symbols)
natural_image
Isometric line drawing of a multi-level refrigerator with drawers and shelves, no text or symbols present


ДОБРЕ ДОШЛИ
natural_image
Empty white rectangle with a thin gray border (no text or symbols)
natural_image
Technical line drawing of a multi-tiered rack or storage unit (no text or symbols)
natural_image
Line drawing of a rectangular tray placed inside an oven (no text or symbols)
natural_image
Line drawing of a rectangular tray placed inside an oven (no text or symbols)
natural_image
Pure electrical circuit lines without any symbols
natural_image
Line drawing of a rectangular appliance with internal grating, placed inside an oven (no text or symbols)
natural_image
Line drawing of a microwave oven with a grid-patterned lid placed inside (no text or symbols)
natural_image
Line drawing of a cabinet with a magnified circular inset showing radial lines (no text or symbols)
natural_image
Line drawing of a rectangular oven with a grating tray inside, placed on an open shelf (no text or symbols)
natural_image
Illustration of a hand cleaning a kitchen oven with a water bottle and beaker (no text or symbols)
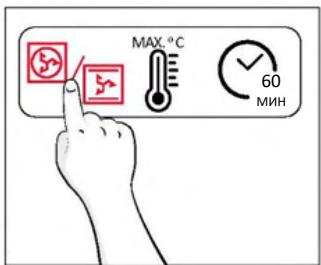
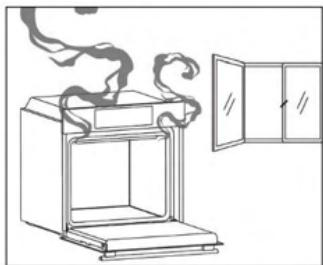
natural_image
Line drawing of a steam rising from a cabinet to a door, with no text or symbols present.
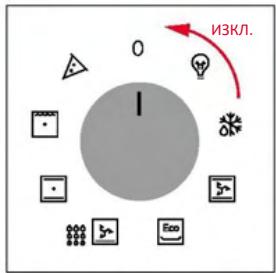
ЗАДАВАНЕ НА ПРОГРАМА ЗА ГОТВЕНЕ
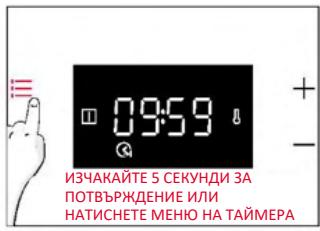

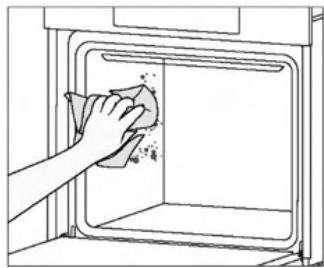
natural_image
Hand cleaning a kitchen oven with a cloth (no text or symbols visible)
natural_image
Line drawing of hands operating a small oven with a lid open (no text or symbols)

natural_image
Diagram showing a mechanical component with a red downward arrow indicating force or direction (no text or symbols present)
natural_image
Pure mechanical diagram showing a triangular plate with two arrows indicating direction, no text or symbols present.
natural_image
Simple line drawing of a hand holding a tool, enclosed in a circle with a diagonal line (no text or symbols)
natural_image
Illustration of a hand cleaning a tiled surface with a cloth, water being poured into a bowl labeled H₂O (no text or symbols on the main subject)
natural_image
Pure technical line drawing of a mechanical component with no text or symbols
natural_image
Line drawing of hands operating a front-loading oven (no text or symbols)

natural_image
Diagram showing a red arrow pointing to a mechanical component with a black outline, no text or symbols present
6.3. ПОЧИСТВАНЕ НА ПРИНАДЛЕЖНОСТИ
natural_image
Line drawing of an oven with a rack inside, showing airflow direction (no text or symbols)


natural_image
Line drawing of an oven with a rack inside, showing internal structure and an arrow indicating direction (no text or symbols)
6.4. ПОДДРЪЖКА
ПОДМЯНА НА КОМПОНЕНТИ
Стъпка 2

natural_image
Line drawing of a hand inserting a circular component into an oven, with a red rotation arrow indicating clockwise motion (no text or symbols)
Стъпка 3

natural_image
Line drawing of a hand inserting a circular component into a washing machine (no text or symbols)
Стъпка 4

natural_image
Line drawing of a hand washing a circular object into a microwave oven (no text or symbols)
Стъпка 5

natural_image
Diagram of a hand inserting a circular component into an oven, with a red rotation arrow indicating motion (no text or symbols)
Стъпка 6
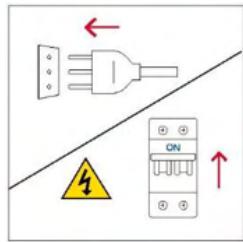
natural_image
Illustration of two people working with a rising trend line and computer monitor (no text or symbols)
Дим
!


natural_image
Illustration of two people working with a rising trend line and computer monitor (no text or symbols)
8.ОПАЗВАНЕ НА ОКОЛНАТА СРЕДА И ИЗХВЪРЛЯНЕ
8.1. ИЗХВЪРЛЯНЕ НА УРЕДА
natural_image
Simple line drawing of a trash bin with crossed lines indicating no waste or discharge (no text or symbols)
natural_image
Isometric line drawing of a multi-level refrigerator with drawers and shelves, no text or symbols present

- Upravljačka ploča
- Položaji polica
(bočna žičana rešetka ako je isporučena)
- Metalne rešetke
- Ladica
- Poklopac ventilatora
- Vrata pećnice
- Bočne žičane rešetke (ako postoje: samo za ravni prostor za pečenje)
- Serijski broj i QR kôd
natural_image
Empty white rectangle with a thin gray border (no text or symbols)
natural_image
Line drawing of a multi-tiered rack or storage unit with no text or symbols
natural_image
Line drawing of a rectangular tray placed inside an oven (no text or symbols)
Metalna rešetka u pećnici uklonjiva je, podesiva polica koja služi kao nosač za posuđe i omogućuje ravnomjernu pripremu hrane i olakšava čišćenje. Može se kori- stiti za držanje pridržavanje tanjura i posuda na različitim visinama za različite potrebe kuhanja.
Duboka ladica

natural_image
Line drawing of a rectangular tray placed inside an oven (no text or symbols)
Duboka ladica idealna je za recepte s dodanim tekućinama ili slojevima, kao što su složenci ili pečenja. Njena je dubina posebno dizajnirana kako bi hrana koja se u njenoj priprema imala željenu konzistentnost.
Teleskopske vodilice

natural_image
Pure electrical circuit lines without any symbols
Teleskopske vodilice u pećnici police su koje se mogu produljiti, što olakšava postavljanje i uklanjanje predmeta, bez potrebe za posezanjem duboko u vruću pećnicu. Poboljšavaju sigurnost, stabilnost i mogu se postaviti na različite razine.
natural_image
Line drawing of a rectangular appliance with internal grating, placed inside an oven (no text or symbols)
natural_image
Line drawing of a microwave oven with a grid-patterned lid placed inside (no text or symbols)
natural_image
Line drawing of a cabinet with a magnified circular inset showing radial lines (no text or symbols)
Šarke za postupno zatvaranje i otvaranje upravljanju kretanjem vrata koja se zbog njih zatvaraju glatko, bez lupanja.
natural_image
Line drawing of a rectangular tray with ribbed contents inside an oven (no text or symbols)
Konveksni oblik prikladan je za pečenje roštiljanje u pećnici na visokoj temperaturi (220 °), omogućujući rezultate kao na roštilju čak i kod kuće, s malo dima zahvaljujući drenažnom djelovanju masti na dnu ladice.
2.3. UPRAVLJAČKA PLOČA
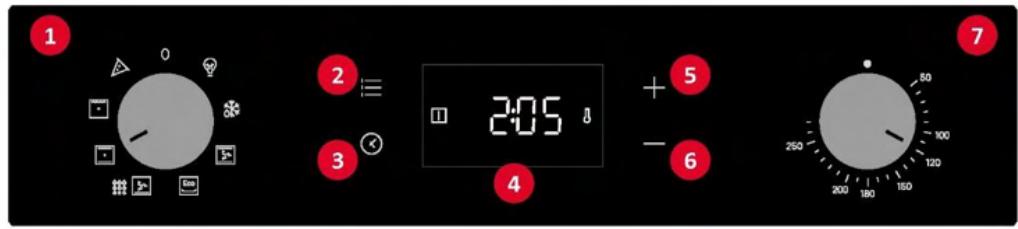
Funkcije i rangiranje funkcija ovise o modelu.
- Ručica izbornika funkcije
- Osnovni izbornik
- Vremenski programator
- Zaslon LED
- Gumb plus (+)
- Gumb minus (-)
- Gumb za odabir temperature
GLAVNE FUNKCIJE


natural_image
Line drawing of a steam rising from a cabinet to an open door (no text or symbols)
4.1. NAČIN RADA PROIZVODA
UKLJUČIVANJE/ISKLJUČIVANJE PEĆNICE
Za uključivanje pećnice okrenite birač funkcija (udesno/ulijevo) i odaberite program. Želite li je isključiti, postavite birač funkcija u položaj „0”.
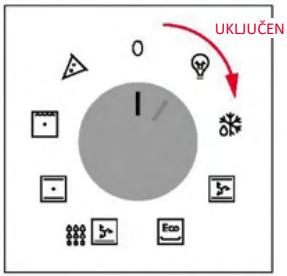

PODEŠAVANJE PROGRAMA KUHANJA
Okretanjem birača funkcija odaberite željeni program i okretanjem regulatora temperature postavite temperaturu.
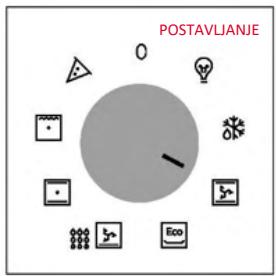
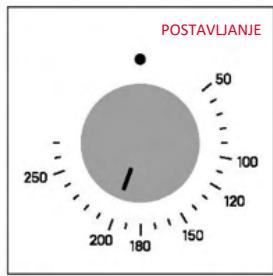
GLAVNI IZBORNIK
Pristupite glavnom izborniku pritiskom na : . Za navigaciju dodirnite : onoliko puta koliko je potrebno za unos sljedećih postavki:

SIGURNOSNA BLOKADA ZA DJECU
Ova funkcija omogućuje zaključavanje zaslona kako bi se maloljetnicima onemogućila neželjena upotreba uređaja. Želite li aktivirati zaključavanje zaslona, pritisnite „Main menu” (Glavni izbornik) jednom, a zatim pritisnite „+” za potvrdu funkcije.
Želite li deaktivirati zaključavanje, pritisnite „Main menu” (Glavni izbornik), a zatim pritisnite „-”.
Aktivacija
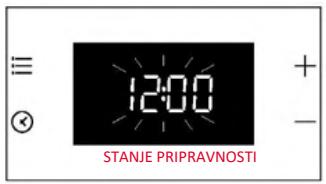

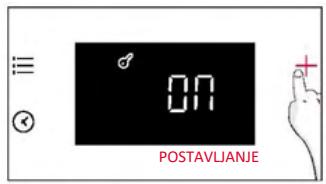
Deaktivacija

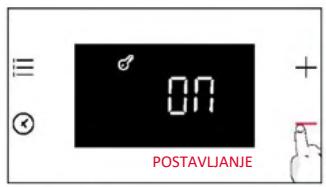


POSTAVLJANJE SATA
Regulator temperature:
Kada je temperatura pećnice niža od postavljene vrijednosti, na zaslonu se prikazuje ikona ⚠ (termostat uključen).
4.2. FUNKCIJE KUHANJA
4.2.1. STANDARDNE FUNKCIJE


natural_image
Hand cleaning a kitchen appliance with a cloth, showing a clean interior and no text or symbols
Katalitičko čišćenje
Katalitičke ploče oblažu pećnicu i pružaju vam luksuz da se ne morate boriti s prljavom pećnicom.
Ploče su obložene specijaliziranim emajlom koji se diči mikroporoznom strukturom, vještom u apsorpciji masnih ostataka prskanja.
Katalitičkom kemijskom reakcijom učinkovito pretvaraju apsorbiranu mast u plinovite elemente kada su izloženi visokim temperaturama.
natural_image
Line drawing of hands operating a small oven with a door open (no text or symbols)

natural_image
Diagram showing a mechanical component with a red downward arrow indicating force or direction (no text or symbols present)
natural_image
Pure technical line drawing of a mechanical component with no text or symbols
- UPOZORENJE: Vanjsko staklo ne može se ukloniti.

natural_image
Simple line drawing of a hand holding a tool, no text or symbols present
- Očistite staklo mekom krpom i odgovarajućim sredstvima za čišćenje.

natural_image
Pure technical line drawing of a mechanical component with no text or symbols
- Zatim vratite vrata na 90° i zakrenite jezičke za zaključavanje šarki tako da gledaju prema unutrašnjosti pećnice.

natural_image
Line drawing of a double-bowel oven with two hands inserting a plug into the opening (no text or symbols)

natural_image
Simple line drawing of a tool interacting with a small object, no text or symbols present
6.3. ČIŠĆENJE PRIBORA
Nakon svake upotrebe temeljito očistite pribor i osušite ga ručnikom. Tvrdokorne je ostatke na priboru pribora možda najbolje namočiti u mješavini vode i sapuna otprilike 30 minuta prije drugog pranja.
ČIŠĆENJE BOČNIH REŠETKI:
- Model sa 6 razina
- Uklonite bočne rešetke povlačenjem u smjeru strelica.
- Žičane rešetke prilikom čišćenja stavite u perilicu posuđa ili upotrijebite mokru spužvu, a zatim ih obavezno osušite.
- Nakon čišćenja postavite bočne police obrnutim redoslijedom.
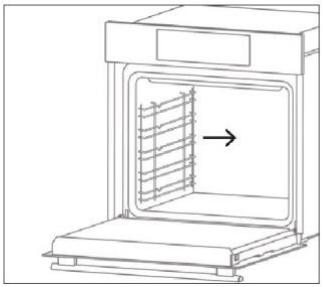
natural_image
Line drawing of an oven with a rack inside, showing airflow direction (no text or symbols)

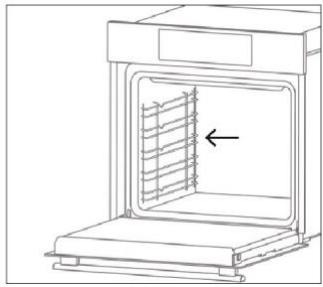
natural_image
Line drawing of an oven with a rack inside, showing internal structure and an arrow indicating direction (no text or symbols)
6.4. ODRŽAVANJE
ZAMJENA DIJELOVA
- korak

natural_image
Line drawing of a hand inserting a circular component into an oven, with a red rotation arrow indicating clockwise motion (no text or symbols)
- korak

natural_image
Line drawing of a hand inserting a bulb into an oven with a red circular arrow indicating rotation (no text or symbols)
- korak

natural_image
Line drawing of a hand using a tool to clean or remove a cylindrical object inside an oven (no text or symbols)
- korak

natural_image
Line drawing of a hand inserting a device into an oven with a circular arrow indicating rotation (no text or symbols)
- korak

natural_image
Illustration of two people working with a rising trend line and computer monitor (no text or symbols)
Dim
!


natural_image
Illustration of two people working with a rising trend line and computer monitor (no text or symbols)
8.ZAŠTITA OKOLIŠA I ZBRINJAVANJE
8.1. ZBRINJAVANJE UREĐAJA
natural_image
Simple line drawing of a trash bin with crossed lines indicating no waste or discharge (no text or symbols)
Važno je posebno obraditi otpadnu električnu i elektroničku opremu da bi se ispravno uklonili i odložili onečišćivači i vratili svi materijali.
Pojedinci mogu imati važnu ulogu u postizanju cilja da otpadna električna i elektronička oprema ne postane ekološki problem. Treba se pridržavati nekoliko osnovnih pravila:
natural_image
Isometric line drawing of a multi-level refrigerator with drawers, shelves, and control panels (no text or symbols)


VELKOMMEN
natural_image
Empty white rectangle with a thin gray border (no text or symbols)
Skriv dit serienummer her til fremtidig reference.
2.2. TILBEH∅R
natural_image
Technical line drawing of a multi-tiered rack or storage unit (no text or symbols)
natural_image
Line drawing of a rectangular tray placed inside a rack, no text or symbols present
natural_image
Line drawing of a rectangular tray placed inside an oven (no text or symbols)
natural_image
Pure electrical circuit lines without any symbols
natural_image
Line drawing of a rectangular appliance with internal grating, placed inside an oven (no text or symbols)
natural_image
Line drawing of a microwave oven with a grid-patterned lid placed inside (no text or symbols)
natural_image
Line drawing of a cabinet with a magnified circular inset showing radial lines (no text or symbols)
natural_image
Line drawing of a rectangular oven with a rack inside, no text or symbols present
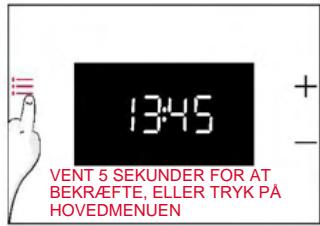
3.3. INDLEDENDE RENG∅RING
natural_image
Line drawing of a kitchen appliance with a hand cleaning the oven and a water bottle labeled H2O (no text or symbols on main subject)


natural_image
Line drawing of a steam rising from an oven to a cabinet (no text or symbols)
4.1. SÅDAN VIRKER PRODUKTET
TÆND/SLUK FOR OVNEN
Deaktiver
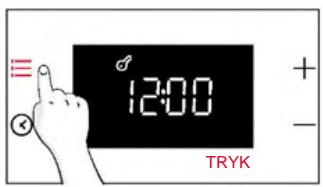
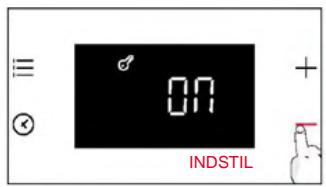
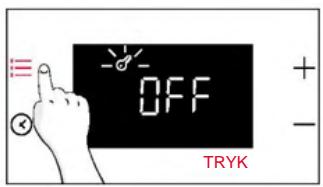

INDSTIL UR
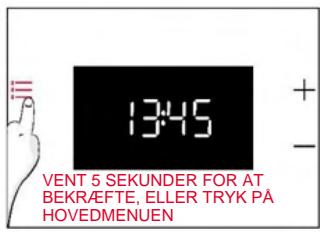
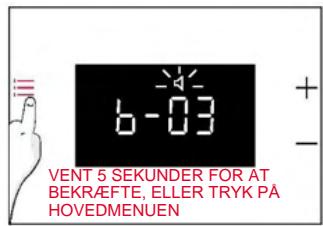
DISPLAYLYSSTYRKE
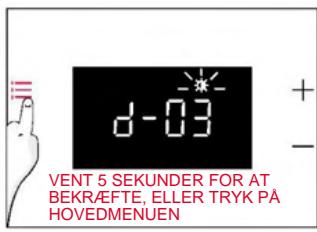
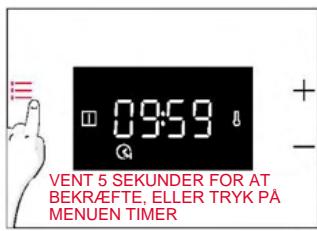
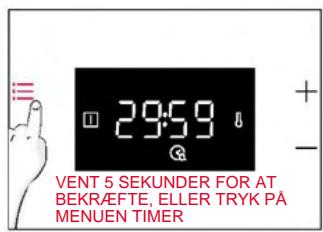

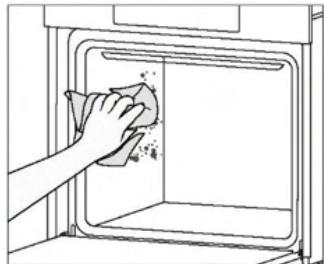
natural_image
Hand cleaning a kitchen appliance with a cloth, showing a clean interior (no text or symbols)
Katalyserengøring
natural_image
Line drawing of hands operating a small oven with a door open (no text or symbols)

natural_image
Diagram showing a mechanical component with a red downward arrow indicating force or direction (no text or symbols present)
natural_image
Pure mechanical diagram showing a tilted rectangular component with two arrows indicating direction (no text or symbols)
natural_image
Simple line drawing of a hand holding a tool, no text or symbols present
natural_image
Pure technical line drawing of a mechanical assembly with no text or symbols
natural_image
Line drawing of a double-bowel oven with two hands inserting a plug into the opening (no text or symbols)

natural_image
Diagram showing a red arrow pointing to a small mechanical component, with no visible text or symbols.
6.3. RENG∅RING AF TILBEH∅R
RENG∅RING AF SIDESKINNERNE:
- Model med 6 niveauer
natural_image
Line drawing of an oven with a rack inside, showing airflow direction (no text or symbols)


natural_image
Line drawing of an oven with a rack inside, showing internal structure and an arrow indicating direction (no text or symbols)
6.4. VEDLIGEHOLDELSE
UDSKIFTNING AF KOMPONENTER
Trin 2

natural_image
Line drawing of a hand inserting a circular component into an oven, with a red rotation arrow indicating clockwise motion (no text or symbols)
Trin 3
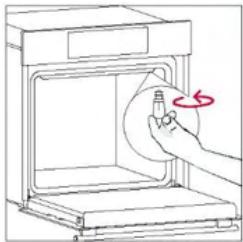
natural_image
Line drawing of a hand inserting a circular component into a washing machine (no text or symbols)
Trin 4

natural_image
Line drawing of a hand washing a circular object into a microwave oven (no text or symbols)
Trin 5

natural_image
Line drawing of a hand inserting a device into an oven with a circular arrow indicating rotation (no text or symbols)
Trin 6
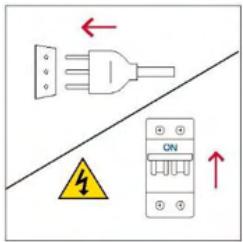
natural_image
Simple line drawing of a trash bin with crossed lines indicating no waste or discharge (no text or symbols)
natural_image
Isometric line drawing of a multi-level refrigerator with drawers, shelves, and control panels (no text or symbols)


TERVETULOA
natural_image
Empty white rectangle with a thin gray border (no text or symbols)
natural_image
Line drawing of a multi-tiered rack or storage unit with no text or symbols
natural_image
Line drawing of a rectangular tray placed inside a rack, no text or symbols present
natural_image
Line drawing of a rectangular tray placed inside an oven (no text or symbols)
natural_image
Pure electrical circuit lines without any symbols
natural_image
Line drawing of a rectangular appliance with internal grating, placed inside an oven (no text or symbols)
natural_image
Line drawing of a microwave oven with a grid-patterned lid placed inside (no text or symbols)
natural_image
Line drawing of a cabinet with a circular diagram showing a fan or pointer (no text or symbols)
natural_image
Line drawing of a rectangular tray with a grating inside, placed inside an oven (no text or symbols)
natural_image
Line drawing of a kitchen appliance with a hand cleaning the oven and a water bottle labeled H2O (no text or symbols on main subject)
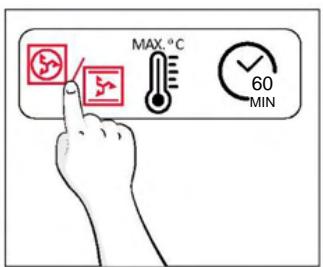
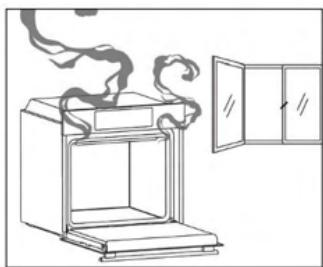
natural_image
Line drawing of a steam stove with smoke rising from the chimney, next to a cabinet (no text or symbols)
4.1. MITEN TUOTE TOIMII
UUNIN KYTKEMINEN PÄÄLLE/POIS PÄÄLTÄ
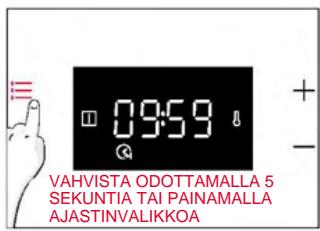
4.2. RUOANVALMISTUSTOIMINNOT
4.2.1. VAKIOTOIMINNOT
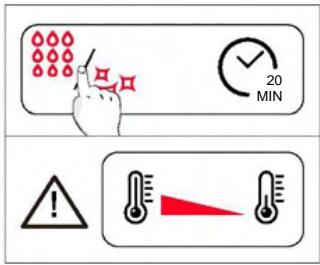
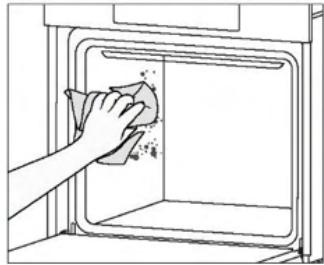
natural_image
Hand cleaning a kitchen oven with a cloth (no text or symbols visible)
natural_image
Line drawing of hands operating a small oven with a door open (no text or symbols)

natural_image
Diagram showing a mechanical component with a red downward arrow, no text or symbols present
natural_image
Pure mechanical diagram showing a tilted rectangular component with two arrows indicating direction (no text or symbols)
natural_image
Simple line drawing of a hand holding a tool, no text or symbols present
natural_image
Pure technical line drawing of a mechanical component with no text or symbols
natural_image
Line drawing of a double-bowel oven with two hands inserting a plug into the opening (no text or symbols)

natural_image
Simple line drawing of a tool interacting with a small object, no text or symbols present
6.3. LISÄVARUSTEIDEN PUHDISTUS
natural_image
Line drawing of an oven with a rack inside, showing airflow direction (no text or symbols)


natural_image
Line drawing of an oven with a rack inside, showing internal structure and an arrow indicating direction (no text or symbols)
6.4. HUOLTO
KOMPONENTTIEN VAIHTO
Vaihe 2

natural_image
Line drawing of a hand inserting a circular component into an oven, with a red rotation arrow indicating clockwise motion (no text or symbols)
Vaihe 3

natural_image
Line drawing of a hand inserting a bulb into an oven with a red arrow indicating rotation (no text or symbols)
Vaihe 4

natural_image
Line drawing of a hand using a tool to clean or remove a cylindrical object inside an oven (no text or symbols)
Vaihe 5

natural_image
Line drawing of a hand inserting a device into an oven with a circular arrow indicating rotation (no text or symbols)
Vaihe 6

natural_image
Illustration of two people working on a rising trend line graph, one gesturing and the other observing (no text or symbols)
Savu
!


natural_image
Illustration of two people working on a rising stock chart, one gesturing while the other watches (no text or symbols present)
8.YMPÄRISTÖNSUOJELU JA HÄVITTÄMINEN
8.1. LAITTEEN HÄVITTÄMINEN
natural_image
Simple line drawing of a trash bin with crossed lines indicating no waste or discharge (no text or symbols)
natural_image
Isometric line drawing of a multi-level refrigerator with drawers and shelves, no text or symbols present

VELKOMMEN
- Kontrollpanel
- Plassering av hyller (endegitter hvis inkludert)
- Metallgitter
- Brett
- Viftedeksel
- Ovnsdør
- Lateral vaiergitter
(hvis til stede: kun for flatt kammer)
- Serienummer og QR-kode
natural_image
Empty white rectangle with a thin black border (no text or symbols)
Skriv her serienummeret for fremtidig referanse.
2.2. TILBEH∅R
natural_image
Technical line drawing of a multi-tiered rack or storage unit (no text or symbols)
natural_image
Line drawing of a rectangular tray placed inside an oven (no text or symbols)
natural_image
Line drawing of a rectangular tray placed inside an oven (no text or symbols)
natural_image
Pure electrical circuit lines without any symbols
natural_image
Line drawing of a rectangular appliance with internal grating, placed inside an oven (no text or symbols)
natural_image
Line drawing of a microwave oven with a grid-patterned lid placed inside (no text or symbols)
natural_image
Line drawing of a bookshelf with a magnifying glass showing a fan-like pattern (no text or symbols)
natural_image
Line drawing of a tray with a grating inside an oven (no text or symbols)
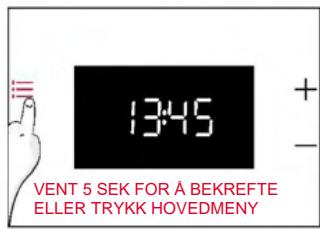
3.3. FOREL∅PIG RENGJ∅RING
natural_image
Line drawing of a kitchen oven with a hand cleaning the interior and a bottle labeled H2O (no text or symbols on main subject)

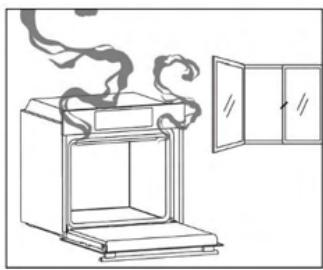
natural_image
Line drawing of a steam stove with smoke rising from the chimney, next to a cabinet (no text or symbols)
4.1. HVORDAN PRODUKTET FUNGERER
SLÅ PÅ/AV OVNEN
Deaktiver

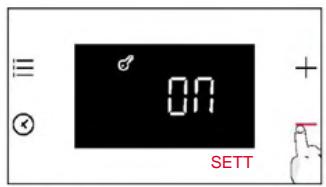


KLOKKEINNSTILLING
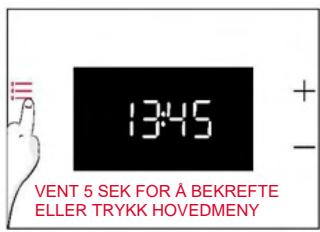
DISPLAYETS LYSSTYRKE
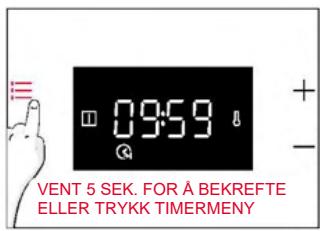
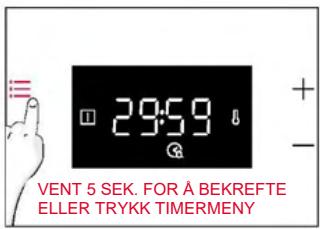

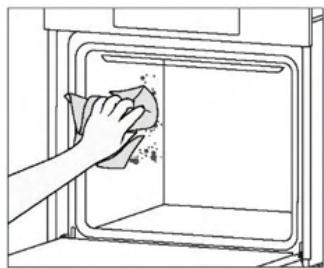
natural_image
Hand cleaning a kitchen appliance with a cloth (no text or symbols visible)
natural_image
Line drawing of hands operating a small oven with a door open (no text or symbols)

natural_image
Diagram showing a mechanical component with a red downward arrow, no text or symbols present
natural_image
Pure technical line drawing of a mechanical component with no text or symbols
natural_image
Simple line drawing of a hand holding a tool, no text or symbols present
natural_image
Pure technical line drawing of a mechanical component with no text or symbols
natural_image
Line drawing of a double-bowel oven with two hands inserting a plug into the opening (no text or symbols)

natural_image
Diagram showing a red arrow pointing to a small mechanical component, with no visible text or symbols.
6.3. RENGJ∅RING AV TILBEH∅R
natural_image
Line drawing of an oven with a rack inside, showing airflow direction (no text or symbols)


natural_image
Line drawing of an oven with a rack inside, showing internal structure and an arrow indicating direction (no text or symbols)
6.4. VEDLIKEHOLD
UTSKIFTNING AV KOMPONENTER
Trinn 2

natural_image
Line drawing of a hand inserting a circular component into an oven, with a red rotation arrow indicating clockwise motion (no text or symbols)
Trinn 3

natural_image
Line drawing of a hand inserting a circular component into a washing machine (no text or symbols)
Trinn 4

natural_image
Line drawing of a hand washing a circular object inside a microwave oven (no text or symbols)
Trinn 5

natural_image
Line drawing of a hand inserting a circular component into an oven, with a red rotation arrow indicating motion (no text or symbols)
Trinn 6
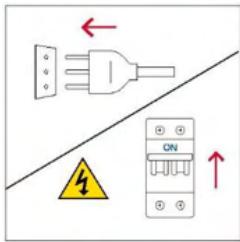
Dette produktet inneholder én eller flere lyskilder av energieffektivitetsklasse G (lampe)
7.FEILS∅KING
natural_image
Simple line drawing of a trash bin with crossed lines indicating no waste or discharge (no text or symbols)
natural_image
Isometric line drawing of a multi-level refrigerator with drawers, shelves, and control panels (no text or symbols)
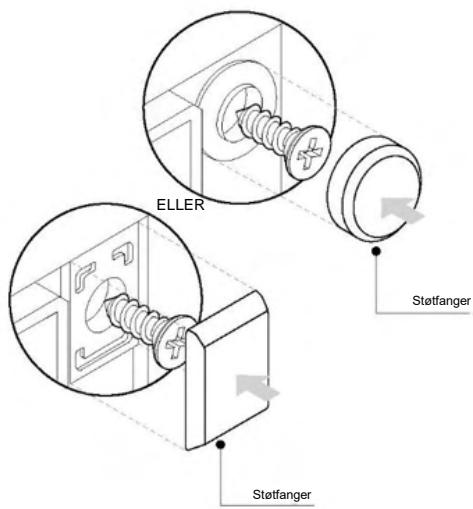

VÄLKOMMEN
natural_image
Empty white rectangle with a thin black border (no text or symbols)
natural_image
Technical line drawing of a multi-tiered rack or storage unit (no text or symbols)
natural_image
Line drawing of a rectangular tray placed inside an oven (no text or symbols)
natural_image
Line drawing of a rectangular tray placed inside an oven (no text or symbols)
natural_image
Pure electrical circuit lines without any symbols
natural_image
Line drawing of a rectangular appliance with internal grating, placed inside an oven (no text or symbols)
natural_image
Line drawing of a microwave oven with a grid-patterned lid placed inside (no text or symbols)
natural_image
Line drawing of a cabinet with a circular diagram showing a fan or pointer (no text or symbols)
natural_image
Line drawing of a rectangular tray with ribbed contents inside an oven (no text or symbols)
natural_image
Line drawing of a kitchen oven with a hand cleaning the interior and a bottle labeled H2O (no text or symbols on main subject)


natural_image
Line drawing of a steam锅炉 with smoke rising, next to a cabinet (no text or symbols)

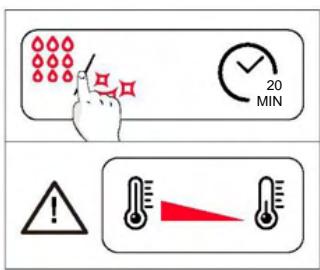

natural_image
Hand cleaning a kitchen oven with a cloth (no text or symbols visible)
natural_image
Line drawing of hands operating a small oven with a door open (no text or symbols)

natural_image
Diagram showing a mechanical component with a red downward arrow, no text or symbols present
natural_image
Pure technical line drawing of a mechanical component with no text or symbols
natural_image
Simple line drawing of a hand holding a tool, no text or symbols present
natural_image
Pure technical line drawing of a mechanical component with no text or symbols
natural_image
Line drawing of a double-bowel oven with two hands inserting a plug into the opening (no text or symbols)

natural_image
Diagram showing a red arrow pointing to a small mechanical component, with no visible text or symbols.
6.3. RENGÖRING AV TILLBEHÖR
natural_image
Line drawing of an oven with a rack inside, showing airflow direction (no text or symbols)
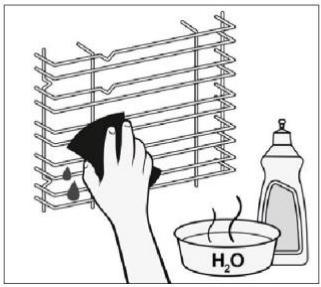

natural_image
Line drawing of an oven with a rack inside, showing internal structure and an arrow indicating direction (no text or symbols)
6.4. UNDERHÅLL
BYTE AV DELAR
Steg 2

natural_image
Line drawing of a hand inserting a circular component into an oven, with a red rotation arrow indicating clockwise motion (no text or symbols)
Steg 3

natural_image
Line drawing of a hand inserting a circular component into a washing machine (no text or symbols)
Steg 4

natural_image
Line drawing of a hand washing a circular object into a microwave oven (no text or symbols)
Steg 5

natural_image
Line drawing of a hand inserting a device into an oven with a circular arrow indicating rotation (no text or symbols)
Steg 6

natural_image
Illustration of two people working with a rising trend line, one gesturing while the other watches (no text or symbols present)
Rök
!


natural_image
Illustration of two people working with a rising stock chart and computer monitor (no text or symbols)
8.MILJÖSKYDD OCH BORTSKAFFANDE
8.1. BORTSKAFFANDE AV APPARATER
natural_image
Symbol of a trash bin crossed with diagonal lines, no text or numbers present
natural_image
Isometric line drawing of a multi-level refrigerator with drawers and shelves, no text or symbols present


ЛАСКАВО ПРОСИМО
natural_image
Empty white rectangle with a thin gray border (no text or symbols)
natural_image
Line drawing of a multi-tiered rack or storage unit with no text or symbols
natural_image
Line drawing of a rectangular tray placed inside a rack (no text or symbols)
natural_image
Line drawing of a rectangular tray placed inside an oven (no text or symbols)
natural_image
Pure electrical circuit lines without any symbols
natural_image
Line drawing of a rectangular appliance with internal grating, placed inside an oven (no text or symbols)
natural_image
Line drawing of a microwave oven with a grid-patterned lid placed inside (no text or symbols)
natural_image
Line drawing of a cabinet with a magnified circular inset showing radial lines (no text or symbols)
natural_image
Line drawing of a rectangular oven with a grater inside, placed on top of an oven (no text or symbols)


natural_image
Line drawing of a steam stove with smoke rising, next to a cabinet (no text or symbols)
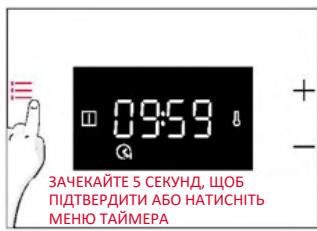
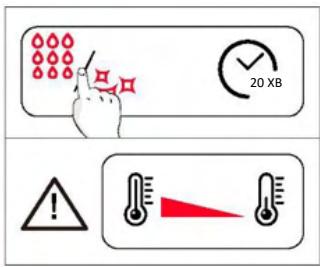
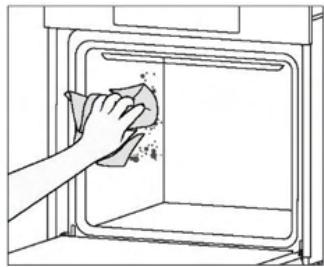
natural_image
Hand cleaning a kitchen oven with a cloth (no text or symbols visible)
natural_image
Line drawing of hands operating a small oven with a lid open (no text or symbols)

natural_image
Diagram showing a mechanical component with a red downward arrow indicating force or direction (no text or symbols present)
natural_image
Pure mechanical diagram showing a triangular plate with two arrows indicating direction, no text or symbols present.
natural_image
Simple line drawing of a hand holding a tool, enclosed in a circle (no text or symbols)
natural_image
Illustration of a hand cleaning a tiled surface with a cloth, water being poured into a bowl labeled H₂O (no text or symbols on the main subject)
natural_image
Pure technical line drawing of a mechanical assembly with no text or symbols
natural_image
Line drawing of hands operating a front-loading oven (no text or symbols)
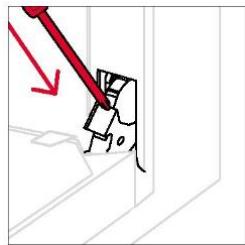
natural_image
Diagram showing a red arrow pointing to a small mechanical component, with no visible text or symbols.
natural_image
Line drawing of an oven with a rack inside, showing airflow direction (no text or symbols)


natural_image
Line drawing of an oven with a rack inside, showing internal structure and an arrow indicating direction (no text or symbols)
Крок 2

natural_image
Line drawing of a hand inserting a circular component into an oven, with a red rotation arrow indicating clockwise motion (no text or symbols)
Крок 3

natural_image
Line drawing of a hand inserting a bulb into an oven with a red circular arrow indicating rotation (no text or symbols)
Крок 4
natural_image
Line drawing of a hand cleaning a microwave oven with a circular brush (no text or symbols)
Крок 5

natural_image
Line drawing of a hand inserting a device into an oven with a circular arrow indicating rotation (no text or symbols)
Крок 6

natural_image
Illustration of two people working with a rising trend line and computer monitor (no text or symbols)
Дим
!


natural_image
Illustration of two people working on a rising stock chart, one gesturing while the other watches (no text or symbols present)
natural_image
Simple line drawing of a trash bin with crossed lines indicating no waste or discharge (no text or symbols)
natural_image
Isometric line drawing of a multi-level refrigerator with drawers and shelves, no text or symbols present

HOŞ GELDİNİZ
natural_image
Empty white rectangle with a thin gray border (no text or symbols)
natural_image
Technical line drawing of a multi-tiered rack or storage unit (no text or symbols)
natural_image
Line drawing of a rectangular tray placed inside an oven (no text or symbols)
natural_image
Line drawing of a rectangular tray placed inside an oven (no text or symbols)
natural_image
Pure electrical circuit lines without any symbols
natural_image
Line drawing of a rectangular appliance with internal grating, placed inside an oven (no text or symbols)
natural_image
Line drawing of a microwave oven with a grid-patterned lid placed inside (no text or symbols)
natural_image
Line drawing of a cabinet with a magnified circular inset showing radial lines (no text or symbols)
natural_image
Line drawing of a rectangular oven with a rack inside, no text or symbols present
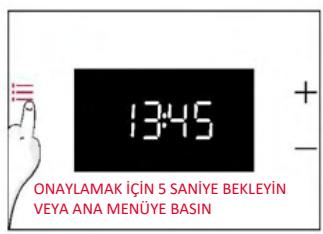
3.3. ÖN TEMİZLİK
natural_image
Line drawing of a kitchen oven with a hand cleaning the interior and a bottle labeled H2O (no text or symbols on main subject)
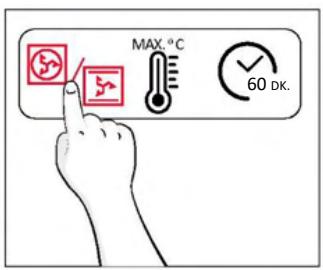

natural_image
Line drawing of a steam stove with smoke rising from the chimney, next to a cabinet (no text or symbols)
4.ÜRÜNÜN ÇALIŞTIRILMASI
4.1. ÜRÜN NASIL ÇALIŞIR?
FIRININ AÇILMASI/KAPATILMASI
Devre dışı bırak
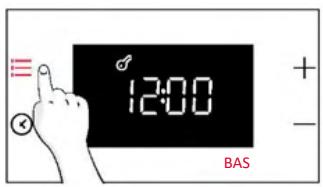
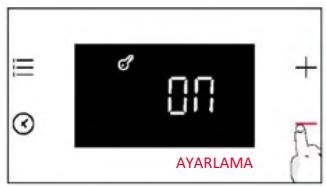
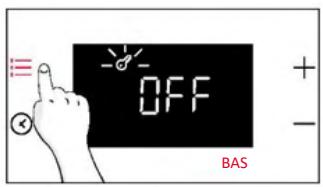

SAAT AYARI
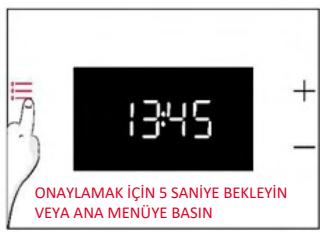
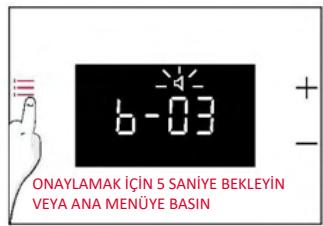
EKRAN PARLAKLIĞI
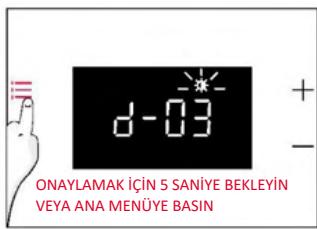
ZAMANLAYICI MENÜSÜ
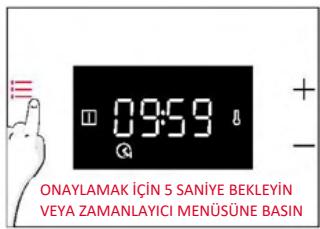
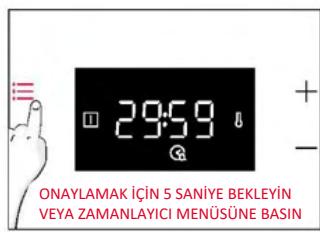
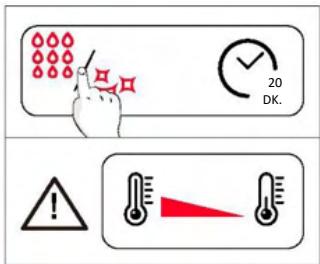

natural_image
Hand cleaning a clean appliance into a stainless steel oven (no text or symbols visible)
Katalitik temizleme
natural_image
Line drawing of hands operating a small oven with a door open (no text or symbols)

natural_image
Diagram showing a mechanical component with a red downward arrow indicating force or direction (no text or symbols present)
natural_image
Pure technical line drawing of a mechanical component with no text or symbols
natural_image
Line drawing of a hand holding a tool with a crossed-out circle (no text or symbols)
natural_image
Pure technical line drawing of a mechanical component with no text or symbols
natural_image
Line drawing of a double-bowel oven with two hands inserting a plug into the opening (no text or symbols)
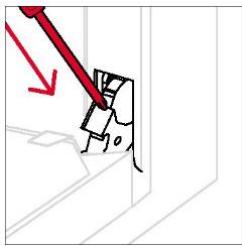
natural_image
Simple line drawing of a tool interacting with a small object, no text or symbols present
6.3. AKSESUAR TEMİZLIĞI
natural_image
Line drawing of an oven with a rack inside, showing airflow direction (no text or symbols)


natural_image
Line drawing of an oven with a rack inside, showing internal structure and an arrow indicating direction (no text or symbols)
6.4. BAKIM
Adım 2

natural_image
Line drawing of a hand inserting a circular component into an oven, with a red rotation arrow indicating clockwise motion (no text or symbols)
Adım 3

natural_image
Line drawing of a hand inserting a bulb into an oven with a red circular arrow indicating rotation (no text or symbols)
Adım 4

natural_image
Line drawing of a hand washing a circular object into a microwave oven (no text or symbols)
Adım 5

natural_image
Line drawing of a hand inserting a device into an oven with a circular arrow indicating rotation (no text or symbols)
Adım 6

natural_image
Illustration of two people working with a rising trend line and computer monitor (no text or symbols)
Duman
!


natural_image
Illustration of two people working with a rising trend line and computer monitor (no text or symbols)
8.ÇEVREYİ KORUMA VE BERTARAF
8.1. CİHAZIN BERTARAF EDİLMESİ
natural_image
Simple line drawing of a trash bin with crossed lines indicating no waste or discharge (no text or symbols)
natural_image
Isometric line drawing of a multi-level refrigerator with drawers and shelves, no text or symbols present
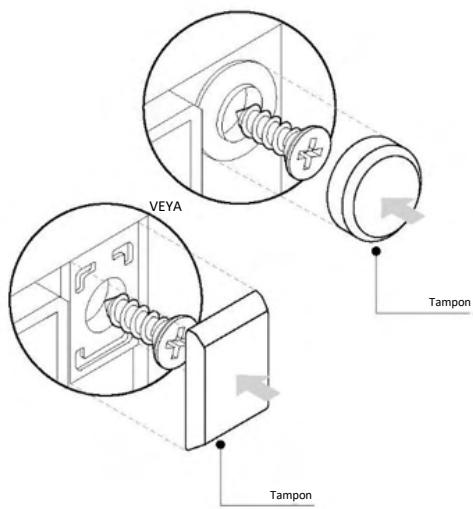

70050185