USER MANUAL 12VSD2-21.51A DEXTER
FR Perceuse sans fil 12V + 1 batterie ^+ 1 chargeur
ES Taladro sin cable 12V + 1 bateria + 1 cargador
Berbequim sem fio 12V + 1 bateria ^+ 1 carregarador
Trapano cordless 12V + 1 batteria ^+ 1 caricabaterra
Aoumuotrpunavi 12V + 1 matapia ^+ 1oepiostn
PL Wiertarka akumulatorowa 12V + 1 akumulator + 1现代农业
AkkymyraTopnaIdpenb12B+13apaHbIM yctpoiCTBOM+1akkm.6atapee
R0 Burghi fara fir cu 12V + 1 incarcator ^+ 1baterie reincarcabila
EN Cordless Drill 12V + 1 battery +1 charger

EAN CODE : 3276007366419

Mentions Legales
Exigences relatives aux conditions ambantes
Conditions de transport
He BUKndaIte akymyIaTOpy BorOhb.

MaKcImaMbHa TeMnepatypya EkCnnyatauji -45°C.

He kndaai te akymyjtopt y Body.
3MICT
1.BUKOPNCTAHH3AIPIN3HAUEHHAMAKUMYJATOPHO DPNJDEXTER
2.3AΓaIbHI ΜΠΕPΕДχΕΗΝ ΚΟΙ ΕΤΧΗΚΙ ΕΒΕΝΟΙ ΠΟβΟΥ ΕΕΚΤΡΟΗΝΤΑΜΙ
3.IIPOPEIXJXEHNAIO CBEPIINHH
4.IIPOPEIXKEHHIIOZAKPYUBAHHI
5.CIeJIaJIbHI IHCTPYKJIi 3 Be3NEKIn IIOdo AKyMylrTOPA TA 3APJdHOTo PnCtPOI
6.0NMC
7.TEXHIHDIAHI
8.3APJXKHHH
9.EKCIJYATAUJI
10.TEXHUIHEOBCIYTOBYBAHH
11.YCYHEHHH HECIPABHOCETI
12.3AXMCT DOBKIJIIJIA
13.ΓΑΡΑΤΙΥ
14.306PAXEHH BPO3IBPAHOMY BUNJI TA CINCOK DETAJEI
1. BUKOPNCTAHHЯ 3A ПИЗHAUECHHЯМ AKUMYJIATOPHOFO ДРИЛД DEXTER
3a60pohraTbCBAKOpncTOBByaTInHCTpymENT He 3a npn3NaueHHAM.
Iicna p03nakvbanha ynakobkn nepekoHaTeCBAHARBHOCTI Bc0ro npnilaDla, 1o BXOJntb y KOMPNEKT (Akpio take e).
KpO BuPio n6 noKoJKeHn ab6 0ae 6ydb-ynkneKT, HBeNKOpcTOByte Ioro Ta NOBepHtB NOrO CBOmE Mynlepy.
KksoBn daCTe uei HcTpyMeHT iHsIM nHOaM, daIte im TakoX uei noc6HnK.
3BepHtB yBary, 100 ue Bnpi6 He npni3naueHn IaB NbKOpNCtAHN B KOMepuiHnx, TropOBx a6o npomncobnx zijnx.
Iapantia bye anyboBaHa, kIoo IHctpymeHT BnKOpNCTOByBaTmMeTbCBA KOMepuiHnx, TropOBx, npomncobnx a6o cxoxuxiJnx.
2.3AΓΑJIbHI ΝONEPEДЖECHЯ ΚΟΥO TEXHIΚΙ ΕE3ΝΕΚΙ ΜΟΒΟΤΙ 3 EJEΚΤΡΟΗCTΡΥΜΕΝΥ
!NONEPEJXEHH! Ipountaite Bc i nonepejxehn npo 6e3neky, IHCTpykui, 03hauomTece 3 inoctpaiaiMa Ta texhiuHmxaapaKtepncTtKAMn, kki daokotbcdo eekptoHCTpymenta.
HedtpmaHHa HabeEHnX nKcye iNCTpykui Moe np3BecTIO do ypaKeHH eEkeTpHm CTpMOM, noKeki Ta/abo cepno3HX TpaBM.
36epiraute BcneonepegeHHra hctpyku dnoaIbwoBukopncTann.
TePmH "eNeKtpoiHcTpyment" y nOpepeJxehnHex cTocyETbCra eNeKtpuHoro IHcTpymenta, 10 npaioE bI eNeKtpoMepekxi (uepez hyp) a6o BiakymyIaTopara (63 uHypa).
1)Be3neka p06ooyi 30HN
a)Po6oça 30ha Ma€ 6ytn uicToI O Ta dOpe ocBItIeHIO. Henpi6paHa a6o noraHO ocBItIeHa pO6Oa 30Ha MOKe CTaN IpUWnHO HeuacNHx BmApKIB.
6) He npaioTe 3 eneKtpoHcTpymertom y Bn6yXoHe6e3neuHomy cepedobuisi, hapnKnlaD, y npncTycoSti Ierko3aMnCTnx piin, raizB a60 nnu. Pia cac po6oTu eneKtpoHcTpymertu yTBopIObIckpR, kI MOxYb pIn3BeCTn Do 3aIMAHNA nnly a60 BNapirB.
B)He donyckaite 6n3bko ditei i ctopoHHix niac po60Tu 3 eneKtpoiHcTpymentom. Ce moxe BiabolikaTn Bacip npni3BeCTn do BTPaTI KOHTPOJIIO.
2)EneKrp06e3neka
a)WtencbHBI BUNKNeEeKtpoHcTpymEna MaObTiNxDoxnTdo po3etok. 3a6OponeHo MoDnphiKyBaTN WtencbHy BUNky 6ydb-yaKm YHNoH. He BIKOpncTOByTe KoJDi nepeXdiHNKn Ira po60tn i3 3a3eMJIeHNMI eNEKtpoiHCTpymENTAM. BIKOpNCaTHAn OprirHaBHOI WtencbHoi BUNK Ta HaneKhoi PO3ETKN 3MeHUny EpuKHe NHeEeKpUHM CTpyNM.
6)YnkaTe KOtakTu qactH tina i3 3aemLeHmMu nobepxHmU, taKmMu k Tpy6u, padiaTOpu, nIHTa XoJouNbHnku. y pazi 3aemMeHHra tina 3bInbUyTcBc Pn3NK ypaKeHHe neEeKTPnuHMM cTpyMOM.
B) He 3aIIaIaIe enekTpoiHCTpymEt nID doUcE m a6o B yMObax nIBuIeHOI BOIorOcti. B0a, iO noTpapanna B enekTpoIHCTpymEt, nIDbIaIe pIN3IK UpaJKeHHN eEnekTpuHMM CTpyMOM.
r)He BnKOpNCTOByTe 7hnp JxNBLeHn3 NopuyenHnM Hopm EKnnyatauqI. HikOni He BnKOpNCTOByTe 7hnp JxNBLeHn4 npepeheCHe, nepeTayBaHHe enEKeTpoInCTpymEtA 60 BeMMAHN BnIKn 3 p03eTK. 3axMaaiTe 7hnp JxNBLeHnB 1d II TePNa, onII, roctpnk Kytib a60 pyomix qactMH. PoiKoDkeHni 60 3aIpyTahi 7hnp JxNBLeHn 36IbIbTuYbPi3NK ypaXeHH eEnEeKTPuHM CTpyMOM.
Д)Пи робoti eilektpoiHCTpymeHTa Ha BiKpntomy NOBITpi BnKOpNtOByte NodobkyaBau,дяцьог npin3hauehen. BnKOpNtAHHЯ NOIDOBxBuAca, npin3hauehoro ДЯЗOTbHix po6it, 3MeHwE pIN3NK ypaKeHHe eIeKTpUHM CTpyMOM.
e)Kuo HEMOJIINBO YHNUKHTN BIKOPNCaTHN ENEKTPOIHCTPymenta y BOIOTOMy npMiuEHNi, BIKOPNCOBYTe npnctpi 3axncchoro BIDKNIOUeHH (P3B). BIKOPNCaTHN P3B 3mENuye pniNK upaXeHH eNEKTpUHMM CTpyMOM.
3)IINBIDyabHa texhika 6e3nekn
a)Пд час роботи 3еентончсримьхуьхи,стку за сбоIMдям ta мснлть розулmbo. He npaioite 3еентончсримьуьхи, якso BV bTomnehi, nepe6byaTe nid diio hapkOtunmchpeoyobn, ankoriono abo nikib. Habitb mttteBa HeybaxhNtcbпд час роботи 3еents pntBcetdo BaxkoTtpabMn.
6)KopucnyTebc 3ac06amn iHdNbDyalbHoro 3axncty. 3aBXKn nHaRaTne 3axncHi OkynpRn. BIKOPMCtAnHry y BiNDOBiHX yMOBax TAKNX 3axmChnx 3ac06IB kN npOTNIIOBn peCnipatOp, NEKO83e 3axNCHE B3YTTA, OJLOM-KACKa Ta HABUYHMKI DOnOMOKe 3MeHNITn P3N3K TpaBMYBaHHa.
b)YnkaeBnnaKoboro 3anycky IHcTpymeta. NepuHXiNikKIOUaTH enEeKToipHcTpymEt Do MEpeXIKJMBHeHHA 6akyMnyTopa, 6paTn ao nepeHOCTNI Ioro, nepeBipte, u BCTAHOBNeO nepemKaay nnoJeHHA KApO nepeHOCTNI eKeKToipHcTpymET, TpIMaOChn paneCb Ha nepemKauHi XKBLeHHA, ao NdkIOUaTH ioro do Dxepena XKBLeHHA, KOINepeMaKau XKBLeHHA nepe6yBaC b noIOJKeHHI "YbIMKHyTO", ue MoKe np33BeCTn Do TpaBMyBAHH.
r)Iepu hix ybimkhytn enektpoiHcTpyment npn6epitb Bci perylloBanhki Klnnuc ta raikoboi kIoqi. Akuo 3aImunTn TAKm KIOU ha pyxomui qactniH enektpoiHcTpymeHTa, ce moke npn3BcTn do TpaBMyBaHH.
d)He doTayteb 3 iNcTpymeHOM B pykax. 3aBxnn 36epiraTe CTiKe NOLOXeHH Ta Ta TpMaIte pibHObary. Ue da 3MOry KpaIe KepyBaTH enEeKtpoiHcTpymeHOM y pa3i BHNKHeHH HenepeD6aByBaHmCtUaui.
e)HaJaRaTe BiDnOBiDnOjA. He HaJaRaTe BInbHm OJ4o 60 npKpacn. BaSi BOLOCC Ta OJ4MaOTb 3NaXoIIMcB Ha 6e3neuHm BiCTaHI BiD pyxOMIX qactHn. BInbHm OJ4r, npKpacn a6o DOBE BOLOCC MoxyTb NOTpaIHTN BpyxOMI qactHn IHCTpymenta.
€) y pazi hauhnocti npictpoib dny iikkluoyehn cnctemu bidaedeHHa Ta 3bupanHnny,ix cnid oob'raKOBO BCTAHOBHTI Ta BUKOPNCTOBByBatn 3a npni3haueHHam. BUKOPNCtAHNpynpictpoIOIy 3bupanHnny MOKe 3MeHunr He6e3neky, nob'83any 3nilom.
x)He Btpaayte ybaxhocti chee3 cacte Bnokpnctahnn IHcptymeta. He do3bOnTb Bam po3cna6ntbca Ta npoiHopyBatn npinuynn Texhikn 6e3neKn. Heo6epexhi dii MOyTb MHTTCBO pnp3BecTdo cepno3nX TpaBM.
4)Bukopucanha Ta dorgla 3a eNeKTpoHCTpymENTOM
a)He nepebahtaxyute enektpoihctpyment. BnKOpucobuyte Hanexhn enektpoihctpyment BiinnoBIDNO do notpe6n. IpaBnIbHO nii6banyen enektpoihctpyment donomooxe kpaue ta 63neuHlwe 3po6ntu po6toy 3i wBnkicto, yka Jra for HbOrepe6aeha.
6)He BnKOpncTobyIe enEKTpoInCTpyment, JaKIO nepeMnKaU He BMnKa e 6o He BmMnKa e Ioro. Yci enEKTPOINCTpyMeHTN, AekIMN HEmOxJIbMO KepyBaTn 3a DoJOMorOIO nepeMnKAua, CtaHOBnAITb He6e3NeKy Ta NotpeBouh peMoHTy.
2. 3AΓΑJIbHI NONEPEДЖEHн YOДО TEXHIK N E3ПЕК N POБOTN 3EJEKTPOHCTPYMEHTAMN
B)Bnimitb Bnky 3 po3etkn Ta/a6o akymyIaTOp 3 IHcTpymenta, kxio BIn 3himn, nepe TmK A3mHOBATn 6yb-ka HanaIodKyBaHNHa, ZAMHrTN KOMPNeKTyBaNbHi cactHHn a6o nepe36epirAHnM IHcTpymenta. Taq 3anobixhi 3axoDi 6e3neKn 3MeHsuYbPiNik BnauKIOBOrO 3anyCKy eNEKTPOIHcTpymenta.
r)36epiraTe iHcTpymEnI, 0e He BnKOpncTobYIObIcra, NODaI Bi dItei I He Do3BOnJaTe Oco6am, Aki He MaOTb DocBiyDpo6OtN 3 TaKIMN iHcTpymEnAm a6o He 3Naomi 3 cIMM iHcTpKUiaMn, KopNCtBuTaNcb eNeKtpoiHcTpymEnOM. EneKtpoiHcTpymEnIT cTAHOJIbTB He63Neky B pykax HeNoDCbiDuHeHX KopNCtBuBaivI.
Д)ЕnéktpoiHCTPymENT Ta npuIaIaINotpe6yIbDorJMy.IpebeipIe IHO ha pIeIdMeT 3MIueHHa 603aTnCKyBaHNr pyxOMHX qAChIN, 3IaMaHIX qAChIN Ta 6yIb-IAKIN IHXIM yMOB, kI MOKByBnIMHyTn Ha poBOTy IHCTpymEHTa. Y pa3i nowkOdKeHHN eKTePOIHCTPymEETC nID 3aTn BpeMOHT, nepHi HIX KOpICTBaTcRnHm. Aacto HeuaChi BnauKn TpaJIaHOTbCBAHcnIOK HeNAKeHHOrTo texHicHoro o6ClyTOBvBaHNr eNeKTpoIHCTPymEHTIB.
e)Tpmaite pizalbhi iHCTpmeHTn roctpmm Ta uCTmM. HanekHM m HOM doTlanyti piabhi iHCTpmeHTn 3 roctpmPi jxuymm Kpaam PiDwe bokyotbTa TMMn nee KepyBatn.
e)KopncTyITeca eNeKTpoInCTpymeHTo, npnlaDjam i hacaKaMn Ia nIcTpyMeHa 3riIdno 3iieo IInctpykuicO, 3BaXaOuH na po6oHi yMOBn Ta po6Oty, kky cnid BkoHaatn. BkOpncTaHHneKTPOInCTpymeHa He 3a npn3NaueHnMa MoKe cTAtn pnpNHO BVNHKHeHHn He63neuHx CITyaui.
K)Pyu kn i nctpymeHa ta noBepxhi 3axonnen Ha maOt b 6ytn 3abXnn cyxmm, uNCTmM, 6e3 xny Ta 6pyd. Cn3bki pyu kn ta nobepxhi 3axonnen Hne 3a6e3neuyt b 6e3neue Noobxden Ta KOHTpOJI b i nctpymeHa B He cnoDIBAHnx CNTyauiax.
5)Bukopustahna Ta dorgla 3a akymyITopnIM iHCTpyMeHToM
a)3apjxajte Imse 3a donomoro 3apjHoro npucrpo, Bu3haueHoro Bnpo6nkom. 3apJHNI npucrpi, knni nixdoinb dIy akyMnyTOpIB oHoro BNdy, MoKe cnpuHHNt pN3NK noKexi y BnnaKy Ioro BVkOpNCtAHN 3 iHsIM akyMnyTOpOM.
6)3 eNeKtpoHCTpymentamn cId BVKOpncTObyBaTu NIIepe npn3Hauehi dIe HNX akymyIaTOPn. BVKOpncTaHHa 6yDb-kaHX iNIXx akymyIaTOPiMoKe npn3BecTeNo TpaBMn a60 noKexi.
B)KoIu akymyIaTOp He BnKOpNCTObYeTbCra, Ioro CnIg TpUmAtu OkpEmo BiD MeTanEbnx npedMetIb -3aTnCKaivB nanepy, MoHET, KJIouciv, ZbXiv, WypyniB ta iHux dpi6hNx npedMetIb, kIy moKByt 3amKHyTu KIemu. Kopotke 3amKauHH KIem akymyIaTopa MoKe CTaTI npMUnHO oOnIK ib aO noJexKi.
r)Y naT0 Baxknx yMOBX eKcnIyatauii 3 akymyIaTOPa MOxe BuTikatn piHa; He TopkaItecb ii. KaIO BnIaNKO BO Bce J TOpKHyNcIe, ce MlcE cnI dpOMITn BOOIO. KaIO pIina NotpanIna BOOi, cnID 3BepHTncs 3a MeduHOO donomorHO. PdINA, kA bCtynae 3 akymyIaTOPa, MOxE cnpuHINn ToDpaHeHHA abo onIKn.
Д)He BnKOpNCTObuYte akymyIaTOp a6o iHcTpyment, kAIO BOH N OwKoDxKeHi a6o moNΦiKOBaHI. PoiKOdXeHI a6o MoDiΦiKOBaHI aKymyIaTOp mOxyb MaTI HenepeIbAcyBaHy NOBcIHKU, 10 npIN3BOmITb Do noJoxEki, Bv6yX a6o pN3IKy TpaBMvBAHH.
e)O6epiraute akymyntop a6o iHcTpMeNT BiD BORHIO a6o NaMipHOI Tempepatyp. IaBorHIO a60 Temnepatpyu BVue 130°C MoKe BmKNIkatu BV6yx.
€)Дotpimmyteca inhctpykuii 0do 3apjdxkeHHa Te he 3apjdxkaite akymyIaTOp a6o iHcTpyment 3a mekam dianazohy Tempeatyp, 3a3nauehIX B inhctpykii. HnpeabInbHe 3apjdxehnA 6o Tempeatypa 3a MEkAMn Bk23aHoro diianazohy Moke noKoJdTuAkymyIaTOp i3ibNHTu PN3K BVHNKHeHHnoXeKi.
6)06cnyrobybaHHa
a)BiDaaBte CbI eNEKtpoiHCTpymeT B pemOHT KBaniΦiKOBaHOMy faxiBcebi Ta BUKOPNCOTByTe TilbKn opurihnbln 3anachi YactmN. Lc 3a6e3neuHb HdiiHy po60Ty iHCTpyMeNTa.
6)HikonHe 06cnyrobyte nookjxeni akymytnTopn.06cnyrobybaHHa akymnytOpIB MaIOb BIKOHyBaTN TINBKM BINO6Nk ABO abTOpIN3OBAHa cepBcHa MaIcTePnH.
3. NONEPEJXEHNJI ODO CBEPJIINH
1) IHCtpykuii zoTo Texhikn 6e3neKn iD yac BUKOHaHHra po60Tu
a)PepeB BukopustahHm npabunbho nioirotyte IHctpment. Iein IHctpment CTbOIOE BVCOKN BIXIDHN KpytbnHm MOMENT 163 HaneJXHO iKcauii HcTpmeHTa nid cacpoobTN BMOKTe BpATNTu KOHTPONBJ, 10o pni3BeDe Do TpaBMyBaHHA.
6)Якpo i3aJIbHe npuIaIdЯ моke nID vac po60Tu TOpKaTcR npuxOBaHO npOBOKn, TpMaIte eNeKTpoiHCTpymeHT 3a izolboAhuy pyky. KoNTaK pIaJIbHOHa cAJaKN 3doTOM nID hAnpyTO npIN3BODnTb Do noRABV HanpyrB M metaLeBHX qACTInhax eNeKTPOIHCTpymeHTa, 1o MoKE npN3BeCTn DO ypaJehHnaPauZIBHKa eNeKTpuHm CTpUMOM.
2) IHCtpyKci 3 Texhikn 6e3nekn niid yac BUKOpncTahHna DObrnx CBepdien
a)Hikon He npauoIte Ha 6InbB BVCOKI WvNDKcTi, HIX MAKCmAlbHa WvNDkICTb CBePdHa. Ha 6InbB BVCOKI WvNDKcTi CBepnIO Moke 3rHAtnc, AkiO My 6yde Do3Bolno BInbHO o6eptatnc 6e3 KOtakTy i3 zarotIKoIO, 0o Moke npu3BcTeNo TpaBMN.
6)3aBxNn nouHaHte CBepDnHnHa Mani WbUKnOci, npu cIbOMy KInChK CBePdNa MaE TopKaTnca 3arotIBKn. Ha 6ilbBv Bscokij WbUKnOci CBepDIO Moxe 3rHnatc, JaIIO IOMy 6yde Do3BoJeHO BIlho OepeTaNCA 6e3 KOtAcTy i3 3arotIBKHO, 0o MoJE pIN3BcTeN DO TpABMn.
B)PpKladaaTe Tnck Tilbkn no npamii niHii 3i CBepdnon i He 3acTOcoBy Te HaIIuKOBm Tnck.
CbePnaMoKyTb 3nHaTcA, BnKInKaIouH nOLOMKy a60 BtpaTy KOHTpOIO, 10 npn3B0oDnTb Do TpaBM.
IonepeJxHn: Ipn BnKOpMCTaHNI HcTpyMeHTa Ha Hebe3neuHnx MATEpianax Moe BnMHKyTH uKidINBm TaTOckUHNi. KOnKT A60 BmXAHNt cybOTo NmOe 3auKOdITn 3doOpOB'1o KOpCtByBaA o6IoJe npOy. Pid cac p60t n 3aBXDn HadaIae pececipatop, TpMaIte CTOPOHNIX IHOe JAKOMORA dJI bID po6ooT OHN t 3abXdu BnKOpCtOByTe CNTeMy 3bpaHn Nnly (HE BxOuNT b KOMPiKeT).
4. ПРавиJA TEXHIKN BE3ПЕКИ ΜΟДО POБOTИ Y PEXIMI ШУРУNOBEPTA
PerynIOBaHHa KpyTbHOro MOMeHTy
-PerynloBaHHKpyTInbHorO MOMeHTy DOnOMoKe BAM perynloBAtn noTyHcHCTb nPBOyND iD ac p06ToY y pexkMmUyPnyoBepta. LcDOnOMoKe 3an06iRTN nowkoJxHeHH 3aOrtIKn. IINr CbePdIIHH BCTaONBtB nepeMkau KpyTInbHorO MOMeHTy y noNoXeHH, IIO No3HaueHe CMMBONOM CbePdJa.
Iopada:3aBxHnOuHHaTe p06ToT 3a HmMeHoro KpyTbHoro MOMeHTy Ta 36iBHyIe IHO, JaKo Heo6XiJHo.
10.TEXHIYHE OBCJLYTOBYAHHH
06naTb BnKOpCTaHHa
AkymnyatopnH nHTpymert np3Hauheny nI da BkOpmtaHn Ta 3apaJxHH B nomipHX periohax 3 xapaktePHIO tempepatyoB iD 0^ do +45^, BIDHOO BOIOTICHe H Buie 80% , BIDCYTHICIpNMAO BINbBy ATMOcPepHX OnaIB Ta HADMIPHO BMCTY NUY B NOBITpi.
BmOrn do yMOB B npmiuehhi
He BnKopcTobuyte enekTpOinChpymEnTu Bn6bXoH6e3neuHx npMmIeHHx, de e nergko3aMMCTi pIDHM, ra3u, nn.BoH cTBOpOyB icKpi, kMooKyTb np3BeCtN do 3aImHa Hnn, Bnnapib.
ymoBN36epiranHH
Tepmi npndaTnocti - 4 pOK m3 yMOBn 36epiragHnBnO6b y npimuiueHHI 3 npipOdoHO BENTINaJIeIO BynakBaHHI npri TemnepaTypi nobitpr bID-20oC do 40^ ta bIDnoCHI BOLOCrTi nobITpr he 6jIbu8 80%
11.YCYHEHHH HECIPABHOCTEIN
Please read the operating instruction carefully and observe the notes given. Use these operating instructions to familiarise yourself with the product, the proper use and the safety instructions. Keep these operating instructions in a safe place for future uses.
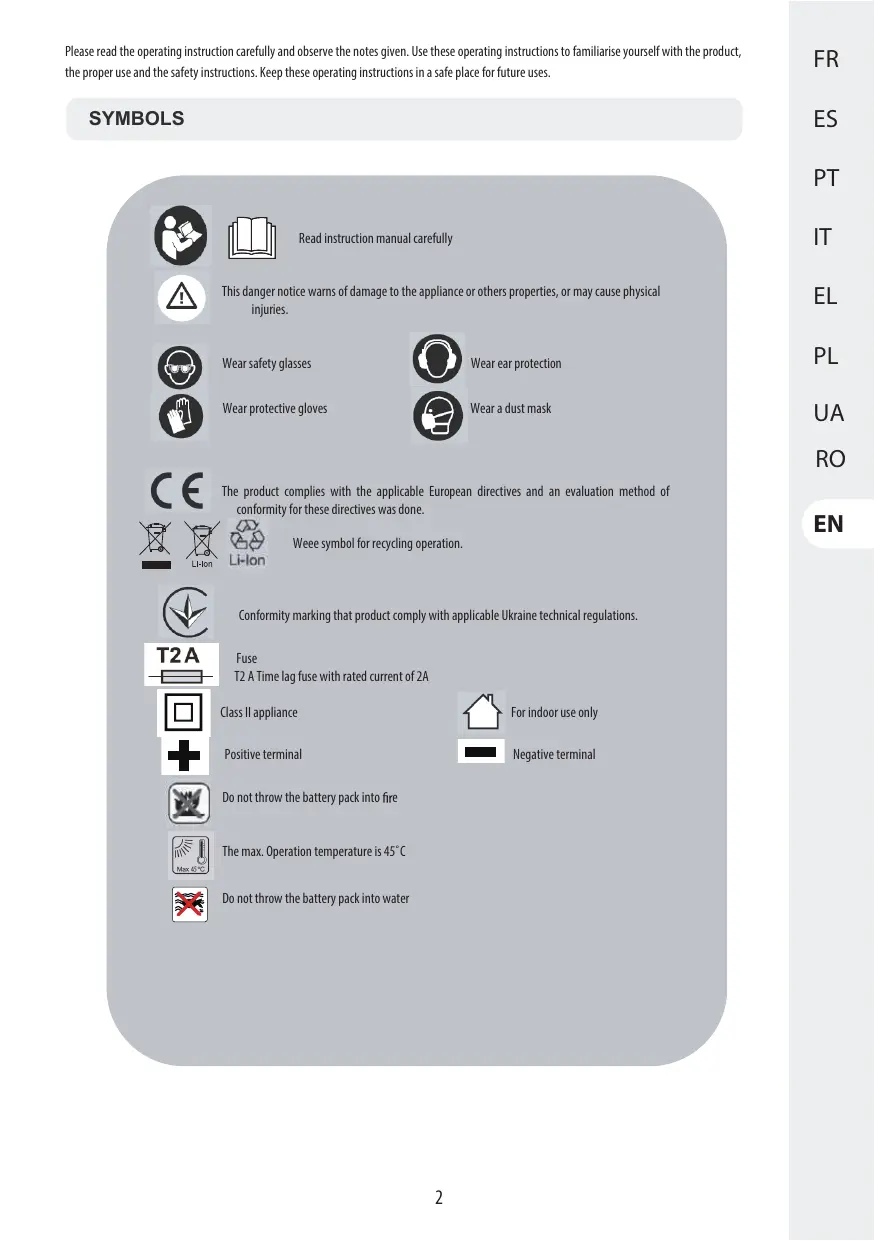
SYMBOLS


Read instruction manual carefully

This danger notice warns of damage to the appliance or others properties, or may cause physical injuries.

Wear safety glasses

Wear protective gloves

Wear ear protection

Wear a dust mask

The product complies with the applicable European directives and an evaluation method of conformity for these directives was done.


LHon L

Li-Ion
Wee symbol for recycling operation.

T2A
Conformity marking that product comply with applicable Ukraine technical regulations.
Fuse
T2 A Time lag fuse with rated current of 2A


Class II appliance
Positive terminal

For indoor use only

Negative terminal

Do not throw the battery pack into fire

The max. Operation temperature is 45^

Do not throw the battery pack into water.
CONTENT
- INTENDED USE OF DEXTER CORDLESS DRILL
- GENERAL POWER TOOLS SAFETY WARNINGS
- DRILL SAFETY WARNINGS
- SCREWING SAFETY WARNINGS
- SPECIAL SAFETY INSTRUCTIONS FOR BATTERY PACK AND CHARGER
- DESCRIPTIONS
- TECHNICAL DATA
- CHARGING
- OPERATION
- MAINTENANCE
- TROUBLE SHOOTING
- PROTECT OUR ENVIRONMENT
- WARRANTY
- EXPLODED VIEW AND SPARE PARTS LIST
1. INTENDED USE OF DEXTER CORDLESS DRILL
Thank you for purchasing this product. Please read through these operating instructions and keep them for future reference.
The machine is intended for driving in and loosening screws as well as for drilling in wood, metal and plastic. This power tool may not be used to do other thing out of the described scope.
After unwrapping the packing, make sure that the product is complete with its accessories (if any). If the product is damaged or has any defect, please do not use it and bring back it to your dealer.
If you give this tool to another people, please give him also this instruction manual.
Please note that our equipment has not been designed for use in commercial, trade or industrial applications. Our warranty will be voided if the machine is used in commercial, trade or industrial businesses or for equivalent purposes.

WARNING Read all safety warnings, instructions, illustrations and specifications provided with this power tool.
Failure to follow all instructions listed below may result in electric shock, fire and/or serious injury.
Save all warnings and instructions for future reference.
The term "power tool" in the warnings refers to your mains-operated (cored) power tool or battery-operated (cordless) power tool.
1) Work area safety
a) Keep work area clean and well lit. Cluttered or dark areas invite accidents.
b) Do not operate power tools in explosive atmospheres, such as in the presence offlammable liquids, gases or dust.
Power tools create sparks which may ignite the dust or fumes.
c) Keep children and bystanders away while operating a power tool. Distractions can cause you to lose control.
2) Electrical safety
a) Power tool plugs must match the outlet. Never modify the plug in any way. Do not use any adapter plugs with earthed (grounded) power tools. Unmodified plugs and matching outlets will reduce risk of electric shock.
b) Avoid body contact with earthed or grounded surfaces, such as pipes, radiators, ranges and refrigerators. There is an increased risk of electric shock if your body is earthed or grounded.
c) Do not expose power tools to rain or wet conditions. Water entering a power tool will increase the risk of electric shock.
d) Do not abuse the cord. Never use the cord for carrying, pulling or unplugging the power tool. Keep cord away from heat, oil, sharp edges or moving parts. Damaged or entangled cords increase the risk of electric shock.
e) When operating a power tool outdoors, use an extension cord suitable for outdoor use. Use of a cord suitable for outdoor use reduces the risk of electric shock.
f) If operating a power tool in a damp location is unavoidable, use a residual current device (RCD) protected supply. Use of an RCD reduces the risk of electric shock.
3) Personal safety
a) Stay alert, watch what you are doing and use common sense when operating a power tool. Do not use a power tool while you are tired or under the influence of drugs, alcohol or medication. of inattention while operating power tools may result in serious personal injury.
b) Use personal protective equipment. Always wear eye protection. Protective equipment such as a dust mask, non-skid safety shoes, hard hat or hearing protection used for appropriate conditions will reduce personal injuries.
c) Prevent unintentional starting. Ensure the switch is in the off-position before connecting to power source and/or battery pack, picking up or carrying the tool. Carrying power tools with your finger on the switch or energizing power tools that have the switch on invites accidents.
d) Remove any adjusting key or wrench before turning the power tool on. A wrench or a key left attached to a rotating part of the power tool may result in personal injury.
e) Do not overreach. Keep proper footing and balance at all times. This enables better control of the power tool in unexpected situations.
f) Dress properly. Do not wear loose clothing or jewellery. Keep your hair and clothing away from moving parts. Loose clothes, jewellery or long hair can be caught in moving parts.
g) If devices are provided for the connection of dust extraction and collection facilities, ensure these are connected and properly used. Use of dust collection can reduce dust-related hazards.
h) Do not let familiarity gained from frequent use of tools allow you to become complacent and ignore tool safety principles. A careless action can cause severe injury within a fraction of a second.
a) Do not force the power tool. Use the correct power tool for your application. The correct power tool will do the job better and safer at the rate for which it was designed.
b) Do not use the power tool if the switch does not turn it on and off. Any power tool that cannot be controlled with the switch is dangerous and must be repaired.
c) Disconnect the plug from the power source and/or remove the battery pack, if detachable, from the power tool before making any adjustments, changing accessories, or storing power tools. Such preventive safety measures reduce the risk of starting the power tool accidentally.
d) Store idle power tools out of the reach of children and do not allow persons unfamiliar with the power tool or these instructions to operate the power tool. Power tools are dangerous in the hands of untrained users.
e) Maintain power tools and accessories. Check for misalignment or binding of moving parts, breakage of parts and any other condition that may affect the power tool's operation. If damaged, have the power tool repaired before use. Many accidents are caused by poorly maintained power tools.
f) Keep cutting tools sharp and clean. Properly maintained cutting tools with sharp cutting edges are less likely to bind and are easier to control.
g) Use the power tool, accessories and tool bits etc. in accordance with these instructions, taking into account the working conditions and the work to be performed. Use of the power tool for operations different from those intended could result in a hazardous situation.
h) Keep handles and grasping surfaces dry, clean and free from oil and grease. Slippery handles and grasping surfaces do not allow for safe handling and control of the tool in unexpected situations.
a) Recharge only with the charger specified by the manufacturer. A charger that is suitable for one type of battery pack may create a risk of fire when used with another battery pack.
b) Use power tools only with specifically designated battery packs. Use of any other battery packs may create a risk of injury and fire.
c) When battery pack is not in use, keep it away from other metal objects, like paper clips, coins, keys, nails, screws or other small metal objects, that can make a connection from one terminal to another. Shorting the battery terminals together may cause burns or a fire.
d) Under abusive conditions, liquid may be ejected from the battery; avoid contact. If contact accidentally occurs, flush with water. If liquid contacts eyes, additionally seek medical help. Liquid ejected from the battery may cause irritation or burns.
e) Do not use a battery pack or tool that is damaged or modified. Damaged or modified batteries may exhibit unpredictable behaviour resulting in fire, explosion or risk of injury.
f) Do not expose a battery pack or tool to fire or excessive temperature. Exposure to fire or temperature above 130^ may cause explosion.
g) Follow all charging instructions and do not charge the battery pack or tool outside the temperature range specified in the instructions. Charging improperly or at temperatures outside the specified range may damage the battery and increase the risk of fire.
6) Service
a) Have your power tool serviced by a qualified repair person using only identical replacement parts. This will ensure that the safety of the power tool is maintained.
b) Never service damaged battery packs. Service of battery packs should only be performed by the manufacturer or authorized service providers.
3. DRILL SAFETY WARNINGS
1) Safety instructions for all operations
a) Brace the tool properly before use. This tool produces a high output torque and without properly bracing the tool during operation, loss of control may occur resulting in personal injury.
b) Hold the power tool by insulated gripping surfaces, when performing an operation where the cutting accessory may contact hidden wiring. Cutting accessory contacting a "live" wire may make exposed metal parts of the power tool "live" and could give the operator an electric shock.
2) Safety instructions when using long drill bits
a) Never operate at higher speed than the maximum speed rating of the drill bit. At higher speeds, the bit is likely to bend if allowed to rotate freely without contacting the workpiece, resulting in personal injury.
b) Always start drilling at low speed and with the bit tip in contact with the workpiece. At higher speeds, the bit is likely to bend if allowed to rotate freely without contacting the workpiece, resulting in personal injury.
c) Apply pressure only in direct line with the bit and do not apply excessive pressure. Bits can bend causing breakage or loss of control, resulting in personal injury.
Warning: Harmful and toxic dusts can be produced when you use the tool on hazardous materials. These dusts can endanger the health of operator and bystanders. Always wear a dust mask when you work, keep bystanders away from the working area and always use the dust collection system (not supplied).
4. SCREWDRIVER SAFETY WARNING
Hold power tool by insulated gripping surfaces, when performing an operation where the fastener may contact hidden wiring.
Fasteners contacting a «live» wire may make exposed metal parts of the power tool «live» and could give the operator an electric shock.
. If possible, always use clamps or a vice to hold your work.
Always switch off before you put the tool down.
. Ensure that the lighting is adequate.
. Do not put pressure on the tool, such that it slows the motor down. Allow the bit to screw without pressure. You will get better results and you will be taking better care of your tool.
. Keep the area free of tripping hazards.
. Only use accessory bits in good condition.
. Before starting, check that there is sufficient clearance for the bit under the workpiece.
. Do not touch the bit away after operation. It will be very hot.
. Keep your hands away from under the workpiece.
. Never use your hands to remove dust, chips or waste close by the bit.
. Rags,cloths,cord,strong and the like should never be left around the work area.
. Support the workpiece properly.
. If you are interrupted when operating the tool, complete the process and switch off before looking up.
Periodically check that all nuts, bolts and other fixings are properly tightened.
. When using the tool, use safety equipment including safety glasses or shield. Hearing protection, and protective clothing including safety gloves.
Wear a dust mask if the operation creates dust.
5. SPECIAL SAFETY INSTRUCTIONS FOR BATTERY PACK AND CHARGER
a) This appliance can be used by children aged from 8 years and above and persons with reduced physical, sensory or mental capabilities or lack of experience and knowledge if they have been given supervision or instruction concerning use of the appliance. Cleaning and user maintenance shall not be made by children without supervision.
b) Children shall not play with the appliance. Cleaning and user maintenance shall not be made by children without supervision.
c) Before the use of the charger and the battery pack, read the instruction manual for it carefully.
d) During the charge process, the current used should correspond to the current of the battery charger.
e) Never let moisture, rain or splashed wayer reaches the charging location.
f) The ambient temperature must not exceed 50^ . Never expose the device to direct insulation.
g) Only switch off the current when the battery pack has been inserted into the box or has been pulled out of the box.
h) Storage-battery pack, which are detective or damaged or can no longer be recharged, must be disposed of hazardous waste. Hand them over at a special collection point. Never harm our environment. Do not throw unusable storage-battery pack away into the domestic watse, into fire or into water.
i) If the electrical cable is damaged, the wire may only be replaced by the supplier or by this repair workshop. Have repairs carried out only by an authorized specialist only.
j) Use only storage-battery pack into the charger, which have been produced by the original manufacturer.
k) Always keep the surface of the charger free from dust and dirt.

Residual risks
Even when the tool is used as prescribed it is not possible to eliminate all residual risk factors. The following hazards may arise in connection with the tool's construction and design:
- Damage to lungs if an effective dust mask is not worn.
- Damage to hearing if effective hearing protection is not worn.
- Health defects resulting from vibration emission if the power tool is being used over longer period of time or not adequately managed and properly maintained.
WARNING! This machine produces an electromagnetic field during operation. This field may under some circumstances interfere with active or passive medical implants. To reduce the risk of serious or fatal injury, we recommend persons with medical implants to consult their physician and the medical implant manufacturer before operating this machine.
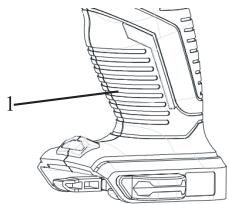
6.DESCRIPTIONS
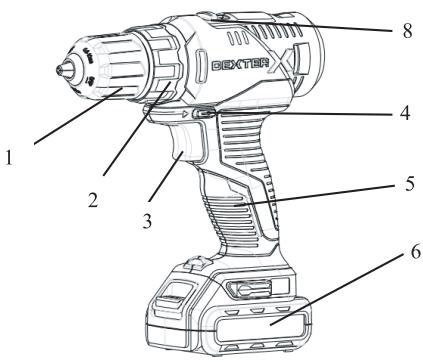
- Keyless chuck
- Torque selector
- On/off switch with speed control
- Left/Right switch
- Handle
- Battery pack
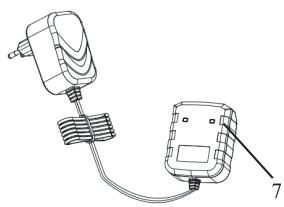
- Charger
- Speed adjustment button
7. TECHNICAL DATA
| Model | 12VSD2-21.51A |
| Rated Voltage | 12Vd.c. |
| No-load speed | 0-400/0-1500/min |
| Range of Drill Bit sizes | 0.8-10mm |
| Max.torque | 24Nm |
| Drilling capacity | Ø 20mm |
| -in soft wood | Ø 10mm |
| -in metal | |
| Battery pack | 12VBA2-20.51/12VBA2-20.5 |
| No. Of Cells | 3 |
| Battery capacity | 2000 mAh Li-lon |
| Charger | WJG-Y281501700W1
Input: 100-240VAC, 50-60Hz,
Output:56W 15Vd.c. 1700mA |
| Declaration of the noise emission values according to EN 62841 (considered uncertainty 5 dB(A)) |
| - Sound pressure level | 66.8 dB(A) |
| - Sound power level | 77.8 dB(A) |
| Declaration of the vibration emission according to EN 62841 (considered uncertainty 1.5m/s2) | 2.235 m/s2 |

Warning!
The vibration and noise emission during actual use of the power tool may differ from the total declared value depending on the way the tool is used.
There is the need to identify safety measures to protect the operator that are based on an estimation of exposure in the actual conditions of use (taking account of all parts of the operating cycle such as the times when the tool is switched off and when it is running idle in addition to the trigger time).
Note :
The declared vibration total value and the declared noise emission value have been measured in accordance with a standard test method and may be used for comparing one tool with another.
The declared vibration total value and the declared noise emission value may also be used in a preliminary assessment of exposure.
- avoid vibration risk
suggestion: 1) wear glove during operation
2) limit operating time and shorten trigger time
8. CHARGING
- Put the battery pack in the charger make sure it is place correctly (+ and -) (until click)
- Plug the charger into an appropriate outlet, the red light on the charger and the blue light on battery pack will be on to indicate the charging process having started.
- When charging is completed, the light on the battery pack will turn off. The pack is now full charged.
- Normally it will take 1.5 hour to fully charged the battery.
- Unplug the plug after charging.
- Remove the battery pack by pressing the release button on the battery pack and by pulling the battery pack out.
Caution
- Fully charge battery before first use. The battery will reach full capacity after being charged and discharged several times.
-Avoid short periods of charging. Only charge battery pack when full empty.
- Charging base, charger and battery pack will be warm when charging. This is normal.
9. OPERATION
- Push battery pack into the bottom of handle (until click)
- Remove the battery pack by pressing the release button on the battery pack and by pulling the battery pack out.
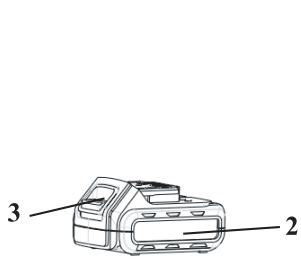
- Cordless drill
- Battery pack
- Release button
Insert drill bits / screwdriver bits
- Rotate the chuck (unlock direction)
- Insert the drill bit / screwdriver bit into the chuck
- Tighten the chuck by hand (lock direction) and check if the drill bit / screwdriver bit is clamped firmly in the chuck
- Select the correct screwdriver bit to avoid damaging the screw when screwing function.
- Front section of chuck
- Back section of chuck
On/off switch
- To switch on the tool, press the on/off switch
- To switch off the tool, release the on/off switch


shown on the left/right switch
Set the Left/right switch to

Set the Left/right switch to

- Change the direction of rotation only when the machine is not in operation!
CAUTION! Set left/right switch Lock position during set up, when changing torque setting or when tool is idle.
CAUTION! Operating the machine with a low speed for a long time will increase the risk that the motor will be overheated. To prevent overheating, let the motor cool down regularly (stop using the machine for 15 minutes)
CAUTION! Please support and clamp the workpiece properly. Do not use hand to grip or clamp the workpiece, it may cause injury.
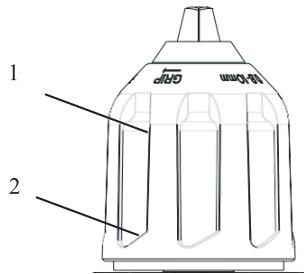
Speed
- Adjust speed by selecting the speed selector to set desired speed.
- When the number is "1" on the speed button, that means low speed, when the number is "2" on speed button, that means high speed.
- Applying more pressure to the On/Off switch will increase the speed.
- Applying less pressure to the On/Off switch will decrease the speed.
LED worklight
- The tool has an LED light to illuminate the work area and improve vision when working in areas with insufficient light.
- The LED light will switch on automatically while the trigger switch is depressed.
Torque setting
- The torque setting will help you regulate the driving power using a scewdriver bit. This will help to prevent damage to the workpiece. For drilling, set the torque selector to position indicated by the drill bit symbol.
Advice: Always start with the lowest torque setting and increase if necessary.
10. MAINTENANCE
Application area
The cordless drill is designed for using and charging in temperature regions with a characteristic temperature of 0^ to 45^, relative humidity not more than 80% the absence of direct exposure to atmospheric pre capitation and excessive dust content of the air.
Requirement for room conditions
Do not use power tools in explosive areas where flammable liquids, gases, dust are present. It creates sparks, which can lead to the ignition of dust, steam.
Storage conditions
Sheffield - 4 years provided that the product are stored indoors with natural ventilation in the package at an air temperature of -20^ to 40^ and relative humidity or not more than 80% .
11. TROUBLE SHOOTING
| Problem | Possible Causes | Likely solutions |
| The machine stops working after rotating slowly. | The battery is in low power. | Need to charge the battery pack before operating. |
| The drill bit or screwdriver bit easy to fall off. | The drill bit or screwdriver bit is not tightly clamped with the chuck | Put the drill bit or screwdriver bit into the middle of the three jaws of the chuck, re-tighten and visually check the drill bit or the screwdriver bit without tilting. |
| Abnormal sound of gearbox. | The speed selector is not in place | you need to push the speed selector in place (before or behind). |
12. PROTECT OUR ENVIRONMENT
Attention! Always remove the battery before carrying out any work on the machine. To clean, always use a dry or moist, but not wet, towel. Many cleaning agents contain chemical substances which may cause damage to the Plastic parts of the machine. Therefore do not use any strong or inflammable cleaners such as petrol, paint thinner, turpentine or similar cleaning agents. Always keep air ventilation holes free of dust deposits to prevent overheating.
CAUTION! This product has been marked with a symbol relating to removing electric and electronic waste. This means that this product shall not be discarded with household waste but that it shall be returned to a collection system which conforms to the European WEEE Directive. Contact your local authorities or stocks for advice on recycling. It will then be recycled or dismantled in order to reduce the impact on the environment. Electric and electronic equipment can be hazardous for the environment and for human health since they contain hazardous substances.
CAUTION! Do not dispose of batteries in your normal household waste!

ENVIRONMENTAL PROTECTION
Waste electrical products must not be disposed of with household waste. According to the European Battery Directive, defective or used battery packs/batteries, must be collected separately and disposed of in an environmentally correct manner. Please recycle where facilities exist. Check with your local authorities or retailer for recycling advice. It will then be recycled or dismantled in order to reduce the impact on the environment. Battery pack/batteries can be hazardous for the environment and for human health since they contain hazardous substances.
Transport conditions
Transportation of products can be any kind of closed transport in the packaging of the manufacturer or without it, preserving the product from mechanical damage, precipitation, exposure to chemically active substances and compliance with precautionary measures for the transport of fragile goods.
13. WARRANTY
- Dexter products are designed to highest DIY quality standards. Dexter offer a 36-month warranty for its machine from the date of purchase. This warranty applies to all material and manufacturing defects which may arise. No further claims are possible, of whatever nature, direct or indirect, relating to people and/or materials.
- In the event of a problem or defect, you should first always consult your Dexter dealer. In most cases, the Dexter dealer will be able to solve the problem or correct the defect.
- Repairs or the replacement of parts will not extend the original warranty period.
- Defects which have arisen as a result of improper use or wear are not covered by the warranty. Amongst other things, this relates to switches, protective circuit switches and motors, in the event of wear.
5. Your claim upon the warranty can only be processed if:
Proof of the purchase date can be provided in the form of a receipt
- No repairs and/or replacements have been carried out by third parties
- The tool has not been subjected to improper use (overloading of the machine or fitting non-approved accessories).
- There is no damage caused by external influences or foreign bodies such as sand or stones.
- There is no damage caused by non-observance of the safety instructions and the instructions for use.
-
The warranty stipulations apply in combination with our terms of sale and delivery.
-
Faulty tools to be returned to Dexter via your Dexter dealer will be collected by Dexter as long as the product is properly packaged. If faulty goods are sent directly to Dexter by the consumer, Dexter will only be able to process these goods if the consumer pays the shipping costs.
- Products which are delivered in a poorly packaged condition will not be accepted by Dexter .
14. EXPLODED VIEW AND SPARE PARTS LIST
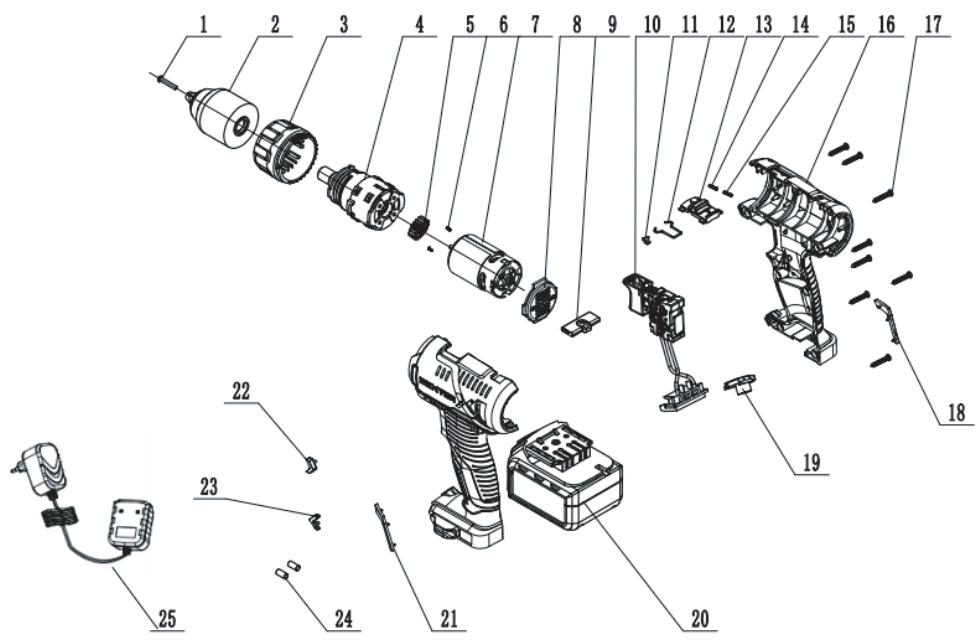
| NO | description | NO | description |
| 1 | Screw | 14 | Speed adjustment button spring |
| 2 | Chuck | 15 | Speed adjustment button spring |
| 3 | Torque sleeve | 16 | Left and right housing |
| 4 | Gear box | 17 | Screw |
| 5 | Motor gear | 18 | Right handle decoration |
| 6 | Screw | 19 | Transparent cover |
| 7 | Motor | 20 | Battery pack |
| 8 | Housing back cover | 21 | Left handle decoration |
| 9 | Push rod | 22 | Left arrow |
| 10 | Switch assembly | 23 | Right arrow |
| 11 | Directive arrow | 24 | Heat shrinkable tube |
| 12 | Elastic steel wire | 25 | Charger |
| 13 | Speed adjustment button | | |
817621
Name and address of the manufacturer or his authorised representative|Nom et adresse du fabricant ou de son mandataires|Nombre y direccion del fabricante o de su representante autorizzato|Nombre e endereço do fabricante ou do seu representante autorizzato|
ADEO Services, 135 Rue Sadi Carnot - CS 00001 59790 RONCHIN - France
CORDLESS DRILL 12V +1 BATTERY +1 CHARGER
817621 - EAN Code: 3276007366419
Industrial Type Design Reference: 12VSD2-21.51A
DEXTER
SN SSSSSS XX DDMMYY nn PPPPPP (SN: Serial No., SSSSSS : Supplier code, XX : Factory ID, DDMMYY: Production date, nn: number of version of product, PPPPPP : Incremental number)
International Project Quality Leader
Ronchin
05/01/2022

La presente dichiarazione di conformità è risiclata sulla ratherness e esulativa del fabricantei [Niniejsta deklarazione zagodnoshe wyand zostera na wylzng odpwiedzialnoa producanta. Ettuvujia kai diovuvon tou kaotaukooi tio hou etoiouohtouevv amovouuouou duDenumire s adres producrutori su a representantui sul autorizatur]
ADEO Services, 135 Rue Sadi Carnot - CS 00001 59790 RONCHIN - France
La presente dichiarazione di conformità e risilucita sulla responsabilità escluduta del fabbricantei [Ninijesza declarazione zgodnoki wydana zostagna na ywcazno odpwedianlncio producunta. Htropo0 60000000000000000000000000000000000000000000000000000000000
Objeto de la declaracion|Przedmiot deklaracion|Teoxoc nSdIawon|Obiectul declaraieil
Tipologia di prodotto[Rodzaj]{Produktu[TuToc]Poiovtroc[Tip produs]
CORDLESS DRILL 12V +1 BATTERY +1 CHARGER
Industrial Type Design Reference: 12VSD2-21.51A
Marcadel prodotto|Marka produktu|Mapka TpoioVtoC|Marcà a produsului: DEXTER
Codifica del numero di series|Kodowanie numero seryjnego|Ku6kotomiong
oepakopap0ip00|Cod de numero de series
SN SSSSSS XX DDMMYN n PPPPPP (SN: Serial No., SSSSSS : Supplier code, XX : Factory ID, DDMMYY: Production date, nn: number of version of product, PPPPPP : Incremental number)
Imported by Adeo South Africa (PTY) LTD T/A Leroy Merlin,
Hosted in Leroy Merlin Fourways Store 35 Roos Street, Witkoppen
Ext 97, Sandton, 2191 Johannesburg, Gauteng
South Africa Tel: +27 10 493 8000 Email: contact@leroymerlin.co.za