
DP6 - 2100AG2-230.5001 - Grinders DEXTER - Free user manual and instructions
Find the device manual for free DP6 - 2100AG2-230.5001 DEXTER in PDF.
| Product Type | Angle Grinder |
| Brand | Dexter |
| Model | DP6 - 2100AG2-230.5001 |
| Rated Voltage | 220-240 V~ |
| Rated Power | 2100 W |
| No-Load Speed | 6500 rpm |
| Disc Diameter | 230 mm |
| Disc Bore | 22.2 mm |
| Spindle Thread | M14 |
| Weight | 5.4 kg |
| Sound Pressure Level | 97 dB(A) |
| Vibration Level | <2.5 m/s² |
| Electrical Protection | Class II (Double Insulation) |
| Guard Type | 2-in-1 Guard (Grinding and Cutting) |
| Auxiliary Handle | Yes, rotatable mounting |
| Main Functions | Grinding and cutting metal and tile (without water) |
| Maintenance | Regularly clean ventilation openings with a dry cloth; no solvents |
| Safety | Spindle lock, switch lock, kickback protection |
| Warranty | 5 years (excluding normal wear and professional use) |
| Included Accessories | Auxiliary handle, tightening key, flanges, protective guard |
| Recycling | Recyclable product – do not dispose of with household waste (WEEE) |
Frequently Asked Questions - DP6 - 2100AG2-230.5001 DEXTER
Important: Ensure the disc bore matches 22.2 mm and the diameter does not exceed 230 mm.
User questions about DP6 - 2100AG2-230.5001 DEXTER
0 question about this device. Answer the ones you know or ask your own.
Ask a new question about this device
Download the instructions for your Grinders in PDF format for free! Find your manual DP6 - 2100AG2-230.5001 - DEXTER and take your electronic device back in hand. On this page are published all the documents necessary for the use of your device. DP6 - 2100AG2-230.5001 by DEXTER.
USER MANUAL DP6 - 2100AG2-230.5001 DEXTER
Opate nanooutoia aopaleiac

Opate npootaetuká yavtia

TootheonTowv troxw/6iaKw
Tonoetntote nvi niow oavtca A nauv ano tov aEova npoeovtac va evarmuoczi oipixta.
Tonoetntote tov biokopoxiauotnck B 0to enawpocnciog TcNoiw oavrtac, diaoepalizovtac ot to diaeTpma
muaievt oTo bma TcN oavrtac.
EvpyoioiOn/anEvpyoioiOn
Evepyoioan: Piéote to Koupi anaoφáionc πoc ta επpóc, evw tautoxpova oφiyete to πeupuyio yia va
evpeyoinae to μnχavna. Σtn ouvexia, kpatnoe to stn θeon tou ia ouvexn λeioupyia.
Antepeyooino: Aphiote tn okaovadn tou diakottn yia va antepeyooinoiete to naxavma.
NPOEIOONIHs: Mny kaIunTe ta avoiyuata Eaepioou otav to epyaieo xpooionoiteai. Auto mnpei va npokaloei IaBn oToV KIVTNpa Ka vA meiwOeT Nv anodoo nou epyaleiou.
Aeiavtikn aeitoupyia
BEZPIECZENSTWO W MIEJSCU PRACY
He CxBaIeNoIa6iHOrO IJIyBaHnHa

Pn3NaHcNoIaIuIyBaHnHa Metany

PnictiB ViNobiAe CINHMM DnpeKTbAM EbponecKoro coo3y, i 6yB npOBeHm TeCT Ha BIDNOIBHicTb CMnDnpeKTbAM.
CNMBOJI

3NaK EByaizbKoi BiNobiDnOCTi.

CmBbON Wee dIa onepaui nepepo6kn.

3nak BiinobiHocTi, 0o nIeBepxye BiinobiHicTb npicrpoIO YHHM B yKpaHi TexHcHMM pernaentam.

3aBxnpaouTe DbOma pykam

He Binkopmtocbyte 3axmchn Koxy dna opeaui Biip3aHnn

BmimtBnky3p03etkn

Maunha KnaCy II - PnoBmiHa i3oJauzia - 3aEemLeHa Bnka He noTpbi6Ha
3MICT
- Пизни Ктуоов Лшуьально Машин Dexter
- IHTpyKcii 3 texHikn 6e3neKn
- Onic
- TexhniHdiHaH
- Ekcnnyatazaia
- Texhuihe 06cnyroByaHHN
- UcyeHHe HecnpaBHOCTeI
- ytniizaiia
- TapaHTIa
- Pozrophyte 3o6paXeHHa 3 nepeiKOM dTeaJIe
- Deknapajia EC npo BiinobiHictb
1.ПИЗ3HAUYEHЯ KYTOBOI ШΙФУВАльноI MAШИН DEXTER
Ikyem0 3a te, 1o npndabn cei npictri. Ipouitate 1o iHctpyuatai ta 3epejitb ii Ira noanbwoBVKOpNCTaHHa.
Kytoba shiifybaNbHa MaunHa np3NaeHa dna shiifybaHn, pi3aHn Ta 3aMueHHn Metany a6o nnTkn 6ez BHKOpNCtAHn BODn.
Iicna po3knpTTyaNakyBaHnna nepekoHaTeC, 10 npncTpi yKOMnKeTObaHO BCIM Heo6xIDHM npnlaadm (aKIO take neped6aueho). JaKIO npncTpi noochokJeHo a6o BIn Ma6 bJa KeKtn, NOBepHtB Ioro nocTaaybHKy, He BUKOPNCTOBYOu.
Jkuo BnpepaTe uei hctpymet dIy BnKOpmtanHna HINMOCobam, taKoN pepaTe im uei noC6Hnk 3 EcKnpyataJIi.
3BepHbYbary, 0o haSe 6bHaHaHH He npn3HaueHe Iy KOMepuiHoro, npopeciHoro Ta npomncIbOro BHKOpHCTAHN. Jaio Horo 6yde BHKOpHCTaHO Iy BnPiUeHH 3aBdAnb KOMepuiHnx, npopeciHnx Ta npomncIbHX nipnpemCTb a6o 3 iHNOIO pOio6HOIO MeTOO, rapaHTIO HA 6bHaHaHH 6ybe cKaCobHo.
3 mipkybAHb 6e3neK iDITa Tn iDlITkAm Do 16 pokB, a TAKO XOC6AM, Aki He O3HaOMJIeH 3 ciEIO IHCTpyKciEO 3 ekCIIyatau, 3abOpOHcTB Ca BnOPICTOBYBat n eI npictpi. Oc6N 3 o6mExeHMn f3iNuHMn a60 pO3ymOBMM 3dI6HOCTMaMOxTyB NOKPcTObYBaTH n pIcTPI TINBKn NiI HaJIAOM a60 3a IHCTpyKaem BiINOBADJIbHOIOOC6N.
2. IHCTPYKci3 TEXHIK N E3NEKNI
3AFAJIbHI 3ACTEPEXEHHЯ 3 TEXHIKи BE3NEKи ПД YAC PO6OTи 3 EJEKTPOIHCTPYMEHTOM

OBEPEXHO: O3haiomTeCe 3 ycima 3aCtepeXeHHMa 3 TexHIX 6e3neK, iHCTpyKizHMn, iIOCTpaiziamn ITexHicHNM DaHIMN, 0o HadaioTbc3 3 cHMM eNEKtpoiHCTpymentOM. HeDToPMaHnB BCix 3a3HaueHHx HmJy eHCTpyKzI MOKe IpuNBeCTn Do ypaXeHHa eNEKTPuHIM CTpyMOM, noXeKi ta (a60) cepno3HIN TpaBM.
YCI 3ACTEPEXEHNA TA IHCTPYKUII HE06XIIDHO 3BEPIGATN DIA NODAJIbWTO BUKOPUCTAHNA. TepMIn «eNeKtpoiHcTpyMeNT» y nonepaKeHHx O3Nauei HcTpyMeNT i3 XnVBJeHHaM BiD MepeXi (IpoToBni) abo Bid akymyIaTopa (6e3dpotobni).
TEXHIKA 6E3NEKINB3OH BVKOHAHHPOBIT
A. Póboa 30ha maé 6byu chctoTo Ta dope ocBiteHIO. Be3naI abo noraHe ocBiteHnB B pOboui 30Hi cacto CTAOyb npUHHO HeuaChnx BnauKIB.
B. 3a6oPOnHaTbC KOpNCTyBaTcA eNeKtPoIHcTpymeHToM y Bn6yXoHe6e3neuHm atMocfepi - HapnKlaI, taKi, Ika MICTb Ierko3aMncti piHn, r3n a60 nII. II dac po6Otn eNeKtPoIHcTpymeHTo YTBOPHObTcIckpI, uee3 kki MoxyTb cnaJxHyTn nI a6o Bnnapi.
C. Ipaioo3 enekptoHcTpyMeHTo, cnikyute, 606 y po6ooh 30hi He 6yno dTei i ctopoHHxCnoctepirayib. BiBolikaOuHcB, MoXHa BTPaTIu KOHTpOJIb HAd CNTyaCiEIO.
ENEKTPNUHA B3NEIKA
A. Bnkn enektpoihctpymenta nobHHi BiDnobiatn po3ezi. 3a6oponetbca 6ydb-akm YHOM moNphikyBatn Bnky. He BnkopncTObyte nepexiHNIk dIra enektpoihCTpymerta 3a3emLeHHAM. BnkopncTahnn BnloK 6e3 moNphiiaui Ta biDnOBiHNx po3eok 3MeHUntb p3Nk ypaXehnaen eektpuHm CTpyMOM.
B. YHnKaIe KOHTaKtY qACTmH TIn a3a3EmLeHIMN NOBepxHAMn, HApnKlAaTpy6Amn, paiaTOpAMn, BapnLbHMn NaHEnMaT Ta XoNoDnBHKamn. AkuO tINO onepaTopa BnaBraTe bCra 3a3emHeHIM, icHy ePn3NK ypaxKeHHr eNeKTPuHIM CTpyMOM.
C. EneKtpoiHCTpymeT Heo6xioHIO 3axnuaTH BID nOtpanpHnn Kpanenb Douy Ta BOON. y pa3i noTpapanHn BOIN BCEpeDHy eNeKtpoiHCTpymeHTa 36IbIbUyEcb pN3IK UpaKeHH EneKtpuHm CTpymom.
D. He donnyckaite BnKOpCTaHHa Hpya He 3a npH3aueHHM. 3a60pOHaTbCHeCTN, TgHTyN a60 BmmkaTN eKeKtpoHcTpyment i3 po3eTKn 3a whyp. TpMaite shyP dani BiD jKepeI tenna, a taKoB iD MaTHNa, roCTpxk KpaIB Ta pYxOMHX qAChIN. POnKoJKeHi a60 3aJIyTuHi Whyp 36InbUyOt b Pn3NK ypaXeHHa eKeKTPuHIM CTpymom.
E. IpaquiouH 3 enektpoiHcTpymeHOM hApOBI, BnKOpHCTOByIte nixoJusn noOpBxvBaU. BnKOpHCTAHN HhUpa, 10 niDxOxDtB dJa 3OBHIHX pO6IT, 3MeHsye pH3NK ypaXeHHra eNeKTPuHNM CTpyMOM.
F.Якшо Вьай Heo6xioHno npaioBATn 3 eKeTpoiHcTpymeHToM y BOJoromy cepeobu, BnKOpNCTOByIte po3etky, ochauney npicTPOeM dHepenHIIHoro 3axHcy. BnKOpNCTaHHa TAKORO npicTPOIO 3MeHUY pN3NK ypaJXHRe eJeKTPuHIM CTpyMOM.
IHDNBIVDAJbHATEXHIKABE3NEK
A.Пичacpo60nt3eKtpoHCTpymeHOM6yIbTe yBaJxHi,ДИВITbcry,Ю Bn po6nte,ɪ KepuTecg 3dopOBm rIy3dOm.He BHKOpHCTOByte eKtpoHCTpymeHT,Якso Bn BTOMnHcA60 nepe6yBaCte TID BnNBOM MeuHnx a60 HapKToHnx npenapatBtAnKOROnk.OHa MItb HeyBaXHoCTi NiD ac po60nt3eKtpoHCTpymeHOMMOTKe CnpuHHTn cepno3Hi TpaBMN.
B. BnKOpNCTOByTe 3ac06n iHnBiDyIaNbHoro 3axNCTy. 3aBXn BnKOpNCTOByTe 3ac06n Ira 3axNcty opranib 3opy. BnKOpNCTaHHa Y BiDnOBiDnHX BnnaIakx 3ac06IB Ira 3axNCTy - pecnipatopIB, npOTnKOB3HOrO 3axNCHOro B3yTTA, KAcOK i 3ac06IB Ira 3axNCTy opranib Cnyx - 3MeHwE pM3NK TpaBMvBaHH.
C. 3an6iraute BnnaKobomy 3anycky 06nHaHHa. Nepw hix NiKIOuOATn IHCTpMent Do Jxepena KMBHeHNa, nIDImaTH a6o nepehoCTn Ioro, nepeKoHaTecA, 1o BmNkaue nepe6yBaC B noLoXeHHi «BIMKHeHO». RaIoo BN peheocHT eNEKTPOIHCTpMent, TpMaOnu NaeUb Ha BmNkaU, a6o nOaCTe XmbHeHNa ha IHCTpMent i3 BmNkaUem y noLoXeHHi «BBiMKHeHO», ue 36IbUye PN3NK HeuaChINs BnadaKIB.
D. Пелш fixybIMKHyTN xHbIeHnH eEnKTpoiHCTpymeHTa, np6epitb perynIOabHn KlnH a60 raIKOBn KIOU, kIso BV Ioro BnKOpNCTOByBaII. 3aIIuHaOuN KInH a60 raIKOBn KIOU, npIcIHaHn Do pYxOMIX qACTINH eEnKTpoiHCTpymeHTa, BV pIz3IKyTe OTpIMAtu TpaBMy.
E. He hamaraitecn doTaryntca do qini. 3abxnn 36epiraite npabunby onopy ta pibnohy. Ie dae 3moTy Kpaue KOHTPOJIHOBATn ENEKTPOINCTpymEt Y HeouikyBaHnx CNTyaicX.
F. OdaiaTeca HaneKHM mHOM. He hadaaTe npocToPi npkpcn. Bae BoNocC, oaripyKabuI He nobHHI nopantnB pyxomi qactnH. IpocToPi OJr, npKpaT Ta IObre BOncs MoKyTb3aueHITcA 3a pyxomi qactnH.
G.Якшо Надаюстся пистой ддя пионьовенна та видалени ппу,ixnotpi6ho ni4'eHaTu Ta BnKOpIcTObYBaTH HaneJHIM YHOM.BNKOpIcTaHHa 3ac06iДдя пионьовенна може 3meHUnTи He63neky, nob'rahy 3i shkiDmBoIO DiEIO pny.
H.Якшо Ви част користуся систчмпом i Вьжаэт,шо Добpe 3найом 3 усima Hioансам, ue He n i nda lo DnToro,шо IGнорвати npabunla texhikn 6e3nekn. Heбалi dI MOxytb 3a JyKcb Mntb CnpuHHTN TReKKI TrpBMn.
BUKOPNCTAHH EJEKTPOIHCTPYMERTA TA 3ACTEPEXHI 3AXODI
A. He dokladaite cnly do eneKtpoiHCTpymeHa. CkopnctaItecra TAKHM eneKtpoiHCTpymeHtOM, 0o nixoHb IJIy NoCTabHeHO 3aBdAnHJ. IpaBnIbHO niiIbpaHm eneKtpoiHCTpymeH ynpaETbcra i3 aBdaHnM KpaSe Ta 63neuHHe, 3 tioU WbUdkicTIO, Ha kY Ioro 6yo npO pOzpaXOBaHO.
B. He Kopructyteca eNektpoiHCTpymeHOM, kKIO Ioro HEmoXnBO BBIMKHyTH a60 BImKHyTH 3a donomoroo BMnkaa. Byd-b-kyne eNektpoiHCTpymeHT, 10 HUM HEmoXnBO KepyBaTH 3a DonomorO BIMnKaHa, EHe63neuHm i nIiIraE peMOHTy.
C. Пелш Нж 3дийсювати 6уь-як ретуновань, заминовати ппалдя a60 nepeда batи eнектоiptсремпт ha 36epirahн, Bi'EDнaite BnIky BiД джерета xmblenн. Taki npoФinasТУнни 3асторжни 3хади ДОПOMагают bmeшИн риИКВиладКOBOrO 3anyckу eнектоiptсремпта.
D. Konu eNeKtpoiHcTpymHe BHKOpHcTOBcTbC, TpMaIte Noro dani Bi ditee. He do3BoJMe npaIOBAtn 3 eNeKtpoiHcTpymToM IIOJAM, Aki He 3NaHomi 3 Oco6bNBOCTaMn Noro pO6OTn a6o H npouHTaTI niHcTpykii. Ypykax HeniIroTOBLeHNX KOpHcTByaUb EneKtpoiHcTpymET e He63neuHIM.
E. 3diiichoiTe pnaHOBe texnHue o6cnyoBvBaHH neekTpoiHCTpymeHa ta npuaJa. IpebipaIte pyxomi qactuHa ha npedmet BiXmJeHH bID oci a60 3aknnHOBaHH, po3nAmyBaHH deTanen i 6ydjaKnx iHnx cTahIB, zo MoKyTB BnInHyTu Ha pO6Ote neekTPOiHCTpymeHa. 3a HauBHOCTi noKoKDHeh IHCPymeN cIid BiPeMoHTyBaTH npeD BnKOpHCTaHHaM. Barato HeuacnX BnAnkib E hAcniKOM HeKaICHO texnHOrO o6cnyoBvBaHH neekTPOiHCTpymeHa.
F. PizalbHe npilana Heo6xidno 3aroctpoBAtn Ta Tpimatn B uchtoti. PizalbHe npilana,Ke HaleXHM CHHOM o6cnyroByetbcra Ta 3aroctpoCTbca,piDiue 3rHaecb;Ioro IerEe KOHTponOBaTn.
G. EnektpoHCTpymENT, npnnaa, hacaKu ToO cnI BnKOpNcOByBaTH BiNobiHDo o uNX IHCTpyKcu, 6epyNu Do yBaru yMOBn po60Tu Ta NoctabHe 3aBdHa. EKcnnyataizye nEeKtpoHCTpymEna IINr iHux onepaui, 10 He BiNobiaIObT noRo npn3NaueHHo, MOKe cnpnuHHT N he63neHi ciTyauii.
H. Pykoatkn Ta nobepxhi Ira TpmaHH MaIOb 6yTH cyXMM NcHCTMn, 6e3 cIiB Jxpy Ta MaCTnla. AkiO pykoatkn Ta nobepxhi Ira TpmaHH e CIm3bkmm, ce 3aBaXaK e63neHPO npaioBAtn 3 IHCTpyMeHOM i KepyBaTn HmU HeoikyBaHnx CITyaIax.
CEPBICHE OBCIYTOBYBAHNA
A. Cepbiche 6cbnyrobyaHH enektpoHCTpymeHTa MaE 3diinchoBAtn KBaIipikOBaHn cneuaianct 3 peMOHTy, kN BnKOpNCTOBy BnKIOUHO iTeHTuHi 3mHHi Detani. Ie rapaHTyBaTIme 6e3neKy nD qoc 6cbnyrobyaHH iHCTpymeHTa.
IHTCPYKII 3 TEXHIK N E3NIENI YAC WNIIOYBAHH ABO BIDPI3AHH
A) CEJ ELEKTPOHCTPYMENT PUN3HAUEHNI JIJA POBOTN JK WJIIOYBAJIbHN ABO BIIPI3HN IHCTPYMENT. O3HAOMTEC3 YCIMA 3ACTPEXJEHHAMN 3 TEXHIKN BE3NEKN, IHCTPYKJIAMN, IIOCTPAUIMN TEHXUYHMN DAHIMN, IO HADAIOTbcN 3 ZUM ELEKTPOHCTPYMHTOM. HEIDOTPUMAHN BCIX 3A3HAUEHNX HIXXVE IHCTPYKUIM MOXE PUN3BECTN DO YPAXEHN ELEKTPUHM CTPYMOM, IIOXEXI TA (A05) CEPIN03HNX TPABM.
B) 3A DIONOMOTOU cboTO ELEKTPOHCTPymeHTY HE MOXHA BUKOHYBATN TAKI ONEPAUJI, YK OIKKYPOBAHHa, YIeHHe NPOTAHOU ZITKOHO, NOIPYBAHHa, BUN13AHH YABOPIB. OIEPAUJI, IJRA KIXX ELEKTPOHCTPymeHT HE IPN3HAeHn, MOxytb CTBOPNTI HEBE3NEKy TA PIN3BECTN DO TPABMYBAHH.
C) HE PEPE06JIaIe TcE EJEKTOIHCTPymeH DJIPOBOTu Y CIOcIb, AKN HE BvB CIIeUJIbHO P03PO6JIeHn TA BN3HAueHn BUNo6hNkOM IHCTPymeHTy. TAKE IPEPE06JIaJHaHHaMOKe IIPNU3BECTn DO BTPATN KEPYBAHHI CINPUHHTN CEPIO3HI TPABMI.
D) HE BUKOPACTOBYTE PIPILADIA, AKE CNEUJIbHO HE PO3PO6JEHE I HE BKA3AHE BMPO6HOKOM IHCTPMEHTY. AKIIO PIPILADIA MOXHA PIPKPIINITI DO EIEKTPOIHCTPMEHTY, CE IEE HE TAPAHTYE 63IIeH0I PO6OTN.
E) HOMIHAlbHA WBNIKICTb OBEPTAHRA PNIAIJa MAE 0OHAmEHWE DOPIBHIOBATM MAKcIMaJIbHI WBNIKOCTI,3A3HauEHIA EJEKTPOIHCTPYMEHTI. PNIAIJa,IO PAPUC 3I WBNIKCTIO,BMIIOHO A HOMIHAlbHy,MOKE 3JAMATNC I PO3NETITNC HA YACTHNH.
F) 3OBHIHII IIAMETP I TOBUNHA IPNIAIDRA MAOTb BIDNIOIBATN HOMIHABHI NOTJXHOCTI ELEKTPOHCTPYMEHTY. HEIPABINbHO IIIDIBPAHIM IPNIAIDRAM HEMOXJIIMO KEPYBATN HAJEKHIM YHOM ABO 3AXNCTITNCB I, D HbOTo.
G) P03MIPN KPIINLEHNAIIAADMAIOB BIDNOIBATN PO3MIPAM KPIINILbHIX ELEMHTIB ELEKTPOIHCTPUMEHTY. IPNIAIDRA, AKE HE BIDIOBIAC KPIINILbHIM ELEMHTAM EJEKTPOIHCTPUMEHTY, BYDE PO3BAJAHCOBAHE, HADMIPHO BIBPYBATIIMOKE PIPIN3BECTINO BTPATI KEPYBAHHA.
H) HE BUKOPUCTOBYI TE NOXKOJXEHE PNILADJa. IPEE KOKHNBM BKNOPCTAHHM IPEBIPRAITE PNILADJa TAKE, JIK WIIIOYBAJIbHI KPYTN HA BIIDCYTHICTb CKONIB TA TPIUHN, DICKIIOWBy HA BIDCYTHICTb TPIUHN, NOXKOJXEHB ABO HADMIPHORO 3HOCY, IPOTRHY BA BIDCYTHICTb OCLABJEHINX ABO 3LAMAHNX IPOTIB. JKIO ELEKTKPOIHCTPymeHT ABO PNILADJa BNAIO, IPEKOHAITEcR, IO BOHO HE NOXKOJXEHE, ABO BCTAHOBITb HEYWKODXEHE PNILADJa. IICJIa IPEBIPKn TA BCTAHOBIEHNR PNILADJa BIDIITb CAMI TA BIDBEITb CTOPOHIX OCIB BIDILOUHN PNILADJa, IO OBEPTAeTBcR, I 3ANYCTITb ELEKTKPOIHCTPymeHT HA MAKCIMAJBIH IWBNIKOCTI XOIOCTOFO XOy HA ODNHY XBNIUY. NOXKOJXEHE PNILADJa 3A3BVAAI PO3NIAAcTbCR HA YACTHNI IPOTAROM CboTOYACY TECTVBAHH.
I) BUKOPUCTOBYUE 3AC06N IHINBIUYALBHO 3AXNCTY. 3ALEXHO BI D CFEPI 3ACTOCYBAHH, BUKOPCTOBYUE 3AXMCHY PPO30PY MACKY, BIJKPITI ABO 3AKPNTI 3AXMCHI OKJIAPN. y PA3I HE0BXIDHOCTI HADRAITE NIO3AXMCHY MACKY, 3AC06N 3AXNCTY OPTAHIB CLYXY, 3AXMCHI PYKABUKN T A POBOUH QAPTYX, 3Q 3DAHTI 3YUNHITN DIP6HI ABPA3NBHI YACTKN ABO OCKOLKN POBOOJI ETALII. 3AC06N 3AXNCTY OUYE MAIOTB 3YUNHATN YAMKNI, 10 POZIIATAOTbCRI YAC POBOTN 3 PI3HMNI PPICTPORAM. INIO3AXUCHA MACKA ABO PECIIPATOP MAIOTB BIΦIbTPOBYBATN YACTHNK, IOTy TBOPHOBTcR II D YAC KOHKPETHOI POBOTN. TPINBAIMB CNILB HOTO WUMY MOKE IPN3BECTN DO BTPATN CNYX.
J) CTOPOHHI OCOBI NOBUNHI INPESEBYATN HA BE3NEUHBI DCTAHI BID POBOOIO 30HN. BCI OCOBNI KAI BXODTb DO POBOOIO 30HN, NOBUNHI BNKOPNCTOBYBATN 3ACOBN IHINBIVALHO 3AXNCTV. YIAMNKPOBOOIOI DETAJI A5O 3LAMAHOTIOPINJIAIDRA MOKYTB PO3IIITATNCI 3ABDATN TPABMN 3A MEXAMNI B3IOCEPEDHbIO 30HN POBOTN.
K) TPUMAIME EJEKTPOIHCTPUMEHTIIBKN 3A I30JIbOBAHI NOBEPXHI, BMKOHUYOUH ONEPAUII, PID YAC JAKNX PI3AJBHE PPUNIAJDA MOKE TOPKATNCRA PIPXOBAHOI PPOBOIKN A50 BIACHORO WHYPA. KOIN PI3AJBHE PPUNIAJDA TOPKACTbCRA PPOBOUYI CTPUMOM, HE3AXNIeHI METAIIEBI YACTNH INEJEKTPOIHCTPUMEHTA TEX MOXYTB CTATN HEEB3PIeHIMNA TBA BPA3NTN ONEPATOPA EJEKTPUHIM CTPUMOM.
L) PO3AIOBYIe WHUP HA B3E3NEUH BIDCTAHIBIIN PUNIAIDJ, OO OBEPTAETCB. Y PA3I BTPATN KEpyBAHHI SHUP MOXJE IPEPI3ATNCAB 60 3AUYNTUC, A PYKY ABO KINTBC, OIEPATOPA MOXJE 3ATAYHTB INPUNIAIDJ, OO OEBPTAEtCB.
M) 3A5BOPHOHCTbC KIACTN ELEKTPOHCTPMEHT DO NOBH0I 3YUNHKI PYXOMO I PPNJADJa. PPNJADJa, 10 OBEPTAETbC, MOXE 3AUYNTNCRA 3A IOBEPXHIO I NOTARHYTN ELEKTPOHCTPMEHT, B PE3YbTATI YTO IHCTPMEHT BIMDE 3-ПД KOHTPOHIO ONEPATOPA.
N) HE 3ANYCKAITE ELEKTPOHCTPMEHT, KOLI HECETE MOTO NOPRAID 3 COBOIO. B PA3I BVIIAIAKOBOTO KOHTAKTY 3 PUNIAADJAM, IO OBEPTAETCB, MOKE NOPBATNCBAW OJAR, A PUNIAADJMOKE YBIINT B TINO.
0) PEGYIAPHO OUYIAMTE BEHTNIJIH IOTBOPN ELEKTPOIHCTPUMHTY. BEHTNIJATOP IBNIYHA BTAIGYE INIL BCEPEIDINHY KOPNYC, I YEPE3 HADIMIPHE HAKOIINHHe METAIEBOTO NIVMOJE BUNIKHYT NHE63NEKA YPAXEHNA ELEKTPUHNM CTPUMOM.
P) HE BUKOPMCTOBYI TE ELEKTPOIHCTPYMEHT N05N3Y JELK03AIMMCTNX MATEPIAJIB. TAKI MATEPIJIMMOXYt 3AI MATINCBAIDICKOP.
Q) HE BUKOPUCTOBYIe PIPJIADJa, AKE NOTPEbE PIJKNX OXJIOJXyBAiB. BHKOPCTAHH BAIO ABO IHIXX PIKNX OXJIOJXyBAiB MOKe IPI3BECTn DO YPAKHeHH EJEKTPuHIM CTPYMOM ABO HABITb IO JETALbHO HACIIJKy.
2. IHCTPYKUII 3 TEXHIKN BE3NEKNI
IODAJIbIHHCTPYKU3TEXHIKBEE3NEKINLABCIXONEPAU
Bidya Ta noB'zani3 Heo 3acepexhenn
Bidaa- ce panToba peaksHa 3aTnckahna a6o 3aenneHnK pyra, 0o o6eTaTcBc, nCKa-nIOWBn, uITKn a6o iHoro npniladra. 3aTnckahna a6o 3aenneHn npin3BoDntb do WBnKOi 3yInHKn npniladra, jeke o6eTaTcBc, 0o, B CBOU cepry, BnKLNAe HekOHtponlboBaHe nepemiiueHH eJIeKtpoIHCTpyMeHTA B HaprrMky, npOTINJEXHOMy HaprrMKy o6eTahna npiladaB TOUci 3aklnHOBAHn.
HapnKnad, kauo uIkyBaIbHn Kpyr 3aueINBCra a6o 6yB 3aTnCHTu n pO6OtuO DetanLIO, To Kpa Kpyra, kKm BxOuNTb B Micce 3aUeMJIeHH, MoXe BpIaTNCRA B NOBepXHIO MaTePiany, 0o npI3BeDe O BuCKaKYBaHHa 6o BNUtOBxYBaHHa Kpyra.
Kpyr Moke BiDCKoHTN B HApPMAKy OnePAtopa 60 BiD HbO,3aEnXHO BiHnPMAKy pyx Kyra B MciCi 3aSeMLeHHa. KpIM TOrO, y TaNXuYMOBax 7NIiHyBaIbHN Kpyr MoKe pO3NaMaTicra. BiDaaya C pe3yIbTaTom He npabINbHoro BVKOpNCtAHHa ENEKTPOIHCTPymEtY Ta/a60 HnpePABINbHOI NocniIOBHOCTI BHKOHANH DII Ta HnpePABINbHXuMBo60To, i II MOxHA YNHKNHTU, DoTpIMyUOChb HaneXHN 3aXoID 6e3NeKm, Ik 3a3NaueHo HnKHe.
A. Heo6xioho Miioho TpImaTH eneKtpoiHcTpyment i 3aHnTn Take noIooKeHH Ta pyk, oio6 npOTnCToTH CnAm BiDaui. 3abKnBVKOpNCTOByIte DoonomixHy pyKoTky, kkuO BOHa nepe6aeha, dna MAcMmaBHorO KOHTPOIO HAD BiDauei 60 peakuiEoi KpyTHoro MOMENTu nic npcy. OnpaTop MOke KOHTPOIOBAtu KpyTHNI MOMENT Ta CIny BiDaui, kkuO 6yNo BxNTo HaleKHNx 3axOJB 6e3neKN.
B. Hikonl He trpmaite pyky 6iia npuaadla, zo o6eptaetbca. Pnlaadm MOKe BIDCKOHTn Ha pyky.
C. He po3taowoyte tio B 30hi pyxy eeneKtpoiHcTpymEna B pa3i BnHHKeHHe BIDauchi. BiDaua pyxatme iHCTpyMeHT y HaprMky, npoTIeJekHMy pyxy kpyra B Mici 3aueJIeHHA.
D.Пд ac p60t3 Kytamn, roctpmm Kpaamn Tsoo Heo6xidno 36epiratn Ooc6nHy nIbHictb. Ynkaite niactpr6ybaHH Ta 3aueenHnn npniladJa.Kytn, roctpi kpaia Ta nictpr6ybaHH npin3bOyraT do 3aueenHnn npnilaIdJa, 10 o6eTaetbca, i Btpatn kepyBaHH a6o BiIaui.
E. He BCTAHOBNIOTe DnK dIpaIb6NeHnNo DepeBy, cerMeHToBAnH anMa3Hn Kpyr 3 nepuopeiHm 3a3Opom 6IbIe 10 MM a60 3y6Uacte NIIaJIbHe nOtoHo. Take pIaJIbHe npIaIaJa qAto cnpuHnE BiDaay i npIa3BOJITb DO BpATN KepyBaHHn IHCTpymENTOM.
Oc6nBt3acTepeKEnH3TexHik6e3neKnPiJucwIiHyBaHHaTa a6pa3NBHoro BiDi3aHHa:
A. Binkopncobuyte tInbkn ti TnNk Kpyrib, aki pekomedobani dna Baaworo enektpoHcptymenty, i cneiaIbHni 3axnchN KOxyx, npn3haeHNI dny o6paHOrO kpyra. Ppi BnkOpncTaHHi Kpyrib, dny AKNX eNEKtpoHcTpymert He 6yB npn3haeHNI, HEMOXJIBO 3a6e3neHTN HALEXHHN 3axnCT i ce He63neHNo.
B. ⅢπiφybaNbHa NoBepxHg KpyrIB 3eHTpaNbHM 3aIIN6NeHnM Ma€ 6byTN BCTaHOBHeHa HmKYe pIoUHH 3axNCHoi KpOMKn. HenpaBnHbBO BCTaHOBLeHn Kpy, kyn BnCTynε 3a pIoUHH yaxNCHoi KpOMKn, He MoKe 6byTN HaJIeXHMM YINHom 3axNueHn.
C. 3axnchm koxyx Ma6yt NaHidno 3akpInnen Hn aeKtpoHcTpymeti Ta po3aWOBAHn y taKnn cnoci6, zo6 rapaHTyBatn MaKcmMaIbHy 6e3neky. BIDkpnto do onepatopa Mae 3anuATncr Inwe kOMora MeHsa qactHa Kpyra. 3axnchm koxyx npn3NaeHn dny 3axncty onepatopa BiD φpaMentrib 3IamaHOrO kpyra, BINaNkOBOrO KOtAKTy 3 Kpyrom Ta icKOp, BiD JKnx MOne 3aropitcn OJr.
D. Kpyru MaioTb BnKOpNCtOByBaTcna Imse 3a npImHaueHnHm. HanpNklaad: He BnKOnHyTe wliOyBaHn6iHoIO NOBepXHeIO BIDpi3HOrO kpyra. A6pa3mbHI bIDpi3Hi Kpyru npImHaueHni dIe npInpeipHoro WNIphiYBaHn, TOMy 6iuHi 3ucnnII, npIMKaJeHoi Do HIX, MoKyTB npIN3BeCTn Do iXhboro pyHyBaHn.
E. 3aBXn BnKOpNCTOByTe HenoXoKJKeHi KOniChi NaHci Heo6xIdHoro po3mipy i fopMn Ira Bn6paHoro Kpyra. BiNobiHi KOniChi NaHci IKcyIOb Kpyr, TmC CamIM 3HnXyOuN ImOBiPHiCTb NOro pIOMKn. ONaHci Ira BIDpiHnx Kpyrib MoKyTB BiDpi3HrtncsB iD NaHciB Ira UIiOyBaIbHnx Kpyrib.
F. He BUKOPACTOBYte 3noheni Kpyr BiE enektpoiHCTpymeTIB 6inbwoTo po3mipy. Kpyr, npn3naueHn dIe enektpoiHCTpymeTa 6inbwoTo po3mipy, He po3paXOBaHn Ha BVCOKy 7BnKicb eektpoiHCTpymeHa MeHwOPO3mipy i TOMy Moze 3naMaTncra.
G. y paizi BnKOpNCTaHn KpyrB NOBbIHoro np3HaueHHa 3ABXdN BnKOpNCTOByTe 3axChn KoJx, BiIObIhN do BnKohyBaHOi p6OToH. HnpaBnIbHe BnKOpNCTaHn 3axCHOro KoJxMa MoKe He 3abe3neHTn 6axaHOrO pIBH 3axHcSTy, lo MoKe np3BeCtNo Do cepno3HN TpaBM.
Iodatkobi 3aceptepeken h3 texhik6e3nekn, 0o ctocyotbc onepaui biip3aHna:
A. He donyckaite 3aklnHOBaHH BIDpi3HOro kpyra Ta He npKladaite Do hbo rHaMipnX 3cunb. He hamaraitecr 3po6ntn npopizn HADNIuKOBoi rIn6HNn. HAdmiphe HabaTaeHHa Kpyr 36IbWye IMobipHCTb CkpyuBaHH a60 3aklnHOBaHH kpyra nD qac pi3aHH, i, jk HacniDok, 36IbWytcbr pUdai ta pyHyBaHH Kpyra.
B. He po3tawobyte tio ha onHii nii 3 kpyrom, oo o6eptaetbca, i 3a Hm. KOnn Kpyr B MOMENT p060tn pyxaetbca btd tila wliiphiybaIbHnka, imOBipHa BiJaau Moje cnpMyBaTn Kpyr, oo o6eptaetbca, Ta eNEKtpoiHcTpymEHT npAmo Ha wliiphiybaIbHnka.
C.Якшкрузaklnnnoabo6BIN npunnnbPizahna36ydb-akoi npuHHN,BMMKHtbe eneKtpoHcTpymerti Tpmaite noro hepyxmo do nobhoI 3ynnkn Kpyra.HikonHe hamaraiTeceBnHrtn BIDpi3hN Kpyr 3 po3pi3y,KoJI Kpyr pyxaetbca,iHaKwte moke ctaTncB iDdaua.3'acyTe npuHHy Ta 3diHCHNTb KopurgybaHbHi 3axOJIO yCyHNe 3aklnnHOBaHHKpyra.
D. 3a6oPOnHaCTbC NOBTOPO NoUHnATNoepauio piaHnpo6Oooi Detani. O03BOJte KpyroBi Ha6patu NobHy uBnKicTB, i notim o6epeXHO 3HOy BBeDiTb Noro y po3pi. RaIO NOBTOPO YBMKHUTn eNEKtpoIHCTpymENT, KOIN Kpyr 3hAxOHTbcB p6ooui Detani, Kpyr MoKe 3aKJIHNITn, NiHrAITcA a60 CTAHeTbC BIdaay.
E. Uctanobit naheni ta Bemikorabapnhi po6o i detani ha onopy, 06 3bectno miHmmy n3nk 3aTnckannn Kpyra i BiDaui. Bemki po6oii detani maotb bnaCtibcI npGInatncn iid iieo Blachoi Barn. iip po6oy detalb Heo6xioho ndkactn onopn 6iin liHH pi3y ta 6iia kpaO po6ooi detani 3 o6ox 6okiv kpyra.
F. Bybte oco6nbo 06epkhi npn Bkohonhi «Kmnehkboknx» npop3iB iv chyounx cihax a6o iHnx dianhkax, khi neocx hi nra orny. Bictynaoyu kpyr moze nepepiatn trpyn ra3onpo body i Bodorohy, eNEKTpuhy npobody a6o MOe HaTuTOBxHyTncb Ha o6'kT, knn BiDnOBiCTb BiDaueio.
G. He HAMARAIteca po6ntu KPNBONIINIe pi3aHnHa. HAdmiphe HabaHTaxHeHHa Ha Kpyr 36iNbWyE mMOBipHicTb CkpyuBaHH a60 3aklinHOBaHH Kpyra nID qac p3aHH, i, kA hcnIdOK, 36iNbWyETcbr p3Nk BIDaqi Ta pyuHyBaHH Kpyra, lo MoKe npu3BeCTn Do cepo3HNx TpaBM.
3.ОПИС

1 Khonka nepemukaua
2 Baxinb 6nokyBaHHa3axnchoro kOxyxa
3ДоаТКОВа руча
4 Kopnyc peDyKTopa
5 OchOBHa pykoTka
6 3axncha kpiuka (3axncT 2 B 1, 230 MM)
7 Khonka 6nokyBaHHa
8 Taikobm Klnou
9 3obhiinii pnae3 pi3b6nHnM
10 BnytpiunhikyT
11 Khonka dans nobopoThoi pyuKs
4. TEXHIYHI DAHI
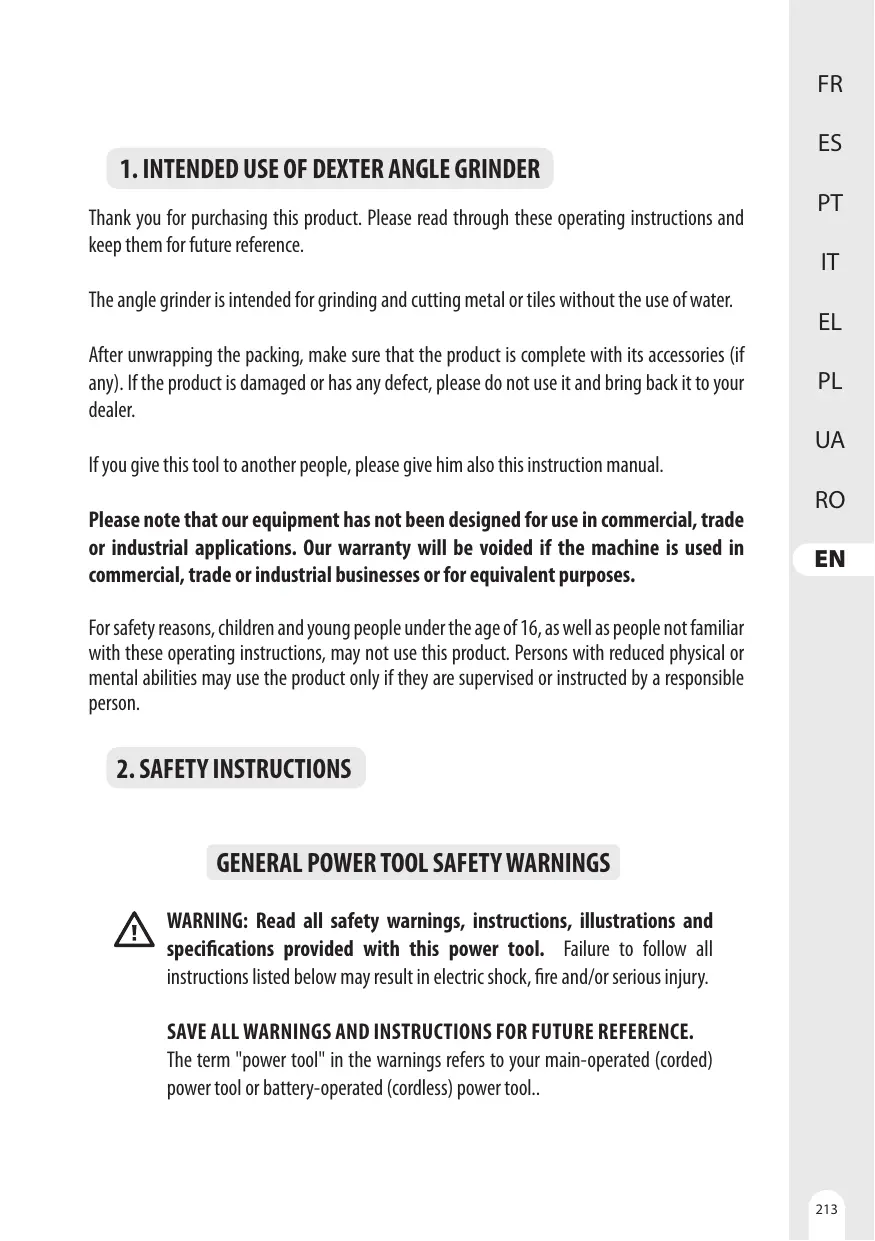
06EPEXHO: Hikon He BCTaHOBJIte 3axnCHKOxuy TAK, 106BbIN 3hAXOJIMBCa nepeD 5niIyBaJIbHOIO MaIHHIO.
Lc Moxe npu3Bectn Do cepno3Hnx TpaBM, ockinbKn icKpn Ta OkpeMi qactNHKn, 0o BnKndaHObCra 3 Kpya, 6yDyTb cnPMAOBAHi B 6ik onepatopA. 3abXdN BCTaHOBIOte 3axNCHI KOxvB nPpABINbHomy MiCi.
IoopeceBaHTzaxnCHnKOxUx:
Poz6nkyte 3aTnckay 3axnchoro koxyxa, noTarybni nOro Ha ce6e, nobepHtB koxyx y npabInbne noLoxehn, y bik BID uIiFyBaIbHOI MaunHH.
3aΦikcye 3aTnCKauchaxnCHOro Koxyha,HaTmChYbMn Ha HbOrO.
IPIUMITKA: IpekoahTeCay, 10 NiHATIN BnCTyn 3axiChoro Koxyxa yBInbOy nHa Na Kpniuoi NiDinHnka. HikOni He BnKOpriCTOByute WlifyBaNHy MaunHy 6e3 BCTaHOBneHOrTo Ta npaBnHBo BIdperyLbObaHO r 3axiChoro Koxyxa.

Ipeq TmM, Aek nepectabnT 3axncn KoxyX, nepekoHaTeCz, 0e enktpoiHcTpyment Bidknouenb BID dxkepena KmbnenHn.
BctahOBnEHNA603H7T3aXmCHOKpnuK
06EPEXKHO: IpekoHaTeca, 1O KTOBa 5IHyBaBbHa MaSInH BmKHeHa i BiKnIOueHa BiMepexi.
3aIexHIO BID TORO, uBnBuKoHyEbCp i3aHHA a60 7uIyBaHnH, Bn6epiTB BiNObiHy 3axHcy KpnUky. Hnpabunhe BnKOpNCtAHnKpnuKMOe npu3BeCTn do TpaBMvBaHn. Ppi BuKOpNCtAHnHi 7uIyBaNbHoro a60 BiP3Horo Kpyra 3axnCHn KoxyMa eByTn BCTaHOJIeHN Ha IHcTpMeHTi TaKIM YHOM, 063akpnta CToPOHa KoxyXa 3aBXnn 6yla cnpMBoHa Do oIepatopa.
BctahOBtB 3axHCHN KOxyx: 3BilbHtB BaxiNb 6NoKYBaHHa KQyXa i BCTaBe TIOB rONOBky peDyKTopa, NOeBH/ BIDperyIIOte B 6yb-IAKOMY nOpiHOMy pNOXeHHi IJRA DOcRHeHHa MAcMImalbHOI npOdyKTMBHocTi, a NOTIM 3aKpIITe BaxiNb 6NoKYBaHH. IpeKeOHaiTeCg, 0o BaxiNb KpINJIeHH HaJIeXHM uHOM 3aΦIKCOBaHH niCJIa BCTAHOBJIeHH 3axHCHOrKOxyxa.
Ioo6 3aXnchny KpuiKy, BvkoHaiTe npOeDpy BCTaHOBHeHH y 3BOpOTHomy nopRky. 3axnchy KpuiKy MoxHa nobepTaTH Na nOtpi6Hm KyT, ane He 6ilbSe Hix Ha 45^3 iBoro a6o npaboro 6oky.
BIMKHeHHa: BiDnpttB cIpyckOBm IraOK NpeMnKaay, 06 B IMKnHyT MaHInHy.
06EPEXHO: He nepekpuBaIte Btayxhi BeHTnlaizni OTbOpN iD qac po60Tu IHCTpMeHTy. Lc moKe np3BecTu DO NOWKoJKeHnRA DBrHyHa i 3H3NTu eFekTbHbHcTb po60Tu IHCTpMeHTy.
UliiΦyBaIbHa o6pO6ka
Kiio 1000000000000000000000000000000000000000000000000000000000000000000000000000000000000000000

IEPEBAHTAXEHH
IpeBaHTaXeHnMoKe npI3BcTeN Do noIkoJxHeHH DInyHa KytOBoI IiIyBaJIbHOI MaIHNu. Lc BiD6yBaCTcb BhacniDOK hAmipHoro pOboOro TnCKy IpotaRm TpIBaNo rnpioHy. Tomy He BapTo HamaRaTnc npicKOpntn poOoy WBnDKiCTb, 36InbSyUOnn TnCK Ha MaIHNy. IiIyBaJIbHi KpyrN CnpauOITb eEkeTnBHIse, JaKIO Ha IiIyBaJIbHy MaINHy YnHnTbCra LiNe He3NaChn TnCK, IIO Do3BOJaYHnKHyTn NaDiHn WbUdKOcTi IiIyBaHNH.

06EPEXHO! H6E3NEKA TPABMYBAHH! 3abKd BUMKaIte npnai i BmMaIte BNky 3 po3eKnpeed BnKOHaHnM p6it Ha npnaI.
He BnKOpNCTOByTe roctpi npedmetn dny uenHn npnilady. HikOn He donyckaTe nOtpanHn npinHn BCEpEnHy npnilady. Ihakse npnilad MOke nooKoDHTMC.
Peynnpno Ounnyte npnaad, hainkpaune oopa3y nicna 3aBepenHn p06tM.
OuimauTe Kopnyc cyxio rauchipkoio - HE BnKOpNCTOByTe 6eH3HH, po3HHNKn a6o MInoui 3ac06n, kI MoKyTb noHKoHTn PIACTMK.
BmMKHtB kyTOby shiJfYbAbnHy MaunHy.
3axuaiTe kyTOBy 7nIyBaBHy MaunHy BiD MoKJIINBHX CInbHnx ydApIB a60 Bi6paui niD qac TpAHcnpTyBaHHa BABTOMo6iJx.
HadiiHo 3aikcyte KTOby uIiybany MaunHy, uO6 BOHa He nepeKnJaIacn He KOB3aIa.
7. ycyehhh HecnPABHOCTEI
KJIO pIcTPII noIKoJKeHn a60 MaE deQeKTH, He BKNOPcTObYte NOrO Ta NoBepHrIb Do haiBnNjXoR OMa3iHy.
Ley npnctpi npn3nauehen nIe BNKOpNCtAHN BKNIOUHO NaDBOpi; 3a 6yNb-aknx 06CTABH 3abOpHeo BIKOPNCTOBYBATn Ioro B npmIueHHX.
Ley nprictpi MOKHa NOklaCTN B pImiueHHI TJIbKn Niicra ToR, A K MInHe Dbl FOnHn Niicra OctaHbO BIKOPNCaTHa.
Mn daKyem Boa 3a Baa Dobipy i cnoiDbaemoc, uo ce npnctri 3adOBonbHnty cai Baui oikyBaHHa.
Bydemo Bdanyi 3a Baaii BiDyKn Ha Be6-caiTi Maar3Hny.
Tapaantia
Ipoodykuio DEXTER po3p6bneho BiDnOBiDHO do HauBnux CTaHApTIB kocti Tobapib, npu3HaueHHx dny uipokoro cnoKunBaHHra.
Ha kyToby shiCyBaIbHy MaunHy hadaetbcra rapantia 5 pokIB BiD datn npu6aHna. Ira rapantia nouipouetcbra Ha Bci Bnpo6huiyekeKtn abo dekeKtn matepiJiB.
Ypasi noIOMKn cnoaTu kni 3BepHyTncA Do CTOpIHKn ycHHe HecnPabHocTe (npo6nMe Ta piHHe) B 6poUpi;
KaIO np6nMa He 3NkAc, 3BepHtBCa Do hai6nXyOro mara3Hny.
IpaizBnKMa3aHnHydoKnaDytbBCix3cunb,io6BriipuiHTn npo6nemy.
Pemont 13aMHa deTaleHne IpoDObKyOb nOauTkoBn rapaTtHmN TepmiH.
IapaHTHe NpoINIOeTbCnHa NpONOMKn, IIO BUNIKNl BnACIIIDOK HopMaJIbHOrO 3Hcy a6o HnpeBaINbHOrO BnKOpIcTaHHN npICTPOHO. Lc TocyETCBs, 30KpeMa, nepeMkauB, BmMkauB 3axxHnx CXeMa Ta DnBuHyB y pa3i X3Hcy.
3BepHtbybary, 10nIeNBHXKpaIHcHcyTOb oO6mBi yMOBn rapaTIII.
YpazicmHIBiB,6yDbnaCa,3BepHITbCraDIO npHKTy npOdaJcxy.
Дяpoztладу npetehzii, noj'3aahnx i3 raptanticiu, neobxidne doTpmaHnHa cTaynHx yMOB:
Ma6byn hadaho dokymENT, 10i niTbepdxy eoknyk
- Pemont Ta/a/603aMHa DeTaleNe He 6yIn BVKoHaHI CTOpOHbIOO Oco6IO.
- Поблема Не в салдом Нормально знocу.
Heo6xidi np60ti 3 texhiHoro 06cnyrOBAHHa Ta pemOnTy 6yni BIKOHai HAIeXHM NINOM.
IoripuHHe He BID6yOcB HAcNIOK HEnpabunbHoro HalaUHTyBaHHa Kap6Opatopa.
-Пистрин Heпддаваьсян Дмірноу Вліпьу; He 6уlio Н�алжно NOБДжЕн_H, HecaHкцioHOBaHOro BmKOprictaHnH
a60 Heuzauchnx BunaikB
NoripuHHe He biD6yNoC BHaCnIaOKepeRpBAAHH, CnpuMHeHOr 3aCmUeHNMaBEHTnAuaHOro 6NOky.
- Hekbaniipikobani npauiBnKHe BnKohyBaJIHiaKnx pOIt 3 npiCTpoE m Ie 6Byo CnpoB BnKohATn HeKaICHI peMOHT.
IhctpymEnHikONHeBjKpNBaBCiHe pO3bnpaBC.
IhctpymEnHikOn He niiDabABcBnBnBy BNOIOrO TopeoBOnu(a (pocA,IOU,3aHypeHny y BOyTo)
He BnKOpIcTObyBaIImcH HeiDIOBIDHI Detani, To6To Detani, BnroTOBNeHi He KOMpaHicEo DEXTER, AaO BoHn BnAByIinca npuHHoNpOriPseHnpo60Tu npCtpo
- IInctpymeHT He BnKOpNCTOBvBaBCa HeHaJIexHMM YINHom (nepeBaHTaJxehnHa IHcTpymeHTy a60 BnKOpNCTaHnHeXbAbeHOro npinaIdЯ).
- PoiKoJxHHe 6yNo BnKJIkaHO 3OBHIuHIMn npuHnAMn a60 CTOpOHIMn npedMeAMn, TAKIMn JIK nICOK u KaMInHn.
-Пошкдженин He 6улno Викимано Нсетрumsнгам pekomeндаць 3 texhikn 6be3nekn ta iHctpykui 3 BOKOpicTaHHa.
Ley iHCTpymeHT MoXHa eKcIpyATyBaTn BKNIOUHO B HopMaJIbHIX yMOBAX; 3a6OpOHrEbCBA RIKOPNCTOBYaT N Ioro k npOfeciHn. TaKIM YIHOM, ZA rapaHTiHe PO3NOBcIOJxUeTBc H a iHCTpymeHT, AIKY BIKOPNCTOBYuToB CaIbHNi NiIDPNiEMCTBa, MiCeBi OprAHn BLnAdi, a TAKoX KOMNaHII, UO NaHdAIO Tb IORO B OpeHdy PIIATHO YIe3KOHTOBHO.
10. P03FOPHYTE 306PAXEHH3 IPEPIKOM IETAJEi
10. P03FOPHYTE 306PAXEHH3 IPEPEJIKOM DETAJIEN
Please read the operating instruction carefully and observe the notes given. Use these operating instructions to familiarise yourself with the product, the proper use and the safety instructions. Keep these operating instructions in a safe place for future uses.
SYMBOLS

Read instruction manual carefully

This danger notice warns of damage to the appliance or others properties, or may cause physical injuries.

Wear safety glasses

Wear ear protection

Wear safety shoes

Wear protective gloves

Wear a dust mask

Using damaged cutting or roughing discs is dangerous and may cause serious injury.

Not approved for wet grinding

Not approved for side grinding

Intended for metal grinding

The product complies with the applicable European directives and an evaluation method of conformity for these directives was done.
SYMBOLS

Eurasian conformity work.

Wee symbol for recycling operation.

Conformity marking that product comply with applicable Ukraine technical regulations.

Always operate with two hands

Do not use the guard for cutt-off operations

Disconnect mains plug from electrical outlet

Class II machine - Double insulation - You don't need any earthed plug
CONTENTS
- Intended use of Dexter angle grinder
- Safety instructions
- Description
- Technical data
- Operation
- Maintenance
- Trouble shooting
- Recycling
- Warranty
- Exploded view with part list
- EC Declaration of conformity
1. INTENDED USE OF DEXTER ANGLE GRINDER
Thank you for purchasing this product. Please read through these operating instructions and keep them for future reference.
The angle grinder is intended for grinding and cutting metal or tiles without the use of water.
After unwrapping the packing, make sure that the product is complete with its accessories (if any). If the product is damaged or has any defect, please do not use it and bring back it to your dealer.
If you give this tool to another people, please give him also this instruction manual.
Please note that our equipment has not been designed for use in commercial, trade or industrial applications. Our warranty will be voided if the machine is used in commercial, trade or industrial businesses or for equivalent purposes.
For safety reasons, children and young people under the age of 16, as well as people not familiar with these operating instructions, may not use this product. Persons with reduced physical or mental abilities may use the product only if they are supervised or instructed by a responsible person.
2. SAFETY INSTRUCTIONS
GENERAL POWER TOOL SAFETY WARNINGS

WARNING: Read all safety warnings, instructions, illustrations and specifications provided with this power tool. Failure to follow all instructions listed below may result in electric shock, fire and/or serious injury.
SAVE ALL WARNING AND INSTRUCTIONS FOR FUTURE REFERENCE.
The term "power tool" in the warnings refers to your main-operated (corded) power tool or battery-operated (cordless) power tool..
WORK AREA SAFETY
A. Keep work area clean and well lit. Cluttered or dark areas invite accidents.
B. Do not operate power tools in explosive atmospheres, such as in the presence of flammable liquids, gases or dust. Power tools create sparks which may ignite the dust or fumes.
C. Keep children and bystanders away while operating a power tool. Distractions can cause you to lose control.
ELECTRICAL SAFETY
A. Power tool plugs must match the outlet. Never modify the plug in any way. Do not use any adapter plugs with earthed (grounded) power tools. Unmodified plugs and matching outlets will reduce risk of electric shock.
B. Avoid body contact with earthed or grounded surfaces, such as pipes, radiators, ranges and refrigerators. There is an increased risk of electric shock if your body is earthed or grounded.
C. Do not expose power tools to rain or wet conditions. Water entering a power tool will increase the risk of electric shock.
D. Do not abuse the cord. Never use the cord for carrying, pulling or unplugging the power tool. Keep cord away from heat, oil, sharp edges or moving parts. Damaged or entangled cords increase the risk of electric shock.
E. When operating a power tool outdoors, use an extension cord suitable for outdoor use. Use of a cord suitable for outdoor use reduces the risk of electric shock.
F. If operating a power tool in a damp location is unavoidable, use a residual current device (RCD) protected supply. Use of an RCD reduces the risk of electric shock.
PERSONAL SAFETY
A. Stay alert, watch what you are doing and use common sense when operating a power tool. Do not use a power tool while you are tired or under the influence of drugs, alcohol or medication. A moment of inattention while operating power tools may result in serious personal injury.
B. Use personal protective equipment. Always wear eye protection. Protective equipment such as dust mask, non-skid safety shoes, hard hat, or hearing protection used for appropriate conditions will reduce personal injuries.
C. Prevent unintentional starting. Ensure the switch is in the off-position before connecting to power source, picking up or carrying the tool. Carrying power tools with your finger on the switch or energising power tools that have the switch on invites accidents.
D. Remove any adjusting key or wrench before turning the power tool on. A wrench or a key left attached to a rotating part of the power tool may result in personal injury.
E. Do not overreach. Keep proper footing and balance at all times. This enables better control of the power tool in unexpected situations.
F. Dress properly. Do not wear loose clothing or jewellery. Keep your hair, clothing and gloves away from moving parts. Loose clothes, jewellery or long hair can be caught in moving parts.
G. If devices are provided for the connection of dust extraction and collection facilities, ensure these are connected and properly used. Use of dust collection can reduce dust-related hazards.
H. Do not let familiarity gained from frequent use of tools allow you to become complacent and ignore tool safety principles. A careless action can cause severe injury within a fraction of a second.
POWER TOOL USE AND CARE
A. Do not force the power tool. Use the correct power tool for your application. The correct power tool will do the job better and safer at the rate for which it was designed.
B. Do not use the power tool if the switch does not turn it on and off. Any power tool that cannot be controlled with the switch is dangerous and must be repaired.
C. Disconnect the plug from the power source of the power tool before making any adjustments, changing accessories, or storing power tools. Such preventive safety measures reduce the risk of starting the power tool accidentally.
D. Store idle power tools out of the reach of children and do not allow persons unfamiliar with the power tool or these instructions to operate the power tool. Power tools are dangerous in the hands of untrained users.
E. Maintain power tools and accessories. Check for misalignment or binding of moving parts, breakage of parts and any other condition that may affect the power tools operation. If damaged, have the power tool repaired before use. Many accidents are caused by poorly maintained power tools.
F. Keep cutting tools sharp and clean. Properly maintained cutting tools with sharp cutting edges are less likely to bind and are easier to control.
G. Use the power tool, accessories and tool bits etc. in accordance with these instructions, taking into account the working conditions and the work to be performed. Use of the power tool for operations different from those intended could result in a hazardous situation.
H. Keep handles and grasping surfaces dry, clean and free from oil and grease. Slippery handles and grasping surfaces do not allow for safe handling and control of the tool in unexpected situations.
SERVICE
A. Have your power tool serviced by a qualified repair person using only identical replacement parts. This will ensure that the safety of the power tool is maintained.
SAFETY INSTRUCTIONS FOR GRINDING OR CUTTING-OFF OPERATIONS
A) THIS POWER TOOL IS INTENDED TO FUNCTION AS A GRINDER, CUT-OFF TOOL. READ ALL SAFETYWARNINGS, INSTRUCTIONS, ILLUSTRATIONS AND SPECIFICATIONS PROVIDED WITH THIS POWER TOOL. FAILURE TO FOLLOW ALL INSTRUCTIONS LISTED BELOW MAY RESULT IN ELECTRIC SHOCK, FIRE AND/OR SERIOUS INJURY.
B) OPERATIONS SUCH AS SANDING, WIRE BRUSHING, POLISHING, HOLE CUTTING ARE NOT TO BE PERFORMED WITH THIS POWER TOOL. OPERATIONS FOR WHICH THE POWER TOOL WAS NOT DESIGNED MAY CREATE A HAZARD AND CAUSE PERSONAL INJURY.
C) DO NOT CONVERT THIS POWER TOOL TO OPERATE IN A WAY WHICH IS NOT SPECIFICALLY DESIGNED AND SPECIFIED BY THE TOOL MANUFACTURER. SUCH A CONVERSION MAY RESULT IN A LOSS OF CONTROL AND CAUSE SERIOUS PERSONAL INJURY.
D) DO NOT USE ACCESSORIES WHICH ARE NOT SPECIFICALLY DESIGNED AND SPECIFIED BY THE TOOL MANUFACTURER. JUST BECAUSE THE ACCESSORY CAN BE ATTACHED TO YOUR POWER TOOL, IT DOES NOT ASSURE SAFE OPERATION.
E) THE RATED SPEED OF THE ACCESSORY MUST BE AT LEAST EQUAL TO THE MAXIMUM SPEED MARKED ON THE POWER TOOL. ACCESSORIES RUNNING FASTER THAN THEIR RATED SPEED CAN BREAK AND FLY APART.
F) THE OUTSIDE DIAMETER AND THE THICKNESS OF YOUR ACCESSORY MUST BE WITHIN THE CAPACITY RATING OF YOUR POWER TOOL. INCORRECTLY SIZED ACCESSORIES CANNOT BE ADEQUATELY GUARDED OR CONTROLLED.
G) THE DIMENSIONS OF THE ACCESSORY MOUNTING MUST FIT THE DIMENSIONS OF THE MOUNTING HARDWARE OF THE POWER TOOL. ACCESSORIES THAT DO NOT MATCH THE MOUNTING HARDWARE OF THE POWER TOOL WILL RUN OUT OF BALANCE, VIBRATE EXCESSIVELY AND MAY CAUSE LOSS OF CONTROL.
H) DO NOT USE A DAMAGED ACCESSORY. BEFORE EACH USE INSPECT THE ACCESSORY SUCH AS ABRASIVE WHEELS FOR CHIPS AND CRACKS, BACKING PAD FOR CRACKS, TEAR OR EXCESS WEAR, WIRE BRUSH FOR LOOSE OR CRACKED WIRES. IF POWER TOOL OR ACCESSORY IS DROPPED, INSPECT FOR DAMAGE OR INSTALL AN UNDAMAGED ACCESSORY. AFTER INSPECTING AND INSTALLING AN ACCESSORY, POSITION YOURSELF AND BYSTANDERS AWAY FROM THE PLANE OF THE ROTATING ACCESSORY AND RUN THE POWER TOOL AT MAXIMUM NO-LOAD SPEED FOR ONE MINUTE. DAMAGED ACCESSORIES WILL NORMALLY BREAK APART DURING THIS TEST TIME.
I) WEAR PERSONAL PROTECTIVE EQUIPMENT. DEPENDING ON APPLICATION, USE FACE SHIELD, SAFETY GOGGLES OR SAFETY GLASSES. AS APPROPRIATE, WEAR DUST MASK, HEARING PROTECTORS, GLOVES AND WORKSHOP APRON CAPABLE OF STOPPING SMALL ABRASIVE OR WORKPIECE FRAGMENTS. THE EYE PROTECTION MUST BE CAPABLE OF STOPPING FLYING DEBRIS GENERATED BY VARIOUS APPLICATIONS. THE DUST MASK OR RESPIRATOR MUST BE CAPABLE OF FILTRATING PARTICLES GENERATED BY THE PARTICULAR APPLICATION. PROLONGED EXPOSURE TO HIGH INTENSITY NOISE MAY CAUSE HEARING LOSS.
J) KEEP BYSTANDERS A SAFE DISTANCE AWAY FROM WORK AREA. ANYONE ENTERING THE WORK AREA MUST WEAR PERSONAL PROTECTIVE EQUIPMENT. FRAGMENTS OF WORKPIECE OR OF A BROKEN ACCESSORY MAY FLY AWAY AND CAUSE INJURY BEYOND IMMEDIATE AREA OF OPERATION.
K) HOLD THE POWER TOOL BY INSULATED GRIpping SURFACES ONLY, WHEN PERFORMING AN OPERATION WHERE THE CUTTING ACCESSORY MAY CONTACT HIDDEN WIRING OR ITS OWN CORD. CUTTING ACCESSORY CONTACTING A «LIVE» WIRE MAY MAKE EXPOSED METAL PARTS OF THE POWER TOOL «LIVE» AND COULD GIVE THE OPERATOR AN ELECTRIC SHOCK.
L) POSITION THE CORD CLEAR OF THE SPINNING ACCESSORY. IF YOU LOSE CONTROL, THE CORD MAY BE CUT OR SNAGGED AND YOUR HAND OR ARM MAY BE PULLED INTO THE SPINNING ACCESSORY.
M) NEVER LAY THE POWER TOOL DOWN UNTIL THE ACCESSORY HAS COME TO A COMPLETE STOP. THE SPINNING ACCESSORY MAY GRAB THE SURFACE AND PULL THE POWER TOOL OUT OF YOUR CONTROL.
N) DO NOT RUN THE POWER TOOL WHILE CARRYING IT AT YOUR SIDE. ACCIDENTAL CONTACT WITH THE SPINNING ACCESSORY COULD SNAG YOUR CLOTHING, PULLING THE ACCESSORY INTO YOUR BODY.
O) REGULARLY CLEAN THE POWER TOOL'S AIR VENTS. THE MOTOR'S FAN WILL DRAW THE DUST INSIDE THE HOUSING AND EXCESSIVE ACCUMULATION OF POWDERED METAL MAY CAUSE ELECTRICAL HAZARDS.
P) DO NOT OPERATE THE POWER TOOL NEAR FLAMMABLE MATERIALS. SPARKS COULD IGNITE THESE MATERIALS.
Q) DO NOT USE ACCESSORIES THAT REQUIRE LIQUID COOLANTS. USING WATER OR OTHER LIQUID COOLANTS MAY RESULT IN ELECTROCUTION OR SHOCK.
2. SAFETY INSTRUCTIONS
FURTHER SAFETY INSTRUCTIONS FOR ALL OPERATIONS
Kickback and RelatedWarnings
Kickback is a sudden reaction to a pinched or snagged rotating wheel, backing pad, brush or any other accessory. Pinching or snagging causes rapid stalling of the rotating accessory which in turn causes the uncontrolled power tool to be forced in the direction opposite of the accessory's rotation at the point of the binding.
For example, if an abrasive wheel is snagged or pinched by the workpiece, the edge of the wheel that is entering into the pinch point can dig into the surface of the material causing the wheel to climb out or kick out.
The wheel may either jump toward or away from the operator, depending on direction of the wheel's movement at the point of pinching. Abrasive wheels may also break under these conditions. Kickback is the result of power tool misuse and/or incorrect operating procedures or conditions and can be avoided by taking proper precautions as given below.
A. Maintain a firm grip on the power tool and position your body and arm to allow you to resist kickback forces. Always use auxiliary handle, if provided, for maximum control over kickback or torque reaction during start-up. The operator can control torque reactions or kickback forces, if proper precautions are taken.
B. Never place your hand near the rotating accessory. Accessory may kickback over your hand.
C. Do not position your body in the area where power tool will move if kickback occurs. Kickback will propel the tool in direction opposite to the wheel's movement at the point of snagging.
D. Use special care when working corners, sharp edges etc. Avoid bouncing and snagging the accessory. Corners, sharp edges or bouncing have a tendency to snag the rotating accessory and cause loss of control or kickback.
E. Do not attach a saw chain woodcarving blade, segmented diamond wheel with a peripheral gap greater than 10mm or toothed saw blade. Such blades create frequent kickback and loss of control.
SafetyWarnings Specific for Grinding and Abrasive Cutting Off Operations:
A. Use only wheel types that are recommended for your power tool and the specific guard designed for the selected wheel. Wheels for which the power tool was not designed cannot be adequately guarded and are unsafe.
B. The grinding surface of centre depressed wheels must be mounted below the plane of the guard lip. An improperly mounted wheel that projects through the plane of the guard lip cannot be adequately protected.
C. The guard must be securely attached to the power tool and positioned for maximum safety, so the least amount of wheel is exposed towards the operator. The guard helps to protect the operator from broken wheel fragments, accidental contact with wheel and sparks that could ignite clothing.
D. Wheels must be used only for recommended applications. For example: do not grind with the side of cut-off wheel. Abrasive cut-off wheels are intended for peripheral grinding, side forces applied to these wheels may cause them to shatter.
E. Always use undamaged wheel flanges that are of correct size and shape for your selected wheel. Proper wheel flanges support the wheel thus reducing the possibility of wheel breakage. Flanges for cut-off wheels may be different from grinding wheel flanges.
F. Do not use worn down wheels from larger power tools. Wheel intended for larger power tool is not suitable for the higher speed of a smaller tool and may burst.
G. When using dual purpose wheels always use the correct guard for the application being performed. Failure to use the correct guard may not provide the desired level of guarding, which could lead to serious injury.
Additional SafetyWarnings Specific for Cutting-Off Operations:
A. Do not "jam" the cut-off wheel or apply excessive pressure. Do not attempt to make an excessive depth of cut. Overstressing the wheel increases the loading and susceptibility to twisting or binding of the wheel in the cut and the possibility of kickback or wheel breakage.
B. Do not position your body in line with and behind the rotating wheel. When the wheel, at the point of operation, is moving away from your body, the possible kickback may propel the spinning wheel and the power tool directly at you.
C. When wheel is binding or when interrupting a cut for any reason, switch off the power tool and hold the power tool motionless until the wheel comes to a complete stop. Never attempt to remove the cut-off wheel from the cut while the wheel is in motion otherwise kickback may occur. Investigate and take corrective action to eliminate the cause of wheel binding.
D. Do not restart the cutting operation in the workpiece. Let the wheel reach full speed and carefully re-enter the cut. The wheel may bind, walk up or kickback if the power tool is restarted in the workpiece.
E. Support panels or any oversized workpiece to minimize the risk of wheel pinching and kickback. Large workpieces tend to sag under their own weight. Supports must be placed under the workpiece near the line of cut and near the edge of the workpiece on both sides of the wheel.
F. Use extra caution when making a "pocket cut" into existing walls or other blind areas. The protruding wheel may cut gas or water pipes, electrical wiring or objects that can cause kickback.
G. Do not attempt to do curved cutting. Overstressing the wheel increases the loading and susceptibility to twisting or binding of the wheel in the cut and the possibility of kickback or wheel breakage, which can lead to serious injury.
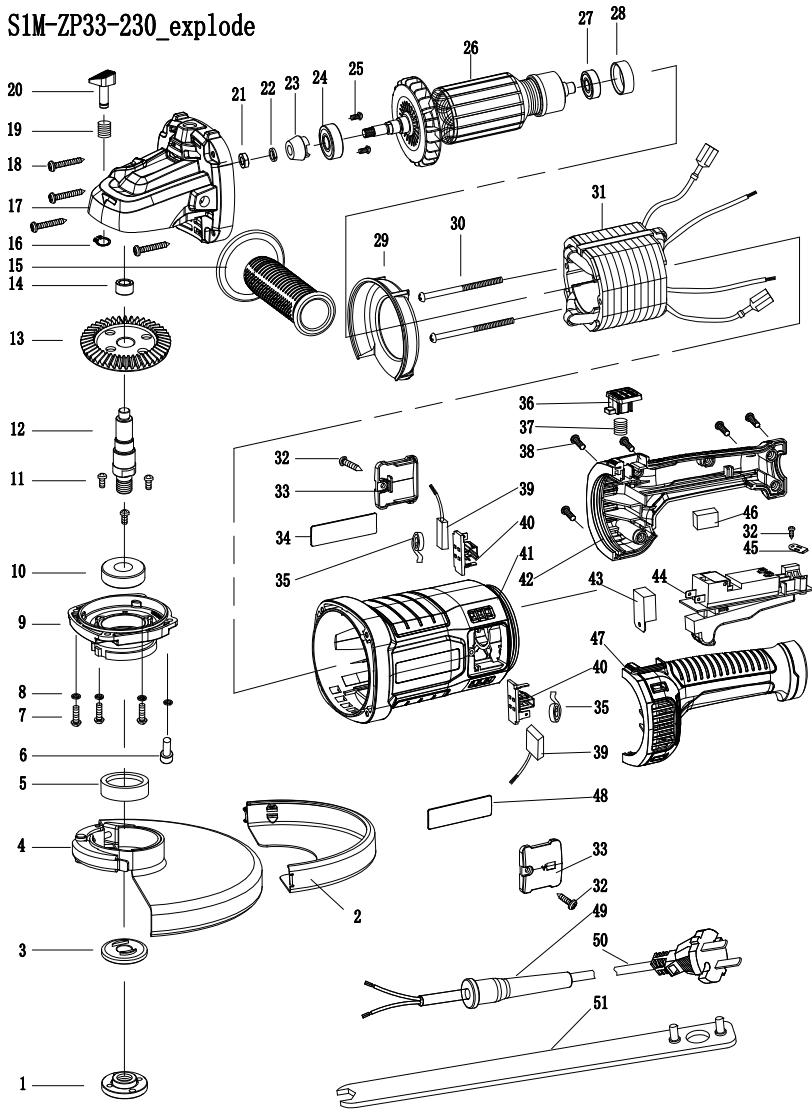
3.DESCRIPTION
Switch button
Guard locking lever
3 Auxi handle
Gearbox
5 Main handle
6 Protective cover (2 in 1 guard 230mm )
7 Lock button
8 Spanner
External ange with thread
10 Internal ange
11 Button for rotating handle
4. TECHNICAL DATA
| Model | 2100AG2-230.5001 |
| Rated voltage: | 220-240 V~ |
| Rated Power | 2100W |
| Rated no-load speed: | 6500min-1 |
| Disc diameter | 230mm |
| Disc bore: | 22.2mm |
| Spindle thread: | M14 |
| Sound pressure level: | LpA : 97,0 dB(A) |
| Uncertainty | KpA : 3,0 dB(A) |
| Sound power level | LwA : 105,0 dB(A) |
| Uncertainty | KwA : 3,0 dB(A) |
| Vibration level | <2,5 m/s2 |
| Uncertainty | K = 1,5 m/s2 |
| Machine weight | 5,4 kg |
| Diameter of grinding wheels | 230mm |
| Permitted thickness of grinding wheels | 6.5mm |
| Permitted construction of cutting-off wheels | Diamond and bonded reinforced |
| Permitted wheel diameter | 230mm |
| Permitted wheel thickness | 3.2mm |
| Maximum peripheral gap between segments for diamond cutting-off wheels | 10mm |
NOTE: The declared vibration total value(s) and the declared noise emission value(s) have been measured in accordance with a standard test method and may be used for comparing one tool with another;
The declared vibration total value(s) and the declared noise emission value(s) may also be used in a preliminary assessment of exposure.
WARNING! The vibration and noise emissions during actual use of the power tool can differ from the declared values depending on the ways in which the tool is used especially what kind of workpiece is processed;
The emissions need to identify safety measures to protect the operator that are based on an estimation of exposure in the actual conditions of use (taking account of all parts of the operating cycle such as the times when the tool is switched off and when it is running idle in addition to the trigger time).
WARNING! Grinding thin sheets of metal or other easily vibrating structures with a large surface can result in a total noise emission much higher (up to 15 dB) than the declared noise emission values. Such workpieces should as far as possible be prevented from emitting sound by suitable measures such as the application of heavy flexible damping mats. The increased noise emission is also to be considered for both the risk assessment of noise exposure and selecting adequate hearing protection.
5.OPERATION
LOCK-OFF BUTTON
The lock-off button is located on the handle above the switch trigger. You must depress the lock-off button in order to pull the switch trigger. This button resets each time when the switch trigger is released.
SWITCH TRIGGER
To turn the grinder ON, depress and hold lock-off button, then depress the switch trigger. To turn it OFF, release the switch trigger.
LOCK-ON BUTTON
Once the tool is turned ON, by pushing forward the lock on/off switch, the tool will be locked on ON mode even if you release the switch trigger.
To unlock ON mode and switch off the tool, just press and release the lock on/off switch.
GENERAL OPERATION
- If you have just installed an accessory or are beginning a period of work, test the disc by letting it spin for one minute before applying it to the workpiece. WARNING! Never use an accessory that has been dropped. Out-of-balance or damaged accessories can damage workpiece, damage the tool, and cause stress that may cause accessory failure.
- Use a clamp, vise or other practical means to hold your work, freeing both hands to control the tool.
- WARNING! Hold tool securely with both hands.
- Allow accessory to come to full speed before beginning work.
- Control pressure and surface contact between accessory and workpiece. WARNING! Never bang accessory onto work. Too much pressure causes accessory failure or slows speed.
- When finished, turn off the tool and make sure it comes to a complete stop before laying it down.
USING QUICK GUARD FOR GRINDING
For grinding operation, always use the specific guard dedicated to grinding operation.
The guard type must match the disc type to provide maximum protection for the operator if the disc should break.
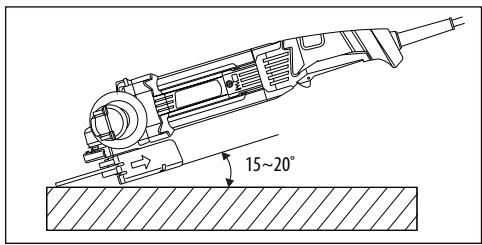
When side grinding and peripheral grinding applications, hold tools at a 15^ to 20^ angle, using constant pressure for a uniform finish.
Too great an angle causes concentrated pressure on small areas which may gouge or burn the work surface.
WARNING! When using a Type A (cut-off) wheel guard for facial grinding, the wheel guard may interfere with the workpiece causing poor control
WARNING! When using a Type A (cut-off), Type B (grinding) or Type C (combination) wheel guard for cutting-off and facial operations in concrete or masonry, there is an increased risk of exposure to dust and loss of control resulting in kickback
USING QUICK GUARD FOR CUTTING
For cutting operation, always use the specific guard dedicated to cut off operations
Quick guard for cutting is suited for small cut-off and shallow notching operations only.
WARNING: The guard type must match the disc type to provide maximum protection for the operator if the wheel should break. When using a quick guard for cutting, hold the tool as shown, using only the edge of the disc.
WARNING! Using the face of a quick guard for cutting will cause the disc to crack and break, resulting in serious personal injury
WARNING! When using a Type B (grinding) wheel guard for cutting-off operations with bonded abrasive wheels, there is an increased risk of exposure to emitted sparks and particles, as well as exposure to wheel fragments in the event of wheel burst.
WARNING! When using a Type A (cut-off), Type B (grinding) or Type C (combination) wheel guard for cutting-off and facial operations in concrete or masonry, there is an increased risk of exposure to dust and loss of control resulting in kickback
POSITIONING THE GUARD
The guard on the grinder should be correctly positioned depending on which side the handle is mounted. Never use the grinder without the guard correctly in place.
WARNING: Never place the guard so that it is in front of the grinder.
This could result in serious injury because sparks and loose particles thrown from the disc would be directed toward the operator. Always place the guard in the correct location.
To reposition the guard:
Unlock the guard clasp by pulling the clasp out, rotate the guard to its correct position, away from the grinder.
Lock the guard clasp by pushing the clasp in.
NOTE: Be sure the raised ridge on the guard is seated in the groove on the bearing cap. Never use the grinder without the guard in place and properly adjusted.

Before repositioning the guard please make sure that the powertool is unplugged from the power source.
Installing or moving protective cover
WARNING: Ensure the angle grinder is switch off and unplugged from the mains.
Depending on whether your operation is cutting or grinding, select the correct protective cover. Failure to use the right cover for operation could result in injury. When using a grinding or cutting-off wheel, the protective guard must be fitted on the tool so that the closed side of the cover always points toward the operator.
Install the guard: release the lock lever of the guard and insert it on the gear head, and turn/adjust in any desired position for maximum performance, then close the lock lever. Make sure that the fastening lever is properly locked after setting the guard.
To remove the protective cover, follow the installation procedure in reverse. The protective cover can be turned to a desired angle, but not more than 45^ on left side or right side.

Please use grinding protective cover for grinding operation.
Grinding and Surface Processing
In order to grind surface, you should use a coarse abrasive disk with a sunken centre.
You can use the abrasive disks with diameter of 125mm . The maximum thickness of disks is 6mm .
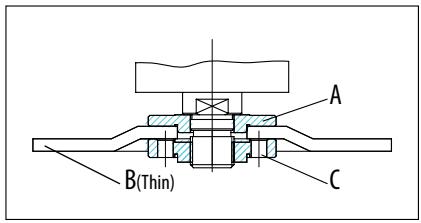
Mounting the Wheels /Disks
0Place the back flange A over the spindle making sure that it fits tight.
Place the grinding or cutting disc B on the top of the back flange, ensuring the bore fits into the step of the flange.
Mount the external flange C over the spindle.
Press the spindle lock button to lock the spindle firmly, then tighten the external flange with the spanner in clockwise direction.
Allow the angle grinder to run in idle at least 1 minute with the grinding or cutting disc correctly assembled, a vibration disc should be immediately replaced.
For flange arrangements when using grinding wheels and cutting wheels, please refer to the assembly instruction manual.

OPERATING INSTRUCTIONS / DRAWINGS
Switch ON/OFF
Switch on: Push the lock off button forwards meanwhile clenching the paddle to turn on the machine. Then keep hold it in position for continuous operation.
Switch off: Loosen the switch trigger to turn off the machine.
WARNING: Do not cover exhaust vents when the tool is in use. This may cause damage to the motor and reduce the efficiency of the tool.
Abrasive operation
When equipped with abrasive wheel and guard, for the best work results hold the grinder at 15 20^ to the work piece.
OVERLOAD
The motor of your right angle grinding machine may be damaged when overloaded. This results from excessive working pressure over a prolonged period. Therefore you should not try to accelerate your working speed by increasing pressure on your machine. The abrasive disks work more efficiently if only slight pressure is exerted on the grinding machine, thus avoiding a drop in the grinding speed.

WARNING! RISK OF INJURY! Always switch the appliance off and unplug before carrying out any work on the appliance.
Do not use any sharp objects for cleaning the appliance. Never allow any liquids to penetrate inside the appliance. Otherwise the appliance could be damaged.
Clean the appliance regularly, preferably immediately after completion of the work.
Clean the housing with a dry cloth—do NOT use petrol, solvents or cleaners which can attack the plastic.
A vacuum cleaner is required for thorough cleaning of the appliance.
Ventilation openings must never be obstructed.
Remove any sanding dust stuck to the appliance with a brush.
If the replacement of the supply cord is necessary, this has to be done by the manufacturer or his agent in order to avoid a safety hazard
CLEANING
Clean dust and debris from vents. Keep handles clean, dry and free of oil or grease. Use only mild soap and a damp cloth to clean, since certain cleaning agents and solvents are harmful to plastics and other insulated parts. Some of these include gasoline, turpentine, lacquer thinner, paint thinner, chlorinated cleaning solvents, ammonia and household deter-gents containing ammonia. Never use flammable or combustible solvents around tools.
REPAIRS
For repairs, return the tool to the nearest service center.
STORAGE & DISPOSAL
Switch the angle grinder off and unplug it.
Store the angle grinder and its accessories in a dark, dry, frost-free, well-ventilated place.
6. MAINTENANCE
Always store the angle grinder in a place that is inaccessible to children. The ideal storage temperature is between 10^ and 30^ .
We recommend using the original package for storage or covering the angle grinder with a suitable cloth or enclosure to protect it against dust.
TRANSPORTATION
Switch the angle grinder off.
Protect the angle grinder from any heavy impact or strong vibrations which may occur during transportation in vehicles.
Secure the angle grinder to prevent it from slipping or falling over.
7. TROUBLESHOOTING
| Problems | Probable causes | Corrective action |
| Device doesn’t start | On/off switch may be defective. | Repair by customer care |
| Engine faulty | ||
| Grinding tools do not move although the engine is running | Grinding disc nut is loose | Tighten grinder dies nut |
| Workpiece, remaining workpieces or remaining grinding tools block drive | Remove blockages | |
| Grinding disc does rotate smoothly,abnormal noises can be heard | Grinding disc nut is loose | Tighten grinding disc nut |
| Grinding disc is defective | Change grinding disc |
8. RECYCLING

The packaging consists of environmentally friendly material. It can be disposed of in the local recycling containers.

CAUTION! This product has been marked with a symbol relating to removing electric and electronic waste. This means that this product shall not be discarded with household waste but that it shall be returned to a collection system which conforms to the European WEEE Directive. Contact your local authorities or stocks for advice on recycling. It will then be recycled or dismantled in order to reduce the impact on the environment. Electric and electronic equipment can be hazardous for the environment and for human health since they contain hazardous substances.
ENVIRONMENTAL PROTECTION
Waste electrical products must not be disposed of with household waste. Please recycle where facilities exist. Check with your local authorities or retailer for recycling advice. It will then be recycled or dismantled in order to reduce the impact on the environment.
9. WARRANTY
PREFACE
Thank you for choosing this product. Upon designing and manufacturing our products, we place all of our efforts into ensuring an excellent quality that meets the needs of the users.
IMPORTANT! PLEASE READ THIS MANUAL BEFORE USING THIS PRODUCT, FOLLOW THE BASIC SAFETY WARNINGS WITHIN, AND KEEP IT CAREFULLY.
As soon as you open the packaging, we recommend that you check to ensure that all elements required for assembly of the product have been included.
If the product is damaged or has some defects, please do not use it, and bring it back to the nearest store.
This product is intended for outdoor use only, and must not be used inside a building under any circumstances.
This product can be placed inside a building only after having rested for two hours after the last use.
We thank you for your business and hope that you will be totally satisfied upon using our product.
We will be happy to receive all of your remarks on our online store web site.
Warranty
DEXTER products are designed based on the most rigorous quality standards for products intended for the general public.
The angle grinder is covered with a warranty of 5 years starting from the date of purchase. This warranty covers all manufacturing or material defects.
In the event of a breakdown, please refer first to the troubleshooting page (problems and solutions) in the brochure; if the problem persists, please check with the nearest store.
Your store shall spare no effort in resolving the issue.
Repairs and change of parts do not extend the duration of the initial warranty.
Breakdowns resulting from normal wear and tear or from improper use of the product are not covered by the warranty. This includes, among others, the switches, the safety circuit breaker and the motors, in case of wear.
Please note that there are specific warranty terms for certain countries.
In case of doubt, please check with your point of sale.
For claims relating to the warranty to be taken into account, the following is required:
Providing proof of purchase
- That no repairs and/or change of parts have been performed by a third party.
- That the issue is not a matter of normal wear and tear.
- That required maintenance and repair works have been performed correctly.
- That no deterioration has taken place as a result of incorrect setting of the carburetor.
- That there has been no forcing, improper handling, unauthorised use, or accidents
- That no deterioration has taken place due to overheating, resulting from clogging of the ventilator block.
- That no work has been done on the product by an unskilled person, and no incorrect repairs have been attempted.
- That the tool has never been disassembled or opened.
- That the tool has never been in a wet environment (dew, rain, submerged in water...)
- That no incorrect parts have been used, parts not made by DEXTER, whereas they prove to be the cause of deterioration
- That the tool has not been used improperly (overloading the tool, or use of non-approved accessories).
- That no damage has resulted from external causes, or foreign bodies such as sand or stones.
- That no damage has resulted from non-compliance with safety recommendations and use instructions.
The product must be used under normal usage circumstances, and for non-professional purposes. Therefore, excluded from this warranty are products used by landscaping companies, local authorities, as well as companies offering paid rentals or free loaning of equipment.
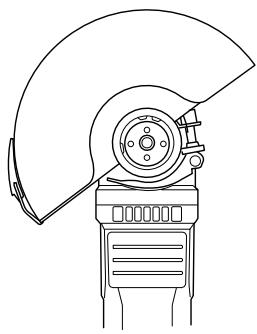
10. EXPLODED VIEW WITH PART LIST
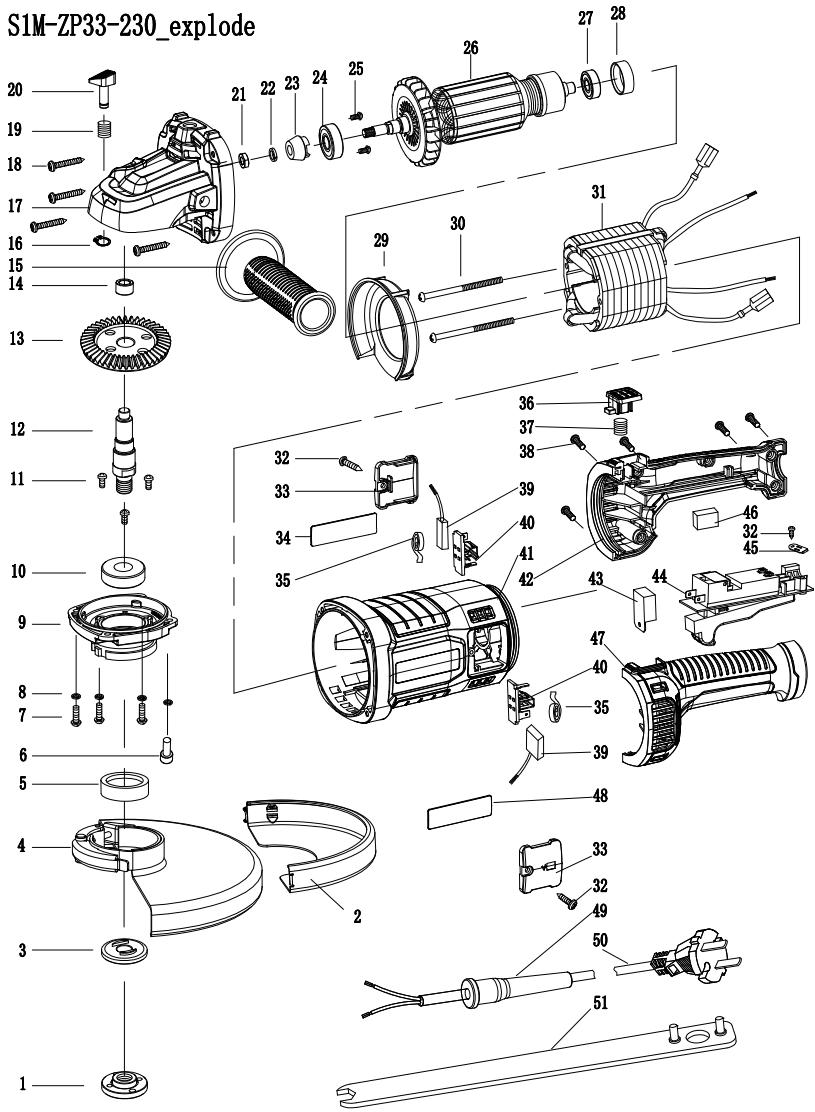
10. EXPLODED VIEW WITH PART LIST
| N° | DESIGNATION | QTY |
| 1 | Flange nut | 1 |
| 2 | Shield Type A | 1 |
| 3 | Flange | 1 |
| 4 | Guard | 1 |
| 5 | Oil seal | 1 |
| 6 | socket cap screw | 1 |
| 7 | Screw | 3 |
| 8 | Spring washer | 4 |
| 9 | Front cap | 1 |
| 10 | Bearing | 1 |
| 11 | Screw | 3 |
| 12 | Spindle | 1 |
| 13 | Gear | 1 |
| 14 | Bearing | 1 |
| 15 | Auxiliary Handle | 1 |
| 16 | Check ring | 1 |
| 17 | Gear box | 1 |
| 18 | Screw | 4 |
| 19 | Spring | 1 |
| 20 | Lock pin | 1 |
| 21 | Nut | 1 |
| 22 | Spring washer | 1 |
| 23 | Pinion | 1 |
| 24 | Bearing | 1 |
| 25 | Wood ruff-key | 2 |
| 26 | Armature | 1 |
| N° | DESIGNATION | QTY |
| 27 | Bearing | 1 |
| 28 | Bearing sleeve | 1 |
| 29 | Fan guide | 1 |
| 30 | Screw | 2 |
| 31 | Stator | 1 |
| 32 | Screw | 3 |
| 33 | Brush cover | 2 |
| 34 | Nameplate | 1 |
| 35 | Brush spring | 2 |
| 36 | Rotation lock trigger | 1 |
| 37 | Spring | 1 |
| 38 | Screw | 5 |
| 39 | Brush | 2 |
| 40 | Brush holder | 2 |
| 41 | Housing | 1 |
| 42 | Handle (R) | 1 |
| 43 | Soft start | 1 |
| 44 | Switch | 1 |
| 45 | Cord clamp | 1 |
| 46 | Capacitance | 1 |
| 47 | Handle(L) | 1 |
| 48 | Brand logo label | 1 |
| 49 | Cord armor | 1 |
| 50 | Cord plug | 1 |
| 51 | Spanner | 1 |

This product is recyclable. If it cannot be used anymore, please take it to waste recycling centre.

EN.*Machine 5-year guarantee
www.product-regulatory.adeoservices.com
Imported by Adeo South Africa (PTY) LTD T/A Leroy Merlin,
Hosted in Leroy Merlin Fourways Store, 35 Roos Street, Witkoppen Ext 97,
Sandton, 2191 Johannesburg, Gauteng, South Africa
Tel. +27 10 493 8000 Email: contact@leroymerlin.co.za