USER MANUAL 12SD2-25RC.1A 20SD2-35RC.2A 20SD2-35RC.2B DEXTER
| N° | Description | N° | Description | N° | Description |
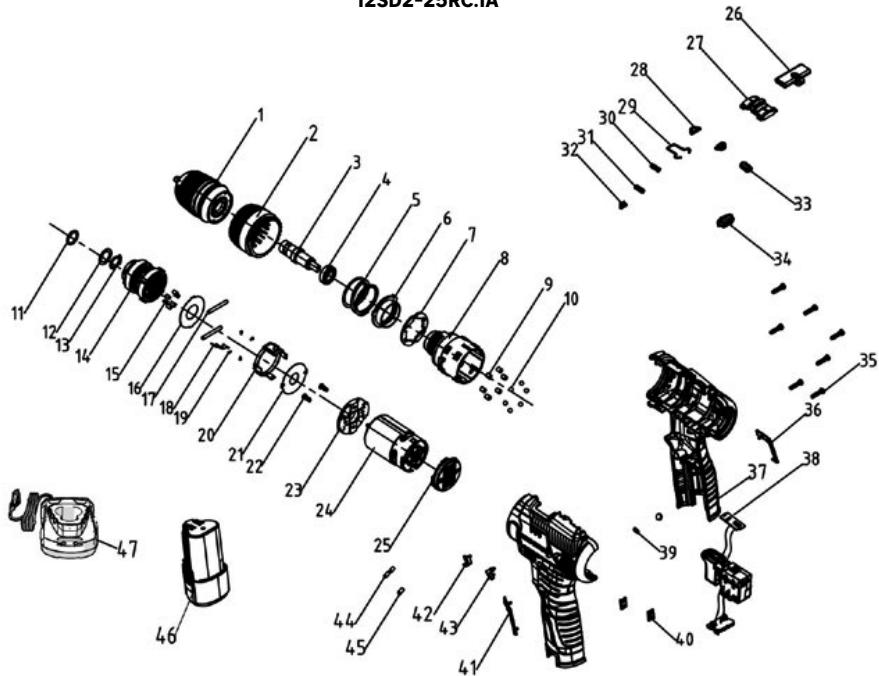
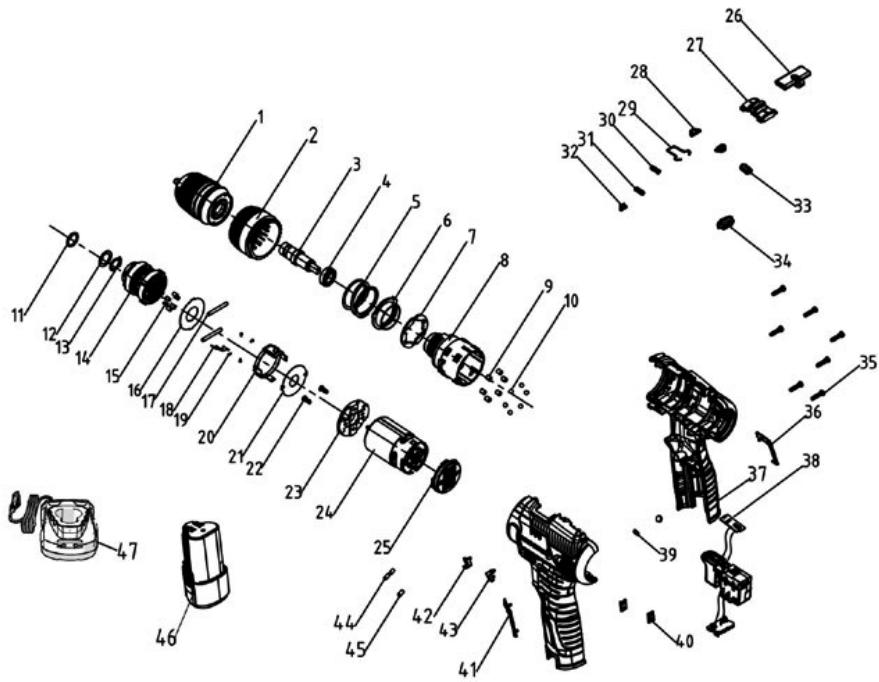
| 1 | Chuck | 17 | Gaske | 33 | Push rod |
| 2 | Cover plate for torque sleeve | 18 | Srew ST3*12(T type) | 34 | Screw ST3*14(T type) |
| 3 | Output shaft | 19 | Vis ST3*12 (type T) | 35 | Right decorative part |
| 4 | Torque sleeve 21+1 | 20 | Jnner ring side pin | 36 | Housing |
| 5 | No. 64 powder metallurgy assembly | 21 | Toggle support | 37 | Switch assembly |
| 6 | Internal thread | 22 | Big gasket | 38 | Transparent lampshade |
| 7 | (No 10)Spring for torque sleeve | 23 | Motor end cap | 39 | Left decorative part |
| 8 | Gasket for torque sleeve | 24 | Screw M3X6 | 40 | Left arrow |
| 9 | Deep groove ball bearing | 25 | Motor | 41 | Right arrow |
| 10 | O-ring | 26 | Back cover | 42 | Belt hook No3 |
| 11 | No 7 tuning fork | 27 | Indicator arrow | 43 | Screw M4X8 |
| 12 | Front shell for gear box | 28 | Speed adjustment button | 44 | Heat shrink tube |
| 13 | Torque needle roller | 29 | No 10 Elastic steel wire | 45 | Magnetic ring |
| 14 | Steel ball | 30 | Spring for speed adjustment button | 46 | Battery pack |
| 15 | Circlip | 31 | Forward and reverse light board | 47 | Charger |
| 16 | Self-locking pin | 32 | Indicator cover | | |
USO PREVISTO
B. ΣYNTHPHΣH TOY KINHTHPA
| 3abЖди Вд'сdнуTe ппстriй Вд мерекi
пicя BИКористань аб оретд Тхичим
обслуговваням |
| Д�� заMuMuMuMuMuMuMuMuMuMuMuMuMuMuMuMuMuMuMuMuMuMuMuMuMuMuMuMuMuMuMuMuMuMuMuMuMuMuMuMuMuMuMuMuMuMuMuMuMuMuMuMuMuMuMuMuMuMuMuMuMuMuMuMuMuMuMuMuMuMuMuMuMuMuMuMuMuMuMuMuMuMuMuMuMuMuMuMuMuMuMuMuMuMuMuMuMuMuMuMuMoMuMuMuMuMuMuMuMuMuMuMuMuMuMuMuMuMuMuMuMuMuMuMuMuMuMuMuMuMuMuMuMuMuMuMuMuMuMuMuMuMuMuMuMuMuMuMuMuMuMuMuMuMuMuMuMuMuMuMuMuMuMuMuMuMuMuMuMuMuMuMuMuMuMuMuMuMuMuMuMuMuMuMuMuMuMuMuMuMuMuMuMuMuMuMuMuMuMuMuBuBbBbBbBbBbBbBbBbBbBbBbBbBbBbBbBbBbBbBbBbBbBbBbBbBbBbBbBbBbBbBbBbBbBbBbBbBbBbBbBbBbBbBbBbBbBbBbBbBbBbBc | |
UP20 YhIbpcalbHn: cymicn tiNbKn 3 Sterwins UP20, Lexman UP20, ta Dexter UP20
TEXHIHDAHI
| Модевь | 12SD2-25RC.1A | 20SD2-35RC.2A | 20SD2-35RC.2B |
| HOMIHАльна HANРУТA | 12V d.c. | 18V d.c. (Max 20V d.c.) |
| ШВДКICTь n0 | 0-400/0-1500/min | 0-400/0-1500/min |
| DIAMETR ПATROНу | Ø10mm | Ø13mm |
| MAKCIMAJьний
ДIAMETR
СВЕРДПИХЯ | Деревиha | 25mm | 35mm |
| Metan | 8mm | 10mm |
| Вага | 0.87kg | 1.19kg |
| PIBEнь 3BYKOBОTO TИСКУ Lpa | 69dB(A) | 79dB(A) |
| PIBEнь 3BYKOBОЛ NOTΥKHOCKTI
Lwa | 77dB(A) | 71dB(A) |
| ПОХИБKA Кра, Кwa | 5 | 5 |
| ЗАГАЛБЕ 3HAЧЕНЯ BIBPAQUII
Сberдлиниmetалу ah,D | 0.699m/S2 | 0.706m/S2 |
| ПОХИБKA K | 1.5m/S2 | 1.5m/S2 |
| ИнФОРMAЦЯ ПО
АКУМУЛТOPНУ БАТAPEЮ ТА
ЗAPДНЙ ПИСТРΙй | Homeр мордилд дakуштоги
батаре: MLC3H-202(SJ20) 12V d.c. 2.0Ah;
24Wh; 3 Li-ion cells; 12BA2-20L.112Vd.c.; 2.0Ah; 24Wh; 3 Li-ion cells; INR18650-2000; 12BA2-40L.112Vd.c.; 4.0Ah; 48Wh,
6 Li-ion cells; INR18650-2000; Homeр мордилд дakуштоги постю:
ЛH201351500G Bxid; 100-240VAC;50-60Hz;30W Bxid; 13.5V d.c.; 1500mA;
UAOC-01 Bxid; 200-240VAC, 50-60Hz,
24W Bxid; 12.9Vd.c. 1.5A | CymicnicbT 3ucima
akушлтоги Дытгчп.
СуmicnicbT 3ucima зapадими
псисчрми UP20 |

NONEPEDKEHHA:
Pibeh Bi6pauii Ta pibeh uMy niD yac faKTNUHOro BUNKOpNCtAHN eJekTpoIHCTpymeHTa MoKe BiDi3HnTcB iD 3aJeKlnapOBaHnx pIBHIB 3aJIeXHO BID yMOB, y JIKNX BUNKOpNCTOByETbCra eJekTPOIHCTpymeHT, a TAKOJK BID TORO, kA came 3aROTOBKa o6p6nEbC;
3HaueHnHa B6paui Heo6xDiI nIe Bn3HaueHn 3axOIB 6e3neKn Inn 3axNCTy KopncTByaay, kI rpyHTyOTbCa H o CIIOHOBaHI bINiBy Bi6paui y peaIbHnx yMOBX BIKOPNCtAHn (3BaXaOuH Na BCI detani OnerapaiHoro LKny, TaNX JAc BmKHeHH nHCTpyMeHTy i cac p060Tu 6e3 HabAHTaKeHH, Ha DoDAToK Do acy 3anCky).
PnmiTka:
- 3aBHeH 3aRaIbHnPiBeH Bi6paui Ta 3aBHeHn PiBeH yMy 6yNo BmIpHaBIOiHO Do cTaNapTHOro MeToDy TeCTyBaHHa.BoH MoKyt b 6yTu BnKOpNCaHI dny NopIBHHO odHoro eNeKTpoIHcTpymenta 3 iHNIM.
-3aBnHn 3araIbHn pibeHb Bi6paui Ta 3aBHeHn pibeHb ShyMy MoKyt b tyTn TAKoK BnKOpncTaHi B nonepednix ociHOBaHNx BpNBy Bi6paui.
- YHnKaIte np3nKy Bi6pauii.
Popa:
1) ni ā cac pòobTn B冈kopncTObyīTe pykabuci
2) 6mexkyTe yac BVKOpncTaHnHa Ta cKoOpuyTe yac 3aNyScy
EKCJITYATALIA

IIOPEJXEHH: Ipej noaTKOM BBeDeHHo6laHaHHB EKcnnyataciio NOro cniD BiD'cHaTI Bid eJeKtpomepexi.
BCTAHOBJIENHH CBEPIIA
Bn6epiTb CbePnlo, 0io nixoDnTb DnBnKohyBaHoi po6Otn. Ipn OtpMaHH HaKpaunx pe3ynbTaTIB cnId KopncTyBaHcra roctpumn CbePdAmn.
- Lio6 po3TnCHyTN KynauKn 3aTnCKHOro NaIpoHa, yTpmyTe KInbue, oNHOuacHo NOBepTaOnu MyfTy npOtn RoDHHNKOBoi cTpiIKn. BcTaBte CbePdIo B NaIpoH i BiDcEHTpyTe NOrO B KynauKax 3aTnCKHOro NaIpoHa.
- Lio6 3aTnCHyTN KyaunK 3aTnCKHOro NaTPOHa, yTpMnyTe KInbue, OJHOacHo NOBepTaOuN MyOTo 3a RoDINHHKOBOO CTpiKIOU. HadiiHO 3aTgHIb II.
3.ДлЯ ВИМань CBepДи BA BIVKOHaIte Diy 3BOPOTHOMY NOpRdKy.
ПРМITKA:у реверсиВнх дрлях 3атнckи патони 3аьжд Фikсютбя 3a ДОпOMою ГИNTа 3
ЛЮСТОРОн HIM pi3b6лeнHM.У BiДNOВΙДНOMу Виадку поед 3нгTTМ патона Heo6xIDH NO nocla6nTи
ГВИNT.LU6 nocla6nTи ГИNT,И�О CПД ВИКPyuВaTN 3a RoINHHNKOBOIO CTPIKIO.
OBEPTAHN BINEPDAH3AD
- Дя обертунь Впецд (за говинковоюстриковою) вcertановы лиме поожен.
<|im_start|>assistant
- Дя обертунь Впецд (за говинковою)
<|im_start|>assistant
- Дя обертунь Впецд (за говинковою)
<|im_start|>assistant
- Дя обертунь Впецд (за говинковою)
<|im_start|>assistant
- Дя обертунь Впецд (за говинковою)
<|im_start|>assistant
- Дя обертунь Впецд (за говinder)
<|im_start|>assistant
- Дя обертунь Впецд (за говinder)
<|im_start|>assistant
- Дя обертунь Впецд (за говinder)
<|im_start|>assistant
- Дя обертунь Впецд (за говinder)
<|im_start|>assistant
- Дя обертунь Впецд (за говinder)
<|im_start|>assistant
- Д借贷:
- Д借贷:
- Д借贷:
- Д借贷:
- Д借贷:
- Д借贷:
- Д借贷:
- Д借贷:
- Д借贷:
- Д借贷:
- Д借贷:
- Д借贷:
- Д借贷:
- Д借贷:
- Д借贷:
- Д借贷:
- Д借贷:
- Д借贷:
- Д借贷:
- Д借贷:
- Д借贷:
- Д借贷:
- Д借贷:
- Д借贷:
- Д借贷:
- Д借贷:
- Д借贷:
- Д借贷:
- Д借贷:
- Д借贷:
- Д借贷:
- Д借贷:
- Д借贷:
- Д借贷:
- Д借贷:
- Д借贷:
- Д借贷:
- Д借贷:
- Д借贷:
- Д借贷:
- Д借贷:
- Д借贷:
- Д借贷:
- Д借贷:
- Д借贷:
- Д借贷:
- Д借贷:
- Д借贷:
- Д借贷:
- Д借贷:
- Д借贷:
- Д借贷:
- Д借贷:
- Д借贷:
- Д借贷:
- Д借贷:
- Д借贷:
- Д借贷:
- Д借贷:
- Д借贷:
- Д借贷:
- Д借贷:
- Д借贷:
- Д借贷:
- Дя обетаннаиоту рогиньо CTpikn) bctaHOBiTpepeMHKaU pape NOLOKeHH. He3BaXaOHHa Te, lo MExaHIm 3bOkyBaHH 3an06Irae 3MiH HaprMky o6eTaHH IHCTpyMeHTa nid qac po60t DnBryHa, nepu HiK 3mHOBaTHn HaprMOK o6eTaHH, doyeKaItec nobHOI 3ynHNKn npInnay.

PONEPENKENH: Aki nopeMnKa uopeTahn BnepeHa3aBCTaHO B cHTpaIbHOMy PNOJKeHH, puiJa He BMnKaeTbcra.
PEYJIIOBAHHI LIBNKOCTIO BEOPTAHH

ПОЕРДЖЕнг: 3abKd npebEpiaTe, lo6n JxNbIeHn BiDnobIaNo 3NaueHHIO, aKe Bka3aHe Na 3aOoDbki Ta6muci iHcTpymenta.
Leyi nctpymEn Ochauheny fynkciio peryIIOBaHHa WbIKoCTi oepTaHH, kA dae MoKJIINBicTb 36ilbWbATn WbIKcTb 3abJAKN 36ilbWeHHTO TCKY Ha cnYcKOBI rayOK.
山BvdkicTbpeyIIOeTbcSINIOHaNTCKaHHaCnyckOBnraOK.
CbITNoIOIOHa JIaMNa BMnKaeTbcraABTomAHTuH0,RAUHOHaTNCHTN Ha CnyCKOBn RaOH.
ПДГOTOBKA ДО CBEPДИHHA
Ll06 3ayncttni nhtpymeH, HATNCHtB Ha cnyckOBn rauok peylnoBaHHra WbNdkocTi o6epTaHH. L06 3ynnHTn i nhtpyMeH, BiDnycttB cnyckOBn rauok.
CBEPINHHOTBOPIB
KuIIO noTpi6HNO pOcBepdIHTN OTbip BENIKORO diaMeTpA, iHOJI BAPTO NOaTN 3i CBePdNA MeHIoRO p03Mipy, a NotIM p03UnpITN OTbIP Do NoTpi6HOro p03Mipy. Lcze3anobirae nepeBaHTaxeHHIO dpnII.

IIOPEJXEHH: Barato HeuacnBnnaKIB Bi6ybaTbca Yepe3 Henepe6aehi Cntyaui.
Pam'raTte, 0o BncBepdNIOBaHH HebeNKoro OTbOpY, Oc6nBO B MetaI, MoKe np3BeCTn Do
3aTnCKaHH CBePDla.
-ПдчacВисвердлованнглбokиxOTbOpIB BИКОпСТОуTe MeToД 3aRlNsHeHHI I BИMaHHa CBepdna,山06ВиДаЯTNCTpyKky3OTbOpy.
- JIcBcBpIIO 3aCtpraIO, cIi HeaHIO BmKHyTn IprInb, IIO6 yHnKHyTn Ioro cepno3Horo ykoJKeHH.
- LIO6 BnBilbHNTn CBepeIIO, Cnpo6yTe 3miHNTn Haprrmok Ioro OeepTaHHN.
-BuipBnIe CBePdNo B OTBopi. B iJeani CBePdNo Mae BXoNTu B 3aOToBky NiD npRMM KytOM. RaIIO nIac CBePdNInHry KyT 3MiHNBcR, To CBePdNo MoKe 3NaMaTncs, 3aCTpRHyTu B OTbopi I HABiTb 3aBdaTI TpaBMn.
- 3MeHsItb Tnck, KOJI NCBepINO 6yde 6IIN3bKO IO KpaIO MaTepiAly, B JAKOMY BVNCBepDIOCTbcr OTBip.
- He TnchItb Ha dprnil. IHcTpymeHT Maε npaioBAtu y BlaChOMy TeMNI.
- CπiδκηγιTe 3a ΣιΜ, Σιος CBερДλα δυγίνη τοςτριμή.
CBEPJIINHNADEPEBUNH
TEXHIYHE OBCJLYTOBYAHH

PONEPEDKEH: He donyckaTe notpapanJHHraIbMbHnX piINH, 6eHNHy, NaFTOnpoDyKTIB, npocOuyBaJIbHnx 3ac0b IB ToIO Ha IpaTcIKOBi DeTani. BOHN MICTaTB xIMiHi peOBUHNI, kI MOxTyB noIshKoNDtN, noCna6HTn a60 3pyuHbATn KOpNc, nOpuyuBUn cIIicHicTb noDbIHO i3OJaJI.

PONEPENKENH: Ipeep6ydb-jaKIM HaJaIaHTyBaHHa 60TexHiHM 6ocnyroByBaHHa 3aJxN BID'cHynte npncpti BId Mepeki KINBLeHH.
KuIIO NOUKOJKeHn IHyp KInBHeHn, 06 yHKnHytn He63neHnx CItyaui NOro 3aMHy Mae 3dIiCHIOBAtn BnO6HnA 60 NiO cepBicHn aReHT. RaIIO UHyp KInBHeHn NOnKoDKeHn, HeraiHO BmKNHtB pIncTpiB iD MepeXi KInBHeHn. BepeXiTb IHCTpyMeNT BID DoUy.
JkUo Heo6XiDHO 3amHInTu ByrIbHi UitKn, ce Mae 3poBtu KbaIiOkaOBaHm faxibeCb i3 pEmOnTy (3abXdn 3amHInoute 06uDi Bui OJHouacHo). EneKTPOIHCTpyMeHT He notpe6yE doatKOBoro 3MaueHHA 60 texHicHOrO 06cIyROyBaHHa. HikOIHe Be BIKOpNCTOByTe BoHy a60 ximHi 3ac6bI dIra OUYueHHe EneKTPOIHCTpyMeHT. IpOTnpaTe Ioro cyxOIO TKAHNHO. 3abXdn 36epiraTe eNEKTPOIHCTpyMeHT y cyxomy MICl.
CTeKTe 3a YnCTOToO OTBopB INI BENTINJyHa. He DOnyUcKaIte NtPapnnHnNny Ha opraHn YnpaBnIHn. IHOi MoXHa NIObAunTI cIKpn UpeE3 BeHTINJcIHn OTbOpN. Lc HOpMaJIbHo I He 3aWKnOuTb eLEKToPiOHCTpymEtY. BUnOpNCToBouYte IHCTpymEt 3a TeMnepaTyPrn HbKOInuHbOro cepedOBuTa bID 0^ do 40 ^ C
BidiHocHa BOnorictb y npimiuieHHi He Mae nepeBnUyBaTu 80% BOHO Mae 6ytu 3axuHem B iD 6e3nocepedhboro BnInBy doouy HnMipHoro BMicty Nnny B nobitpi. Be nEektpoHcTpyMeHTi E deKilbKa 0cbnyrobybaHx DeTalei.
UCYHEHHHHECITPABHOCTEI
Pemonti 3aMiHa chaTnH He NIOOBKJuToB NoaTkoBOrO rapaHTiHOro TepmiHy.
ГараNTI He ПОШИРЮЕТСА Ha HecправноCTi, NOB'3aHI 3 He npabINbHIM BnKOpNCTaHHM a60 HopMaJIbHIM 3HOCOM iHCTpyMeHTa.
Lc, 30kpeMa, cTocyeTbca 3Hocy nepemkaiv, 3anobixKnKIB Ta DnBirHyIb.
Дяpoэглу npeteH3i 3a rapaHTIEOMaTb 6yTu DoTpmaHi TaKi yMOBn:
-Пдтбженидати Куньи Вигляд Квпанцii;
- KoDiHcTOpOHHi Oco6n He npOboDnI npMoHT Ta/a60 3aMHy DeTaJe;
-Пюоблема He noB'ЯзANA 3ПрироДнIM 3HOCOM;
- IHCtpymeHT BnKOpNCTOByBaBCr npaBnIbHo (He 6yINo npeBaTaXKeHHr iHCTpyMeHTa a6o He BnKOpNCTOByBaNcO rHeI03BOJIeHe pINJaI;
- Heo6xidihi p060nti 3 texhiHoro o6cIyroBvBaHHa Ta peMOHTy 6yIn BnKoHaHi HaneXHM uHOM;
- He 6yno BnnaKIB nepeBaHTaJxHeHH, HnnpabInbHOro NOBoJxHeHH, HecaHKcioHOBaHOro BnKOpncTaHH a60 noUkOJxHeH;
- Hemae noiKoJKeHb BiD iii 3OBHiJHix YHHNKiB a60 cTOpOHhIX npedMeTIB, HapnKnad, nicky a60 KaMInHn;
- Hemae nouKoJxKeHb yHacnIIOK HeIoTpmaHHpeKoMeHdaui i3 6e3neKn Ta iHcTpyKcii 3 ekCnPyataui;
- 3 HaIoro 60ky HeMaE JKOdHx φOpC-MaKOpHx 06cTaBnH;
- He 6yIIO BnKOpncTaHO JKOJHOI HEBINOBiHDOIeTANI,JeTANI, BNIOTOBNeHOI He KOMNaHIEO Dexter, kUIO 6yIe DOBeDeHO, IIO cAme BOHN BnBUNNCNpInuHIO NOripSeHHraCTAHY;
- Ipe6byaHnI hCTpymEnTa/aKymyTOpa/3aprAnHOrO pIncTpoU y BOnoromy cepeobu (poca, dou, 3aHpyenHry y Body ToLIO);
-ОпссakarngДодаeТься.
YMOBn rapaHti 3aCTOCOByIObC B NoEHaHHI 3 HaHIMN yMOBaMn IpoJaXy N IOCTaBKn.
Hecnpabhi i nctpymEnTu, 10 niIJIraHOb NOBepHeHHo KOMnaiDexter uepe3 npedCTabNka Dexter, 6dyTb npinHrTI IINe ToDi, KOIn TObap 6yde HaleXHM uHOM ypaKOBaHN.
KuHcnpabHToBapn BiIpaBnIOb63nocepeHbO B KOMpaHIO Dexter, Dexter 3moKe oboNTu Ce BiIpaBHeHHr TlkbN B TOMaKn Ky, KaIoo BiIpaBnIK CpNaTb TpaHCnOpTHi BVtpan.
Dexter He npinMae TOBapn, kIyNakOBaHi HeHaJIeXHmM YINHom.
12SD2-25RC.1A
The machine is intended for driving in and loosening screws as well as for drilling in wood and metal.
Do not use machines, tools and accessories for additional applications (see manufacturer's instructions) or for works other than those for which they are designed for.
The drill and screwdriver bit recommendations are to be observed.
SPECIFIC SAFETY WARNINGS
1/Safety instructions for all operations
A. Hold the power tool by insulated gripping surfaces, when performing an operation where the cutting accessory or fasteners may contact hidden wiring. Cutting accessory or fasteners contacting a «live» wire may make exposed metal parts of the power tool «live» and could give the operator an electric shock.
2/ Safety instructions when using long drill bits
A. Never operate at higher speed than the maximum speed rating of the drill bit. At higher speeds, the bit is likely to bend if allowed to rotate freely without contacting the workpiece, resulting in personal injury.
B. Always start drilling at low speed and with the bit tip in contact with the workpiece. At higher speeds, the bit is likely to bend if allowed to rotate freely without contacting the workpiece, resulting in personal injury
C. Apply pressure only in direct line with the bit and do not apply excessive pressure. Bits can bend causing breakage or loss of control, resulting in personal injury.
Additional safety warnings
- Switch the power tool off immediately if the application tool becomes blocked. Be prepared for high torque reactions which cause kickback. The application tool becomes blocked when it becomes jammed in the workpiece or when the power tool becomes overloaded.
- Hold the power tool securely. When tightening and loosening screws be prepared for temporarily high torque reactions.
- Secure the workpiece. A workpiece clamped with clamping devices or in a vice is held more secure than by hand.
- Use suitable detectors to determine if utility lines are hidden in the work area or call the local utility company for assistance. Contact with electric lines can lead to fire and electric shock. Damaging a gas line can lead to explosion. Penetrating a water line causes property damage or may cause an electric shock.
- Always wait until the power tool has come to a complete stop before placing it down. The application tool can jam and cause you to lose control of the power tool.
- Hold the power tool firmly with both hands and make sure you have a stable footing. The power tool can be more securely guided with both hands.
- In order to prevent the power tool from being switched on unintentionally, always unlock the lock on button. To do so, briefly press the On/Off switch.
- Application tools can become hot during operation. There is a risk of burns when changing the application tool. Use protective gloves to remove the application tool.
- Children and frail people must not use this tool. Children should be supervised at all times if they are in the area in which the tool is being used. It is also imperative that you observe the accident prevention regulations in force in your area.
RESIDUAL RISKS
The following hazards may arise in connection with the tool's construction and design:
-
Risk of electrocution if electric cables are drilled into - Always grasp the tool by designated handles, do not touch the drill bits.
-
Damage to the respiratory system - Wear respiratory protection masks containing filters appropriate to the materials being worked. Ensure adequate workplace ventilation. Do not eat, drink or smoke in the work area.
- Damage to hearing - Always wear effective hearing protection and limit exposure to noise.
- Damage to eyes from flying dust and debris particles – Always wear suitable eye protection.
- Injury caused by vibration - Hold the tool by designated handles and limit exposure to vibration. See "RISK REDUCTION".
- Injury caused by dust - Dust created by operating the product can cause respiratory injury. wear an appropriate dust control mask with filters suitable for protecting against particles from the material being worked on.
RISK REDUCTION

WARNING: the vibration emission and noise emissions during actual use of the power tool can differ from the declared total value depending on the ways in which the tool is used, especially what kind
of work piece is processed; Identify safety measures to protect the operator that are based on an estimation of exposure in the actual conditions of use (taking account of all parts of the operating cycle such as the times when the tool is switched off and when it is running idle in addition to the trigger time). Depending on the actual use of the product the vibration values can differ from the declared total! Adopt proper measures to protect yourself against vibration exposures! Take the whole work process including times the product is running under no load or switched into consideration! Proper measures include among others regular maintenance and care of the product and application tools, keeping hands warm, periodical breaks and proper planning of work processes!
This tool may cause hand-arm vibration syndrome if its use is not adequately managed. Helping to minimise your vibration and noise exposure risk :
- Always use sharp chisels, drills and blades.
- Maintain this tool in accordance with these instructions and keep well lubricated (where appropriate).
- If the tool is to be used regularly then invest in anti vibration and noise accessories.
- Plan your work schedule to spread any high vibration tool use across a number of days.
It's recommended to wear ear protection during operation with this machine.
| Read instruction manual carefully |
| CE | This device complies with the applicable European directives and an evaluation method of conformity for these directives was done. |
| EAC | Single mark of circulation of products on the market of the Member States of the Customs Union |
| This device complies with applicable Ukraine technical regulations |
| Waste electrical products must not be disposed of with household waste. Please recycle where facilities exist. Check with your local authorities or retailer for recycling advice. |
| Recyclable products subject to extended producer responsibility. Observe the associated sorting instructions. |
| Safety glasses mandatory |
| Ear protection mandatory |
| Protection gloves mandatory |
| Dust mask mandatory |
| This danger notice warns of damage to the appliance or others properties, or may cause physical injuries. |
| For indoor use only, do not expose to rain. |
| T3.15A | If the current of the charger is higher than 3.15A, the current to the outlet will be stopped by the fuse. |
| Read the instruction handbook and follow all warnings and safety instructions. |
| Protection Class II |
| MAXIMUM | Use and store the battery within an temperature below 45°C |
| Do not disassemble, crush, heat above 100°C; Never expose the battery to microwaves or high pressures. |
| Li-on battery. This product has been marked with a symbol relating to 'separate collection' for all battery packs and battery packs. It will then be recycled or dismantled in order to reduce the impact on the environment. Battery packs can be hazardous for the environment and for human health since they contain hazardous substances. | |
| Always unplug the device after use or before maintenance |
| To reduce the risk of electric shock, do not expose to water |
UP20 Universal: compatible only with Sterwins UP20, Lexman UP20, and Dexter UP20
TECHNICAL DATA
| MODEL | 12SD2-25RC.1A | 20SD2-35RC.2A | 20SD2-35RC.2B |
| RATED VOLTAGE | 12V d.c. | 18V d.c. (Max 20V d.c.) |
| SPEED n0 | 0-400/0-1500/min | 0-400/0-1500/min |
| CHUCK CAPACITY | Ø10mm | Ø13mm |
| MAX DRILLING DIAMETER | Wood | 25mm | 35mm |
| Metal | 8mm | 10mm |
| WEIGHT | 0.87kg | 1.19kg |
| SOUND PRESSURE Lpa | 69dB(A) | 79dB(A) |
| SOUND POWER Lwa | 77dB(A) | 71dB(A) |
| UNCERTAINTY Kpa, Kwa | 5 | 5 |
| VIBRATION TOTAL VALUE Drilling in metal ah,D | 0.699m/S2 | 0.706m/S2 |
| UNCERTAINTY K | 1.5m/S2 | 1.5m/S2 |
| BATTERY PACK AND CHARGER INFORMATIONS | Model no for battery pack:MLC3H-202(S20) 12V d.c. 2.0Ah;24Wh; 3 Li-ion cells; 12BA2-20L.1;12Vdc.;2.0Ah;24Wh,3 Li-ion cells; INR18650-2000;12BA2-40L.1;12Vdc.;4.0Ah;48Wh,6 Li-ion cells;INR18650-2000;Model no for Charger:JLH201351500G Input:100-240VAC;50-60Hz;30W Output:13.5V d.c.;1500mA; UAOC-01 Input:200-240 VAC, 50-60Hz,24W Output: 12.9Vdc. 1.5A | Compatible with all UP20 batteriesCompatible with all UP20 chargers |

WARNING:
The vibration and noise emissions during actual use of the power tool can differ from the declared values depending on the ways in which the tool is used especially what kind of workpiece is processed;
The emissions value need to identify safety measures to protect the operator that are based on an estimation of exposure in the actual conditions of use (taking account of all parts of the operating cycle such as the times when the tool is switched off and when it is running idle in addition to the trigger time).
Note:
- The declared vibration total value and the declared noise emission value have been measured in accordance with a standard test method and may be used for comparing one tool with another.
- The declared vibration total value and the declared noise emission value may also be used in a preliminary assessment of exposure.
- Avoid vibration risk.
Suggestion:
1) wear glove during operation
OPERATION

WARNING : The device should be disconnected from the mains before putting into operation
BIT INSTALLATION
When selecting a drill bit, use the right type for your job. For best performance, always use a sharp drill bit.
- To open the chuck jaws, holdits collar while turning the sleeve in the counter clockwise direction. Insert the drill bit deeply into the chuck, and then center the bit in the chuck jaws.
- To close the chuck jaws, hold the collar while turning the sleeve in the clockwise direction.Tighten securely.
- Remove the drill bit in reverse order.
NOTE: The chucks of reversible drills are always fixed by a screw with a left hand thread. The screw must be loosed before the chuck can be removed if necessary. To loosen the screw, turn it in a clockwise direction.
FORWARD / REVERSE ADJUSTMENT
- For forward (clockwise) rotation, push the forward /reverse switch to the left position.
- For reverse (counterclockwise) rotation, push the forward/reverse switch to the right position. Although an interlock prevents reversing the tool while the motor is running, allow it to come to a full stop before reversing.

WARNING: If the forward / reverse switch is in the central position, the tool can not be switched on.
VARIABLE SPEED TRIGGER SWITCH

WARNING: Always check that the power supply is the same as that indicated on the nameplate of the tool.
This tool has a variable speed switch which can reach higher speed with increased trigger pressure. Speed is controlled by the pressure to the switch trigger. The variable speed feature is particularly useful when starting drilling. It also enables you to select the best speed for a particular application.
To limit the maximum speed of the tool, rotate the dial on the front of the trigger until the desired setting is achieved. Turn the dial to the "+ direction to increase the speed and to the " - direction to decrease the speed.
NOTE: It is recommended to use the variable speed feature for a short time only. Do not continuously operate the tool at different speeds. It may damage the switch.
LED WORKLIGHT
The tool has a LED light to illuminate the work area and improve vision when working in areas with insufficient lights.
The LED light will switch on automatically while the trigger switch is depressed
START DRILLING
Start the tool by squeezing the variable speed trigger switch. Release the trigger to stop the tool.
HOLE DRILLING
When attempting to drill a large diameter hole, it is sometimes best to start with a smaller drill bit then work up to the required size. This prevents overloading the drill.

WARNING: Many accidents occur because of unforeseeable situations. Please pay attention that drilling-out a small hole may cause the drill bit to jam in the hole, especially when drilling metal.
- Remember to use a "wood-pecker" action on deep holes to allow the swarf to be ejected from the hole.
- If the drill bit snags, switch off immediately to prevent permanent damage to the drill.
- Try running the drill in reverse to remove the bit.
- Keep the drill in line with the hole. Ideally, the drill bit should enter at right angles to the work. If the angle is
changed during drilling, this could cause the bit to snap off, blocking the hole and perhaps causing injury.
- Reduce pressure as the drill is about to break through the item being drilled.
- Don't force the drill, let it work at its own pace.
- Keep the drill bit sharp.
DRILLING WOOD
For maximum performance when drilling larger holes, use auger bits or spade bits for wood drilling.
- Set the tool to the drill mode.
- Begin drilling at a very low speed to prevent the bit from slipping off the starting point. Increase the speed as it bites into the wood.
- When drilling through holes, place a block of wood behind the work piece to prevent ragged or splintered edges on the back of the hole.
For maximum performance, use HSS drill bits for metal drilling.
- Set the tool to the drill mode.
- Mark off the center of the hole using a center punch.
- Use a suitable lubricant for the material you are working on.
- Begin drilling at a very low speed to prevent the bit from slipping off the starting point.
- Always clamp sheet metal. Support thin metal with a block of wood to avoid distorting it.
SPECIAL SAFETY INSTRUCTIONS FOR BATTERY PACK AND CHARGER
a) This appliance can be used by children aged from 8 years and above and persons with reduced physical, sensory or mental capabilities or lack of experience and knowledge if they have been given supervision or instruction concerning use of the appliance in a safe way and understand the hazards involved.
b) Children shall not play with the appliance. Cleaning and user maintenance shall not be made by children without supervision.
c) Before the use of the charger and the battery pack, read the instruction manual for it carefully.
d) During the charge process, the current used should correspond to the current of the battery charger.
e) Never let moisture, rain or splashed water reaches the charging location.
f) The ambient temperature must not exceed 50^ . Never expose the device to direct insulation.
g) Only switch off the current when the battery pack has been inserted into the box or has been pulled out of the box.
h)Storage-battery pack, which are defective or damaged or can no longer be recharged, must be disposed of as hazardous waste. Hand them over at a special collection point Never harm our environment.Do not throw unusable storage-battery pack away into the domestic waste,into free or into water.
i) If the electrical cable is damaged, the wire may only be replaced by the supplier or by his repair workshop. Have repairs carried out only by an authorized specialist only.
j) Use only storage-battery pack, which have been produced by the original manufacturer.
k) Always keep the surface of the charger free from dust and dirt.
l) Insert the battery pack into the charger. Follow the guidelines provided concerning polarity.
m) Always remove battery pack before working on the machine.
n) When the battery pack is outside the drill, cover the contacts to avoid short circuits (e.g. from tools)
0) Do not throw Li-ion batteries into water or fire, risk of explosion!
p)Protect the battery pack from impacts, and don't open it.
q)Never discharge the battery pack completely and recharge occasionally if not used for aprolonged period.
r) Do not recharge non-rechargeable batteries, as they can overheat and break.
- Damage to lungs if an effective dust mask is not worn.
- Damage to hearing if effective hearing protection is not worn.
- Health defects resulting from vibration emission if the power tool is being used over longer period of time or not adequately managed and properly maintained.

WARNING: This machine produces an electromagnetic field during operation. This field may under some circumstances interfere with active or passive medical implants. To reduce the risk of serious or fatal injury, we recommend persons with medical implants to consult their physician and the local implant manufacturer before operating this machine.
MAINTENANCE

WARNING: Do not allow brake fluids, gasoline, petroleum-based products penetrating oils, etc... come in contact with plastic parts. They contain chemicals that can damage, weaken or destroy the housing, thus compromising the integrity of the double insulation

WARNING: Always disconnect the device before performing any adjustment or maintenance operation. If the supply cord is damaged, it must be replaced by the manufacturer or its service agent in order to avoid a hazard. Disconnect from the power supply immediately if the supply cord is aged. Take care not to expose this tool to the rain. If the carbon brushes need to be replaced, have this by a qualified repair person (always replace the two brushes at the same time) Your power tool uses no additional lubrication or maintenance. Never use water or chemical cleaners to clean your tool. Wipe clean with a dry cloth. Always store your power tool in a dry place. Keep the motor rotation slots clean. Keep all working controls free of dust. Occasionally you may see sparks through the vibration slots. This is normal and will not damage your power tool. The ambient temperature range for tool use is 0^ - 40^ . The relative humidity of the area must be not more than 80% without direct exposure to rain and excessive dust content of the air There are some user serviceable parts in your power
Please refer to the list of spare part list of the manual.
A. INSPECTING THE MOUNTING SCREWS
Regularly inspect all mounting screws and ensure that they are properly tightened. Should any of the screws be loose, tighten them immediately. Failure to do so could result in serious injuries
B. MAINTENANCE OF THE MOTOR
The motor unit winding is the very "heart" of the power tool. Exercise due care to ensure the winding does not become damaged and /or wet with oil or water
C. INSPECTION OF THE CARBON BRUSHES (for brushed model only)
The motor employs carbon brushes which are consumable parts. Since excessively worn carbon results in motor trouble, replace the carbon brush with an identical part when it becomes worn to or near the limit. In addition, always keep carbon brushes clean and ensure that they slide freely within the brush holder.
TROUBLE SHOOTING
| PROBLEM | POSSIBLE CAUSE | SOLUTION |
| PRODUCT DOES NOT START | Not connected to power supply | Connect to power supply |
| Other electrical defect to the product | Check by a specialist electrician |
| The battery is low power | Need to charge the battery pack before operating |
| THE MACHINE STOPS WORKING AFTER ROTATING SLOWLY | Air vents are blocked | Clean the air vents |
| The battery is low power | Need to charge the battery pack before operating |
| UNUSUAL VIBRATION DURING USE | Bit is not well assembled | Disassembly and assembly the drill bit by strictly following instructions |
| SPARKING VISIBLE THROUGH THE HOUSING AIR VENTS | A small amount of sparking may be visible through the housing vents | This is normal and does not indicate a problem |
| UNSATISFACTORY RESULT | Drill bit is worn or not adapted to the material to drill | Replace with new bit or check the compatibility between drill bit and material to drill |
STORAGE AND TRANSPORTATION CONDITION
STORAGE
This product :
- Must be stored in a dry place.
- Must be stored away from sources of high temperatures and exposure to sunlight.
- Must avoid sudden temperature changes during storage.
- Must be stored without packaging is not allowed.
- Must be stored in the manufacturer's packaging in warehouses at an ambient temperature of +0 to +40^ . Humidity should not exceed 80% .
TRANSPORTATION
This product :
- Must be transported in closed vehicles in accordance with the rules for the carriage of goods in force on this type of transport.
- During transportation and handling operations, the packaging with the product should not be subjected to sharp impacts and the effects of precipitation.
- When unloading / loading, it is not allowed to use any type of equipment that works on the principle of clamping the package.
- Must be transported at ambient temperature from -20^ to +50^ . Relative air humidity should not exceed 90% .
- After transporting the device in winter conditions, it is necessary to keep it at room temperature for at least 2 hours until the moisture is completely dry.
PROTECT OUR ENVIRONMENT
CAUTION! This product has been marked with a symbol relating to removing electric and electronic waste. This means that this product shall not be discarded with household waste but that it shall be returned to a collection system which conforms to the European WEEE Directive. Contact your local authorities or stocks for advice on recycling. It will then be recycled or dismantled in order to reduce the impact on the environment. Electric and electronic equipment can be hazardous for the environment and for human health since they contain hazardous substances.
WARRANTY
Dexter & UP20 products are designed to the highest DIY quality standards. We offer a 60-month warranty for DEXTER product (tool), and a 36-month warranty of UP20 products (charger & battery) from the date of purchase. This warranty applies to all material and manufacturing defects which may arise. No further claims are possible, of whatever nature, direct or indirect, relating to people and/or materials. Dexter products are not intended for professional use.
In the event of a problem or defect, you should first always consult your Dexter dealer. In most cases, the Dexter dealer will be able to solve the problem or correct the defect.
Repairs or the replacement of parts will not extend the original warranty period.
Defects which have arisen as a result of improper use or wear are not covered by the warranty. Amongst other things, this relates to switches, protective circuit switches and motors, in the event of wear.
Your claim upon the warranty can only be processed if:
- Proof of the purchase date can be provided in the form of a receipt.
- No repairs and/or replacements have been carried out by third parties.
- The issue is not a matter of normal wear and tear.
- The tool has not been subjected to improper use (overloading of the machine or fitting non-approved accessories).
- The required maintenance and repair works have been performed correctly.
- There has been no forcing, improper handling, unauthorized use, or accidents.
- There is no damage caused by external influences or foreign bodies such as sand or stones.
- There is no damage caused by non-observance of the safety instructions and the instructions for use.
- There is no force majeure on our part.
- No incorrect parts have been used, parts not made by Dexter, whereas they prove to be the cause of deterioration.
- The tool / battery / charger have been in a wet environment (dew, rain, submerged in water, ...).
- A description of the complaint is enclosed.
The warranty stipulations apply in combination with our terms of sale and delivery.
Faulty tools to be returned to Dexter via Dexter dealer will be collected by Dexter as long as the product is properly packaged. If faulty goods are sent directly to Dexter by the consumer, Dexter will only be able to process these goods if the consumer pays the shipping costs.
Products which are delivered in a poorly packaged condition will not be accepted by Dexter.
| N° | Description | N° | Description | N° | Description |
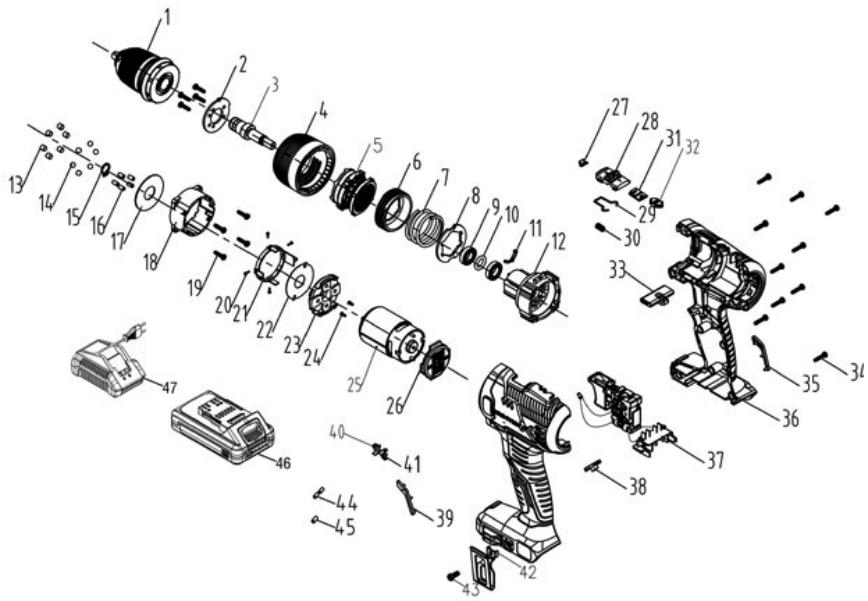
| 1 | Chuck | 17 | Inner ring side pin | 33 | Lampshade for Power indicator |
| 2 | Torque sleeve 21+1 | 18 | No 4 Tuning fork | 34 | Transparent lampshade |
| 3 | Output shaft | 19 | Variable speed pin | 35 | Screw ST3*14(T type) |
| 4 | Deep groove ball bearing | 20 | Variable speed frame | 36 | Right decorative part |
| 5 | Torque spring | 21 | Big gasket | 37 | Housing |
| 6 | Internal thread | 22 | Screw M3X6 | 38 | Switch assembly |
| 7 | Gasket for torque sleeve | 23 | Motor end cap | 39 | Magnet |
| 8 | Shell for gear box | 24 | Motor | 40 | Metal card |
| 9 | Cylindrical pin | 25 | Back cover | 41 | Left decorative part |
| 10 | Steel ball | 26 | Push rod | 42 | Left arrow |
| 11 | O-ring | 27 | Speed adjustment button | 43 | Right arrow |
| 12 | Gasket | 28 | Indicator cover | 44 | Heat shrinkable tube |
| 13 | Circlip | 29 | No 11 Elastic steel wire | 45 | Magnetic ring 9X5.2X12 |
| 14 | No. 40 powder metallurgy assembly | 30 | Spring for Speed adjustment button | 46 | Battery pack |
| 15 | Self-locking pin | 31 | Spring for Speed adjustment button | 47 | Charger |
| 16 | Gasket | 32 | Indicator arrow | | |
| N° | Description | N° | Description | N° | Description |
| 1 | Chuck | 17 | Gaske | 33 | Push rod |
| 2 | Cover plate for torque sleeve | 18 | Srew ST3*12(T type) | 34 | Screw ST3*14(T type) |
| 3 | Output shaft | 19 | Vis ST3*12 (type T) | 35 | Right decorative part |
| 4 | Torque sleeve 21+1 | 20 | Jnner ring side pin | 36 | Housing |
| 5 | No. 64 powder metallurgy assembly | 21 | Toggle support | 37 | Switch assembly |
| 6 | Internal thread | 22 | Big gasket | 38 | Transparent lampshade |
| 7 | (No 10)Spring for torque sleeve | 23 | Motor end cap | 39 | Left decorative part |
| 8 | Gasket for torque sleeve | 24 | Screw M3X6 | 40 | Left arrow |
| 9 | Deep groove ball bearing | 25 | Motor | 41 | Right arrow |
| 10 | O-ring | 26 | Back cover | 42 | Belt hook No3 |
| 11 | No 7 tuning fork | 27 | Indicator arrow | 43 | Screw M4X8 |
| 12 | Front shell for gear box | 28 | Speed adjustment button | 44 | Heat shrink tube |
| 13 | Torque needle roller | 29 | No 10 Elastic steel wire | 45 | Magnetic ring |
| 14 | Steel ball | 30 | Spring for speed adjustment button | 46 | Battery pack |
| 15 | Circlip | 31 | Forward and reverse light board | 47 | Charger |
| 16 | Self-locking pin | 32 | Indicator cover | | |
FR Ce produit est recyclable. S'il ne peut plus etre utiliseveuillez apporter dans un centre de recyclage des dechets.
Este producto es recicable. Si ya no se possible usar, levelo a un centro de recicaje de residuos.
Eeste prodeto e reciclavel. Se deixar de outilizar, entrega-o num centro de reciclagem de residuos.
Il Questo prodotto può essere reciclato. Se deve essere smaltitto, portalo presso un centro de reciclaggio.
Auto to npioov eivai avakukwaiuo. Eav sev mnpei nev vxaonpoionthei,etapepet ny ae kanoio kevtro avakukwong anopmuatuv.
TL Ten produkt poddawany jest recyklingowy, kiedy przystaje być uzyteczny daneź do dostarczy go do punktu zbiórki odpadów.
1A Lle npoyk Moje nepepeobnTcra. JaLIO BOHO 6IbIe He e pnpaTHe IINBOKOpNCTyBaHnHa, 3daIte NOrO B yTmni3auiHn lCeHTp.
Aceast produs estre reciclabil. Dacu mu ma poate fi folosit, va rugam sa l aduceci intr-un centru de reciclare a deseurilor.
EN This product is recyclable. If it cannot be used anymore, please take it to waste recycling centre.


FR. Machine Garantie 5 ans, batterie garantie 3 ans, chargeur Garantie 3 ans / ES. Maquina garantia 5 ans, batteria garantia 3 ans, cargador garantia 3 ans / PT. Maquina 5 ans de garantia, batteria 3 ans de garantia, carregador 3 ans de garantia / IT. Macchina 5 anni di garanzia, batteria 3 anni di garanzia, caricabatterie 3 anni di garanzia / EL. Mxovn 5 xovia eyyon, umatapia 3 xovia eyyon, FOPTOTC 3 xovia eyyon / PL. Maszyna 5 lat garancjPL, bateria 3 lata garancj, tadowarka 3 lata gwarancj/ RU. Tarpanha Ha maunhy 5 net, raptanha Ha akkymnytorp 3 roda, rapantha Ha zapadrihoe yctpoictbo 3 roda / UA. TarpanTH Ha maunhy 5 pokib, raptanTH Ha akmyytorp 3 poki, raptanTH Ha zapadriHn pnciptri 3 pOK / KZ. Mauninahnkeninindir 5 kbln, akkymnytorpndhkeninindir 3 kbln, zapartauhtbkeninindir 3 kbln / RO. Maina 5 ani garantie, batterie 3 ani garantie, incarcator 3 ani garantie/ EN. Machine 5-year guarantee, battery 3-year guarantee, charger 3-year guarantee
ADEO Services - 135 Rue Sadi Carnot - CS 00001
59700 RONCHIN - France
Imported by Adeo South Africa (PTY) LTD T/A Leroy Merlin, Hosted in Leroy Merlin Fourways Store 35 Rooos Street, Witkoppen Ext 97, Sandton, 2191 Johannesburg, Gauteng, South Africa
Tel: +27 10 493 8000 Email: contact@leroymerlin.co.za
Fabrique en Chine \ Made in China \ CenanoH B Ktae \ KItaiJa JxacanfAH \ BurotoBneH B Ktai \ Origim:China
Imnpotep.TOBJLepyaMepehYkpaHa,04201YkpaHa,M.Kmib,ByI. PnIopRHa17A,+38044984600.Imnpotep npimMae npeteh3ii BID cnoXnBaaH zuo ToBay,a TaKox npobOanb Hoiro pemont,Texhiue i rapaHTne 06cbnyoBauHH
MInOpTeP 10/IpIaBaeU OPAr7A3nju, yNOnIOHmOcvHHeA npINHMtAs npTeHN H No KAnCTeBy ToBaPa b PΦ. OOO INPEYA MEPIEH BOCTOK, 141031, PoCCMa, MokOBckaa 6O6, n. MtBtUnu, OCTauKIOBcKO uLoC, o1
MmnpotTayuB/ /CatuyuB/ /KazakCTahn Pecny6bnkacbHaJdae eHm Canapacb 60blHuaHn Hapa3blvIbKaptabD kabdaih JbYbIM: "Ipey MepnekAa3KTanH" KLIUC, KAZAKCTAH Pecny6bnkacbA, 050000, Anmatki B, KOaeb Kluceci, 77, PARKVIEW 50, 6-Kabat, 07-Kence. Mmnpotter/Pipodaee/ApOraHauzmaqur, npinHMaKoAaer pntep3HmN noKaeechy TpoPdykUKNB Pecny6bnkie KazakCTahn:TOO "pey MepnekAa3XCTanH", Pecny6bnkA Ka3xCTanH, 050000, r.AmatabIy, yu.KyaEbae, 77, SLC PARK VIEW 6, 3Tak, oPhi NC 07

