
20VAG3-125BL.1 - Angle grinder DEXTER - Free user manual and instructions
Find the device manual for free 20VAG3-125BL.1 DEXTER in PDF.
| Product Type | Cordless Angle Grinder |
| Brand | DEXTER |
| Model | 20VAG3-125BL.1 |
| Rated Voltage | 18 V DC / 20 V Max DC |
| No-load Speed | 11 000 rpm |
| Disc Diameter | 125 mm |
| Disc Bore | 22.23 mm |
| Spindle Thread | M14 |
| Weight (without battery) | 1.8 kg |
| Sound Pressure Level | 89 dB(A) |
| Sound Power Level | 100 dB(A) |
| Vibration Level | 10.535 m/s² |
| Compatible Battery | 20V series: 2.0 Ah, 2.5 Ah, 4.0 Ah, 5.0 Ah |
| Compatible Charger | 20VCH1-3A.1, 20CH2-3A.2, 20VCH2-6A.1 |
| Motor Type | Brushless |
| Functions | Grinding, cutting, brushing |
| Protective Guard | Quick, for grinding and cutting |
| Auxiliary Handle | Screwed, adjustable on both sides |
| Safety | Switch lock, spindle lock button, guard |
| Overload LED | Yes, flashes in case of overload |
| Warranty | 60 months tool, 36 months battery/charger |
| Maintenance | Clean ventilation slots, do not use solvents |
Frequently Asked Questions - 20VAG3-125BL.1 DEXTER
User questions about 20VAG3-125BL.1 DEXTER
0 question about this device. Answer the ones you know or ask your own.
Ask a new question about this device
Download the instructions for your Angle grinder in PDF format for free! Find your manual 20VAG3-125BL.1 - DEXTER and take your electronic device back in hand. On this page are published all the documents necessary for the use of your device. 20VAG3-125BL.1 by DEXTER.
USER MANUAL 20VAG3-125BL.1 DEXTER
Thank you for purchasing this product. We recommend that you read the installation, user and maintenance instructions carefully. We have designed this product to ensure your complete satisfaction. If you require assistance, the team at your retailer is on hand to help you.

Attention danger / Atencion: Peligro / Atencion perigo / Attenzione pericolo / PpoooxkivduvoC / Uwaga niebezpieczeiStwo / BnImaHne! Onacno! / Ybara! He6e3neuHo! / Atentje, pericol / Caution danger

Hors tension / Apagado / Desligado da alimentacao / Fuori tensione / Ektoç táoc / Odlaczenie zasilania / He não haprajkehem / He πíd happyroio / Scoatere de sub tensiune / Power off

Mise sous tension / Puesta en tension / Ligação da alimentação / Messo除去 tensione / Σύνδεοη με το ηλεκτρίκό δικτuo / Włączenia zasilania / Béklioexe neod naprajexene / Πίd'επhaHH nID happyr / Punere sub tensiune / Power up

FR: Mentions Legales & Consignes de Securite
ES: Instrucciones Legales y de Seguridad
PT: Avisos Legais e Instruções de Seguranca
IT: Istruzioni Legali e di Sicureza
EL: Nopíkó οημείωμα και obñγiεc αοφαλείαc
PL: Uwagi Prawne i Instrukcja B ezpieczénstwa
RU: RykoBoDCTBO По ТхнIKE Be3OJaNCHOCTи ИпраВOBbIM HOPMaM
KZ: TexHnKaCbIбОьИнSha HycKayIbIbIbI
Kayinci3diKjKdHe KyKbIKTbIK KaMTaMacB13 ety
UA: KepiBnIeTBO 3 TexHikn Be3NeKi I ПраВOBmH HopMaM
RO: Manual privind siguranta sl aspectele juri dice
BR: Avisos Legais e Instruções de Seguranca
EN: Legal & Safety Instructions
6→301

FR: Montage / ES: Montaje / PT: Montagem / IT: Montaggio / EL: Συναρμολόγηση / PL: Montañ / RU: C6opka / KZ: Moŋṭaŋkday / UA: 36ipka / RO: Montaj / BR: Montagem / EN: Assembly

FR: Utilisation / ES: Utilização / PT: Utilização / IT: Uso / EL: Xpíŋη / PL: UzytkOWanie / RU: Истовозанце / KZ: Пайдалиу / UA: Викорисань / RO: Utilizare / BR: Utilização / EN: Use
308
Universal: Compativel apenas com Sterwins UP20, Lexman UP20 e Dexter UP20

XPHSH THGPRHPSIPOSTAIAIGKONIH
H ynpoynp npooaia yia koné eivai katalaaan móvo yia uipéc epyaoc koinc kai koilec evtoec. NPOEIOIOIHSH: 0 tucn pnooataeutikou npenei va taipiazoi tov tuio diokou yia tvnpoxn éyiotnc npooaia yia tox epiotn éav onaei o tpoxoc.
O'tav xnpoiopoiei eia ynpoy npoostia yia tnv konn, kpatate to epyaio onwc paiveta xpoiopoiovvtac mvo tnv akpn tou idokou.
IPOEIOIOIHsH! XpnoTn TnpoooNc Evoc diokou yia Tnv kon npokalei paoyua kai pabon anoteloea oobapao atoiikopauatio.
TOnoOeTHsH THs IPOsTAzIAz
H npootaia otov leavtnpa npenei va tonotheitea otota avaloya me toe noia nlevpa totoeitea t a nah. Not eun xnpoiopoite tov leavtnpa xwpi vexi totoeetn e i npoataia ootat.
IPOEIAOIOIHsH: IotE mnu tono0eTeiTE Tnu npooTaia npooTa ano tv AiaVtnpa.
BEZPIECZENSTWO W MIEJSCU PRACY
Cpok cnjx6b1 (r): 5 net
KoHIO cePTnΦIkATA COOTBcTcTBnI NIN DeKlnapaun O COOTbCTbNn Ha daHHbI TOBap MOxHO nOlyuHTb HnHΦopMaunOHn CTOnke IIO60rO u3 Mara3nHOB Jepya MepeH.
daTny6nkaunnHCTpykunn
BHNMaTeNbHo npOHTaIe IHCTpyKcIIO NO kCNpIyatauIN 3yUHTe pPmEuaHn. DaHHa HNCTpyKcIg N03BOJAEr O3HaKOMITbCra C yCTPOIcTBOM, npaBUNaMn erO nCNoJIb3OBaHn INHCTpyKcIaMn I0 TexNIke 6e3oNaChocTn. XpaHIne IHCTpyKcIIO B hAnExHOM MeCTe dJa NCNoJIb3OBaHn B 6UYSeM.
YCIOBhbIE O6O3HAUHIN

IpoountaTe pykoBoDCTBO.

3TOT cMBOI ppeDynpexJaet O pncke NOBpexJeHn yctpoiCTBa nIN dpyrOIO mUyecTBa, a TAKKHe pOnyuHn TpaBM.

Icnojbl3yJte 3auiNThIbe OcKN.

IcnoIb3yIte cpeIcTBA 3aIuTbI opraHOB clyxa.

IcnoJb3yIte 3aunTHyo 06yBb.

Icnobn3ynte 3aunHtbe nepaTkn.

HadeBaIte pecnnpaTOp.

IcnoJIb3OBAHnE NOBpeXJDeHHbIX OTe3HbIX KpyRO NII KpyRO DJIa YepHOBoI 6pa60TK OueHb OAnCHO I MoKET CtA b PpUHHO CpeB3HO TpaBMbl.

3anpezaetraannfoBaHnncBnaJhblmOxnaJdeHnem.

3anpezaetc60koBoe 7nfoBaHne.

UcTpoICTBOIpeHa3NaueHOДЯшиФOBaHnMaTeaIIa.

UcTpoCTBO COOTBeCTBByET DeiCTBYIOUIM EBPoneIckIM DnpeKtNBAM 6bIIO OueHeHO B COOTBeTCTBmC DaHhbIMN DnpeKtNBAMN.

Ebpaznckn 3HaK COoTBcTbN.

CmB0J WEEE (ytunn3aunna 3neKtpnueckoro n 3neKtpnHOro 6obpydoBaHn).

Universal: coBmectmoctb Toblko C Sterwins UP20, Lexman UP20 n Dexter UP20

3HaK COOTBETCTBnI PIPIMEHmblm TEXHnueckm Tpe6oBaHnAm YkpaHbI.
KOMПЛЕКТ NOCTABКИ
- Ha3haueHne aKKyMnyIaTOpHoi 6ecuTeOuHoi yrIIOBoI uINIOBaIbHO MaIINHbD Dexter
2.ИнструкциюТЕХИКЕ 6e3Oanachoctn - Onuscanhe
- Texnueckne xapaktepnuk
5.Исповьоваиме - 06cnykubahne
- YctpaHne HEnoJaOK
8.утейнзацьn
9.「TapaHTa
10.Изобрахени в раобарном Вид e n спсok detajel
11.Декларачи COOTBETCTBWA HOPMaM EC
1. HA3HAUYEHNE YTLOBOI SHINΦOBAJIbHOI MAUNHBI DEXTER
Blaoradapm 3a npno6peTHe nDaHnOro n3dEIny. BHNMaTeIbHo npOuTnTe BCE nHcTpkykUnn COxpaHnTe IN dJaIaNbeHneIeRo IcNOpIb3oBaHnI.
YrnoBaa nnHOBaIbHaMaIina npEHa3NaueHa dIy pe3Kn, cepHOBoe3Kn uNCTkn MeTaalna, 6eToHa nPiNTkn 6e3 NcNoJIb3OBAHn BODbl.
Iocne pacnakOBKn y6eHntecb, YTO Bce akccceaybi (ecnn npdeymOTpehbl) IMeIOCTB HahINm. EcnYcTpoiCTBO NOBpexJeHO IIN IMeET KaKHe-Im6o HeNCnPabHoctN, He NcNoJIb3yIte erO IN BepHnTe o6paTHo pnoaBu.
Pnpepeaue yctpoiCTBa Dpyum Iuaam pepeabaTte TaKke I daHoe pykoBODCTBO.
3NEKTPOTEXHnueCKa B630nACHOCTb
A. BnIka 3JIeKTPoHnHCTpymeHTa DOJXHa COOTBeTCTBOBaTb pO3eTKe. HnKOrJa He nepeJeBbIbAitc Te BnIKy. He nCnoJIb3yIte HnKaKHe nepexOHDnKn DnBnIOK 3JIeKTPoHnHCTpymeHTOB C3a3EmLeHnEM. NcNoJIb3OBAHnE opuHnHaJIbHbIX BnIOK IN COOTBeTCTByUOxNtM pO3eTOK yMeHbShaET PnCK IopajKeHnI 3JIeKTPuYeCKM TOKOM.
B.ИЗбаятЕ npикочовенК 3a3eMнeHHbIM 06beKТam,TakIM KaK Tpy6bl,paDnATOpbl,IINTbI N XOLOdNbHnKn.PnCK nopaxeHnЯ эЛеКтрчecKM TOKOM Bblse,KoГДа TEло 3a3eMnEHO.
C. He noDBepraTe 3JIeKTPoHnCTpymeHTbI BO3dEiCTBnIO DoJDA nn Bnarn. Ipn IonoJaHm B0dbI B3JIeKTPoHnCTpymeHTyBeJIuHnBaETcR pNCK nopaxKeHn JJIeKTPuYeCKnM TOKOM.
2.ИHCTPyKUЯ ПО TEXHnKE Be3OПАCHOCTN
D. 06paaItec b c Ka6eIem aKKypaTHo. HnKOrJa He nepeHocHTe, He TAHnte n He BbIKIOUaIte 3NeKTPoINHCTpymeHT 3a Ka6eJIb. DePxHtE Ka6eJIb NOdaJIbwe OT NCTOuHNKOB TeNla, MaCJa, OCTpbIX ppeIMeTOB mII NBHXUxxCra ChTe. NObpeXdEHbIe mII 3anyTAHbIe Ka6eJI NOBbIaIOT PnCK NopaxHeNIA 3NeKTPuueckm TOKOM.
E.Дя pa60ыc элкtpoHCTpyMeHTOM BHe NOMeueHn IcnoIb3yIte npedHa3HaueHHbI DЯ 3TOrO ydInHHTeNbHbI Ka6eIb.ИсnoIb3OBAHne Ka6eI, noIxOJaIeTo DЯ ИсnoIb3OBAHn BHe NOMEuEHN, CHIXKaET pNCK IopaxKeHn элкtpnueckmTOKOM.
F. Ecnn nCnoJb3OBAHne 3JIeKtpoHHCTpyMeHTa B cbIpom MeCTe HEn36eXHo, noDknIouaIte erO uepe3 yCTpoiCTBO 3aunTHoro OTKnIOUeHnra (Y30). NcnoJb3OBAHne Y30 cnHXKaET pNCK npopaxHeHnna 3JIeKTPuuecknM TOKOM.
JIiHNAIe3OJACHOCTb
A. Ппн Исторьанни Зелковин CTум enta 6ydbTe 6dntelbHbl, Cneinte 3a CBOMN DeiCTBnAMn n Cneiyte 3dpabOMy CMbICny. He noIb3yIteCb ZelkovhCTpymentom, ecn Bbl yctann HaxoITecb nod BO3deJCTBnEM HapKOTNKOB, ankoTOna nn MeDnKaMeHToB. Доже КраТКOBpeMeHHaн НБHIMMaTeJIbHoCTb Ппru pa6Ote CzelkovhCTpymentom MoXET npuBeCTN K TЯжелm TpaBMam.
B.Используйт eрдТВа ИнДиВиДуальНО 3auntbI. Bcerda Используйт 3auntHьile cpeDCTBa Дя Гla3.Использоване 3auntHыIX cpeDCTB,Тaknx KaK peCnnpaTOp, HeCKoЛьЗКЯ 3auntHая 06уВь,Кacka И cpeDCTBA 3auntbI opraHOB Clyxa B COOTBETCTByUOxNx UcNoBmIx YMeHbShaET PnCK ПОлчЕня TpaBM.
C. He donyckaTe clyaHoro 3anycka nHcTpymenta. Npeed nodkloueHem nHcTpymenta K cetn nHTaHna (nnn aKKymyIaTOp) n neped ero nepehocko y6eHITecb, qTO BbIKLIOUaTeIb HaxOJTCB B BbIKLIOUeHHOM nOLOXeHN. He depxnte naIeue Ha BbIKLIOUaTeIe npu nepeHOCKe 3JIeKTPoIHCTpymeHTOB n He BKIOUaTe BnIKy B p03eTKy, ecII n3JIeKTPoIHCTpymeHT BkIOUeH. 3TO MOxET PnVBcTNI K HeCuaCTHOMy clyaHO.
D. Пелед Вкlioуенем Л ektpоннстумента Chmnte C Hero PerynpoBouHbI NHCTpymeHTbl N raeHbIe KIOUH. PerynpoBouHbI INCHTpymeHT nII raeHbI KIOU, OCTaBleHHbI Ha BpaauoueiC qactn JektponHcTpymEHTa, MoKET CTaTB npuHHOI
2.ИHCTPyKUЯ NO TEXHnKE B30nACHOCTN
TpaBMbl.
E. He TAHNTecb. Bcerda coxpaHnTe yCTOuHBOe noLoXeHne n paBHOBecne. 3To N03B0JIIT JyUHe KOHTpOJIpuoBaTb 3JIeKTPoIHnCTpymEnT B HENpeDvIeHHbIX CNTyaCuaJx.
F. OndeBaIteScb NaJIeXkaUIM o6pa3OM. He HaeBaIte CBo6OHyU OeJy u YKpaUeHnA. IepJNTE BOnocbl, OeJy n IepuATKn NoidaIbwe OT DvNkUxncxCyaCTe. CBo6OHaJ OeJda, yKpaUeHnA IN DIIINHbIe BOIOcbl MOrT IOnaCTb B DvNkUxncECACTN.
G. Ппн haичи устюгдя otвoda n c6opa nbiH y6eHntecb, chTo OHH nodklouchebl i npabunbHo pa6oTaIOT. ИспьзOBaHne nbIleynaBnBaIOxu xустюгд CBnKaeT BpeI,прчиЯEmbI nbIbIbI. NCПОЛБ3OBAHNE И OBСЛУЖИBAHNE эЛКТРОMHCTPUMEHTA
A. He npnKnaIbIBaIte K 3neKtpOnHCTpyMeHT ype3MepHbIX ycIyI. NcNoJIb3yIte IodXoJaIuN dJI BaUHX 3aJaU 3neKtpOnHCTpyMeNT. IpaBnJIbHO Bbl6paHbIe 3neKtpOnHCTpyMeHT 60Jee 3ΦΦeKTHBeH n 6e3OpacEn pR HOMHaJIbHOH Harpy3Ke.
B. He Исторьштейугов.
Алкетюнстумент, сени忡аим БыклioчateNB
Немпавен. Делковинстументы Сныншравим ВыклioчateЛeМ
Опачны и полжат peMOHTY.
C. Пелед ренировков, смен akceccyapob Илхаehнем OTКлочITE Злкгюнсчрмент OT сети ппаньи (Илп) akkyмлаяtopa. Тakим Меры п dedосторожхосту умевшот рис сухайно задуся слкгюнсчрмента.
D. XpaHnte HencNoJIb3yEmblc 3NeKtpOnHCTpymeHTbl B MeCtax, HeIOCTynhblx IJIa DeTeN, n He IOBepaIte 3NeKtpOnHCTpymeHTnIuam, He 3HaKOMbIM C Hm N C 3TUMN INHCTpyKzmaM. 3NeKtpOnHCTpymeHTbl ONaChbl B pyKax HEnoJrTOBJIeHHblX NOlb30BaTeJeN.
E. BbINOHJTe TexHnueckoe 06cIyXnBaHne 3JIeKTPoHNCTpymENTOB.IpoBepbTe BbIPaBNBaHne n cIePHe HIOBnXhBX DeTaleN, HAIuHne IIOLOMOK n IpOChne ycNoBn, KOtOpbIE MOryt NOBnAryb Ha pa6Oty 3JIeKTPoHNCTpymENTa. Ecn 3JIeKTPoHNCTpymENT NobpekDn, nepei NcIOnb3OBAHemero Heo6xOJIMO OTPeMOHTnpoBaTb.MHOrne HeecuaCTHbIe ClyuAn Bbl3BaHbI HePiPaBnIbHbIM TexO6cIyXnBaHnEM 3JIeKTPoHNCTpymENTa.
F. XpaHnTe peKyuIe nHCTpyMeHtbl B uHCTOte n 3aToUeHHOM
2.ИHCTPyKUЯ ПО TEXHnKE Be3OПАCHOCTN
COCTOHN. IpaBnIbHo 06cnyKnBaemble n XopoIo 3aToueHHble pexyune IHCTpyMeHTbl MeHbSe 3aKlnHnBAIO T N Lyuwe KOHTPOINpUOTcra.
G.ИспользуйTe эл ektpоннстчмent,akceccyapbl,насади T.I.B COOTBETCTBmC 3TUMN HHCTpyKcIaMn, yuHTbIBaY cNoBnI n CpeunФNKy BbInONHЯeMoI pa6Otbl.Исполь30BaHne эл ektpоннстчмentа Дя BblONHeHЯ He npeДуСМоТрeHHbIX OpeaцIM MÖKET pINBECTN K ONaCHbIM CNTyaцIM.
NCSIOJIb3OBAHNEI OBCJIYJXUBAHNE IHCTPYMEHTA CINTAHNEM OT AKKUMYJIYTOPA
A. 3apjaKaIte aKKyMylTOp T0lbKO c NOMOuBIO 3apJHOrO yCTPOJCTBa, yKa3aHHoro n3r0TOBHTeJeM. 3apJHoe yCTpOJCTBO, npEJaHa3NaueHHoe dIy OJHO rO TnPa aKKyMylTOpHBix 6bTapei, moKet CTaTB npUChHoi NojKapa npu nCpONb3OBAHN C DpyHM TUNOM 6bTaapei.
B.ИспользуITE эл ekтponнстумент Tолько сецально пedingа3нayeHHbIMДя Hero akKymлТорами.Испоьз0Ване Лобогдугог罗 Вида AkKymлТорьх 6aTapeй может статп рпунов Несчадых Слуаев ил пожара.
C. Korda aKKymyIaTOP He nCNoIb3YeTcR, xpaHnte erO OTdIbHOOT MeTaalnuecknx npedMeTOB — KaHcJIepCKNX CkpenOK,MOHeT, KJIoueI, rBO3deI, BnHTOB u dp.— OHN MOrYT CoEINHTb KOHTaKTbl. KopotKoe 3aMbIkaHne KOHTaKTOB aKKymyIaTOPHO bTaapeIMoJET CTaTB pInuHHo OXKOIB UII NOxapa.
D. Прн He6laonpnaTHbIX 06ctOraTeJbCTBax n3 aKKymyIaTopa MoKet noteY bIeKtpoIHT; n36eraIte KOHTaKtCa c Hm. Прn ClyuahHom KOnTaKTE npOMoi Te BODoi. Ecln JxNdkocTb nonaja B rJa3a, 6paTInTeCb K BpaCy. JxNdkocTb n3 aKKymyIaTopHoi 6aTapei MoKet Bbl3BaTb pa3dpaXeHne n OxOgN.
PEMOHT
BCTaBbTe aKKymyIaTOp. IpeNd hauanom pa6oTbI BCTaBbTe aKKymyIaTOp B HxKHOU qAcTb pyKoTkn uYbeuTeCb, yTo OH 3aΦnKcupoBaH Ha MeCTe.
U3BLeueHne
Haxmte KhoKy oToeDInHeHn aKKymJatopu n3BLeKeIte ero. IOpno6bIe HcTpyKun no BbIOnHeHIO 3apAdkn CM. B pyKOBoCDtBE pOlb3OBaTeJIaKKymJatopu n 3apAnHO rO yCTpoNCTBa.
KHONKA BLOKINPOBKN
KhONka 6IbOKIpOBKn paCnIOJoxHeHa pyKoTKe CbePxy KypKOBoTo nepeKJIIOUaTeJe. 4TO6bl BOCNtB3OBAtBcra KypKObIM nepeKJIIOUaTeJeM, Heo6XoDmIo HaxKaTb KhoNky 6IbOKIpOBKn. PpO tNysCaHm KypKOBoTo nepeKJIIOUaTeJe KhoNka 6IbOKIpOBKn Bo3BpaAaetcB INxCOHOe nIOJOxKeHne.
KYPKOBbI INPEKJIQUATEJIb
TtO6bI BkJIOUHTb yCTpOietBO, HAKMITE u YdePKuBAite KHOKNy 6LOKINPOBKn, 3aTeM HAKMITE KypKObI nepeKJIIOUaTeIb. TtO6bI BbIKJIOUHTb IHCTpyMeH, OTNcyTne KypKObI nepeKJIIOUaTeIb.
PERYINIPOBKA PABOUETO IOLOXEHNA BPAUCEHNA
IPMMEAHNE. Npej HaxaTneM KhoNk BpaueHn KypKobBn nepeKlOuTaTeB DoJIKeH haoDntbCBA nCXoHOM noLoXeHn (noLoXeHne 0). HaxMMte KhoNk BpaueHn n NobepHnTe MrgKyIO pyKoTky npOTNB YacOBn cTpeKN, TTo6bl KypKOBn nepeKlOuTaTeB 3aHnI rOpNZHTaBHo nIoXeHne (noLoXeHne 1).
Hajmte KhoNky BpaueHnna eue pa3 n nobepHnTe KypKobb npeeknOaTeIb B nepeBepHyToe noJoxHe (noJoxHe 2).
Iocne perynipOBKn noJoxeHn KypKOBOro nepeKlOuaTeJe CHOBa yCTaHOBITe BCIOMaTeJIbHyO pykOaTKy, eCNI tpe6yetc.
BcnoMoraTeIbHyIO pyKoTky MoXHO yCTaHOBnTB c IIO6O b CTOPOHb KOpNyCa peDyKTopa. PaCNOIOXnTE BcNoMoraTeIbHyIO pyKuBY TAKOM MeCTe, rDe OHa 6yET ObecneuBaTb HauNyUshn KOHTpOJIb N3aUNTy.
Дя установский BCПOMORAtelbHо pyKoTkn HaJEXHO 3akpyTnte ee B COOTBeTCTByIOUeOTBepCTne.
U3BNeKNTe aKKMyIaTOp.
Pa36boknyte 3axim tsntka, noTAYB erO hapyJy. NobepnTe tsitOK B npabInbHoe noloxHe B cToPOHy OT yCTpoiCTBa.
3a6nokpyte 3axm mntka.
PIMMEUHNE. 86eINTEcB, yTO pInnoHnTbI BbCTyn cOBMueH C na30M B KpbIuKe nOuHHNka. HnKOrda He NcNoJIb3yIte 7nnfOBaIbHyIO MaunHy 6e3 yCTaHOBHeHHoro npabINbHO OtperynnpoBaHHORO uNTKa.
6.ОБСЛУЖИBAHAнE

IPEyIPEXJDEHNE! PnCK IOnUyeHnRA TPABMbI! Ipeed BblOnHeHnEM IIO6bIX pa60 Tno 06cnyKuBaHNIO yCTPOiCtBA Bcerda BblKnOuaTe erO nI3BLeKaIeTa aKKymyIaTOp.
He nCnoJb3yIte octpblpe npedMeTbI dIy OUcHcTKu yCTpoiCTBa. He onyckaTe nonaHaNIA kaoiJn6o KnuKocTn BHytpb yCTpoiCTBa. 3To moKet npBecTn K nobpeKdEnHIO yCTpoiCTBa.
Pergnno Ounuainy cpoctBo, jatelbo cpa3y nocle 3aBepenna pa60bl.
Дя ounstки koprnyca nCnoIb3yIte cyxuTo TkaHb. He nCnoIb3yIte 6eH3nH, pactBopnten nIin YIcTЯпсе cpeDCTBa, KOTOpbl eMOrT NOBpeDNTb NlaCTNK.
ДлгштateьноучсpoctBa peKOMeHdyetcN cnoB30BA Tb bIbIeocC.
HnKoRJa He 3aKpbBaIte BeHTnJIaONHbIe OTBepCTHa.
YdaiIe TpuiinuHuyo K npi60py uinphiobalhyo nbIb c nOmoaBIO eTkn.
OuNCTKA
OuHsAaTe BEHTINJLZUIOHNbIe OTBepCTNr OITbIIN 3aqr3HeHn. CSeIte 3a TEM, YTObIpyKoTKn 6blnn cyxIMn uNCTbIMn HnHx He 6blNO Macna nn Cma3Kn. IJIa OUYCTKN INHCTpyMeHtAnCpOJIb3yIte ToIbKO cIa6blMblhblpaTcBOp BnAaXHHyIO TKAHb, TaK KaK HeKOTOpBe UCHTzIe CpeCDTBa n PaCTBOpNTe MoYr NOBpeDITb PIACTKOBbIe I DpyIne I30JIPOBaHbIe qactN. K TakIM BeueCTBaOMHOCTcR: 6EH3IN, CKIIINdAp, pa36abITe NJaKa I KpaCKn, OOUHaOUIpe pACTBOpTEi C XlOpOM, NaUaTbIPbHb CInPT n 6blTOBbe MOIOUe CpeCDTBa, CodepJkaUe HaAtbIPHb CInPT. He NCpOJIb3yIte PraDM C INHCTpyMeHTo MlrKOBocJIaMaHEHJOUeCe rnn roPouHne pACTBOpTEIi.
PEMOHT
YnakOBKa COCTOIT N3 3KoIOnuYeCKN UcTbIX MaTePnaIOB. Ee MoXHo yTuIN3nPoBaTb B COOTBeCTByUOxN KOHTeHepax.

BHIMAHNE!Данhoe yctpoCTBO MapKIpOBAHO CmMBOLOM,уka3bIBaIOUIM Ha ytINI3aIIO 3NeKTprueeCKIX I 3NeKTPOHbIX OTXODB. 3TO O3Naayet,чTO dAnHoe yctpoCTBO HeIb3B Ybl6paCbIbT BMeCTe C6blTOBbIMN OTXoAMn.Ero Heo6xOIMO cdaTb HA ytINI3aIIO B NpHK Tc6opA OTXoOB B COOTBECTBNI C EBPOneCKO INpeKTHBO 06ytINI3aIIO 3NeKTprueeCKORI 3NeKTPOHnO IObOpyOBaHn (WEEE).ДлЯ nOlyeHnpeKOMHeIaIIO NOYtINI3aIIO 6OpaITcB B MeCTHbIE OpraHb IBaCTN IIN B MaRa3IN. YcTPOCTBO 6ydetпepea6OtaHO IIN IinkBvIDnpOBaHO B ceJnx ChInKeHn BIIraHnHa OKpyKaIOUyO cpey. 3NeKTprueeCKOE I 3NeKTPOHoe 6OpOpyOBaHne IIpeDcTaBJIET notEuaJIbHyO ONaCHOCTb Dny OkpyKaIOUeI cpebl I 3dOpOBBy IIODeI N3-3a HAIuYrONaCHbIX BeIeCTB.

BHIMAHNE! He BbI6paBcIBaEte AkkymyJIaTOpbl BmEcTe C 6bITOBbIMN OTXdAMn!
3AùNTA OKPYKAIOUÇE CPEIbI
Hehyxhble 3nEeKtpoTeXHueCKe N3dJIy HcIb3a YtUIN3uPObaTb BMeCTe C6bITOBIM Mycopom. B COOTBETCTBUN C eBPoneckOJ DpeKTHBOJ 06 3nEmeHTax PNTAHN, HnpiroDhble n IcNoJIb3OBAHhble 6aTaapeKn n aKKymJrTopbl DOnKhb6bITb Co6paHb1 OTJeBHO uYtIN3uPObaHbI 3KOJOruCeCK 6e3ONaChbIM CnOCobOM. CdaBaIte INx Ha nepepaboTKy B cneuaJIbHO 6OpuyoDaHhble ceHTpbI. POnyUme INhoFopMaunIO no nepepabotke B MeCThblx Oprahax BnaCTn INy y TopROBO npedctaBntela. UcTroiCTBO 6byet nepepaboTANO INn INKBuInpOBoH b CEIAx CHNXeHn BInHnHa OKpyxaIoUyO cpeHy. AkkymJrTopbl N 6aTaepn ppeCTabJIOT NOTeHuaJIbHyO ONaCHOCTB DnA OKpyxaIoUe Cpebl N 3DoPOBb IIODe IN-3a HauNry B Hnx ONaChbIX BeueCTB.
9. TAPAHTIA
BBEDEHNE
Blaorapum 3a npno6pTeHne HaWero n3dJeNn. Pnp pa3pa6Ote K u3roTOBHeHH Naeien npOdyKmMb HnPaBLaem BCE ycInna Ha oecpeHne ppeBOxCoDHoro KaueCTBa, KoTopoe OTBeaET notpe6HoCTaONb30BaTeNei.
BAXHO! IPEEd NcIIOJIb3OBAHnEM N3dJIINr IPOUHTAITE DAHHOE PYKOBODCTBO, COBJIOJAIte OCHOBHbIE IPNABINr TEHXNKn BE30PiACHOCTN IN COXPAHNTE IHCTPYKcIMI DJIr NcIIOJIb3OBAHnR B ByDyUeM.
Cp3y nocIe OTKpbTINypaKOBKn y6eDITecb B HaNiUHn BCEX KOMnoHETOB, Heo6xOIMbIX nIa C6OpKn yctpoiCTBa.
Ecn npOyKT NOBpeKdEn HnI NmEe KaKHe-Jn6o HeCnpaBHOCTN, He nCpOb3yIte erO n BepHHT o6paTHO B Mara3nH.
3To yctpoCTBO npedHa3HaueHo TObko IJnI nCnoIb3OBAHn Ha OTKpbITOM Bo3DyXe Hn npi KaKHX yCNOBnIX He DoJNXo IcNoIb3OBAtBByTPn NOMEuEHH.
ДанhoeуctpoIcTBOMOKeT6bITpa3MeueHOB\PoMeueHINTOJbKO NocJIToTOKAKOHO OCTbIHET B TeUeHHe DBYx YacOB NocJIeNocJIeHero IcNoJIb3OBAHnI.
Mbl 6nlaOapum Bac 3a NOKyNkU nHaedeemC, YTO Bbl 6yTe NOnHocTbU yDObNeTBopeHbl NCnOJIb30BaHHeM HaIero I3JeINJ.
MbyedpaBbipnHbBaaN3aMeaHaHa caTe HaIeero NHTepHET-MaraHa.
Fapantna
IpoDyKzua DExter n UP20 pa3pa6oTaHa B COOTBeCTBn C BbICOaHIMM CTaNapTAMKaueCTBa u3denn Ida domaunHero uCnoIb3oBaHn. Mbl npedocTabraem rapaHTnIO B 60 MecaeB h npOduKyuHO DEXTER (UnCTpyMeHtbl) n 36 MecaeB Ha npOduKyuHo UP20 (3apJNbYe yctPoIcTba n AKKymyIaTOPhIE 6aTapeN) c DaTb NOKynKn. HAcToaJra rapaHTnPaacpOcTpaHReTcRa Ha BCE MaTePnaJI b n POn3BOvCTBeHHbIe DeEeKtbl, KOToPbIe MOrY Bo3HNKHyTb.
HnkaKne DpyrIe NpTeH3nn KaKOrO 6bI To HN 6bIIO XapaKTePa, npraMo IIN KocBeHHo CBa3aHHbIE CJIIOBmN /nIM MaTePnaJAMn, He pInHMmaOTcA.
B cnyae BO3HKnHOBeHnI NOOMK nCha7a O3HaKOMbTeCb co cTpaHnue yctpaHEn HeNoJadok (np6Iembl npEweHnI) B pykoBoDCTBe. Ecn I np6IeMy He ydaOoc bYcTpaHnTB, 6paTnTeCb B MaRa3HH.
Baw MaaraznH ne noxaneet ycnll nI pyepeHn BOpOca.
PemOHt mIa 3aMeHa cAteH He npOJIeBAKoT n3HaayalbHy bCpOK rapaHTm.
Iapantn He paocpaHaeTc H naOBpeKdeHna, ABAJIOUeCE CNECTBnEM eCTeBHeHO n3HocauHn HeaDnHexaueero nCOnb3ObaHn. BToomuCne, KpOme npOeryo, 3TO paocpoctpaHaeTc Ha clyan u3HocapepeKluoyateene, npedoxpaHntenei undraTeenei.
06paTte BnHmAHne, YTOДЯ HeKOTOpbIX CTpaH DeIeCTByIOT OcObIe yCJIOBna rapaHTM.
Пи ВОЗнКНовени Comнени образпесь по мecту пионбетеня усточа.
Дя расмтpeня претени,Cвязаньix C rapaHTne, Heo6xOДMuMo co6JIouDeHne cIeDyUOxNx yCNoBn.
-Долженбытпразоставелдokумент,нортевскадюшни покунк.
- HnkaKoI peMOHT u (nIu) 3aMeHa YacteY yCTpoiCTBa He npBOOJIINCb TpeTbUMN IInzAMM.
10.ИЗОБРAXЕHΙEВРАЗОБPAHHOMВДЕИСПСOKЧАCTЕYNCTPOДCTBA
10.ИЗОБРAXЕHWEВРАЗОБPAHHOMBUNIICINCOKYACTEYNCTPOICTBA
HadraiTe 3axnChi OkyIpy.

HadaaTe 3ac6b3axncty opranib cyxy.

Hajraite 3axnche B3yTTA.

HadraaTe 3axChi pyKaBnui.

Kopuctyntcpecnipatopom.

BukopncTaHnnoKoJKeHHnx DnCKIB a60 DnCKIB dIy OOpHOoi 6bO6Kn He6e3neuHo Ta MoKe npU3BeCTn Do TpaBMYaHnH.

He npin3nauehoIaIifoybaHn3 0xOIOJKeHHaM.

He npin3nauehoIa 6iunoro 7uifybaHna.

Pn3NaeHOnIaIshIiΦyBaHHaMeTaNly.

Bupi6 Biinobiidae cneiaibHm EbponecbKm DnpeKTbAm; npoBeheHa HopMaTbHbna pnoeypura ouiKn BiinobiHocti.

Ebpa3iibckn 3HaK BiDIOBIDHOCTI.

CUMBOI WEEE 0oO yTuNlaaui.

YiBepcaJIbHn: cymicn TiIbKn 3 Sterwins UP20, Lexman UP20 ta Dexter UP20.

MapkyBaHHaBIOBIOHOcti bOro Bnpo6y BiNObIaE YHHm TexHiHm pernaMeHTam KpaIHn.
3MICT
- BvnopctaHnHa 3a npn3NaueHnAm akymyIaTOpHOi 6e3uITKoBOi kyTOBOi nnifyBaIbHOI MaunHH Dexter
- ПравILATeXHIXI6e3neKIN
- Onic
- Texhihi dahi
- Ekcnnyatauia
- Texhihe o6cIyroByaHHa
- UcyhenHH HeCnpaBHOCTeI
- Ytunlizaia
- Faantia
- 3o6paXeHnB pO3i6paHomy BnDi Ta cIncok DeTalei
11.Декларacia npo BiinobiHictb Stanapram EC
1.BUKOPNCTAHH3A INP3HAUYEHNM AKUMYJATOHOI B3UITKOBOI KYTOBOI UJIΦYBAJBHOI MAUNHN DEXTER
IHCPTYKciI ⅢOIO TEXHIKN B3NEKN IJI BCIX TUNIB BHKOPNUCTAHNIA
Bka3iBkn 70do texhikn 6e3nekn IJy po6it i3 7niΦyBaHnA a6o a6pa3NBHorO p3aHnA:
A. Αeɪ eñeKTpOiHCTpMent npn3HaueHnДЯ shIiΦyBaIbHnx a60 BiDpi3Hnx po6it. IpouHTaIte Bci nonepeJxHHe, iNCTpyKüi, O3HaNoOMTeCg i3 3O6paXeHHaMn Ta cneuΦikaizm, kKi D0DaIOTBcRdo zuBOrO eñeKTpOiHCTpMentHa. HeoTpImaHnHaBeJeHnx HnXue IHCTpyKüi MoKe npn3BecTn Do ypaXeHHe eñeKTpuHnM CTpymom, IoxEkei Ta/a6o cepno3Hnx TpaBM.
B. Taki onepaui, kI shiΦyBaHHa, 3aunuHnHa pOraHOU uitkoIO, noipyBaHH a6o BiDpi3aHHa, He peKOMeHdyETbca npOBoHTn cIM eNEKTPOiHCTpymeHTom. BukopnstAHnHa IHcTpymeHTa He 3a npu3HaueHHa M oKe CTBOpBuTaN He6e3neuHi CITyaui Ta npu3BOHTn Do TpaBMyBaHHa.
C. He BnKOpNCToBvIe iHwi akcecyapn, Kpim cneuaJIbHo po3po6JeHnx i peKoMeHDoBaHnx BnPo6HnKo mInCTpyMeHTa. Te, 10 neBHe npuJaDЯ MOxHa BCTaHOBtN Ha eJKeTpoIHCTpyMeHT, 1e He 03NaUcE 6e3NeKn po6Otn.
D. HomiHaJIbHa шВИдКICTь npnlaДЯ Ma€ npnHaIMHi dopIBHIOBaTm MaKcImaJIbHIМ шВИдКоCTi, 3a3HaueHn Ha eIeKtpoiHCTpyMeHTi. IprnlaДя,Яke npaцioшВИdIse nopIBHЯHO 3 HOMiHaJIbHIM 3HaueHHaM,MOKe 3JaMaTncb i pO3JeTIncsB pI3Hi 6OKn.
E. 3oBhiHni DiameTp i TobuHa npnlaDЯ NOBHHI BiDnoBiDaTH MoXJIbOcTЯm BaWOrO eNeKtpoiHCTpyMeHTa. PnplaJaHeBiIOBiDHO r03Mipy HeMOxJIbO HaJeXHM YHOM 3axNCTNT Ta KOHTpOJIbOAtI.
F. Hapi3b ha npniladni Ma€ 36iratncb 3 Hapi331o Ha unnndeni
2. ПРавILA TEXHIKи BE3ПЕКИ
IHCTpymeHtOM 3aBXKnBIMNKaIte IHCTpymeHT I BImMaIte aKymyIaTOp.
He BnKOpncTobyIte roctpi npedMeTn InyuieHnMaunHn. HikOnn He donyckaTe notpannnHH pIDHH BCEpEnHy IHcTpymeHa. InakSe IHcTpymeH 6ye noWkoJKeHo.
Peyraho nciitb iNctpyment, 6aKaHO Biapa3y niJna 3aBepenHn po60tn.
Ynctitb Kopnyc cyxio raunipkoH, HIKOJI He BnKOpNCTOByTe 6eH3uH, po3uHHNKn a6o MmHi 3ac06n, kki MOkyTb nooKOJNTn PnaCTNK.
Pemonti 3aMiHa qactnH He noDobXyIb TnoaTkoBOro rapaHTiHoro TepmiHy.
TapaHTiHe NOnHnPioEbCra Ha HecnPabHocTi, NOB'3aHi 3 HopMaIbHIM 3HOCOM a60 He npabuBnHM BnKOpNCtAHnM BnPo6y. Lc, 3okpema, cToCyEbCra 3Hocy IepemNkaiv, 3aNo6ixHNKIB Ta MOTOpIB. 3BepHITb Ybary, 10ДЯпЕВнx KpaIH icHyOt CneuaJIbHI yMOBn rapaHTii.
Ypa3i cMHIbY 3BepHITbCBy Micne npoDaxy.
EAN code:3276000697985
Kayinci3ik TexHnKacsb6oBbHwa HcckayIbIK.KykbIKTbIK HopMaJap
JXeknHaHr T3neKtpnKaJI 3nnJaHec Ko., JIa No.150 B3NbIy H PoaI, IOcInb TayH, HaHxu IJCTpnKt, L3acIN, YK343H, KbTaI
IImnpotep/Ipodaueu/Opranua, npHnMaioaepneTeH3nn no KaeeCTBy npOduKunB Pecny6nkeKaasxctah:TOO «Jepya MpeHnKaasxCTah». 050000, Pecny6nka Ka3axCTah, r.AInmatb, yN. KyhaebA, d.77, BL«PARK VIEW», 6 taxk, opcn N 07. IImnpotTayb/ CaTyb/ Ka3akCTaH Pecny6nkaCbHa eHim canacb 6oBbHsa Hapa3blkTapdb Kab6blnDaTbH YbIM: «Jepya MpeHnKa3akCTan» JXUC. 050000, Ka3akCTaH Pecny6nkaCbI, AInmatb K., KoHaeb Keueci, 77 yN, «PARK VIEW» BO, 6-Ka6at, 07-KeHce.
Cpok cnyy6b5 5 JET/Kb3MeT Mep3imi: 5XbI
KejiectkiMiHdtTIpactaybI Taan eTeIH Tayaipnap YiHiN cepTuNkaTbIH /deKnapaunHbIH KoiipmecIn Ilepya Mepneh DykeHHInA kAnpat 8araBnHaH anyfa bOanaB daTa npObnKaunu HcTpykUn/HycKaynbTkBtBx XpaJrMaHaF aYkbTb:09/2019
20VAG3-125BL.1
PaiDanaHy HcayIbIbIH MyKmT OkBn I bIbIbI3 XeHe 6epiIreH eceptnepepi YCTaHbIbI3. OhIMMeH, PaiDanaHy KOBImEH XeHe Kayinc3dk TexHNkacbIHbH NcaynapbIme TahbcIn IbHy yWIn, Ocbi PaiDanaHy HcyKayIbIKTapbH PaiDanaHbIHbI3. Ocbi PaiDanaHy HcyaynapbH 6oNaawKaTa PaiDanaHy Wsin Kayinc3 xepde caKaTbI3.
BENITIEP

PainanahHy HcyckaynbIbH MkyrT OkbHbI3

OcbKayin TypabIe ckepy KpbJfBfHa He backa MylkiTepre 3akbIM Keenyi TypabHemce deHe JapakaTbHa eKeenyi MymkiH eKehIH eceptdi.

KopfahbI I Ke3iJipik Taftin JypiH3

Kynap KopFaHbIcBiH KmiHj3

KoprahbiawarKniMkninjypiHiz

KopfahbIC KONFa6bH IN KmiH3

OpaIbIM 0aHaHaN KOpFaIbTbIH MaCKaHbTaFbIH3

BvniHren KeckiH HeMece cbIbIPfblI dNcKInepdi naJaIaNaHy kayinti KHe aybpjkapakTaKa eKenyI MymKiH.

IbIMKbl tericteyre pykcat etinmeren

Byinpiik tericteyre pykcat etinmeren

MetaIdbI teriTeyre apHaIFaH

HIM KONdaHbICTaBf lyepoNaIbIK DnpeKTbIbIapra ca KeJeI JxHe ocbl DnpeKTbIbIapra caiKeCTiKti 6aFanay adici opbIHdIbl.

EypaiaJIbIc caiKeCTiK 6ntrici.

Wee Ta6abci Kaedere Xapatdyb 6iJipei.

Ömşeban: Tek Sterwins UP20, Lexman UP20 Üçehne Dexter UP20 KþpblfblapbImeH yIneCimdi

Byn eHIMHIn KOnDaHbIcTaFbYkpaHa texHnKaIbI epExepeiHe caikec KeNETinDi rTypaBb6enri.
MA3M¥HbI
- Dexter Brushless cbIMcbI3 ⅢapKaaPaBbHbH MaKcaTbI KOJaHaBcBi
- Kayinci3ik TexHnKacbHbH HycKayapbl
- Cnattamacbi
- TexHnIkaIbIcNIIaTTAmacBi
- Paiandaany
- TexHnKaIbIk Kbl3MeT KepeTeY
7.AkayIbIKapDbIxHO - Kaɪta eHnEy
- KeniДik
10.BeIikTeP t3iMi 6oBbHua eKe-TeKeJIi KePiHc - EK caikectik deknapaunacbI
1.CbIMcbI3 电Kacbl3 6ypbltblk TericTeyiMaunHaHbIN MAKCATTbl KOJDAHbICbl
Ocbl eHIMdi catbIn anFaHbHbI3fa paKMTe. Ocbl naJaIaNHy HyCKaynapbIH OKbl IuBfBbI3
KHe 6oIaWakTa naJdaNahy yuih CaTan KOnbHbI3.
BpybIbTb TericTeiyi Kecyre, CbIbIpyra JxHe MeTaIbI, BoToHdbI HEme PJIITKaHbI CyCbI3 KbIbIbIKneh Ta3aIayra apHaIraH.
OpaybIHTAH 1bIFapraH coH, eHIMHH KepeK-JapaKaTapbIme H bire (6ap 6oNca) 6ytIH eKeHNdiRHe Ke3 XetKi3iH3. Erep eHIM 3aKbIMdaJIFaH 6oNca HeMece Ke3 KeJIReh aKayIaPbI 6ap 6oNca, OHb I naJdanaHa6aHb3 XeHe dInepiH3re KaITapbHbI3.
OcbI Kpyanblb 6aca 6ip aamra 6epcehi3, ocbi naaanahy HcckaybIbH 6pire 6epiH3.
Bi3diH Xa6dbfblmb3 KOMMepuJbIK, cayda Hemece eHepKcintik MaKcaTTapMeH naIdanahyra apHaJImaRaHbIH eCkepiH3. Kypblrbl KOMMepuJbIK, cayda, eHepKcintik Hemece yKcac MaKcaTTapda naIdanaHbIJca, 6i3diH Kenindirimi3 e3 KywiH XOABbl.
Kayincizik MAKcatbHda 16 xacka deiHri bala nap MeH xactap, coHdai-ak ocbi naJaIaNHy HcaynapbIMeH taHbc eMec aadamdap ocbi eHimdi naIaNAnaHa anMaIdbi. Fn3IKaIbIK XHe akbl-oi KaBileT iweKteyIi adamdap eHimdi TEK XayantbI TyIraHBi KaIaNaybl MeH Hcaybl BoibIHwa naIaNAnaHa anaDbI.
2. KAYINCI3ДIK TEXHnikAcbIhBiH HYCKAYAPbl
3NEKTP KYPALbIHbIH KAYINCI3dI1 BOYbIHsA XaJIbI ECKEPTyIeP

ECKEPTY: 6apIbIK kayinci3dk eckepTynepi MeH NyckaynapdbI OKbIN 1bIfbIHbI3. EckepTynep MeH
HyCKaynapdbOpbIHdAmay caJIapbIHaH TOK COfbyI,OPT WbIFybl KHe/Hemecae aybip JapaKat any JafdaJnapbl TybIHdaybl MymkIH.
BAPJIbIK ECKEPTUJEP MEH HYCKAYLAPDbI BOJALAKTA KAPAY YLIH CAKTAN KOJIbIHbI3.
Eckenpyepeeri "JneKtp KpaJIbI" TepMnHi 3neKtp XeJIciHeH JxMbIC iTeiTIN (cbIMdbI) HeMece 6aTapeAmeH JxMbIC iTeiTIN (cbIMcB13) 3neKtp KpaJIbIH biNdipei.
XYMbIC OPHbIHbIH KAYINCI3IITI
A.ЖуMbIC opHbI Ta3a apKapbIK 6onybl KaKeT.ЖуMbIC opHbIHbIH NaC Hemece KapaHbI 6onybl OKbIC OKnFaIapDbIH naJa 6onybHa ce6en 6olaBl.
B.Злект Кураздарын ТУТАнБИС CУВИКТБИКТар, ra3Дap Hemece
шан сиякту 3aTTap 6ОЛаТын Харыльс kayиб ap optanapda
пайдалибаныз. Злект Кураздары Шанды Hemece TУТIHДI
ТУТАнБИРУБММКИH YSWKБИДAP ShIFapaDIbI.
C.Злес耗费 Кралььн паданаган Ke3de, Балалap мен 6огд eадамдар ршak Турькжет. Бackа НерсereAnnaDay calapbIHAN Kралььбackapaajmaй KaIyblbMymkiH.
3JIeKTP JYIeJIePIH IaIaJIaHyIaFbI KAYINCI3IiK TEXHnKAcbl
A. Θлкг Кралыньи aшаларpo3eTKaRa cэйкес Keуi kaxet. Aшаны ew yaKbITta e3reptneHi3. Eшkaндай adanterp shtenceьdeipin Jepre TybIKtanFaH 3ЛКг КралдapbIMeH 6ipre naДанбанbI3. 03reptiJmERen aшалap MeH cэйkec KeJIeTIH po3ETkapanap 3ЛКг TOrblH, cofY KayPiN a3aTadbl.
B. Ky6bIpnap,paNaTopnap,ra3nIHTanapbIXeHeToHa3bITKbIHTap cnAaTbI Jepre TynbIKtaJFaH 3aTTapra DeHeHi3di TURi36eHi3. DeHeHi3 Jepre TybIKtaJFaH 3aTTapMeH XaHaCCa, 3JIeKtp TOrbIHbIHcFy Kayni apTaJbl.
C.3neKtp KypaIapbIH XaH6bIpdaH XeHe bIJFaIJaH caKaTahbl3.
2. KAYINCI3IK TEXHUNKACbIHbIH HYCKAYAPbl
3neKtp KypaJIbHa cy Kipce, 3neKtp TOrbIHbH coFy Kayni apTaIbI.
D.CbIMDbI TeK OPHbIMeH naJaIaHaHbIHbI3. 3JNeKTp KypaJIbIHbIH CbIMbIH OHbl TAcBImaJIday, TapTy Hemece Kyat Ke3iHeH axbIpaTy ywiH naJaIaHa6aHbI3. CbIMdbI Jxorapbl TemnepaTypaDaH, MaJdaH, 0TKip WETTepDen Hemece XblXbIMaJIbI 6eJWeKTepeDen anwak YCTaHbI3. 3aKbIMdaJIraH Hemece WaTackaH CbIMdAp 3JNeKTp TOBtIHbIH COFy KayPiH apTTbIPAbl.
E. ΘneKtp KypaIbIH danaHa naHdaIaHraH Ke3de, daJaDa naJaIaHaHyFa JapaMdbI y3apTKbIi CbIMdbI naJaIaHaHbIbI3. DaIaHa naJaIaHaHyfa apHaIraH cbIMdbI naJaIaHaHaHda, 3JeKtp TOrbIHbIH COFy KayPi a3aIbI.
F. bɪnfran Jæpde 3ʌneKtp KypaJIbɪN naɪdaɪaHryta Tpya Keɪnce, KopraHbICTbl eɪpiy KypbIbIbICbIMeH (KΘK) Kopraɪnfran Jæ6dɪkTbɪ naɪdaɪaHbɪhɪs. KΘK KypbIbIbICbɪN naɪdaɪaHaHfənda, 3ʌneKtp Tɒrɪbɪhɪ Cofy kayni a3aɪdbl.
JXEKE KAYINCI3IK
A. ΘneKtp KypaIbH naIdaHaHfah Ke3de a6aB 60nbIHbI3, ic-opekeTiH3re 6aibITbIBIKneH Kapan, 3eIH KOybHbI3. Ⅲapwan TycaHbI3 Hemece eciptKi, iWIMdIK He dApi-dApMeK Ka6bIpaFah 6oJcaHbI3, 3neKtp KypaIbH naIdaHaH6aHbI3. ΘneKtp KypaIpaBbH naIdaHaHaFah Ke3de 3eIH KoMay caIdaPbIHah JKeE aybp JapaKaT aNybiHbI3 MymkIn.
B.Keke KopfahbIC Xa6dbIbIH naHaJaNbIHbI3. KopfahbIC Kezilndipirih yHemi Taftbn xypihi3. ShaHHan KopfaiTbIH MaCKa, CbIPfAHMaHTbIH apHaBI aR-KIM, Bepi KACKa Hemece ecty MyseciH KopfaiTbIH Kypal CNaKTBI KopfahbIC Xa6dbIbIH cAKeC KafdaJnapda naJaJaNHaHaDA XeKe XapaKaT any Kayni a3aJNbI.
C. ΘηκTp KυραβιHbIh a6aɪcβI3da iːcke KοςβΙγυβɪHa Jɔŋ 6eρmeɪz. Kyat Kε3iHe JxəHe/Hemece 6aɪapeɪfa Kocnac 6þpθIn, KυραДbI JxɪHamaɪ He TácsbɪMaɪdʌmaɪ TþpθIn, aþyICTbIPbɪN-KOCKbɪWtBɪH Œɪpɒyi I Kúŋde 6ɔŋyβɪHa Kε3 Jxetki3iH3. ΘηκTp KυρaɪdapbɪH aþyICTbIPbɪN-KOCKbɪwɪbɪHaŋ YCTan TácsbɪMaɪday Hemece aþyICTbIPbɪN-KOCKbɪ W KOCyβI Kúŋde KyaTtAɪdʌbɪpy caɪdapbɪHaŋ OKbɪC OKɪfɑnap Oþbɪ N aʌybl MymkɪH.
D. ΘηκTp Kυραῦν ἔκε Κοσης δύρβιν, peττειώ κιπτερ MeH combɪnɒbɪ 6ύραῖν ἔκε Κιπτερdi aʌbɪn Táctaɪhɒt. ΘηκTp
2. KAYINCI3IJK TEXHNIKACbIHbIH HYCKAYAPbl
KypaIbIbIH, aHahalatbIH 6eJIirInde 6ekITyI KyIe KaIFaH peTteriI KJIT Hemece COMbIHdbI 6ypaIbIH KJIT DeHe JkapaKaTbHa eKeJIyi MymKiH.
E. KypaJFa Kapai KaTbI yMTbImaHbI3 YHemi TypaKtBi KaJIbIInTa TpybIHbI3 XeHe Tene-TeHdik CaKTaHbI3. Byn Ke3deiCOK KaFdaInapda 3neKtp KypaBbIH dypbc I backapyfa MymkiHdk bepei.
F. Tnicti Typde KnihiH3. KeH KIm KImeHi3 Hemece aWekey TaKnaHbI3. WauBihbI3dbI, KmiH3di XaHe KOJra6bIHbI3dbI XblXbIMaJIb 6JIweKTepeH anWak yCTaHbI3.KeH KIm, aWekey Hemece Y3bIH Wau XblXbIMaJIb 6JIweKTepre iJIHH KaNYbI MymKiH.
G.KypaJapMeH 6ipre 7aH copy XaHe 7aH XnHay Xyneci KaTamaCbI3 etince, onapdbIH Dypbc XaNfaHbIn, naJaHaBInaTbIHbHa Ke3 XeTKi3iH3. ShaHcopFbIHTapDbI naJaHaHy 7aHaKaTbICTbI KayiTepdi a3aITadbl.
3NEKTP KYPALbIH PAndAJIAHY XHE OFAH KYTIM KOPCETY
A.3neKtp KypaIbHa apTbIK KyKTeMe TycipMeH3. KyMbICbIHbI3 ywiN dypbc 3neKtp KypaIbH naJaIaNbHbI3. Dypbc 3neKtp KypaIb e3iH, apNaIb JxblMaMbIFbIHda KymbICTbI eDeyip TImDi api Kayinc3 Tpyde opbIHdaIbI.
B.AybcIbIbIPbIN-KCKblIbI KocblIMaHTbIH XeHE eWneTIn 3JeKtp KypalbH naJaIaNbHaB13. AybcIbIPbIN-KCKblI W apKblIb 6ackapblImaHTbIH Ke3 KeJIreH 3JeKTp Kypalbl KayiNTi XeHe OHbl XeHNDeY KaXeT.
C. PeTtey ċpekeTTepiH opbIHday, KepeK-JapaKaTpDbI aybICTbIPy Hemece KyaT KypaIpaBbIH caTaydah 6ypbIH wTeNceJIbI Kyat Ke3iHeH XeHe/Hemece 6atapeAH bI ŠNeKTP KypaJIbIHaH aXbIpaTbIHbI3. MyHdai caKtblk 7apaIapbl ŠNeKTP KypaJIbIHbIH Ke3deicOK icKe Kocblny KayniH a3aITadbl.
D.ПадаланылmaитбIH 3ЛeКТР KypalapbIH 6aIanapdIH KOblI XeTneTIN Jxepde caKaTHbI3. 3ЛeKTP KypalbIMeH HeMece Ocbl HycKaylanapMeH TaHbIC eMec aIamapFa KypalDbI NaIdaJahyra pyKcat 6eRpeMehi3. 3ЛeKTP KypalapbIH XaTTbIKTbIPbIMarHaN paIaIahUshbInap KOnDaHca, Kayin THeDi.
E. ΕπεκTp KypaɪdapbɪHa TexHɪkaɪbɪK Kbɪ3MeT Kεpceɪtɪz. Xbɪŋxkbɪmənbɪ 6ənʌeKærpeɪn KɪcaɪoBɪN Hemece Watacɪyɪn, 6ənʌeKærpeɪn 6y3bɪnybɪN XəHe MexaɪnkaɪbɪK KypaɪdapdɪbɪN
2. KAYINCI3IJK TEXHNIKACbIHbIH HYCKAYJAPbl
JyMbIcblHa 3cep etyi MymKIn 6apNbIK XaFdaIdbI TeKcepiH3. 3NeKtp Kypalbl 3akbIMdAnca, OHbl NaIdaIhaP aIdbIHda JxHHeH3. KeTereH OKblc OKnfAanap 3NeKtp KypaIdpbHa TnicTi TypDe TEXHnKaJIbIK KbI3MeT KepCETney caIpaBHaH opbH aIaNbl.
F. Keckiw KypaapanapdbI eTkip Xhe Ta3a Kynde yCTaHbI3. Tnicti Typde TexHnKaJIbIK KbI3Met Kepcetinren WeTTepi eTKip Keckiw Kypaapanap 6yriin KaImaNbI XHe onapdbI backapy OhaB oJanaBl.
G.ЖуMbIC XaFdaInapbIH XaHe opbIHday KaXeT XyMbICTbl Ha3apFa aJa OTbIPbIN, 3JIeKTp KypaJIbH, KepeK-XapaKTapDbI, KypaI YwTbIKTapbIH XaHE T. 6. Ocbl Hcyckaynapra Caikec NaIdaIaNbIHbI3. 3JIeKTp KypaJIbH TaFaNbIaNfAH MaKCaTbIHah 6acka MaKcaTTapda NaIdaIaNHy OcepIneH Kayinti XaFdaI opbIH aIybl MymKiH.
БАТAPЕ КУРалын Пайдалиу XэHE OFAH KYTIM KОPCETY
A.Tek eHdipywi ycbiHfAH 3apraTaftiW KypaI apKbIbI 3apraTahbl3. Batape 6norbHbH 6enrini 6ip Typine apHaIraH 3apraTaftiW KypaIdbI 6acka Tpyderi 6atape 6nOrbImeH naJaIaHaY ePT KayPiH TyDbIPybl MymKiH.
B. ΘleKtp KypaIapbH TeK apHaNbi XacaJFaH 6aTape8 6nokTapbImeH naJaIaHaHbIHbI3. Ke3 KeJIreH 6acka 6atapeaIapdbI naJaIaHy JapaKaT Hemece ept KayPiH TyDbipy MymKiH.
C.Батaper naДаланьлmanжatkaн Ke3de, OHbI 6ip KJIeMMaanh 6ackacbHa KocblnybHa ce6en 6onybl MymKIn KaFa3 KbICTbIPfblTap,TnblHdap,KiTTep, WereJep, 6ypaHdaIap CnAKTbI 6acka Da ycaK MeTaN 3aTTapDaH aJUak YCTaHbI3. Bapater KJIeMManapbIHbH, BiPre TynblKaTajybl Kyin KaIyra Hemece ept ShbybHa ce6en 6onybl MymKIn.
D.KoJaCbI3 XaFdaJnapda 6aTapeJdAn cyMbIKtbK afbIn KeTyi MymKiH, OHbI DeHeH3re Tnir36eH3. Erep abaCbI3da Tnin KETce, Cymen WaiB1bI3. Erep cyMbIKTBK Ke3re Tnin KETce, KocbIMwa MeINuHaJIbIK KEMek aJIbIHbI3. BatapeJdAn WsbIKKaH cyMbIKtbK tiTipKeHyre Hemece Kyin Kanyfa ce6en BoNybl MymKiH.
KbI3MET KOPCETY
A.3JIeKTp KypaIbHa KbI3MeT KOpCETy XyMbIcBn 6iJIkTi MAmAH TeK TynHycKa 6eIweKTePdi NaIdanaHbIn Xacaybl Tnic. ByI 3JIeKTp KypaIbI Kayinci3diirHin CaKTaNyBH KaMTamacb3 etedi.
2. KAYINCI3IJK TEXHNIKACbIHbIH HYCKAYAPbl
БАРЛыК KОДАньICTAPFA APHAJIFAH KAYINCI3ДИK HYСКАУЛAPы
Terictey Hemece abpa3nBti kecy xMbICTapbl ywiH opTak kayinci3dk eckepTynepi:
A.Бул злелкт куралышаркайрах Нemece Keckiw Kypan petiHde
ЖуMbIC icteyre apHaIraH.Осы злелкт Куралыmen 6ipre
берінгьарык kayinci3діК eckeptулepin, HycKaynapы,
cypETTepdiжэHe Textнкалык CnnaTTaMaIapDbl OkbIn
шыfblHbI3.Тemehde керсетін'reн Барык HycKaynapы
opbyHdamay caJIapbIHahн злелкт Тогыньн COfybl,opt ShbyfbyJxHe/
Hemece aybpжарakat opbl anlybl Mymkih.
B.OcbI 3JneKtp KypaIbIbIH KEMerImeH axapayfa, TericTeyre, cbIM KbIiShaKeH Ta3aNayra, XblITbIpaTyra Hemece Kecyre KeHec 6epinMei. 3JneKtp KypaIbIH TafaiBHaJaMaHaJ KymbICTapra naIdaIaNHy Kayin ToHyIHe JHe DeHe JapaKaTbHa OKeNyI MymKiH.
C.KypaJI eHdipyuici apHaNbI KypacTbIpblMaFaH XHe MaKyJdaMaFaH KepeK-JkapAkapTapDbI NaJaDaHa6aHbI3.KepeK-JkapAkapTbIH 3JIeKTp KypaJIbHa 6ekiTJe aIybl Kayinci 3 JyMbICTbl KaMTaMaCbI3 etnEiDi.
D.Kepek-JkapakTapdbH HOMHaIdbI XbIJaMaDbIfbI KEMInHe 3neKtp KypaIbIHda KepeCetTirReH MaKcMaJNbI XbIJaMaDbIKKa TeH 6onybI KaXeT. HomHaJIdbI XbIJaMaDbIKTaH Xofapbl XbIJaMaDbIKPeH XyMbIC iTeiTih KepeK-JkapakTap 6y3bIJbI, yShbIN KETyi MymKiH.
E.KepeK-xapakTbIH cbiptkbl DnaMeTp MeH KaIbIHdbIfbl 3JeKtp KpaIbIHbIH cbIbIMdbIBIK Kepcetkiwi aykbIMbIHda 6Onybl Tnic. ΘJIeMI dypbic TaHdAmFaH KepeK-xapakTapdbI Tnicti Typde Kopray Hemece backapy MymkiH emec.
F. Kepek-JXapaKTapDbIH OYbIKTbI 6eKITkiWi 7apKaJaPaKTbIH aHaJIbIPfBi OYbIFbIHcAKeC KeJyI Tnic. FJIaHeUTeP apKbIbI bOpHaTbINFaH KepeK-JXapaKTap YsiH KepeK-JXapaKTbIH 6iIK CaHbIaybI FJIaHeUtiH OPhATy DnAmETpIe CKeKc KeJyI KaKet. 3neKtp KypalbIHbIH 6eKITy KypalDaIbIHcAKeC KeJMeTIH KepeK-XapaKTap TeNe-TeHdIKTeH LbIFbIH, 6eKTEH TBIC dipIN TydbIpadBi JxHe KypalDbI backapa anMayra eKeJyIMMKIn.
G.3aKbIMdaJraH KepeK-JapaKaTbI naJaJaHa6aHbI3. Op naJaJaHy
2. KAYINCI3IK TEXHUNKACbIHbIH HYCKAYAPbl
aIbIHda a6pa3nBti DeHreJIek CeKlDi KepeK-JkapAaTbIH CbIHybIH XHe CbIaT NaJa 6OlybIH, TipeKTik Ta6akShaBH IN KApblyIH, CbIHbIH Hemece To3yblH, CbIM KbIlnaAaTbIH BocayIH Hemece CbIMdapdbIH y3iInyIH TeKcepH3. 3JeKtp KypalbI Hemece KepeK-JkapAK Jepre KJLaca, 3aKbIMdaNBybIHbIH 6ap-KoFBIH TekcepH3 Hemece 3aKbIMdaJMaHaF KepeK-XapaKTbI OPhaTBHbI3.KepeK-JkapAK Tltekepin, OPhaTKaHHah KeiIN, aHaHaTaBH H KepeK-JkapAK Xa3bIKTBfBIHaH e3IH3 XHe aHaHaadaRbI aAdMaDap aUwak Typyb KaXeT, Codan KeiH 3JeKTP KypalbIH MaKcImaHDbI XyKTeMeci3 XblDaMdbIKneH bip MNHT BoBbI icKe KocBtB3. 3aKbIMdaJIraH KepeK-JkapAaTap aDeTTe oCb I CbIHak Mep3IMHde CbIHbIN KaJaDbI.
H.Keke KoprahbcI Xa6dbfbIn KniH3. KondaHbicka 6aJnabHbictbl KoprahbcMackacbIn XaHe KopraHbI Xe3iJdpirih TaBbIb3. WaftbIn a6pa3NBtIn Hemece oHdeJeTIN 6yMbIM cbHBkTapbIHAN KopraTbIH WAn MackacbIH, KyaKka apHaNfAH KopraHbI KypalbIH, KonFaNTbIX XaHe XymbcI AnXaNkbIbIH KNiH3. Ke3 KopraHbICbI aPtpJI XyMbICTapdAn naDa 6oNaTbIH KaNbIKTapdbIH TIn KeTyIHen Kopra anatbIn 6onybl KaKeT. WaHHan KopraTbIH Macka Hemece pecnnapot JxMybICTah naJa 6oNaTbIH BeIweKtePi cy3rJleAnybl KaKeT. Y3ak yaKbIT 6oBl Xofapbl KapKbIHbIbIKTaftbl Uy acepHne 6Oly ecty Ka6jntiH 6y3blNybiHa eKeenyi MymKiH.
I. Beige aamdapbH JyMbic aMafbHaH Kayinci3 KaabkTbIKTa 6onybI kaxet. Kymbc aMafbHa Kipetin Ke3 KeJreH aam Jxke KopraHbc Ka6dbfBn KNIOiTnic. OHJeRHeH HeMece cblHaH KepeKxapaKTbIH CbHbIKTapbl YuBn, JyMbIC aMafbHa XaKaBH Xepde XapaKaTka OKeJyIMMKiH.
J. Keckiш Крал Хасьрbingсымfa TnIN KeTyi MymKIn JxMbICTbl OpbHdaFah Ke3de 3JekTp KypalbH OkwayaHaFah KapMay BeTepiHEn UcTaHbI. Keckiш Kepek-Jkapak KepHeyni CbIMfa KaIra, 3JekTp KypalbHbH aMbIK MeTaNJI 6eJIkTePihDe KepHey NaJaDa 6onybl MymKIn, HtNIXecIHDe ONEpAToPdbI TOK COfybl MymKIn.
K. CbIMdbI aHnHaTbIH Kepek-JapaKaTah aJIwaK OPHAJaCTbIPbIHbI3. BaCKApYdbI XoFAJNTcaHbI3, CbIM y3iIN Hemece iINIin, KOJIbIHbI3 aHnbln JatKaH KepeK-JapaKa eHIn KeTyI MymKiH.
2. KAYINCI3IK TEXHnKAcbIHbIH HYCKAYAPbl
L. Kepek-kaap TOIbIFbIMeH TOKtAmFaHa, 3NeKtp KypaIbIH KOImaHbI3. AInHaJIaTbIH KepeK-kaap 6yIbIMbIH 6eTIH iJIIN KeTce, KypaJIbIbI bAcKa pa aImaI KaIyblHbI3 MymKiH.
M.3neKtp KypaBbIn 03iHi36eH 6ipre aIbIn JyPren Ke3de OHbl icKe Kocnab13. AHaBbIn TpyFaH KepeK-JkapKa Ke3deCok KaHaCKaH Ke3de KImiHi 3 IJIHIn, KepeK-JkapK DeHeHi3re Kapai TapTbIybl MymKiH.
N. ΝηκTp KypalbHbH aya JeIeTkiWTepi H yHemi Ta3aJAN OTbIPbHbI3. Motop JekIeTkiWi Kopnyc iwiHe IwH JxHaNbI JxHe YHTaKTaJIFaH MeTaIbH, WKeTeh Tbc XINHaNybl TOK COfy KayniHe eKEnyi MymKiH.
O.3neKtp KypaIbIH TyTaHbIiMaTePnaIdapDbIH XaHbIHda naIdaIaHa6aHbI3. YIckbIHdap Ocbl MaTePnaIdapDbI TyTaHdbIpbyI MymKiH.
P. Cynbik caJIbIHdaTKbIUtapdbI kaxket eteTih KepeK-JapaKTapdbI naJaHaHbAb3.Cy Hemece backa CynbIK caJIbIHdaTKbIUtapdbI naJaHaHaHaDa 3JeKTP TOBbIHcFby MymKiH.
BACKA BAPJIbIK XYMbICTAPFA APHAJIFAH KAYIINCI3dIK HYCKAYJIAPbl
Kepi cokkbl khe ofah kaTbictbl eckepTynep
Kepi cokbl - aHannabI dHreNek, TipeKTik TabakUa, Kbluak Hemece Ke3 keIreH bacKa kepek-kaPaKtBnK bICbIbIn Hemece iJIiH IN KaNybl AcepH eKeHTte H TybHaAaTbH peAkZna. KypaIdbH KbICbIybl Hemece iINH KaNybl aHaIbIn TypFaH kepek-kaPaKtBnXbIJdAm KJlaybHa eKeJeDi, aJ 6yJbJaayCbI3 TypFaH 3JeKTp KypaJIbH kepeK-kaPaKtBn KeNTeny 6ypbIbCbHa Kapcbl SaftTa JxpyiHe eKeJeDi.
MbicaJIb, abpa3nBti dHreIek eHdey 6yIbIMbHa iinHce Hemece KbcblbKanca, KbIcblfAH opblHa eHETiH deHreIeKTiH, Weti MaTePnaJbIH, bETKI JkaBHa eHIn, dHreIeKTiH, SwIbIbN KeTyiHe Hemece Kepi cokblbepyIhe oKeIyI MymkiH.
Kbicy HkyTeciHderi DeHReIe K03faJbICbIHbIH, 6aftbIHbHa 6aJIaHbICTbl DeHReIe Oepatopra Kapai Hemece KepicHwe YdbIn KeTy i MymKiH. CoHdaN-ak MyHdai JkaFdaIa a6pa3nBti DeHReIeKTePepDIn CbIHbI MymKiH. Kepi cokkbl 3neKtp KypalbIH dypbc NauJaIaNbay XHe/Hemece KaTe Kymblc PpoedypaIapblbIH Hemece KaFdaIapblbIH HtNKeCiHde
2. KAYINCI3IK TEXHUNKACbIHbIH HYCKAYAPbl
TybHdaIbI XaHe TeMeHderi TnicTi CaKtbIK, 7apalapbIH naJaIaNHy apKbIbI OHbIH aIbIH anyfa 6oJadbl.
A.3neKtp KypalbH MbIKTan YCTaHbI 3 XeHe DeHei3 6EH KOJIbIHbI3DbI Kepi COKKblapra KapcbI Tpya anaTbH KUre KOJIbHIbI3. IcKe KockaH Ke3de Kepi cOfydBi Hemece aHaany MOMHTiH peakzuaCBH MaKcMaJdbI TypDe bAckay ywiH KocBIMwa TytKaHbI Ka6DbIKTAJFaH KaFdaNda NaJaIaNbHbI3. Tnicti CaKtbI Kwapanap Ka6blDaHfAn 6oNca, onepatop aHaany MOMHTiH peakzuaPabH XeHe Kepi cOfy KUwTepih Baccapa aJaBl.
B.AaHaJaTaBIn KepeK-JapaKTbIH XaHbIHa KOJIbIHbI3DbI KOIMaHbI3. KepeK-JapaK KOJIbIHbI3fa Kepi cokkbl 6epyi MymkiH.
C.Kepi cokkbl opbIH aIfahda, 3neKtp Kypalbl Ko3raIaNbIH Xepre DeHeHiz JkaBihDaTnabHb3. Kepi cokkb1 Kypalbl iJIHy HkyTeciHderi DcHreIek Ko3faJIbICbHa KapcbI Safta NTpepi.
D.Бурьштар,еткipштетерхэнг.T.6.болikтepdi eHdererH Ke3de aca MyknT 60lbIbI3.KepeK-жapaktpdbIn ysbIn KeTyin KxHe axbipan KeTyine kOJ bepmeH3.BypbIstap,etkip wETter Hemece cepniictep aHaNaTBIn KepeK-жapaktbIn iInHIN KeTyiHe acep etedi XHe KypaNbIb IbacapyDbI KnbIHdaTaIbI Hemece Kepi COKkbHbI TydbpaIbI.
E. Apa 6ekitnei3. MyHdai Kyy3dep Kepi COKkbl Kni Tydbipn, Kypalbl 6ackapydbI KNbIHdaTaDbI.
Terictey XəHe a6pa3nBti kecy xymbICTapbHa faHa apHaIraH kayinci3dk eckepTynepi:
A. ΘηκTp KūpaNbI ywiH MaKyIaHaFraH ΣeHreJek TypIepiH JxHe TaHdaJaFraH ΣeHreJekTepre CəNKeC KeJeiH CaKtaHdbIpfbIbTbI fHa naiDaIaNbIbI3. ΣeHreJekTepre apHaImaFaH ΣeKtp KūpaNbIH TiicTi Tpyde Kopray MymKiH emec XeHe Onap Kayinci3 6oImaIbI.
B. Optacbl 6acblnfaH deHreKeTepdiH tericteriH 6eti CaKaTaHDbIPbIu TymCbIFbl Xa3bIKtBfblHbIH TomeHri 6enirHde 6ekitiny Tnic. CaKaTaHDbIPbIu TymCbIFblHbIH Xa3bIKtBfbl apKbIbI bETeIH dypbc opHaTbImFaH deHreJek Tniicti Typde KopraJa aImaNbl.
2. KAYINCI3IK TEXHNIKACbIHbIH HYCKAYAPbl
C.CaKaTaNDbIbPbIiOnepaTopra DeHReIeKtIH a3 6eNiri rAHa 6aftbTTaIaNdAn etin 3neKtp KypalbHa bepik 6eKtiJy iXHe MaKcImaIbI Tpyde Kayinc3 OpaTbIybl Tnic. CaKaTaNDbIbPbIi ONepaTopdbI dHReIeK cbHbIKTapbHaH, DeHReIeKTIH Ke3DeiCoK TnIn KeTyiHeH XHe KNIMdi TytanDbIPbI MyMKiH YsKbIHapdAn Kopfayra KEMeKTecedi.
D.ДeнгrelenkTePdiTek ycbiHbInFaH JyMbICTap ywiH naJaIaHy kaxet.MbicaJIb:KeckiDOnHreLeKTHWeTImEH TericTeMeHi3. Abpa3nBti KeckiDOnHreLeKTeP nepupepernaIbK TericTeyre apHaIraH,ocbl DOnHreLeKTePre KOnDaHbInaTbH 6yIpNIk KyUTeP OJapDbI CbIHdbIpYbIMyMkiH.
E. TaHdaIraH dOHeReleK ywiH apKaWah DypbIC eJlWeMdi XaHe NiWiHdi, 3aKbIMdaJIMaFah DoHReleK fPaHeTepi HnDaIaNbIHbI3. Caikec KeTeIH dOHeReleK fPaHeTepi DeHreLeKTIH cbHy MymKiHdiRiH a3aItaBHaJ erin TipeNdi. Keckiu DeHreLeKTePdIH fPaHeTepi TericTeriH dOHeReleKTIH fPaHeTepi Hen epeKSeJeHyI MymKiH.
F. KeIemDi 3neKtp KypaJIdapbIHbIH To3fAH DeHreJIeKTePih naIdaIah6aHbI3. KeIemDi 3neKtp KypaJIbHa apHaJIFaH DeHreJIeKTeP 3afBbH KypaJIdbIH XOFapbIXbIJaMDbIFbIHcai KeJIMei, JapbIybl MymKiH.
A6pa3nBti kecy xymbICTapbHa fHa aPhaIfah KocbIMwa kayinci3dk eceptynepi:
A. Keckiw DeHreIekTI "KaxamaHbI3" Hemece Ofah Wamadah TbIC KbcIM TycipMeH3. WamadaH TbIC TepeHdetin Kecyre apeket XacaMaHbI3. DeHreIekke WamadaH TbIC KbICbIM Tycipy OHbIH KeciInReH XepiHderi JxKTemehi XHe MaibCyra He axbipan KeTyre beimdiinirn apTbIpaBl XHe Kepi COKkbHbI Hemece DeHreIekTIH, cblHy KayPiH TydbIpaBl.
B.Ainhaibn XaTkaH dHreJekneh 6ip CbI3bIKtbIH 6oBHInHa Hemece DHeJreJekTIH apTBIna TypMaHbI. Kymblc icTey 6apbicsHda DeHreJek DeHei3deH aIIwaKtan XaTca, bIKTMaj Kepi cokkbl aHaibn XaTkaH DeHreJekTI XeHe 3JeKTP KypaNbIH ci3re Kaapan tiKeJen NTepin Xi6epyi MymkiH.
C.Дэнгrel ek KИсайын KaIraH Ke3de Hemece Ke3 KeIreH ce6eppenek Ceky ĀpekeTih TOKtaTkaH Ke3de, KypaIdbI Owipin, Dэнгrel ek
2. KAYINCI3IJK TEXHNIKACbIHbIH HYCKAYJAPbl
TOnbIfbImeH TOKtaFaHa, 3JKeTp KypaJIbIH KO3fAITnai YCTan TypbIHbI3. KeckiW DeHreJIek KO3fAJIbICTa 60JFaH Ke3De, DHeHReJIeKTI KecinRc H JepdE h Ew yaKbITTa aNbI TAcTaMaHbI3, əntnece Kepi CokKbI TybIHdaybl MymKiH. DHeHReJIeKTIH KICAIO ce6eBIn aHbIKtan, OHbl XOIO yUsh TY3ETy ČpekeTIH opbIHdaHbI3.
D. ΘΗνηδελητι Μανγίας Μανγίας Μανγίας Μανγίας Μανγίας Μανγίας Μανγίας Μανγίας Μανγίας Μανγίας Μανγίας Μανγίας Μανγίας Μαφερούσους Μαφερούσους Μαφερούσους Μαφερούσους Μαφερούσους Μαφερούσους Μαφερούσους Μαφερούσους Μαφερούσους Μαφερούσου.
Дэнгелекті有很大хогарькі кылдамдыікka xeTkizi3iH3 xэне kecijtreн
жерre enten ka'ta ehri3iH3. Злесг Куралы сн'dелтін 6уньIMда
kaɪta icke kocblɪca, Deнгелектін kɪcaɪəbɪ, cepniñyi hemece kepi
cokkblбepу i MymkiH.
E.Дэнгreleктɪн KBICblny Hemece Kepi COKKbl 6epy KayniH a3aɪty ywiH nAHeIbIdep Hemece Ke3 KeJIreH YIken EHNDEy 6yIbIMbIH tipeH3.YIken EHNDEtɪn 6yIbIMdAp e3 caImaftbHa 6aJIaHbICTbl eHKeoi MymKiH.TipeKTePdi EHNDEtɪn 6eJIwEKTɪn acTbHa, DeHreLekTIH eKI JxafblHaftbl EHNDEtɪn 6yIbIMdbI Kecy cbl3bIFbHa XəHe WETiH JxakblH Xepe OPhaNaCTbIPbIHbI3.
F. Ka6bipranap Hemece KepiH6eTIn 6backa Jxepnepre "KaIta Kecirih" Xacaarah Ke3de aca MyKnT 60nbHb13. 5bifbn Typran DeHReIek Ra3 Hemece cy Ky6bipnapbH, 3JIeKtp CbIMbH Hemece Kepi COKKbl TydIPybl bIKTImaJI NbICaHdApdbI KeciN KeTyI MymKiH.
3.CNATTAMACbI
1 Kecyre apHaIraH XbIJaMa CaKaTaNdbIpfbIi
2 ⅢnHdJIbdi Kynblntay Tymecci
3 AInHaJImaIbI TyIme
4 ApTbIK JxKTeMe XapbIK dNoDbI
5 BaTapea 6IIOBbIHbH 6OcaTy Tymeci
6 BaTapea 6Iorbl
7 Aybictbipbin-Kockbiil
8 KyIbIInTaH 6oCaTy Tymecci
KocbIMwa TtTKa
10ДиСК*
11 Tericteyre apHaIraH XbIJaM CaKTaHDbIpFbIi
12 CaKaThaHdbIpfbIi nIrerI
13 IwkiФланeц
14 Cbiptkbl pnaheu
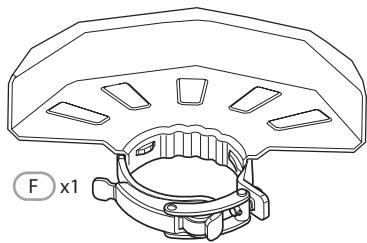
*Cunatattanfah HeMece Kepcetinre HKepeK-ka6dbkTapdbH 6apNbIFb 6ipdei cTaHapTTbI JeTkiim JnHaFbHa KipMei.
4. TEXHnKAJIbIK CINATTAMACbl
| Ytrici | 20VAG3-125BL.1 |
| Hominahdby Kepehey: | 18 B TT 20 B maks. TT |
| Hominahdby JbIldamdbIfby: | 11000/MnH |
| ДиckinH eH: | Ф125 MM |
| Диck saHbIaHbI: | Ф22,23 MM |
| Ainahdbyipfby 6bpaHdaCby: | M14 |
| ДыбICTbIK KbICbIM DeHrei: | 89дБ (A) |
| Abytky Koэффициентi | 3 дБ (A) |
| ДыбICTbIK KyaT DeHrei | 100дБ (A) |
| Abytky Koэффициentsi | 3 дБ (A) |
| Дирл днг: | 10,535 M/c2 |
| Abytky Koэффициentsi | 1,5 M/c2 |
| КурьлfbI салмafы (батаряпарсыз) | 1,8 кr |
| Заядагыш Кчралдамен уйесимддiri | 20VCH1-3A.1/20VCH1-3A.1XXX 20CH2-3A.2/20CH2-3A.2XXX 20VCH2-6A.1/20VCH2-6A.1XXX |
| Батаряларmen уйесимддiri | 2.0Ah: 20BA2-20.2/20BA2-20.2XXX |
| 2.5Ah: 20VBA2-25.1/20VBA2-25.1XXX | |
| 4.0Ah: 20BA2-40.1/20BA2-40.1XXX | |
| 5.0Ah: 20VBA2-50.1/20VBA2-50.1XXX |
ECKEPTNE: OcbI HcyckayIbIKTapda KepceTIReH dipin DeHreI cTaHdpTTaIFah EIIwey npOeDypanapbIMeH caiKeCTikTe eIiueHReH XHe OHbl Xa6dbIKTapbl caIbICTbpyfa KOnDaHyfa 6oJaBl. Dipin sbIRapybln 6epirren MeHH eCep etyIN bactankbl 6araIaybHa KOnDaHyfa 6oJaBl.
ECKEPTY! Dipin DeHrei 3neKtp KypanbIH naiDanaHyfa 6aIaanbIcTbI e3repeDi XHe KeBip JxarDaIapda OcbI HcyKayIbIKTapda KepCetIInReH MAndepEn AcbIN KETyIMymKIn. OcbIaIIa 3neKtp KypanbIH TpyakTbI KOndaHny NaiDanaHybIHn DipinDi 6araIamaybHa 3Kenyi MymKIn. Dipin KxVTEmecih MymKHHirHWe TEmeHDeTy TBpbcHb3. Dipin KxVTEmecih TEmeHDeTy amalapbHa MbICbl, KONFaN KIO XHe KymBic YaKbTBn IweKtey KaTadbl. CoBImen BiPree Bapblk Xymbc Kynepi KamTbIybl KaXet (MbICbl, 3neKtp Kypanbl Ewin TyprAH yaKbTI neh OHn Kocybl BiPak KxVTEmec3 Xymbc ICTeTIH yaKbITbl).
5. Пайдалану
AYbICTbIPbIN-KOCKblI
UapKaIpaKbI Kocy yuHIN aNdbImeH KyIbIInTah 6oCaTy TymeciH, cOaH KeiH aybIcTbIPbIN-KockbIHTbI bacyKepeK. OHJI eWipin, aybcIbTbPbIN-KockbIHTbI 6oCaTbIH3.
AINHAMJIbIXyMbIC KYIH PETTEY
ECKEPTIe: aybICTbIPbIN-KOCKblw aHnabpy Tymecin 6acyanb 6ypbIn 6actanbl KyiHte TypaB (0-ky). Aynabpy Tymecin 6acbl, KymcaK yctaBlbB 6ap TykA hB carat 6aftbHa KaPcb 6ypaHb3, COHa aYbICTbIPbIN-KOCKblW KeJdeHeN Kyire (1-ky) aybicaB. Aynabpy Tymecin KaTbA 6acbl, aybICTbIPbIN-KOCKblTbX KOFAPbI KyiHne (2-ky) 6ypaHb3. AybICTbIPbIN-KOCKbl W KyIH petTeReHHHe N KeiH, KocBMwa TyTKaHb KaTApOnaty KaKet.
KocbIMwa TtKaHb6epnic KopabkaptepiHKe3 KeIreH JafbHa opHaTyra 6oJaB.
KocbIMwa TtKaHb6ackapy MeH KopFaHbICTbEh KaKcb KAMTaMaCb3 eTeIH Jepre
opHaNactbIpbHb3.
Ophaty yuish Kocbimwa TtkaHb caHbIaybHa Kipri3in,MbIKTan 6ekitih3.
XAJIIbI PAnJaJAHY
- Kepek-kaapKbI ZaHa rAHa OPhaKaH HEmece JyMbIC Ke3EHH eHdi fAha 6actaHa 6oIcaHbI dNcKiH eHdey 6eIWeiHe KOnDaHbAcTah 6ypbH bip MNHyT 6oBbI aHnDbipa OTbIPbIn, OHbl TeKcepHJ3. ECKEPTY! Kepre Tycin KaHan Kepek-kaapKbI eKhauan naIdaIaan6bHbI3. TeHdecTipImerH Hemece 3akBIMdaIraH Kepek-kaapKTabeH dey 6eIWeiH 6yIepin, KpaIbI 3akBIMdAn XeHe KepeK-kaapKbIH aKayIbFbHa eKeNeTIH KepHeyDi TydBiPybl MyMkiH.
- Θηνη Επιλεριην Κγατη Μγαβίκης Μγαβίς Μγαβίς Μγαβίς Μγαβίς Μγαβίς Μγαβίς Μγαβίς Μγαβίς Μγαβίς Μγαβίς Μγαβίς Μγαβίς Μγαβίς Μγαβίς Μγαβίς 卡 Μγαβίς Μγαβίς Μγαβίς Μγαβίς Μγαβίς Μγαβίς Μγαβίς Μγαβίς Μγαβίς Μγαβίς Μγαβίς Μγαβίς Μγαβίς Μγαβίς Φεκηνηνηνηνηνηνηνηνηνηνηνηνηνηνηνηνηνηνηνηνηνηνηνηνηνηνηνηνηνηνηνηνηνηνηνηνηνηνηνηνηνηνηνηνηνηνηνηνηνηνηθ
- ECKEPTY! KypaIbI eKoKbIbI36eH MblTan yCTaHbI3. ECKEPTNE: BaTapeR KypaI KocblbI TpyraH Ke3e caJIbIHraH 6oJca, KypaI xMbIC iCTeMeiDi. KypaIbI bI OJIPIHl3, CoaH KeiH XyMbICTb I bactay yuH OHbI KaTa KOCblbI3.
5. Пайдалану
- Xymbictbi 6actaydah 6ypbih Kepek-xapaKtbIH TOblk XblnamMbikKa JeTyiHe MymkiHdiK 6epinj3.
- Kepek-xapak nen eHney 6eIeirHH apacbIaft KbIcblm MeH JkaHacy 6etIH 6aKbIaHbI3. ECKEPTY! Kepek-xapakTbI eHney 6eIeirHH yCTHe eUkaaH aYMaHbI3. KbcIMHbI TbIM KEN 6onybI kepek-xapakTbIH akaylbIbHa aNbI IN KeleDi Hemece XbIaMDbIKbTI a3aITaJIbI.
- Xymbictb aarTaFahHah KeHH KypaIdb eWipin, OHbOpHbHa KOIOdAn 6ypbH ToIbIKTaN TOkTaFaHbHa Ke3 JeTKi3iHi3.
TECTEYTE APHAJFAH XbIJaAM CAKTAHDbIPfbltbl PAndAIAH
ECKEPTY: CaKaThNbIbPbIu Tpyi DiNc Tpyihe CaiKec KeIy i Kepek, OcbIaIma Da Ncck CbHbIn KaIraH KafDaIJa, OneapToP MaKcImaIbI KoPraHbICHeN KaMTaMaCbI3 etiNei.
Булірік Xэне періфэрьлік тERCICTeY Ke3iHne,біркELki EHNDEnyIe KON JxETKI3y yuHIn, KypaJIы TpyakTы KbICbIMdbl NaДanaHa OТырВи,15°-30° apanbIFbIHda YCTaHbI. TbIM yIkeH 6byIsh WafBIn aMakTapda JxMbIC 6etIN KpArbI IN Hemece KyuDipin Xi6bpYi MymKIn IwOfbIPnAHDbIPJFaH KbICbIMdbl TydIpaIbI.
KECYTE APHAJFAH XbIДAM CAKTAHbIPfblTbI PAnJaJIaHv
Kecyre apHaJFaH XblIaM CaTaNbIpBbIe TK KIiipeeTIn Kecy XHe YcaK etin TIny KymbICTapbHa fAHa IaNbIKtbl.
ECKEPTY: CaKtahnDbipfBtI Typi Dnck Tpyihe CcNkeC KeNy iKepe, OcbNaIa IeHreNeK CbHbI KaNFAH JKaFdaIJa, ONepaTOP MaKcMaJIbI KoPfAhbICNeH KaTAmacbI 3 etiJeI.
Kecyre apHaIraH KbIaam CaKaTaNbI PbIbITbI NaIaHaNHaF Ke3e, KypaJIbI DnCKiHiH WeTI apKbIbI fAHa KepCetInrReHdE etin yctay KepeK.
ECKEPTY! Kecyre apnaIraH anckciHn 6eTki XaBbH naIdaIaNHy nckciHn CbHybH Hemece 3aKbIMdaHbH TdybIpbn, aybIp DeHe JkapakTaHa eKeNyi MymKiH.
CAKTAHДыIPьIшТыОРHAJIACTыIPY
UpaKaPakTaBfCaTaHDbipBfIuTyKanBih6eKiTineiH XaFbHa 6aIIaNbIcTbI Dpybc opHaNactbIpbIraH 6onybTnic.CaKaHDbipBfIuBdypbc opHaJaCTbIpblMaFaH 1wapKaPaKtBtEwkaWan naDanaH6aHb3.
ECKEPTY: CaKaTHdbIpfbIbTbI 1apKaIpaKtbH anDbIHda 6oJaTBHdai etin eWkaaH KOIMaHbI3.
Bynndickienhshifapbifanhykblndapmeh6oc6eIweKtepeonepatopfa6afblTTaTbHbIKtaH, aybpjkapakTaKaekenyi MymkiH. CaKaTHdbpflbTIbEpkaaHdpybIC opbHra KoBbHb3.
CaKaTHaBbIpRbIbTbIH opHbIH 03repty ywiH:
Batape 6IolbIn aIbHbI3.
KbickblTb TaTpTy apkblbl KylbnTaH 6ocatblh3, caKaipfbIITbI 7apkaPaKaTah anbc Jepde DypbcOpHbHa bpaHb3.
CaKtaHdbipfblbTHkbickblbHbOHb6acyapKblbKyblntaHbI3.
ECKEPTNE: CaKaTaNbIbPfbltBnH, bIbFbIHkbl JKepi MoBIHTipeKTIH KaKNaFbIHdaFbI OByIKKa opHaTbJlFaHbHa Ke3 JeTKi3iH3. CaKaTaNbIbPfblsbl OPhaJIacTbPbIJMaFAH Hemece DpybIC petTeJMereh WapKaJaPaKTb EkaaHn NaIdanaHbAhl3.
6. TEXHnKAJIbIK KbI3MET KOpCETY

ECKEPTY! JXAPAKAT AJY KAYNI! KypblfbiDa Ke3 KeIReH XyMbICTbI
6aCTamac 6bybH, OHbl epaBbIM eWipin, 6aTapeHbI aIbn TaTaHbI3.
KypbIbIbI Ta3anay ywiH etKip 3aTAPdbI naDanaH6aHbI3. KypblfbiHbI iwiHe KaHdai da 6ip cybIKbIKbIH eHIn KeTyiHe eWkaaHxon bepMeHiz. OHTnce Kypblfbi 3akBIMaYbI MymkiH.
Kypblfblhyem,ehDypbCblXmbICTaayTaraHah KeHHepey Ta3an Tpyblb3.
KopnyctbI pnaCTnKiTi 6y3aTbIH 6eH3nH, epiTkiUTepe Hemece Ta3aJafbl 3aTTapdbI PAJDAHAHBAI, Kpyfak uSybepeKeHN Ta3anaHbI3.
LHaHcOpfbIi KypblfBhlb MyKnT Ta3anay yuHkaxet.
Kenndekiiw cahblaynapbye kkaanah 6itein kaImaybKepek.
KypbIyfIra Jka6bcIbn KaIfah aXapnay Ke3IhDe YsKah WaHdbI KbIwakNHe Ta3aHaHbI3.
TA3AJIAY
JenTeKlW CaHbIayApblDaftbI WaH MeH KObICTapDb Ta3aHaBbI. TyKaIapDbTa3a, Kprak XHe MaI MeH MaIIaRbIwTAPdAn T3a YCTaHbI. Ta3aay yIiH TeK JyMCAk Ca6bH epiTidici MeH DbIMKbI WSybepeKTI NaIdaNaHbIb3, Ce6e6i Ke6ip Ta3aHaBbI 3aTTap PnactMacca MeH BaCa Da OKuaynaHfAH 6eJIWeKTEpre 3nAHybI. OnapdbH Ke6bipeYiHe 6EHIN, TepneHTIN, NaK CyBbITKbIbI, CbIP CyBbITKbIbI, XNpNaHrF epITKiW 3aTTap, AMMNAK XHe AMMNAK KcObIFAH TyPbICTbIK XyBbIW 3aTTap KaTaDbI. KypaLbIH XaHbINDa OHa TYaHbI W Hemece XaHbIw epITKIwTepDi eWkaaH naJaIaNb6aHbI3.
XOHIDey XYMbICTAPbl
KHeDey KymbIcTapbl yuH KypaIbI, 6atape 6nOrblx KHe 3aprTaBbI KypaIbI eH KaBbIK bI3MeT KepeTy opTaIbIFbHa KaITapbIHbI3.
UapkaiaKaTbI TeKcePin,6aTapeHbI aIbIn TaCTaHbI3.
Iapkaipak nen OHbIH KepeK-kaPaKTapblH KapaHfbI, KypfA,K My3daTbImaFaH JeHe KaKcbI JeIetinTeH Jepde caKaTahB13.
UapkaipakTbI epaaiBIM banaanapBbIH KONJI XeTIneTIH JepDe caKaTaHbI3. EJXapaMdbI cakTay tempepatypacbi 10^ XaHE 30^ apaBbIFHnda.
B3 7apkaipakTb caTay yuHn TynHcyCa opamdbi KOndahyfa Hemece OHbl 7aHnH Kopray yuiH xapaMdbi MaTameh Hemece Ka6bHmeh Ka6yfa Kehec 6epem3.
TACbIMAJIAY
UapkaipakTbI TeKcePin,6aTapeHbI aBIn TaCTaHbI3.
UapkaipakTbI Ke3 KeIreH aybIp bIKpIaIaH HeMece KeIiK iIiHde TaCbIMaIay Ke3IHne naJa 6Olybl MyMKiH KaTTb IdpIInDe KOpFaHbI3.
UapkaPakTBiH cbPbIn Hemece Kylan KeTyine JokbepMey yuHIn OHbi 6ekitHiz.
KOPUJAFAH OPTAHbI KOPFAY
3neKtpnik eHimDepdrin KaIbIKTapbIH TpyMbICTbIK KOKbICKa Tactayfa 6oJMaIdbI. EyponabIK 6BatapeyIapra KaTbICTbI DnpeKTINBFA caikec, aKaybl 6ap Hemece naIanahbIrfan 6Batape 6NOKTapbIH/6BatapeyIapdbI 6eKe JxHAn, KopuafAH optara 3iHN KeTIIpMeiTIn JxOMMeH KdEre Jkapaty KaKet. KdEre JxapaTyFA apHaflrH apNaIbMeKemep 6oIca, KpaIbI kAeTe JXApTaIBIs. KdEre Jxapaty BoBHima KeHc Aynu yuih JxepriikTi eKilTeTI opraHapFa Hemece cayaOpHbHa xAbpIacBbI3. OHIb KopuaFAN optara Kepi ocepH Tnir36ey uuih KaTt EHeeiH I Hemece 6eJeKTei. Batape 6NoBbIHbIH/6BatapeyIapDbH, KypamblHa Kayinti 3ATTAP 6oJatbIHbIKTaH, OIAP KopuaFAN opta MeH aIaM DeHcaylbfHa Kayin TEHdipyIMymkiH.
9. KENIIJIK
KIPICNE
OcbHimDi TaHdaHaBbIb3Fa paKMeT. HImdepdi Jo6aay XHe daBbHday bapbcHda 6i3 naDanaHyBbIbApdbH KaKeTTJIkTePi KaHaFaTTaHbPaTbH KOrapbI cAnaHb KaMTamacbI3 ety yuHbKyuJ-kirepim3di caIaMbI3.
MAHbI3dbI! OCbl ΘHIMDI IAIIAIAY AINDbIHDA OCbl HYCKAYIbIKTbI OKbl INbIFbIHbI3, HEI3TI KAYINC13IIK ECKEPTUJIPEIH KAPAHBi3 XΘHE M¥KNJAT CAKTAHbI3.
Opambih aWKah coH eHIMdi Kypactbipy ywiin KaKeTTi 6apJIk ZnemeHTepDIn XnHaKaTa KaMTbIraHbHa Ke3 XeTki3reH XeH.
Erep 3aKbIMdaIah Hemece 6ipazakaynapb6ap 6oIca,ohbI naIdaIaN6aHbI3 JkHe eJkaBIn dyKeHRe KaITapbHbI3.
OcbI eHIM cbIpTtFaHa naJaIaIaHyra apHaIFaH XeHe esX KaIdaIa FImapat iHiNde naIdaIaNbIIMaybl Tnic.
ΘHimDi FImapat iushi He KOIO YsIH COHfBI peT naIdaIaNFAH coH eKI cFaTka cbIpTTa KaIDbipy KepeK.
Ctbin aIfahbHb3fa paKmet. Bi3iH eHmDi irniriri3re naIdaIaHbHb3.
Pikpneipin3iOnnHyKeHHInBe6-CanTbHdaKyaHa-KyHaKa6bIJaMbI3.
Keninik
Dexter JxHe UP20 eHimdepi eH Kofapfbl DY cana cTaHdapTTapbHa caikec Keledi. Bi3 caTbIn aIbIHFaH KyHHeN 6actan DEXTER eHimihe (KpaIbHa) 60 aIbIK keiinik xHe UP20 eHimdepine (3apraTafbln nen 6aTaper) 36 aIbIK keiinik yCbHAmbl. ByL keiinik tybHndaybl Mymkih 6apblk MaTePnaIbIK xHe eHdpictik akaynapfa KOnJaHbIaNbl. AdaMaIapfa XHe/Hemec MaTePnaIbIapfKaTbICTb TikeNe Hemece XaHaMa Ke3 KeIReH CnPaTTaFb eUkaHdAn opi KaPaNbluAfbIMap Mymkih emec.
ΘHIM cIbI KAIraH XaIaIaIa I bpoUHaopaIbI aKayIbIKTapIbI XOIO (McSeIepe MHe WseImep) 6etIH KapaHbI3; ereP Mcene WeiImce, ci3re eH XaKbIH opHaIackaH dyKeHde TekcepH3.
DykehiH3 mocenehi wuyuHH ekaHd aKbI aMMaybTic.
Kehney xane 6aiktepy bactbipy bcknkikeninik y3aktbfbH 3apTnaDb.
KaJIbIITbI TO3yDaH HeMece eHIMdi KATE KOJIMeH NaIaHaHydA H TybIHdaFaH 3aKbIMdAp KeniDik aCsbHa KaTNaDbI. Onapra, coHbIMeH Katap To3fAH Kayinci3dk AxbipatkbIbI bXHe Ko3faNTkblTAP KaTaDbI.
Benrini bip endep yinai aybikwa keinikik wapTapbihb 6ap eKehdirin cckepiiz.
KydikTeHReh JxafDaanJa DyKeHHi3Je TekcepiHj3.
Ha3ap aydpabjnyb tnic kenijdikke KaTbIcTb IaFBIMap yuiH TeMeHderinep tanan etiJei:
CatabnanydbI daneldeinTIN KxkaTbIKepcTeY
Boliktep yihui tapanneH kHeDmereHH xHe/Hemce aybictbpbmafaBH Kepcety.
Macene KaIbInTb To3yDaH TybHdAmaraHbH dJeNlDey.
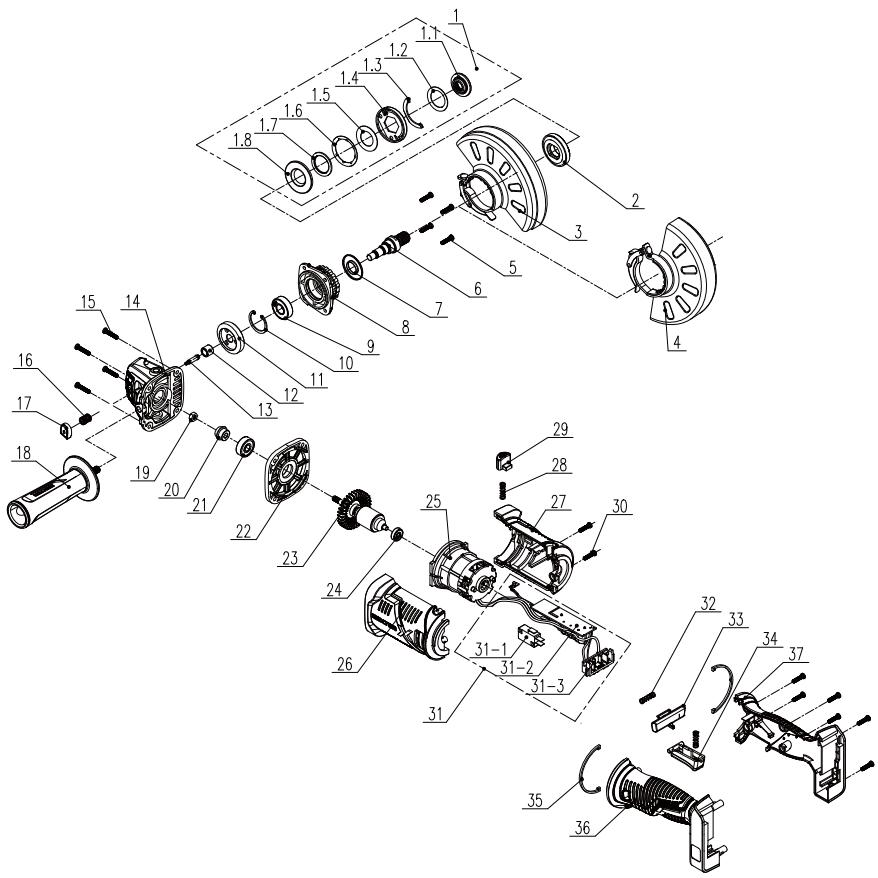
10. БОЛIKTEР TI3IMI БОИБIHSHAЕXFEN-TEXFENJI KÖPIHIC
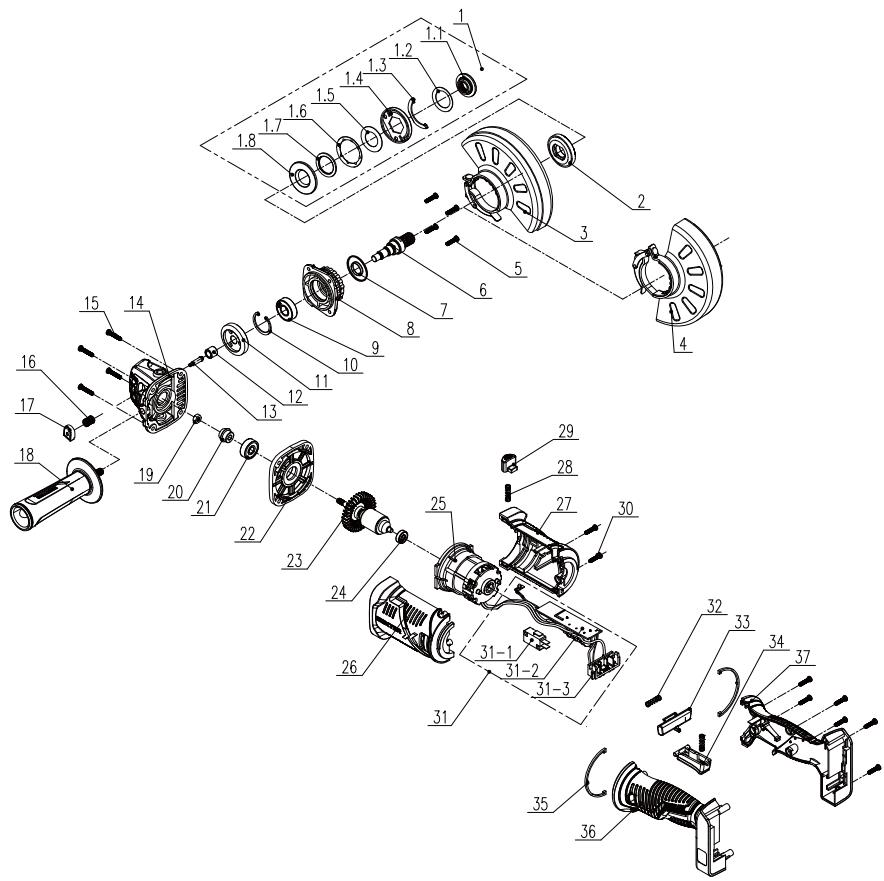
10. БОЛIKTEР TI3IMI БОИБIHSHAЕXFEN-TEXFENJI KÖPIHIC
| POS | СИПATTAMACБI |
| 1 | Баса пл actин acын bichхинаftы |
| 1-1 | Бекітілген Кьісьіш |
| 1-2 | Шаіба |
| 1-3 | Аралык |
| 1-4 | Баса пл actина |
| 1-5 | Жалпak šаібалap |
| 1-6 | Шаіба |
| 1-7 | Моьыntіpek |
| 1-8 | Теменгі пл actина |
| 2 | lші кі ралец |
| 3 | Жыltыратьш короганыш саКтандырfbiiшы |
| 4 | Кесіш короганыш саКтандырfbiiшы |
| 5 | M4*16 bypan'dacbI |
| 6 | Шыftыс bіліk |
| 7 | Шан оTKi3бeytin саКина |
| 8 | Кakпak |
| 9 | Моьыntіpek |
| 10 | Сасиналы саылay |
| 11 | Улken тereршik |
| 12 | Моьыntіpek |
| 13 | Біліktін kуль'tay ictiri |
| 14 | Бас короганы |
| 15 | ST4*20 bypan'dacbI |
Please read the operating instruction carefully and observe the notes given. Use these operating instructions to familiarise yourself with the product, the proper use and the safety instructions. Keep these operating instructions in a safe place for future uses.
SYMBOLS

Read instruction manual carefully

This danger notice warns of damage to the appliance or others properties, or may cause physical injuries.

Wear safety glasses

Wear ear protection

Wear safety shoes

Wear protective gloves

Wear a dust mask

Using damaged cutting or roughing discs is dangerous and may cause serious injury.

Not approved for wet grinding

Not approved for side grinding

Intended for metal grinding

The product complies with the applicable European directives and an evaluation method of conformity for these directives was done.

Eurasian conformity work.

Wee symbol for recycling operation.

Universal : compatible only with Sterwins UP20, Lexman UP20, and Dexter UP20

Conformity marking that product comply with applicable Ukraine technical regulations.
CONTENTS
- Intended use of Dexter Cordless angle grinder Brushless
- Safety instructions
- Description
- Technical data
- Operation
- Maintenance
- Trouble shooting
- Recycling
- Warranty
- Exploded view with part list
- EC Declaration of conformity
1. INTENDED USE OF DEXTER ANGLE GRINDER
Thank you for purchasing this product. Please read through these operating instructions and keep them for future reference.
The angle grinder is intended for cutting, rough cutting and brushing metal, concrete or tiles without the use of water.
After unwrapping the packing, make sure that the product is complete with its accessories (if any). If the product is damaged or has any defect, please do not use it and bring back it to your dealer.
If you give this tool to another people, please give him also this instruction manual.
Please note that our equipment has not been designed for use in commercial, trade or industrial applications. Our warranty will be voided if the machine is used in commercial, trade or industrial businesses or for equivalent purposes.
For safety reasons, children and young people under the age of 16, as well as people not familiar with these operating instructions, may not use this product. Persons with reduced physical or mental abilities may use the product only if they are supervised or instructed by a responsible person.
2. SAFETY INSTRUCTIONS
GENERAL POWER TOOL SAFETY WARNINGS

WARNING: Read all safety warnings and all instructions.
Failure to follow the warnings and instructions may result in electric shock, fire and/or serious injury.
SAVE ALL WARNING AND INSTRUCTIONS FOR FUTURE REFERENCE.
The term "power tool" in the warnings refers to your mains-operated (corded) power tool or battery-operated (cordless) power tool.
WORK AREA SAFETY
A. Keep work area clean and well lit. Cluttered or dark areas invite accidents.
B. Do not operate power tools in explosive atmospheres, such as in the presence of flammable liquids, gases or dust. Power tools create sparks which may ignite the dust or fumes.
C. Keep children and bystanders away while operating a power tool. Distractions can cause you to lose control.
ELECTRICAL SAFETY
A. Power tool plugs must match the outlet. Never modify the plug in any way. Do not use any adapter plugs with earthed (grounded) power tools. Unmodified plugs and matching outlets will reduce risk of electric shock.
B. Avoid body contact with earthed or grounded surfaces, such as pipes, radiators, ranges and refrigerators. There is an increased risk of electric shock if your body is earthed or grounded.
C. Do not expose power tools to rain or wet conditions. Water entering a power tool will increase the risk of electric shock.
D. Do not abuse the cord. Never use the cord for carrying, pulling
2. SAFETY INSTRUCTIONS
or unplugging the power tool. Keep cord away from heat, oil, sharp edges or moving parts. Damaged or entangled cords increase the risk of electric shock.
E. When operating a power tool outdoors, use an extension cord suitable for outdoor use. Use of a cord suitable for outdoor use reduces the risk of electric shock.
F. If operating a power tool in a damp location is unavoidable, use a residual current device (RCD) protected supply. Use of an RCD reduces the risk of electric shock.
PERSONAL SAFETY
A. Stay alert, watch what you are doing and use common sense when operating a power tool. Do not use a power tool while you are tired or under the influence of drugs, alcohol or medication. A moment of inattention while operating power tools may result in serious personal injury.
B. Use personal protective equipment. Always wear eye protection. Protective equipment such as dust mask, non-skid safety shoes, hard hat, or hearing protection used for appropriate conditions will reduce personal injuries.
C. Prevent unintentional starting. Ensure the switch is in the off-position before connecting to power source and/or battery pack, picking up or carrying the tool. Carrying power tools with your finger on the switch or energising power tools that have the switch on invites accidents.
D. Remove any adjusting key or wrench before turning the power tool on. A wrench or a key left attached to a rotating part of the power tool may result in personal injury.
E. Do not overreach. Keep proper footing and balance at all times. This enables better control of the power tool in unexpected situations.
F. Dress properly. Do not wear loose clothing or jewellery. Keep your hair, clothing and gloves away from moving parts. Loose clothes, jewellery or long hair can be caught in moving parts.
2. SAFETY INSTRUCTIONS
G. If devices are provided for the connection of dust extraction and collection facilities, ensure these are connected and properly used. Use of dust collection can reduce dust-related hazards.
POWER TOOL USE AND CARE
A. Do not force the power tool. Use the correct power tool for your application. The correct power tool will do the job better and safer at the rate for which it was designed.
B. Do not use the power tool if the switch does not turn it on and off. Any power tool that cannot be controlled with the switch is dangerous and must be repaired.
C. Disconnect the plug from the power source and/or the battery pack from the power tool before making any adjustments, changing accessories, or storing power tools. Such preventive safety measures reduce the risk of starting the power tool accidentally.
D. Store idle power tools out of the reach of children and do not allow persons unfamiliar with the power tool or these instructions to operate the power tool. Power tools are dangerous in the hands of untrained users.
E. Maintain power tools. Check for misalignment or binding of moving parts, breakage of parts and any other condition that may affect the power tools operation. If damaged, have the power tool repaired before use. Many accidents are caused by poorly maintained power tools.
F. Keep cutting tools sharp and clean. Properly maintained cutting tools with sharp cutting edges are less likely to bind and are easier to control.
G. Use the power tool, accessories and tool bits etc. in accordance with these instructions, taking into account the working conditions and the work to be performed. Use of the power tool for operations different from those intended could result in a hazardous situation.
2. SAFETY INSTRUCTIONS
BATTERY TOOL USE AND CARE
A. Recharge only with the charger specified by the manufacturer. A charger that is suitable for one type of battery pack may create a risk of fire when used with another battery pack.
B. Use power tools only with specifically designated battery packs. Use of any other battery packs may create a risk of injury and fire.
C. When battery pack is not in use, keep it away from other metal objects, like paper clips, coins, keys, nails, screws or other small metal objects, that can make a connection from one terminal to another. Shorting the battery terminals together may cause burns or a fire.
D. Under abusive conditions, liquid may be ejected from the battery; avoid contact. If contact accidentally occurs, flush with water. If liquid contacts eyes, additionally seek medical help. Liquid ejected from the battery may cause irritation or burns.
SERVICE
A. Have your power tool serviced by a qualified repair person using only identical replacement parts. This will ensure that the safety of the power tool is maintained.
SAFETY INSTRUCTIONS FOR ALL OPERATIONS
SafetyWarnings Common for Grinding or Abrasive Cutting-Off Operations:
A. This power tool is intended to function as a grinder or cut-off tool. Read all safety warnings, instructions, illustrations and specifications provided with this power tool. Failure to follow all instructions listed below may result in electric shock, fire and/or serious injury.
B. Operations such as grinding, sanding, wire brushing, polishing or cutting-off are not recommended to be performed with this
2. SAFETY INSTRUCTIONS
power tool. Operations for which the power tool was not designed may create a hazard and cause personal injury.
C. Do not use accessories which are not specifically designed and recommended by the tool manufacturer. Just because the accessory can be attached to your power tool, it does not assure safe operation.
D. The rated speed of the accessory must be at least equal to the maximum speed marked on the power tool. Accessories running faster than their rated speed can break and fly apart.
E. The outside diameter and the thickness of your accessory must be within the capacity rating of your power tool. Incorrectly sized accessories cannot be adequately guarded or controlled.
F. Threaded mounting of accessories must match the grinder spindle thread. For accessories mounted by flanges, the arbour hole of the accessory must fit the locating diameter of the flange. Accessories that do not match the mounting hardware of the power tool will run out of balance, vibrate excessively and may cause loss of control.
G. Do not use a damaged accessory. Before each use inspect the accessory such as abrasive wheels for chips and cracks, backing pad for cracks, tear or excess wear, wire brush for loose or cracked wires. If power tool or accessory is dropped, inspect for damage or install an undamaged accessory. After inspecting and installing an accessory, position yourself and bystanders away from the plane of the rotating accessory and run the power tool at maximum no-load speed for one minute. Damaged accessories will normally break apart during this test time.
H.Wear personal protective equipment. Depending on application, use face shield, safety goggles or safety glasses. As appropriate, wear dust mask, hearing protectors, gloves and workshop apron capable of stopping small abrasive or workpiece fragments. The eye protection must be capable of
2. SAFETY INSTRUCTIONS
stopping flying debris generated by various operations. The dust mask or respirator must be capable of filtrating particles generated by your operation. Prolonged exposure to high intensity noise may cause hearing loss.
- Keep bystanders a safe distance away from work area. Anyone entering the work area must wear personal protective equipment. Fragments of workpiece or of a broken accessory may fly away and cause injury beyond immediate area of operation.
J. Hold the power tool by insulated gripping surfaces only, when performing an operation where the cutting tool may contact hidden wiring. Contact with a "live" wire will also make exposed metal parts of the power tool "live" and could give the operator an electric shock.
K. Position the cord clear of the spinning accessory. If you lose control, the cord may be cut or snagged and your hand or arm may be pulled into the spinning accessory.
L. Never lay the power tool down until the accessory has come to a complete stop. The spinning accessory may grab the surface and pull the power tool out of your control.
M. Do not run the power tool while carrying it at your side. Accidental contact with the spinning accessory could snag your clothing, pulling the accessory into your body.
N. Regularly clean the power tool's air vents. The motor's fan will draw the dust inside the housing and excessive accumulation of powdered metal may cause electrical hazards. - Do not operate the power tool near flammable materials. Sparks could ignite these materials.
P. Do not use accessories that require liquid coolants. Using water or other liquid coolants may result in electrocution or shock.
FURTHER SAFETY INSTRUCTIONS FOR ALL OPERATIONS
2. SAFETY INSTRUCTIONS
Kickback and RelatedWarnings
Kickback is a sudden reaction to a pinched or snagged rotating wheel, backing pad, brush or any other accessory. Pinching or snagging causes rapid stalling of the rotating accessory which in turn causes the uncontrolled power tool to be forced in the direction opposite of the accessory's rotation at the point of the binding.
For example, if an abrasive wheel is snagged or pinched by the workpiece, the edge of the wheel that is entering into the pinch point can dig into the surface of the material causing the wheel to climb out or kick out.
The wheel may either jump toward or away from the operator, depending on direction of the wheel's movement at the point of pinching. Abrasive wheels may also break under these conditions. Kickback is the result of power tool misuse and/or incorrect operating procedures or conditions and can be avoided by taking proper precautions as given below.
A. Maintain a firm grip on the power tool and position your body and arm to allow you to resist kickback forces. Always use auxiliary handle, if provided, for maximum control over kickback or torque reaction during start-up. The operator can control torque reactions or kickback forces, if proper precautions are taken.
B. Never place your hand near the rotating accessory. Accessory may kickback over your hand.
C. Do not position your body in the area where power tool will move if kickback occurs. Kickback will propel the tool in direction opposite to the wheel's movement at the point of snagging.
D. Use special care when working corners, sharp edges etc. Avoid bouncing and snagging the accessory. Corners, sharp edges or bouncing have a tendency to snag the rotating accessory and cause loss of control or kickback.
E. Do not attach a saw chain woodcarving blade or toothed saw blade. Such blades create frequent kickback and loss of control.
2. SAFETY INSTRUCTIONS
SafetyWarnings Specific for Grinding and Abrasive Cutting Off Operations:
A. Use only wheel types that are recommended for your power tool and the specific guard designed for the selected wheel. Wheels for which the power tool was not designed cannot be adequately guarded and are unsafe.
B. The grinding surface of centre depressed wheels must be mounted below the plane of the guard lip. An improperly mounted wheel that projects through the plane of the guard lip cannot be adequately protected.
C. The guard must be securely attached to the power tool and positioned for maximum safety, so the least amount of wheel is exposed towards the operator. The guard helps to protect the operator from broken wheel fragments, accidental contact with wheel and sparks that could ignite clothing.
D. Wheels must be used only for recommended applications. For example: do not grind with the side of cut-off wheel. Abrasive cut-off wheels are intended for peripheral grinding, side forces applied to these wheels may cause them to shatter.
E. Always use undamaged wheel flanges that are of correct size and shape for your selected wheel. Proper wheel flanges support the wheel thus reducing the possibility of wheel breakage. Flanges for cut-off wheels may be different from grinding wheel flanges.
F. Do not use worn down wheels from larger power tools. Wheel intended for larger power tool is not suitable for the higher speed of a smaller tool and may burst.
Additional SafetyWarnings Specific for Abrasive Cutting-Off Operations:
A. Do not "jam" the cut-off wheel or apply excessive pressure. Do not attempt to make an excessive depth of cut. Overstressing the
2. SAFETY INSTRUCTIONS
wheel increases the loading and susceptibility to twisting or binding of the wheel in the cut and the possibility of kickback or wheel breakage.
B. Do not position your body in line with and behind the rotating wheel. When the wheel, at the point of operation, is moving away from your body, the possible kickback may propel the spinning wheel and the power tool directly at you.
C. When wheel is binding or when interrupting a cut for any reason, switch off the power tool and hold the power tool motionless until the wheel comes to a complete stop. Never attempt to remove the cut-off wheel from the cut while the wheel is in motion otherwise kickback may occur. Investigate and take corrective action to eliminate the cause of wheel binding.
D. Do not restart the cutting operation in the workpiece. Let the wheel reach full speed and carefully re-enter the cut. The wheel may bind, walk up or kickback if the power tool is restarted in the workpiece.
E. Support panels or any oversized workpiece to minimize the risk of wheel pinching and kickback. Large workpieces tend to sag under their own weight. Supports must be placed under the workpiece near the line of cut and near the edge of the workpiece on both sides of the wheel.
F. Use extra caution when making a "pocket cut" into existing walls or other blind areas. The protruding wheel may cut gas or water pipes, electrical wiring or objects that can cause kickback.
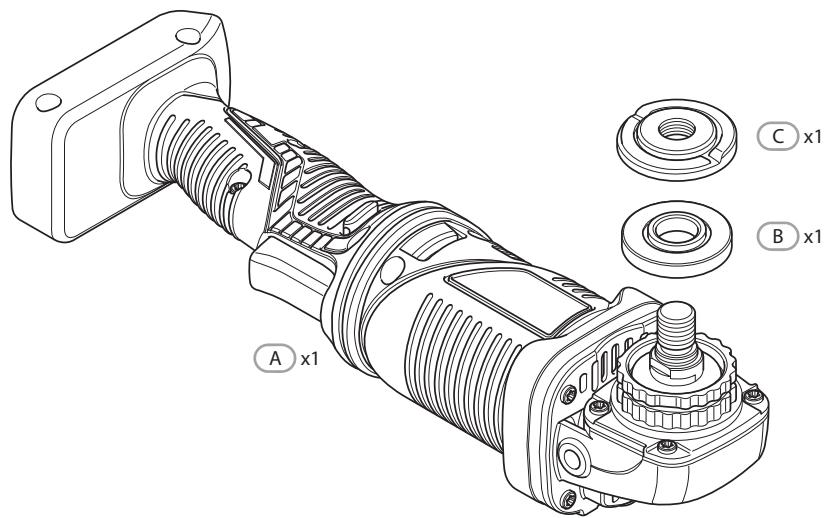
3.DESCRIPTION
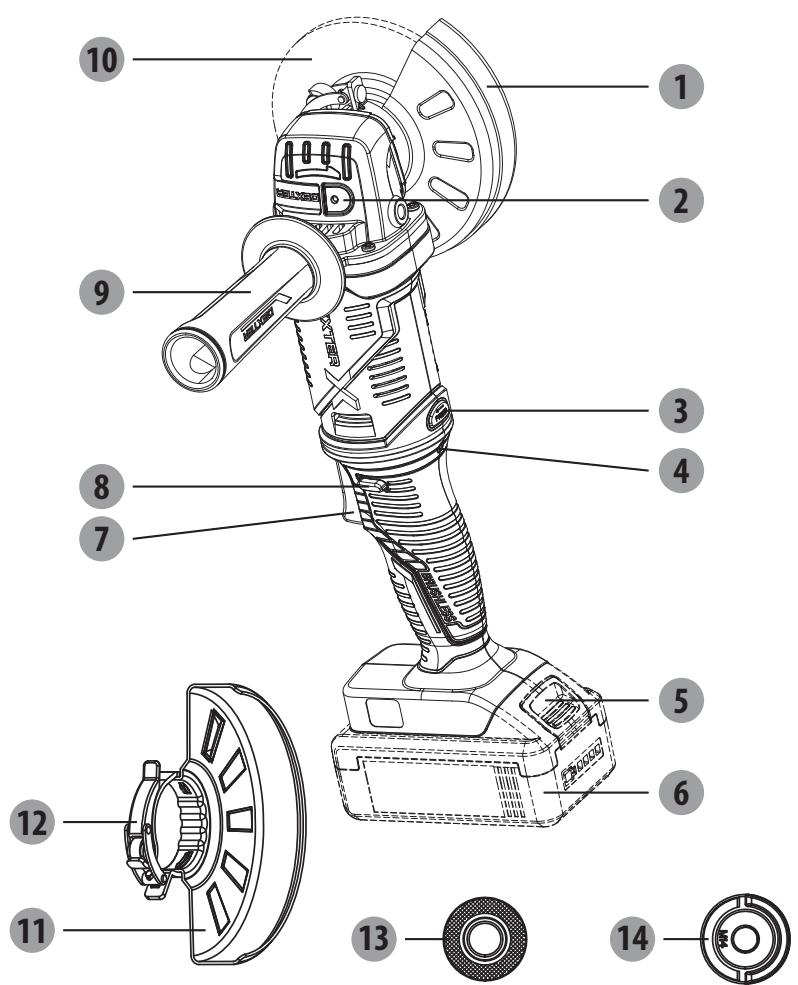
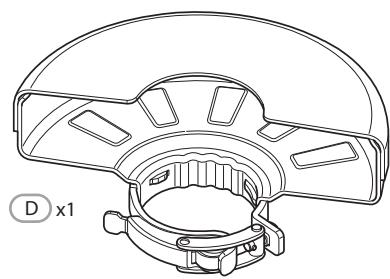
Quick guard for cutting
2 Spindle locking button
3 Rotating button
4 Overload LED
5 Battery pack unlock button
6 Battery pack
Switch trigger
8 Lock-off button
9 Auxiliary handle
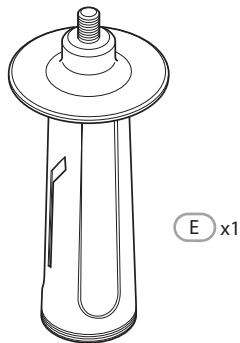
10 Disc*
11 Quick guard for grinding
12 Guard clasp
13 Inner flange
14 Outer flange
4. TECHNICAL DATA
| Model | 20VAG3-125BL.1 |
| Rated voltage: | 18V d.c. 20V Max d.c. |
| Rated speed: | 11000/min |
| Disc width: | Φ125mm |
| Disc bore: | Φ22.23mm |
| Spindle thread: | M14 |
| Sound pressure level: | 89dB (A) |
| Uncertainty | 3dB (A) |
| Sound power level | 100dB (A) |
| Uncertainty | 3dB (A) |
| Vibration level | 10.535m/s2 |
| Uncertainty | 1.5m/s2 |
| Machine weigh (not included batteries) | 1.8kg |
| Compatibilities with chargers | 20VCH1-3A.1/20VCH1-3A.1XXX 20CH2-3A.2/20CH2-3A.2XXX 20VCH2-6A.1/20VCH2-6A.1XXX |
| Compatibilities with batteries | 2.0Ah : 20BA2-20.2/20BA2-20.2XXX |
| 2.5Ah: 20VBA2-25.1/20VBA2-25.1XXX | |
| 4.0Ah: 20BA2-40.1/20BA2-40.1XXX | |
| 5.0Ah: 20VBA2-50.1/20VBA2-50.1XXX |
NOTE: The vibration level specified in these instructions has been measured in accordance with a standardised measuring procedure and can be used for equipment comparisons. The specified vibration emission value can also be used to make an initial exposure estimate.
WARNING! The vibration level varies depending on the use of the power tool and may be higher than the value specified in these instructions in some cases. Regular use of the power tool in this way may cause the user to underestimate the vibration. Try to keep the vibration loads as low as possible. Measures to reduce the vibration load are, e.g. wearing gloves and limiting the working time. Wherein all states of operation must be included (e.g. times when the power tool is switched off and times where the power tool is switched on but running without load).
5. OPERATION
INSTALLING/REMOVING BATTERY PACK
To install:
Insert the battery pack. Push battery pack into the bottom of the handle and that battery pack is secured in the product before beginning operation.
To remove:
Depress the battery pack unlock button and by pulling the battery pack out. For complete charging instructions, see the operator's manuals for your battery pack and charger.
LOCK-OFF BUTTON
The lock-off button is located on the handle above the switch trigger. You must depress the lock-off button in order to pull the switch trigger. This button resets each time when the switch trigger is released.
SWITCH TRIGGER
To turn the grinder ON, depress and hold lock-off button, then depress the switch trigger. To turn it OFF, release the switch trigger.
NOTE:The switch trigger in a original position(position 0) before pressing the rotating button.Press the rotating button,rotate the soft grip handle anticlockwise to make the switch trigger be in a horizontal position (position1).
Press the rotating button again,rotate the switch trigger in a upturned position (position2).
After adjusting the switch trigger position,reinstall the auxiliary handle is necessary.
The auxiliary handle is able to be installed on any side of the gear case. Position the auxiliary handle in the location which offers best control and guard protection.
To install, thread auxiliary handle into auxiliary handle socket and tighten securely.
GENERAL OPERATION
- If you have just installed an accessory or are beginning a period of work, test the disc by letting it spin for one minute before applying it to the workpiece. WARNING! Never use a accessory that has been dropped. Out-of-balance or damaged accessories can mar workpiece, damage the tool, and cause stress that may cause accessory failure.
- Use a clamp, vise or other practical means to hold your work, freeing both hands to control the tool.
- WARNING! Hold tool securely with both hands. NOTE: If the battery is inserted when the tool is ON, the tool will not run. Turn the tool OFF, then back ON to begin work.
5. OPERATION
- Allow accessory to come to full speed before beginning work.
- Control pressure and surface contact between accessory and workpiece. WARNING! Never bang accessory onto work. Too much pressure causes accessory failure or slows speed.
- When finished, turn off the tool and make sure it comes to a complete stop before laying it down.
USING QUICK GUARD FOR GRINDING
WARNING: The guard type must match the disc type to provide maximum protection for the operator if the disc should break.
When side grinding and peripheral grinding applications, hold tool at a 15^ to 30^ , using constant pressure for a uniform finish. Too great an angle causes concentrated pressure on small areas which may gouge or burn work surface.
USING QUICK GUARD FOR CUTTING
Quick guard for cutting is suited for small cut-off and shallow notching operations only.
WARNING: The guard type must match the disc type to provide maximum protection for the operator if the wheel should break.
When using a quick guard for cutting, hold the tool as shown, using only the edge of the disc.
WARNING! Using the face of a quick guard for cutting will cause the disc to crack and break, resulting in serious personal injury.
POSITIONING THE GUARD
The guard on the grinder should be correctly positioned depending on which side the handle is mounted. Never use the grinder without the guard correctly in place.
WARNING: Never place the guard so that it is in front of the grinder.
This could result in serious injury because sparks and loose particles thrown from the disc would be directed toward the operator. Always place the guard in the correct location.
To reposition the guard:
Remove the battery pack.
Unlock the guard clasp by pulling the clasp out, rotate the guard to its correct position, away from the grinder.
Lock the guard clasp by pushing the clasp in.
NOTE: Be sure the raised ridge on the guard is seated in the groove on the bearing cap. Never use the grinder without the guard in place and properly adjusted.
6. MAINTENANCE

WARNING! RISK OF INJURY! Always switch the appliance off and remove the battery before carrying out any work on the appliance.
Do not use any sharp objects for cleaning the appliance. Never allow any liquids to penetrate inside the appliance. Otherwise the appliance could be damaged.
Clean the appliance regularly, preferably immediately after completion of the work.
Clean the housing with a dry cloth—do NOT use petrol, solvents or cleaners which can attack the plastic.
A vacuum cleaner is required for thorough cleaning of the appliance.
Ventilation openings must never be obstructed.
Remove any sanding dust stuck to the appliance with a brush.
CLEANING
Clean dust and debris from vents. Keep handles clean, dry and free of oil or grease. Use only mild soap and a damp cloth to clean, since certain cleaning agents and solvents are harmful to plastics and other insulated parts. Some of these include gasoline, turpentine, lacquer thinner, paint thinner, chlorinated cleaning solvents, ammonia and household deter-gents containing ammonia. Never use flammable or combustible solvents around tools.
REPAIRS
For repairs, return the tool, battery pack and charger to the nearest service center.
STORAGE & DISPOSAL
Switch the angle grinder off and remove the battery.
Store the angle grinder and its accessories in a dark, dry, frost-free, well-ventilated place.
Always store the angle grinder in a place that is inaccessible to children. The ideal storage temperature is between 10^ and 30^ .
We recommend using the original package for storage or covering the angle grinder with a suitable cloth or enclosure to protect it against dust.
TRANSPORTATION
Switch the angle grinder off and remove the battery.
Protect the angle grinder from any heavy impact or strong vibrations which may occur during transportation in vehicles.
Secure the angle grinder to prevent it from slipping or falling over.
7. TROUBLESHOOTING
| Problems | Probable causes | Corrective action |
| Device doesn’t start. | The battery is less power | Check the battery and charge it |
| The charger is broken | Repair by customer care | |
| On/off switch may be defective. | ||
| Engine faulty | ||
| Grinding tools do not move although the engine is running | Grinding disc nut is loose | Tighten grinder dies nut |
| Workpiece, remaining workpieces or remaining grinding tools block drive | Remove blockages | |
| Engine is slower and stops and overload LED is flashing | Device is overloaded | Restart the device |
| Grinding disc does rotate smoothly,abnormal noises can be heard | Grinding disc nut is loose | Tighten grinding disc nut |
| Grinding disc is defective | Change grinding disc |
8. RECYCLING

The packaging consists of environmentally friendly material. It can be disposed of in the local recycling containers.

CAUTION! This product has been marked with a symbol relating to removing electric and electronic waste. This means that this product shall not be discarded with household waste but that it shall be returned to a collection system which conforms to the European WEEE Directive. Contact your local authorities or stocks for advice on recycling. It will then be recycled or dismantled in order to reduce the impact on the environment. Electric and electronic equipment can be hazardous for the environment and for human health since they contain hazardous substances.

CAUTION! Do not dispose of batteries in your normal household waste!
ENVIRONMENTAL PROTECTION
Waste electrical products must not be disposed of with household waste. According to the European Battery Directive, defective or used battery packs/batteries, must be collected separately and disposed of in an environmentally correct manner. Please recycle where facilities exist. Check with your local authorities or retailer for recycling advice. It will then be recycled or dismantled in order to reduce the impact on the environment. Battery pack/ batteries can be hazardous for the environment and for human health since they contain hazardous substances.
9. WARRANTY
PREFACE
Thank you for choosing this product. Upon designing and manufacturing our products, we place all of our efforts into ensuring an excellent quality that meets the needs of the users.
IMPORTANT! PLEASE READ THIS MANUAL BEFORE USING THIS PRODUCT, FOLLOW THE BASIC SAFETY WARNINGS WITHIN, AND KEEP IT CAREFULLY.
As soon as you open the packaging, we recommend that you check to ensure that all elements required for assembly of the product have been included.
If the product is damaged or has some defects, please do not use it, and bring it back to the nearest store.
This product is intended for outdoor use only, and must not be used inside a building under any circumstances.
This product can be placed inside a building only after having rested for two hours after the last use. We thank you for your business and hope that you will be totally satisfied upon using our product.
We will be happy to receive all of your remarks on our online store web site.
Warranty
Dexter & UP20 products are designed to the highest DIY quality standards. We offer a 60-month warranty for DEXTER product (tool), and a 36-month warranty of UP20 products (charger & battery) from the date of purchase. This warranty applies to all material and manufacturing defects which may arise.
No further claims are possible, of whatever nature, direct or indirect, relating to people and/or materials. In the event of a breakdown, please refer first to the troubleshooting page (problems and solutions) in the brochure; if the problem persists, please check with the nearest store.
Your store shall spare no effort in resolving the issue.
Repairs and change of parts do not extend the duration of the initial warranty.
Breakdowns resulting from normal wear and tear or from improper use of the product are not covered by the warranty. This includes, among others, the switches, the safety circuit breaker and the motors, in case of wear.
Please note that there are specific warranty terms for certain countries.
In case of doubt, please check with your point of sale.
For claims relating to the warranty to be taken into account, the following is required:
Providing proof of purchase
- That no repairs and/or change of parts have been performed by a third party.
- That the issue is not a matter of normal wear and tear.
- That required maintenance and repair works have been performed correctly.
- That no deterioration has taken place as a result of incorrect setting of the carburetor.
- That there has been no forcing, improper handling, unauthorised use, or accidents
- That no deterioration has taken place due to overheating, resulting from clogging of the ventilator block.
10. EXPLODED VIEW WITH PART LIST
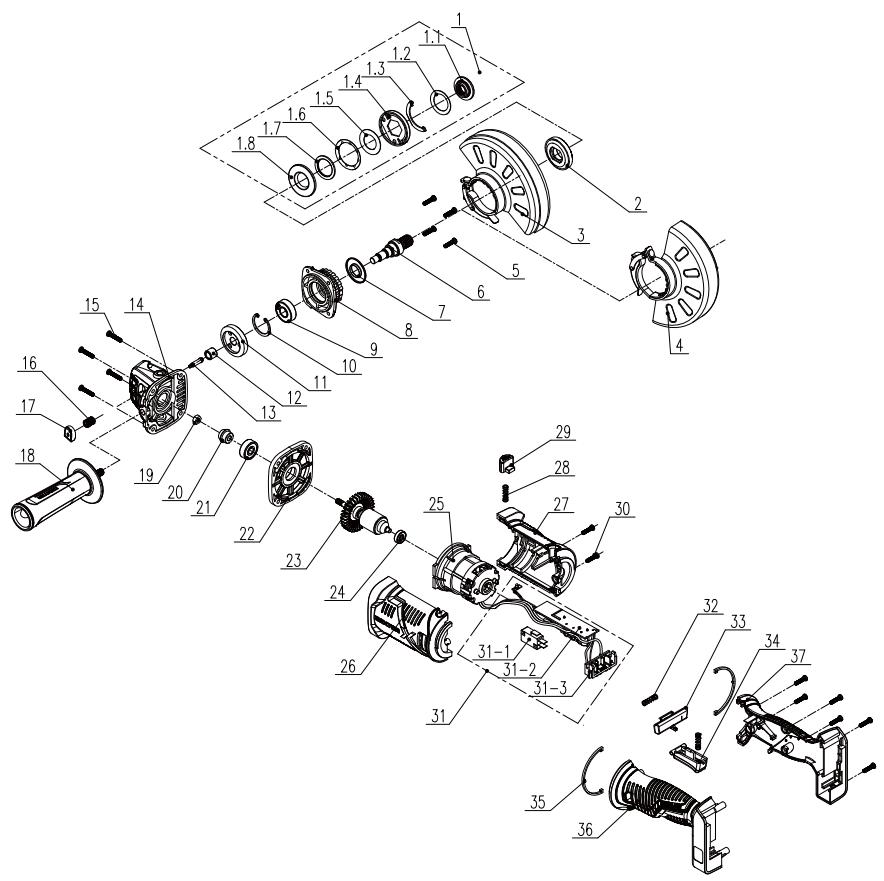
10. EXPLODED VIEW WITH PART LIST
| POS | DESCRIPTION |
| 1 | Press plate assembly |
| 1-1 | Fixed clamp |
| 1-2 | Washer |
| 1-3 | Baffle |
| 1-4 | Press plate |
| 1-5 | Flat Washers |
| 1-6 | Washer |
| 1-7 | Bearing |
| 1-8 | Bottom plate |
| 2 | Inner flange |
| 3 | Polishing safety guard |
| 4 | Incise safety guard |
| 5 | Screw M4*16 |
| 6 | Out put shaft |
| 7 | Dust proof ring |
| 8 | Cover |
| 9 | Bearing |
| 10 | Hole with ring |
| 11 | Big gear |
| 12 | Bearing |
| 13 | Shaft locking pin |
| 14 | Head shell |
| 15 | Screw ST4*20 |
| 16 | Return spring |
| 17 | Shaft lock button |
| POS | DESCRIPTION |
| 18 | Auxiliary handle |
| 19 | Hex nut |
| 20 | Pinion |
| 21 | Bearing |
| 22 | Middle cover |
| 24 | Bearing |
| 23 | Rotor |
| 25 | Stator |
| 26 | Left Housing |
| 27 | Rigt Housing |
| 28 | Spring |
| 29 | Rotary push button |
| 30 | Screw ST4*14 |
| 31 | Magnetic ring |
| 31-1 | Switch |
| 31-2 | PCB |
| 31-3 | Contact pin Ass'y |
| 32 | Spring |
| 33 | Switch lock button |
| 34 | Switch button |
| 35 | Ornament |
| 36 | Left handle |
| 37 | Rigt handle |
839530
Name and address of the manufacturer or his authorised representative[Nom et adresse du fabricant ou de son mandataires[nomé y direction del fabricante o de su représentante autorizzato[nome e endereço do fabricante ou do seu représentante autorizzato]
ADEO Services, 135 Rue Sadi Carnot - CS 00001 59790 RONCHIN - France
This declaration of conformity is issued under the sole responsibility of the manufacturer. La presente déclaration de conformité est établit sous la seule responsabilité du fabricant [La presente declaración n de conformidade se expece bajo la exclusiva responsabilité del fabricante].[Estádeclaracióndeconformidadémitida sobaexclusiva responsabilitédo fabricante.]
839530 - EAN Code: 3276000697985
Industrial Type Design Reference: 20VAG3-125BL.1
DEXTER
SN SSSSSS XX DDMMYY nn PPPPPP (SN: Serial No., SSSSSS: Supplier code, XX : Production line ID, DDMMYY: Production date, nn: number of version of product, PPPPPP : Incremental number)
International Project Quality Leader
839530 - EAN Code: 3276000697985
Industrial Type Design Reference: 20VAG3-125BL.1
DEXTER
SN SSSSSS XX DDMMYY nn PPPPPP (SN: Serial No., SSSSSS : Supplier
code, XX : Production line ID, DDMMYY: Production date, nn: number of
version of product, P PPPPPP : Incremental number)
Riferimenti alle pertuneri norme anionizzateizzate o alle specifiche in relatione alle quali e chiirarate la conformità?Owedania ada os dinohydnich norm acharizonowany, kote zastrosowanu, lub do specifikny, w odiensienu do ktoychr deklararanta was zo gnedocid;[Mvltva tuy cnoynkov evapoynokv npromv muv cou naynoknoknoknoknoknoknoknoknoknoknoknoknoknoknoknoknoknoknoknoknoknoknoknoknoknoknoknoknoknoknoknoknoknoknoknoknoknoknoknoknoknoknoknoknoknoknoknoknoknoknuk on ciic oin Lina'nu n uqupodopur; [Referenite standardare ammoniante referente folosite sau referinte specifikatior in tegatura cu care se declarareconstitui:
EN 60745-1:2009 + A11:2010
EN 60745-2-3:2011 + A2:2013 + A11:2014 + A12:2014 +
A13:2015
EN IEC 55014-1:2021
ENIEC55014-2:2021
RoHS Directive (EU) 2015/863 amending Directive 2011/65/EU
IEC 62321-1:2013
IEC 62321-2:2021
IEC 62321-3-1:2013
IEC 62321-4:2013+A1:2017
IEC 62321-5:2013
IEC 62321-6:2015
IEC 62321-7-1:2015
IEC 62321-7-2:2017
IEC 62321-8:2017
ISO 17075-1:2017
EN IEC 63000:2018
Eric LEMOINE
International Project Quality Leader
Ronchin France
01/12/2022
Imported by Aedo South Africa (PTY) LTD/T/A Leroy Merlin, Hosted in Leroy Merlin Fourways Store 35 Roos Street, Witkoppen Ext 97, Sandton, 2191 Johannesburg, Gauteng, South Africa
Tel: +27 10 493 8000 Email: contact@leroymerlin.co.za
MnnpTayu /Catuy /Ka3akCTAH
Pecny6nKacbHaEhIM Canacbl
60bHnHaA Hap3aBkTAp4nB KabJbIaBTHYbM: 《Jepya Mepneh KaKaTcH7》KUIC.
050000, Ka3akctan Pecn6ybnkacai, AmItaiu K., Koeaee Kecei, 77 U. PARKVIEW 5O, 6-Kagat, 07-Xeheke
MImorpet /PtoBaeal /OprAnhaiaa, npnHMaiaoua pntehen3n noKaChetyePnpDyckunE PecBybnFek
Ka3axCTAH:TOO《JepyaMepnH Ka3axCTAH》.050000
PecnyIgNka 76,177
- XPHSH THGPRHPSIPOSTAIAIGKONIH
- TOnoOeTHsH THs IPOsTAzIAz
- BEZPIECZENSTWO W MIEJSCU PRACY
- YCIOBhbIE O6O3HAUHIN
- KOMПЛЕКТ NOCTABКИ
- HA3HAUYEHNE YTLOBOI SHINΦOBAJIbHOI MAUNHBI DEXTER
- 3NEKTPOTEXHnueCKa B630nACHOCTb
- 2.ИHCTPyKUЯ ПО TEXHnKE Be3OПАCHOCTN
- JIiHNAIe3OJACHOCTb
- 2.ИHCTPyKUЯ NO TEXHnKE B30nACHOCTN
- NCSIOJIb3OBAHNEI OBCJIYJXUBAHNE IHCTPYMEHTA CINTAHNEM OT AKKUMYJIYTOPA
- PEMOHT
- U3BLeueHne
- KHONKA BLOKINPOBKN
- KYPKOBbI INPEKJIQUATEJIb
- PERYINIPOBKA PABOUETO IOLOXEHNA BPAUCEHNA
- 6.ОБСЛУЖИBAHAнE
- OuNCTKA
- 3AùNTA OKPYKAIOUÇE CPEIbI
- TAPAHTIA
- BBEDEHNE
- BAXHO! IPEEd NcIIOJIb3OBAHnEM N3dJIINr IPOUHTAITE DAHHOE PYKOBODCTBO, COBJIOJAIte OCHOBHbIE IPNABINr TEHXNKn BE30PiACHOCTN IN COXPAHNTE IHCTPYKcIMI DJIr NcIIOJIb3OBAHnR B ByDyUeM.
- Fapantna
- 10.ИЗОБРAXЕHΙEВРАЗОБPAHHOMВДЕИСПСOKЧАCTЕYNCTPOДCTBA
- 10.ИЗОБРAXЕHWEВРАЗОБPAHHOMBUNIICINCOKYACTEYNCTPOICTBA
- 3MICT
- 1.BUKOPNCTAHH3A INP3HAUYEHNM AKUMYJATOHOI B3UITKOBOI KYTOBOI UJIΦYBAJBHOI MAUNHN DEXTER
- ПРавILA TEXHIKи BE3ПЕКИ
- Kayinci3ik TexHnKacsb6oBbHwa HcckayIbIK.KykbIKTbIK HopMaJap
- BENITIEP
- MA3M¥HbI
- 1.CbIMcbI3 电Kacbl3 6ypbltblk TericTeyiMaunHaHbIN MAKCATTbl KOJDAHbICbl
- KAYINCI3ДIK TEXHnikAcbIhBiH HYCKAYAPbl
- 3NEKTP KYPALbIHbIH KAYINCI3dI1 BOYbIHsA XaJIbI ECKEPTyIeP
- XYMbIC OPHbIHbIH KAYINCI3IITI
- 3JIeKTP JYIeJIePIH IaIaJIaHyIaFbI KAYINCI3IiK TEXHnKAcbl
- KAYINCI3IK TEXHUNKACbIHbIH HYCKAYAPbl
- JXEKE KAYINCI3IK
- KAYINCI3IJK TEXHNIKACbIHbIH HYCKAYAPbl
- 3NEKTP KYPALbIH PAndAJIAHY XHE OFAH KYTIM KOPCETY
- KAYINCI3IJK TEXHNIKACbIHbIH HYCKAYJAPbl
- БАТAPЕ КУРалын Пайдалиу XэHE OFAH KYTIM KОPCETY
- KbI3MET KOPCETY
- БАРЛыК KОДАньICTAPFA APHAJIFAH KAYINCI3ДИK HYСКАУЛAPы
- KAYINCI3IK TEXHnKAcbIHbIH HYCKAYAPbl
- BACKA BAPJIbIK XYMbICTAPFA APHAJIFAH KAYIINCI3dIK HYCKAYJIAPbl
- Kepi cokkbl khe ofah kaTbictbl eckepTynep
- KAYINCI3IK TEXHNIKACbIHbIH HYCKAYAPbl
- 3.CNATTAMACbI
- TEXHnKAJIbIK CINATTAMACbl
- Пайдалану
- AYbICTbIPbIN-KOCKblI
- AINHAMJIbIXyMbIC KYIH PETTEY
- XAJIIbI PAnJaJAHY
- TECTEYTE APHAJFAH XbIJaAM CAKTAHDbIPfbltbl PAndAIAH
- KECYTE APHAJFAH XbIДAM CAKTAHbIPfblTbI PAnJaJIaHv
- CAKTAHДыIPьIшТыОРHAJIACTыIPY
- CaKaTHaBbIpRbIbTbIH opHbIH 03repty ywiH:
- TEXHnKAJIbIK KbI3MET KOpCETY
- TA3AJIAY
- XOHIDey XYMbICTAPbl
- TACbIMAJIAY
- KOPUJAFAH OPTAHbI KOPFAY
- KENIIJIK
- KIPICNE
- MAHbI3dbI! OCbl ΘHIMDI IAIIAIAY AINDbIHDA OCbl HYCKAYIbIKTbI OKbl INbIFbIHbI3, HEI3TI KAYINC13IIK ECKEPTUJIPEIH KAPAHBi3 XΘHE M¥KNJAT CAKTAHbI3.
- Keninik
- БОЛIKTEР TI3IMI БОИБIHSHAЕXFEN-TEXFENJI KÖPIHIC
- SYMBOLS
- CONTENTS
- INTENDED USE OF DEXTER ANGLE GRINDER
- SAFETY INSTRUCTIONS
- GENERAL POWER TOOL SAFETY WARNINGS
- WARNING: Read all safety warnings and all instructions.
- SAVE ALL WARNING AND INSTRUCTIONS FOR FUTURE REFERENCE.
- WORK AREA SAFETY
- ELECTRICAL SAFETY
- PERSONAL SAFETY
- POWER TOOL USE AND CARE
- BATTERY TOOL USE AND CARE
- SERVICE
- SAFETY INSTRUCTIONS FOR ALL OPERATIONS
- FURTHER SAFETY INSTRUCTIONS FOR ALL OPERATIONS
- Kickback and RelatedWarnings
- 3.DESCRIPTION
- TECHNICAL DATA
- OPERATION
- INSTALLING/REMOVING BATTERY PACK
- To install:
- To remove:
- LOCK-OFF BUTTON
- SWITCH TRIGGER
- GENERAL OPERATION
- USING QUICK GUARD FOR GRINDING
- USING QUICK GUARD FOR CUTTING
- POSITIONING THE GUARD
- To reposition the guard:
- MAINTENANCE
- CLEANING
- REPAIRS
- STORAGE & DISPOSAL
- TRANSPORTATION
- TROUBLESHOOTING
- RECYCLING
- ENVIRONMENTAL PROTECTION
- WARRANTY
- PREFACE
- IMPORTANT! PLEASE READ THIS MANUAL BEFORE USING THIS PRODUCT, FOLLOW THE BASIC SAFETY WARNINGS WITHIN, AND KEEP IT CAREFULLY.
- Warranty
- EXPLODED VIEW WITH PART LIST
- 839530
- ADEO Services, 135 Rue Sadi Carnot - CS 00001 59790 RONCHIN - France
- DEXTER
- SN SSSSSS XX DDMMYY nn PPPPPP (SN: Serial No., SSSSSS: Supplier code, XX : Production line ID, DDMMYY: Production date, nn: number of version of product, PPPPPP : Incremental number)
Brand : DEXTER
Model : 20VAG3-125BL.1
Category : Angle grinder