
800AG2-125.5 - Angle grinder DEXTER - Free user manual and instructions
Find the device manual for free 800AG2-125.5 DEXTER in PDF.
| Product Type | Angle Grinder |
| Brand | DEXTER |
| Model | 800AG2-125.5 |
| Rated Voltage | 220-240 V~ |
| Rated Frequency | 50 Hz |
| Rated Input Power | 800 W |
| Maximum No-Load Speed | 12,000 rpm |
| Disc Diameter | 115 / 125 mm |
| Disc Thickness (Grinding) | 6 mm |
| Weight | 1.77 kg |
| Spindle Thread | M14 |
| Sound Pressure Level (LpA) | 94.2 dB(A) |
| Sound Power Level (LwA) | 105.2 dB(A) |
| Vibration Level | 8.092 m/s² |
| Protection Class | II (Double Insulation) |
| Ingress Protection Rating | IPX0 |
| Dimensions (L×W×H) | 31.5 × 13.8 × 10.4 cm |
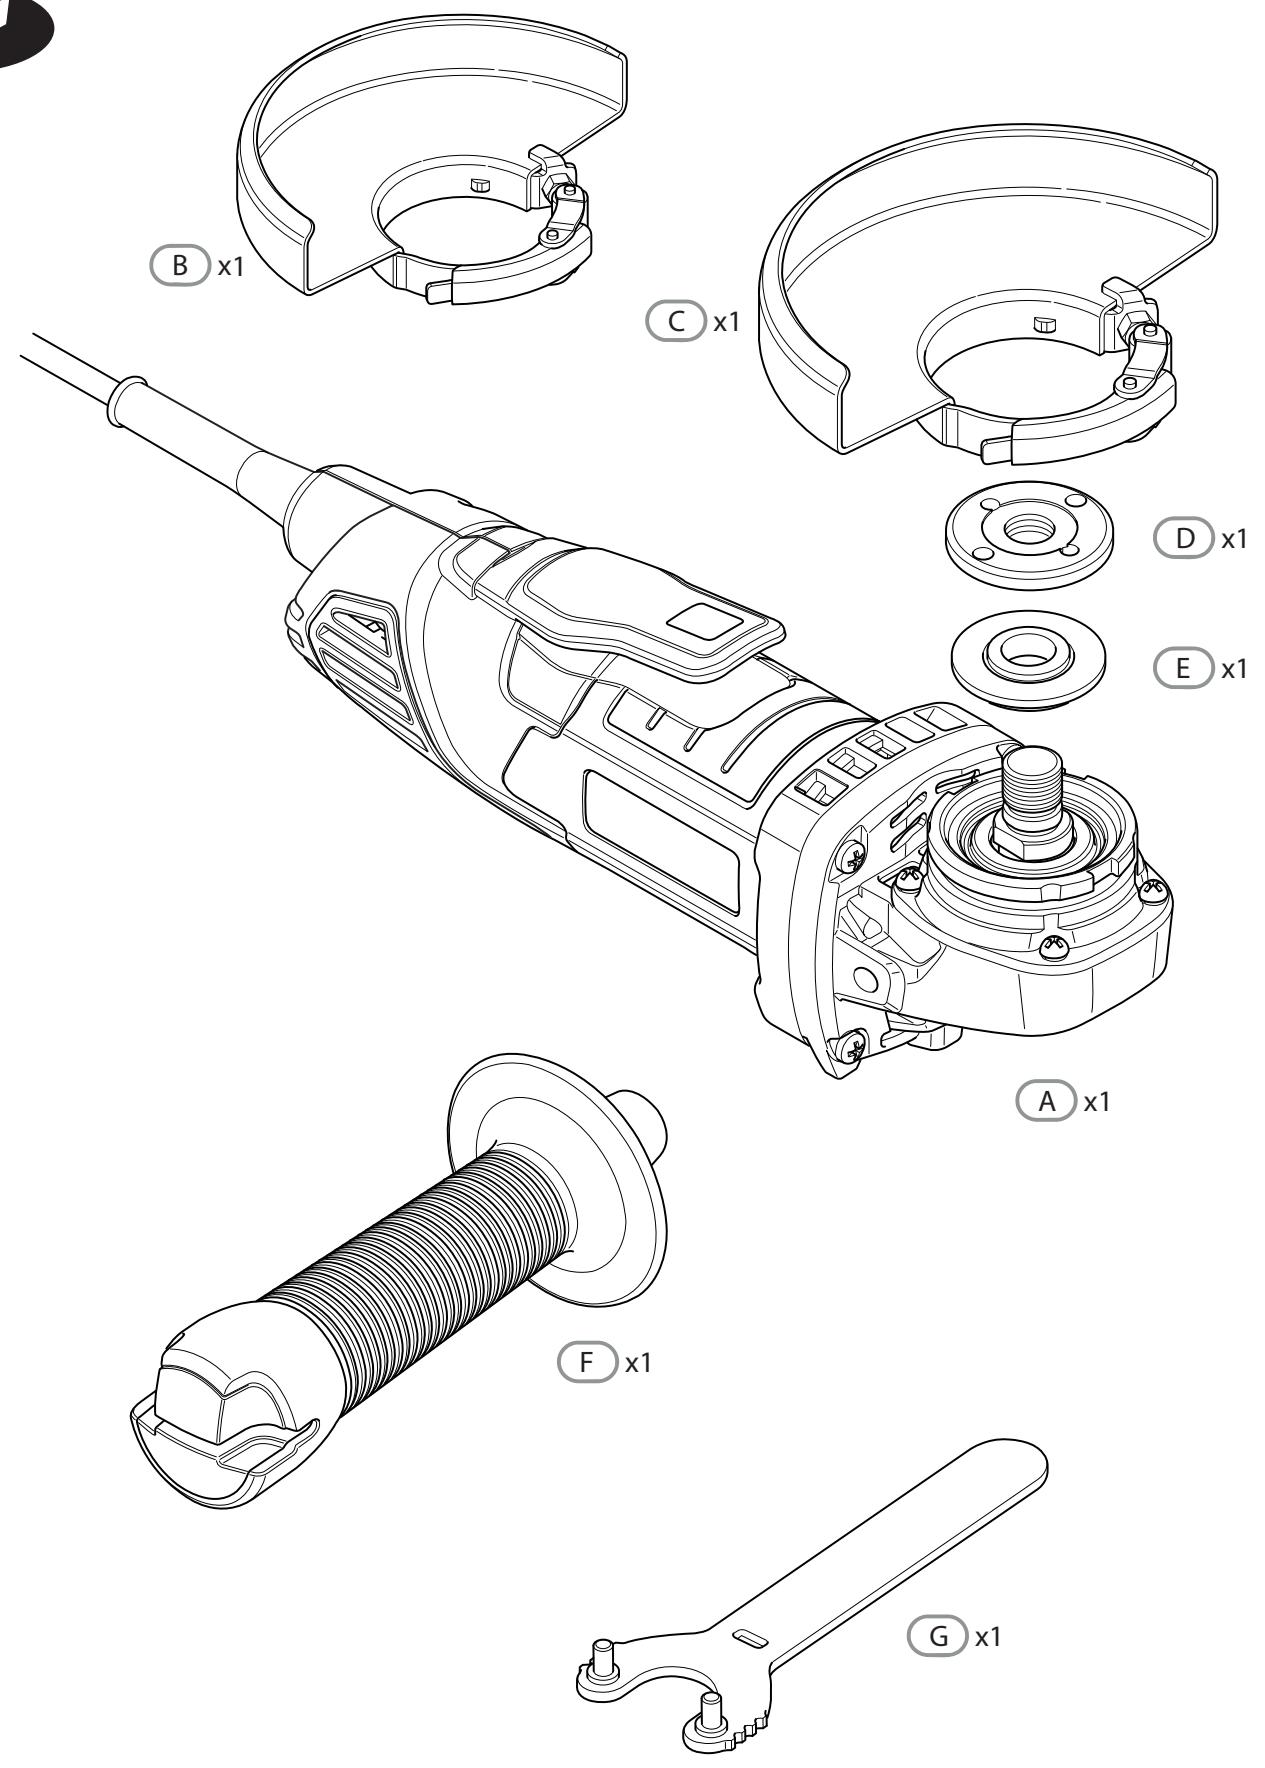
| Box Contents | Grinder, side handle, 115 mm and 125 mm guards, wrench, flanges |
| Main Functions | Grinding and cutting (recommended accessories) |
| Maintenance and Cleaning | Regular cleaning of ventilation slots; no lubrication required |
| Safety | Double insulation, mandatory eye protection, safety guard, auxiliary handle |
| Warranty | 3 years against manufacturing defects |
Frequently Asked Questions - 800AG2-125.5 DEXTER
User questions about 800AG2-125.5 DEXTER
0 question about this device. Answer the ones you know or ask your own.
Ask a new question about this device
Download the instructions for your Angle grinder in PDF format for free! Find your manual 800AG2-125.5 - DEXTER and take your electronic device back in hand. On this page are published all the documents necessary for the use of your device. 800AG2-125.5 by DEXTER.
USER MANUAL 800AG2-125.5 DEXTER
Thank you for purchasing this product. We recommend that you read the installation, user and maintenance instructions carefully. We have designed this product to ensure your complete satisfaction. If you require assistance, the team at your retailer is on hand to help you.

Attention danger / Atencion: Peligro / Atencion perigo / Attenzione pericolo / IppoooxkivduvoC/ Uwaga niebezpieczenstwo/BHmMaHne! OnpaCHO! / A6aJnAHy3, KayiPTI/YBara! He6e3neuHO! / Atentie, perico/ Perigo de precaUao/Caution danger

Hors tension / Apagado / Desligado da alimentacao / Fuori tensione / Ektoc taoonc / Odackenzie zasilania / He nao hapijxeHHem / KyaattbI eWipy / He niiHappyroio / Scoatere de sub tensiune / Desligar / Power off

Mise sous tension / Puesta en tensión / Ligação da alimentação / Messo sotto tensione / Σύνδεοη μετο ηλέκτρικό δικτuo / Wączenia zasilania / В-kindeousne по наprженье / Куаты кэтepy/ Пiod'еднанни пд нарру / Punere sub tensiune / Energizar / Power up

Directive Machines 2006/42/CE
Hikoli He BnKOpncToBvIe 7JIiΦyBaJIbHi DnCKn DnJyOphOBoi o6p06Kn! He 3aCTOCoByTe TnCK Ha 6iUHi CTOPOHn 7JIiΦyBaJIbHnx DnCKiB.
3arotiBka Maé lejkatn piBHO Ta 6yTu 3axuiehoU BiD KOB3aHnA, HapnKlaI, 3a DOnomoroIO 3aTnCKaiv.ДЯ DoBrux 3arotiBOK cIId 3a6e3neuHTN doCTaTHO nIDTPmKy.
Якwo BnKOpNCTOByETbC npIaIJa 3 pI3b6OBmN BCTaBKaMn, KiHeuB uHneJ MOJKe He TOpKaTnCra OCHOBn OTBOPY Ha shJIiΦyBaJIbHOMy iHCTpyMeHTi.
IpekehaiTecra, 0n Hapi3b B npnilaandi DOCTaTHbO DOBra, 0o6 BMicHTN BCIO DOBXHny 7nnHdJIe. Hapi3b B npnilaandi NOBHHa 36iratncs 3 Hapi331o Ha 7nnHdJIe.
TEXHIYHI XAPAKTEPNUKNI
| Hominahha ha hapuya | 220-240 B~ |
| Hominahha quactota | 50 Γι |
| Hominahha bxaɪdha ποτχκiçtb | 800 Bт |
| Hominahha shbndkictb | 12000 /xv. |
| Дiametр диcka | 115/125 MM |
| ToBülna dnička | Шліфувальский диск - 6 MM |
| Maca | 1,77 кг |
| Hapižь shpiindeя | M14 |
| LpA (piВeNb 3BykoBOrO TnCKu) | LpA: 94,2 ДБ (A) KpA: 3,0 ДБ (A) |
| LwA (piВeNB 3ByKOBoÖI NOtUxKHOCTi) | LwA: 105,2 nb (A)) KwA: 3,0 nb (A) |
| Pivěнь Biópaçüi | 8,092M/c² K=1,5 M/c² |
| Клас зашисту | II |
| Стυпinem зашисту | IPXO |
| Розмірі | 31,5×13,8×10,4 cm |
Bka3aHe 3aRaIbHe 3HaueHnB Bi6paQii BmIpRHe 3a CtAnDapTHm MeToDom TeCTyBaHHa Ta MoKe BnKOpNCTOByBaTnCЯ ДяпорIHну OndHOro iHcTpymeHa 3 iHsIM.
Bka3aHe 3araIbHe 3HaueHnBaIbpaIIMoJHa TaKoX BnKOpNCTOByBaTn IJI nonepedNbOoi OciHKn DII.
-Понерджени: emici Bi6paцii πid quac φaktnuhoi po6otn
eIektpoiHCTpyMeHTa може BiDiPI3HЯТиСb BiД 3aIbIeHOrO 3aIaJIbHOrO 3HaueHnry,
3aIexKHO BiД ВИКОпСтання iHCTpyMeHTa.
-Попераць:унkaite риИкВ Bi6paцii.
Iopa: 1) iD yac po60Tu haJaTepykaBnci;
2) obmexkyte yac BnKOpncTaHnT Ta yac 3ayncKy.
7. EKCSJIYATAZIA / CKLADAHNRA / 306PAJXEHNRA
OrJa
- Лonaть
- BiúHa pyuKa
- 3axnchn tsntok (sniΦyBaHna 125 MM)
- 3aTnCKHm BaxiNb 5ntKa
5.3y6chaTa nepeaua - Khonka-φikcaTop
- Гайковский
- 3obhihniΦlahecb 3 Hapi3310
- BnTypiHniΦlaHeu
10.3axnche 6lOkyBaHHa
11.3axnchniuTOK (xniΦyBaHn 115 MM)
BctaHOBJIeHNaIooTkoBooi pyuKn
BiuHy pyuKy MoXHa BCTaHOBHTn Ha liBn a6o npaBn 6iK iHcTpymeHa.
Bn6epitb noIooKeHHa,Ke 6yde hai6ilb3pyuHm i 6e3peuHm dIpa06OTn.
yBAGA:
Перед поатkom роботи пееконaitecя, сio 6iua pyuka BCTaHOBJIeHa NaDiIHO.
Пд час ekсплуataцii Trимаite odHy ryka Na 3aHni ryuci, a dpyry - Ha 6iHni ryuci.
BctaHOBJIeHHa6o nepemiiueHHa3axnCHOrO 7NTka
NONEPEDJXEHH: IpekehaiTecra, 0 KyToBa 7iYBaJIbHa MaunHa BIMKHeHa Ta BiKlUoyeHa BiMepexi KINBJeHHa.
Bn6epiTb 3axncn iuToK dIy dNcKa 3aJeXHo BID po6OTn, kky nOtpi6HOBVKoHaTu (pizAHn a60 uIiOyBaHH). BnKOpNCtAHn HeBIDNOBIDHO uNTka BVpo6OTi MoKe cTaTu npUHIO TpaBMvBaHH.
При Викорисаннашліфувально abo BiДріЗного дИСКа 3axИСнй сntOK Ma6byTN BCTaHOBJIeHn Ha iHcTpymeHT TaKIM YHOM, 706 3akpNTa CTOpOHa 7uNTKa 3aBxДn 6yla cnpraMoBaHa Ha KOpIcTsyBaUa.
BcTaHOBLeHnHa 3axnCHOrO uNTKa: BiDnyCtItb 3aTnCKnBaxKilb Ta BCTaBTe Ioro Ha rOIOBky peyKTopa; BiDpeRyIouTe nOTpi6He nOLOXeHHra MaKcIMaJIbHOi eΦeKTHBHOCTi, Notim 3aTnCHiTb 3aTnCKnBaxKilb. IpekoHaTeCs, 3o 3aTnCKnBaxKilb 3aΦikCOBaHn HadiHNo niCJRA BCTaHOBLeHnHa uNTKa.
3H3xNCHK, Te y 3BOPOTOMy npaKy.
3axnchni 1IITOK MOxHa NOBepHyTuPi d 6aKaHm KyTOM, aJe He 6iIbH HIX Ha 45^ BliBO a60 BnpaBO.
1 x 3axnchni TOK Ira 7niybaHHa 125 MM (BCTaHOBJIeHn Ha MaunHy)
1xraikobnKJIIOU
1 x 30BnHiΦlaHeCb (BCTaHOBHeHn Ha MaunHy)
1 x Bnytpiushi' Φlahec b (BCTaHOBJIeHn Ha MaShuHy)
11. HOMEP BIDCTEKYBAHNA /CEPIHNI HOMEP
Homep BiDCTeKyBaHHa / cepiHnHomep Bka3aHnHa eTtKeTci.
12. усунова HECПРавhoeн
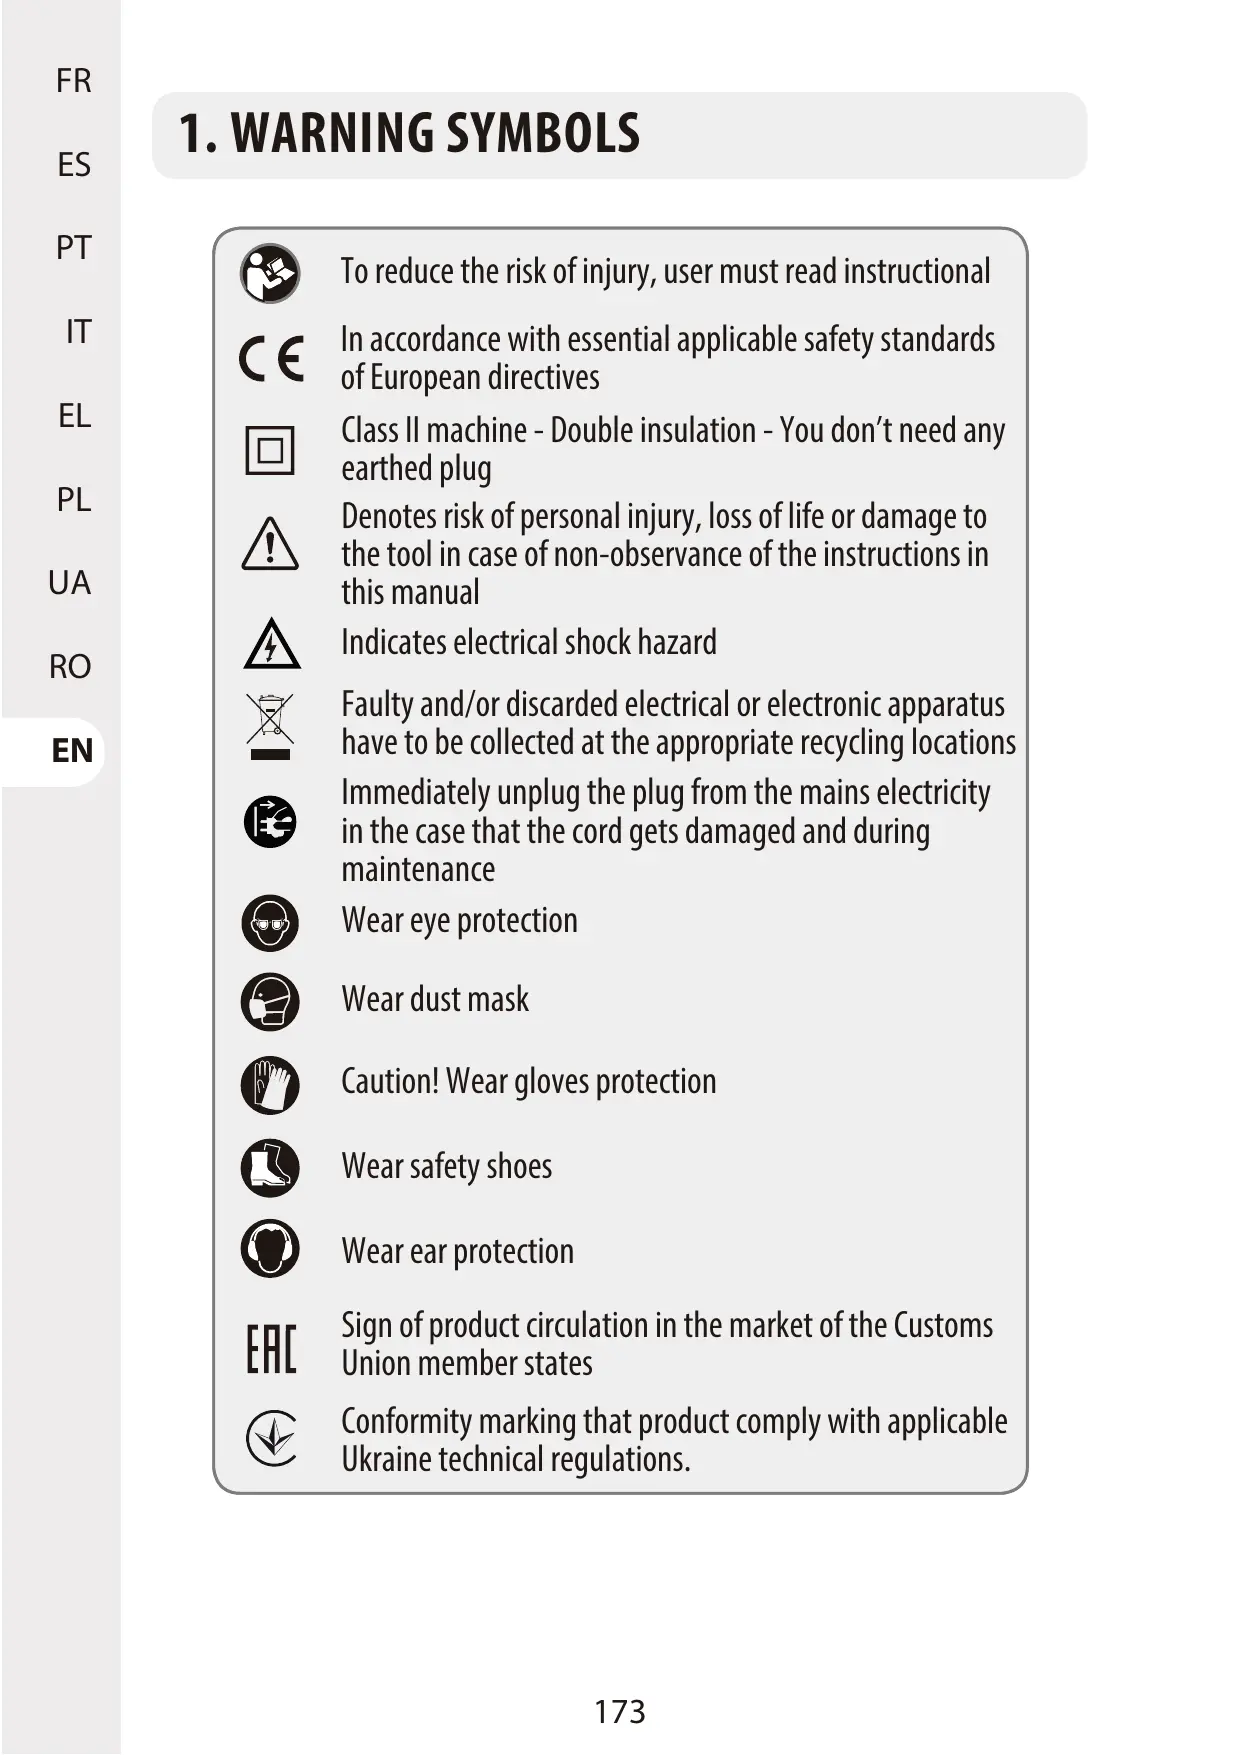
| To reduce the risk of injury, user must read instructional In accordance with essential applicable safety standards of European directives Class II machine - Double insulation - You don't need any earthed plug Denotes risk of personal injury, loss of life or damage to the tool in case of non-observation of the instructions in this manual Indicates electrical shock hazard Faulty and/or discarded electrical or electronic apparatus have to be collected at the appropriate recycling locations Immediately unplug the plug from the mains electricity in the case that the cord gets damaged and during maintenance Wear eye protection Wear dust mask Caution! Wear gloves protection Wear safety shoes Wear ear protection Sign of product circulation in the market of the Customs Union member states Conformity marking that product comply with applicable Ukraine technical regulations. |
1. GENERAL SAFETY INSTRUCTIONS

WARNING! Read all safety warnings and all instructions.
Failure to follow the warnings and instructions may result in electric shock, fire and/or serious injury.
Save all warnings and instructions for future reference.
The term "power tool" in the warnings refers to your mains-operated (corded) power tool or battery-operated (cordless) power tool.
1) Work area safety
a) Keep work area clean and well lit. Cluttered and dark areas invite accidents.
b) Do not operate power tools in explosive atmospheres, such as in the presence of flammable liquids, gases or dust. Power tools create sparks which may ignite the dust or fumes.
c) Keep children and bystanders away while operating a power tool. Distractions can cause you to lose control.
2) Electrical safety
a) Power tool plugs must match the outlet. Never modify the plug in any way. Do not use any adapter plugs with earthed (grounded) power tools. Unmodified plugs and matching outlets will reduce risk of electric shock.
b) Avoid body contact with earthed or grounded surfaces such as pipes, radiators, ranges and refrigerators. There is an increased risk of electric shock if your body is earthed or grounded.
c) Do not expose power tools to rain or wet conditions. Water entering a power tool will increase the risk of electric shock.
d) Do not abuse the cord. Never use the cord for carrying, pulling or unplugging the power tool. Keep cord away from heat, oil, sharp edges or moving parts. Damaged or entangled cords increase the risk of electric shock.
e) When operating a power tool outdoors, use an extension cord suitable for outdoor use. Use of a cord suitable for outdoor use reduces the risk of electric shock.
f) If operating a power tool in a damp location is unavoidable, use a
residual current device (RCD) protected supply. Use of an RCD reduces the risk of electric shock.
3) Personal safety
a) Stay alert, watch what you are doing and use common sense when operating a power tool. Do not use a power tool while you are tired or under the influence of drugs, alcohol or medication. A moment of inattention while operating power tools may result in serious personal injury.
b) Use personal protective equipment. Always wear eye protection. Protective equipment such as dust mask, non-skid safety shoes, hard hat, or hearing protection used for appropriate conditions will reduce personal injuries.
c) Prevent unintentional starting. Ensure the switch is in the off-position before connecting to power source and/or battery pack, picking up or carrying the tool. Carrying power tools with your finger on the switch or energising power tools that have the switch on invites accidents.
d) Remove any adjusting key or wrench before turning the power tool on. A wrench or a key left attached to a rotating part of the power tool may result in personal injury.
e) Do not overreach. Keep proper footing and balance at all times. This enables better control of the power tool in unexpected situations.
f) Dress properly. Do not wear loose clothing or jewellery. Keep your hair, clothing and gloves away from moving parts. Loose clothes, jewellery or long hair can be caught in moving parts.
g) If devices are provided for the connection of dust extraction and collection facilities, ensure these are connected and properly used.
Use of dust collection can reduce dust-related hazards.
4) Power tool use and care
a) Do not force the power tool. Use the correct power tool for your application. The correct power tool will do the job better and safer at the rate for which it was designed.
b) Do not use the power tool if the switch does not turn it on and off.
Any power tool that cannot be controlled with the switch is dangerous and must be repaired.
c) Disconnect the plug from the power source and/or the battery pack from the power tool before making any adjustments, changing accessories, or storing power tools. Such preventive safety measures reduce the risk of starting the power tool accidentally.
d) Store idle power tools out of the reach of children and do not allow persons unfamiliar with the power tool or these instructions to operate the power tool. Power tools are dangerous in the hands of untrained users.
e) Maintain power tools. Check for misalignment or binding of moving parts, breakage of parts and any other condition that may affect the power tool's operation. If damaged, have the power tool repaired before use. Many accidents are caused by poorly maintained power tools.
f) Keep cutting tools sharp and clean. Properly maintained cutting tools with sharp cutting edges are less likely to bind and are easier to control.
g) Use the power tool, accessories and tool bits etc. in accordance with these instructions, taking into account the working conditions and the work to be performed. Use of the power tool for operations different from those intended could result in a hazardous situation.
5) Service
a) Have your power tool serviced by a qualified repair person using only identical replacement parts. This will ensure that the safety of the power tool is maintained.
SafetyWarnings Common for Grinding Operations:
a) This power tool is intended to function as a grinder or cut-off tool. Read all safety warnings, instructions, illustrations and specifications provided with this power tool. Failure to follow all instructions listed below may result in electric shock, fire and/or serious injury.
b) Operations such as sanding, wire brushing, polishing are not recommended to be performed with this power tool. Operations for which the power tool was not designed may create a hazard and cause personal injury.
c) Do not use accessories which are not specifically designed and recommended by the tool manufacturer. Just because the accessory can be attached to your power tool, it does not assure safe operation.
d) The rated speed of the accessory must be at least equal to the maximum speed marked on the power tool. Accessories running faster than their rated speed can break and fly apart.
e) The outside diameter and the thickness of your accessory must be within the capacity rating of your power tool. Incorrectly sized accessories cannot be adequately guarded or controlled.
f) Threaded mounting of accessories must match the grinder spindle thread. For accessories mounted by flanges, the arbour hole of the accessory must fit the locating diameter of the flange. Accessories that do not match the mounting hardware of the power tool will run out of balance, vibrate excessively and may cause loss of control.
g) Do not use a damaged accessory. Before each use inspect the accessory such as abrasive wheels for chips and cracks, backing pad for cracks, tear or excess wear, wire brush for loose or cracked wires. If power tool or accessory is dropped, inspect for damage or install an undamaged accessory. After inspecting and installing an accessory, position yourself and bystanders away from the plane of the rotating accessory and run the power tool at maximum no-load speed for one minute. Damaged accessories will normally break apart during this test time.
h) Wear personal protective equipment. Depending on application, use face shield, safety goggles or safety glasses. As appropriate, wear dust mask, hearing protectors, gloves and workshop apron capable of stopping small abrasive or workpiece fragments. The eye protection must be capable of stopping flying debris generated by various operations. The dust mask or respirator must be capable of filtrating particles generated by your operation. Prolonged exposure to high intensity noise may cause hearing loss.
i) Keep bystanders a safe distance away from work area. Anyone entering the work area must wear personal protective equipment.
- Fragments of workpiece or of a broken accessory may fly away and cause injury beyond immediate area of operation.
j) Hold power tool by insulated gripping surfaces only, when performing an operation where the cutting accessory may contact hidden wiring or its own cord. Cutting accessory contacting a "live" wire
may make exposed metal parts of the power tool "live" and could give the operator an electric shock.
k) Position the cord clear of the spinning accessory. If you lose control, the cord may be cut or snagged and your hand or arm may be pulled into the spinning accessory.
I) Never lay the power tool down until the accessory has come to a complete stop. The spinning accessory may grab the surface and pull the power tool out of your control.
m) Do not run the power tool while carrying it at your side. Accidental contact with the spinning accessory could snag your clothing, pulling the accessory into your body.
n) Regularly clean the power tool's air vents. The motor's fan will draw the dust inside the housing and excessive accumulation of powdered metal may cause electrical hazards.
o) Do not operate the power tool near flammable materials. TSparks could ignite these materials.
p) Do not use accessories that require liquid coolants. Using water or other liquid coolants may result in electrocution or shock.
Kickback and RelatedWarnings
Kickback is a sudden reaction to a pinched or snagged rotating wheel, backing pad, brush or any other accessory. Pinching or snagging causes rapid stalling of the rotating accessory which in turn causes the uncontrolled power tool to be forced in the direction opposite of the accessory's rotation at the point of the binding.
For example, if an abrasive wheel is snagged or pinched by the workpiece, the edge of the wheel that is entering into the pinch point can dig into the surface of the material causing the wheel to climb out or kick out. The wheel may either jump toward or away from the operator, depending on direction of the wheel's movement at the point of pinching. Abrasive wheels may also break under these conditions.
Kickback is the result of power tool misuse and/or incorrect operating procedures or conditions and can be avoided by taking proper precautions as given below.
a) Maintain a firm grip on the power tool and position your body and
arm to allow you to resist kickback forces. Always use auxiliary handle, if provided, for maximum control over kickback or torque reaction
during start-up. The operator can control torque reactions or kickback forces, if proper precautions are taken.
b) Never place your hand near the rotating accessory. Accessory may kickback over your hand.
c) Do not position your body in the area where power tool will move if kickback occurs. Kickback will propel the tool in direction opposite to the wheel's movement at the point of snagging.
d) Use special care when working corners, sharp edges etc. Avoid bouncing and snagging the accessory. Corners, sharp edges or bouncing have a tendency to snag the rotating accessory and cause loss of control or kickback.
e) Do not attach a saw chain woodcarving blade or toothed saw blade. Such blades create frequent kickback and loss of control.
SafetyWarnings Specific for Grinding and cutting-off Operations:
a) Use only wheel types that are recommended for your power tool and the specific guard designed for the selected wheel. Wheels for which the power tool was not designed cannot be adequately guarded and are unsafe.
b) The grinding surface of centre depressed wheels must be mounted below the plane of the guard lip. An improperly mounted wheel that projects through the plane of the guard lip cannot be adequately protected.
c) The guard must be securely attached to the power tool and positioned for maximum safety, so the least amount of wheel is exposed towards the operator. The guard helps to protect operator from broken wheel fragments and accidental contact with wheel and sparks that could ignite clothing.
d) Wheels must be used only for recommended applications. For example: do not grind with the side of cut-off wheel. Abrasive cut-off wheels are intended for peripheral grinding, side forces applied to these wheels may cause them to shatter.
e) Always use undamaged wheel flanges that are of correct size and
shape for your selected wheel. Proper wheel flanges support the wheel thus reducing the possibility of wheel breakage. Flanges for cut-off wheels may be different from grinding wheel flanges.
f) Do not use worn down wheels from larger power tools. Wheel intended for larger power tool is not suitable for the higher speed of a smaller tool and may burst.
Additional safety instructions for wire brushing operations
NOTE If wire brushing operation is not recommended by the manufacturer, this section may be omitted.
SafetyWarnings Specific for Wire Brushing Operations:
a) Be aware that wire bristles are thrown by the brush even during ordinary operation. Do not overstress the wires by applying excessive load to the brush. The wirebristles can easily penetrate light clothing and/or skin.
b) If the use of a guard is recommended for wire brushing, do not allow any interference of the wire wheel or brush with the guard. Wire wheel or brush may expand in diameter due to work load and centrifugal forces.
3. SPECIFIC SAFETY RULES
- Check that speed marked on the wheel is equal to or greater than the rated speed of the grinder;
- Ensure that the wheel dimensions are compatible with the grinder;
- Abrasive wheels shall be stored and handled with care in accordance with manufacturer's instructions;
- Inspect the grinding wheel before use, do not use chipped, cracked or otherwise defective products;
- Ensure that mounted wheels and points are fitted in accordance with the manufacturer's instructions;
- Ensure that blotters are used when they are provided with the bonded abrasive product and when they are required;
-
Ensure that the abrasive product is correctly mounted and tightened before use and run the tool at no-load for 30~s in a safe position, stop immediately if there is considerable vibration or if other defects are detected. If this condition occurs, check the machine to determine the cause;
-
Do not use separate reducing bushings or adapters to adapt large hole abrasive wheels;
- For tools intended to be fitted with threaded hole wheel, ensure that the thread in the wheel is long enough to accept the spindle length;
- Check that the work piece is properly supported;
- Ensure that sparks resulting from use do not create a hazard e.g. do not hit persons, or ignite flammable substances;
- Ensure that ventilation openings are kept clear when working in dusty conditions. If it should become necessary to clear dust, first disconnect the tool from the mains supply (use non metallic objects) and avoid damaging internal parts;
- Always use eye and ear protection. Other personal protective equipment such as dust mask, gloves, helmet and apron should be worn;
- The wheel continues to rotate after the tool is switched off.
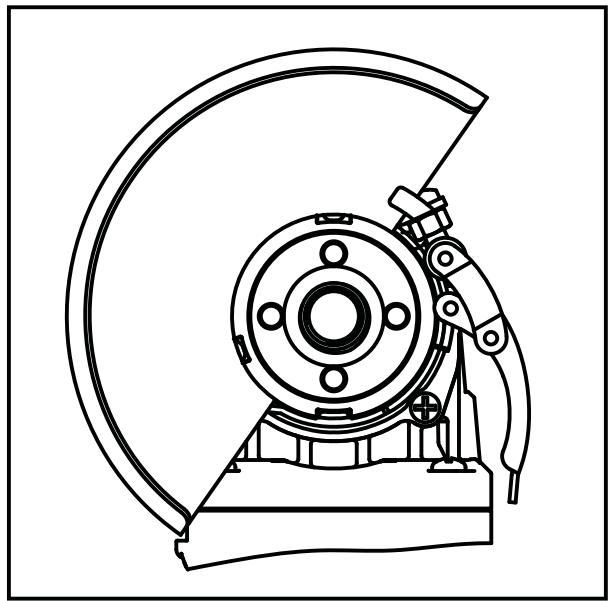
- Never use the tool without the guard in place, the wheel guard must be fitted on the tool so that the closed side of the guard always points toward the operator.
4. INTEND USE
WARNING! Always wear protective goggles.
Observe the specifications of the tool or accessory manufacturer! Protect the discs from grease or impact!
Never use parting grinder discs for roughing work! Do not apply pressure to the side of parting grinder discs.
The workpiece must lay flat and be secured against slipping, e.g. using clamps.
Large workpieces must be sufficiently supported.
If accessories with threaded inserts are used, the end of the spindle may not touch the base of the hole on the sanding tool. Make sure that the thread in the accessory is long enough to accommodate the full length of the spindle. The thread in the accessory must match the thread on the spindle.
When working in dusty conditions, ensure that ventilation openings are not blocked. If it becomes necessary to remove dust, first up plug and avoid damaging internal components.
Damaged, eccentric or vibrating tools must not be used.
Avoid damage to gas or water pipes, electrical cables and load-bearing walls
(static).
Remove the power plug from the socket before making any adjustments, changing tools, maintaining or cleaning.
In order to avoid a hazard, before set switched ON, make sure the grinder discs is not touch workpieces.
A damaged or cracked additional handle must be replaced. Never operate the machine with a defective side handle.
A damaged or cracked safety guard must be replaced. Never operate a machine with a defective safety guard.
Secure small workpieces. For example, clamp in a vice.
5. ENVIRONMENTAL PROTECTION

13/14
CAUTION! This product has been marked with a symbol relating to removing electric and electronic waste. This means that this product shall not be discarded with household waste but that it shall be returned to a collection system which conforms to the European WEEE Directive. Contact your local authorities or stocks for advice on recycling. It will then be recycled or dismantled in
order to reduce the impact on the environment. Electric and electronic equipment can be hazardous for the environment and for human health since they contain hazardous substances.
6. TOOL SPECIFICATIONS
TECHNICAL CHARACTERISTICS
| Rated voltage | 220-240V~ |
| Rated frequency | 50 Hz |
| Rated input power | 800 W |
| Rated speed Max. | 12000 /min |
| Disc diameter | 115/125 mm |
| Disc thickness | 6mm for grinding disc |
| Weight | 1.77 kg |
| Spindle thread | M14 |
| LpA (Sound pressure level) | LpA: 94.2 dB(A) KpA: 3.0 dB(A) |
| LwA (Sound power level) | LwA: 105.2 dB(A) KwA: 3.0 dB(A) |
| Vibration level | 8.092m/s² K=1.5 m/s² |
| Protection class | II |
| Degree of protection | IPX0 |
| Main size | 31.5×13.8×10.4 cm |
The declared vibration total value has been measured in accordance with a standard test method and may be used for comparing one tool with another; The declared vibration total value may also be used in a preliminary assessment of exposure.
-
Warning: the vibration emission during actual use of the power tool can differ from the declared total value depending on the ways in which the tool is used.
-
Warning: avoid vibration risk
Suggestions: 1) wear glove during operation;
2) limit operating time and shorten trigger time.
7. OPERATION / ASSEMBLY / DRAWINGS
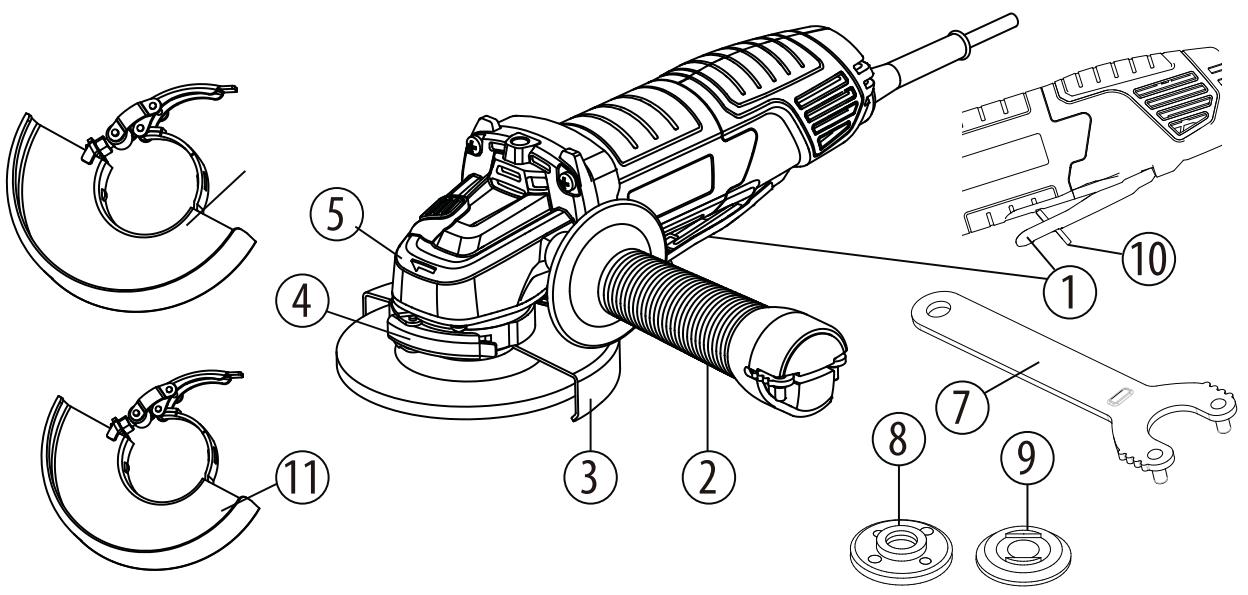
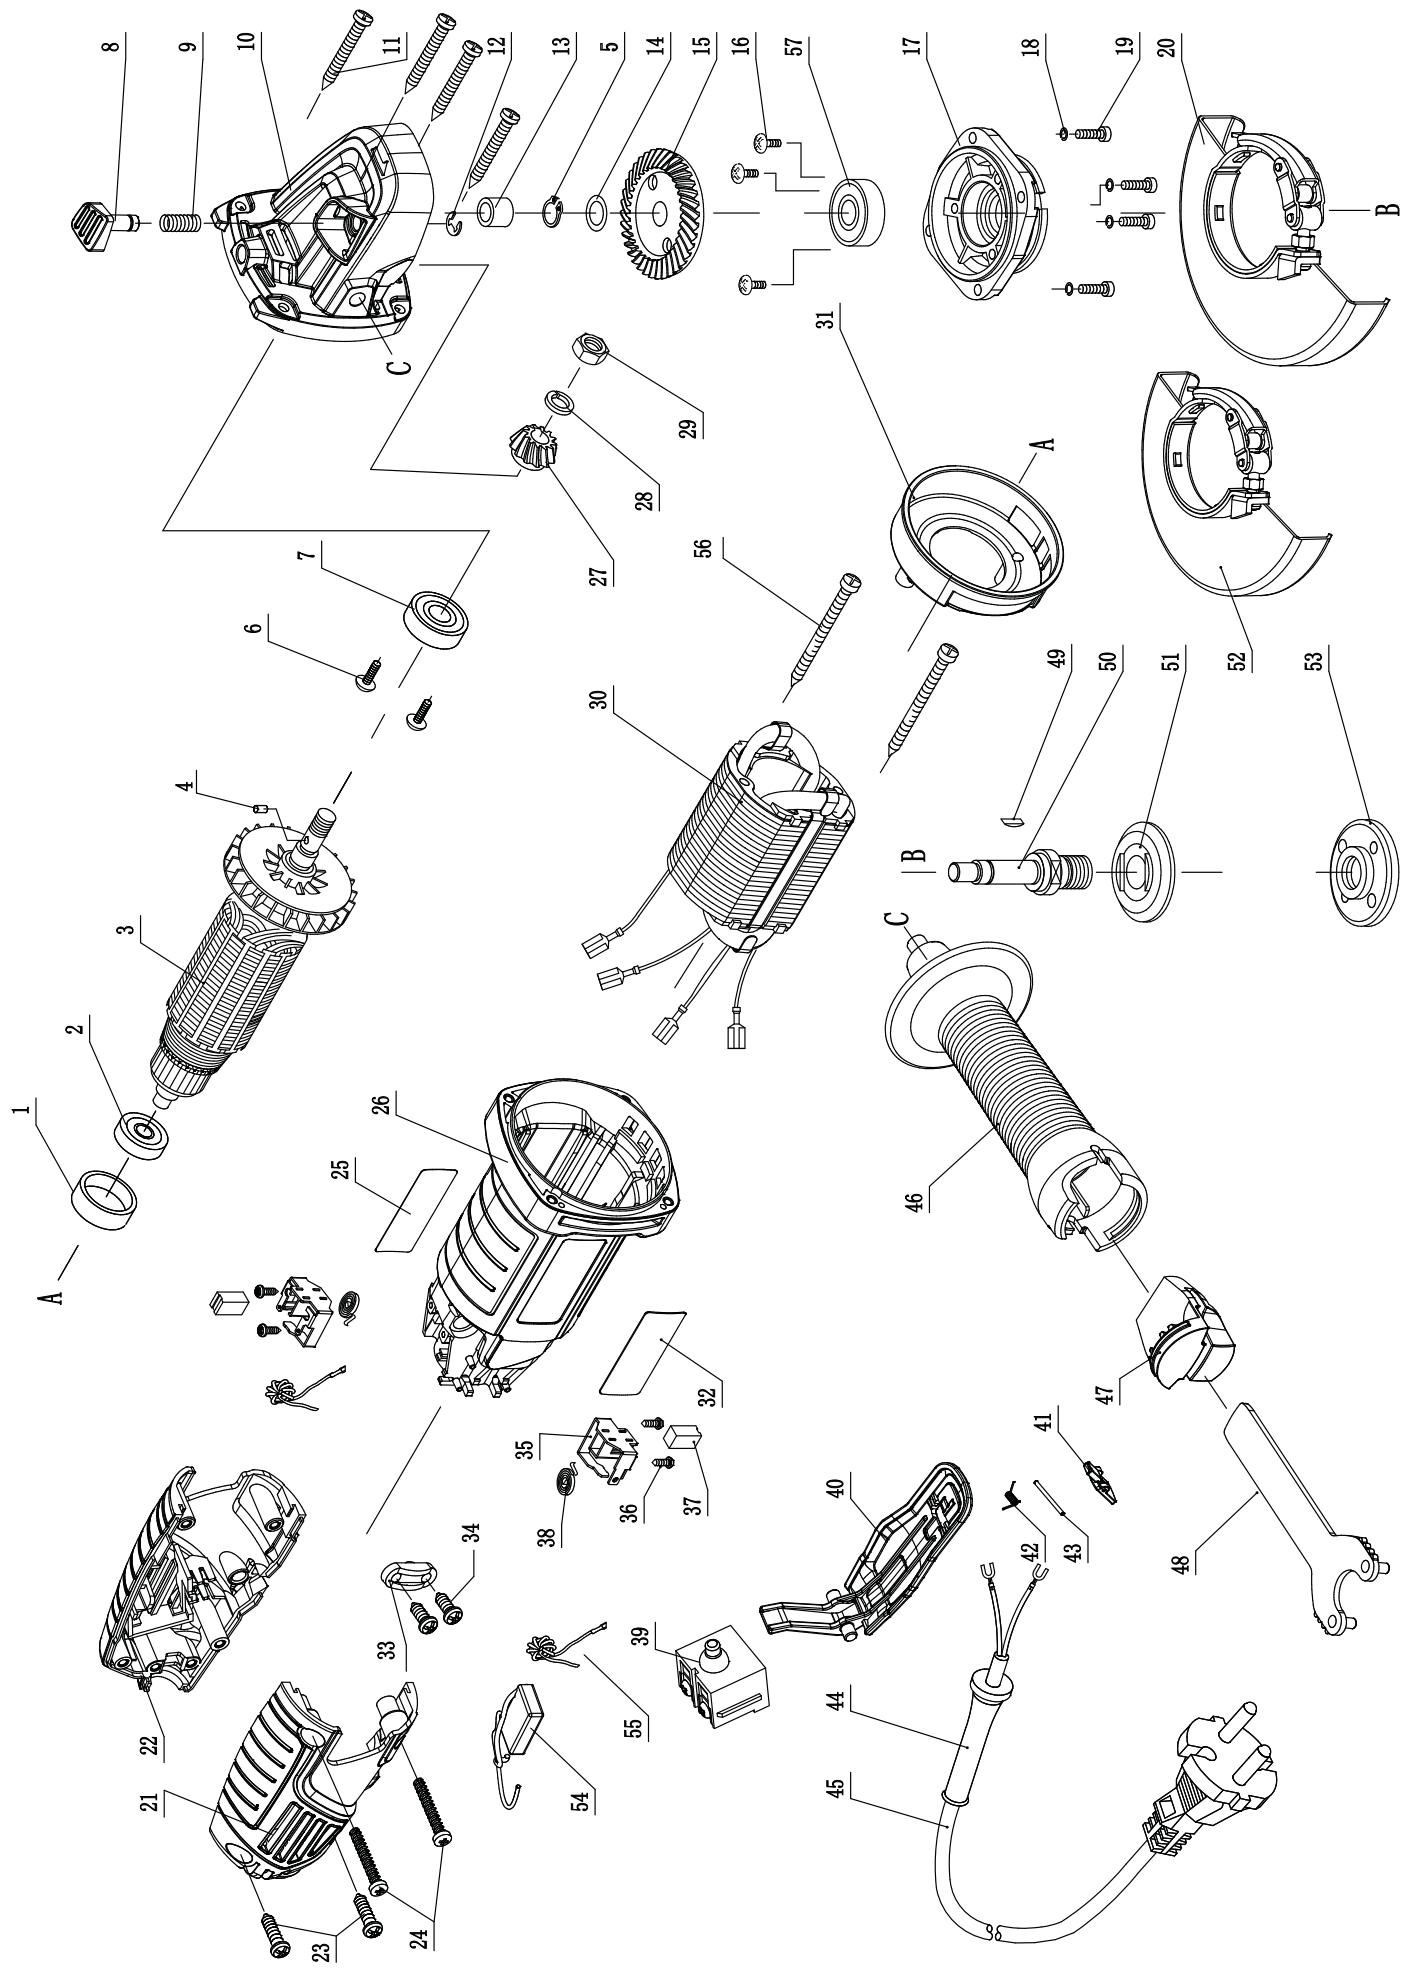
Overview
- Paddle
- Side handle
- Protective cover (grinding125mm)
- Guard locking lever
- Gearbox
- Lock button
- Spanner
- External flange with thread
- Internal flange
- Safety interlock
- Protective cover (grinding115mm)
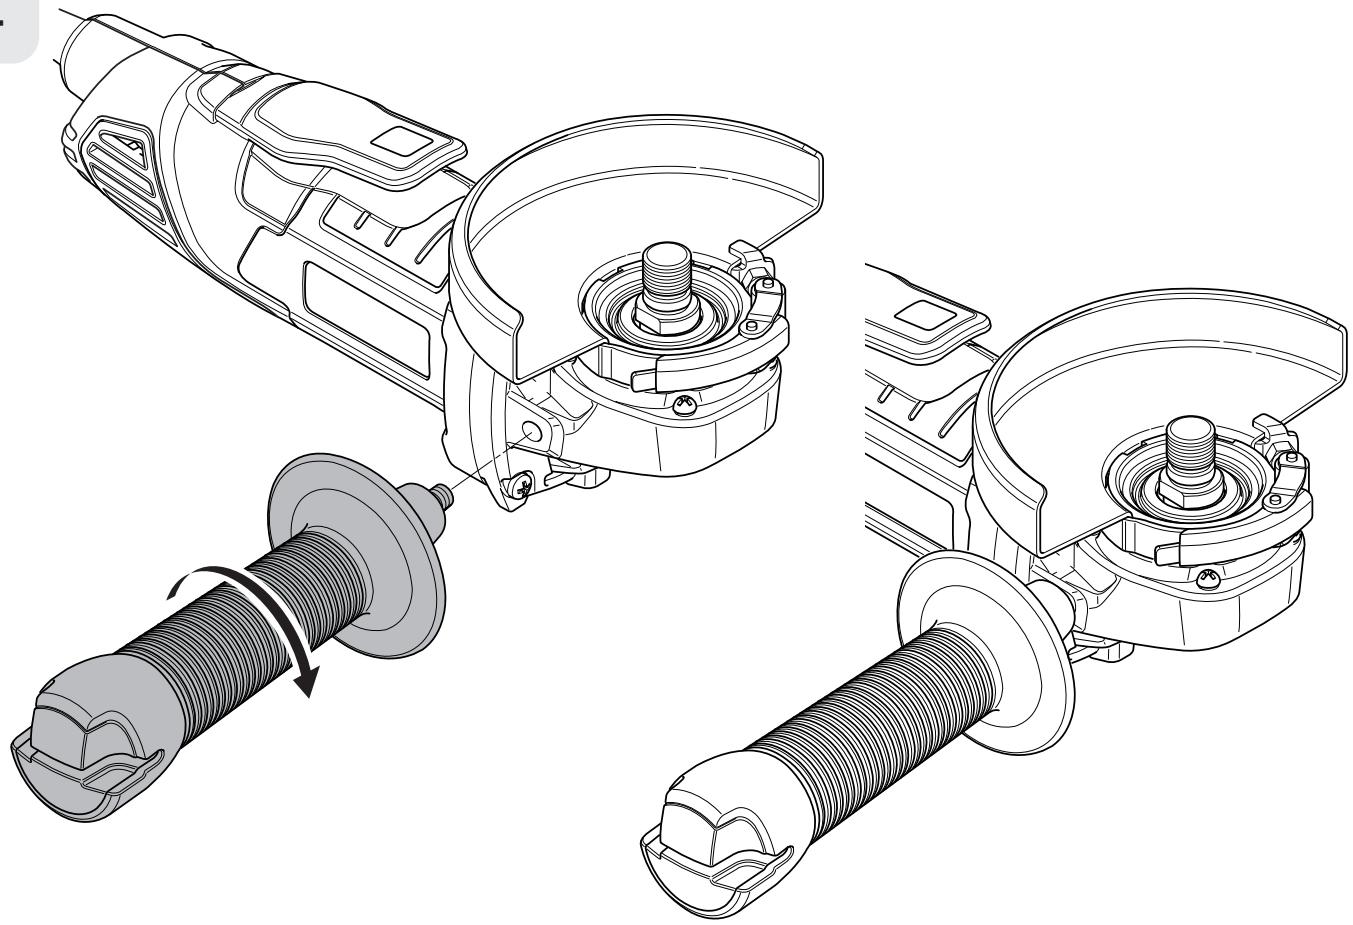
Mounting the Auxiliary Handle
The side handle can be fitted to the left, right of the unit. Select the position which gives the most comfortable and safe use.
CAUTION:
Always be sure that the side grip is installed securely before operation.
During operation, keep one hand on the rear handle and the other on the side handle.
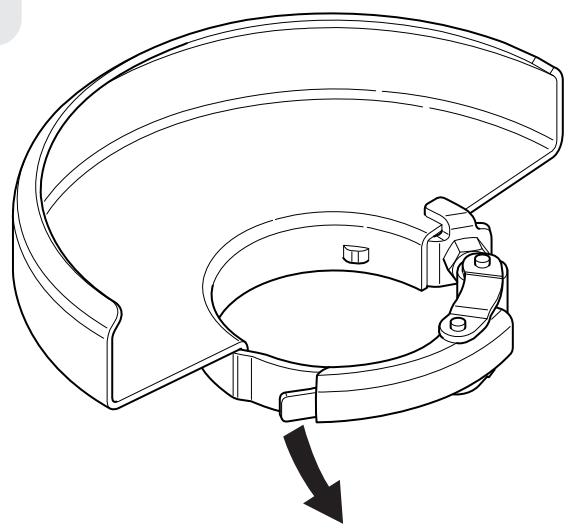
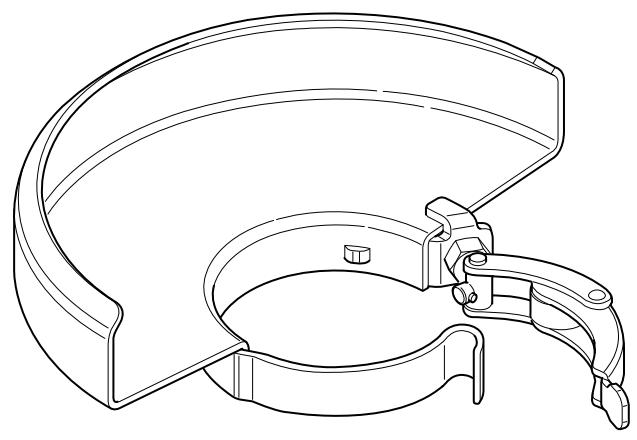
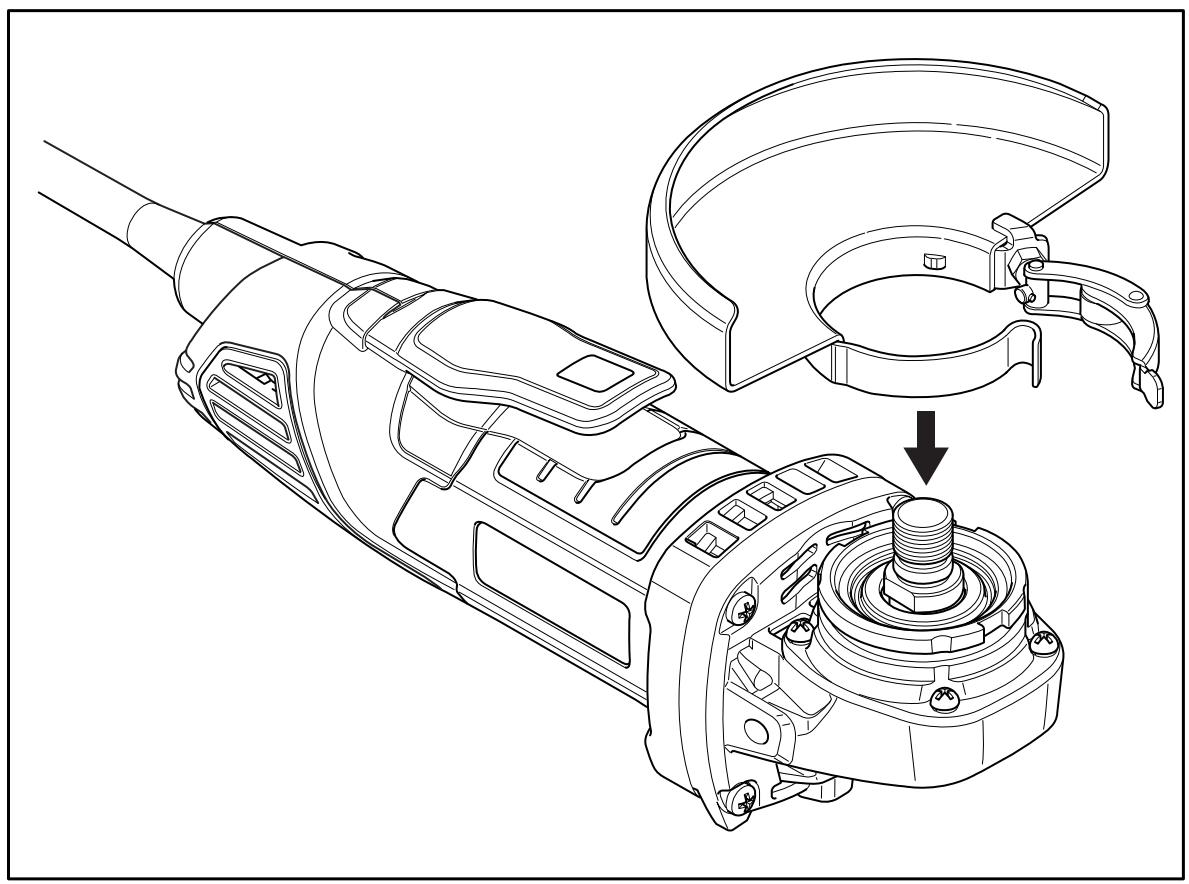
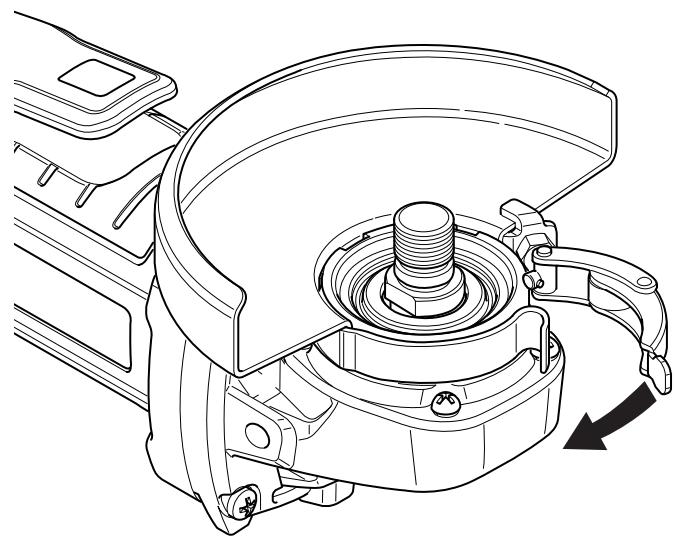
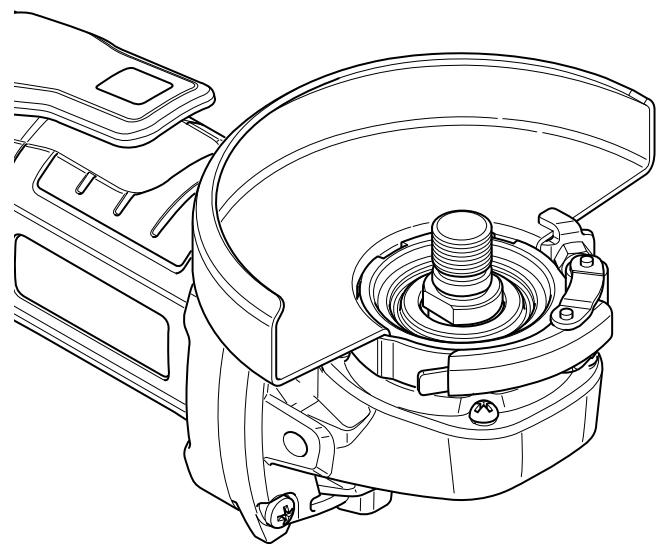
Installing or moving protective cover
WARNING: Ensure the angle grinder is switch off and unplugged from the mains.
Depending on whether your operation is cutting or grinding, select the correct protective cover. Failure to use the right cover for operation could result in injury. When using a grinding or cutting-off wheel, the protective guard must be fitted on the tool so that the closed side of the cover always points toward the operator.
Install the guard: release the lock lever of the guard and insert it on the gear head, and turn/adjust in any desired position for maximum performance, then close the lock lever. Make sure that the fastening lever is properly locked after setting the guard.
To remove the protective cover, follow the installation procedure in reverse.
The protective cover can be turned to a desired angle, but not more than 45^ on left side or right side.
Please use grinding protective cover for grinding operation.
Grinding and Surface Processing
In order to grind surface, you should use a coarse abrasive disk with a sunken centre.
You can use the abrasive disks with diameter of 125mm . The maximum thickness of disks is 6mm .
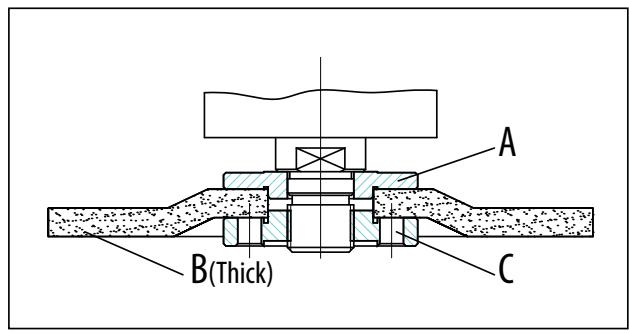
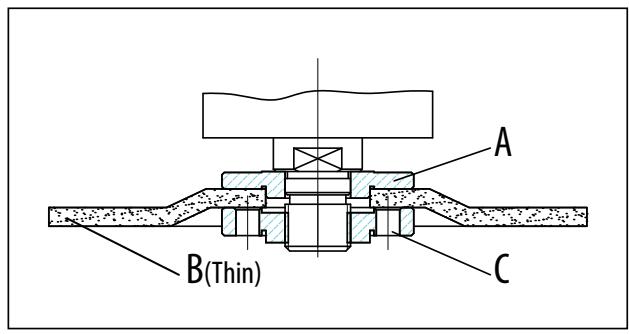
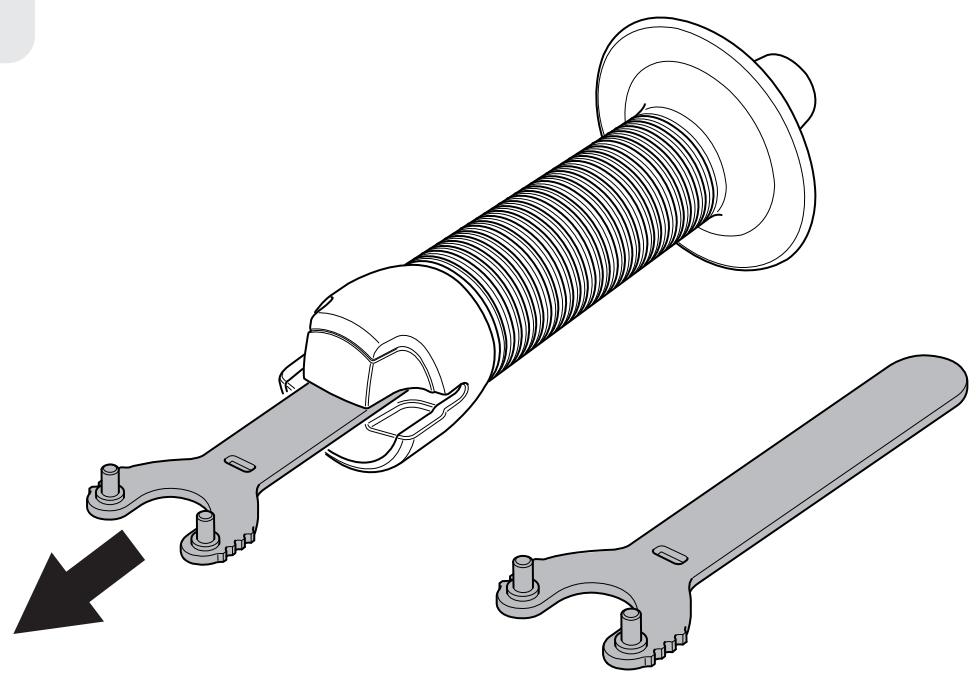
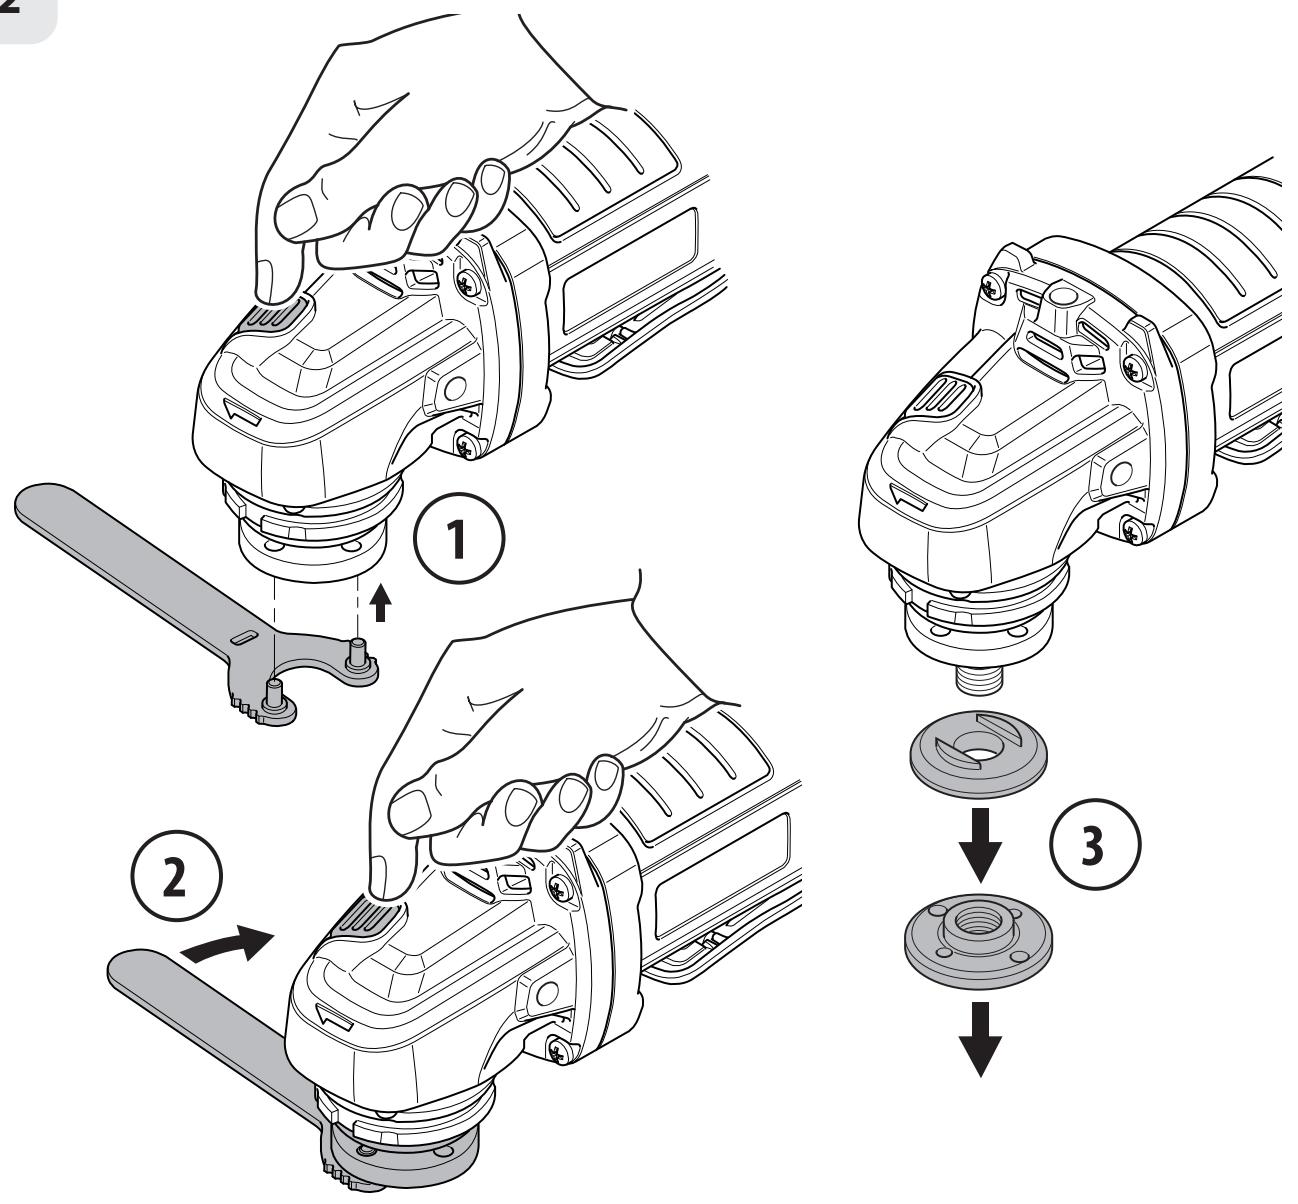
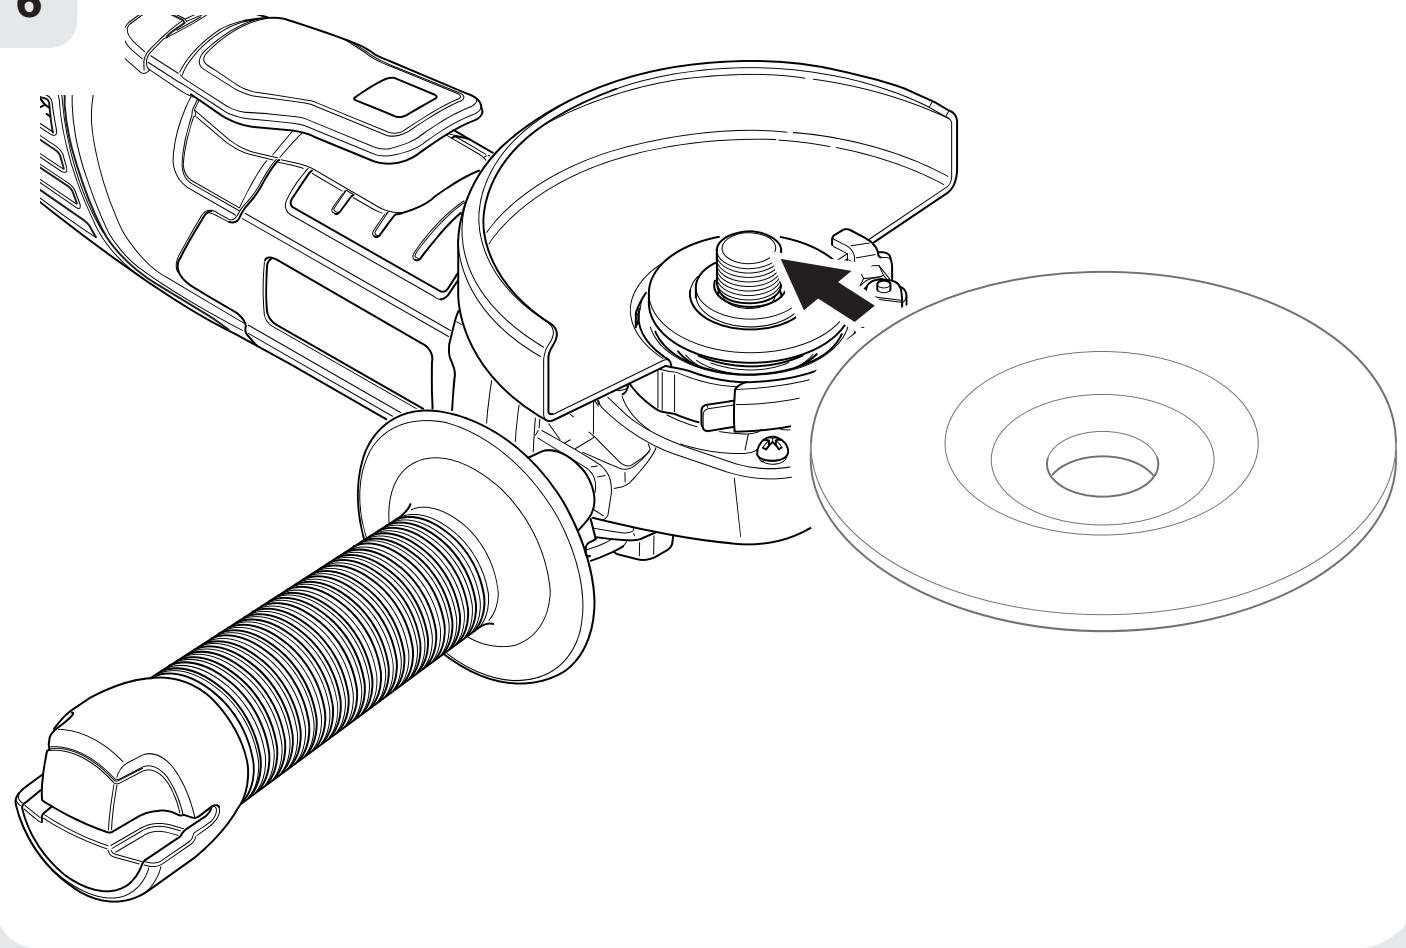
Mounting the Wheels /Disks
Place the back flange A over the spindle making sure that it fits tight.
Place the grinding or cutting disc B on the top of the back flange, ensuring the bore fits into the step of the flange.
Mount the concave recess side of the external flange C over the spindle.
Press the spindle lock button to lock the spindle firmly, then tighten the external flange with the spanner in clockwise direction.
Allow the angle grinder to run in idle at least 1 minute with the grinding or cutting disc correctly assembled, a vibration disc should be immediately replaced.
8. OPERATING INSTRUCTIONS / DRAWINGS
Switch ON/OFF
Switch on: Push the safety interlock forwards meanwhile clenching the paddle to turn on the machine. Then keep hold it in position for continuous operation. Switch off: Loosen the paddle and turn off the machine, go loosen the safety interlock to lock witch at OFF position.
WARNING: Do not cover exhaust vents when the tool is in use. This may cause damage to the motor and reduce the efficiency of the tool.
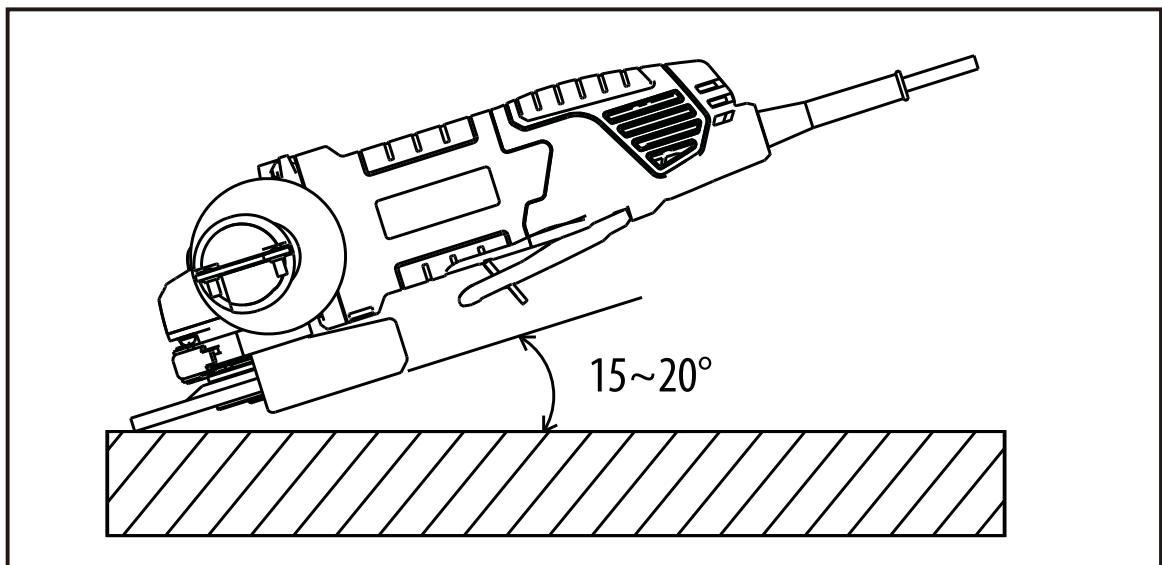
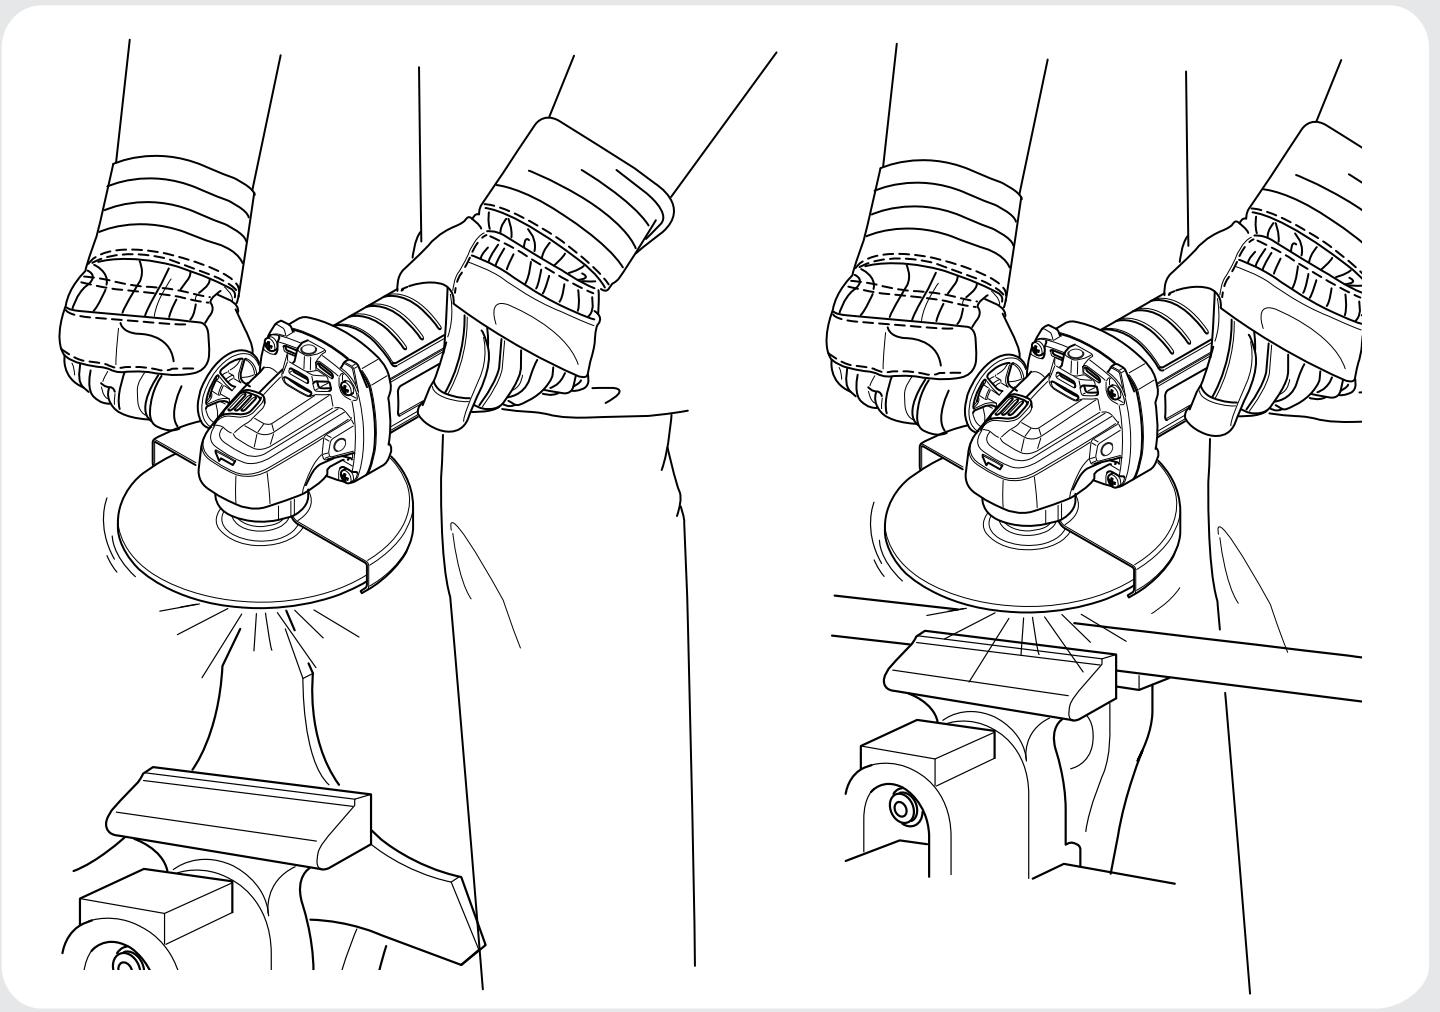
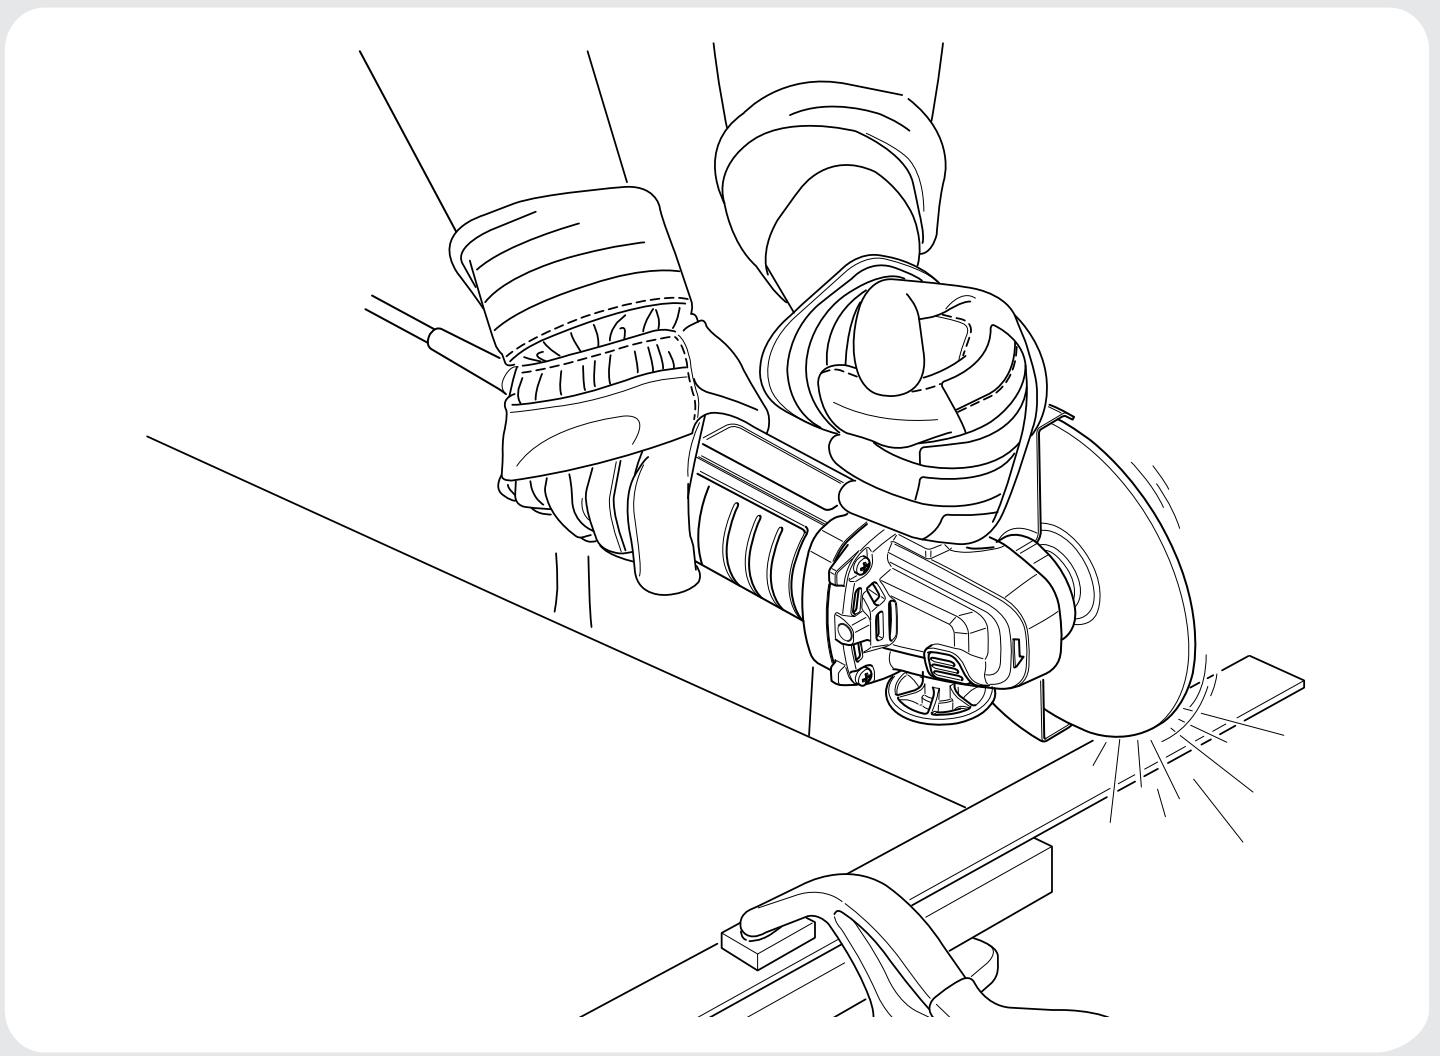
Abrasive operation
When equipped with abrasive wheel and guard, for the best work results hold the grinder at 15 20^ to the work piece.
Overload
The motor of your right angle grinding machine may be damaged when overloaded. This results from excessive working pressure over a prolonged period. Therefore you should not try to accelerate your working speed by increasing pressure on your machine. The abrasive disks work more efficiently if only slight pressure is exerted on the grinding machine, thus avoiding a drop in the grinding speed.
9. MAINTENANCE / CLEANING /
LUBRICATION / STORAGE
Maintenance
Always be sure that the tool is switched off and unplugged before attempting to perform inspection or maintenance.
If the supply cord of this power tool is damaged, it must be replaced by a specially prepared cord available through the service organization.
Cleaning
The tool and its air vents have to be kept clean. Regularly clean the tool's air vents or whenever the vents start to become obstructed.
Avoid using solvents when cleaning plastic parts. Most plastic parts are susceptible to damage from various types of commercial solvents and may be damaged by their use. Use clean clothes to remove dirt, carbon dust, etc.
Lubrication
All the bearings in this tool are lubricated with a sufficient amount of high grade lubricant for the life of the unit under normal operating conditions, therefore no further lubrication if required.
Storage
Store the angle grinder in a dry place. Regularly inspect the disks / wheels, ensure that the disks / wheels is free of cracks and surface defects. Replace the disks / wheels when it has wore out.
Take care not to expose this tool to the rain.
10. CHECK THE DELIVERY PARTS
Carefully remove the tool from its packaging and check if the following parts are complete:
1 x Angle grinder
1 x Side handle
1 x 115mm grinding protective cover
1 x 125mm grinding protective cover(assembled on the machine)
1 x spanner
1 x External flange (assembled on the machine)
1 x Internal flange(asssembled on the machine)
11. TRACEABILITY NUMBER / SERIAL NUMBER
The Traceability Number/Serial Number will be showed in the label.
12. TROUBLESHOOTING
| PROBLEM | CAUSE | SOLUTION |
| Machine does not start. | 1. Power cord not plugged in. 2. Power cord is damaged. 3. Circuit breaker is tripped. 4. Switch is locked at “OFF” conditions. | 1. Plug in cord. 2. Replaced at authorized service center. 3. Reset circuit breaker. 4. Restart the tool. |
| Motor does not reach full. | 1. Voltage from power source. 2. Circuit is overloaded. 3. Motor burned out. | 1. Request a voltage check. 2. Test on a different circuit or without anything else on circuit. 3. Have tool serviced and request a voltage check. |
| Motor stalls, blows fuses, or trips circuit breakers. | 1. Switch is defective. 2. Carbon brush is wornout. 3. Voltage from source is low. 4. Fuses or circuit breakers are wrong size or defective. | 1. Replaced at authorized service center. 2. Replace at authorized service center. 3. Request a voltage check. 4. Replace with a correct circuit breaker or fuses. |
| Motor overheats. | 1. Motor is overloaded. 2. Grinding disc is being fed into work too fast. 3. Air vents become obstructed. | 1. Request a voltage check. 2. Feed grinding into work slower. 3. Clean air vents. |
| Machine vibrates or shakes. | 1. Disc is out-of-round. 2. Disc is chipped. 3. Disc is loose. 4. Machine is not secure. 5. Work surface is uneven. | 1. Replace wheel. 2. Replace wheel. 3. Set flange nut correct and tighten it. 4. Check machine and all hardware. 5. Feed grinding into work slowly. |
13. GUARANTEE
DEXTER products are designed based on the most rigorous quality standards for products intended for the general public.
The Angle Grinding (Model n° 800AG2-125.5) is covered with a warranty of 3 years. starting from the date of purchase. This warranty covers all manufacturing or material defects.
In the event of a breakdown, please refer first to the troubleshooting page (problems and solutions) in the brochure; if the problem persists, please check with the nearest store.
Your store shall spare no effort in resolving the issue.
Repairs and change of parts do not extend the duration of the initial warranty.
Breakdowns resulting from normal wear and tear or from improper use of the product are not covered by the warranty. This includes, among others, the switches, the safety circuit breaker and the motors, in case of wear.
Please note that there are specific warranty terms for certain countries.
In case of doubt, please check with your point of sale.
For claims relating to the warranty to be taken into account, the following is required:
. Providing proof of purchase
. That no repairs and/or change of parts have been performed by a third party.
That the issue is not a matter of normal wear and tear.
. That required maintenance and repair works have been performed correctly.
. That no deterioration has taken place as a result of incorrect setting of the carburetor.
. That there has been no forcing, improper handling, unauthorised use, or
accidents.
. That no deterioration has taken place due to overheating, resulting from clogging of the ventilator block.
. That no work has been done on the product by an unskilled person, and no incorrect repairs have been attempted.
. That the tool/battery/charger have never been disassembled or opened.
. That the tool/battery/charger have never been in a wet environment (dew, rain, submerged in water...)
. That no incorrect parts have been used, parts not made by DEXTER, whereas they prove to be the cause of deterioration.
. That the tool has not been used improperly (overloading the tool, or use of non-approved accessories).
. That no damage has resulted from external causes, or foreign bodies such as sand or stones.
. That no damage has resulted from non-compliance with safety recommendations and use instructions.
The product must be used under normal usage circumstances, and for nonprofessional purposes.
Therefore, excluded from this warranty are products used by landscaping companies, local authorities, as well as companies offering paid rentals or free loaning of equipment.
14. EC DECLARATION OF CONFORMITY
ADEO Services
135 Rue Sadi Carnot - CS 00001
59790 Ronchin - France
Declare that the product detailed below:
Angle grinder
Model: 800AG2-125.5
Serial No.: Please refer to the back cover page
Satisfies the requirement of the following directives, regulations and standards:
EC Machinery Directive: 2006/42/EC
Electromagnetic Compatibility Directive: 2014/30/EU
ROHS Directive(EU)2015/863 amending Directive 2011/65/EU
And conforms with the norms:
EN 60745-1:2009 + A11:2010
EN 60745-2-3: 2011 + A2: 2013 + A11: 2014 + A12: 2014 + A13: 2015
EN 55014-1:2017
EN 55014-2:2015
EN 61000-3-2:2014
EN 61000-3-3:2013
IEC 62321-1:2013
IEC 62321-2:2013
IEC 62321-3-1:2013
IEC 62321-4:2013+A1:2017
IEC 62321-5:2013
IEC 62321-6:2015
IEC 62321-7-1:2015
IEC 62321-7-2:2017
IEC 62321-8:2017
ISO 17075-1:2017

Eric LEMOINE
International Project Quality Leader
ADEO Services 135 Rue Sadi Carnot - CS 00001 59790 RONCHIN - France
Done in Ronchin:29/06/2019
Last two number of the year CE marking applied:19

1
2
3
4

5
6

7
Ce produit est recyclable. S'il ne peut plus etre utilise, veuillez l'apporter dans un centre de recyclage de déchets.
Este producto es recicable. Si ya no se possible usar, levelo a un centro de recicaje de residuos.
Esteproedeciclvel.Se deixar de outilizar,entregue-0 num centro de reciclagem deresiduos.
Questo prodotto cui è serra riciclato. Se deve essere smaltito, portalo presso un centro de reciclaggio.
AutoTo npoiov eivai avakukkwio.o. Eav mopei nEv va xpooiopoinθei, metapepet e tnv oK kanoio Kevtpo avakukwong, anoppiumuatw.
Ten produit poddawany jest recyclungowski, kiedy przystasteby uzyteczny sązy dostarczy go do punktu zbiórki odpadów.
30 3TOT npOdyKT moKET nepepa6aTaBbTaBcA. EcIn OH 6oNbIe He npiroDeH IJI NaONb3OBaHnA, cJaTe erO B yTuIN3aCNoHHbIu CEHTp.
byn eHim kaia Ta eHdeyre keeidi. Ohbi api kondahyra 6oImaTbH xaFdaJa, OHbl Kaia Ta eHneTIn opTaIbIKKa TaNCbIPyBih3DbI eTIHeM3
Ua Ue npoykt moke nepepo6nTc. RaIoo BOHO 6ilbSe He c npuaTHe Ira BnKOpNCTyBaHn, 3aTe Ioro B yTuJIi3auiHn uHTp.
Aceast produs este reciclabil. Daca nu mai poate ti folosit, va rugam sa il aducei intr-un centru de reciclare a deseurilor.
83 Este produits é recicl的身体. Se não puder mais ser uso, descarte em um centro de reciclagem de resíduos.
This product is recyclable. If it cannot be used anymore, please take it to waste recycling centre.

Serial number: 2074840015041901281910
- Garantie 3 ans / 3 años de garantía / Garantia de 3 años / Garanzia 3 Anni / Eyyüŋən 3 ετών / Gwarancja 3-letnia / Γαραπίη 3 ύος / Keniίπικ 3 ἀνλ / Γαραπίη 3 ρούβεν / Garantie 3 ani / 3-year guarantee

C∈EAC
Made in P.R.C. 2019
ADEO Services - 135 Rue Sadi Carnot - CS 00001 59790 RONCHIN - France
TOB«Jlepya MepehnUkpaiHa》, Byn.Poiapha 17a,M.KiB 04201,YkpaiHa
000JIePYA MEPEH BOCTOK, 141031, MoKOBcKa8 oJbIaTb, r. Mbltnu, OctaikOBcKoe uocce, d.1, POCCU
Imported by Adeo South Africa (PTY) LTD T/A Leroy Merlin
Leroy Merlin Greenstone Store
Corner Blackrock Street and Stoneridge Drive, Greenstone
Park Ext 2, Edenvale, 1610 Johannesburg, Gauteng, South Africa
《Л膨胀а Мерпейн Казахтын》ЖИС Казактун
Pecny6JIHKacbl,050000,AImaTbIK,KoHaeb
Kωεci, 77, «ParkView» 50, 6.. 07 Φ.


- EKCSJIYATAZIA / CKLADAHNRA / 306PAJXEHNRA
- BctaHOBJIeHNaIooTkoBooi pyuKn
- yBAGA:
- BctaHOBJIeHHa6o nepemiiueHHa3axnCHOrO 7NTka
- HOMEP BIDCTEKYBAHNA /CEPIHNI HOMEP
- усунова HECПРавhoeн
- GENERAL SAFETY INSTRUCTIONS
- WARNING! Read all safety warnings and all instructions.
- Save all warnings and instructions for future reference.
- 3) Personal safety
- 4) Power tool use and care
- 5) Service
- Kickback and RelatedWarnings
- Additional safety instructions for wire brushing operations
- SafetyWarnings Specific for Wire Brushing Operations:
- SPECIFIC SAFETY RULES
- INTEND USE
- WARNING! Always wear protective goggles.
- ENVIRONMENTAL PROTECTION
- TOOL SPECIFICATIONS
- OPERATION / ASSEMBLY / DRAWINGS
- Overview
- Mounting the Auxiliary Handle
- CAUTION:
- Installing or moving protective cover
- Grinding and Surface Processing
- Mounting the Wheels /Disks
- OPERATING INSTRUCTIONS / DRAWINGS
- Switch ON/OFF
- Abrasive operation
- Overload
- MAINTENANCE / CLEANING /
- LUBRICATION / STORAGE
- Maintenance
- Cleaning
- Lubrication
- Storage
- CHECK THE DELIVERY PARTS
- TRACEABILITY NUMBER / SERIAL NUMBER
- TROUBLESHOOTING
- GUARANTEE
- EC DECLARATION OF CONFORMITY
- ADEO Services
- Rue Sadi Carnot - CS 00001
- Ronchin - France
- Angle grinder
- Satisfies the requirement of the following directives, regulations and standards:
- And conforms with the norms:
Brand : DEXTER
Model : 800AG2-125.5
Category : Angle grinder