USER MANUAL PLM2-46B150 STERWINS
LM-18B, Building 4,2 Dajiaoting Zhongjie, Chaoyang District,
Beijing 100022 - CHINA, P.R.C.

000 JEPYA MEPJEN HOCTOK, 141031, Mockobcka
0bactb, MbytnuHckn paoh, r. MbTuun
OctawkoBCKoe wocce,di,POCCnA

Imported by Adeo South Africa (PTY) LTD T/A Leroy Merlin
Leroy Merlin Greenstone Store - Corner Blackrock Street
and Stoneridge Drive, Greenstone Park Ext 2,
Edenville, 1610-Johannesburg, Gauteng, South Africa

«Лерва Мерпен Ka3axCTан»ЖИС Ka3aKCTан
Pecny6mKacbl,050000,AImaTbK,KoHaeb
keweci,77,«ParkView»B0,6K-,07oΦ.


EAN CODE:3276000429883

Notice de Montage -
KOpctery HcckaynbIfb

KepiBmTbO I0 36ipci
I Eknnnyatauqii

Manual asamblare,
utilizare sintretnere

BR: Manutença / EN: Maintenance

20 22

FR: Hivernage / ES: Durante el invierno / PT: Preparacao para o inverno / IT: Rimessaggio /
EL: Atoθηκευοι Κεμώνα / PL: Przechowyanie / RU: 3mHmπηρηοι / KZ: KbicKbI caKtay / UA: 3mOmπηρoR O: Pāstrare pe perioda iernii / BR: Hibernação / EN: Winter storage

23 29

/ EN: Legal & Safety Instructions

30 245

FR: Montage / ES: Montaje / PT: Montagem / IT: Montaggio / EL: Συναρμολόγησι / PL: Montaz / RU: 60ρκa / KZ: Μηταχκήγι / UA: 36ipκa / R0: Montaj / BR: Montagem/ EN: Assembly
1
2
3
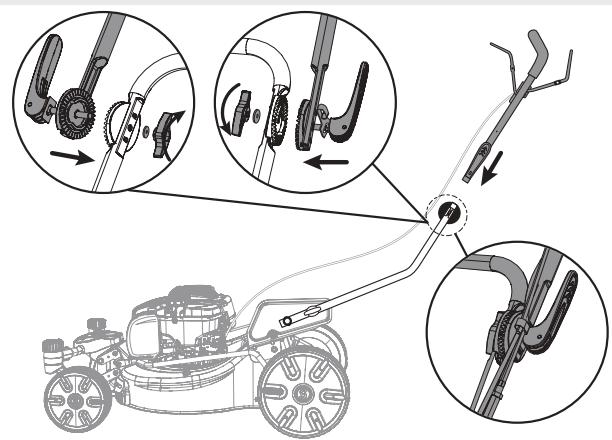


4
4
5
7
6

8

FR: Préparation / ES: Preparación / PT: Preparação / IT: Preparazione / EL: Προετουμοι/
PL: Przygotowanie / RU: Плогосторka / KZ: Дайындану / UA: Плоготуванna / R0: Pregatire /
BR: Preparacao / EN: Preparation
A

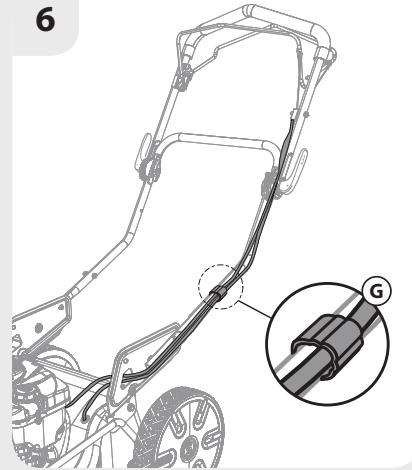
6→7
Ejection laterale
descarga lateral
descarga lateral
scarico laterale
πλaivn εκκενωσn
Boczne wyładowanie
6OKOBovBb6poc
6yHnpiK nbIxFapy CaHbIaNaybl
6OKOBVI BKNiD
evacuare laterala
descarga lateral
side discharge
B
(8→9
Bac de ramassage
Movéλo: PLM2-46B150.5
Supplier Quality Leader
Evtoλoδóxος τοῦ κ. Julien Ledin, ADEO Quality Leader
ADEO Services 135 Rue Sadi Carnot - CS 00001 59790 RONCHIN - France
YIpyapnKεσηΣavynakntc 06/09/2018
OPIS SYMBOLI

8.UTYLIZACJA I RECYKLING
Model: PLM2-46B150.5

JIOBNTbIe npbl; He NCIOJIb3OBA Tb BHYTpNIOMeUeHn.

BoBpemKaunBaHnna
ncnoJIb3yIte cpeDCTBa
HNDbNDbUaJIbHOJ
3aunTbI:OQKNHauyuHKn.
Ipepe peMOHTOM N3BJIeKNTe CBeCy 3aXnIraHnI N BbINJHNTe peMOHT yCTpoIcTBA B COOTBeTCTBm C INHCTpyKUne.

BhimaHne! DvuraTeB ropayn.

Icnojbl3yIte nepuataKn.

I3dJIne n erO ynaKOBka DOnXHbI yTuIN3nPoBaTbcr OTeJIbHO B cIeJx nepepa60TK.

IcnoJb3yUte 3aunTHyu 06yBb.

UcTpoCTBO MoXHO XpaHnTB BBePTKaklbHom NpOJKeHN.

BydbTe octopoxhbl npn o6pauehenn c0ctpbimpexuyumn 3JeMeHTAMN.
stop

OTnyctnte pyky TopMo3a, yTO6bI OCTaHOBHTb DBVaTeJIb npexKyuyn 3JeMeHt.

IOTaHInTepykU npINbOda,HTo6bl NCIOJIb30BaTb caMOxOHNbIpeKIM.

UcpoCTBO COOTBETCTByeT DeiCTBYIOUM EBPoneNCKM DnpeKTNBaM n 6bIIO OUEHEHO B COOTBETCTBUN C DaHhbIM NnpeKTNBAMN.

MapKnpOBka yPoBnHa 7uMa. yPoBEnb 7uMa yCTpoNCTBa He npBeBlaaet 96 dB.

ДЕРЖИТЕ HОГИ NYUKIN HA PACCTORHIN.
UCIOBhbIE O603HAUHIN

IPEyPExEHE.3HaKn 6e3oNaChOCTn Ha yctpoiCTBe BcERda OJONKbI 6bITb YNCTbIMn XopoIO WdImbIMn.3aMeHnte 3HaKn 6e3oNaChOCTn, eCnn OHCTepJIncb NII CTaII Hepa36OpuHBIMn.
COДЕРЖAHNE
- HA3HAUYEHIE
2.ИHCTPYKUJIЯ NO TEXHNIKE 630IACHOCTN
- ONICAHINE YACTEN UCTPOINCTBA
4.TEXHUYECKHEXAPAKTEPNCTUKI
- UCTPAHEHNE HENOLAIOK
6.ΓAPAHTNIA
7.ObCJUJKBAHNE, XPAHEHNE ITPAHCPOTNPOBKA
8.YTNJIN3AUZM INPEPEPA5OTKA
9.ИЗОБРАЖЕНЕВAP3ОБPAHHOMBIDENICIMCOKЧАТЕNCTBA
- DEKJIAPAUZI COOTBETCTBUN HOPMAM EC

PNEyPEXKDEHNE. B ceyx 6e3oNaChOCTn pOuTnte 3TO pyKOBOCTBO n pkoBOcTBOKDINrAteJIO, npKJe CE m PnCtynaTb K pa6Ote C HOBbIM TBOM. HecobJeHne INCHtpkun MoKeT pNBeCTn K cepbe3hBm TpaBMam.
Ipepe nCpOJIb3OBaHmE rA30HOKocnKn IOTpaTbTe HeCKoJIbKO MInHyT, tO6bl O3HaKOMtBcR C ee OcO6eHHoCTAmN. XpaHnte DaHHOe pyKOBODCTBO B HAdExHOM MeCe, tO6bl INΦOpMaunr 6bln DcSTynBa N IIO6oe BpeM. Ppi nepeJaue O6OpyDobAHnI dpyromy IuCy nepeDaBaIte TaKKe I 3Tu INHCTpyKUnn NO EKcIIyataunn I npabUla TeXnKn 6e3OnaCHOCTn.
1. HA3HAUEHNE
4. TEXHnueCKMEXAPAKTEPNUCTNKN
Ecn npOyKT NOBpeJdeH IIN IMeET KaKHe-JI6o HeNCpPABHOCTN, He NCNoJIb3yIte erO IN BepHnTe 06paTHO B MaRa3MH.
3To yCTPOIcTBO npeHa3NaueHo TOlbKO dJa IcNoJIb3OBaHnHa OTKpblTom BO3dyXe Hn npK KaKnx ycIOBnX He DoJIgHO IcNOJIb3OBaTbCBAHTpy NOMEuEHH.
He kypitte! Napb6eH3nHa MOryT cTaB npuHNO B03rOpaHnI nn B3pyBa.
6) 3aynctnte Dniratb N octabte ero pa60taTb Do Tex nop, noka OH He n3pacxoodyet OctaTKn 6eh3nHa.
B) OToCoeINHInTe CBeVy 3aXKurHaHn.
2.AKKypaTHO OuHCTe Ra3OHOKoCnIKy i CmKbTe ee.
-
CnErka cMaXbTe pexyUn 3eNemHT, YTo6bI n36ExaTb Kopp03uN.
-
XpaHnte ra3OHOKoNkU B cyXOM, UCTOM n TEnlOM MceT, HeIOCTyINOM dIy IIOCTOPOHHX.
-
Bcerda xpaHnte yctpoiCTBO B HeIOCTyHOM dIy dTeY MeCTe. IdeaJIbHaT TeMnepaTypa xpaHEnia — ot 10 do 30^

BHIMAHNE!Ipejxe qem nomecntb ra30Hokocnky Ha xpaHeHne, daTte DBNrTaTeIOIPOHCTbIO 0CTbITb.

TIPMMEYAHNE
-ПихаениллбогоэлкгрбудовиьнвНЕрбетрьмьхпОмшенихллпн HabecOMДЯхаени МATEрпалOBСLEdYETNo3a60TntbCOTOM,YTO6blyCTpoiNCTBO He pKabEno.PekOMHdyetcNcOINb3ObAtbДЯхаениOprInHaNbHyU yNaKOBkyIlnn HAKpbIBaTbYCTpoiNCTBO NOxOJaSeT KAnHbU INI YeXhOMДЯ3aUNTbOTnbl.
- CnEInTe 3a Tem, YTO6bI He COrHyTb N He CdaBnTb Ka6eIN.
TpaHcnpToPobKa
- BbiklnouHTe yctpoCTBO u daIte DbIrataTeJIO OCTbIb.
- OToeINHnTe npoBOd CBeU 3aJxRHaHn IOnyCTOuHTe TOnNtBnBbI 6ak CoTnAcho INCTpyKUm, pInBeJeHHbIM B pyKoBOcTBe K DvRAtEn. B npOTnbHom cnyae ToTnIBo MOKeT BbITEb NcnaKaTb TpaHCnOpTHoe CpeDCTBO.
3.ПрикpeniteТрансорпювочезшионеprinncopo6lenhe,eclmmeetca.
- Bcerda nepenocite yctpoiTbO 3a pykoTky.
- Пи посяпглготь рячелун.TeTm,ТOTб He nOrgHyb n He NOBpeDHT bpeKyuшйЭЛeMeHT.
- 3aunuainyte yctpoCTBOOTCNbHbIXB03deIcTBnININB6paun, KOToPbIe MOryT B03NkHyTb npnpeBozKe TpAHcnpTbIMn CpeCTBaMn.
- 3aKpeHnTe yctpoiCTBO, YTO6bI npEIOTBpaTb COCKaJIb3bIbAHne, NaDeHne, NOBpeJxHeHnI TpaBMbl.
8. YTNJIIN3AUIGNI INPEPEPABOTKA
Beperite okpykaioy cpey. IIO OKOHuaHm Cpoka Cnyx6by yctpoiCTBa JoCTaBBte erO Bmecte C npHaJIeXHOCTaMn U ypaKOBkO B CEHTp yTuIN3aun OTxOIOB. He bIbpcbIbaIte erO Bmecte c 6bITOBIM Mycopom.
IpebeoD opunnaHbno nHcTpykuni
9.ИЗБРАЖЕHМЕВРАЗБРАНHOMВИДЕИСПСОКЧАCTECHYCTPOICTBA
Mодenvb:PLM2-46B150.5
IpebeoD opunnaHbno nHcTpyKuun
9.ИЗБРАЖЕHМЕВРАЗБРАНHOMВИДЕИСПСОКЧАCTECHYCTPOICTBA
Cnucok Detanen
A6aJnHaHbI3: K03FaJIrkbll bICTblK.

KonFan Knin kypiH3.

HIM MeH OHbH opaybIb KaTAt HNeY YwH 6JneK HAJIaBl.

AaK KopFaHbIcH KnI JxPyiHi3.

AcnantbIH TiriHeH caKTay yHKcIaCb 6ap.

ECKEPTY: BeH3nHdi Kypaapdabpb naJdaanhy Ke3iHne, abyip JapaKaT any
KaHe/Hemec KpybIYbFa3aKbIM KeTIPy KayiH a3aIyTu YuiH KeNecinepePi
KamTntbH Herizri Kayincizik ⅢapalapbH apdaiBIM opbIHay Kepek. Byn ΘHimdi naIaHa6ac 6ypbH, Ocb HcKaynapdbH 6apblfBH OKbIN sbIFbn, KeenekeTe naIaHaNy YwH CaTan KoBiHb3.

ECKPTY:OcbacnJxMbicKe3iHneJleKtpMaHHTTikΘpicti sbiFapadbl.
OcbI Opiic 6enrini 6ip Jxafdaunapda 6enceHni Hemece 6eitapan
MeiHnHaJIbIK MMnHaTtATapFa Keepri KeTIPyI MymKIn. Aybp HeMece Ka3aJIbI KapaKaT aNy Kayin H a3aiTy YsiH MeiHnHaJIbIK MMnHaTtATapBb 6ap aAdAMap OcbI acnAeTb I naJdAnaHyan 6YpbH dApirepMeH HeMece MeiHnHaJIbIK MMnHaTtAT ΘHdpyWicimEn KeHeCKeH XΘH.
2. KAYINCI3Iik BOHbIHWA H¥CKAYIAP
Yüpeny
HcaynapbmyKnTOKblIbIbIb3.BacKapy 3neMeHTepimEnKaHe Ka6bIKbTI niCiHne naDanaHy aicimeH TaHbICIN bIbIbIbI3.
- BaIaIapFa HeMece Ocby HcyKayIapMeH TaHbC eMec aIaMdapFa eW JkaFdaJa KaTaNkBbIHTbI naIaIaHyFa pyKcat 6epMeHi3. JKeprilKiTi epexepe onepaTopdbIH KacbHa WeKtey KoIObl MymKiH.
Aaamap, acipece 6anaIap HeMece XaHyapnap KaKbIH MaHda 6oJFaH Ke3Je eWKaaHa HannaHbI3.
- OnpaTop Hemece naIanaHnybI 6acKa aIamap MeH oIapdbH JxKe MeHwirHe Tureh 3aIaN YsiH XayantbI eKHeDirH eciHizDe caKtAHbI.
- OnepaTopnap acnantbI naJdaJauhy, peTtey Xhe OHbIH JxMbIcbl 60bHJaa, cohIH iuHne TbIM calbIHFaH apeKeTTep XeHiHe TNicti OKyduh OTyI Tnic.
JaibHbIK
- 7a6by 6ab1cbHda aepaaiBm 6epiK aKnim MeH y3bH 7a16ap Knin JypiH3. Ka6dbkTbi KaHaaw aKneH Hemece aWbK caHdAn KIn KOJaHa6aHbI3.
Ka6dbI K naJaHaHbIaTbIH aMaKbI MyKnAT TeKcepin bIbI3 XHe acnAnneH JaKtbipblybl MVMkIH TaTap, ObIHbIKTap, 6TaKTap MeH cbIMap CnAaKbI 3aTTapDbI anbIn TaCTaHbI3.
- ECKEPTY - 6e3HH Θe XaHbIi 60JIbI Ta6blIaBl.
-OTbIHdbapHaHbIKoHTeHepnepdeCaKaTahbI3.
- OtbHdbI Hemece 6aKaTb OTbHbI 6ap Jaa6bIbKtbl CaTay ywiH: owaKaTap, neWtep, cy Kb3DbipFbIbTAP Hemece 6aKbInay WaMApabI He 6aCka OtaIy KΘ3JePi 6ap Θ3re KypbIbFbIaPdAn aIIaKa CaTaHbI3, ce6eBi onap OTbH 6byH OtaIbPybl MyMKiH.
- Tek cbiptta 0tbiH KyyiHbI3 XaHe 0tBiH KYIO Ke3InDe TeMeKi IeKeNeh3.
-Ko3FaTbIbIcKe Kocy aIbIHda OtbH KybIHbI3. Ko3FaTbIHx MybIc I cTeN TyFaHa HEmecbe bIcTBK 60fHaHa OtbH 6aBbIH KaKaNaFbIH aWnHaI3 HEmec 6eH3IN KyuMaHbI3.
-BeH3nH TOrin KaIca, K03FaTtKbItbIcKe KocyFa apekeTTeh6eHi3, acnantbI beH3nH TOrinre HKepeH aIbICTaTbI, 6eH3nH 6bybldbipFaHaHaOtaNDbipydbIH eKaHdai KΘ3iH TydbipMaHbI3.
-0TbIH 6aBIMeH KOHTeHepDiH 6apblK KaKaNaKtpabH KayiCi3 aJMaCtblpblHbI3.
-AkaynbIdbIb6ic6aCkbIITapdbIaIMactbIpbIb3.
-Падалану anDbHДа apdAыIM Ky3dep, KY3 60ЛТары JxHe KeckiJxNHaFbT O36aFaHbHa
неме 3aKbIMДАлмФаНьИКоЗ 3x ketki3Ii3. Tene-TeHДiKti caKtay YшIN T03FaHн hemece
3aKbIMДАлFан KY3deP MeH 60ЛТары JxNHaK 60иьИWA alMaCTbIPbIHbI3.
-ПадаланынFaH raДанб 6олatabин Kayinti a3aIty YuIN TBHbc any KOpFaHbICbH KnIn JxPyH3.
2. KAYINCI3IJK BOYbIHWA H¥CKAYAP
PaiDanaHy
KOranlanKbIbIbIaPHaHKbI,aybipFaH Hemece iuiimdiK / backa dapi-dapmek acep etkeh Knyide KondaH6aHbI3.
KOranlanKbIbIyJMyiTeKcepiTypeKeiHdeBapblkickeKockylbntapbiXHeonepataOpdbIH 6ap-koFbHb6aKbIbay KypalapbldyMbICxMbicictenTpyFaHbHaK3XeKtki3Hj3.
KeIaIaIaIbIbIbIHaIap aya paaiHnda, acipece KaTbIkaH6bIpKaayFaH KyIe naIaIIaHaB13.
Kyaanblc bipta FaHa nai danaHya 60nda, FImapat iuiHne nai danaHya KaTal Tbibm cIbHa.
Ko3FaTNTbIbTIbKayinTIyHbIbTKbIbPfBIIra36byJxHaNahyblMymKInXa6bIbKxepdeKoJaHa6aHbI3.
Eckety! KToaIaanKbIbTbI Na3aFai Kayni 6ap Jepde naIdaanHbI3.
Iybn MeH dipinDen TybHdAaTbH TayeKeIep CaHbHa3aYuHJXMybc Y3aKbTbFbH a3aNTKaHxH.
KOranlanKnblbte HeHe aFb3y HfMaIapbl, apblKtap HeMece YnHnep KaHbHa naDanaHy KeiHne caK60bnHb3.
- Tek KaHa KHydi3ri JxapbIkTa HEmeCe XaKaCbl JxacaHbl JxapbIkTa Ia6bblHb3.
Mymkih 6oJca, acnTb cyIb KOrIaDa KoIaHa6BaHb3.
- Ehjcte aepdaabim KadaamapabHb3Fa Ha3ap aydpabHb3.
Baay kpiHj3, eKauan kYripMeHj3.
- ΠΗΓρελητία ἀνΑλΜαβλί αςαπιρά εΗγίστιν 6βειήκε Κεκε-KΩπδεθεΗιηη Φαδύνινιδι, ευΚαλαην ΚοFαρύνιχα ΘΜΕη ΚΟΓαλΜανόμι.
EhjcTe 6aFbTTbI Θ3reptKeH Ke3e aMbKJha CaKbIK TaHbITbIHbI3.
Te uYfbl eHjcte 7abyfa 60maiabl.
15^ 1aMaMbHaH aptbIK KJI6eJy Xepde JYMbIc iCTMeH3.
KOranAaNkBtBtO3iH3re KapaJXbIbTyHeMeCeTapTy Ke3iHde aIpbIIka CaKbIb TaHbITbHbI3.
KOranDnB6aCk6BeTepRdi KbIe TKeHKe3De KHe KeRaIIaNkBiITbI 7a6bIaNbIH aiMaKaKa JHe aiMaKTah TaBImaJdY Ke3IHe KOraIIaNkBiITbE HKeTIy KaKeT 60JIc, KYZ(1ep)JI TOKTAbIHb3.
KopFaFbIITapbl aKaaybl HeMece caKaTaHdbIpFbIi KPyblfnapbl, Mbicbl, KaITapFbIITapbl JxHe/Hemece 10n XmHaFbIbI xoK KOraIaanKnBtB eKlAaH KOnlaHbHb3.
A6aIaHaB3:ByTIN WOIT XINHaFbIbHHeMeCe O3diirHeH Xa6bIaTbH IbIFapy CaHbIaybIXOK KToIaIaNKnBtBnI naIaNalNaHyFa 60ImaiNbI.
Ko3FaTKnBliXypicin petteriwiH petteynepiH 3reptnHe3 Hemece Ko3FaTKnBliWbI IaMaJaH apTbIK XblJdAmdaTaNbI3.
Ko3FaTnKbIiXkbIaMdbIbIh6aKbIay YuHIn OKuaynaHFaH peTeydi Θ3repTneH3 Hemece MoNfNkAuaNaMaHaB3.
KOraIaIaNbIyI KHyIeepiH HeMeC cIaTApbIH MoDIIΦNkaIaIyIayFa HeMeC OIipIyre 6oJImaIbI.
Ko3FaTnKbIbTbIcKe Koc aIbnBa6apBbIK Jx3eepJiXaHe XeTeKuI MyfTaIaPbIaXbIpaTbHbI3.
Ko3FaTKnBbIbHcaynapFa CaikecxHeaAerBbIb3dbjXy3(dep)DeH aIIaKaYCTan MyKmT icKe KocbiHbI3.
Ko3FaTKnBbIbIcKe Koc Ke3iHJe KOraIbnAknBbIbIe HKeInnEiz.
Ko3FaTKnBbIbI bHbFapy HayacbHbH anDbHnDa typbIn icKe KocNaHbI3.
KoH aaykTbai HnHaJImaJIb6OJIKTepHJXaHbIHJaHEMece aCTbIHda YcTaMaHbI. 1bIFapy caHbINaybIHAn epaaiBm aIIaKaTKpybIHbI3.
Ko3FaTKnBbI XyMbICICTEN TYpFaHda KOrTaIIaANKnBbITbKTepeMeH3 HEmec TaBImAbI3.
Ko3FaTtKbIUtBt ToKaTbHb3 XaHe OtaJIbIpy 6JItecIH CbIMbIH axbIpaTbHb3, 6apblKxblNkBaMbnI b6NIkTepeDih ToBIK ToKaTaFahbHa K3XeTIkiH3 XaHe OtaJIbIpy kJITI 6ap 6Ola, OHbIbFapblHb3.
TynHcKa HcKayapdbH ayapMaCbI
2. KAYINCI3IJK BOYbIHWA H¥CKAYAP
- BiteIeRHeJ XeRJIepDi T3aIapTy HeMeEs HayaHbI Ta3aIay aIdbIHda.
KeranlanKbIbIbI TeKcepy, Ta3aay Hemece OHbIH YcTIne XMbic iTeY aNdbHda.
- Bθrde 3aTneH coKtbIbICKaH coH. KθraIIaanKbIbITb KaTia icKe Kocy JxHe KOnlaHny aIbIHda KθraIIaANKbIbTa 3aKbIMapDbIH, 6ap-KoFbIH TeKcepi I bIbIH3 JxHe JxHDey ΘTkizH3.
-KeTanlwnKbIw KaNblncb3 dipindeBacTaC (peye TeKcepHiz).
Ko3FaJIrkBbIbIbTbIOKaTaBbIHb3XHeOaTaNbIpy6iNTecCihCbIMbIHxkbipaTbHb3,6apblIK XblNkblMaIb6OJIkTePdiHToBikTOKaTaFaBHa KΘ3XeTkciH3XHeOaTaNbIpyKiTI6ap 60nca,OHbIbFapbiHb3.
KeIaIIanKbIaTaepKaIaNbpFaHcaIbIH.
-0TbIH KUo aIbIhJa.
Ko3FaTbIi OJipyni 60fAH Ke3e Ipocenb peTteYIH a3aTbHb3 JHe K03FaTbIi Ewipy klanahbImen Ka6dbkTaFANFaH 60nca, WabdyiaaKaTaFAncoH OTbHb6epydi OwipipiHi3.
TexHnKaIbIK Kbl3MeT KOpCteTy JxHe caKtay
Ka6bIKbIH Kayinc3 JyMbIC KYiHne eKehirHe K3XeTki3y YuHn 6apblk raiKaIap, 60TTap MeH 6ypaHaIapDbI TaPbIHaF KYide YCTaHbI.
BaKtAbeH3nHi6apka6bIKTbIeWKa7AH6byawbIKXaJIbIHFaKeTyiHEMece TYTaHyblMYMKIH FImapatTA caKTamaHbI3.
KyaIbI naJaIaNFaH coH FImapat iIiHe KipMeCTe 6ypbIH KEMInDe eKI caFaTKa cbIpTTa KaIdbpy KepeK.
Ke3 KeIreH Xa6bIK KanTa caKaTaydAn 6ypbH K03FaNTKbiWtBi CyBtBiHb3; KOraJIiHaNkBiWtBi CaKaTay aIbHda Ta3aJaan IbFbHb3 XHe KYTIM KOpCetTiH3.
- Θpt 乌f Kyain H a3aHry Ywih K03FaTtKbIITbl, Dbl6bcic 6acKbIITbl, 6atape 6eImin JxHe 6eH3nH caTay aMafBih WOnTeH, XanbipaKTapdaH HeMece 7aMaDaH apTbIK MaJaH Ta3a Kynde VCTaHb13.
- ΜΟινηλίναFbιδτα Το3FaH Κεμε Εκίρινην ΚερπερπίH δαρ-χοFbɪN χγήσι Σγρά Ετκερι ΣγρβιHδι3.
- To3FaH Hemece 3aKbImdAnFaH 6JNikTeepi Kayinc3iik MaKaTaBHa aJMaCTbPbHb3.
- 0TbIH 6aBih aFbI3y KaXeT 6oJCa, oCb IpeKeTTi cbPTTa 0pBHaFaH xEh.
Kate konlmeh Texnkaibk Kb3MeT KePcTe, cKeKec KeJMeTInH KocaNbI KOMNoHEHTepi naJaNaHy HemeCe Kayinc3dik KOMNoHEHTepi Any/MoDnNkauaay HtMxEcHKe TAnBnKbIaKbKa 3aKbIM TIOI JxHe OnePaTopnap aybip JapaKaT aIybl MyMKIn.
TekKaHa YcbHbINFaH Ky3ep MeH KocaiKbI 6ONIkTepi nainaHaBHy3. TyNHcyKa eMeC 6ONIkTepi nainaHaN H aTNKeciHne acnAn Ka 3aKbIM TIOI XHe onepApTopnap JapaKaT anbl MyMKIn. KOranlanKbIHTb KaKcbi KMybIC KyHnDe CaKaTaHbI3.
Ky3di TOKtaTbI KpybIIFbI Kymbc ICTeMece, KEmek any VwH Kb3Met KOpctTy optaBfbiHa xa6apnaCbHb3.

ECKEPTy:AaHaMaJIbI JxY3re TmHeH3.

ECKEPTY: K03faNTKbIbTb TOKtaTbIN, XaKcbI XeNDeTIReH XepIe OTBH KMyblHbl3.
TynHcKa HcKayapdbiH ayapMaCbI
3.БОЛIKTEP CПИATTAMACbl

1XoFapFbI TYTKa
2 Θ3dɪrɪHEn Kʌpɒdi 6aʊkApу TʌTkAcbl
3 Kynbntay iHtperi
4 CtapTeP TtTKacbi
5 WENXINHaFbIi
6 Bniktki peTtey nHtiperi
7 ApTKbI έHrReJek
8 BynipikxanKbii
9 Byuipnik ublFapy ahpacbi
10AndbHfblDHeJreJek
11 Kybnbntay retiri
12 OtanIbIpy 6iInTeci
13 0tbH6aBbHbHKaKaNfaBf
14MaBbHbHaKaNaFb
15 Petteri 60Jt
16 Texeriwi 6acKapy TTKacbi
4. TEXHUNKAJIbIK DEPEKTEP
| Улгi | PLM2-46B150.5 |
| КозfantКыш Турi | В&S 625EXi (4 курICTi) |
| Θздгінен журетін | Иэ |
| КозfantКышТын жуMbіс Көлөмi | 150 cm3 |
| Homonhal'di Куаты | 2,2 KBT |
| Homonhal'di Хьлдам'dыБы | 2800 aйн/мен |
| Отал'dыр 6iIntecinH mapkaы | CHAMPION |
| Отал'dыр 6iIntecinH улгici | XC92YC |
| КесікEni | 46 cm |
| Жуз турi | DAYE263001465 |
| Жузdi 6ekitу м的对象 | 44~46 H.M |
| Май 6a rgbɪhɪŋ cblbɪmʌdɪbɪfbl | 470 cm3 |
| Отbing 6a rgbɪhɪŋ cblbɪmʌdɪbɪfbl | 800 cm3 |
| Отbing Tурi | 95 отinueдeнбeген (Eурona - AК山西省)92 отinueдeнбeген (Peceи) |
| Шел линаftышТын cblbɪmʌdɪbɪfbl | 60л |
| БутTO салмafы | 39,3 кг |
| HetTO салмafы | 34,1 кг |
| Биiktikti pettey | 25~75 MM, 7 pettey |
| Оператор орнындаfti[eçentelген дыбіctыкKысbIM DeH'reи | 84,8 nb(A)k=3 nb(A) |
| Еcentelген дыбіctыкКуат DeH'reи | 93,4 nb(A)k=2,21 nb(A) |
| Kenildi dny6bɪctык Kуat DeH'reи | 96 nb(A) |
| Діріn | 3,88 M/c2k=1,5 M/c2 |
BaKa KaO TbIH KYbHbI3.
Aya ta3anaFbiw 3neMeHTTI ta3anaHbI3.
-
OtanDbipy 6iInTeCiH TapbIb3.
-
0tandbipy 6iIntecine 0taIbipy 6iIntechiH cbIMbIH opHaTbIb3.
-
ΘηκTpOπTap apacbHda apaBbK opHaTbHb3 (TyMbHybFa KbI3MeT Θερcety optaBbFbI).
KaHa, dypbic 6oc apaabik OpahtbJfAn f6iTeHi oPhatbHbI3.
Aya Ta3anaFbIi 3JemeHTI aIbIIN TactaHbI3 JHe Kap6IopaTop Ta3apTbINFaHua CTapTe pApKaHbIH TapTbIHbI3 JHe aya Ta3anaFbIi 3JemeHTI opHaTbIHbI3.
-
Kap6Iopatop aKaybIbI opbIH aIIFaHda, Kap6IopatOpdbI TEK ΘKiIeTTi KbI3MeTKeP (TyTBHybIfa KbI3MET KΘpeCy tOpaJIbIbI) peTTEiy MVMkiH.
-
Otanbipy 6iTeciciH, 6iTe XaIaNFaFbIuBbIh I aKayIbIbI opbIH anFaHda, KHey JYMbICbIHTek ΘKinetTI Kb3MetKepeopbIHaybl MyMKIH, TTybIHyybIFa Kb3MET KOpceTy opTaIbIbHa Hemece B&S ΘKinetTI Kb3Met KOpceTywi dInepihe xa6apJaacblHbI3.
-
K03FaTtKbIi KbIi Icke KocblaIbI HeMece KyaTbHaH aIbIpblaIbI:
-
0TbIbI bI aFbI3bI, 6aKtbl Ta3aHaHbI3. 6aKtbl Ta3a, KaHa O TbIHMeH ToTbIbIbI3.
-
0TbH 6aTbHbIH KaKnaFbIH Ta3aJaHbI3 HEMece aJIMactbIpbHbI3.
-Aya ta3anaFbiw 3neMeHTTI ta3anaHbI3.
3.Ko3FaTkBil aKayIbI Tpype KMbic icTeuii:
KaHa, dypbic 6oc apanbIK opHaTbINFaH 6iInTeHi opHaTbIHbI3.
- Θηκτροπιαρ apacbɪHda apaɪbɪk OρHaɪtɪbɪHbɪ 3 (TʌTbɪhʊhɪfa KbɪʒMæT KΘpεγι optaɪbɪFbɪ).
-Aya Ta3aJlFaBbIi 3JIeMeHHTI Ta3aHaHbI3.
4.Ko3FaJTKbIiHaIap oTaIaIbI:
Aya Ta3aJFaBfIiH eJIeMeHTTI Ta3aJHaB13.
OyblKTapbl KoKbIcTah Ta3apTbIHbI3.
CybltKbIi Ka6bIpFaIap MeH aya XoJIaDapBIn KoKbICTaH Ta3apTbIHbI3.
- KozFaTtKbIi XoFapbl XbIbnAmdbkTa TeHcenei:
3NeKtpoIaTap apacbIHda apalbIK opHaTbHb3 (TyMbHyBbFa KbI3MeT KEpcty optaMbFbl).
-
K03FaTtKbIi KaTTbI Kbl3aDbI:
-
XaNkBbIHTaFbI, JKeJIeTkiU KOpnyCbIHdaFbIXxHe aya JxOJIapblHaFbI OyblKTapdbI KoKbICTah Ta3apTbIHbI3.
-
KərānlaanKbɪsh Kənbɪncbɪʒ Tɒpɪe iːpɪndeɪnɪdɪ:
Kv3diTapTbIbI3.
Xy3di TeHectipiHiz.
8.AcnantblickeKocyKe3iHneIbFapycaHbIaybIHa aK Tytin naJa6oanaBb:
- Byn CunHnDpre XbIjNkntbH MaIbIH XaHybHa 6aIaNbHcTbOpbIH aIaNbI. Acnan yW MInHyTTaYaKbITTa KMbICbIH XaNFaTbIPFaHda 6yN KaNbITbIXaFdain 60bnT Ta6bln DaIbI.
5.AKAYIbIKTAPDbI XOIO
-
Θ3dirinHxpydi6ackapyyTKacbiYCTanFaHKe3deKOranlanKbIiKo3FaMaIbI:
-
Benjik AkaybIfbOpbIH anFaHda, benjikTI TEK ΘKiJIeTTi Kbl3MeTKepeTeyi MVMkiH, TyTBHybIfa Kbl3MeT KePcTeY opTaIbFbHa xa6apnacbHb3.
-
Θ3diriHEn Jxpydi 6acKapy cbIMb KaTbI 6ocan KeTTi, Θ3diHEn Jxpydi 6acKapy cbIMbH TapTBHbI3: Θ3diHEn Jxpydi 6acKapy cbIMbHbIH peTteriH 6oNTbIH JxapaMdbI KYire DeinH 6paHbI3.
-
Θεπιρίην Ὀγρύς δακάργ τυτΚαcbήν ΚεταλιωπΚβιώ Μοελαίβα:
-
3diHJxpydi6acKapy cbIMbTbIMKaTbTapTbINFaH, 3diIHHxpydi6acKapy cbIMbH6ocTbHb3: 3diIHHxpydi6acKapy cbIMbHbHpeTTerIi60NTbHxapaMdbI KYire deinH 6ypaHb3.
6. KENIIJIK
0cbi OHimDi TaHaDaFaHbHb3Fa paKMeT. OHimDepi JxO6aay KHe daBihday 6apbCbHda 6i3 naIaIahyUdbIapDbIH KaKeTTNIkTePIH KaHaFaTaHdbIpaTbIH XoFapbl CanaHb KaMTaMaCb13 ety UwH 6apblIK Kyu-xirepiMdi CanaMbI3.
MAHbI3IbI! OcbI ΘHIMDi IAIДАЛAHY AIIbIHДA OcbI H¥CKAYIbIKTbI OKbIIN bIbIHbI3, HETI3I KAVIICl3Ik ECKEPTyJIePIH KAPAHbI3 XΘHE M¥KnIAT CAKTAHbI3.
OpambH aWkaH COH eHIMdi Kypactbipy yuH KKaKeTTi 6apNbIK 3IeMeHTTepDiH KINHaKaMTbJFaHbHa Ke3 KeTKi3ReH KeH, ON yuHIOcb HcaybIKTBH 2-6etIH KapaHbI3.
Erep eHIM 3aKbIMdaIaNfAH Hemece bipa3 aKaynapblbap6oJca, OHbl NaIaIaHaBbI3 XHe eH XaKbIH dyKeHre KaTapbIbI3.
Ocbl eHIM cbiPTTa faha naIdaIaHyfa apHaIFaH JxHe eIJkaFdaIa FImapat iwiHde naIdaIaHbIJMaybl Tnic.
Ohimdi FImapat iwiHe KOIO yWIn COHfBi peT naJaIaNHaH coH eKi caTaKa cbIpTTa KaIbpy KepeK.
Ctbn anfahbihb3fa paKmet. Bi3dn eHimdi nirinirihi3re naDanaHaHbIbI3.
a) BeHN 6aBbH copFbIeN 60CaTbIb3.
7. TEXHUNKAJIbIK Kbl3MET KΘPCETY, CAKTAY XΘHE TAcbIMaJIdA

ABAJIAHbI! BeH3nHdi Ka6bIK 6OImeJIepDe, aUbIK KaJIbIHFa KaKbIH MaHda XaHe T.6. Jeppe aFbI36aHbI3.
Temeki wekehiz! BezHH 6by XapbInc He Opt Kayin Tpybipy Mymkin.
b)Ko3FaTtKbIbTbI icke Kc6bn,6ykn KaIFaH 6eH3nH KOnJaHaBfNFaHwa JyMbic icTeTiH3.
c) 0TaIbIpy 6iITecIH axbipaTbHbI3.
2.KeTajIiAnKbIITbMyKInrTa3aJlanMaJIaHbI3.
-
Tot 6acydb60nlbipMay yuiH keckiSti kiKHe MaJNaHbI3.
-
KərālɪwʌnKbɪwɪt bɪ KʌpFɑK, təzə Ṣpi aɪzɪdɪn KopFɑnFɑh, pʌKcaTbɪ xɔk aɪdʌmʌpɒbɪH, KoIbɪ kætneɪtɪh Jæpɪde caKtəhɒbɪ3.
-
Θиимдл epdай bIM 6aIanapdblH KOLJI JKeTneTIH Jepde caKtaHbI3. EH JkapamdbI caKtay TemnepaTypacbl 10^ xHe 30^ apalbFbIHda.

ABAJIAHbI3! KOranlanKbIbTbI CaTaydaH 6ypbIH Ko3FaNTKbIbTbI TOJIbIKtaI cyIty KaXeT.

ECKEPTIIE:
- ΘηκTp Jαa6bɪFbɪhɪH Ke3 Keɪrɪŋ Tуpɪn Jænɪdɪ ŠmɪeɪnɪH HeMec MaTePnʌdap caKtʌlaTbɪH
Wüe6epxaháda caKaTaFah Ke3nde, Jαa6bɪKKa TOT bacydɪh aɪdɪbɪ nany Yuɪn CaKtɪk WapalapbɪH
Kɔlʌdʌy Kɑkεt. Bi3 Θɪhimdi caKtay Yuɪn TynHycKa opambl KoɪlaʌHyFa Hemece Ohbl WaHnaH
KopFay Yuɪn Xapambl MaTæmɛ Hemece Jαa6bɪHmɛn Jαa6bY Fa KeHec 6epeMi3.
-Ka6ebdepdi MaibcTbipBn Hemece 6yir anMaHb3.
TacbImaay
- ΘΗΠΟ ΘΙψιρι, K03FaΤΚΤΒΙΤΤΙ ΤυΤΙΤΙΗΙΙ.
- OtaIbIpy 6iTeciH axbIpaTbI, oTBi H 6aBbI K03FaITKbI HcayIbIbIHdaFbIHcayIap 6oIbIIa 6ocatbIHbI3. Kepi XaFdaIa OTBi aFBin KeTIN, KcJIikTePdiH eENIH Jactaybl MVMKIH.
- KɔnlaHbIaTbIb 6oIcTa, TacbImaIayFa apHaIFaH KopFaBtiWapDbI 6ekitiiH3.
- ΘHimДi ἀραίMbIM TγTΚαcbɪHaH ζγTηπ TaçbɪMaɪdaHbɪ3.
- KərəlɪwʌnKbɪtɪbɪ 6θeɪTep YcɪHeNɪTepy KeɪHne Keckiʌti MaɪbɪCTbɪpɪn He 3aKbɪMdʌn aʌmHaɪbɪz.
- ΘHIMDi Ke3 KeIreH aybip bIKpIaIaNanH HeMece KΘiK iwiHne TaCbIMaNay Ke3iHne PaIa 6Olybl MVMIH KaTbI DipijIeH KopFaHbI3.
- ΘΗΜΗΙΝΑ ΒυρFBΙΝ ΕΜΕς Κγλια ΚετγιH, 3aΚ𝑏ιΜ Μην ὄλαρΑΚαT Αγύβι Σθήδιν Μαμγ Ψιχιν ΘΗΜΙΝΑ δεκίτιHι3.
8. KOKbICKA TACTAY XÖHE KÄIITA ΘHDéY
KopwaFah opTaFa Kytim KOpceTiH3. Kypal, Kepek-JapaKTap MeH opambli PaJaHaBn 60nFaH coH KaTtAeY opTaIbIFbHa KaTApbIHbI3.
OHbI TYPmbiCTbIK KOKbicka JIAKTbpMaHbI3.
9.БОЛКTEP T13IMI BOИьИнSHAЕXFEN-TERXFENJI KΘPIHIC
Ynri: PLM2-46B150.5
9.БОЛIKTEP T13IMI BOИьИWA ERЖЕN-TERЖЕЛКΘPIHIC
Bekikrep T3iMi
| N° | Ataybl | N° | Ataybl |
| 1 | Жузdi KУлыntay 6олты | 27 | ЧьнICTIK |
| 2 | шайба | 28 | Төмэнгд кронштейн тiperi |
| 3 | 460 MMЖу3 | 29 | 4*16 челлидрлік ictiri |
| 4 | Жу3 tiperi | 30 | ЖоFaРБы Кронштейнді отbingfыш |
| 5 | Жу3 tiperiHinH TЕлkeci | 31 | M5*35 щыы 6урышы челлидрлік |
| 6 | Жу3 tiperiHinH TЕлkeci | | Бураздасы |
| 7 | ЖeteшишпВ | 32 | Кулыntay ictiri |
| 8 | М6*8 щыы 6урышы щаллak
орнау 6урандасы | 33 | Тетikтін bасьш ТАКтасы |
| 34 | серіпe |
| 9 | Жаллak кіnt | 35 | Тетik KaKnaFы |
| 10 | Чш 6урышы 6елдіk | 36 | Тетik |
| 11 | M8 щыы 6урышы 6урыntay rайkasы | 37 | Тетik KaKnaFы |
| 12 | Жаллakшаib6a | 38 | Киськ сальник |
| 13 | ST5*16 əЗдіrinen oяын 6урандасы | 39 | алдын Fы штOK |
| 14 | Белдіkti Корfasийн KaKnaK | 40 | алдын Fы KaKnaK |
| 15 | 8 діймдін Дэнгrelек KaKnaFы | 41 | M8*120 щыы 6урышы 6олты |
| 16 | 8 дійmдін Дэнгrelектін,Жабін ТАКтасы | 42 | M8*20 щыы 6урышы 6олты |
| 17 | M8 щыы 6урышы ФларецTi
КУлыntay rайkasы | 43 | bushing2 |
| 44 | ТOLКe |
| 18 | Моьыntipeк | 45 | алдын Fы TАКТа 2 |
| 19 | 8 дійmдін ДэнгrelекЖинafы | 46 | алдын Fы TАКТа 1 |
| 20 | 8 дійmдін Шан Өтізбeyтін
Дэнгrelек KaKnaFы | 47 | бас мackасы |
| 48 | аиhalу cepinnci |
| 21 | ST4*16 əЗдіrinen oяын 6урандасы | 49 | тipeуіш TАКТа |
| 22 | Жаллakшаib6a | 50 | M8*16 щыы 6урышы Фларец 6олты |
| 23 | Онжak 6урышык КронштейнЖинafы | 51 | ST4*10 əЗдіrinen oяын 6урданасы |
| 24 | сол щык 6урышык КронштейнЖинafы | 52 | 11 діймдін Дэнгrelек KaKnaFы |
| 25 | сыrtКы tipeiyìш саКинá | 53 | 11 дійmдін Дэнгrelектін,Жабін TАКТаСы |
| 26 | саныlayfa aphanfaHan mɪlɪmdi ÜctaFыш
саКинá | 54 | 11 дійmдін ДэнгrelекЖинafы |
| 55 | 11 дійmдін тісті дэнгreleк |
9. PLANO DE DESPIECE Y LISTA DE PIEZAS
3aCTepeKeHHa. Ta3OHOKocApky He MoKHa BmKOpNcTObyBaTu 6e3 NOBHcItro 3i6paHOro TpaBO36ipHnKa a60 CamO3aKpNBHorO 3aNo6ixKHnKa BmNyCKHOrO OTbOpy.
3a60pnoHc8bC06xOoHTn a60 BmMkATn CNTeMn CHyHKuII 6e3neKr Ra30HOKOcapK.
BIMKhit3yenHnHOJtaneepauipeep3anyckOMDInyHa.
-
06epejxho 3ayncttb DnBryh BiDnOBiHDo iHCTpykui, pni cboMy HOrn MaHOb 6yTu Ha DoCTaTHI BiDtai He3a (Je3).
-
He haxinui Te Kocapky, KOJI 3aŋyckaTe DnBryH.
-
He 3anzyckaia Te Dzunhy, KOJI Bn CTOITE pepeD BNyuckhm XJOLOBOM.
-
He nabnkyte pykn a6o hou n do qactnH, 10 o6epTaioTbc. 3aBXn TpImaTecb Ha BiDctahi BiD BnpyckHoro. OTbOpy.
HikonHe niiHimaiTe i He nepeHoCte ra3oHokocapky niD acp6oToi DnBryHa.
3yINHITb DInrHy i BID'cHaHTe PnOBiD cBiYK 3anaJIIOBaHN, nepeKOHaTEcB, 0o BCI pyxOMI qACTMHN NOBHICTO 3yINHINlCb, i BIMiTb KJIIOU, AIKU O Bt HcyTahOBHeHNI.
2. ПРавILA TEXHIKи БE3пЕКи
- Ipepe ycyHeHHm 3acmueHHa abo npouHcHnM JKOJ06a.
- Ipeed nepeBipkoIO, ouuueHnM a6o npOBeHnM po6I Ha ra30Hokocapci.
-Пися зіткненя зістороним п体现在Tom.песьірпіе Кокару на Наразьісь пошкоadingь.Ta Bдремontугійпетпіп\'л\'п\'л\'ьшIMВИКОРИСТАHHМ.
JaKIO rAOHOOKOcApKa POUHaC cINbHo Bi6pyBaTn (HeraHNo nepeBipTe).
3yinnHtBdunrHyiBicnHaHTe npoBid cBiuKu 3anaIIOBaHHa, nepeKoHaTeCb, 0c Bci pyxomi qactHNI NOBHCTU 3yinnHnINCb, i BnMIb KLIou, kIo CI H yCTaHOBLeHNI.
-卍opa3y,KoIN Bn BiDxOuInTe BiI ra3OHOKocAPKn.
-Перед дозаразьгелем.
3MeHHTe nOIOXeHHpepyIaTopa rAz niD yac BmKHeHHn DnBryHaTa, kAUo DnBryH 0bnAnHHn 3anipHM KlaNaHOM, BiKnIouItb NpaUy naIbHorO nicra 3aBePeHHn KocIHn.
Texhihe 06cnyrobybHaTa Ta 36epirAHn
- Yci raiK, 60ntu Ta rBHTn MaOt b 6yTu 5iNbHO 3aTyrHymn, 0o6 6bnaHaHn8 6yNo B 6e3neuHomy p6ooyomy cTahi.
Hikon He 36epiraTe npictpi i3 6eH3nHom y 6aky B 6ydiBni, ne BUnapn MoKyTb DoCARTN BiKpntoro BorHIO a60 ickop.
-Пись ВИКОРИСТАнHA ИСТРУМЕТ Ma€ 3aIIIaIaTcHb Ha BIDKpITOMy NOBITpi npINHaMHi npOTAROM DBOX rOdIN nepeD nepeMiUeHNHm y 6yIDIBNIO.
JaTe DnBryHy oxoNoHyTu nepe3 36epirAHm y 3aKpntomy npimiuHHi; neped 36epiraHHam nouCTbTe ra3OHOKocapKy Ta npoBeiTb ii 06cnyroByBaHHa.
ДяЗMeHSeHЯ рИЗнКУ BИNHKHeHЯ NOJexki TpIMaTe DnBryH, rIyUHNK, aKymЛТOPHIN BiDcIK TaMiCze 36epiraHЯ 6eH3InHy uCtMm BiD TpaBn, nIcTЯ a6O HAdNsky MaCTnla.
- Yacto pepebipnye TpaB036ipnHK na ppeMeT 3HOweHnA a6o noXkoJxehn.
3noohehi ta nookjxehi qactnHn 3aminltb 3apaDn 6e3neKn.
Jkuo Heo6xio 3nntn pannbo 3 npinbHoro 6aka, ce cnip po6nTu nadbopi.
- HenpaBnIbHe 36epirAHH, BnKOpNCTaHH HeBIDNoBdHX 3aNaChNX aCTHN a60 BnDaJIeHH YI 3MHeHH KOMPOnHeTt CBCTeMM 6e3NeKN MoKe npu3BeCTN Do NpOkoJXeHH Ra3OHokCapKn i cepo3HO TpaBMvBaHH OpeaTopa.
3aBxDn BOKOpNCTOByTe peKOMeHDoBaHi HOXi Ta 3aNaChi qactHH. BOKOpNCTAHHeOpRiHaJIbHNx DeTaeJeM MoKe npu3BeCTn Do NOUKOJxEHN iHCTpyMeHTa Ta TpaBMyBaHHonepaTopa. TpMaIte ra3OHokCapky B raphomy po6oMy cTahi.
JaKIO npIcTPI 3yUnHKn Ie3a He npaioE, 3BepHITbc4 Do cepBicHorO cHTpy No donomory.

NONEPEDXEHHA. He TopkaTecsJe3a, 0o o6ePaTeBcA.

NONEPEJXEHH.3a npabIyTe nalbHM y do6pe BeHTnIbOHaHOMy Micci, 3 BmKHeHIM DvRyHOM.
3. ONIC KOMIOHEHTIB

1 Bepxna pyka
2 PyuKa BMnKaHHa camoxiHOro peXIMy
3 CtoonopnBaxkib
4 PyuKa cTapTepa
5 TpaBo36ipHnK
6 BaxiNb perynIOBaHHa BnCOTn
7 3aundKoileco
8 BiuHa 3acyBka
9 KaHaI 60KoBOr BOuKnIy
10 IpepeHneKoIeCo
11 Ctonopha pyka
12 Cbiyka 3anaJIIOBaHHa
13 Kpnska naJIbHoro 6aka
14 KOBnauOK OINBHNi
15 PerynIOBaJIbHn 6oJT
16 Puyka kepyBaHHraIbMoM
4. TEXHIYHIXAPAKTEPNCTUKN
- Kocapka HeHopMaJIbHo Bi6pyc:
3aTARHITb HIX.
-36aIahcyIteHIX.
8.Якwoпд aczanycky ichtpymeHa 3 BuxlonHOrO oTbOpy BuxOuHt b iInn Dm:
-Le cnpuHHeHO roipHHaM MaTnla, 10 pyxaETbC B UcInHdp. Ie HopMaJI3yETbC8, KOnI INCTpyMeHT npOIOBxkyBaTmpePauIOBAtn pnp6bn3HO TpXXBUNH
5.BNBAHNEHHA TAYCYHENHHECNPABHOCTE
- Kocapka He pyxa€tcb, KOJI N Bu CTnCKa€te pyky BMnKaHnCa moXiDHO peKmMy:
-ypa3i HecnpabHocti peMeHryIoropeRyIIOBaHHoMooze 3diIChIOBaTnca TInbKN BNOBHOBAxHeHM nepcoHaJOM, 3BepHiTbcra do ueHTpy o6cnyROByaHHa KJIeHTiB.
Tpoc KepyBaHHa CamOXiDnHm pexHMOM 3aHaT0 BilbHn, 3atgHtB Tpoc KepyBaHHa CamOXiDnHm pexHMOM: 3akpyTitb peryIIOBaIbHn 6oJIT Tpoc KaepyBaHHa CamOXiDnHm peXHMOM Do BiIDNObIDHoro noloxeHHa.
- Kocapka pyxaetbca, KOJI N BI He CTnCKaTe pyuKy BMUNKaHrCa moXiDHO peKIMy:
Tpoc KepyBaHHa camoxiHmpeKumom 3aHaTTo 0iJIbHO 3aTgHeHn, nocna6Te Tpoc KepyBaHHa camoxiHm peKumom: 3akpytib perynIOBAlbHn 6oIT Tpoca KepyBaHHa camoxiHm peKumom Do BiINOBiHOrO nIoXeHH.
6. IPAAPTIA
ДякуемВамзавибipцboro Виробу.Розробляочи та вiroтobляочи нашу npodukio,Mн дokладаemicMO BCix 3ucinь,么63a6e3neuHTn BiIMHHyЯкICTb,ЯKa BiINOBiJaEnotpe6am KopructybaivB.
BAXJIHBO! IPOUHTAITE IHCTPyKcIIO NEPED BUKOPUCTAHHrM cboTO BnPO6y, JOTPUMYITECb OCHOBHIX NOpEPEJXeHb 0OIO BE3NEKN, AKI MICTaTbcR B HII, I 3BEPIAITE II B HAdiHOMY MICU.
IouHO BV BiKpnTe ynaKOBky, Mn peKomeHdyEmo nepeBipuTn, YN B Hi E Bci eJeMeHTN, Heo6xHni dny 3bupHH Bnp6y. NIB. cToPiHKy 2 bOro noci6Hnka.
JaKIO BnI6 NpOkoJKeHn a6o Ma€ DeΦeKTn, He BnKOpNCToBvIte Ioro Ta NOBepHITb Ioro do NaH6nXJyOrO Ma3unHy.
Ley Bupi6 np3hauhen tiIbKn IyBnKOpntaHna HbIkpntomy nobitpi. He BnKOpntOByTe Noro BCEpeuHi 6yDIBI3 aXoJHnx O6CTabuHn.
LcE Bnip6 MoKHa nepeMictuN BCEpeDunHy 6yDIBni JIiue niCJr TORO, kB iN nocToaB DbI rOuHn NiCJr OCTaHHbOro BnKOpNCtAHn.
Pemont i 3amHa qaTIn He noIOBjxIb nOaTKOBOro rapaHTnHOrO cToKy.
Гарашия He пошюкъся Ha HecnpaBHOCTi, NO'3aHi 3 HopMaJIbHIM 3HOCOM a60 HENpaBnIbHIM BUKOpIcTaNHЯm BIVo6y. Lc, 3OKpeMa, CTocyETbC 3HOCy nepeMnKauIB, 3aNo6IXHKNkIB Ta MoTOpIB.
3BepHtB yBary, 00 IJIe NpBnIX KpaIH icHyIOb CneuaIbHi yMOBn rapaHTII. Y pa3i cUmHbY 3BepHtBCa B Micpe npOdaJy.
Дл розгл Any npeteh3i 3a rapahtiio maoIb 6ytn DoTpmaHtaki yMOBn:
- Heo6xiHnO haTaTn NiTBePdxJeHHNoKOpKN
KoDi CTOpOHnOc6n He npOBOnuPemOnT Ta/ab03amHy DeTaJIe.
-Пюблема He Ma€ 6byTи NOB'3aHa 3i 3BvuaHIM 3HOCM.
- 06OB'ЯЗКОВI peMOHTIpo6OToTа 06ClyroBvBaHHaBkoHaHoHaJIeJxHIM YINHOM.
- Hema n ooiKOJxHb yHaCniOk HenpaBnIbHO BCTaHOBHeHHaKap6IopaTopa
-ДоИСТPyMeNTa He 3aCTOCOByBaIIN CnIy, BiH He 3a3HaB HeNpaBnIbHOrO IOBOJKeHHa, HeD03BOJIeHO BnKOpNCaHHa a6o abapii
- Hemaоншкдхь hyacniok neperpiby, zacmiiehn6noka BeHTnIaTopa.
Bupi6 He peMOHTyBaJaHeKbAJIiΦIKOBaHa OcOba, iNoRo He peMOHTyBaHn HnPaBnIbHo.
- INCTpyment/AkymyIaTOp/3apdHn npicrpi HixTo hikoJI He po36npaB i He BiKpNbAe.
- INCTpyMeHT/akymyIaTOp/3apAHynI npIcTpiH nikoHne nepe6yBaB y BOnoromy cepedobu (pocA,doU,3aHypeHryyBoDyToIO)
- He BUKOPICTOBByBaIncsHeBIDNObiDHi DeTani, DeTani He BiD STERWINS, OcklbKn BOHn e npuHNO BHXOy 3 naNy
- IHCTpymeHT He BnKOpNCtOByBaBcR HEnpaBunbHo (nepeBaHTaKeHHra IHCTpyMeHa a60 BnKOpNCTaHHr HecXBaIeHOro npuJaDJa).
- Hemaé noшкожehb bID II 3OBHiHIX ΦakTopiB uN CTOpOHHix ppeImeTiB, HanpNKlaad nicky kn KamiHHa.
- Hemaэ пошджевунслійк НedoТриманг рекомпдцій i3 6e3neкітін ta iHCTpykцii 3 ekplnyataquii.
Bupi6 MaE BUKOpNCTOByBaTncb y 3BnuaHnX yMOBaX ekCnpyataqii, a He nI pyoPeciHnx cinei. Tomy rpaHTia He po3noBcIOJxgyETbcra Ha BnpO6n, Ioo BUKOpNCTOByOTbcra KOMnaHiamM 3 6laorOCTpoTo Ta 03eJIeHHe, MicceBIMN OprHaAMn BnAa, a TAKOX KOMnHiamM, aKi nponohyOt b OnpauyBaHm a6o 6e3OpNaTHn pOkaT o6laadHnn.
7.Доглад,36EPIAHHI ITPAHCIOPTYBAHHI
Do i nici Koxhoro BnKOpnstahn nepeBipIte IHcTpMeH t akceCyapn Ha npEIMeT 3HOWeHHa Ta noiKOJxehn. Y pa3i notpe6n 3amHItb ix Ha HOBI bIDNObIDHO do ciE i HCTpykci.
IOTpIMyTeCbTexHicnHexBmOr.IpeedKoKHM BkOpncTahHmpeBipTe pBeHb NaINBa Ta MOtOpHOro MaCTnla,doaIte NaJInBO Ta MaCTnIO,AKUO BOHN Ha Hn3bKOMy pIBHi.
Bidiomocti npo 06cnyrobyBaHnI DeTaneIe DmryHa nIB. B noci6hNkY 3 ekcnnyatauii.

PONEPJXEHH!IiD qac po60Tu3 pIXyUIM npnCTpoEM i nO6n3y HbOro Hocitb 3axnChi pykabuyn! BkOpncTObuYte haneKHi nCtpmEnT dIy npouuHn8 3acmueHb! HikOnn He po6Itb zuBo rOTo mPykamn!

PONEPEJXEHH! -ДяЗamIHи BnKOpNCTOByTe TINbKN opurHaJIbHI 3aIaChi YactHNI. He BCTahOBJIouTe pIXyUH pnucTpiB 6yDb-ЯKOrO iHwOrO tyn!

PONPEJXEHH! 3aminy pixyuro pncstpoMa€ BnKohyBaTn DocBIDueHn KopncTyBaH! Pemont a6o 3atoeHHNHOxIB peKoMeHnycBcDopyaTu npaicIBHKAM cepBichoro zentpy a60 faxibm 3 ananorioHIO KBaJIiFikaicIoo!
1.Плдтуму Te Deky ta pixyun npicrtpi y uciCTOTI ta npi6upaiTe 6yd-b-aje cmiTЯ. Budanayte CkOseHy TpaBy 3 BunyckHoro koloba.
2. NepioDnHNo neped noaTkOM pO6OTn nepeBipraHte, uN 3aTargHeo BcI rAkn Ta 60NTn. Picna TpNbALrO BVKOpNCTAHn, Oc6bNBO Ha NiUaHnx rpyHTax, pIXyUn npCtpi 3HOuYETbcra Ta qactkoBv BTPaue nepBicHy oPmy. 3MeHwYeTBcEeKTUBHICTb KociHH, i pIXyUn npCtpi CnID 3amInTu.
3.ПлдгмуITE pIXIчИnpICTpI rOCTPIM,иO6 3a6e3neHTn IorO rApHy pIXIyU 3daTHiCtB. 3amHITb 3HOWeHn QI NIOsKOJKeHn pIXIyH nPcTPI Ha HOBm TOrO Jx TnPy a6o dOpuyIb Ioro 3aToUYBaHN KBAJIΦIKOBaHOMy φaxiBIO.
4.3aminitb pixyuyn npictpi Ha hOBni toro x tiny.
5. 3MauyTe pixyuHn npictpi niCJI KOKHOrO BVKOpNCaHHa, IIO6 npoOBxHTu TepMIn CnyXb npixyoro npictpoTo Ta Bvpo6y. Haecitb IerKe MaunHHe MaCTnlo Ha KpaI pIXyoro npictpoNo BCiDobxHi.
6. IpebipaIte TpaB036ipHnK nepei KoxHM BnKOpNCaHHaM. He BnKOpNCTOByTe Ioro B pa3i BnBJIeHHa 6yDb-IAkX NIOxOkoJKeHb.
7. Ouiny Te TpaB036ipHn KicIa BvKOpncTaHHa BOIOU 3 M'JAKM MUNOM.
8.ДаиTeТраьо3бірніку Добpe Виcoхнуті пeperд 3бepiragнham,цoБ ункнуtnnoBnПлснв.
9. NpebipraTe pO60Tu npOoBIOB npei KOxHm BnKOpNCTaHHM. IOnpocIb KBaIIiΦIKOBaHO CneuiJnicTa BiDperyIIOBAtu, kkuo Heo6xIDHO.
36epirahnHa:
Длготовки ra30HOKocapkn Do 36epirahnСлд ВикоганТакдii:
1.CnpoJHnTb 6ak, JAKUO Bn He 36npaTeC8a BkOpNCTOBvBaTN Bpi6 npToTgOM TpNBaIoro Yacy (6ilbue 30 nHB), a TaKoX Npeed 3UMOBIM 36epiraHHM.
a) CnpoXHnTb naIbHN bak 3a dOnomOrIO BCMOKtYBaIbHorO HacoCa.
Model: PLM2-46B150.5

9. VEDERE IN SPATIU Şİ LISTA PIESELOR COMPONENTE
Lista pieselor componente
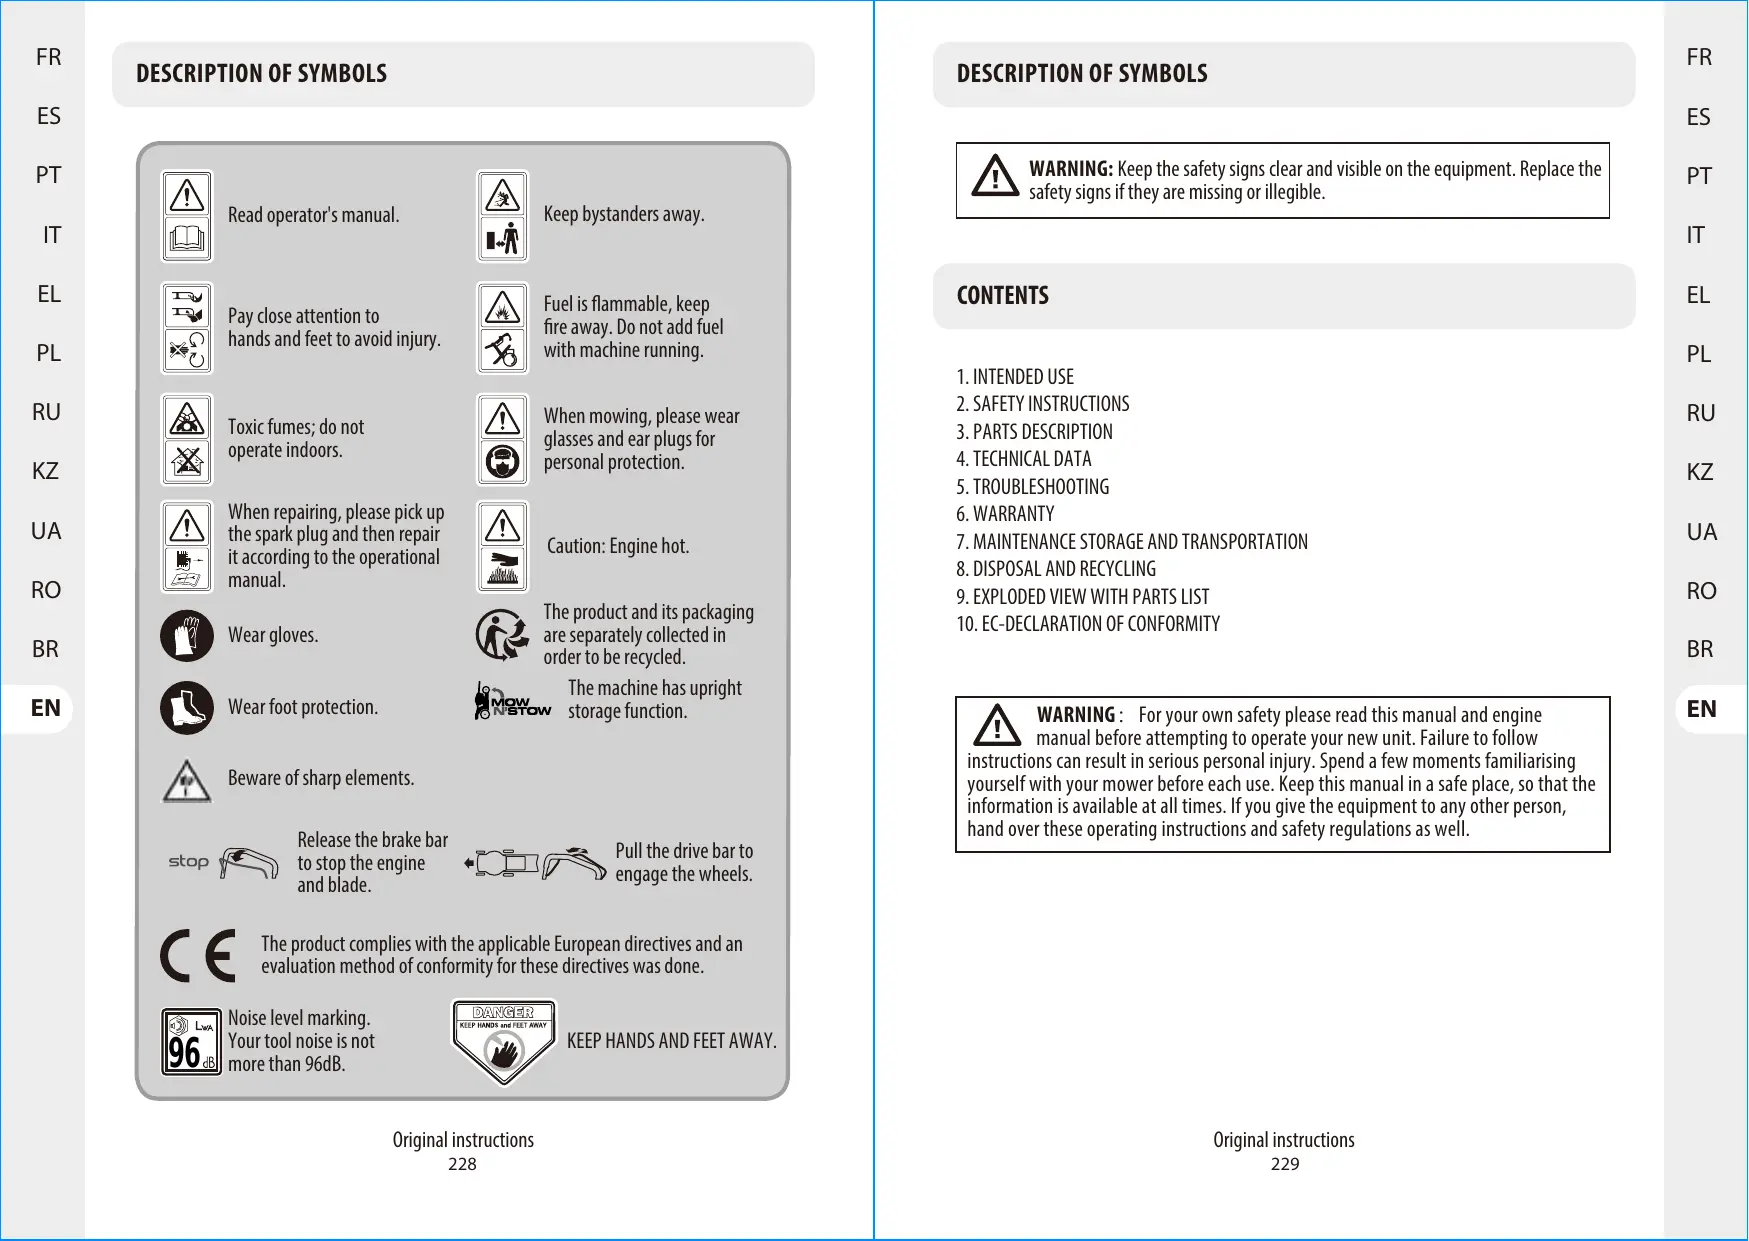
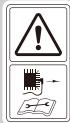
Read operator's manual.
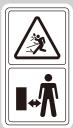
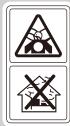
Keep bystanders away.
Pay close attention to hands and feet to avoid injury.
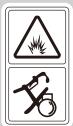
Fuel is flammable, keep fire away. Do not add fuel with machine running.
Toxic fumes; do not operate indoors.

When mowing, please wear glasses and ear plugs for personal protection.
When repairing, please pick up the spark plug and then repair it according to the operational manual.
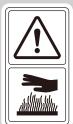
Caution: Engine hot.

Wear gloves.

The product and its packaging are separately collected in order to be recycled.

Wear foot protection.

The machine has upright storage function.

Beware of sharp elements.
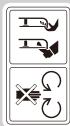
stop

Release the brake bar to stop the engine and blade.

Pull the drive bar to engage the wheels.

The product complies with the applicable European directives and an evaluation method of conformity for these directives was done.

Noise level marking. Your tool noise is not more than 96dB.

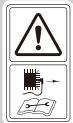
KEEP HANDS AND FEET AWAY.
DESCRIPTION OF SYMBOLS

WARNING: Keep the safety signs clear and visible on the equipment. Replace the safety signs if they are missing or illegible.
CONTENTS
- INTENDED USE
- SAFETY INSTRUCTIONS
- PARTS DESCRIPTION
- TECHNICAL DATA
- TROUBLESHOOTING
- WARRANTY
- MAINTENANCE STORAGE AND TRANSPORTATION
- DISPOSAL AND RECYCLING
- EXPLODED VIEW WITH PARTS LIST
- EC-DECLARATION OF CONFORMITY

WARNING: For your own safety please read this manual and engine
manual before attempting to operate your new unit. Failure to follow instructions can result in serious personal injury. Spend a few moments familiarising yourself with your mower before each use. Keep this manual in a safe place, so that the information is available at all times. If you give the equipment to any other person, hand over these operating instructions and safety regulations as well.
1. INTENDED USE
The equipment may only be used for the tasks it is designed to handle. Any other use is deemed to be a case of misuse. The user/operator and not the manufacturer will be liable for any damage or injuries of any kind caused as a result of this.
The petrol lawn mower is intended for private use i.e. for use in home and gardening environments.
Private use of the lawn mower assumes an annual operating time generally not exceeding 50 hours, during which time the machine is primarily used to maintain small-scale, residential lawns and home/hobby gardens. Public facilities, sporting halls, and agricultural/forestry applications are excluded.
Please note that our equipment has not been designed for use in commercial, trade or industrial applications. Our warranty will be voided if the machine is used in commercial, trade or industrial businesses or for equivalent purposes.
The operating instructions as supplied by the manufacturer must be kept and referred to in order to ensure that the lawn mower is properly used and maintained. The instructions contain valuable information on operating, maintenance and servicing conditions. Important! Due to the high risk of bodily injury to the user, the lawn mower may not be used to trim bushes, hedges or shrubs, to cut scaling vegetation, planted roofs, or balcony-grown grass, to clean (suck up) dirt and debris off walkways, or to chop up tree or hedge clippings. Moreover, the lawn mower may not be used as a power cultivator to level out high areas such as molehills.
For safety reasons, the lawn mower may not be used as a drive unit for other work tools or toolkits of any kind.
2. SAFETY INSTRUCTIONS
WARNING: When using petrol tools, basic safety precautions, including the following, should always be followed to reduce the risk of serious personal injury and/or damage to the unit. Read all these instruction before operating this product and retain these instructions for future reference.
WARNING: This machine produces an electromagnetic field during operation. This field may under some circumstances interfere with active or passive medical implants. To reduce the risk of serious or fatal injury, we recommend persons with medical implants to consult their physician and the medical implant manufacturer before operating this machine.
2. SAFETY INSTRUCTIONS
Training
- Read the instructions carefully. Be familiar with the controls and the proper use of the equipment.
- Never allow children or people unfamiliar with these instructions to use the lawn mower. Local regulations may impose age restrictions on the operator.
- Never mow while people, especially children, or pets are nearby.
- Keep in mind that the operator or user is responsible for accidents or hazards caused to other people or their property.
- Operators must receive proper training in the use, adjustment and operation of the machine, including prohibited operations.
Preparation
- While mowing, always wear substantial footwear and long trousers. Do not operate the equipment when barefoot or wearing open sandals.
- Thoroughly inspect the area where the equipment is to be used and remove all objects, such as stones, toys, sticks and wires, which can be thrown by the machine.
-
WARNING-Petrol is highly flammable.
-
Store fuel in containers specifically designed for this purpose.
-
For storing fuel or equipment with fuel in tank: store away from furnaces, stoves, water heaters or other appliances that have pilot lights or other ignition sources because they can ignite fuel vapors.
-
refuel outdoors only and do not smoke while refueling.
-
add fuel before starting the engine. Never remove the cap of the fuel tank or add petrol while the engine is running or when the engine is hot.
-
if petrol is spilled, do not attempt to start the engine but move the machine away from the area of spillage and avoid creating any source of ignition until petrol vapors have dissipated.
-
replace all fuel tank and container caps securely.
-
Replace faulty silencers.
- Before using, always visually inspect to see that the blades, blade bolts and cutter assembly are not worn or damaged. Replace worn or damaged blades and bolts in sets to preserve balance.
- Wear breath protection to reduce the risk of exhaust gas.
2. SAFETY INSTRUCTIONS
Operation
- Do not use the lawn mower while being tired, ill or under influence of alcohol or other drugs.
- Regular checking the lawn mower, ensure that all starting interlocks and operator presence controls are properly functioning.
- Do not use the lawn mower in the bad weather especially in the thunder rain day.
- The tool can only be used outdoors, and in no case in a building.
- Do not operate the engine in a confined space where dangerous carbon monoxide fumes can collect.
- Warning! Do not use the lawn mower when there is a risk for lighting.
- It is recommended to limit the duration of operation, in order to minimise the risks from noise and vibration.
- Be careful when using the lawn mower on slopes and near drop-offs, ditches or embankments.
- Mow only in daylight or in good artificial light.
- Avoid operating the equipment on wet grass, where possible.
Always be sure of your footing on slopes.
- Walk, never run.
- For wheeled rotary machines, mow across the face of slopes, never up and down.
Exercise extreme caution when changing direction on slopes.
- Do not mow excessively steep slopes.
- Do not operate on inclines greater than 15^ .
- Use extreme caution when reversing or pulling the lawn mower towards you.
- Stop the blade(s) if the lawn mower has to be tilted for transportation when crossing surfaces other than grass, and when transporting the lawn mower to and from the area to be mowed.
- Never operate the lawn mower with defective guards, or without safety devices, for example deflectors and/or grass catchers, in place.
- Caution: The lawn mower shall not be operated without either the entire grass catcher or self-closing discharge opening guard in place.
- Do not change the engine governor settings or overspeed the engine.
- Do not alter or tamper with any sealed adjustment for the engine speed control.
- The lawn mower safety systems or features shall not be tampered with or disabled.
- Disengage all blades and drive clutches before starting the engine.
- Start the engine carefully according to instructions and with feet well away from the blade(s).
- Do not tilt the lawn mower when starting the engine.
- Do not start the engine when standing in front of the discharge chute.
- Do not put hands or feet near or under rotating parts. Keep clear of the discharge opening at all times.
- Never pick up or carry a lawn mower while the engine is running.
- Stop the engine and disconnect the spark plug wire, make sure that all moving parts have
2. SAFETY INSTRUCTIONS
come to a complete stop and, where a key is fitted, remove the key.
- Before clearing blockages or unclogging chute.
- Before checking, clea ning or working on the lawn mower.
- After striking a foreign object. Inspect the lawn mower for damage and make repairs before restarting and operating the lawn mower.
- If the lawn mower starts to vibrate abnormally (check immediately).
- Stop the engine and disconnect the spark plug wire, make sure that all moving parts have come to a complete stop and, where a key is fitted, remove the key.
- Whenever you leave the lawn mower.
- Before refueling.
- Reduce the throttle setting during engine shut down and, if the engine is provided with a shut-off valve, turn the fuel off when finished mowing.
Maintenance and storage
- Keep all nuts, bolts and screws tight to be sure the equipment is in safe working condition.
- Never store the equipment with petrol in the tank inside a building where fumes can reach an open flame or spark.
- After use, the tool must be left outdoors for at least two hours before entering inside a building.
- Allow the engine to cool before storing in any enclosure; Clean and maintain the lawn mower before storage.
- To reduce the fire hazard, keep the engine, silencer, battery compartment and petrol storage area free of grass, leaves, or excessive grease.
- Check the grass catcher frequently for wear or deterioration.
- Replace worn or damaged parts for safety.
- If the fuel tank has to be drained, this should be done outdoors.
- Improper maintenance, use of non-conforming replacement components, or the removal or modification of safety components can damage the lawn mower and injure the operators seriously.
- Only use the blades and spare parts recommended. The use of non-genuine parts can damage the machine and injure the operators. Keep the lawn mower in good working condition.
- If the blade stopping device doesn't work, please contact service centre for help.

WARNING: Do not touch rotating blade.

WARNING: Refuel in a well-ventilated area with the engine stopped.
3. PARTS DESCRIPTION
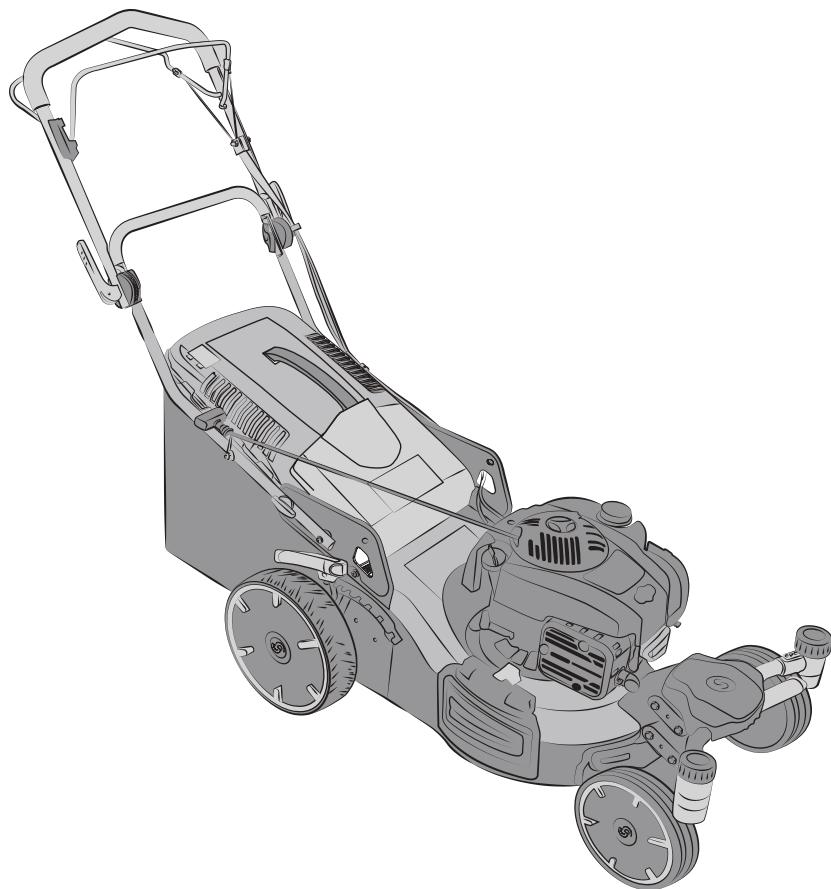
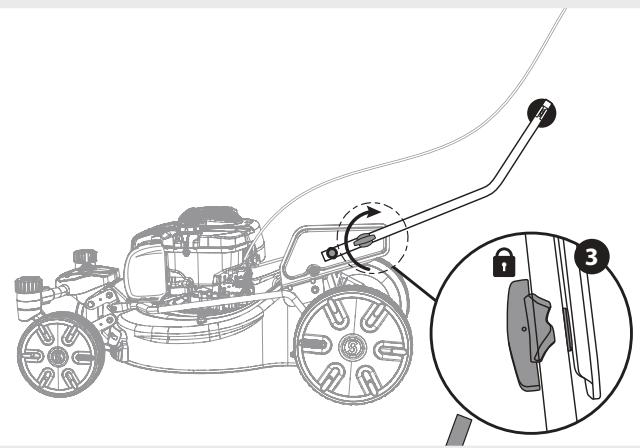
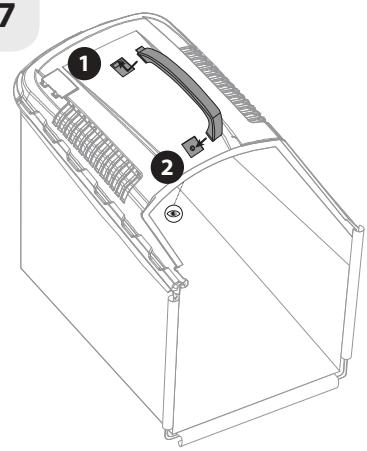
1 Upper handle
2 Self-drive control handle
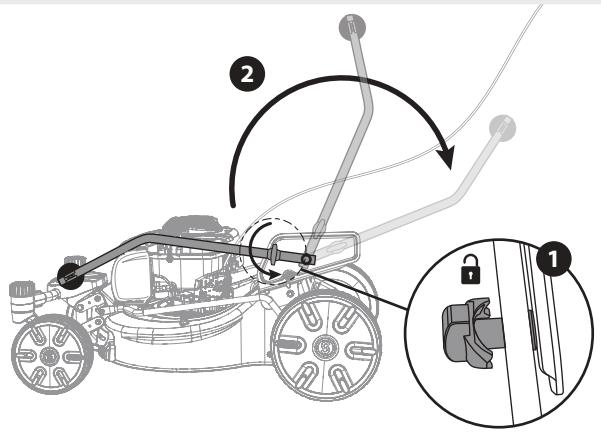
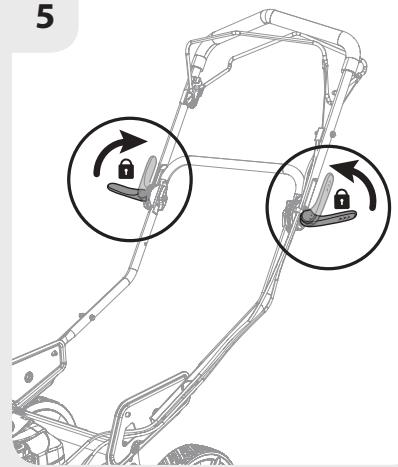
3 Locking lever
4 Starter handle
5 Grass catcher
6 Height adjusting lever
7 Rear wheel
8 Sideward flap
9 Side discharge channel
10 Front wheel
11 Locking knob
12 Spark Plug
13 Fuel cap
14 Oil cap
15 Adjusting bolt
16 Brake control handle
4. TECHNICAL DATA
| Model | PLM2-46B150.5 |
| Engine type | B&S 625EXi (4-stroke) |
| Self-propelled | Yes |
| Engine displacement | 150cm³ |
| Nominal power | 2.2kW |
| Rated speed | 2800/min |
| Spark brand | CHAMPION |
| Spark model | XC92YC |
| Cutting width | 46 cm |
| Blade type | DAYE263001465 |
| Blade tightening torque | 44~46N.m |
| Oil tank capacity | 470 cm³ |
| Fuel tank capacity | 800 cm³ |
| Fuel type | 95 unleaded (Europe - US)
92 unleaded (Russia) |
| Grass catcher capacity | 60L |
| Gross weight | 39.3kg |
| Net weight | 34.1kg |
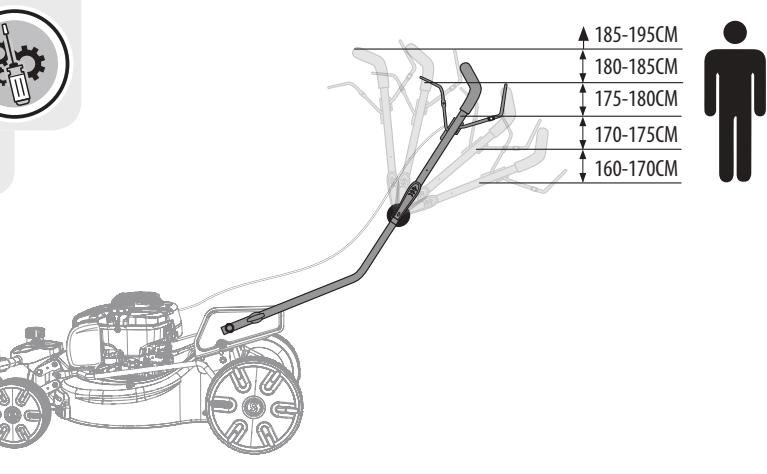
| Height adjustment | 25~75mm,7adjustment |
| Measured sound pressure level at operator's position | 84.8dB (A)
k=3 dB (A) |
| Measured sound power level | 93.4dB (A)
k=2.21dB (A) |
| Guaranteed sound Power level | 96dB(A) |
| Vibration | 3.88m/s²
k=1.5 m/s² |
5. TROUBLESHOOTING
In you encounter some problems with this tool, please follow these solutions. If you cannot resolve your problem, please contact our service agent.
- Engine does not start:
-Fill tank with fuel.
Clean air cleaner element.
Install spark plug wire on spark plug.
- Set gap between electrodes (customer service center).
Install new, correctly gapped plug.
-
Remove air cleaner element and pull starter rope continuously until carburetor clears itself and install air cleaner element.
-
Carburetor malfunction, carburetor adjustments can only be done by authorized personnel (customer service center).
-
Spark plug malfunction, spark plug connector malfunction can only be done by authorized personnel, please contact customer service center or B S authorized service dealer for service.
-
Engine difficult to start or loses power:
-
Drain fuel and clean tank. Fill tank with clean, fresh fuel.
Clean or replace fuel tank cap.
Clean air cleaner element.
- Engine operates erratically:
Install new, correctly gapped plug.
- Set gap between electrodes (customer service center).
Clean air cleaner element.
- Engine idles poorly:
Clean air cleaner element.
-
Remove debris from slots.
-
Remove debris from cooling fins and air passages.
-
Engine skips at high speed:
-
Set gap between electrodes (customer service center).
-
Engine overheats:
-
Remove any debris from slots in shroud, blower housing, air passages.
-
Mower vibrates abnormally:
-Tightenblade.
Balanceblade.
-
White smoke appears in the exhaust port when starting the machine:
-
It is caused by the burning of the oil that moves into the cylinder. It will be normal when the machine continues to operate for about three minutes
5. TROUBLESHOOTING
-
Mower doesn't move while grasping the self-drive control handle:
-
Belt malfunction, belt can only be done by authorized personnel, please contact customer service center.
-
The self-drive control wire is too loose, tighten the self-drive control wire: Screw the adjusting bolt of self-drive control wire to a suitable position.
-
Mower moves without grasping the self-drive control handle:
-
The self-drive control wire is too tight, loosen self-drive control wire: Screw the adjusting bolt of self-drive control wire to a suitable position.
6. WARRANTY
Thank you for choosing this product. Upon designing and manufacturing our products, we place all of our efforts into ensuring an excellent quality that meets the needs of the users.
IMPORTANT! PLEASE READ THIS MANUAL BEFORE USING THIS PRODUCT, FOLLOW THE BASIC SAFETY WARNINGS WITHIN, AND KEEP IT CAREFULLY.
As soon as you open the packaging, we recommend that you check to ensure that all elements required for assembly of the product have been included, in order to do this, please refer to page 2 of this manual.
If the product is damaged or has some defects, please do not use it, and bring it back to the nearest store.
This product is intended for outdoor use only, and must not be used inside a building under any circumstances.
This product can be placed inside a building only after having rested for two hours after the last use.
We thank you for your business and hope that you will be totally satisfied upon using our product.
We will be happy to receive all of your remarks on our online store web site.
Warranty
STERWINS products are designed based on the most rigorous quality standards for products intended for the general public.
The products are covered with a warranty of 3 years starting from the date of purchase. This warranty covers all manufacturing or material defects.
6. WARRANTY
- If purchasing a Sterwins lawn mower with a deck made of galvanized steel, the deck is covered with a 10-year warranty against corrosion.
In the event of a breakdown, please refer first to the troubleshooting page (problems and solutions) in the brochure; if the problem persists, please check with the nearest store.
Your store shall spare no effort in resolving the issue.
Repairs and change of parts do not extend the duration of the initial warranty.
Breakdowns resulting from normal wear and tear or from improper use of the product are not covered by the warranty. This includes, among others, the switches, the safety circuit breaker and the motors, in case of wear.
Please note that there are specific warranty terms for certain countries.
In case of doubt, please check with your point of sale.
For claims relating to the warranty to be taken into account, the following is required:
Providing proof of purchase
- That no repairs and/or change of parts have been performed by a third party.
- That the issue is not a matter of normal wear and tear.
- That required maintenance and repair works have been performed correctly.
- That no deterioration has taken place as a result of incorrect setting of the carburetor
- That there has been no forcing, improper handling, unauthorized use, or accidents
- That no deterioration has taken place due to overheating, resulting from clogging of the ventilator block.
- That no work has been done on the product by an unskilled person, and no incorrect repairs have been attempted.
- That the tool/battery/charger have never been disassembled or opened.
- That the tool/battery/charger have never been in a wet environment (dew, rain, submerged in water...)
- That no incorrect parts have been used, parts not made by STERWINS, whereas they prove to be the cause of deterioration
- That the tool has not been used improperly (overloading the tool, or use of non-approved accessories).
- That no damage has resulted from external causes, or foreign bodies such as sand or stones.
- That no damage has resulted from non-compliance with safety recommendations and use instructions.
The product must be used under normal usage circumstances, and for non-professional purposes. Therefore, excluded from this warranty are products used by landscaping companies, local authorities, as well as companies offering paid rentals or free loaning of equipment.
7. MAINTENANCE, STORAGE AND TRANSPORTATION
Before and after each use, check the product and accessories for wear and damage. If required, exchange them for new ones as described in this instruction manual. Observe the technical requirements. Check the level of the fuel and engine oil before each use, add the fuel and the engine oil if it is under the low lever.
Please refer to the B&S operator's manual for the maintenance of the engine parts.

WARNING! Wear protective gloves when working on the cutting device and close to it! Use proper tools to remove debris! Never use your bare hands!

WARNING! Always use original spare parts for replacement. Do not attach any other type of cutting device!

WARNING! The replacement of the cutting device should be done by an experienced user! Rework or sharpening blades is not recommended unless it is done by a repair service or a similarly qualified specialist!
- Keep the deck and cutting device clean and free of debris. Remove clippings from the discharge chute.
- Check all nuts and bolts periodically for tightness before operation. After prolonged use, especially in sandy soil conditions, the cutting device will become worn and lose some of the original shape. The cutting efficiency will be reduced and the cutting device should be replaced.
- Keep the cutting device sharp to ensure a good cutting performance. Replace a worn or damaged cutting device with a new one of the same type or have it sharpened by a qualified specialist.
- Replace the cutting device with a new one of the same type.
- Lubricate the cutting device after each use to prolong the life span of cutting device and product. Apply light machine oil along the edge of the cutting device.
- Inspect the grass catcher before each use. Do not use it if you find any damage.
- Clean the grass catcher after operation using water and mild soap.
- Let the grass catcher dry thoroughly before storing to avoid mildew.
- Check the performance of the wires before each use. Ask a qualified specialist to adjust it if necessary.
Storage:
The following steps should be taken to prepare lawn mower for storage.
- Empty the tank if you are not going to use the product for an extended period of time (more than 30 days) and before storing it for the winter.
a) Empty the petrol tank with a suction pump.
7. MAINTENANCE, STORAGE AND TRANSPORTATION

CAUTION! Do not drain the petrol in closed rooms, in close proximity of open fire, etc. Do not smoke! Petrol fumes can cause explosion or fire.
b) Start the engine and let it run until it has used up all remaining petrol.
c) Disconnect the spark plug.
2. Clean and grease the lawnmower carefully.
3. Slightly grease the cutter to avoid corrosion.
4. Store the lawnmower in a dry, clean and frost-protected place, out of reach of unauthorized persons.
5. Always store the product in a place that is inaccessible to children. The ideal storage temperature is between 10^ and 30^ .

CAUTION! The engine must have completely cooled down before storing the lawnmower.
NOTE:
- When storing any type of power equipment in an unventilated or material storage shed, care should be taken to rust-proof the equipment. We recommend using the original package for storage or covering the product with a suitable cloth or enclosure to protect it against dust.
- Be careful not to bend or kink cables.
Transportation
- Switch the product off and allow the engine to cool down.
- Disconnect the spark plug wire and empty the fuel tank according to the instructions in the engine manual. If not, the fuel could flow down and soiled the floor of the vehicles.
- Attach transportation guards, if applicable.
- Always transport the product by its handle.
- Ensure not to bend or damage the cutter when pushing the lawnmower over obstacles.
- Protect the product from any heavy impact or strong vibrations which may occur during transportation in vehicles.
- Secure the product to prevent it from slipping or falling over, damage and injury.
8. DISPOSAL AND RECYCLING
Be environmentally friendly. Return the tool, accessories and packaging to a recycling centre when you have finished with them.
Do not put it in the domestic waste.
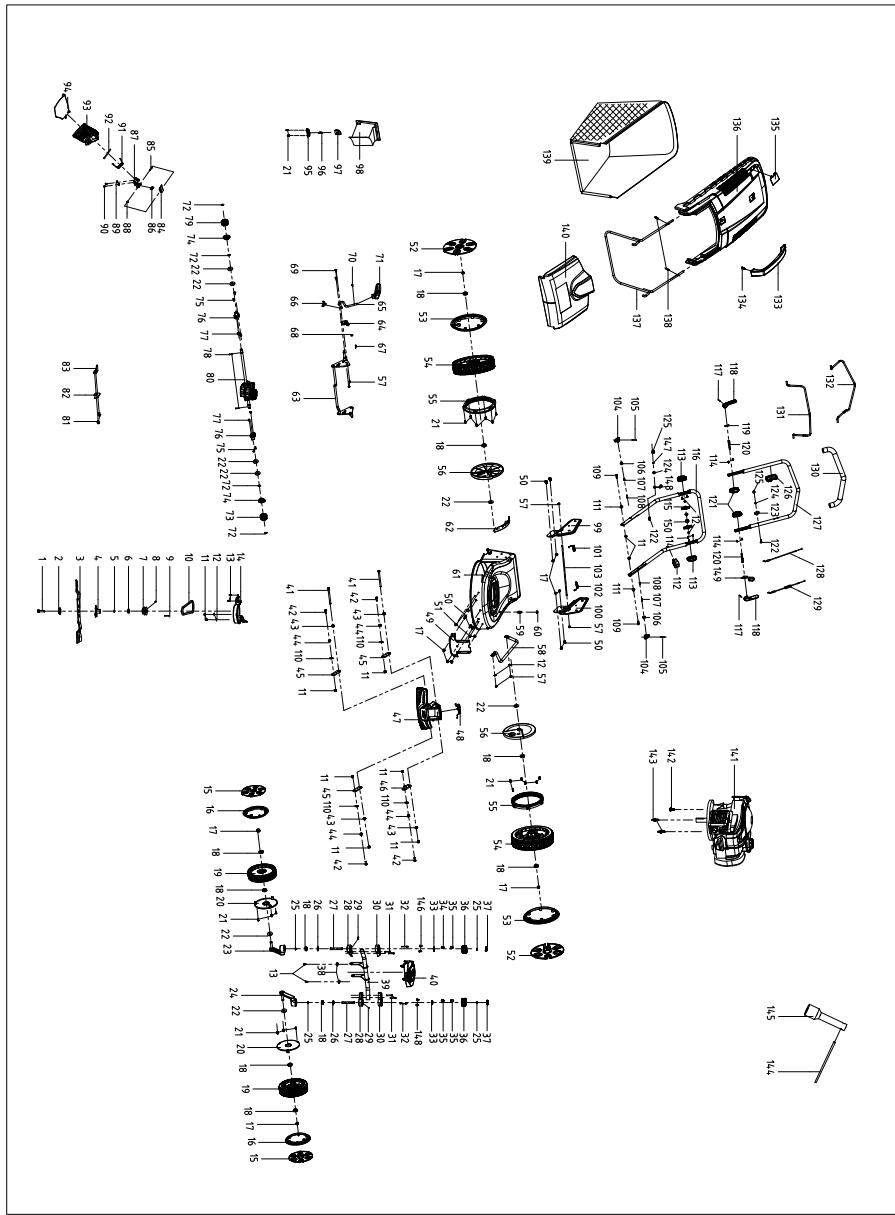
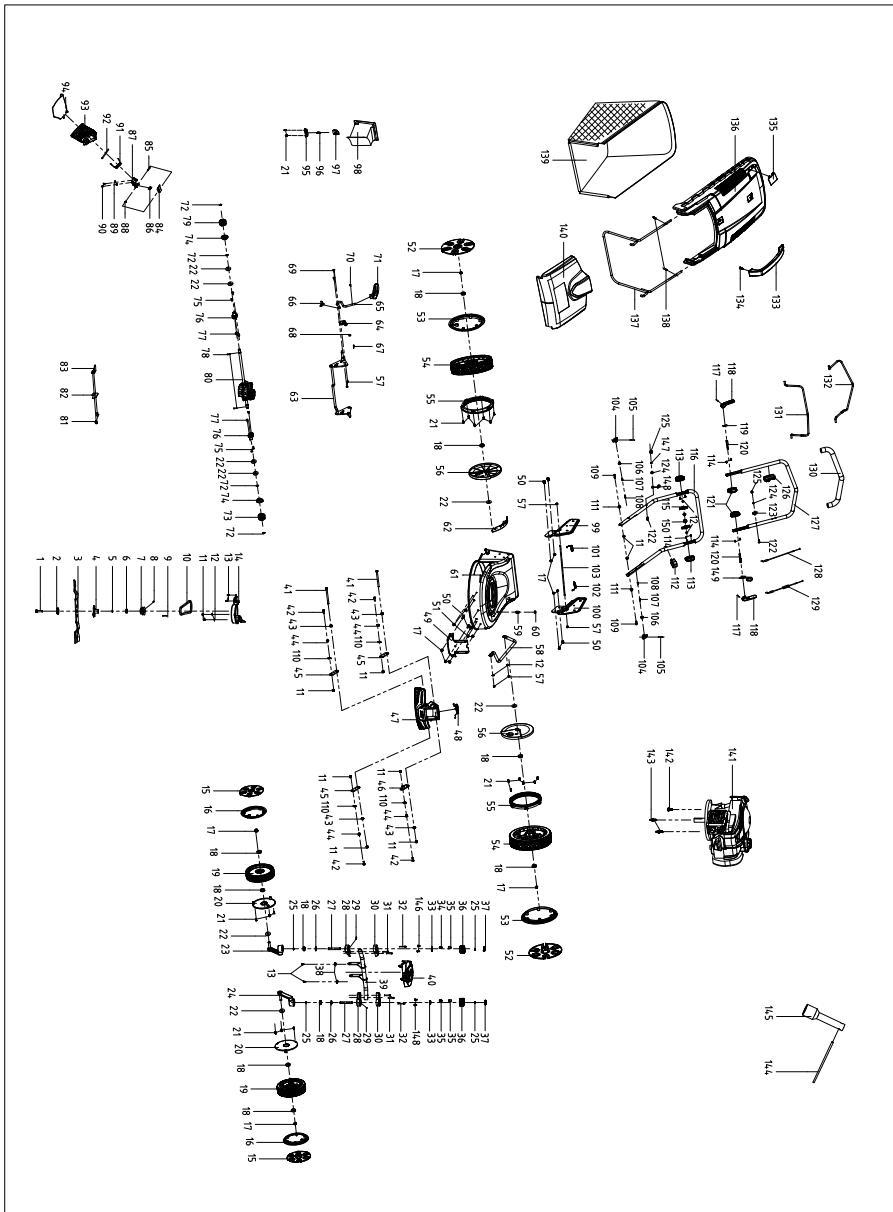
9. EXPLODED VIEW WITH PARTS LIST
Model: PLM2-46B150.5

9. EXPLODED VIEW WITH PARTS LIST
Parts list
| No. | Name | No. | Name |
| 1 | blade locking bolt | 31 | M5*35 hexagon cylindrical screw |
| 2 | dish washer | 32 | locking pin |
| 3 | 460mm blade | 33 | knob pressing plate |
| 4 | blade support | 34 | spring |
| 5 | blade support bushing | 35 | knob cap |
| 6 | blade support bushing | 36 | knob |
| 7 | driving pulley | 37 | knob cap |
| 8 | M6*8 hexagonal flat set screw | 38 | curved gasket |
| 9 | flat key | 39 | front rod |
| 10 | triangle belt | 40 | front cover |
| 11 | M8 hexagon locking nut | 41 | M8*120 hexagon bolt |
| 12 | flat washer | 42 | M8*20 hexagon bolt |
| 13 | ST5*16 self-tapping screw | 43 | bushing2 |
| 14 | belt protective cover | 44 | bushing1 |
| 15 | 8" wheel cover | 45 | front plate2 |
| 16 | 8" wheel cover plate | 46 | front plate1 |
| 17 | M8 hexagon flange locking nut | 47 | head mask |
| 18 | bearing | 48 | torsion spring |
| 19 | 8" wheel assembly | 49 | support plate |
| 20 | 8" dustproof wheel cover | 50 | M8*16 hexagon flange bolt |
| 21 | ST4*16 self-tapping screw | 51 | ST4*10 self-tapping screw |
| 22 | flat washer | 52 | 11" wheel cover |
| 23 | right axle bracket assembly | 53 | 11" wheel cover plate |
| 24 | left axle bracket assembly | 54 | 11" wheel assembly |
| 25 | external circlip | 55 | 11" wheel gear |
| 26 | elastic retaining ring for hole | 56 | 11" dustproof wheel cover |
| 27 | long pin | 57 | hexagon locking nut |
| 28 | turn down bracket seat | 58 | connection rod |
| 29 | 4*16 cylindrical pin | 59 | washing connector |
| 30 | turn up bracket seat | 60 | o size ring |
9. EXPLODED VIEW WITH PARTS LIST
| No. | Name | No. | Name |
| 61 | deck | 93 | side discharge flap |
| 62 | height adjusting board | 94 | side discharge protecting cover |
| 63 | rear axle assembly | 95 | knob pressing plate |
| 64 | handle fixed board | 96 | spring |
| 65 | height adjusting rod | 97 | plug-in locking knob |
| 66 | height adjusting torsion spring | 98 | mulching kit |
| 67 | Φ2.5*16 cotter pin | 99 | right handle bracket |
| 68 | flat washer | 100 | left handle bracket |
| 69 | M6*14 cross-recessed pan head screw | 101 | right torsional spring |
| 70 | M6*12 tooth screw | 102 | left torsional spring |
| 71 | height adjusting lever assembly | 103 | long lod |
| 72 | opening washer | 104 | locking lever |
| 73 | left output gear assembly | 105 | 2*14 cylindrical pin |
| 74 | padding block | 106 | bearing sheath |
| 75 | M6*16 tooth screw | 107 | lower handle spring |
| 76 | rear axle sheath | 108 | pin |
| 77 | M6 all-metal hexagon flange locking nut | 109 | M8*31 inside hexagon special bolt |
| 78 | Φ5*21.5 cylindrical pin | 110 | wave washer |
| 79 | right output gear assembly | 111 | bearing sheath |
| 80 | gearbox assembly | 112 | cable clamp |
| 81 | M6*12 hexagon flange bolt | 113 | lower adjusting gear |
| 82 | limit plate | 114 | ST3*10 self-tapping screw |
| 83 | fix board | 115 | knob |
| 84 | locking block | 116 | lower handle |
| 85 | locking block fixed axle | 117 | 5*20 cylindrical pin |
| 86 | locking block torsion spring | 118 | locking lever |
| 87 | Side discharge cover fixed plate | 119 | compacting sheet |
| 88 | opening washer | 120 | locking lever bolt |
| 89 | spring washer | 121 | upper adjusting gear |
| 90 | M5*10 tooth screw | 122 | M6*35 hexagon flange bolt |
| 91 | side discharge flap torsion spring | 123 | cable fixed block |
| 92 | side discharge locating shaft | 124 | flat washer |
9. EXPLODED VIEW WITH PARTS LIST
| No. | Name | No. | Name |
| 125 | M6*13 cap nut | 138 | ST4.2*18 self-tapping screw |
| 126 | bar limit block | 139 | grass catcher |
| 127 | upper handle | 140 | rear cover assembly |
| 128 | flameout cable assembly | 141 | petrol engine assembly |
| 129 | driving cable assembly | 142 | triangle self-tapping bolt |
| 130 | handle sheath | 143 | M8*25*17 special bolt |
| 131 | flameout rod | 144 | Φ8*110mm socket wrench spanner |
| 132 | driving rod | 145 | 80mm socket wrench |
| 133 | grass catcher handle | 146 | ST3*10 self-tapping screw |
| 134 | ST4.8*19 self-tapping screw | 147 | spring washer |
| 135 | lever indicator | 148 | cable hook |
| 136 | grass catcher cover board | 149 | cable hook |
| 137 | grass catcher bracket | 150 | M8 hexagon nut |
| ADEO Services
135 rue Sadi Carnot
CS 00001
59790 Ronchin-France |
| Declare that the product:
Petrol Lawn mower
Model: PLM2-46B150.5 |
| meets the requirements of the following Council directives:
Machinery Directive 2006/42/EC
EMC Directive 2014/30/EU
NOISE Directive 2000/14/EC, Annex VI and 2005/88/EC
Measured sound power level: 93,4 dB(A)
Guaranteed sound power level: 96 dB(A) |
| And conforms to the following norms
EN ISO 5395-1:2013+A1:2018
EN ISO 5395-2:2013+A1:2016+A2:2017
EN ISO 14982:2009 |
| Notified Body for EC Directive 2000/14/EC:0036
TÜV SüD Industrie Service GmbH
Westendstrasse 199·80686 München·Deutschland |
| Serial No:Please refer to the back cover page
Last two numbers of the year CE year marking applied:18 |
| Richie PERMAL
Supplier Quality Leader
Authorized representative of JulienLedin, ADEO Quality Leader
ADEO Services 135 Rue Sadi Carnot - CS 00001 59790 RONCHIN – France
Signed in Shanghai 06/09/2018 |