USER MANUAL KA4814 SEVERIN
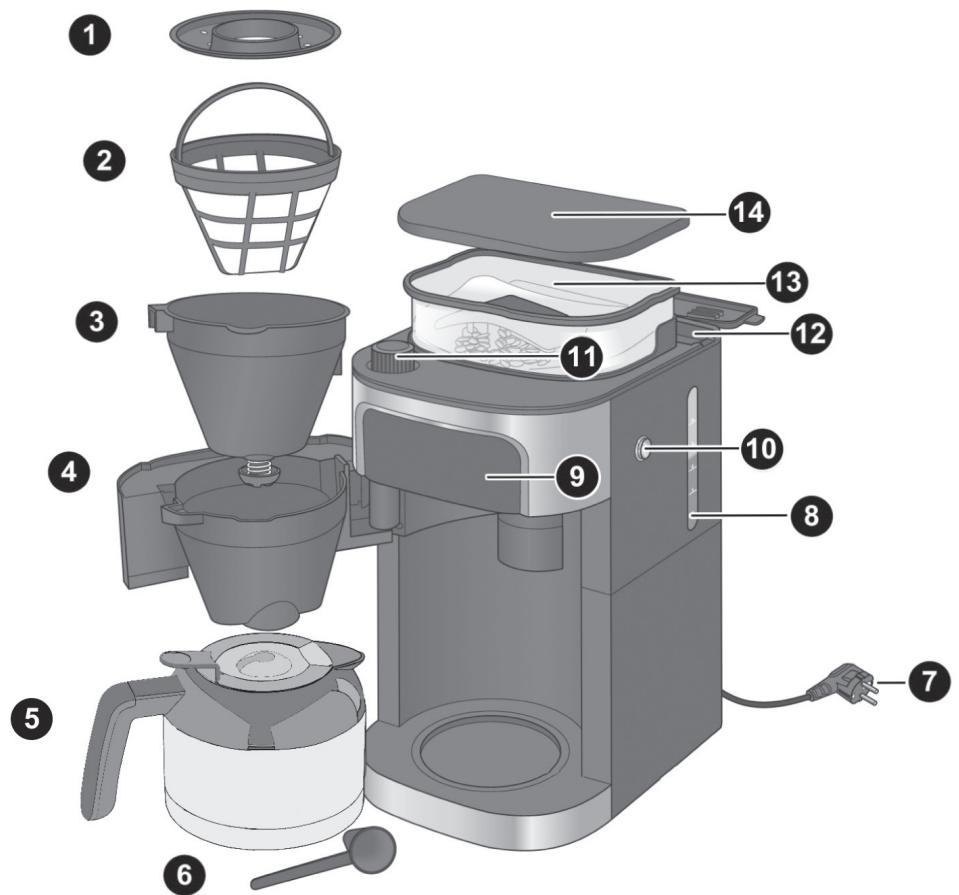
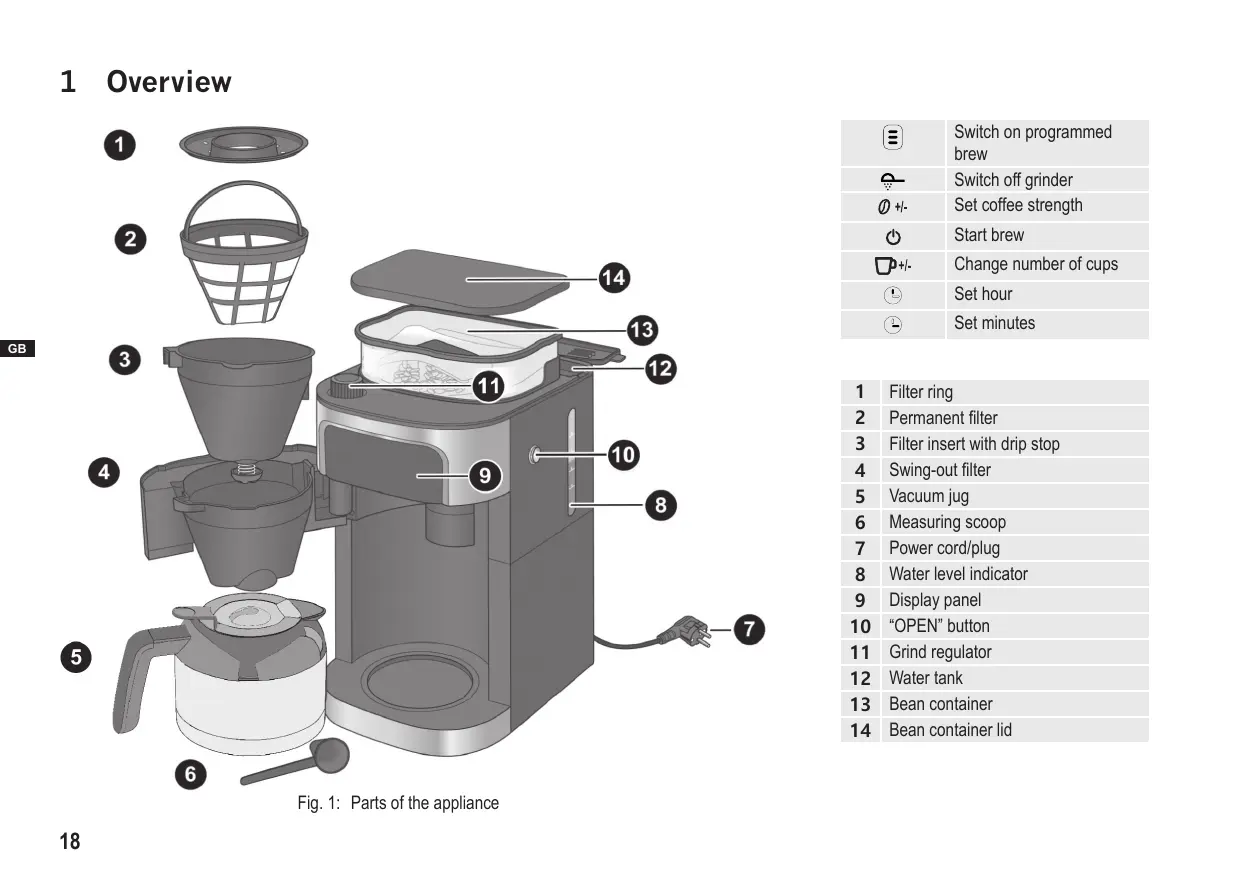
Fig. 1: Parts of the appliance
| 三 | Switch on programmed
brew |
| ♀ | Switch off grinder |
| ∅ +/- | Set coffee strength |
| ♂ | Start brew |
| □+/- | Change number of cups |
| ⓷ | Set hour |
| ⓹ | Set minutes |
| 1 | Filter ring |
| 2 | Permanent filter |
| 3 | Filter insert with drip stop |
| 4 | Swing-out filter |
| 5 | Vacuum jug |
| 6 | Measuring scoop |
| 7 | Power cord/plug |
| 8 | Water level indicator |
| 9 | Display panel |
| 10 | “OPEN” button |
| 11 | Grind regulator |
| 12 | Water tank |
| 13 | Bean container |
| 14 | Bean container lid |
Table of contents
1 Overview 18
2 For Your Safety 20
3 Technical data 24
4 Preparing the appliance 25
5 Preparing coffee. 25
5.1 With coffee beans 26
5.2 With ground coffee 27
6 Brew programming. 28
7 Cleaning the appliance 29
7.1 After brewing 29
7.2 Daily cleaning 30
7.3 Running water through the appliance 30
7.4 Descaling the appliance 31
7.5 Cleaning surfaces 31
8 Troubleshooting 31
8.1 Remedying problems yourself 31
8.2 Accessories and spare parts 32
9 Storage and disposal 32
9.1 Storing the appliance 32
9.2 Disposing of the appliance 32
Dear Customers,
We hope you will enjoy your high-quality SEVERIN product and thank you for placing your trust in us.
The SEVERIN brand has stood for durability, German quality and development power for more than 120 years. Each appliance is manufactured and tested with care.
With the proverbial thoroughness, precision and honesty of the Sauerland, this family-owned company in Sundern has been winning over customers around the world since its establishment in 1892.
In the eight product groups coffee, breakfast, kitchen, grilling, household, floor care, personal care, and cooling & freezing, SEVERIN offers a complete range with more than 250 products. The right product for every occasion!
Get to know the wide range of SEVERIN products; visit us at
www.severin.de or www.severin.com.
Your SEVERIN team
2 For Your Safety
Follow the operating instructions
Read the operating instructions completely before using the appliance. Keep the instructions in a safe place for future reference. If you give the appliance to somebody else, also give them the operating instructions.
Non-observation of these instructions can cause severe injuries and damage to the appliance.
Important notes for your safety are highlighted in the operating instructions as shown below. Be sure to follow these instructions to prevent accidents and damage to the appliance:
| WARNING!
Indicates notes that must be adhered to in order to prevent the risk of injury or fatal injury. |
| ! | CAUTION!
Indicates notes that must be adhered to in order to prevent the risk of material damage. |
| ○ | TIP
Emphasises tips and other useful information. |
Hazards for certain persons
Particular groups of people are at an increased risk:
- This appliance may be used by children over 8 years of age and by persons with reduced physical, sensory or mental capacities or a lack of experience and/or knowledge if they are supervised or if they have been instructed on safe use of the appliance and have understood the risks resulting from use of the appliance.
- Cleaning and user maintenance must not be carried out by children, unless they are 8 years old or older and are supervised.
Keep the appliance and its power cord away from children younger than 8 years of age.
Children must not play with the appliance.
- Keep children away from the packaging material. It presents a suffocation risk.
Correct use
WARNING: Misuse of the appliance can result in injuries. The appliance is designed solely for the purpose of brewing coffee from roasted, ground or whole coffee beans. Any other use is deemed improper use and can cause personal injuries and damage to the appliance. The appliance is designed for household use or use in a similar environment, e.g.
- in kitchens for employees in stores, offices and other commercial areas;
on agricultural estates;
- by customers in hotels, motels and other residential facilities;
in bed-and-breakfast facilities.
It is not suitable for commercial use, e.g. in the catering industry.
The appliance is not designed to be operated with a timer or separate remote control system.
Power
Since the appliance is operated with electrical current, there is a risk of receiving an electric shock. Be sure to follow the precautions mentioned below:
- Only connect the appliance to a properly installed, earthed safety outlet socket (minimum 10 A fuse). Do not use any extension cords or multi-outlet sockets.
- Only operate the appliance if the voltage specified on the rating plate matches the voltage of your outlet socket.
- Make sure that the power cord is not kinked or pinched and that the power cord and the appliance do not come in contact with heat sources (e.g. cooking plates, gas flames).
- When you pull the power cord out of the outlet, always pull directly on the plug. Never carry the appliance by the power cord.
- Never immerse the appliance in water or other fluids, do not clean it under running water, and do not place it in the dishwasher.
- Never touch the power plug with wet hands.
-
Never operate the appliance outdoors.
-
Even when the appliance is switched off, the inside of the appliance is live as long as the power cord is plugged into the outlet socket.
- The appliance is only disconnected from the mains if the power cord is disconnected.
- Disconnect the power plug before you fill the appliance with water.
- Always unplug the appliance from the outlet socket after use.
- If a dangerous situation or defect occurs, unplug the appliance from the outlet socket immediately. For this reason, make sure that the outlet socket, to which the appliance is connected, is easily accessible at all times.
- Disconnect the power cord out from the socket before you clean or carry out maintenance work on the appliance, or when assembling or disassembling it.
- Never remove screws from the appliance to open it and never carry out any technical modifications.
Risk of scalding
The appliance heats up water and keeps it hot, thus posing a risk of scalding.
- A soiled outlet can cause hot liquid or steam to spray out. Make sure that the outlet is clean.
- Never open the swing-out filter while the coffeemaker is in operation.
Poor hygiene
Bacteria can form in the appliance due to poor hygiene:
- Empty and clean the vacuum jug, the filter insert and the permanent filter daily.
- Empty the complete appliance if you are not going to use is for a longer period of time.
- Change the water daily to prevent germ contamination.
- Clean the appliance regularly, "7 Cleaning the appliance" on page 29.
- Descale the appliance regularly, "7.4 Descalining the appliance" on page 31.
The use of improper cleaning agents harbours health risks:
- Only use the cleaning agents and utensils described in these operating instructions to clean the appliance.
Risks for the appliance
Damage can be caused by handling the appliance incorrectly.
- Place the appliance on a dry, level, non-slip, heat-resistant surface which will not react with the rubber feet.
- The device must not be operated in a closed cupboard.
- Never set up the appliance on a hot surface or near strong sources of heat.
- Do not allow the power cord to dangle to avoid a potential trip hazard.
- Only fill the water tank with cold, fresh tap water. Warm/hot tap water or other liquids can damage the appliance.
- Do not use caramelised or sugar-coated coffee beans.
- Do not use unroasted coffee (green, unroasted coffee beans) or mixtures containing unroasted coffee beans, as they can damage the appliance.
- Do not fill the coffee bean container with ground coffee.
- Before you stow the appliance, disconnect the power cord and let the appliance cool off completely.
In case of a defective appliance
A defective appliance can cause material damage and injuries:
- Always check the appliance for damage before use. In the event that you detect damage due to transport, immediately contact the dealer where you have purchased the appliance.
- Never operate a defective appliance. Never operate a appliance that has fallen down.
- If the appliance's power cord is damaged, it must be replaced by the manufacturer or their customer service department or a similarly-qualified person to prevent hazards.
- The appliance does not contain any parts that you can repair yourself. Repair work must only be carried out through SEVERIN customer service department (see "Service Centres" on page 187).
3 Technical data
| Type of appliance | Coffee maker with grinder and vacuum jug |
| Appliance designation | KA 4814 |
| Voltage | 220–240 V~, 50 Hz |
| Power | 850–1000 W |
| Dimensions (W x H x D) | 215 mm x 430 mm x 315 mm |
| Weight | approx. 4.8 kg |
| Water tank | 1100 ml (8 cups) |
| Auto power-off | after 5 minutes |
| Identification |
| Do not dispose of as household waste! |
| Lid of the coffee jug - open. |
| Lid of the vacuum jug - close. |
| The appliance conforms with all EU directives that are binding for CE certification. |
4 Preparing the appliance
- Remove all protective films and other packaging material from the appliance.
- Set up the appliance in a place that fulfils the following conditions:
Near a socket outlet with earthing contact (fuse at least 10 A)
Horizontal and free from vibration/shocks
Heat-resistant
- Does not react to rubber pads
- Away from heated or flammable surfaces and objects (>1 m)
- Away from walls (>15 cm)
- Clean the appliance as described under "7.2 Daily cleaning" on page 30.
- Run water through the appliance as described under "7.3 Running water through the appliance" on page 30.

TIP
A beep is emitted to confirm each button press. These button sounds can be switched off. The beeps emitted after the brewing/warming processes cannot be disabled!
- Press the + l button for 2 seconds. You will see "O" and "O O" flashing on the display.
- Press the + l button
: button sounds switched on
:button sounds switched off
→ Wait a few seconds. The most recent option displayed will be applied.
Setting the time

TIP
You must first set the time to ensure the programming function works correctly. If you do not wish to use this function you can skip setting the time.
- Repeatedly press the "L" button to set the hour.
- Repeatedly press the "0" button to set the minutes.
The time is now set.
5 Preparing coffee

WARNING!
Risk of scalding!
- Do not place parts of the body under the drip stop while the appliance is in operation.

CAUTION!
To avoid damaging the appliance only fill the water tank with cold tap water.
Blooming function

TIP
In order to retain a more full-bodied coffee aroma, the device is equipped with an Blooming function. The coffee grounds are moistened with hot water before brewing. It can swell up, the coffee taste becomes more intense.
-
Press the “ ^+/- ” button for 2 seconds. You will see “ ” and “ ” flashing on the display.
-
Press the ^+ / - button.
: Blooming function switched on
: Blooming function switched off
→ Wait a few seconds. The most recent option displayed will be applied.

TIP
The display switches off 5 minutes after making coffee or, if coffee is not made, 1 minute after the last entry. To switch it on again, press the "O" button.

TIP
You can interrupt the brewing function at any time by pressing the "O" button. Water remains in the water tank when you interrupt the brewing function. Empty the water tank by removing the disposable coffee filter or permanent filter from the filter insert, placing the empty vacuum jug into the device and continuing operation after pressing the "O" button followed by the "O".
5.1 With coffee beans

CAUTION!
Make sure that the water tank is closed when filling the bean container to prevent the obstruction of the water system with coffee beans.
- Remove the bean container lid.

CAUTION!
Do not use unroasted, caramelised or sugar-coated coffee beans.
- Add no more than 200g of coffee beans to the bean container.
- Replace and firmly press down the lid.
- Press the "OPEN" button on the side of the appliance to open the swingout filter.
- Place the filter insert in the swing-out filter.
- Place a disposable coffee filter in the filter insert.

TIP
You can also use the permanent filter instead of a disposable coffee filter.
- Fit the filter ring onto the filter insert.
- Close the swing-out filter.
- Remove the vacuum jug.

TIP
Fill the vacuum jug only up to the required number of cups as all the water is used for brewing. One cup is approx. 125 ml.
- Fill the vacuum jug with cold tap water up to the required number of cups.
- Open the water tank.
- Pour the water into the water tank until it reaches the desired amount of cups.
- Empty out residual water inside the vacuum jug.
-
Place the vacuum jug with lid into the device.
-
Plug the power plug into the socket. Press the “ ” button.
The appliance switches on automatically. The time and the current settings are shown on the display.
-
Press the “ + ” button to set the number of cups matching the amount of water.
-
Press the +i· button to set the strength of the coffee:
·:mild
: medium
:strong
- Press the "O" button.
The “ ” and “ 念 ” buttons will light up. The appliance starts the brewing process by initially grinding the coffee beans. The “ 念 ” symbols appear on the display when the appliance starts brewing the coffee.
19. Wait until the appliance beeps 3 times and the " ” symbol goes out.
The coffee is ready. Push down the flap on the jug lid in order to pour out coffee.
Adjusting the grind
!
CAUTION!
Adjust the grind only while the appliance is grinding the coffee beans otherwise the grinder may be damaged.
0
TIP
A fine grind is recommended for a light roast and a coarse grind for a dark roast. The roast is normally printed on the coffee packaging.
- Prepare coffee with coffee beans, "5.1 With coffee beans" on page 26.
- Wait until the appliance grinds the beans.
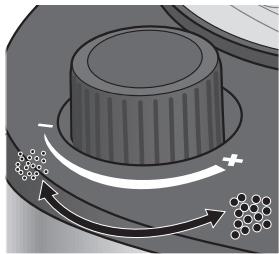
Fig. 2: Adjusting the grind
-
Set the grind regulator to the required grind.
-
Turn the regulator clockwise towards “-” to grind the coffee finer.
- Turn the regulator anticlockwise towards “+” to grind the coffee coarser.
5.2 With ground coffee
- Press the "OPEN" button on the side of the appliance to open the swingout filter.
- Place the filter insert in the swing-out filter.
- Place a disposable coffee filter in the filter insert.
0
TIP
You can also use the permanent filter instead of a disposable coffee filter.
- Add the ground coffee to the disposable coffee filter. Use the supplied measuring scoop for this purpose. Refer to the following table for the required amount:
| Number of cups | Number of scoops |
| 2 | 1½ – 2 |
| 4 | 3 – 4 |
| 6 | 4½ – 6 |
| 8 | 6 – 8 |
- Fit the filter ring onto the filter insert.
- Close the swing-out filter.
- Remove the vacuum jug.

TIP
Fill the vacuum jug only up to the required number of cups as all the water is used for brewing. One cup is approx. 125 ml.
- Fill the vacuum jug with cold tap water for the desired amount of cups.
- Open the water tank.
- Pour the water into the water tank until it reaches the desired amount of cups. Empty out residual water inside the vacuum jug.
- Close the water tank.
- Place the vacuum jug with lid into the device.
- Plug the power plug into the socket. Press the “ 心 ” button.
The appliance switches on automatically. The time and the current settings are shown on the display.
- Press the "O" button to switch off the grinder.
The " button turns blue.
- Press the "O" button.
The “ ” button lights up. The appliance begins to brew the coffee and the “ 喝 ” symbol appears on the display.
- Wait until the appliance beeps 3 times and the " ” symbol goes out.
The coffee is ready. Push down the flap on the jug lid in order to pour out coffee.
6 Brew programming

CAUTION!
If the programme has already been selected and the "三" button has turned blue, you can no longer modify the programme time, coffee strength or number of cups. To make any changes you need to turn off the programme setting by briefly pressing the "三" button.
When you program the brewing function, the coffee maker will brew coffee to the programmed settings at the set time.
- Program the required settings for the brew, "5.1 With coffee beans" on page 26 or "5.2 With ground coffee" on page 27.
- Press and hold the button for 2 seconds.
The time is shown flashing.
- Repeatedly press the " " button to set the hour.
-
Repeatedly press the "0" button to set the minutes.
-
Press the "E" button to confirm your entry.
The current time and “①” are shown on the display. The “②” button turns blue. The coffee maker will brew coffee to the programmed settings at the set time.
- Press the "三" button again to switch off programmed brewing function.
The "E" button turns white. Programmed brewing is switched off.
7 Cleaning the appliance

WARNING!
Risk of scalding!
Before cleaning: Unplug the power plug from the socket and allow the appliance and its components to completely cool down (at least 30 minutes).

WARNING!
Risk of injury and damage to the appliance!
- Never immerse the appliance in water!

WARNING!
Health risks by use of incorrect cleaning agents!
Only use food-safe cleaning agents to clean the parts that come in contact with water and coffee.

CAUTION!
Do not use abrasive or aggressive cleaning agents or utensils that could scratch the surfaces. Do not put the appliance in the dishwasher.
7.1 After brewing
- Make sure that brewing has finished and the appliance has cooled down.
- Press the "OPEN" button on the side of the appliance to open the swingout filter.
- Remove the filter ring.
- Take out the filter insert together with the permanent filter or disposable coffee filter.
- Empty the coffee grounds out of the permanent filter into the household waste or throw the disposable coffee filter together with the coffee grounds into the household waste.
- Rinse out the filter insert and permanent filter under flowing water.
- Allow the filter insert and permanent filter to dry before placing back into the appliance.
7.2 Daily cleaning
- Make sure that the appliance is switched off, has cooled down and the power plug is disconnected.
- Press the "OPEN" button on the side of the appliance to open the swingout filter.
- Remove the filter ring.
- Take out the filter insert together with the permanent filter.
- Wash the filter insert and the permanent filter in warm water containing washing up liquid.

TIP
The filter ring, permanent filter and filter insert can also be cleaned in the dishwasher.
- Wipe the swing-out filter with warm water containing washing up liquid.
- Empty the vacuum jug.
- Wash the vacuum jug in warm water containing washing up liquid.
- Thoroughly dry all components before placing them back in the appliance.
7.3 Running water through the appliance
- Make sure there is no filter with coffee grounds in the appliance and the vacuum jug is clean.
- Remove the vacuum jug.
- Fill the vacuum jug with cold tap water.

CAUTION!
To avoid damaging the appliance only fill the water tank with cold tap water.
- Pour the water into the water tank.
- Place the vacuum jug with lid into the device.
- Plug the power plug into the socket. Press the “ 心 ” button.
The appliance switches on automatically.
- Press the " 一 " button.
The “ 一 ” button turns blue and indicates that the grinder is switched off.
- Press the "O" button.
The “ ” and “ ” buttons will light up. The water heats up and runs through the appliance. Wait until the appliance beeps 3 times and the “ ” symbol goes out.
- Empty and clean the vacuum jug.
7.4 Descaling the appliance
All hot water devices need descending depending on the water hardness and how often the device is used. Warranty claims cannot be made for a device that is not functioning due to a failure to descale it properly.
The device is equipped with a descale reminder after 200 brew cycles. All the indicators on the display will flash at this point. Descaling should then be carried out as soon as possible. If the drinking water is very hard, you will need to descale the device earlier. If the brewing time increases or the device becomes noisier, this is a sure sign that the coffee machine needs to be descaled.
The descale reminder will disappear once the device has been descaled and has gone through two rinsing cycles or three coffee brewing cycles.
- Make sure there is no filter with coffee grounds in the appliance and the vacuum jug is clean.
- Remove the vacuum jug.
- Fill the vacuum jug with cold tap water.
- Pour the water into the water tank.
- Pour 80ml of vinegar into the water tank.
- Place the vacuum jug with lid into the device.
- Plug the power plug into the socket. Press the “ ” button.
The appliance switches on automatically.
- Press the " " button.
The “ ” button turns blue and indicates that the grinder is switched off.
-
Press the "O" button.
The “ ” and “ 串 ” buttons will light up. The entire water/vinegar solution runs through the appliance. Wait until the appliance beeps 3 times and the “ 串 ” symbol goes out.
-
Run the device through two rinsing cycles, "7.3 Running water through the appliance" on page 30, to remove the remains of the water/vinegar solution.
7.5 Cleaning surfaces
Clean the surfaces of the appliance with a soft, lint-free cloth.
8 Troubleshooting
8.1 Remedying problems yourself

WARNING!
Risk of injury! The appliance does not contain any parts that you can repair yourself.
- Never attempt to operate a defective appliance.
- Never attempt to repair the appliance by yourself. If your appliance is defective, contact our customer service department (see "Service Centres" on page 187).
Before contacting our customer service, check with the aid of the table below whether you can remedy the problem yourself.
| Problem | Cause | Remedy |
| The appliance will not switch on. | The appliance is not connected to the power supply. | Plug the power plug into a socket outlet with earthing contact. |
| Coffee does not flow out of the outlet (drip stop). | Vacuum jug not placed correctly under outlet. | Check that the vacuum jug is placed correctly inside the device and that is presses up the valve in the outlet. |
| Coffee is too watery. | Grind set too coarse. | Set the grind finer, ▷“Adjusting the grind” on page 27. |
| Too little ground coffee. | Refer to the measurement table, ▷“5.2 With ground coffee” on page 27. |
| All display indicators flash. | The device must be descaled. | Carry out descending ▷ 7.4 Descale device |
| Error codes E01 / E14 | Problem with the grinder | Call customer service. |
| Error codes E12 / E13 | PCB fault | Call customer service. |
8.2 Accessories and spare parts
| Item number | Accessory/spare part |
| ZB 8688 | SEVERIN coffee 500 g, specially for Severin coffee makers |
| GK 5547 | Vacuum jug |
| ZT 9064 | Permanent filter, size 4 |
9 Storage and disposal
9.1 Storing the appliance
- Clean the appliance, "7.2 Daily cleaning" on page 30.
- Store the appliance in a dry place.
9.2 Disposing of the appliance
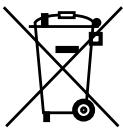
Appliances that are marked with this symbol must be disposed of separately from household waste. These appliances contain valuable raw materials that can be recycled. Proper disposal protects the environment and the health of your fellow men.
Your local authorities or dealer can provide information regarding proper disposal.
1 Vue d'ensemble
www.severin.de of www.severin.com.
Uw SEVERIN-team
Ppoooxn otic oyniecs xpnns
i oIokLnpeC Tc Ondyies XpnoS, TPIV XpN- 1IOIOHOETe Tn OoKEuH. PuAeTe OxolaotikA Tc Ondyies XpnoS. ZE TEPiTTWOn Tnou TnpadwoTe Tn OoKeuN Oe TpITouC, Dwote Touc KAI TIC Ondyies XpnoS.
7.1 Ao's a preparacao
AVEDA Lifestyle EOOD
ul. Angel Kanchev 1, et. 5
BG 1124
Sofia
Croatia
Koracell d.o.o.
Donje Svetice 40
26 Oaktree Business Park
Trim Co, Meath
Tel.: 046 94 83100
Fax: 0469483663
Web: www.bluestone.ie
Italia
ASSISTENZA POST-VENDITA
NUMERO VERDE 800224155
E-Mail: assistenza@severin.com
Indonesia
PT. Setai Modern Elektronik
Email.: info@severin.co.id
Web.: www.severin.co.id
Jakarta
Komp. Glodok Plaza Blok F No. 9, JI. Pinangsa
Raya, Jakarta Barat
02165911888/0216592889
Medan
JI. Apel No. 88 Kom. Cemara Asri
061 6620186 / 061 6625836
Surabaya
Pergudangan Mutiara Margo Mulyo Indah,
Blok DC No. 2
Telp: (031) 749 1012, (031) 749 1016
Banjarmasin
Dr.Waleed Maraqa commercial center, Level 1
Khalda, Amman Zip code: 11953
Tel.: +962 65346429
Fax:+96265341706
Mob Jordan: +962 797426108
Kuwait
Mohammed Abdulrahman Al Bahar
Al Bahar Building P.O.Box 148
Safat 13002 Kuwait
Tel.: +965 4810855
Latvia
SIA GTCL BALTIC
Piedrujas iela 7
LV - Riga 1073
Tel.: +371 29119989
Fax:+37167297769
Lebanon
Khoury Home
7th Floor, Cité Dora 3 Building, Dora
P.O.Box 70611
Antelias, Lebanon
Tel.: +961 1 244200
Fax:+961253535
E-Mail: info@khouryhome.com
Internet: www.khouryhome.com
Lithuania
UAB Topo Grupe
Savanoriu PR. 206A,
50193 Kaunas, Lithuania
Tel.: +370 660 00200
Web: www.severinshop.hu
Malta
Crosscraft Co Ltd
Valletta Road
Paola. PLA1511
Malta
Tel: +356 21805805
+356 79498432
E-Mail: clyde@crosscraft.com.mt
Maroc
BS Cast
19, Allee des Villas Ain Sebaa
20250 Casablanca
Fax:+2125222424034
TEL Port: +212 6 61 28 60 88
Nederland
A.A.K & Partners L.L.C.
P.O Box.-1650, Muttrah
Postal Code - 114
Sultanate of Oman
Tel.: +968 24834470
Fax: +968 24835186
E-Mail: aakplc@gmail.com
Peru
SEVERIN PERU / Comercial Rebecca S.R.L.
208 Circunvalacion del Golf Avenue
Office 301-A Los Inkas Prime Tower II
Santiago de Surco, Lima - Peru
Tel.: 0051 1 2729370
E-mail: severinperu@gmail.com
Philippines
COLOMBO MERCHANT PHILIPPINES, INC.
Mezzanine 1, South Center Tower
2206 Venture Street, Madrigal Business Park
Alabang, Muntinlupa City
Tel.: 8093441
E-Mail: severinconsumercare@colombophils.
com.ph
Polska
Severin Polska Sp.z 0.o.
6 Tagore Drive, #03-04
Singapore 787623
Tel.: +65 6455 0005
Fax: +65 6455 4010
Web: www.beste.com.sg
E-Mail: info@beste.com.sg
Slovenia
SEVTIS d.o.o.
Smartinska 130
1000 Ljubljana
Tel.: +386 1542 1927
Fax: +386 1542 1926
Slowak Republic
BVZ Commerce s.r.o.
Odbavovaci centrum
Závodu miru 974/66a
360 17 Karlovy Vary
Tel.: +420 233 557 825
3rd Floor, Grove Exchange
Grove Avenue
Claremont
South Africa
7708
Tel: +27 21 674 0294
Fax: +27 21 674 0295
Web: http://www.alcdashley.co.za
Mail: service@alcdashley.co.za
Svenska
EI & Digital Service AB
Folkungagatan 144
11630 Stockholm
Tel.: +46 8 845180
www.eldigital.se
E-Mail: info@eldigital.se
Switzerland
SPC Electronics AG
Mövenstrasse 12
CH-9015 St.Gallen
Tel.: +41 71 227 99 99
E-Mail: service@spcag.ch
www.spc.ch
Thailand
Verasu Ltd. part.
83/7 Wireless Rd., Lumpini,
Patumwan, Bangkok 10330
Tel.: +622 254 81 008
E-Mail: askverasu@verasu.com
Tunisie
GEI
54, rue du Mercure
Zone Industrielle 2013-BEN AROUS
TUNISIE
Ukrayina
Service for Modern Electronics LLC
Sim'i Khokhlovykh Str.8
4119 Kiev
Tel.: +38 044 247 67 34
E-Mail: info1@photoservice.com.ua
United Kingdom
Homespares Centres Limited
Peel House
2 Chorley Old Road
BL13AA
Tel.: 01204558160
Fax: 01204558169
E-Mail: office@homespares.co.uk
Web: wwwhomespares.co.uk
Vietnam
BRAND PARTNER
CTY TNHH DOI TAC NHAN HIEU
FLOOR 8, DAG HOLDINGS
87A HAM NGHI
NGUYEN THAI BINH WARD, DISTRICT 1
HO CHI MINH CITY, VIETNAM
Tel.: +84-28-62 899 648
E-Mail: kenny.clark@brandpartner.vn
trang.hau@brandpartner.vn
Stand: 03/2022