PLX-500 - Turntable PIONEER DJ - Free user manual and instructions
Find the device manual for free PLX-500 PIONEER DJ in PDF.
| Product type | Direct drive turntable |
| Dimensions (W × H × D) | 450 mm × 158.5 mm × 367.5 mm |
| Weight | 10.7 kg |
| Power supply | AC 110-120 V / 220-240 V, 50/60 Hz, 11 W |
| Rotation speeds | 33 1/3 rpm, 45 rpm, 78 rpm |
| Pitch adjustment range | ±8% |
| Starting torque | 1.6 kg·cm or more |
| Start-up time (33 rpm) | 1 second or less |
| Signal-to-noise ratio | 50 dB or more |
| Tonearm type | Universal S-shaped tonearm, gimbal support, static balance |
| Effective tonearm length | 230.5 mm |
| Overhang | 16 mm |
| Stylus tracking force | 0 g to 4.0 g (graduation 0.1 g) |
| Appropriate cartridge weight | 9.5 g or less |
| Included cartridge | VM type |
| Audio outputs | PHONO (2.5 mV) and LINE (150 mV) |
| USB connectivity | USB-B for digital recording |
| Stylus illumination | Yes, dedicated switch |
| Record jacket display | Support on dust cover |
| Maintenance | Clean stylus with a soft brush, clean the cover with a soft cloth |
| Safety | Free ventilation (15 cm above, 5 cm sides/back), do not block, avoid condensation |
| Operating temperature | +5 °C to +35 °C |
| Operating humidity | 5% to 85% (without condensation) |
Frequently Asked Questions - PLX-500 PIONEER DJ
User questions about PLX-500 PIONEER DJ
0 question about this device. Answer the ones you know or ask your own.
Ask a new question about this device
Download the instructions for your Turntable in PDF format for free! Find your manual PLX-500 - PIONEER DJ and take your electronic device back in hand. On this page are published all the documents necessary for the use of your device. PLX-500 by PIONEER DJ.
USER MANUAL PLX-500 PIONEER DJ
The Pioneer DJ site shown above offers FAQs, information on software, and various other types of information and services to allow you to use your product in greater comfort.
Operating Instructions
Mode d'emploi
Bedienungsanleitung
Private households in the member states of the EU, in Switzerland and Norway may return their used electronic products free of charge to designated collection facilities or to a retailer (if you purchase a similar new one).
For countries not mentioned above, please contact your local authorities for the correct method of disposal.
By doing so you will ensure that your disposed product undergoes the necessary treatment, recovery and recycling and thus prevent potential negative effects on the environment and human health.
K058b_A1_En
CAUTION
TO PREVENT THE RISK OF ELECTRIC SHOCK, DO NOT REMOVE COVER (OR BACK). NO USER-SERVICEABLE PARTS INSIDE. REFER SERVICING TO QUALIFIED SERVICE PERSONNEL.
D3-4-2-1-1_B1_En
WARNING
This equipment is not waterproof. To prevent a fire or shock hazard, do not place any container filled with liquid near this equipment (such as a vase or flower pot) or expose it to dripping, splashing, rain or moisture.
D3-4-2-1-3_A1_En
WARNING
To prevent a fire hazard, do not place any naked flame sources (such as a lighted candle) on the equipment.
D3-4-2-1-7a_A1_En
Operating Environment
Operating environment temperature and humidity: +5^ C to +35^ C ( +41^ F to +95^ F ); less than 85 % RH (cooling vents not blocked)
Do not install this unit in a poorly ventilated area, or in locations exposed to high humidity or direct sunlight (or strong artificial light).
D3-4-2-1-7c*A2_En
CAUTION
The POWER switch on this unit will not completely shut off all power from the AC outlet. Since the power cord serves as the main disconnect device for the unit, you will need to unplug it from the AC outlet to shut down all power. Therefore, make sure the unit has been installed so that the power cord can be easily unplugged from the AC outlet in case of an accident. To avoid fire hazard, the power cord should also be unplugged from the AC outlet when left unused for a long period of time (for example, when on vacation).
D3-4-2-2a*_A1_En
This product is for general household purposes. Any failure due to use for other than household purposes (such as long-term use for business purposes in a restaurant or use in a car or ship) and which requires repair will be charged for even during the warranty period.
K041_A1_En
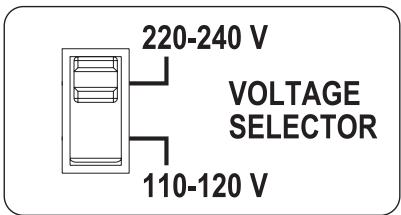
Voltage selector
You can find the voltage selector switch on the top panel of multi-voltage models.
The factory setting for the voltage selector is 220-240 V. Please set it to the correct voltage for your country or region.
Before changing the voltage, disconnect the AC power cord. Use a medium size screwdriver to change the voltage selector switch.
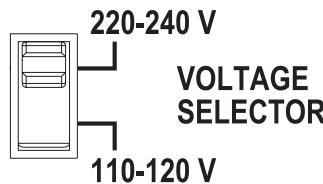
D3-4-2-1-5*A2En
POWER-CORD CAUTION
Handle the power cord by the plug. Do not pull out the plug by tugging the cord and never touch the power cord when your hands are wet as this could cause a short circuit or electric shock. Do not place the unit, a piece of furniture, etc., on the power cord, or pinch the cord. Never make a knot in the cord or tie it with other cords. The power cords should be routed such that they are not likely to be stepped on. A damaged power cord can cause a fire or give you an electrical shock. Check the power cord once in a while. When you find it damaged, ask your nearest service center or your dealer for a replacement. S002*.A1_EN
VENTILATION CAUTION
When installing this unit, make sure to leave space around the unit for ventilation to improve heat radiation (at least 15cm at top, 5cm at rear, and 5cm at each side).
WARNING
Slots and openings in the cabinet are provided for ventilation to ensure reliable operation of the product, and to protect it from overheating. To prevent fire hazard, the openings should never be blocked or covered with items (such as newspapers, table-cloths, curtains) or by operating the equipment on thick carpet or a bed.
D3-4-2-1-7b*A1_EN
NOTE:
This equipment has been tested and found to comply with the limits for a Class B digital device, pursuant to Part 15 of the FCC Rules. These limits are designed to provide reasonable protection against harmful interference in a residential installation. This equipment generates, uses, and can radiate radio frequency energy and, if not installed and used in accordance with the instructions, may cause harmful interference to radio communications. However, there is no guarantee that interference will not occur in a particular installation. If this equipment does cause harmful interference to radio or television reception, which can be determined by turning the equipment off and on, the user is encouraged to try to correct the interference by one or more of the following measures:
— Reorient or relocate the receiving antenna.
— Increase the separation between the equipment and receiver.
- Connect the equipment into an outlet on a circuit different from that to which the receiver is connected.
— Consult the dealer or an experienced radio/TV technician for help.
D8-10-1-2_A1_En
Information to User
Alterations or modifications carried out without appropriate authorization may invalidate the user's right to operate the equipment.
D8-10-2_A1_En
FEDERAL COMMUNICATIONS COMMISSION DECLARATION OF CONFORMITY
This device complies with part 15 of the FCC Rules. Operation is subject to the following two conditions: (1) This device may not cause harmful interference, and (2) this device must accept any interference received, including interference that may cause undesired operation.
Product Name: TURNTABLE
Model Number: PLX-500-K, PLX-500-W
Responsible Party Name: AlphaTheta Music Americas, Inc. OPERATIONS DIVISION
Address: 2050 W. 190th Street, Suite 109, Torrance, CA 90504, U.S.A.
Phone: 1-424-488-0480
URL: pioneerdj.com
D8-10-4*C1_EN
Contents
How to read this manual
- Thank you for buying this Pioneer DJ product.
Be sure to read this booklet, which includes important information that you must understand before using this product.
After you have finished reading the instructions, put them away in a safe place for future reference. - In this booklet, the names of the buttons and terminals of the main unit appear in square brackets ([ ]). Examples: Press the [START/STOP] button.
Before start
Features 5
What's in the box . 5
Before you start
- Installingrekordbox (Mac/Windows) 6
Assembly 6
Part names and functions
Top panel 8
Rear panel 9
Adjustment
Adjusting the tone arm balance 10
Adjusting the stylus pressure. 10
Adjusting anti-skating 11
Adjusting the arm lifter height 11
Adjusting the arm height. 11
05 Connections
- Connecting to powered speakers. 12
- Connecting to a pre-main amplifier and component. 12
- Connecting to a DJ mixer. 13
- Connecting with a computer. 13
- Place of installation. 13
- Adjusting the height of the main unit. 13
Operation
Turning the power on 14
Turning the power off 14
Playback 14
Pausing playback. 14
Finishing playback. 14
Adjusting the pitch 14
Displaying a record jacket 14
To play a standard EP record.. 15
Illuminating the stylus tip . 15
Recording. 15
Replacing the stylus. 15
Changing the cartridge. 15
Additional information
Troubleshooting 16
Cautions on use 16
Maintenance of each part 16
About trademarks and registered trademarks 17
Specifications 17
Before start
Features
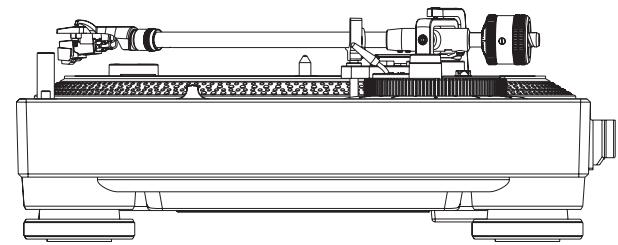
This unit is a high-torque direct drive turntable that can be enjoyed in a variety of applications ranging from home listening to DJing.
High-quality analog record sound
The path from the stylus tip to the PHONO/LINE output has been designed as the shortest to faithfully reproduce the original sound quality of analog records.
Furthermore, since not only PHONO output but also LINE output is supported, you can easily enjoy high quality analog record sound by simply directly connecting with powered speakers.
Easy digital recording
A USB-B terminal is provided so you can directly connect this unit and a PC or Mac and then record analog record sound sources to the PC or Mac by converting them to data. Digital recording with simple operation can be performed by using the recording function of the free music management application "rekordbox" (Ver.4.2.1 or later) when recording.
DJ performance capable direct-drive turntable
The adoption of a high-torque direct-drive system means you can perform track mixing, scratching, and other DJ performances by combining two of these units with a DJ mixer.
Dust cover that can serve as a stand for a record jacket
A record jacket can be displayed on the dust cover while the dust cover is in an open state. This allows you to enjoy analog record sound while looking at the record jacket.
What's in the box
- Turntable
- Slip mat
Dust cover - Adapter for EP record
Balance weight - Headshell (cartridge included)
Shell weight
Power cord
USB cable
Audio adapter cable (Stereo pin plug (female) to stereo mini plug (male))
Warranty (for some regions) - Operating instructions (this document)
The included warranty is for the European region.
WARNING
Store small parts out of the reach of children and infants. If accidentally swallowed, contact a doctor immediately.
D41-6-4_A1_En
Before you start
Installingrekordbox(Mac/Windows)
1 Accessrekordbox.com.
https://rekordbox.com/en/store/
- The page content is subject to change without notice.
2 Check the Get Started guide and then click [Free to Download].

Free To Download

3 Carefully read the Software End User License Agreement and select the [Agree] check box if you agree.
When you select the check box, [Download] becomes clickable.
4 Click [Download].
Downloading of rekordbox (Mac/Windows) starts.
5 Double-click the downloaded file to unzip it.
6 Double-click the unzipped file to launch the installer.
7 Carefully read the Software End User License Agreement, and continue with the installation according to the instructions on the screen if you agree.
- If you do not agree to the contents of the Software End User License Agreement, cancel the installation.
8 When the installation completion screen appears, follow the instructions on the screen to close the installer.
The installation is now complete.
- To use rekordbox dj, rekordbox dvs, and rekordbox video, activation (license authentication) is required. For details, see the rekordbox Operating Instructions.
https://rekordbox.com/en/support/manual.php
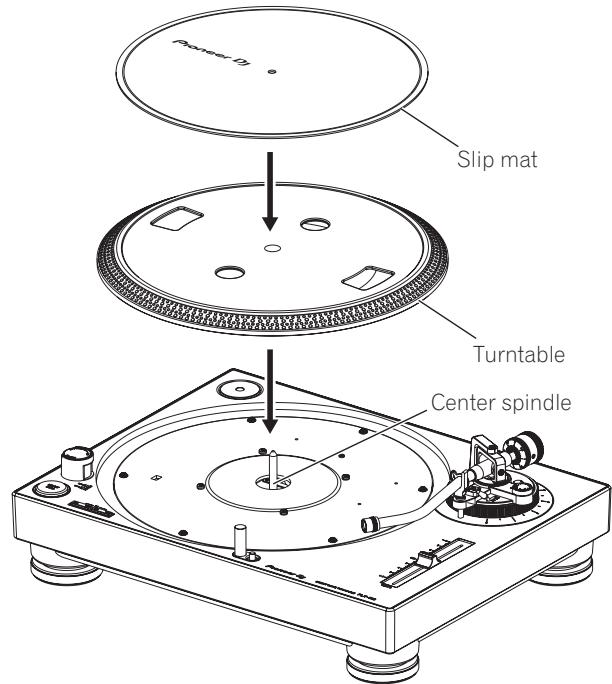
Assembly
1 Attach the turntable and slip mat.
Set the turntable on the center spindle and place the slip mat on top of the turntable.
- Be careful not to hit the turntable on the main unit or drop it.
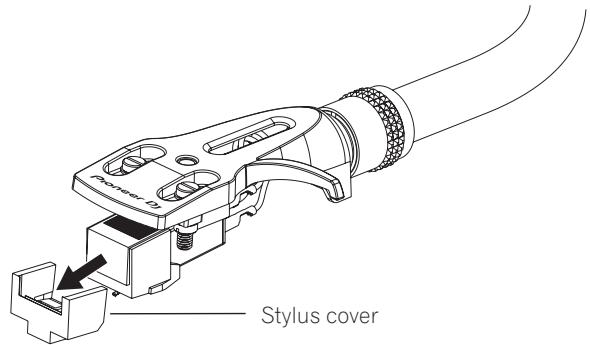
2 Attach the headshell.
Insert the headshell with attached cartridge into the tone arm. Next, while keeping the headshell horizontal, tighten the lock nut.
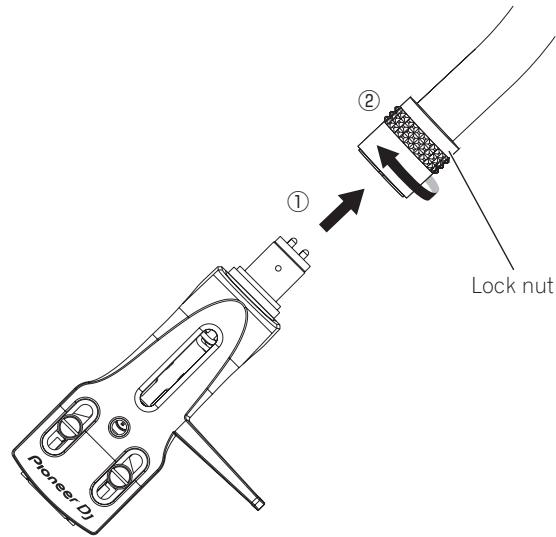
Before use, remove the stylus cover without touching the stylus tip.
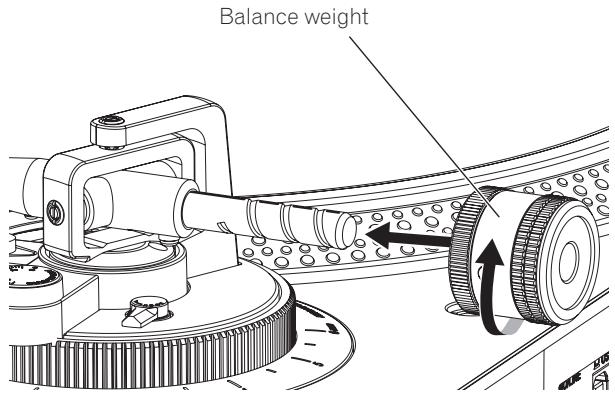
3 Attach the balance weight.
Attach the balance weight to the rear shaft of the tone arm.
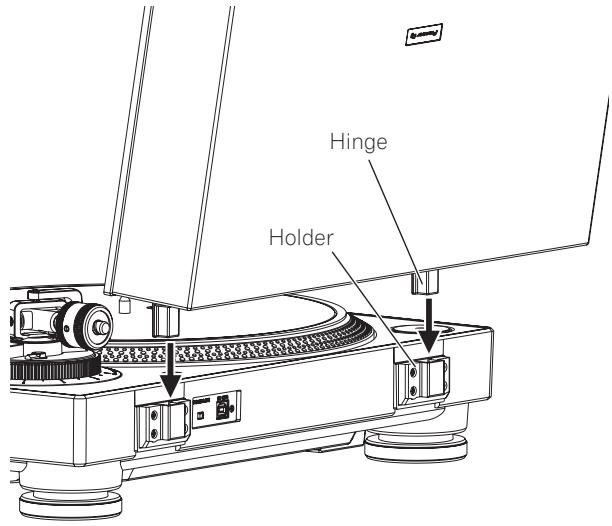
Attach the dust cover.
Insert the hinges of the dust cover into the holders at the rear panel of this unit.
When removing the dust cover, pull the hinges up outward while the dust cover is in an open state.
Part names and functions
Top panel
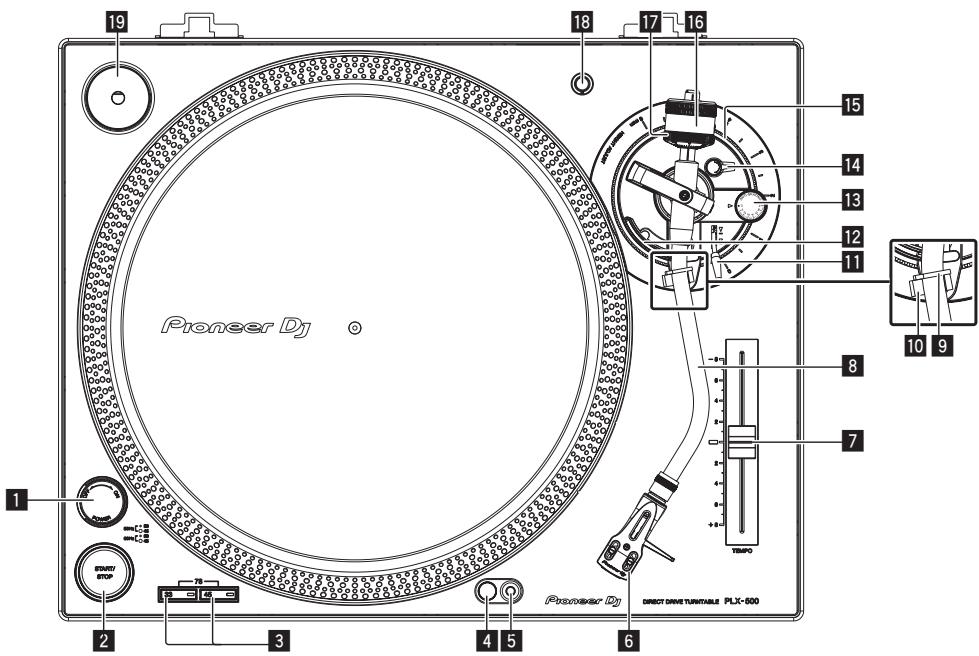
1 POWER switch
When turning the switch to the [ON] side, the power is turned on and the strobe illuminator on the side lights.
Turning the power on (p.14)
Turning the power off (p.14)
2 START/STOP button
Pressing the button starts or stops rotation of the turntable.
Playback (p.14)
3 Speed change button
Changes the speed according to the record to be played.
For a 33 1/3 rpm record, press the [33] button.
For a 45 rpm record, press the [45] button.
- For a 78 rpm record, press the [33] button and [45] button at the same time.
Playback (p.14)
4 Stylus illuminator
Lights to illuminate the stylus tip.
Illuminating the stylus tip (p.15)
Stylus illuminator switch
The stylus illuminator lights in white and ascends to the position at which the stylus tip is illuminated.
Illuminating the stylus tip (p.15)
6 Headshell
7 TEMPO slider
You can slide back and forth to perform fine adjustment of the rotation speed.
Adjusting the pitch (p.14)
8 Tone arm
Adjustment (p.10)
9 Arm clampers
Clamps the tone arm.
10 Arm rest
Serves as the support base for the tone arm.
Lifter lever
The tone arm goes up when the lever is pulled up. The tone arm goes down when the lever is pushed down.
12 Arm lifter
This device is used to move the tone arm up and down. It is operated by the lifter lever.
13 ANTI SKATING dial
When a record is played, there is power to pull the stylus tip toward the inner perimeter. By matching this dial to the stylus pressure value, that power is eliminated.
Adjusting anti-skating (p.11)
Locks the adjusted height of the arm.
Adjusting the arm height (p.11)
Used to adjust the height of the tone arm.
Adjusting the arm height (p.11)
16 Balance weight
Used to balance the tone arm and adjust the stylus pressure.
Adjustment (p.10)
17 Stylus pressure adjustment ring
Used to match to the appropriate stylus pressure of the cartridge.
Adjusting the stylus pressure (p.10)
18 Headshell stand
Used to stand the headshell up.
19 Adapter for EP record
Used to play standard EP records.
To play a standard EP record (p.15)
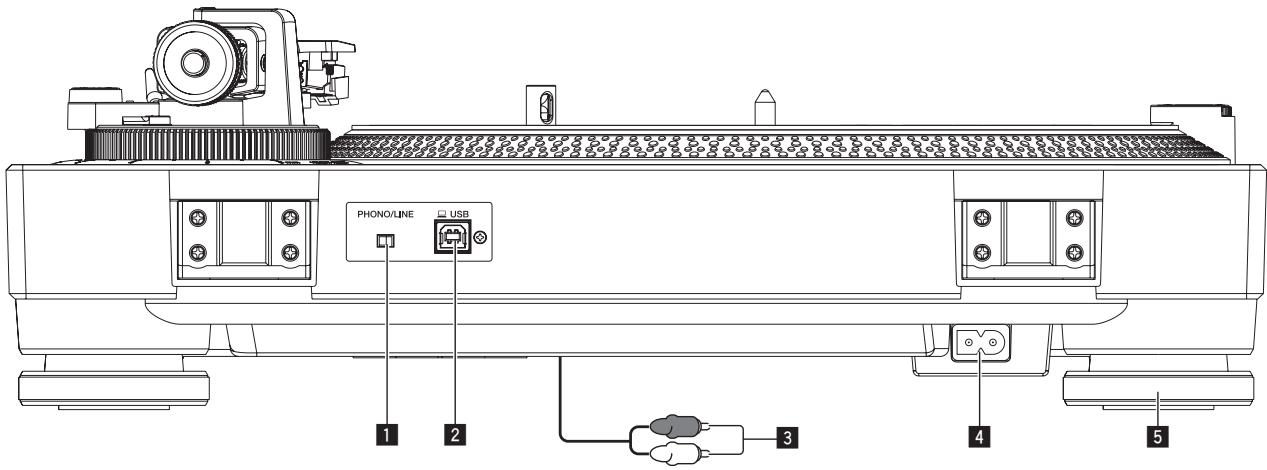
Rear panel

1 PHONO/LINE switch
Switches the level of the sound output from the unit.
- [PHONO]: Select this when the unit is connected with a device that supports phono level input, such as a pre-main amplifier or component.
- [LINE]: Select this when the unit is connected with a device that supports line level input, such as a powered speakers.

CAUTION
Do not connect the unit with a device that supports phono level input while the PHONO/LINE switch is in the [LINE] state.
2 USB terminal
Connect the USB cable (included) here.
Connecting with a computer (p.13)
3 Audio cable
Connections (p.12)
4 AC IN
Connects to a power outlet using the included power cord. Wait until all connections between the equipment are completed before connecting the power cord.
- Be sure to use the included power cord.
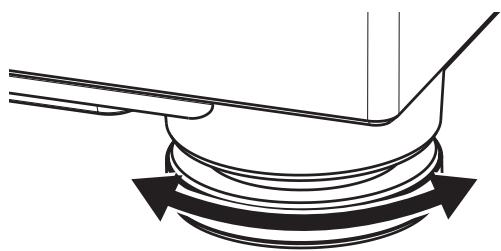
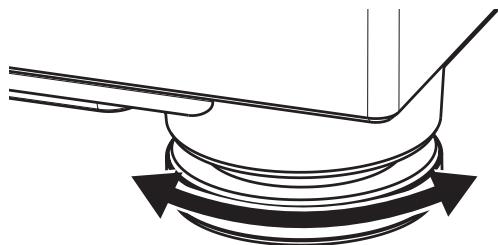
5 Insulator
Suppresses the effect of outside vibration. Turning the insulator adjusts the turntable height.
Adjusting the height of the main unit (p.13)
Adjustment
Adjusting the tone arm balance
Because the cartridge and headshell weights differ depending on the product, the balance of the tone arm is adjusted.
Prepare as follows.
- Remove the stylus cover and arm clampper while paying attention not to touch the stylus tip.
- Push down the lifter lever.
- Set the [ANTI SKATING] dial to "0".
Keep the tone arm from the arm rest and adjust the balance so it is horizontal.
Turn the balance weight until the tone arm becomes almost horizontal.
- When moving the tone arm, make sure that the stylus tip does not directly touch the turntable and the like.
Adjusting the stylus pressure
To prevent stylus jumping or sound distortion, the stylus pressure is adjusted to the appropriate stylus pressure value determined for each cartridge.
The appropriate stylus pressure value for the included cartridge is from 3.0g to 4.0g .
Prepare as follows.
- Return the tone arm to the arm rest and secure with the arm clamp.
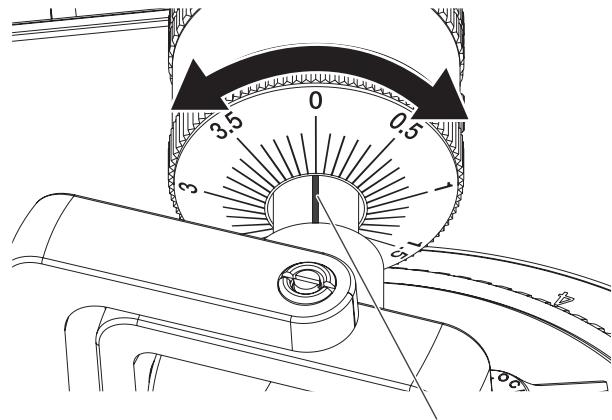
1 Match the "0" on the stylus pressure adjustment ring to the center line of the arm rear shaft.
While using your finger to hold the balance weight to keep it from moving, turn only the stylus pressure adjustment ring so that the number "0" comes to the black center line of the tone arm rear shaft.

Center line
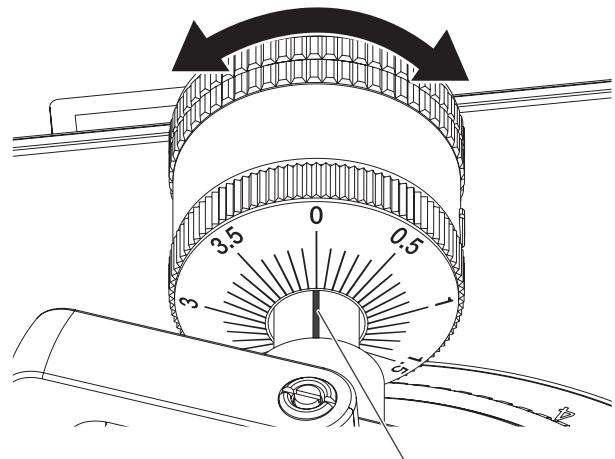
2 Adjust the stylus pressure.
Turn the balance weight to adjust to the appropriate stylus pressure value for your cartridge.
- When turning the balance weight, the stylus pressure adjustment ring turns together. While observing the adjustment ring, adjust the stylus pressure to the appropriate value.
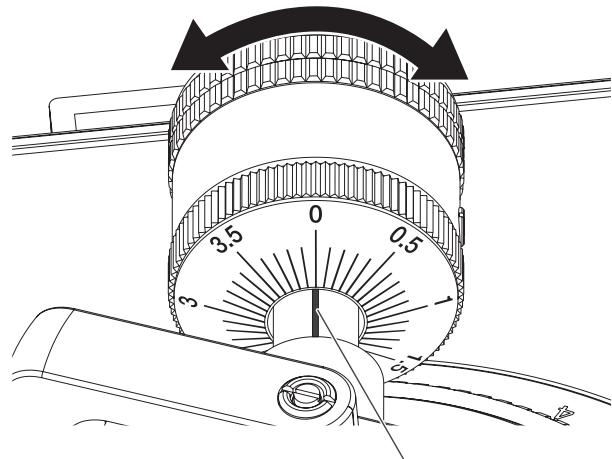
Center line
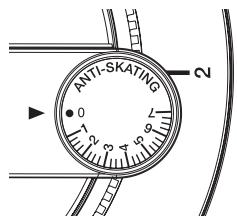
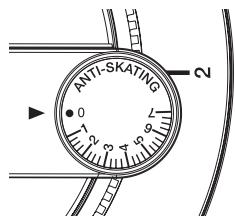
Adjusting anti-skating
This adjustment is made to prevent stylus jumping.
Match to the same scale position as the stylus pressure value.
Turn the [ANTI SKATING] dial to match the reference line to the same value as the cartridge stylus pressure value.
When scratch play is performed
To prevent stylus jumping, adjust the scale position to match the play action.
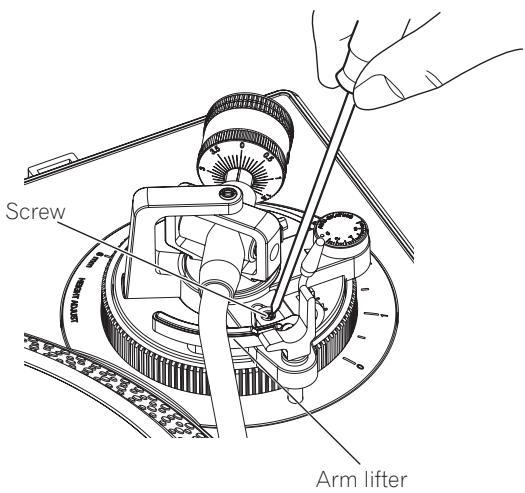
Adjusting the arm lifter height
When using other than the included cartridge, adjust this to match the cartridge to be used.
Prepare as follows.
- A record is placed on a slip mat.
- Remove the stylus cover and arm clampper while paying attention not to touch the stylus tip.
Pull up the lifter lever and move the tone arm onto the record.
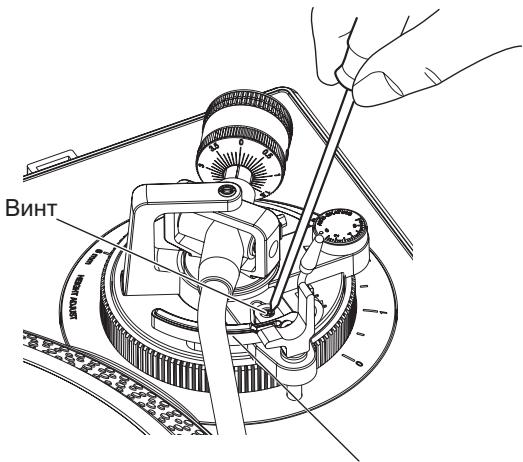
Adjust the height by turning the screw while the arm lifter is pushed down.
Turing clockwise narrows the distance between the record and stylus.
Turing counterclockwise widens the distance between the record and stylus.
- The arm lifter height (the distance between the record and stylus when the lifter lever is pulled up) is factory-adjusted in a range between approximately 8 mm and 13 mm.
Adjusting the arm height
When using the included cartridge, the "0" position is appropriate. When using other than the included cartridge, adjust this to match the cartridge to be used.
1 Turn the [HEIGHT ADJUST] lock to unlock the lock.
![PIONEER DJ PLX-500 - Turn the [HEIGHT ADJUST] lock to unlock the lock. - 1](/content/2025/01/328346/images/d90ab7edefedf5ab7c421b4588cb5de44cac37562f26756a59793b7be5526fe7.jpg)
2 Push down the lifter lever and place the stylus on the record, then adjust the [HEIGHT ADJUST] dial to make the tone arm and record parallel.
Adjust so that the tone arm becomes horizontal.
![PIONEER DJ PLX-500 - Push down the lifter lever and place the stylus on the record, then adjust the [HEIGHT ADJUST] dial to make the tone arm and record parallel. - 1](/content/2025/01/328346/images/604ed4822911b0720f27bc9b93a71a9cd1213d77a88d1641ad97fd019a387f30.jpg)
![PIONEER DJ PLX-500 - Push down the lifter lever and place the stylus on the record, then adjust the [HEIGHT ADJUST] dial to make the tone arm and record parallel. - 2](/content/2025/01/328346/images/323a667f59e5fe0722e2507d2de3480293a1fcd66f1ab7cdc9d22fd1367de6cf.jpg)
3 Turn the [HEIGHT ADJUST] lock to fix the height of the arm.
After adjusting height of the arm, always turn the [HEIGHT ADJUST] lock to fix the arm.
Connections
- Be sure to turn off the power and unplug the power cord from the power outlet whenever making or changing connections.
Refer to the operating instructions for the component to be connected. - Connect the power cord after all the connections between devices have been completed.
Connecting to powered speakers
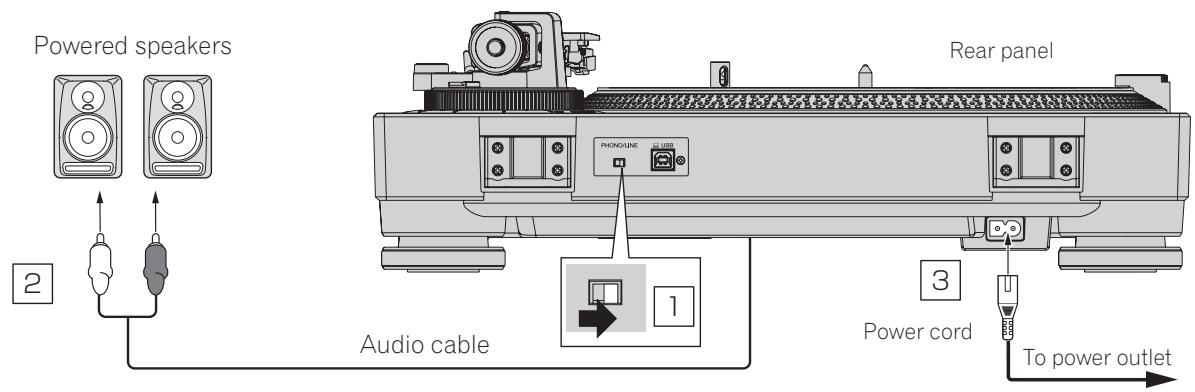
1 Set the [PHONO/LINE] switch to [LINE].
2 Connect the audio cable to the [LINE] input terminal of the powered speakers, etc.
If necessary, use the included audio adapter cable.
3 Connect the power cord.
Connects to a power outlet using the included power cord. Wait until all connections between the equipment are completed before connecting the power cord.
Connecting to a pre-main amplifier and component
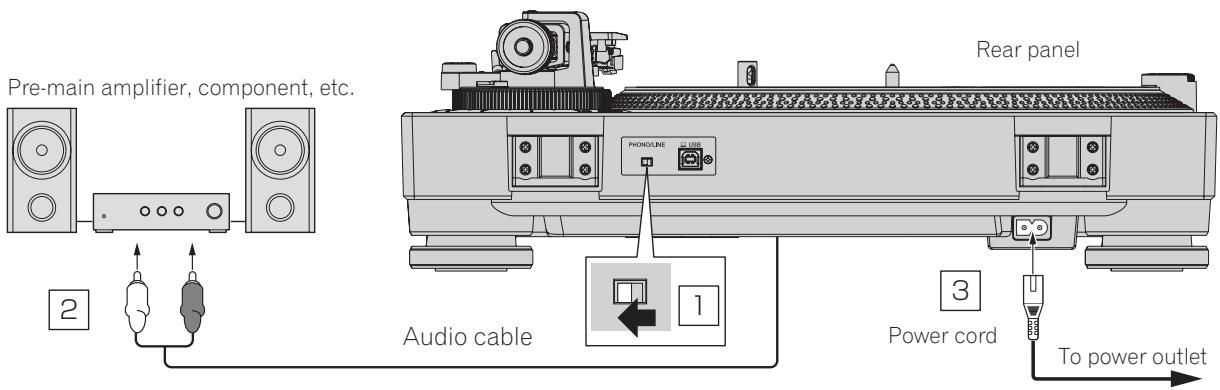
1 Set the [PHONO/LINE] switch to [PHONO].
2 Connect the audio cable to the [PHONO] input terminal of the pre-main amplifier or other component.
- If this product is connected to a pre-main amplifier or component that does not have a [PHONO] terminal, sufficient volume and sound quality cannot be obtained. In that case, set the [PHONO/LINE] switch of this unit to [LINE] and then connect this unit to the [LINE] input terminal of the pre-main amplifier or component or use a phono equalizer.
3 Connect the power cord.
Connects to a power outlet using the included power cord. Wait until all connections between the equipment are completed before connecting the power cord.
Connecting to a DJ mixer
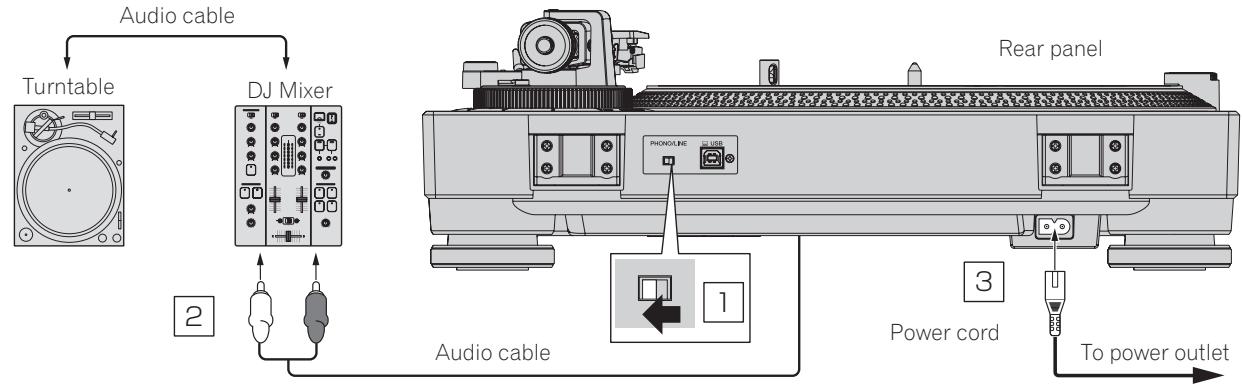
1 Set the [PHONO/LINE] switch to [PHONO].
2 Connect the audio cable to the [PHONO] input terminal of the DJ mixer.
If this product is connected to a DJ mixer that does not have a [PHONO] input terminal, sufficient volume and sound quality cannot be obtained. In that case, set the [PHONO/LINE] switch of this unit to [LINE] and then connect the unit to the [LINE] input terminal of the DJ mixer.
3 Connect the power cord.
Connects to a power outlet using the included power cord. Wait until all connections between the equipment are completed before connecting the power cord.
Connecting with a computer
USB driver software is not required for this unit.
Recording (p.15)
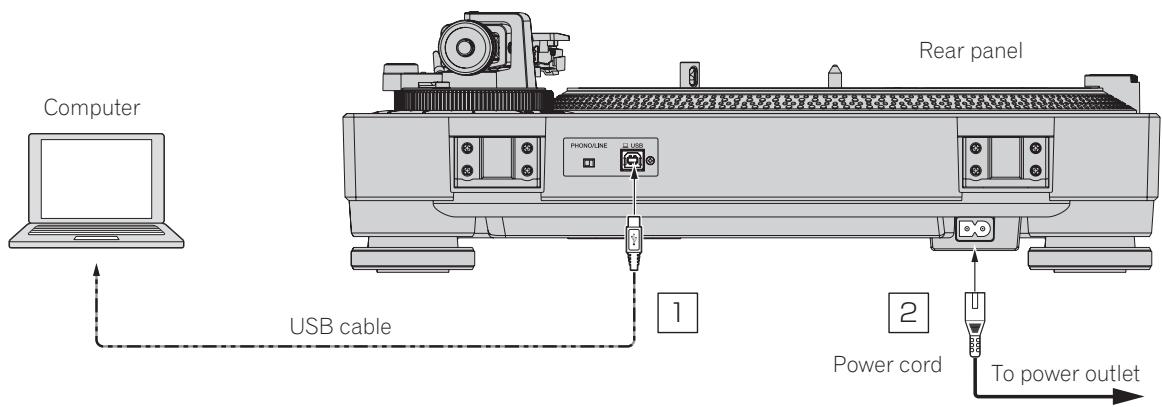
1 Connect the USB cable to a USB port on the computer.
2 Connect the power cord.
Connects to a power outlet using the included power cord. Wait until all connections between the equipment are completed before connecting the power cord.
Place of installation
Place the unit on a level surface that is free of external vibration.
- To the extent possible, keep the unit away from the speaker system.
- When the unit is very close to a radio (AM/FM broadcasting), the radio could generate noise. Keep the distance as far away from the unit as possible.
Adjusting the height of the main unit
Adjust the height by turning the insulator in a way that the main unit is horizontal.
Operation
Turning the power on
1 Make all the connections, then plug the power cord into a power outlet.
Connections (p.12)
2 Change the [POWER] switch to the [ON] side to turn on the power of the unit.
This unit's indicators light and the power turns on.
Turning the power off
Change the [POWER] switch to the [OFF] side to turn off the power of the unit.
This unit's power turns off.
Playback
Prepare as follows.
- Place a record on the turntable.
- Remove the stylus cover and arm clamper.
1 Change the [POWER] switch to the [ON] side to turn on the power of the unit.
2 Select the rotation speed to match the record to be played by pressing a speed change button.
3 Press the [START/STOP] button.
The turntable rotates.
4 Pull up the lifter lever and move the tone arm onto the record.
5 Push down the lifter lever.
The tone arm slowly descends and playback begins.
Pausing playback
Pull up the lifter lever.
The stylus of the cartridge lifts away from the record.
To resume playback, push down the lifter lever.
Finishing playback
1 Pull up the lifter lever to return the tone arm to the arm rest and then push down the lifter lever.
2 Press the [START/STOP] button.
The turntable stops smoothly.
3 Change the [POWER] switch to the [OFF] side to turn off the power of the unit.
Use the arm clamper to secure the tone arm
To protect the stylus tip, attach the stylus cover.
Close the dust cover.
Adjusting the pitch
Move the [TEMPO] slider forward or backward.
Moving the slider forward increases the rotation speed and moving it backward decreases the rotation speed.
- When the [TEMPO] slider is at the center, the indicator lights in yellow-green and the rotation speed becomes the specified rpm (33 1/3 rpm, 45 rpm, or 78 rpm).
- The scale of the [TEMPO] slider is a rough value. Please use it as a guide.
- You can confirm that the rotation speed has become the specified rpm by looking at the four rows of strobe patterns inscribed around the turntable.
Strobe pattern

① When the strobe pattern appears stopped, 33 1/3 rpm (50 Hz power supply)
② When the strobe pattern appears stopped, 45 rpm (50 Hz power supply)
③ When the strobe pattern appears stopped, 33 1/3 rpm (60 Hz power supply)
④ When the strobe pattern appears stopped, 45 rpm (60 Hz power supply)
- A strobe illuminator (red LED light) is used to illuminate the strobe pattern of this unit. When checking the pitch, always use the strobe illuminator light.
Displaying a record jacket
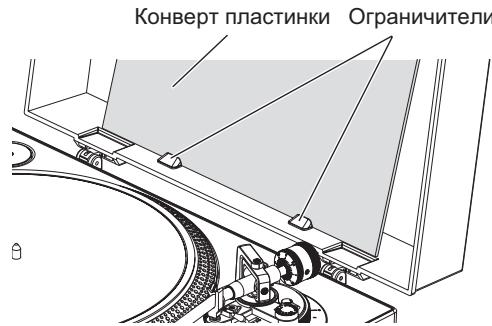
Place the record jacket behind the stoppers attached to the dust cover as shown in the figure.
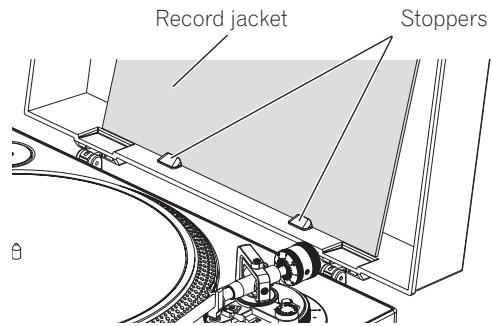
- Do not place anything other than a record jacket.
- Place the record jacket secured behind the stoppers properly.
- When using this feature during playback, be careful that the record jacket does not fall. The record or stylus may be damaged.
- Be careful not to close the dust cover while a record jacket is placed on it.
To play a standard EP record
Attach the EP record adapter to the center spindle and press the [45] button.
Illuminating the stylus tip
When the stylus illuminator switch is pressed, the stylus illuminator lights in white and ascends to the position at which the stylus tip is illuminated.
- If it is not needed, press the stylus illuminator switch to lower it. The stylus illuminator switch goes off.
- Do not look directly at the light while the stylus illuminator is lit.
Recording
Analog records can be digitally recorded by connecting with a computer that has the music management software "rekordbox" installed. For details, access therekordbox product site below and see therekordbox Operating Instructions in [Support]. https://rekordbox.com/en/store/
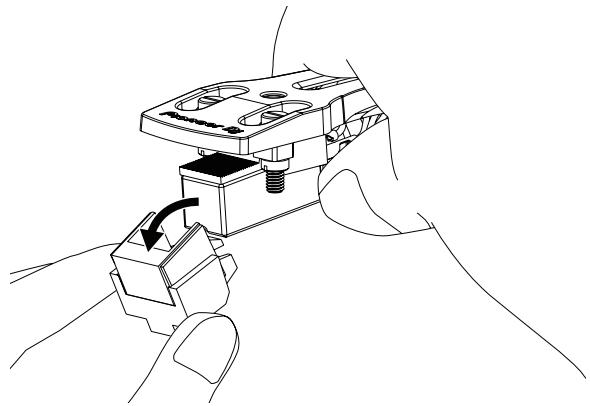
Replacing the stylus
Check that the power is not on before performing the following procedure.
1 Hold the cartridge with one hand.
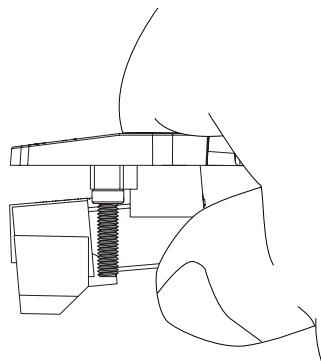
2 Remove the cartridge in the direction of the arrow while holding the stylus holder part with your other hand.
Changing the cartridge
This unit is not compatible with MC cartridges. Use a VM cartridge or an MM cartridge.
Removing the cartridge
1 Remove the screws, nuts, and washers attached to the headshell.
2 Disconnect the lead wires connected to the cartridge.
Attaching the cartridge
1 Connect the cartridge while matching the colors of the lead wires of the headshell and the symbols on the cartridge terminals.
Match the colors of the lead wires of the headshell and the symbols on the cartridge terminals as follows.
When looking from the front, the top left is L+ : white, the bottom left is L : blue, the top right is R+ : red, and the bottom right is R- : green.
- Connect the lead wires securely using tweezers or the like.
2 Attach the cartridge to the headshell using the screws, nuts, and washers included with the cartridge.
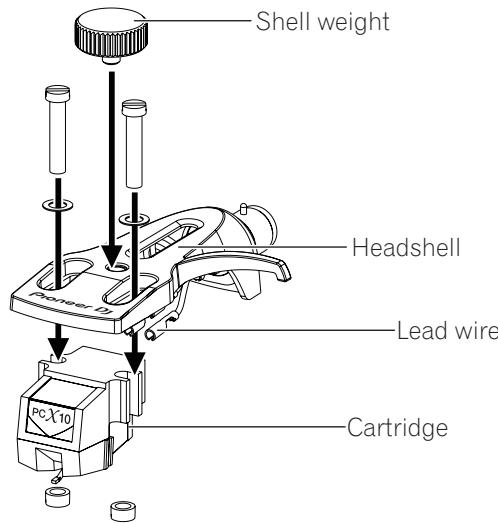
- When attaching the cartridge to the headshell, attach it properly.
- When using a cartridge between 5g or less, use the supplied shell weight.
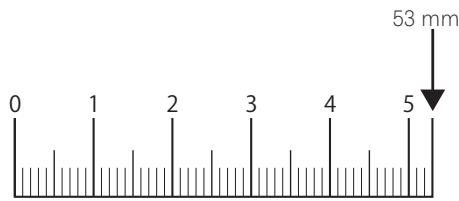
Adjusting the overhang
Use the following overhang adjustment scale to adjust the position using the cartridge attaching screw so that the stylus tip comes to a position 53mm from the tone arm attachment part.
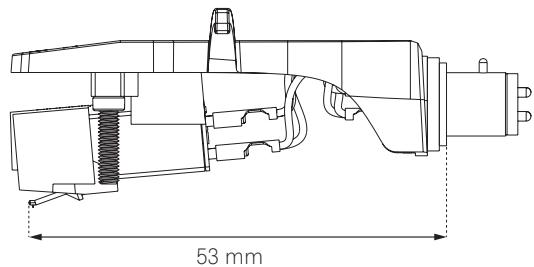
Overhang adjustment scale
Additional information
Troubleshooting
Incorrect operation is often mistaken for trouble or malfunction. If you think that there is something wrong with this component, check the points below and the [FAQ] for the [PLX-500] on the Pioneer DJ support site. pioneerdj.com/support/
Sometimes the problem may lie in another component. Inspect the other components and electrical appliances being used. If the problem cannot be rectified, ask your nearest service center or your dealer to carry out repair work.
This unit may not operate properly due to static electricity or other external influences. In this case, proper operation may be restored by turning the power off, waiting 1 minute, then turning the power back on.
| Problem | Check | Remedy |
| The power is not turned on. | Is the power cord properly connected? | Properly connect the included power cord to a power outlet. |
| Is the [POWER] switch for power supply set to [ON]? | Set the [POWER] switch for power supply to [ON]. | |
| No sound or small sound. | Are the audio cables properly connected? | Connect the audio cables properly. |
| Are the terminals and plugs dirty? | Clean the terminals and plugs before making connections. | |
| Is the headshell attached properly? | Attach the headshell property. | |
| The left and right sound are reversed. | Are the left and right connections for each piece of equipment reversed? | Correctly connect the audio cable and the lead wires of headshell part. |
| There is a low hum sound (humming or buzzing sound) during playback. | Is there an electric device such as a fluorescent lamp or its power cord near the connection cord? | Place the power cord of the fluorescent lamp or other device as far away as possible. |
| The stylus tip does not come down on the record. | Is the stylus pressure adjusted property? | Match the balance weight to the appropriate stylus pressure value for your cartridge. |
| Is the arm horizontally balanced? | Turn the balance weight until the tone arm becomes horizontal state. | |
| Stylus jumping occurs. | Is the stylus pressure adjusted property? | Match the balance weight to the appropriate stylus pressure value for your cartridge. |
| Is the record warped or does it have scratches? | Check the condition of the record. | |
| Does the stylus tip have a lot of dust on it? | Remove the shell with cartridge and use a soft tip brush or writing brush to carefully remove dust, etc. from the stylus tip. | |
| Is anti-skating adjusted correctly? | Adjust anti-skating correctly. | |
| Is the arm height adjusted correctly? | Adjust the arm height correctly. | |
| The arm stops along the way and does not go ahead. | Does the record have scratches? | Check the condition of the record. |
| Is the arm coming into contact with something? | Check around the arm. If there is an obstacle, remove it. | |
| Sound volume is low or loud (distorted). | Is the connection to the amplifier appropriate for the cartridge type (output)? | Connect the connection cables properly. |
| Is the setting of the [PHONO/LINE] switch correct? | Set the [PHONO/LINE] switch correctly according to the input terminal of the connected device. | |
| The rotating turntable shakes a lot. | Dirt, etc. is adhered to the attachment parts of the turntable and center spindle. | Remove the dirt. |
Cautions on use
About condensation
Water droplets (condensation) may form inside the unit (on operating parts and lenses) in the winter, for example, if the unit is moved from a cold place into a warm room or if the temperature in the room in which the unit is installed rises suddenly (through heating, etc.). The unit will not operate properly and will not be playable with condensation inside. Let the unit stand for 1 to 2 hours at room temperature (though this time depends on the conditions of the condensation) without turning on the power. The water droplets will evaporate and the unit will become playable. Condensation can occur in the summer as well if the unit is exposed to the direct wind from an air-conditioner, etc. If this happens, move the unit to a different location.
When transporting the unit to another location
Use the original packing materials to pack the unit.
If the original packing materials are not available, be sure to perform the following.
- Detach the slip mat and turntable before packing.
- Detach the headshell and balance weight from the arm and pack carefully.
- Use the arm clamper to secure the tone arm and use tape to secure it so that it does not move.
- Wrap the main unit in a blanket or soft paper so that it will not be damaged.
- Pack so that a force will not be applied to the tone arm.
Maintenance of each part
When attaching and detaching the headshell, turn off the power of the amplifier.
If you attempt to do so while the volume is loud, the speaker could be damaged.
- Remove the shell with cartridge and use a soft tip brush or writing brush to carefully remove dust, etc. from the stylus tip.
Use a good quality record cleaner to clean records. - Use a soft cloth or something similar to clean the headshell terminal and then reattach it to the tone arm.
Cleaning the dust cover, etc.
Use a soft cloth to clean the dust cover and cabinet
- Do not clean the dust cover while playing. Static electricity could cause the tone arm to be pulled by the dust cover.
About trademarks and registered trademarks
"Pioneer DJ" is a trademark of PIONEER CORPORATION, and is used under license.
-rekordbox™ is a trademark or registered trademark of the AlphaTheta Corporation.
The names of companies and products mentioned herein are trademarks or registered trademarks of their respective owners.
Specifications
Power requirements.....AC 110 V to 120 V or 220 V to 240 V, 50 Hz/60 Hz
Power consumption. 11 W
Main unit weight 10.7 kg
Max. external dimensions ...450 mm (W) × 158.5 mm (H) × 367.5 mm (D)
Tolerable operating temperature +5^ to +35^
Tolerable operating humidity. 5% to 85% (no condensation)
Turntable part
Drive method. Servo type direct drive
Motor 3-phase brushless DC motor
Braking system Electronic brake
Rotation speed 33 1/3 rpm, 45 rpm, 78 rpm
Rotation speed adjustment range. ± 8%
Wow and flutter. 0.15% or less WRMS
S/N ratio. 50 dB or higher
Turntable.. Aluminum die-casting Diameter: 332 mm
Starting torque 1.6 kg·cm or more
Starting time. 1 second or less (at 33~1/3~rpm )
Tone arm part
Arm type Universal type S-shape tone arm, gimbal-supported type bearing structure, static balance type
Effective length. 230.5 mm
Overhang 16 mm
Tracking error. Within 3^
Arm height adjustment range. 6 mm
Stylus pressure variable range. 0g to 4.0g (1 scale 0.1 g)
Proper cartridge weight. 9.5 g or less (single cartridge)
Cartridge type VM
Output voltage
PHONO. 2.5 mV/1 kHz
LINE. 150 mV/1 kHz
The specifications and design of this product are subject to change without notice.
© 2016 AlphaTheta Corporation. All rights reserved.
Raccordements (p.12)
4 AC IN
https://rekordbox.com/en/store/
WAARSCHUWING NETSNOER
https://rekordbox.com/en/support/manual.php
Montage
https://rekordbox.com/en/store/
De naald verrangen
https://rekordbox.com/en/support/manual.php
Montagem
Regularo anti-skating (pag.11)
14 Lingueta de bloqueio de HEIGHT ADJUST
Regular o anti-skating
https://rekordbox.com/en/store/
Substituir a agulha
IpeekJIIOUaTeJIb HAnpJxKeHn
IpeeknlouateIb Hnnpjxehn HaxoDntcHa BepxHei paHEn y MOeJe C BO3MOXHOCTbIO IpeeknloueHn Hnnpjxehn.
Ha 3aBoDe-Im3rOToBnTeJe nepeKlIOuCaTeIb HAnpJxKeHn yCTaHOBJIeN B nONoXeHne 220-240 B. Bb6epHTe npAwnlbHoE HApJxKeHne dIy BaSei cTpaHbI nnI peNoHa.
Ipeed Tem, KaK BbIbpaTb Dpyroe HaprrxKeHne, OTCoeDHHTE CINIOBOI Ka6eJIb. C NOMOuIb0 OTBePTKn CpeDHeRo pa3Mepa NepeBEdnTe nepeKIIuOAteNb HAprrxKeHnB HyXHoe NIOJoxKeHne.
OB3ATEJIbHAR BEHTUNLAUR
I3dJIe NcKnIyATnpyeTc npn CJeDyUOxNx TemnepaTy n BnaxHoCTn: +5°C Do +35°C; BnaxHoCTb MeHee 85% (He 3acNoHJrTe OXnJaHOuIe BeHTnJIrTOpbl) He yCTaHaBnBaIte I3dJIe N B IIOxo IPOBETPnBaEMOM NOpMeUeHIN INB MMeCTe C BvICOKoB BnaxHoCTbH,OTKpbITOM DnI pRmORO COJIHeHOrO CBeta (ININ CNJIbHOrO NCKycCTBeHOrO CBeta).
D3-4-2-1-7c*A1_Ru
D3-4-2-1-5*A2Ru
MEPbI IPEIOCTOPOXHOCTN PNI OBPAUENC CETEBBIM SHHYPOM
Держпге сеевошур 3а Вилку. He bItackивайт e BИКУ, B3aBwincb 3a WHyp, n HNKOrda He kacaITecb cTeBOrO shHpya, ecn Baun pykn BnaxkhIe, TAK KAc 3To MoKjet npINBeCTN K KOPOTKOMy 3ambIkaHIno nIn nopaxhenIO 3neKTPnueCKM TOKOM. He CTaBbTe annapat, ppeDmtebl Me6eJIn n T.D. Na cTeBOI shHyp, He 3axkmaite erO. He 3aBra3bBaIte y3IOB ha shHype n He CB73bAitre erO c DpyHMn shHypamn. CTeBbIe shHypbl DoJXhbl JekTaTak, YTO6bl Ha NHX HeJIb38 6blNo HAcTynITb. NOBpeKdEHHbI cTeBOI shHyp MOKeT cTAb PrUnHOn BO3HNKHOBEHn IOxapa nIn n nopaa3ntb Bac 3neKTPnueCKM TOKOM. BpeMOn OT BpeMeHn IpOBepaIte cTeBOI shHyp. B clyuae obHapyKeHn IOBpeKdEHHa O6paTITcEsb 3a ZameHoB B 6nJaWn CepBnChbI ueHTp nIn K BaWeMy dInJepy.
S002*A1_Ru
BHIMAHNE
BbIKHIOUaTEb POWER DaHHORO yCTPOINCTBa He NoIHOCbIb OTKJIIOuaET erO OT 3JIeKTPoCeTn. YTo6bI NoIHOCbIb OTKJIIOuHTb NITAHne yCTPOINCTBa, BbITaUNTe BUNKy Ka6EJa NITAHnY n3 3JIeKTProp03ETKn. No3TOMy yCTPOINCTBO CNeJyET yCTaHaBUNBaTb TaK, YTO6bI BUNKy Ka6EJa NITAHnY MOXHO 6bIIO JeTKO BbITaUNtB n3 pO3ETKn B Upe3BbIaHbIX o6cTOnrTaBCTBax. Bo n36EkaHne NOKapa CNeJyET n3BNeKaTaB BUNKy Ka6EJa NITAHnY n3 pO3ETKn, ecNl yCTPOINCTBO He bYudet NCNOL3OBaTbCBA TceHne DOnIrO BpEmEHn (HanPIMep, ecNl Bbl Ye3Kaete B OTnyck).
D3-4-2-2-2a*A1Ru
Copepkne
Kac cJeNyET YHTaTb DaHHoe pyKOBOdCTBO
-БлардамВасяпokункуЗтOroиздениКOMпаимPioneerDJ. O683ateIbHNo npOчTne DaHnyO bpoшИру.В Hei coDeprKHTcR BaxKHЯ ИнФорMaцHy,КOTOPуHo HeO6xOДIMоИЗЧУТьdo INCOnЛь- 30BaHnIaDaHHoro I3dEJIy. П�ЗавшениИЗчЕнERYHСТРУКUIM,ХpaHnITe INB HAnDEJXHOM MeCTe ДЯгспавOKВбуduSeM.
B daHHoB 6poUHope Ha3BaHnHa KHONoK n pa3bEmOB OCHOBHOrO 6noka yKa3bIbAIOCTcB KBaDpaTHbIX cKobkax ([ ]). IprImepebl: Haxmnte KhoNky [START/STOP].
DOnaHauana
CboiCTBa 5
KoMJIeKT nOCTaBKn 5
https://rekordbox.com/en/store/
CoepkaHne cTpaHcbl MoKet n3MeHraTbca 6e3 npedBaPntb-Horo yBeDomJIeHn.
2 BbIbepnTe KpaTkoe pyKOBoDCTBO u ⅢeJKNHTe [Free To Download].
![PIONEER DJ PLX-500 - BbIbepnTe KpaTkoe pyKOBoDCTBO u ⅢeJKNHTe [Free To Download]. - 1](/content/2025/01/328346/images/a640a53f54080ed68462d618a26ef553480dc5e60614846d199494b529d52283.jpg)
Free To Download
Ver. (20
3 BHIMaTeIbHo npOuHTaIe TJIueH3NoHHOe corlaueHne n yctaHOBnTe fJnaXoK [pnpHmAo], ecn Bbl cOrIaChbI cero ycIOBnAMN.
Ecn yctaHOBHeN 3TOT pnaKOK,3HaOOK [Download] cTaHOBITcAKTNBbIM.
Haxmnte [Download].
Hauhentc3a rpy3ka rekordbox (Mac/Windows).
PernynpobKa BbICToI ToHa (Ctp.14)
8 TohapM
PerynpoBka (cTp.10)
9 3axkIM ToHApMa
CnykntIJIaФNKcaUNToHApMa.
10 Ynop ToHapMa
CJnyknt onopoT TohapMa.
PbIurMnKpOJIuΦTa
Ppi npDjBempebHara TOHAPM pOdHMaetc. Ppi onyckanHHpBuHaToHApM ONyCKaETc.
12 MinkpoJnФT ToHapMa
3To yctpoCTBO npedha3NaeHcO nIpeMeueHn ToHapMa BBePx nBn3. YnpablenHe IM OcyuceCTbIeTcra bYarom MkPOJInФTa.
13 Pyuka ANTI SKATING
PnBocpno3BeHnn nlaCTnHKn Ha KOHcK nIbI deIeCTByET Cnna, HaprabneHHa K cHTpy BpaueHn. 3a cTcTAHOBKn C NOMOsbU 3ToI pyuKn daBHeNn paBHoro CnIe, BO3DeCTByUoJe H na Iy, BNJIHHe 3ToI CNbI yCTpaHrTC.
PerynipOBKa KOMneHcaunn cKaTaBbAiooee cnblc (ctp.11)
PerynipOBKa npnxKMMHOn cnblnrrblc (ctp.10)
18 CtoiKa dePkaTeIa KapTpndka
IcnoJIb3yETcI JIyUcTaHOBKINoIOBKNB BepTnKaJIbHOMNoJIOXKeHN.
19 AanTep dny doJrOurpaIoUxN nlaCTnHOK
IcnoJIb3yETcI IaB OBCnpon3BeJeHnI CtAHdApTHbIX DoJIroINrpaIO-ux IIactHOK.
Bocnpoun3bveHne cTaHdapTHbIX DoJIroUrgpaIOuix PnactInOHK (ctp.15)
3aDnnaHeIb
CoOTBETCTBYUOa Cnla HauKaTna CTnLyca dIy KaTpndka N3 KOM- nIeKta: ot 3,0 do 4,0 g.
BbInonHnTe CneDyUoIe noDrotOBtIeIhIbe onepaun:
BepnTe ToHApMa Ha ynp N 3aKpeNtTe 3axmOM ToHApMa.
1 COBmecnte MeKy "0" Ha KOJIbce peRpyJInpObKn npNXMHOH CNJIbI INJIbI C OCEBOI JINHNe Hn 3aJHe qactn Tpy6Kn ToHaPma.
YdepKINBaa npOTnBOBec nalbcem IJnpEoTbpaueHn erO nepeMeuneHn, NOBepHNTe TOnbKO JcOp peRyIInPOBKn pNIXMHo CnblI rIbI TaK, YTObbl MetKa Yncna "0" COBnala c cepHO OceBOJ LInHnei Ha 3aDHeu qactn TpybKn ToHaPma.
LentpaHna shkana
2 OtperyIpyIte npnxmHyu cnly nIbl.
ПовернITE npOTиBOBec,УTObI yCTaHOBITb npINKIMHyO cNHy nITbl COOTBetCTByUOyHO NcONJb3yEMomy KapTnDxy.
- Pπu BpaüeHnnpoTbOBeca BpaaetcnyKoIbIoo peryInpOBKn npIXMHO cnbl. CneJy 3a KoIbIoumpeYIpOBKn, yctahOBHTe Heo6xOdmMyIO npXIMHyO cnIy ngbl.
LcHTpaNbHa 1kana
Perylnpobka KOMpeHcaunnCKaTbIBaIOUeN CNIbl
3Ta peryunpoBka BblIOHЯETcA dIa npedotbpaueHna nepeckoka nIbl.
YcTaHOBnTe To Xe 3HaueHne Ha 5kaJIe, YTO N dJa npIXHMHO CNblI rJbI.
ПовернITE руку [ANTI SKATING] takIM obpa3OM, чTOбыmetka 3начениya, усТанOBЛеHHORO дя ппЖимHoи сИлblI ngлbl KapTpNiДжа, coBNaDana c δаЗоВй линей.
Pn BocnpOn3BeDeHnn CO Ckp3TqEm
IpypeoTbpaueHnpeeCKOKOBIrblbOTperynpuyTe nnoJKeHne 1kAJIbB COOTBETCTBnC TINOM BOCPON3BeDeHnR.
PerylnpoBkA BbICOTbIMNKpOJnΦTa
PnncnoB3OBAHN KAPTpNJa He n3 KOMPiKeTaNocTabKN OTpeyIpyIe ee B COoTBETCBN C NcNoB3yeMbIM KApTpNJaEM. BbIPOHNIte cNeDyUOnne NODroTOBnTeJIbHbIe OnpaUN:
-Пл actнka yctaHaBnBaetca Ha noDnoKky.
- CHIMITE 3auntHbI KOJIpaOK INJIbI IN 3axIM TOHApMa, He npika-CaCbK KOHUY INJIbI.
- ПоДнHMnTe рьчаг МИКрОиФТа И yCTaHOBnTe ToHApM Ha nIpaTnHky.
OtperyI npuy Te BbICOTy, NOBopauVBa BnHT npu OnyuHem MkpoJIneTe.
PnBpaueHnNo yacobO chpeJIke paCtOHaHne MeJy nPa-CTNkoI INrIOy MEmHbSaetc.
PnBpaueHnnpoTbYacobOcTpeIKNpacCTOHaHE MeKdny pIaactNkoN uIrNo yBeJIuNBAeTCR.
BbICota MmKpOINΦTa TOHApMa (pacCToHne MEkDy PnactHKnO INrIIO, KOrDa pByar MmKpOINΦTa NODHrT BBePx) yCTaHaBnBaETcRa Ha 3aBoe-He3roTOBnteB DnAna30He npImepHO O T 8 MM Do 13 MM.
MnKpOJIuΦT ToHApMa
Pereynipobka BbICOTbl ToHapMa
PeruInpoBka BbICOTbl OCHOBHOrO 6Ioka
Ipyem nobopota demnepera otperynnyte BbICOTy taKIM o6pa3OM, T06bl OCHOBHO 6LOK HaxoINCR roN3OHTaIBHO.
YnpaBJIeHne
BkJIoueHne NITaHHN
1 BbINOJIHnTE BCE NOkKIOUChEHN, 3aTeM NOkKIOUChTe CInoBOi Ka6eIb K Po3eTke.
日 IopKnIoueHnA (ctp.12)
2 IpeBédnte nepeKJIIOuTeIb [POWER] B noLoXeHne [ON], yTo6bl BKJIIOUHTb nITaHne yCTpoIcTBA.
BbCBeuBaIOCTaHdNkaTOpbl DaHHoro annapata N BKnIOUaETcra nHTaHne.
OTKIIIOUeHne IHTaHnIa
IpebeDnte nepeKJIIOuataTeB [POwER] B noLoXeHne [OFF], yTo6bI BBIKJIOOHHTb NITaHHe yCTpoiCTBa.
Пианнданно annapata OTKNIOUaetcra.
Bocnpon3BeJeHne
BbIOpHnTe cNeyuOuIe noIroTOBtIbHbIe onepaun:
- IonoXnTe nIaTnHKy Ha onOpHbI dNcK.
- CHIMMTE 3aunTHbIK KOINaOK INrIbI IN 3axIM TOHapMa.
1IpeBcHtepeKIOuTeb [POWER]BnoLOXeHne[ON],yTo6bIKJIIOUHTbNITAHne yCTpoiCTBA.
2 BbIbePte CkOPOCTb BpaUeHnB COOTBeTcTBnC 3aIIncbIO, HAKIMMa KHOKNy N3MeHeHHc CKoPOCTN.
3 Haxmnte KhoNky [START/STOP].
OnopHbI dNcBvaaetc.
4ПоднIMITEpbIyar MmKpoJIHΦTaи yCTaHOBnTe TOHaPmHaIIJaCTnHKy.
5 Onyctnte pbIur MmKpOJIuΦTa.
ToHapm MeDneHNO onyckaetc n HauHHaetc BOCpOn3BedeHne.
PpnoocTaHOBKa BOCnpon3BeDeHnA
IodHmnte pbiur mKpOJnΦTa.
Igna Kaptpnda noDnHmaeTcO TnactnKn.
-Дяво36новлениь ВOCпpon3Bedeня onyctnte pyhar MKNpOJInФТа.
3aBepseHne BocnpOn3BeDeHn
1 POnHmInTe pbIar MKNpOJIINΦTa, YTO6bI BepHyTb ToHApM Ha yNOp, a 3aTeM onyCTnTe pbIar MKNpOJIINΦTa.
2 HaxmTe KhoNky [START/STOP].
PpOurpbBateIb nnabHO npekpaauaet Bocnpoun3BeDeHne.
3 Пелевадитупеклочаь [POWER] в полжени [OFF], утосы BBIKJIIOHHTь питане устюгоста.
3aKpeNITE TOHApM 3aXIMOM TOHApMa.
YTo6b3aUHTnTB KOHcNK nIblb,HaJeHbTe 3aUHTbIK KOJINaOJKrJIbI.
3aKpoTe nbIe3aunTHyO KpbIuKy.
PerynnpOBKa BbICOTbl TOHa
IpeedBraiTe no3yHok [TEMPO] Bnpeed nnn Ha3a.
Pn npemeeHnn PON3yHKa Bpeepd qactota BpaeeHna yBennBa-etca, a npn npemeeHnn Ha3ad — yMehbaaetc.
Korda non3yHOK [TEMPO] OKaJcTcNo ceHTpy, 3arOpITcJeITo-3eJIeHb CnHaN INdNkaTopa N bdyet YctaHOBHeHa BbIbpaHnaCKopocTb BpaueHnra (331/3,45nn78obOpOTOB MmHyTu).
-Шka的答案 [TEMPO] поаьинглп рибиntьhoe 3hae-Hne.Испльзутег В каессе opentupa.
- TTo6bI npOBeRtB, qTO ckOPOCTb BpaaSeHnI3MeHnIaCb COOTBeTCTByUoIIM O6pa3OM, NOCMOTPte CTpObockOnuYeCKn CnHaJI Ha NOBOPOTHom CTOnIKe.
MeTkn cTpo6oKoHnN

① EcII IN CINHAN He DnIXeTcR, CKOpOCTb BpaUeHnA COCTaBnAET 331/3 06/MnH (NITaHne 50 T)
② EcHn CnHn Hne DnKjEeTc,CKOpocTb BpaJeHncoCTabJnert 45 o6/ MNH (NtTaHne 50 T)
③ Ecni CnHan He DnBxJETc,CKOpocTb BpaJeHna COCTaBnAeT 331/306/MnH (NtTaHne 60 T)
④ EcHn CnHn Hne DnKeTcR, CKOpocTb BpaueHncoCTabTnEET 45 o6/ MNH (NITaHn 60 T)
Дляпдсеваньma MeTOK CTpo6OckOnn B daHOM yCTpoIcTbe nCNoJIb3yETcR CTpo6OckON (KpaChnB CBeToDIO).ПрnpoBepKe BbICOTb BCERda NcNoJIb3yIte CTpo6OckON.
Kak noka3aTb 06JoxkU pIaCTnHKn
UctaHOBHTe 06nKc3a depKaTeIaMNI, pNkpeIeHHbIMNK nbJIte3a- uTHo KpbIuKe, KaK Noka3aHO Ha pncyHke.
- He yctaHaBnBaIte TuJa dpyrIe npEpmTebl.
- IpaBnIbNo 3aKpeNITe o6IoxKy 3a depXkTeJIaMn.
- Пи Испльь�ани 3то Функции BO Врем BAОСпОНЗБЕDEнИСеДNTe, Утоби оьложка He yana. 3То мokет NOВрEDITb Ппа-CTINKу ИПС CTINYc.
He OTKpbIbAaTe nbIe3aUHTHyIO KpbIuKy,ecnHa HeyycTaHOBJIeHa oBIOKka pIaNCTnHKn.
Bocnpon3BeDeHne cTaHdapTHbIXdoJIrOuIoux nlaCTNHOK
UctaHOBITE aadTep DoJIrOIMraIOx nIaCTINHOK Ha CEHTpaIbHbI ⅢINHDeJI b N HAKMITE KHOJIKY [45].
Iopcbetka KOHUnka nIbl
Haxatne nepeknnoatae I NOCBETK INBkIOUaET 6enyu noCBETky INIbI NIOHNMAeYCTPOINCTBO NOCBETKN BNOLOXHeNIE NOCBETKN KOHNKA INIbl.
- EcINB3TOM HeT Heo6xOIMOCtN,HaxMITE Ha BbIKIooTaTeNb noCDBeTKn CTInyCa,YTO6bl ONyCTnTB erO. IOncBETKa CTInyCa BbIKIIOHTCra.
He cmOTpnte npraMo ha ropaui cnHaI CTnlyca.
3aanncb
Пи рплкючим К кOMMbIoTepy,Ha KOTOpOM yctahOBNeHo npINIOJKeHne ДЯУнравЛeноу МуЗьКоI"rekordbox",ВОзMOЖHA zuNФровая 3aANb aHaANOROBbIX pIaCTHNOK.
P1 - FoiuN3rOToBJIeHnA
| Гор | 2011 | 2012 | 2013 | 2014 | 2015 | 2016 | 2017 | 2018 | 2019 | 2020 |
| Символ | К | L | M | N | O | P | Q | R | S | T |
| Гор | 2021 | 2022 | 2023 | 2024 | 2025 | 2026 | 2027 | 2028 | 2029 | 2030 |
| Симbvои | A | B | C | D | E | F | G | H | I | J |
P2-Mecrau3roTOBLeHnA
| Месуц | 1 | 2 | 3 | 4 | 5 | 6 | 7 | 8 | 9 | 10 | 11 | 12 |
| Символ | A | B | C | D | E | F | G | H | I | J | K | L |
D3-7-10-7_A1_Ru
© 2016 AlphaTheta Corporation. All rights reserved.