USER MANUAL HS5100 HISENSE
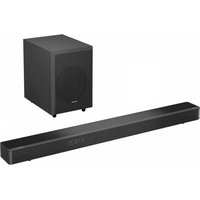
5.1CH Soundbar with Wireless Subwoofer
Model: HS5100
Dolby Audio

Bluetooth
HOMI
HIGH-DEFINITION MULTIMEDIA INTERFACE

Roku TV
Ready
USER MANUAL

Before using the soundbar, please read this manual thoroughly and retain it for future reference.
Contents
1. Important Safety Instructions 3
1.1 Safety 3
1.2 Caution 4
1.3 Warning 4
2. What's in the Box 5
3. Identifying the Parts 6
3.1 Soundbar 6
3.2 Surround Speakers 6
3.3 Wireless Subwoofer.. 6
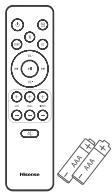
3.4 Remote Control 7
4. Preparations 7
4.1 Prepare the Remote Control 7
4.2 Replace the Remote Control Battery 7
5. Placement and Mounting 8
5.1 Placement 8
5.2 Wall Mounting the Soundbar 8
5.3 Wall Mounting the Surround 9
6. Connections 9
6.1 Use the HDMI ARC Socket 9
6.2 Use the Roku TV. 9
6.3 Use the Hisense EzPlay Function 9
6.4 Use the OPTICAL Socket 10
6.5 Use the AUX Socket 10
6.6 Connect Surround Speakers 10
6.7 Connect Power 10
7. Pair up with the Subwoofer 11
7.1 Automatic pairing 11
7.2 Manual pairing 11
8. Basic Operation 11
8.1 Standby/ON 11
8.2 Auto-Standby / Auto-Wake Feature 11
8.3 Select Modes 12
8.4 Adjust the Volume 12
8.5 Turn the Surround PURE/PRO/OFF 12
8.6 Adjust the Bass/Treble 12
8.7 Select Equalizer (EQ) Effect 12
8.8 Adjust the Brightness 12
8.9 Factory reset 12
9. AUX/OPTICAL/HDMIARCOperation 12
10. USB Operation 13
11. Bluetooth® Operation 13
13. DEMO Mode 14
14. Troubleshooting 15
15. Specifications 16
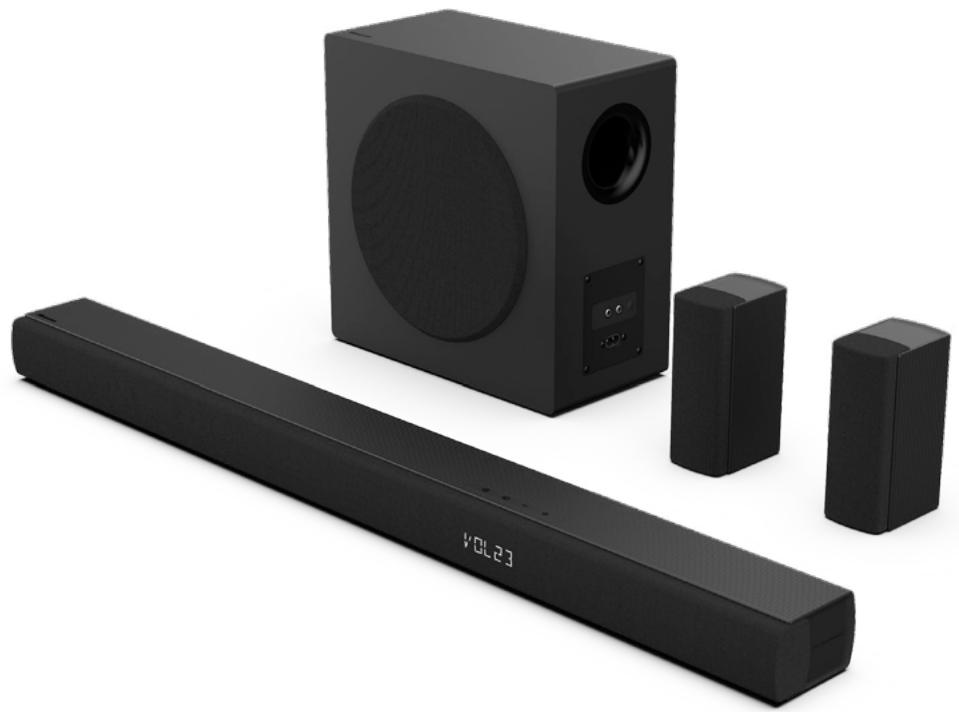
2. What's in the Box

Soundbar
Wireless Subwoofer
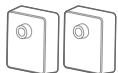
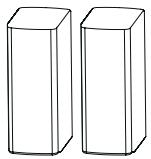
Surround Speakers x 2

Remote Control / AAA Batteries x 2
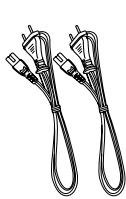
AC Power Cord x 2

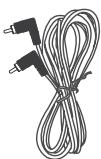
Surround Speaker Cable x 2
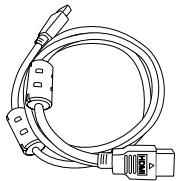
HDMI Cable

User Manual/Warranty card /Quick start guide
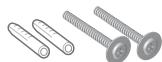

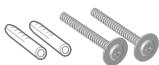
Wall Bracket
Power cord quantity and plug type vary by regions.
Images, illustrations and drawings shown on this User Manual are for reference only, actual product may vary in appearance.
3. Identifying the Parts
3.1 Soundbar
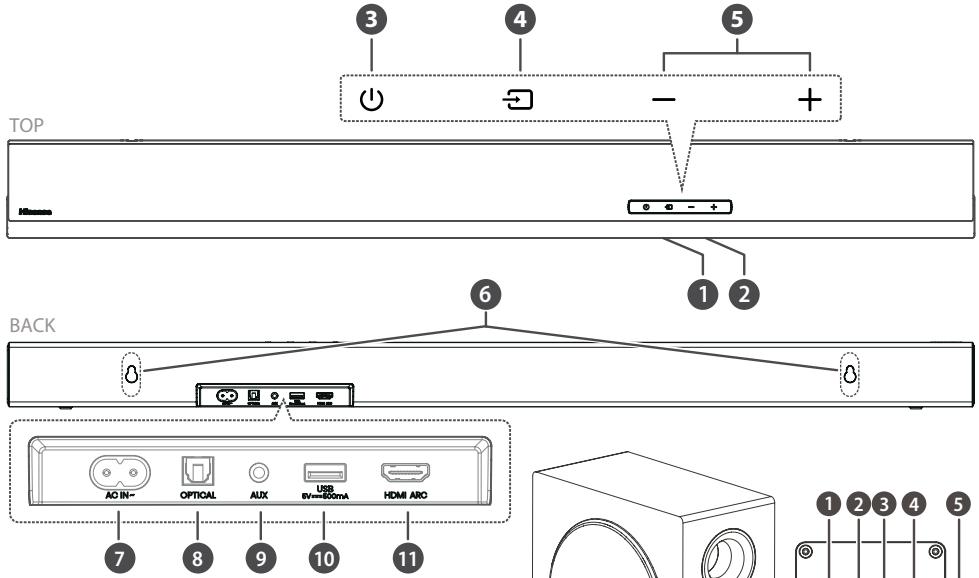
1 Remote Control Sensor
Receive signal from the remote control.
2 Display Window
Show the current status.
3 (ON/OFF) button
Switch the soundbar between ON and Standby mode.
4 (SOURCE) button
Select the play function.
Increase/decrease the volume level.
6 Wall bracket screws
7 AC~Socket
Use to connect the power cable.
8 OPTICAL Socket
9 AUX Socket
10 USB Socket
Insert the USB device to play music.
11 HDMI ARC Socket
Connect to a TV via HDMI cable.
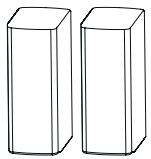
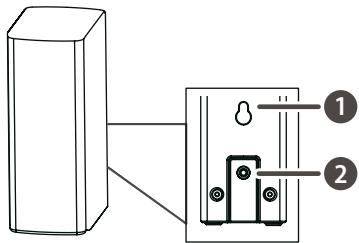
3.2 Surround Speakers
1 Wall bracket screws
2 SURROUND Socket
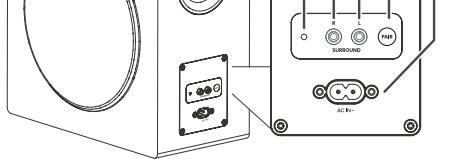
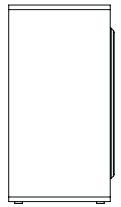
3.3 Wireless Subwoofer
1 Pairing Indicator
Light stops blinking once the subwoofer is paired with the soundbar.
2 SURROUND (R) Socket
3 SURROUND (L) Socket
4 PAIR button
Press activate the pairing function between the soundbar and subwoofer.
5 ACIN~Socket
Use to connect the power cable.
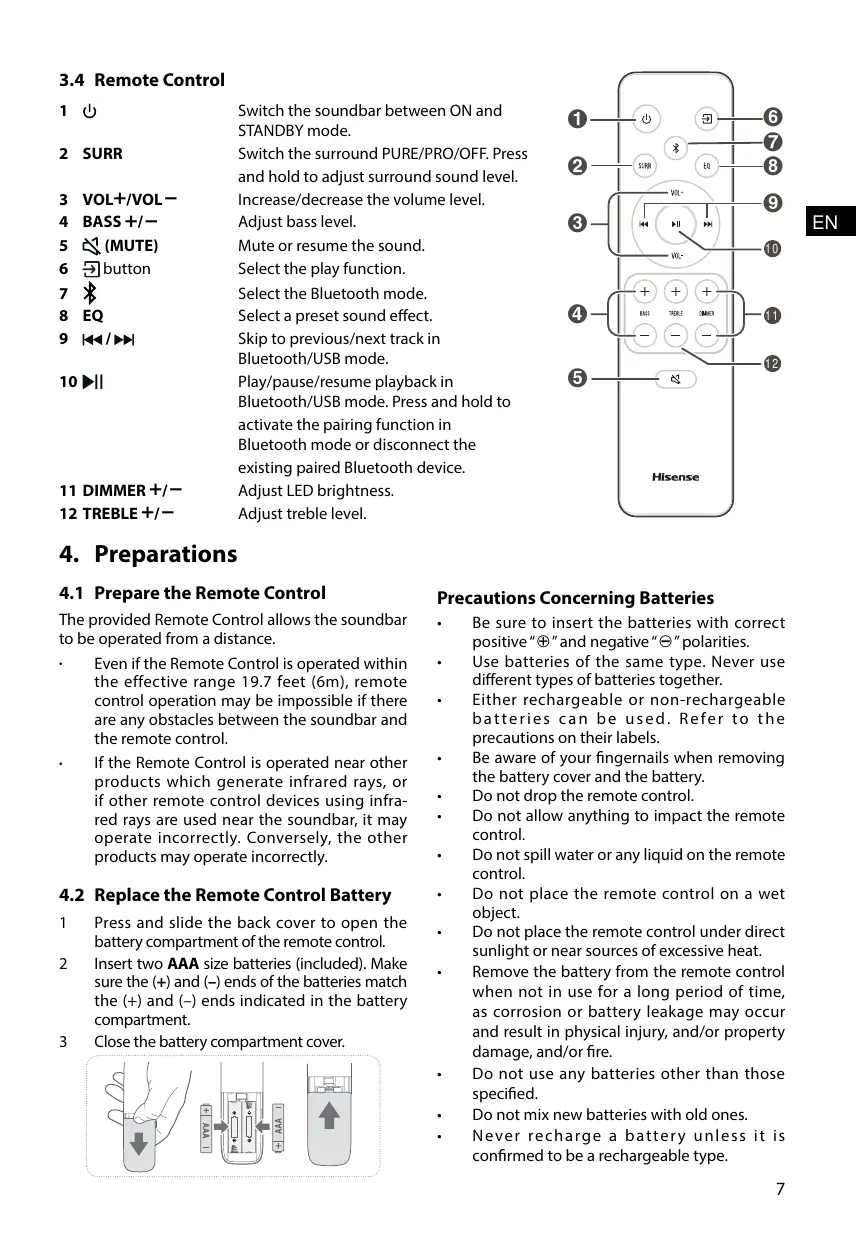
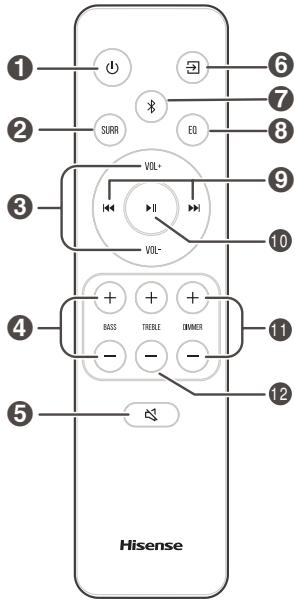
3.4 Remote Control
| 1 | ① | Switch the soundbar between ON and STANDBY mode. |
| 2 | SURR | Switch the surround PURE/PRO/OFF. Press and hold to adjust surround sound level. |
| 3 | VOL+/VOL- | Increase/decrease the volume level. |
| 4 | BASS+/− | Adjust bass level. |
| 5 | (MUTE) | Mute or resume the sound. |
| 6 | button | Select the play function. |
| 7 | | Select the Bluetooth mode. |
| 8 | EQ | Select a preset sound effect. |
| 9 | /→ | Skip to previous/next track in Bluetooth/USB mode. |
| 10 | || | Play/pause/resume playback in Bluetooth/USB mode. Press and hold to activate the pairing function in Bluetooth mode or disconnect the existing paired Bluetooth device. |
| 11 | DIMMER+/- | Adjust LED brightness. |
| 12 | TREBLE+/- | Adjust treble level. |
4. Preparations
4.1 Prepare the Remote Control
The provided Remote Control allows the soundbar to be operated from a distance.
Even if the Remote Control is operated within the effective range 19.7 feet (6m), remote control operation may be impossible if there are any obstacles between the soundbar and the remote control.
If the Remote Control is operated near other products which generate infrared rays, or if other remote control devices using infrared rays are used near the soundbar, it may operate incorrectly. Conversely, the other products may operate incorrectly.
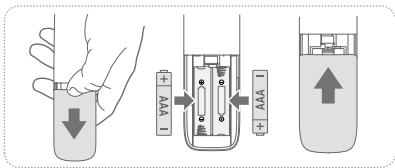
4.2 Replace the Remote Control Battery
1 Press and slide the back cover to open the battery compartment of the remote control.
2 Insert two AAA size batteries (included). Make sure the (+) and (-) ends of the batteries match the (+) and (-) ends indicated in the battery compartment.
3 Close the battery compartment cover.
Precautions Concerning Batteries
- Be sure to insert the batteries with correct positive “⊕” and negative “Θ” polarities.
Use batteries of the same type. Never use different types of batteries together.
Either rechargeable or non-rechargeable batteries can be used. Refer to the precautions on their labels.
- Be aware of your fingernails when removing the battery cover and the battery.
- Do not drop the remote control.
- Do not allow anything to impact the remote control.
- Do not spill water or any liquid on the remote control.
- Do not place the remote control on a wet object.
- Do not place the remote control under direct sunlight or near sources of excessive heat.
- Remove the battery from the remote control when not in use for a long period of time, as corrosion or battery leakage may occur and result in physical injury, and/or property damage, and/or fire.
- Do not use any batteries other than those specified.
- Do not mix new batteries with old ones.
- Never recharge a battery unless it is confirmed to be a rechargeable type.
5. Placement and Mounting
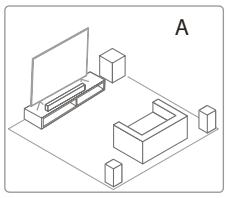
5.1 Placement
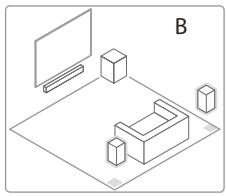
A If your TV is placed on a table, you can place the soundbar on the table directly in front of the TV stand, centered with the TV screen.
B If your TV is attached to a wall, you can mount the soundbar on the wall directly below the TV screen.
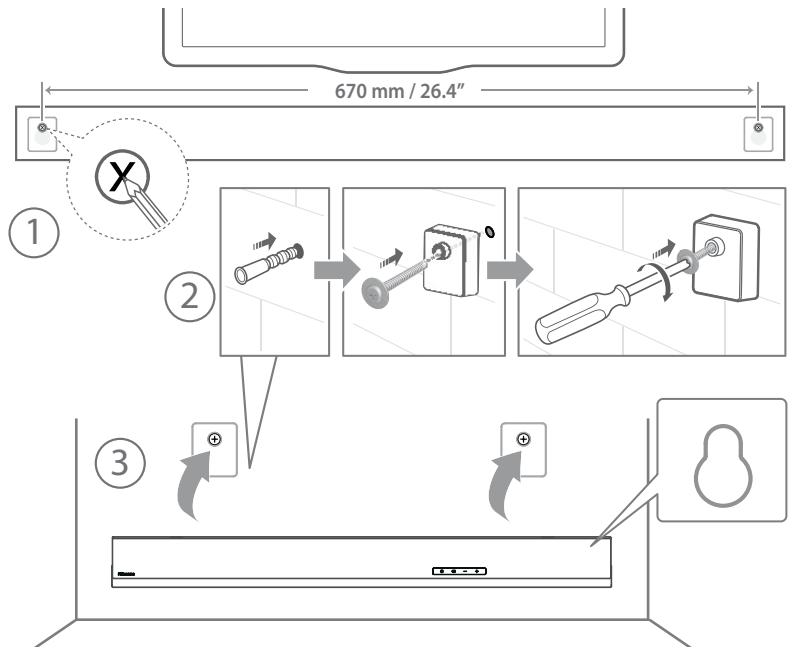
5.2 Wall Mounting the Soundbar
Installation must be carried out by qualified personnel only. Incorrect assembly can result in severe personal injury and property damage (if you intend to install this product yourself, you must check for installations such as electrical wiring and plumbing that may be buried inside the wall). It is the installer's responsibility to verify that the wall will safely support the total load of the soundbar and wall brackets.
Additional tools (not included) are required for the installation.
- Do not overtighten screws.
- Keep this instruction manual for future reference.
- Use an electronic stud finder to check the wall type before drilling and mounting.
WARNING
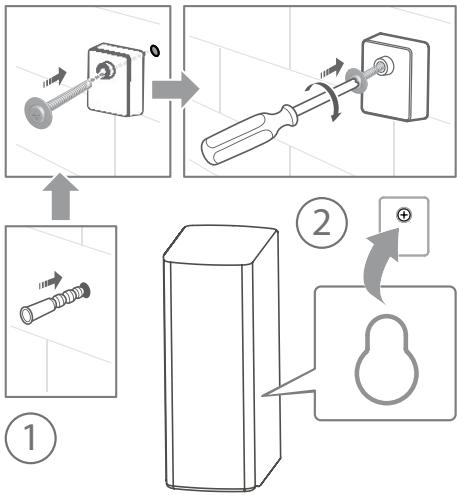
5.3 Wall Mounting the Surround
- The (R/L) Surround Speakers can be fixed to the wall using the included wall mount package.
- Note: Before installing the wall bracket, you need to connect the power/speaker cables of the (R/L) Surround Speakers.
6. Connections
6.1 Use the HDMI ARC Socket
The ARC (Audio Return Channel) function allows you to send audio from your ARC- compliant TV to your soundbar through a single HDMI connection. To enjoy the ARC function, please ensure your TV is both HDMI-CEC and ARC compliant and set up accordingly. When correctly set up, you can use your TV remote control to adjust the volume output (VOL + / - and MUTE) of the soundbar.
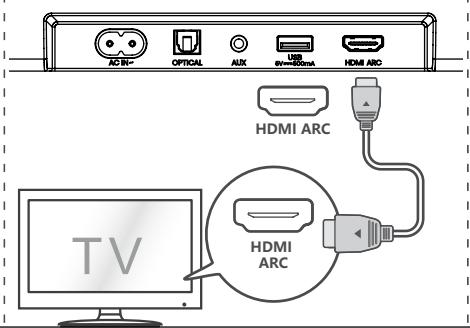
- Connect the HDMI cable from soundbar HDMI ARC socket to the HDMI ARC socket on your ARC compliant TV. Then press the remote control to select HDMIARC.
Tips:
- Your TV must support the HDMI-CEC and ARC function. HDMI-CEC and ARC must be set to On.
- The setting method of HDMI-CEC and ARC may differ depending on the TV. For details about ARC function, please refer to the owner's manual.
- Only HDMI 1.4 or higher version cable can support the ARC function.
6.2 Use the Roku TV
If you have a Roku TV^TM , simply plug in the HDMI cable to the ARC ports and follow the Roku TV ReadyTM on-screen instructions.

Simple setup
√ One remote
Quick settings
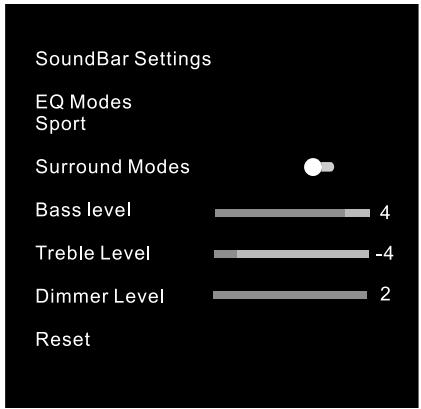
6.3 Use the Hisense EzPlay Function
For Hisense EzPlay, when the Soundbar connects with a Hisense TV via HDMI ARC, the will be a Soundbar Setting menu on the TV, and you can control this menu via you TV remote to control most of the Soundbar features.
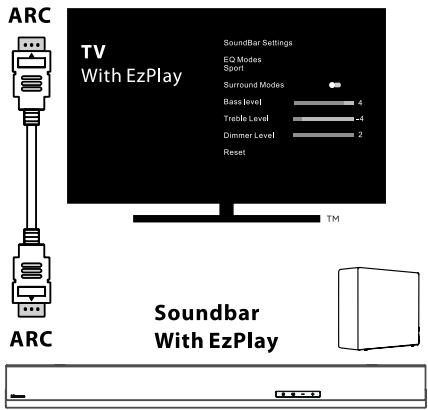
TV menu example (different models may have different menus):
Setting--sound--Soundbar Setting.
Note:
This function is available only when both Soundbar and TV support Hisense Ezplay.
This function requires Soundbar and TV connected via HDMI ARC, and the CEC of the TV must be truned ON.
If every time setting right, for the first time connect, there would be a tip on the TV screen to guide you find the Soundbar setting menu.
6.4 Use the OPTICAL Socket
- Use the OPTICAL cable to connect the TV's OPTICAL OUT socket and the OPTICAL socket on the soundbar.
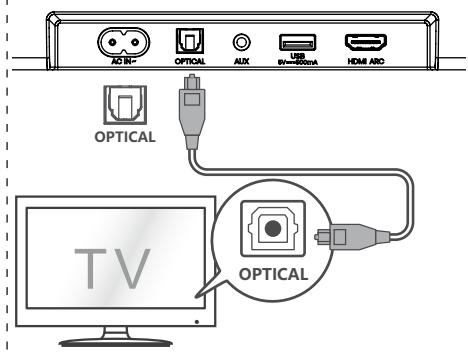
Tip:
The Soundbar may not be able to decode all digital audio formats from the input source. In this case, the Soundbar will mute. This is NOT a defect.
Ensure that the audio setting of the input source (e.g. TV, game console, DVD player, etc.) is set to PCM or Dolby Digital (Refer to the user manual of the input source device for its audio setting details) with HDMI ARC / OPTICAL input.
6.5 Use the AUX Socket
A. Use a 3.5mm to 3.5mm audio cable to connect the TV's or external audio device headphone socket to the AUX socket on the soundbar.
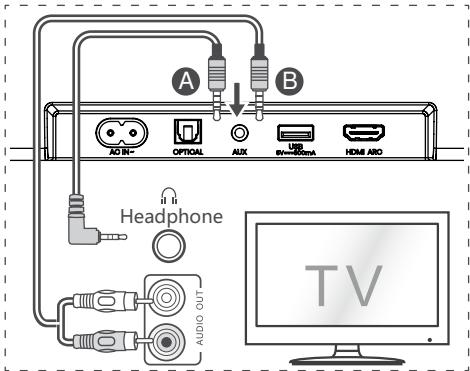
B. Use a RCA to 3.5mm audio cable to connect the TV's audio output sockets to the AUX socket on the soundbar.
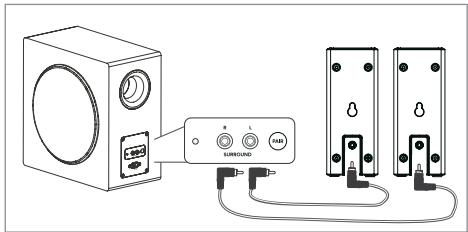
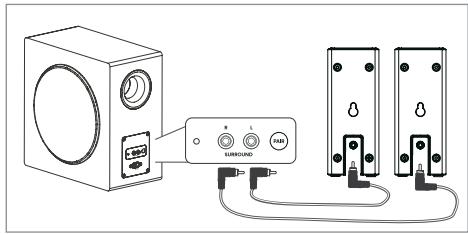
6.6 Connect Surround Speakers
- Use the surround speaker cable to connect to the SURROUND socket on the back of the surround speakers.
- Connect each surround speaker into one of the SURROUND (R/L) Socket on the back of the subwoofer.
6.7 Connect Power
Risk of product damage!
-
Risk of product damage! Ensure that the power supply voltage corresponds to the voltage printed on the back or the underside of the soundbar.
-
Before connecting the AC power cord, ensure you have completed all other connections.
Soundbar
Connect the mains cable to the AC~ socket of the soundbar and then into a mains socket.
Subwoofer
Connect the mains cable to the AC~ socket of the subwoofer and then into a mains socket.
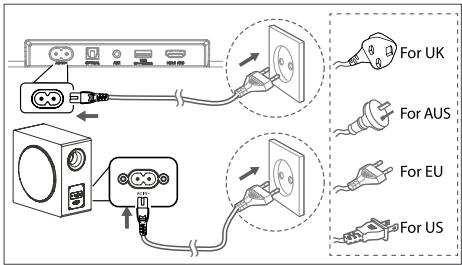
* Power cord quantity and plug very by regions.
7. Pair up with the Subwoofer
7.1 Automatic pairing
The subwoofer and soundbar will automatically pair when both units are plugged into the mains sockets and turned on. No cable is needed for connecting the two units.
- Determine the status based on the wireless subwoofer indicator.
| LED State | Status |
| Fast blink | Subwoofer in pairing mode |
| Constant on | Connected / Pairing successful |
| Slow blink | Connection / Pairing Failed |
NOTE:
- Do not press the PAIR button on the rear of the subwoofer, except for manual pairing.
If the automatic pairing fails, pair the subwoofer with the soundbar manually.
7.2 Manual pairing
- Ensure that all the cables are well connected and the soundbar is in Standby mode.
-
Press and hold the PAIR button on the rear of the subwoofer for a few seconds. The subwoofer will enter the pairing mode and the Pair Indicator will blink quickly.
-
Press the button on the soundbar or on the remote control to switch the soundbar on.
- Press and hold the button on the Soundbar or on the remote control for a few seconds.
- After the wireless connection succeeded, the Pair Indicator will light up.
- If the Pair indicator blinks, the wireless connection has failed. Unplug the cable of the subwoofer and then reconnect the main cable after 4 minutes. Repeat step 1 4
NOTE:
If the wireless connection fails again, check if there is conflict or strong interference (for example, interference from an electronic device) around your location. Remove these conflicts or strong interferences and repeat the above procedures.
The subwoofer should be within 6m (19.7 feet) of the soundbar in an open area.
If the soundbar is not connected with the subwoofer and it is in On mode, the POWER Indicator will flash. Follow step 1 4 above to pair the subwoofer to the soundbar.
8. Basic Operation
8.1 Standby/ON
It will automatically turn on when the power cord is connected.
- Press the button to switch the soundbar STANDBY mode.
- Disconnect the mains plug from the mains socket if you want to switch the soundbar OFF completely.
8.2 Auto-Standby / Auto-Wake Feature
[Auto-Standby] Your soundbar has been programmed to enter STANDBY mode automatically when no audio is detected for 15 minutes. For example, this would happen when pausing playback, or should the soundbar be left on accidentally.
[Auto-Wake] If a TV or an external device is connected (AUX / OPTICAL / HDMI ARC mode), the unit will switch on automatically when the TV or the external device is switched on.
To disable this feature, please follow the steps below:
- During ON mode, press and hold the button for 3 seconds to open the menu.
- The unit's display will scroll "MENU".
- Press the button 6 times in succession: the display shows: Auto Wake [ON / OFF].
or Press the button 7 times in succession: the display shows: Auto Standby [ON / OFF].
- Select the content with VOL + / - buttons on the remote control, and then press the button to confirm your selection and exit the settings.
- Repeating these steps will toggle the feature "ON" and "OFF".
8.3 Select Modes
Press the (SOURCE) button repeatedly on the soundbar or on the remote control to select the AUX, OPTICAL, HDMI ARC and USB mode. The selected mode will show on the display.
The selected mode will show on the display.
| Display | Mode |
| ARC | HDMI ARC |
| OPT | OPTICAL |
| BT IN | Bluetooth
Connected |
| NO BT | Not Connected |
| AUX | AUX |
| USB | USB |
| NO USB | No USB connected |
8.4 Adjust the Volume
- Press the VOL+/- buttons on the soundbar or on the remote control to adjust the volume.
If you wish to turn the sound off, press the (MUTE) button on the remote control. Press the (MUTE) button again or press the VOL+ buttons to resume normal listening.
8.5 Turn the Surround PURE/PRO/OFF
- Press the SURR button on the remote control to switch the surround PURE/PRO/OFF.
8.6 Adjust the Bass/Treble
- Press the BASS + / - buttons on the remote control to adjust bass level.
- Press the TREBLE +/- buttons on the remote control to adjust treble level.
While playing, press the EQ button on the remote control to select desired preset equalizers: MOVIE, MUSIC, GAME, NEWS, SPORT, NIGHT.
8.8 Adjust the Brightness
- Press the DIMMER + / - buttons on the remote control to select brightness level.
8.9 Factory reset
Reset device to default setting.
- Switch the soundbar on the optical mode, press and hold the [按钮] button on the soundbar, the soundbar will enter factory reset mode and turn to standby state.
| MODE | DEFAULT |
| SOURCE | ARC |
| Volume | 30 |
| Surround | Off |
| Dimmer | MAX |
| Bass | 0 |
| Treble | 0 |
| EQ | MOVIE |
| Auto Wake | OFF |
| Auto Standby | ON (Except the United States) |
9. AUX / OPTICAL / HDMI ARC Operation
1 Ensure that the soundbar is connected to the TV or audio device.
2 Press the (SOURCE) button repeatedly on the soundbar or on the remote control to select the AUX, OPTICAL, HDMI ARC mode. The selected mode will show on the display.
3 Operate your audio device directly for playback features.
4 Press the VOL+/- buttons to adjust the volume to your desired level.
Tip: The Soundbar may not be able to decode all digital audio formats from the input source. In this case, the Soundbar will mute. This is NOT a defect. Ensure that the audio setting of the input source (e.g. TV, game console, DVD player, etc.) is set to PCM or Dolby Digital (Refer to the user manual of the input source device for its audio setting details) with HDMI ARC / OPTICAL input.
10.USB Operation
1 Insert the USB device.
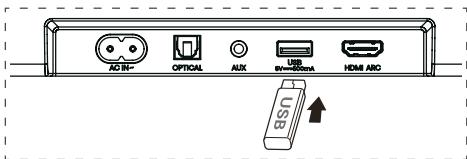
2 Press the (SOURCE) button repeatedly on the soundbar or on the remote control to select the USB mode.
3 During playback:
Start, pause or resume play
快 ,Skip to the previous or next track
Tips:
The unit can support USB devices with up to 32 GB of memory.
This unit can play WAV/WMA/MP3/FLAC.
This product may not be compatible with certain types of USB storage devices.
If you use a USB extension cable, USB hub, or USB Multifunctional card reader, the USB storage device may not be recognized.
- Do not remove the USB storage device while reading files.
11. Bluetooth® Operation
Through Bluetooth, connect the Soundbar with your Bluetooth device (such as an iPad, iPhone, iPod touch, Android phone, or laptop), and then you can listen to the audio files stored on the device through your Soundbar speakers.
First time pairing
1 Press the (SOURCE) button on the soundbar or button on the remote control to select Bluetooth mode.
The display will show NO BT.
2 Activate your Bluetooth device and select the search mode.
3 Select "Hisense HS5100" in the pairing list. After audio prompt, the system is successfully connected and and the display will show BT IN.
If you want to connect your soundbar with another Bluetooth device, press and hold the button on the remote control to disconnect the currently connected Bluetooth device. Follow step 2-3 to pair your Bluetooth device.
To disconnect the Bluetooth function, you can :
- Switch to another function on the unit.
- Disable the function from your Bluetooth device.
- Press and hold the × button on the remote control.
Listen to music from Bluetooth Device
- If the connected Bluetooth device supports Advanced Audio Distribution Profile (A2DP), you can listen to the music stored on the device through the player.
-
If the device also supports Audio Video Remote Control Profile (AVRCP), you can use the player's remote control to play music stored on the device.
-
Pair your device with the player.
- Play music via your device (if it supports A2DP).
- Use supplied remote control to control play (if it supports AVRCP).
Start, pause or resume play
山 ,Skip to the previous or next track
Tips:
The operational range between the Sound Bar and the device is approximately 8 metres.
- Before connecting a Bluetooth® device to the Sound Bar, ensure you know the device's capabilities.
- Compatibility with all Bluetooth® devices is not guaranteed.
- Any obstacle between the device and the Sound Bar can reduce operational range.
- Keep this player away from other electronic devices that may cause interference.
The player will also be disconnected when your device is moved beyond the operational range.
- During ON mode, press and hold the button for 3 seconds to open the menu.
- Select the content with the / buttons.
- Change the initial values for each of the settings with VOL + / - buttons.
- Press the button to confirm your selection and exit the settings.
If no button is pressed within 10 seconds, the system will automatically exit the menu.
| Display
↓/→ | Description
VOL+/− |
| MOVIE | Select Equalizer (EQ) effect
(MOVIE, MUSIC, GAME, NEWS, SPORT, NIGHT) |
| SUR OFF | Switch Surround Sound
SUR PURE / PRO / OFF |
| BASO | Adjust the Bass Level |
| TRE O | Adjust the Treble Level |
| IM3 | Adjust the Brightness
DIM 0 / DIM 1 / DIM 2 / DIM 3 |
| AUTO WAKE OFF | Switch Auto Wake
ON / OFF |
| AUTO STANDBY ON | Switch Auto Standby
ON / OFF |
| BASS BOOST ON | Switch: BassBoost
ON / OFF |
13.DEMO Mode
DEMO mode is a user mode specially configured for use in a Shop environment.
Activate/Deactivate the DEMO mode:
This Soundbar factory defaults to the ordinary consumer mode.
- Insert the Demo Kit to activate the DEMO mode.
- Remove the Demo Kit to deactivate the DEMO mode.
The soundbar will display the following as follows:
| Display | Mode |
| DEMO ON | DEMO mode |
| DEMO OFF | Consumer mode |
Use the DEMO mode
- Enter the DEMO mode, the soundbar will switch on automatically when the AC power on.
- Lock source (Unavailable). You can select source only through the Demo Kit.
- All keys will be locked and unavailable. You can controlled only by Demo Kit.
| All keys Locked
(Remote control & Bar) | Default | Demo
Kite |
| ↓ | X | | |
| →(SOURCE) | X | Lock Source | √ |
| + (Vol+) | X | | √ |
| - (Vol-) | X | | √ |
| SURR | X | ON | |
| (BT) | X | | |
| EQ | X | MOVIE | |
| ↓/→ | X | If in BT mode | √ |
| II | X | If in BT mode | √ |
| BASS+/− | X | | |
| TREBLE+/− | X | | |
| DIMMER+/− | X | DIM 3 | |
| (MUTE) | X | | |
| AutoStandby | OFF | |
| AutoWake | OFF | |
- When press the (X) unavailable keys, the soundbar will show "DEMO ON".
14.Troubleshooting
To keep the warranty valid, never try to repair the system yourself. If you encounter problems when using this soundbar, check the following points before requesting service.
| Problem | Solution |
| No power | ·Ensure that the AC cord of the apparatus is properly connected.
·Ensure that there is power at the AC outlet.
·Press ⋃ (standby) button to turn the soundbar on. |
| Remote control does not work | ·Before you press any playback control button, first select the correct source.
·Reduce the distance between the remote control and the soundbar.
·Insert the battery with its polarities (+/−) aligned as indicated.
·Replace the battery.
·Aim the remote control directly at the sensor on the front of the soundbar. |
| No sound | ·Make sure that the soundbar is not muted. Press MUTE or + (VOL) button to resume normal listening.
·Press ⋃ button on the soundbar or on the remote control to switch the soundbar to standby mode. Then press the ⋃ button again to switch the soundbar on.
·Unplug both the soundbar and the subwoofer from the mains socket, then plug them again. Switch on the soundbar.
·Ensure the audio setting of the input source (e.g. TV, game console, DVD player, etc.) is set to PCM or Dolby Digital mode while using digital (e.g. HDMI, OPTICAL) connection.
·The subwoofer is out of range, please move the subwoofer closer to the soundbar. Make sure the subwoofer is within 5 m of the soundbar (the closer the better).
·The soundbar may have lost connection with the subwoofer. Re-pair the units by following the steps on the section “Pair up with the Subwoofer”.
·The soundbar may not be able to decode all digital audio formats from the input source. |
| TV has display problem while viewing HDR content from HDMI source. | ·Some 4K HDR TVs require the HDMI input or picture settings to be set for HDR content reception. For further setup details on HDR display, please refer to the instruction manual of your TV. |
| I can’t find the Bluetooth name of this soundbar on my Bluetooth device for Bluetooth pairing | ·Ensure the Bluetooth function is activated on your Bluetooth device.
·Ensure you have paired the soundbar with your Bluetooth device.
·The soundbar has a Bluetooth® function that can receive a signal within 8 metres. Keep a distance within 8 metres between the soundbar and your Bluetooth® device. |
| This is a 15 mins power off function, one of the ERPII standard requirement for saving power | ·When the unit's external input signal level is too low, the soundbar will be turned off automatically in 15 minutes. Please increase the volume level of your external device. |
15. Specifications
Soundbar
| Power Supply | 100-240V~ 50/60Hz |
| Power Consumption | 50 W< 0.5 W (StandBy) |
| USB | 5V== 500mAHi-Speed USB (2.0) / FAT32 / FAT1632G (max), WAV / WMA / MP3 / FLAC. |
| Dimension (WxHxD) | 902 x 62.3 x 91 mm / 35.5" x 2.4" x 3.6" |
| Net weight | 1.6 kg / 3.5 lbs |
| Audio input sensitivity | 500mV |
| Frequency Response | 120Hz - 20KHz |
| Operating Temperature | 0°C - 45°C |
Subwoofer
| Power Supply | 100-240V~ 50/60Hz |
| Power Consumption | 50 W
< 0.5 W (StandBy) |
| Dimension (WxHxD) | 161 x 303 x 304.5 mm / 6.3" x 11.9" x 12" |
| Net weight | 3.6 kg / 7.9 lbs |
| Frequency Response | 40Hz-150Hz |
Surround Speaker
| Frequency Response | 180Hz - 20KHz |
| Dimension (WxHxD) | 60 x 151 x 91 mm / 2.3" x 5.9" x 12" x 3.6" |
| Net weight | 0.57 kg (0.29 kg x 2) / 1.25 lbs (0.63 lbs x 2) |
Wireless Specification
| Bluetooth version / profiles | V 5.3 (A2DP, AVRCP) |
| Bluetooth frequency range | 2400 MHz ~ 2483.5 MHz |
| Bluetooth Max. transmitting power | ≤ 5 dBm |
| 2.4G Wireless frequency range | 2400 MHz ~ 2483 MHz |
| 2.4G Max. transmitting power | ≤ 6 dBm |
| Modulation Type | GFSK, π/4 DQPSK |
Amplifier (Max audio power)
| Total | 540 W |
| Soundbar | 300 W |
| Subwoofer | 180 W |
| Surround | 60 W |
Remote Control
| Distance/Angle | 19.7 feet (6m) / 30° |
| Battery type | AAA (1.5V x 2) |
- Design and specifications are subject to change without notice.
Hisense
Colunas Surround × 2
Controlo remoto / 2 pilhas AAA
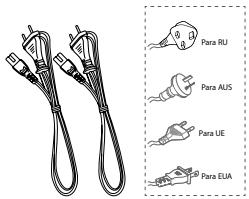
Caboétrico CA × 2
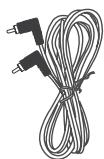
Cabo de colunas Surround × 2

Cabo HDMI
3.2 Colunas Surround
6.6 Ligar as colunas Surround
- Utilize o cabo das colunas Surround para ligar à tomada SURROUND na traseira das colunas surround.
- Ligue cada coluna surround a uma tomada SURROUND (R/L) na traseira do subwoofer.
7.1 Standby/ACCENSIONE
| Display | Modality |
| DEMO ON | Modality DEMO |
| DEMO OFF | Modality Consumatore |