
L150 - Laser printer CANON - Free user manual and instructions
Find the device manual for free L150 CANON in PDF.
| Product Type | Multifunction laser printer (fax, copy, print) |
| Brand | Canon |
| Model | L150 (FAX-L150) |
| Power supply | 220-240 V, 50/60 Hz, max consumption 1020 W |
| Main functions | Copy (reduction/enlargement), fax (PC send, broadcast, memory reception, remote reception), print (reduced/enlarged, 2 in 1, 4 in 1, poster, watermark, preview, profiles) |
| Fax | PC direct send, address book, abbreviated dialing, broadcast, delayed send, memory reception, remote reception, polling reception |
| Copy | Reduction/enlargement on standard sizes, custom percentage |
| Reduced/enlarged, reduced layout (2/4 on 1), poster printing, watermark, print preview, profile selection | |
| Printing technology | Class 1 laser (IEC 60825-1:2007, EN60825-1:2007) |
| Laser diode | Wavelength 780-800 nm, max power 10 mW |
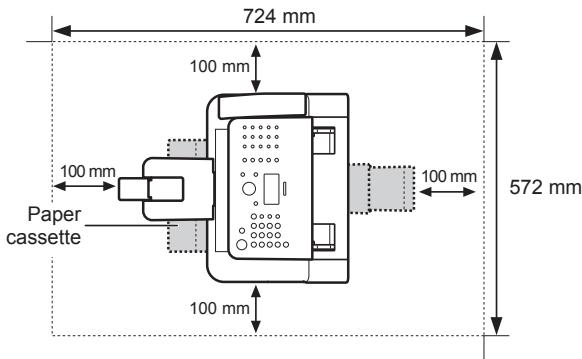
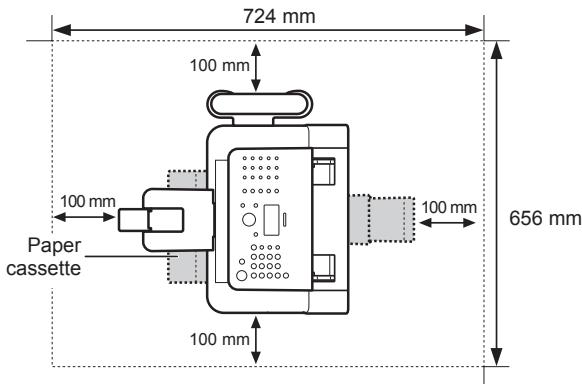
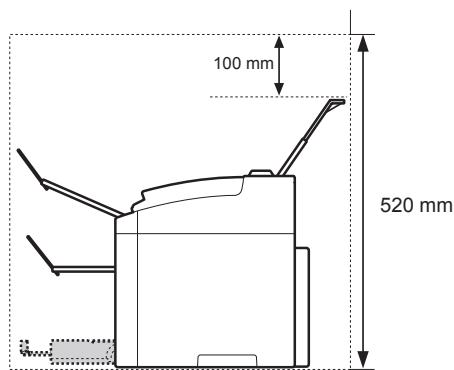
| Installation conditions | Temperature 10-30 °C, relative humidity 20-80% (no condensation), flat and stable surface, good ventilation |
| Weight and dimensions | Not specified in manual (estimate: approx 12-15 kg, dimensions ~400x400x300 mm) |
| Maintenance and cleaning | Clean with a soft cloth slightly dampened (water or mild detergent). Do not use alcohol, benzene, thinner. Unplug before cleaning. Do not use a vacuum cleaner for spilled toner (explosion risk). |
| Consumables | Ink cartridge (toner). Available at least 7 years after end of commercialization. Do not throw into fire. |
| Laser safety | Class 1 laser product. Do not open covers unless instructed. Do not remove safety label. |
| Usage precautions | Do not install near flames, moisture sources, heat. Do not use extension cord. Unplug during storms. Leave space around the outlet. |
| Environmental directives | Compliant with WEEE (2012/19/EU) and battery directive (2006/66/EC). Do not dispose with household waste. |
| Telephone compatibility | Use a modular cable of max 3 meters. Line types not detected automatically: manual configuration in menu. |
| Legal information | Trademarks: Canon, Microsoft Windows. Copyright CANON INC. 2014. Third-party software included. |
| Warranty and service | Limited warranty. Contact authorized Canon dealer for assistance. Spare parts available 7 years. |
| Included manuals | Quick Start Guide (paper), FAX driver CD-ROM, multilingual electronic manual CD-ROM. |
Frequently Asked Questions - L150 CANON
User questions about L150 CANON
0 question about this device. Answer the ones you know or ask your own.
Ask a new question about this device
Download the instructions for your Laser printer in PDF format for free! Find your manual L150 - CANON and take your electronic device back in hand. On this page are published all the documents necessary for the use of your device. L150 by CANON.
USER MANUAL L150 CANON
Read this guide first.
Please read this guide before operating this product.
After you finish reading this guide, store it in a safe place for future reference.
English
Základní příručka
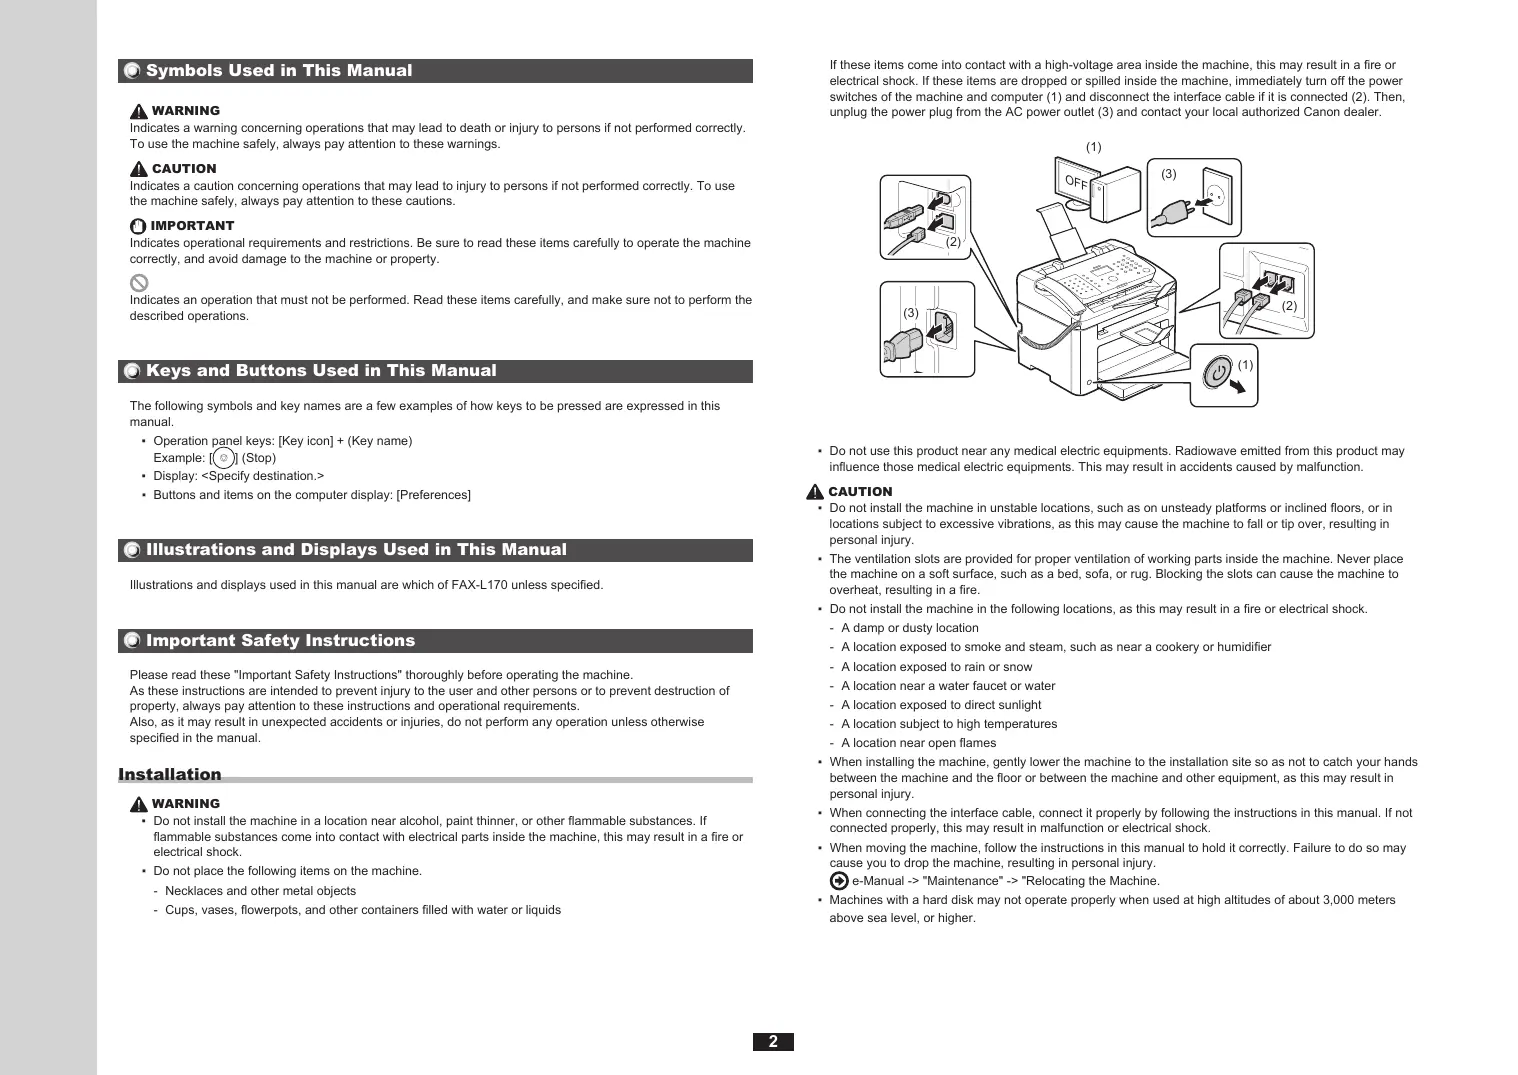
natural_image
Illustration of a printer with a close-up view showing internal components (no text or symbols)


FAX-L170 Only
FAX-L150 Only


natural_image
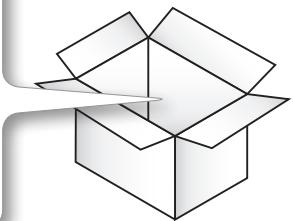
Simple line drawing of an open box with a diagonal line extending from it (no text or symbols)Check!
●FAX-L170/FAX-L150

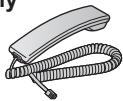
●FAX-L150 + Handset (option)
1

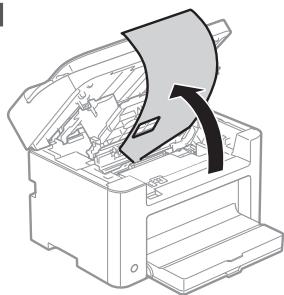
natural_image
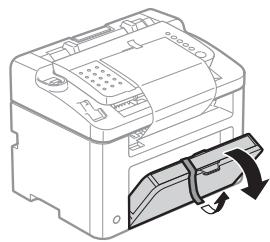
Diagram of a printer or printer with an open lid and internal components, showing a close-up view of the lid (no text or symbols present)2
natural_image
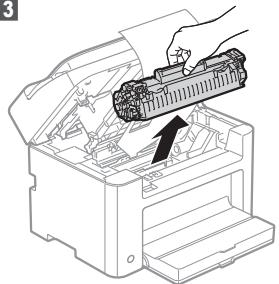
Line drawing of a hand holding a portable electronic device with buttons and ports (no text or symbols)3
4
natural_image
Technical line drawing of a mechanical device with no visible text or symbols
5
natural_image
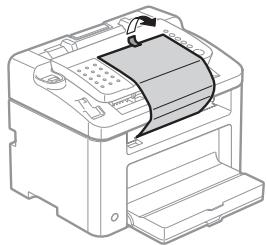
Line drawing of a printer with a paper feed and scroll wheel (no text or symbols)
6
natural_image
Line drawing of a printer with a scroll wheel (no text or symbols)
7
natural_image
Illustration of a printer with a hand inserting paper into the print (no text or symbols visible)8
natural_image
Technical line drawing of a printer holder with open lid and paper feed (no text or symbols)9
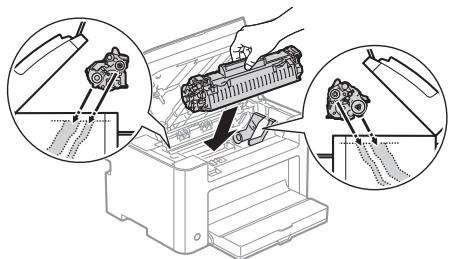
natural_image
Diagram of an open printer with a hand inserting a clip into the cover, showing internal components and a magnified inset (no text or symbols)10
natural_image
Technical line drawing of an open industrial machine with internal components (no text or symbols)11
natural_image
Diagram of a printer with an arrow indicating the process (no text or symbols present)12
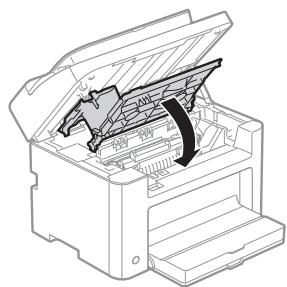
natural_image
Technical line drawing of a printer with an open lid and internal structure (no text or symbols)
13
natural_image
Illustration of a printer being inserted into a paper holder, showing the printer's handle and paper inside (no text or symbols)
15
natural_image
Line drawing of hands holding a mechanical device with a handle (no text or symbols)16
natural_image
Technical diagram of a mechanical component with an inset showing a close-up of internal parts (no text or symbols present)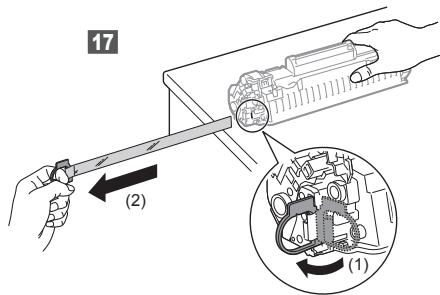
18
natural_image
Illustration of a printer with mechanical components and three circular insets showing close-ups of the process (no text or symbols)19
natural_image
Line drawing of an open industrial machine with internal components (no text or symbols)20
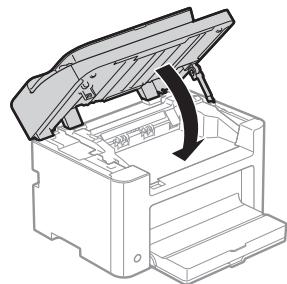
natural_image
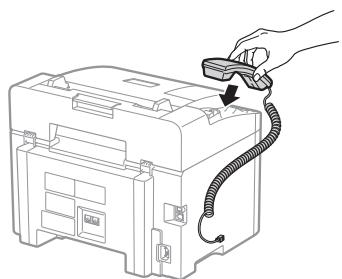
Diagram of a printer with an open lid and arrow indicating rotation (no text or symbols)Connecting the Handset
FAX-L170
1
natural_image
Line drawing of a hand holding a handheld device next to an open electronic device with a coiled cable (no text or symbols)2
natural_image
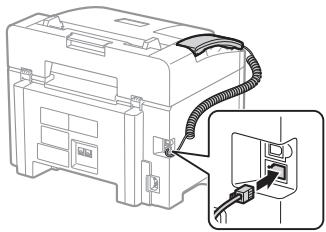
Diagram of a printer with cable and connector, showing internal components (no text or symbols)Option
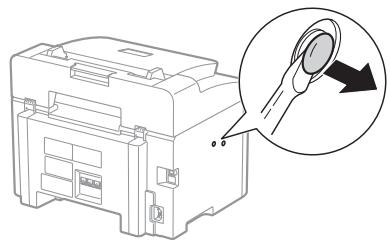
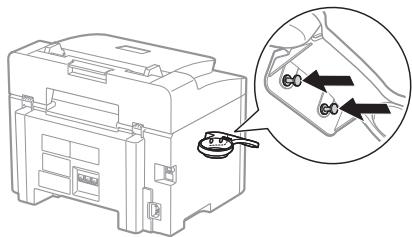
FAX-L150
1
natural_image
Line drawing of a printer with a magnified inset showing the tip of the lid (no text or symbols present)2

natural_image
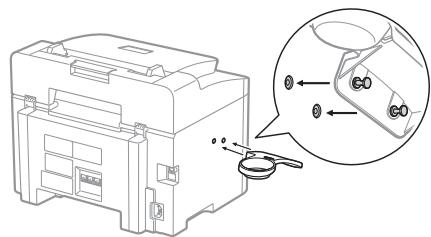
Technical line drawing of a mechanical clamp or bracket component (no text or symbols)3
natural_image
Technical line drawing of a mechanical device with an inset showing internal components (no text or symbols)4
natural_image
Technical line drawing of a mechanical device with a magnified inset showing internal components (no text or symbols)5
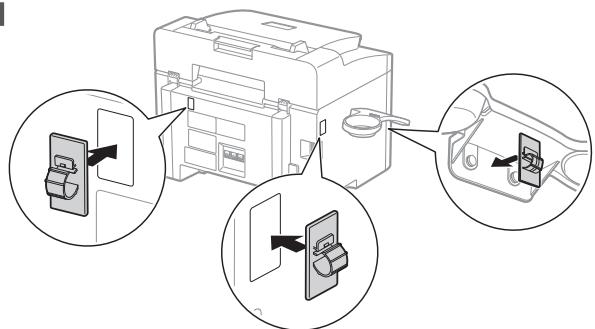
6
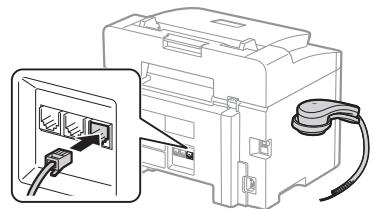
natural_image
Diagram of a printer with an inserted cable and cable outlet, showing internal components (no text or symbols)7
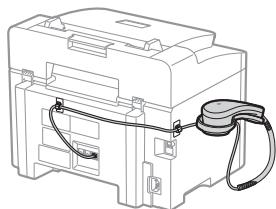
natural_image
Technical line drawing of a mechanical device with attached cable and housing (no text or symbols)| English | Settings for the Machine and Software Installation | Next, specify the settings for the machine and install software. See the language tab page on the right. |
| Français | Paramètres pour l'installation de la machine et du logiciel | Spécifiez ensuite les paramètres de la machine et installez le logiciel. Reportez-vous à l'onglet de langue, à droite. |
| Italiano | Impostazioni della macchina e installazione del software | Selezionare le impostazioni della macchina e installare il software. Vedere la pagina a destra corrispondente alla scheda della lingua. |
| Deutsch | Einstellungen für das Gerät und Softwareinstallation | Geben Sie als nächstes die Einstellungen für das Gerät an, und installieren Sie die Software. Sie finden das Sprachenregister auf der rechten Seite. |
| Česky | Nastavení zařizení a instalace softwaru | Poté zvolte nastavení zařizení a nainstalujte software. Stránka karty s jazykem je umístěna vpravo. |
| Magyar | A készülék beállitásainak megadása és szoftvertelepítés | A következő lépésben adja meg a készülék beállitásait és telepítse a szoftvert. Tekintse meg a jobb oldalon található nyelvi címke oldalát. |
| Polski | Ustawienia urządzenia oraz instalacja oprogramowania | Następnie określ ustawienia urządzenia i zainstaluj oprogramowanie. Patrz odpowiednia karta języka po prawej stronie. |
| Slovensky | Nastavenie zariadenia a inštalácia softvéru | Potom zvoľte nastavenie zariadenia a nainštalujte softvér. Stránka karty s jazykom je umiestnená vpravo. |
| Hrvatski | Postavke za uređaj i instaliranje softvera | Zatim odredite postavke za uređaj, a potom instalirajte softver. Pogledajte stranicu kartice jezika na desnoj strani. |
| Română | Setări pentru aparat și instalarea software-ului | În continuare, specificați setările pentru aparat și instalați software-ul. Vezi pagina cu etichete de limbi din partea dreaptă. |
| Slovenščina | Nastavitve za namestitev naprave in programske opreme | Nato določite nastavitve za napravo in namestite programsko opremo. Oglejte si stran zavihka z jeziki na desni. |
| Български | Настройки на устройството и инсталиране на софтуера | След това задайте настройките за устройството и инсталирайте софтуера. Вж. страницата с раздела за език дясно. |
| Русский | Настройки для аппарата и установка программного обеспечения | Далее задайте настройки для аппарата и установите программное обеспечение. См. вкладку для вашего языка справа. |
| Українська | Параметри для встановлення программного забезпечення та аппарата | Потім вкажіть параметри для аппарата та встановіть программне забезпечення. Див. вкладку зі сторінкою мови з правого боку. |
| العربية | إعدادات للجهاز وتشبít التيronym | بعد ذلك، حدد إعداد الجهاز Terم بتشبít التيronym. انظر صفحة علامة تبويب اللغة الموجودة على اليمين. |
| فارسی | تryptimsات دستگاه و نسب نرم افزار | ميس، تryptimsات دستگاه را انجام داده و نرم افزار را نسب کنید. به صفحه زبان در سمت راست مراجعه کنید. |
| Türkçe | Makine Ayarları ve Yazılım Kurulumu | Ardından, makine ayarlarını belirleyin ve yazılımı kurun. Sağ taraftaki dil sekmesine bakın. |
| Latviešu | lekârtas iestatījumi un programmatūras instalēšana | Tālāk norādiet iekârtas iestatījumus un instalējiet programmatūru. Skatiet valodu cilnes lapu, kas atrodas labajā pusē. |
| Lietuviškaï | Aparato ir programinês įrangos diegimo parametrai | Nurodykite aparato parametrus ir jdiekite programinę įrangą. Žr. kalbų skirtuko puslapį dešinėje. |
| Eesti | Seadme ja tarkvara installisätted | Järgmisena määrake seadme ja tarkvara installisätted.Vaadake paremal asuvat keelte loendit. |
| Dansk | Maskinindstillinger og softwareinstallation | Angiv derefter maskinindstillingerne, og installer software. Se fanesiden for sprog i højre side. |
| Norsk | Innstillinger for maskin- og programvareinstallasjon | Angi deretter innstillinger for maskinen, og installer programvaren. Se kategorisiden for språk til høyre. |
| Suomi | Laitteen asetukset ja ohjelmiston asentaminen | Määritä seuraavaksi laitteen asetukset ja asenna ohjelmisto. Katso kielivälilehtisivu oikealla. |
| Svenska | Inställningar för enheten och installation av programvaran | Ange sedan inställningarna för enheten och installera programvaran. Se sidan med språkflikar till höger. |
| Español | Configuración para la máquina e instalación del software | A continuación, especifique la configuración para la máquina e instale el software. Vea la página de la ficha de idioma en el lado derecho. |
| Nederlands | Instellingen voor het apparaat en software-installatie | Geef vervolgens de instellingen voor het apparaat op en instelleer de software. Zie het tabblad van uw taal aan de rechterkant. |
| Português | Defi nições da máquina e instalação do software | A seguir, especifi que as defi nições da máquina e instale o software. Consulte a página do separador do idioma, do lado direito. |
| Еллнікá | Рубміσεις συσκευής και εγκατάσταση λογισμικού | Στη συνέχεια, καθορίστε τις ρυθμίσεις συσκευής και εγκαταστήστε το λογισμικό. Ανατρέξτε στη σελίδα καρτέλας γλώσσας στα δεξιά. |
Contents
Table des matières
Sommario
Inhalt
| English | 1 About the Supplied Manuals ..... P.22 Navigating the Menu and Text Input Method ..... P.33 Connecting the Power Cord and Turning ON the Power ..... P.44 Specifying the Initial Settings and Connecting a Telephone Cable..... P.5 | 5 Setting a Paper Size and Type..... P.76 Installing the Driver/Software ..... P.87 Perform Useful Tasks..... P.9 |
| Français | 1 A propos des manuels fournis ..... P.22 Navigation dans le menu et méthode de saisie de texte..... P.33 Branchement du cordon d'alimentation et allumage de la machine ..... P.44 Indication des réglages de départ et branchement d'un câble téléphonique..... P.5 | 5 Réglage du format et du type de papier..... P.76 Installation du pilote/logiciel ..... P.87 Exécution de tâches utiles..... P.9 |
| Italiano | 1 Informazioni sui manuali forniti a corredo con il prodotto..... Pag.22 Navigazione del menu e metodo di input del testo ..... Pag.33 Collegamento del cavo di alimentazione e accensione della macchina..... Pag.44 Impostazioni iniziali del fax e collegamento di un cavo telefonico ..... Pag.5 | 5 Impostazione di un formato e di un tipo di carta..... Pag.76 Installazione di driver/software ..... Pag.87 Attività utili..... Pag.10 |
| Deutsch | 1 Informationen zu den mitgelieferten Handbüchern..... S.22 Navigieren durch das Menü und Texteingabemethode..... S.33 Anschließen des Netzkabels und Einschalten des Geräts..... S.44 Festlegen der anfänglichen Einstellungen und Anschließen eines Telefonkabels... S.5 | 5 Einstellen eines Papierformats und Papiertyps..... S.76 Installieren des Treibers bzw. der Software..... S.87 Hilfreiche Funktionen..... S.10 |
1
About the Supplied Manuals
English

Starter Guide (This manual): Read this manual first.
This manual describes the installation of the machine, the settings, and a caution. Be sure to read this manual before using the machine.

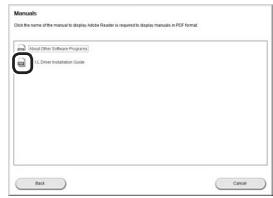
FAX L Driver Installation Guide (User Software CD-ROM):
Read this manual next.
This manual describes software installation.

- Manual (Multi-lingual User Manual CD): Read the desired chapter to suit your needs.
The e-Manual is categorized by subject to find desired information easily.
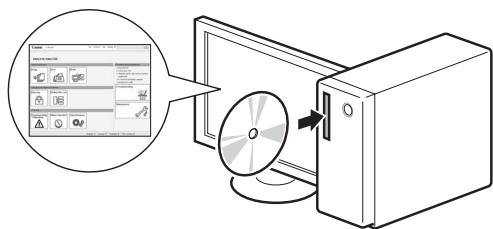
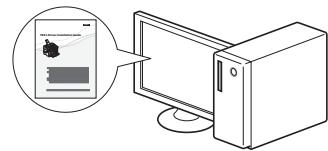
Displaying the e-Manual from the CD-ROM
- Insert the Multi-lingual User Manual CD in your computer.
- Select your language.
- Click [Display].
* Depending on the operating system you are using, a security protection message is displayed. Allow the contents to be displayed.
Français

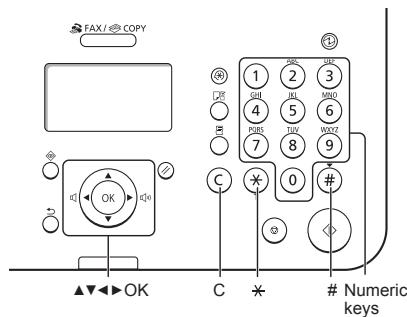
Navigating the Menu and Text Input Method
| English | Navigating the Menu• Item selection or moving the cursor among the menu itemsHighlight an item with [▲] or [▼].Proceed to the next hierarchy with [OK] or [►].Return to the previous hierarchy with [○] (Back) or [◄].• Setting confirmationPress [OK]. However, whenappears on the display, highlight, and then press [OK]. | Text Input Method- Changing entry modePress [▼] to highlight, and press [OK]. You can also press [※](Tone) to change the entry mode.- Entering text, symbols, and numbersEnter using the numeric keys or [#](Symbols).For details on the switchable mode or the available text, see the next page. | - Moving the cursor (entering a space)Move with [◄] or [►].Move the cursor to the end of the text and press [►] to enter a space.- Deleting charactersDelete with [◎] (Clear).Pressing and holding [◎] (Clear) key deletes all characters. |
| Français | Navigation dans le menu• Sélection d'éléments ou déplacement du curseur dans les éléments de menu Sélectionner un élément à l'aide des touches [▲] ou [▼].Passer au niveau hiérarchique suivant avec [OK] ou [►].Revenir au niveau hiérarchique précédent avec [○] (Préc.) ou [◄].• Confirmation du paramétrageAppuyer sur [OK]. Cependant, lorsqu'apparaît sur l'afficheur, sélectionner, puis appuyer sur [OK]. | Méthode de saisie du texte- Changement de mode de saisieAppuyer sur [▼] pour sélectionner, puis appuyer sur [OK].Vous pouvez également utiliser [※](Tonalité) pour changer de mode de saisie.- Saisie de texte, de symboles et de chiffresUtiliser le clavier numérique ou [#](SYMBOLES).Pour en savoir plus sur les modes ou le texte disponible, reportez-vous à la page suivante. | - Déplacement du curseur (ajout d'un espace)Utiliser [◄] ou [►] pour le déplacement.Déplacer le curseur vers la fin du texte saisi et appuyer sur [►] pour entrer un espace.- Suppression de caractèresUtiliser [◎] (Effacement) pour effectuer la suppression.Appuyer sur la touche [◎] (Effacement) et la maintenir enfoncée pour supprimer tous les caractères. |
| Italiano | Navigazione dei menu• Selezione di una voce o spostamento del cursore sulle voci dei menuSelezionare una voce utilizzando [▲] e [▼].Procedere al livello gerarchico successivo con [OK] o [►].Tornare al livello gerarchico precedente con [○] (Indietro) o [◄].• Conferma delle impostazioniPremere [OK]. Alla visualizzazione del messaggio sul display, selezionaree premere [OK]. | Metodo d'immissione del testo- Cambio della modalità d'immissionePremere [▼] per selezionaree premere [OK]. Per cambiare il modo d'immissione è anche possibile premere [※](Tono).- Immissione di testo, simboli e numeriImmettere utilizzando i tasti numerici oppure [#](Simboli).Per i dettagli relativi al modo selezionabile o al testo disponibile, vedere la pagina successiva. | - Spostamento del cursore (immissione di uno spazio)Spostare il cursore utilizzando [◄] e [►].Spostare il cursore alla fine del testo e premere [►] per immettere uno spazio.- Cancellationade dei caratteriCancellare utilizzando [◎] (Azzera).Tenendo premuto il tasto [◎] (Azzera) si cancellano tutti i caratteri. |
| Deutsch | Navigieren durch das Menü• Elementauswahl oder Versetzen des Cursors zwischen den Menüelementen Markieren Sie ein Element mit [▲] oder [▼].Fahren Sie mit [OK] oder [►] mit der nächsten Hierarchie fort.Kehren Sie mit [○] (Zurück) oder [◄] zur vorherigen Hierarchie zurück.• Bestätigung der EinstellungDrücken Sie [OK]. Wird jedochauf dem Display angezeigt, markieren Sie, und drücken Sie dann [OK]. | Texteingabemethode- Ändern des EingabemodusDrücken Sie [▼], umauszuwählen, und drücken Sie [OK].Sie können den Eingabemodus auch durch Drücken von [※](Ton) ändern.- Eingeben von Text, Symbolen und ZahlenNehmen Sie die Eingabe über die numerischen Tasten oder über [#](Symbole) vor.Nähere Informationen zur Modusänderung oder zum verfügbaren Text finden Sie auf der nächsten Seite. | - Versetzen des Cursors (Eingeben eines Leerzeichens)Versetzen Sie den Cursor mit [◄] oder [►].Versetzen Sie den Cursor an das Ende des Textes, und drücken Sie [►], um ein Leerzeichen einzugeben.- Löschen von ZeichenLöschen Sie Zeichen mit [◎] (Löschen).Wenn Sie die Taste [◎] (Löschen) gedrückt halten, werden alle Zeichen gelöscht. |
3 Connecting the Power Cord and Turning ON the Power Branchement du cordon d'alimentation et allumage de la machine Collegamento del cavo di alimentazione e accensione della macchina Anschließen des Netzkabels und Einschalten des Geräts
English
Entering text, symbols, and numbers
| Key | Entry mode: | Entry mode: |
| 1 | @ . - _/ | 1 |
| 2 | ABCabc | 2 |
| 3 | DEFdef | 3 |
| 4 | GHIghi | 4 |
| 5 | JKLjkl | 5 |
| 6 | MNOmno | 6 |
| 7 | PQRSpqrs | 7 |
| 8 | TUVtuv | 8 |
| 9 | WXYZwxyz | 9 |
| 0 | (Not available) | 0 |
| # | -. * # ! " , ; : ^ ` = / | ' ? $ @ % & + ( ) [ ] { } < > | (Not available) |
Changing the entry mode
| Entry mode | Available text |
| Uppercase and lowercase letters and symbols | |
| <12> | Numbers |
flowchart
graph LR
    A["Device with scroll icon"] -->|OFF| B["Switched plug"]
    B -->|ON| C["Load plug"]
| English | Do not connect the USB cable. Connect the USB cable when installing the software.If no operations are performed for a fixed period of time, the machine automatically enters the energy saver state (sleep mode). To cancel sleep mode, press [IMAGE] (Energy Saver) on the control panel. |
| Français | Ne branchez pas le câble USB. Vous le connecterez lors de l'installation du logiciel.Si vous n'effectuez aucune opération pendant le délai spécifié, la machine passe automatiquement en mode d'économie d'énergie (mode Veille). Pour annuler le passage en mode Veille, appuyer sur [IMAGE] (Economie d'énergie) sur le panneau de commandes. |
| Italiano | Non collegare il cavo USB. Collegare il cavo USB quando si installa il software.Se per un periodo di tempo prefissato non viene eseguita alcuna operazione, la macchina entra automaticamente nello stato di risparmio energetico (modo riposo). Per annullare il modo riposto, premere [IMAGE] (Risparmio energetico) sul pannello di controllo. |
| Deutsch | Schließen Sie nicht das USB-Kabel an. Schließen Sie das USB-Kabel bei der Installation der Software an.Wenn über einen festgelegten Zeitraum keine Vorgänge durchgeführt werden, wechselt das Gerät automatisch in den Stromsparmodus (schlafmodus). Zum Abbrechen des Schlafmodus drücken Sie auf dem Bedienfeld [IMAGE] (Stromsparmodus). |
4 Specifying the Initial Settings and Connecting a Telephone Cable Indication des réglages de départ et branchement d'un câble téléphonique Impostazioni iniziali del fax e collegamento di un cavo telefonico Festlegen der anfänglichen Einstellungen und Anschließen eines Telefonkabels
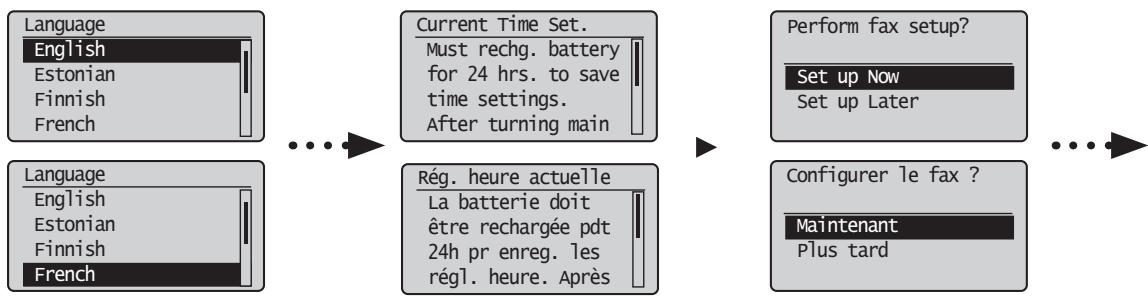
flowchart
graph LR
    A["Language\nEnglish\nEstonian\nFinnish\nFrench"] --> B["Current Time Set.\nMust rechg. battery for 24 hrs. to save time settings.\nAfter turning main"]
    B --> C["Perform fax setup?\nSet up Now\nSet up Later"]
    D["Language\nEnglish\nEstonian\nFinnish\nFrench"] --> E["Rég. heure actuelle\nLa batterie doit être rechargée pdt 24h pr enreg. les régl. heure. Après"]
    E --> F["Configurer le fax ?\nMaintenant\nPlus tard"]
| English | 4-1 Specify the initial settings.Follow the instructions on the screen, set the language and time.For details on navigating the menu and how to input the numbers, see 2 "Navigating the Menu and Text Input Method" (⊕ P.3). | 4-2 Specify the initial fax settings.Follow the "Fax Setup Guide" to specify a fax number, a unit name, and a receive mode.For more details on the receive mode, see the e-Manual.⊕ e-Manual -> "Fax" -> "Using the Fax Functions" -> "Receiving Faxes" -> "RX Mode." | What happens with the unit nameOnce the information has been registered, it is printed at the top of each page that you are sending. |
| Français | 4-1 Indiquer les réglages de départ.Suivez les instructions à l'écran pour définir la langue et l'heure.Pour en savoir plus sur la navigation dans le menu et la saisie des nombres, voir 2 "Navigation dans le menu et méthode de saisie de texte" (⊕ P.3). | 4-2 Spécifiez les paramètres de fax initiaux.Suivez les instructions du manuel "Guide de configuration du fax" pour spécifier un numéro de fax, un nom d'unité et un mode de réception.Pour en savoir plus sur le mode de réception, reportez-vous au manuel électronique.⊕ Manuel électronique -> "Fax" -> "Utilisation des fonctions fax" -> "Réception de fax" -> "Mode RX". | Traitement du nom d'unitéUne fois les informations enregistrées, elles sont imprimées en haut de chaque page que vous envoyez. |
| Italiano | 4-1 Specificare le impostazioni iniziali del fax .Seguire le istruzioni visualizzate per impostare la lingua e l'orario.Per i dettagli sulla navigazione del menu e su come immettere i numeri, vedere 2 "Navigazione del menu e metodo di input del testo" (⊕ Pag.3). | 4-2 Specificare le impostazioni iniziali del fax.Attenersi alle istruzioni della "Guida configurazione fax" per specificare il numero del fax, il nome dell'unità e la modalità di ricezione.Per ulteriori dettagli sulla modalità di ricezione, consultare l'e-Manual.⊕ e-Manual -> "Fax" -> "Utilizzo delle funzioni fax" -> "Ricezione di fax" -> "Modo RX". | Operazioni eseguite con il nome dell'unitàUna volta registrate le informazioni, queste vengono stampate nella parte superiore di ogni pagina che si sta inviando. |
| Deutsch | 4-1 Legen Sie die anfänglichen Einstellungen fest.Folgen Sie den Anweisungen auf dem Bildschirm, und stellen Sie die Sprache und die Uhrzeit ein.Nähere Informationen zum Navigieren durch das Menü und zur Eingabe der Zahlen finden Sie unter 2 "Navigieren durch das Menü und Texteingabemethode" (⊕ S.3). | 4-2 eben Sie die Anfangsfaxeinstellungen an.Folgen Sie den Anweisungen im "Fax Setup Handbuch", um eine Faxnummer, den Namen einer Einheit und einen Empfangsmodus anzugeben.Weitere Informationen zum Empfangsmodus finden Sie in der e-Anleitung.⊕ e-Anleitung -> "Fax" -> "Verwenden der Faxfunktion" -> "Empfangen von Faxen" -> "Empfangsmodus". | Verwendung des Namens der EinheitNachdem die Informationen gespeichert wurden, werden sie auf jeder von Ihnen gesendeten Seite oben gedruckt. |

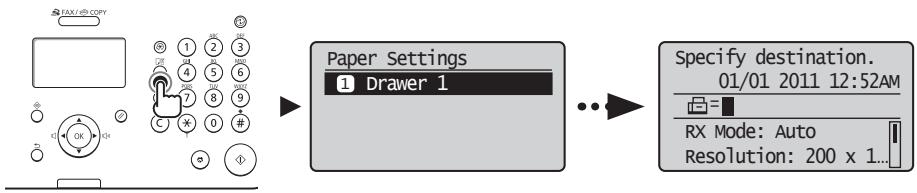
Setting a Paper Size and Type
5 Réglage du format et du type de papier Impostazione di un formato e di un tipo di carta Einstellen eines Papierformats und Papiertyps
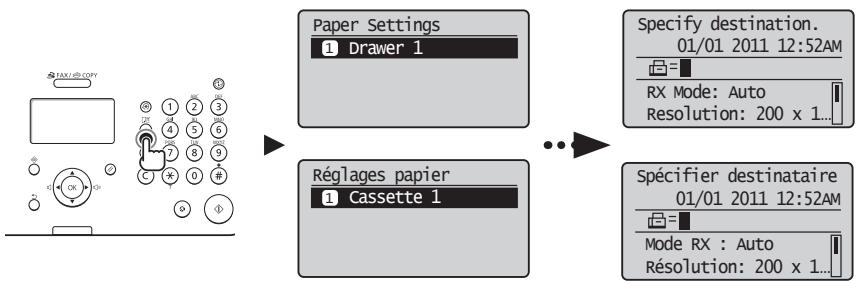
flowchart
graph LR
    A["Start Screen"] --> B["Paper Settings"]
    B --> C{1.1 Paper Setting}
    C --> D["Paper Settings: Drawer 1"]
    C --> E{2.1 Paper Settings}
    E --> F["Paper Settings: Paper Setting"]
    C --> G["Réglages papier"]
    G --> H{1.2 Paper Settings}
    H --> I["Paper Settings: Paper Setting"]
    H --> J{1.3 Paper Settings}
    J --> K["Paper Settings: Paper Setting"]
    H --> L["Cassette 1"]
    L --> M["Specify destination.<br>01/01 2011 12:52AM"]
    L --> N["Mode RX : Auto<br>Resolution: 200 x 1..."]
    L --> O["Spécifier destinataire<br>01/01 2011 12:52AM"]
flowchart
graph LR
    A["Computer"] --> B["Canon"]
    B --> C["Installation"]
    C --> D["Manual"]
    D --> E["Installation par CD-ROM"]
    E --> F["Manual"]
    F --> G["Queer"]
    G --> H["Manush: Click the name of the manual to display Action Reader in separate display manuals in PDF format"]
    H --> I["Back"]
    I --> J["Manush: Descriptive the main file from this device, does not appear in other reader for action here manuals as format PDF"]
    J --> K["Preserved"]
    K --> L["Anchor"]
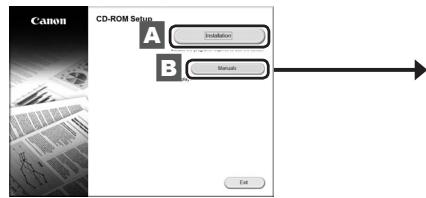
| English | A Install the driver and software using the User Software CD-ROM.B For details on the installation procedures, see the FAX L Driver Installation Guide.We ask for the user's cooperation for the Product Extended Survey Program. For details, see the descriptions on the screen. | For Windows 2000 users, refer to the "Readme" file included in the User Software CD-ROM.[My computer] -> [Open] -> [Readme for Windows2000 Users_XX.hta]** Select your language for XX. | The newest software:Depending on the operating system you are using, some functions of the driver software included in the CD-ROM may not be usable. The newest software is posted on the Canon web site. Please verify the operating environment etc. and download the appropriate software if required. |
| Français | A Installez le pilote et le logiciel avec le CD-ROM "User Software CD-ROM".B Pour en savoir plus sur les procédures d'installation, consulter le Guide d'installation des pilotes FAX L.Nous souhaitons obtenir la pleine coopération de l'utilisateur à travers le programme de questionnaire étendu sur le produit (Product Extended Survey Program). Pour en savoir plus, voir les descriptions reprises à l'écran. | Pour les utilisateurs Windows 2000, reportez-vous au fichier « Lisez-moi » sur le CD-ROM fourni.[Poste de travail] -> [Ouvrir] -> [Readme for Windows2000 Users_XX.hta]** Sélectionnez la langue à afficher sur XX. | Logiciel le plus récent :Selon le système d'exploitation utilisé, certaines fonctions du logiciel du pilote d'impression fourni sur le CD-ROM peuvent ne pas être disponibles. La version la plus récente du logiciel est postée sur le site Web Canon. Vérifiez votre environnement système, etc., puis, le cas échéant, téléchargez la version logicielle requise. |
| Italiano | A Installare il driver e il software dall'User Software CD-ROM.B Per i dettagli relativi alle procedure d'installazione, consultare la Guida di Installazione del driver FAX L.Chiediamo la collaborazione dell'utente per il Programma Esteso di Indagine sul Prodotto (Product Extended Survey Program). Per maggiori dettagli, fare riferimento alle descrizioni sulla schermata. | Per gli utenti di Windows 2000, fate riferimento al file "Leggere con attenzione" incluso nel CD-ROM per l'utente del Software.[Risorse del computer] -> [Apri] -> [Readme for Windows2000 Users_XX.hta]** Selezionate la lingua per XX. | Software più recente:In base al sistema operativo utilizzato, alcune funzioni del software del driver contenuto nel CD-ROM potrebbero non essere utilizzabili. Il software più recente è pubblicato sul sito Web di Canon. Si prega di verificare l'ambiente operativo ecc. e di scaricare il software adeguato, se richiesto. |
| Deutsch | A Installieren Sie den Treiber und die Software über die User Software CD-ROM.B Nähere Informationen zum Installationsvorgang finden Sie im Installationshandbuch zum FAX L-Treiber.Wir bitten die Benutzer um die Teilnahme am Product Extended Survey Program. Detaillierte Informationen werden auf dem Bildschirm angezeigt. | Windows 2000-Benutzer: Lesen Sie die Infodatei auf der CD-ROM „User Software".[Arbeitsplatz] -> [Öffnen] -> [Readme for Windows2000 Users_XX.hta]** Wählen Sie für XX Ihre Sprache aus. | Neueste Software:Je nach Betriebssystem können einige Funktionen der Treibersoftware, die auf der CD-ROM enthalten ist, nicht verwendet werden. Die neueste Software finden Sie auf der Canon-Website. Überprüfen Sie die Betriebsumgebung usw., und laden Sie ggf. die passende Software herunter. |
Perform Useful Tasks
English
7
You can use various functions in this machine. Following functions are the overview of the overview of the main functions that you can use routinely. For details on each function, see the e-Manual.
Copy
● Enlarged/Reduced Copies
You can enlarge or reduce standard size documents to copy on standard size paper or specify the copy ratio in percentage.
Fax
- Sending a Document Directly from a Computer (PC Fax)
In addition to the normal sending and receiving faxes, you can use the PC fax.
- Sending
You can register fax destinations in the address book. You can specify the destinations using various methods, enabling you to send documents quickly and easily.
- Destination search
- One-touch keys
- Coded dialing
- Destination Group
- Specifying from the sending history
- Sequential broadcast
- Delayed sending
- Receiving
- Receiving in the memory
You can store the received documents in the memory. You can print the stored documents at any time or if you do not need them, you can delete them.
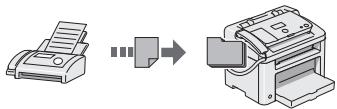
natural_image
Illustration of a printer and its corresponding printer with a close-up arrow (no text or symbols)- Remote Receiving
If an external telephone is connected, you can switch to the fax receiving mode immediately by dialing the ID number for fax receiving using the dial buttons of the telephone during a phone call.
- Polling Receiving
You can retrieve pre-loaded documents from a sender's fax machine when you want to receive the fax.
● Enlarged/Reduced Printing
- Reduced Layout
You can reduce multiple documents to print them onto one sheet.
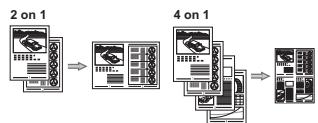
flowchart
graph LR
    A["2 on 1"] --> B["Data Collection"]
    B --> C["4 on 1"]
    C --> D["Data Storage"]
- Poster Printing
● Watermark Printing
● Displaying a Preview before Printing - Selecting a "Profile"
natural_image
Illustration of a printer and its corresponding output device (no text or symbols)natural_image
Illustration of a printer being processed with a close-up view (no text or symbols)natural_image
Illustration of a printer and its corresponding image (no text or symbols present)C
| Česky | A Základní příručka (tato příručka):Nejprve si přečtěte tuto příručku.Tato příručka popisuje instalaci přístroje, nastavení a upozornění. Tuto příručku si přečtěte, než začnete přístroj používat. | B FAX L Driver Installation Guide (Příručka instalace ovladače FAX L) (disk User Software CD-ROM):Ve druhém kroku si přečtěte tento návod.Tato příručka popisuje instalaci softwaru. | C Elektronická příručka („Multi-lingual User Manual CD“ (Vícejazyčný disk CD s uživatelskými příručkami)):Přečtěte si požadovanou kapitolu odpovídající vaším potřebám.Elektronická příručka je uspořádaná do kategorí podle témat, aby bylo možné snadno vyhledávat požadované informace.Zobrazení příručky Elektronická příručka z disku CD-ROM1. Do počitače vložte disk „Multi-lingual User Manual CD“ (Vícejazyčný disk CD s uživatelskými příručkami).2. Zvolte jazyk.3. Klepněte na možnost [Display] (Zobrazit).* V závislosti na používaném operačním systému se zobrazí upozornění ochrany zabezpečení. Povolte zobrazení obsahu. |
| Magyar | A Telepítési kézikönyv (ez az útmutató):Ezt a kézikönyvet olvassa el először.Ez a kézikönyv a készülék telepítését, beállításait és a kapcsolódó óvintézkedéseket ismerteti. A készülék használatba vétele előtt olvassa el figyelmesen ezt a kézikönyvet. | B FAX L Driver Installation Guide (Az FAX L illesztóprogram telepítési kézikönyve) (User Software CD-ROM (Felhasználói szoftverlemez)):Folytassa ennek a kézikönyvnek az elolvasásával.Ez a kézikönyv a szoftvertelepítést mutatja be. | C e-Kézikönyv (Multi-lingual User Manual CD (Többnyelvů felhasználói kézikönyv CD)): Olvassa el a megfelelő fejezetet.Az e-Kézikönyv témakörök szerinti csoportosításban tartalmazza a tudnivalókat, így könnyen megtalálhatja a keresett információt.Az e-Kézikönyv megjelenítése a CD-ről1. Helyezze be a Multi-lingual User Manual CD (Többnyelvů felhasználói kézikönyv CD) a számítógépbe.2. Válasszon nyelvet.3. Kattinton a [Display] (Megjelenítés) elemre.* A számítógép operációs rendszeretől függően előfordulhat, hogy megjelenik egy biztonsági figyelmeztetés. Engedélyezze a tartalom megjelenítését. |
| Polski | A Przewodnik wprowadzający (niniejszy podręcznik):W pierwszej kolejności należy przeczytać ten podręcznik.W przewodniku opisano proces instalacji, a także ustawienia i przestrogi dotyczące urządzenia. Przed rozpoczęciem korzystania z urządzenia należy przeczytać niniejszy przewodnik. | B Instrukcja instalacji programu Sterownik do faksów L (na dysku Úser Software CD-ROM (Dysk CD-ROM z oprogramowaniem użytkownika)):W dalszej kolejności należy przeczytać tę instrukcję.W przewodniku opisano proces instalacji oprogramowania. | C e-Podręcznik (na dysku Multi-lingual User Manual CD (Dysk CD-ROM z wielojęzycznymi podręcznikami użytkownika)): W razie potrzeby należy zapoznać się z odpowiednim rozdziałem.e-Podręcznik podzielono na tematy ułatwiające znajdowanie odpowiednich informacji.Wyświetlanie programu e-Podręcznik bezpośrednio z dysku CD-ROM1. Umieść dysk Multi-lingual User Manual CD (Dysk CD-ROM z wielojęzycznymi podręcznikami użytkownika) w napędzie komputera.2. Wybierz język.3. Kliknij opcję [Display] (Wyświet!).* W niektórych systemach operacyjnych wyświetlany jest komunikat o zabezpieczeniach. Należy wyrazić zgodę na wyświetlenie zawartości. |
| Slovensky | A Úvodná príručka (táto príručka):Túto príručku si prečítajte ako prvú.Táto príručka opisuje inštaláciu zariadenia, nastavenia a upozornenia. Túto príručku si pozorne prečítajte pred začiatkom používania zariadenia. | B FAX L Driver Installation Guide (disk User Software CD-ROM):Túto príručku si prečítajte ako d'alšiu v poradí.Táto príručka opisuje inštaláciu softvéru. | C e-Manual (Elektronická príručka) (Multi-lingual User Manual CD (Disk CD s viacjazyčnými príručkami pre používateľa)): Podľa potreby si prečítajte požadovanú kapitolu.e-Manual (Elektronická príručka) je rozdelená do kategóril podľa predmetu, aby ste mohlí jednoducho nájsť požadované informácie.Zobrazenie dokumentu e-Manual (Elektronická príručka) z disku CD-ROM1. Vložte disk Multi-lingual User Manual CD (Disk CD s viacjazyčnými príručkami pre používateľa) do počitača.2. Vyberte jazyk.3. Kliknite na položku [Display] (Zobrazit).* Podľa toho, aký operačný systém používate, sa môže zobrazíť správa o ochrane zabezpečenia. Povoľte zobrazenie obsahu. |
2 Navigace v nabídce a metoda zadávání textu Navigálás a menüben és a szövegbeviteli mód megadása Poruszanie się po menu i sposób wpisywania tekstu Navigácia v ponuke a metóda zadávania textu
| Česky | Navigace v nabídceVýběr položky nebo pohybování kurzoru mezi položkami nabídkyPomocí [▲] nebo [▼] vyberte položku.Na další úroveň přejdete pomocí tlačitka [OK] nebo [▶].Pomocí [○] (Zpět) nebo [◀] se vrátíte o úroveň výše.Potvrzení nastaveníStiskněte tlačitko [OK]. Pokud se však na displeji zobrazí,, vyberte možnosta poté stiskněte tlačitko [OK]. | Metoda zadávání textu- Změna režimu zadáváníStisknutím tlačitka [▼] vyberte možnosta stiskněte tlačitko [OK].Režim zadávání můžete změnit také stisknutím tlačitka [★] (Tónová).- Zadávání textu, symbolů a čiselK zadávání použijte čiselná tlačitka nebo tlačitka [#] (Symboly).Podrobné informace o přepínatelném režimu nebo dostupném textu najdete na následující stránce. | - Posouvání kurzoru (zadávání mezery)Posouvejte se pomocí [◀] nebo [▶].Posuňte kurzor na konec textu a stisknutím [▶] zadejte mezeru.- Odstraňování znakůK odstranění znaků používejte tlačitko [◎] (Vymazat).Stisknutím a podržením tlačitka [◎] (Vymazat) odstraníte všechny znaky. |
| Magyar | Navigálás a menübenElemek kiválasztása és a kurzor léptetése a menúpontok közöttAz elemeket a [▲] vagy [▼] gombbal jelölheti ki.A menů következő szintjére az [OK] vagy [▶] gombbal léphet át.A menů előző szintjére a [○] (Vissza) vagy [◀] gombbal léphet vissza.Megerősítés beállításaNyomja meg az [OK] gombot. Ha azonban az <Alkalmaz> elem jelenik meg a kijelzőn, akkor jelölje ki az <Alkalmaz> elemet, majd ezután nyomja meg az [OK] gombot. | Szövegbeviteli mód- Beviteli mód megváltoztatásaJelölje ki az <Beviteli mód> elemet a [▼] ikonnal, majd nyomja meg az [OK] gombot.A beviteli módot a [★] (Hangkód) gomb megnyomásával is megváltoztathatja.Szöveg, jelek és számok beírásaA bevitel a számgombok, illetve a [#] (Szimbólumok) gomb használatával történhet.Az átváltható módokkal és a beírható karakterekkel kapcsolatos részletekért tekintse meg a következő oldalt. | - A kurzor léptetése (szóköz beírása)A kurzort a [◀] vagy [▶] gombbal léptetheti.Szóköz beírásához vigye a kurzort a karakterlánc végére, majd nyomja meg a [▶] gombot.- Karakterek törléseA törléshez használja a [◎] (Törlés) gombot.A [◎] (Törlés) gomb lenyomva tartásával az összes karakter törölheti. |
| Polski | Poruszanie się w obrębie menuWybór pozycji lub przesuwanie kursora między pozycjami menuWybierz pozycję za pomocą przycziku [▲] lub [▼].Przejdź do następnego poziomu naciskając przyczisk [OK] lub [▶].Przejdź do poprzedniego poziomu naciskając przyczisk [○] (Wstecz) lub [◀].Potwierdzenie ustawieniaNaciśnij przyczisk [OK]. Jeśli na ekranie zostanie wyświetlona opcja, wybierz ją, a następnie naciśnij przyczisk [OK]. | Sposób wpisywania tekstuZmiana trybu wprowadzaniaNaciśnij przyczisk [▼], aby wybrać opcję, a następnie naciśnij przyczisk [OK].W celu zmiany trybu wprowadzania można także nacisnąć przyczisk [★] (Tonowe).- Wprowadzanie tekstu, symboli i liczbWprowadzanie powyższych elementów odbywa się przy użyciu klawiszy numerycznych lub przyczisku [#] (Symbole).Szczegółowe informacje na temat zmiany trybu lub dostępnego tekstu znajdują się na następnej stronie. | - Przesuwanie kursora (wprowadzanie spacji)Przesuń kurzor za pomocą przyczisku [◀] lub [▶].Przesuń kurzor na koniec tekstu i naciśnij przyczisk [▶], aby wprowadzić spację.- Usuwanie znakówUsuń znak za pomocą przyczisku [◎] (Kasuj).Naciśniecie i przytrzymanie przyczisku [◎] (Kasuj) powoduje usunięcie wszystkich znaków. |
| Slovensky | Navigácia v ponukeVýber položky alebo pohybovanie kurzora medzi položkami ponuky Pomocou [▲] alebo [▼] vyberte položku.Na dalšiu úroveň pokračujte pomocou tlačidla [OK] alebo [▶].Pomocou [○] (Spát) alebo [◀] sa vrátite o úroveň vyššie.Potvrdenie nastaveniaStlačte tlačidlo [OK]. Ak sa však na displeji zobrazí,, vyberte možnosťa potom stlačte tlačidlo [OK]. | Spôsob zadávania textuZmena režimu zadávaniaPomocou tlačidla [▼] vyberte možnosťa stlačte tlačidlo [OK].Na zmenu režimu zadávania môžete tiež stlačit’ tlačidlo [★] (Tón).- Zadávanie textu, symbolov a čiselZadávať môžete pomocou čiselných tlačidiel alebo tlačidla [#] (Symboly).Podrobné informácie o prepínateľnom režime alebo dostupnom texte nájdete na nasledujúcej stránke. | - Posúvanie kurzora (zadávanie medzery)Posúvajte sa pomocou [◀] alebo [▶].Posuňte kurzor na koniec textu a stlačením [▶] zadajte medzeru.- Odstraňovanie znakovNa odstránenie znakov používajte tlačidlo [◎] (Vymazat').Stlačením a podržaním tlačidla [◎] (Vymazat) odstránite všetky znaky. |
| Česky | Nepřipojujte kabel USB. Kabel USB připojte při instalaci softwaru.Pokud po uplynutí pevné doby nejsou provedeny žádné operace, přístroj automaticky přejde do stavu úspory energie (režim spánku). Chcete-li režim spánku zrušit, stiskněte tlačitko [(IMAGE)] (Spořič energie) na ovládacím panelu. |
| Magyar | Ne csatlakoztassa az USB-kábelt. Az USB-kábelt a szoftver telepítésekor kell csatlakoztatni.A készülék adott ideig tartó tétlenség után automatikusan átvált energiatakarékos állapotba (alvó üzemmódra). Ha ki szeretne lěpni az alvó üzemmódból, nyomja meg a kezelőpanel [(IMAGE)] (Energiatakarékos mód) gombját. |
| Polski | Nie należy podłączać kabla USB. Podłącz kabel USB podczas instalacji oprogramowania.Ježeli w ciągu określonego czasu użytkownik nie wykona żadnych czynności, urządzenie automatycznie przejdzie w tryb oszczędzania energii (tryb uśpienia). Aby wyłączyć tryb uśpienia, naciśnij przycisk [(IMAGE)] (Oszczędzanie energii) na panelu sterowania. |
| Slovensky | Nepripájajte kábel USB. Kábel USB pripojte počas inštalácie softvéru.Ak počas stanoveného času nebudú vykonané žiadne úkony, zariadenie sa automaticky prepne do stavu šetrenia energie (režim spánku). Ak chcete zrušit’ režim spánku, na ovládacom paneli stlačte tlačidlo [(IMAGE)] (Šetrenie energie). |
flowchart
graph LR
    A["Connect phone line.<br>Follow illustrations<br>on the next screen<br>and connect:<br>1. Phone line to A"] --> B["Telephone line connector"]
    B --> C["End Fax Setup Guide?"]
    C --> D["Setting is complete.<br>Turn the main power<br>OFF and ON. OK"]
flowchart
graph LR
    A["Computer"] --> B["Canon CD-ROM Setup"]
    B --> C["Manual Selection"]
    C --> D["Desktop with Manual Icon"]
| Česky | A Z disku „User Software CD“ (CD s uživatelským softwarem) nainstalujte ovladač a software.B Podrobné informace o postupech instalace najdete v příručce FAX L Driver Installation Guide (Příručka instalace ovladače FAX L).Žádáme uživatele o spolupráci na programu Product Extended Survey Program. Podrobnosti naleznete v popisech na obrazovce. | Používáte-li systém Windows 2000, nahlédněte do souboru „Readme” na disku „User Software CD“ (CD s uživatelským softwarem).[My computer] (Tento počítač) -> [Open] (Otevřit) ->[Readme for Windows2000 Users_XX.hta]* Pismena XX zastupují váš jazyk. | Nejnovější software:Podle použivaného operačního systému nemusí být některé funkce softwaru ovladače zahmutého na disku CD-ROM použitelné. Nejnovější software je k dispozici na webu společnosti Canon. Oveřte provozní prostředí apod. a v případě potřeby stáhněte příslušný software. |
| Magyar | A Telepitse az illesztőprogramot és a szoftvert a User Software CD (Felhasználói szoftverlemez) segítségével.B A telepítési eljárások részleteiről az FAX L Driver Installation Guide (Az FAX L illesztőprogram telepítési kézikönyve) címů útmutatóból tájékozódhat.Kérjük a felhasználó együttműködését a Product Extended Survey Programban. Részletek a képernyőn megjelenő ismertetésben olvashatók. | Windows 2000-felhasználók olvassák el a User Software CD (Felhasználói szoftverlemez) található „Readme” fájlt.[My computer] (Sajátgép) -> [Open] (Megnyitás) ->[Readme for Windows2000 Users_XX.hta]* Az XX helyén válassza saját nyelvének kódját. | A legújabb szoftver:A használt operációs rendszertől függően előfordulhat, hogy a CD-ROM-on található illesztőprogramok egyes funkciói nem használhatók. A legújabb szoftver a Canon webhelyén van közzétéve. Kérjük, ellenőrizze az operációs környezetet és egyéb feltételeket, és szükség esetén töltse le a megfelelő szoftvert. |
| Polski | A Zainstaluj sterownik i oprogramowanie znajdujące się na dysku User Software CD (dysk CD-ROM z oprogramowaniem użytkownika).B Szczegółowe procedury instalacji znajdują się w Instrukcji instalacji programu Sterownik do faksów L.Zachęcamy użytkowników do wzięcia udziału w programie Product Extended Survey Program. Szczegółowe informacje znajdują się w opisie na ekranie. | Użytkownicy systemu Windows 2000 powinni skorzystać z pliku „Readme” dodanego do dysku User Software CD (Dysk CD-ROM z oprogramowaniem użytkownika).[My computer] (Mój komputer) -> [Open] (Otwórz) ->[Readme for Windows2000 Users_XX.hta]* Zamiast XX należy wybrać oznaczenie własnego języka. | Najnowsze oprogramowanie:W zależności od używanego systemu operacyjnego niektóre funkcje oprogramowania sterownika zawartego na dysku CD-ROM mogą być niedostępne. Najnowszą wersje oprogramowania można znaleźć na stronie internetowej firmy Canon. Zalecane jest sprawdzenie środowiska operacyjnego itd. i pobranie wymaganej wersji odpowiedniego oprogramowania. |
| Slovensky | A Z disku User Software CD (Disk CD s obslužným softvérom) nainštalujte ovládač a softvér.B Podrobné informácie o postupoch inštalácie nájdete v príručke FAX L Driver Installation Guide.Žiadame používateľov o spoluprácu pri prieskume Product Extended Survey Program. Podrobnosti sú uvedené v informáciách na obrazovke. | Používatelia systému Windows 2000, prečítajte si súbor „Readme” na disku User Software CD (Disk CD s obslužným softvérom).[My computer] (Tento počítač) -> [Open] (Otvorit) ->[Readme for Windows2000 Users_XX.hta]* Podľa skratky XX vyberte svoj jazyk. | Najnovší softvér:V závislosti od operačného systému, ktorý použivate, niektoré funkcie softvéru ovládača z disku CD-ROM sa nemusia dať použit’. Najnovší softvér je uverejnený na webovej lokalite spoločnosti Canon. Skontrolujte operačné prostredie atď. a v prípade potreby prevezmite príslušný softvér. |
natural_image
Illustration of a printer and its corresponding printer with a close-up of the printer (no text or symbols present)natural_image
Illustration of a printer and its corresponding printer with a close-up arrow (no text or symbols)natural_image
Illustration of a printer and its corresponding image showing the same process (no text or symbols present)- Odbieranie zdalne
natural_image
Illustration of a printer being processed into a printer (no text or symbols present)Hrvatski

Upute za početak korištenja (ovaj priručnik): Najprije pročitajte ovaj priručnik.
Ovaj priručnik opisuje instalaciju uređaja, postavke i oprez. Prije korištenja uređaja svakako pročitajte ovaj priručnik.

FAX L Driver Installation Guide (Upute za instaliranje upravljačkog programa FAX L Driver) (User Software CD-ROM (CD-ROM s korisničkim softverom)):
| Hrvatski | Kretanje po izborniku• Odabir stavke ili pomicanje pokazivača po stavkama izbornikaOznačite stavku pomoću tipke [▲] ili [▼].Nastavite do sljedeće razine u hijerarhiji pomoću gumba [OK] ili [►].Vratite se na prethodnu razinu u hijerarhiji pomoću gumba[○] (Natrag) ili [◀].• Postavljanje potvrdePritisnite [OK]. Ako se na prikazu pojavi, označite, a zatim pritisnite [OK]. | Način unosa teksta- Promjena načina unosaPritisnite tipku [▼] da biste označili,a zatim pritisnite [OK].Da biste promijenili način unosa, možete pritisnuti i [(*) (Ton).- Unos teksta, simbola i brojevaUnesite ih pomoću numeričkih tipki ili tipke [(#) (Simboli).Pojedinosti i načinu koji se može prebacivati ili o dostupnom tekstu potražite na sljedećoj stranici. | - Pomicanje pokazivača (unos razmaka)Pomičite pomoću [◀] ili [►].Pokazivač pomaknite na kraj teksta, a zatim za dodavanje razmaka pritisnite [►].- Brisanje znakovaBrišite pomoću tipke [◎] (Izbriši).Pritisak i držanje tipke [◎] (Izbriši) briše sve znakove. |
| Română | Navigarea prin meniu• Selectarea elementelor sau deplasarea cursorului prin elementele de meniuSelectați un element cu [▲] sau cu [▼].Treceți la ierarhia următoare cu [OK] sau cu [►].Reveniți la ierarhia anterioară cu [○] (Înapoi) sau cu [◀].• Confirmarea setărilorApăsați [OK]. Totuși, când pe ecran se afișează, selectați, apoi apăsați [OK]. | Metoda de introducere a textului- Schimbarea modului de intrareApăsați pe [▼] pentru a selecta, apoi apăsați pe [OK].De asemenea, puteți apăsa pe [(*) (Ton) pentru a schimba modul de intrare.- Introducerea textului, simbolurilor și numerelorIntroduceți utilizând tastele numerice sau [(#) (Simboluri).Pentru detalii despre modul comutabil sau textul disponibil, consultați pagina următoare. | - Deplasarea cursorului (introducerea unui spațiu)Vă deplasați utilizând [◀] sau [►].Deplasați cursorul la sfârșitul textului și apăsați [►] pentru a introduce un spațiu.- Ștergerea caracterelorȘtergeți cu [◎] (Golire).Ținând apăsată tasta [◎] (Golire), se șterg toate caracterele. |
| Slovenščina | Krmarjenje po meniju• Izbiranje elementa ali premikanje kazalke po menijskih elementihElement označite s tipko [▲] ali [▼].S tipko [OK] (V redu) ali [►] se premaknite na naslednjo hierarhijo.S tipko [○] (nazaj) ali [◀] se vrnete na prejšnjo hierarhijo.• Nastavitev potrditvePritisnite [OK] (V redu). Če se na zaslonu prikaže, označitein pritisnite [OK] (V redu). | Način vnosa besedila- Spreminjanje načina vnosaS tipko [▼] označitein pritisnite [OK] (V redu).Način vnosa lahko spremenite tudi tako, da pritisnete tipko [(*) (Tonsko).- Vnos besedila, simbolov in številkBesedilo lahko vnašate s številskimi tipkami ali [(#) (Simboli).Če želite podrobnosti o načinu, ki ga je mogoče preklopiti, ali razpoložljivem besedilu, si oglejte naslednjo stran. | - Premikanje kazalke (vnos presledka)Premaknete se s tipko [◀] ali [►].Kazalko premaknite na konec besedila in s tipko [►] vnesite presledek.- Brisanje znakovZnake brišete s tipko [◎] (Izbriši).Če tipko [◎] (Izbriši) pridržite, izbrišete vse znake. |
| Български | Придвижване в менюто• Избране на елемент или преместване на курсора между елементите на менютоИзберете елемент с [▲] или [▼].Преминете на следващото йерархично ниво с [OK] или [►].Върнете се на предишното йерархично ниво с [○] (Назад) или [◀].• Потвърждаване на настройкитеНатиснете [OK]. Kogato обаче на дисплея се появи съобщението<Прилагане>, изберете <Прилагане> след което натиснете [OK]. | Метод на въвеждане на текст- Смана на режима на въвежданеНатиснете [▼], за да изберете <Режим за въвеждане>, след което натиснете [OK].Можете също да натиснете [(*) (Тонално) за промяна на режима на въвеждане.- Въвеждане на текст, символи и цифриВъвеждайте с помощта на цифровите клавиши или [(#) (Символи).За подробности за режимите, на които може да се превключи, или текста, който може да се въвежда, вж. следващата страница. | - Преместване на курсора (въвеждане на интервал)Преместването става с [◀] или [►].Преместете курсора в края на текста и натиснете [►], за да въведете интервал.- Изтриване на знациИзтрийте с бутона [◎] (Изчистване).Ако натиснете и задържите бутона [◎] (Изчистване), ще изтриете всички знаци. |
flowchart
graph LR
    A["Language\nEnglish\nEstonian\nFinnish\nFrench"] --> B["Current Time Set.\nMust rechg. battery for 24 hrs. to save time settings.\nAfter turning main"]
    B --> C["Perform fax setup?\nSet up Now\nSet up Later"]
| Hrvatski | 4-1 Određivanje početnih postavkiPratite upute na zaslonu; postavite jezik i vrijeme.Pojedinosti o kretanju po izborniku i načinu unosa brojeva potražite u poglavlju 2 "Kretanje po izborniku i način unosa teksta" ( str.3). | 4-2 Odredite početne postavke faksa.Pratite "Upute za postavljanje faksa" kako biste odredili broj faksa, naziv jedinice i način primanja.Više pojedinosti o načinu rada za primanje možete saznati u e-priručniku.⊖ e-priručnik -> "Faks" -> "Korištenje funkcija faksiranja" -> "Primanje faksova" -> "Način primanja". | Što se događa s nazivom uređajaNakon registracije ti se podaci ispisuju pri vrhu svake stranice koju šaljete. |
| Română | 4-1 Specificarea setărilor inițialeUrmați instrucțiunile de pe ecran, setați limba și ora.Pentru detalii despre navigarea prin meniu și despre modul de introducere a numerelor, consultați 2 „Navigarea prin meniu și metoda de introducere a textului” ( P.3). | 4-2 Specificați setările inițiale de fax.Urmați instrucțiunile din „Fax Setup Guide" (Ghid de configurare a faxului) pentru a specifica un număr de fax, un nume de unitate și un mod de recepționare.Pentru detalii despre modul de recepționare, consultați Manualul electronic.⊖ e-Manual (Manual electronic) -> „Fax" -> „Using the Fax Functions" (Utilizarea funcțiilor de fax) -> „Receiving Faxes" (Receptionarea faxurilor) -> „RX Mode" (Modul RX). | Ce se întâmplă cu numele unitățiiDupă ce au fost înregistrate informațiile, acestea sunt imprimate în partea de sus a fiecărei pagini pe care o trimiteți. |
| Slovenščina | 4-1 Določanje začetnih nastavitevSledite navodilom na zaslonu ter nastavite jezik in čas.Če želite podrobnosti o krmarjenju po meniju in načinu vnosa številk, si oglejte 2 »Krmarjenje po meniju in način vnosa besedila« ( Str.3). | 4-2 Določite začetne nastavitve faksa.Oglejte si »Vodnik za namestitev faksa« ter določite številko faksa, ime enote in način sprejema. Če želite več informacij o načinu sprejemanja, si oglejte E-priročnik.⊖ E-priročnik -> »Faks« -> »Uporaba funkcij faksiranja« -> »Sprejemanje faksov« -> »Način SPR«. | Kaj se zgodi z imenom enoteKo registrirate podatke, bodo ti natisnjeni na vrhu vsake poslane strani. |
| Български | 4-1 Указане на първоначалните настройкиКато следвате инструкциите на екрана, задайте часа и езика.За повече информация относно придвижването в менюто и начина за въвеждане на цифри вж. 2 "Придвижване в менюто и метод на въвеждане на текст" ( стр.3). | 4-2 Укажете първоначалните настройки на факса.Спазвайте инструкциите във "Fax Setup Guide" (Ръководство за конфигуриране на факса), за да зададете номер на факса, име на устройството и режим на получаване.За повече информация за режима на получаване вж. e-Manual (Електронно ръководство).⊖ e-Manual (Електронно ръководство) -> "Fax" (Факс) -> "Using the Fax Functions"(Използване функциите на факса) -> "Receiving Faxes" (Получаване на факсове) -> "RX Mode" (Режим на получаване). | Какво става с името на устройствотоСлед като веднъж информациятае регистрирана, тя се отпечатвав горния край на всяка страница, която изпращате. |

flowchart
graph LR
    A["Connect phone line.<br>Follow illustrations on the next screen and connect:<br>1. Phone line to A"] --> B["Telephone line connector"]
    B --> C["End Fax Setup Guide?"]
    C --> D["Setting is complete.<br>Turn the main power OFF and ON.<br>OK"]
| Hrvatski | 4-3 Priključite telefonski kabel.Kada se na zaslonu pojavi Spojite telef. liniju. priključite telefonski kabel prema ovoj slici.Ako je u uređaj utaknuta slušalicaSlušalicu možete koristiti bez povezivanja vanjskog telefona. | 4-4 Izadite iz Fax Setup Guide (Upute za postavljanje faksa), a zatim ponovno pokrenite uređaj.Isključite uređaj, pričekajte najmanje 10 sekundi, a zatim ga uključite.Vrste telefonskih linija ne otkrivaju se automatski. Pogledajte e-priručnik i ručno postavite telefonsku liniju.⊖ e-priručnik -> "Faks" -> "Korištenje funkcija faksiranja" -> "Promjena postavki faksiranja (postavke koje se mogu navesti pomoću tipke [Izbornik])" -> "Konfiguriranje postavki slanja" -> "Odabir vrste linije". | 5 "Postavljanje vrste i veličine papira" (str.7) |
| Română | 4-3 Conectați un cablu telefonic.Când pe ecran apare mesajul Conectați linia tel. , conectați cablul telefonic ținând cont de cele prezentate în illustrație.Dacă receptorul este conectat la aparatPuteți utiliza receptorul fără a conecta un telefon extern. | 4-4 Ieşiti din Fax Setup Guide (Ghid de configurare a faxului), apoi reporniți aparatul.OPRIȚI aparatul și așteptați cel puțin 10 secunde, apoi PORNIȚI-L din nou.Tipurile de lini telefonice nu sunt detectate automat. Consultați documentul e-Manual (Manual electronic) și setați manual o linie telefonică.⊖ e-Manual (Manual electronic) -> „Fax” -> „Using the Fax Functions" (Utilizarea funcțiilor de fax) -> „Changing Fax Settings (Settings that Can Be Specified Using the [Menu] Button)" (Modificarea setărilor de fax (Setări care pot fi specificate prin utilizarea butonului [Meniu]) -> „Configuring Send Settings" (Configurarea setărilor de trimitere) -> „Select Line Type" (Selectarea tipului de linie). | 5 „Setarea dimensiunii și a tipului de hârtie" (P.7) |
| Slovenščina | 4-3 Priključite telefonski kabel.Ko se na zaslonu prikaže sporočilo Priklj. telef. linije. , si pomagajte s sliko in priključite telefonski kabel.Če je na napravo priključena slušalkaSlušalko lahko uporabite brez priključitve zunanjega telefona. | 4-4 Zaprite vodnik za nastavitev faksa in znova zaženite napravo.Izklopite napravo in počakajte vsaj 10 sekund, preden jo znova vklopite.Vrste telefonske linije niso samodejno zaznane. Oglejte si E-priročnik in ročno nastavite telefonsko linijo.⊖ E-priročnik -> »Faks« -> »Uporaba funkcij faksiranja« -> »Spreminjanje nastavitev faksiranja (Nastavitve, ki jih lahko določite z gumbom [Menij]« -> »Konfiguracija nastavitev pošiljanja« -> »Izberite vrsto linije«. | 5 »Nastavitev velikosti in vrste papirja« (Str.7) |
| Български | 4-3 Свързване на телефонен кабел.Когато на дисплея се покаже Свързване тел. линия. , свържете телефонния кабел, като използвате за справка фигурата.Ако слушалката е свързана с машинатаможете да използвате слушалката, без да свързвате външен телефон. | 4-4 Излезте от Fax Setup Guide (Ръководство за конфигуриране на факса) и след това рестартирайте устройството.ИЗКЛЮЧЕТЕ устройството, изчакайте поне 10 секунди, след което го ВКЛЮЧЕТЕ отново.Типът на телефонната линия не се открива автоматично. Вж. e-Manual (Електронно ръководство) и настройте телефонната линия ръчно.⊖ e-Manual (Електронно ръководство) -> "Fax" (Факс) -> "Using the Fax Functions" (Използване функциите на факса) -> "Changing Fax Settings (Settings that Can Be Specified Using the [Menu] Button)" (Промяна на настройките на факса (настройките, които може да се укажат чрез бутона [Меню]) -> "Specifying Fax Sending Settings" (Задаване на настройки за изпращане на факс) -> "Configuring Send Settings" -> "Select Line Type" (Избор на тип линия). | 5 "Задаване на формата и типа на хартията" (стр.7) |
Postavljanje vrste i veličine papira
5 Setarea dimensiunii și a tipului de hârtie Nastavitev velikosti in vrste papirja Задаване на формата и типа на хартията
flowchart
graph LR
    A["Start"] --> B["Paper Settings"]
    B --> C{1 Drawer 1}
    C --> D["Specify destination.<br>01/01 2011 12:52AM"]
    C --> E["RS Mode: Auto<br>Resolution: 200 x 1..."]
| Hrvatski | Pratite upute na zaslonu; postavite veličinu i vrstu papira.Nakon određivanja ove, odredite sljedeće postavke. | 6 "Instalacija upravljačkog programa ili softvera" (str.8) |
| Română | Urmați instrucțiunile de pe ecran, setați dimensiunea și tipul de hârtie.După finalizarea setării, specificați următoarele setări. | 6 „Instalarea driverului/software-ului” (P.8) |
| Slovenščina | Sledite navodilom na zaslonu ter nastavite velikost in vrsto papirja.Ko dokončate nastavitev, določite te nastavitve. | 6 »Namestitev gonilnika/programske opreme« (Str.8) |
| Български | Като следвате инструкциите на екрана, задайте формата и типа на хартията.След като извършите настройката, задайте следните настройки. | 6 "Инсталиране на драйвера/софтуера" (стр.8) |
6
Instalacija upravljačkog programa ili softvera
natural_image
Diagram of a CD or DVD disc being inserted into a rectangular box (no text or symbols present)▶
▶
Hrvatski
A Instalirajte upravljački program i softver pomoću User Software CD-ROM-a (CD-ROM s korisničkim softverom).
B Pojedinosti o postupcima instalacije potražite u uputama FAX L Driver Installation Guide.
[My computer] (Moje računalo) -> [Open] (Otvori) -> [Readme for Windows2000 Users_XX.hta]*
* Odaberite jezik za XX.
[My computer] (Computerul meu) -> [Open] (Deschidere) -> [Readme for Windows2000 Users_XX.hta]*
natural_image
Illustration of a printer and its corresponding printer with a close-up of the printer (no text or symbols present)natural_image
Illustration of a printer and its corresponding printer, showing the process from paper to print (no text or symbols present)natural_image
Illustration of a printer and its corresponding printer, showing the process from paper to print (no text or symbols present)natural_image
Illustration of a printer and its corresponding printer with a close-up view (no text or symbols)Русский

| Русский | Поиск в Меню• Выбор элемента или перемещение курсора по элементам менюВыделите элемент клавишей [▲] или [▼].Для перехода на следующий уровень используйте кнопку [OK] или клавишу [▶].Для возврата на предыдущий уровень используйте клавишу [○] (Назад) или [◀];• Подтверждение настроекНажмите [OK]. Если на экране отображается кнопка <Применить>,сначала выберите <Применить>, затем нажмите [OK]. | Способ ввода текста- Изменение режима вводаКлавишей [▼] выделите пункт <Режим ввода> и нажмите кнопку [OK].Можно также изменить режим ввода с помощью клавиши [◎] (Тон).- Ввод букв, символов и чиселВвод осуществляется с помощью цифровых клавиш или клавиши [◎] (Символы).Подробнее о режиме, на который можно переключиться, или о доступном текстесм. на следующей странице. | - Перемещение курсора (ввод пробела)Используйте клавиши [◀] и [▶].Переместите курсор в конец текста и нажмите [▶], чтобы ввести пробел.- Удаление символовДля удаления используйте клавишу [◎] (Стереть).Для удаления всех символов нажмите и удерживайте клавишу [◎](Стереть). |
| Українська | Переміщення між пунктами меню• Вибир пункту або переміщення курсору між пунктами менюВиділіть елемент за допомогою стрілки [▲] або [▼].Щоб перейти до наступного підрозділу, натисніть кнопку [OK] або [▶].Щоб повернутися до розділу, натисніть кнопку [○] (Назад) або [◀].• Для підтвердження виборуНатисніть кнопку [OK]. Однак ящо на диспліє відобразиться <Apply>(Застосувати), виділіть <Apply> (Застосувати), а потім натисніть кнопку [OK]. | Спосіб введення тексту- Зміна режиму введенняНатисніть [▼], щоб виділити <Entry Mode> (Режим введення), відтак натисніть кнопку [OK].Режим введення можна також змінити за допомогою клавіші [◎] (Тон).- Введення тексту, символів та цифрВведіть за допомогою цифрових клавіш або [#] (Символи).Докладну інформацію про переключення режимів та доступні для введення символидив. на наступній сторінці. | - Переміщення курсору (введення пробілу)Виконуйте переміщення за допомогою кнопок [◀] або [▶].Переміщуйте курсор до кінця тексту та натисніть кнопку [▶], щоб ввести пробіл.- Видалення символівВиконуйте видалення за допомогою кнопки [◎] (Стерти).Щоб видалити всі символи, натисніть та утримуйте кнопку [◎](Стерти). |
| العربية | التنقل OVER القائمة• تحديد عصر أو تحریک المؤشر بین عناصر القائمة [▼] [▲] أو [▲]مُل بنتلّلی ANY عصر پاستخدام [OK] [▶] [★] (مواق) [وابت] [◀] [●] [●] [●] [●] [●] [●] [●] [●] [●] [●] [●] [●] [●] [●] [●] [●] [●] [●] [●] [●] [●] [●] [●] [●] [●] [●] [●] [●] [●] [●] [●] [●] [●] [●], [●] [●] [●] [●] [●] [●] [●] [●] [●] [●] [●] [●] [●] [●] [●] [●] [●] [●] [●] [●] [●] [●] [●] [●] [●] [●] [●] [●] [●] [●] [●] [●] [●] | طريقة إدخال النص• تعYYИИ و + • تاممنز الادخال [▼] [▶] لتم鹦ل [موقق]. [OK] [●] [●] [●] [●] [●] [●] [●] [●] [●] [●] [●] [●] [●] [●] [●] [●] [●] [●] [●] [●] [●] [●] [●] [●] [●] [●] [●] [●] [●] [●] [●] [●] [●][●] [●] [●] [●] [●] [●] [●] [●] [●] [●] [●] [●] [●] [●] [●] [●] [●] [●] [●] [●] [●] [●] [●] [●] [●] [●] [●] [●] [●] [●] [●] [●] [●] [○] [●] [●] [●] [●] [●] [●] [●] [●] [●] [●] [●] [●] [●] [●] [●] [●] [●] [●] [●] [●] [●] [●] [●] [●] [●] [●] [●] [●] [●] [●] [●] [●] [●] الProcess على قتصайه Consulting Volatile للبندیا أو النص المتفرف، انظر屏幕ة التالية. الProcess على قتصайه Consulting Volatile للبندیا أو النص المتفرف، انظر屏幕ة التالية.الProcess على قتصайه Consulting Volatile للبندیا أو النص المتفرف، انظر屏幕ة التالية.الProcess على قتصайه Consulting Volatile للبندیا أو النص المتفرف، انظر屏幕ة التالية.الProcess على قتصайه Consulting Volatile للبندیا أو النص المتفرف، انظر屏幕ة التالية.الProcess على قتصайه Consulting Volatile للبndیا أو النص المتفرف، انظر屏幕ة التالية.الProcess على قتصайه Consulting Volatile للبندیا أو النص متفرف، انظر屏幕ة التالية.الProcess على قتصайه Consulting Volatile للبندیا أو النص متفرف، انظر屏幕ة التالية.الProcess على قتصайه Consulting Volatile للبندیا أو النص متفرف، انظر屏幕ة التالية.الProcess على قتصайه Consulting Volatile للبندیا أو النص متفرف، انظر屏幕ة التالية.الProcess lighting (الProcess lighting) - تاممنز الادخال (OK) [●] (OK) [●] (OK) [●] (OK) [●] (OK) [●] (OK) [●] (OK) [●] (OK) [●] (OK) [●] (OK) [●] (OK) [●] (OK) [●] (OK) [●] (OK) [●] (OK) [●] (OK) [●] (OK) [●] (OK) (●) (OK) (●) (OK) (●) (OK) (●) (OK) (●) (OK) (●) (OK) (●) (OK) (●) (OK) (●) (OK) (●) (OK) (●) (OK) (●) (OK) (●) (OK) (●) (OK) (●) (OK) (●) (OK) (●) (OK) | • تاممنز الادخال (OK) [●] (OK) [●] (OK) [●] (OK) [●] (OK) [●] (OK) [●] (OK) [●] (OK) [●] (OK) [●] (OK) [●] (OK) [●] (OK) [●] (OK) [●] (OK) [●] (OK) [●] (K) (K) (K) (K) (K) (K) (K) (K) (K) (K) (K) (K) (K) (K) (K) (K) (K) (K) (K) (K) (K) (K) (K) (K) (K) (K) (K) (K) (K) (K) (K) (K) (K) (K) |
| العربية | • تاممنز الادخال (OK) [●] (OK) [●] (OK) [●] (OK) [●] (OK) [●] (OK) [●] (OK) [●] (OK) [●] (OK) [●] (OK) [●] (OK) [●] (OK) [●] (OK) [●] (OK) [●] (OK) [●](●) (●) (●) (●) (●) (●) (●) (●) (●) (●) (●) (●) (●) (●) (●) (●) (●) (●) (●) (●) (●) (●) (●) (●) (●) (●) (●) (●) (●) (●) (●) (●) (●) (●) (○) [●] (○) (○) (○) (○) (○) (○) (○) (○) (○) (○) (○) (○) (○) (○) (○) (○) (○) (○) (○) (○) (○) (○) (○) (○) (○) (○) (○) (○) (○) (○) (○) (○) (○) (○) | • تاممنز الادخال (OK) [●] (OK) [●] (OK) [●] (OK) [●] (OK) [●] (OK) [●] (OK) [●] (OK) [●] (OK) [●] (OK) [●] (OK) [●] (OK) [●] (OK) [●] (OK) [●] (OK) [○] (○) (○) (○) (○) (○) (○) (○) (○) (○) (○) (○) (○) (○) (○) (○) (○) (○) (○) (○) (○) (○) (○) (○) (○) (○) (○) (○) (○) (○) (○) (○) (○) (○)(●) (●) (●) (●) (●) (●) (●) (●) (●) (●) (●) (●) (●) (●) (●) (●) (●) (●) (●) (●) (●) (●) (●) (●) (●) (●) (●) (●) (●) (●) (●) (●) (●) ( ●) (●) (●) (●) (●) (●) (●) (●) (●) (●) (●) (●) (●) (●) (●) (●) (●) (●) (●) (●) (●) (●) (●) (●) (●) (●) (●) (●) (●) (●) (●) (●) (●) (●)(●) (●) (●) (●) (●) (●) (●) (●) (●) (●) (●) (●) (●) (●) (●) (●) (●) (●) (●) (●) (●) (●) (●) (●) (●) (●) (●) (●) (●) (●) (●) (●) (●) 100% (●) (●) (●) (●) (●) (●) (●) (●) (●) (●) (●) (●) (●) (●) (●) (●) (●) (●) (●) (●) (●) (●) (●) (●) (●) (●) (●) (●) (●) (●) (●) (●) (●) 200% (●) (●) (●) (●) (●) (●) (●) (●) (●) (●) (●) (●) (●) (●) (●) (●) (●) (●) (●) (●) (●) (●) (●) (●) (●) (●) (●) (●) (●) (●) (●) (●) 300% (●) (●) (●) (●) (●) (●) (●) (●) (●) (●) (●) (●) (●) (●) (●) (●) (●) (●) (●) (●) (●) (●) (●) (●) (●) (●) (●) (●) (●) (●) (●) (●) | • تاممنز الادخال (OK) [●] (OK) [●] (OK) [●] (OK) [●] (OK) [●] (OK) [●] (OK) [●] (OK) [●] (OK) [●] (OK) [●] (OK) [●] (OK) [●] (OK) [●] (OK) [●] (OK) [O] (O) (O) (O) (O) (O) (O) (O) (O) (O) (O) (O) (O) (O) (O) (O) (O) (O) (O) (O) (O) (O) (O) (O) (O) (O) (O) (O) (O) (O) (O) (O) (O) (O) (O) |
| العربية | • تاممنز الادخال (OK) [●] (OK) [●] (OK) [●] (OK) [●] (OK) [●] (OK) [●] (OK) [●] (OK) [●] (OK) [●] (OK) [●] (OK) [●] (OK) [●] (OK) [●] (OK) [O] (O) (O) (O) (O) (O) | • تاممنز الادخال (OK) [●] (OK) [●] (OK) [●] (OK) [●] (OK) [●] (OK) [●] (OK) [●] (OK) [●] (OK) [●] (OK) [●] (OK) [●] (OK) [●] (OK) [●] (OK) [●] (OK) [C] (●) (●) (●) (●) (●) (●) (●) (●) (●) (●) (●) (●) (●) (●) (●) (●) (●) (●) (●) (●) (●) (●) (●) (●) (●) (●) (●) (●) (●) (●) (●) (●) (●) | • ت autom� م Carbon م Carbon م Carbon م Carbon م Carbon م Carbon م Carbon م Carbon م Carbon م Carbon م Carbon م Carbon م Carbon م Carbon م Carbon م Carbon م Carbon م Carbon م Carbon م Carbon م Carbon م Carbon م Carbon م Carbon م Carbon م Carbon م Carbon م Carbon م Carbon م Carbon م Carbon م Carbon م Carbon م Carbon م Carbon م Carbon م Carbon م Carbon م Carbon م Carbon م Carbon م Carbon م Carbon م Carbon م Carbon م Carbon م Carbon م Carbon م Carbon م Carbon مCarbon م Carbon م Carbon م Carbon م Carbon م Carbon م Carbon م Carbon م Carbon م Carbon m Carbon m Carbon m Carbon m Carbon m Carbon m Carbon m Carbon m Carbon m Carbon m Carbon m Carbon m Carbon m Carbon m Carbon m Carbon m Carbon m Carbon m Carbon m Carbon m Carbon m Carbon m Carbon m Carbon m Carbon m Carbon m Carbon m Carbon m Carbon m Carbon m Carbon m Carbon m Carbon m Carbon m Carbon m Carbon m Carbon m Carbon m Carbon m Carbon m Carbon m Carbon m Carbon m Carbon m Carbon m Carbon m Carbon m Carbon m Carbon m Carbon m Carbonm Carbon m Carbon m Carbon m Carbon m Carbon m Carbon m Carbon m Carbon m Carbon m Carbon m Carbon m Carbon m Carbon m Carbon m Carbon m Carbon m Carbon m Carbon m Carbon m Carbon m Carbon m Carbon m Carbon m Carbon m Carbon m Carbon m Carbon m Carbon m Carbon m Carbon m Carbon m Carbon m Carbon m Carbon m Carbon m Carbon m Carbon m Carbon m Carbon m Carbon m Carbon m Carbon m Carbon m Carbon m Carbon m Carbon m Carbon m Carbon m Carbon m Carbon nna m nna m nna m nna m nna m nna m nna m nna m nna m nna m nna m nna m nna m nna m nna m nna m nna m nna m nna m nna m nna m nna m nna m nna m nna m nna m nna m nna m nna m nna m nna m nna m nna m nna m na m na m na m na m na m na m na m na m na m na m na m na m na m na m na m na m na m na m na m na m na m na m na m na m na m na m na m na m na m na m na m na m na m na m na m na m na m na m na m na m na m na m na m na m na m na m na m na m na m na mna m na m na m na m na m na m na m na m na m na m na m na m na m na m na m na m na m na m na m na m na m na m na m na m na m na m na m na m na m na m na m na m na m na m na m na m na m na m na m na m na m na m na m na m na m na m na m na m na m na nna m na m na m na m na m na m na m na m na m na m na m na m na m na m na m na m na m na m na m na m na m na m na m na m na m na m na m na m na m na m na m na m na m na m na m na m na m na m na m na m na m na m na m na m na m na m na m na m na mna mna mna mna mna mna mna mna mna mna mna mna mna mna mna mna mna mna mna mna mna mna mna mna mna mna mna mna mna mna mna mna mna mna mna mna mna mna mna mna mna mna mna mna mna mna mna mna mna mna mua mna mna mna mna mna mna mna mna mna mna mna mna mna mna mna mna mna mna mna mna mna mna mna mna mna mna mna mna mna mna mna mna mna mna mna mna mna mna mna mna mna mna mna mna mna mna mna mna mna mma mna mna mna mna mna mna mna mna mna mna mna mna mna mna mna mna mna mna mna mna mna mna mna mna mna mna mna mna mna mna mna mna mna mna mna mna mna mna mna mna mna mna mna mna mna mna mna mna mna mha mna mna mna mna mna mna mna mna mna mna mna mna mna mna mna mna mna mna mna mna mna mna mna mna mna mna mna mna mna mna mna mna mna mna mna mna mna mna mna mna mna mna mna mna mna mna mna mna mna mno mna mna mna mna mna mna mna mna mna mna mna mna mna mna mna mna mna mna mna mna mna mna mna mna mna mna mna mna mna mna mna mna mna mna mna mna mna mna mna mna mna mna mna mna mna mna mna mna mna mns mna mna mna mna mna mna mna mna mna mna mna mna mna mna mna mna mna mna mna mna mna mna mna mna mna mna mna mna mna mna mna mna mna mna mna mna mna mna mna mna mna mna mna mna mna mna mna mna mna mnia mna mna mna mna mna mna mna mna mna mna mna mna mna mna mna mna mna mna mna mna mna mna mna mna mna mna mna mna mna mna mna mna mna mna mna mna mna mna mna mna mna mna mna mna mna mna mna mna mna mnp ma ma ma ma ma ma ma ma ma ma ma ma ma ma ma ma ma ma ma ma ma ma ma ma ma ma ma ma ma ma ma ma ma ma ma ma ma ma ma ma ma ma ma ma ma ma ma ma ma ma ma ma ma ma ma ma ma ma ma ma ma ma ma ma ma ma ma ma ma ma ma ma ma ma ma ma ma ma ma ma ma ma ma ma ma ma ma ma ma ma ma ma ma ma ma ma ma ma ma ma maru maru maru maru maru maru maru maru maru maru maru maru maru maru maru maru maru maru maru maru maru maru maru maru maru maru maru maru maru maru maru maru maru maru maru maru maru maru maru maru maru maru maru maru maru maru maru maru maru maru maro maru maru maru maru maru maru maru maru maru maru maru maru maru maru maru maru maru maru maru maru maru maru maru maru maru maru maru maru maru maru maru maru maru maru maru maru maru maru maru maru maru maru maru maru maru maru maru maru maru marv maru maru maru maru maru maru maru maru maru maru maru maru maru maru maru maru maru maru maru maru maru maru maru maru maru maru maru maru maru maru maru maru maru maru maru maru maru maru maru maru maru maru maru maru maru maru maru maru maru mar u maru maru maru maru maru maru maru maru maru maru maru maru maru maru maru maru maru maru maru maru maru maru maru maru maru maru maru maru maru maru maru maru maru maru maru maru maru maru maru maru maru maru maru maru maru maru maru maru maru mari maru maru maru maru maru maru maru maru maru maru maru maru maru maru maru maru maru maru maru maru maru maru maru maru maru maru maru maru maru maru maru maru maru maru maru maru maru maru maru maru maru maru maru maru maru maru maru maru maru mara maru maru maru maru maru maru maru maru maru maru maru maru maru maru maru maru maru maru maru maru maru maru maru maru maru maru maru maru maru maru maru maru maru maru maru maru maru maru maru maru maru maru maru maru maru maru maru maru maru marr u maru maru maru maru maru maru maru maru maru maru maru maru maru maru maru maru maru maru maru maru maru maru maru maru maru maru maru maru maru maru maru maru maru maru maru maru maru maru maru maru maru maru maru maru maru maru maru maru marumar u maru maru maru maru maru maru maru maru maru maru maru maru maru maru maru maru maru maru maru maru maru maru maru maru maru maru maru maru maru maru maru maru maru maru maru maru maru maru maru maru maru maru maru maru maru maru maru maru maru minnunununununununununununununununununununununununununununununununununununununununununununununununununununununununununununununununununununununununununununununununununununununununununununununununununununun ununununununununununununununununununununununununununununununununununununununununununununununununununununununununununununununununununununununununununununununununununununununununununununununun |
flowchart
graph LR
    A["Language\nEnglish\nEstonian\nFinnish\nFrench"] --> B["Current Time Set.\nMust rechg. battery for 24 hrs. to save time settings.\nAfter turning main"]
    B --> C["Perform fax setup?\nSet up Now\nSet up Later"]
flowchart
graph LR
    A["Connect phone line.<br>Follow illustrations on the next screen and connect:<br>1. Phone line to A"] --> B["Telephone line connector"]
    B --> C["End Fax Setup Guide?"]
    C --> D["Setting is complete.<br>Turn the main power OFF and ON.<br>OK"]
flowchart
graph LR
    A["Printer Setup"] --> B["Paper Settings"]
    B --> C["Specify destination. 01/01 2011 12:52AM"]
    C --> D["RX Mode: Auto Resolution: 200 x 1..."]
flowchart
graph LR
    A["Computer"] --> B["Canon CD-ROM Setup"]
    B --> C["Manual Selection"]
    C --> D["Desktop with Manual Icon"]
natural_image
Illustration of a printer and its corresponding image showing the same process (no text or symbols present)natural_image
Illustration of a printer being inserted into a print device (no text or symbols present)natural_image
Illustration of a printer and its corresponding printer with a close-up view (no text or symbols)▪ الاستلام عن بُعد
Türkçe

| Türkçe | Menüde Gezinme• Oğe seçimi veya imleci menü öğeleri arasında hareket ettirme[▲] veya [▼] ile bir oğe vurgulayin.[OK] (Tamam) veya [▶] tuşuyla bir sonraki aşamaya ilerleyin.[○] (Geri) veya [◀] tuşuyla önceki aşamaya geri dönün.• Ayar onayı[OK] (Tamam) tuşuna basin. Ancak, ekranda <Uygula> görüntülendiğinde,<Uygula> öğesini vurgulayıp ardından [OK] (Tamam) tuşuna basin. | Metin Giriş Yöntemi- Giriş modunu değiştirme<Giriş Modu> öğesini vurgulamak için [▼] tuşuna ve [OK] (Tamam) tuşuna basın.Giriş modunu [(*) (Ton) tuşuna basarak da değiştirebilirsiniz.- Metin, simge ve numaraları girmeSayı tuşlarını veya [(#) (Simgeler) tuşunu kullanarak girin.Değiştirilebilir moddaki veya kullanılabilir metindeki ayrıntılar için, sonraki sayfaya bakın. | - İmleci hareket ettirme (boşluk girme)[◀] veya [▶] tuşuyla hareket edin.İmleci metnin sonuna getirin ve boşluk girmek için [▶] tuşuna basin.- Karakter silme[[C] (Temizle) tuşuyla silin.[C] (Temizle) tuşu basılı tutulduğunda tüm karakterler silinir. |
| Latviešu | Naviğešana izvělně• Vienumu izvěle vai kursora pärvietošana pa izvělnes vienumiemIzceliet vienumu, izmantojot [▲] vai [▼].Pârejiet uz nâkamo hierarhijas fīmeni, nospiežot [OK] (Labi) vai [▶].Atgriezieties iepriekšējā hierarhijas fīmenī, nospiežot [○] (Atpakaļ) vai [◀].• Iestatījumu apstiprinăšanaNospiediet [OK] (Labi). Taču, ja displejā ir redzama iespēja <Apply> (Lietot), izceliet <Apply> (Lietot) un pēc tam nospiediet [OK] (Labi). | Teksta ievades metode- Ievades režīma maiņaNospiediet [▼], lai izceltu(Ievades režīms), un nospiediet [OK] (Labi).Lai mainītu ievades režīmu, varat arī nospiest [(*) (Tonāls).- Teksta, simbolu un ciparu ievadelevadiet, izmantojot ciparu taustiņus vai [(*) (Simboli).Detalizētu informāciju par pārslēdzamo režīmu vai pieejamo tekstu sk. nākamajā lappusē. | - Kursora pärvietošana (atstarpes ievade)Pārvietojiet kursoru, izmantojot [◀] vai [▶].Lai ievadītu atstarpi, pärvietojiet kursoru līdz teksta beigāmun nospiediet [▶].- Rakstzīmju dzēšanaDzēsiet, izmantojot [C] (Dzēst).Lai dzēstu visas rakstzīmes, nospiediet un turiet taustiņu [C] (Dzēst). |
| Lietuviškai | Meniu narśymas• Elemento pasirinkimas arba žymeklio perkėlimas prie meniu elementųParyškinkite elementą paspausdami [▲] arba [▼].Pereikite prie paskesnės hierarchijos spustelėję [OK] (Gerai) arba [▶].Grijžkite prie ankstesnės hierarchijos spustelėję [○] (Atgal) arba [◀].• Patvirtinimo nustatymasPaspauskite [OK] (Gerai). Tačiau kai ekrane bus rodoma <Apply> (Taikyti), paryškinkite <Apply> (Taikyti) ir paspauskite [OK] (Gerai). | Teksto įvesties būdas- Įvesties režimo keitimasPaspauskite [▼], kad paryškintumėte(Ivesties režimas), tada paspauskite [OK] (Gerai).Norėdami pakeisti įvesties režimą taip pat galite paspausti [(*) (Tonas).- Teksto, simbolių ir skačių įvestisĮveskite naudodami skačių mygtukus arba [(#) (Simboliai).Išsamesnės informacijos apie perjungimo režimą arba galimą tekstą ieškokite paskesniame puslapyje. | - Žymeklio perkėlimas (tarpo įvedimas)Perkelkite naudodami [◀] arba [▶].Perkelkite žymeklį į teksto pabaigą ir paspauskite [▶], kad įvestumėte tarpą.- Simbolių naikinimasNaikinkite naudodami [C] (Valyti).Paspaudus ir palaikius mygtuka [C] (Valyti) panaikinami visi simboliai. |
| Eesti | Menüüs liikumine• Käskude valimine või kursoriga menüükäskudes liikumineTõstke käsk esile klahvi [▲] või [▼] abil.Liikuge järgmisele tasemele, kasutades nuppu [OK] või [▶].Liikuge eelmisele tasemele, kasutades nuppu [○] (Tagasi) või [◀].• Sätze kinnitamineVajutage nuppu [OK]. Kui näidikul kuvatakse <Rakenda>, tõstke <Rakenda> esile ja seejärel vajutage klahvi [OK]. | Tekstisisestusviis- Sisestusrežimi muutmineVajutage nuppu [▼], et tõsta esile, ja seejärel nuppu [OK].Sisestusrežimi muutmiseks võite vajutada ka [(*) (Toon).- Teksti, sümbolite ja numbrite sisestamineTeksti saate sisestada numbriklahvide või klahvi [(*) (Sümbolid) abil.Täiendavat teavet ümberlūlitusrežiimi või saadaoleva teksti kohta vaadake järgmiselt leheküljelt. | - Kursori liigutamine (tühiku sisestamine)Liigutage [◀] või [▶] abil.Tühiku sisestamiseks viige kursor teksti lõppu ja vajutage [▶].- Tähemärkide kustutamineKustutamiseks kasutage [C] (Tühjenda).Klahvi [C] (Tühjenda) vajutamise ja allhoidmisega saate kustutada kölik tähemärgid. |
3 Güç Kablosunu Bağlama ve Makineyi AÇIK Konuma Getirme Strāvas vada pievienošana un iekārtas ieslēgšana Maitinimo laido prijungimas ir aparato ijungimas Toitejuhtme ühendamine ja toite sisselülitamine
Türkçe
flowchart
graph LR
    A["Language\nEnglish\nEstonian\nFinnish\nFrench"] --> B["Current Time Set.\nMust rechg. battery for 24 hrs. to save time settings.\nAfter turning main"]
    B --> C["Perform fax setup?\nSet up Now\nSet up Later"]
| Türkçe | 4-1 Başlangıç Ayarlarını BelirlemeEkrandaki talimatları izleyin, dili ve saati ayarlayın.Menüde gezinmeyle ve sayıların nasıl girileceğiyle ilgili ayrıntılar için, bkz. 2 "Menüde Gezinme ve Metin Giriş Yöntemi" (S.3). | 4-2 Başlangıç faks ayarlarını belirleyin.Bir faks numarası, bir ünite adı, bir de alma modu belirlemek için "Faks Kurulum Kılavuzu"nu izleyin.Alma modu hakkında daha fazla bilgi için Elektronik Kılavuza bakın.Elektronik Kılavuz -> "Faks" -> "Faks İşlevlerini Kullanma" -> "Faks Alma" -> "RX Modu". | Ünite adı ne işe yarar?Bilgiler kaydedildikten sonra, gönderdiğiniz her sayfanın üst kısmına yazdırılır. |
| Latviešu | 4-1 Sâkotnêjo iestatījumu norâdīšanaIzpildiet ekrână redzamos norâdījumus un iestatiet valodu un laiku.Detalizêtu informâciju par navigēšanu izvělnë un ciparu ievadi sk. 2. nodală "Navigēšana izvělnë un teksta ievades metode" (Ipp.3). | 4-2 Norâdiet sâkotnêjos faksa iestatījumus.Izpildiet Faksa uzstâdīšanas vednî minētãs darbības, lai norâdītu faksa numuru, iekārtas nosaukumu un saņemšanas režīmu.Detalizêtu informâciju par saņemšanas režīmu skatiet e-Rokasgrāmatā.e-Rokasgrāmata -> "Fakss" -> "Faksa funkciju lietošana" -> "Faksu saņemšana" -> "Saņemšanas režīms". | Kas notiek ar bloka nosaukumuKad informâcija ir registrêta, tã tiek drukăta katras nosūtītãs lapas augšdală. |
| Lietuvištai | 4-1 Pradinių parametrų nustatymasVykdydami ekrane rodomas instrukcijas nustatykite kalbą ir laiką.Informacijos apie meniu naršymą ir skaičių įvestį rasite 2 skyriuje „Meniu naršymas ir teksto įvesties būdas" (P.3). | 4-2 Nustatykite pradinius fakso parametrus.Norėdami nustatyti fakso numerį, aparato pavadinimą ir priėmimo režimą, vykdykite „Fax Setup Guide“ (Fakso sąrankos vadove) pateiktas instrukcijas.Išsamesnės informacijos apie priėmimo režimą ieškokite vadove „El. instrukcija”.El. instrukcija -> „Faksas" -> „Fakso funkciju naudojimas" -> „Faksogramų priėmimas” -> „Priėmimo režimas”. | Kas nutinka su jrenginio pavadinimuUžregistravus informacija, ji spausdinama kiekvieno siunčiamo puslapio viršuje. |
| Eesti | 4-1 Algsätete määramineJärgige ekraanil kuvatavaid juhiseid, määrake keel ja kellaaeg.Menuüs liikumise ja numbrite sisestamise kohta täiendava teabe saamiseks vaadake ptk 2 "Menüüs liikumine ja tekstisisestusviis" (P.3). | 4-2 Määrake algsed faksisätted.Määrake „Faksi häälestusjuhendit“ järgides faksi number, seadme nimi ja vastuvõturežiim.Lisateavet vastuvõturežiimi kohta leiate e-juhendist.E-juhend -> Faks -> Faksifunktsioonide kasutamine -> Fakside vastuvõtmine -> Vastuvõturežiim. | Mis saab seadme nimestPärast nime salvestamist prinditakse see iga saadetava lehe ülaossa. |

flowchart
graph LR
    A["Connect phone line.<br>Follow illustrations on the next screen and connect:<br>1. Phone line to A"] --> B["Telephone line connector"]
    B --> C["End Fax Setup Guide?"]
    C --> D["Setting is complete.<br>Turn the main power OFF and ON. OK"]
| Türkçe | 4-3 Telefon kablosunu bağlayın.Ekranda <Tel. hattını bağlayın.> ifadesi görüntülendiğinde, resmi göz önünde bulundurarak telefon kablosunu bağlayın.Ahize makineye bağlıysaAhizeyi harici bir telefona bağlamadan kullanabilirsiniz. | 4-4 Faks Kurulum Kılavuzu'ndan çıkın ve makineyi yeniden başlatın.Makineyi KAPATIN, en az 10 saniye bekleyin ve ardından yeniden AÇIN.Telefon hattı türleri otomatik olarak algılanmaz. Elektronik Kılavuza başvurun ve telefon hattını manuel olarak ayarlayın.❖Elektronik Kılavuz -> "Faks" -> "Faks İşlevlerini Kullanma" -> "Faks Ayarlarını ([Menü] Düğmesi Kullanılarak Belirtilebilen Ayarlar) Değiştirme" -> "Gönderme Ayarlarını Yapılandırma" -> "Hat Türünü Seç." | ➤ 5 "Kağıt Boyutu ve Türü Ayarlama" (S.7) |
| Latviešu | 4-3 Pievienojiet târlruņa kabeli.Kad displejā tiek parādīts zipojums <Connect phone line.> (Pievienojiet târlruņa līniju), pievienojiet târlruņa kabeli, kā tas parādīts attēlā.Ja iekārtai ir pievienota klausuleVarat izmantot klausuli, nepievienojot ärējo tâlruni. | 4-4 Aizveriet Faksa uzstādīšanas vedni un pēc tam restartējiet iekārtu.Izslēdziet iekārtu, pagaidiet vismaz 10 sekundes un pēc tam to atkal ieslēdziet.Târlruņa līnijas tips netiek noteikts automātiski. Sk. e-Rokasgrāmatu un iestatiet târluņa līniju manuāli.❖e-Rokasgrāmata -> "Fakss" -> "Faksa funkciju lietošana" -> "Faksa iestatījumu mainīšana (iestatījumi, ko var norādīt, izmantojot pogu [Izvēlne])" -> "Sūtīšanas iestatījumu konfigurēšana" -> "Līnijas tipa izvēle". | ➤ 5. nodaļa "Papīra formāta un tipa iestatīšana" (Ipp.7) |
| Lietuviškai | 4-3 Prijunkite telefono kabelj.Kai ekrane rodoma <Connect phone line.> (Prijungti telefono liniją), prijunkite telefono kabelj, kaip parodyta paveikslėlyje.Jei ragelis prijungtas prie aparatoGalite naudoti ragelj neprijungdami išorinio telefono. | 4-4 Uždarykite „Fax Setup Guide“ (Fakso sąrankos vadovą) ir paleiskite aparatą iš naujo.IŠJUNKITE aparatą, palaukite bent 10 sekundžių ir vėl ji IJUNKITE.Telefono linijų tipai neaptinkami automatiškai. Perziūrēkite vadovą „El. instrukcija“ ir nustatykite telefono liniją rankomis.❖El. instrukcija -> „Faksas“ -> „Fakso funkciju naudojimas“ -> „Fakso parametrų keitimas (parametrai, kuriuos galima nurodyti naudojant mygtuką [Meniu]“ -> „Siuntimo parametrų konfigūravimas“ -> „Linijos tipo pasirinkimas”. | ➤ 5 „Popieriaus formato ir tipo nustatymas“ (P.7) |
| Eesti | 4-3 Ühendage telefonikaabel.Kui näidikul kuvatakse <Ühendage telefonijuhe.>, ühendage telefonikaabel vastavalt joonisele.Kui telefonitoru on seadmega ühendatudTelefonitoru saate kasutada ilma ühenduseta válise telefoniga. | 4-4 Sulgege faksi häälestusjuhend ja taaskäivitage seade.Lūlitage seade VÄLJA, oodake vähemalt 10 sekundit ja lūlitage seejärel uuesti SISSE.Telefonilini tüüp ei tuvastata automaatelt. Vaadake e-juhendit ja määrake telefoniliin käsitsi.❖E-juhend -> Faks -> Faksifunktsioonide kasutamine -> Faksiseadete muutmine (klahvi [Menüü] abil määratavad seaded) -> Saatmisseadete konfigureerimine -> Liinitüübi valimine. | ➤ 5 "Paberiformaadi ja -tüübi määramine" (P.7) |
5
flowchart
graph LR
    A["Computer"] --> B["Canon CD-ROM Setup"]
    B --> C["Manual Selection"]
    C --> D["Desktop with Manual Icon"]
| Türkçe | AUser Software CD (Kullanıcı Yazılımı CD'si) öğesini kullanarak sürücü ve yazılımı kurun.BKurulum prosedürleriyle ilgili ayrıntılar için, bkz. FAX L Driver Installation Guide.Product Extended Survey Program için kullanıcıdan işbirliği talep ederiz. Ayrıntılar için ekrandaki açıklamalara bakın. | Windows 2000 kullanıcıları, User Software CD (Kullanıcı Yazılımı CD'si) içinde bulunan "Readme" dosyasına bakın.[My computer] (Bilgisayarım) -> [Open] (Aç) ->[Readme for Windows2000 Users_XX.hta]** XX için kendi dilinizi seçin. | En yeni yazılım:Kullandığınız işletim sisteme bağlı olarak, CD-ROM'da bulunan sürücü yazılının bazı işlevleri kullanılamayabilir. En yeni yazılım Canon web sitesinde yayınlanmıştır. Lütfen çalışma ortamı vb. durumları onaylayıp gerekirse uygun yazılımı indirin. |
| Latviešu | AInstalējiet draiveri un programmatūru, izmantojot User Software CD (Lietotāja kompaktdisks).BDetalizētu informāciju par instalēšanas procedūru sk. FAX L Driver Installation Guide (FAX L draivera instalēšanas rokasgrāmata).Lūdzam lietotāju piedalīties programmā Product Extended Survey Program. Detalizētu informāciju skatiet ekrānā esošajos aprakstos. | Sistēmas Windows 2000 lietotājiem ir jäskata fails Readme, kas ir iekļauts User Software CD (Lietotāja kompaktdisks).[My computer] (Mans dators) -> [Open] (Atvērt) ->[Readme for Windows2000 Users_XX.hta]** Izvēlieties savu XX valodu. | Jaunākā programmatūra:Atkarībā no izmantotās operētājsistēmas dažas no CD-ROM iekļautās draivera programmatūras funkcijām var nebūt izmantojamas.Visjaunākā programmatūras versija ir norādīta Canon vietnē. Lūdzu, pārbaudiet darba vidi un citas lietas un lejupielādējiet atbilstošo programmatūru, ja nepieciešams. |
| Lietuviškai | Aİdiekite tvarkyklę ir programinę įrangą naudodami „User Software CD-ROM“ (Vartotojo programinės įrangos kompaktinį diską).BInformacijos apie diegimo procedūras rasite „FAX L Driver Installation Guide“ (FAX L tvarkyklės diegimo vadove).Norėtume paprašyti naudotojų pagalbos del programos „Product Extended Survey Program“.Išsamią informaciją rasite ekranų aprašuose. | „Windows 2000“ vartotojai turėtų žiūrėti „User Software CD“ (Vartotojo programinės įrangos kompaktinis diskas) pateiktą „Readme“ failą.[My computer] (Mano kompiuteris) -> [Open] (Atidaryti) ->[Readme for Windows2000 Users_XX.hta]** Pasirinkite savo XX kalbą. | Naujausia programinė įrangà:Atsižvelgiant j jūsų naudojamą operacinę sistemą, kai kurių kompaktiniame diske esančios tvarkyklės programinės įrangos funkciju gali nepavykti naudoti. Naujausia programinė įrangą skelbiama „Canon“ svetainėje. Patikrinkite naudojimo aplinką ir atsisiųskite atitinkamą programinę įrangą, jei to reikia. |
| Eesti | AInstallige draiver ja tarkvara User Software CD (Kasutustarkvara CD-plaat) abil.BDraiverite ja tarkvara installimise kohta leiate lisateavet juhendist FAX L Driver Installation Guide.Palume kasutaja abi kava Product Extended Survey Program osas. Lisateavet leiate kuval esitatud kirjeldustest. | Windows 2000 kasutajad peavad vaatama User Software CD (Kasutustarkvara CD-plaat) olevat seletusfaili (Readme).[My computer] (Minu arvuti) -> [Open] (Ava) ->[Readme for Windows2000 Users_XX.hta]** Valige XX jaoks oma keel. | Uusim tarkvara:Sõltuvalt sellest, millist opsüsteemi te kasutate, ei pruugi kõik CD-I leiduva draiveritarkvara funktsioonid olla kasutatavad. Uusima tarkvara leiate Canoni veebisaidilt. Kontrollige üle töökeskkonna jms nõuded ning vajadusel laadige alla asjakohane tarkvara. |
natural_image
Illustration of a printer being inserted into a printing machine (no text or symbols present)natural_image
Illustration of a printer and its corresponding output, showing the process from paper to print (no text or symbols present)natural_image
Illustration of a printer being inserted into a print (no text or symbols present)Dansk
flowchart
graph LR
    A["Language\nEnglish\nEstonian\nFinnish\nFrench"] --> B["Current Time Set.\nMust rechg. battery for 24 hrs. to save time settings.\nAfter turning main"]
    B --> C["Perform fax setup?\nSet up Now\nSet up Later"]
flowchart
graph LR
    A["Connect phone line.<br>Follow illustrations on the next screen and connect:<br>1. Phone line to A"] --> B["Telephone line connector"]
    B --> C["End Fax Setup Guide?"]
    C --> D["Setting is complete.<br>Turn the main power OFF and ON.<br>OK"]
flowchart
graph LR
    A["Printer Setup"] --> B["Paper Settings"]
    B --> C["Specify destination. 01/01 2011 12:52AM"]
    C --> D["RX Mode: Auto Resolution: 200 x 1..."]
flowchart
graph LR
    A["Computer"] --> B["Canon CD-ROM Setup"]
    B --> C["Manual Selection"]
    C --> D["Desktop with Manual Icon"]
natural_image
Illustration of a printer and its corresponding printer, showing the printing process (no text or symbols present)natural_image
Illustration of a printer and its corresponding output, showing the printer's internal structure and the printer's internal structure (no text or symbols present)- Fjernmottak
Hvis en ekstern telefon er koblet til, kan du bytte til faksmottaksmodus umiddelbart under en telefonsamtale ved å ringe ID-nummeret for faksmottak ved hjelp av ringetastene på telefonen. - Avspørringsmottak
Du kan hente dokumenter som er lagt inn på forhånd fra en avsenders faksmaskin när du ønsker å motta faksen.
Utskrift
natural_image
Illustration of a printer and its corresponding printer, showing the printing process (no text or symbols present)- Etävastaanotto
natural_image
Illustration of a printer and its corresponding image, showing the printer being copied to a document (no text or symbols present)C
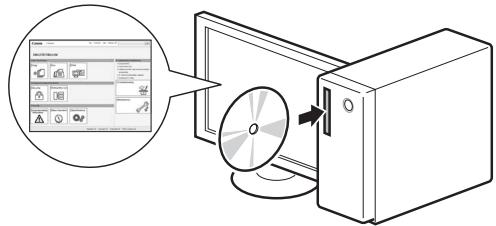
Español
B FAX L Driver Installation Guide (User Software CD-ROM
| Español | Navegación por el menú• Selección de elementos o desplazamiento del cursor entre los elementos del menúResalte un elemento con [▲] o [▼].Proceda con la jerarquía siguiente con [OK] o [►].Vuelva a la jerarquía anterior con [○] (Anterior) o [◀].• Confirmación del ajustePulse [OK]. Sin embargo, cuando aparezcaen la pantalla, resaltey, a continuación, pulse [OK]. | Método de introducción de texto- Cambio del modo de entradaPulse [▼] para resaltar, y, a continuación, pulse [OK].También podrá pulsar [★] (Tonos) para cambiar el modo de entrada.- Introducción de texto, símbolos y númerosIntroduzca utilizando las teclas numéricas o [(#) (Símbolos).Para obtener una información detallada sobre el modo que se puede cambiar o el texto disponible, consulte la página siguiente. | - Desplazamiento del cursor (introducción de un espacio)Desplace con [◀] o [►].Desplace el cursor al final del texto y pulse [►] para introducir un espacio.- Eliminación de caracteresElimine con [C] (Borrar).Si se pulsa y se mantiene presionada la tecla [C] (Borrar),se eliminarán todos los caracteres. |
| Nederlands | Navigeren in het menu• Items selecteren of de cursor verplaatsen door de menu-itemsMarkeer een item met [▲] of [▼].Ga naar de volgende structuur met [OK] of [►].Ga naar de vorige structuur met [○] (Vorige) of [◀].• Instellingen bevestigenDruk op [OK]. Als <Toepassen> echter wordt weergegeven op het display, markeert u en drukt u op [OK]. | Tekstinvoermethode- Invoermodus wijzigenDruk op [▼] omte selecteren en druk op [OK].U kunt ook op [★] (Toon) drukken om de invoermodus te wijzigen.- Tekst, symbolen en cijfers invoerenVoer gegevens in met de numerieke toetsen of met [#] (Symbolen).Zie de volgende pagina voor meer informatie over de beschikbare modus of tekst. | - De cursor verplaatsen (een spatie invoeren)Verplaats de cursor met [◀] of [►].Verplaats de cursor naar het einde van de tekst en druk op [►] om een spatie in te voeren.- Tekens verwijderenVerwijder tekens met [C] (Wissen).Houd [C] (Wissen) ingedrukt om alle tekens te wissen. |
| Português | Navegar no menu• Selecção de itens ou movimentação do cursor entre os vários itens de menuRealce um item com [▲] ou [▼].Avance para o item seguinte na hierarquia com [OK] ou [►].Regresse ao item anterior na hierarquia com [○] (Retroceder) ou [◀].• Confirmação da definiçãoPrima [OK]. No entanto, quando aparecer no ecrã a mensagem, realcee depois prima [OK]. | Método de introdução de texto- Mudar o modo de introduçãoPrima [▼] para realçare prima [OK].Também pode premir [★] (Sinal) para mudar o modo de introdução.- Introduzir texto, símbolos e númerosIntroduza utilizando as teclas numéricas ou [(#) (Símbolos).Para obter mais detalhes sobre o modo de mudança ou o texto disponível, consulte a página seguinte. | - Mover o cursor (introduzir um espaço)Mova o cursor com [◀] ou [►].Mova o cursor para o final do texto e prima [►] para introduzir um espaço.- Apagar caracteresApague com [C] (Limpar).Se mantiver a tecla [C] (Limpar) premida, são apagados todos os caracteres. |
| Ελληνικά | Περιήγηση στο μενού• Επιλογή στοιχείου ή μετακίνηση του δρομέα στα στοιχεία μενούΕπισημάνετε ένα στοιχείο με το πλήκτρο [▲] ή [▼].Συνεχίστε στην επόμενη ιεραρχία με [OK] ή [►].Επιστρέψτε στην προγούμενη ιεραρχία με [○] (Προγούμενο) ή [◀].• Επιβεβαίωση ρύθμισηςΠατήστε [OK]. Ωστόσο, όταν εμφανιστεί το στοιχείο<Εφαρμογή> στην οδόνη,επισημάνετε την επιλογή<Εφαρμογή>, και έτεπα πατήστε [OK]. | Μέθοδος εισαγωγής κειμένου- Αλλαγή λειτουργίας εισαγωγήςΠατήστε το [▼] για να επισημάνετε την επιλογή<Κατ. Εισαγ> και πατήστε [OK].Μπορείτε επίσης να πατήστε το πλήκτρο [★] (Τόνος) για να αλλάξετε τη λειτουργία εισαγωγής.- Εισαγωγή κειμένου, συμβόλων και αριθμώνΕισαγάγετε με τα αριθμητικά πλήκτρα ή με το εικονίδιο [○] (Σύμβολα).Για λεπτομέρειες σχετικά με τη λειτουργία με δυνατότητα αλλαγής ή το διαθέσιμο κείμενο, δείτε την επόμενη σελίδα. | - Μετακίνηση του δρομέα (εισαγωγή κενού)Μετακίνηση με [◀] ή [►].Μετακίνηστε το δρομέα στο άκρο του κειμένου και πατήστε [►] για την εισαγωγή κενού.- Διαγραφή χρακατήρωνΔιαγραφή με [C] (Διαγραφή).Πατώντας και κρατώντας πατημένο το πλήκτρο [C] (Διαγραφή)διαγράφονται όλοι οι χαρακτήρες. |
3 Conexión del cable de alimentación y encendido Het netsnoer aansluiten en het apparaat inschakelen Ligar o cabo de alimentação e a alimentação Σύνδεση του καλωδίου ρεύματος και ενεργοποίηση της ισχύος
Español
flowchart
graph LR
    A["Language"] --> B["Current Time Set."]
    B --> C["Perform fax setup?"]
    A --> D["English"]
    A --> E["Estonian"]
    A --> F["Finnish"]
    A --> G["French"]
    B --> H["Must rechg. battery for 24 hrs. to save time settings. After turning main"]
    C --> I["Set up Now"]
    C --> J["Set up Later"]
| Español | 4-1 Especificación de las opciones inicialesSiga las instrucciones de la pantalla y establezca el idioma y la hora. Para obtener una información detallada sobre cómo navegar por el menú y cómo introducir los números consulte 2 "Navegación por el menú y Método de introducción de texto" ( ✉ Pág. 3). | 4-2 Especifique las opciones iniciales de fax.Siga la "Guía de configuración de fax" para especificar un número de fax, un nombre de unidad y un modo de recepción.Para obtener más información sobre el modo de recepción, consulte el e-Manual. ✉ e-Manual -> "Fax" -> "Uso de las funciones de fax" -> "Recepción de faxes" -> "Modo RX". | Qué ocurre con el nombre de unidadUna vez registrada la información, ésta se imprimirá en la parte superior de cada página que envíe. |
| Nederlands | 4-1 De begininstellingen opgevenVolg de instructies op het scherm; stel de taal en tijd in.Zie 2 Navigeren in het menu en tekstinvoermethode ( ✉ P. 3) voor meer informatie over het navigeren in het menu en het invoeren van nummers. | 4-2 Geef de eerste faxinstellingen op.Volg de Fax installatiegids als u een faxnummer, apparaatnaam en ontvangstmodus wilt opgeven.Raadpleeg de e-Handleiding voor meer informatie over de ontvangstmodus. ✉ e-Handleiding -> Fax -> De faxfuncties gebruiken -> Faxen ontvangen -> Ontvangstmodus. | Wat gebeurt er met de apparaatnaamZodra de gegevens zijn geregistreerd, worden deze afgedrukt bovenaan op elke pagina die u verstuurt. |
| Português | 4-1 Especificar as definições iniciaisSiga as instruções apresentadas no ecrã e defina o idioma e a hora. Para obter mais detalhes sobre como navegar no menu e como introduzir os números, consulte 2 "Navegar no menu e método de introdução de texto" ( ✉ Pág. 3). | 4-2 Especifique as definições iniciais de fax.Siga as instruções do "Fax Setup Guide" (Manual de configuração do fax) para especificar um número de fax, o nome de uma unidade e um modo de recepção.Para mais detalhes sobre o modo de recepção, consulte o Manual Electrónico. ✉ Manual Electrónico -> "Fax" -> "Utilizar as funções de fax" -> "Receber faxes" -> "Modo RX". | O que acontece ao nome da unidadeApós o registo da informação, o nome é impresso na parte superior de cada página que envia. |
| Ελληνικά | 4-1 Καθορισμός αρχικών ρυθμίσεωνΑκολουθήστε τις οδηγίες στην οθόνη, ορίστε τη γλώσσα και την ώρα. Για λεπτομέρειες σχετικά με την περιήγηση στο μενού και τον τρόπο εισαγωγής αριθμών, ανατρέξτε στην ενότητα 2 "Περιήγηση στο μενού και τη μέθοδο εισαγωγής κειμένου" ( ✉ Σελ. 3). | 4-2 Καθορισμός των αρχικών ρυθμίσεων του φαξ.Ακολουθήστε το εγχειρίδιο "Fax Setup Guide" (Οδηγός διαμόρφωσης φαξ) για να καθορίσετε έναν αριθμό φαξ, ένα όνομα μονάδας και μια κατάσταση λήψης.Για περισσότερες πληροφορίες σχετικά με την κατάσταση λήψης, ανατρέξτε στο Ηλεκτρονικό εγχειρίδιο. ✉ Ηλεκτρονικό εγχειρίδιο -> "Φαξ" -> "Χρήση των Λειτουργιών Φαξ" -> "Λήψη Φαξ" -> "Κατάσταση Λήψης Φαξ." | Τι γίνεται με το όνομα μονάδαςΤα στοιχεία, αμέσως μετά την καταχώρησή τους, θα εκτυπώνονται στο επάνω μέρος κάθε σελίδας που αποστέλλετε. |

flowchart
graph LR
    A["Connect phone line.<br>Follow illustrations on the next screen and connect:<br>1. Phone line to A"] --> B["Telephone line connector"]
    B --> C["End Fax Setup Guide?"]
    C --> D["Setting is complete.<br>Turn the main power OFF and ON. OK"]
| Español | 4-3 Conecte un cable de teléfono.Cuando aparezcaen la pantalla, conecte el cable de teléfono consultando la ilustración.Si el auricular está conectado a la máquinaPodrá utilizar el auricular sin conectar un teléfono externo. | 4-4 Salga de la Guía de configuración de fax y, a continuación, reinicie la máquina.Apague la máquina, espere 10 segundos como mínimo y, a continuación, enciéndala de nuevo.Los tipos de línea telefónica no se detectan automáticamente. Consulte el e-Manual y establezca una línea telefónica manualmente.⊖ e-Manual -> "Fax" -> "Uso del fax" -> "Cambio de las opciones fax (optiones que pueden especificarse utilizando el botón [Menú]) -> "Cofiguración de opciones de envío" -> "Seleccionar tipo línea". | ⇨ 5 "Ajuste del tamaño y el tipo del papel" (Pág. 7) |
| Nederlands | 4-3 Sluit een telefoonkabel aan.Alswordt weergegeven op het display, sluit u de telefoonkabel aan op de manier die in de afbeelding wordt aangegeven.Als de handset op het apparaat is aangesloten:U kunt de handset gebruiken zonder een extern telefoontoestel aan te sluiten. | 4-4 Sluit de Fax installatiegids en start het apparaat opnieuw.Schakel het apparaat uit, wacht minimaal 10 seconden en schakel het apparaat dan weer in.Het type van de telefoonlijn wordt niet automatisch vastgesteld. Raadpleeg de e-Handleiding en stel handmatig een telefoonlijn in.⊖ e-Handleiding -> Fax -> De faxfuncties gebruiken -> Faxinstellingen wijzigen (Instellingen die kunnen worden opgegeven met behulp van de knop [Menu]) -> Verzendinstellingen configureren -> Lijntype selecteren. | ⇨ 5 Papierformaat en type papier instellen (P. 7) |
| Português | 4-3 Ligue um cabo telefónico.Quando aparecer no visor a mensagem, ligue o cabo telefónico conforme é exemplificado na imagem.Se o auscultador estiver ligado à máquinaPode utilizar o auscultador sem ligar um telefone externo. | 4-4 Saia do "Fax Setup Guide" (Manual de configuração do fax) e depois reinicie a máquina.Desligue a máquina, aguarde pelo menos 10 segundos e volte a ligá-la.Os tipos de linha telefónica não são detectados automaticamente. Consulte o Manual Electrónico e defina uma linha telefónica manualmente.⊖ Manual Electrónico -> "Fax" -> "Utilizar as funções de fax" -> "Alterar definições de fax (Definições que podem ser especificadas utilizando o botão [Menu]) -> "Configurar as definições de envío" -> "Seleccionar o tipo de linha". | ⇨ 5 "Definir um tipo e tamanho de papel" (Pág. 7) |
| Ελληνικά | 4-3 Σύνδεση καλωδίου τηλεφώνου.Όταν εμφανίζεται στην οθόνη το «Συνδέστε τ/φ γραμμή», συνδέστε το καλώδιο τηλεφώνου ανατρέχοντας στην εικόνα.Αν είναι συνδεδεμένο στη συσκευή ένα ακουστικόΜπορείτε να χρησιμοποιήσετε το ακουστικό χωρίς να έχετε συνδέσει εξωτερικό τηλέφωνο. | 4-4 Έξοδος από το "Fax Setup Guide" (Οδηγός διαμόρφωσης φαξ) και έπειτα επανεκκίνηση της συσκευής.Απενεργοποιήστε τη συσκευή, περιμένετε τουλάχιστον 10 δευτερόλεπτα και μετά ενεργοποιήστε την ξανά.Οι τύποι γραμμών τηλεφώνου δεν εντοπίζονται αυτόματα. Ανατρέξτε στο Ηλεκτρονικό εγχειρίδιο και ορίστε μια γραμμή τηλεφώνου χειροκίνητα.⊖ Ηλεκτρονικό εγχειρίδιο -> "Φαξ" -> "Χρήση των Λειτουργιών Φαξ" -> "Αλλαγή των Ρυθμίσεων Φαξ (Ρυθμίσεις που καθορίζονται με το πλήκτρο [Μενού]) -> "Διαμόρφωση Ρυθμίσεων Αποστολής" -> "Επιλογή Τύπου Γραμμής." | ⇨ 5 "Καθορισμός μεγέθους και τύπου χαρτιού" (Σελ.7) |
5
Ajuste del tamaño y el tipo del papel Papierformaat en type papier instellen Definir um tipo e tamanho de papel Καθορισμός μεγέθους και τύπου χαρτιού
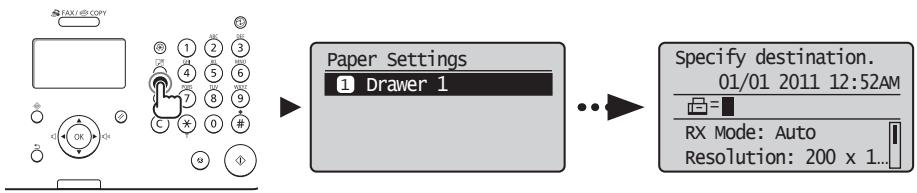
flowchart
graph LR
    A["Start"] --> B["Paper Settings"]
    B --> C{1.1.1.1}
    C --> D["Specify destination.<br>01/01 2011 12:52AM"]
    C --> E["Resolution: 200 x 1..."]
| Español | Siga las instrucciones de la pantalla y establezca el tamaño y el tipo del papel. Tras completar la configuración, especifique las siguientes opciones. | 6 "Instalación del controlador/software" (Pág. 8) |
| Nederlands | Volg de instructies op het scherm; stel het papierformaat en de papiersoort in. Nadat u de instelling hebt voltooid, moet u de volgende instellingen opgeven. | 6 Het stuurprogramma/de software installeren (P. 8) |
| Português | Siga as instruções apresentadas no ecrã e defina o tamanho e o tipo de papel. Depois de concluir a definição, especifique as definições que se seguem. | 6 "Instalar o controlador/software" (Pág. 8) |
| Ελληνικά | Ακολουθήστε τις οδηγίες στην οθόνη, ορίστε το μέγεθος χαρτιού και τον τύπο. Αφού ολοκληρώσετε τη ρύθμιση, καθορίστε τις παρακάτω ρυθμίσεις. | 6 "Εγκατάσταση προγράμματος οδήγησης/λογισμικού" (Σελ. 8) |
6
flowchart
graph LR
    A["Computer"] --> B["Canon CD-ROM Setup"]
    B --> C["Manual Selection"]
    C --> D["Desktop with Manual Icon"]
| Español | A Instale el controlador y el software utilizando el disco User Software CD-ROM.B Para obtener una información detallada sobre los procedimientos de instalación, consulte la Guía de instalación de controladores FAX L.Solicitamos la colaboración del usuario con el Programa extendido de encuesta de producto (Product Extended Survey Program). Para obtener más información, consulte las descripciones que aparecen en la pantalla. | Si es usuario de Windows 2000, consulte el archivo "Readme" que viene incluido en el disco User Software CD-ROM.[Mi PC] -> [Abrir] -> [Readme for Windows2000 Users_XX.hta]**Seleccione su idioma para XX. | El último software:De acuerdo con el sistema operativo que use, algunas de las funciones del software del controlador que se incluye en el CD-ROM podrían no ser utilizables. El último software se encuentra publicado en el sitio Web de Canon. Verifique el entorno de operación, etc., y descargue el software correspondiente, en caso de ser necesario. |
| Nederlands | A Installeer het stuurprogramma en de software met de cd-rom met gebruikerssoftware.B Raadpleeg de Installatiehandleiding FAX L-stuurprogramma voor meer informatie over de installatieprocedures.We vragen de gebruiker om medewerking aan het zogenaamde Product Extended Survey Program. Zie voor meer informatie de beschrijvingen op het scherm. | Windows 2000-gebruikers raadplegen het "Readme"-bestand in de User Software CD (Cd met gebruikerssoftware).[My computer] (Deze computer) -> [Open] (Openen) ->[Readme for Windows2000 Users_XX.hta]** Selecteer uw taal voor XX. | De meest recente software:Afhankelijk van het besturingssysteem dat u gebruikt, zijn enkele functies van de op de cd aanwezige stuurprogrammasoftware mogelijk niet bruikbaar. De meest recente software is op de Canon website geplaatst. Controleer de besturingsomgeving enzovoort en download indien nodig de juiste software. |
| Português | A Instale o controlador e o software utilizando o User Software CD-ROM (CD de software do utilizador).B Para obter mais detalhes sobre os procedimentos de instalação, consulte o FAX L Driver Installation Guide (Manual de Instalação do Controlador FAX L).Pedimos a colaboração do utilizador no Product Extended Survey Program. Para mais detalhes, consulte as descrições no ecrã. | Os utilizadores do Windows 2000 devem consultar o ficheiro "Readme" incluído no User Software CD (CD de software do utilizador).[My computer] (O meu computador) -> [Open] (Abrir) ->[Readme for Windows2000 Users_XX.hta]** Seleccione o idioma pretendido para XX. | Software mais recente:Dependendo do sistema operativo utilizado, pode não ser possível utilizar algumas funções do software do controlador incluído no CD-ROM. O software mais recente é publicado no site da Canon. Verifique o ambiente de funcionamento, etc., e transfira o software apropriado se for necessário. |
| Ελληνικά | A Εγκατάσταση του προγράμματος οδήγησης και του λογισμικού με το User Software CD (CD λογισμικού χρήστη).B Για λεπτομέρειες σχετικά με τις διαδικασίες εγκατάστασης, ανατρέξτε στο FAX L Driver Installation Guide.Zητάμε τη συνεργασία του χρήστη για το πρόγραμμα Product Extended Survey Program. Για λεπτομέρειες, δείτε τις περιγραφές στην οθόνη. | Για τους χρήστες των Windows 2000, ανατρέξτε στο αρχείο "Readme" που περιλαμβάνεται στο User Software CD (CD λογισμικού χρήστη).[My computer] (Ο Υπολογιστής μου) -> [Open] (Ανοιγμα) ->[Readme for Windows2000 Users_XX.hta]** Επιλέξτε τη γλώσσας σας για το XX. | To νεότερο λογισμικό:Ανάλογα με το λειτουργικό σας σύστημα, ορισμένες λειτουργίες του λογισμικού των προγραμμάτων οδήγησης που περιλαμβάνονται στο CD-ROM ενδέχεται να μην μπορούν να χρησιμοποιηθούν.Οι τελευταίες εκδόσεις του λογισμικού βρίσκονται στην τοποθεσία web της Canon. Επαληθεύστε το περιβάλλον λειτουργίας κ.λπ. και πραγματοποιήστε λήψη του κατάλληλου λογισμικού, εάν είναι απαραϊτητο. |
natural_image
Illustration of a printer and its corresponding output, showing the printing process (no text or symbols present)- Recepción remota
natural_image
Illustration of a printer and its corresponding printer with a close-up arrow (no text or symbols)natural_image
Illustration of a printer and its corresponding printer with a close-up of the print (no text or symbols present)- Recepção remota
natural_image
Illustration of a printer being inserted into a print device (no text or symbols present)Symbols Used in This Manual
WARNING
Indicates a warning concerning operations that may lead to death or injury to persons if not performed correctly. To use the machine safely, always pay attention to these warnings.
CAUTION
Indicates a caution concerning operations that may lead to injury to persons if not performed correctly. To use the machine safely, always pay attention to these cautions.
IMPORTANT
Indicates operational requirements and restrictions. Be sure to read these items carefully to operate the machine correctly, and avoid damage to the machine or property.

Indicates an operation that must not be performed. Read these items carefully, and make sure not to perform the described operations.

Keys and Buttons Used in This Manual
The following symbols and key names are a few examples of how keys to be pressed are expressed in this manual.
- Operation panel keys: [Key icon] + (Key name)
Example: [(∅)] (Stop) - Display:
- Buttons and items on the computer display: [Preferences]

Illustrations and Displays Used in This Manual
Illustrations and displays used in this manual are which of FAX-L170 unless specified.

Important Safety Instructions
Please read these "Important Safety Instructions" thoroughly before operating the machine.
As these instructions are intended to prevent injury to the user and other persons or to prevent destruction of property, always pay attention to these instructions and operational requirements.
Also, as it may result in unexpected accidents or injuries, do not perform any operation unless otherwise specified in the manual.
Installation
WARNING
- Do not install the machine in a location near alcohol, paint thinner, or other flammable substances. If flammable substances come into contact with electrical parts inside the machine, this may result in a fire or electrical shock.
- Do not place the following items on the machine.
- Necklaces and other metal objects
- Cups, vases, flowerpots, and other containers filled with water or liquids
If these items come into contact with a high-voltage area inside the machine, this may result in a fire or electrical shock. If these items are dropped or spilled inside the machine, immediately turn off the power switches of the machine and computer (1) and disconnect the interface cable if it is connected (2). Then, unplug the power plug from the AC power outlet (3) and contact your local authorized Canon dealer.
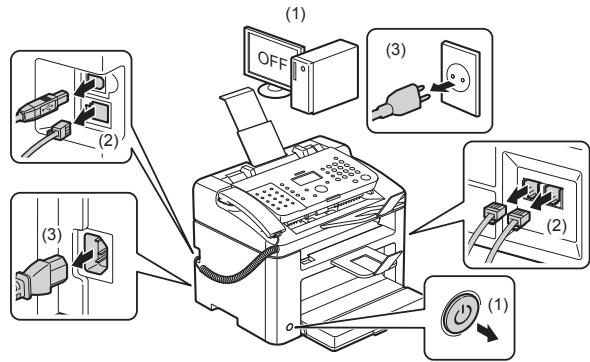
- Do not use this product near any medical electric equipments. Radiowave emitted from this product may influence those medical electric equipments. This may result in accidents caused by malfunction.
CAUTION
- Do not install the machine in unstable locations, such as on unsteady platforms or inclined floors, or in locations subject to excessive vibrations, as this may cause the machine to fall or tip over, resulting in personal injury.
- The ventilation slots are provided for proper ventilation of working parts inside the machine. Never place the machine on a soft surface, such as a bed, sofa, or rug. Blocking the slots can cause the machine to overheat, resulting in a fire.
- Do not install the machine in the following locations, as this may result in a fire or electrical shock.
- A damp or dusty location
- A location exposed to smoke and steam, such as near a cookery or humidifier
- A location exposed to rain or snow
- A location near a water faucet or water
- A location exposed to direct sunlight
- A location subject to high temperatures
- A location near open flames
- When installing the machine, gently lower the machine to the installation site so as not to catch your hands between the machine and the floor or between the machine and other equipment, as this may result in personal injury.
- When connecting the interface cable, connect it properly by following the instructions in this manual. If not connected properly, this may result in malfunction or electrical shock.
- When moving the machine, follow the instructions in this manual to hold it correctly. Failure to do so may cause you to drop the machine, resulting in personal injury.
e-Manual -> "Maintenance" -> "Relocating the Machine.
- Machines with a hard disk may not operate properly when used at high altitudes of about 3,000 meters above sea level, or higher.
Power Supply
WARNING
- Do not damage or modify the power cord. Also, do not place heavy objects on the power cord or pull on or excessively bend it. This can cause electrical damage, resulting in fire or electrical shock.
- Keep the power cord away from all heat sources. Failure to do so can cause the power cord insulation to melt, resulting in a fire or electrical shock.
- The power cord should not be taut, as this may lead to a loose connection and cause overheating, which could result in a fire.
- The power cord may become damaged if it is stepped on, fixed with staples, or if heavy objects are placed on it.
- Continued use of a damaged power cord can lead to an accident, such as a fire or electrical shock.
- Do not plug or unplug the power plug with wet hands, as this can result in electrical shock.
- Do not plug the power cord into a multiplug power strip, as this can result in a fire or electrical shock.
- Do not bundle up or tie up the power cord in a knot, as this can result in a fire or electrical shock.
- Insert the power plug completely into the AC power outlet. Failure to do so can result in a fire or electrical shock.
-
If excessive stress is applied to the connection part of the power cord, it may damage the power cord or the wires inside the machine may disconnect. This could result in a fire. Avoid the following situations:
-
Connecting and disconnecting the power cord frequently.
- Tripping over the power cord.
- The power cord is bent near the connection part, and continuous stress is being applied to the power outlet or the connection part.
-
Applying a shock to the power connector.
-
Do not use power cords other than the one provided, as this can result in a fire or electrical shock.
- As a general rule, do not use extension cords. Using an extension cord may result in a fire or electrical shock.
- Remove the power plug from the AC power outlet and refrain from using the machine during a thunder storm. Lightning can result in a fire, electrical shock or malfunction.
CAUTION
- Do not use a power supply voltage other than that listed herein, as this may result in a fire or electrical shock.
- Always grasp the power plug when unplugging the power plug. Do not pull on the power cord, as this may expose the core wire of the power cord or damage the cord insulation, causing electricity to leak, resulting in a fire or electrical shock.
- Leave sufficient space around the power plug so that it can be unplugged easily. If objects are placed around the power plug, you may be unable to unplug it in an emergency.
Handling
WARNING
- Do not disassemble or modify the machine. There are high-temperature and high-voltage components inside the machine which may result in a fire or electrical shock.
- Electrical equipment can be hazardous if not used properly. Do not allow children to touch the power cord, cables, internal gears, or electrical parts.
- If the machine makes an unusual noise or emits smoke, heat, or an unusual smell, immediately turn off the power switches of the machine and computer and disconnect the interface cable if it is connected. Then, unplug the power plug from the AC power outlet and contact your local authorized Canon dealer. Continued use can result in a fire or electrical shock.
-
Do not use flammable sprays near the machine. If flammable substances come into contact with electrical parts inside the machine, this may result in a fire or electrical shock.
-
Always turn off the power switches of the machine and computer, and then unplug the power plug and interface cables before moving the machine. Failure to do so can damage the cables or cords, resulting in a fire or electrical shock.
- Confirm that the power plug or power connector is inserted completely after moving the machine. Failure to do so can result in an overheating and fire.
- Do not drop paper clips, staples, or other metal objects inside the machine. Also, do not spill water, liquids, or other flammable substances (alcohol, benzene, paint thinner, etc.) inside the machine. If these items come into contact with a high-voltage area inside the machine, this may result in a fire or electrical shock. If these items are dropped or spilled inside the machine, immediately turn off the power switches of the machine and computer and disconnect the interface cable if it is connected. Then, unplug the power plug from the AC power outlet and contact your local authorized Canon dealer.
- When plugging or unplugging a USB cable when the power plug is plugged into an AC power outlet, do not touch the metal part of the connector, as this can result in electrical shock.
CAUTION
- Do not place heavy objects on the machine. The object or the machine may fall, resulting in personal injury.
- Turn off the power switch when the machine will not be used for a long period of time, such as overnight. Turn off the machine and unplug the power plug if the machine will not be used for an extended period of time, such as for several days.
- Open or close covers and install or remove cassette gently and carefully. Be careful not to hurt your fingers.
- Keep your hands and clothing away from the roller in the output area. Even if the machine is not printing, the roller may suddenly rotate and catch your hands or clothing, resulting in personal injury.
- The output slot is hot during and immediately after printing. Do not touch the area surrounding the output slot, as this may result in burns.
- Printed paper may be hot immediately after being output. Be careful when removing the paper and aligning the removed paper, especially after continuous printing. Failure to do so may result in burns.
- Close the feeder or the platen glass cover gently so as not to catch your hand. This may result in personal injury.
-
The laser beam can be harmful to the human body. The laser beam is confined in the laser scanner unit by a cover, so there is no danger of the laser beam escaping during normal machine operation. Read the following remarks and instructions for safety.
-
Never open covers other than those indicated in this manual.
- Do not remove the caution label attached to the cover of the laser scanner unit.
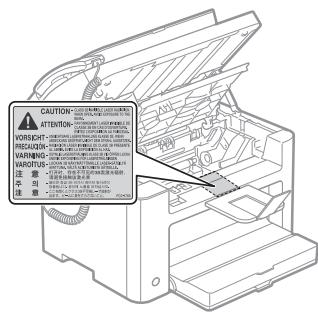
- If the laser beam should escape and enter your eyes, exposure may cause damage to your eyes.
- This machine is confirmed as the class 1 laser product in IEC60825-1:2007.
Laser Diode Information
- wavelength: 780-800 nm
- maximum power: 10 mW
Maintenance and Inspections
WARNING
- When cleaning the machine, turn off the machine and computer, and unplug the interface cables and power plug. Failure to do so can result in a fire or electrical shock.
- Unplug the power plug from the AC power outlet periodically and clean the area around the base of the power plug's metal pins and the AC power outlet with a dry cloth to remove all dust and grime. In damp, dusty, or smoky locations, dust can build up around the power plug and become damp, which can cause a short circuit, resulting in a fire.
- Clean the machine with a well wrung out cloth dampened with water or mild detergent diluted with water. Do not use alcohol, benzene, paint thinner, or other flammable substances. If flammable substances come into contact with electrical parts inside the machine, this may result in a fire or electrical shock.
- Some areas inside the machine are subject to high voltage. When removing jammed paper or when inspecting inside of the machine, be careful not to allow necklaces, bracelets, or other metal objects to touch the inside of the machine, as this can result in burns or electrical shock.
- Do not dispose of used toner cartridges in open flames. This may cause the toner remaining inside the cartridges to ignite, resulting in burns or fire.
- If you accidentally spill or scatter toner, carefully gather the toner particles together or wipe them up with a soft, damp cloth in a way that prevents inhalation.
Never use a vacuum cleaner that does not have safeguards against dust explosions to clean up spilled toner. Doing so may cause a malfunction in the vacuum cleaner, or result in a dust explosion due to static discharge.
- Confirm that the power plug or power connector is inserted completely after cleaning the machine. Failure to do so can result in an overheating and fire.
-
Check the power cord and plug regularly. The following conditions may result in fire, so please contact your local authorized Canon dealer or the Canon help line.
-
There are burn marks on the power plug.
- The blade on the power plug is deformed or broken.
- The power is turned OFF or ON when bending the power cord.
- The coating of the power cord is damaged, cracked, or dented.
- A part of the power cord becomes hot.
- Check regularly that the power cord and plug are not handled in the following manner. Failure to do so can result in a fire or electrical shock.
- The power connector is loosened.
- Stress is being applied to the power cord by a heavy object or by fixing it with staples.
- The power plug is loosened.
- The power cord is tied in a bundle.
- A part of the power cord is put in an aisle.
- The power cord is put in front of the heating appliance.
CAUTION
- The fixing unit and its surroundings inside the machine become hot during use. When removing jammed paper or when inspecting the inside of the machine, do not touch the fixing unit and its surroundings, as this may result in burns.
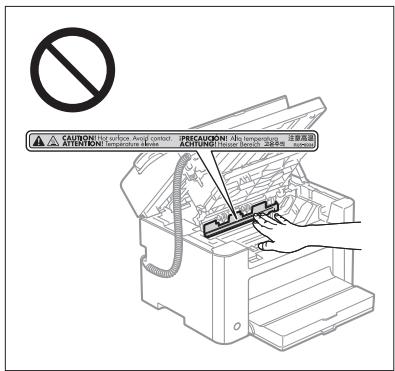
- When removing jammed paper or when inspecting the inside of the machine, do not expose yourself to the heat emitted from the fixing unit and its surroundings for a prolonged period of time. Doing so may result in low temperature burns, even though you did not touch the fixing unit and its surroundings directly, as this may result in burns.
- If paper is jammed, remove the jammed paper so that any pieces of paper do not remain inside the machine according to the displayed message. Also, do not put your hand in an area other than indicated areas, as this may result in personal injuries or burns.
- When removing jammed paper or replacing a toner cartridge, be careful not to get any toner on your hands or clothing, as this will dirty your hands or clothing. If toner gets on your hands or clothing, wash them immediately with cold water. Washing with warm water sets the toner, making it impossible to remove the toner stains.
- When removing jammed paper, be careful not to allow the toner on the paper to scatter. The toner may get into your eyes or mouth. If toner gets into your eyes or mouth, wash them immediately with cold water and consult a physician.
- When loading paper or removing jammed documents or paper, be careful not to cut your hands with the edges of the paper.
- When removing a toner cartridge, remove the toner cartridge carefully so as to prevent the toner from scattering and getting into your eyes or mouth. If toner gets into your eyes or mouth, wash them immediately with cold water and consult a physician.
- Do not attempt to disassemble the toner cartridge. The toner may scatter and get into your eyes or mouth. If toner gets into your eyes or mouth, wash them immediately with cold water and consult a physician.
- If toner leaks from the toner cartridge, be careful not to inhale the toner or allow it to come into direct contact with your skin. If the toner comes into contact with your skin, wash with soap. If the skin becomes irritated or you inhale the toner, consult a physician immediately.
Consumables
WARNING
- Do not dispose of used toner cartridges in open flames. This may cause the toner to ignite, resulting in burns or fire.
- Do not store toner cartridges or paper in a location exposed to open flames. This may cause the toner or paper to ignite, resulting in burns or fire.
- When disposing of a toner cartridge, place the toner cartridge into a bag to prevent the toner from scattering, and then dispose of the toner cartridge according to local regulations.
- If you accidentally spill or scatter toner, carefully gather the toner particles together or wipe them up with a soft, damp cloth in a way that prevents inhalation.
Never use a vacuum cleaner that does not have safeguards against dust explosions to clean up spilled toner. Doing so may cause a malfunction in the vacuum cleaner, or result in a dust explosion due to static discharge.

CAUTION
- Keep the toner cartridges and other consumables out of the reach of small children. If the toner or other parts are ingested, consult a physician immediately.
- Do not attempt to disassemble the toner cartridge. The toner may scatter and get into your eyes or mouth. If toner gets into your eyes or mouth, wash them immediately with cold water and consult a physician.
- If toner leaks from the toner cartridge, be careful not to inhale the toner or allow it to come into direct contact with your skin. If the toner comes into contact with your skin, wash with soap. If the skin becomes irritated or you inhale the toner, consult a physician immediately.
- Do not pull out the sealing tape forcefully or stop at midpoint, as this may cause toner to spill out. If toner gets into your eyes or mouth, wash them immediately with cold water and consult a physician.
Others

WARNING
- If you are using a cardiac pacemaker This machine generates a low level magnetic field. If you use a cardiac pacemaker and feel abnormalities, please move away from this machine and consult your physician immediately.

Installation Requirements and Handling
In order to use this machine in a safe and trouble-free manner, install the machine in a place that fulfills the following conditions. Also, read the remarks carefully.
Temperature and Humidity Conditions
- Temperature range: 10°C to 30°C
- Humidity range: 20 % to 80 % RH (Relative Humidity) (no condensation)

IMPORTANT
Protecting the machine from condensation
- To prevent condensation from forming inside the machine in the following cases, let the machine adjust to the ambient temperature and humidity for at least two hours before use.
- When the room where the machine is installed is heated rapidly
- When the machine is moved from a cool or dry location to a hot or humid location
- If water droplets (condensation) form inside the machine, this can result in paper jams or poor print quality.
When using an ultrasonic humidifier
When you are using an ultrasonic humidifier, it is therefore recommended that you use purified water or other water that is free of impurities.
If you use tap water or well water, impurities in the water will be dispersed through the air. This can be trapped inside the machine, causing degradation in print quality.
Power Supply Requirements
220 to 240 V, 50/60 Hz

IMPORTANT
Precautions when connecting the power cord
- Do not connect this machine to an uninterruptible power source.
- Use an AC power outlet exclusively for the machine. Do not use the other sockets of the AC power outlet.
- Do not plug the power plug into the auxiliary outlet on a computer.
Do not use the same AC power outlet for both the machine and any of the following equipment. - Copy machine
- Air conditioner
- Shredder
- Equipment that consumes a large amount of electricity
- Equipment that generates electrical noise
- When unplugging the power cord, keep interval of 5 seconds or more before plugging it again.
Miscellaneous precautions
- The maximum power consumption of the machine is 1,020 W or less.
- Electrical noise or a dramatic drop in supplied voltage may cause the machine or computer to operate incorrectly or lose data.
Installation Requirements
- A location with sufficient space
- A location with good ventilation
- A location with a flat, even surface
- A location able to fully support the weight of the machine

IMPORTANT
Do not install the machine in the following locations, as this may result in damage to the machine.
- A location subject to dramatic changes in temperature or humidity
- A location subject to condensation
- A poorly ventilated location
(If you use the machine for a long time or to perform a large amount of printing in a poorly ventilated room, the ozone or other odors generated by the machine may create an uncomfortable working environment. In addition, chemical particles are dispersed during printing; therefore, it is important to provide adequate ventilation.) - A location near equipment that generates magnetic or electromagnetic waves
- A laboratory or location where chemical reactions occur
- A location exposed to salt air, corrosive gases, or toxic gases
- A location, such as on a carpet or mat, that may warp from the weight of the machine or where the machine is liable to sink.
Maintenance and Inspections

IMPORTANT
- Follow the instructions in the caution label attached to this machine.
- Avoid shaking or applying a shock to this machine.
- To prevent a paper jam, do not turn the power ON/OFF, open/close the operation panel or rear cover, and load/unload paper in the middle of printing operation.
-
Be sure to remove the toner cartridge from the machine when transporting the machine to a distance.
-
To avoid exposing the toner cartridge to light, place it in the protective bag included with this machine or wrap it in a thick cloth.
- Clean this machine regularly. If this machine becomes dusty, it may operate improperly.
- Use a modular cable of 3 m or shorter in length.
- Depending on your locale or your telephone connection, you may be unable to perform data communication. In this case, contact your local authorized Canon dealer or the Canon help line.
- The repairing parts and toner cartridges for the machine will be available for at least seven (7) years after production of this machine model has been discontinued.

Legal Notices
Model Names
FAX-L170 (F162002)
FAX-L150 (F162004)
WEEE Directive

The Ground Truth image displays a single, solid horizontal line. According to Rule 2 (UNDERSCORE & LINE RULES), this is a stylistic or background line, not a placeholder underscore. Therefore, the OCR result must ignore it and output nothing or only meaningful text. The provided OCR content is "____", which consists of four underscores. This is an incorrect interpretation of the line as a placeholder, violating the rule that stylistic lines must be ignored. The OCR has hallucinated underscores where none should exist based on the GT's visual context. Hence, the OCR result is inconsistent with the Ground Truth.
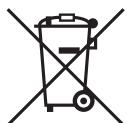
Only for European Union and EEA (Norway, Iceland and Liechtenstein)
These symbols indicate that this product is not to be disposed of with your household waste, according to the WEEE Directive (2012/19/EU), the Battery Directive (2006/66/EC) and/or national legislation implementing those Directives.
If a chemical symbol is printed beneath the symbol shown above, in accordance with the Battery Directive, this indicates that a heavy metal (Hg = Mercury, Cd = Cadmium, Pb = Lead) is present in this battery or accumulator at a concentration above an applicable threshold specified in the Battery Directive.
This product should be handed over to a designated collection point, e.g., on an authorized one-for-one basis when you buy a new similar product or to an authorized collection site for recycling waste electrical and electronic equipment (EEE) and batteries and accumulators. Improper handling of this type of waste could have a possible impact on the environment and human health due to potentially hazardous substances that are generally associated with EEE. Your cooperation in the correct disposal of this product will contribute to the effective usage of natural resources.
For more information about the recycling of this product, please contact your local city office, waste authority, approved scheme or your household waste disposal service or visit www.canon-europe.com/weee, or www.canon-europe.com/battery.
R & TTE Directive

This equipment (F162002/F162004) conforms with the essential requirements of EC Directive 1999/5/EC and is usable in EU. (Only for models with facsimile functionality.)
(For Europe only)
Canon Inc. / Canon Europa N.V.
EMC requirements of EC Directive
This equipment conforms with the essential EMC requirements of EC Directive. We declare that this product conforms with the EMC requirements of EC Directive at nominal mains input 230 V, 50 Hz although the rated input of the product is 220 to 240 V, 50/60 Hz. Use of shielded cable is necessary to comply with the technical EMC requirements of EC Directive.
International ENERGY STAR Program

ENERGY STAR
As an ENERGY STAR ^® Partner, Canon Inc. has determined that this product meets the ENERGY STAR Program for energy efficiency.
The International ENERGY STAR Office Equipment Program is an international program that promotes energy saving through the use of computers and other office equipment.
The program backs the development and dissemination of products with functions that effectively reduce energy consumption. It is an open system in which business proprietors can participate voluntarily.
The targeted products are office equipment, such as computers, displays, printers, facsimiles, and copiers. The standards and logos are uniform among participating nations.
Laser Safety Information
Laser radiation could be hazardous to the human body. For this reason, laser radiation emitted inside this equipment is hermetically sealed within the protective housing and external cover. No radiation can leak from the machine in the normal operation of the product by the user.
This machine is classified as a Class 1 Laser Product under IEC 60825-1: 2007, EN60825-1: 2007.
220 to 240 V Model
The label shown below is attached to the laser scan unit on the machine.

DANGER
Invisible laser radiation when open, AVOID DIRECT EXPOSURE TO BEAM
CLASS 3B INVISIBLE LASER RADIATION WHEN OPEN AVOID EXPOSURE TO THE BEAM
ATTENTION
RAYONNEMENT LASER INVISIBLE DE CLASSE 3B EN CAS DOCUMENTURE, ÉVITEZ LEXPOSITION A
VORSICHT
UNSICHTBARE LASERSTRAHLUNG KLASSE 3B, WENN ABDECKUNG GEÖFENET, MCHT DEM STRAHL, ALISSETZEN
PRECAUCIÓN
This machine has been classified under IEC 60825-1: 2007, EN60825-1: 2007 and conforms to the following classes:
CLASS 1 LASER PRODUCT
LASER KLASSE 1
APPAREIL À LASER DE CLASSE 1
APPARECCHIO LASER DI CLASSE 1
PRODUCTO LÁSER DE CLASE 1
APARELHO A LASER DE CLASSE 1
LUOKAN 1 LASER-TUOTE
LASERPRODUKT KLASS 1

CAUTION
Use of controls, adjustments, or performance of procedures other than those specified in the manuals for the machine may result in hazardous radiation exposure.
Trademarks
Canon and the Canon logo are trademarks of Canon Inc.
Microsoft, Windows, and Windows Vista are either registered trademarks or trademarks of Microsoft Corporation in the United States and/or other countries.
All other product and brand names are registered trademarks, trademarks or service marks of their respective owners.
Copyright
Copyright CANON INC. 2014
No part of this publication may be reproduced, transmitted, transcribed, stored in a retrieval system, or translated into any language or computer language in any form or by any means, electronic, mechanical, magnetic, optical, chemical, manual, or otherwise, without the prior written permission of Canon Inc.
Third Party Software
This product includes third-party software modules. Use and distribution of this software modules, including any updates of such software modules (collectively, the "SOFTWARE") are subject to conditions (1) through (9) below.
(1) You agree that you will comply with any applicable export control laws, restrictions or regulations of the countries involved in the event that this product including the SOFTWARE is shipped, transferred or exported into any country.
(2) Rights holders of the SOFTWARE retain in all respects the title, ownership and intellectual property rights in and to the SOFTWARE. Except as expressly provided herein, no license or right, expressed or implied, is hereby conveyed or granted by rights holders of the SOFTWARE to you for any intellectual property of rights holders of the SOFTWARE.
(3) You may use the SOFTWARE solely for use with the Canon product you purchased (the "PRODUCT").
(4) You may not assign, sublicense, market, distribute, or transfer the SOFTWARE to any third party without prior written consent of rights holders of the SOFTWARE.
(5) Notwithstanding the foregoing, you may transfer the SOFTWARE only when (a) you assign all of your rights to the PRODUCT and all rights and obligations under the conditions to transferee and (b) such transferee agrees to be bound by all these conditions.
(6) You may not decompile, reverse engineer, disassemble or otherwise reduce the code of the SOFTWARE to human readable form.
(7) You may not modify, adapt, translate, rent, lease or loan the SOFTWARE or create derivative works based on the SOFTWARE.
(8) You are not entitled to remove or make separate copies of the SOFTWARE from the PRODUCT.
(9) The human-readable portion (the source code) of the SOFTWARE is not licensed to you.
Disclaimers
The information in this document is subject to change without notice.
CANON INC. MAKES NO WARRANTY OF ANY KIND WITH REGARD TO THIS MATERIAL, EITHER EXPRESS OR IMPLIED, EXCEPT AS PROVIDED HEREIN, INCLUDING WITHOUT LIMITATION, THEREOF, WARRANTIES AS TO MARKETABILITY, MERCHANTABILITY, FITNESS FOR A PARTICULAR PURPOSE OF USE OR NON-INFRINGEMENT. CANON INC. SHALL NOT BE LIABLE FOR ANY DIRECT, INCIDENTAL, OR CONSEQUENTIAL DAMAGES OF ANY NATURE, OR LOSSES OR EXPENSES RESULTING FROM THE USE OF THIS MATERIAL.
Legal Limitations on Usage of Your Product and the Use of Images
Using your product to scan, print or otherwise reproduce certain documents, and the use of such images as scanned, printed or otherwise reproduced by your product, may be prohibited by law and may result in criminal and/or civil liability. A non-exhaustive list of these documents is set forth below. This list is intended to be a guide only. If you are uncertain about the legality of using your product to scan, print or otherwise reproduce any particular document, and/or of the use of the images scanned, printed or otherwise reproduced, you should consult in advance with your legal advisor for guidance.
- Paper Money
- Traveler's Checks
- Money Orders
- Food Stamps
- Certificates of Deposit
- Passports
- Postage Stamps (canceled or uncanceled)
- Immigration Papers
- Identifying Badges or Insignias
- Internal Revenue Stamps (canceled or uncanceled)
- Selective Service or Draft Papers
- Bonds or Other Certificates of Indebtedness
- Checks or Drafts Issued by Governmental Agencies
- Stock Certificates
- Motor Vehicle Licenses and Certificates of Title
- Copyrighted Works/Works of Art without Permission of Copyright Owner
Considerable effort has been made to make sure that the manuals for the machine are free of inaccuracies and omissions. However, as we are constantly improving our products if you need an exact specification, please contact Canon.
CLASS 1 LASER PRODUCT
LASER KLASSE 1
APPAREIL À LASER DE CLASSE 1
APPARECCHIO LASER DI CLASSE 1
PRODUCTO LÁSER DE CLASE 1
APARELHO A LASER DE CLASSE 1
LUOKAN 1 LASER-TUOTE
LASERPRODUKT KLASS 1

ATTENTION
CLASS 1 LASER PRODUCT
LASER KLASSE 1
APPAREIL À LASER DE CLASSE 1
APPARECCHIO LASER DI CLASSE 1
PRODUCTO LÁSER DE CLASE 1
APARELHO A LASER DE CLASSE 1
LUOKAN 1 LASER-TUOTE
LASERPRODUKT KLASS 1

ATTENZIONE
CLASS 1 LASER PRODUCT
LASER KLASSE 1
APPAREIL À LASER DE CLASSE 1
APPARECCHIO LASER DI CLASSE 1
PRODUCTO LÁSER DE CLASE 1
APARELHO A LASER DE CLASSE 1
LUOKAN 1 LASER-TUOTE
LASERPRODUKT KLASS 1
VORSICHT
www.canon-europe.com/weee nebo www.canon-europe.com/battery.
Směrnice R & TTE

m = 311
RU5-8126
LASERPRODUKT KLASS 1

UPOZORNĚNÍ
DANGER - Invisible laser radiation when open.
DANGER AVOID DIRECT EXPOSURE TO BEAM. CAUTION CLASS 18 INMISIBLE LASER RADIATION WHEN OPEN
CAUTION - CLASS 50 MINISTERE LABERTABLE AVOID EXPOSURE TO THE BEAM.
ATTENTION
_ RAYONNEMENT LASER INVISIBLE DE CLASSE 3E
EN CAS D'OUVERTURE, ÉVITEZ L'EXPOSITION AU FAISCEAU
- UNSICHTBARE LASERSTRAHLUNG KLASSE 3B, WENN ABDECKUNG
CLASS 1 LASER PRODUCT
LASER KLASSE 1
APPAREIL À LASER DE CLASSE 1
APPARECCHIO LASER DI CLASSE 1
PRODUCTO LÁSER DE CLASE 1
APARELHO A LASER DE CLASSE 1
LUOKAN 1 LASER-TUOTE
LASERPRODUKT KLASS 1
VIGYÁZAT
www.canon-europe.com/weee, lub www.canon-europe.com/battery.
Dyrektywa RTTE

Invisible laser radiation when open, avoid direct exposure to BEAN
AVOID DIRECT EXPOSURE TO BEAM, CLASS 3B INVISIBLE LASER RADIATION WHEN OPEN,
AVOID EXPOSURE TO THE BEAM. LASER INVISIBLE DE CLASS
ATTENTION
EN CAS D'OUVERTURE, ÉVITEZ L'EXPOSITION A
VORSICHT - UNSICHTBARE L. GEÖGENET MICH
LASERPRODUKT KLASS 1
PRZESTROGA
www.canon-europe.com/weee, alebo www.canon-europe.com/battery.
CAUTION - CLASS 3B INVISIBLE LASER RADIATION WHEN OPEN
ATTENTION- RAYONNEMENT LASER INVISIBLE DE CLASSE 3
ATTENTION EN CAS D'OUVERTURE, ÉVITEZ L'EXPOSITION AU FAISCEAU UNSICHTRADE LASSESTRAUUNG KLASSE 2B, WENN ARBECKLINIC
VORSICHT - ONSKHTBANE LASERSTRAHLUNG KLASSE 31 GEÖFFNET, MCHT DEM STRAHL AUSSETZEN.
LASERPRODUKT KLASS 1

UPOZORNENIE
- Kada uklanjate zaglavljeni papir ili provjeravate unutrašnjost uređaja, nemojte se na dulje vrijeme izlagati vrućini koja dolazi iz jedinice za fiksiranje i njene okoline. U suprotnom može doći do opeklina niske temperature, a do opeklina može doći čak i ako izravno ne dotaknete jedinicu za fiksiranje i njenu okolinu.
- Ako se papir zaglavi, uklonite ga u skladu s prikazanom porukom tako da unutar uređaja ne ostanu nikakvi komadići papira. Također nemojte gurati ruku u područja koja nisu naznačena jer to može dovesti do ozljeda ili opeklina.
- Prilikom uklanjanja zaglavljenog papira ili zamjene spremnika za toner, pripazite da toner ne dođe u dodir s vašim rukama ili odjećom jer ćete ih upljati. Ako toner dospije na ruke ili odjeću, odmah ih operite hladnom vodom. Pranje toplom vodom rastapa tonera, pa je mrlje nemoguće ukloniti.
- Prilikom uklanjanja zaglavljenog papira budite pažljivi kako se toner s papira ne bi rasuo. Toner može dospjeti u vaše oči i usta. Ako vam toner dospije u oči ili usta, odmah ih isperite hladnom vodom i obratite se liječniku.
- Pri umetanju ili uklanjanju zaglavljenih dokumenata ili papira pripazite da se ne porežete na rubove papira.
- Prilikom uklanjanja iskorištenenog spremnika za tonerom, pažljivo uklonite spremnik da biste spriječili rasipanje tonera i upadanje u oči i usta. Ako vam toner dospije u oči ili usta, odmah ih isperite hladnom vodom i obratite se liječniku.
- Ne pokušavajte rastaviti spremnik za toner. Toner se može raspršiti i dospjeti vam u oči i usta. Ako vam toner dospije u oči ili usta, odmah ih isperite hladnom vodom i obratite se liječniku.
- Ako toner curi iz spremnika za toner, pazite da ga ne udahnete ili da on ne dođe u izravan dodir s vašom kožom. Ako toner dođe u dodir s vašom kožom, isperite je sapunom. Bude li koža iritirana ili ako toner udahnete, odmah se obratite liječniku.
Potrošni materijal
UPOZORENJE
- Ne odlažite rabljene spremnike za toner u otvoreni plamen. To može uzrokovati paljenje tonera, što može dovesti do opeklina ili požara.
- Ne pohranjujte spremnike za toner ili papir na mjesta izložena otvorenom plamenu. To može prouzročiti zapaljenje tonera ili papira, što može dovesti do opeklina ili požara.
- Pri odlaganju spremnika tonera stavite ga u vreću da biste spriječili njegovo rasipanje, a zatim ga odložite u skladu s lokalnim propisima.
- Ako slučajno prolijete ili raspršite toner, pažljivo skupite čestice tonera ili ih obrišite vlažnom mekom krpom pazeći pritom da ih ne udahnete.
Za prikupljanje prolivenog tonera nemojte koristiti usisavač koji nema zaštitu od raspršivanja prašine.
U suprotnom možete izazvati kvar na usisavaču ili raspršivanje prašine zbog statičkog pražnjenja.
OPREZ
www.canon-europe.com/weee ili www.canon-europe.com/battery.
Direktiva R & TTE (Pravilnik o radijskoj opremi i telekomunikacijskoj terminalnoj opremi)
CE
Ova oprema (F162002/F162004) u skladu je s glavnim zahtjevima pravilnika EC-a Directive 1999/5/EC te se može koristiti u zemljama EU-a. (Samo za modele s funkcijama faksiranja.)
(Samo za Europu)
Canon Inc. / Canon Europa N.V.
EMC zahtjevi EC direktive
Ova je oprema usklađena s osnovnim zahtjevima Direktive EC. Izjavljujemo da je ovaj proizvod usklađen s odredbama o elektromagnetskoj kompatibilnosti EC Direktive pri nominalnom ulaznom naponu od 230 V, 50 Hz iako je ulazni napon proizvoda 220 do 240 V, 50/60 Hz. Korištenje oklopljenog kabela nužno je radi sukladnosti s tehničkim zahtjevima EMC direktive.
Međunarodni Program ENERGY STAR

Tvrtka Canon Inc. je, kao ENERGY STAR ^® partner, utvrdila da ovaj proizvod zadovoljava smjernice programa ENERGY STAR o učinkovitoj potrošnji energije. International ENERGY STAR Office Equipment Program (Međunarodni ENERGY STAR program za uredsku opremu) je program koji promiče uštedu energije u upotrebi računala i druge uredske opreme.
LASERPRODUKT KLASS 1
OPREZ
CLASS 1 LASER PRODUCT
LASER KLASSE 1
APPAREIL À LASER DE CLASSE 1
APPARECCHIO LASER DI CLASSE 1
PRODUCTO LÁSER DE CLASE 1
APARELHO A LASER DE CLASSE 1
LUOKAN 1 LASER-TUOTE
LASERPRODUKT KLASS 1
ATENTIE
www.canon-europe.com/weee, ali www.canon-europe.com/battery.
Direktiva o radijski opremi in telekomunikacijski terminalski opremi (R & TTE)

m = 311
RU5-8126
Ta naprava je razvrščena v okviru IEC 60825-1: 2007, EN60825-1: 2007 in ustreza tem razredom:
RAZRED 1 LASERSKI IZDELEK
LASER KLASSE 1
APPAREIL À LASER DE CLASSE 1
APPARECCHIO LASER DI CLASSE 1
PRODUCTO LÁSER DE CLASE 1
APARELHO A LASER DE CLASSE 1
LUOKAN 1 LASER-TUOTE
LASERPRODUKT KLASS 1

PREVIDNO

The Ground Truth image displays a single, solid horizontal line. According to Rule 2 (UNDERSCORE & LINE RULES), this is a stylistic or background line, not a placeholder underscore. Therefore, the OCR result must ignore it and output nothing or only meaningful text. The provided OCR content is "____", which consists of four underscores. This is an incorrect interpretation of the line as a placeholder, violating the rule that stylistic lines must be ignored. The OCR has hallucinated underscores where none should exist based on the GT's visual context. Hence, the OCR result is inconsistent with the Ground Truth.

www.canon-europe.com/weee, или www.canon-europe.com/battery.
R & TTE Директива

LASERPRODUKT KLASS 1

ВНИМАНИЕ!
LASERPRODUKT KLASS 1
ВНИМАНИЕ
LASERPRODUKT KLASS 1
УВАГА
LASERPRODUKT KLASS 1

نيازمندی های نصب
▪ محلى با فضای کافى
CLASS 1 LASER PRODUCT
LASER KLASSE 1
APPAREIL À LASER DE CLASSE 1
APPARECCHIO LASER DI CLASSE 1
PRODUCTO LÁSER DE CLASE 1
APARELHO A LASER DE CLASSE 1
LUOKAN 1 LASER-TUOTE
LASERPRODUKT KLASS 1

CLASS 1 LASER PRODUCT
LASER KLASSE 1
APPAREIL À LASER DE CLASSE 1
APPARECCHIO LASER DI CLASSE 1
PRODUCTO LÁSER DE CLASE 1
APARELHO A LASER DE CLASSE 1
LUOKAN 1 LASER-TUOTE
LASERPRODUKT KLASS 1
⚠ DİKKAT
www.canon-europe.com/weee, vai www.canon-europe.com/battery.
R&TTE direktiva

LASERPRODUKT KLASS 1

UZMANİBU!
CLASS 1 LASER PRODUCT
LASER KLASSE 1
APPAREIL À LASER DE CLASSE 1
APPARECCHIO LASER DI CLASSE 1
PRODUCTO LÁSER DE CLASE 1
APARELHO A LASER DE CLASSE 1
LUOKAN 1 LASER-TUOTE
LASERPRODUKT KLASS 1
DÈMESIO
LASERPRODUKT KLASS 1

ETTEVAATUST
www.canon-europe.com/weee, eller www.canon-europe.com/battery
CLASS 1 LASER PRODUCT
LASER KLASSE 1
APPAREIL À LASER DE CLASSE 1
APPARECCHIO LASER DI CLASSE 1
PRODUCTO LÁSER DE CLASE 1
APARELHO A LASER DE CLASSE 1
LUOKAN 1 LASER-TUOTE
LASERPRODUKT KLASS 1
FORSIGTIG
CLASS 1 LASER PRODUCT
LASER KLASSE 1
APPAREIL À LASER DE CLASSE 1
APPARECCHIO LASER DI CLASSE 1
PRODUCTO LÁSER DE CLASE 1
APARELHO A LASER DE CLASSE 1
LUOKAN 1 LASER-TUOTE
LASERPRODUKT KLASS 1

FORSIKTIG
www.canon-europe.com/weee, tai www.canon-europe.com/battery.
R & TTE -direktiivi

CLASS 1 LASER PRODUCT
LASER KLASSE 1
APPAREIL À LASER DE CLASSE 1
APPARECCHIO LASER DI CLASSE 1
PRODUCTO LÁSER DE CLASE 1
APARELHO A LASER DE CLASSE 1
LUOKAN 1 LASER-TUOTE
LASERPRODUKT KLASS 1
HUOMIO
www.canon-europe.com/weee, eller www.canon-europe.com/battery.
R & TTE-direktivet
CE
CLASS 1 LASER PRODUCT
LASER KLASSE 1
APPAREIL À LASER DE CLASSE 1
APPARECCHIO LASER DI CLASSE 1
PRODUCTO LÁSER DE CLASE 1
APARELHO A LASER DE CLASSE 1
LUOKAN 1 LASER-TUOTE
LASERPRODUKT KLASS 1
VAR FÖRSIKTIG!
CLASS 1 LASER PRODUCT
LASER KLASSE 1
APPAREIL À LASER DE CLASSE 1
APPARECCHIO LASER DI CLASSE 1
PRODUCTO LÁSER DE CLASE 1
APARELHO A LASER DE CLASSE 1
LUOKAN 1 LASER-TUOTE
LASERPRODUKT KLASS 1
ATENCIÓN
www.canon-europe.com/weee, of www.canon-europe.com/battery.
R&TTE-richtlijn

CLASS 1 LASER PRODUCT
LASER KLASSE 1
APPAREIL À LASER DE CLASSE 1
APPARECCHIO LASER DI CLASSE 1
PRODUCTO LÁSER DE CLASE 1
APARELHO A LASER DE CLASSE 1
LUOKAN 1 LASER-TUOTE
LASERPRODUKT KLASS 1
VOORZICHTIG
www.canon-europe.com/weee, ou www.canon-europe.com/battery.
Directiva R & TTE

CLASS 1 LASER PRODUCT
LASER KLASSE 1
APPAREIL À LASER DE CLASSE 1
APPARECCHIO LASER DI CLASSE 1
PRODUCTO LÁSER DE CLASE 1
APARELHO A LASER DE CLASSE 1
LUOKAN 1 LASER-TUOTE
LASERPRODUKT KLASS 1
CUIDADO
www.canon-europe.com/weee n̩ www.canon-europe.com/battery.
LASERPRODUKT KLASS 1

ΠΡΟΣΟΧΗ
30-2, Shimomaruko 3-chome, Ohta-ku, Tokyo 146-8501, Japan
One Canon Park, Melville, NY 11747, U.S.A.
CANON EUROPA N.V.
Bovenkerkerweg 59, 1185 XB Amstelveen, The Netherlands
15F Jinbao Building No.89, Jinbao Street, Dongcheng District, Beijing 100005, PRC
CANON SINGAPORE PTE LTD
1 HarbourFront Avenue, #04-01 Keppel Bay Tower, Singapore 098632
CANON AUSTRALIA PTY LTD
1 Thomas Holt Drive, North Ryde, Sydney NSW 2113, Australia
CANON GLOBAL WORLDWIDE SITES
http://www.canon.com/

- Základní příručka
- Check!
- Connecting the Handset
- FAX-L170
- Option
- FAX-L150
- Contents
- Table des matières
- Sommario
- Inhalt
- 1
- About the Supplied Manuals
- English
- Starter Guide (This manual): Read this manual first.
- FAX L Driver Installation Guide (User Software CD-ROM):
- - Manual (Multi-lingual User Manual CD): Read the desired chapter to suit your needs.
- Displaying the e-Manual from the CD-ROM
- Français
- Navigating the Menu and Text Input Method
- Connecting the Power Cord and Turning ON the Power Branchement du cordon d'alimentation et allumage de la machine Collegamento del cavo di alimentazione e accensione della macchina Anschließen des Netzkabels und Einschalten des Geräts
- Specifying the Initial Settings and Connecting a Telephone Cable Indication des réglages de départ et branchement d'un câble téléphonique Impostazioni iniziali del fax e collegamento di un cavo telefonico Festlegen der anfänglichen Einstellungen und Anschließen eines Telefonkabels
- Setting a Paper Size and Type
- Réglage du format et du type de papier Impostazione di un formato e di un tipo di carta Einstellen eines Papierformats und Papiertyps
- Perform Useful Tasks
- 7
- Copy
- ● Enlarged/Reduced Copies
- Fax
- - Sending a Document Directly from a Computer (PC Fax)
- - Sending
- - Receiving
- ● Enlarged/Reduced Printing
- - Reduced Layout
- Navigace v nabídce a metoda zadávání textu Navigálás a menüben és a szövegbeviteli mód megadása Poruszanie się po menu i sposób wpisywania tekstu Navigácia v ponuke a metóda zadávania textu
- Numeric keys
- Hrvatski
- Upute za početak korištenja (ovaj priručnik): Najprije pročitajte ovaj priručnik.
- FAX L Driver Installation Guide (Upute za instaliranje upravljačkog programa FAX L Driver) (User Software CD-ROM (CD-ROM s korisničkim softverom)):
- Postavljanje vrste i veličine papira
- Setarea dimensiunii și a tipului de hârtie Nastavitev velikosti in vrste papirja Задаване на формата и типа на хартията
- 6
- Instalacija upravljačkog programa ili softvera
- Русский
- Türkçe
- Güç Kablosunu Bağlama ve Makineyi AÇIK Konuma Getirme Strāvas vada pievienošana un iekārtas ieslēgšana Maitinimo laido prijungimas ir aparato ijungimas Toitejuhtme ühendamine ja toite sisselülitamine
- 5
- Dansk
- Utskrift
- Español
- B FAX L Driver Installation Guide (User Software CD-ROM
- Conexión del cable de alimentación y encendido Het netsnoer aansluiten en het apparaat inschakelen Ligar o cabo de alimentação e a alimentação Σύνδεση του καλωδίου ρεύματος και ενεργοποίηση της ισχύος
- Ajuste del tamaño y el tipo del papel Papierformaat en type papier instellen Definir um tipo e tamanho de papel Καθορισμός μεγέθους και τύπου χαρτιού
- Symbols Used in This Manual
- WARNING
- CAUTION
- IMPORTANT
- Keys and Buttons Used in This Manual
- Illustrations and Displays Used in This Manual
- Important Safety Instructions
- Installation
- Power Supply
- Handling
- Maintenance and Inspections
- Consumables
- Others
- Installation Requirements and Handling
- Temperature and Humidity Conditions
- Protecting the machine from condensation
- When using an ultrasonic humidifier
- Power Supply Requirements
- Precautions when connecting the power cord
- Miscellaneous precautions
- Installation Requirements
- Do not install the machine in the following locations, as this may result in damage to the machine.
- Legal Notices
- Model Names
- WEEE Directive
- R & TTE Directive
- EMC requirements of EC Directive
- International ENERGY STAR Program
- Laser Safety Information
- to 240 V Model
- Trademarks
- Copyright
- Third Party Software
- Disclaimers
- Legal Limitations on Usage of Your Product and the Use of Images
- ATTENTION
- ATTENZIONE
- VORSICHT
- Směrnice R & TTE
- UPOZORNĚNÍ
- VIGYÁZAT
- Dyrektywa RTTE
- PRZESTROGA
- UPOZORNENIE
- Potrošni materijal
- UPOZORENJE
- OPREZ
- Direktiva R & TTE (Pravilnik o radijskoj opremi i telekomunikacijskoj terminalnoj opremi)
- EMC zahtjevi EC direktive
- Međunarodni Program ENERGY STAR
- ATENTIE
- Direktiva o radijski opremi in telekomunikacijski terminalski opremi (R & TTE)
- PREVIDNO
- R & TTE Директива
- ВНИМАНИЕ!
- ВНИМАНИЕ
- УВАГА
- نيازمندی های نصب
- ⚠ DİKKAT
- R&TTE direktiva
- UZMANİBU!
- DÈMESIO
- ETTEVAATUST
- FORSIGTIG
- FORSIKTIG
- R & TTE -direktiivi
- HUOMIO
- R & TTE-direktivet
- VAR FÖRSIKTIG!
- ATENCIÓN
- R&TTE-richtlijn
- VOORZICHTIG
- Directiva R & TTE
- CUIDADO
- ΠΡΟΣΟΧΗ
Brand : CANON
Model : L150
Category : Laser printer